One-Stop BO3 Zombies Easter Egg Guide
Some info before starting
This Guide will assume some things
- Some knowledge on the Easter Egg of the map
- Knowledge of Zombies lingo (like PAP, Gobblegum, Wonder Weapon etc.)
- Knowledge of map location names
- Knowledge of Character names for certain steps
- If a map requires multiple players to complete, It will say so before the steps
- If a map requires pre-game setup (like "Zetsubou No Shima" needing "Anywhere But Here") it will be put before listing anything else
The maps are listed as they are in-game.
Shadows of Evil
Requires 4 players for the final step
Shield part locations
Canals: Top/Window
Footlight: Middle/Body
Waterfront: Bottom/Air Tanks
Whilst doing this next step, make sure to open up the Rift doors (and optionally the egg statues)
Rituals (opening pack)
Summoning Key - Spawn
Fountain Pen - Junction
Police Badge - Canals
Wig - Footlight
Champion Belt - Waterfront
After the rituals are done, head to the underground and open the pack (open the wall and then interact with the altars).
The Swords
Take the tram for the 3 symbols in each district (Different every game)
Enter Beast mode and zap the 3 symbols, grabbing your egg
If you hadn't already, break the 4 boxes that the statues are in
Grab your egg and fill the 4 statues (soul boxes)
Go back underground and grab your sword
Upgrading the Swords
Depending on your character, you will need to head to different areas
Nero - Spawn Ritual Area
Floyd - Waterfront Ritual Area
Jackie - Canals Ritual Area
Jessica - Footlight Ritual Area
Grab your egg and do the 4 ritual circles (1 per round (each ritual circle are in the different districts))
After the 4 rounds and rituals are done, head back to your ritual area and grab your upgraded sword.
After all players have their upgraded sword, head to Nero's ritual room (spawn) and interact with the book on the floor. After this the flag will spawn in the underground.
Flag Step
I recommend having the wonder weapon, shield and Civil Protector
Take the flag around the map and defend it from the "meatballs" and shadow man.
Every district has 2 spots to defend. After they are both done, head to the respective ritual room and interact with the keeper.
Trapping the Shadow Man
Head to pap and interact with the 4 keepers on the altars and then have someone stand near the table.
When the shield drops, shoot the Shadow Man till he gets above the table, at which point interact with the table and trap him in the summoning key.
Final Step
3 players enter beast mode and stay at each tram station.
The last player stays human and calls the tram.
The 3 Beasts zap their respective boxes whilst the tram is going.
Finally, one of the beast players head back to Junction and electrify the ghost keepers.
This is the final step of the easter egg and will start the cut scene.
Shield part locations
Canals: Top/Window
Footlight: Middle/Body
Waterfront: Bottom/Air Tanks
Whilst doing this next step, make sure to open up the Rift doors (and optionally the egg statues)
Rituals (opening pack)
Summoning Key - Spawn
Fountain Pen - Junction
Police Badge - Canals
Wig - Footlight
Champion Belt - Waterfront
After the rituals are done, head to the underground and open the pack (open the wall and then interact with the altars).
The Swords
Take the tram for the 3 symbols in each district (Different every game)
Enter Beast mode and zap the 3 symbols, grabbing your egg
If you hadn't already, break the 4 boxes that the statues are in
Grab your egg and fill the 4 statues (soul boxes)
Go back underground and grab your sword
Upgrading the Swords
Depending on your character, you will need to head to different areas
Nero - Spawn Ritual Area
Floyd - Waterfront Ritual Area
Jackie - Canals Ritual Area
Jessica - Footlight Ritual Area
Grab your egg and do the 4 ritual circles (1 per round (each ritual circle are in the different districts))
After the 4 rounds and rituals are done, head back to your ritual area and grab your upgraded sword.
After all players have their upgraded sword, head to Nero's ritual room (spawn) and interact with the book on the floor. After this the flag will spawn in the underground.
Flag Step
I recommend having the wonder weapon, shield and Civil Protector
Take the flag around the map and defend it from the "meatballs" and shadow man.
Every district has 2 spots to defend. After they are both done, head to the respective ritual room and interact with the keeper.
Trapping the Shadow Man
Head to pap and interact with the 4 keepers on the altars and then have someone stand near the table.
When the shield drops, shoot the Shadow Man till he gets above the table, at which point interact with the table and trap him in the summoning key.
Final Step
3 players enter beast mode and stay at each tram station.
The last player stays human and calls the tram.
The 3 Beasts zap their respective boxes whilst the tram is going.
Finally, one of the beast players head back to Junction and electrify the ghost keepers.
This is the final step of the easter egg and will start the cut scene.
The Giant
Opening Pack-a-Punch
Go through the map and turn on power.
Afterwards, link all 3 teleporters.
Pack-a-Punch any weapon (preferably not a shotgun)
Shoot things with PAP'd gun
Shoot control panel outside the map (to the right of PAP machine)
Go around and shoot the 3 bears that spawn after
After Shooting the bears, head to the furnace area in the garage and interact with the floating annihilator to finish the easter egg.
Go through the map and turn on power.
Afterwards, link all 3 teleporters.
Pack-a-Punch any weapon (preferably not a shotgun)
Shoot things with PAP'd gun
Shoot control panel outside the map (to the right of PAP machine)
Go around and shoot the 3 bears that spawn after
- Bear 1 - in the dark hole below teleporter B
- Bear 2 - in the vat next to teleporter A
- Bear 3 - outside the map, near the power switch
After Shooting the bears, head to the furnace area in the garage and interact with the floating annihilator to finish the easter egg.
Der Eisendrache
NOTE - The number of players matches the number of bows needed (unless if you play unranked which is always 4)
Preparation
Send all PaP pieces to the same platform to unlock PaP
Stand on the 4 symbols until they sink to activate low grav
Ragnarok Parts (required for egg)
Defeat Panzer
Turn on Death Ray (in the air after use)
Rocket test (wait for test to start and flip switch before it launches then interact with box next to teleporter when it has 3 green lights)
Shield Parts
Bottom - Courtyard crates, stairs or fence
Middle - Clock Tower Stairs, Church entrance or In clock tower
Top - Underground Above PaP, Above Teleporter or Above Altar
Preparation - Wrath of Ancients (unupgraded bow) and each upgrade
Feed the 3 dragons around the map to obtain the unupgraded bow
Step 1 of the Egg needs unupgraded bow with step 2 needing an upgraded bow
Fire Bow
Shoot a charged arrow at the marked wall in the clock tower and pick up the arrow head
Head to the launch pad and wait for a rocket launch, as soon as you can leave, leave and shoot the glowing ball to your right
Shoot the 3 red circles with a charged arrow while using the wundersphere’s
Stand in the circles after and get kills until a ray shoots up to the “sun”
Head back to the clock tower and interact, showing a symbol for one of the 3 fire places. Find which one of the 3 circles are glowing and with this, shoot charged shots in the direction of the fireplace you need to create a blazing rock on the ground. After the first shot, stand on the rock for the next shots.
Head back to the Sun near the death ray and interact with it, picking up the arrow that gets left behind.
Head underground to the fire altar, kill zombies near it and then pick up your bow
Wolf Bow
Interact with the 4 paintings in this order
Go back underground afterwards and pick up your arrow tip across from the PaP spot
Head to the launch pad and shoot the flag above the door with a charge shot, picking up the skull that drops on the ground
Place the skull on the headless skeleton next to the wolf altar
Follow the wolf that spawns and kill zombies when he stops to dig somewhere, picking up the piece when available
After the wolf goes back underground, he will scratch at a wall. Wait for low grav to activate and go to the hole above the wolf, shooting it when it lights up allowing you to stand on a platform and interact with the hole, allowing you to then pick up your arrow
Head back to the wolf altar, kill the zombies near it and pick up your upgraded bow
Storm Bow (Recommended for Solo)
Shoot an arrow at the weather ♥♥♥♥ near the death ray, picking up the arrow tips
Ignite 3 woodsheds with charged shots
Kill 6 zombies next to 3 electrical jars
Head back to the weathercock, interact with the blue cloud below it to get your arrow
Go underground to the storm altar, kill zombies near it and pick up your upgraded bow
Void Bow
Charge Shoot an arrow at the void symbol located above the gate trap
Head to below the clock tower and melee kill a zombie on the purple square, interacting with the broken tile after to release a jar
Interact with the 6 skulls around the map
After, shoot a charged arrow at the floating jar and write down the 3 words that are said in order, the words can be as follows
After all 6 are collected, head to the corridor between power and Samantha’s room. With the 3 words from before, interact with their respective armours with the same symbols.
They will show you 3 new symbols in order, remember this also (using simple words like teeth, bow tie, fangs etc.).
Go back underneath the Clock tower and shoot the 3 symbols you were shown in order.
Grab your arrow, head underneath to the altar, kill zombies and then pick up your upgraded bow.
Main Egg
Setting Up Teleporter Step
Shoot the blue orbs above the teleporter with charged arrow shots of the unupgraded bow and turn them golden/yellow colour
Electrified Item Step
An item on the map will be electrified, find it and shoot it with an upgraded bow. You need to shoot 4 of the 8, the locations are as follows
Time Travel Part 1
If the teleporter has the purple light, enter it to head back in the past and do these 3 things
Grab the soul canister (big blue tube)
Fuses (on a box on your right)
Remember the 3 symbols that Groph enters into the safe (there are 4 possible symbols; Arrow/Rocket, Circle, Card and Lightning)
Protection Ray & Groph Symbols
Head to the death ray and put the fuses into the side, heading to the other side and switching the mode to protect
Enter the Symbols from the past into the console from top to bottom
Safe contents
Head back to the teleporter room and grab the stuff in the safe
Then go back up top and put the fuses in the two tesla coils on the sides that are missing fuses.
Switch the Death ray back to destroy
Simon Says & Shooting Down Dempsey
Two consoles will play simon says, one being next to the clock tower and the other being on the launch pad
Head back to the death ray, and set it back to protect. Afterwards press the green button on the machine.
Go down to where dempsey crash landed and pick up the vril generator near the crash
Time Travel Part 2
Go back in time, if the teleporter doesn't have the purple glow then repeat step 2 with the electrified items around the map.
Once you time travel, Interact with the book on your right and then pick up the ornamented stone from the black crate.
Preparation
Send all PaP pieces to the same platform to unlock PaP
Stand on the 4 symbols until they sink to activate low grav
Ragnarok Parts (required for egg)
Defeat Panzer
Turn on Death Ray (in the air after use)
Rocket test (wait for test to start and flip switch before it launches then interact with box next to teleporter when it has 3 green lights)
Shield Parts
Bottom - Courtyard crates, stairs or fence
Middle - Clock Tower Stairs, Church entrance or In clock tower
Top - Underground Above PaP, Above Teleporter or Above Altar
Preparation - Wrath of Ancients (unupgraded bow) and each upgrade
Feed the 3 dragons around the map to obtain the unupgraded bow
Step 1 of the Egg needs unupgraded bow with step 2 needing an upgraded bow
Fire Bow
Shoot a charged arrow at the marked wall in the clock tower and pick up the arrow head
Head to the launch pad and wait for a rocket launch, as soon as you can leave, leave and shoot the glowing ball to your right
Shoot the 3 red circles with a charged arrow while using the wundersphere’s
Stand in the circles after and get kills until a ray shoots up to the “sun”
Head back to the clock tower and interact, showing a symbol for one of the 3 fire places. Find which one of the 3 circles are glowing and with this, shoot charged shots in the direction of the fireplace you need to create a blazing rock on the ground. After the first shot, stand on the rock for the next shots.
- The circle near Double-Tap goes to the Samantha room fire place
- The circle on top of the castle links to the church fireplace (beneath the dragon)
- The circle near the clocktower links to the fireplace upstairs near a Wunderfizz machine
Head back to the Sun near the death ray and interact with it, picking up the arrow that gets left behind.
Head underground to the fire altar, kill zombies near it and then pick up your bow
Wolf Bow
Interact with the 4 paintings in this order
- The King on his throne with wolves beside him
- The king on his horse with his armour on
- The castle burning with a dark creature in the sky
- The skeleton of the king
Go back underground afterwards and pick up your arrow tip across from the PaP spot
Head to the launch pad and shoot the flag above the door with a charge shot, picking up the skull that drops on the ground
Place the skull on the headless skeleton next to the wolf altar
Follow the wolf that spawns and kill zombies when he stops to dig somewhere, picking up the piece when available
After the wolf goes back underground, he will scratch at a wall. Wait for low grav to activate and go to the hole above the wolf, shooting it when it lights up allowing you to stand on a platform and interact with the hole, allowing you to then pick up your arrow
Head back to the wolf altar, kill the zombies near it and pick up your upgraded bow
Storm Bow (Recommended for Solo)
Shoot an arrow at the weather ♥♥♥♥ near the death ray, picking up the arrow tips
Ignite 3 woodsheds with charged shots
- In the town landscape below, on a hill in the direction of the launch pad
- On the castles rampart near the clock tower
- On the hill above the landing pad
Kill 6 zombies next to 3 electrical jars
- Clock Tower
- Above Double Tap
- In the tunnel on landing pad
Head back to the weathercock, interact with the blue cloud below it to get your arrow
Go underground to the storm altar, kill zombies near it and pick up your upgraded bow
Void Bow
Charge Shoot an arrow at the void symbol located above the gate trap
Head to below the clock tower and melee kill a zombie on the purple square, interacting with the broken tile after to release a jar
Interact with the 6 skulls around the map
- Near Mule Kick
- On a window outside church
- In the chest in Samantha’s room
- On the wall near double tap
- In the sink in teleporter room
- On the tray of the truck on the landing pad
After, shoot a charged arrow at the floating jar and write down the 3 words that are said in order, the words can be as follows
- DOOR
- ROE
- HORN
- HEARTH
- CROWN
- GRIFFIN
After all 6 are collected, head to the corridor between power and Samantha’s room. With the 3 words from before, interact with their respective armours with the same symbols.
They will show you 3 new symbols in order, remember this also (using simple words like teeth, bow tie, fangs etc.).
Go back underneath the Clock tower and shoot the 3 symbols you were shown in order.
Grab your arrow, head underneath to the altar, kill zombies and then pick up your upgraded bow.
Main Egg
Setting Up Teleporter Step
Shoot the blue orbs above the teleporter with charged arrow shots of the unupgraded bow and turn them golden/yellow colour
Electrified Item Step
An item on the map will be electrified, find it and shoot it with an upgraded bow. You need to shoot 4 of the 8, the locations are as follows
- On the wheel of the car near Double-Tap
- Phone near quick revive
- Box above double tap
- Globe in Samantha's bedroom
- Phone near the power lever
- Clock in living quarters
- Clock in Church
- Radio in Church
Time Travel Part 1
If the teleporter has the purple light, enter it to head back in the past and do these 3 things
Grab the soul canister (big blue tube)
Fuses (on a box on your right)
Remember the 3 symbols that Groph enters into the safe (there are 4 possible symbols; Arrow/Rocket, Circle, Card and Lightning)
Protection Ray & Groph Symbols
Head to the death ray and put the fuses into the side, heading to the other side and switching the mode to protect
Enter the Symbols from the past into the console from top to bottom
Safe contents
Head back to the teleporter room and grab the stuff in the safe
Then go back up top and put the fuses in the two tesla coils on the sides that are missing fuses.
Switch the Death ray back to destroy
Simon Says & Shooting Down Dempsey
Two consoles will play simon says, one being next to the clock tower and the other being on the launch pad
Head back to the death ray, and set it back to protect. Afterwards press the green button on the machine.
Go down to where dempsey crash landed and pick up the vril generator near the crash
Time Travel Part 2
Go back in time, if the teleporter doesn't have the purple glow then repeat step 2 with the electrified items around the map.
Once you time travel, Interact with the book on your right and then pick up the ornamented stone from the black crate.
Der Eisendrache (cont.)
Ghost step
Head to where you pick up the unupgraded bow and palace the vril Generator into the insert on the coffin.
Follow the ghost that comes out from it and kill zombies in the circles when it stops with the corresponding bows (it will glow the bows colours that it wants, with it only doing one bow when solo and two when duo etc.)
When the ghost goes to the area near double tap you need to place the stone you picked up from Time Travel Part 2 into the wall indentation
Finally follow the ghost underground and place the blue glowing canister near the pyramid
Boss Battle (Finale)
When prepared, head underground to the altar room and each player place their ragnarok’s on the pads that activate low grav to enter the boss battle.
When the boss attacks with the lightning, you must go into the centre and place your ragnarok's in time to cancel his attack and be able to attack the boss by shooting him in the chest.
Eventually the boss will die, afterwards you place the summoning key into the pyramid, pick it back up after and place it on the console next to the clock tower to finish the Easter Egg.
Head to where you pick up the unupgraded bow and palace the vril Generator into the insert on the coffin.
Follow the ghost that comes out from it and kill zombies in the circles when it stops with the corresponding bows (it will glow the bows colours that it wants, with it only doing one bow when solo and two when duo etc.)
When the ghost goes to the area near double tap you need to place the stone you picked up from Time Travel Part 2 into the wall indentation
Finally follow the ghost underground and place the blue glowing canister near the pyramid
Boss Battle (Finale)
When prepared, head underground to the altar room and each player place their ragnarok’s on the pads that activate low grav to enter the boss battle.
When the boss attacks with the lightning, you must go into the centre and place your ragnarok's in time to cancel his attack and be able to attack the boss by shooting him in the chest.
Eventually the boss will die, afterwards you place the summoning key into the pyramid, pick it back up after and place it on the console next to the clock tower to finish the Easter Egg.
Zetsubou No Shima
You NEED "Anywhere But Here" before starting
Parts
Gas mask
Cable: Crash site
Filter: Bottom of the zipline
Mask: Green water area (lab b)
Shield
First piece: under the lab a (near the kuda)
Second: a tree in lab b area
Third: AA Gun (near the box)
Power
Pick up a bucket and fill the generators in each Lab within a short amount of time
Open the bunker and do the water lock down (first left) to access the switch to turn on power.
Pack-A-Punch
PAP requires 3 parts, which you get in this way:
Skull of Nan’sapwe
Head to the right from spawn where you will find an altar with 4 skulls
Take each skull to their respective altars (changes locations each game) around the map to clean them
Altar locations are as follows:
Trials
Where you do the Skull step, there will be 3 trials that need to be done for each player. Completing them allows the altar to be struck by lightning which is needed for future steps.
KT-4
To get the wonder weapon you need 3 parts
Prepping the Map with the Skull
With the Skull of Nan'sapwe, use its hypnosis attack at the following places in that order
Masamune (KT-4 Upgrade)
To upgrade the KT-4 to the masamune, you will need another 3 parts
Starting the Egg
Plant a seed and water it with blue water, shooting it with the Masamune/KT-4 after each time. Do this until you get a shell from the plant.
Gear Step
Head to the AA Gun and place the Shell. Shoot the plane when it comes.
The First Gear will drop in one of these 3 spots:
Tip: there is no inertia, so when falling you fall straight down vertically
Solo: hit the console with the electrified shield, then use the zipline. While above the deck, melee to fall down and pick up the gear.
Multiplayer: Player A must have the electrified shield ready to hit the console whilst Player B takes the zipline. When Player B is above the deck, Player A hits the console with the Shield.
The Third gear is above Lab A. Get the "Anywhere But Here" gobblegum and use it near there to find the third gear amongst the dragon eggs.
The Boss Fight (The Finale)
Make sure to have the Gas Mask for this step
Put the 3 Gears in the machine behind the Elevator, then take it down.
Using the Masamune, shoot the orange spores on the plants to access the fight.
During the fight, Shoot the orange spores when they appear, After shooting 4 of them, the fight ends and you complete the Easter Egg.
Parts
Gas mask
Cable: Crash site
Filter: Bottom of the zipline
Mask: Green water area (lab b)
Shield
First piece: under the lab a (near the kuda)
Second: a tree in lab b area
Third: AA Gun (near the box)
Power
Pick up a bucket and fill the generators in each Lab within a short amount of time
Open the bunker and do the water lock down (first left) to access the switch to turn on power.
Pack-A-Punch
PAP requires 3 parts, which you get in this way:
- Underwater after cleaning the fan and activating power
- Dropped from the cocoons in the purple water room
- The submerged cave area (take the first left)
Skull of Nan’sapwe
Head to the right from spawn where you will find an altar with 4 skulls
Take each skull to their respective altars (changes locations each game) around the map to clean them
Altar locations are as follows:
- In the spawn room
- Near the crashed gun-ship
- In the bunker, near the KT-4 crafting and upgrading stations
- Outside the bunker, near the bottom of the zipline and after the power lever
Trials
Where you do the Skull step, there will be 3 trials that need to be done for each player. Completing them allows the altar to be struck by lightning which is needed for future steps.
KT-4
To get the wonder weapon you need 3 parts
- Spider Venom - Lower the cage in Lab A, get a spider trapped in there and re-interact with the control panel to get the venom
- Green Flask - After turning power on, play near Lab B and you will find a Green glowing zombie, kill him and pick up the flask
- Flower - At the bottom of the underwater cave is the flower, just pick it up
Prepping the Map with the Skull
With the Skull of Nan'sapwe, use its hypnosis attack at the following places in that order
- Poster in the room with the Purple Water
- Door to the left of entering the bunker (behind the Elevator)
- The Wall in the green specimen tank room, on your left after going down the stairs
Masamune (KT-4 Upgrade)
To upgrade the KT-4 to the masamune, you will need another 3 parts
- Spiders tooth - Complete the spider boss fight and pick up her tooth
- The rainbow flower - Enter the sewer with an empty bucket. Spam interact when passing the 115 meteor to pick up the rainbow water. Head to where you picked up the flower for the KT-4 and use the skull hypnosis attack on the rock face to the right. Plant a seed and water it with the rainbow water to then get the rainbow flower.
- 115 Flask - Head to Lab B with an electrified shield. In Solo: Melee the console for the cage, enter and pick up the flask. In Multiplayer: Melee the console for the cage and enter. Have another player send you down, pick up the flask and get them to send you back up.
Starting the Egg
Plant a seed and water it with blue water, shooting it with the Masamune/KT-4 after each time. Do this until you get a shell from the plant.
Gear Step
Head to the AA Gun and place the Shell. Shoot the plane when it comes.
The First Gear will drop in one of these 3 spots:
- By the Green Water
- In Front of the Bunker
- Near the bottom of the Zipline
Tip: there is no inertia, so when falling you fall straight down vertically
Solo: hit the console with the electrified shield, then use the zipline. While above the deck, melee to fall down and pick up the gear.
Multiplayer: Player A must have the electrified shield ready to hit the console whilst Player B takes the zipline. When Player B is above the deck, Player A hits the console with the Shield.
The Third gear is above Lab A. Get the "Anywhere But Here" gobblegum and use it near there to find the third gear amongst the dragon eggs.
The Boss Fight (The Finale)
Make sure to have the Gas Mask for this step
Put the 3 Gears in the machine behind the Elevator, then take it down.
Using the Masamune, shoot the orange spores on the plants to access the fight.
During the fight, Shoot the orange spores when they appear, After shooting 4 of them, the fight ends and you complete the Easter Egg.
Gorod Krovi
Shield Parts
First Part: between the Department Store and Bunker
Second Part: between the Bunker and the Infirmary
Third Part: around the Armoury
OPTIONAL Upgrading Shield
To start, get 50 kills with the fire blast or shield bash attacks
Next, stay in fire for a certain number of time (until a sound plays)
With the fire blast, hit 3 purple symbols at each dragon call location
Unlocking PAP
Turn on power in the Control room (Hit the green button in front of S.O.P.H.I.A while you're here)
Get the 3 code cylinders; Blue, Yellow and Red, and place them in their respective spots
After getting 3 network circuits, place them in the bunkers underground and can now call the dragons at the 3 control networks, essentially unlocking PAP.
Siegfried Gauntlet
Alongside this step, do your other 3 trials
get the dragon egg from the PAP area (its above the sewer exit, just shoot it down)
Warm up the egg in a nest and wait a round to pick up the egg (after its cooled)
Kill 15 Burning (Napalm) zombies
Kill Multiple Zombies with a single bullet (best to use a sniper)
Melee Kill 15 zombies
After doing these “trials”, head back to PAP and and incubate your egg. After killing a few zombies it should be ready to be grabbed again and you can head back to spawn to get the gauntlet
Dragon Strike Controller (And Upgrade)
Head to PAP area, on the upstairs area there is a console. Each player in the game must interact with it, doing so starts a lockdown.
After finishing the lockdown, head back to the console and get your dragon strike controller
OPTIONAL Upgrading the Dragon Strike Controller
To start you need to hit a number of flags equivalent to the players in the lobby
The flag locations are as follows:
In Spawn near Quick Revive
In the tank factory
In the Dragon Command
In the Supply Depot
Once finished, head back to where we did the lockdown and do another lockdown again, using the dragon strike controller once per wave. If done correctly, you can get the upgraded dragon strike.
Trophy Step
Collect 6 trophies around the map
Valve Step
Kill a valk drone near the generator, then turn it on
The 6 valves are located around the map:
Blue means its receiving air and white means its not.
The green light is the start of the circuit and the code cylinder valve the end.
To do this step, go to this website (https://www.kronorium.com/blackops3/gorodkrovi/) for easy assistance, otherwise externally you can learn the pattern online.
When its successful, you can pick up the code cylinder from the last valve.
Random Challenge Step
Go to S.O.P.H.I.A and shoot the word (from top to bottom) “KRONOS”, interacting with her afterwards
Place the 6 trophies in position opposite of S.O.P.H.I.A and interact with the command console, starting a random challenge. You must play through all 6 challenges, with the first 5 having a random order. The challenges will be one of the following:
Go back to S.O.P.H.I.A and give her the card. After a short Exchange, pick up the power core.
Boss Fight
Head back to spawn and send you dragon out to Nikolai who is stuck in his mech in the neighbourhood.
Head back to the dragon command and stand on the grid where S.O.P.H.I.A was and get sent to the boss fight
The first stage will be spent shooting the dragon and its weak spots
The next will be shooting Nikolai, shooting the yellow lights on his mech
This is the final step of the easter egg, with the cutscene playing at the end
First Part: between the Department Store and Bunker
Second Part: between the Bunker and the Infirmary
Third Part: around the Armoury
OPTIONAL Upgrading Shield
To start, get 50 kills with the fire blast or shield bash attacks
Next, stay in fire for a certain number of time (until a sound plays)
With the fire blast, hit 3 purple symbols at each dragon call location
- To the left in dragon control room
- On the roof in supply depot
- On the shoulder of the tank factory robot
Unlocking PAP
Turn on power in the Control room (Hit the green button in front of S.O.P.H.I.A while you're here)
Get the 3 code cylinders; Blue, Yellow and Red, and place them in their respective spots
- Blue in Control Room
- Yellow in Supply Depot
- Red in Tank Factory
After getting 3 network circuits, place them in the bunkers underground and can now call the dragons at the 3 control networks, essentially unlocking PAP.
Siegfried Gauntlet
Alongside this step, do your other 3 trials
get the dragon egg from the PAP area (its above the sewer exit, just shoot it down)
Warm up the egg in a nest and wait a round to pick up the egg (after its cooled)
Kill 15 Burning (Napalm) zombies
Kill Multiple Zombies with a single bullet (best to use a sniper)
Melee Kill 15 zombies
After doing these “trials”, head back to PAP and and incubate your egg. After killing a few zombies it should be ready to be grabbed again and you can head back to spawn to get the gauntlet
Dragon Strike Controller (And Upgrade)
Head to PAP area, on the upstairs area there is a console. Each player in the game must interact with it, doing so starts a lockdown.
After finishing the lockdown, head back to the console and get your dragon strike controller
OPTIONAL Upgrading the Dragon Strike Controller
To start you need to hit a number of flags equivalent to the players in the lobby
The flag locations are as follows:
In Spawn near Quick Revive
In the tank factory
In the Dragon Command
In the Supply Depot
Once finished, head back to where we did the lockdown and do another lockdown again, using the dragon strike controller once per wave. If done correctly, you can get the upgraded dragon strike.
Trophy Step
Collect 6 trophies around the map
- In the hand of the statue outside of Dragon Command
- Shoot the glowing light leaving the PAP area, the trophy being found in the toilet at the PAP building
- Smash the safe in the bunker with the gauntlet
- Outside the supply depot, use a dragon strike on the puddle
- Activate the giant robot laser in supply depot, trophy being where the laser shot
- Shoot the pipe on the wall with the shield near double-tap in the tank factory
Valve Step
Kill a valk drone near the generator, then turn it on
The 6 valves are located around the map:
- In Dragon Command upstairs
- In the armoury near the 500 point bridge
- In supply depot next to the mystery box spot
- In infirmary. Next to the beds when going down the building
- In Tank factory, facing the metal stairs
- In department store, on the top floor
Blue means its receiving air and white means its not.
The green light is the start of the circuit and the code cylinder valve the end.
To do this step, go to this website (https://www.kronorium.com/blackops3/gorodkrovi/) for easy assistance, otherwise externally you can learn the pattern online.
When its successful, you can pick up the code cylinder from the last valve.
Random Challenge Step
Go to S.O.P.H.I.A and shoot the word (from top to bottom) “KRONOS”, interacting with her afterwards
Place the 6 trophies in position opposite of S.O.P.H.I.A and interact with the command console, starting a random challenge. You must play through all 6 challenges, with the first 5 having a random order. The challenges will be one of the following:
- Bomb Defusal - Defuse 6 bombs (3 in solo) around the map, the order of which will be shown on the monitor. Write down the order and go around and defuse the bombs.
- Yellow Orb - The soul of gersh will spawn somewhere and you need to shoot it with a PAP’d weapon until he stops speaking and then wait as he moves around. Repeat this till he gets to the Dragon Command trap
- Friendly Mangler - Head to the highlighted area and find the mangler with green eyes. Escort him to the dragon command trap and be careful not to kill him.
- Friendly Valkyrie - Same as the Mangler step just with a Valkyrie Drone
- Groph Pod - A graph pod will spawn in one of the areas you ride the dragons (you will find it from the green beam). Protect it until it opens, sending the siegfried gauntlet dragon to pick up the part. Then head back to S.O.P.H.I.A to give her the part
Go back to S.O.P.H.I.A and give her the card. After a short Exchange, pick up the power core.
Boss Fight
Head back to spawn and send you dragon out to Nikolai who is stuck in his mech in the neighbourhood.
Head back to the dragon command and stand on the grid where S.O.P.H.I.A was and get sent to the boss fight
The first stage will be spent shooting the dragon and its weak spots
The next will be shooting Nikolai, shooting the yellow lights on his mech
This is the final step of the easter egg, with the cutscene playing at the end
Revelations
Dragon Shield
First - Origins
Second - Der Eisendrache
Third - Verruckt
Keeper Protector
Flag - Origins or Mob of the Dead
Skull - Verruckt
Gem - Der Eisendrache or Kino
Optional
Best Mask: Margwa Head - Kill 5 Parasites, 5 Spiders, 5 Keepers, 10 Furies, 50 Zombies and 3 Margwas whilst in the stomach of the Apothicon, standing in the Green Bile and when there is Green Mist around
Upgrading Lil Arnies - Get 150 kills with the Arnies, then throw an Arnie into the window above the church in spawn.
Prerequisites
Unlocking PAP
Go around and do the 4 rituals/power soul boxes. Then head through one of the portals to Nacht Der Untoten and use the console when its flashing (when the Apothicon is flying by). Once in the Apothicon, shoot the three glowing balls on the side to unlock PAP.
Upgrading the Apothicon Servant
Get the apothicon servant from the box, then shoot 5 115 rocks with it
Main Egg
Shoot the Graves outside the spawn room (on your left) from Richtofen, Dempsey, Takeo and Nikolai (left to right: 2-3-1-4, in the order they die during the cutscenes)
Keeper Rock Step
Find the Jagged rock in the bumper pad. Call the keeper protector and bring him to the opposite pad and use it. Then when next to the Jagged Rock, stand as deep as you can until the keeper starts his ritual. Protect him while he does this, Picking up the Audio Reel he drops and taking it to Nacht Der Untoten and playing it (besides Jug).
ARNIES GAMBLING YAY
Personally, I recommend bringing something that assists with hitting the box as I am unlucky
After getting Arnies, head to inside the Apothicon and throw 9 Arnies into the 9 holes in the Apothicon without leaving it. Kill the Margwas that spawn every 3 Arnies and then pick up the Audio Reel when done. Place it in Kino Der Toten (opposite of the teleporter).
Bone Pile Step
Next you need to shoot the 6 bricks around the map with a PAP’d gun, then shooting the bone that pops out with the PAP’d Apothicon Servant. They are located at:
Turret Reflection Step
Then shoot the 4 turrets out to the blue (115) rocks outside the map, reflecting the laser to Nacht (You'll know this is done when the game kicks you off the turret)
Interact with S.O.P.H.I.A (In Nacht) and she will head to Kino’s teleporter.
After taking the teleporter, Pick up the Kronorium from the bed and then place it on the podium on the kino stage.
Apothicon Egg Step
4 Eggs will spawn around the map, with only 1 being on the map at once (there are alot of locations, if you need them look at step 8 of this guide). Take them to the Apothicon and place them in one of the four corners in the acid.
After its complete, grab the worm and take it to either Spawn, Der Eisendrache, Verruckt or Mob and listen for a beeping noise, placing it there and picking up the rune that spawns.
Runes and Mini Boss Step
After all 4 runes have been gotten, all players must head to the projection room in kino.
After teleporting, Interact with the kronorium and memorise the 4 symbols and their sequence (easy way of doing this; holding tab, the symbols from left to right are numbered 1 to 4, then when the kronorium shows the order, type out which symbol is when. For example it shows 1 3 2 4)
With this, head to the other side of the room where the glowing symbols are and interact when the order of symbols appear.
Once all 4 symbols are appeared in Gold, 4 phases of elemental margwa battles will begin, Picking up the summoning key when it finishes.
Summoning Key Step
With the summoning key, you will need to throw it at 7 different items out of the map
Boss Fight (End of the Easter Egg)
In the boss room, interact with a pedestal in one of the 4 corners and charge the summoning key.
When its done, pick it up and throw it at S.O.P.H.I.A and she will destroy the Shadow Man’s shield
Then like Shadows of Evil, Shoot the Shadow Man until he is in the mouth of the Apothicon Statue, then interacting with the Kronorium to seal him and finish the Easter Egg
First - Origins
Second - Der Eisendrache
Third - Verruckt
Keeper Protector
Flag - Origins or Mob of the Dead
Skull - Verruckt
Gem - Der Eisendrache or Kino
Optional
Best Mask: Margwa Head - Kill 5 Parasites, 5 Spiders, 5 Keepers, 10 Furies, 50 Zombies and 3 Margwas whilst in the stomach of the Apothicon, standing in the Green Bile and when there is Green Mist around
Upgrading Lil Arnies - Get 150 kills with the Arnies, then throw an Arnie into the window above the church in spawn.
Prerequisites
Unlocking PAP
Go around and do the 4 rituals/power soul boxes. Then head through one of the portals to Nacht Der Untoten and use the console when its flashing (when the Apothicon is flying by). Once in the Apothicon, shoot the three glowing balls on the side to unlock PAP.
Upgrading the Apothicon Servant
Get the apothicon servant from the box, then shoot 5 115 rocks with it
- Shangri-La, above the Pyramid
- Spawn, in the sky to the right (facing the portal)
- Mob, in the sky to the left (facing the portal)
- Verruckt, above the building when you are about to head to Mob
- Verruckt, Above the portal (and a tad to the right)
Main Egg
Shoot the Graves outside the spawn room (on your left) from Richtofen, Dempsey, Takeo and Nikolai (left to right: 2-3-1-4, in the order they die during the cutscenes)
Keeper Rock Step
Find the Jagged rock in the bumper pad. Call the keeper protector and bring him to the opposite pad and use it. Then when next to the Jagged Rock, stand as deep as you can until the keeper starts his ritual. Protect him while he does this, Picking up the Audio Reel he drops and taking it to Nacht Der Untoten and playing it (besides Jug).
ARNIES GAMBLING YAY
Personally, I recommend bringing something that assists with hitting the box as I am unlucky
After getting Arnies, head to inside the Apothicon and throw 9 Arnies into the 9 holes in the Apothicon without leaving it. Kill the Margwas that spawn every 3 Arnies and then pick up the Audio Reel when done. Place it in Kino Der Toten (opposite of the teleporter).
Bone Pile Step
Next you need to shoot the 6 bricks around the map with a PAP’d gun, then shooting the bone that pops out with the PAP’d Apothicon Servant. They are located at:
- Nacht Der Untoten - Above Der Eisendrache Portal
- Verruckt - Next to the waterfall (to the right of the portal)
- Origins - Near the giant robot footstep
- Shangri-La - Above Stamin-Up
- Spawn - In the broken church
- Der Eisendrache - Third wall along the wall ride section (bottom right when riding the wall)
Turret Reflection Step
Then shoot the 4 turrets out to the blue (115) rocks outside the map, reflecting the laser to Nacht (You'll know this is done when the game kicks you off the turret)
Interact with S.O.P.H.I.A (In Nacht) and she will head to Kino’s teleporter.
After taking the teleporter, Pick up the Kronorium from the bed and then place it on the podium on the kino stage.
Apothicon Egg Step
4 Eggs will spawn around the map, with only 1 being on the map at once (there are alot of locations, if you need them look at step 8 of this guide). Take them to the Apothicon and place them in one of the four corners in the acid.
After its complete, grab the worm and take it to either Spawn, Der Eisendrache, Verruckt or Mob and listen for a beeping noise, placing it there and picking up the rune that spawns.
Runes and Mini Boss Step
After all 4 runes have been gotten, all players must head to the projection room in kino.
After teleporting, Interact with the kronorium and memorise the 4 symbols and their sequence (easy way of doing this; holding tab, the symbols from left to right are numbered 1 to 4, then when the kronorium shows the order, type out which symbol is when. For example it shows 1 3 2 4)
With this, head to the other side of the room where the glowing symbols are and interact when the order of symbols appear.
Once all 4 symbols are appeared in Gold, 4 phases of elemental margwa battles will begin, Picking up the summoning key when it finishes.
Summoning Key Step
With the summoning key, you will need to throw it at 7 different items out of the map
- Kino - The radio in the chandelier
- Der Eisendrache - The Clock above the main room
- Shangri-La - The convergence stone (white stone on a pole) in a palm tree
- Origins - A grave near the excavation site (before heading below the excavation site)
- Mob of The Dead - A poster in a cell
- Verruckt - The MG-42 on a Fountain
- Nacht Der Untoten - Red barrel near the truck
Boss Fight (End of the Easter Egg)
In the boss room, interact with a pedestal in one of the 4 corners and charge the summoning key.
When its done, pick it up and throw it at S.O.P.H.I.A and she will destroy the Shadow Man’s shield
Then like Shadows of Evil, Shoot the Shadow Man until he is in the mouth of the Apothicon Statue, then interacting with the Kronorium to seal him and finish the Easter Egg
Ascension
Requires 4 Players
Power
The Power Switch is located at the top of the central building
Unlocking PAP
Next to power switch should be a Red diagram with 4 parts
Fly the moon lander from these 4 spots to make the diagram fully green
Starting the Main Easter Egg
Before Starting, Get Gersh Devices and Matryoshka Dolls from box as well as powerful PAP'd weapons
Throw a gersh on a light on top of the generator (outside the map, on your right facing the stairs to widows)
Next, Head to the Stamin-Up moon lander and interact with the flickering TV.
You must wait till a monkey round and then activate 4 buttons at the same time
LUNA step and Ending
Next you need to Write the word “LUNA” with the moon lander by calling the moon lander around the map. Start by calling it to spawn, Staying on the moon lander and have someone call it in this order:
When the light raises into the sky and gives you your reward, you have completed the Easter Egg
Power
The Power Switch is located at the top of the central building
Unlocking PAP
Next to power switch should be a Red diagram with 4 parts
Fly the moon lander from these 4 spots to make the diagram fully green
- From the Spawn Room
- On the platform near Widows Wine
- In the courtyard facing Stamin-Up
- In the area before Speed Cola
Starting the Main Easter Egg
Before Starting, Get Gersh Devices and Matryoshka Dolls from box as well as powerful PAP'd weapons
Throw a gersh on a light on top of the generator (outside the map, on your right facing the stairs to widows)
Next, Head to the Stamin-Up moon lander and interact with the flickering TV.
You must wait till a monkey round and then activate 4 buttons at the same time
- On the wall next to Widows Wine
- On the wall next to Speed Cola
- On the wall next to Stamin-Up
- On the wall facing Juggernog
LUNA step and Ending
Next you need to Write the word “LUNA” with the moon lander by calling the moon lander around the map. Start by calling it to spawn, Staying on the moon lander and have someone call it in this order:
- To Stamin-Up for L
- Back To Spawn, for U
- Near Speed Cola to get N
- Finally, call it back to Stamin-Up for A
When the light raises into the sky and gives you your reward, you have completed the Easter Egg
Shangri-La
REQUIRES 4 PLAYERS
Preparation
Both Power switches are underground
To access PAP, make the 4 statues immobile by standing on the plate in front of them
Make sure to have the baby gun and trip mines from the box
Main Egg
Eclipse Step
All 4 players press the circular buttons in spawn, beginning an eclipse
Symbol Step
First room to the right of spawn, press the button next to the pharo wall buy
Once the dialog stops, 24 tiles will appear (12 in the area near the button that triggered the dialog, and 12 around the wooden bridge on the opposite side of the map)
Each tile is paired with one on the opposite side. One player describes a tile to the second and then they both stand on the same symbol. Once all tiles disappear, a sound will play and a focusing crystal will rise from the brick construction.
Water Slide Step
3 players must stand on the pressure plate at the bottom of the slide after using it, having the fourth player slide down using the interaction button to activate a trigger. When done correctly it will end the eclipse.
Focus Crystal Step
Head back to the waterfall near the slide. On top of it is the focus crystal. Take it down with an explosion or ray gun etc.
Once it's down, shrink it with the baby gun (31-79 JGb 215) and knife it, following it into the geyser near the spawn. Stand on top of it to activate it, putting the crystal on top of a tower.
Gas Leak/Napalm Step
This Step needs to be done in a single Eclipse Phase
Re-activate the Eclipse, then head to the tunnel that has PaP, near the Pharo a valve will be located that you need to interact with 4 times to turn it. Afterwards you need to lead a napalm zombie to 3 different spots
Trip Mine Step
Re-activate the Eclipse again and head to the tunnel near the wooden bridge. Use a trip mine next to the 4 holes in the wall and kill a zombie next to each one to fill them in.
After this is done, head down the water and press the button on the brick wall in the middle of the pool.
Panel Step
Again, re-activate the eclipse and knife the 12 new panels around the map that have appeared.
Circular Code Step
Time for the eclipse again and interact with the radio that appeared on the crate near the minecart. It will give you a code “16 1 3 4” and enter the code into the circular displays around the map.
Gong Step
Eclipse, again. Interact with the radio near the PaP staircase. Afterwards you will need to knife 4 of the 8 gongs on the map. If you knife the wrong gong, the crystals will glow red, when correct nothing will glow. The locations are as follow:
PaP the baby gun (if you hadn't yet) and have someone not using the baby gun stand underneath the crystal tower near the minecart entrance while the baby gun shoots it.
The person standing underneath needs to catch the dynamite before it touches the ground.
Focusing Stone Step
Activate the Eclipse for the final time
Shoot the focusing crystal above the mud maze with the baby gun.
Head up the PaP stairs and place the dynamite on the wall where the PaP machine was.
Activate the PaP opening sequence and head back up, revealing the the altar with the focusing stone hovering above it, completing the egg when its picked up.
BONUS Perma-Perks for all
The person who picks up the focusing stone gets the perma perks, due to this its possible to repeat the final step to get more focusing stones for everyone.
When its done, you just need to interact with the radio that appeared in the spawn, beneath the PaP stairs.
Preparation
Both Power switches are underground
To access PAP, make the 4 statues immobile by standing on the plate in front of them
Make sure to have the baby gun and trip mines from the box
Main Egg
Eclipse Step
All 4 players press the circular buttons in spawn, beginning an eclipse
Symbol Step
First room to the right of spawn, press the button next to the pharo wall buy
Once the dialog stops, 24 tiles will appear (12 in the area near the button that triggered the dialog, and 12 around the wooden bridge on the opposite side of the map)
Each tile is paired with one on the opposite side. One player describes a tile to the second and then they both stand on the same symbol. Once all tiles disappear, a sound will play and a focusing crystal will rise from the brick construction.
Water Slide Step
3 players must stand on the pressure plate at the bottom of the slide after using it, having the fourth player slide down using the interaction button to activate a trigger. When done correctly it will end the eclipse.
Focus Crystal Step
Head back to the waterfall near the slide. On top of it is the focus crystal. Take it down with an explosion or ray gun etc.
Once it's down, shrink it with the baby gun (31-79 JGb 215) and knife it, following it into the geyser near the spawn. Stand on top of it to activate it, putting the crystal on top of a tower.
Gas Leak/Napalm Step
This Step needs to be done in a single Eclipse Phase
Re-activate the Eclipse, then head to the tunnel that has PaP, near the Pharo a valve will be located that you need to interact with 4 times to turn it. Afterwards you need to lead a napalm zombie to 3 different spots
- Next to the valve you just turned
- Next to the Geyser
- Before the room with the power generators
Trip Mine Step
Re-activate the Eclipse again and head to the tunnel near the wooden bridge. Use a trip mine next to the 4 holes in the wall and kill a zombie next to each one to fill them in.
After this is done, head down the water and press the button on the brick wall in the middle of the pool.
Panel Step
Again, re-activate the eclipse and knife the 12 new panels around the map that have appeared.
- In spawn room, left of the PaP staircase
- In spawn room, facing the door right of Quick Revive
- In spawn room, across from the previous one
- In spawn room, facing the door leading to the cart
- In spawn room, in front of the previous one
- In cart room, on the wall facing spawn
- In cart room, next to the gong near the minecart
- In power room, on the left of the left power switch
- In the connector between waterfall and power on a wall
- In the same room, on a wall before the stairs
- In before the wooden bridge, on the right before the bridge
- In the mud maze, on the right heading to the water slide
Circular Code Step
Time for the eclipse again and interact with the radio that appeared on the crate near the minecart. It will give you a code “16 1 3 4” and enter the code into the circular displays around the map.
- Directly to your right when coming from spawn, select the single dot
- Directly to your left when coming from spawn, select the four dots
- Far left when coming from spawn, select the three dots
- Far right when coming from spawn, select the [ | -
Gong Step
Eclipse, again. Interact with the radio near the PaP staircase. Afterwards you will need to knife 4 of the 8 gongs on the map. If you knife the wrong gong, the crystals will glow red, when correct nothing will glow. The locations are as follow:
- Near the brick prison and tunnel entrance
- Same area, in front of the the tunnel entrance
- On the left of the minecart entrance
- Next to the Shieva wall buy in spawn
- On your left when entering the mud maze from spawn
- On your right when leaving the mud maze
- On the far right after the maze, before the wooden bridge
- On the right side after the wooden bridge
PaP the baby gun (if you hadn't yet) and have someone not using the baby gun stand underneath the crystal tower near the minecart entrance while the baby gun shoots it.
The person standing underneath needs to catch the dynamite before it touches the ground.
Focusing Stone Step
Activate the Eclipse for the final time
Shoot the focusing crystal above the mud maze with the baby gun.
Head up the PaP stairs and place the dynamite on the wall where the PaP machine was.
Activate the PaP opening sequence and head back up, revealing the the altar with the focusing stone hovering above it, completing the egg when its picked up.
BONUS Perma-Perks for all
The person who picks up the focusing stone gets the perma perks, due to this its possible to repeat the final step to get more focusing stones for everyone.
When its done, you just need to interact with the radio that appeared in the spawn, beneath the PaP stairs.
Moon
Pre-Requisites
Reminder to put on the space suit when you first teleport to the moon
Power Lever is in the MPD room
Main Egg
Simon Says
After power is turned on, head out of the spawn room on moon where the 4 computers sit
Interact with them and play Simon Says, finishing when the screens go black (if they go red, then start again)
Hacking Time
With the Hacker, hack the first button on the left (up stairs from the MPD room).
Doing so starts a timer where you need to hack the 4 panels with shiny lights on them, with 8 possible panels (3 on the first floor, 2 on the second and 3 on the third)
Head back to were you hacked the left button and press all 4 of them from left to right.
If the step is done correctly then the buttons should glow
Excavator Pi
Wait till Excavator Pi starts breaking into tunnel 6
When it starts to do so, take the hacker and use it on the affiliated console in spawn
After the excavator is done, head to tunnel 6 and knife the dark metal ball (Vrill Sphere), following where it goes and continuing until it stops.
The Ball will then stick to the antenna, shoot it down with the wave-gun
Keep following the ball. It will eventually get stuck in the roof above stamin-up, requiring you to get it down with an explosive (ray-gun works also)
The ball will eventually stop, fitting into the MPD
MPD Soul Box - Part 1
The Glass container on the MPD need 25 kills
When it finishes interact with the lever on the right side of the pyramid
The MPD will then open, revealing Samantha inside
Hexagonal Plates
Head back to Area 51. On your right there is two hexagonal plates on a shelf, throw a grenade to get them down and then throw a gersh device on them.
If done correctly, they should sit on the teleporter with you now.
Head back to moon, throwing a Q.E.D on the plates that teleported with you, which will set them up on a machine near the computer in the corner.
Grey Cable and Golden Rod
Pick up a grey cable, which can be picked up at any stage. Its commonly located in the lab on any floor.
After picking it up, place it between the two plates and the computer in the corner of spawn.
The Player with Richtofen then places the golden rod between the plates and then spam interact on the computer. The step is done when the rod glows purple, picking it up.
MPD Soul Boxes - Part 2
Head back to the MPD and kill 25 zombies next to the new 3 canisters (75 in total)
Once finished, place the golden rod in the vrill interface, giving you perkaholic
Throw a Q.E.D onto the vril sphere in the interface
Simon Says 2 - Electric Boogaloo
Head back to the Simon Says computers and play again.
Each time you complete a game, A rocket will lift up
Once done, throw a gersh device on the vril sphere (itll be next to the computers)
This will end the Easter Egg and everyone will get Perkaholic.
Reminder to put on the space suit when you first teleport to the moon
Power Lever is in the MPD room
Main Egg
Simon Says
After power is turned on, head out of the spawn room on moon where the 4 computers sit
Interact with them and play Simon Says, finishing when the screens go black (if they go red, then start again)
Hacking Time
With the Hacker, hack the first button on the left (up stairs from the MPD room).
Doing so starts a timer where you need to hack the 4 panels with shiny lights on them, with 8 possible panels (3 on the first floor, 2 on the second and 3 on the third)
Head back to were you hacked the left button and press all 4 of them from left to right.
If the step is done correctly then the buttons should glow
Excavator Pi
Wait till Excavator Pi starts breaking into tunnel 6
When it starts to do so, take the hacker and use it on the affiliated console in spawn
After the excavator is done, head to tunnel 6 and knife the dark metal ball (Vrill Sphere), following where it goes and continuing until it stops.
The Ball will then stick to the antenna, shoot it down with the wave-gun
Keep following the ball. It will eventually get stuck in the roof above stamin-up, requiring you to get it down with an explosive (ray-gun works also)
The ball will eventually stop, fitting into the MPD
MPD Soul Box - Part 1
The Glass container on the MPD need 25 kills
When it finishes interact with the lever on the right side of the pyramid
The MPD will then open, revealing Samantha inside
Hexagonal Plates
Head back to Area 51. On your right there is two hexagonal plates on a shelf, throw a grenade to get them down and then throw a gersh device on them.
If done correctly, they should sit on the teleporter with you now.
Head back to moon, throwing a Q.E.D on the plates that teleported with you, which will set them up on a machine near the computer in the corner.
Grey Cable and Golden Rod
Pick up a grey cable, which can be picked up at any stage. Its commonly located in the lab on any floor.
After picking it up, place it between the two plates and the computer in the corner of spawn.
The Player with Richtofen then places the golden rod between the plates and then spam interact on the computer. The step is done when the rod glows purple, picking it up.
MPD Soul Boxes - Part 2
Head back to the MPD and kill 25 zombies next to the new 3 canisters (75 in total)
Once finished, place the golden rod in the vrill interface, giving you perkaholic
Throw a Q.E.D onto the vril sphere in the interface
Simon Says 2 - Electric Boogaloo
Head back to the Simon Says computers and play again.
Each time you complete a game, A rocket will lift up
Once done, throw a gersh device on the vril sphere (itll be next to the computers)
This will end the Easter Egg and everyone will get Perkaholic.
Origins
Preparations
Turn on the 6 generators to access PaP
Note: Unlike Der Eisendrache, you must build all 4 staffs and their upgrades no matter the amount of players.
G-Strikes
Take a stone from the tank station to the church to clean it with melee kills.
Afterwards take the stone without dirtying it (walk on the wood planks) back to the tank station and melee kill zombies again, until it gives you the G-Strikes
One Inch Punch
Fill the soul box chests around the map to unlock the one inch punch for later
Maxis Drone
Shield
Staffs
Gramophone always spawn inside the excavation site
Black Disk - On some crates facing the church, Left side of PaP or on the wooden platform leading up to PaP
Each Staffs upgrade is the same for its final step, so it will be written last after each staff and their unique upgrade steps
Fire Staff and Upgrade
Base Staff
Red Disk - Around the church
The parts are given out from different things:
Upgraded Staff
Head to the crazy place and Kill zombies with the fire staff on the metal grids to fill the jars
Head to church and find what symbols are lit up on the top floor and shoot their corresponding torches below (with the two dot symbol always being lit)
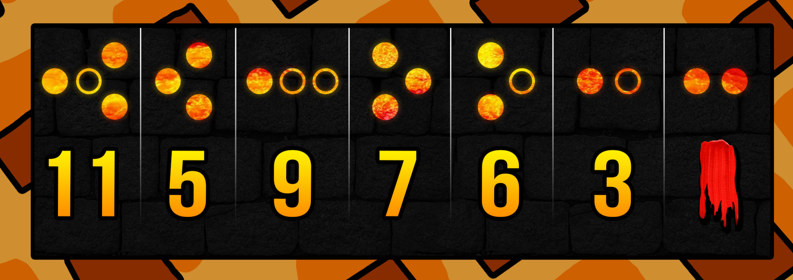 Now complete the upgrade with the steps from “Final Staff Upgrade Step”
Ice Staff and Upgrade
Base Staff
Blue Disk - Tank Station at Generator 2
To acquire the Ice staff parts you must dig during snow rounds with only one part dropping in each of the areas of the map (corresponding with where each robot comes along)
After all 3 parts are acquired, head to the ice tunnel and grab the blue gem, heading back to the excavation site and crafting it.
Upgraded Staff
Head to the Crazy place and shoot the floating tiles corresponding with the ice pillar with a symbol on it to the right
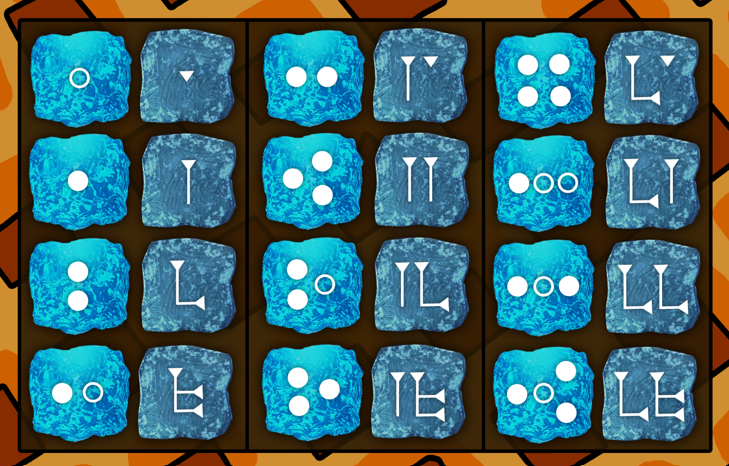 Leave the crazy place and freeze the 3 graves around the map with the ice staff, shooting them with bullets after they freeze
Lightning Staff and Upgrade
Base Staff
Purple Disk - Generator 4
Take the tank around the map to get the 3 parts outside the map
Enter the lightning tunnel and get the purple gem from the crazy place and build the staff in the excavation site
Upgraded Staff
Head to the crazy place again and shoot the bottom row of gems with the image
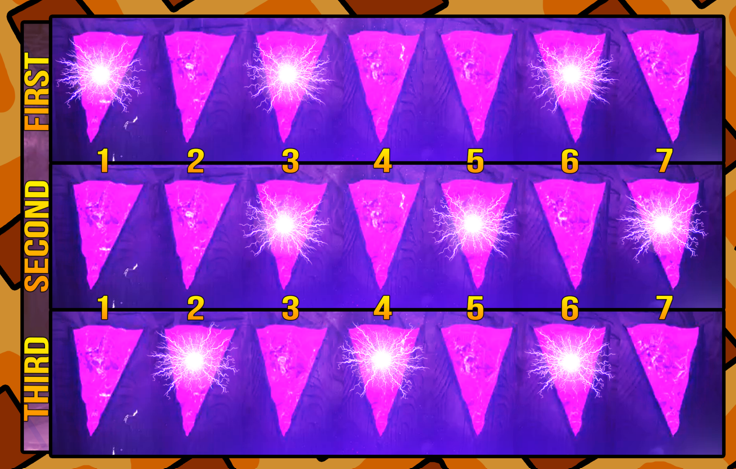 Head back out to turn all the dials in the following orders Note that you can turn the dials at any point in the game and upon reaching this step will be finished already
Wind Staff and Upgrade
Base Staff
Yellow Disk - Generator 5
Enter the 3 robots by shooting the glowing feet and going underneath it as it stomps to get the 3 parts
Enter the crazy place through the Wind tunnel and grab the yellow gem, coming back to the excavation site and building the staff
Upgraded Staff
With the staff, head back to the crazy place and shoot the symbols above you to match the image
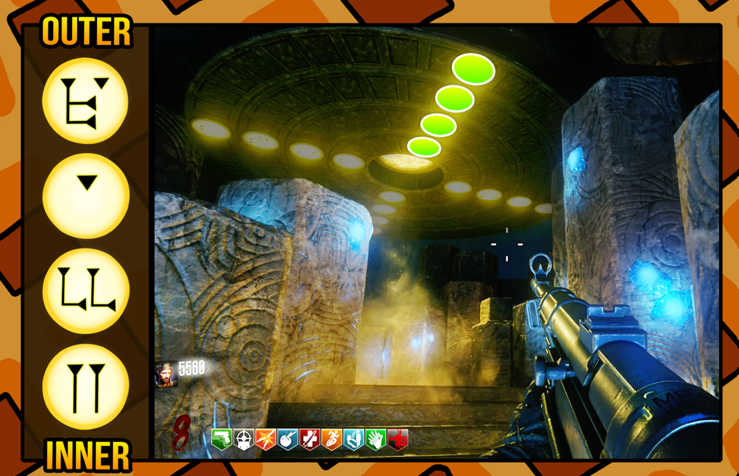 Head back to the main map and shoot the 3 chimneys with the wind staff in the direction of the excavation site. They are located at:
Final Staff Upgrade Step
Head back to the Excavation site and change the colours to correspond with your staff, shooting the ball with your staff after.
Head back into the crazy place afterwards and place your staff in its place, killing zombies near it to then get it back in its upgraded form after filling the soul box.
Main Egg
Step 1 is making all the staffs and their upgrades
Step 2
Place the 4 staffs in their respective places
Step 3
Need G-Strikes and Maxis Drone by now
Enter Odin (Centre) and press the red button whilst someone throws G-Strikes at the patch outside the map near Gen 5 and then once its open the maxis drone (in solo you need to do all of this yourself quickly)
Upon sending the maxis drone it will release a lot of Panzers that don't have much health that you need to kill
Step 4
Enter Zombie blood and shoot down a glowing plane (similar to the fire staff step one).
While still in zombie blood, find the invisible zombie that is running around the centre of the map and kill him to get the maxis drone back (cant be seen without zombie blood)
Step 5
With the One Inch Punch, head to the excavation site and punch the white mist off of the templar zombies (which you can freely kill after).
When you finish this step, a stone tablet will drop upgrading your fists (all players must upgrade their fists).
Step 6
Enter the crazy place and place all staffs in their respective places, kill zombies until there is a white flash on your screen at which you send the maxis drone up through the hole in the roof (you can also take back your staffs). When this is done, all players must stand in the middle and interact to finish the Easter Egg.
Turn on the 6 generators to access PaP
Note: Unlike Der Eisendrache, you must build all 4 staffs and their upgrades no matter the amount of players.
G-Strikes
Take a stone from the tank station to the church to clean it with melee kills.
Afterwards take the stone without dirtying it (walk on the wood planks) back to the tank station and melee kill zombies again, until it gives you the G-Strikes
One Inch Punch
Fill the soul box chests around the map to unlock the one inch punch for later
Maxis Drone
- Brain - Spawn room
- Rotor - Excavation Site, Corner near gramophone or on a crate down the cave
- Frame - in the mud from the left or right of the church or down the ice tunnel
Shield
- Part 1 - between spawn and gen 2, on top of gen 2 tank station or at the end of the trench past gen 2
- Part 2 - Fire tunnel, small room towards gen 3 or near the body on gen 3
- Part 3 - In the robots footstops between gen 4/5 and the Excavation site or behind gen 4
Staffs
Gramophone always spawn inside the excavation site
Black Disk - On some crates facing the church, Left side of PaP or on the wooden platform leading up to PaP
Each Staffs upgrade is the same for its final step, so it will be written last after each staff and their unique upgrade steps
Fire Staff and Upgrade
Base Staff
Red Disk - Around the church
The parts are given out from different things:
- Shoot Down the glowing plane (the part drops around gen 4 and excavation site)
- From activating Gen 6
- Dropped from the first Panzer Kill
Upgraded Staff
Head to the crazy place and Kill zombies with the fire staff on the metal grids to fill the jars
Head to church and find what symbols are lit up on the top floor and shoot their corresponding torches below (with the two dot symbol always being lit)
Now complete the upgrade with the steps from “Final Staff Upgrade Step”Ice Staff and Upgrade
Base Staff
Blue Disk - Tank Station at Generator 2
To acquire the Ice staff parts you must dig during snow rounds with only one part dropping in each of the areas of the map (corresponding with where each robot comes along)
After all 3 parts are acquired, head to the ice tunnel and grab the blue gem, heading back to the excavation site and crafting it.
Upgraded Staff
Head to the Crazy place and shoot the floating tiles corresponding with the ice pillar with a symbol on it to the right
Leave the crazy place and freeze the 3 graves around the map with the ice staff, shooting them with bullets after they freeze- Near Gen 4, outside where the robot steps
- On the side of the hill of the excavation site
- Outside the map at tank station near gen 2
Lightning Staff and Upgrade
Base Staff
Purple Disk - Generator 4
Take the tank around the map to get the 3 parts outside the map
Enter the lightning tunnel and get the purple gem from the crazy place and build the staff in the excavation site
Upgraded Staff
Head to the crazy place again and shoot the bottom row of gems with the image
Head back out to turn all the dials in the following orders Note that you can turn the dials at any point in the game and upon reaching this step will be finished already- Tank Station - Down
- Spawn - Left
- Wind Tunnel Entrance - Up
- Church top floor - Up
- Church Bottom Floor - Right
- Gen 5 - Down
- Excavation Site - Up
Wind Staff and Upgrade
Base Staff
Yellow Disk - Generator 5
Enter the 3 robots by shooting the glowing feet and going underneath it as it stomps to get the 3 parts
Enter the crazy place through the Wind tunnel and grab the yellow gem, coming back to the excavation site and building the staff
Upgraded Staff
With the staff, head back to the crazy place and shoot the symbols above you to match the image
Head back to the main map and shoot the 3 chimneys with the wind staff in the direction of the excavation site. They are located at:- Generator 4
- No Mans Land near Church (opposite the tanks direction)
- Left of stamin-up on Generator 5
Final Staff Upgrade Step
Head back to the Excavation site and change the colours to correspond with your staff, shooting the ball with your staff after.
Head back into the crazy place afterwards and place your staff in its place, killing zombies near it to then get it back in its upgraded form after filling the soul box.
Main Egg
Step 1 is making all the staffs and their upgrades
Step 2
Place the 4 staffs in their respective places
- Fire - centre in the excavation site
- Ice - Freya (Church) robots head
- Wind - Odin (Centre) robots head
- Lightning - Thor (Spawn) robots head
Step 3
Need G-Strikes and Maxis Drone by now
Enter Odin (Centre) and press the red button whilst someone throws G-Strikes at the patch outside the map near Gen 5 and then once its open the maxis drone (in solo you need to do all of this yourself quickly)
Upon sending the maxis drone it will release a lot of Panzers that don't have much health that you need to kill
Step 4
Enter Zombie blood and shoot down a glowing plane (similar to the fire staff step one).
While still in zombie blood, find the invisible zombie that is running around the centre of the map and kill him to get the maxis drone back (cant be seen without zombie blood)
Step 5
With the One Inch Punch, head to the excavation site and punch the white mist off of the templar zombies (which you can freely kill after).
When you finish this step, a stone tablet will drop upgrading your fists (all players must upgrade their fists).
Step 6
Enter the crazy place and place all staffs in their respective places, kill zombies until there is a white flash on your screen at which you send the maxis drone up through the hole in the roof (you can also take back your staffs). When this is done, all players must stand in the middle and interact to finish the Easter Egg.
Final Thoughts
Thank you for using this guide! Make sure to like and favourite if it helped you out and share it around for if anyone else needs a hand.
Also let me know if there are any issues with the guide (wrong, misspellings etc.) so I can fix them up.
Images for the Origins Staffs are from FreeMetal's Guide
30th of July, 2024 - Added The Giant and "thoughts before starting"
5th of August, 2024 - Added Zetsubou no Shima, Ascension and Gorod Krovi, as well as "final thoughts"
22nd of August, 2024 - Added Revelations and Moon
9th of September, 2024 - Added Shangri-La, Der Eisendrache and Origins. Also updated Final Thoughts as well as finish up the guide (and clean up some parts)
7th of November, 2024 - Changed title to include "BO3 Zombies" as I made other versions of this style of guide for other games as well as added a section for my other Zombies Guides.
- Removed my Giant guide and Deleted the guide itself as I came to dislike it and felt it wasn't needed (as other guides much better and more in depth then it existed already)
7th of December, 2024 - Added small tip to lightning staff upgrade step
17th of June, 2025 - Updated images to be uniform with my other guides
Also let me know if there are any issues with the guide (wrong, misspellings etc.) so I can fix them up.
Images for the Origins Staffs are from FreeMetal's Guide
Updates
23rd of July, 2024 - Uploaded guide with Shadows of Evil30th of July, 2024 - Added The Giant and "thoughts before starting"
5th of August, 2024 - Added Zetsubou no Shima, Ascension and Gorod Krovi, as well as "final thoughts"
22nd of August, 2024 - Added Revelations and Moon
9th of September, 2024 - Added Shangri-La, Der Eisendrache and Origins. Also updated Final Thoughts as well as finish up the guide (and clean up some parts)
7th of November, 2024 - Changed title to include "BO3 Zombies" as I made other versions of this style of guide for other games as well as added a section for my other Zombies Guides.
- Removed my Giant guide and Deleted the guide itself as I came to dislike it and felt it wasn't needed (as other guides much better and more in depth then it existed already)
7th of December, 2024 - Added small tip to lightning staff upgrade step
17th of June, 2025 - Updated images to be uniform with my other guides
All my "One-Stop Guides"
Treyarch/Main Zombies
Black Ops 1
TBABlack Ops 2
TBABlack Ops 3
https://steamcommunity.com/sharedfiles/filedetails/?id=3295182437Black Ops 3: Custom Maps
https://steamcommunity.com/sharedfiles/filedetails/?id=3450315962Black Ops 4
PLEASE JUST ADD THIS TO STEAM LIKE COME ONBlack Ops 5 (Cold War)
TBABlack Ops 6
https://steamcommunity.com/sharedfiles/filedetails/?id=3500995295Black Ops 7
Not ReleasedNon-Treyarch/Main Zombies
Advanced Warfare
TBAInfinite Warfare
TBAWWII
TBAVanguard
TBAModern Warfare III (2023)
TBA
More Call of Duty: Black Ops III guides
- All Around Enhancement Mod Description And Info★ 5 (597)211k views1.2k ♥34 minUpdated Aug 10, 2023
- Black Ops 3: Console Commands★ 5 (1.1k)123k views2.4k ♥7 minUpdated Feb 13, 2020
- Origins Ultimate Guide★ 5 (562)72k views1.7k ♥17 minUpdated Jun 24, 2017
- Guide for Shadows of Evil [2020 updated]★ 5 (1.4k)67k views4.5k ♥24 minUpdated Mar 22, 2024
- Guide for Der Eisendrache [2020 updated]★ 5 (1.3k)65k views4.6k ♥30 minUpdated Feb 22, 2024
- How to download the community T7patch by Serious and play online zombies safely (also FPS Fix)★ 5 (491)62k views1.2k ♥4 minUpdated Apr 30





This guide was created by its original author on the Steam Community. Are you the author and want it removed? Request removal.