Prison Architect Mega-Guide [V.1.7]
A note on units:
1 square = 1m2 = 1m x 1m
5 days = 120 game hours = 1 year of a sentance
[Note - in large prisons, any prison started on a large map without taking into account land bought at a later time, a TimeWarp factor of 50% is applied to help reduce the effect of walking. This means in large prison 5 shown days = 120 shown game hours = 240 mechanical game hours (for mechanics like needs) = 2 years of sentance]
Warden Options
At the start of your prisons life, before you even place the first foundation or wall, you will have to choose a warden. This warden will represent your omnipotent character and comes with a variety of bonuses depending on the warden. There are a total of 6 wardens to choose from:
The Warden - The default warden with no special bonus or abilities. You do your job and pick up your paycheck. A simple worker looking to live a simple life.
The Lobbyist - You run the prison for profit and bribe whoever you need to in pursuit of lower risks. All prisoners arriving at your prison have half the chance of possessing Violent, Lethal, or Deadly traits. Who wants to house dangerous prisoners anyway? It’s just unprofitable.
Rita - You’re the boss. you love being the boss. You love the feeling of crushing prisoners under your autocratic heel. All prisoners with the Stoic and Fearless traits have the effects of that trait diminished, and all prisoners are suppressed twice as fast. Remember to feed the office gimp once a week.
J.W. Periwinkle - Years of service in Vietnam led to years of suffering in a POW camp deep in Vietcong territory. As such, you know a tunnel when you see one. Guard Dogs have a 50% chance to uncover tunnels they detect. That’s Major Periwinkle to you.
The Pacifier - You might be naturally calm, or simple. Either way you’ve found zen in the universe and don’t get riled up by anything. Prisoners respond with a 25% drop in prison temperature.
Saphara Acknova - Corruption is a nasty word. You prefer to call them unlisted services. Every prisoner caught with contraband is fined a small fee to not disappear forever, and you make a small profit from reselling the items recovered. All hypothetically of course.
Prison Gender
The Prison
Rooms:
Holding cells
Regular Cells
Dormitories
Dormitories are the second type of cell designed for permanent use. It functions similarly to regular cells or holding cells depending on their design, with multiple prisoners able to inhabit each dormatory simultaniously. The base size of a dorm is the same as regular cells (2X3) however it can house one additional prisoner per 4m2 provided there are sufficient beds.
There are two ways to treat dormitories. The most obvious is as a large multi-prisoner cell with basic amenities as housing for a larger prison. Such a design is still designed around a traditional cell based prison and requires prisoners interact with prisoners outside of their assigned dorms. Such a design can allow prisons to house more prisoners at the standard costs of dorm use, increaced privacy need and much more time for prisoners to instigate fights or murder.
The second way dorms can be used is as a shared multi-function prison area. Using dorms in this way entails providing as many prison functions as possible into large dorms with the intention of only releasing prisoners to other areas when needed for work, feeding, or visitation, etc.... This method also creates the standard dorm tradeoffs but can be used to allow far greater freedom of movement for lower security prisoners to fill their needs.
Solitary
Kitchen
After you have somewhere to house your prisoners you will need to keep them alive. The next step should be the Kitchen to provide food. Again the kitchen has no optimal size however as a general rule you will need:
For ease of calculations assume 1 - 3 sinks will be enough to clean used trays until you notice otherwise, because of the variable time-span between meals in regimes the effectiveness of the sink isn't fixed.
All items quantity need to be rounded up to avoid starving prisoners.
As well as providing food the kitchen also produces a large amount of contraband in the form of knives, forks, and spoons. All these items are made of metal so a metal detector and guard on the kitchen door will stop most contraband from entering your prison population. Due to the use of this contraband as a weapon it is best to keep max sec prisoners and particularly those with the volatile, snitch, or ex-law enforcement traits out of the kitchens to avoid incidents.
Canteen
Shower Room
Yards
Common Rooms
Libraries
Chapel
After you can fill prisoner needs and prevent riots you can start to use prison labor. Working prisoners have a lower re-offending rate and generate money or services for your prison. To use prison labor you will need to research the 'prison labor' option under the maintenance tree of the bureaucracy tab. This required both a warden and foreman and carries a cost of $1,000.
Laundry Room
Workshops
Export area's are the other part of the workshop cycle. Finished goods ready for export are collected there ready to be loaded onto trucks. The movement of good is facilitated by either prisoners or staff workers depending on access rights to the area.
Cleaning Cupboards
Staffrooms
Kennels
Armoury
(For more information about the different types of guards skip ahead to the appropriate section)
Infirmary
Morgue
Security Room
(For more information about the different security methods skip ahead to the appropriate section)
Execution Chamber
Office
Parole Rooms
Prisoners released who do not re-offend grand an instant payout of $3,000. Prisoners may become angry if they are denied parole so have a guard in the room to protect your staff.
Reception
As well as searching new prisoners the reception will also distribute fresh uniforms and as such needs to be serviced by a laundry.
Mail Room
Visitation Rooms
The visitation room can be any size but must contain either visitor tables or visitor booths. Each of these items is capable of handling one prisoner and their family at a time.
Shop
The shop is able to sell items to satisfy most prisoner needs and so may help struggling prisons prevent rioting, however it is also a potent source of contraband so precautions are required to prevent it from being more trouble that is solves.
Other Rooms
Guard Types
Guards
Armed Guards
Dog Handlers
Sniper Guards
Snipers are the most expensive type of guard in the game with a hiring cost of $2,000 and a wage of $500, so use them efficiently to save cash.
Unhirable Guards
If you enter the failure state for too many continuous riots National Guard guards will arrive wielding powerful assault rifles. They will quickly take over the prison and kill any prisoner who doesn't surrender. If they arrive you have lost the game and lose all control of the prison.
Security Methods
Guard Towers
The ultimate in anti-escape systems, the guard tower acts as a lethal solution to all your prisons problems. Guard towers must be unlocked through the bureaucracy tree after the armoury.
A guard tower can be manned by a sniper guard before an armoury is built. In this capacity it functions as a secure lookout point with a long line of sight at the cost of creating constant suppression within their watched area. If your prison does have an armoury constructed however these guards will arm themselves with sniper rifles. Once armed the guards have a greater suppressing effect on prisoners and become able to shoot troublemaking or escaping prisoners.
Armed snipers will engage only if certain conditions are met. When those conditions are not met the guards may fire warning shots at all troublemakers, but will not hit them, with the same chance of causing the prisoner to surrender as other gunfire. The conditions for elevating response to lethal fire are:
- The targeted prisoner is outside the prisons outermost walls, with no barriers between them and the edge of the map
- Freefire mode is manually turned on
- Multiple warning shots have been fired and the prisoner is still causing trouble
A red laser line will appear between the sniper and its intended target when aiming.
A Sniper’s fire range is unknown, however estimates vary between 40 and 100 meters.
CCTV
Phone Taps
Entrance and Road Design
Example
An example prison entrance: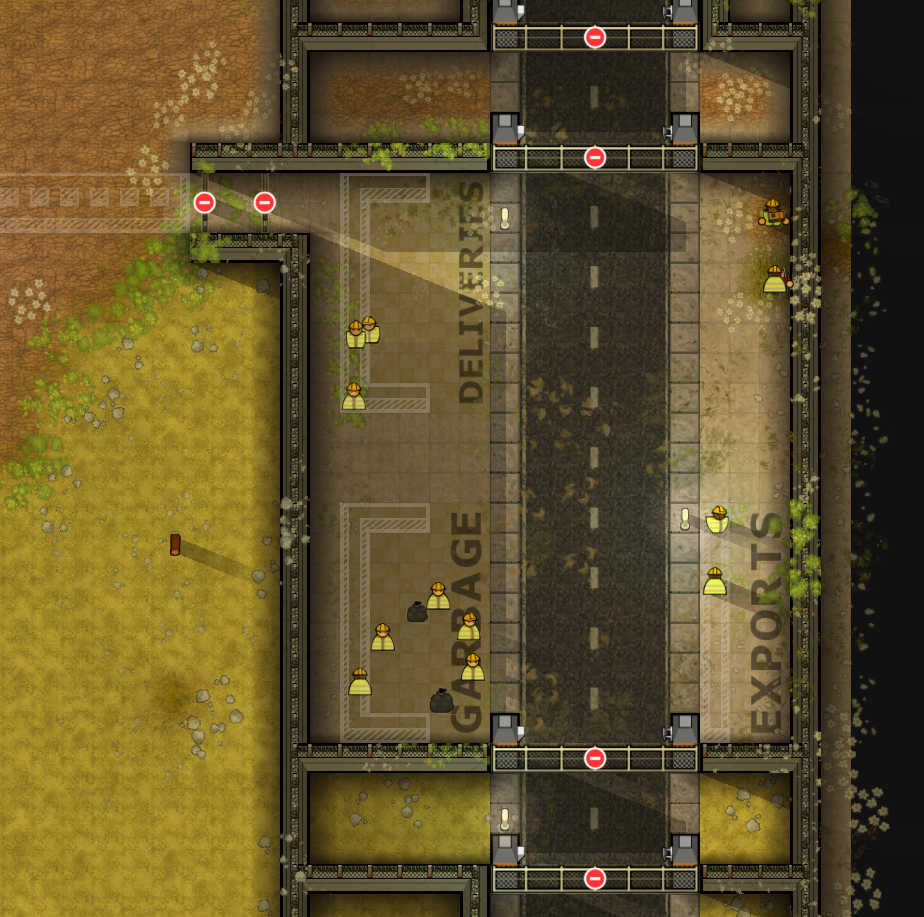 Regular View
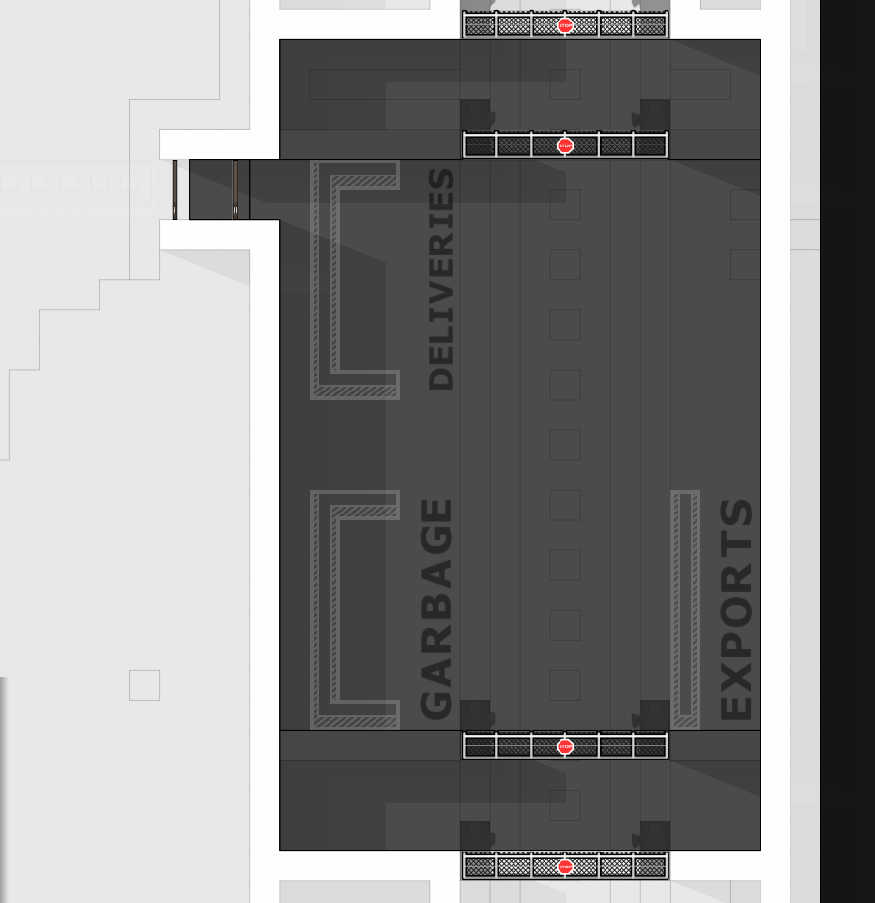 Permissions view
[Note - a storage zone can be added above the export room and across the road from the deliveries area] shows one of many ways to create a secure air-locked entrance with a 15 meter road clearance to prevent contraband throw-ins. In this design the middle of the large map has been marked with a 2-thick plan line seen extending from the 2-wide path. This lines up with the two blocks at the top of the default delivery zone and knowing that will help you line up your design with the edge of the standard map. In this design the road adjacent area is set to staff-only, however this limits the export zone [mentioned in elsewhere in this guide] to only being fillable by staff workers and not prisoners. Due to the double road gates and accompanying double wall prisoners could be trusted in this design so long as they are supervised and pass both dogs and metal detectors before reentering the main prison facility. The gap between each set of gates should be over 4 meters so the first gate can close behind a truck before the second one is opened. It should be noted that this design is very secure and features the ability to extend into a double perimeter wall with a 15 meter anti-contraband gap making it fully secure against all non-violent incidents.]
Any entrance with 2 monitored doors or gates between the prisoners and the open road can be deemed secure however, and a single perimeter fence works just as well in designs where the exterior 15 meter area is indoors or otherwise designated staff only. [Note - This design places a wall in the last free-build square before the edge of the map. Prisoners digging under the road to escape will produce a tunnel on the edge square and are impossible to destroy without buying a land extension. All other tunnel squares can still be destroyed as normal however, rendering this problem mostly cosmetic.]
Road Management
You have one road from the start of the game. It runs down the right side of the map and acts as the only route for all items and persons entering and leaving the map.
The road has two sides although all spawns occur at the top of the map and all despawns occur at the bottom. This splits traffic into three types.
Foot traffic is the first type. It appears on the left side of the road and walks down any path provided. This kind of traffic includes family members heading for visitation and non-hirable staff walking to their regimed programs.
The Left Lane of traffic deal with all normal day-to-day transport. Unlike foot traffic spawned trucks and busses cannot pass each other so congestion will build up if they are not emptied in a timely fashion. Trucks arrive loaded with items and materials for construction and workshops, raw food for kitchens, and any other items ordered. After deliveries trucks can be loaded with garbage or produce from your workshop or forestry to export. Each truck is 7 metres long and can hold 8 items.
Buses will spawn with shackled prisoners, and can only transport prisoners. They are the same size as trucks and hold 8 prisoners.
By contrast the Right Lane deals with exceptional and rare traffic. Hearse are the most common vehicle to use this lane. They spawn on prisoner deaths and wait for the body to be loaded by a guard.
The next most common spawns are the ‘Emergencies’ options Fire engine, Paramedic, and Riot Police who use the less congested lane to speed up deployment time.
This lane is also used by national guard units during some failure states.
Key Factors
When designing an entrance several key things should be considered. To put the in a simple list: How close will prisoners get to the road and/or the open edge of the map to escape? [if it is less than 2 secure and monitored doors then you may have problems], Can items or contraband enter the prison without being checked [Metal detectors and dog patrols are useful here.], and perhaps most importantly how will the entrance cope with the quantity of trucks and visitors it is expected to handle while remaining difficult to escape [Easy mistakes involve placing road gates too close together so both must be open simultaneously, or forgetting to make the space between gates staff-only]. Aside from that all design is and should be up to you. The game is all about creativity so don't get bogged down thinking that example is either the only or best solution. It is neither.
The standard 5X8 delivery and garbage zones provided at the start of every game are more than adequate to sustain the daily operations of even very large 1000+ prisoner prisons, however the delivery zone can quickly become saturated during expansions and is only able to contain 40 new items at a time. Assuming the fittings for a standard cell includes 1 door, 1 bed, and 1 toilet this is only enough room for 13 new cells. Once entertainment items are added this becomes even less. During these expansions consider building a storage area closer to the construction area before ordering the parts so they will spawn inside the prison. This reduces the amount of items which must pass through the entrance and prevents the road becoming blocked by loaded trucks.
Storage zones are also where deconstructed or deleted items are sent. This means that you do not recuperate the costs of dismantled or cancelled items, however if you place an identical object it will cost nothing and the stored object will be used by workers. The number of each object you have in storage is easily readable in the ordering tab on the bottom half of the object image.
The Prisoners
Prisoner Privileges
While inside your prison prisoners are assigned cells automatically. The cell assigned to an individual prisoner is determined by the prison cells quality rating and the prisoners privilege rating. The cells rating is determined by the factors given above (size, objects, view, etc...) while the prisoners privilege is determined by the time since their last incident. The long a prisoner lives without causing an incident the better the cell they deserve up until the limit at quality 10.
Prisoners who enter your prison new have a prisoner privilege of 3 fixed for the first three days as this number allows them to move straight into the lowest quality individual cells if such cells are free. Prisoners who do cause incidents have their privilege reset to ‘0’ and must move into holding cells or extremely basic individual cells until they can regain some privilege.
The check a cells privilege you can enter the Room Quality view through the appropriate button in the logistics tab. This will show you two numbers for each cell with the left number representing the privilege demand of the occupying prisoner, and the right number showing that cells quality rating. Guards will move prisoners to appropriate cells as needed however prisoners will not be moved into cells too different from their deserved quality [Note - At current a prisoner may only occupy a cell two ranks higher than their privilege meaning rank 2 cells are required to house offending inmates immediately] and may be moved back to holding cells if they cause an incident and appropriate quality cell is not available.
While living in cells which are better than your prisons average prisoners will be less likely to cause incidents, while the reverse is true for those living in cells worse than the prisons average.
Prisoner Cash
As well as gaining cell privilege for good behaviour prisoners will be rewarded with cash in exchange for work. If your prison has a functional shop this will incentivise some reform programs and make prisoners more likely to voluntarily apply, and pass, those courses.
Prisoners are paid 50 cents ($0.50) per hour of work completed and also gain small amounts of money from relatives during visitation. They can use this money to buy items in the shop for $5 each.
Due to the fact prisoners are paid by the hour instead of useful work done oversized and overpopulated work rooms may be attractive prospects. They will grant the prison warden better control over prisoner income and thus prisoner access to shop items.
The reverse side of this prisoner cash system is its interaction with gangs which can be read about in the gangs section.
Security Levels
Security Levels are the most obvious differentiation but the security level of an imported prisoner actually tells you very little. The security level does however affect the payment received for each prisoner.
Minimum security - $300
Medium security - $500
Maximum security - $1000
Death Row - $2500
All prisoners pay a fixed $150 per day incarcerated.
Traits
The real information comes in the form of a prisoner's traits and reputations. Traits first:
Clever - Trait allows a prisoner to dig out of your prison. Only possessed by around 20% of the prison population.
Controlling - No known effect on prisoner behavior.
Destructive - Trait makes prisoners more likely to cause physical damage to your prison when needs are not met.
Fraud - No known effect on prisoner behavior.
Lethal - Trait makes prisoners more likely to kill others either in direct stabbings or by beating them to death.
Narcotics - Trait makes prisoners 'drug' need greater, causing them to seek out narcotics more vigorously and causing more severe unhappiness/agitation if narcotics are not available.
Petty - Trait makes a prisoner more likely to engage in petty and non-violent crimes within your prison. Contraband being the main form.
RisksLife - Trait makes prisoners more likely to attempt escape and less likely to surrender.
Sexual - No known effect on prisoner behavior.
Theft - Trait makes prisoners more likely to steal contraband if needs are not met.
Vehicular - No known effect on prisoner behavior.
Violent - Trait makes prisoners more likely to instigate or join riots, fights, or other physical assaults. [Note - different to 'lethal' in that the prisoner's goal is to have a fight, not to kill. Most victims should be rendered unconscious and wounded unless combined with another trait or reputation.]
Traits are not directly visible in-game however there are ways to see them in the save games text file. Traits are associated with some crimes however. Most of these are self-explanatory but ones to watch are IndieVideoGamePiracy, VideoGamePiracy, MoneyLaundering, InsiderTrading, FalseAccounting, and CounterfeightingCurrency as they require the trait 'clever' and so make that prisoner an increased escape risk [Note - these crimes require the clever trait and make the prisoner a guaranteed escape risk, but all prisoners can possess the clever trait regardless of their crime] [Note - It has been suggested that prisoners may be innocent of their crimes so they might not always give an accurate representation].
Reputations
The in-game helpful versions of traits are called Reputations but don't show as much information.
COP KILLER makes the prisoner a target for guards. They are much more likely to be beaten to death when subdued for disobedience. They generally don't live long but may have their chances improved by detention in a protected wing with fewer guards and less reasons to become involved in an incident.
DEADLY makes the prisoner more lethal in combat. They can often kill in 1 hit and so should be treated with great care so as to avoid them being able to kill a rooms guards and instigate a riot. If paired with 'volatile' set the prisoner to max sec or supermax immediately.
EX LAW ENFORCEMENT makes the prisoner a target for other prisoners. They are much more likely to be attacked and killed by other prisoners for no reason. Place in protective custody whenever possible or they don't live long in the general population.
FEARLESS makes the prisoner less easily intimidated. They are less likely to surrender during riots or after incidents. Sometimes they must be beaten to death in order to be subdued unless tazers are available to take them down.
INSTIGATOR makes the prisoner able to start trouble indirectly, prompting other prisoners to start incidents. As a major riot risk if allowed to spark multiple other incidents simultaneously you may want to keep them subdued, or not want to risk taking them to high sec.
QUICK makes the prisoner faster. It's that simple. When they run they will outpace your guards but that's all.
SKILLED makes the prisoner able to disarm guards and steal their weapons without having to knock them unconscious first.
SNITCH makes the prisoner a target for attack the same as ex-law enforcement. Move them to protective as soon as possible or they will die.
STOICAL makes the prisoner impossible to suppress in solitary confinement. They are thus more likely to attempt to escape solitary cells when their needs fill up in the small uninteresting room. They are also harder to reform and so retain the compulsion to commit crimes and incidents throughout their sentence.
TOUGH makes the prisoner tougher. They can withstand tazers and gain protection against physical damage and are thus harder to subdue.
VOLATILE makes the prisoner liable to start violent incidents for no reason. Depending on your prisons supply of max sec cells you may want to set all volatile prisoners to max sec so they don't start fights in general population.
All these traits can be altered by Modifier Words in them such as 'Extremely' and 'Very'. These just signify a higher form of the reputation and make the effect more pronounced. Not all reputations can be modified like this however.
Gangs
Within your prison the prisoners will organize themselves into various gangs if you have the appropriate option turned on in the difficulty menu. These semi-unified prisoners can become a problem as they are far less likely to seek reform and more likely to become involved in violent altercations. Gang members are more likely at higher security levels and arrive already members of the gang. Gang members are visually identifiable by full body tattoos which are unique to each gang as well as though the gang tab in the intelligence menu. The gang menu will also track each individual gangs current member count and kill total to evaluate the most problematic gangs.
Within each gang members will attempt to assist each other if one becomes involved in a fight against either another prisoner or prison guards. This can quickly lead to lone guards becoming mobbed by gangs if unsupported or cause riots if a fight breaks out between gangs as both sides will flock to join the fight.
To assist the gang members in their fights each member is more likely to steal contraband such as weapons and more likely to carry those weapons rather than hide them for later use. Gang members will avoid all voluntary reform programs and voluntary work shifts and so are difficult to reform. As well as the effect of this refusal to work on reform it also means that gang members are less likely to have spare cash to buy store items. This can lead to unhappiness if they are unable to fulfill needs elsewhere and makes even non-volatile gang members more likely to start a fight, however gang members have an alternative source of income through intimidation and protection schemes if they own an area of territory [More about that later when we cover gang territory mechanics].
At the top end of a gang's structure are Gang Leaders. These are random legendary prisoners who will take over all members of their gang upon entering the prison and dictate that gangs actions from then on. Initially this involves promoting Gang Lieutenants (up to a about of 1 lieutenant per 10 gang members) who will interact with the territory mechanics (again, more on that later) as well as initiating non-gang members into the gang to grow their strength. Gang Leaders also affect the mood of all other gang members with punishments such as solitary or lockdown causing other gang members to become aggravated. Similarly, if a Gang Leader dies inside your prison all active gang members will riot.
Gang Lieutenants and Leaders will avoid trouble at all costs.
Territory
As well as causing general trouble prisoner Gangs will attempt to cut out a place for themselves inside your prison. This involves capturing and running territories that can be single rooms or entire cell wings depending on your prisons design. All territories, claimed and potential, are shown in the gang view map. To capture a territory the gang must have a leadership hierarchy that includes at least one Lieutenant who will gather a group of lower gang member to make a ‘play’, and have sufficient numbers of gang members able to access the territory to take the area from other gangs. During this initial time the gang members will gather around the acting lieutenant before moving into the territory. At this stage the gang members (NOTE - not the lieutenant. He will return to his cell to stay out of immediate trouble) remove their shirts to show their gang tattoos as an immediate sign they are making a play.
Inside the territory the gang members will invite a fight from a rival gang, but take no action against non-gang members or guards. The territory will be taken by the gang after around 1 hour if no other gangs fight back, in which case the territory will remain unowned.
All territory plays will fail if the number of guards within a territory is more than the number of prisoner required to take it as this will mean the guards ‘own’ the territory in an unclaimed limbo.
Once the territory is taken it will becomes owned by the gang. This means that members of other gangs will not enter that territory for fear of being beaten, and non-gang members must pay tribute/protection to the gang in order to stay within the territory and use associated items to fill their needs (This extortion is worth roughly $1 per prisoner per hour). The owning gang will continue to show their force within the territory to maintain control by flooding the area with gang members.
Additionally, territories owned by gangs cannot be rezones, dezoned, deconstructed, constructed, or otherwise controlled by the warden.
There are two ways a controlled territory will be lost for a gang. The first involves losing it to another rival gang. These plays are initiated when an attacking gang can significantly outnumber a defending gang's territory maintenance plays. During these plays members of the attacking gang will enter the territory by force, beating any defending gang members who enter the area. During this time the attacking gang will control themselves to avoid being removed by the guards. This means that only one or two attacking members will initiate violent actions against each defender.
Defending gangs may withdraw completely if sufficiently outnumbered, as will be the case in most successful plays, but if numbers are even the play may spark widespread violence.
The second way a gang may lose its territory is by Forced Eviction. This involves using security guards to evict the gang members. To begin the process of evicting a gang from an area press the ‘Eviction’ button in the gang view. This will immediately make all gang members inside the territory hostile and encourage gang members from outside the territory to enter the zone as lieutenants made plays to defend the zone. The get around some of this initial violence you should have guards placed in or around the territory prior to starting the eviction process [Note - If you move a large number of guards into a held territory prior to the eviction process the defending gang will make a preemptive play to defend by moving gang members into the territory]. When taking a territory you are still vulnerable to the ‘prisoner death’ failure state.
If the eviction button is left ‘on’ for 24hours and the defending gang is unable to make a successful defensive play the territory is reset to ‘unclaimed’. Once again, the gangs play will be proportional to the opposing force.
During plays and mass-punishments gangs are unable to field their full member base at will. This provides easier opportunities for evictions by your guards or other gangs.
Intake
The security status or risk of the prisoners you import will drastically change their likelihood of possessing the more negative traits and reputations, and can even give them multiple reputations. Prisoners with many modified traits are called Legendary Prisoners and will usually have 'Extremely Volatile' and 'Very Deadly' although some Legendaries will be less dangerous. Should you choose to keep them alive be aware that combination is a great way to lose guards since the prisoner will attack at random times and kill in the first hit. Legendary prisoners can only be found among high security inmates and should be treated as supermax.
You can select how many prisoners arrive each day using a slider in the ‘prisoners’ tab of the Reports menu. These prisoners can be specified by security rating using sliders at the top of the tab.
Additionally you can set intake to maintain either maximum prison capacity or a defined total number and prisoners will continuously intake prisoners to meet that limit. These methods also work exactly to the ratios of prisoner levels set above and do not take into account the number of beds you have designated for each security level.
All prisoners arrive from a perpetual pool of possible prisoners limiting the amount that can be taken in at once. This pool will grow constantly while not being emptied and gains prisoners in relation to the current ratios selected. These ratios are shared between prison and pool intake so as to ensure backlogs of unwanted prisoners are minimal.
Defining Security Levels
Deployment - Prisoner Access
Within your prison, prisoners will be free to wander within all secure zones by default. This includes all indoor and outdoor areas right up to the outer gates. This movement can be controlled using the ‘Deployment’ tab to restrict each secure area to one access type. These options are for each individual security level from minimum to maximum plus supermax and protective. Indeed prisoners in need of protective security require areas marked as ‘protected only’ areas to prevent all mixing with other prisoners.
Additionally there exist options to make a space ‘Shared’ which opens it for use by all prisoner levels, Staff-only which blocks all prisoners from an area, and ‘Unlocked’ which opens all doors in that zone and renders it unsecure.
These deployment zones only affect prisoners, so staff and family members will continue to use the most direct path regardless.
Deployment zones can be used to create airlocks within your prison by making rooms marked staff-only between your prisoners intended areas and their unintended ones. A guard positioned in this kind of airlock will automatically attempt to capture any prisoners attempting to flee before they actually leave your secure area.
Internal airlocks can use a specific security level for similar results, keeping prisoners from wandering into the wrong areas from when traveling to or from shared spaces. In more complex setups these kinds of airlock can also be used to prevent specific security levels from entering shared space, provided multiple access points are provided with a range of security deployment levels. As deployment zones don’t currently allow the exclusion of specific security levels directly this is a bulky workaround.
Confidential Informants
To start with only half your incoming prisoners will show their reputations in the 'character' tab of their sheet or the 'informant' view. Confidential Informants are a way of increasing that. To recruit a CI you must first send them to solitary. While there recruit-able CI's will be marked with a yellow ring when looking in the 'informant' tab of the 'Intelligence' window. If a prisoner has that option you recruit them in the 'information' tab of their individual character sheet. All information they find in your prison will be shown in that informant view.
CI's can also find contraband, however they must be activated to do this. To activate an informant select 'activate' from the drop-down box next to their name in the informant view and wait. They will make their way to the security office and raise a little suspicion in the process. Once at the security room the CI will tell you everything they know and it will update the map accordingly. When using informants to prevent contraband flow it is wise to release the CI before taking action as to do otherwise increases their suspicion levels. If the suspicion level becomes too highthe CI will have his cover blown. The current suspicion level of all CI's is shown as a red bar next to their name in the informant view with a smaller red line to mark the maximum suspicion level each CI has survived previously. As each CI's maximum suspicion level before their cover is blown is different but static this maximumm previous point can be considered a safe benchmark for future actions.
If a CI's cover is blown they will become a prime target for attack and they should be moved to protected status immediately to avoid death. The longer a prisoner is in the security room the more suspicious others will become. Suspicion is also increaced by any search actions ordered while a CI is activated within the security office.
Suppression
Work And Education is a fairly major part of the prison experience. Prisoners will work or learn during specified hours according to the regime [more about that in the next part] but they do have some basic requirements. The main requirement being that prisoners will not enroll in voluntary classes such as workshop tutorials or classroom educations when suppressed. Suppression also makes the prisoner walk slower so even those programs they are signed up for are much more likely to be failed as the prisoner will miss most of the actual teaching, or can't pay attention to the class [joke about school goes here]. Suppression is gained by the presence of armed guards or solitary confinement, dog handlers and regular guards do not contribute to suppression.
Prisoners with the ‘Fearless’ trait are not suppressed by armed guards.
Prisoners with the ‘Stoic’ trait are not suppressed by solitary.
Contraband
Contraband is something this guide has mentioned a lot. To gain a full understanding of contraband it must be thought of as Schrodinger's Shank. When prisoners are in a room which spawns contraband the game runs several checks. First it checks the prisoners needs and checks if a contraband item available would fill one of those needs, next it checks suppression status, and finally it runs an RNG. This means there are many random parts of the contraband equation. The RNG is beyond largely player control but can be affected by the amount of contraband to have enter the room via imported items in some cases as all imported items have a chance to contain random contraband items.
A happy prisoner won't steal nearly as much so use of entertainment items, free time, and even some programs can manage contraband levels where dogs patrols and metal detectors seem to be failing.
Contraband can be exchanged between prisoners in public spaces such as the yard or common room for cash. The price of contraband on this black market is determined by the supply:demand ratio.
Thermodynamics
Heat makes everyone a little weird, just look at Florida. Cold will also send you Hákarl. To keep your prisoners temperature need under control you’ll need to control the flow of heat throughout the prison at all times.
Heat is calculated for each square metre so there may be multiple temperatures even within the same room. Heat bleeding is never transferred outside although it will.
Heat leaching is increased by the presence of windows and doors compared to solid walls, although an open door will leach the same heat as a closed one regardless of door type.
The ideal standard prisoner temperature is 20°C/68°F.
Heat
Heat is generated by cookers, power
stations, and boilers. Excessive heat may cause prisoners to become uncomfortable. Prolonged exposure to such temperatures will cause an increased risk of misbehaviour including but not limited to fighting and rioting.
Heat can also be generated by radiators to combat the other temperature extreme. No amount of radiators will raise the ambient temperature above 20°C/68°F however, so overheating is not a risk.
Heat is also a factor in the Hot Water utility, which is required to operate radiators, with more information on this found in the utilities section of this guide.
Cold
Cold areas can be warmed using radiators, with each single radiator able to heat a large area
Seasons and Weather
Seasons
Weather Events
Overcast
Overcast weather, known as the peak of British summer, makes the ambient temperature cooler than the seasons natural variability would suggest.
Snow
During snowy conditions prisoners will gain warmth need much faster than under regular conditions. Under this temperature extreme prisoners who remain outdoors for too long may become injured by exposure, with death a possibility for prolonged exposure.
Rain
Cold and miserable, rain has always been a compelling reason to stay inside. Prisoners will prefer to remain indoors during the rain shower, but if they are forced outside their needs for comfort, warmth, and clothing will rise significantly.
Torrential Rain
Torrential rain works like rain, but it’s more torrential. It’s all in the name. Be ready for significant flooding and rapid needs spikes. This is a rare event by comparison however so don’t expect to face it very often.
Heatwave
Heatwaves bring a risk of overheating not only to prisoners who spend too long directly exposed to the weather outdoors, but also inside your prison if heat dissipation/generation is poorly managed. While prisoners do not face health risks from excessive heat they may become more likely to commit infractions, including violence and rioting.
Flooding
Re-Offending Rates
When prisoners enter your prison they are given a reoffending rate based on their security level and crime. This rate is important for your prisons grading, and parole options as well as being a general indicator of a prisoner's tendency towards violence within your prison.
A prisoners re-offending rate is determined by their ‘enjoyment’ of their time in prison and is measured in 4 factors:
Punishments like solitary or lockdown decrease reoffending rate.
Reform programs decrease the reoffending rate if passed successfully. Education schemes and work options factor into this as well as drug and alcohol rehab.
Prisoners held in well secured prisons are less likely to reoffend, likely due to the decreased chance of escape should they return. This is based on prisoner escapes, deaths, and contraband rather than the security presence directly.
Prisoners with good health satisfaction are also less likely to reoffend.
Fast ways to reduce your prisons average reoffending rate include prolonging punishments after altercations using the ‘policy’ tab. This may also require changes to your solitary block to cope with the longer punishments to avoid release riots.
Extra work programs or reduced suppression to encourage prisoners into voluntary programs might also work. This has the added bonus of earning funds through prison labor if set up properly.
Prison security and prisoner health are affected by more factors and so may be easier or much harder to change, depending on your prison.
As well as determining your prisons grade prisoners re-offending rate also affects a prisoner's likelihood of causing incidents with the prisons mean average rate representing the equilibrium point between prisoners more likely to cause incidents vs those less likely to cause them. New prisoners will likely have a higher re-offending rate unless your prison is terrible in terms of security, punishment, and reform programmes so they will likely be the main source of incidents. You can begin to control these new prisoners by exploiting the prisoner privilege mechanic that will initially separate out prisoners who are new to the prison (with ratings of 3) or who have recently caused incidents. These under-privileged prisoners should be the target for reform or punishment programs and may also be a hotspot for contraband and tunnel digging activities.
Regimes
-
Regimented time slot : Sleep
Rooms involved : Cell / Holding cell
Recommended time(s) : All night. Prisoners require only 6 hours sleep. [Note - Nocturnal prisons are impossible as prisoners will not sleep in the day, only after 10pm.]
Other things to consider : Prisoners will continue to sleep during free time if it is arranged directly after the sleep period ends. Sleep periods will be the equivalent of lockup for prisoners who are not tired. During the sleep time is when prisoners will dig tunnels, so watch for tired prisoners since they are the ones who stayed up all night digging.
-
Regimented time slot : Eat
Rooms involved : Canteen
Recommended time(s) : At least twice daily, three times maximum. Prisoners who go to bed hungry will be difficult to control when they wake up so make sure at least one feeding is shortly before they sleep.
Other things to consider : During their time in the canteen prisoners who aren't hungry will become agitated. Consider adding toilets, showers and entertainment items to the canteen to keep them satisfied.
-
Regimented time slot : Shower
Rooms involved : Shower room
Recommended time(s) : As with the feeding need prisoners who don't shower before bed will be difficult in the morning. This makes shower times late in the day more useful if your prisoners have access to showers during the days freetime to keep their needs down themselves. If showers are provided in your cells or another room that isn't designated as showers do not use the regime time. Prisoners will use the free showers as they have access.
Other things to consider : During their time in the shower prisoners who aren't feeling dirty will become agitated. Consider adding toilets and benches to the shower room to keep them satisfied.
-
Regimented time slot : Yard
Rooms involved : Yard
Recommended time(s) : Fits around other regime points as a break. Whenever you have free time.
Other things to consider : Yard time is inferior to freetime unless you want/need all your prisoners in one place for another reason. If your prisoners have a set yard time make sure the yard design can fill all needs with toilets, benches, and a full range of entertainment items.
-
Regimented time slot : Freetime
Rooms involved : All
Recommended time(s) : Fits around other regime blocks to rest your prisoners and fill their individual needs.
Other things to consider : Freetime will let all your prisoners deal with their individual needs and they will travel around their accessible parts of the prison to fill those needs. The only activities they will not fill are eating, and work.
-
Regimented time slot : Work
Rooms involved : Classrooms, Workshops, Cleaning cupboards, Laundry, kitchen
Recommended time(s) : Depending on the programs you have active a minimum time may be required to complete courses. The longest of these is a single 3-hour block.
Other things to consider : Prisoners who do not have jobs or programs to attend will treat work time as freetime.
(For more information about work programs skip ahead to the appropriate section)
-
Regimented time slot : Lockup
Rooms involved : Cells / Holding cells
Recommended time(s) : Dependent on your prisoners sec levels. Lockup should be mostly used for max and supermax prisoners too dangerous to grant freetime as it will increase suppression and agitation.
Other things to consider : While locked in their rooms prisoners will not dig tunnels.
Visitation
Visitation is a mandatory part of each prisoner regime. It happens sometime between 8am and 8pm regardless of regime, and is supposed to take place in freetime although this rule is not always followed. During visitation times prisoners and their families will move towards visitation rooms to sit and talk. During this time the prisoners family need will be fully satisfied and there may be a transfer of cash or contraband between the prisoner and his family. To account for this all prisoners leaving visitation should be searched before re-entering the main prison area.
The family members should also be protected as prisoners may become upset with news from outside and kill members of their own or other prisoners family.
Contraband can also be prevented by using visitation booths instead of tables. The booths allow full separation of the prisoners from their families and so prevent contraband transfer. They do also lower the ability of prisoners to fill their family need however so use carries an inherent tradeoff. For visitation booths to be valid there must be no open passage between sides of the room designed for prisoners and their families respectively. This means that a visitation room designed for booths becomes divided into two parts both in terms of access and deployment. This can be used to more accurately assign guards to the prisoners half. [Note: Make sure the right side of each booth is facing the right side of the room. This is clearly marked when placing the items.]
As family members can’t be searched for nor carry contraband (the game spawns the contraband itself in the room rather than linking it to a visitor beforehand) there is no reason to keep them separate from the general prison population if you can keep them safe, however the longer they walk through the prison the longer the prisoner waiting for them will be left to boil over without any way to lower his needs. This means visitation rooms should be built near the road.
Entertainment
Now that's done let's go back and define those entertainment items.
The Bookshelf lowers a prisoner's Recreation need. [Note - Non functional]
The Weight Bench lowers a prisoner's Exercise need.
The Phone Booth lowers a prisoner's Family need.
The Pool Table lowers a prisoner's Recreation need.
The TV lowers a prisoner's Comfort and Recreation Needs.
The Sofas and Benches lower a prisoner's Comfort Need.
Library Shelf lower a prisoner's Literacy Need
Prayer Mat / Pews lower a prisoner's Spiritual Need
Radios lower a prisoner's Recreation need
If you have a problem with any need getting too high during regimented time slots simply add the appropriate item to the room. All prisoner needs (Except sleep, drugs, and alcohol) should be fill-able by your prisoners at all times, with no single (apart from hunger and sleep) need allowed to grow for more than 1 hour.
Prisoner needs
Prison Programs
For the 'work' slot to work properly your prisoners will need somewhere to, well, work. After you unlock 'Prison Labor' under the foreman's section of the bureaucracy tree you can order prisoners to work in certain rooms. This is done with the 'Logistics' tab and shows rooms where prisoners can work in green. Ordering prisoners into a room is done by clicking the same as deploying guards.
Some rooms such as the cleaning cupboard and laundry can be operated by any prisoners, but the classroom, kitchen, and workshop are dependent on programs.
Kitchen work requires prisoners pass the 'Kitchen Safety And Hygiene' course taught by a cook in the kitchen. This is a two hour voluntary course with a low failure rate. When allowing prisoners into the kitchen remember its contraband generation and fit appropriate measure to stop it from spreading.
Workshops are associated with two classes. The most basic level 'Workshop Safety Induction' allows prisoners to use basic workshop equipment in the form of the saws and presses. It is a two hour voluntary course with a low failure rate. After completing the class prisoners will work in the workshop they are assigned during all future 'work' times. Workshops also have a second level of training called 'Carpentry Apprenticeship' which is a two hour class with a moderate-high failure rate. It requires a carpentry bench and allows prisoners to make superior beds on carpentry tables in the future. As this course first requires the workshop safety induction course it is very difficult to find prisoners able and willing to complete the carpentry course.
Classrooms are where your prisoners will take classes in 'Foundation Education Programs' and afterwards the more advanced 'General Education Qualification'. Both these programs are 3 hours long and require a school desk for each student. The foundation class has a low failure rate but the general one is much harder. These classes are useful for maintaining a working prisoner-run library as Foundation Education will allow workers to sort books. Both courses also help reduce re-offending rates.
Other programs include the 'Alcoholics Group Therapy' held in common rooms for 2 hours with a psychologist. This will reduce prisoners alcohol need without getting them liquored up. The only other way to fill the alcohol need is to allow booze contraband into your prison.
Psychologists also hold 1-on-1 2-hour 'Behavioral Therapy' meetings in their offices to reduce prisoner aggression and make them less likely to start future fights. These classes are automatically assigned to prisoners who have been instigators of fights.
Doctors will lead 'Pharmacological Treatment Of Drug Addiction' courses in infirmaries. This will work like AA meetings to lower a prisoners drug needs without letting them get high, although it only takes 1 hour so much less time than the AA meeting. It is automatically assigned to prisoners caught with drugs.
Spiritual Leaders will arrive to lead sermons in the chapel. This will satisfy your prisoners spirituality need as well as creating a prison-wide effect to reduce violence for a period of time. This is a voluntary program but unlike others prisoners will attend multiple sessions.
The Parole Hearing takes place in the parole room and decides which prisoners may be set free. It is vital to the rooms operation, and prisoners denied parole may become agitated so station a guard nearby.
These are all the programs that take place during prisoner 'work' times, with the exception of
Parole which can take place anytime. The last program is called ‘Guard Tazer Certification' and focuses on Guard training. It can occur at any time the classroom is free and teaches guards how to use Tazers when the right research is completed and is led by the security chief. It is only a 1 hour course and has a high pass rate.
All programs must be ordered in the programs tab and assigned a time within your prisoners 'work' slots. You can have multiple operations of the same programs so long as you have all the requirements to carry out the multiple slots.
When building a regime and prisoner programs the access of your prisoners can be another consideration. To set prisoner access use the 'deployment' window to colour code areas. As well as setting entire areas you can create airlocks what can't be passed by some classes of prisoner. This allows for shared med/min sec areas with separate max sec for example.
Policy and Punishment
In severe cases prisoners can be sentenced to permanent solitary or lockdown to remove them from the general population. This is a very powerful tool for controlling troublesome inmates however it does require extra manpower to deliver a food tray to the detained prisoner.
Riots
Dealing with Riots is a part of the game you don't want to deal with, but you inevitably will. During these instances of intense violence and localized unrest there are a few things you will need to consider.
Can The Riot Spread? This is your number one problem as riots will spread and encompass more inmates over time if you let them. More guards to intercept such movement and move prisoners as far from riot areas as you can using the 'Bang-Up' control in the bottom right of the screen. This command will send all prisoners back to their cells where tight corridors will often discourage riotous prisoners. 'Lockdown' will also help contain riots until you can bring in more guards or congregate those you already have.
Can The Rioters Escape? The other major danger. Riots can provide the prisoners with the sheer unstoppable mass to punch a way out though the prisons front gates and scarper off to freedom. This is likely to cause failure conditions if the riot was large enough and will tank your prisons rating if not. Once again strategic placement of guards and locked doors will help control and contain the riot while you can react. Fortunately most riots aren't too mobile and will simply trash whatever room they started in for several hours before moving on.
Can The Rioters Arm Themselves? Once you have the riot contained, unable to grow, and unable to escape you need to stop them from getting into an armory, or the security offices. If they get into the armory they will almost all arm themselves with some kind of weapon (mostly guns) and stopping the riot will become a gunfight. In such a case the minority of prisoners who don't surrender after the first shot are likely to kill several armed guards and they will slaughter dog handlers and regular guards faster than you can hire replacements. The security room has less deadly weapons but it will grant them access to your CCTV and door control networks. Expect heavy and expensive damage on top of the immediate loss of control over those systems. This can cause line of sight outages and restrict guard movements making it harder to reach the riot.
Once the riot is contained it's time to fight back. This can often be as simple as selecting all your guards and ordering them to the riotous area. Large riots must be treated with more delicacy as large swarms of prisoners will overwhelm guards if they arrive one at a time. To mitigate this have guards stage nearby until enough are ready to storm and retake the area. Riot guards can be called in via the emergencies tab to assist your regular guards, Paramedics can help deal with the sea of wounded guards and prisoners too, although healing a wounded prisoner may cause them to begin rioting again so it is best to keep a heavy guard presence around during this process. If any of your guards were beaten unconscious you will have to search every involved prisoner for keys and weapons as well as any contraband they might have picked up as the riot traveled around your prison.
Rooms taken by riots will be marked in red for easy identification. [Note - Unarmed staff will not enter riot areas even if you order them to. More dangerous rooms will not be entered by basic Guards either, only Riot or Armed Guards]
Utilities
Power
Power systems start that the Power Station which produces 1 bar of power on its own. The station itself is is 3X3 and a major fire risk. If water enters the same squares as a power station it will immediately spawn multiple fires within a meter of the station. The Capacitor is an upgrade of the power station fitted by building one in a square surrounding the power station itself. A maximum of 16 capacitors can be fitted to each power station each upgrading its capacity by one bar each time to a maximum of 17.
In each system there can only be one power station or it will cause an overload. Overloads will also occur if you attempt to draw too much power from a single power station. Overloads force all power stations to turn off but they can be reactivated by selecting the 'power on' option after selecting it. You will have to first solve the power problem causing it to overload first however. If you have a busy prison consider using the power switch to split non-essential parts of your power-grid so they can be quickly switched off in order to save the rest of your grid from long-term outages due to repairs. [Note - You can have multiple power systems in a prison at the same time, the must however stay totally separate.]
To work out the power needs here is a list of what equipment uses what power:
Electric chair - 2 bars
Boiler - 1 bar
Phone Tap - 1 bar
Door Control - 1 bar
Water Pump - 0.5 bars
Cooker - 0.2 bars
Fridge - 0.2 bars
Workshop press - 0.2 bars
Workshop saw - 0.2 bars
Laundry machine - 0.2 bars
CCTV monitor - 0.2 bars
Metal detector - 0.2 bars
CCTV camera - 0.02 bars
TV - 0.02 bars
Lights - 0.02 bars
When routing power around your prison you use Electrical Cable. From this cable smaller power lines will automatically connect to all objects that need power. These smaller automatic wires can extend up to 15 meters and will not pass through walls or over the indoor/outdoor boundary. Automatic wires will not form in outside spaces. Electrical cable will pass through walls as well as this boundary, only being stopped by perimeter walls.
Water
When building your water system there are other things to keep in mind large pipes are easy routes for prisoners to dig though. As such it is usually best to run large pipes though your cells corridors and then use small pipes to actually connect into their cells to their toilets. For the same reason large pipes should never run outside your prisons outer perimeter wall unless you are specifically leading prisoners to a known location with permanent guard and dog patrols.
Pipe Traps
Hot Water
Hot water is dealt with separately from cold water. It comes from a boiler, which must be fed with a working large water pipe (with cold water) and a power supply. All hot water is then fed into hot water pipes which act similarly to small water pipes. In these pipes the water will remain hot for approximately 57 metres.
Hot water pipes are a separate pipe layer to cold water pipes, so may be overlaid at will. Multiple hot water pipe systems may be interconnected with no penalty.
Showers supplied with hot water as well as cold will reduce a prisoners comfort and warmth needs as well as hygiene,
All radiators must be supplied with hot water to function.
Additionally, sinks will function faster if supplied with hot water.
Tunnels
Tunnel Paths
Tunnel paths are dictated by a series of factor, the most overriding being time to complete the tunnel. This is initially effected by pure distance to the nearest point outside your control. This is any location deemed ‘unsecured’ from the edge of the map from which the prisoner can escape by foot. This distance must take into account lakes if they are enabled on your map, as tunnels cannot travel under lakes.
The next largest factor in time to tunnel is the presence of player-built structures. There are 4 levels of tunnel speed with dirt acting as the default ‘medium’ resistance. Foundations and walls create a slightly higher level of resistance to tunneling although extended tunnels under these structures aren’t uncommon. Prisoners will often require tools to dig through foundation at the start of their tunnel. Perimeter walls have the highest resistance to tunneling and will be avoided by prisoners at almost all costs. Prisoners may dig halfway across the prison to avoid tunneling under a perimeter wall, giving you a somewhat predictable route for tunnels through gates if you have an otherwise complete perimeter wall around your prison.
On the other end of the scale large water pipes are practically tunnels already. If a prisoner enters a large pipe they will move almost unhindered by the heavily reduced resistance to tunneling.
Tunnel Digging
prisoners can work together if they are either in the same holding cell, or if the tunnel intersects with multiple occupied cells. The efficiency at which more prisoners increased digging speed is inversely proportional meaning that to dig twice as fast as a single prisoner, 4 prisoners are needed. To dig 3 times as fast as a single prisoners 11 prisoners are needed.
The second factor, tunneling tools, are all forms of contraband with the tag ‘Tool’ such as spoons or spades. All tools speed up tunneling by a degree based on their quality. Generally higher quality tools are easier to detect with metal detectors or dogs, although cell searches should find most contraband if you still have an issue.
Tunnel Identification
Both of these methods can be conducted periodically throughout your prison as a constant deterrent, or targeted with the help of warnings. The most obvious warning is provided by Dog Handlers who will mark possible tunnel locations with a yellow flag [Note - If your warden is J.W. Periwinkle these flags will have a 50% chance of detecting the entire tunnel] to give you a general idea of where tunnels are being dug. Depending on the design of your prison you can then narrow down the origin of the tunnel and specifically search those cells until the entrance is found. Keep in mind that some flags will be false alarms so not every one is evidence of tunneling.
Alternatively you can identify prisoners with high sleep needs as tunnelers. This is because tunneling prisoners tunnel at night during the sleep regime and do not sleep nightly. This method is more useful in smaller prisons where individual prisoners can be checked semi-regularly.
Fire Prevention
(Semi-)Automated Systems
After you've got the basic utilities running you can enhance parts of your prison with a selection of automated systems. The most common of these is the automatic Door Servo. Door servos react to a simple yes-no command system requiring only one 'open' command out of however many connections it had to open. This is most often done through the Door Control terminal or Pressure pads. To fit a door with a door servo simply build a servo in the wall around the door with some overlap, it will automatically open when the connection to it (which you must connect in the same way as CCTV cameras from the trigger to the servo) becomes active. Items with a green light are generally active, orange is inactive, and red is unmanned or inactivatable.
A list of these basic triggers is provided below with what effects an activation.
Item : Pressure pad
Activation trigger : Weight (any human NPC) standing on the plate
Other notes :
Item : Door control
Activation trigger : Stationed guard activates door (prisoner or staff wanting to come through the door must be visible though any fog of war)
Other notes : only 2 door can be opened per second, if the monitor is broken all connected doors will open
Item : Door timer
Activation trigger : Set times of day
Other notes : Times are worked by hour the same as regime timetables so if you are using it to move prisoners you may want to select it to open in the hours both sides of expected movements to ensure stragglers and early-birds don't get stuck
Item : Logic circuit
Activation trigger : Selectable. Options for "And (1:1) / Or (1:0, 0:1, 1:1) / Not (Reverses input before output. 1=0, 0=1) / Nand (0:0, 0:1, 1:0) / Nor (0:0) / Xor (1:0, 0:1)" - Where 1 represents an active input and 0 an inactive one. All possible 2-way connections which produce an activation reaction are shown but make note that the 'not' connection simply inverts its input signal and does not have any internal interaction between signals.
Other notes : Multiple logic circuits can be linked to form complex behaviors. Linking a logic circuit to a door timer and a pressure plate is an easy way of making self-opening semi-restricted doors for low security areas of your prison. The doors will open automatically when a prisoner or staff member needs them to but will lock down for specified parts of the day. Forcing the door to open is as simple as changing the logic circuit from 'And' or 'Or'.
Item : Logic bridge
Activation trigger : Any active incoming signal.
Other notes : Converts connection signals to a form which is carried though larger electrical wires. This allows you to quickly and easily transport signal around the prison. This signal can be accessed by another Logic Bridge.
Item : Power switch
Activation trigger : Manual control
Other notes :
Events
As well as running a standard prison and dealing with the consequences of design choices, needs, and gangs, there are random events that can occur at any time. These events require management or they are capable of destroying your prison within a few days if not causing direct failure states. Some of these events come in regular and extreme versions with the extreme events requiring as much luck as skill to survive.
The events are listed below:
Event : Power Station Fire
Effect : Your power station catches fire. It will instantly lose power generational ability and may be destroyed if the fire is not controlled quickly. The fire will also spread so sprinkler systems are advised as well as keeping power stations near the road for firemen to reach quickly.
Extreme Version : The power station explodes, destroying the station itself and spreading fire to nearby areas. Besides the need to replace the power station this is managed in the same way as the regular version.
-
Event : Kitchen Fire
Effect : A random cooker catches fire. Again fire is best controlled with sprinkler systems to control the spread and duration of the fire.
Extreme Version : None
-
Event : Bulk Intake
Effect : Within one hour of the event starting a random number of prisoners of a random security status will be deposited at your prison from another prison in the area. Make sure you have the ability to take up to 50+ prisoners (NOTE : Number seems to scale with prison population) or install capacity to do so quickly.
Extreme Version : All prisoners that arrive are part of the same gang. If this happens the only real management (besides regular gang management described above) is to restart from an earlier savegame.
-
Event : Workshop Accident
Effect : A prisoner working in the workshop injured themselves. After the initial injury the prisoner will continue to bleed so either set up an infirmary close to the workshop or manually order a doctor to the prisoner.
Extreme Version : None
-
Event : Subsidence
Effect : A random section of wall or fence collapses. If it is your outer wall this may lead to escape attempts so double outer walls are recommended. It may also, depending on the design of your prison, allow access to the armoury or other such contraband generators.
Extreme Version : None
-
Event : Virus
Effect : A random prisoner will become ill with a transmittable virus. The prisoner will slowly lose health (but will not die) and begin to fall unconscious. While the prisoner is still mobile they will pass on the infection to other prisoners. Guards will attempt to move unconscious prisoners to the infirmary for care and ill prisoners (shown by a green tinge and vomiting) can be manually healed so make sure you have enough medical staff. Lockdowns can prevent the spread of the virus.
Extreme Version : The virus is lethal and sick prisoners will die if not treated in time. The virus still spread the same way and can be controlled in the same way.
-
Event : Mass Assassination
Effect : Multiple prisoners in your prison become targets for assassination for their role as federal witnesses. You must use your CI network to find out who is targeted and move them to safety before they are killed.
Extreme Version : None
-
Event : City Mayor Demands
Effect : The city mayor, in an attempt to look good with a ‘tough on crime’ stance, orders you to change your prison to make life more miserable for your prisoners. This includes the removal of TV’s or Weights (Note : Removal of items only includes shared spaces, not cells.), or removal of visitation, or reduction in food quality and quantity. Making these changes may prompt riots and displeasure inside your prison but the items can be reinstalled after a couple of days with no repercussions from the mayor.
Extreme Version : None
-
Event : Prisoner Demands
Effect : Similar to the mayor's demands, the prisoners can sometimes demand conditions improve as a collective voice. They will demand less work, more sleep, or more freetime and will become prone to rioting and violence if you fail to meet their request.
Extreme Version : None
-
Events will not happen during riots or if you have less than 50 prisoners incarcerated, and are less likely if prisoners have recently escaped or died. They can also be turned off when starting a new prison.
Valuation
Prison Valuations are a part of the end-game for each map. It is the single value you carry over to your next prison. The value you can carry over is dependent on six variables.
Bricks and Mortar - The actual value of your physical buildings. This is modified by the buildings cleanliness as well as structures with cleaner stuff worth more. This value constantly shifts by small amounts as grime levels fluctuate.
Fixtures and Fittings - The value of any objects and utilities built in your prison. This value fluctuates dependent on objects damage with damaged goods worth less.
Stock and Materials - The value of any objects or building materials stored but not constructed within your prison (only objects within a storage, deliveries, or export zone will be counted).
Staff - Value is equal to half the hire cost of all your staff members.
Prisoner Capacity - $500 per prisoner based on the capacity window in the top of your screen. This counts individual cells only and does not include holding cells. This can be exploited by installing extra beds in dorms to inflate the prisons cell count beyond its actual capacity.
Cash - How much cash you have at that moment (this may be negative).
Bank Loans - How much you owe the bank. All loans must be paid off in full when starting fresh.
Starting Grant - This is the initial loan you get at the start of each game and as with bank loans it must be paid off in full when restarting, although you will get a new grant to repay that value.
On top of that you gain $240 for each hour without an incident (any form of violence) up to 24 hours before selling. You also lose $2,000 for each serious injury, $30,000 for deaths, and $60,000 for escapes. As such it is best to wait for a peaceful day to sell.
Selling Prisons is something you can only do once. Once sold you maintain the ability to profit from and build a prison but you cannot resell it and any gained value is lost to the new AI owners. To sell your prison you also need to meet the set conditions:
Accountant on payroll (Simply have an accountant in your prison)
More than $50,000 value (less than this and you might as well start new with a standard $50,000 grant anyway)
20 or more prisoners actively in your prison
No deaths or escapes in the recent past.
Failure States
Apart from selling your prison Failure States are the other way to end its construction.
Criminal Negligence is the most unique end-state. After the deaths of 20 prisoners within 24 hours you will be issued a warning and further deaths will cause you to be jailed in your own prison. [More about that later when we cover Escape Mode]
Too many re-offending parolees will get you fired. Adjust the parole board leniency in the 'policy' tab to prevent this. After 10 prisoners re-offend you will receive a warning, if another 5 re-offend you will be fired.
If too many wardens die you will be fired for endangerment. Prisoners shouldn't require access to their office though.
Too many Escapes can also trigger an endstate. The number of escapes resets every 24 hours and you will receive a warning 1 escape before you fail. If you fail you are sacked and lose control of the prison.
Uncontrolled Riots will call in the national guard to take over your prison. You will be given 6 hours to quell the riot before receiving a warning, then a further 6 hours before the national guard arrive. If you do not stop the riot in this time you will lose control of your prison and must watch as soldiers storm the prison. The AI will then run it far better than you did (It cheats and stops prisoners from doing anything but regime assigned activities, so no contraband or violence).
Bankruptcy is the final failure state. It comes into effect when you have negative income and a negative wallet. You will be given 24 hours to raise your wallet above $0 to avoid failure.
Once per game, and only if prepared in advance, the Lawyer can bypass an impending failure state. This requires the ‘Legal Prep’ research in the bureaucracy tree and costs $50,000 and 72 hours to complete. As failure conditions only last 24 hours this research must be done well in advance to be useful and should be a priority before large expansions or cost saving measures that may cause internal problems in your prison.
Quick Builds
Cloning
While cloning does not cost any more than buying the cloned items individually, be careful you do not run out of funds when cloning large or densely populated areas as each click becomes so much more valuable.
Quick Rooms
Quick rooms are pre-designed templates of the most common rooms in Prison Architect. They are useful for building basic rooms quickly and do not restrict customization or alteration at a later time. The templates provided are:
Basic cell - 2X3m2 cell with a bed and a toilet, accessed by a jail door
Shared Cell - 4X3m2 cell with two bunk beds and a toilet, accessed by a jail door [Note - Despite the two bunk beds being able to hold 4 inmates the rooms size restricts its capacity to 3]
Luxury Cell - 5X3 cell with a toilet, bookshelf, shower (with drain), radio, desk, television and chair, accessed by a jail door
Solitary Cell - 2X1 cell with a toilet, accessed by a solitary door
Office - 4X4 with a desk, chair and filing cabinet. Accessed by a staff door.
Unlike cloned areas quick rooms can be freely rotated the same as objects.
General tips
Starting out
When starting a new prison you’re going to be low on cash and in need of prisoners to make money. This is the point most new players fail since it is very easy to run out of funds before making the prison operable. Given the initial $50,000 loan it is possible to build a basic layout if you know what you’re doing. Start with a holding cell over individual cells as it will allow you to house more prisoners later for a quick burst of cash, it is also essential for the Basic Detention Centre grant which will give you a further $30,000 to build individual cells and other facilities. As well as the holding cell you’ll want a kitchen and canteen to feed the prisoners, and a single solitary room to allow punishments. If these rooms are self-contained within a single building the prison can operate well and you should take in prisoners when ready. If they are located in separate buildings you will also need a perimeter wall (a basic concrete wall will do) to prevent escapes.
Depending on the size of your basic rooms you should now have a small operating prison with between 5 and 30 unhappy inmates. If run with a minimum number of guards you should also be breaking even or turning a small profit so it’s time to expand. It’s entirely up to you to decide what to expand first but over time you will want to create a cell block to house prisoners individually, and some rooms to fill their other needs. Alternatively you can run a sweatshop and build an armory to stop riots quickly, and several workshops to churn out goods. Some of these expansions will also require offices for bureaucracy research.
If at any point you are unsure what to do next either look at the grants list for challenges and ideas, or think about selling your prison to make a new, better designed, one. Starting a new prison with more funds will let you design larger ideas which couldn’t grow organically. These are often very large prisoner which may cause your computer to slow down, but can also be personal goals such as max-sec only, highest prisoner count in a set space, lowest guard count automated prisons, etc…
Small prisons which enter debt or negative income can scale back to this starting size at any time, keeping all constructed infrastructure, and build up enough funds to finish an expansion. This will involve zoning new areas as ‘staff only’ and firing guards not required for the smaller space. For short periods (2-3 days) very large numbers of prisoners can be forced into relatively small holding cells if there are sufficient beds to sleep half of them.
Grants
Administration Centre - Build 2 offices, Hire a warden and Accountant (Hiring an accountant will require the Finance bureaucracy). - Pays $5,000 on acceptance and $5,000 on completion.
Basic Detention Centre - Build a Holding Cell, a Shower, Yard, Kitchen, and Canteen. Hire two Cooks and two Guards. - Pays $20,000 on acceptance and $10,000 on completion.
Carpentry Apprenticeship Program - Produce 10 superior beds. - Pays $10,000 on acceptance and $10,000 on completion.
Cell Block A - Raise prison capacity to 15. - Pays $20,000 on acceptance and $20,000 on completion.
Cell Block B - Raise prison capacity to 50. - Pays $10,000 on acceptance and $20,000 on completion.
Cell Block C - Raise prison capacity to 100. - Pays $10,000 on acceptance and $20,000 on completion.
Cell Block D - Raise prison capacity to 200. - Pays $10,000 on acceptance and $20,000 on completion.
Cell Block E - Raise prison capacity to 500. - Pays $10,000 on acceptance and $20,000 on completion.
Crackdown on Drugs - Find 15 contraband narcotics - Pays $15,000 on completion.
Education Reform Program - Build a Classroom (this will require the Education Buracracy) and have a total of 20 School Desks. Then have 10 prisoners pass the foundation education course, and 1 prisoner pass the general education course. - Pays $15,000 on acceptance and $40,000 on completion.
Government Bailout - $50,000 for zero work. The catch is you have to be one step from bankruptcy to claim it.
Governmental Security Ratings - Assign 2 Dog Handlers to dog patrols, and 2 Armed Guards to a Patrol. - Pays %15,000 on acceptance and $15,000 on completion.
Health and Well Being - Build an Infirmary with 2 Doctors, and hire 1 Psychologist. - Pays $10,000 on acceptance and $10,000 on completion.
Inmate Nutrition Research - Have a single low quality meal regimed per day for a total of 48hours, and at a different time have three high quality meals regimed per day for a total of 48hours. - Pays $15,000 on completion.
Max-Sec Infrastructure Implementation - Hire 20 guards (equipped with Body Armour and Tazers which must be researched as a security bureaucracy). Build a CCTV camera and CCTV monitor. - pays $20,000 on acceptance and $20,000 on completion.
Prison Maintenance - Hire a Foreman (Requires Maintanance Bureaucracy), A Gardener (Requires Grounds Keeping Bureaucracy), and 2 Janitors (Requires Cleaning Bureaucracy).
Prison Manufacturing Facility - Produce 30 licence plates. - pays $20,000 on acceptance and $10,000 on completion.
Prisoner Acclimatization and Engagement - Assign 3 prisoners to work in the Laundry, Kitchen, and Cleaning Cupboard. - Pays $10,000 on acceptance and $10,000 on completion.
Security Procedure Certification - Hire a Security Chief and ten Guards. Have 3 Guards assigned to Patrols (Patrols must be researched as a Bureaucracy). - Costs $10,000 on acceptance and $10,000 on completion.
Staff Well-being Initiative - Build a Staffroom and have no exhausted staff. Also have 5 guards without assigned duties. - pays $10,000 on completion.
Tool Cleanup - Remove every tool and weapon from active circulation in your prison. - Pays $20,000 on completion.
Visitation Rights - Build a Visitation Room with 3 Visitors Tables, Build a Common Room and have at least one Pool Tables, two TV’s, and five Phone Booths in your prison. - Pays $5,000 on acceptance and $5,000 on completion.
Design
When designing a prison it’s best to have a regime in mind. That way the prison design can minimize the most common journeys. Prisons designed around work and reform time may also require more workshops and classrooms than one designed for permanent lockdown or yard time. Prisons designed for lots of freetime are hardest to balance as prisoner needs will vary slightly by intake. In such a prison surplus of each room will keep needs under control.
Designs usually follow 4 basic layouts with almost infinite variations:
The Mirror - Designed with multiple cell blocks on the north and south sides of the map separated by a line of shared rooms in the middle. This design keeps walking distances from cells low but can limit shared space by requiring multiple pathways to ensure the opposing cell blocks can intermingle. Alternatively the two halves can be totally separated forming two prisons of different security level.
The Road-Runner - This is the most organic design with the shared rooms built near the delivery area, and cells placed further back to the west of the map. The design allows for easier movement of goods and deliveries into and out of the prison but at the cost of reducing the amount of cells which can be placed near to them. This might sound like an expensive trade-off but the reduced contraband risk is very useful for housing high risk prisoners.
The X - The least organic design The X requires planning from the start. It is formed from a small box of shared rooms flanked on all sides by cell blocks to house the maximum number of prisoners close to the shared rooms as possible in order to keep walking distance low. X designs can be very hard to manage however as all incoming goods must travel some distance to the correct rooms. Some common variations of the X include extra cell arms at 45* from the centre, or The Box which uses the square spaces at the edge of the X design to house extra shared rooms or separate max-sec. protective-sec, or supermax areas.
The OCD Nightmare - Not so much a design as a hodgepodge of rooms loosely collected together for form some semblance of order. This design usually forms around specific rooms such as max-sec cell blocks, kitchens, or yards, with the other rooms radiating out from that. Early on these designs resemble Road-Runners but differentiate in later games by having new key-rooms spread further into the map as the prison expands. Like the X this design is very hard to manage properly with the paths often becoming maze-like warrens of death and disorder, but a well run prison can operate effectively with smaller sub-prisons each symbiotically assisting each other.
Supermax
Eventually your prison will acquire that special prisoner you always feared. The Legendary, the guard-killer, the unstable provoker. In short, a prisoner that can’t be allowed near general population. For that prisoner the only ways out are supermax, or death. Death is the easier option. It involves sealing up the prisoner's cell and waiting for them to starve to death. It will however contribute to the prisoner death failure state and reduce the game's challenge. To actually control such a prisoner you will have to consider either setting them to permanent lockdown in a specially secure cell (Ideally one with perimeter wall around it and armed guards ready to shoot at the first sign of unrest) or a supermax wing with a very high guard:prisoner ratio where a more normal regime can be used to control multiple troublesome prisoners.
If you decide to use the lockdown method remember that solitary doors are more hardy than cell doors, and that perimeter walls can be fired though by armed guards. By combining these features an airlock can be created with two or three solitary doors to slow the violent prisoner while still allowing armed guards to neutralize him.
Similarly, a supermax cell block will likely have perimeter wall down at least one side of each room so that during insurrections guards can be evacuated and the prisoner quelled without risking staff members. Again, solitary doors are more secure than regular ones and airlocks should exist around exits and high-contraband rooms. If your prison is dealing with multiple supermax-level prisoners you should be sufficiently advanced to understand the concepts of prisoner control and have sought the challenge. Such high level prisoners are fairly rare in even dedicated highsec prisons.
Escape Mode
Once inside the Escape Mode you will take control of a random prisoner in the next wave of intake. The camera and field of vision will be locked to your character and movement is orchestrated with the ‘WASD’ movement buttons. This means that the first order of business will likely be to discover the layout of the prison you find yourself in, so pay attention to your route from the delivery zone to your cell.
As a prisoner you have no needs, and have no need to follow the prison's regime. This means that you can exploit changing patrols or natural danger times such as riots during eat times or showers.
Your player prisoner you act as a gang leader. To recruit another prisoner stand near them and hold down the right mouse button, a prompt will show in the top right side of your screen when this option is available. You can then order them to follow you with the ‘R’ button at any time and they will do just that, auto-attacking guards if you are engaged in combat. Additionally you can directly control another prisoner either by clicking on their portrait in the top left corner or by cycling through them with the ‘E’ button.
As a prisoner you start with no traits but can upgrade them using the ‘Reputations’ tab in the top left of the screen. The reputations all cost 1 reputation to learn to normal level, and an additional 5 to upgrade to their advanced form (E.g Deadly > Very Deadly). As well as upgrading your own skills you can upgrade the skills of your gang.
The Very Deadly skill is highly overpowered, allowing you to kill anyone with 2-3 punches. Similarly a level 2 instigator can break some prisons with spontaneous riots.
To earn reputation you must engage in illegal actions. The simplest of these involve breaking items or attacking prisoners and guards. Reputation can also be exchanged to avoid punishments at a rate of 1 reputation point per punishment regardless of length.
You can interact with objects with the right mouse button to pick them up, then left mouse button to use them. This includes keys, weapons, drugs, and any other contraband.
These items function identically to in Architect mode with keys opening all non-remote doors and weapons increasing attack power or granting ranged attacks. The only exception is the tazer which has no cooldown when used by the player character.
All items can be dropped by right clicking them in the item menu at the bottom of the screen.
The goal of Escape Mode is, rather predictably, to escape. To counter your attempt the warden AI will call in riot guards to deal with riots and issues freefire orders to armed guards. If you can make it to the edge of the map with every member of your gang you win, and any gangmembers left behind can be kicked from the gang provided the player character has escaped.
Collectibles
Achievements
Get Busy Living - Achieve a re-offending rate of 25%
Wait and Hope - Unlock entire tech tree
Don't Put Me In The Dark - Executed a prisoner on death row
It's Not What You Know… - Unlocked all polaroids
... It's What You Can Prove - Unlocked all game bible pages
Warden - Loaded a prison from Steam Workshop
Architect - Shared a prison via Steam Workshop
I May Have Found A Way Out Of Here - Escape from a decent prison in escape mode
Spare The Rod - Stopped a riot of 50 or more prisoners
Samuel Norton - Have a cashflow of $50,000 or more
Freedom - Complete optional objective on Bootstraps
Reformation - Complete all optional objectives on Conviction
Crowd Control - Complete all optional objectives on Riot
Stone Walls - Build a sandbox prison with 100 prisoners
Iron Bars - Build a sandbox prison with 500 prisoners
D.B. Cooper - Sell your prison and make over $1,000,000 profit
Confined - Build a sandbox prison with 1000 prisoners [Note - you will need a supercomputer to actually run a prison of that size]
Throw The Book At Them - Complete the story
-
Womens Prisons
Female prisoners have a substancially different set of demands and requirements to their male counterparts. They are on average weaker than male prisoners, so require less physical force to restrain, but have extra and greater needs such as family and children so may be more inclined to misbehaviours. Don't underestimate them however, as a smaller percentage of prisoners will still be able to overcome basic guard patrols if so inclined.
To make a womens prison select the appropriate option when starting a new prison.
Female prisoners will still forms gangs, make hits, start riots, and steal contraband. These bahaviours are make more extreme by increaced needs so make sure you keep the prison population happy.
Mothers and Babies
Female prisoners who enter your prison may have children with them. These will all be under 18month old babies and change the needs of the mother. The mother prisoner requires a family cell connected to a nursery to look after their child, and devotes all her needs to looking after the baby or feeding herself. Mother prisoners will not attend programmes or any regime slots outside of their family cell or nursery.
As mothers will only use family cells and nursery's they can be effectively removed from the rest of the prison population as your prisons design requires.
As a mothers needs can all be met using either baby related items, or food, they are very easy to keep happy and should be less troublesome than the rest of your prisoners. They do still attempt to escape however and may not always take their child with them, so watch out for signs.
If a female prisoner is not a mother upon entering your prison they do not require access to these additional rooms.
Family Cells
Familly cells are an additional type of cell only found in womens prisons. They must still be 4X4 in size and contain a bed, toilet, and full enclosure the same as regular cells, however they also require a crib and showerhead to keep a baby cleaned and comfortable. The addition of a shower will also keep the mother prisoner happier as they rarely leave their family cell/nursery complex.
The crib is only a 1X1 item for storing the baby when not held directly by the mother prisoner. It requires no power or water to function.
Mothers cannot live in dorms or regular cells.
Nurserys
A nursery is the room mother prisoners will spend most of their time in. It will also need to fill most of their needs. A nursery requires at least:
1 x serving table
1 x table
1 x bench
1 x crib
1 x play mat
However a single nursery can be used by multiple mothers simultaniously if provided the proper ratio of objects. The same as canteens these serving tables must be linked to a kitchen and there must be enough serving tables, tables, and benches for all mothers to eat within the designated times. Additionally there must be enough cribs and play mats, which ideally means about one of each per baby, but can be reduced to two per three babies without much unrest. If your family cells are very close to the nursery you can further reduce the number of cribs and force the mothers to return to their cells instead, you will still need plenty of play mats however.
-
Death Row
Death row prisoners
Death row facilities
Since the death row prisoners are almost permanently locked down there is no need to provide many of the amenities most other prisoners require such as canteens, common rooms, or even punishment areas such as solitary. Food will be delivered to their rooms from the selected kitchen which will require extra manpower however so be careful to balance staff numbers with demand.
Death row inmates do still have a family need however, and visitation rooms are the only external service they will leave their cells to use. when designing the death row visitation room consider the size and security needed to contain more violent inmates as the reduced number of prisoners using the room won’t demand the same area as the main visitation area. Double-secure airlocks and contraband detection is also highly important to prevent escapes or overdose as prisoners will be in their cells alone more often.
Death row inmates also make use of the ‘Appeals’ program at regular intervals if it is active in your prison. This requires a Parole room accessible by a visiting staff.
Death row mechanics
Appeals
If a prisoner is executed before their chance of clemency reaches 5% [NOTE - the ‘Reduce Institution Liability’ research raises this to 10%] you are personally liable for if they are found innocent later. Individual prisoners chance of clemency is shown in the ‘To Do’ list at all time, colour coded by liability.
Execution outcomes
If you execute a prisoner with a clemency chance of under 5% [10% with Reduce Institution Liability’ research] you will not be held liable regardless of the final outcome. Prisoners found innocent posthumously will be rare, and likely decided by the unknowable 5% chance of innocence instead of actual clemency chance. You will be granted a $10,000 bonus for a successful execution.
Similarly if you execute a prisoner with a higher chance of clemency and they are still found guilty posthumously you will be rewarded with $10,000.
If, however, a prisoner with a higher chance of clemency is executed and subsequently found to be innocent you will be instantly fined $50,000 in legal fees, and any death row prisoners inside your prison or waiting to be delivered will be transferred to other prisons and away from yours. Any progress made in those prisoners appeals process will also be lost.
Additional failure states
Executions
Lockdown
Test Facility
Execution detail and Witnesses
You also need to organize an execution detail made up of a religious leader chosen by the condemned prisoner who will appear on the road and wall to the inmate's cell, as well as the security chief and warden. These three will meet at the inmate's cell for last rites and paperwork.
The Green Mile
Execution
Dismissing the staff
Final report
- HOW TO BUILD A PRISON (updated 8/2/2020)★ 5 (1.4k)51k views2.5k ♥25 minUpdated Feb 7, 2021
- GC13's Easy Guide to a Successful Prison★ 5 (689)47k views1.3k ♥30 minUpdated Aug 23, 2015
- Professional Prison Security★ 5 (684)28k views1.4k ♥4 minUpdated Mar 8, 2019
- Rooms sizes and efficiency (alpha 0.30)★ 5 (550)26k views987 ♥24 minUpdated Dec 23, 2015
- Get ALL 100% Achievements★ 5 (754)26k views1.3k ♥10 minUpdated May 19, 2020
- Death Row: All you need to know★ 5 (194)22k views310 ♥8 minUpdated Oct 8, 2018




- Upgrading to PremiumTeam Fortress 2★ 5 (20k)1441k views11k ♥6 minUpdated May 11, 2022
- No More Room in Hell Official ManualNo More Room in Hell★ 5 (2.8k)569k views2.1k ♥29 minUpdated Apr 22, 2019
- NMRiH Community Hosting GuidesNo More Room in Hell★ 5 (526)351k views653 ♥1 minUpdated Aug 10, 2022
- ULTIMATE GUIDE FOR GAME DEV TYCOONGame Dev Tycoon★ 5 (5.8k)326k views10k ♥4 minUpdated 23 Jan, 2014
- How to 'Git Gud' Soon™MORDHAU★ 5 (2k)318k views3k ♥68 minUpdated Nov 16, 2024
- Лучшие кооперативные игры SteamPAYDAY 2★ 5 (1.5k)315k views2.1k ♥56 minRussianUpdated Apr 27, 2025






This guide was created by its original author on the Steam Community. Are you the author and want it removed? Request removal.