Setting Up Hammer++ for Day of Infamy
Introduction
I guess most of people have heard about Hammer++ and tried to set it up to work with Insurgency and Day of Infamy. At the time of writing this guide there's no official Hammer++ build for these games. But it is possible to configure Hammer++ to use assets and compilers for DoI and Ins using some other builds, notably GMOD and CS:GO build.
While DoI and Insurgency are built on CS:GO engine branch, there're many issues with CS:GO Hammer++ build:
- Setting up require symbolic links.
- Requires copying some content from "platform" game folder ( materials and models ).
- Custom content can only be mounted as loose files in original game folder or "gameinfo" folder.
- Only CS:GO MDL version is supported, other MDL versions can crash editor. Vanilla INS and DOI content seems to be fully compatible, but since game does support MDL version from SDK2013 branch, some custom models might be not recompiled for CS:GO branch.
- Build is unsupported and no longer receive any new updates.
- Requires copying shaders from Garry's Mod to Game Directory. While they don't load in-game, just to make sure that they won't trigger anti-cheat system, they should be manually disabled before game launch.
- Soundscripts don't work.
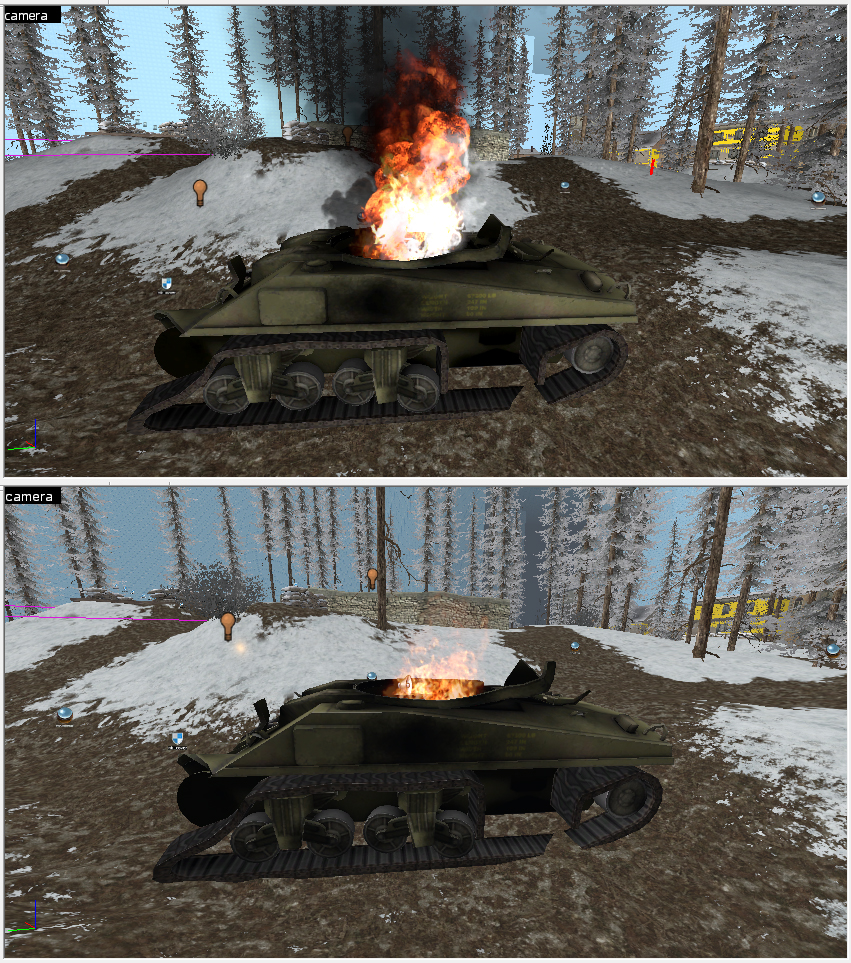
- Particle files don't work out-of-box and require conversion. They don't look same as in-game after conversion.
Top screenshot is original particle system in CS:GO Hammer++, bottom one is converted particle system in Garry's Mod Hammer++ - Player animation can look incorrectly and crash editor.
- OGG audio preview.
- Materials that use GGX shaders.
Setting up Garry's Mod build of Hammer++
Now, get Hammer++ for Garry's Mod from official download page[ficool2.github.io] and install it (check "README.txt" for install instructions).
Day of Infamy shaders are not compatible with Garry's mod build of Hammer++, so you need to copy Garry's Mod shaders into Day of Infamy game directory. Open "garrysmod_dir" VPK archive (located in "<Path to Steam Library>/GarrysMod/garrysmod") and extract "shaders" folder to "<Path to Steam Library>\dayofinfamy\doi". CS:GO branch games don't load shaders folder from game directory, so these shaders won't break game. You can also rename/move this shaders folder somewhere else when you want to just play game - just to make sure that they won't trigger anti-cheat system.
Open Hammer++ (located in "<Path to Steam Library>/GarrysMod/bin/win64") and via the toolbar at the top go to "Tools" -> "Options".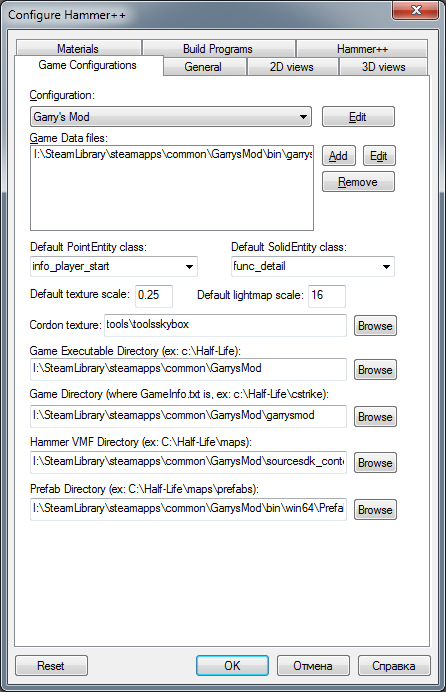
Click on "Edit" button next to "Configurations" dropdown to open "Edit Game Configurations" window:
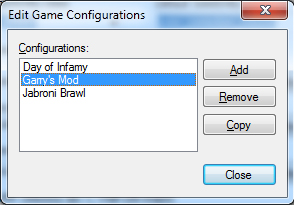
Click on "Add" button to create new game configuration. You can name this whatever you want, but I called mine "Day of Infamy" just to not confuse it with other configurations.
Now, setup game configuration the same way as in original Day of Infamy/Insurgency Hammer game configuration:
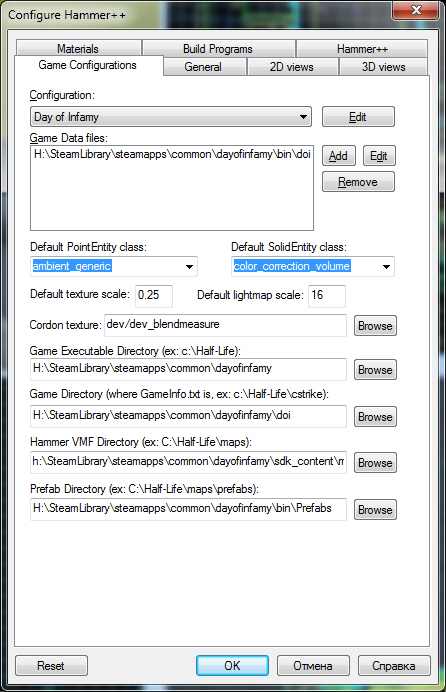
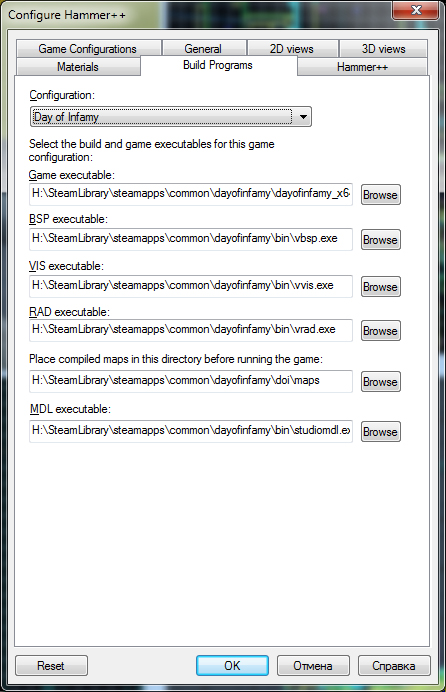
Here's game configuration block from "hammerplusplus_gameconfig.txt":
Insurgency and Day of Infamy only use HDR, so you can replace "-both" to "-hdr" in VRAD expert compile options.
November 2025 update introduced 4-way blend shader port in Garry's Mod, but if you have installed Hammer++ before this update, you might need to manually modify H++ configuration file. Open file "hammerplusplus_settings.ini" in "<Path to Steam Library>\GarrysMod\bin\
win64\hammerplusplus" folder. Find in this file key "Enable4WayBlends" and set it to 1 ( i.e. "Enable4WayBlends=1" ).
For example, here's my "mount.cfg":
After saving modified "mount.cfg", open Hammer++ and choose your "Day of Infamy" configuration. Look at "Messages" window to check content mounting:
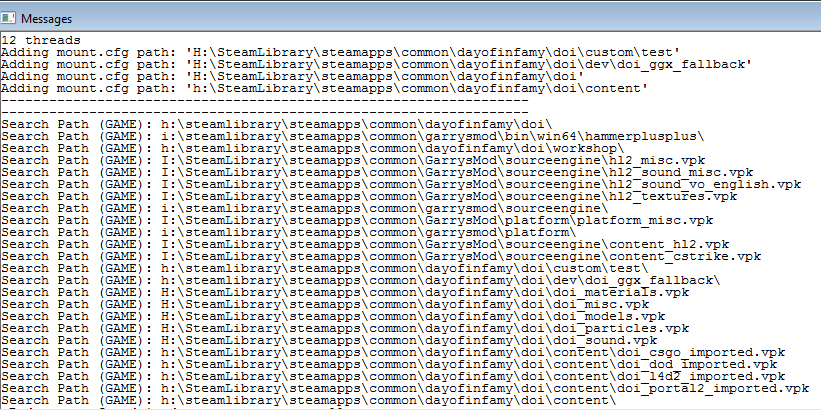 Game content is mounted and can be used in Hammer++.
Setting up CS:GO build of Hammer++
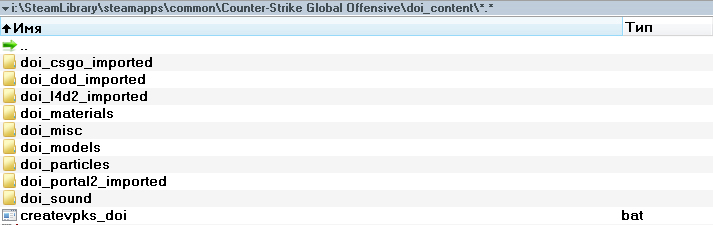 Each folder should contain VPK archive symlinks named "pak01_*".
After setting up symlinks in your "doi_content" folder, create file "gameinfo.txt" there.
Each folder should contain VPK archive symlinks named "pak01_*".
After setting up symlinks in your "doi_content" folder, create file "gameinfo.txt" there.Here's my "gameinfo" file example:
Yeah, it looks weird, but you need to mount same content twice - "gameinfo_path" stuff for Hammer++ and absolute paths for compilers. Thanks to @butchergenesis from "INS/DOI Modding" Discord server for finding this solution.
Let's start with fixing Hammer content. Copy folders "materials" and "models" from "<Path to Steam Library>/dayofinfamy/platform" to "<Path to Steam Library>/Counter-Strike Global Offensive/platform" folder.
Open Hammer++ (located in "<Path to Steam Library>/Counter-Strike Global Offensive/bin"). If you haven't launched original Hammer and CS:GO SDK, you'll see this popup: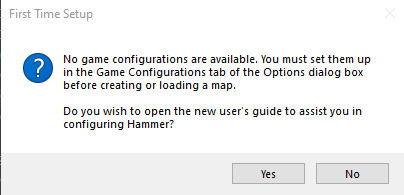
Press "No" and create new configuration ( check previous section for instructions ).
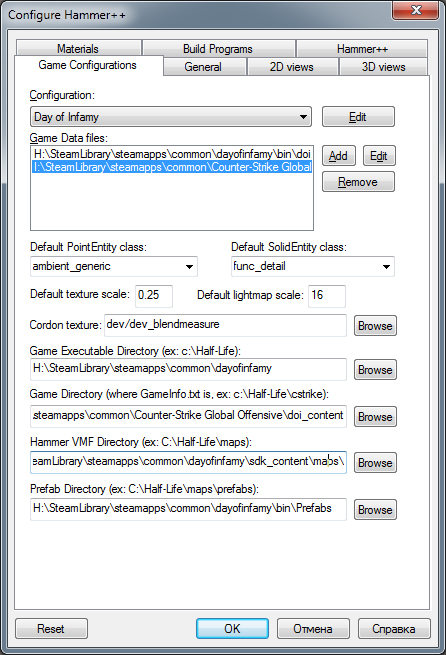
There're some differences in Game Configuration. First, you need to additionally add FGD file "hammerplusplus_fgd.fgd" located in "<Path to Steam Library>/Counter-Strike Global Offensive/bin/hammerplusplus" folder. Another difference is Game Directory parameter - you need to set it to your content folder inside CS:GO root directory (e.g. "<Path to Steam Library>/Counter-Strike Global Offensive/doi_content").
CS:GO variant of game configuration block from "hammerplusplus_gameconfig.txt"
Fixing problems with content
In order to not override original files, do not unpack original VPK files to "custom", "content", "download" folders or directly in Game Directory. In my example, I created folder "doi_ggx_fallback" at "<Path to Steam Library>\dayofinfamy\doi\dev" and exported content there:

For Garry's Mod H++ build, you need to add that folder to your mounting configuration file in the middle of load order - this search path should be before main content to take higher priority.
For CS:GO build you'll need to symlink each folder inside to your "doi_content" folder. If you're already using it for custom content, pack content of your fix folder as multi-chunk "pak01" VPK file, put it in new folder inside of "doi_content" and add path to into "gameinfo.txt" - this search path should be before main content to take higher priority. If you have trouble, check examples in previous sections.
- Open "<Path to Steam Library>\dayofinfamy\doi\doi_particles_dir.vpk" and extract content to your "doi_ggx_fallback" folder.
- Remove "particle_manifest.txt" from exported folder.
- Download Sparc, unpack it somewhere and launch.
- Click on folder button, select extracted "particles" folder and choose "Garry's Mod" at dropdown game list.
- Click button on the right to convert files.
- After conversion, find a folder where you extracted Sparc named "Converted particles (Binary 2, PCF 1)".
- Replace extracted particles with content from this folder.
- Find VMT files that has "WorldGGX" and "SurfaceGGX" in header and extract them to your "doi_ggx_fallback" with relative path.
- If header line is "SurfaceGGX", replace it to "VertexLitGeneric"
- If header line is "WorldGGX", check material parameters - if "$basetexture2" is present, replace header with "WorldVertexTransition". Otherwise, replace header with "LightmappedGeneric".
Closing Paragraph
Other guides for setting up CS:GO build of Hammer++ for games based on Portal 2 and CS:GO branch:
https://steamcommunity.com/sharedfiles/filedetails/?id=3286651278
https://steamcommunity.com/sharedfiles/filedetails/?id=2900613973
- All Weapon Skins / Cosmetics and How To Get Them [WIP]★ 5 (249)13k views302 ♥6 minUpdated Dec 21, 2017
- Complete Unit Showcase★ 5 (317)11k views300 ♥26 minUpdated Feb 17, 2022
- Next Level Gore Setting for DOI★ 5 (176)8.5k views283 ♥1 minUpdated Oct 29, 2025
- Obscure Tips n' Stuff★ 5 (220)8.3k views145 ♥2 minUpdated Oct 18, 2017
- Fix Bayonets! How to Master the Pokey Stick★ 5 (187)7.1k views162 ♥21 minUpdated May 26, 2017
- Wibble's Brutal Class Guide For Newbies★ 5 (260)6.3k views221 ♥15 minUpdated Mar 29, 2017



- Upgrading to PremiumTeam Fortress 2★ 5 (20k)1441k views11k ♥6 minUpdated May 11, 2022
- No More Room in Hell Official ManualNo More Room in Hell★ 5 (2.8k)569k views2.1k ♥29 minUpdated Apr 22, 2019
- NMRiH Community Hosting GuidesNo More Room in Hell★ 5 (526)351k views653 ♥1 minUpdated Aug 10, 2022
- How to 'Git Gud' Soon™MORDHAU★ 5 (2k)318k views3k ♥68 minUpdated Nov 16, 2024
- Лучшие кооперативные игры SteamPAYDAY 2★ 5 (1.5k)315k views2.1k ♥56 minRussianUpdated Apr 27, 2025
- Desert Eagle Heat Treated | Blue GemCounter-Strike 2★ 5 (1.6k)293k views1.5k ♥2 minUpdated Jan 16





This guide was created by its original author on the Steam Community. Are you the author and want it removed? Request removal.