Simpel's Retexturing Guide
Getting started
DISCLAIMER: I am entirely self-taught on GIMP, and almost entirely self-taught on Arma 3 tools and modding in general. Some of my methods may be sub-optimal.
You will need:
Create a folder to act as a project folder, then create another folder inside with a name like "addon folders". Finished mods consist of a folder containing one or more addons with the .pbo[community.bistudio.com] format. A PBO is essentially a compressed folder, like a .zip or .rar file, but is readable by the engine. The "addon folders" folder will contain your addons in the form of file folders before they have been packed into .pbo files.
When using assets from other mods be aware that some will have licenses prohibiting modifying and redistributing content from the mod. Some mods list a specific license in the description like APL-ND or APL-SA, but if no license is listed and if in doubt it is best to err on the side of caution and reach out to the mod creator through comments or direct messages. Be aware that if the modder does not consent to modifications of their mod they can have retextures removed from the workshop.
For this guide I will use the Gorka-R and 6B7-1M from RHSAFRF.
Create a new folder and give it the desired name with an "@" at the beginning, e.g. "@Retexture_demo".
Create a new folder inside called "addons" and a file called "mod.cpp".
Open mod.cpp in your text editor of choice.
Use the BI mod.cpp wiki page[community.bistudio.com] as reference and enter desired information. Logos and pictures can be created later so if this is a public release just leave the path blank for now and we will come back for this at the end. It should at least contain the name and author of the mod.
Create a new folder in the "addon folders" folder. Give it a concise but unique name describing the contents of that particular addon, e.g. "simpel_6b71m_retex". Using a unique prefix is recommended to prevent conflicts with other mods.
Create a subfolder called "textures" and a file called "config.cpp".
You will need:
- Arma 3
- Arma 3 Tools
- Any IDE (VS, VS Code, Notepad++, etc)
- GIMP (or any image editor, but this guide uses GIMP)
- PBOManager
Create a folder to act as a project folder, then create another folder inside with a name like "addon folders". Finished mods consist of a folder containing one or more addons with the .pbo[community.bistudio.com] format. A PBO is essentially a compressed folder, like a .zip or .rar file, but is readable by the engine. The "addon folders" folder will contain your addons in the form of file folders before they have been packed into .pbo files.
Choosing an asset
When using assets from other mods be aware that some will have licenses prohibiting modifying and redistributing content from the mod. Some mods list a specific license in the description like APL-ND or APL-SA, but if no license is listed and if in doubt it is best to err on the side of caution and reach out to the mod creator through comments or direct messages. Be aware that if the modder does not consent to modifications of their mod they can have retextures removed from the workshop.
For this guide I will use the Gorka-R and 6B7-1M from RHSAFRF.
Creating a blank mod
Create a new folder and give it the desired name with an "@" at the beginning, e.g. "@Retexture_demo".
Create a new folder inside called "addons" and a file called "mod.cpp".
Open mod.cpp in your text editor of choice.
Use the BI mod.cpp wiki page[community.bistudio.com] as reference and enter desired information. Logos and pictures can be created later so if this is a public release just leave the path blank for now and we will come back for this at the end. It should at least contain the name and author of the mod.
Creating a blank addon
Create a new folder in the "addon folders" folder. Give it a concise but unique name describing the contents of that particular addon, e.g. "simpel_6b71m_retex". Using a unique prefix is recommended to prevent conflicts with other mods.
Create a subfolder called "textures" and a file called "config.cpp".
CfgPatches
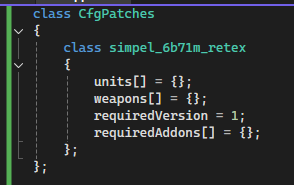
All configs require a CfgPatches class. It declares the basic information about the addon including the name, contents, and the dependencies. Copy the following config from below, replacing simpel_6b71m_retex with the name of your addon folder.
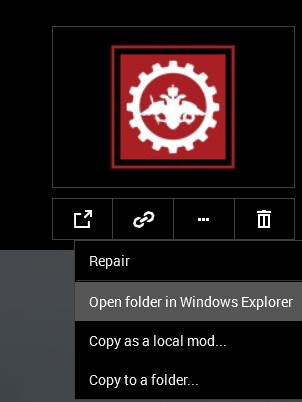
To add the dependencies, locate the mod containing the model your retexture is using. You can do this by clicking the mod in the Arma launcher, then clicking "Open in Windows Explorer".
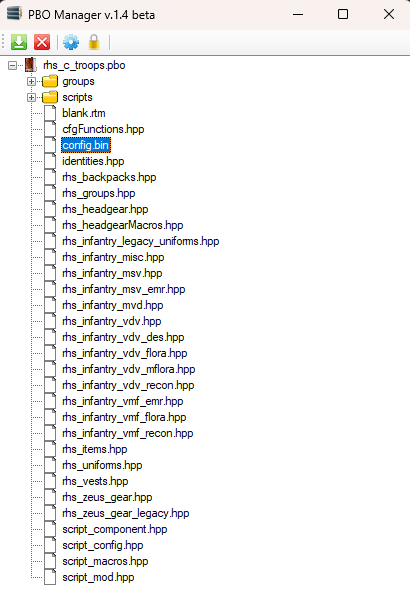
Locate the appropriate PBO, in this case "rhs_c_troops". Double click it to open in PBOManager, then locate the config.bin file and drag it into your project folder. if you are struggling to find the correct PBO, Advanced Developer Tools may help.
Launch Arma Tools and click the button labelled CfgConvert.
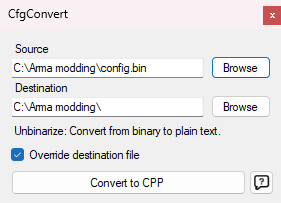
For the box labelled "source", click the "Browse" button and locate the config.bin file. Double click it and the Destination path should autofill to the same folder. Click "Convert to CPP".
Open the newly generated config.cpp file. Copy the classname of the addon in CfgPatches to the dependencies of your mod in quotes.
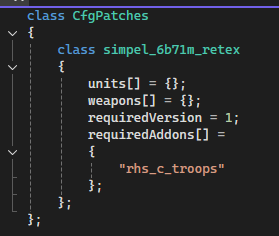
To add the dependencies, locate the mod containing the model your retexture is using. You can do this by clicking the mod in the Arma launcher, then clicking "Open in Windows Explorer".
Locate the appropriate PBO, in this case "rhs_c_troops". Double click it to open in PBOManager, then locate the config.bin file and drag it into your project folder. if you are struggling to find the correct PBO, Advanced Developer Tools may help.
Launch Arma Tools and click the button labelled CfgConvert.
For the box labelled "source", click the "Browse" button and locate the config.bin file. Double click it and the Destination path should autofill to the same folder. Click "Convert to CPP".
Open the newly generated config.cpp file. Copy the classname of the addon in CfgPatches to the dependencies of your mod in quotes.
Non-uniform configs
Open the config for the addon with the model you are using. Search for the string "class [classname]" where [classname] is the classname of your item ingame. It can be found by hovering over it in the list in the vanilla or ace arsenal.
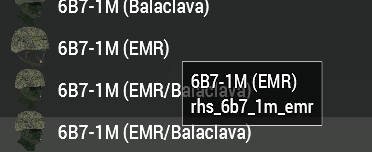
If the class does not contain the variable hiddenSelectionsTextures[], check the parent class and other classes using the same model (.p3d file). If no class using the model you are attempting to retexture has hiddenSelections, there is a high chance that the model was not configured to be retextured and unless you can obtain the debinarised .p3d file, it is impossible to retexture. The only exception is that sometimes multiple models use the same texture set, e.g. the Zenitco AKs in RHS share the same textures as the non-Zenitco versions so their classes do not contain hiddenSelections, they just inherit them from the non-Zenitco variants.
Create a new class "CfgWeapons" in the config for your addon and copy the class of the item into it.
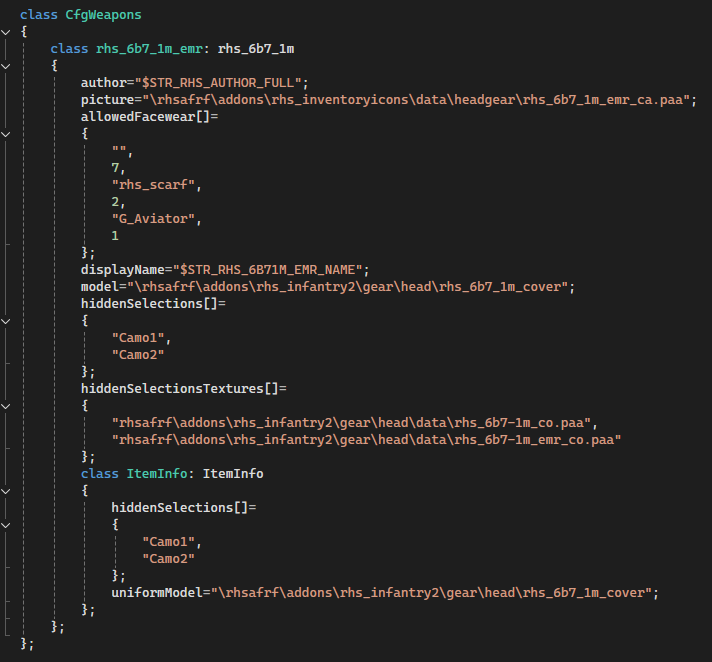
Declare a new class above the one you copied, and give it the same name. Give the class you copied a new name, and replace the class it inherits from with the old name.
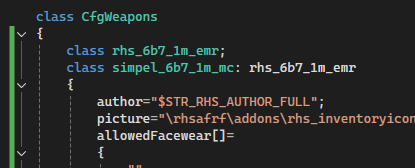
Declare classes in CfgWeapons for any other missing inherited classes.
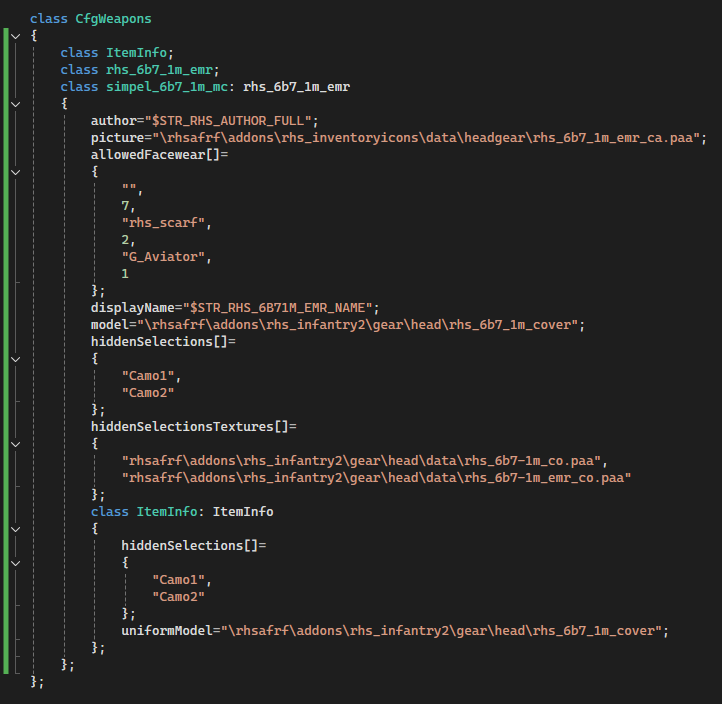
Replace the author and displayname variables. You can also remove any unnecessary variables/classes if you know what you're doing.
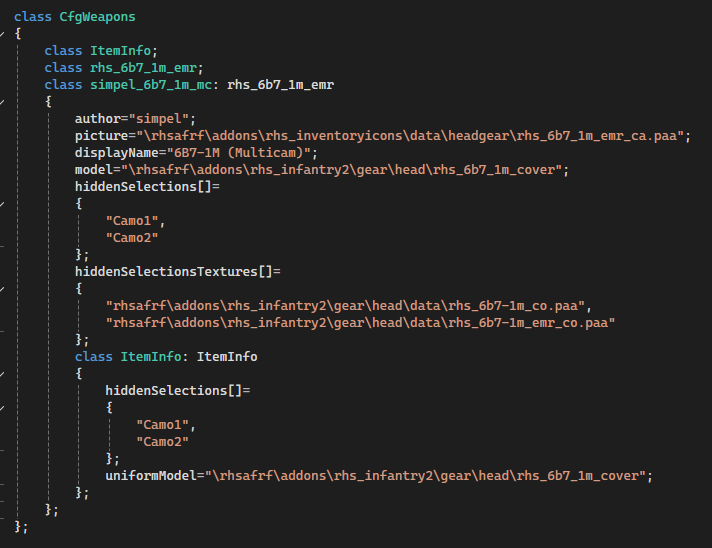
Go to the paths specified in hiddenSelectionsTextures[] and copy the files to your project folder for use later. You should copy the file specified in the path, as well as files ending in _as and _nohq.
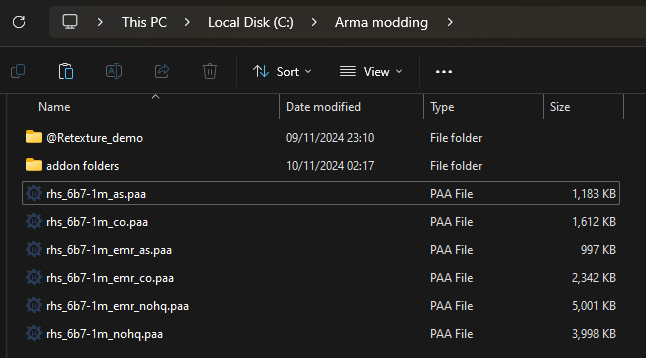
Change the paths in hiddenSelectionsTextures to the textures subfolder of your addon folder, and change the names. In this case I am only changing the texture for the helmet cover not the helmet itself, so I only change the path for the cover.
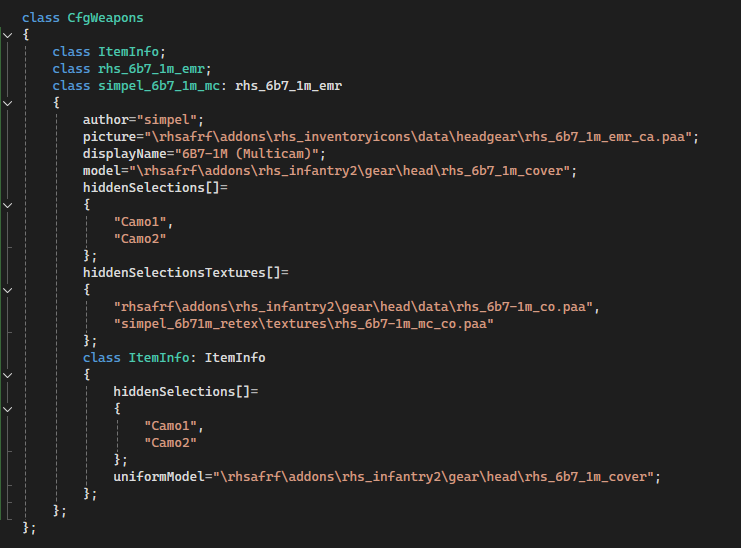
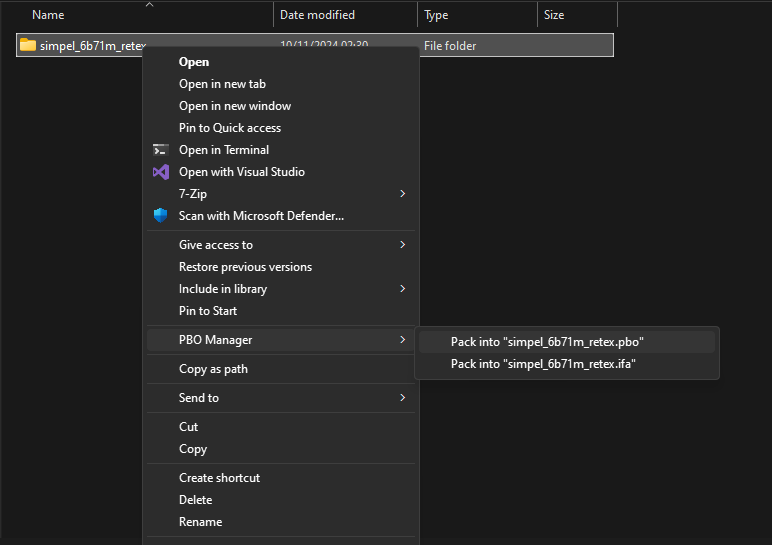
At this point the CfgWeapons class should be finished. You can confirm this by packing it into a PBO using PBOManager, then placing the pbo in the addons folder of your mod.
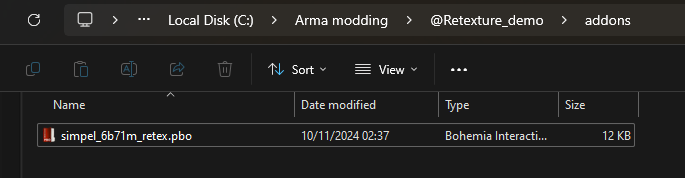
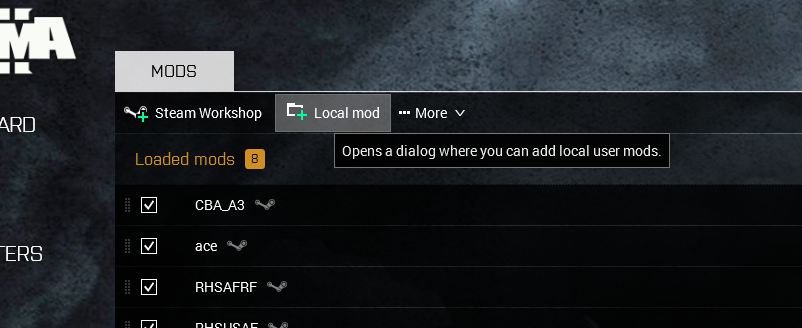
Add the mod as a local mod by clicking the "Local mod" button at the top of your launcher. Select your mod folder (the one that begins with @) and it should appear in the launcher as a local addon.
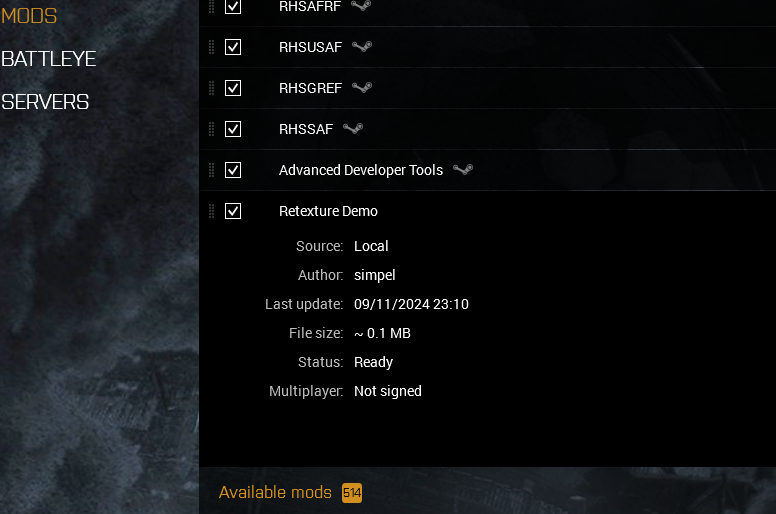
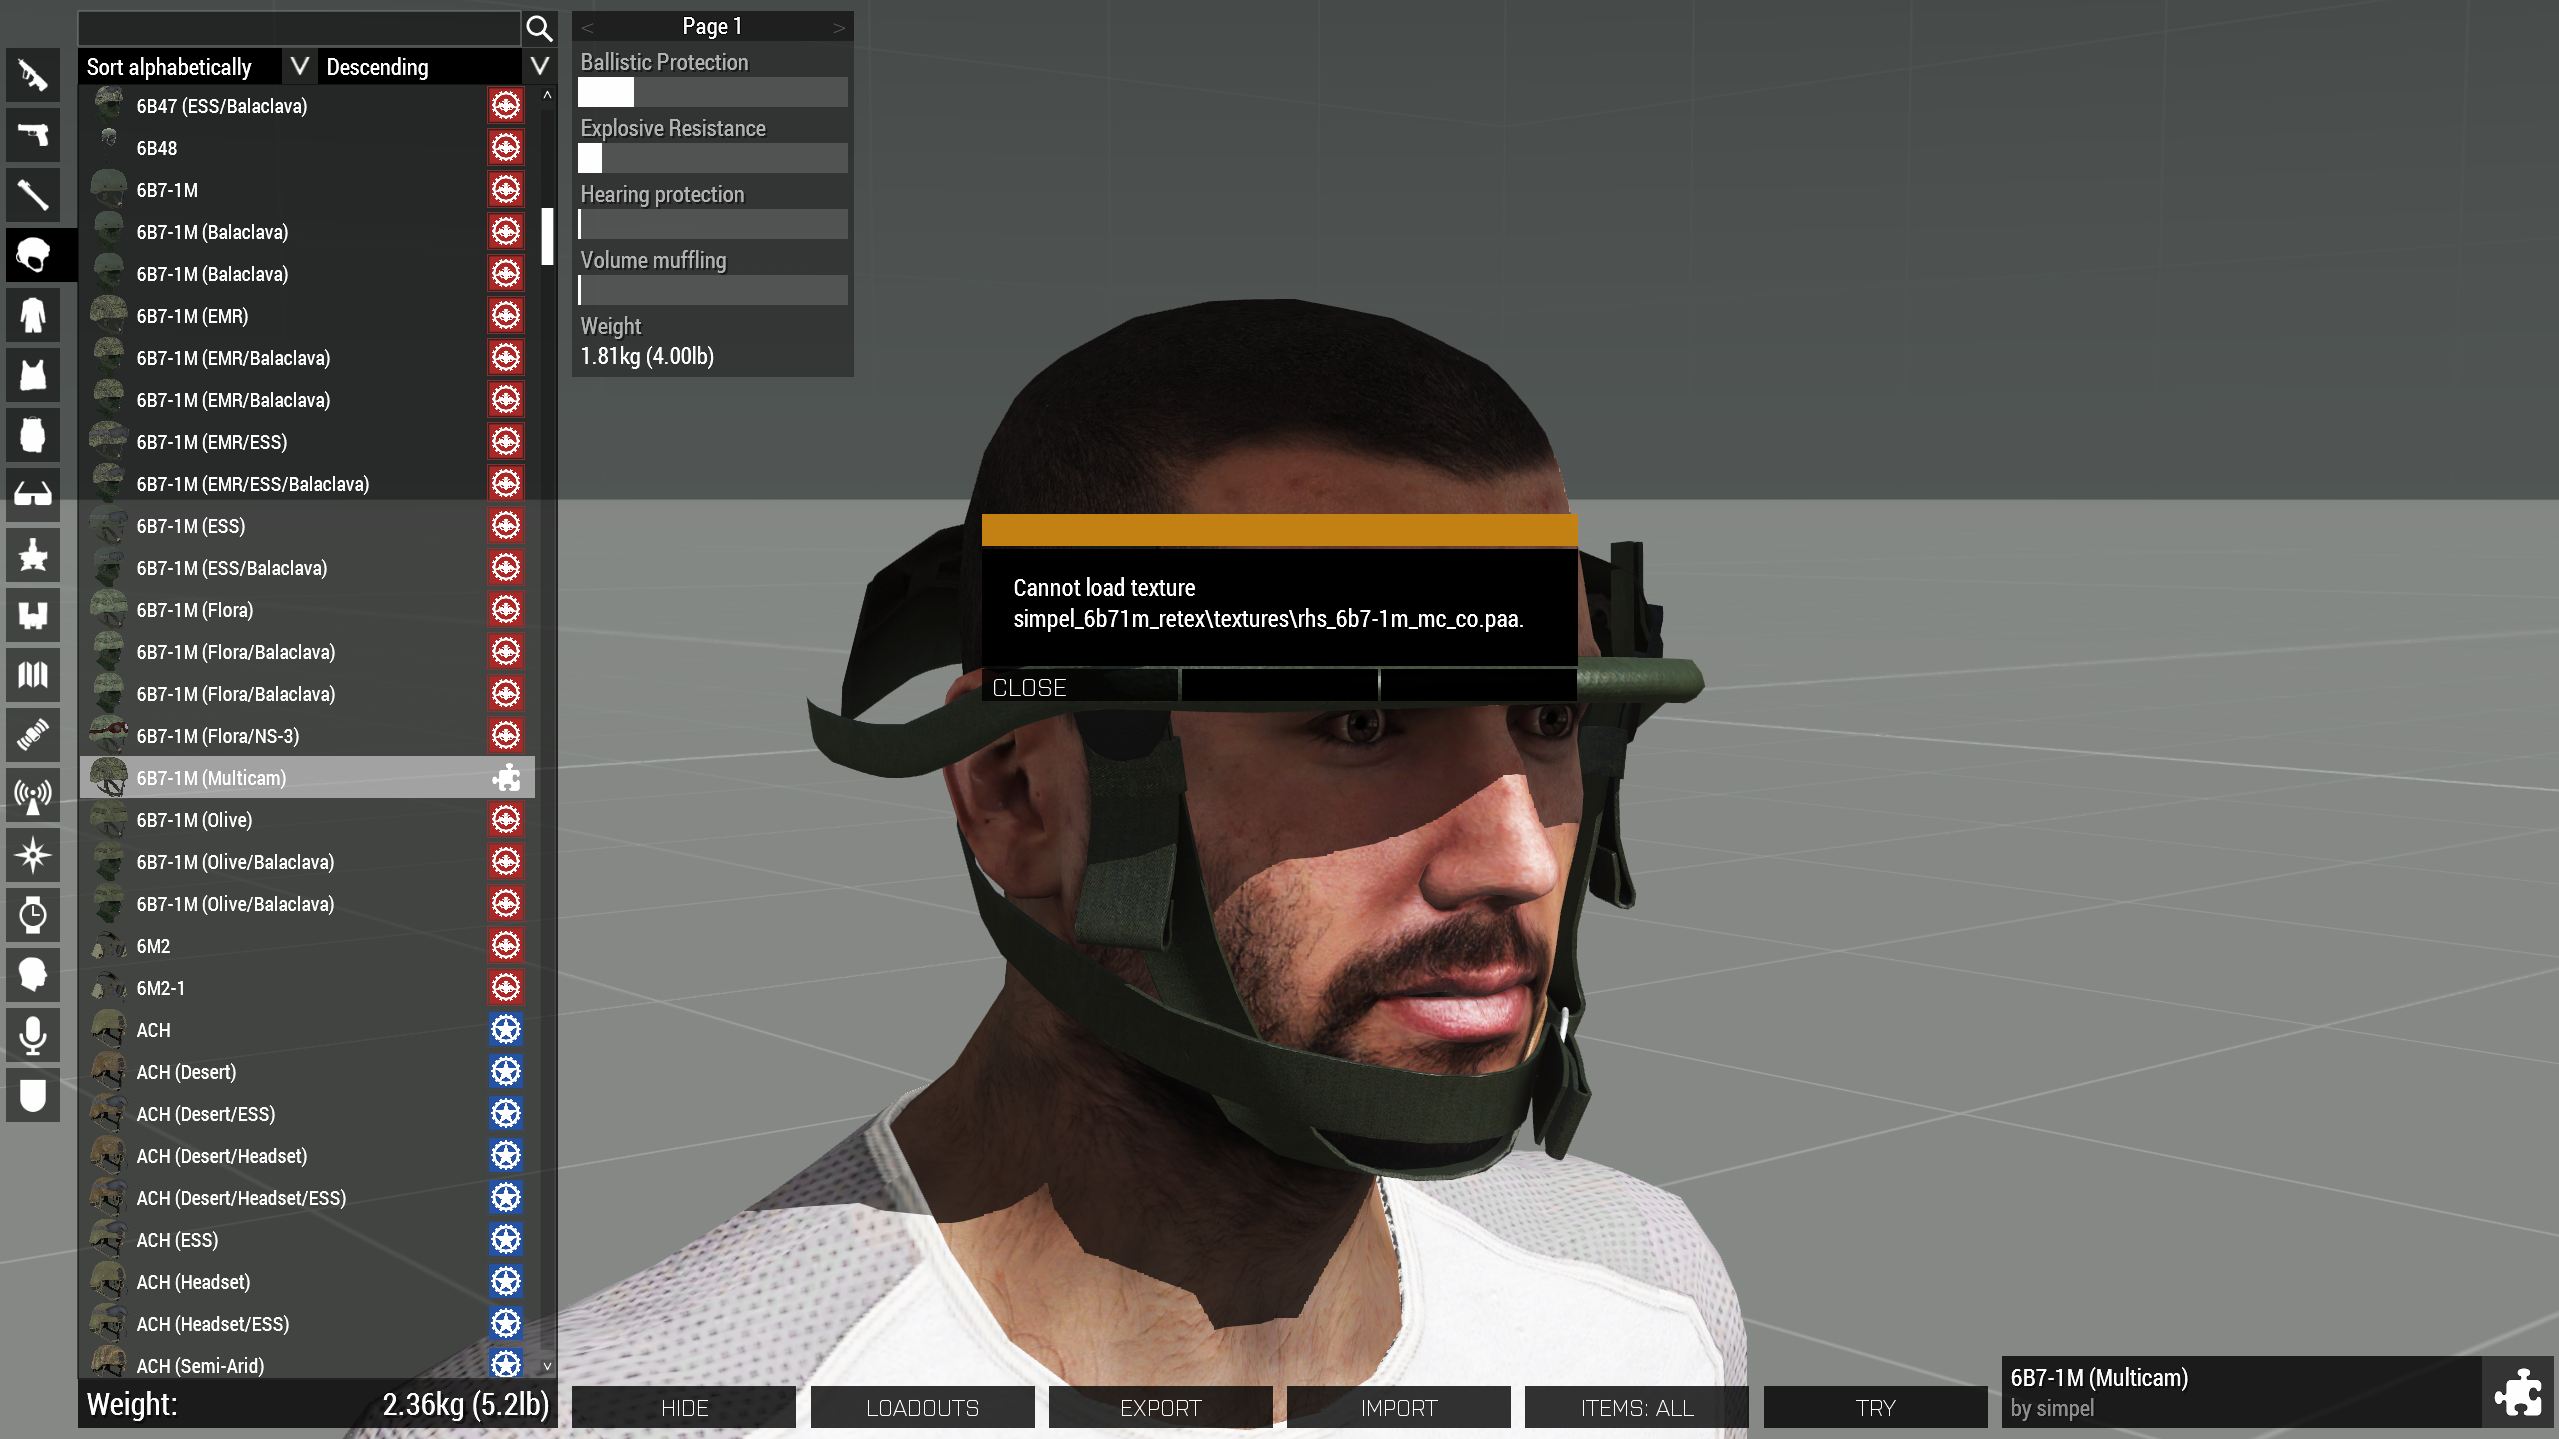
When you launch the game you should see your item in the arsenal, and when you click on it you should receive a missing texture error. If you receieve no error and it looks the same as the item you inherited from, you either did the hiddenSelections incorrectly or there are none for that model.
If the class does not contain the variable hiddenSelectionsTextures[], check the parent class and other classes using the same model (.p3d file). If no class using the model you are attempting to retexture has hiddenSelections, there is a high chance that the model was not configured to be retextured and unless you can obtain the debinarised .p3d file, it is impossible to retexture. The only exception is that sometimes multiple models use the same texture set, e.g. the Zenitco AKs in RHS share the same textures as the non-Zenitco versions so their classes do not contain hiddenSelections, they just inherit them from the non-Zenitco variants.
Create a new class "CfgWeapons" in the config for your addon and copy the class of the item into it.
Declare a new class above the one you copied, and give it the same name. Give the class you copied a new name, and replace the class it inherits from with the old name.
Declare classes in CfgWeapons for any other missing inherited classes.
Replace the author and displayname variables. You can also remove any unnecessary variables/classes if you know what you're doing.
Go to the paths specified in hiddenSelectionsTextures[] and copy the files to your project folder for use later. You should copy the file specified in the path, as well as files ending in _as and _nohq.
Change the paths in hiddenSelectionsTextures to the textures subfolder of your addon folder, and change the names. In this case I am only changing the texture for the helmet cover not the helmet itself, so I only change the path for the cover.
At this point the CfgWeapons class should be finished. You can confirm this by packing it into a PBO using PBOManager, then placing the pbo in the addons folder of your mod.
Add the mod as a local mod by clicking the "Local mod" button at the top of your launcher. Select your mod folder (the one that begins with @) and it should appear in the launcher as a local addon.
When you launch the game you should see your item in the arsenal, and when you click on it you should receive a missing texture error. If you receieve no error and it looks the same as the item you inherited from, you either did the hiddenSelections incorrectly or there are none for that model.
Uniform configs
A single uniform requires two classes, one within CfgWeapons and one within CfgVehicles.
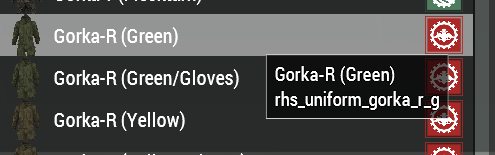
Open the config for the addon with the model you are using. Search for the string "class [classname]" where [classname] is the classname of your item ingame. It can be found by hovering over it in the list in the vanilla or ace arsenal, e.g. "rhs_uniform_gorka_r_g".
Some people prefer to call their uniformClasses for CfgVehicles and CfgWeapons the same thing, so make sure you have the correct one before copying it. It should contain the class "ItemInfo". If it doesn't, go to the next instance of "class [classname]" in the config. Copy the class when you find it.
Declare the class CfgWeapons in the config.cpp in your addon folder, then paste the class from the config of the uniform you are retexturing into it.
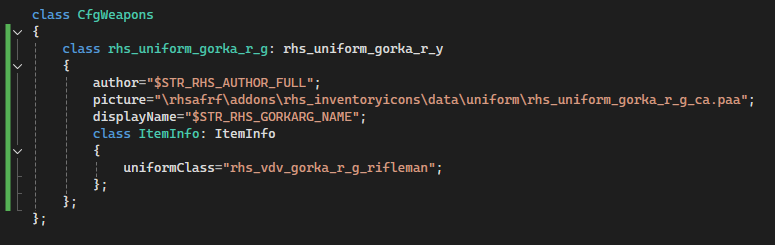
Copy the string in contained in the uniformClass variable, then search for "class [string]" in the config for the other mod. Locate the class and copy it.
If the class does not contain the variable hiddenSelectionsTextures[], check the parent class and other classes using the same model (.p3d file). If no class using the model you are attempting to retexture has hiddenSelections, there is a high chance that the model was not configured to be retextured and unless you can obtain the debinarised .p3d file, it is impossible to retexture. The only exception is that sometimes multiple models use the same texture set, e.g. the Zenitco AKs in RHS share the same textures as the non-Zenitco versions so their classes do not contain hiddenSelections, they just inherit them from the non-Zenitco variants.
In the config for your addon, create a new class called CfgVehicles and paste the uniform class into it.
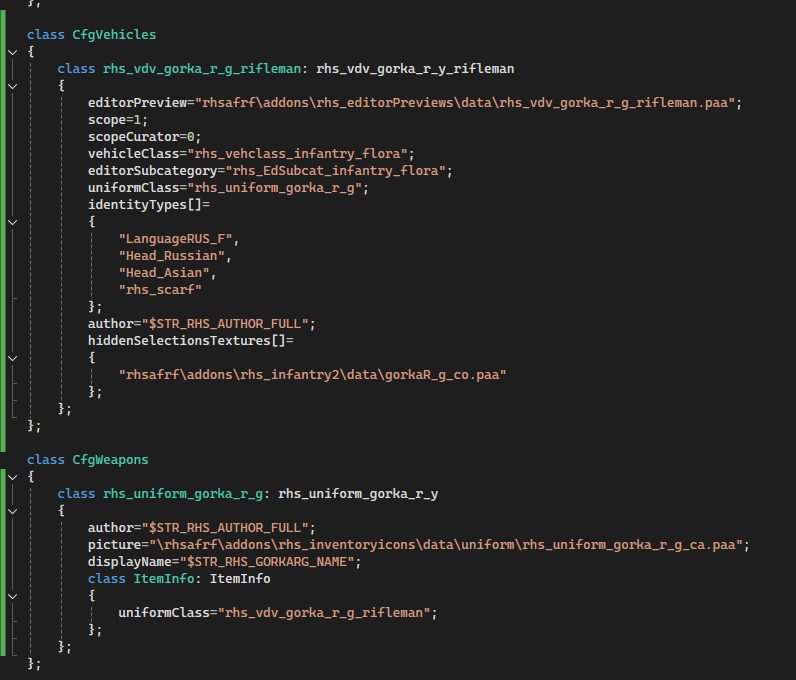
Declare new classes above the ones you copied, and give them the same names. Give the classes you copied new names, and replace the classes they inherit from with the old names. Update the classnames in the uniformClass variable - the variable in the cfgWeapons class should contain the classname of the class in cfgVehicles and vice versa.
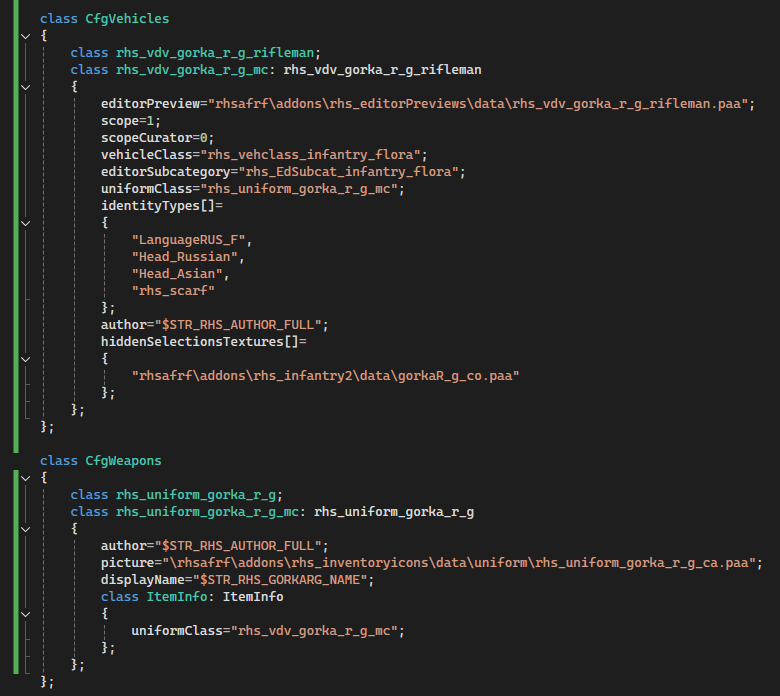
Declare the dependency for ItemInfo in CfgWeapons. Update the authors and displayNames. Remove unnecessary variables if you know what you're doing.
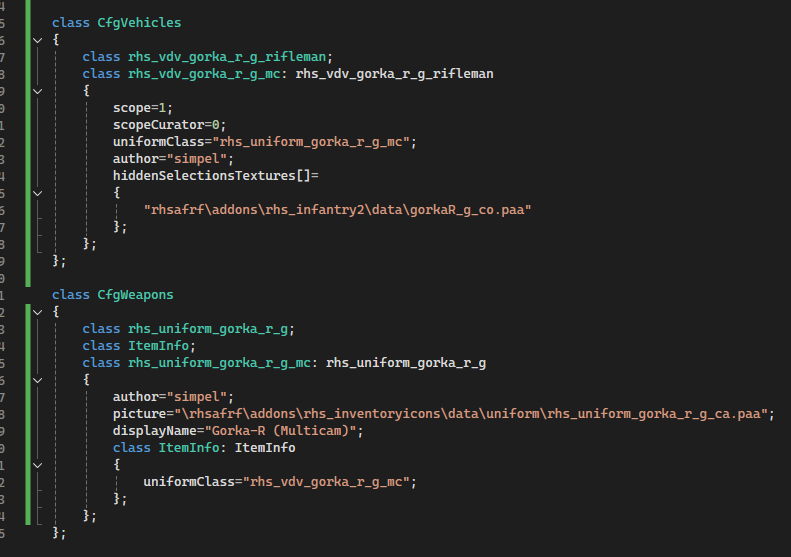
Go to the paths specified in hiddenSelectionsTextures[] and copy the files to your project folder for use later. You should copy the file specified in the path, as well as files ending in _as and _nohq.
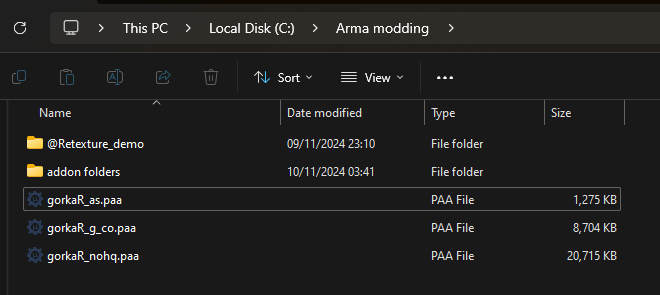
Change the paths in hiddenSelectionsTextures to the textures subfolder of your addon folder, and change the names of the textures.
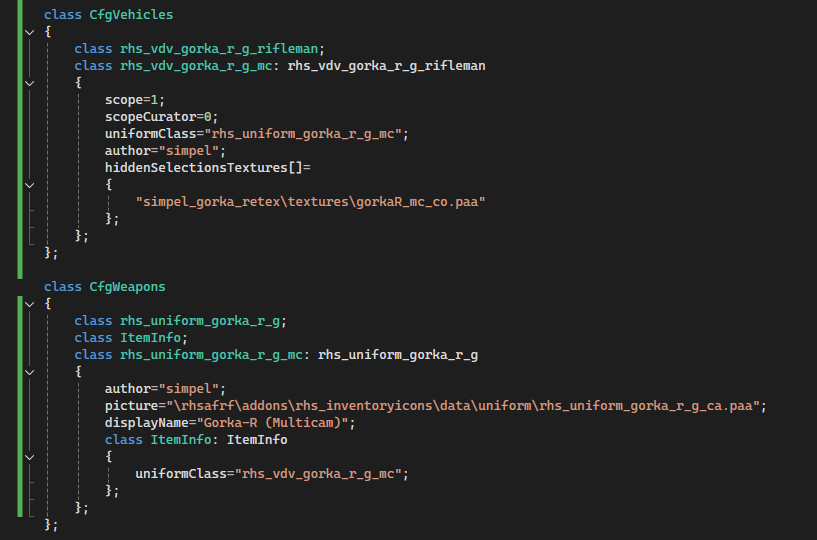
At this point the CfgWeapons class should be finished. You can confirm this by packing it into a PBO using PBOManager, then placing the pbo in the addons folder of your mod.
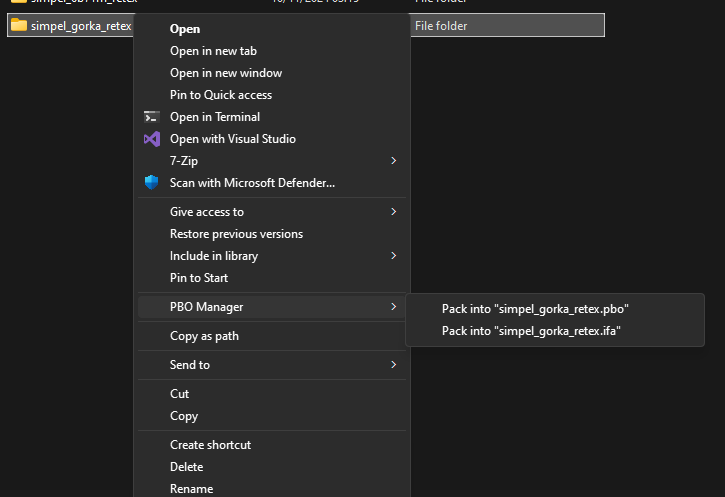
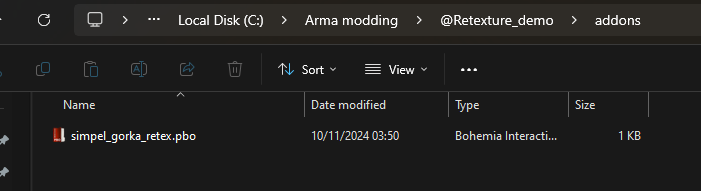
Add the mod as a local mod by clicking the "Local mod" button at the top of your launcher. Select your mod folder (the one that begins with @) and it should appear in the launcher as a local addon.
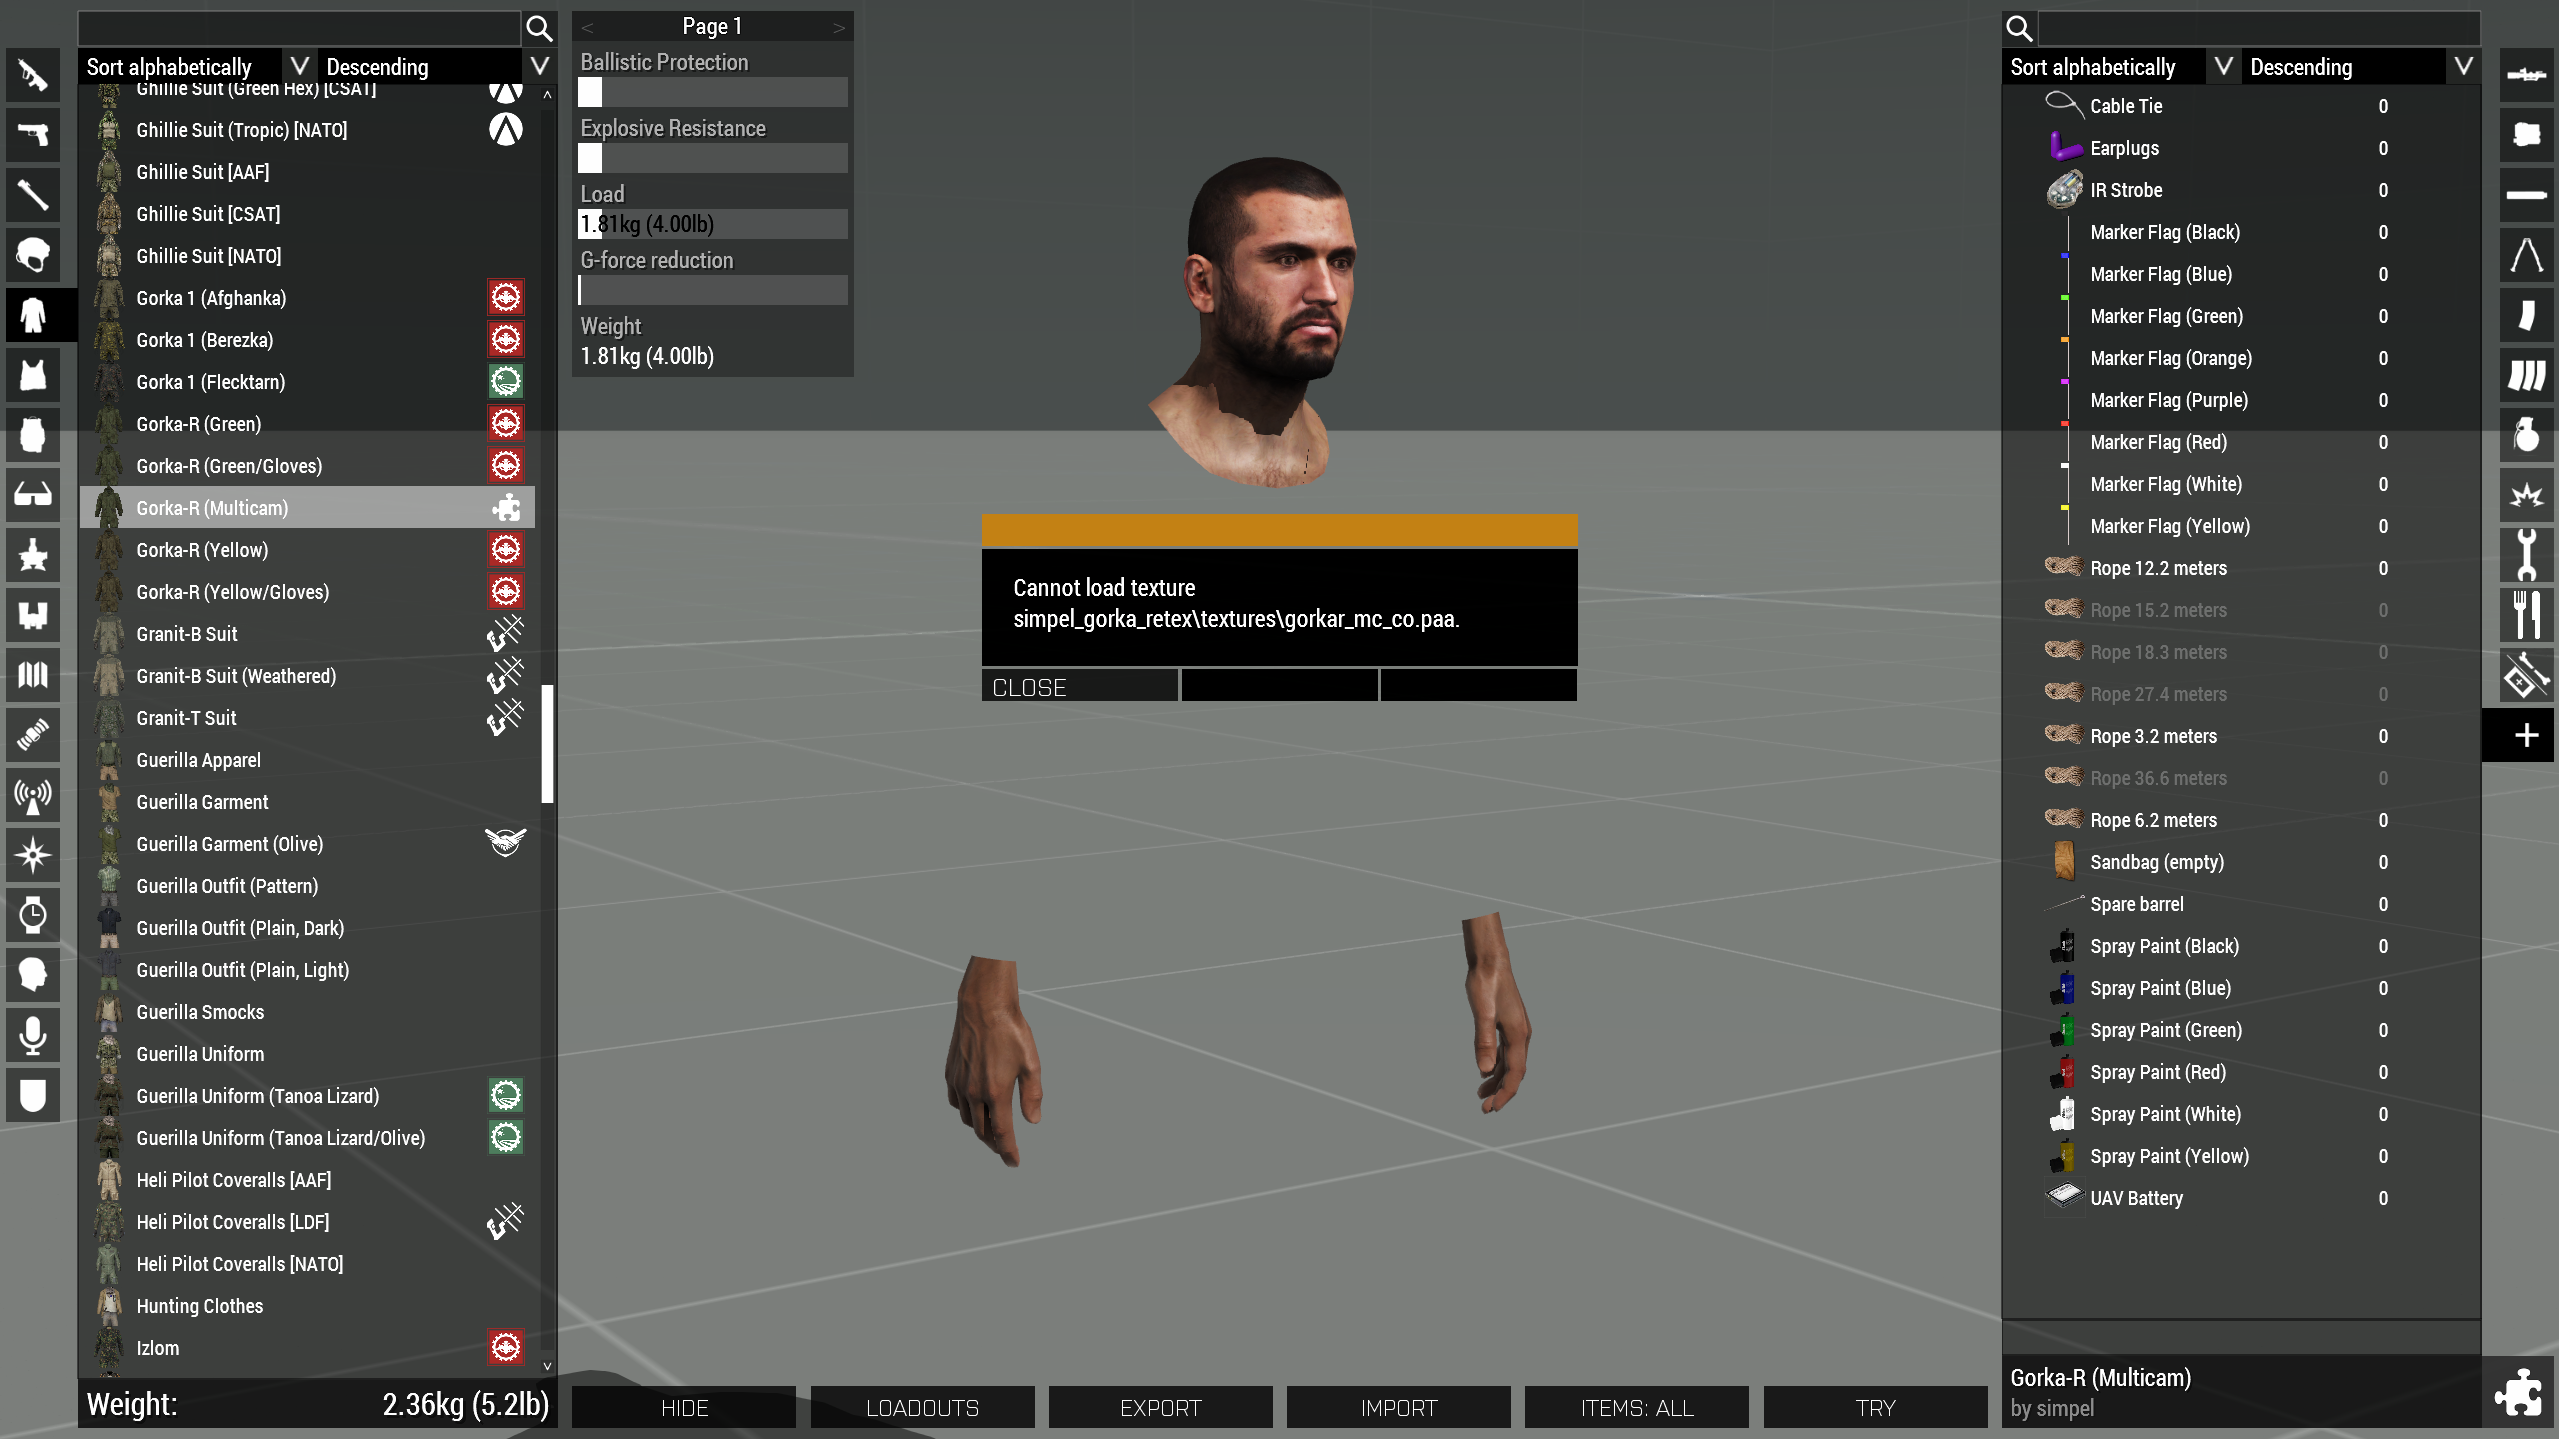
When you launch the game you should see your uniform in the arsenal, and when you click on it you should receive a missing texture error. If you receieve no error and it looks the same as the item you inherited from, you either did the hiddenSelections incorrectly or there are none for that model.
Open the config for the addon with the model you are using. Search for the string "class [classname]" where [classname] is the classname of your item ingame. It can be found by hovering over it in the list in the vanilla or ace arsenal, e.g. "rhs_uniform_gorka_r_g".
Some people prefer to call their uniformClasses for CfgVehicles and CfgWeapons the same thing, so make sure you have the correct one before copying it. It should contain the class "ItemInfo". If it doesn't, go to the next instance of "class [classname]" in the config. Copy the class when you find it.
Declare the class CfgWeapons in the config.cpp in your addon folder, then paste the class from the config of the uniform you are retexturing into it.
Copy the string in contained in the uniformClass variable, then search for "class [string]" in the config for the other mod. Locate the class and copy it.
If the class does not contain the variable hiddenSelectionsTextures[], check the parent class and other classes using the same model (.p3d file). If no class using the model you are attempting to retexture has hiddenSelections, there is a high chance that the model was not configured to be retextured and unless you can obtain the debinarised .p3d file, it is impossible to retexture. The only exception is that sometimes multiple models use the same texture set, e.g. the Zenitco AKs in RHS share the same textures as the non-Zenitco versions so their classes do not contain hiddenSelections, they just inherit them from the non-Zenitco variants.
In the config for your addon, create a new class called CfgVehicles and paste the uniform class into it.
Declare new classes above the ones you copied, and give them the same names. Give the classes you copied new names, and replace the classes they inherit from with the old names. Update the classnames in the uniformClass variable - the variable in the cfgWeapons class should contain the classname of the class in cfgVehicles and vice versa.
Declare the dependency for ItemInfo in CfgWeapons. Update the authors and displayNames. Remove unnecessary variables if you know what you're doing.
Go to the paths specified in hiddenSelectionsTextures[] and copy the files to your project folder for use later. You should copy the file specified in the path, as well as files ending in _as and _nohq.
Change the paths in hiddenSelectionsTextures to the textures subfolder of your addon folder, and change the names of the textures.
At this point the CfgWeapons class should be finished. You can confirm this by packing it into a PBO using PBOManager, then placing the pbo in the addons folder of your mod.
Add the mod as a local mod by clicking the "Local mod" button at the top of your launcher. Select your mod folder (the one that begins with @) and it should appear in the launcher as a local addon.
When you launch the game you should see your uniform in the arsenal, and when you click on it you should receive a missing texture error. If you receieve no error and it looks the same as the item you inherited from, you either did the hiddenSelections incorrectly or there are none for that model.
Texturing
When texturing camouflages, a high quality swatch is very important.
Discord Camo Thread[discord.com] has a huge variety of very high quality swatches. Search for your pattern in the pattern sharing channel or check through the various drives in #useful-tools-and-resources.
RedditCamoThread[www.reddit.com] is also worth checking if you don't find what you're looking for on the discord.
_co - More common texture file type, only supports fully opaque or fully transparent textures
_ca - Texture file, supports semi-transparency
_as - Ambient occlusion
_nohq - Normal map
_smdi - Specular/Metallic, not usually necessary for retextures
The _as file is not required to make the retexture, but it will make the end result look significantly better.
Open TexView 2 from Arma 3 Tools. Drag a .paa texture over TexView 2. It should display the texture in the window.
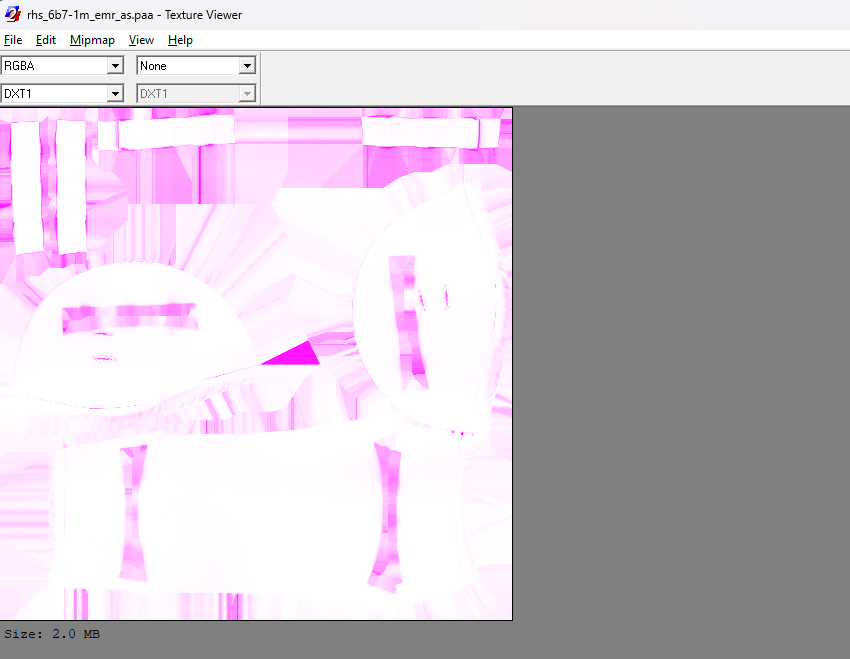
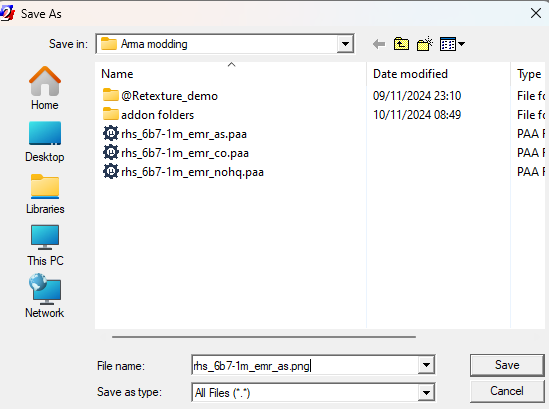
Click File>Save As, then replace the .paa suffix with .png and change the "Save as type" option to "All Files", then click Save. Do this for all textures.
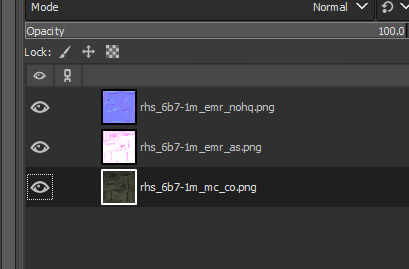
Rename the _co texture to the name you gave it in your config, then open it in GIMP. Drag the _as and _nohq files over the GIMP window to add as layers.
If you have a solid colour texture for the model you are using, the _as and _nohq files are unnecessary.
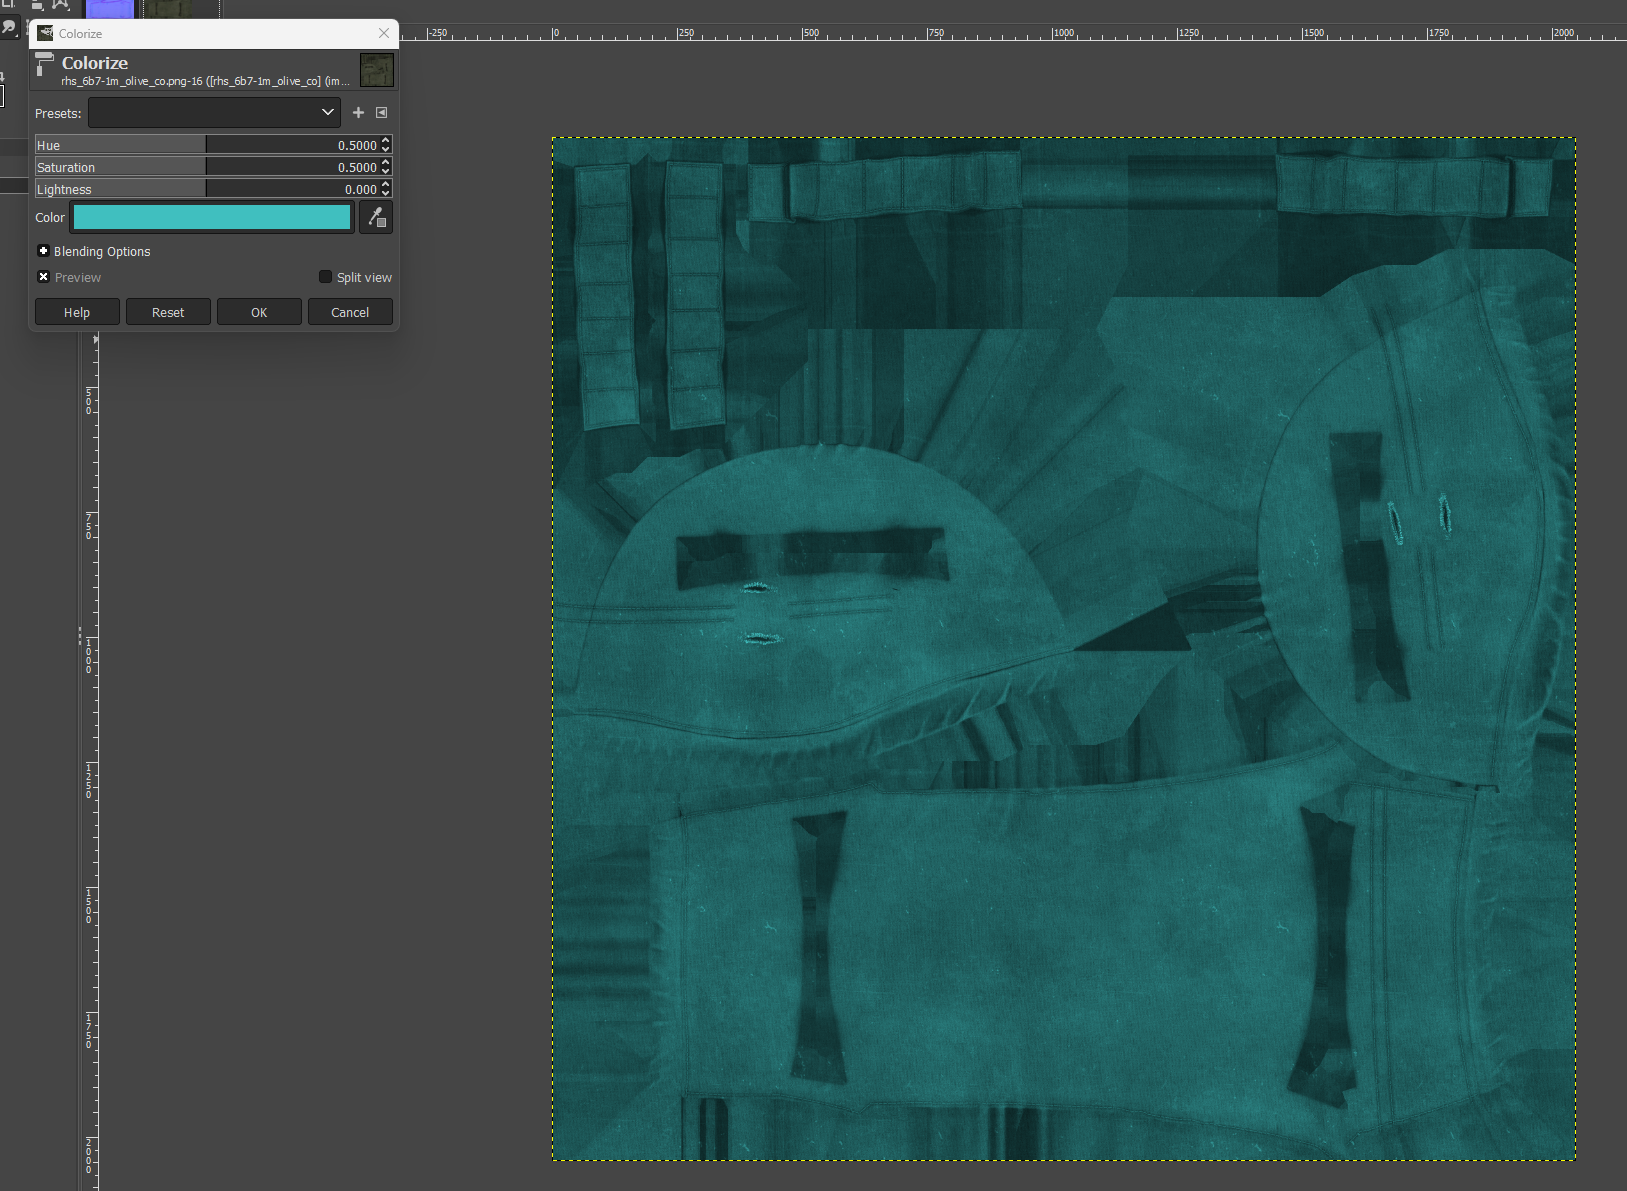
If you are retexturing a solid colour texture to another solid colour, click Colors>Colorize and use the sliders or colour picker to change it to the correct shade. You can skip to the Testing heading.
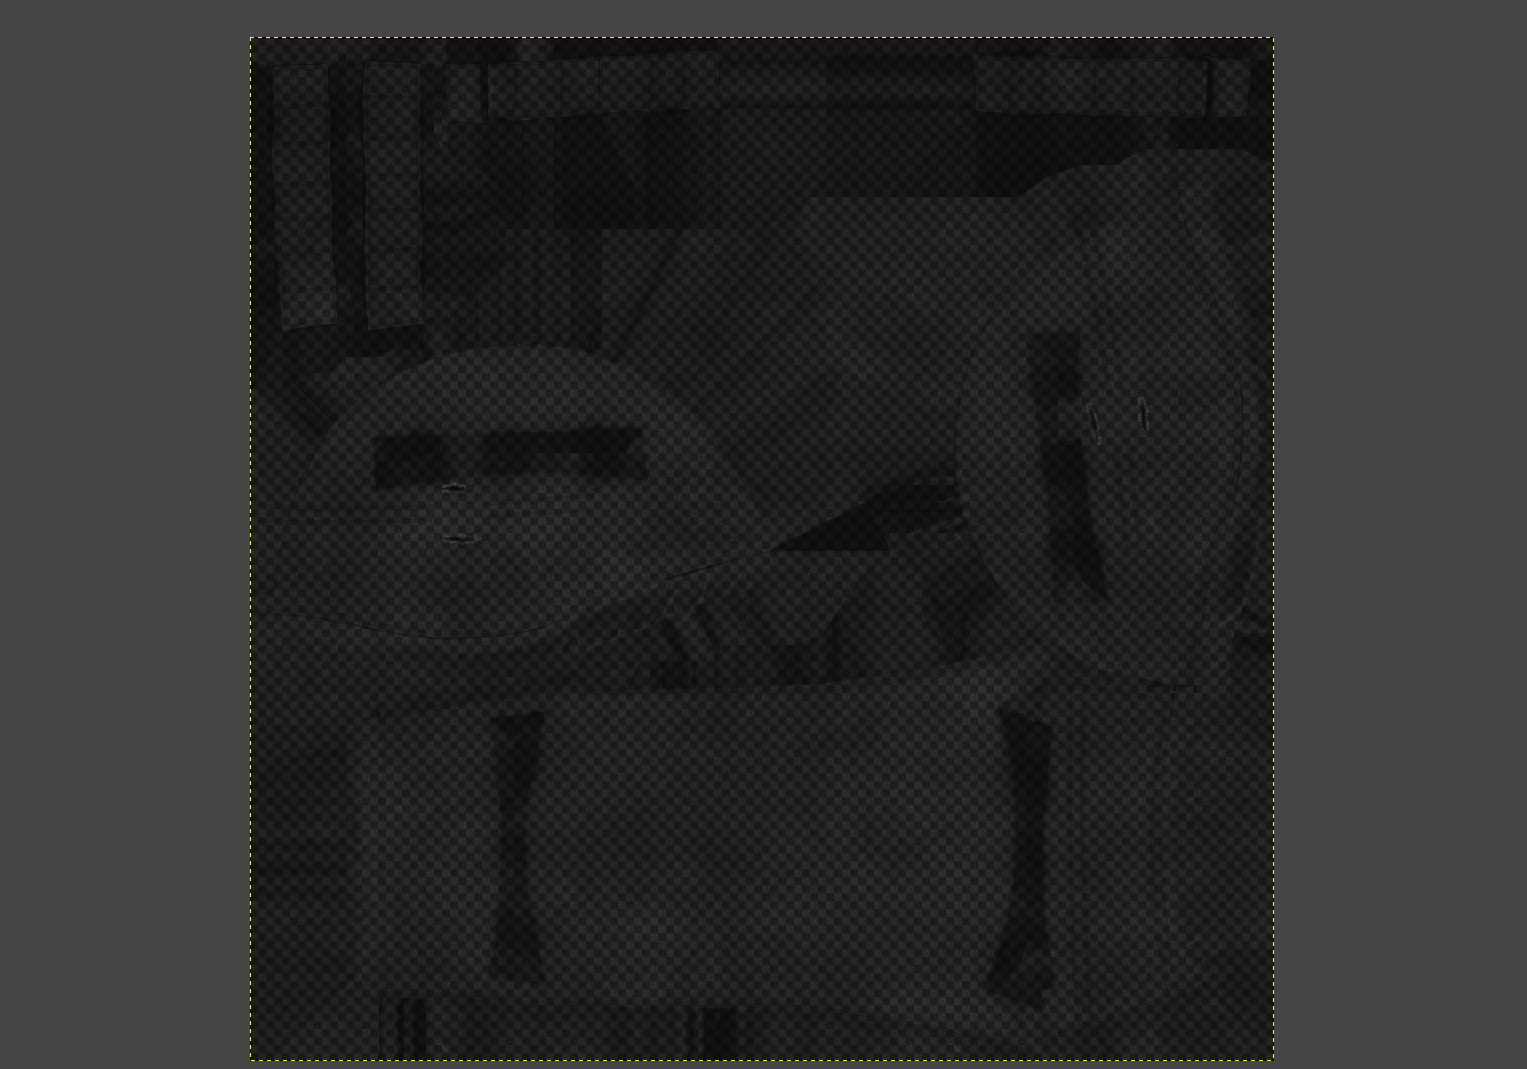
 If you are retexturing a solid colour texture to a camouflaged item, click Colors>Desaturate>Desaturate, then click OK. Next click Colors>Color to Alpha, and click OK. Skip to the Applying the Camouflage section.
If you do not have a solid colour texture, follow the steps below.
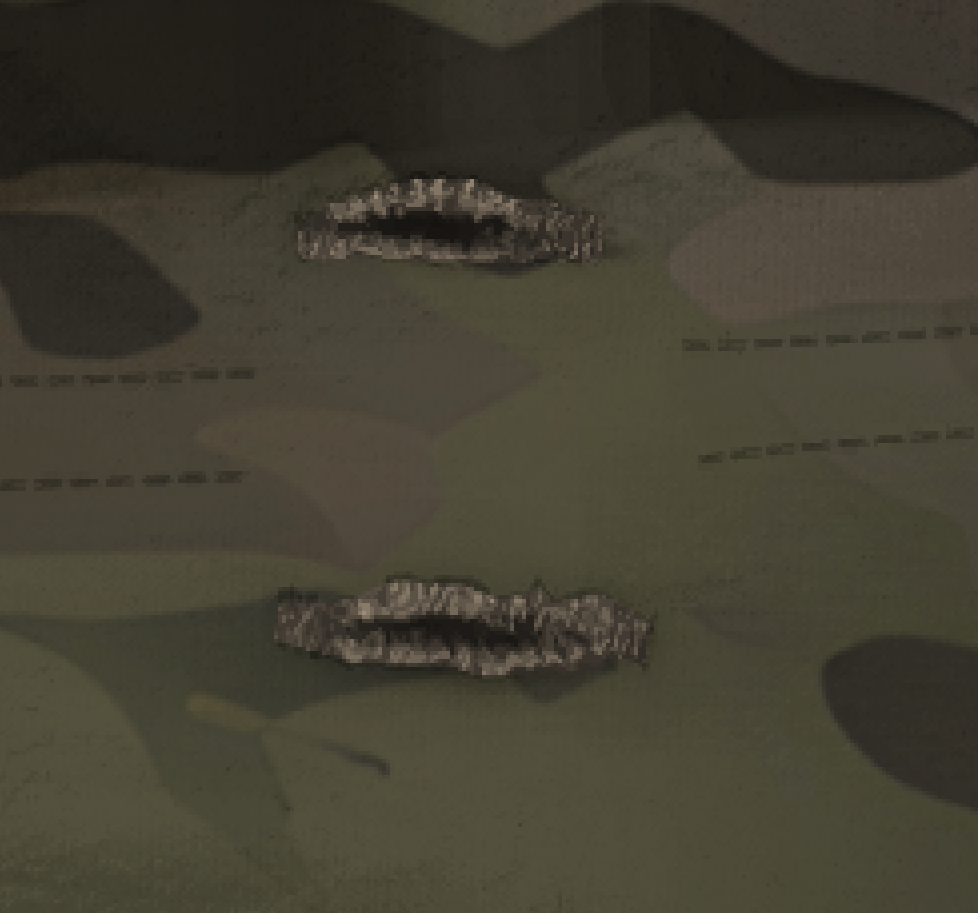
First, hide both the _nohq and _as layers by clicking the eye icons in the layers window. On your base texture file look for any parts of the texture that are not camouflage. In my case this is only the exposed threads around the holes in the cover.
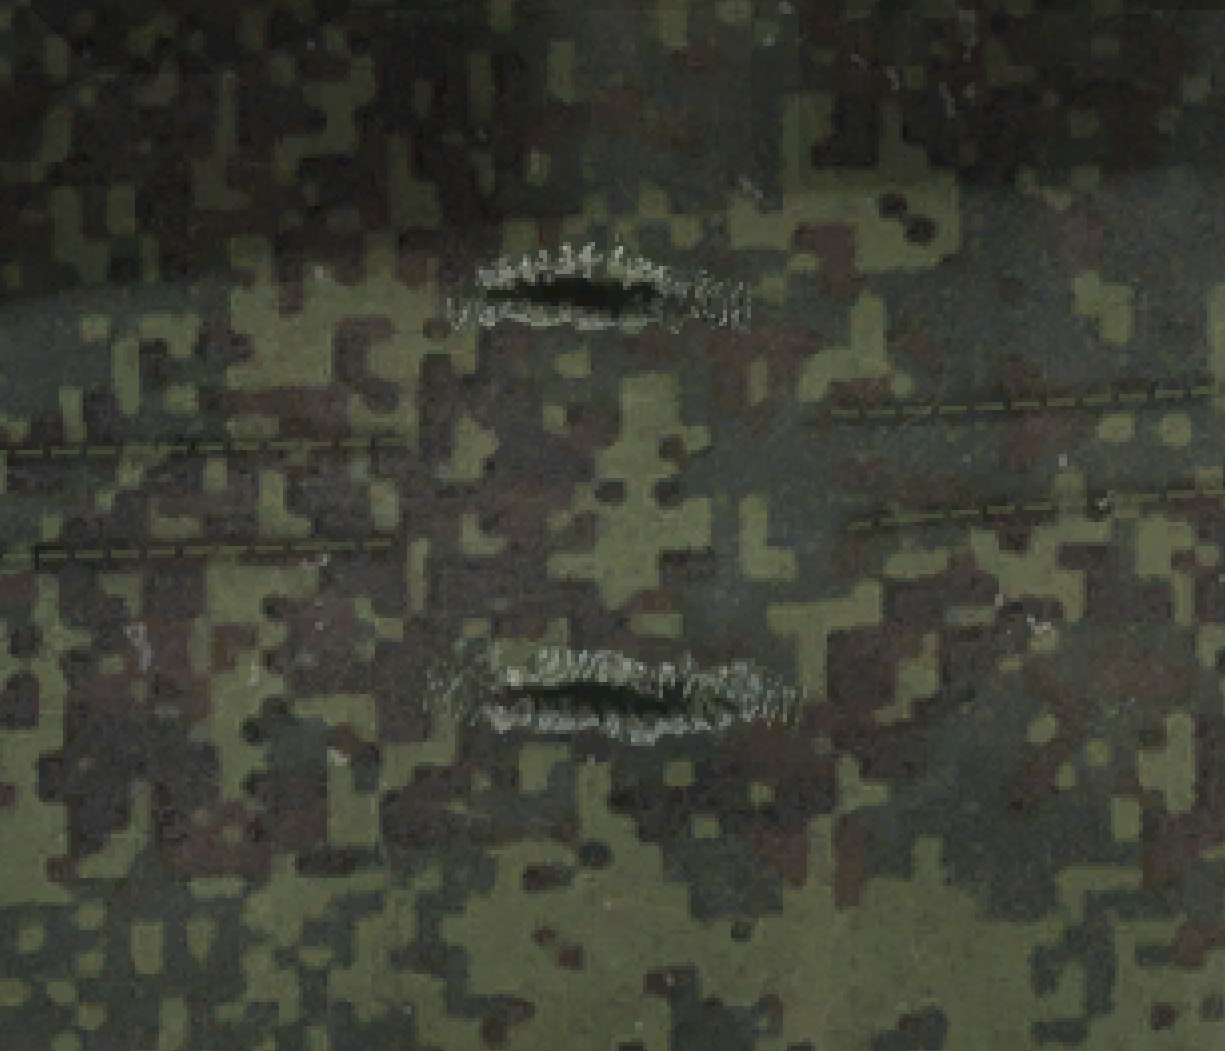
Select the areas using the free select tool (Hotkey = F), then copy paste the selection.
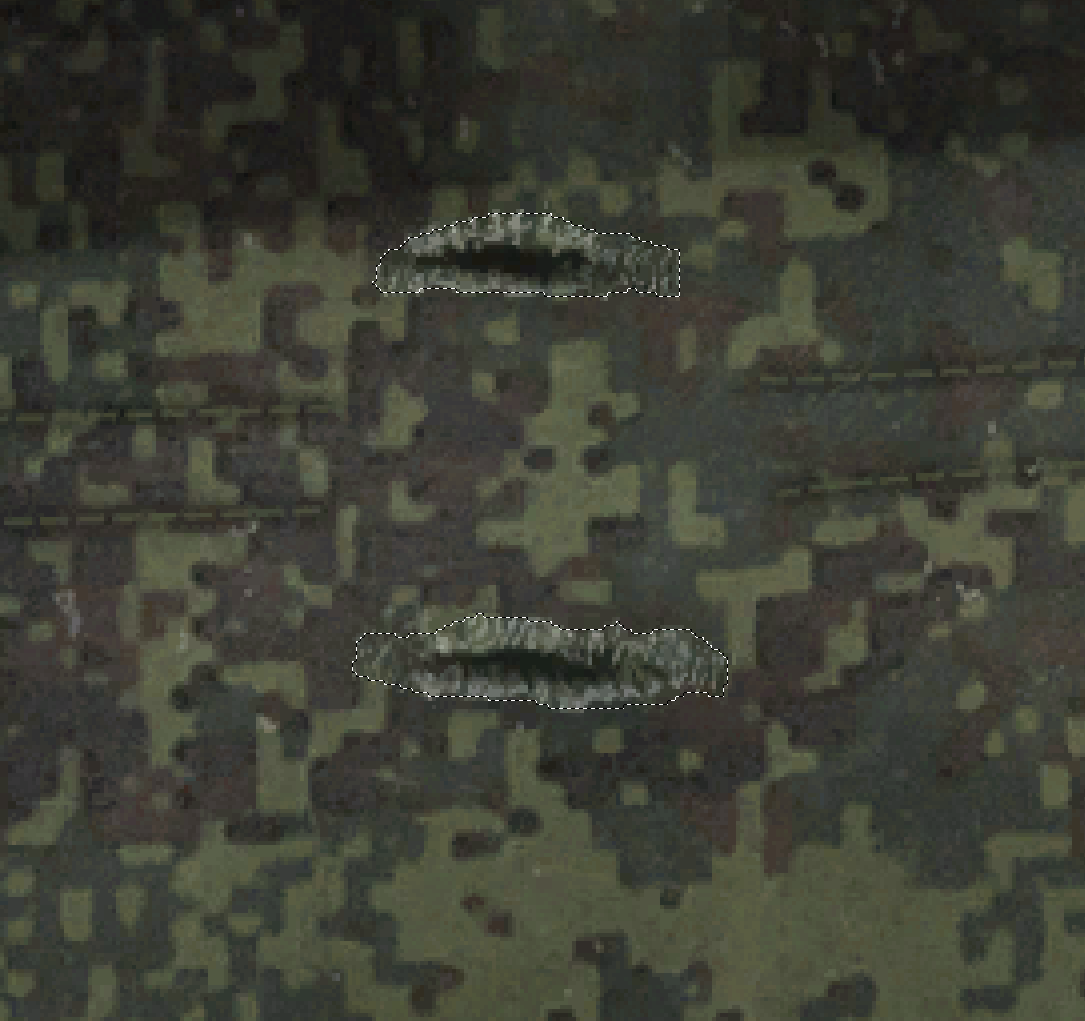
Click the green button with the icon of a page to copy it to a new layer.
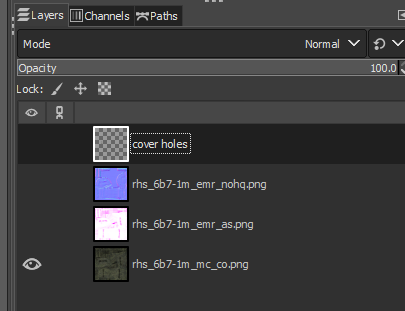
Drag the new layer to the top of the heirarchy, give it an appropriate name and hide the layer.
Select the _as layer and unhide it. Click Colors>Desaturate>Desaturate, then click OK on the window that pops up.
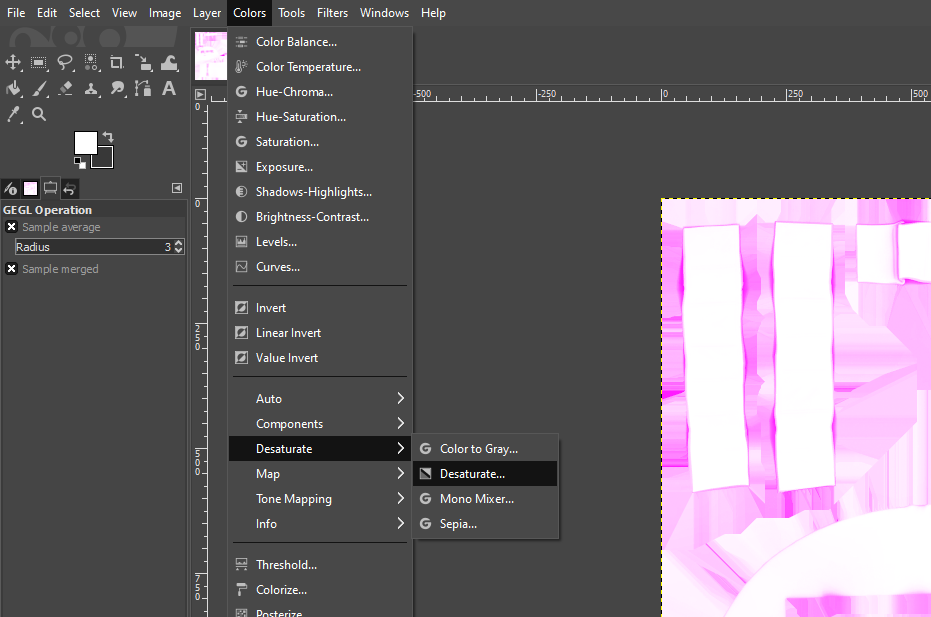
Click Colors>Color to Alpha, then click OK. The layer should become mostly transparent.
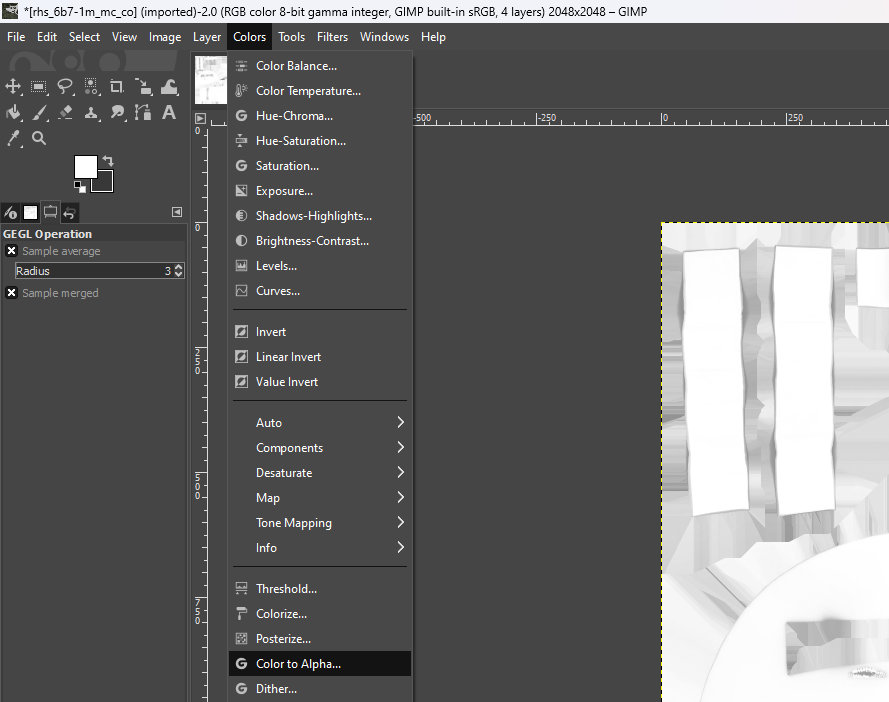
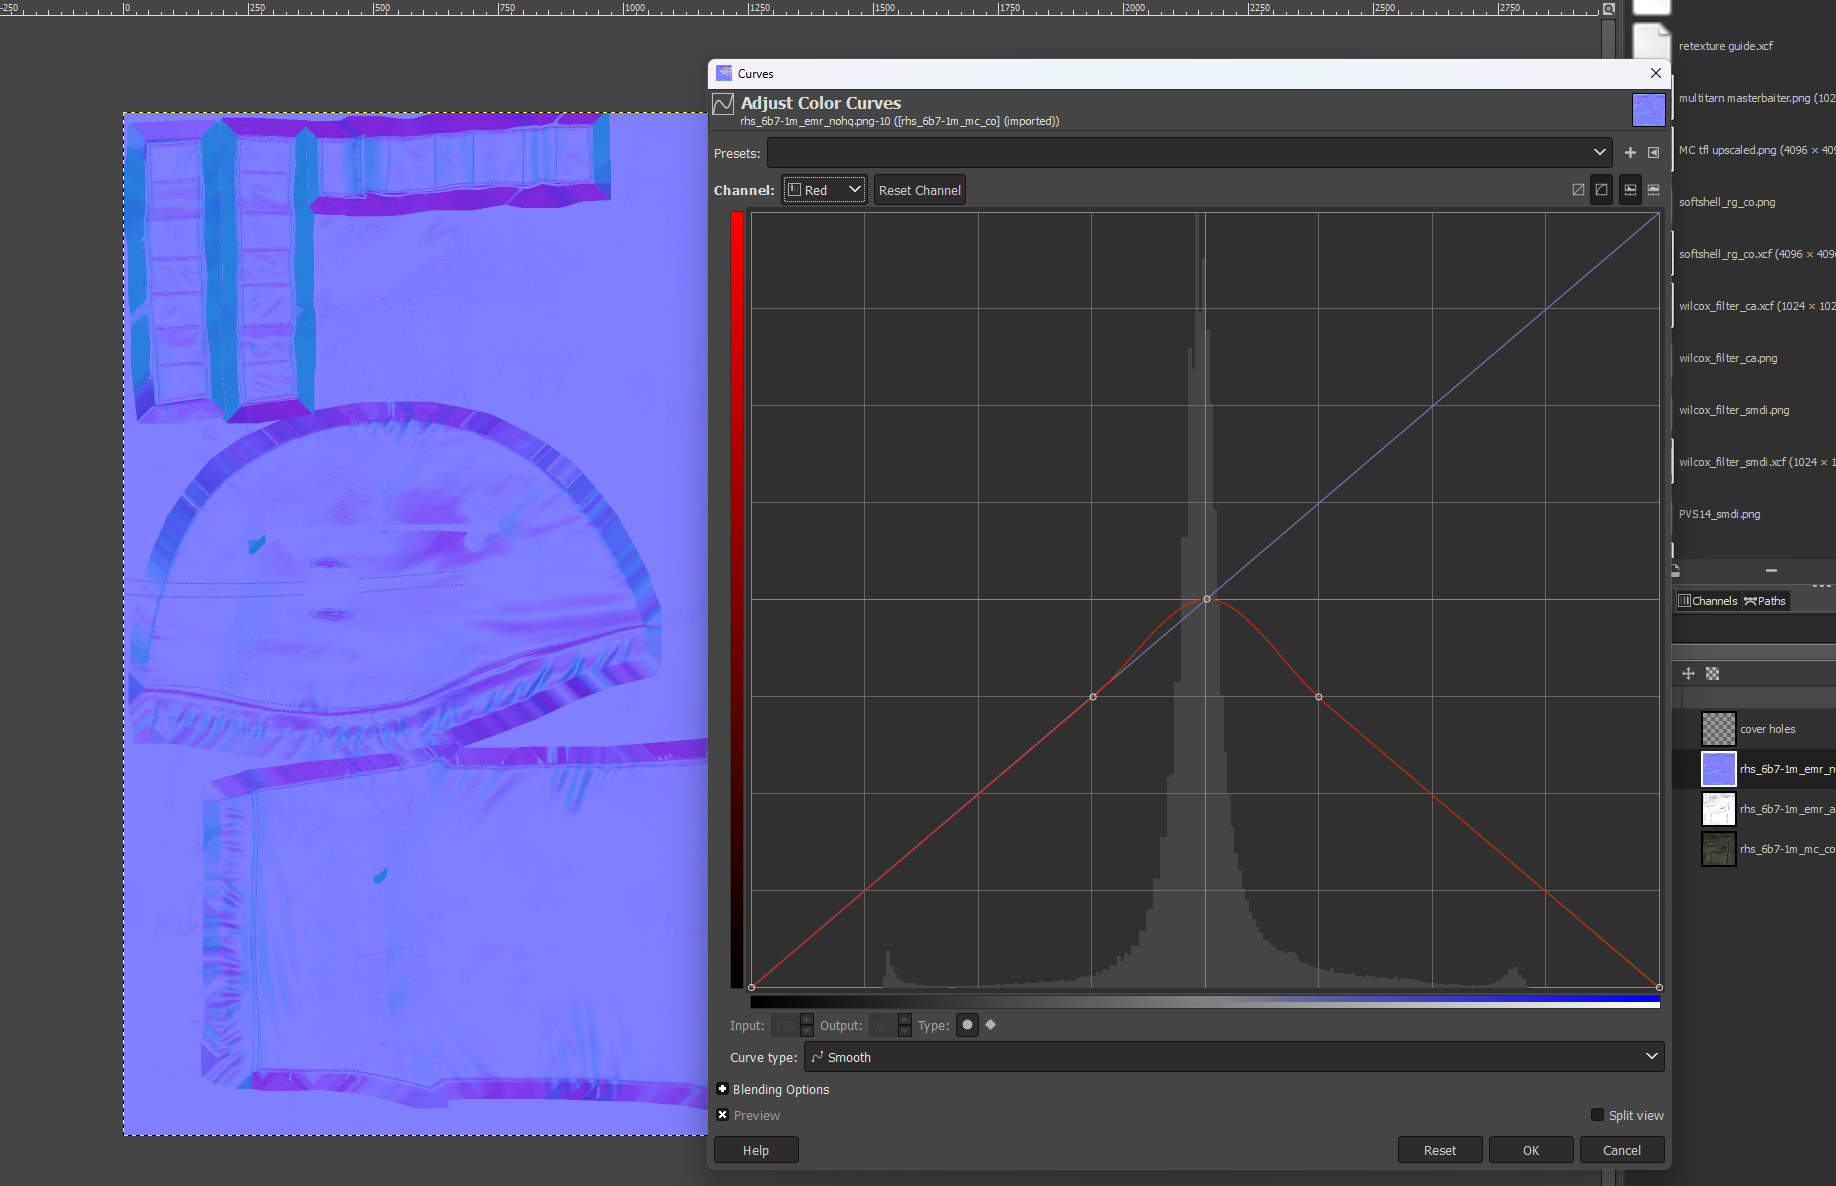
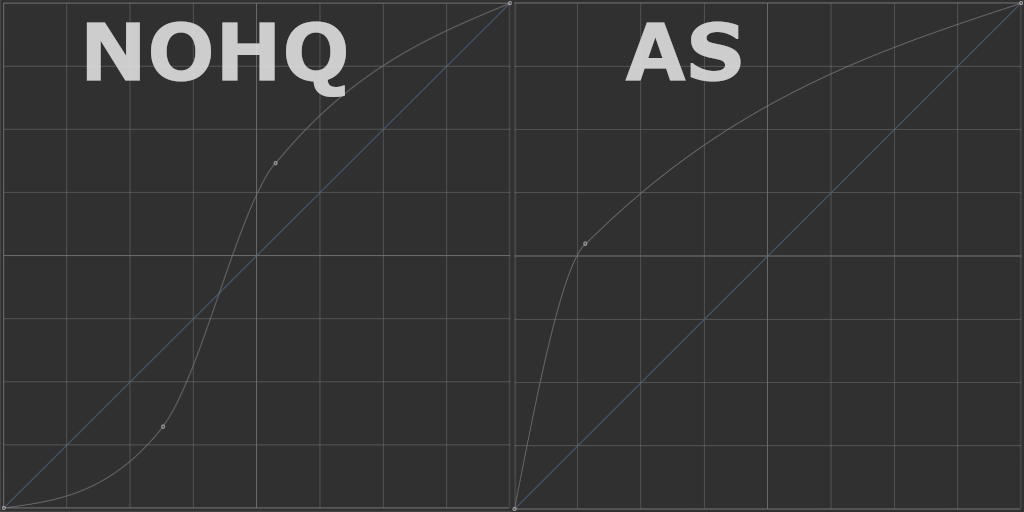
Unhide the _nohq layer. You can repeat the same Desaturate and Color to Alpha process here, but for better results I prefer to add a step. Click Colors>Curves. Select the Red channel and copy the curve shown below, then do the same for the Green channel. Leave the Value, Blue, and Alpha channels untouched.
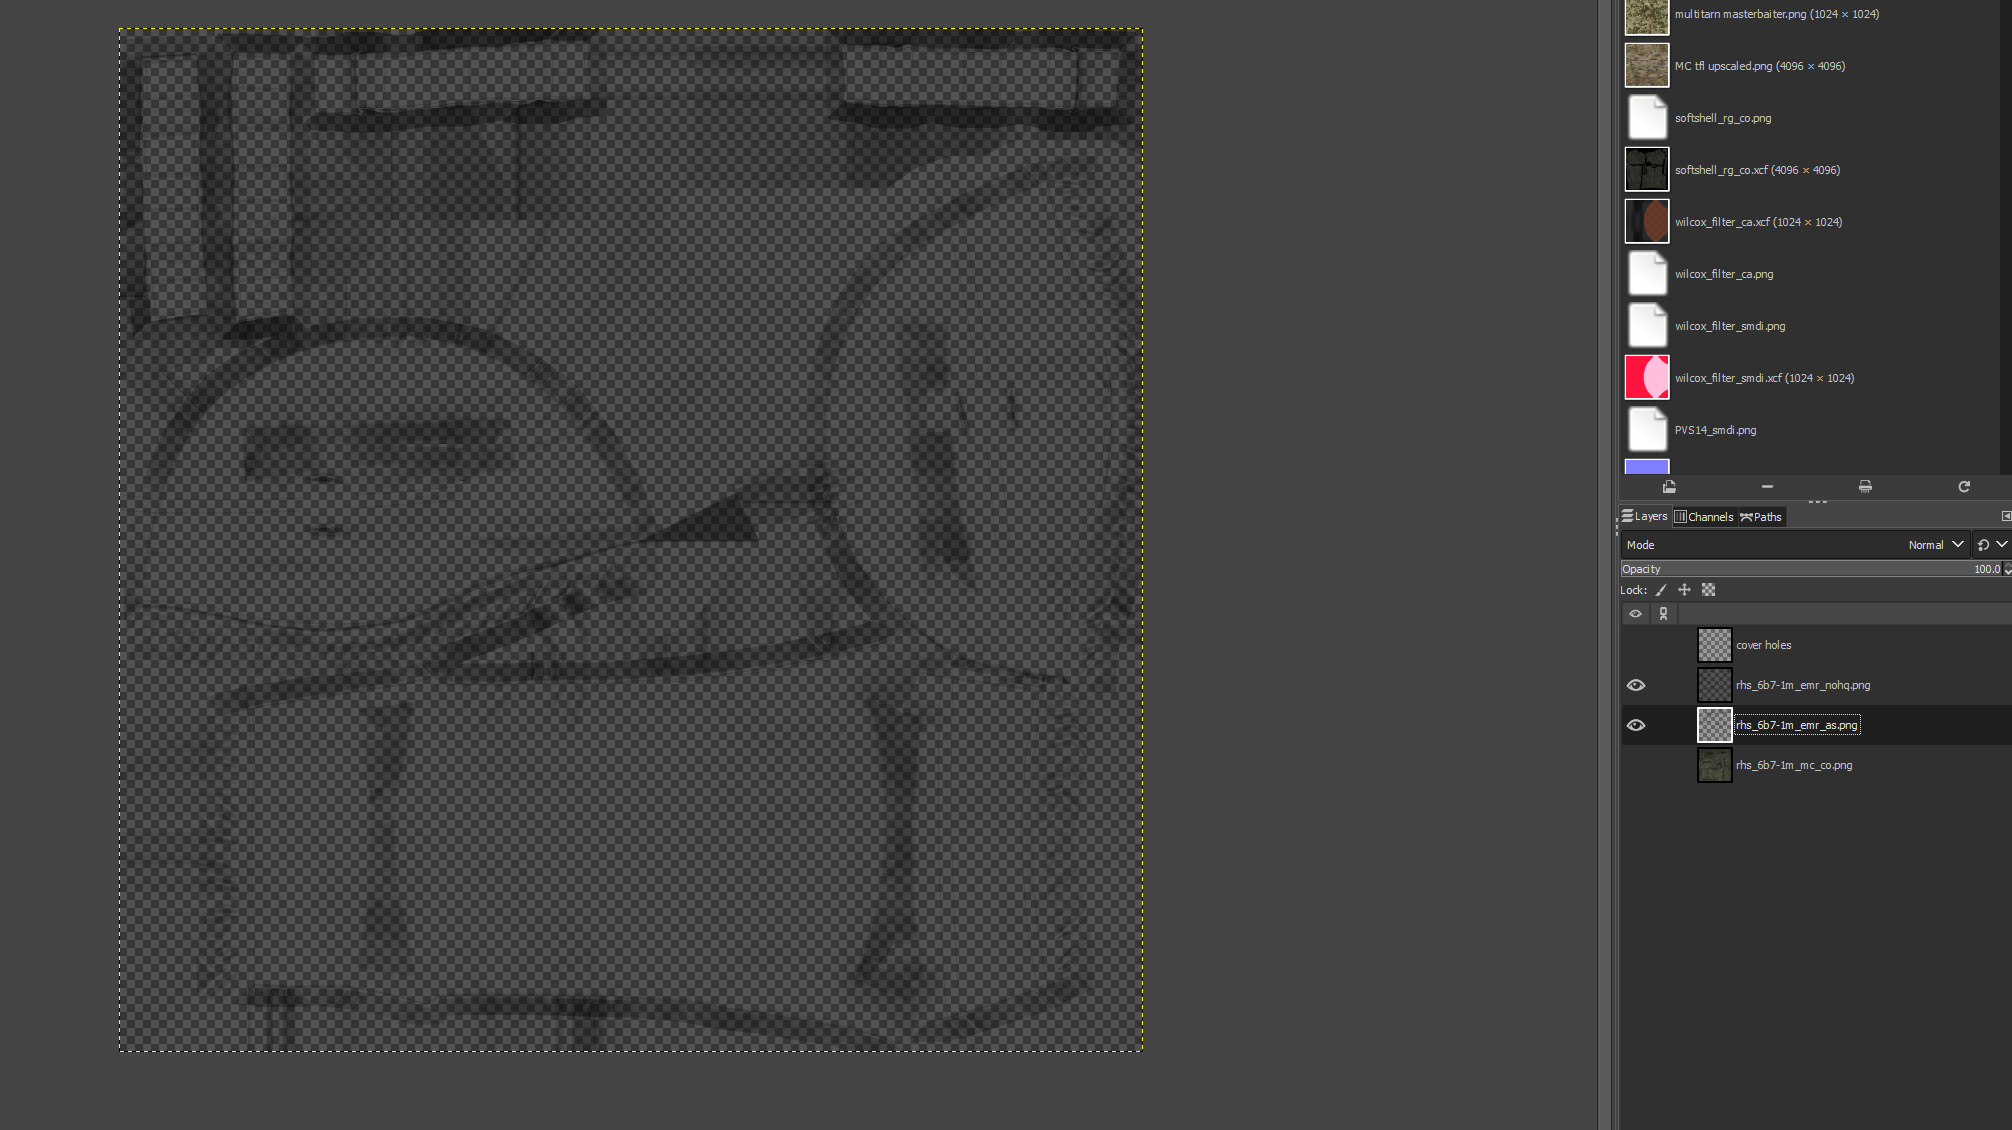
Now follow the same steps as the _as layer, Desaturate then Color to Alpha. Hide the original texture layer, move it to the top, and you should have something looking like this.
Drag your camouflage texture in as a layer and drag it to the bottom in the hierarchy.
Use a reference image and attempt to scale the pattern as accurately as possible. Use Shift+S for the scale tool.If you need more of the camouflage and the texture is tileable, copy the texture and align the edges, then click the Merge option at the bottom of the Layers window.
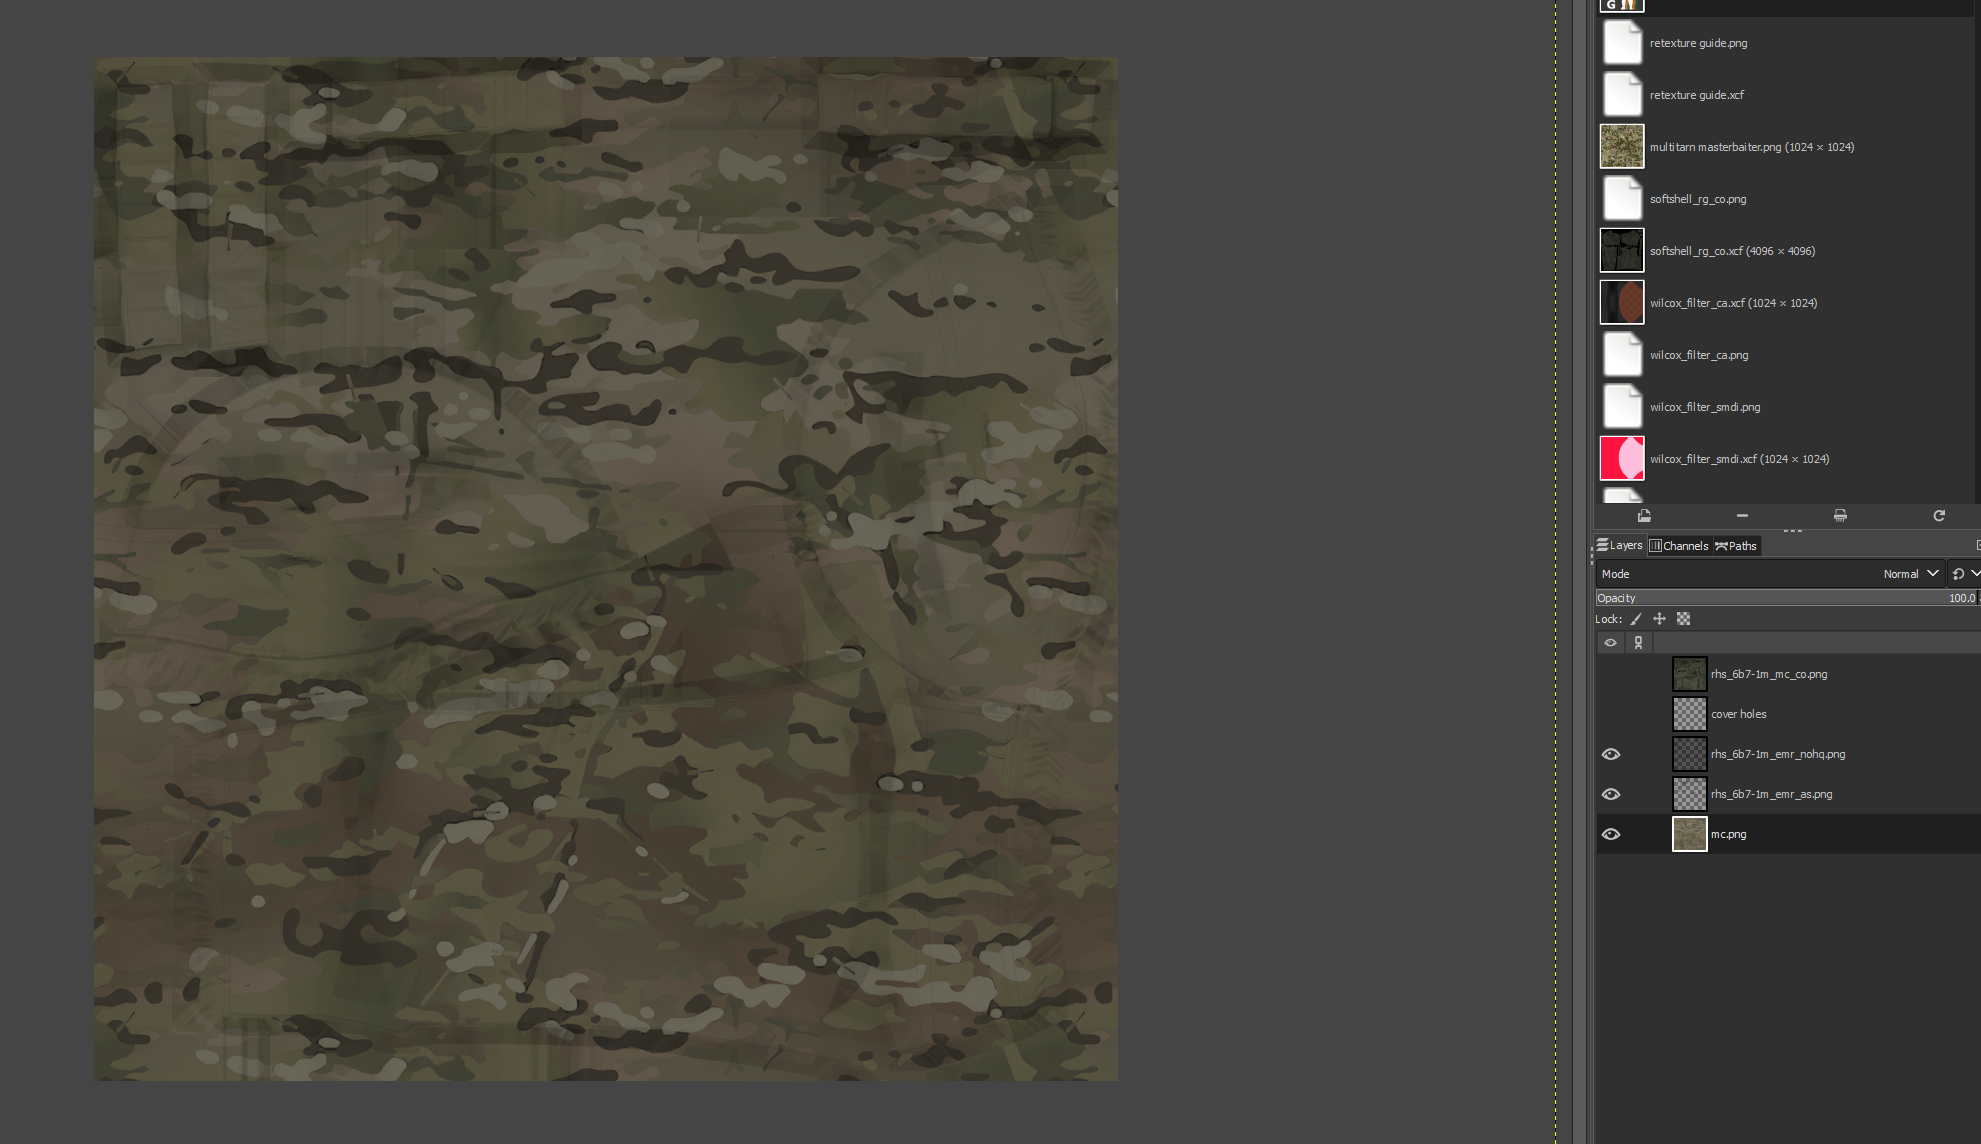
Textures often have sections mapped at different orientations. This will have to be accounted for when retexturing. Using the original texture as reference, copy the camouflage layer and rotate it to match the orientation of each part of the texture.
Right click any new camouflage layers you have made and click Add Layer Mask, click the option for a Black (Full Transparency) mask, then click Add. Do this for all camouflage layers other than the lowest one.
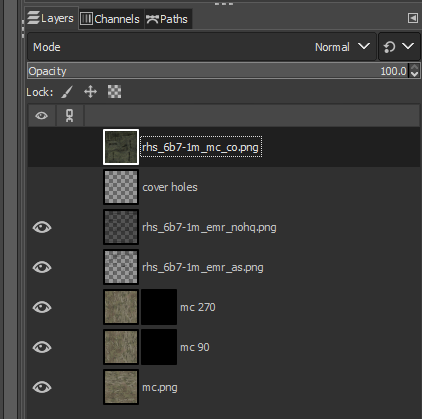
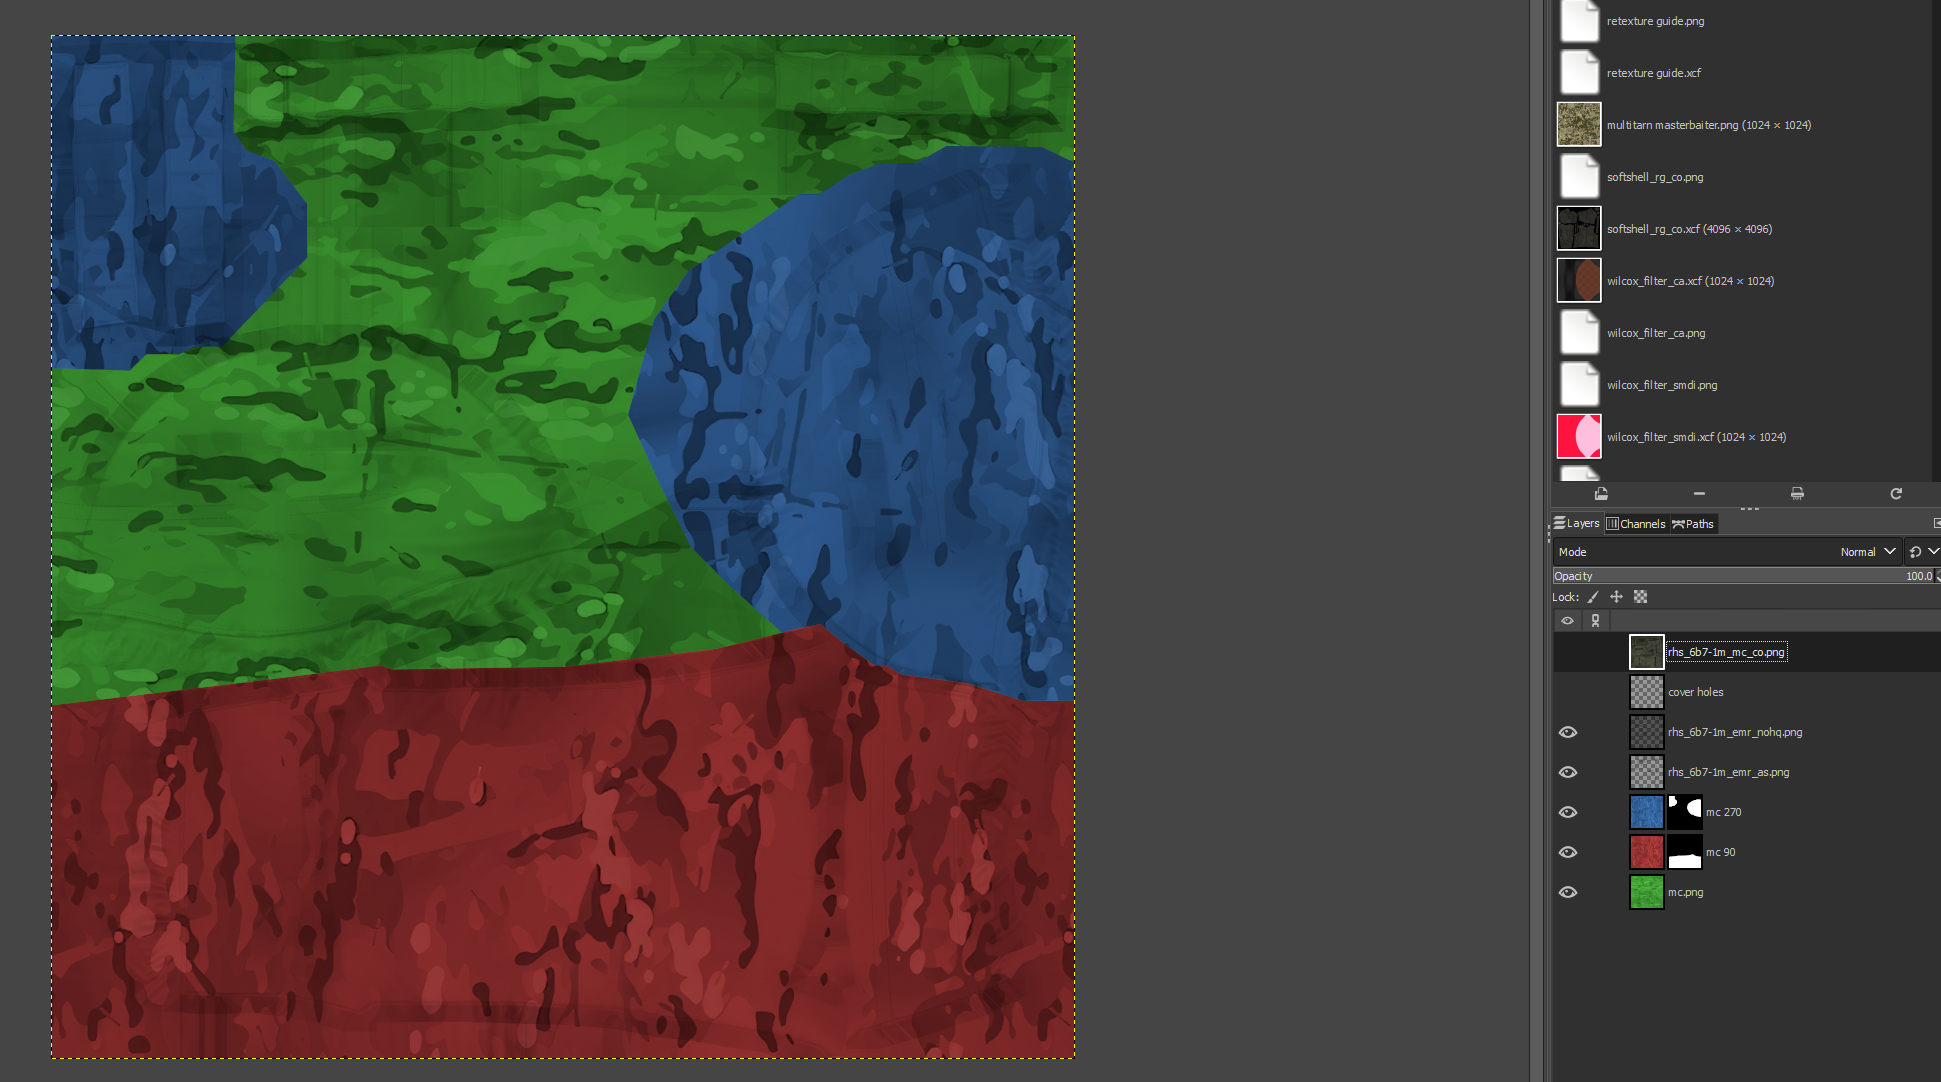
Select the corresponding area of the texture for the first camouflage layer, then click on the layer mask and use the bucket fill tool to fill it white. Do the same for all camouflage layers.
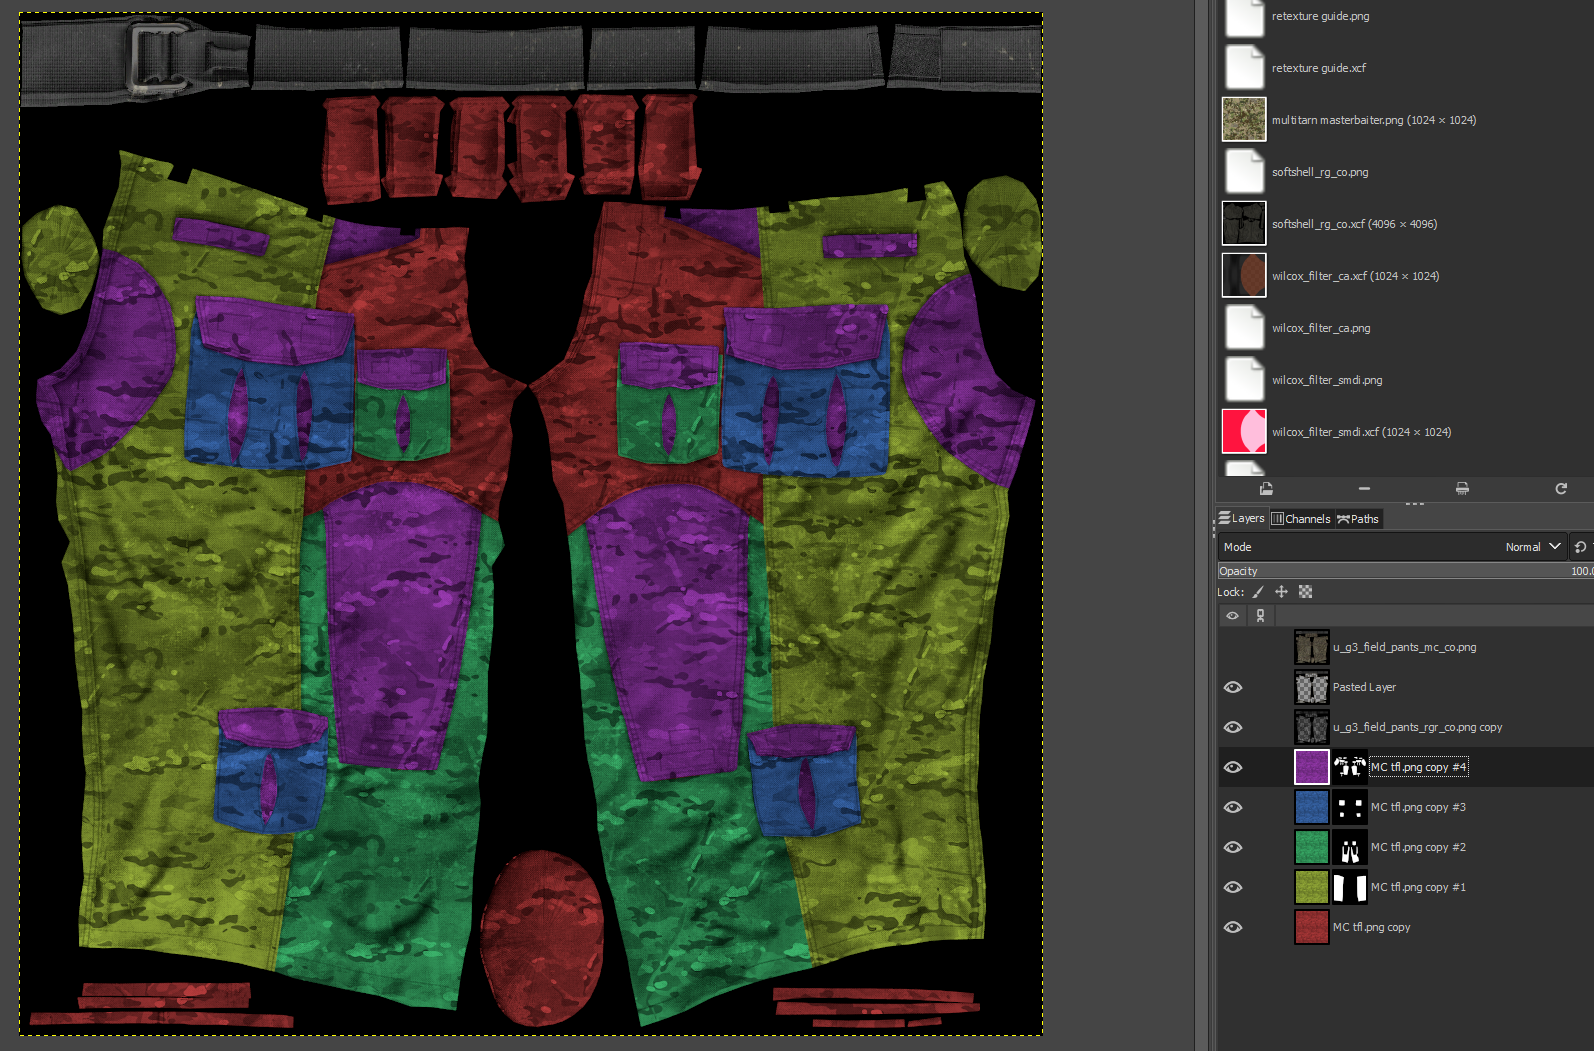
I have highlighted the different camouflage layers different colours to demonstrate what you should be doing.
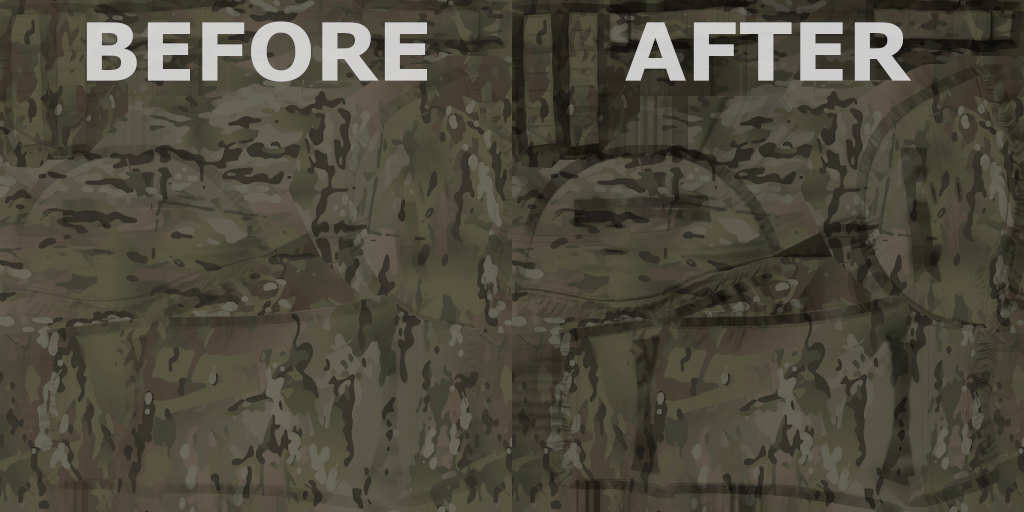
Select one of the overlays and click Colors>Curves, then switch the channel to Alpha. Use the original texture as a reference and adjust the strength of the overlay. Play around with the curves until you get a feel for them and try to get the brightness as close to the original texture as possible.
Increase the alpha of the _as layer to darken shadows, and increase contrast of the _nohq layer to make the texture of the material more visible.
Unhide the solid colour layer we made at the start if you had any and use either the Colors>Hue-Saturation tool or Colors>Colorize tool to make it the correct colour.
Where two pieces of fabric meet at a seam on a texture you should make a copy of the camo texture, reposition it, then use a mask to make it visible only on one of the pieces of fabric. This gives the impression that the item is made of multiple pieces of fabric sewn together rather than the pattern continuing over the seam.
This is not really necessary and many modders don't bother but in my opinion it's worth doing. However, it does take a long time because you have to manually mask each piece of fabric.
Shown below is the multicam texture for the G3 Field Pants from my Military Gear Pack Retextures mod. The different sections of multicam are highlighted in different colours to more easily see the seams.
Discord Camo Thread[discord.com] has a huge variety of very high quality swatches. Search for your pattern in the pattern sharing channel or check through the various drives in #useful-tools-and-resources.
RedditCamoThread[www.reddit.com] is also worth checking if you don't find what you're looking for on the discord.
Types of texture
_co - More common texture file type, only supports fully opaque or fully transparent textures
_ca - Texture file, supports semi-transparency
_as - Ambient occlusion
_nohq - Normal map
_smdi - Specular/Metallic, not usually necessary for retextures
The _as file is not required to make the retexture, but it will make the end result look significantly better.
Converting textures to images
Open TexView 2 from Arma 3 Tools. Drag a .paa texture over TexView 2. It should display the texture in the window.
Click File>Save As, then replace the .paa suffix with .png and change the "Save as type" option to "All Files", then click Save. Do this for all textures.
Rename the _co texture to the name you gave it in your config, then open it in GIMP. Drag the _as and _nohq files over the GIMP window to add as layers.
Making the overlays
If you have a solid colour texture for the model you are using, the _as and _nohq files are unnecessary.
If you are retexturing a solid colour texture to another solid colour, click Colors>Colorize and use the sliders or colour picker to change it to the correct shade. You can skip to the Testing heading.
If you are retexturing a solid colour texture to a camouflaged item, click Colors>Desaturate>Desaturate, then click OK. Next click Colors>Color to Alpha, and click OK. Skip to the Applying the Camouflage section.If you do not have a solid colour texture, follow the steps below.
First, hide both the _nohq and _as layers by clicking the eye icons in the layers window. On your base texture file look for any parts of the texture that are not camouflage. In my case this is only the exposed threads around the holes in the cover.
Select the areas using the free select tool (Hotkey = F), then copy paste the selection.
Click the green button with the icon of a page to copy it to a new layer.
Drag the new layer to the top of the heirarchy, give it an appropriate name and hide the layer.
Select the _as layer and unhide it. Click Colors>Desaturate>Desaturate, then click OK on the window that pops up.
Click Colors>Color to Alpha, then click OK. The layer should become mostly transparent.
Unhide the _nohq layer. You can repeat the same Desaturate and Color to Alpha process here, but for better results I prefer to add a step. Click Colors>Curves. Select the Red channel and copy the curve shown below, then do the same for the Green channel. Leave the Value, Blue, and Alpha channels untouched.
Now follow the same steps as the _as layer, Desaturate then Color to Alpha. Hide the original texture layer, move it to the top, and you should have something looking like this.
Applying the Camouflage
Drag your camouflage texture in as a layer and drag it to the bottom in the hierarchy.
Use a reference image and attempt to scale the pattern as accurately as possible. Use Shift+S for the scale tool.If you need more of the camouflage and the texture is tileable, copy the texture and align the edges, then click the Merge option at the bottom of the Layers window.
Textures often have sections mapped at different orientations. This will have to be accounted for when retexturing. Using the original texture as reference, copy the camouflage layer and rotate it to match the orientation of each part of the texture.
Right click any new camouflage layers you have made and click Add Layer Mask, click the option for a Black (Full Transparency) mask, then click Add. Do this for all camouflage layers other than the lowest one.
Select the corresponding area of the texture for the first camouflage layer, then click on the layer mask and use the bucket fill tool to fill it white. Do the same for all camouflage layers.
I have highlighted the different camouflage layers different colours to demonstrate what you should be doing.
Select one of the overlays and click Colors>Curves, then switch the channel to Alpha. Use the original texture as a reference and adjust the strength of the overlay. Play around with the curves until you get a feel for them and try to get the brightness as close to the original texture as possible.
Increase the alpha of the _as layer to darken shadows, and increase contrast of the _nohq layer to make the texture of the material more visible.
Unhide the solid colour layer we made at the start if you had any and use either the Colors>Hue-Saturation tool or Colors>Colorize tool to make it the correct colour.
Seam shifting
Where two pieces of fabric meet at a seam on a texture you should make a copy of the camo texture, reposition it, then use a mask to make it visible only on one of the pieces of fabric. This gives the impression that the item is made of multiple pieces of fabric sewn together rather than the pattern continuing over the seam.
This is not really necessary and many modders don't bother but in my opinion it's worth doing. However, it does take a long time because you have to manually mask each piece of fabric.
Shown below is the multicam texture for the G3 Field Pants from my Military Gear Pack Retextures mod. The different sections of multicam are highlighted in different colours to more easily see the seams.
Testing
Export the texture with CTRL+SHIFT+E to the textures subfolder of your addons folder.
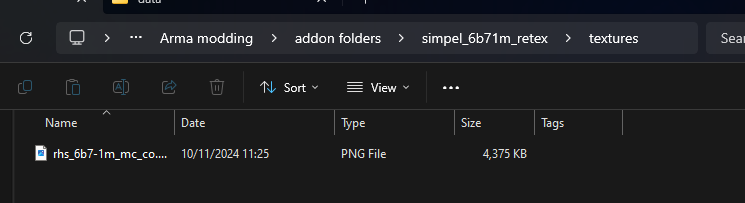
Drag the texture into TexView 2 and click File>Save As. Replace the .png with .paa and save, then delete the .png image.
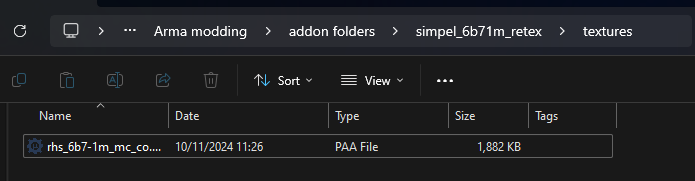
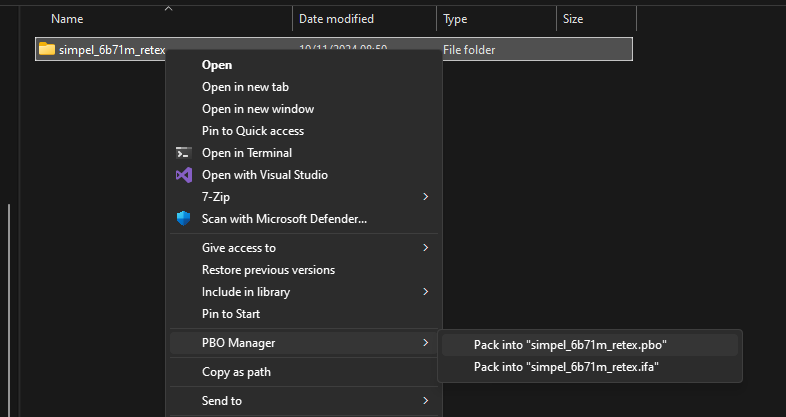
Pack the addon folder into a PBO using PBOManager and move it into your mod folder
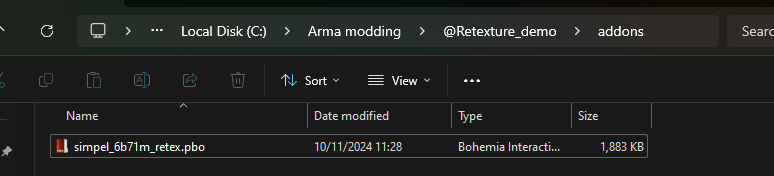
Make sure the mod is loaded as a local mod and launch the game. If the PBO was created correctly it should appear in the editor and have no errors when selected.
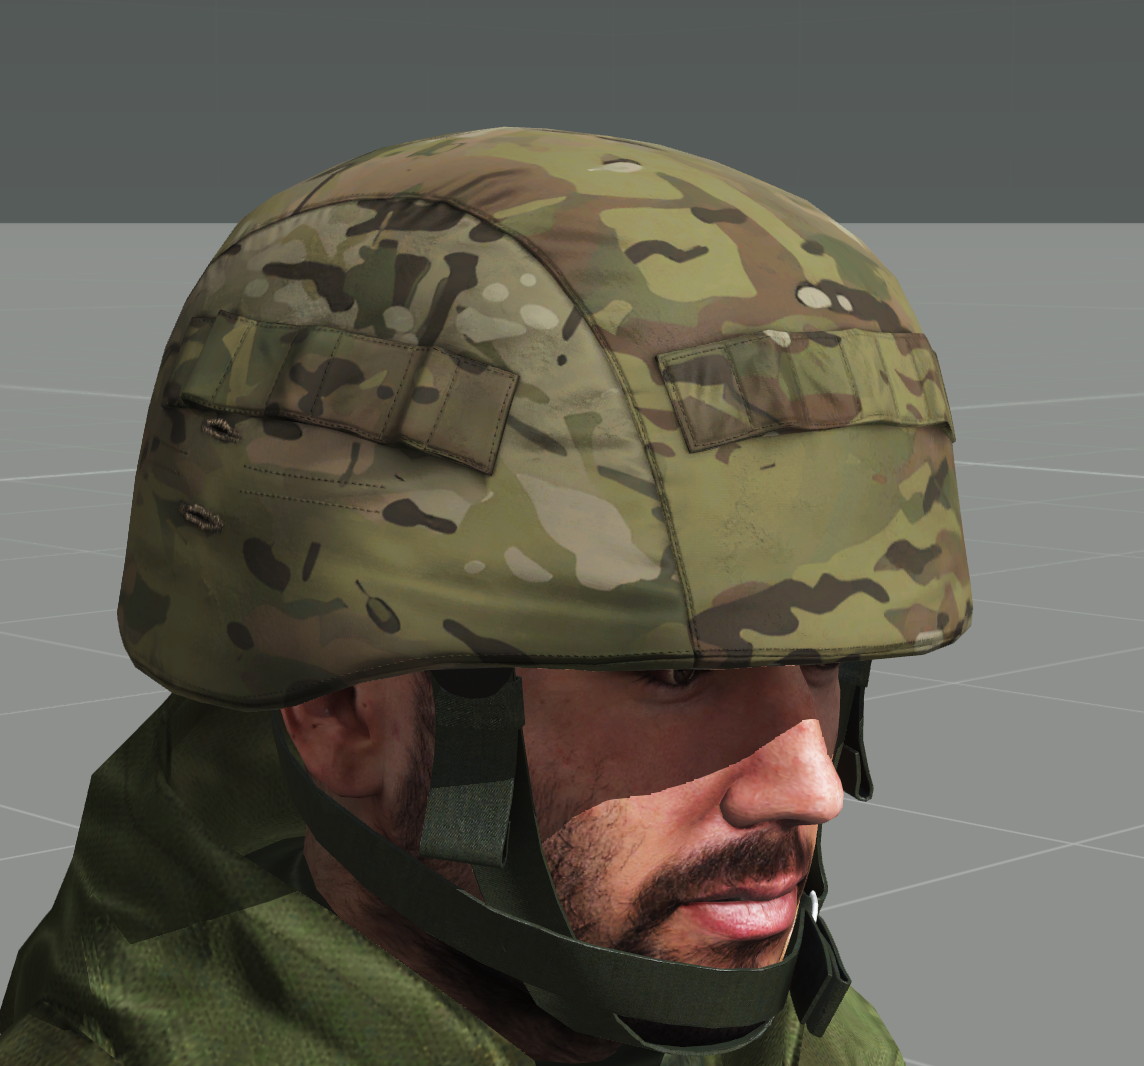
You can make edits to your texture and keep relaunching the game until you are satisfied with how it looks. Below are shown some things to avoid.
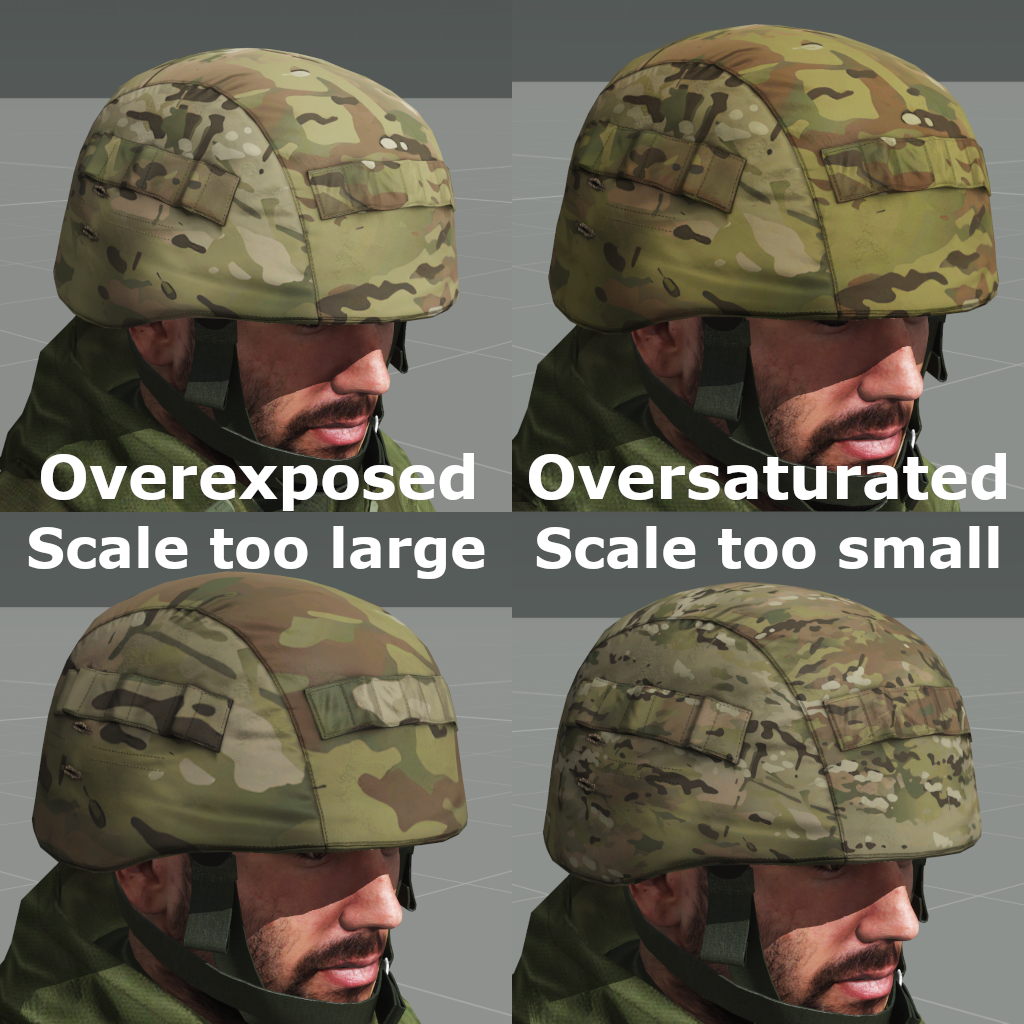
The most common retexture mistakes I see (aside from using bad swatches) are textures that are too vibrant and/or bright, and textures that are scaled wrong. Reference images will help massively with all three, make sure you use them.
Drag the texture into TexView 2 and click File>Save As. Replace the .png with .paa and save, then delete the .png image.
Pack the addon folder into a PBO using PBOManager and move it into your mod folder
Make sure the mod is loaded as a local mod and launch the game. If the PBO was created correctly it should appear in the editor and have no errors when selected.
You can make edits to your texture and keep relaunching the game until you are satisfied with how it looks. Below are shown some things to avoid.
The most common retexture mistakes I see (aside from using bad swatches) are textures that are too vibrant and/or bright, and textures that are scaled wrong. Reference images will help massively with all three, make sure you use them.
Finalising and Publishing
When you're happy with your texture, you should add some finishing touches before publication. If you want to replace the icon for the item you modded, you should do that now.
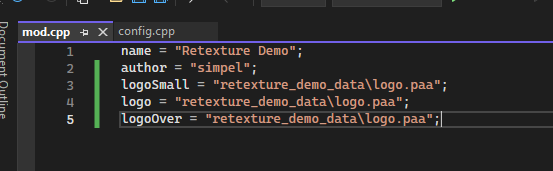
Additionally, for a public mod, you should create a logo and use it for the logo and logoSmall paths in the mod.cpp in your main mod folder.
Create a new folder in your addons folder called "[mod name]_data" where [mod_name] is replaced by the name of your mod, and inside place the logo textures in .paa format.
Pack into a PBO and move into the addons subfolder of your mod folder, then path the mod.cpp to the logos it contains.
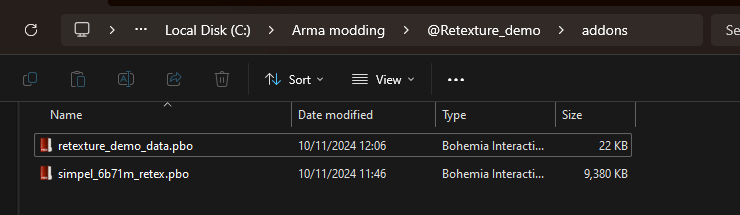
Open Addon Builder from Arma 3 Tools. Select the addon folder as the input and the addons subfolder of the mod folder as the output.
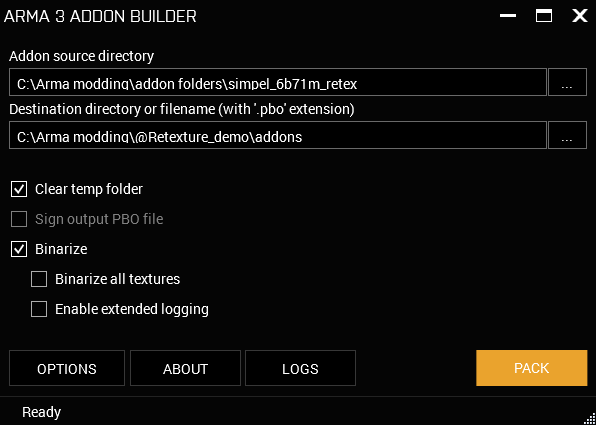
If you plan on ever doing anything other than retexturing, you should click options, then paste the following string into the "list of files to copy directly" box:
*.p3d;*.paa;.rtm;*.sqf;*.sqs;*.bikb;*.fsm;*.wss;* .ogg;*.wav;*.fxy;*.csv;*.html;*.lip;*.txt;*.bisurf;*.sqm;*.ext;*.dbf;*.prj;*.shx;*.shp;*.pac;*.rvmat
Alternatively you can use Mikero's PBOProject which is superior but for simple retextures Addon Builder is easier.
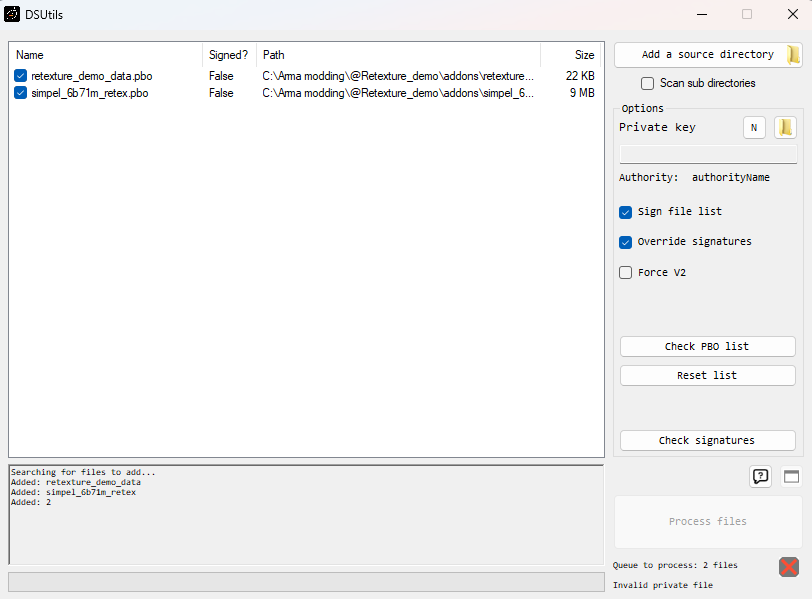
Open DSUtils from Arma 3 Tools. Click the button that says "Add a source directory" and select the addons folder of your mod. Your PBOs should appear in a list.
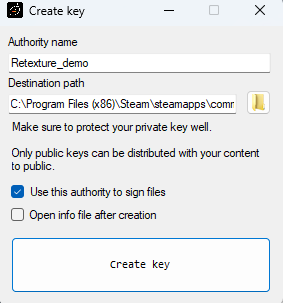
Click the "N" button to the right of where it says "Private key" and enter the name of your mod in the box labelled "Authority name". Copy the path below and then click create key.
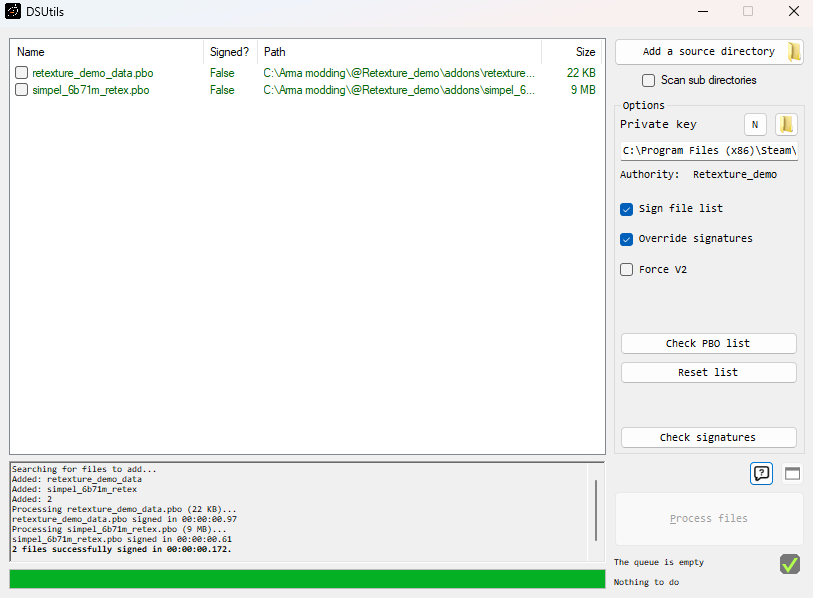
Click "Process files" and the PBOs should be signed with no errors thrown. When this is done, you can close DSUtils.
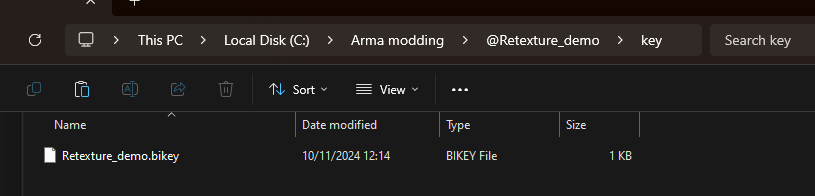
Navigate to the path you copied for the key, and find the bikey file with the name of your mod. Copy the bikey file, NOT the biprivatekey. Create a new folder in your mod folder called "key" and paste the bikey into it.
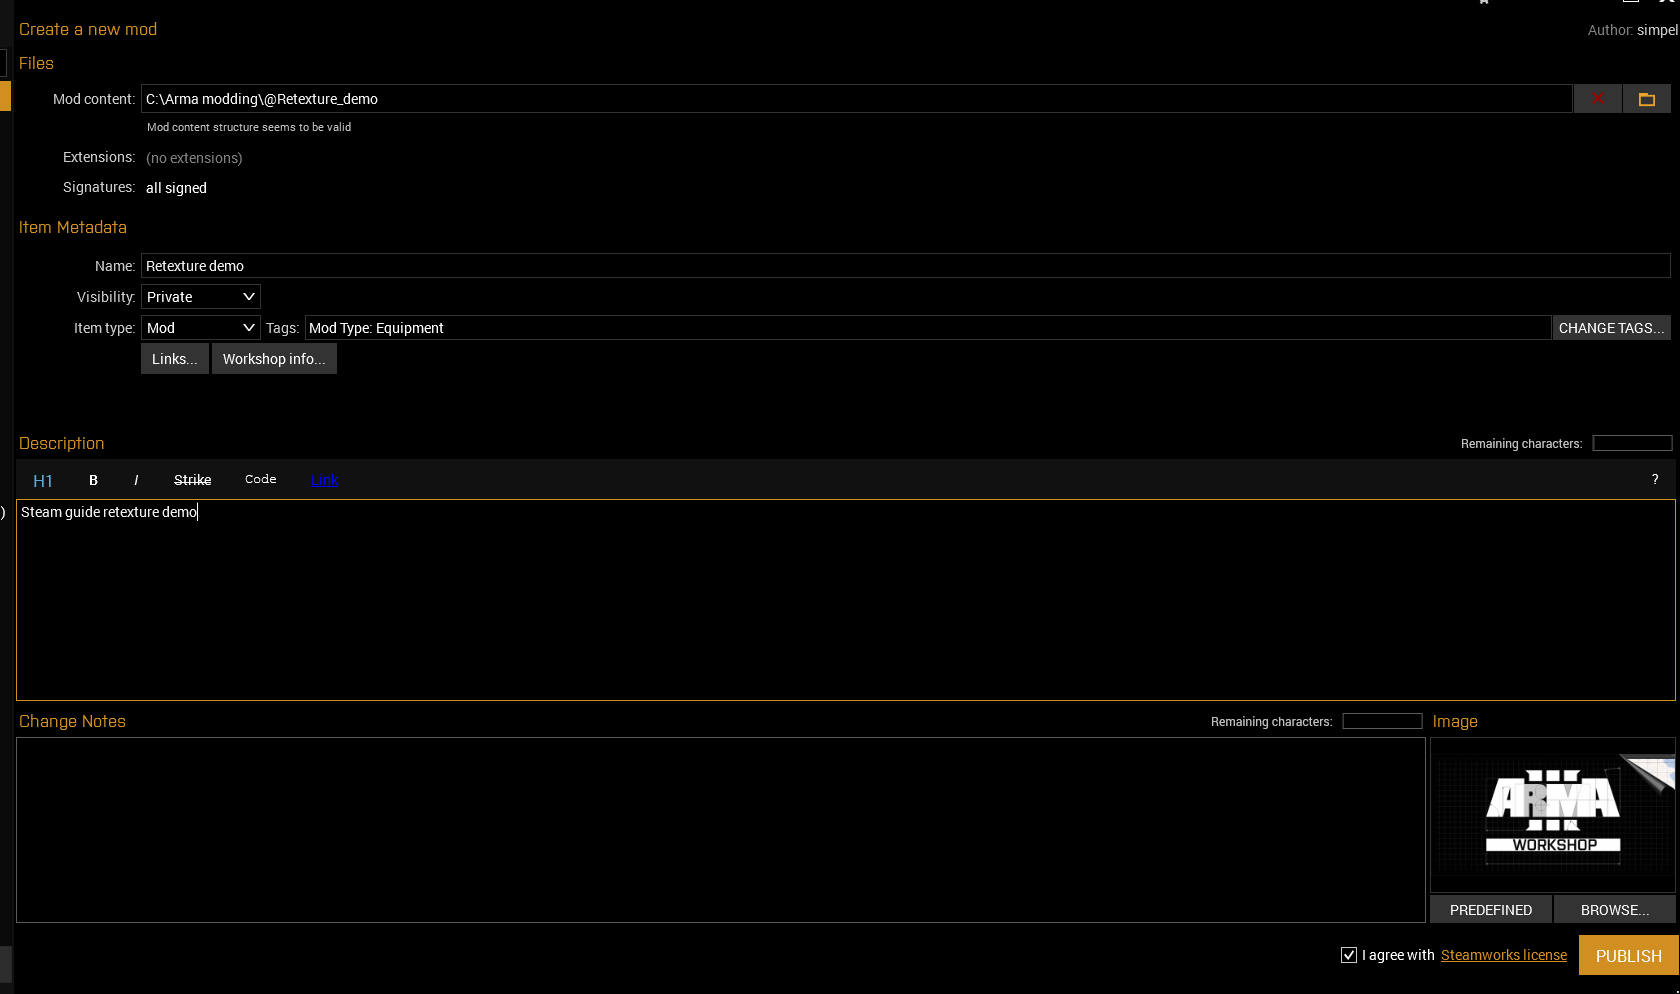
Open Publisher from Arma 3 Tools. Select your mod folder as the Mod content. Fill in all the boxes, then agree to the Steamworks license in the bottom right and click PUBLISH. Wait until it has finished, then close it. Sometimes it freezes at the end, just check your workshop page on Steam to see if it has worked properly.
If you have any problems with the guide feel free to leave comments and I will answer them when I have time.
Additionally, for a public mod, you should create a logo and use it for the logo and logoSmall paths in the mod.cpp in your main mod folder.
Create a new folder in your addons folder called "[mod name]_data" where [mod_name] is replaced by the name of your mod, and inside place the logo textures in .paa format.
Pack into a PBO and move into the addons subfolder of your mod folder, then path the mod.cpp to the logos it contains.
Packing PBOs
Open Addon Builder from Arma 3 Tools. Select the addon folder as the input and the addons subfolder of the mod folder as the output.
If you plan on ever doing anything other than retexturing, you should click options, then paste the following string into the "list of files to copy directly" box:
*.p3d;*.paa;.rtm;*.sqf;*.sqs;*.bikb;*.fsm;*.wss;* .ogg;*.wav;*.fxy;*.csv;*.html;*.lip;*.txt;*.bisurf;*.sqm;*.ext;*.dbf;*.prj;*.shx;*.shp;*.pac;*.rvmat
Alternatively you can use Mikero's PBOProject which is superior but for simple retextures Addon Builder is easier.
Signing addons
Open DSUtils from Arma 3 Tools. Click the button that says "Add a source directory" and select the addons folder of your mod. Your PBOs should appear in a list.
Click the "N" button to the right of where it says "Private key" and enter the name of your mod in the box labelled "Authority name". Copy the path below and then click create key.
Click "Process files" and the PBOs should be signed with no errors thrown. When this is done, you can close DSUtils.
Navigate to the path you copied for the key, and find the bikey file with the name of your mod. Copy the bikey file, NOT the biprivatekey. Create a new folder in your mod folder called "key" and paste the bikey into it.
Publishing
Open Publisher from Arma 3 Tools. Select your mod folder as the Mod content. Fill in all the boxes, then agree to the Steamworks license in the bottom right and click PUBLISH. Wait until it has finished, then close it. Sometimes it freezes at the end, just check your workshop page on Steam to see if it has worked properly.
If you have any problems with the guide feel free to leave comments and I will answer them when I have time.
More Arma 3 guides
- How to increase FOV in ARMA★ 5 (323)51k views586 ♥2 minUpdated Oct 10, 2022
- ACE3 Adv Medical + Cheat Sheet★ 5 (973)48k views2.2k ♥11 minUpdated Feb 21, 2024
- Управление ArmA 3.★ 5 (752)48k views997 ♥4 minRussianUpdated Oct 11, 2015
- ARMA 3 Complete Performance Guide [2020] [ENG]★ 5 (686)48k views1.5k ♥12 minUpdated Oct 10, 2022
- Arma 3 Movement & Weapon Controls (List)★ 5 (513)44k views593 ♥1 minBulgarianUpdated Mar 7, 2016
- How to fly in Arma 3★ 5 (459)40k views746 ♥10 minUpdated Apr 8, 2019



This guide was created by its original author on the Steam Community. Are you the author and want it removed? Request removal.