SM: Ultimate Missile Engineering Guide (NO MODS)
MODS NEEDED TO FACILITATE CONSTRUCTION
Here is one of the mod collections with tools where you can find everything you need:
https://steamcommunity.com/sharedfiles/filedetails/?id=3304245465&searchtext=tool
An important detail: if you build something using these tools, you can spawn your creation even in a friend's world who doesn't have this modpack (provided the construction itself doesn't contain specific modded blocks, like the blue or green sensors). The tools themselves (welding tool, meters, etc.) only assist in the process without turning your build into a "modded" one.
Now, a brief overview of the blocks we need:
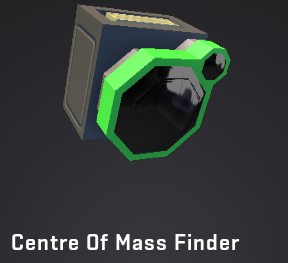 Green sensor, as the name implies, this sensor is designed to visually demonstrate the exact location of your missile's center of mass. This is an indispensable tool, as without understanding the balance point, you won't be able to align your thrusters to prevent the construction from spiraling in the air.
The device has two display modes toggled by the U key. To activate the visualization and see the center of mass on your build, simply press the interaction key E. Use this tool at every stage of assembly to monitor your missile's stability.
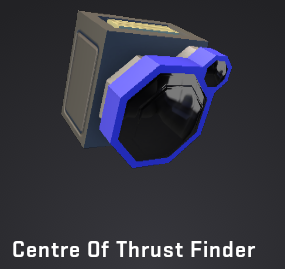 Blue sensor, visualizes the center of thrust (Center of Thrust) of your construction, showing the total force vector of all installed engines.
Just like with the center of mass, there are two display modes changed by the U key, and the visualization itself is toggled by pressing E. The main task of this tool is to help you align the center of thrust with the center of mass. If the blue thrust point does not align with the mass point, the missile will inevitably begin to flip or spin into a nose-dive right at launch.
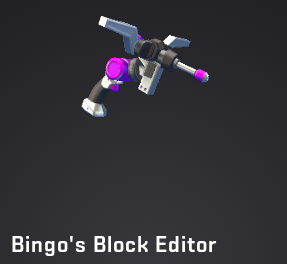 Bingo Block Editor (Blueprint Editor) — this is, without exaggeration, one of the most powerful tools in an experienced mechanic's arsenal. Its capabilities are so vast that a full breakdown of all functions would require a separate massive tutorial. However, within the scope of our missile guide, we will focus on only one, the most critical function for us.
We need this tool primarily to "glitch" elements into one another. This allows you to place blocks, logic, or engines in the same space where the game would normally not allow it due to collision restrictions. Thanks to this, we can create incredibly compact missiles by hiding all the complex internals inside a narrow fuselage while maintaining the complete vanilla status of the build (if you play vanilla survival, you simply won't be able to make missiles this compact).
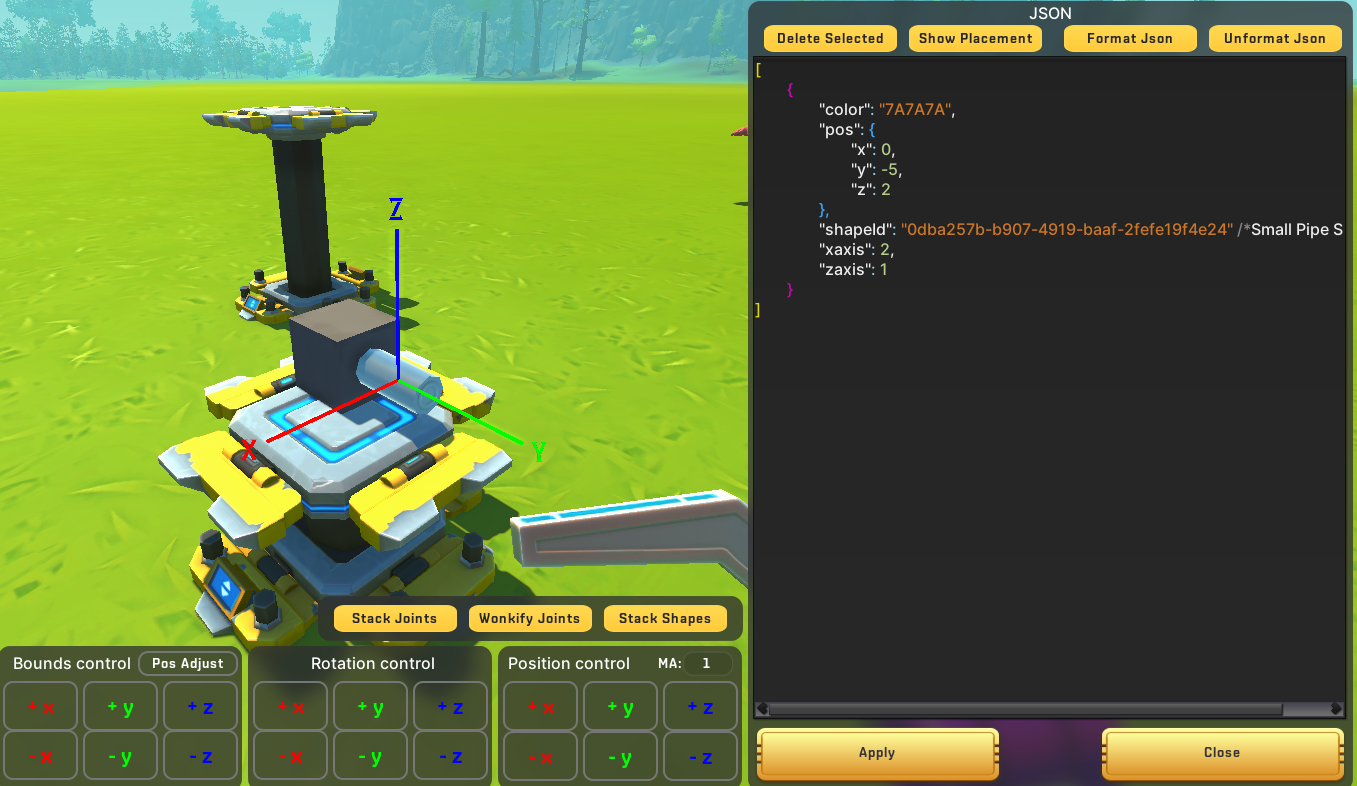 It shows the local coordinates of the construction when you hover over it. If you left-click, we will see the so-called Blueprint—the file that stores information about the construction, for example, when we save it. It is enough for us to just move the object using the bottom panel labeled "Position Control." Generally, I recommend learning how this tool works for further use in your projects.
Gemini HOW THE GAME PROCESSES PHYSICS AND MORE
How the game sees your construction
Scrap Mechanic perceives any missile as a single physical body (Body) consisting of separate blocks.
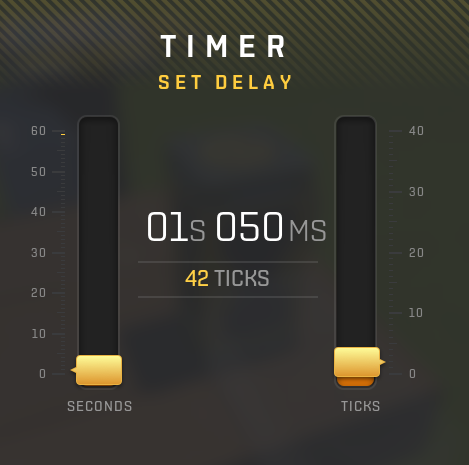
If FPS > 40, the tickrate is stable — 40.
If 20 < FPS < 40, the tickrate equals the FPS value.
If FPS < 20, the tickrate is fixed at 20 (the game starts to "slow down").
Thanks to the timer, you can easily count the number of ticks.
Influence of bearings: Each bearing is a separate connection that creates a small construction that simply tries to stay within the limits where it should be (depending on the physics and weight of the construction). Also, the more bearings in the hull, the more the missile will "wobble" at high speeds, and generally they lag, which is why we will minimize their number.
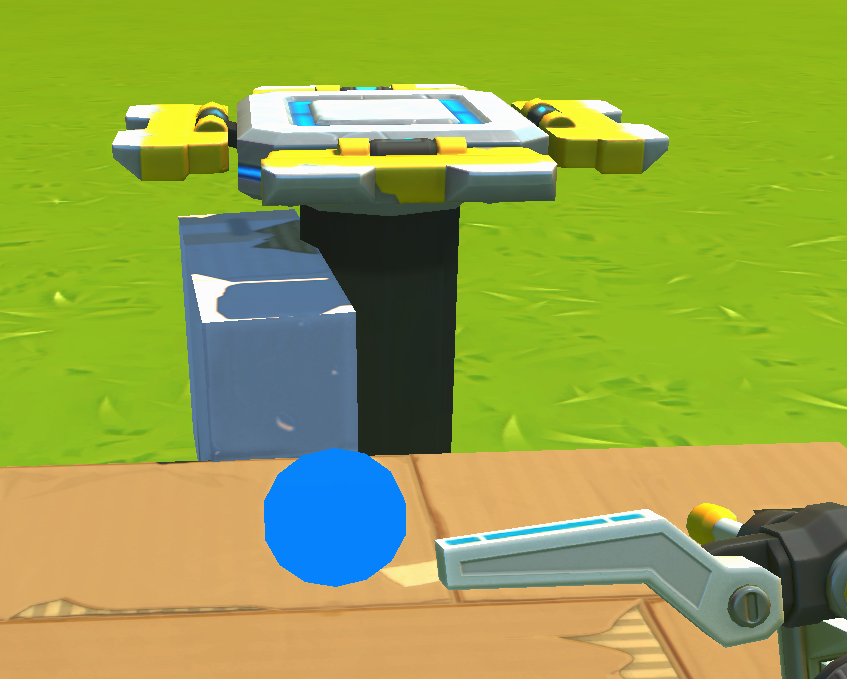 here you can see how the white construction is shifted to the left relative to the camera even though it is fixed on a bearing.
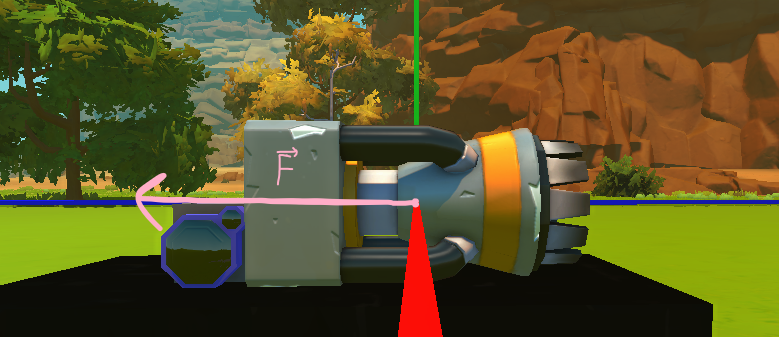 Now let's deal with the jet engine (thruster). Its force starts from its geometric center. Each type of engine has its own weight and maximum force (I will list the characteristics later). Also, each engine has the same fuel consumption regardless of its settings, specifically one gas can per 5 seconds. Separately, there is the so-called "Legacy" — this is an engine from old versions, which is the lightest and gives the same force as a level 5 engine, making it the best. But currently, no way has been found to get it in survival, which is why it is used only in creative (link to all necessary "Legacy" blocks below).
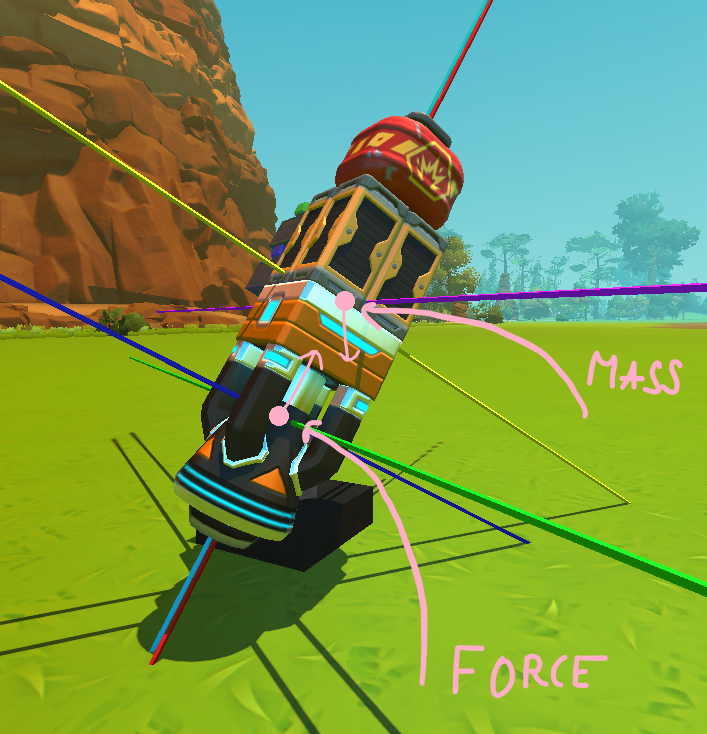
There is a popular mistake when people make missiles and place the engine at the back as shown here; because of this, the missile cannot fly straight or starts spiraling over time.
---
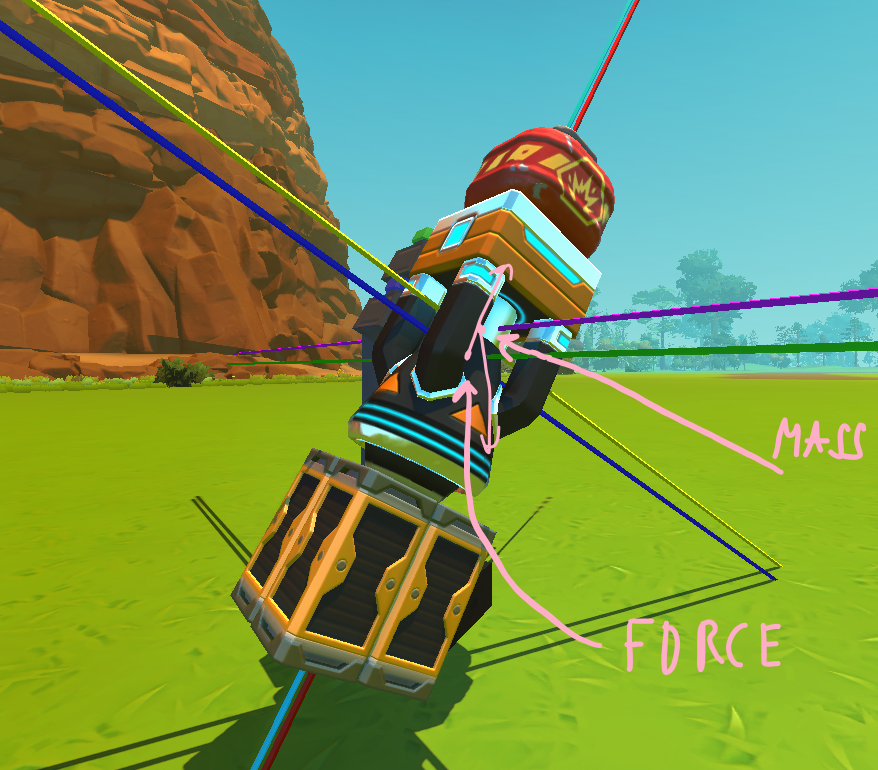
Here is the same missile, but the logic part has swapped places with the engine. Thanks to this, the center of thrust has become closer to the center of mass. It would be perfectly ideal if they were in the same point, but even now, such a missile is capable of flying straight stably.
Aerodynamics
Currently, aerodynamics in the game work in the most simplified way: every tick, the construction loses a certain percentage of speed regardless of all other parameters. According to my measurements, the maximum falling speed in the air is approximately 45 m/s. Based on this, through simple calculations, it can be determined that the construction loses 0.54% of speed every tick.
This information is not critical for NAR (unguided aerial missiles) or guided missiles that depend little on initial conditions. However, if we are talking about high-precision missiles flying along a ballistic trajectory and guided through mathematical calculations, neglecting this air resistance increases the error by 100–200 times. This makes such a "mathematical" ballistic missile less accurate than a regular engine with a bomb launched "by eye."
Flywheels
To be honest, I'm too lazy to explain how flywheels work, especially since most ATGM (Anti-Tank Guided Missiles) or other missiles are guided simply along the axis without turning the hull. But still, Scrap Mechanic's physics handles the gyroscopic effect quite well, so it can be easily used for stabilization.
Logic, like everything else in the game, updates every tick, so in complex constructions, it is advisable to take the delay into account.
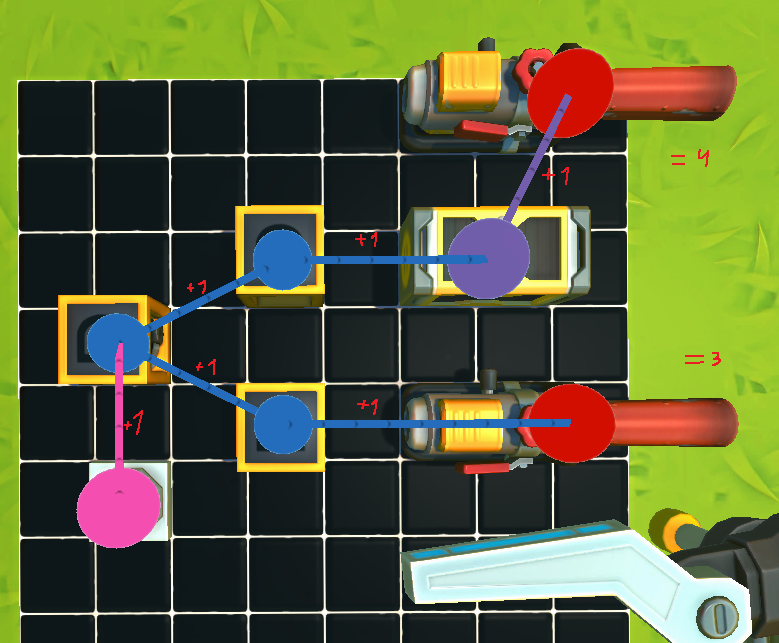 Here, for example, is a circuit with a timer at 0 seconds (and 0 ticks). It seems that two spudguns will fire simultaneously, but if you count, the bottom one will fire 3 ticks after the button press, and the top one — 4. As a result, we have a whole 1 tick of delay, which is quite a lot for sensitive circuits.
There are separate circuits that use this effect, for example, a "self-welded" gate. This is a logic block in XOR mode, which is connected to itself via the blueprint file. However, it is easy to do without editing files: it is enough to connect three XOR gates in series (the input signal should be fed to all three simultaneously). Such a mechanism will constantly change its state (flicker) if a constant signal is applied, or simply toggle the state if a 1-tick pulse is applied.
Bombs inside each other(or the nuke):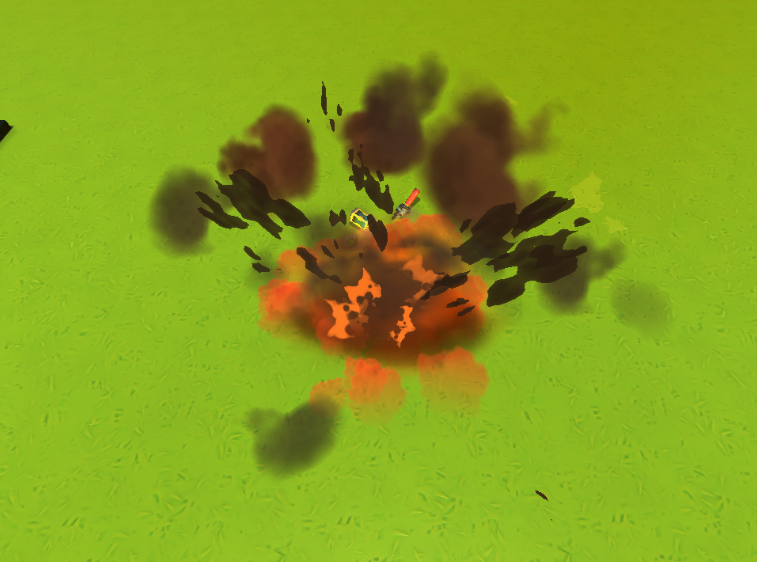 If you take one bomb and explode it, the damage radius will be small — even in the case of a large explosive. Because of this, an idea arose: why not put several bombs inside each other? As a result, when these bombs are not fixed to anything, they try to get out of each other due to hitbox conflict and fly apart (mostly along one axis). Here in the photo, you can see how one small bomb goes off, and below you can see how 20 small ones fly apart.
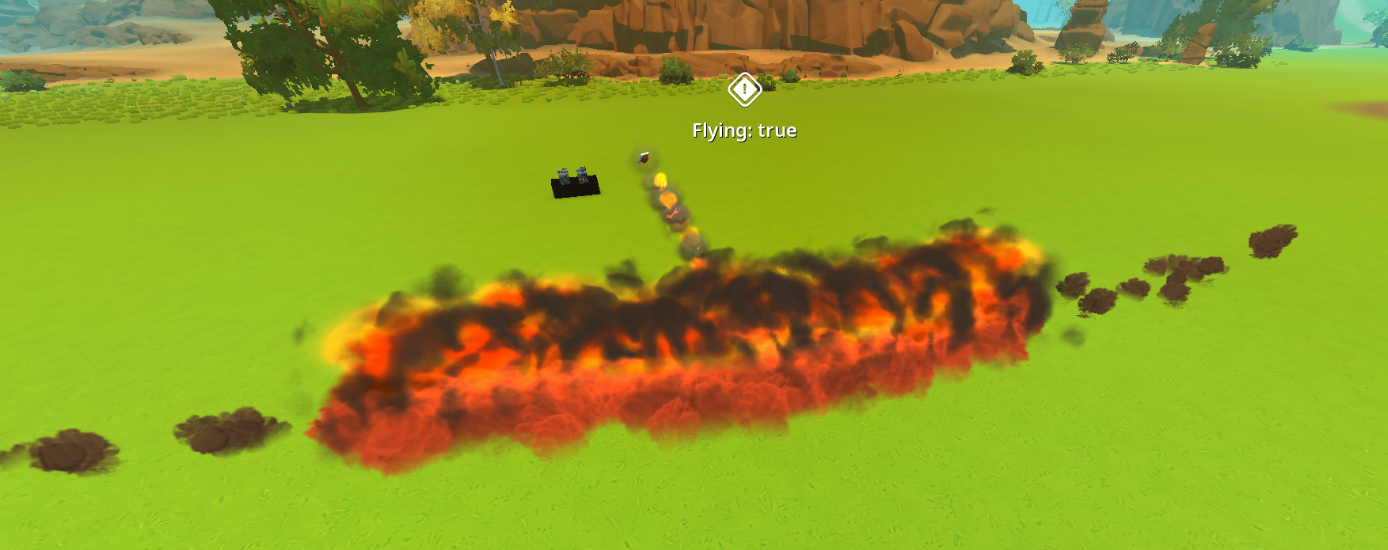 In this way, bombs pass even through blocks, which allows them to penetrate "Tier 3 Metal," although there are ways to protect against this as well. Different types of explosives work differently. For example, if small bombs are not fixed to a strong block that they cannot destroy, then when one bomb is activated, all others will simply fly apart to the sides.
With large bombs, the situation is more complicated: if they are not fixed, then when one detonates, the others will create many visual explosion effects but might not even damage a cardboard block nearby. Because of this, they need to be activated by destroying the block they are fixed to. In the end, we have: small bombs — dangerous and simple, and large bombs — complicated in detonation but much more effective. But they all weigh a lot and can only be made in creative.
SPECIFICATIONS AND A BIT OF THEORY
You often encounter classifications like "air-to-surface missile" or "surface-to-air." What does this mean? It's simple: the first word indicates the launch site, and the second indicates the type of target the missile is meant to hit. For example:
Ground — targets on the ground: tanks, armored vehicles, fortifications, etc.
Air — planes, helicopters, or other missiles.
Water — surface targets like ships or boats.
Sometimes the word "surface" is used when referring to both land and water simultaneously.
Thus, an "air-to-ground" missile is a missile launched from an aircraft at a ground target.
In addition to launch site classification, missiles are divided by their flight and guidance methods. Here are the main types you can encounter or create in Scrap Mechanic:
- NAR (Unguided Aerial Missile) — the simplest type. It has no guidance system: wherever you aim and fire, that's where it flies. The main advantage is low cost and the possibility of mass spam.
- ATGM (Anti-Tank Guided Missile) — a missile that the player can control in flight. In the game, this is usually implemented via remote control or signal transmitters to correct the course precisely into a tank's vulnerable spot.
- Laser missile — a projectile that orients itself to a laser beam (often created using mods or zero-thickness blocks). It tries to stay on the "laser-target" line.
- Ballistic missile — a missile that flies along a pre-calculated trajectory. It turns on engines for a certain time (via timer), rises up or enters an arc, and then falls exactly onto the target by inertia.
- Torpedoes — effectively, these are the same missiles but for the water environment. In Scrap Mechanic, they can be considered missiles, they are simply tuned to work with buoyancy and a different type of medium resistance.
NOW THE SPECIFICATIONS:
The Level 5 Thruster and the Legacy Thruster have the same thrust — they can lift 256 kg each. However, the Legacy Thruster weighs only 6.25 kg, while the Level 5 weighs 9.375 kg, making the Legacy significantly more efficient for missiles. In terms of durability, it roughly corresponds to a Level 3 thruster, so it is easily destroyed upon detonation — which is actually a plus, as less "debris" remains at the explosion site.
In addition, the Legacy versions of the sensor and controller weigh one and a half times less than their modern counterparts. I could list the specifications of every item, but it would take too much time, and they depend on many factors.
Overall, if you are building in "Creative," I strongly recommend using Legacy items. Here is the link to the corresponding pack in the Steam Workshop: [https://steamcommunity.com/sharedfiles/filedetails/?id=3671547818](https://steamcommunity.com/sharedfiles/filedetails/?id=3671547818).
For "Survival" mode, it is best to use Level 3 parts. Using Level 5 is advisable only for complex missiles with a detachable warhead — in such designs, the main part of the missile can remain intact after hitting the target, so expensive components won't be wasted for nothing.
HOW TO MAKE A DECENT NAR TYPE MISSILE
Before reviewing this section, I recommend checking out: "MODS NEEDED TO FACILITATE CONSTRUCTION" and "HOW THE GAME PROCESSES PHYSICS AND MORE."
Now, let's look at my STRELA-2A and STRELA-2B missiles (I'll explain the difference between them later).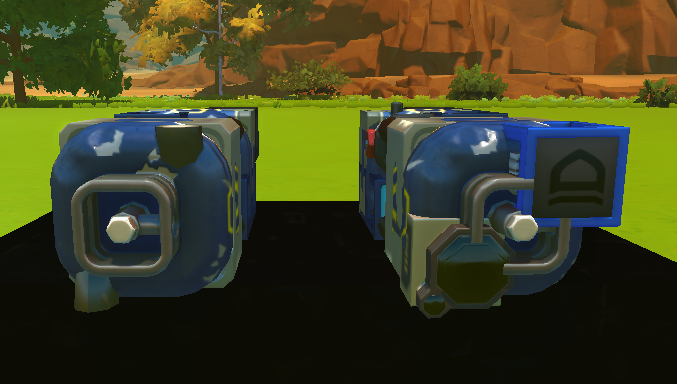
Let's start with the middle of the missile because it is one of the most important parts:
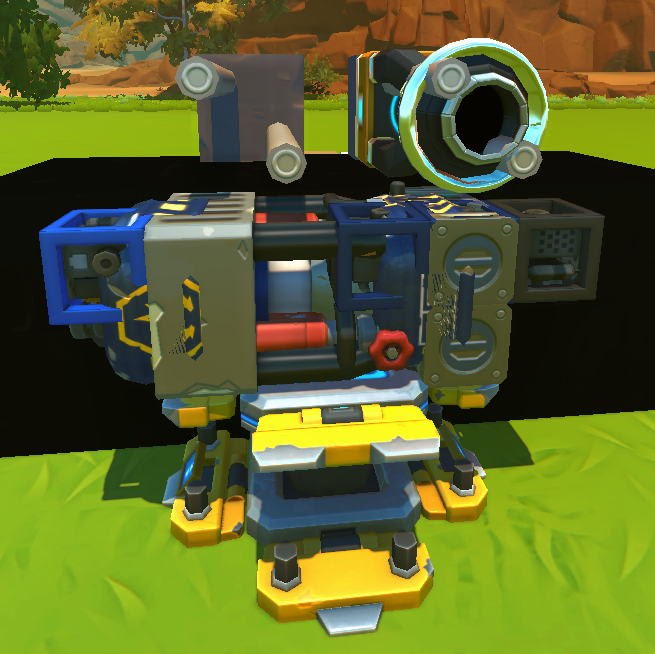 To ensure the center of thrust and the center of mass align (so the missile flies straight), the engine (thruster) must be located strictly in the center of the missile. In vanilla Survival, where you cannot simply "glue" parts into each other, you have to connect the front and rear parts of the missile by building around the engine, which makes the missile larger. You can "stuff" logic blocks inside the engine housing itself, and if the missile detonates via sensor, you can place spudguns there as well. Spudguns have significant weight, which is useful for balancing the nose section.
The image shows an example of how to connect the front and back of the missile. Below is my NAR-type missile; its logic is located at the rear, and the front holds a bomb with a sensor (though actually, there are bombs in both the front and back, but that's not important right now), with 2 spudguns placed diagonally in the middle.
Now, the missile payload (for the air-to-surface class):
For air-to-surface missiles, explosives (a small or large canister) are usually placed at the front, depending on the size and purpose of the missile. A large number of bombs rarely provides an advantage unless they are glitched into each other. A large bomb has a significantly larger blast radius and penetration power, so if the missile hull allows (for example, 3x3 blocks), I recommend using it.
If we are making a missile against ground targets, a single sensor facing forward is sufficient. To prevent the center of mass from shifting sideways, you should place an object of equal weight diagonally from the sensor. For example, in my STRELA-2B missile (pictured on the right), I used one Legacy sensor and one logic block since they have identical mass. Keep in mind: a standard sensor won't work for this setup as it is 1.5 times heavier than the old one.
Generally, nothing else is needed in the front, as the nose of the missile is already the heaviest part. To avoid adding "dead weight" at the back for balancing, try to arrange components as rationally as possible.
What about anti-air missiles?If a missile just flies straight, hitting a flying object accurately is very difficult.
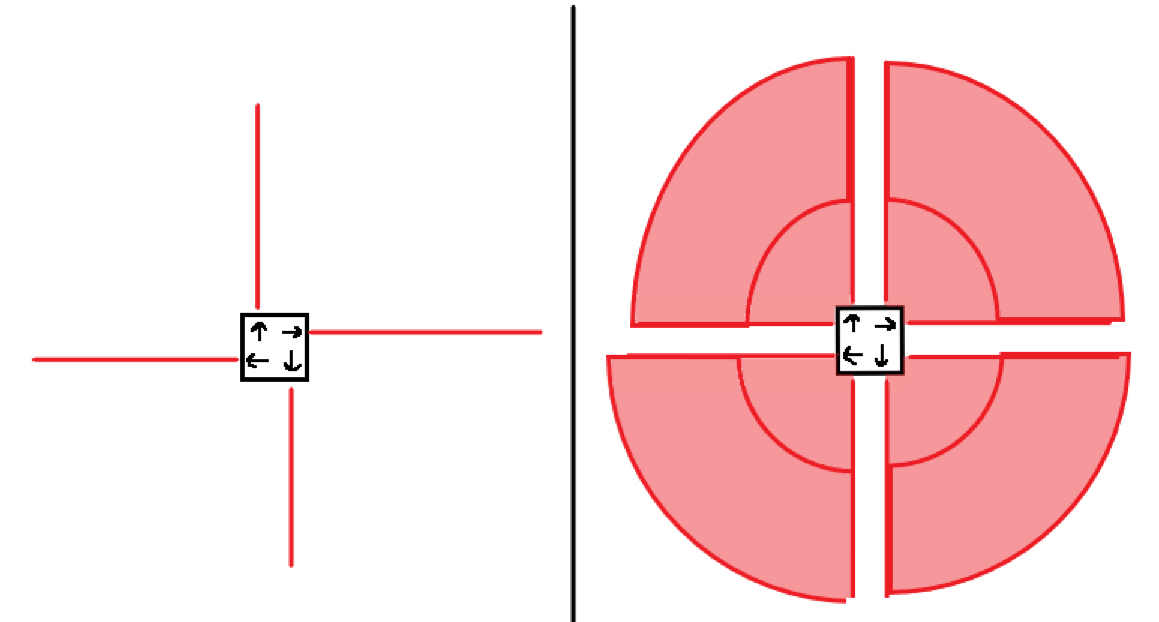 To solve this, players use either a timer that detonates the missile with a delay (damaging the target with the blast radius) or a system of sensors pointing in different directions (left photo). You can also add a bearing with a controller to rotate the sensors—this allows for scanning more space (right photo) and helps reduce dead zones.
Missile Logic
Now that we've covered the class and internals, we can think about logic. Although in-game logic is low-level and primitive, it can significantly improve projectile performance. This is especially true for guided missiles: logic allows for stabilization, guidance, improved detonation systems, or even using bugs for remote control.
Beyond that, without logic blocks, it's hard to implement a correct launch or create a multi-sensor system where the trigger of any sensor causes instant detonation. Logic is my favorite topic, so I will write a lot about it.
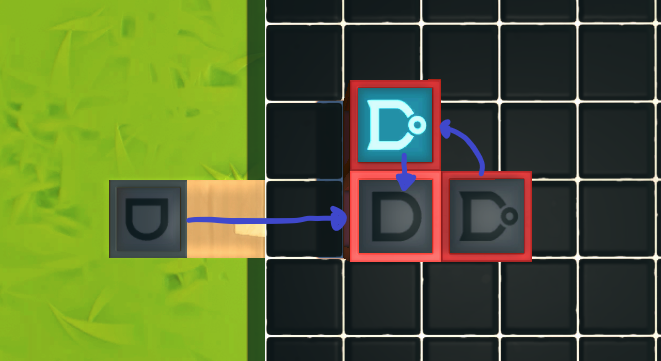 Let's start with a circuit that detects the moment of launch. There are many ways, but in my opinion, the best is activating the missile immediately after it detaches. You might have noticed a dark gate at the back of my missile. Its job is to keep the missile in "standby mode." While this gate is connected to the launcher, the front sensor and main engine are disabled to prevent the missile from exploding prematurely or interfering with the carrier aircraft.
In the diagram on the right, the principle is simple: as long as the "black" gate is present, the pink AND gate is blocked. As soon as the connection breaks (the missile detaches), the pink gate activates after one tick thanks to a pair of red gates providing a constant signal.
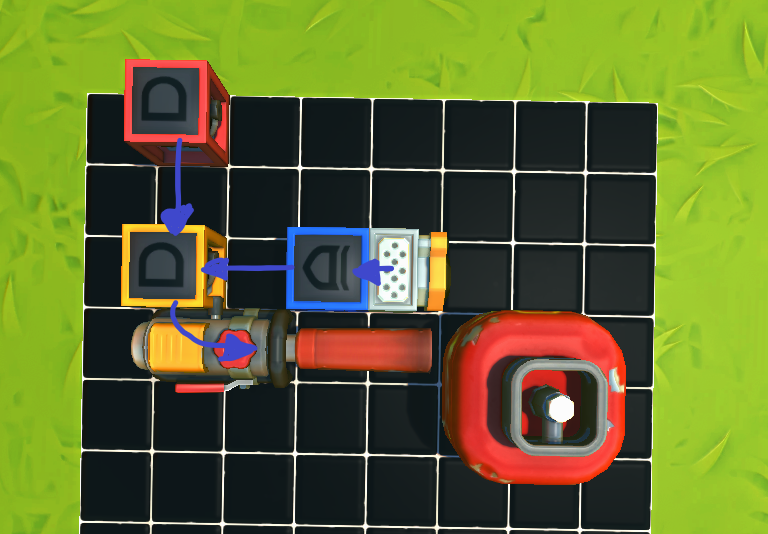 Now imagine the missile has reached the target and the sensor triggered, but we only have one spudgun. If you hit a bomb with just one potato, it explodes with a 2-second delay. Each subsequent potato hit subtracts 1 second of wait time. So, for an instant explosion, you need either 3 spudguns or to wait 2 seconds. The latter doesn't work for us, as the missile might simply ricochet and fly away in that time.
To avoid this, the sensor is connected to a "self-welded" gate. As you remember, if a constant signal is applied to it, it starts flickering, outputting a pulse every other tick. This signal goes to an AND gate, which is necessary so the detonator doesn't trigger while the missile is still on the pylon (i.e., while the pink gate is OFF).
Detonation: Main Methods
There are two main ways to detonate a bomb in Scrap Mechanic:
- **Contact (Physical Impact):** If the missile is flying at high speed, the bomb might trigger upon colliding with an object. However, this method isn't always reliable—sometimes the projectile just breaks apart, leaving unexploded bombs on the map.
- **Remote (Via Sensor):** This method creates a bit more server load (lag), but it is much more reliable. As soon as the sensor detects a target, the spudguns fire and hit the bomb. Even if a bug causes the potato to miss, you can back it up with a self-destruct timer. It will blow the missile up after a set time so it doesn't clutter the map.
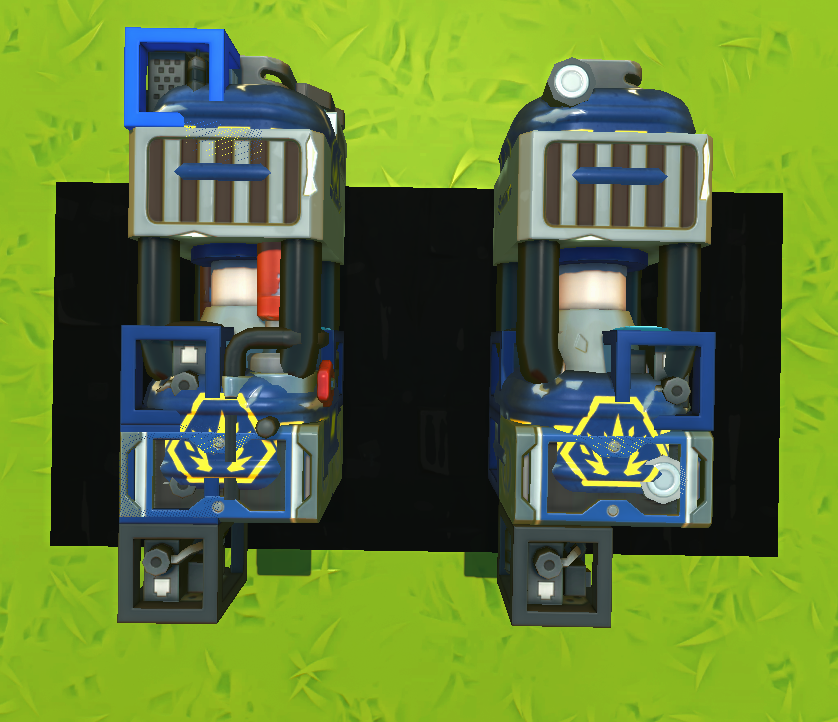 The missile on the left (lighter version) has about 1.5 times less mass than the one on the right. This means an aircraft can carry 1.5 times more of these missiles, significantly increasing volley firepower.
In the end, you should have a basic NAR-type missile. I recommend trying a "surface-to-surface" version first, as it is the simplest, before moving on to more complex types. The key for these missiles is minimal weight, since they are usually "spammed" at enemy positions (unless you are using glitched internal bomb variants).
HOW TO LAUNCH MISSILES
Let's return to the photo where the missile stands simply on a support (a "stick"). Such a missile can be launched using RMB (deleting the block). This type of launch creates ideal conditions for trajectory calculations because we precisely know the vertical and horizontal angles, which is critically important for ballistic missiles.
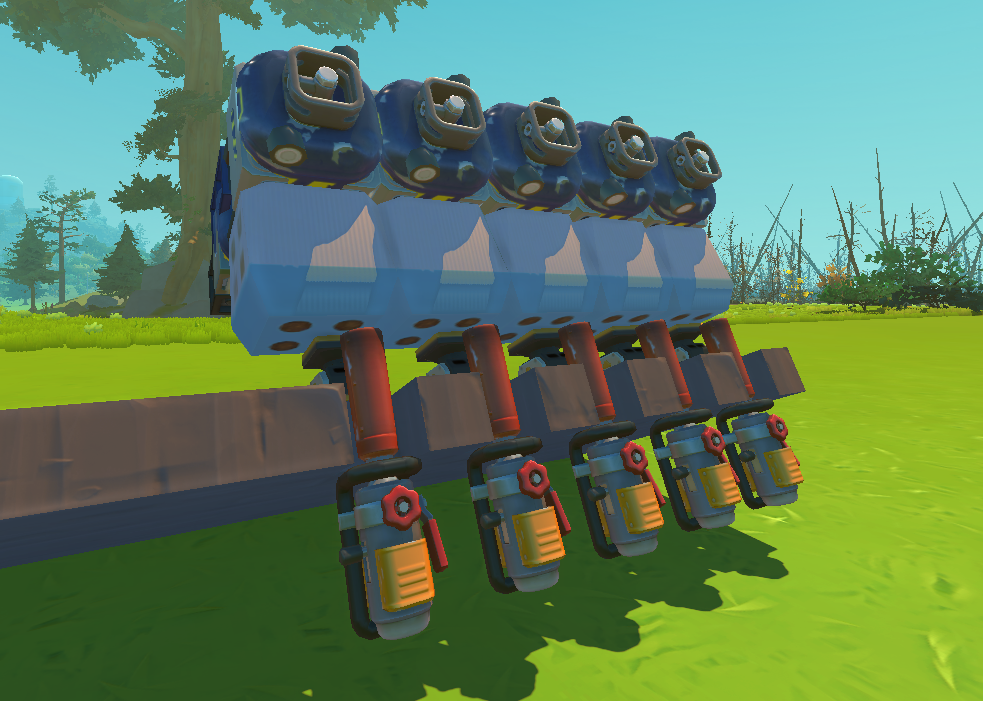 If space is limited, you can use pistons to separate missiles into different structures so they don't stick together. However, it's worth considering that due to friction and the specifics of the game's physics engine, accuracy is slightly lost during such a launch.
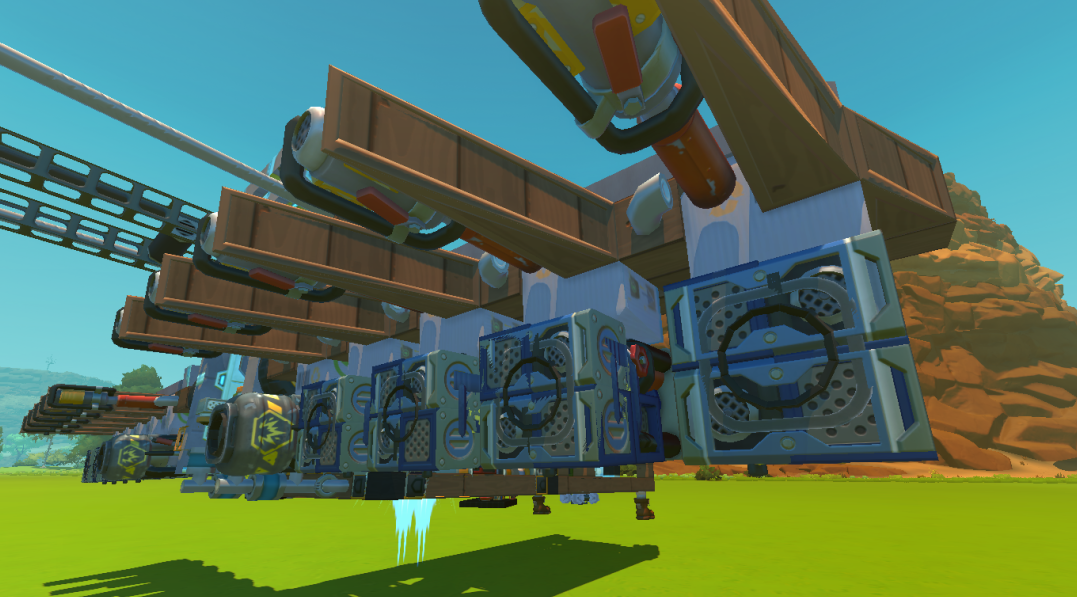 The "golden middle" between accuracy and compactness for mounting on vehicles is when the missile is held by a single block. When it's destroyed, the missile drops and immediately activates. If you decide to arrange missiles via blocks, it's better not to make them separate structures using pistons or bearings. Due to specific game physics, at the moment of launch, such a missile might "swerve" slightly and fly off course.
END
Translation into English and Russian was provided by geminiAI
- How raids actually work (Version 0.5.1)★ 5 (550)19k views867 ♥3 minUpdated 7 Apr, 2021
- Как пройти выживание?★ 5 (448)18k views700 ♥25 minRussianUpdated 12 Aug, 2020
- Все команды для скрап механик★ 5 (259)15k views475 ♥1 minRussianUpdated 1 Dec, 2023
- Robots and weapons concept proposal★ 5 (421)10k views182 ♥3 minUpdated 1 Apr, 2022
- How Does Fuel Consumption Work? Which Engine Is the Most Efficient?★ 5 (182)10k views152 ♥3 minUpdated 16 Oct, 2020
- Русификатор для Scrap Mechanic by Pro100DarkTV (v2.5)★ 5 (317)9.9k views516 ♥1 minRussianUpdated 19 Jun, 2021



- Upgrading to PremiumTeam Fortress 2★ 5 (20k)1441k views11k ♥6 minUpdated May 11, 2022
- No More Room in Hell Official ManualNo More Room in Hell★ 5 (2.8k)569k views2.1k ♥29 minUpdated Apr 22, 2019
- NMRiH Community Hosting GuidesNo More Room in Hell★ 5 (526)351k views653 ♥1 minUpdated Aug 10, 2022
- ULTIMATE GUIDE FOR GAME DEV TYCOONGame Dev Tycoon★ 5 (5.8k)326k views10k ♥4 minUpdated 23 Jan, 2014
- How to 'Git Gud' Soon™MORDHAU★ 5 (2k)318k views3k ♥68 minUpdated Nov 16, 2024
- Лучшие кооперативные игры SteamPAYDAY 2★ 5 (1.5k)315k views2.1k ♥56 minRussianUpdated Apr 27, 2025






This guide was created by its original author on the Steam Community. Are you the author and want it removed? Request removal.