Overview
[*WARNING*] A LOT OF READING IS INTENDED FOR THIS GUIDE!This was a 3 day written guide that is highly detailed with videos, items, builds, and the correct usage of gods to ADC.This is an insanely in depth ADC guide, and I hope in the end this will enhance everybodies ADC skill..
I. Table of Contents
I. Table of Contents
II. Introduction
III. The Definition Of An ADC
IV. Terms To Know
V. Gods That Work Well In The ADC Role
—| Standard ADC Picks
——-| Ah Muzen Cab
——-| Anhur
——-| Apollo
——-| Artemis
——-| Cupid
——-| Hou Yi
——-| Medusa
——-| Neith
——-| Rama
——-| Ullr
——-| Xbalanque
—| Alternate ADC Picks
——-| Arachne
——-| Bellona
——-| Chronos
——-| Freya
——-| Loki
——-| Mercury
——-| Poseidon
—| Counter ADC Skills and Gods
——-| Disarm
——-| Crowd Control
——-| Cripples
——-| Pulls
——-| Heal Reduction
VI. How To Start The Game
—| Jungle Buffs
——-| Strategy 1
—| Invasion
——-| Damage Camp Invade
——-| Attack Speed Camp Invade
——-| Counter Invasions
VII. Lane Strategies
——-| Warding
—| Early Game Strategies
——-| Understanding And Establishing Your Zone
——-| When To Return To Base
——-| Pushing Hard
——-| Playing Defensively
——-| Targeting the Archers Only
——-| Attacking Around The Minions
——-| Letting Your Support Last Hit
——-| Hiding Behind Walls to Conceal your Rotations
——-| Animation Canceling
—| Mid Game Strategies
——-| Rotations
——-| Stealing Enemy Buffs/Defending Your Buffs
——-| Freezing The Lane
——-|Thinning The Wave
—| Late Game Strategies
——-| Split Pushing
——-| Bull Dozing
——-| Ghosting
——-| Ignoring The Lane
VIII. Team Fights
—| Early Game Strategies
——-| Using Your Skills Correctly
—| Mid Game Strategies
——-| Baiting and Boxing The Enemy ADC
——-| The Moron Strategy
—| Late Game Strategies
——-| Stay In The Back
——-| Ambushing
——-| The Charge
IX. Objective Strategies
—| Tier 1 Towers
—| Tier 2 Towers
——-| Destroying The Mid Lane First
——-| Destroying The Duo Lane First
—| Phoenix
——-| Destroying The Duo Lane First
——-| Destroying The Mid Lane First
—| Gold Fury
——-| Soloing The Gold Fury
——-| Trying To Steal The Gold Fury
——-| Team Fight On The Gold Fury
——-| Baiting By Using The Gold Fury
—| Fire Giant
——-| Do NOT Bunch Up On The Fire Giant
——-| Rotate In The Opposite Direction Of The Player With Aggro
——-| Baiting By Using The Fire Giant
X. Itemization Strategies
——-| CORE Builds
——-| Situational Builds
——-| ADC Counter Items
XI. Credits and Special Thanks
XII. Disclaimer and Copyright
II. Introduction
Welcome to my guide for the ADC lane. My goal is to explain the ins and outs of the ADC role, from the very basic to the extremely niche and oddball tactics that might help you beat your opponent. This guide is here to explain the various tactics to you and give you a general rule of thumb. Obviously, no two games are the same, and different situations call for different tactics. It’s up to you to make the best use of the information this guide provides.
If you see any information that you feel could be improved upon, please drop me a PM and I’ll look into adding it to the guide.
III. The Definition Of An ADC
The term ADC (Attack Damage Carry) is a carryover from League Of Legends (LOL) that has stuck onto SMITE’s terminology. A ‘Carry’ does not necessarily mean that the god must be a ranged auto attack god. A Carry is any god that outputs the bulk of the damage, or who carries the team to victory. In SMITE, the ADC role is mostly filled with ‘Hunters’. A good ADC will have three things, High Auto Attack damage, Lifesteal, and a good lane clear. That’s really all you need to perform well as an ADC.
The main objective of any ADC is two-fold, starting from the most important they are –
Earn experience and gold as fast as possible.
Use your high damage to help secure objectives and control team fights from the rear.
It’s fairly simple, but most people forget the fact that this is not a KDA based game, it’s an objective based game. Your main role is to get fed ASAP and knock down objectives for your team. You’re the main source of constant damage, so you need to act like it. You generally don’t want to fight too much early game, as there’s better gods and roles that simply do that better than you can.
IV. Terms To Know
AA – Short for Auto Attacks, AKA Basic Attacks.
ADC – Short for Attack Damage Carry.
Aggro – Short for Aggression. A term to describe who the AI is currently Attacking.
AKA – Short for Also Known As.
AMC – Short for Ah Muzen Cab.
ASR – Short for Attack Speed Reduction.
Backing – AKA RTB
Big – AKA “Being Fed’ (See Fed).
Buff – Short for “Jungle Buff” – A beneficial stat that drops from the big minions of a Camp.
Camp – Short for “Jungle Camp” – Comes in the form of EXP.
Carry – A player or god who is making the best plays on the team, and “Carrying” the team to victory.
CC – Short for “Crowd Control”.
CCR – Short for “Crowd Control Reduction”.
Collapsing – The act of surrounding and killing a player. “The enemy collapsed on our ADC” means The ADC was ganged up on by multiple enemy gods.
XP/EXP – Short for “Experience”, You need EXP to level up your character in game.
Feed – A negative term for when a player dies multiple times to an enemy god.
Fed – A Positive term that means the player is ahead of his adversary, usually by two or more levels.
FOV – Short for Field of View.
Freezing – The act of ‘Freezing’ or stalling the minion wave to deny experience or keep the wave in a more favorable position.
Global Ult – A far reaching Ultimate that can potentially cross maps. Example : Neith’s World Weaver
HOG – Short for Hand of God.
HOG 3 – Short for tier 3 HOG, or Wrath Of The Gods.
KDA – Short for “Kills Deaths Assists”.
KDR – Short for “Kill Death Ratio”.
Kit – The ability set of a god.
Last Hitting – The act of dealing the killing blow to a minion. Last Hitting awards 50% extra gold to players.
LOL – Short for League Of Legends.
Meta – A term to describe an overall strategy in game that yields the highest win rate. “The best way to go about doing something is another way to say META”.
OOM – Short for “Out Of Mana”.
Push – The act of advancing minions or teammates up a lane to attack an objective “The Artemis pushed her minions to the tower”.
Peel – The act of using crowd control to stop an enemy god from damaging a teammate. “Ymir uses his Freeze to Peel the enemy from his ADC”.
Power Spike – A term used to describe power boosts after finishing an item. Important to team fights.
Pubstomp – Short for “Public Stomping” – Usually an Experienced player going into a Casual Match and grabbing a god that most casual players have issues against.
RTB – Short for “Return(ing) To Base”.
Rotate – The act of moving from one lane to another. Usually used as “Rotating Left/Right/Mid”.
Snowball – The act of a player/team getting fed and carrying an overwhelming advantage over the enemy.
Steroid – An innate ability in a gods Kit that boosts attack speed or power (Example, Artemis’s Vengeful Assault).
Wave – A group of Minions. 3 Archers and 3 melee minions is a full wave.
Deep Ward – Placing a ward deeper into the jungle for earlier detection to prevent ganking.
Shallow Ward – Placing a ward close to your buffs to prevent ganking and buff stealing.
Offensive Ward – A ward placed in the enemies half jungle.
Defensive Ward – A ward placed in your half of the jungle
Zone – The Area in your lane that it is safe to fight from.
Zoning – The act of controlling a portion of the lane through minion manipulation and skill.
V. Gods That Work Well In The ADC Role [Part 1]
Let’s face it. Most any god CAN get in the ADC role, but realistically, only a few excel in the role. Here are the most prominent gods that succeed in the ADC Lane.
Standard ADC Picks
Ah Muzen Cab (Easy to Learn, Hard To Use, Pubstomp) – AMC is a harder god to use as an ADC, simply for the fact that other gods have more survivability. AMC has, without a doubt, the strongest lane clear in the game however, along with a monstrous mid game. It is very easy to lock your enemy under their tower as the giant bee. This comes with huge risks however, as AMC has no hard CC, nor any particularly great escape. He can get shut down fairly easily as well if you don’t position well with him. All of these factors together make him favored as a ‘pubstomp’ god.
Anhur (Easy to Learn, Hard to Master, Easy to Use, Weakest End Game, Top Pick) – Anhur arguably has the best early and mid game of any hunter. He absolutely shreds armor; which is huge in the current meta, and he hits like a truck. Unfortunately, his ult falls off fairly hard late game in comparison to other gods. That isn’t to say he isn’t viable, it just means he needs to exert more caution end game. The reason I say “Hard To Master” is that Anhur has several tricks and combos that work together that require some training to pull off (For example, the Leap + Knockup > Pillar > Impale combo)
Apollo (Easy to Learn, Hard to Use) – The fallen star of the SMITE world. Apollo doesn’t have an amazing lane clear early game, but he is the unrivaled god of the split push. His push picks up as soon as you’re done with your first stack item, so as soon as you’re out of that territory he’s right back to top tier god. If the enemy is hunkered down somewhere, simply walk across the map, and begin assaulting the tower. Eventually someone will come and stop you, which results in you ulting away and forcing a 4v5 on the enemy team. He also still retains all of his utility, which makes him very useful for team fights.
Artemis (Easy to Learn, Intermediate to Use, Best Tower Killer, Pubstomp) – Artemis is a great god overall, and very balanced in the current meta. She’s basically a safer AMC. A major note is that she lacks a reliable escape outside of her ultimate, so grabbing combat blink might be a good idea for her. She suffers early game though, as other gods do have a better lane clear skill. The main bread and butter of Artemis is her passive and steroid. Unlike every other hunter in the game, Artemis doesn’t require rage to push out ludicrous amounts of damage. Artemis is unrivaled when it comes to sheer DPS for steroids, so it’s no wonder the lane she’s in will be cleared of towers usually, since it only takes a small window of opportunity for Artemis to destroy them.
Cupid (Easy to Learn, Easy to Master, Top Pick) – Another god with amazing lane clear. Cupid has one of the best team fight presences in the game, since his entire ultimate field is a cripple. Top that off with big early game damage, and you can figure out why Cupid is huge atm.
Hou Yi (Hard to Learn, Hard to Use) – Hou Yi is a rather funky god. He has quite a bit of single target kill potential, but he just doesn’t shine outside of the narrow jungle paths or without a Ymir handy to help set up his Richochet. He has solid clear, but other gods simply do better than him (Rama, Xbalanque, Cupid, etc) His ultimate is nice for team fights in both damage and zoning, as it will generally force the enemy into a nasty position when used right. He requires a bit of a different train of thought than other hunters, so I would recommend other hunters if you’re just starting the ADC role.
Medusa (Easy to Learn, Easy to Use) – Medusa is currently the best boxer in the game. Owing to the fact that she has zero movement penalties while strafing, as well as only half penalties while moving backwards. Unlike every other god, who needs to turn their mouse to juke correctly, Medusa can strafe just as fast as she can walk forward, which is HUGE. She has a solid kit overall, along with a nice steroid, although the windup for her ultimate can feel like it takes an eternity during gameplay. She’s a very strong pick at the moment, though she’s not broken.
Neith (Easy to learn, Hard to Master, Easy to Use, Pubstomp) – Neith has quite a bit of utility, along with a global ult. One of the biggest faults with Neith is the fact that her backflip is completely telegraphed, meaning you will ALWAYS know where she lands. She’s a fairly safe pick overall though, since she has extra healing built into her kit, and a really great team fight presence thanks to the combinations of broken weaves and roots.
Rama (Easy to learn, Intermediate to use, Top Pick) – A solid pick overall. Rama has an escape, a steroid, and a great lane clear. To top it off, he has an ultimate that can kill enemies from quite a distance, though it requires quite a bit of accuracy to pull off. Overall, he’s a top pick in the current meta.
Ullr (Hard to Learn, Hard to Use, Top Pick) – Ullr takes some training, and is also the biggest mana eater of any ADC. He’s an extremely good god if you learn his combinations, as well as how to animation cancel, he can become fairly devastating.
Xbalanque (Easy to learn, Easy to Use, Top Pick) – A very easy god to pick up, Xbalanque can really dish out the damage. His passive basically gives him an extra item, so if you rack up kills, you become big fairly quick. Add to that, his ultimate can cause some serious confusion for the enemy team, as it blocks off ward view, as well as player view. Damage wise, his kit is extremely strong, so you’ll never be left wanting if you pick Xbalanque.
Alternate ADC Picks
Arachne (Easy to Learn, Hard to Use, Pubstomp)- While Arachne is better off in the jungle, you can bring her to the ADC role relatively well. You end up with a fairly strong early game, thanks to the great kit on Arachne early game. She gets bonus lifesteal, as well as a web that can help stop or clear minions. The end game won’t be as strong for Arachne as a traditional ADC, but your early and mid game should be fairly solid.
Bellona (Intermediate To Learn, Easy To Use, Pubstomp, Top Pick) – Being the only god with Disarm, Bellona is the only true counter ADC pick in the game. That said, she can also work quite well as an ADC, despite being a melee god. In fact, Bellona can fill almost every role if you have the right team composition. If you let Bellona get even a little bit ahead, it becomes extremely easy for her to snowball, which is why she’s a pubstomper’s dream as well.
Chronos (Easy to Learn, Hard Early game, Easy to Use, Extremely Safe) – Chronos is usually sent to the Solo lane, but he can easily fill the ADC role as well, if you build him with AA items instead of straight power. His passive also has a mana regen skill which is also extremely helpful. Add to that, he can get a free pass in a fight by utilizing his ult, which will allow him to start the fight fresh.
Freya (Easy to Learn, Hard to Use, Pubstomp) – Being completely reliant on auto attacks topped with massive burst potential, it’s no wonder that Freya can play in the ADC lane. She took a pretty hard hit when the blue buff was replaced with the purple buff in duo lane, but she quickly rebounds so long as you play safe early and buy several blue potions.
Loki (Easy to Learn, Intermediate to Use, Hard to Master) – Loki is obviously made for the Jungle, but can see quite a bit of success in both the Solo and ADC roles. Much like you would when you choose him for the Solo lane, you simply use him as an off Jungle.
Mercury (Easy to Learn, Hard Early game, Intermediate to Use) Unlike Arachne, Mercury gives up the early game for the devastating mid and late game. There aren’t many gods that can’t push a Mercury against the wall easily early, so you’ll always be on the back foot. You’ll want to focus on eating back and mid harpies as much as possible to help close the gap between you and the enemy
V. Gods That Work Well In The ADC Role [Part 2]
Poseidon (Easy to Learn, Hard Early game, Intermediate to Use) – Much like Chronos, you simply build him with slows and attack speed. I would seriously recommend fatalis if you choose ADC Poseidon. Remember that Poseidon has a cripple thanks to his wave, which will absolutely destroy your unwary ADC opponent in the blink of an eye.
Counter ADC Skills and Gods
These gods and skills are the bane of your existence. Practice extra caution around these gods, and you should come out well enough. These are the gods and status effects that are most lethal to you top to bottom.
Disarm – Currently, Bellona is the only god with this unique crow control. It’s the only Crowd Control that focuses on shutting down the ADC completely. If you find yourself under the effects of Disarm, you need to back off or pop your beads.
Attack Speed Reduction – Witchblade, Enfeebling Curse, etc. – When used properly, ASR can really make your life miserable. The most obvious effect is that it shuts down your DPS, but for ADC it’s effectively taking your VHP and cutting away the bulk. Lifesteal is a major part of being an ADC. If you don’t have the DPS to make use of your Lifesteal, you’re in a world of pain.
Heal Reduction Odin and Chang’e can be nasty opponents if you forget they shut your life steal completely off. Odin is a complete monster early game, even more so if you don’t have an escape (combat blink or a leap). Getting stuck in the Ring will be your demise every time. Chang’e is also pretty scary due to the simple fact that she can poke and juke like nobodies business.
Crowd Control- Ymir, Athena, Cabrakan. These are gods that you never want to fight when they have backup. The best counter to this is simply stay out of their range and zone them out. Allow your Support to be the amazing damage soak and help peel enemies off of him as needed. Just like with heal reduction, the second you stop attacking as an ADC, you become just another squishy, and will die very easily.
Cripples – Poseidon, Cupid, and Ares can really make life hell for an ADC. You need to keep your escape available to get out of nasty situations. Respect your opponents, if you know they have a cripple, pay close attention to when they fire it off. Beads will be your only ally here.
Pulls – Sobek, Hercules, and Awilix can turn a pleasant stare down into a full fledged fight within a second, so make sure you stay out of their fishing zone. For Sobek, it’s as simple as keeping a minion in between you. For Hercules and Awilix, it’s all about not meeting the criteria that puts you in their strike zone.
VI. How To Start The Game
Aside from your general start build, there’s several routes you can use to start the game. Make sure to pay attention to what your Support is doing in terms of ward coverage. Remember that 100 gold is a cheap price to pay to stay alive. To help put it in perspective, 1 minion wave is worth 330 exp + 87 gold (129 with all last hits). If you die, you’ll miss one minion wave at the least, if not two. Obviously at the start, if you do a stander Starter item + spiked gauntlet open, you can only buy 1 ward, but that 1 ward might be the difference between dying and living… so think about that and make the call when it comes.
Jungle Buffs
Strategy 1 – The current meta is fairly simple for starting your buffs early game. Begin your game at the Damage Camp along with your Support and Mid laner. You want to take the initial aggro to help keep your Support and Mid healthy, switch the aggro to the Support when you reach about 3/4 health. When the Big minion has about four AA left to death, switch aggro to the mid laner and head for the Attack Speed camp. This allows you to get the experience and the mid lane will be able to get into lane a couple seconds earlier. As with the Damage camp, you want to take initial aggro again. until you’re slightly below 3/4 of your HP. You want to lure the big minion to the edge of the circle closest to the jungle exit to save some walking.
It’s very important to switch aggro early game on these camps. Entering the lane below 90% HP will see you being targeted and pushed easier out of lane. That includes your Support. Keep them healthy as well!
Generally, you have two trains of thought for your Support to use HOG. You can use it offensively on the red camp to increase your clear speed so mid can get to lane quicker, or you can use it defensively if you expect an invade. I would suggest keeping the HOG for the attack speed buff.
Invasion
Have a team composition with plenty of stuns and slows that can net you first blood? This is a great opportunity for you. An invasion is always a viable tactic early game, but it’s more of a risk for your team than it is for the enemy. You need to get results or your team will be left with a very big gap in gold and experience, as well as leaving yourself open to a counter invade.
Damage Camp Invade – This is the riskier of the two invades, and requires the entire teams effort to pull it off. However, it will keep three enemy gods down at the start, instead of just two. The concept is simple, the duo lane and the mid lane converges on the enemy damage camp as soon as they expend their abilities on the harpies. You want to have someone ward just above the Damage camp, then hide around the mid furies. You want to head towards the enemy Damage Camp right when the game starts (0:00). If you’re lucky, the enemy will use their HOG right off the bat, which will allow you to get the jungle buff nearly free, and also pick up a kill or two. The idea here is to deny the mid lane the power buff while driving everyone back to base at the minimum.
This allows your mid lane to proceed straight to mid lane, and get an early push on the enemy. If you’ve pushed everyone back to base and the red buff is down, rotate onto the enemy attack speed camp and go directly to lane. If the enemy used their HOG on the Damage camp, you basically have a free attack speed camp, since your Support can use their HOG to secure.
Attack Speed Camp Invade
This invade targets the Duo lane only, since the Mid lane will have already secured their red buff. You have two ways of going about this steal. The first will allow the enemy to get a strong push early game in both Mid and Duo lane but should require no fighting, and the second will see a huge push on only the Mid lane early, but the Duo lane will have a massive advantage, and will require a fight.
The first option is to secure the attack speed camp while the enemy team is focusing on their damage camp. The only way this can work is if your three gods are able to output more damage early game than the enemy. For example, you would need an Anubis, Ymir, and Anhur vs a Geb, Agni, and Apollo. Obviously the first pair will output bigger numbers than the later, so this becomes a safe option. At the start, you either want to place a sentry ward early to knock out the enemy ward, or you can place a ward over the Damage camp to see what the enemy is doing.
The Second option is to wait for the enemy to attract aggro on the Attack Speed camp, and then attack the enemy as a group. Again, this requires a ward up on the Damage camp early game to see exactly when the rotations happen. Or you can set out with the idea in mind from the get go. Hide around the middle of the lane, and attack the enemy as soon as you see them leave the damage camp. You want to announce your arrival when they use their skill, so you can safely engage them. After you secure their camp, retreat and secure your Damage camp for the mid lane and proceed as usual.
*NOTE* – Pay attention to the enemy team if you decide to ward their
Damage Camp early. If you clear your side’s Damage camp, and you notice that they’re still dealing with it, you can easily take the chance and try stealing their Attack Speed simply by virtue of out clearing them. Even if you don’t get the camp, you’ll more than likely force them both back to base while you go clear your own.
Counter Invasions
Now for the other end of the stick. Sometimes you’ll end up getting invaded as well. I ALWAYS suggest warding the Enemies Damage Camp out of the gate. This usually prevents an invade, since you know exactly where the enemy is. You should also patrol the jungle around the standard invasion waiting areas. If they’re not at their buff, assume they’re going to invade you, and that they have a ward on your buff as well. If you don’t see the enemies, you might also want to hold onto your HOG and simply soak the damage in order to secure your buff.
If you end up being invaded, you should think first on if your team has the damage and ability to fight back. If you just sunk all of your damage into the Camp minions, you should immediately disengage, and proceed to stare the enemy down while letting out as much safe damage as possible. Try not to use your abilities until the enemy gods are completely engaged on you or your allies. Usually, the enemy will try and engage on your Buff after a few seconds of the stare down. Simply wait it out for a few moments, then initiate on the enemy gods. Do not worry about your buff, focus on bursting the enemy down. Your Support should be trying to body block damage on the camp minions while you focus on the enemy ADC or Mid. Usually, this will actually save your buff and allow you to enter lane as normal.
If there’s no way you can fight, you have a few options.
First, you can go straight to lane and push as hard as you can. If the enemy invaded your buff, that will mean their buff is still up. So if you push the minions under their tower, they’ll have no choice but to defend while you go steal their buff in retaliation. This will require you to have HOG available, or it will simply be too dangerous. This will put your mid lane at a significant disadvantage though, as they will not be able to clear as efficiently as the enemy mid. If you go with this scenario, make sure to tell your jungler to pay close attention to mid lane, and play your lane as safe as possible.
Second, you can take out your back furies, and either head to your Attack Speed buff to try and steal with your HOG, or head to lane and look for an opportunity to steal their Attack Speed Buff.
VII. Lane Strategies [Part 1]
You have several options for your lane strategy. There’s no sure fire strategy to winning your lane. It all depends on your team’s skill against the enemies team’s skill. You can, however, maximize your chance to win. Think about each of these strategies and try them out. Most players will favor a single strategy, so if you know how to counter it, you can generally counter it and turn the tables against them.
Remember that no matter what strategy you employ, it’s EXTREMELY IMPORTANT TO LAST HIT. Last hitting nets you a 50% increase in gold.
Rewards
Melee : 65xp, 17 gold without a last hit, 25 gold with last hit.
Brute : 65xp, 17 gold without last hit, 25 gold with last hit
Archer : 45xp, 12 gold without last hit, 18 gold with last hit
Managing your Experience and Gold is the most important thing for an ADC. Your job is to get fed as soon as possible, even more so than any other role. Out farming your opponent is what will make or break you as an ADC.
Warding Take the burden of warding from your Support and cover the most important ward spot for your play style. If you’re being defensive and staying in or near your tower, ward at the bottom of your jungle. If you’re caging the enemy in his own tower and generally staying offensive, cover your butt and ward the top of the jungle. Below is a list of my favorite ward positions for the duo lane.
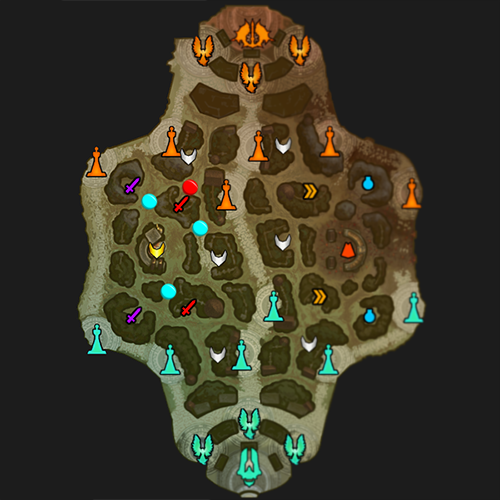
The red dot is for the very start of the game or to help your Jungler stay offensive on the enemies Power Camp. The trio of blue bubbles are where I suggest keeping wards at all times, as it covers the comings and goings for the bulk of the jungle. Please notice the bottom left ward placement. This seems counter intuitive, but this positioning actually creates an effective Deep Ward, as it actually extends out to the main travel paths and will show you the enemy as they approach thanks to the ward’s FOV.
During late game, you’ll need to place wards according to how your team is doing. If you’re on the offensive, keep the upper half of the map lit up. If you’re on the defensive, make sure to keep the main objectives and your half of the jungle lit up. Information is the most vital puzzle piece in war. If you don’t know where all of your enemies are, you’re leaving your team open to a smack down. Keep the mini map lit up like a Christmas tree, and you’ll be able to plan accordingly.
Early Game Strategies
For the early game, it’s most a battle of attrition and who has the better lane clear, but there is a few things to pay attention to. For starters, in the current meta, with the jungle being left barren so early in the game, the Jungler will usually rotate within the first minute or two on the Duo lane to try and get a gank and help push. So you need to pay very close attention when the Solo lane calls their MIA. Expect the Jungler to meet and greet your lane within the next 30 seconds.
Understanding And Establishing Your Zone – Your Zone is essentially where it’s safe for you to play. Think of it as a scale of sorts. If you’re able to clear and out push your opponent, your Zone is much larger than theirs, and extends almost to where the enemy archers are. If you’re not able to outpush the enemy, your zone starts a little behind the friendly Archer line. The opening phase of your game is pretty much all about maintaining and expanding your zone as much as you can, as it generally wont change until the mid game at the earliest.
Here’s a great video showing how to make the best of your Zone when you’re on the backfoot, courtesy of BaRRaCCuDDa and Zapman :
Notice that early game, Mercury is getting smashed by the Ullr in terms of Push and Zoning. The Mercury plays it smart and stays in his zone (which is well behind his minions), and out of the Ullr’s zone (Which encompasses the entire lane). Mercury loses the early and mid game, at one point being 3 levels behind, but comes back strong late game thanks to consistent alternative routes of farming (He constantly shares the back harpies with the Jungler) and not feeding the Ullr despite the overwhelming disadvantage in matchups.
When To Return To Base – One of the biggest things I notice when playing is people not returning to base at the right time, or for the wrong reasons. Do NOT return to base unless you have to or if it’s worth it. For example, you should return to base immediately as soon as you have 1400 gold to finish off your Devo Gauntlet. You should not return to base if there’s no real benefit, or if your lane isn’t taken care of. Try not to return to base if you’re going to lose a minion wave, or if your enemy will be able to push your tower.
https://https://www.youtube.com/watch?v=IJVZpMzV7dU&feature=youtu.be&t=6m32sww.youtube.com/watch?v=48Auj5H8oP8[https//https] demonstrates a poor base return, which ends up costing him a full wave, his blue buff, and almost costs a teammates death
Pushing Hard – The most common strategy used by players is the most obvious one. Push the minion wave as hard as you possibly can. When done correctly, it allows your Support an early head start on the mid furies, which is huge. The strategy is straightforward, but it can land you in hot water fast. Remember that the current meta sees the Jungler greet you within the first two minutes now. A big misstep for a lot of players is pushing to the enemies tower with no ward coverage. This is a huge misplay, and will often lead you to getting killed. Do not go hard unless you have the safety net to do so. Refer to the Warding section above, and NEVER PUSH WITHOUT WARDS.
Playing Defensively – You can’t out push the enemy every time, so it’s best to know how to minimize and control the damage. This comes from understanding your zone and god capabilities. If the enemy has a better lane clear than you, don’t play into their hands and get in a bad situation. It takes time to learn when to turn tail and run, but when it happens turn 180 and don’t look back. If the minions push into your tower, focus on the archers first after they aggro on your tower. You’re unlikely to secure the melee minion experience, so by focusing on the archers you can at least try and salvage a couple last hits while minimizing the damage done to your tower.
Targeting The Archers Only – Whether defensive or offensive, sometimes it’s the best idea to take down the archer line first. The archer minions do the majority of the damage, but they also have the lowest defenses against you.
All minions are subject to a percentage mitigation formula as the game progresses. At the start of a match, minions will mitigate 10% of damage dealt, increasing by 1% every minute up until 40, at which point they have 50% damage mitigation. This does not apply to damage from NPCs such as Towers and other minions, although damage from player pets will still be reduced.
Stats
Normal Melee :
Base damage: 12.
Protections: 1 physical, 0 magical + Damage Mitigation.
Health: 375 HP.
Normal Ranged :
Base damage: 25
Protections: 1 magical, 0 physical + Damage Mitigation.
Health: 265 HP
Normal Brute :
Base damage: 50.
Protections: 16 physical, 0 magical + Damage Mitigation.
Health: 720 HP
So by looking at the chart, archers have magical protections instead of physical, and they have 110 less HP than Melee minions do. Try having your Support attack the melee minions while you make a pincushion out of the archers. As soon as the enemy loses their archer squad, your zone increases dramatically, and will force the enemy back, and might even deny them early game experience, which is the most crucial kind of experience.
Attacking Around The Minions – If you attack the enemy from near your archer line with a melee line in front, you will not attract the aggro of the enemy archers, or if you do, you’ll only earn yourself one or two hits.
VII. Lane Strategies [Part 2]
The melee minions will charge you, but will quickly fixate back on your melee line. Utilize this concept to poke the enemy if they get too close. Free damage is the best damage.
Letting Your Support Last Hit – Watch if your support gets Mark of The Vanguard instead of Watcher’s Gift. This means that Supports cannot simply benefit from watching you do all of the work anymore. If your Support dies in the early game, you need to let them recover as much as possible. This is as simple as letting them take the last hit on a minion wave or two. Even allowing your Support to take half of the last hits when they haven’t died is a huge boon early game. Small things like this can have dramatic effects come mid game. Power spikes during the mid game are a very crucial element, so your support REALLY needs to have enough gold to get his aura items. Not to mention it can be a pretty big disadvantage if your support is a level behind the enemy Support. This could mean that the lower leveled Supports CC isn’t completely maxed out by mid game, which could result in a swift change in the tides.
Hiding Behind Walls to Conceal your Rotations – By this, I mean acting like you’re rotating to another lane without leaving the lane. If you’re in a position where your enemy will most likely clear the minion wave as fast as he can, you can use this tactic. Simply put, you just act like you’re rotating while keeping your eye on the enemy. If the enemy doesn’t have a ward, they’ll call MIA in your lane for the mid, which could help relieve pressure for your mid lane. On top of this, they might over extend, which will put them at your mercy and might secure a kill. Get in the habit of doing this.
demonstrates how to properly use terrain to mask your presence.
Animation Canceling – This is more of an advanced tactic having to do with your timings. The concept is simple, Use an auto attack and immediately use a skill to cancel your shooting animation. What happens is your auto attack and skill will land at roughly the same time, netting you free damage.
goes more in depth about Animation Canceling, as well as why and why you shouldn’t do it.
Mid Game Strategies
Now lets take the above strategies and add to them. During the mid game, you will generally be left alone with the enemy ADC, with the various Supports and Junglers from both teams coming to say hello every now and again. Don’t rely only on your Support to keep your jungle warded. Take it upon yourself to spend the extra 100 gold to keep yourself safe, even if you have to forfeit completing an item.
Rotations – While rotations aren’t the biggest part of being an ADC, it’s still important to make them when you need to. A few things to keep in mind is trying to help the mid lane, sharing experience from the various jungle buffs with your Jungler, and watching the Gold Fury. Remember, your main role is to get fed. Don’t do anything unless it will net you more experience than simply staying in lane.
Stealing Enemy Buffs/Defending Your Buffs – Try to have your Support or Jungler time their attacks to right before the jungle camps come up. If you can push your enemy into their tower or outright kill them as their buff comes online, you can safely secure it. This denies experience, gold, and a lane advantage to your adversary. Likewise, you need to pay closer attention to the jungle when your own buffs come online, or the reverse will happen and you’ll be at the disadvantage.
Another thing to take note is that the enemies jungle doesn’t end at the Damage and Attack Speed camps. There’s always the Back Harpy camp you can try and claim if no enemies are around and your minion wave is dead.
Sometimes it’s actually better to have your Jungler and Support to secure your Attack Speed camp alone, while you focus on pushing the wave up. If you’re pushed against the tower your enemy will have the advantage when it comes to the fight over your Attack Speed Camp.
Freezing the Lane – Freezing the lane is the act of doing as little damage as possible to the minions (Generally, you only use your AA to Last Hit), or even taking minion damage to stop the wave, in order to keep the lane pushed only to where you want it. This can be useful for both defensive and offensive situations.
If you’re well ahead of the enemy ADC, and you freeze the lane near your tower, you actively deny them any experience. If the enemy tries to come and take experience from the lane, he’ll be putting himself in a vulnerable position and potentially handing you a free kill.
Another thing you should pay attention to is if your Support or Jungler is nearby. You can freeze the lane in order to share experience with them.
A golden rule of SMITE is “Feed your Support, and the Support will feed you”.
shows how to freeze the lane to deny experience to the enemy
Demonstrates how much experience you’re effectively denying the enemy when freezing correctly.
Thinning The Wave – Along with Freezing the wave you should understand how to properly thin the wave. You do not want to end up in a position with a full minion wave to clear while a team fight is about to break out. You also don’t want to put yourself in front of a massive wave and be forced to tank too much damage. Thinning the wave is the act of strategically eliminating minions to maximize your benefits. The videos below are the best representations of how and when to thin out your wave.
demonstrates how to select which minion to last hit as well as how to properly thin out your wave.
Late Game Strategies
Split Pushing – Split Pushing is a strategy that is best employed by ADC’s. The idea of a successful split push is to Divide and Conquer. Your objective is to force the enemy to split from the main group to try and shut you down. This results in a more favorable team fight for your team. Be careful though, as the enemy might simply give up a Tier 1 or Tier 2 in favor of decimating your team in a 4v5 situation. To initiate a Split push, you need to have a few things in place.
First and foremost, is to have good ward coverage and map awareness. You need to have ample warning when the enemy is collapsing on you. This is why Apollo is such a notorious Split Pusher, because he doesn’t need much warning to ult away safely. More importantly, you need to know where all the enemies are. When you see an opening, take it. Do not get into a position where you’re going to die for a tower, as it’s not worth it unless your team gets a free high priority objective like the fire giant for your death.
Secondly, your team needs to be focusing on a different objective. – It doesn’t matter what your team is attacking so long as it’s at least one lane away from you. This means that if your team wants the fire giant or gold fury, you need to be on the opposite end of the map since they’re in the middle of the jungle. Or you can be pushing duo lane while your team is pushing the mid lane.
Finally, it takes experience to know when the best time to start a split push is. – This is not the end all strategy. Sure, it’s annoying for your enemies to have to deal with, but if they expect a split push, it’s extremely easy to counter. A failed split push is common, but in the worst case scenario a bad split push can completely screw your team over, and even lose you the game because the enemy killed your entire team.
demonstrates how to help disengage an enemy by simply split pushing.
demonstrates how to split push effectively with two players
Bull Dozing – This strategy is simply gathering with your entire team and demolishing the tower together. Usually the Support will tank the tower damage
VII. Lane Strategies [Part 3]
while everyone else burns the tower to the ground. Generally, the best time to bull doze is after a team fight that your team won. The key is to maintain your momentum by keeping the enemy pushed back or simply dead.
– from 20:20 to 21:50. In the video, the Mercury rotates over to a brewing team fight where the enemy is attempting to bull doze his T1 mid tower. To stop this, he ulted the enemy and passed into the jungle, which baited out the Enemy Bastet and Wukong. This split in the team ended up killing the Enemy Bastet, and giving his team the opening they needed to win a strong team fight. The tide of the battle really turns when Heavenly Agility is popped on the entire team, and they proceed to bull doze both the T1 and T2 towers, then turn around and use the momentum to burn the Fire Giant. If you notice, Mercury’s team continued chasing the enemy out of tower range and back to their base. This allowed the team to continue their bull doze with no issues.
Ghosting – This is a more advanced tactic that belongs solely to gods with long lasting ranged DOT damage such as Ah Muzen Cab’s Honey. The concept is simply to not appear on the enemies minimap while clearing minion waves. The way to employ this tactic is to drop your DOT ahead of the minion wave just before they aggro on you. Your DOT will eliminate the bulk, if not all, of the minion wave while you watch silently. The object is to be on top of an enemy tower without giving yourself away in order to maximize the amount of time you can do damage to the tower. Most players pay more attention to enemy god images on the map, while leaving the wave placement as a secondary or even non existent factor for their rotations.
Remember, as soon as the minions aggro on you, or you walk near the enemy tower, you will show up on the enemy minimap. So use caution.
Ignoring the Lane – You can simply ignore the lane for the most part end game. The bulk of your build will be online and your stacks should be finished. You’re free to begin rotating and poking at the enemies defenses and try to pry open an attack route for your team. Never stray far away from your teammates unless you’re absolutely certain it’s as safe as possible. You’re the ADC. You’re the main cornerstone of consistent damage for your team. If you die, your team has basically lost it’s right arm in a team fight.
VIII. Team Fights
Early Game Strategies
Remember that at all points of the game you’re a High Value Target. In the early game, your head is a mythical beast that everyone wants to mount on their wall. If you get knocked out early game, you get knocked out until late game. The start of the game is when you’re most vulnerable, more so than any other point of the game. Consider the ward spot I suggest with the red bubble on the map below to help prevent invasions and early deaths.
To compound this, it’s even more dangerous within the first 3 minutes for an ADC, mostly due to the fact that a support can dish out quite a bit of damage early. Remember that your Support dying isn’t a significant hit, but it will screw you over if he dies, so don’t just leave him hanging if you can help it. Your Support will peel the enemy off of you and take the damage, so scratch his back and fight with him.
Using Your Skills Correctly – Using your skills isn’t nearly as important as knowing WHEN to use your skills. You can use your skills both offensively and defensively, but it’s important to use them at the right time. This means thinking ahead and trying to have as much situational awareness as possible. Below are a few examples.
Mid Game Strategies
Baiting and Boxing The Enemy ADC – Remember how earlier I said zoning and warding is important? It’s even more so in the mid game. If you box the enemy ADC, you need to know where the reinforcements are, both yours and theirs. The second the situation turns even remotely unfavorable for you do NOT try and force the issue. Chances are the enemy support is lurking just around the corner while the enemy baits you.
Baiting is the act of trying to lure your opponent into a trap. One of the most common baits is appearing to return to base. Most lower skilled players will take this bait and try hitting you with a damaging skill to prevent you to return to base.
A higher skilled bait is sticking around at lower health. You become the juicy piece of bacon in front of the hound. You need a fairly good Support or Jungle to pull this one off, as a single misplay will end up with you dead. This one comes down to overall experience and being able to feel your enemy out correctly for skill level. Don’t get angry if you die when trying to perform the low health bait. Simply readjust your low point and learn from it for next time.
The Moron Strategy – The general idea is to feign being a terrible player. Take extra hits from the enemy ADC or archers and generally make novice mistakes that you know you’ll survive from. The idea is to give your opponent a false sense of superiority. For example, say it’s time for you to go back to base to finish your item. Pick a fight with the enemy, and ‘lose’ the engagement. You’re not losing any experience or gold if you do it right, and the next fight the enemy will come in overconfident, which will make him easier to kill.
Power Spikes – A Power Spike is the result of finishing an item that benefits you or your team. The most dramatic Power Spikes happen during the mid game. For example, a huge power spike for an ADC is the moment they finish their first penetration item. If you manage to finish your items before the enemy ADC, that will put them in the dog house. They won’t be able to effectively box you simply because you have the extra effects that come along with your finished items. Power spikes are usually overlooked, so if you pay attention to this, you can turn some pretty large profits.
Late Game Strategies
Stay in the Back – This applies to pretty much the entire game, but always stay where people can peel the enemy off of you. You need to be in team fights to pick off the squishies and other detrimental characters.
Ambushing – If your team is staring down the enemy team and you see a possibility to sneak into the enemies back line, take it. The main focus will be on your team, so if you can sneak around and get 3 quick shots on the enemy burst characters, the tables will turn extremely quick. Remember to stay in communication with your team, and try waiting until they’re completely initiated before initiating yourself. Chaos is the best cover for an ambush, so you want your team to look like it’s in a very unfavorable position for this one to work.
The Charge – This often won’t be your first, or smartest avenue of attack, but sometimes it’s simply best to pull a full on assault and lead your team into the fight. You’ll want to wait until the bulk of the enemy CC has been expended, but as soon as it’s ‘safe’ feel free to pop your sprint and see red. Your main target will be the enemy ADC, then you need to focus on the next nearby squishy.
IX. Objective Strategies [Part 1]
First thing’s first. Let’s understand how towers work
Tier 1 Towers have 2000 HP and the first shot will deal 170 damage. Killing a Tier 1 Tower will grant the entire team 100 exp and 100 gold.
Tier 2 Towers also have 2000 HP, but their first shot will deal 230 damage. Along with this, they will be immune to all forms of damage until the Tier 1 tower in that lane has been destroyed. Killing one will grant the entire team 200 exp and 300 gold.
After the first shot, towers become progressively more damaging towards enemy gods. For each hit, you add on 20% of the first hit.
Tower/Phoenix shots cannot be dodged once it has been fired, and once it has been fired the damage it will deal is locked.
Towers have 150 Physical and Magical Protections. Unlike a normal basic attack, physical basic attacks on towers will only deal 85% of your physical power. This means that at 300 physical power and zero pen, you would be dealing (300*0.85) * (100/100+150) = 102 damage, with 153 damage being mitigated.
They can’t be affected by debuffs such as Executioner, only penetration will work on them.
Magical basic attack damage on towers has a 1.2x damage coefficient on it, so if your basic attacks are dealing 100 damage with zero pen, you’ll deal (100*1.2) * (100/100+150) = 48 damage.
If there are no minions within range of the tower (and this extends slightly outwards of the tower’s
maximum firing range) then the tower will take 50% damage. Once the final minion has been killed and there are none left in the range to make the tower take 100% damage and someone is still attacking the tower, then there is a roughly 2-3 second gap in which there will be no minions but you are hitting for 100% damage. You can also use pets to break the backdoor coefficient.
Remember, priority lanes work both ways. If it’s really important for you to take down, it”s even more important to do your best to stop the enemy from claiming these key points within reason. Without a doubt, the ADC carries with them one of the most important end game lanes, so you need to treat it as such. The Solo and Mid lanes are more important for the mid game, but the Duo lane is the one lane you cannot surrender if you can help it.
Tier 1 Towers
The Tier 1 tower in the Duo Lane needs to be burned to the ground as soon as possible. Utilize your preferred style and chip it down slowly. The Tier 1 tower makes it much more dangerous to tackle the Gold Fury simply by virtue of the enemy being able to defend from a position that’s closer to the gold fury spawn.
Tier 2 Towers
While Tier 1 towers aren’t particularly a huge priority, since you’ll usually have them knocked down before the mid game, it might be better to ignore your tower in favor for another tower.
Destroying The Mid Lane First By destroying the mid lanes Tier 2 first instead of your own, you give that god free range of the map. Their lane has been won, and the Mid player can now focus solely on the team fights, which will help out the entire team across the board.
Destroying The Duo Lane First By destroying your lane first, you prepare yourself for the biggest and most important fight in the game, that of the Fire Giant. Not to mention, by focusing your lane hard, you’ll be a very fat and healthy ADC most of the time. Remember not to push your luck too much and always keep wards in the jungle to prevent ganks.
Phoenix
Not all Phoenixes are the same. It is a tactical error to assume so. You need to focus the proper bird at the right time, or you’ll only be weakening your team’s footing.
Destroying The Duo Lane First – Your lane’s phoenix is THE most important objective in the game outside of the Titans. By knocking the enemy Duo Phoenix down, you force the enemy to defend the furthest point from the Fire Giant buff, which is a tactical advantage over your enemies. This means that when you take on the fire giant, the enemy will either be forced to leave someone to defend or allow their titan to take a good chunk of damage.
Destroying The Mid Lane First – Sometimes you can’t knock your lanes bird out first. Go for the next best thing and kill the mid lane. By killing the mid lane, you can quickly switch over to the Duo lane’s phoenix and then move on to the next objective.
Gold Fury
First thing’s first. Let’s understand how the Gold Fury works.
The Gold Fury deals 140 damage per attack, and spawns in 0:10 after minions spawn, the same time as the jungle buffs.
Health: The Gold Fury spawns in with 2916 HP.For every minute of the game that passes, the Gold
Fury’s health increases by 216. At 10 minutes into the game, when the Fire Giant spawns, the Gold Fury will have 5076 health. Health adjustments do not occur whilst the Gold Fury is in combat.
Simple formula: 2916 + 216*Minutes Passed
Protections: 35 physical and magical protections.
Killing the Gold Fury gives everyone on the team 200xp and 300gold. She respawns after 5 minutes of being killed.
Soloing The Gold Fury – As soon as you have about 40 stacks on your Devourers gauntlet, you can usually solo the gold fury. It won’t be the fastest thing, but sometimes it’s worth the risk. When you have below 45 stacks, you want to aggro the gold fury first, sustain a good amount of damage, and then allow someone else to take the damage. You’ll be able to lifesteal off of the gold fury back to full or near full, and take the aggro again if needed.
Trying to Steal The Gold Fury – Simply stated, you don’t want to try this usually. You want to leave this job to your support, who will have a tier 3 HOG.
Team Fight on The Gold Fury – As stated above, you want to do the initiation on the Gold fury first, simply because you can heal yourself off of it. Just stay stead and hold your Auto Attack down. You NEED to be on the gold fury if present, as you’re the most constant DPS in your entire team comp.
Baiting By Using The Gold Fury – You can force a team fight on the Gold Fury if the enemy has a ward on the GF. People do not enjoy giving away free Furies, ever, so sometimes you should use this to your advantage so you have a higher success rate of securing the gold fury. Remember, unlike the Fire Giant, the Gold Fury isn’t a massive steroid. Yes, it will suck to lose the gold fury and put your team slightly behind, but sometimes you need to let the enemy take it.
Fire Giant
First thing’s first. Let’s understand how the Fire Giant works.
The Fire Giant is the toughest non-god enemy in the game, and you should only be fighting him if you feel you have the strength to take him down.
The Fire Giant has 4 main attacks. The first two are similar, with the exception of range. This is his Mighty Swing and Boulder Toss. He will use these depending on if the person who is the target for the FG’s aggro is in melee range or not. Both of these will deal 155 physical damage.
Next, is the deadliest move the FG has, Magma Blast. He will slam his weapon into the ground, creating a line of lava into the floor towards his target. Anyone standing on the lava line will be slowed by 80 %(before diminishing returns). After 1.5s, the line will detonate, knocking up anyone who is still standing on it, dealing 500 magical damage to all targets there.
Lastly is the Molten Pools. The Fire Giant will summon pools of magma around where each player in range of his attacks is, dealing 225 magical damage upon spawn, then again once every second for 5 seconds. If you are standing over multiple pools, the damage is applied for each pool.
All of the Fire Giant’s attacks will apply a debuff that causes you to take 40% less healing and regeneration, and deal 20% less damage. Boulder Toss applies Flaming Boulder, whilst Mighty Swing applies Cleave, but they have the same effect.
Attack Pattern:
1.Boulder Toss/Mighty Swing
2.Boulder Toss/Mighty Swing
3.Magma Blast
IX. Objective Strategies [Part 2]
4.Boulder Toss/Mighty Swing
5.Boulder Toss/Mighty Swing
6.Magma Blast
7.Boulder Toss/Mighty Swing
8.Boulder Toss/Mighty Swing
9.Boulder Toss/Mighty Swing
10.Boulder Toss/Mighty Swing
11.Molten Pools.
Health: The Fire Giant spawns at 10 minutes into the game with 8430 health and has a 130 health escalation every minute, meaning at 20 minutes into the game he has 9730 HP. This is not reset by the death of the Fire Giant. Health adjustments do not take place whilst the Fire Giant is in combat.
Simple formula = 7130 + 130*Minutes Passed HP
He has 100 Physical and 50 Magical Protection.
Killing the Fire Giant will give you 200xp, 150 gold and the ‘Fire Giant’s Might’ buff, which gives you 50 Physical Power, 70 Magical Power, while regenerating 4% of your maximum health and mana per 5 seconds, along with 20% bonus damage towards Phoenixes and Towers.
Do NOT Bunch Up On The Fire Giant – Read what happens when the Fire Giant uses Molten Pool. If 4 players are bunched together, as soon as the FG uses this ability, you won’t take 225 damage, you’ll take 900 damage all at once. Your team needs to spread out, and you need to be towards the back to let melee and other gods utilize their abilities up close. By staying on the outer edge, you can immediately turn and engage any enemies that try to come steal the Fire Giant from your team.
Rotate In The Opposite Direction Of The Player With Aggro – You don’t want to take damage if you can help it, so make sure you’re never in a line with the player who’s keeping the FG’s Aggro. It’s simply not healthy.
Baiting By Using The Fire Giant – The enemy must not and cannot leave your team alone at the Fire Giant. You can hover over the Fire Giant to induce a team fight just as you would with the gold fury. Remember, the same strategy can be used against you as well.
X. Itemization Strategies
There’s really not much you can do on an ADC item wise. The item pool is very limited simply because you need Crits and Penetration.
Your general build will almost always be Bluestone Pendant >> Devourers Gauntlet >> Ninja Tabi >> Ichaival >> Executioner >> Rage >> Deathbringer >> Sell Ichaival for Malice. Sorry, it’s just how it is. Below I explain why.
CORE Builds
Bluestone Pendant + Spiked Gauntlet – With no Mana buff in the Duo lane anymore, this item helps out immensely. Gods like Xbalanque should always get this starter item combo simply because he needs the mana to keep his bolo up early game, which helps dramatically with clearing.


Death’s Toll + Spiked Gauntlet – If you want to focus on massive lifesteal early game, this is the combination to go for. Apollo does great with this combination thanks to his passive, Audacity (which doubles your attack speed for 5 shots after landing 10 basics).


Warrior Tabi vs Ninja Tabi – There’s barely any difference between the boots for an ADC DPS wise. Warrior Tabi are good early game for gods with significant scaling from their abilities and Anhur, Cupid, and Neith.

Ichaival – This item is dirt cheap, and gives penetration. The only gods who do NOT get ichaival as the 3rd slot are gods with innate power buffs or debuffs, so Anhur (Passive, Enfeeble), Apollo (Passive, Audacity), and Artemis (Second Ability, Vengeful Assault)

The Executioner – As soon as you’re done with Ichaval you should build Executioner. You NEED that penetration. The Power curve shows the best results by picking this item up first over Rage. If you’re playing Anhur, Apollo, or Artemis, this should be your third item, as it’s simply a better pickup for these 3.

Rage – Rage should always be bought first, unless you’re Artemis (Passive, 15% Crit chance stacks) or Mercury (If you pick up golden bow first). These are the ONLY two gods you don’t pick up Rage before Deathbringer. Rage ups your DPS dramatically compared to Deathbringer. Here are the calculations for this debate, courtesy of AlexError

DeathBringer – There is no crit build that is complete without Deathbringer. Deathbringer is what makes Crit Builds so powerful.

Malice – Once you’re done with Deathbringer, you’ll move straight into Malice. If you picked up Ichaival as your 3rd item, you’ll be selling this item off in order to buy Malice.

Situational Items
Odysseus’ Bow – Odysseus’ Bow is actually a good item, but you’ll be losing Malice in order to pick it up. This item is very potent for end game fights, as it will ping from one player to the next. The Sheer DPS outshines a Malice build if you manage to get a bounce off of every god.

Golden Bow – This is pretty much only good on Mercury, thanks to the passive proc’ing on his 1 and also giving him more power thanks to his Passive and the 5% movement speed bonus.

Hide of the Nemean Lion – You will be wanting to look into this item only if you’re facing 3 Auto Attack based gods with two of them focusing on lifesteal at the same time(for example, An Artemis, Bakasura, and Osiris). This item will provide you a way to punish the enemy, and should allow you to outheal them every time.

Witchblade – Like the Lion Hide, this is an item you want to get to help shut down AA based gods. While the Lion Hide will stop all life steal, Witchblade will make the enemy weaker, and you stronger.

Magi’s Blessing – If you’re dying to stun lucks, then the Magi’s Blessing is a good item switch for Malice. If you’re up against gods who rely on Stuns to kill, like Tyr and Anubis, you should grab this item.

Asi – Instead of getting Malice, you could also choose Asi. You really need to be on point with your Auto Attacks for this to work, but the extra life steal will negate Hide of the Nemean Lion, and make you a veritable tank.

Qin’s Sais – This item has fallen out of favor in the current meta, now that Warrior Tabi lack penetration. However, if you’re facing a god with Shield of the Underworld, this item should be prioritized instead of a Deathbringer or Rage. *NOTE* This is only viable in joust!

ADC Counter Items
Shield Of The Underworld – Be VERY wary of this item. This is the complete counter to a critical build. In Conquest, stop hitting the guy and start dancing to avoid damage, and then attack him. In Joust 1v1, if the enemy picks up this item, you need to avoid a full crit build, and focus on a full penetration and attack speed build instead.

Hide of the Nemean Lion – It’s not just you who has access to this item. If you see this item, you need to be very careful when attacking. A special note about the Lion hide is that it reflects your damage back as MAGICAL damage, not Physical. If you see Lion Hide, you should seriously consider getting Asi, or another life steal item as you can literally kill yourself against this item.
Midgardian Mail – Not an active you’ll generally see, but one you need to be wary of regardless. Usually you’ll see this on a tankier character. This item can cause some serious headaches in teamfights, and will make it extremely hard for the ADC to kill the wearer, even with Greater Sprint.


Brawlers Beat Stick/Divine Ruin – These alone won’t be a huge issue against you, but they will make it harder to sustain. Be extremely wary of one of these items on top of a lion hide, as this will basically nullify all lifesteal you can possibly get.


The Curse Actives – Whether it’s Creeping Curse or Enfeebling curse, both of these actives have the potential to screw up your day. One kills your lifesteal, which renders you a squishy, and the other kills your DPS, which makes you useless in a fight.

Witchblade – This item not only drops your physical power down, it also takes a chunk of your Attack Speed away. There’s not much you can do against this item as an ADC.
XI. Credits and Special Thanks
Natalie [IGN: TryhardPvP] – The writing of this guide
HiRezHinduman – I used a couple of his videos in this guide.
Flareb00t and company – For creating “The Word of Thoth” (Another guide) , which I took and improved many things on
BaRRaCCuDDa – I used a couple of his videos in this guide
Zapman – I used a couple of his videos in this guide.
G0KU – I utilized Hinduman’s observation of him in this guide.
AlarmClock – I utilized Hinduman’s observation of him in this guide.
XII. Disclaimer and Copyright
This guide is the work of myself and the people in the Credits and Special Thanks list. If you enjoyed this guide, and see one of the players on, please thank them.
Do not post the entirety of this guide on other English based forums without my permission. I made this guide exclusively for the Official Smite forums. As such, I want the full content exclusive to these forums. Feel free to link players to this guide.
Feel free to translate this into another language and post it in your forum – I encourage and welcome the expansion of knowledge, and not all people can read English well. If you want to translate this and put it on a forum that hosts your language, feel free. The only thing I ask is you link back to this original post and give credit to everyone in the Credits and Special Thanks Section. If you do translate this, please send me a PM and I’ll put it in the guide.
If your source has been used in this guide, and you don’t want it there, PM me. – I will immediately remove any sources that you do not want in this guide. It is your content and your effort, so obviously I will respect your decision.