The Bread and Butter of SFM
Welcome to SourceFilmmaker!
So! You've finally decided to open up SFM? Good for you!
A wise dog once said: “Dude, suckin’ at something is the first step to being sorta good at something.”
Keep that in mind while you navigate through this journey <3 Believe in yourself and have hope. This takes time and patience.
Firstly, let me go over some basics with you in the next section.

A wise dog once said: “Dude, suckin’ at something is the first step to being sorta good at something.”
Keep that in mind while you navigate through this journey <3 Believe in yourself and have hope. This takes time and patience.
Firstly, let me go over some basics with you in the next section.
Starting Screens
Welcome to SFM! A place where you can let ideas run wild!
Before we get started posing, lighting and rendering, you'll need to know what is what in the program!
Here I will show you the basic things you need to know about the interface!
Launching for the First Time
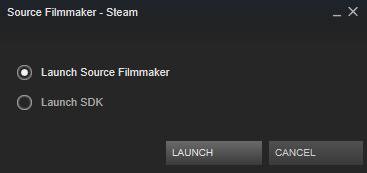
- This is what you'll see when starting up SFM for the VERY first time. Click "Launch SFM".
Don't really worry about the SDK right now, but this is what it essentially means: - "A set of tools for third-party developers to use in producing applications using a particular framework or platform."
- You may edit the load order of Workshop Files here.
Start Menu
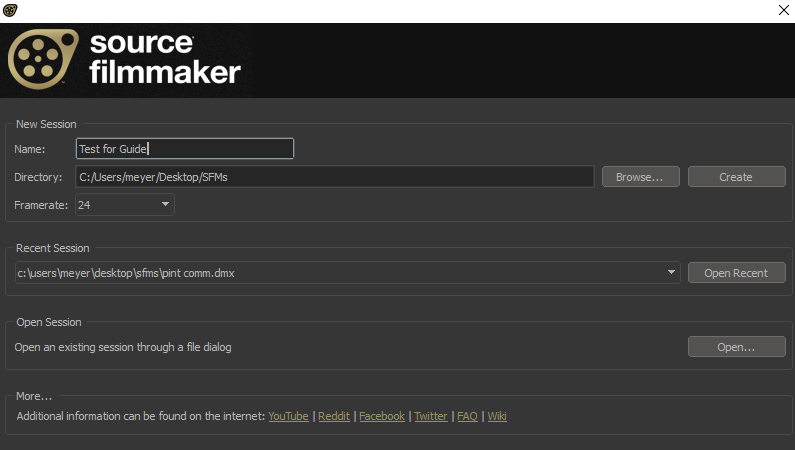
- This is the Start Menu. It is where you can name, file and set certain parameters for the creation of your session, such as: The name of the poster, the location (where it will be put when you're done rendering), and veiwing your previous sessions (if you have any).
- As you can see below, I have my posters render to a certain folder on my desktop.
If you do NOT set a custom location, SFM will send the rendered poster to a certain filepath:
c:\steam\steamapps\common\sourcefilmmaker\game\usermod\elements\renders\poster - If you have Steam on a different drive, please follow the same path on that drive!
Veiwport
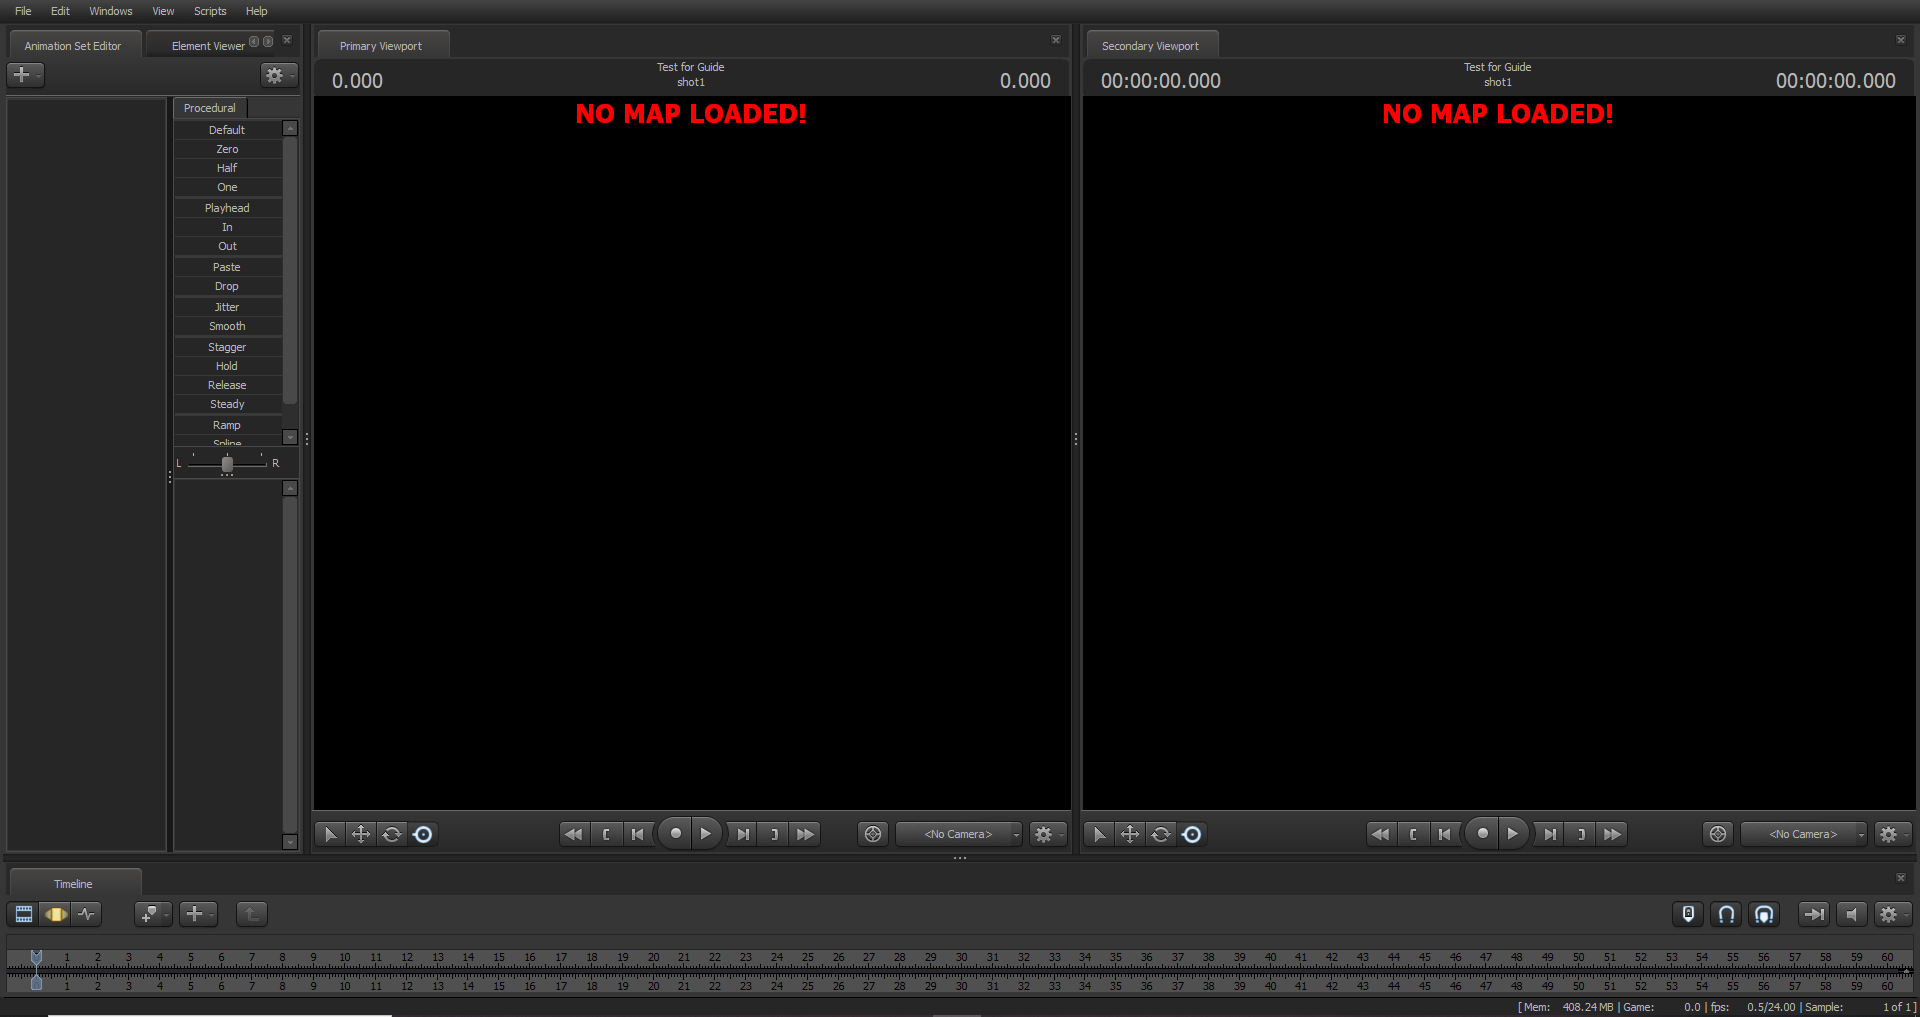
- The Veiwport is where you do most of your work in SFM and is the screen you are met with after the Start Menu.
- You can have TWO Veiwports, which helps in posing, camera composition and scenebuilding!
- Getting two Viewports is simple. Windows (next to 'File') -> Secondary Veiwport. A window will pop up and you may simply click and drag to your desired location! (My setup is Primary on the RIGHT and Secondary on the LEFT).
How to Load A Map
You might be thinking: "Ok. This is A LOT to take in..."
And that's ok! In this section, I will tell you about the things you're looking at.
You already know the Start Menu and the Viewport(s)! That's a great start! now let's add a few more. You can always come back to previous sections to touch up on terms.
Now! For starters, let's get you into a TF2 map! Surely you'll be wanting to explore a bit...
Your Veiwport will say "NO MAP LOADED". So, let's fix that!
- In your Veiwport, RIGHT CLICK. A window will pop up that looks like this:
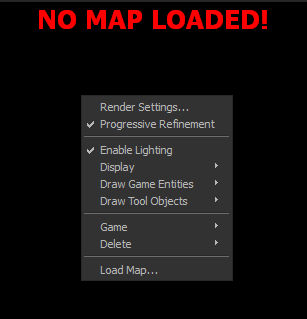
- Go ahead and click on "Load Map". You'll be met with yet another screen:
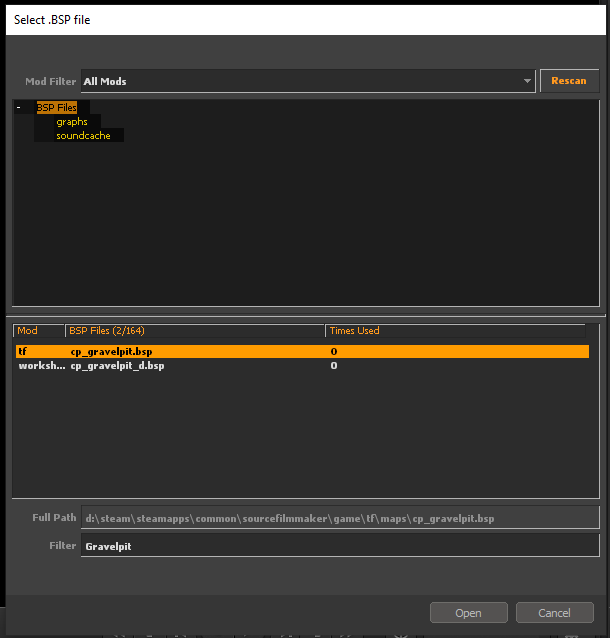
- This is your Map Loader Window. You can type in the search bar for a TF2 map. For mine, let's choose Gravelpit.
- Click "Open".
And Viola! You are in the map!
Moving Yourself Around
"Ok... How do I move around?"
Moving around is a bit different than in Gmod. WASD works, but you will have to HOLD DOWN LEFT CLICK in order to move the camera.
WASD + LEFT CLICK = MOVING AROUND
If it works, your cursor should disappear!- Spacebar will NOT lift you up! The spacebar functions as a "play" button and will MOVE your Playhead on the Timeline.
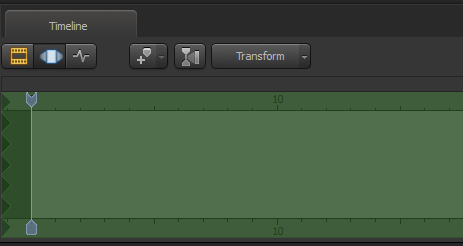
+ And to get you familiar with it; THIS is your Timeline. That little arrow is your Playhead. You can click and drag to adjust it as you see fit. This is mostly used in animation, and doesn't really serve a purpose in a poster. There are some uses of it in a poster, but we'll get to that a bit later in the guide.
Adding a Scene Camera
Have you found a perfect spot for your poster to take place? Cool! Let's get you set up with a Scene Camera!
A Scene Camera is the camera that will view your FINISHED POSTER. I normally use my Right Viewport as the Scene Camera and my left as a Work Camera.
I'll show you the steps to creating two cameras:
- A Work Camera - A camera which allows you to move freely around your model without moving the Scene Camera.
- A Scene Camera - The Camera in which you will finalize your poster, A.K.A "Render Camera".
- First, click on the 'Plus' icon in the top left of your ASE. It should look like this:
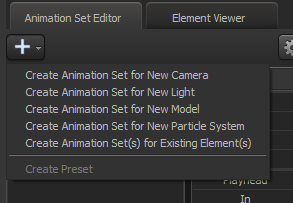
- Next, click on 'Create New Animation Set For New Camera'.
A new camera with the name of "camera1" will appear.
- You will need to go to your SECOND Viewport to make this work!
- Click on the drop down arrow and then select "Change Scene Camera" -> "Camera1"
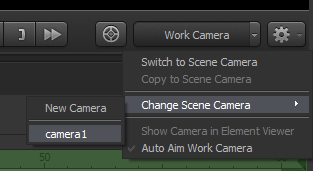
- This will change your Second Viewport cam to the view of "camera1".
***IN ORDER TO MOVE THE "CAMERA1" CAM, YOU MUST HAVE IT SELECTED IN THE ASE!***
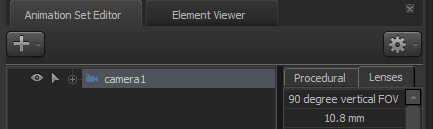
This is what the selected camera looks like. It is highlighted!
The finished camera views should look something like this:
- You will see the other camera's bounds of sight.
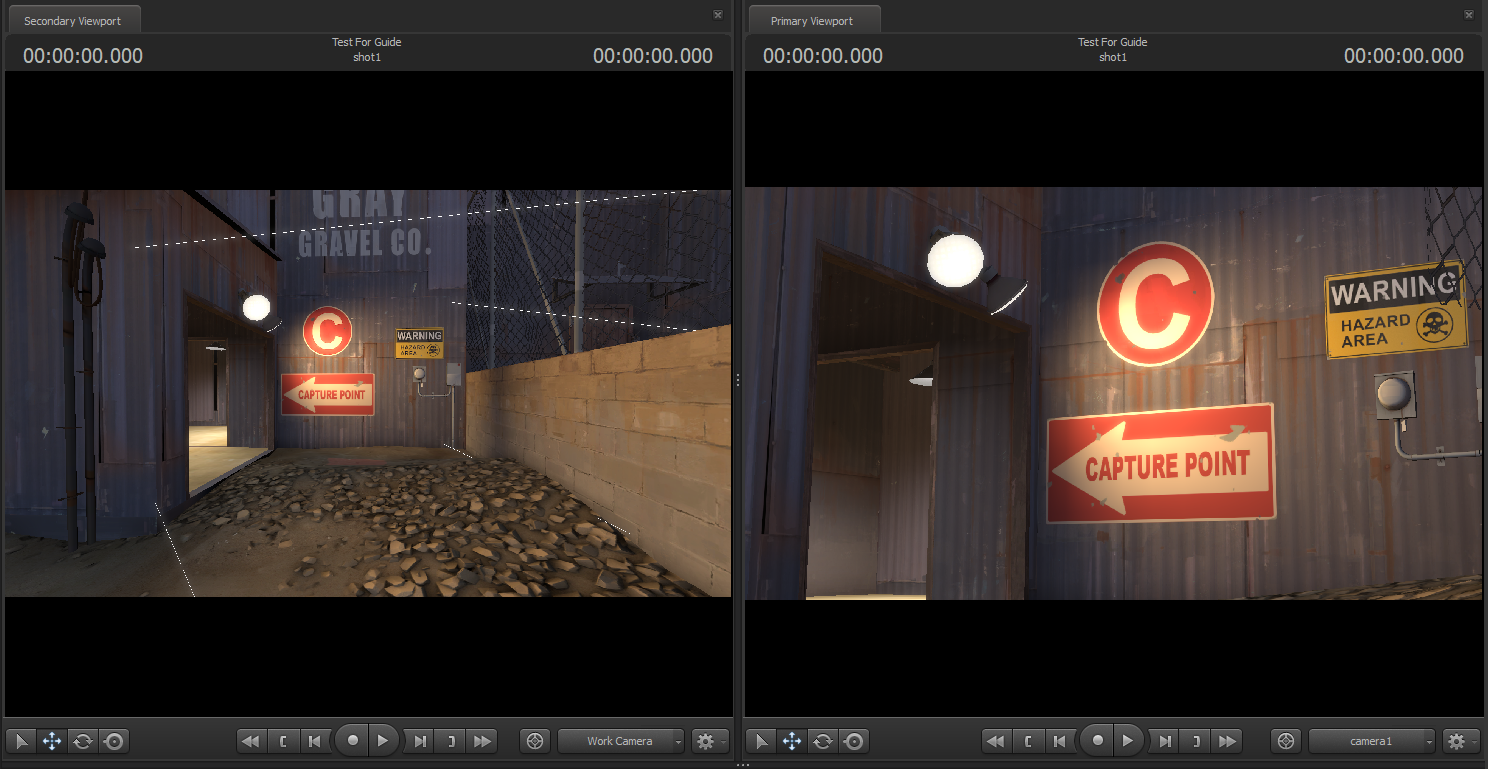 Don't worry about your Field Of View! We'll get to that when we're ready to render your poster! For now, it should just be set to 60mm, the default view for a camera to start at.
Adding a Model
So you have your camera set up? Good work! The next step will be adding some life to your poster with models!
When you want to add something, you should always go here, to the big + button at the top left of your ASE. It will allow you to add anything you want to your poster, including but not limited to: Cameras, Models, Unusual Effects and more!
- Click on "Create new animation set for new model."
- A window should appear and look like this:
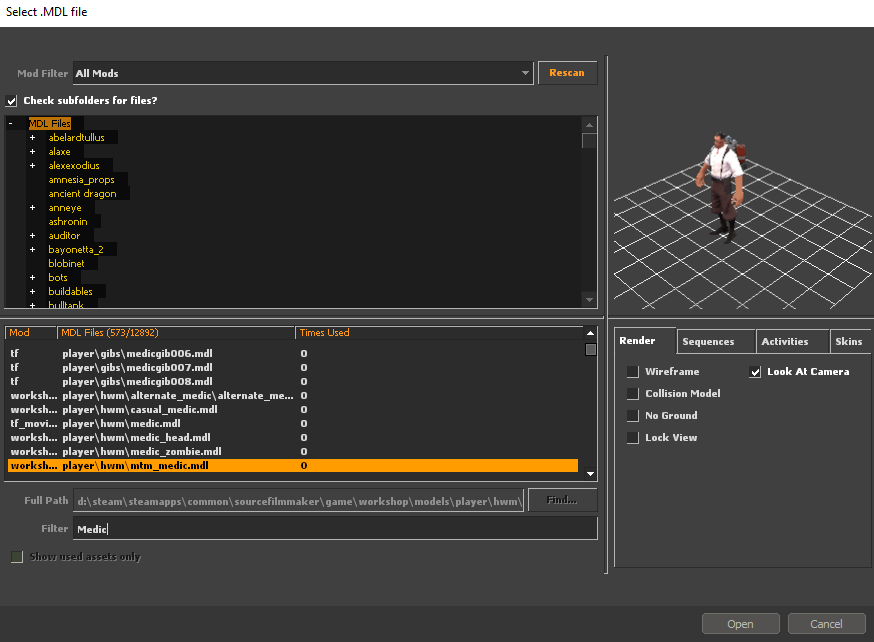
Search for the model you want to put into the scene and then select "open".
Your model will appear in front of your Camera1.
Now that you have a model, let's move it around the scene!
Now that you have a model, let's move it around the scene!
Moving things around
Whether it be a camera, a model or a light, ALMOST EVERYTHING can be positioned the way YOU want it to be! (Like GMod!)
But the similarities stop there. In SFM when you want to move something around, you will have to move it in a 3D Axis.
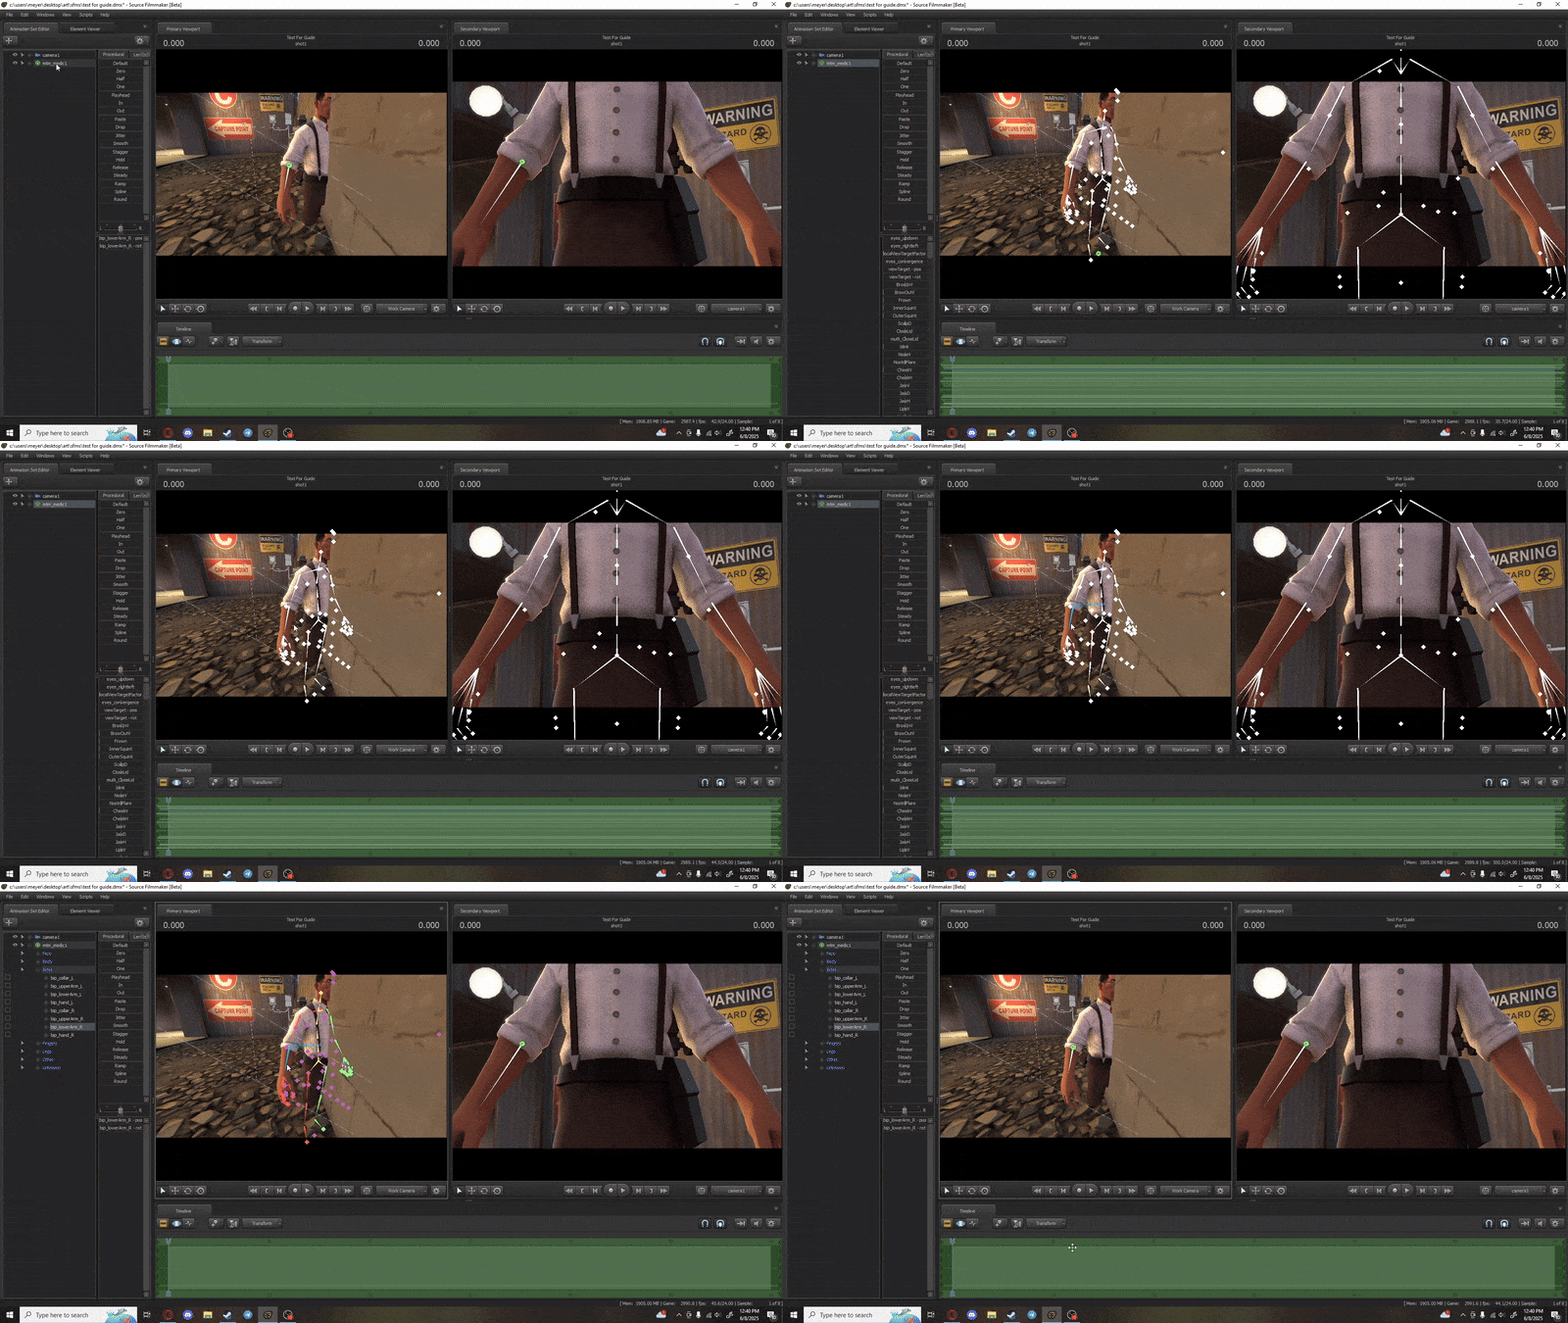
VERY IMPORTANT NOTE: YOU MUST HAVE THE TIMELINE SET TO TRANSFORM TO MOVE ANYTHING. IT CANNOT BE ON THE RENDER SETTING.
In simple terms, press the TAB key to switch from a blue and yellow Timelime (The Render setting) to a pale green Timeline (The Transform setting). Tabbing back and forth will let you preview your poster in the final render state!
So, hitting TAB will take it from this:
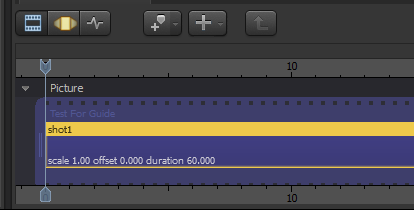
To this:
You can move things around in the pale green mode.
-
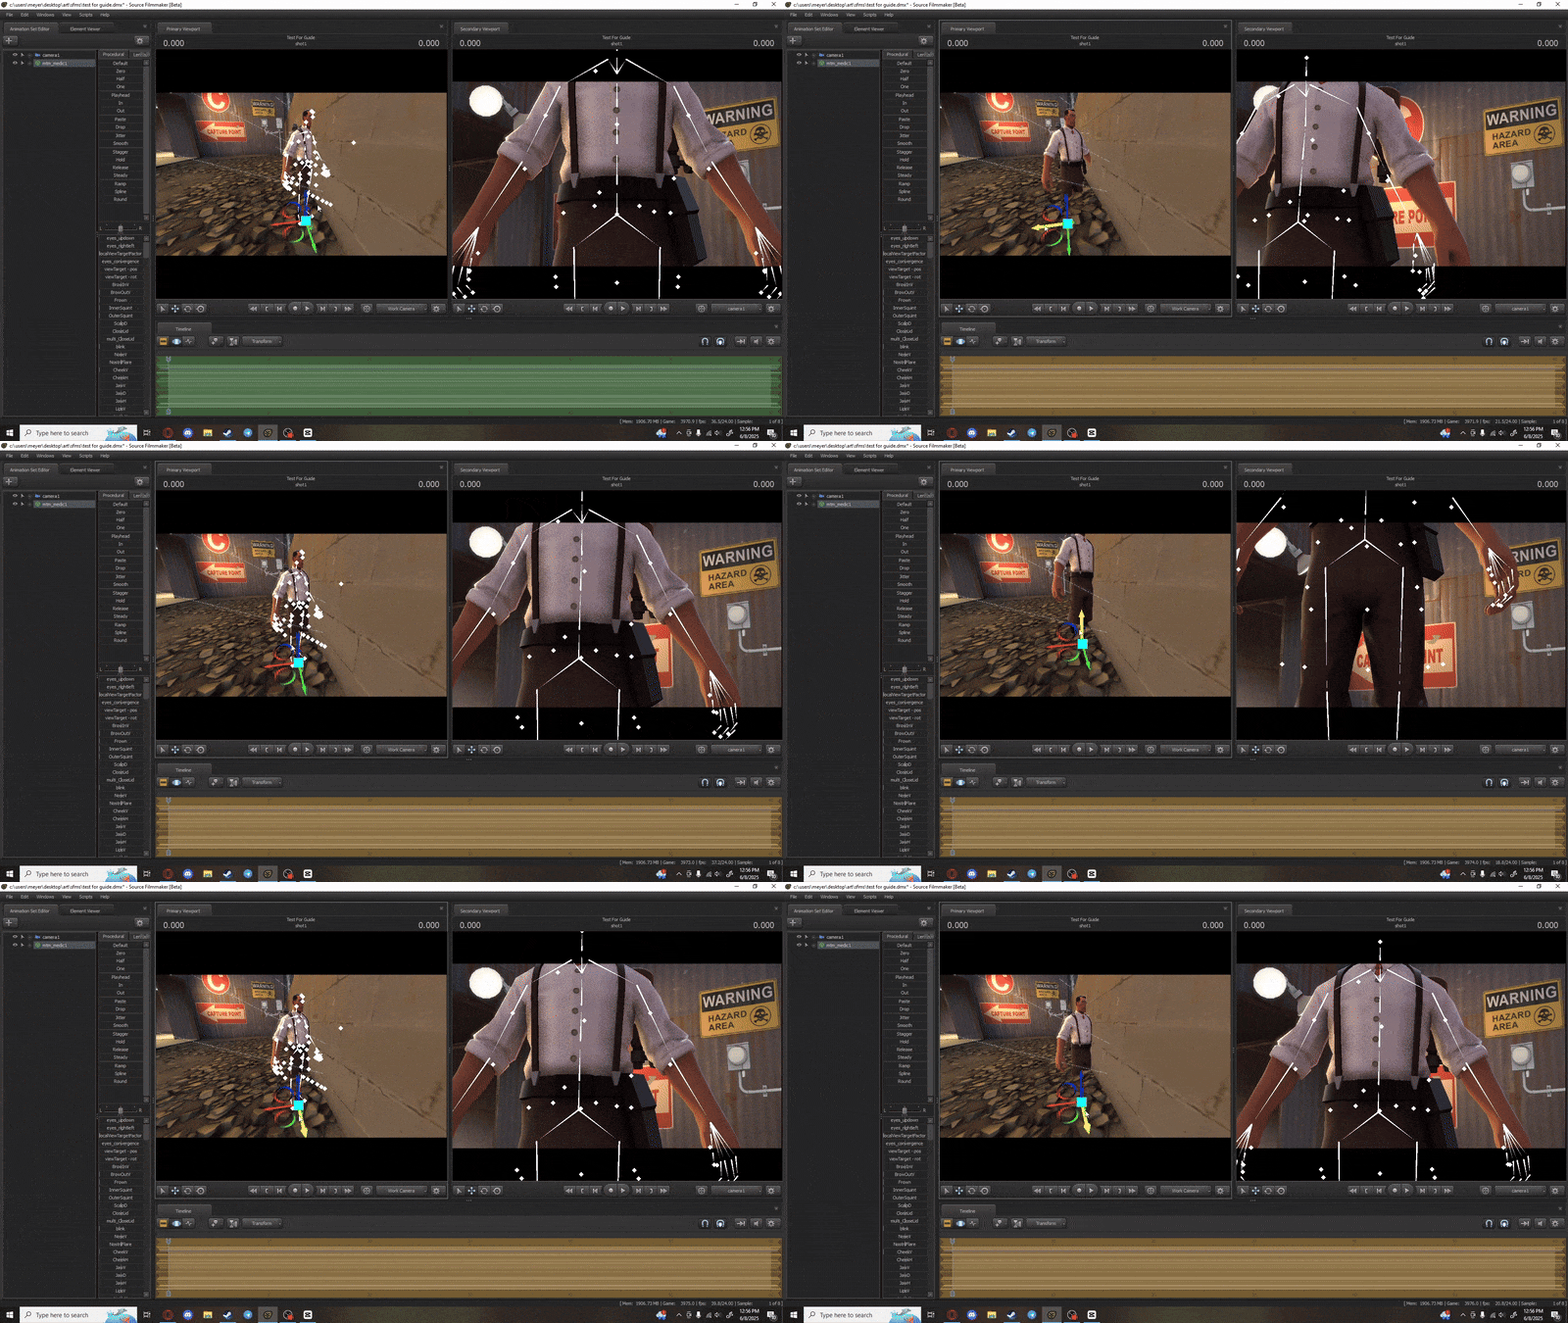
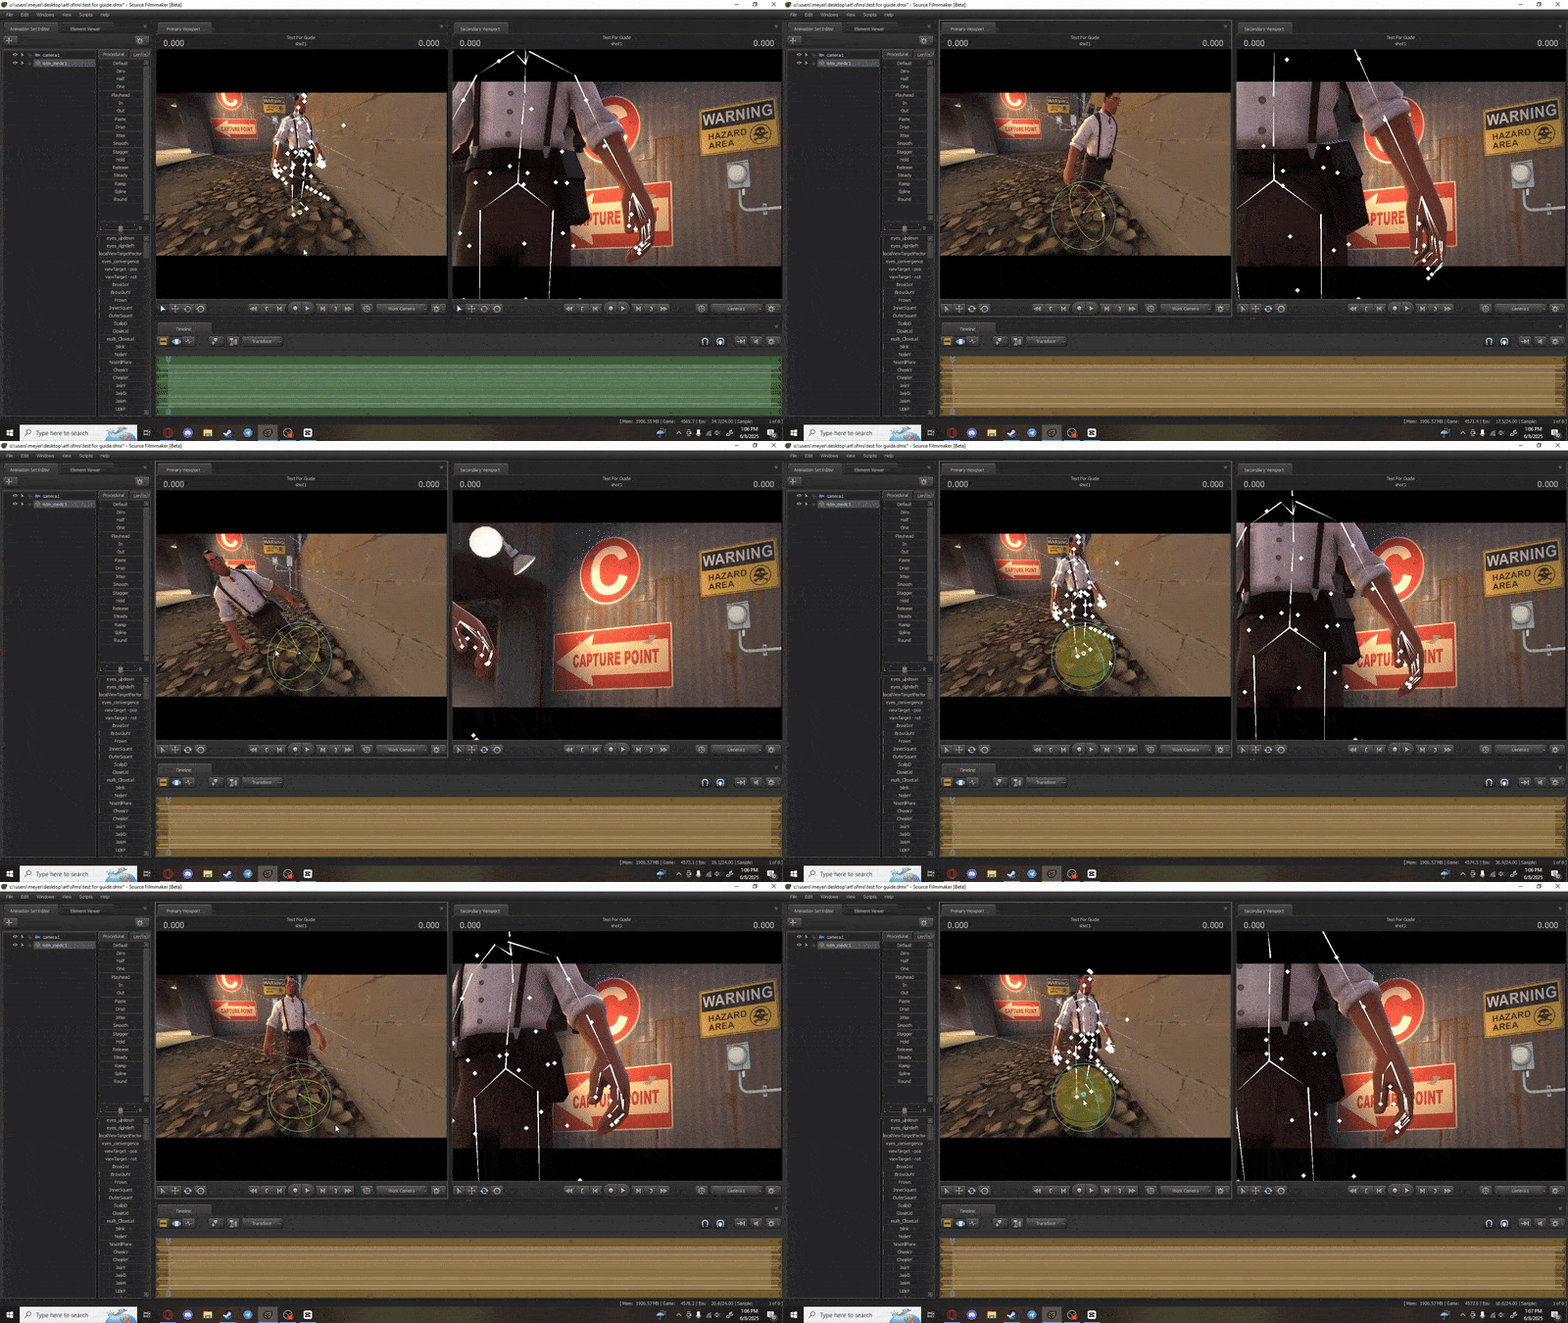
Now, the actual moving!Your Q, W, and E keys will become your best friends when moving things around.
- Q is for SELECTING. You can choose what bones you want to move. (press CTRL and hover over what you want to move, then click.)
- W is for MOVING. You can slide your model wherever you want.
- E is for ROTATING. Spin your model around and make it lean in a direction.
Adding Cosmetics
Now you want your mercs to look like yours in-game, right? Doing that is a bit tricky, but will go a long way! Just like in GMod, you will have cosmetics that you can put on your character. In SFM it's the same thing built in, but not ALL updates are present.
YOU WILL SOMETIMES HAVE TO DOWNLOAD OR SUBSCRIBE TO A STEAM WORKSHOP ADDON IN ORDER TO GET THE NEWEST COSMETICS / UNUSUAL EFFECTS!
That being said: Here is a link to another steam guide I use to make my SFMs for Commissioners. These have a lot (but not all) TF2 cosmetics:
List of Cosmetics in TF2
Big thanks to Baron for making this really helpful guide <3
-
To add a new model, this time, a cosmetic, click your plus button again and select "Add new Model"
Once your cosmetic is loaded in, it will appear like the model did, in front of the Scene Camera.
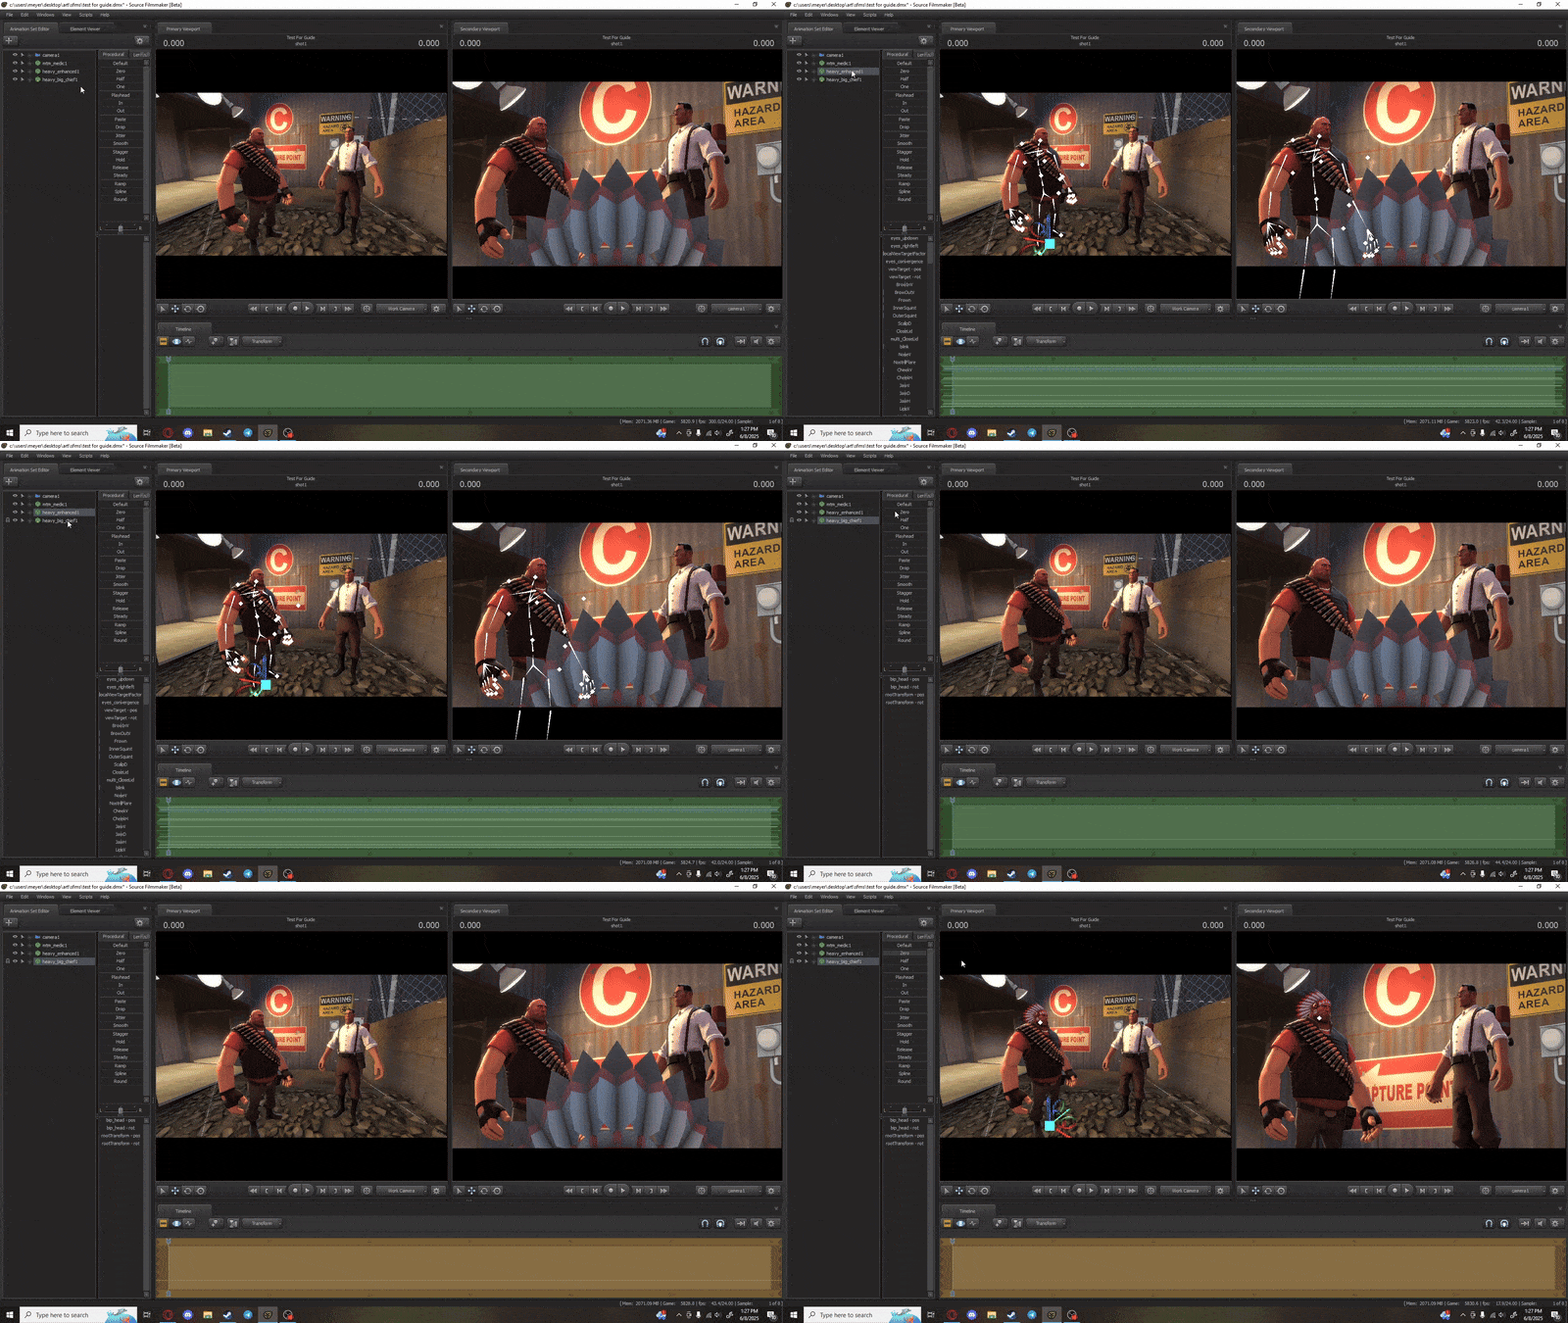
You must follow these steps correctly in order to put the cosmetic on the model!
- Click on WHO you want the cosmetic to BE ON in the ASE.
- Then, CLICK AND DRAG who you want the hat on, ONTO THE COSMETIC.
- You will then see a little lock icon.
- Then, to the right a little bit, you'll see some sliders. CLICK AND DRAG THE ZERO SLIDER FROM THE LEFT TO THE RIGHT.
- The cosmetic should fit your model!
-
A few notes here and stuff to keep in mind:
In my opinion, it is better to get the cosmetics on your characters FIRST before you pose! Then, if something is off or wrong, you can adjust the cosmetic while in your final pose.CTRL + Z is your best friend if you make a mistake. CTRL + SHIFT + Z is for REDOING actions.
SFM isn't a finished program, it has it's bugs and problems, SAVE OFTEN.
With cosmetics, there are no 3 cosmetic limits! Put as many as you'd like on your character!
Adding Unusual Effects
Do you have an unusual in TF2? Want it in SFM? Here's how to do that!
This can be a bit tricky if you don't know where your workshop files go, but once you find them, effects like campfires, unusuals, or ANY in game effect can be found here.
- So lets start out with a hat first, which is a Grimm Hatte.
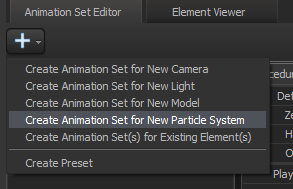
- Then, let's go back up to the ASE and select "Create new animation set for particle system"
- You then should get this window. Click on "browse".
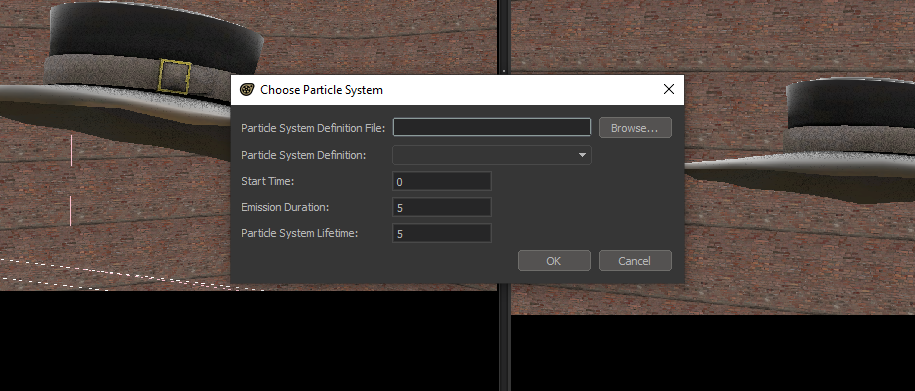
Important note!: Your emission duration and start time DO AFFECT WHEN and HOW LONG you will see the effect take place. Make sure your playhead is within those bounds so the final render will include the unusual effect!
The default TF2 unusuals (the older ones) should already be in SFM, any NEW ones will need to be downloaded from the steam workshop!
- Click on particles and you should have this window pop up:
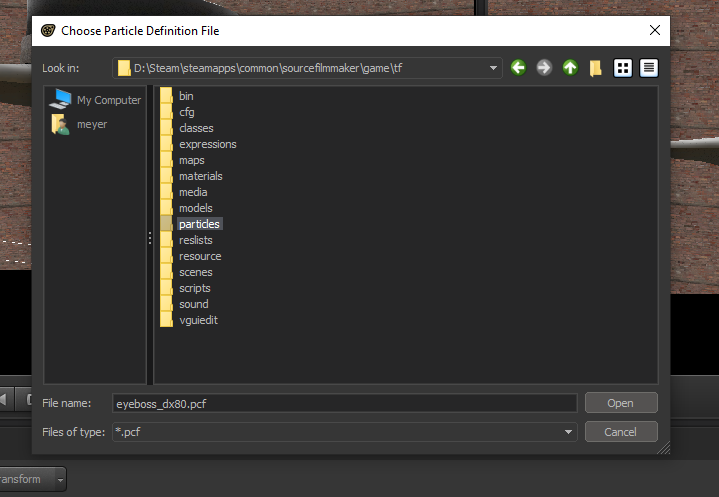
- Next click find and select "item_fx.pfc" This will open up all the unusual effects you can choose from.
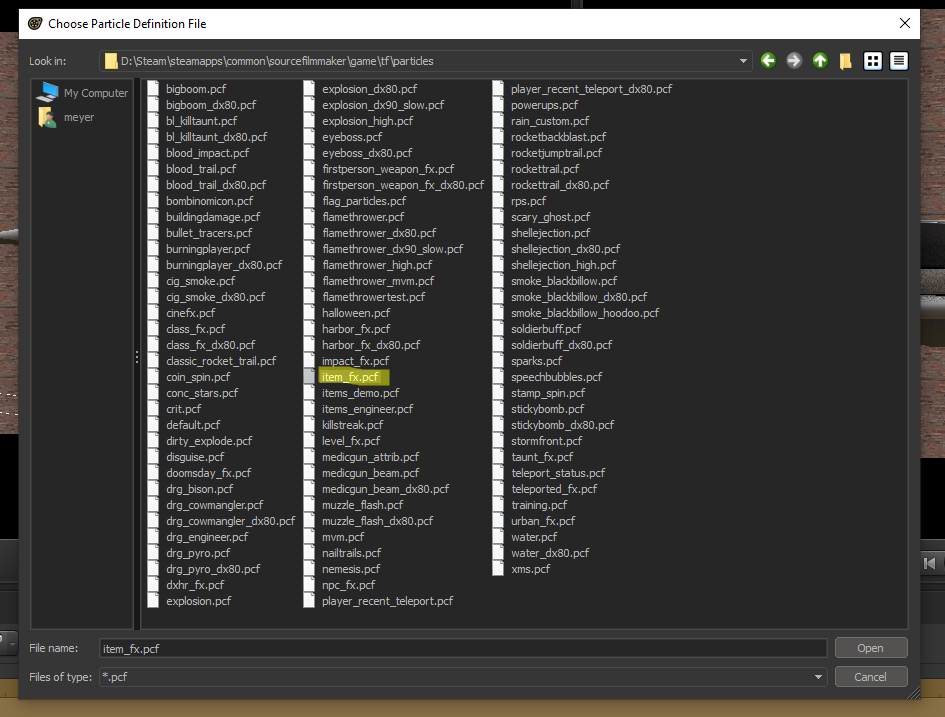
(yours might look a little different mine, and that's ok. Just try and find the highlighted file)
- Next we'll select the unusual effect we want. This part is a bit convoluted because all the unusuals are named their direct filename and not the "name" of the unusual. For example Kill-A-Watt is named "unusual_zap_yellow". There's another helpful guide by Sync who lists all the unusual effect names: Guide to all the unusual effects
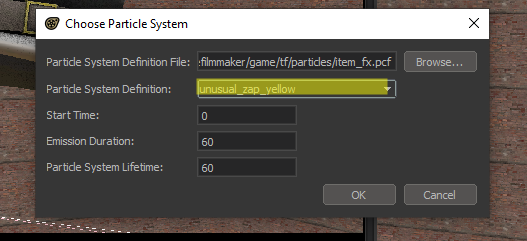
- I want my unusual to last for 60 seconds from 0, so I set both Duration and Lifetime to 60.
- Click ok and the effect should appear in your ASE!
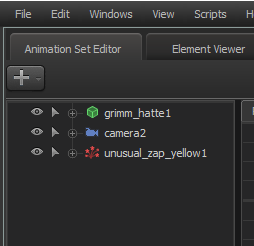
NOTE: IN ORDER TO SEE THE UNUSUAL, CLICK AND DRAG YOUR PLAYHEAD BEHIND ZERO. BECAUSE YOUR UNUSUAL EFFECT STARTS AT 0 VALUE, THE PLAYHEAD WILL HAVE TO GO PAST THAT MARK IN ORDER FOR IT TO SHOW UP!!!
Moving an unusual effect to a hat is a bit different. you'll need to manually place the unusual effect onto the hat by moving it with your "W" movement mode. (Press W and slide the unusual onto your hat. Try to get it as accurate as possible!)
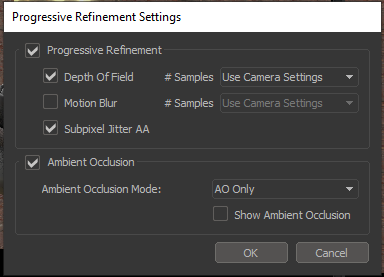
- And if you don't want motion blur on your unusual (which may cause it to look blurry) right click the viewport and go to render settings. You should UNCHECK the motion blur option.
- Added a few lights for added effect, but this is what the final thing should look like!
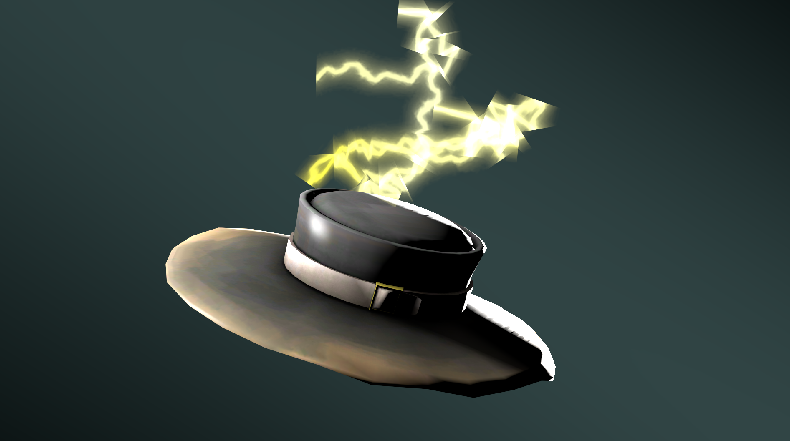
People will apt to paint over or draw the unusuals themselves (like me) because of how... unrefined the effects look. However, that is totally up to the user!
Posing your Models (body + face)
Body and Face posing can be quite a tough subject in SFM and is generally the most time consuming part of the poster making process.
HOWEVER, if you take your time, little by little it will be a breeze!
HOWEVER, if you take your time, little by little it will be a breeze!
If you are here from GMod and know how to pose a little, then you're halfway there.
If not, then posing can be a little harder in SFM.
Like I have shown you before, you can rotate, stretch and move parts of the model to your liking.
Just implement that to certain smaller parts like legs, arms and even the face!
-
Here are a few pointers for body posing:
- Try not to make things look stiff! Aim for Contrapposto! This is where the shoulders and hips are NOT symmetrical. It basically makes things look more natural and less stiff.
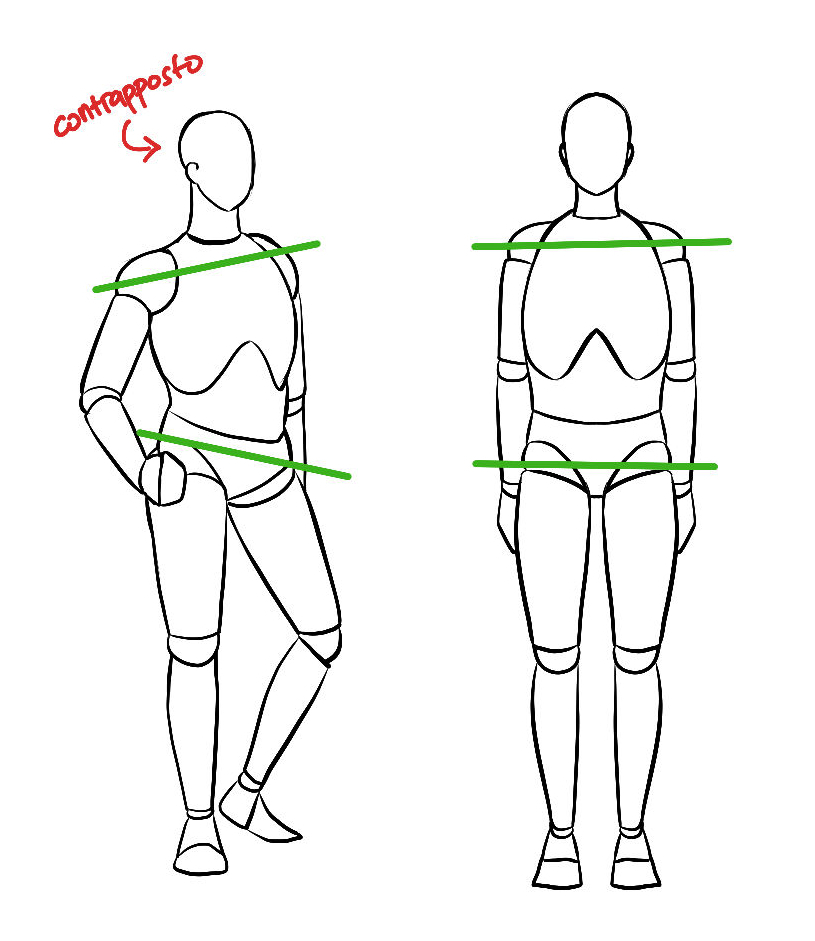
- Getting to know how these poses work and applying them to 3D model can take you EXTREMELY far. Then, you can make the pose yourself without a reference! Whether you are making a dynamic or semi-static pose, your poster will look all the more better!
Here is an example of a dynamic pose with contrapoasto:
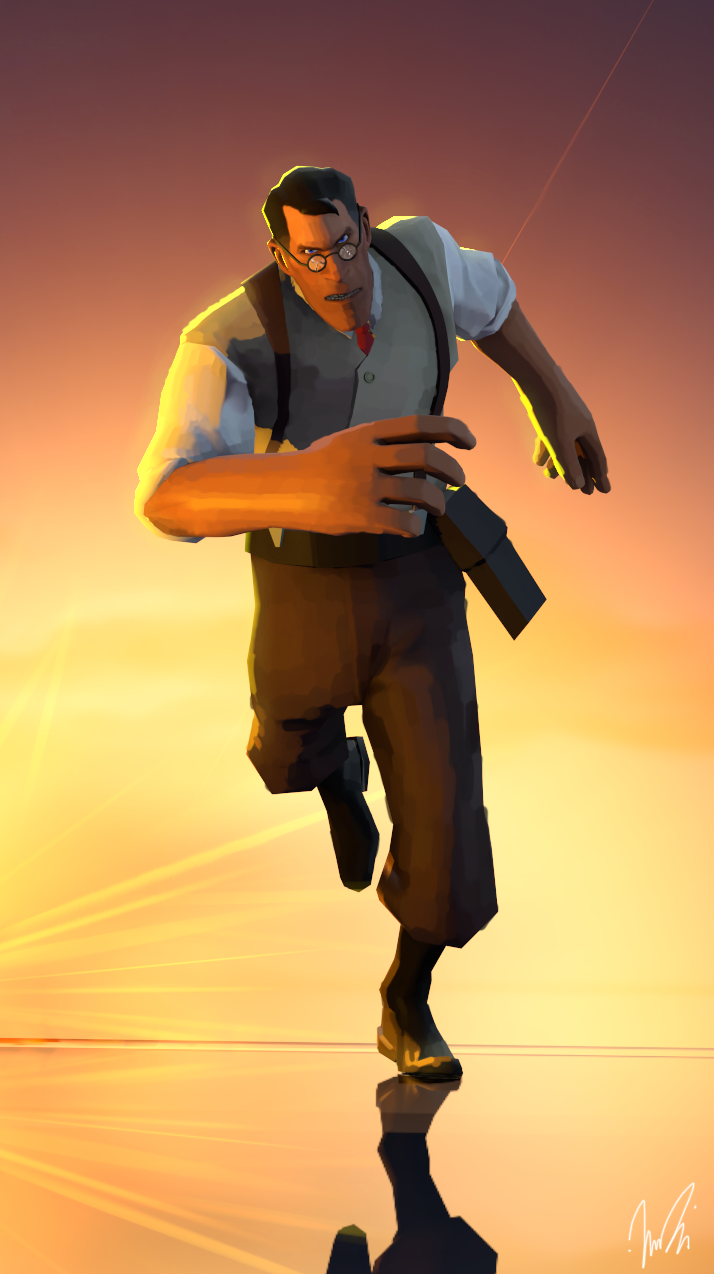
See how the shoulders don't match the hips? Aim for this!
- Pose from the ground up! Starting with the legs can create a foundation that will set up your pose sturdily. (if the legs are off camera, don't worry about it!) Follow up the body and adjust to match the pose you want.
-
Pointers for face posing
When face posing again, it's important that you know the emotion involved. It's good to have a mirror or phone on hand to do this. Make a face or take a picture of yourself and try and put that face onto a character in SFM! The better the faces you make, the better the posing will be!
You'll mainly use these face sliders to pose the face instead of dragging things around. It should look like this when a model with face sliders are selected.
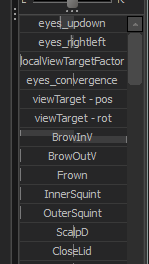
You may slide them to the left OR right to adjust the facial features!
Sometimes, making a cartoony face to match TF2's style can go a long way! Don't be afraid to get really creative!
Scene Framing
Your camera is a most useful tool and comes with a subject that is harder to learn: framing.
It can make or break a poster, unfortunately. If you don't have good framing / perspective, even if you have amazing lighting or posing, it still won't look good. Here are a few examples.
It can make or break a poster, unfortunately. If you don't have good framing / perspective, even if you have amazing lighting or posing, it still won't look good. Here are a few examples.
For instance, take my VERY first SFM poster:
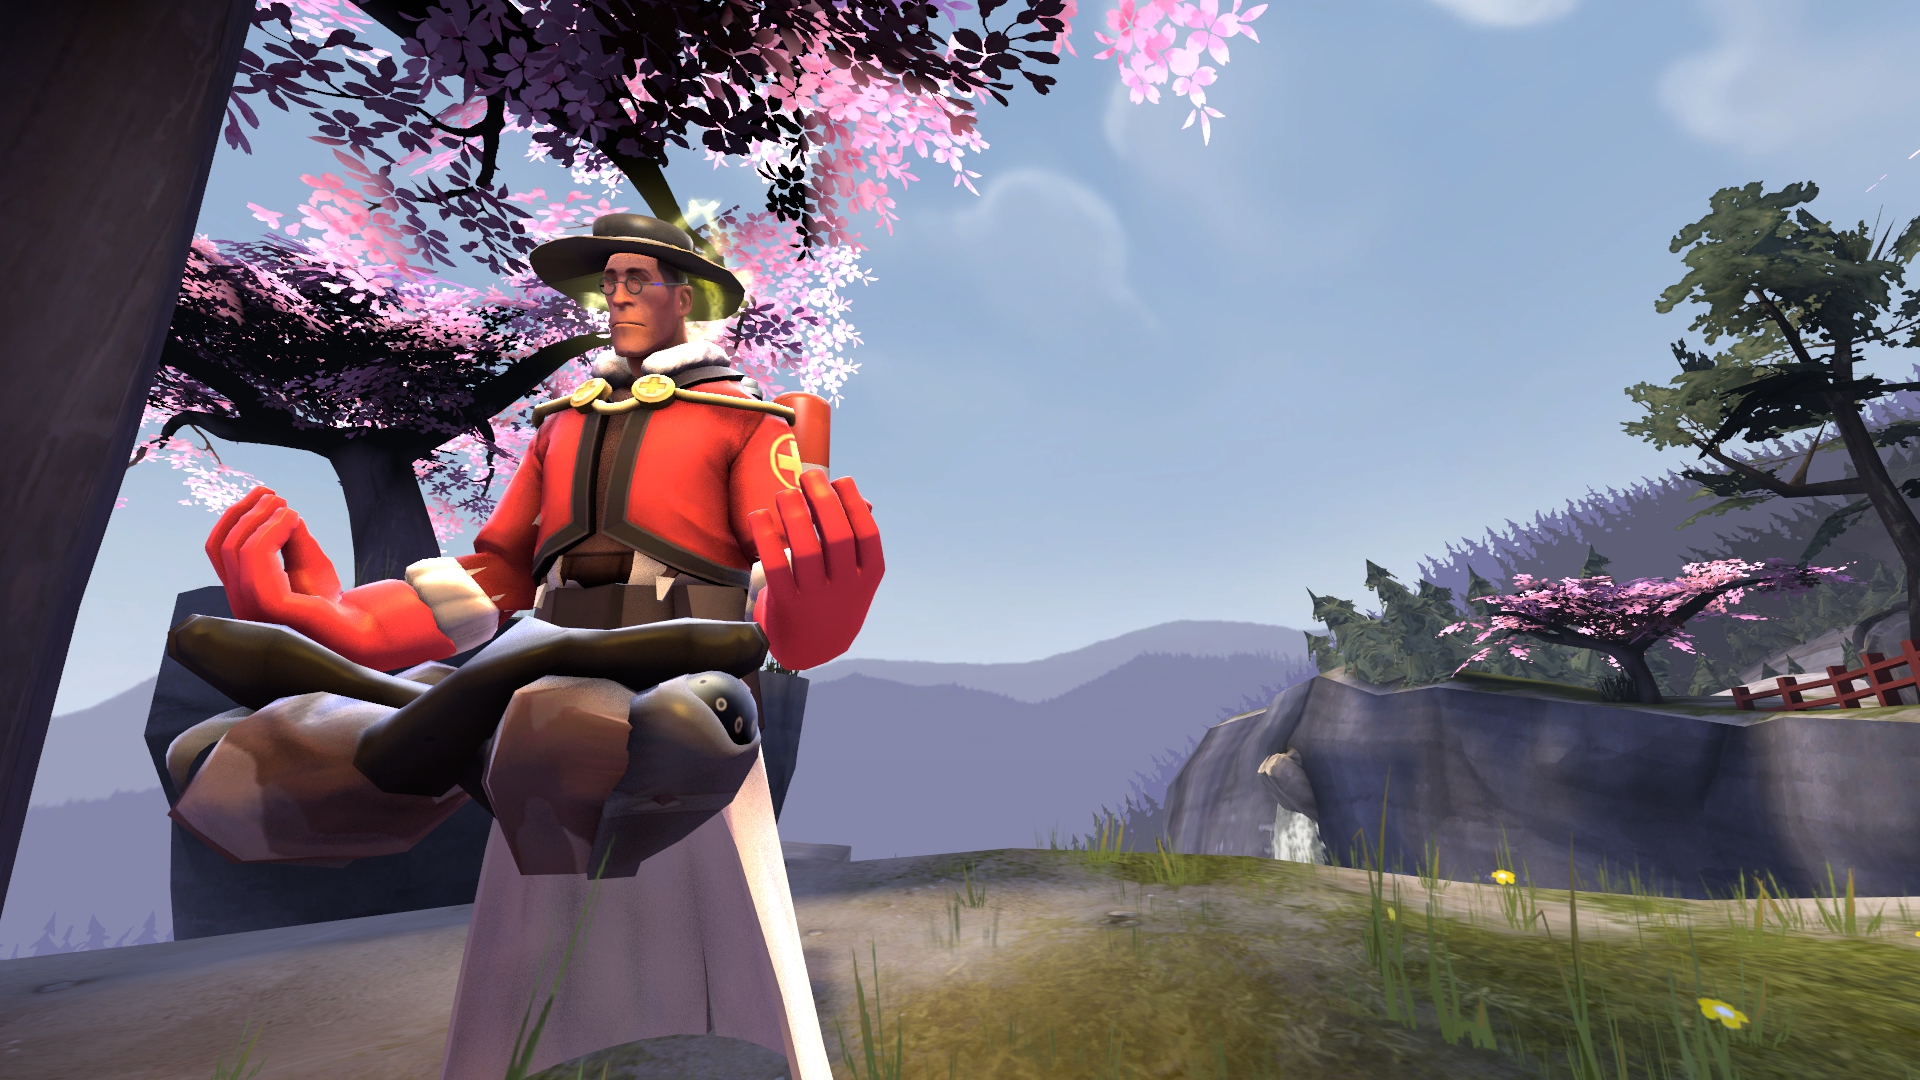
There are a lot of things that are wonky in this SFM. But probably the most noticeable one is the FOV or Field of View. Meaning the camera is too far away. It doesn't have good framing.
- You can see a lot of the background and it's not really focused on the Medic.
- The Medic is off center giving the poster a "not too sure where to look" vibe.
On the LEFT is what better framing looks like, whereas the RIGHT image is a bit more off center and farther away.
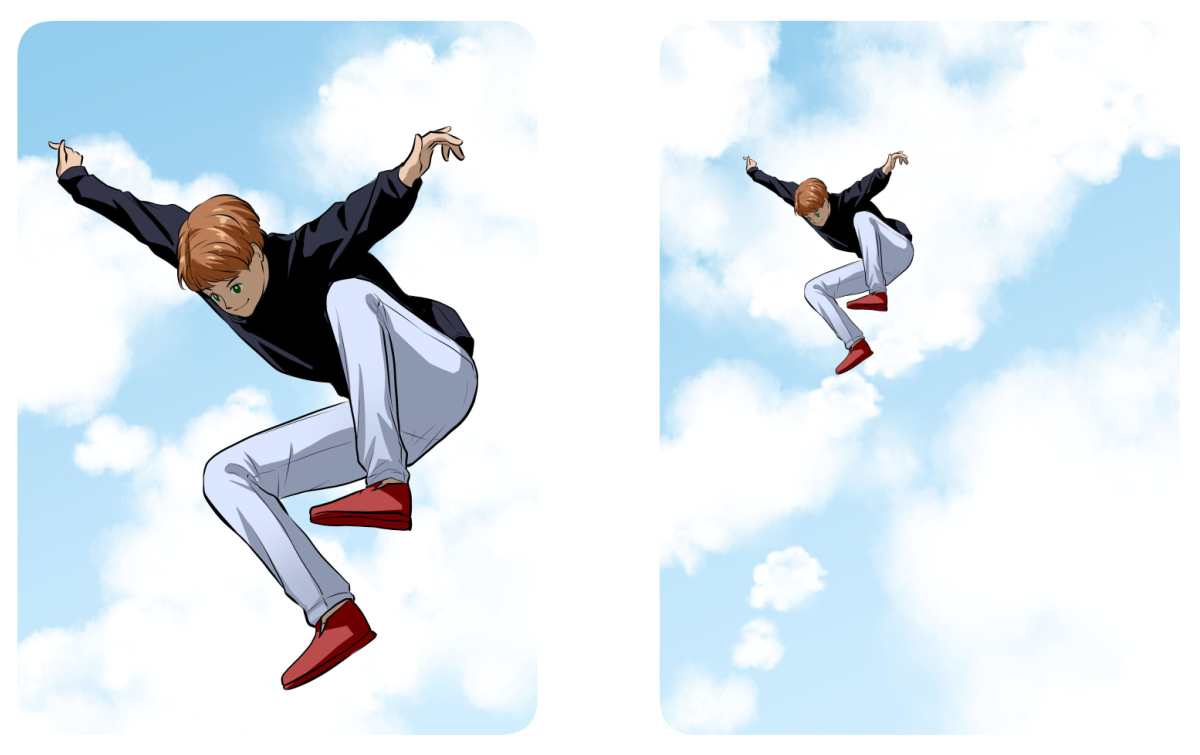
Essentially, the LEFT image has more context to it. It makes sense and the poster comes together.
Here is a poster with better framing and has a clear focus:
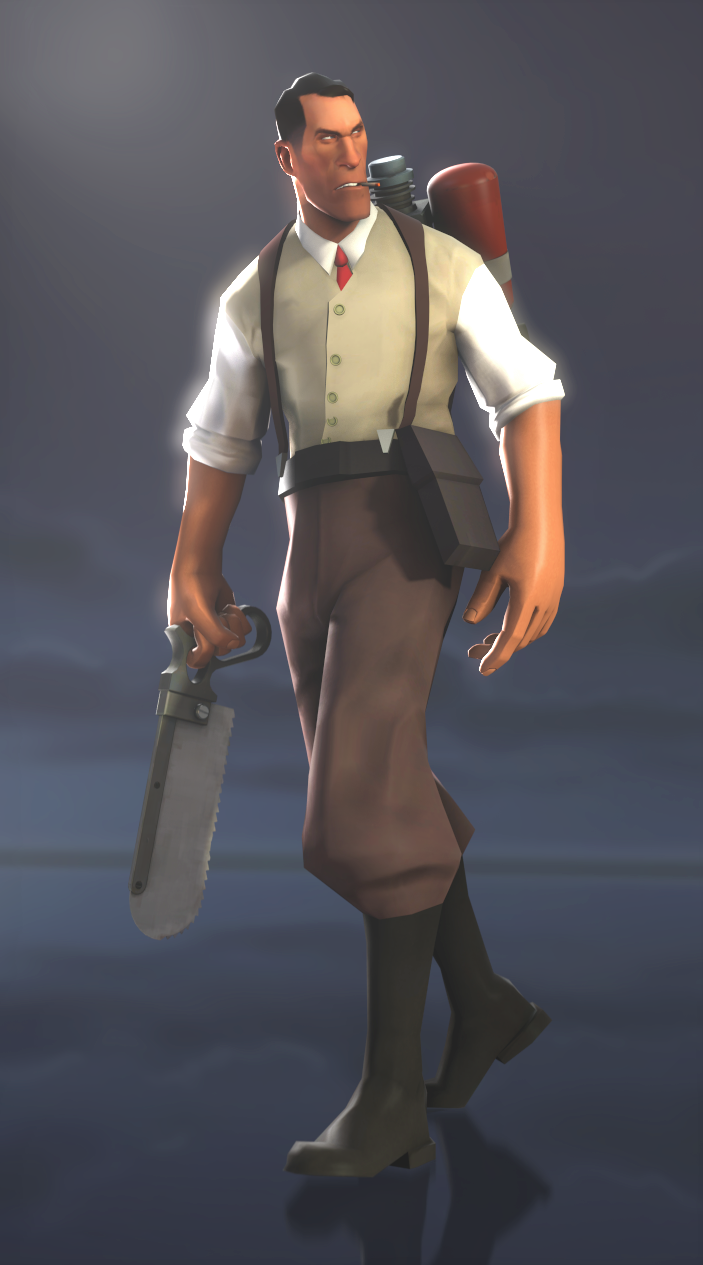
Though the posing or the lighting isn't phenomenal, the camera has a good focus on what is important!
-
How to frame a scene
Much like photography and painting, when framing something you may have to be aware of WHAT you'd like to be the main focus and WHAT is in the background.
These are the tools you can use to set up a perfect scene! I'll tell you what each of them do:
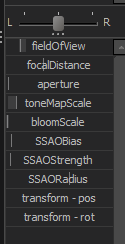
- Field of View: How much you can see or the bounds of sight (same with FOV in video games!)
- Focal Distance: The blur that is past the distance of your character (or where the blur starts)
- Aperture: How much blur you want
- toneMapScale: How bright the things around you are (like the map, mainly used for a transition frame in animation)
- Bloom Scale: How much bloom (fuzzy lights) you would like
- SSAO Bias: How far from the camera do you want shadows to start?
- SSAO Radius: Darker, more solid or softer shadows
- SSAO Strength: How long or short the shadows can be
(no need to worry about the transform and position)
Your camera starts out at 60mm (millimeter lens) and can be adjusted for depth!
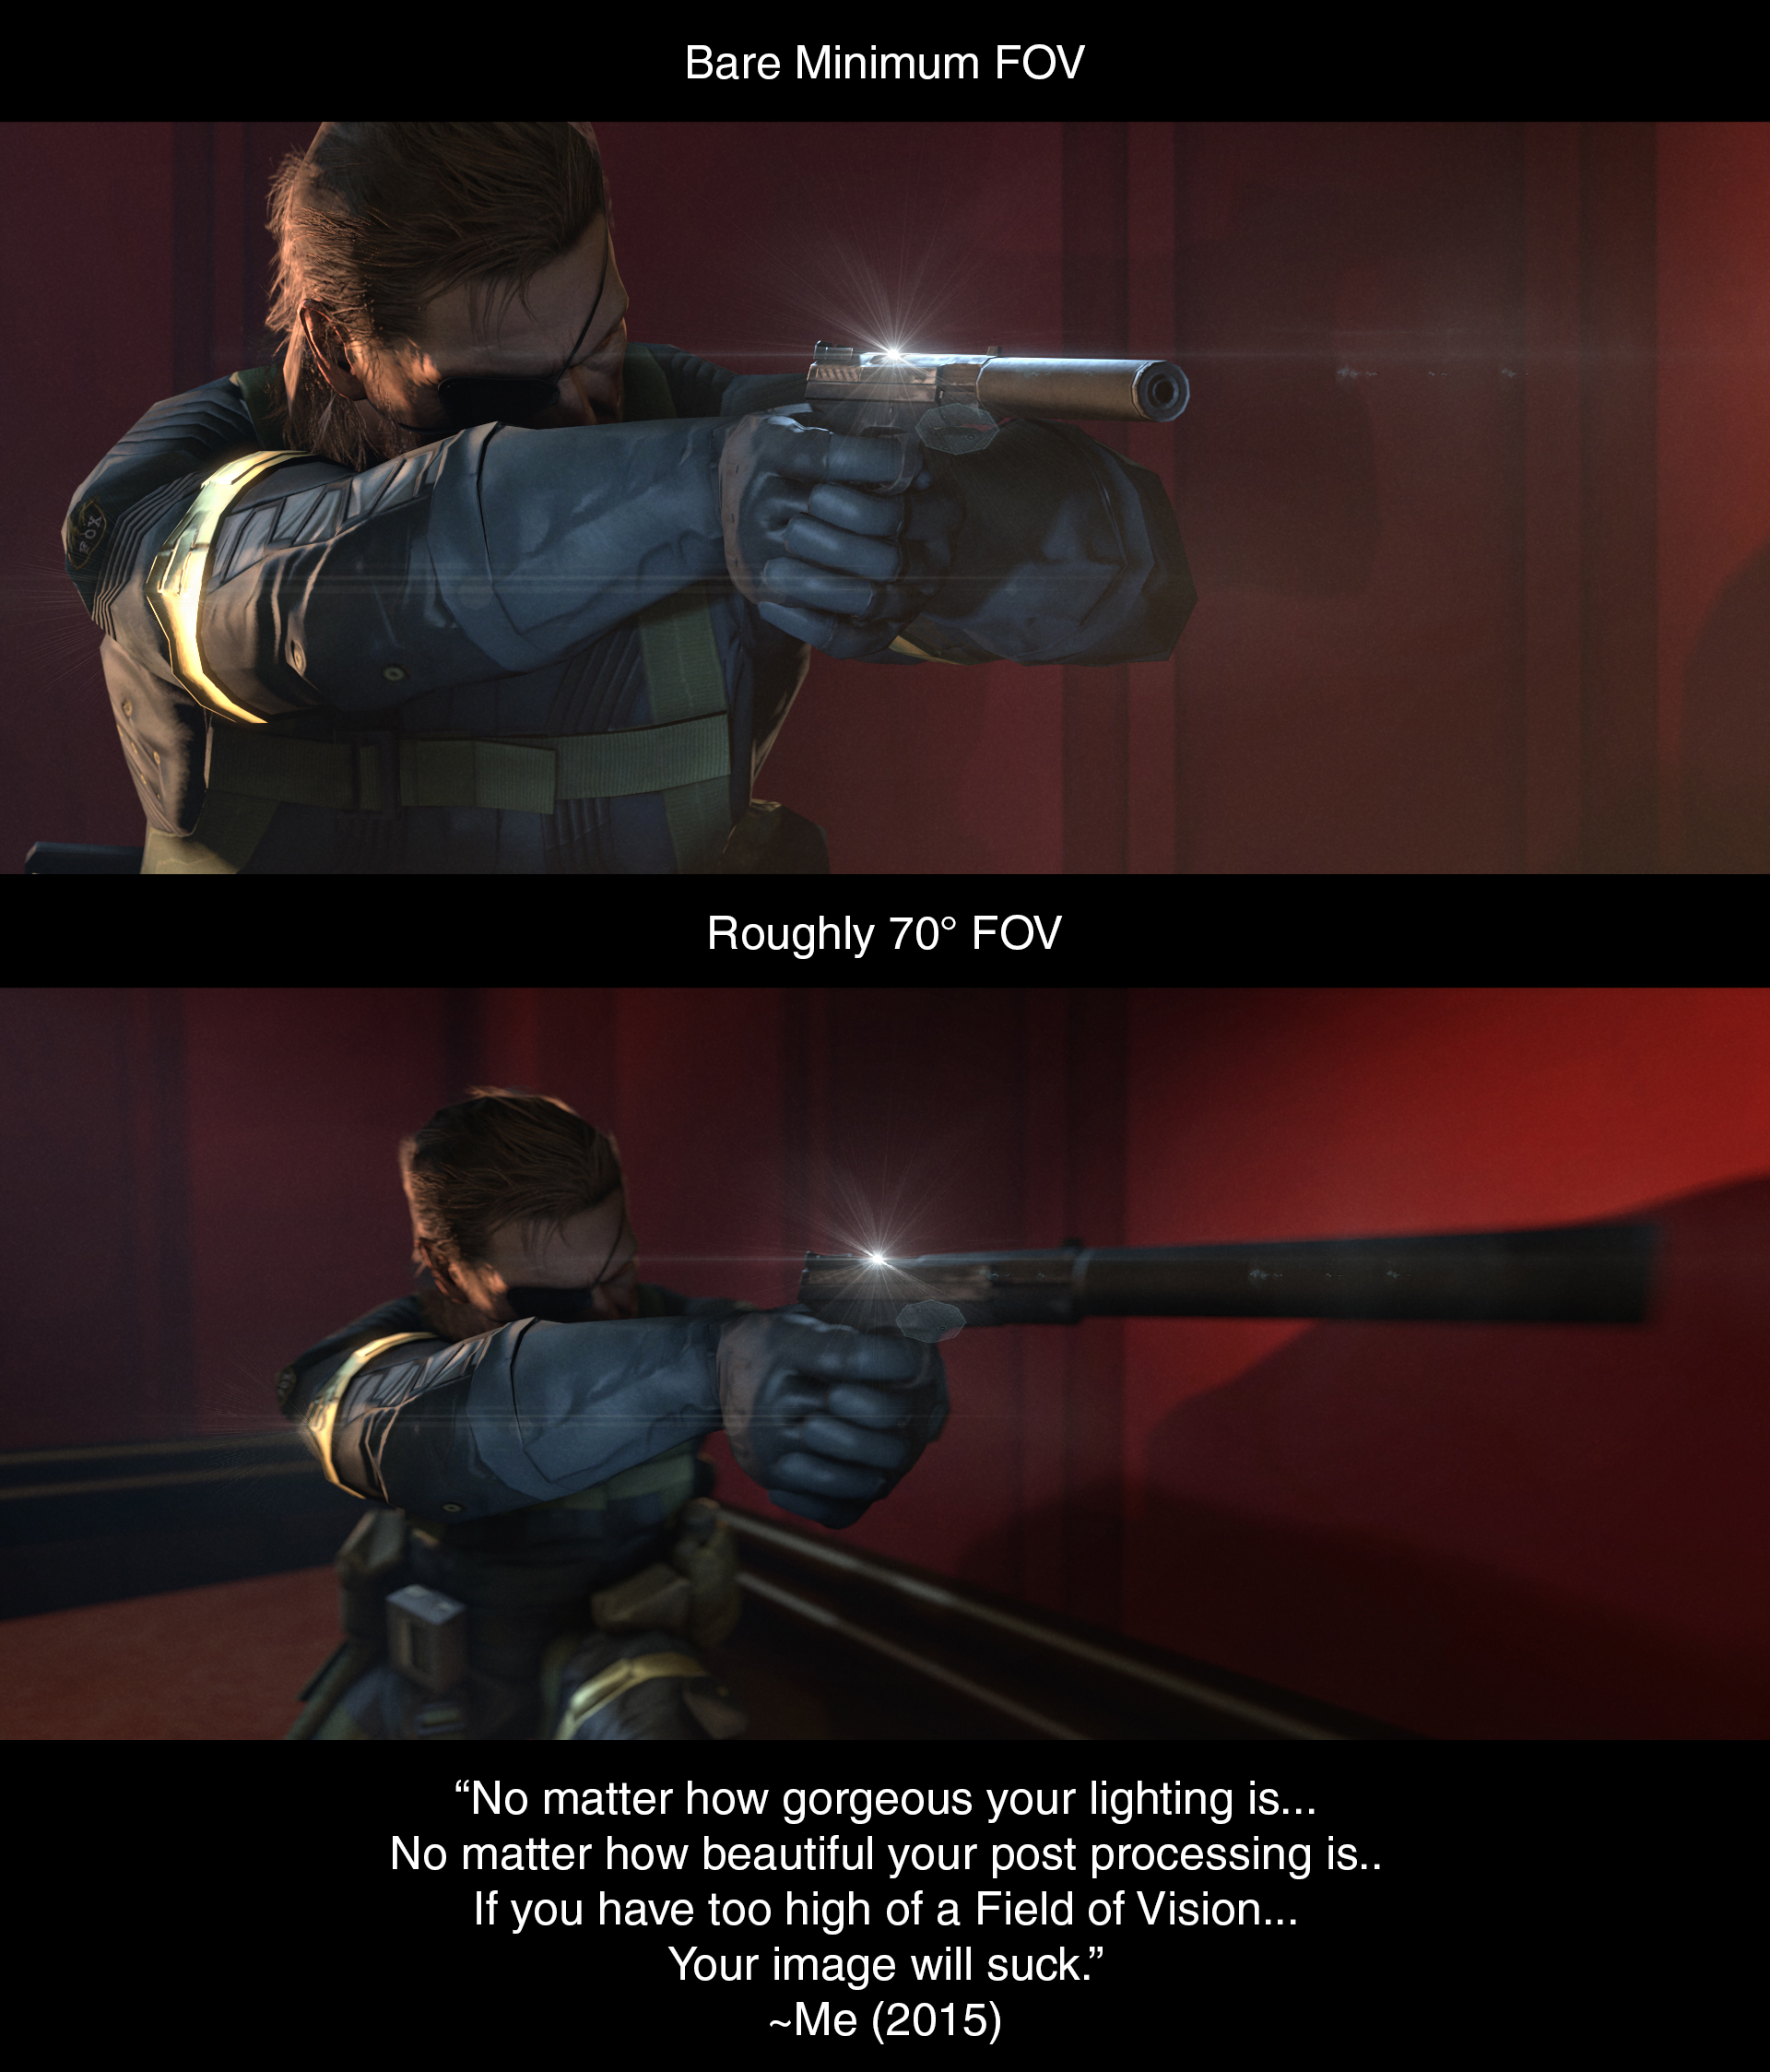
Credit to Rupert484 for original image and poster ^
Of course, experimenting with different lenses of the camera will be your best technique on how to frame a scene. Just make sure that what you want to show is in frame and is focused Like this:
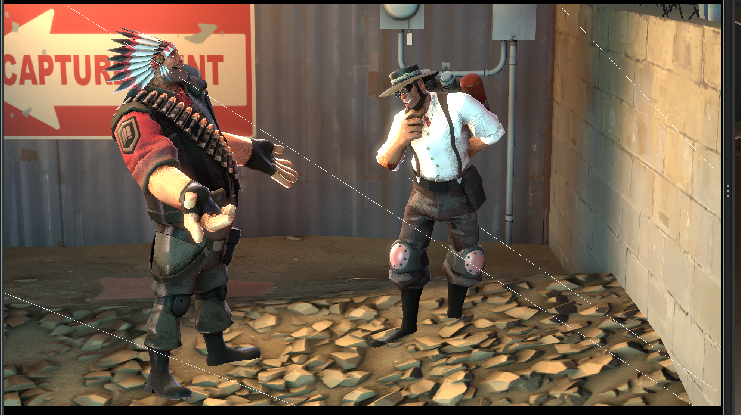
I also won't include the rule of thirds (which is a thing in photography), just because a poster can look nice even without the R.O.T. Even a middle framed poster can look good!
Lighting and Rendering
The next step is lighting which is an essential part of a poster! lighting can convey different emotions and moods.
Some maps already come with their own lighting, which is ok in some instances, but for the most part, you should make your own lights.
But first, there is a method of lighting that many people use, and for good reason!
Three Point Lighting
It is the most versatile yet simple way of lighting an object or character. I'll give you a visual for reference:
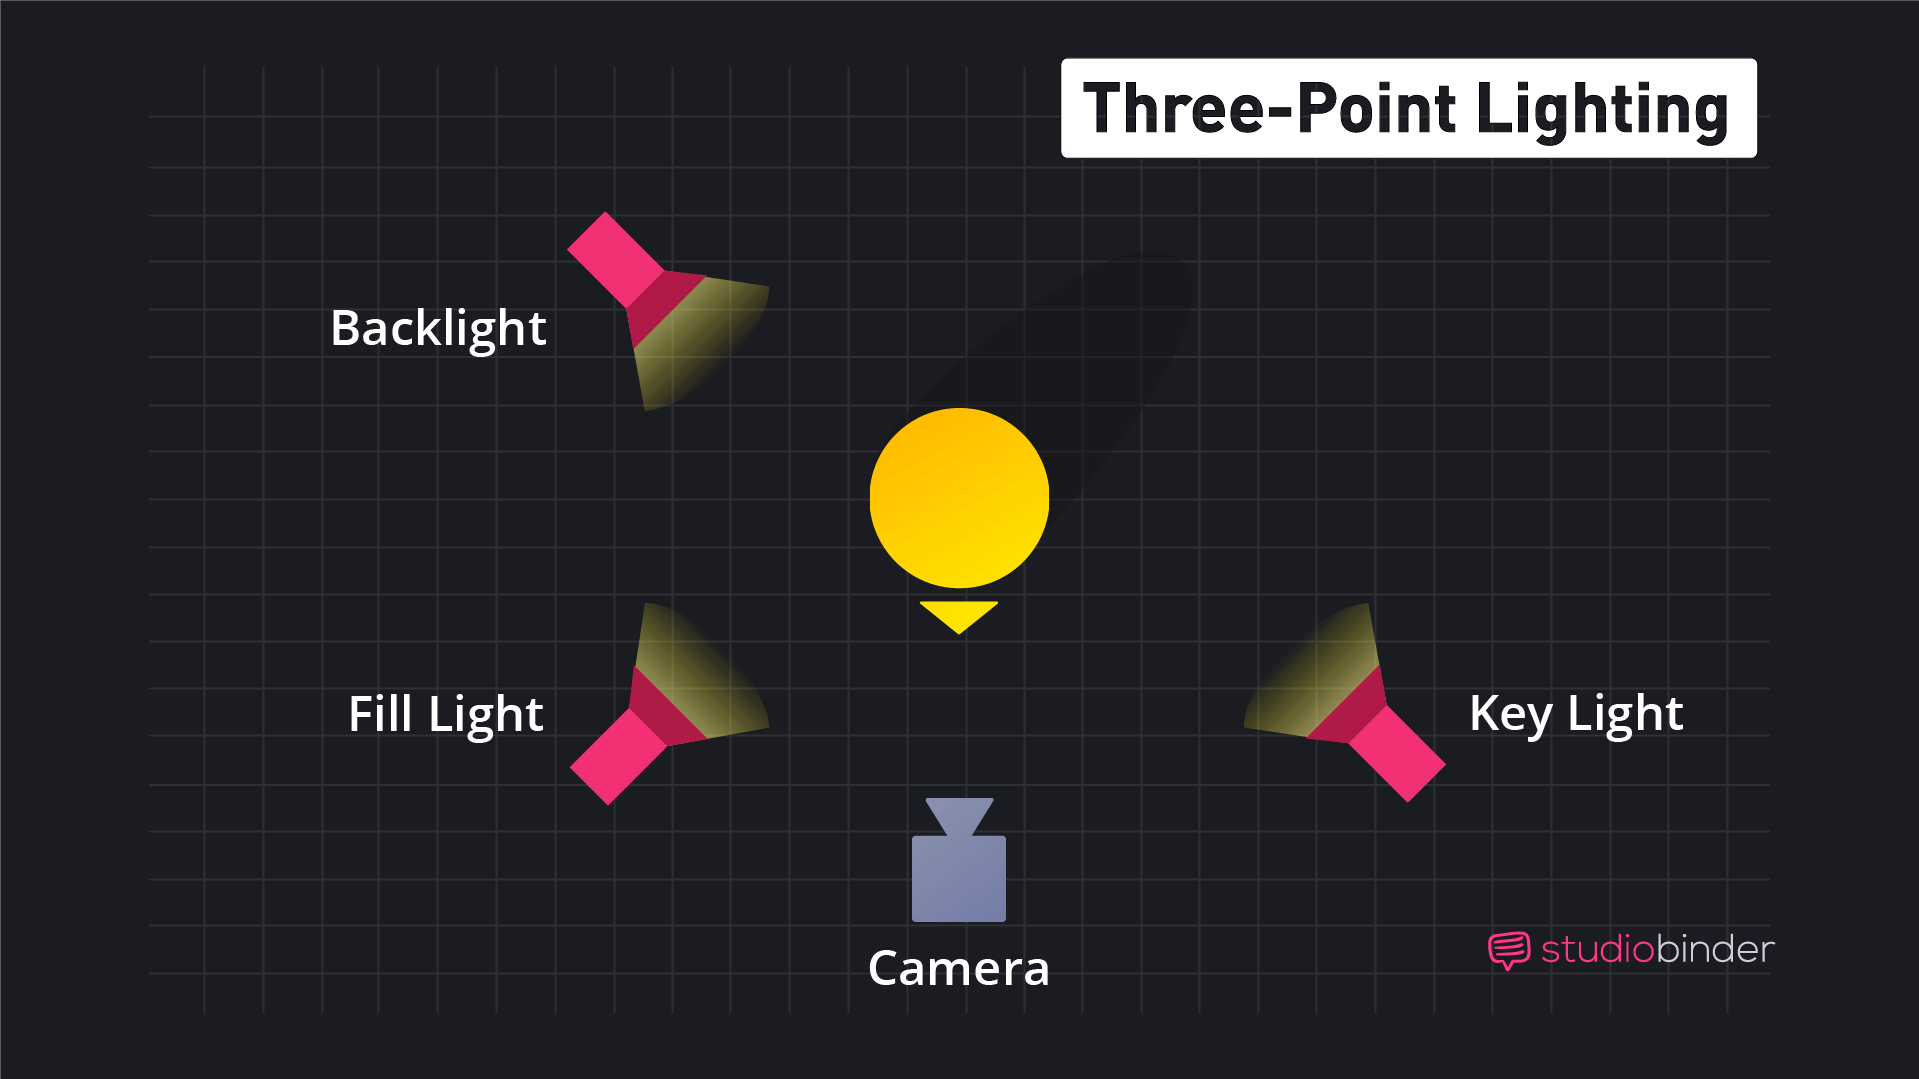
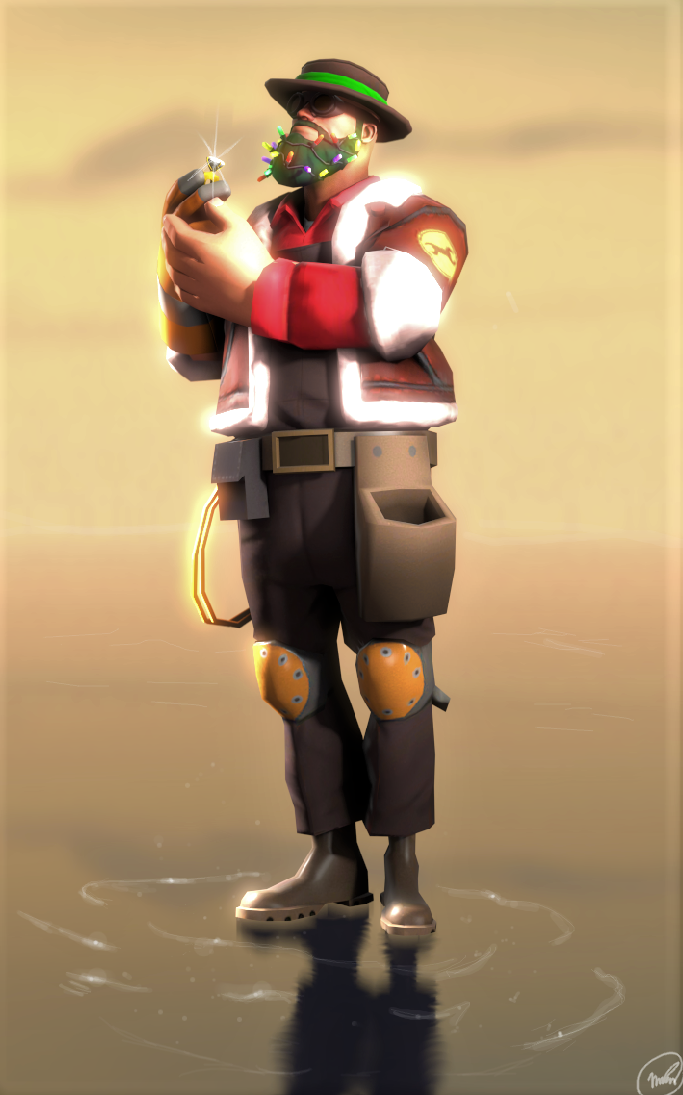
These lights will help you establish depth (and good composition) for all your posters. While it may be the most helpful form of lighting, it's not in every poster! Here are a few examples of three point lighting:
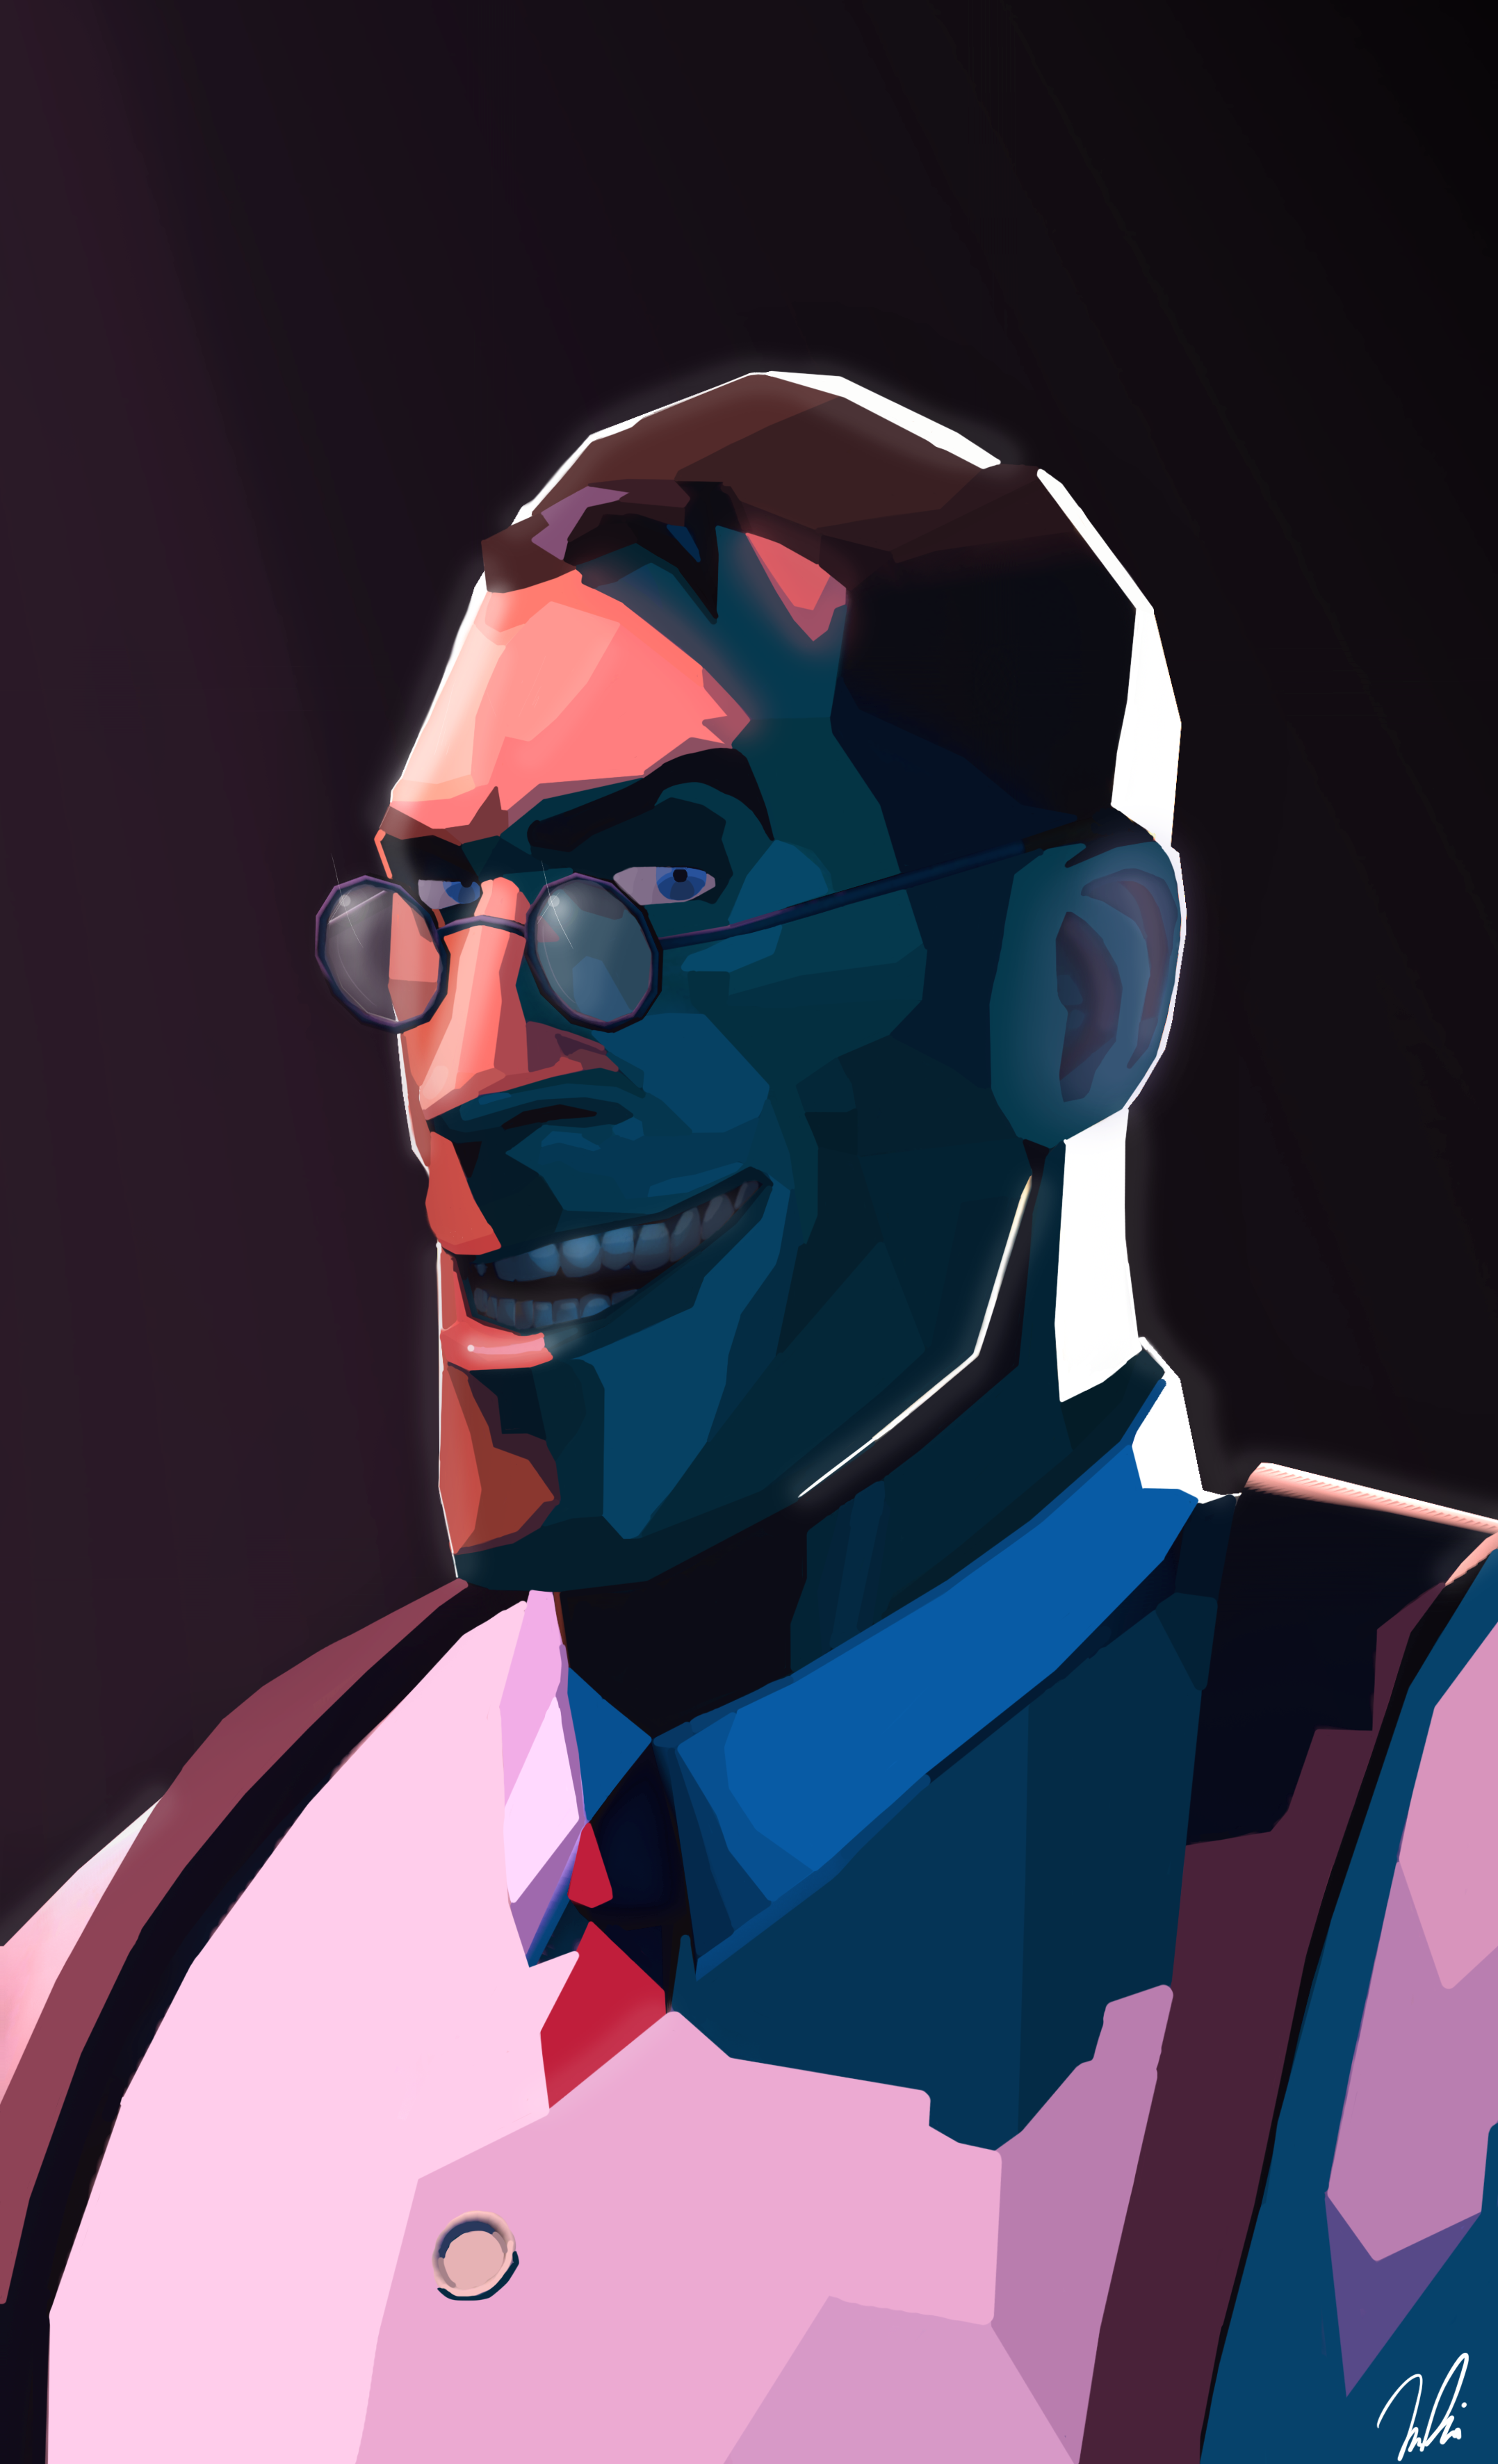
(This one is heavily edited with cell-shading in post processing, but you can clearly see three separate colored lights: a blue, a pink and a white light)
Your Rim Light or Backlight will be softer than the other lights, around 20-30% brightness (not me bc I like hard rimlights >:) )
Your Key light is your brightest light at 90-100% brightness.
Your Fill light is somewhere in the middle at 40-50% brightness.
Your Fill light is somewhere in the middle at 40-50% brightness.
-
The final step is rendering! Remember I told you to press TAB and the scene would render?Well, that's it! But your render setting can be changed! This can make things look a little smoother.
Right click on the viewport and select "render settings". It should look like this:
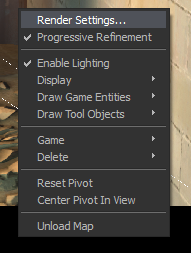
Select render settings and it should bring up this window:
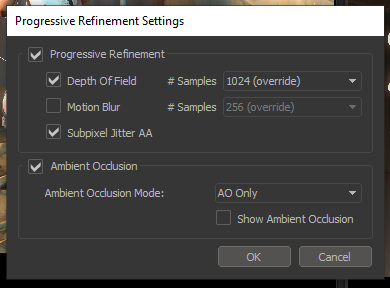
These are my personal settings and you may switch around what you like. I will give a quick guide on what these samples are and what they mean:
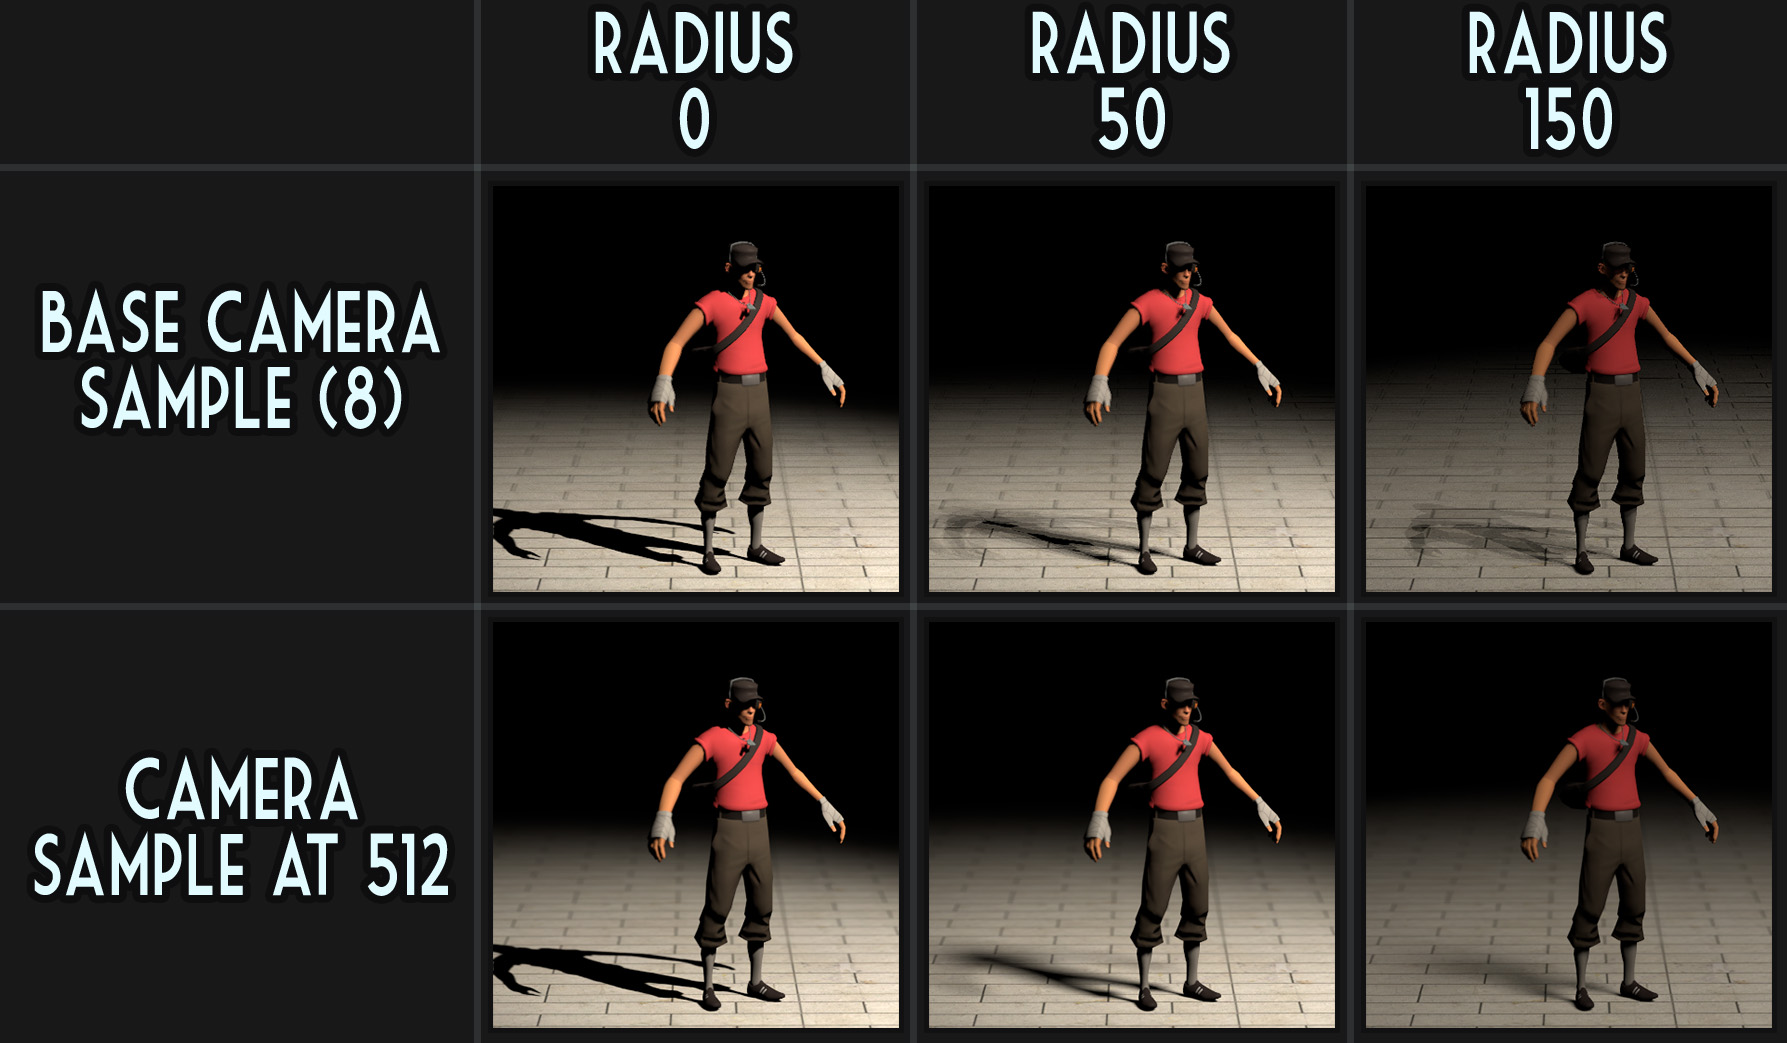
See how on higher camera samples the shadows look more defined? That's what you want. Each camera will spawn in with a sample count of 8, so if you render a poster and the shadows look blocky, don't forget to change the samples!!!
-
Wow, that was a lot, but you have your finished poster and you're so proud of it. Now it's time to Export!
Exporting and saving
You have come to the end of your journey! But there is more we have to do if you want your poster to be on your pc!
At the top left of your program, click on "File" and a dropdown should appear:
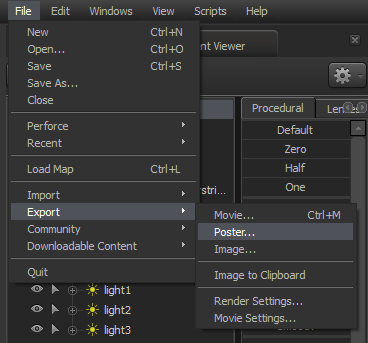
Go to Export then Export as poster
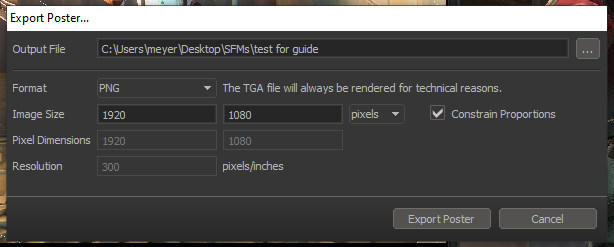
Then another window with a directory should pop up. Chose where you want the file saved to (honestly I just use my desktop so I can drag it into my art folder from there)
(The resolution can be whatever you would like it to be but for my personal preferences I'll set them higher )
At the top left of your program, click on "File" and a dropdown should appear:
Go to Export then Export as poster
Then another window with a directory should pop up. Chose where you want the file saved to (honestly I just use my desktop so I can drag it into my art folder from there)
(The resolution can be whatever you would like it to be but for my personal preferences I'll set them higher )
!!!This is the part where you don't touch anything or SFM can and WILL stroke out!!!
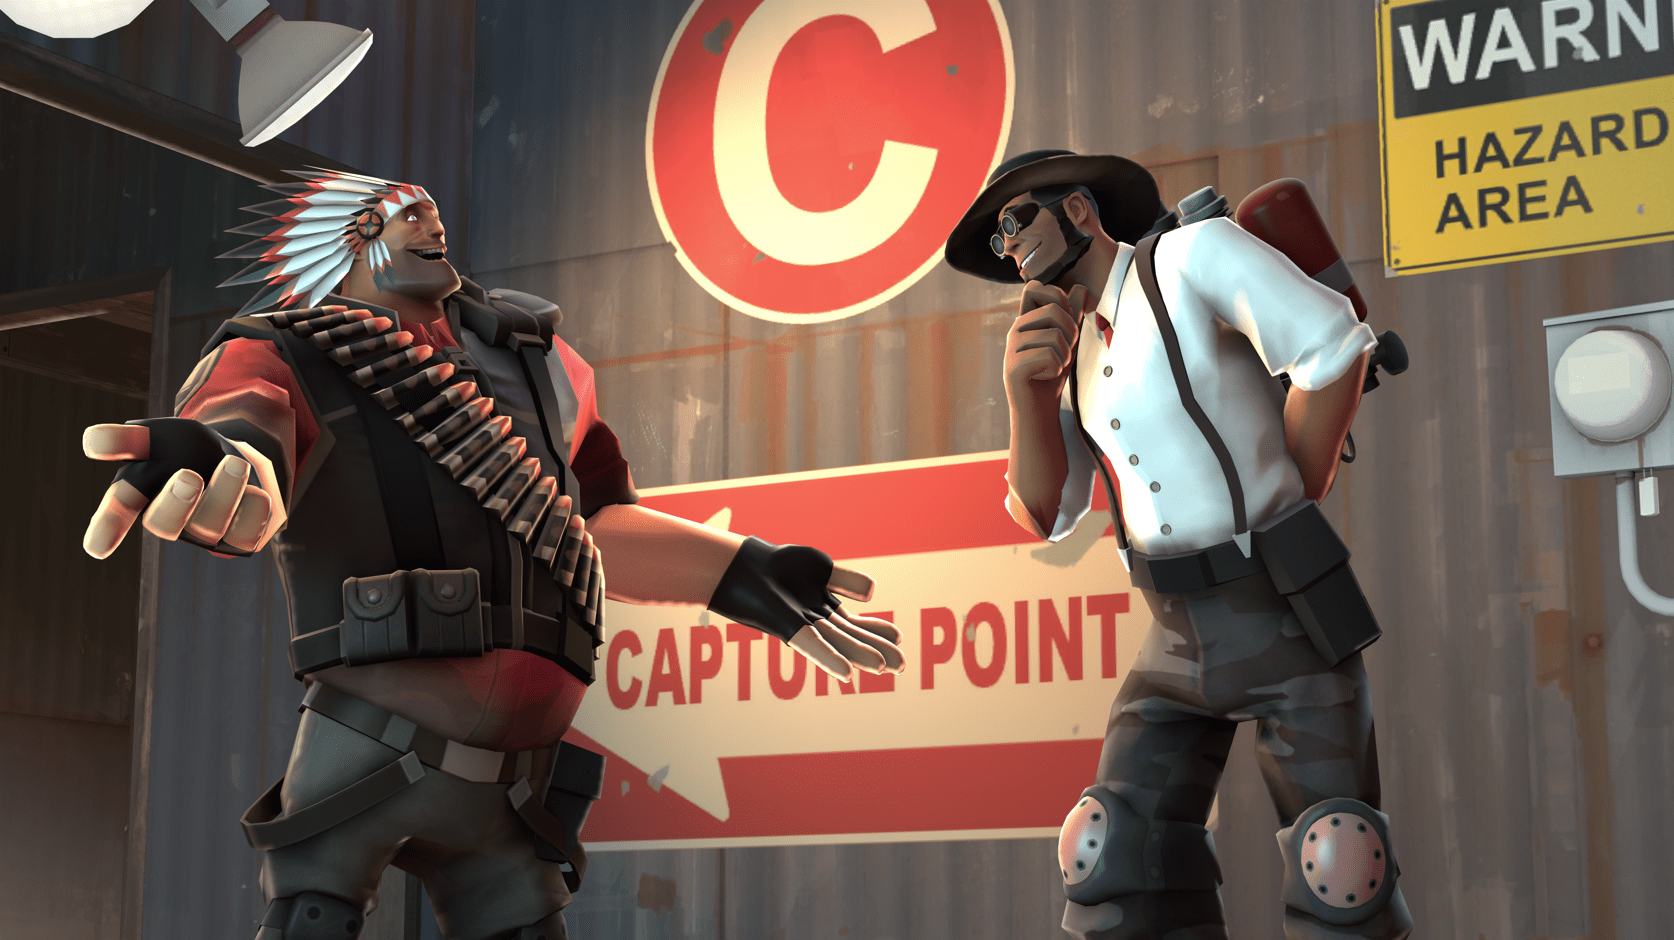
And here is the rendered poster!
Many thanks!
I want to extend my deepest thanks if you chose to read my guide. I've been working on it since late 2020 (hahaha I procrastinate!) and it took a while for me to word things correctly!
If you have any questions / comments / concerns, please don't hesitate to reach out to me and talk it through. I am here to help you learn!
With that being said, please be sure to rate, comment, and favorite so this guide can help those who are new to SFM!
If you have any questions / comments / concerns, please don't hesitate to reach out to me and talk it through. I am here to help you learn!
With that being said, please be sure to rate, comment, and favorite so this guide can help those who are new to SFM!
More Source Filmmaker guides
- Changing Textures Using Material Overrides★ 5 (1.4k)41k views2.7k ♥5 minUpdated Jul 26, 2014
- The Fundamentals of SFM: For Beginners★ 5 (1.3k)25k views3.3k ♥55 minUpdated Apr 29
- Ваш первый постер★ 5 (1.1k)22k views2k ♥5 minRussianUpdated Oct 22, 2024
- Getting Gmod Workshop stuff too SFM★ 5 (509)15k views1.3k ♥1 minBulgarianUpdated Aug 4, 2015
- Улучшение качества постера в SFM★ 5 (973)14k views2.1k ♥12 minRussianUpdated Jan 17, 2020
- How to Light Characters from the Ground Up (or something)★ 5 (1.1k)12k views2.4k ♥23 minUpdated Mar 21, 2019




This guide was created by its original author on the Steam Community. Are you the author and want it removed? Request removal.