The Guiding Lands Complete Guide [Updated]
Introduction
 Welcome to Guiding Lands Complete Guide!
A few notes to mention;
A small amount of info was taken from the IGN Guide and some small bits from Fextralife wiki, with some heavy modification on my part here and there with regional monster list images, tables, guiding lands excel snapshots & other stuff.
If ppl would like to share their info to help expand this guide further, feel free to give a shout in the comments. IGN's guide isn't fully completed so i was able to added as much as i could with my own knowledge of the Guiding Lands.
Hope this helps ppl!
How to Unlock the Guiding Lands
To put it simply, beat Monster Hunter World: Iceborne's main story. After credits role, speak to the Field Team Leader in Seliana, and you'll depart toward the Elder's Recess to look for Ruiner Nergigante. However, this is simply a ruse, and instead you'll be treated to a cutscene before landing in the Guiding Lands, which appears to have multiple biomes in one place.
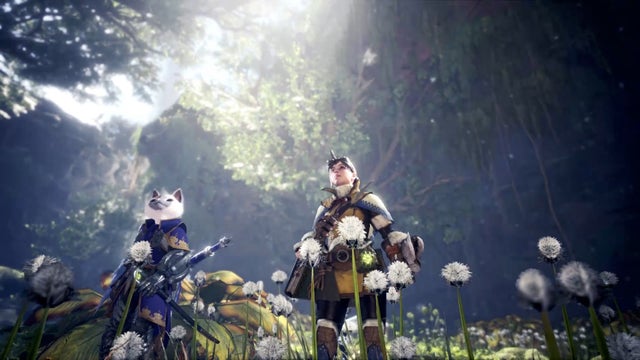
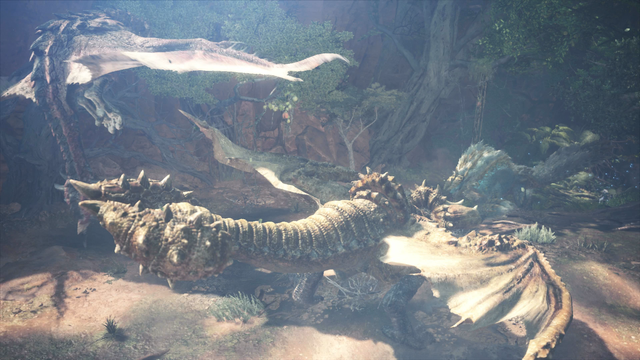
You and your handler land, and get a gander at what looks like the Ancient Forest. Pick up the "Signs of a Turf War" in front of you, then continue following your Handler on a small tour of the Guiding Lands. After making camp, the Handler states that the tracks you found (Signs of a Turf War) have an odd secretion unique to this new region. Head down to Area 2 to trigger a cutscene. You stumble into an area that looks like the Wildspire Waste as Rathalos, Diablos, and a new monster to Iceborne, Zinogre, battle it out.
How the Guiding Lands Work
Each Region in the Guiding Lands has a Level associated with it, which will unlock new monsters and tempered monsters as the level rises.
How to Increase Region Levels
- Pick up monster tracks in that region.
- Break monster parts in the region.
- Break monster parts of a monster native to that region.
- Capture or slay monsters in the region.
- Capture or slay monsters native to that region.
- Trapping a monster. Know that increasing one Region's level will decrease the others.
For example
Anjanath can be lured to both the Forest and Wildspire Regions. If it's lured to the Forest Region, but you mostly fight it and then slay it in the Wildspire Region, the Wildspire Region will be affected more than the Forest Region, though both will increase. The other regions that Anjanath is not native to will decrease incrementally.
How to Tell Which Monsters Increase Which Region Level
To tell which Region a monster is endemic to, and in turn, which region it will provide experience to, go to the following from anywhere:
Options > Info > Check Special Tracks
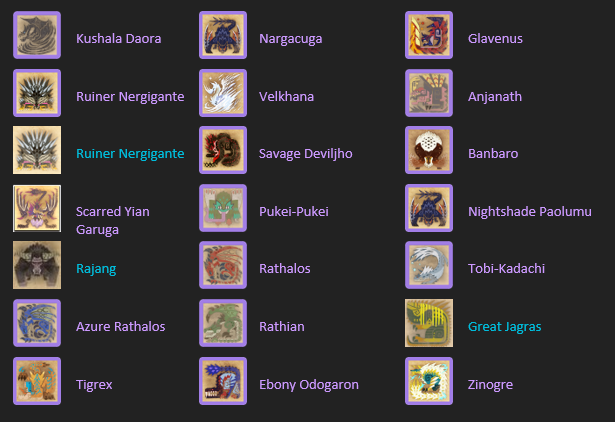
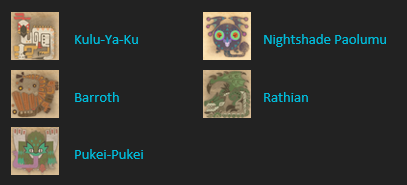
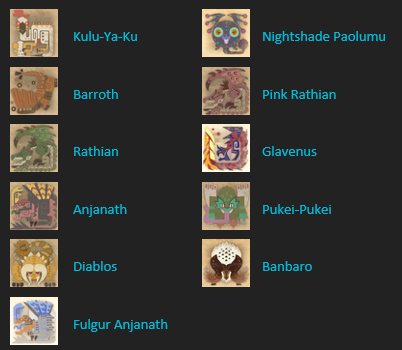
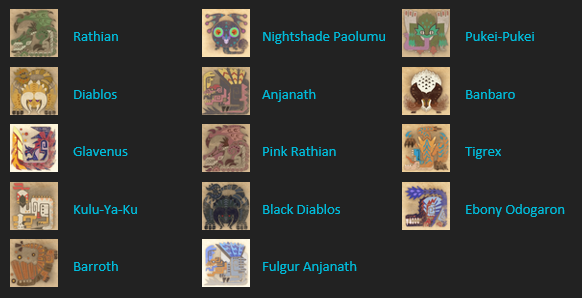
You can only see this once you've analyzed tracks for that monster. You can also reference the Guiding Lands Regional Monster List below.
How to Lure Monsters
Monsters in The Guiding Lands usually leave behind special tracks from Signs of a Turf War. You can also get special tracks by slaying or capturing monsters, or by breaking a large monster's body part.
Once you fully analyze the special tracks, you can use these to lure out monsters from a specific region. You can do this by talking to the Handler at one of the campsites, then choose which specific monster you lure at which region. After a little while, the monster should appear at the region you chose.
When the region's level is high enough, any monster that you lure will automatically be a tempered variant.
Region Level Cap Master Rank Requirements
- MR Any - Up to Region Level 4
- MR 49: Sleep Now in the Fire - Up to Region Level 5
- MR 69: Big Burly Bash - Up to Region Level 6
- MR 99: To the Very Ends With You - Up to Regional Level 7
How to Find New Monsters in the Guiding Lands
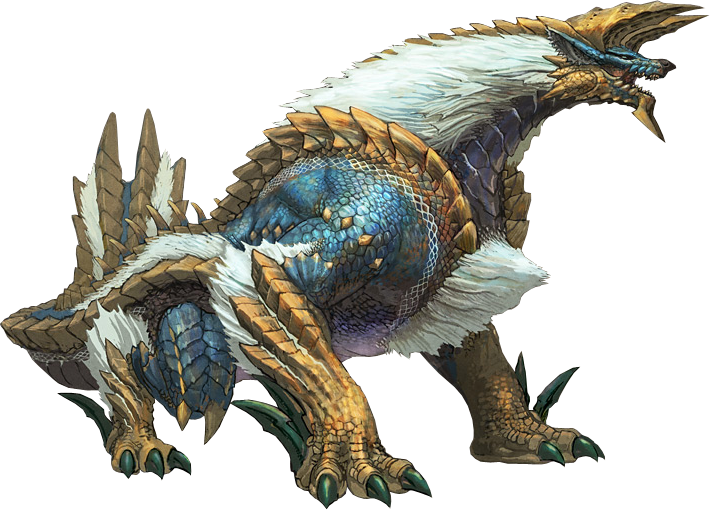
Zinogre isn't the only new monster found within the Guiding Lands. Leveling up the different regions can trigger quests to appear within the guiding lands to hunt different monsters. Here is the list of monsters you can find in the Guiding Lands and how to unlock them.
- Zinogre - Zinogre will appear after completing the first set of Fanged Wyvern special tracks analysis. See How to Unlock Zinogre in Monster Hunter World: Iceborne for more information.
- Yian Garuga - Increase the Forest Region level to 3. Unlocks the Assigned Quest Return of the Crazy One.
- Scarred Yian Garuga - Increase the Forest Region to Level 6. This requires Master Rank 69.
- Brute Tigrex - Increase Rotted Region to Level 6. This requires Master Rank 69.
- Gold Rathian - Increase Wildspire Region to Level 6. This requires you to reach Master Rank 69.
- Silver Rathalos - Increase Coral Region to Level 6. This requires you to reach Master Rank 69.
Resource Information
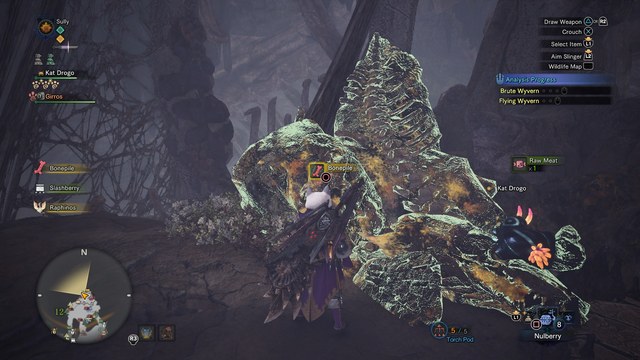 Each Region in the Guiding Lands has Bonepiles and Mining Outcrops that give special materials that can't be obtained anywhere else. There are two different progress bars for Resource Levels of each Region, one for Bonepiles, and one for Mining Outcrops. You can find this by tabbing over to Resource Information from Region Levels within your Map.
You'll increase the progress of these bars each time you gather from a Bonepile or Mining Outcop. The higher the bar, the more variety of items you'll be able to get from gathering points.
Each Region in the Guiding Lands has Bonepiles and Mining Outcrops that give special materials that can't be obtained anywhere else. There are two different progress bars for Resource Levels of each Region, one for Bonepiles, and one for Mining Outcrops. You can find this by tabbing over to Resource Information from Region Levels within your Map.
You'll increase the progress of these bars each time you gather from a Bonepile or Mining Outcop. The higher the bar, the more variety of items you'll be able to get from gathering points.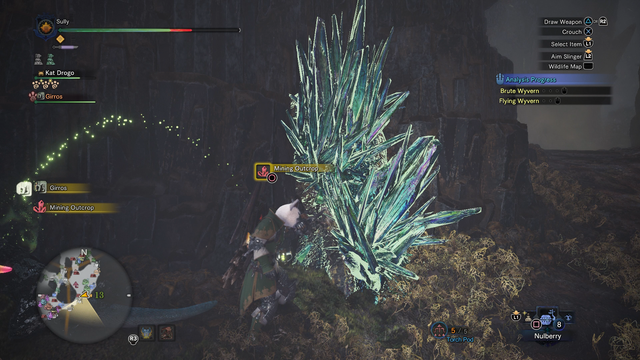 When the bar is leveled up all the way, a single special gathering point will spawn that can be mined once ever. An exclamation point will appear next to the progress bar when this occurs. This gathering point guarantees the rare, unique item from that region. Then, the bar needs to be leveled back up again for another point to spawn again.
When you fight monsters in the Guiding Lands, carve them, break their parts, or flinch shot them, they often drop special materials unique to the Guiding Lands. These take the form of two unique items per monster species -- one for the normal version, one for the tempered version (e.g. a Barioth might drop Coldblooded Icefang, but a Tempered Barioth will only drop Tempered Icefangs). Note that due to a bug, one point of Geologist will double the number of drops - always equip Geologist in the Guiding Lands. In addition to the unique materials, monsters will also drop bones common to many species, and tempered monsters will drop spiritvein gems used for master rank augmenting. The bone system is explained below:
- 1 Star Monsters drop Fierce Dragonvein Bone
- 2 Star Monsters drop Heavy Dragonvein Bone
- 3 Star Monsters drop Dragonvein Solidbone
- Elder Dragons drop Elder Dragonvein Bone
- Threat level 1 Monsters drop Spiritvein Slogbone and Spiritvein Gem Shard
- Threat level 2 Monsters drop Spiritvein Solidbone and Spiritvein Gem
- Some Threat level 2 Monsters drop Spiritvein Solidbone and Great Spiritvein Gem
- Threat level 3 Monsters drop Elder Spiritvein Bone and Great Spiritvein Gem
- You should strive to kill one of each monster (in its tempered form, if any) so that you can elder meld to transmute higher tier materials into lower tier materials as necessary.
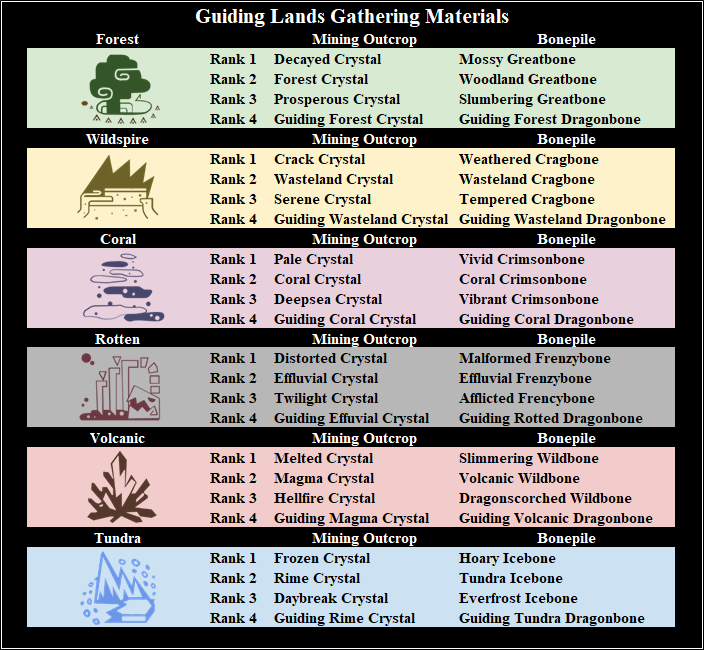
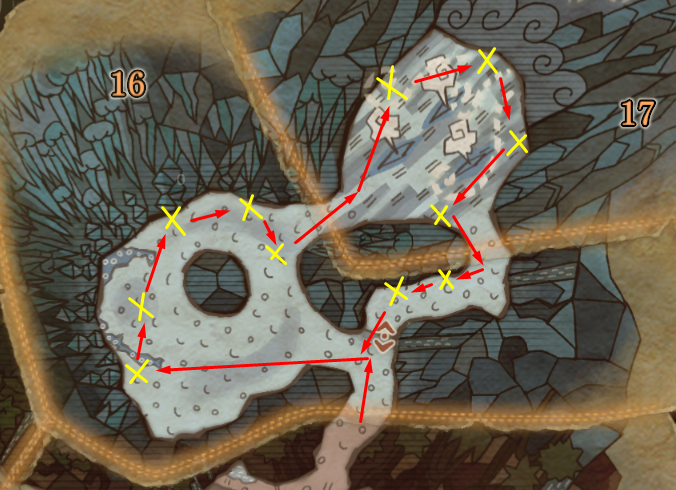
Region Gathering Path
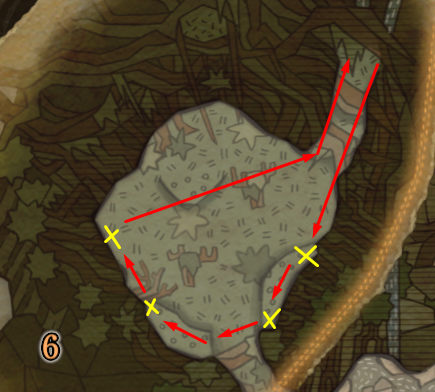
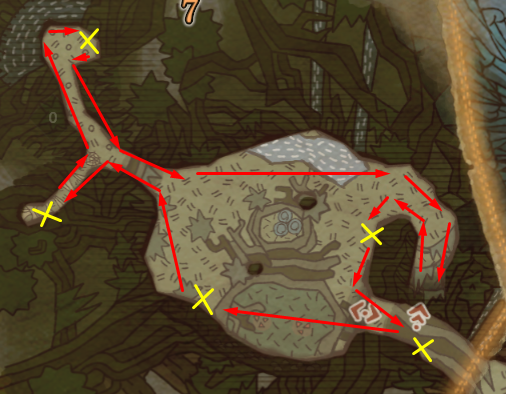
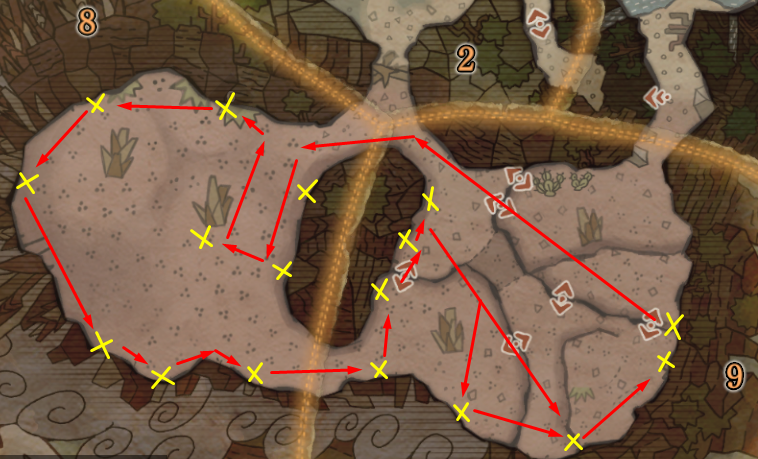
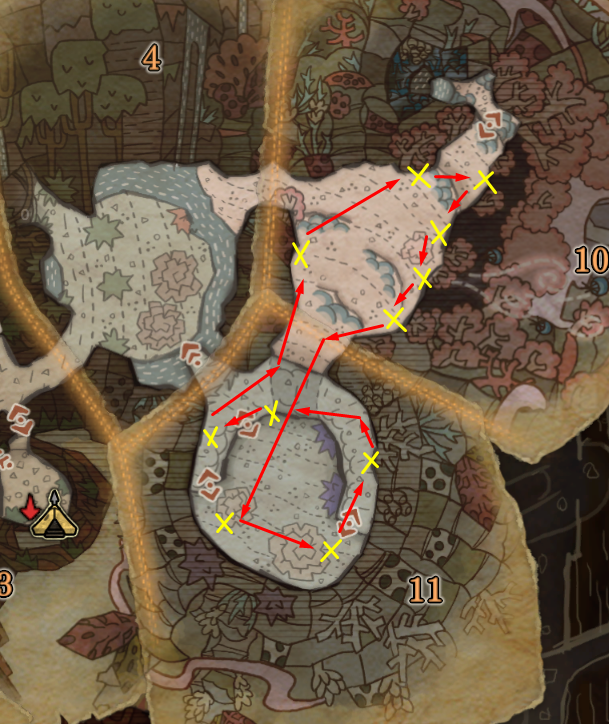
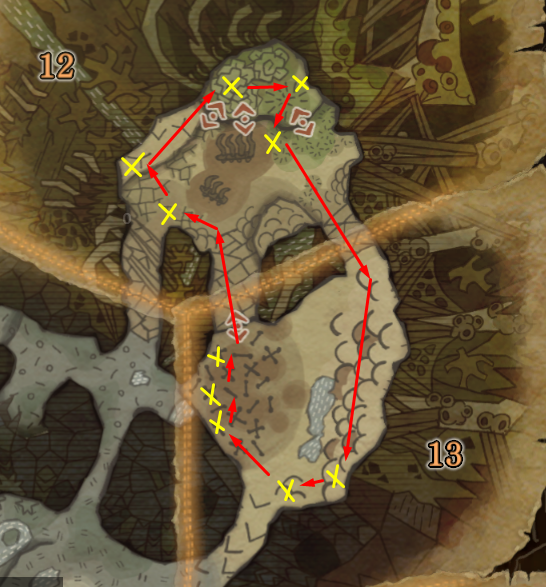
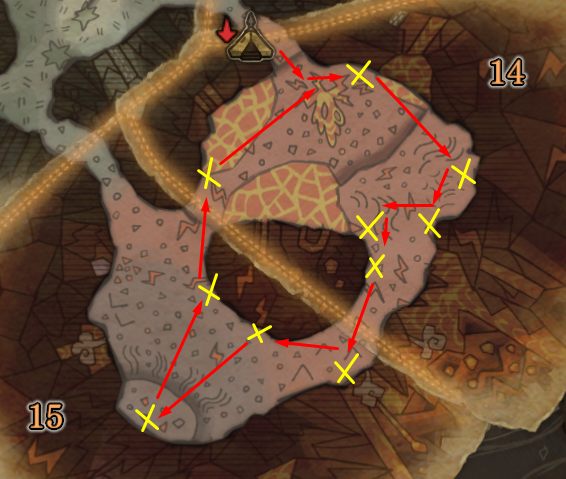
Helpful Gathering Build
- Self Improvement - Speed Boost
- Stamina Use Reduction (L) - Slower Stamina depletion
- Tool Use Drain Reduced (L) - Longer Mantle Times
- Echo Song - Max Stamina Up & Recovery
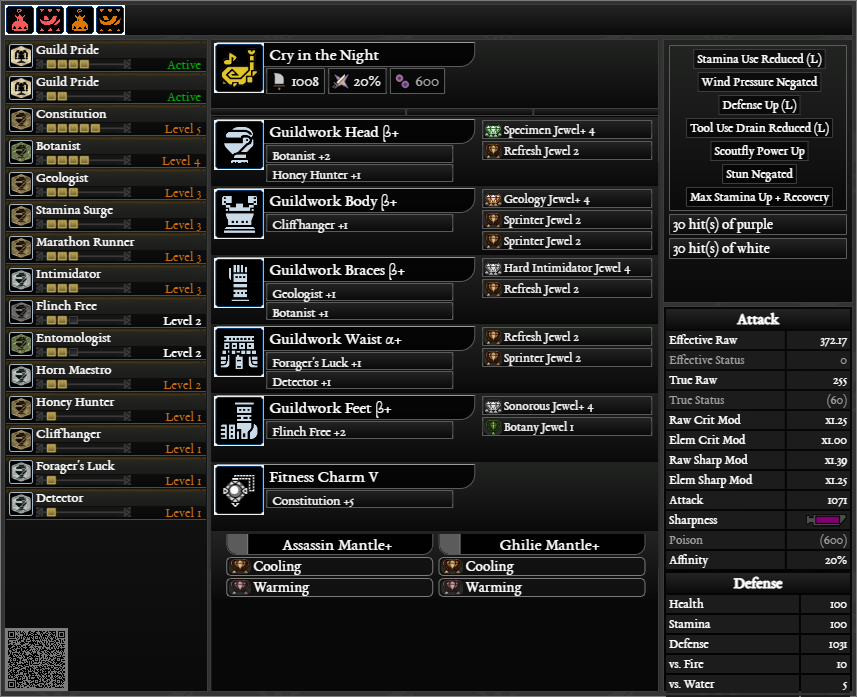 Source: DarcBlade YouTube
List of Monsters and Materials - Pt.1
Forest / Wildspire
(1, 2, 3, 4)
Forest / Wildspire
(5, 6, 7)
All Regions
(1, 2, 3, 4)
All Regions
(5, 6, 7)
Coral / Rotten / Volcanic / Tundra
(1, 2, 3)
Forest / Wildspire
(2, 3)
All Region
(4, 5, 6, 7)
Tundra
(2, 3, 4, 5)
Tundra
(6, 7)
Wildspire
(1, 2, 3)
Wildspire
(4, 5, 6, 7)
Rotten
(5, 6)
Rotten
(7)
Volcanic
(2, 3, 4, 5)
Volcanic
(6, 7)
Wildspire
(2, 3, 4)
Wildspire
(5, 6, 7)
Wildspire
(3, 4, 5)
Wildspire
(6, 7)
Volcanic
(1, 2, 3, 4, 5, 6, 7)
Wildspire
(2, 3, 4, 5)
Forest / Volcanic
(3, 4, 5)
Forest / Wildspire / Volcanic
(6, 7)
Rotten
(3, 4, 5)
Rotten
(6, 7)
Rotten
(1, 2, 3, 4, 5, 6, 7)
Forest
(1, 2, 3, 4, 5, 6, 7)
Coral
(5, 6)
Coral
(7)
Wildspire
(1, 2, 3, 4, 5, 6, 7)
Forest / Volcanic
(5, 6)
Forest / Volcanic
(7)
Volcanic
(1, 2, 3)
Volcanic
(4, 5, 6, 7)
Coral / Tundra
(2, 3, 4)
Coral / Tundra
(5, 6, 7)
Tundra
(3, 4, 5)
Tundra
(6, 7)
Coral
(5, 6)
Coral
(7)
Forest
(2, 3, 4, 5)
Coral
(3, 4, 5)
Forest / Coral
(6, 7)
Rotten
(2, 3, 4)
Coral
(3, 4)
Coral / Rotten
(5, 6, 7)
All Regions
(3, 4, 5)
All Regions
(6, 7)
Coral
(1, 2, 3)
Coral
(4, 5, 6, 7)
Wildspire
(1, 2, 3, 4)
Forest
(2, 3, 4)
Forest / Wildspire
(5, 6, 7)
Forest / Wildspire
(1, 2, 3)
Forest / Wildspire
(4, 5, 6, 7)
Coral
(1, 2, 3)
Coral
(4, 5, 6, 7)
Rotten
(1, 2, 3)
Rotten
(4, 5, 6, 7)
Forest / Wildspire / Coral / Rotten / Tundra
(3, 4, 5, 6, 7)
Volcanic
(3)
Volcanic
(7)
Forest
(2, 3, 4)
Volcanic
(3, 4)
Forest / Volcanic
(5, 6, 7)
Forest
(3, 4, 5)
Volcanic
(4, 5)
Forest / Volcanic
(6, 7)
Volcanic
(6, 7)
Coral
(6)
Coral
(7)
Wildspire
(1, 2, 3, 4)
Forest
(2, 3, 4)
Forest / Wildspire
(5, 6, 7)
Volcanic
(6, 7)
Wildspire
(6)
Forest / Wildspire
(7)
Wildspire / Coral
(2, 3, 4)
Wildspire / Coral
(5, 6, 7)
Forest / Wildspire / Coral / Rotten / Volcanic
(5, 6, 7)
Tundra
(5, 6)
All Region
(7)
All Region
(5, 6)
All Regions
(7)
Volcanic
(4, 5, 6)
Volcanic
(7)
Wildspire / Volcanic
(5, 6)
Wildspire / Volcanic
(7)
Wildspire / Volcanic
(5, 6)
Wildspire / Volcanic
(7)
Rotten
(2, 3, 4, 5)
Forest / Wildspire / Volcanic / Tundra
(3, 4, 5)
Forest / Wildspire / Rotten / Volcanic / Tundra
(6, 7)
Rotten
(6)
Rotten
(7)
Forest
(1, 2, 3)
Forest
(4, 5, 6, 7)
Tundra
(1, 2, 3, 4)
Tundra
(5, 6, 7)
List of Monsters and Materials - Pt.2
Coral
(1, 2, 3, 4, 5, 6, 7)
Volcanic
(2, 3, 4)
Volcanic
(5, 6, 7)
Forest / Wildspire / Coral / Volcanic / Tundra
(5, 6)
Forest / Wildspire / Coral / Volcanic / Tundra
(7)
Forest
(3, 4, 5)
Forest
(6, 7)
Forest / Coral
(2, 3, 4, 5)
Forest / Coral
(6, 7)
Tundra
(4, 5, 6)
Tundra
(7)
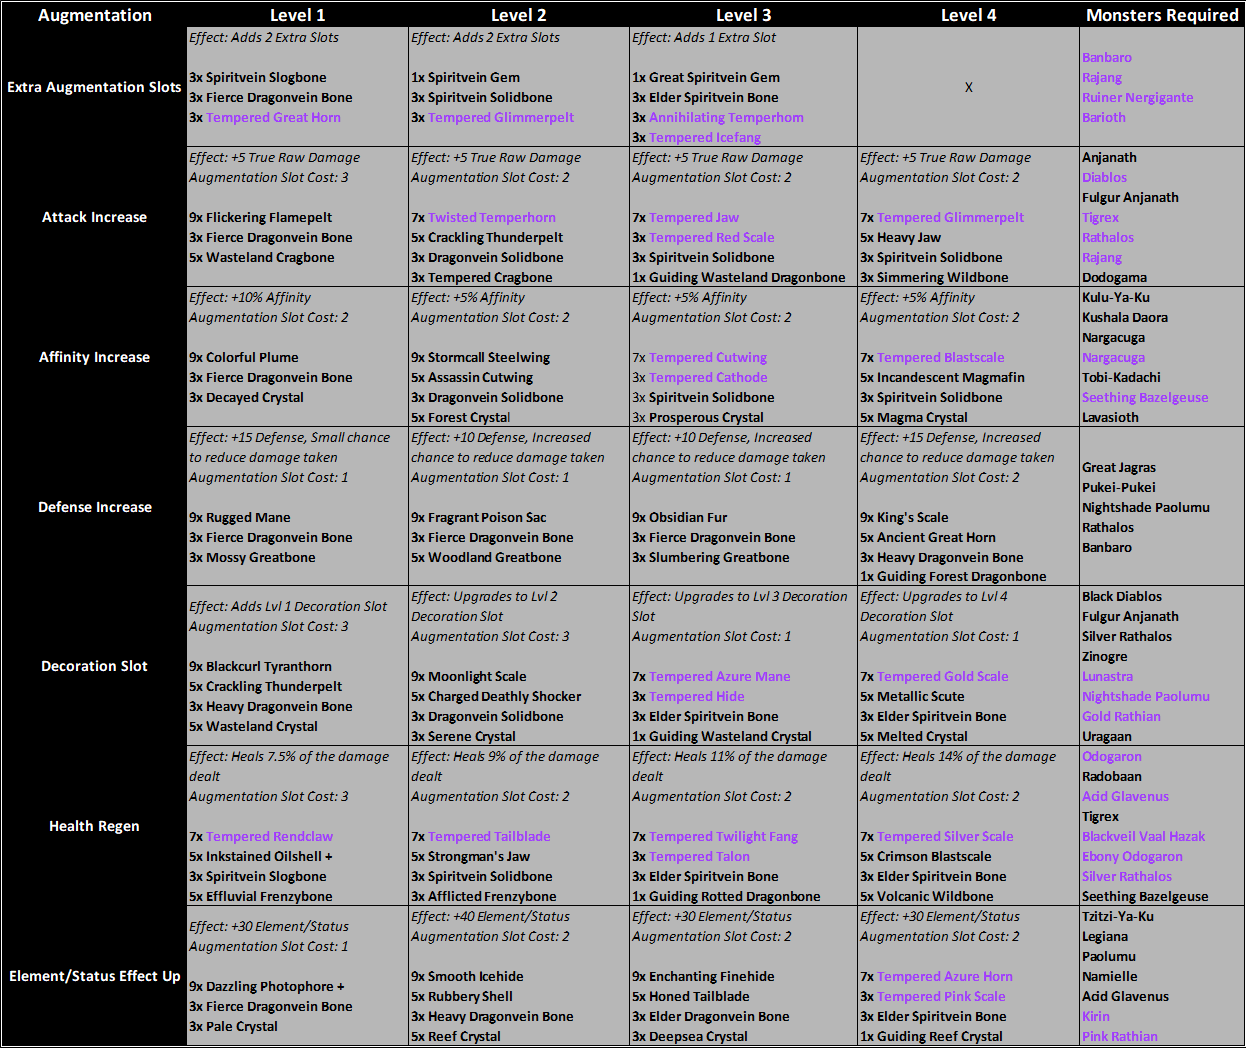
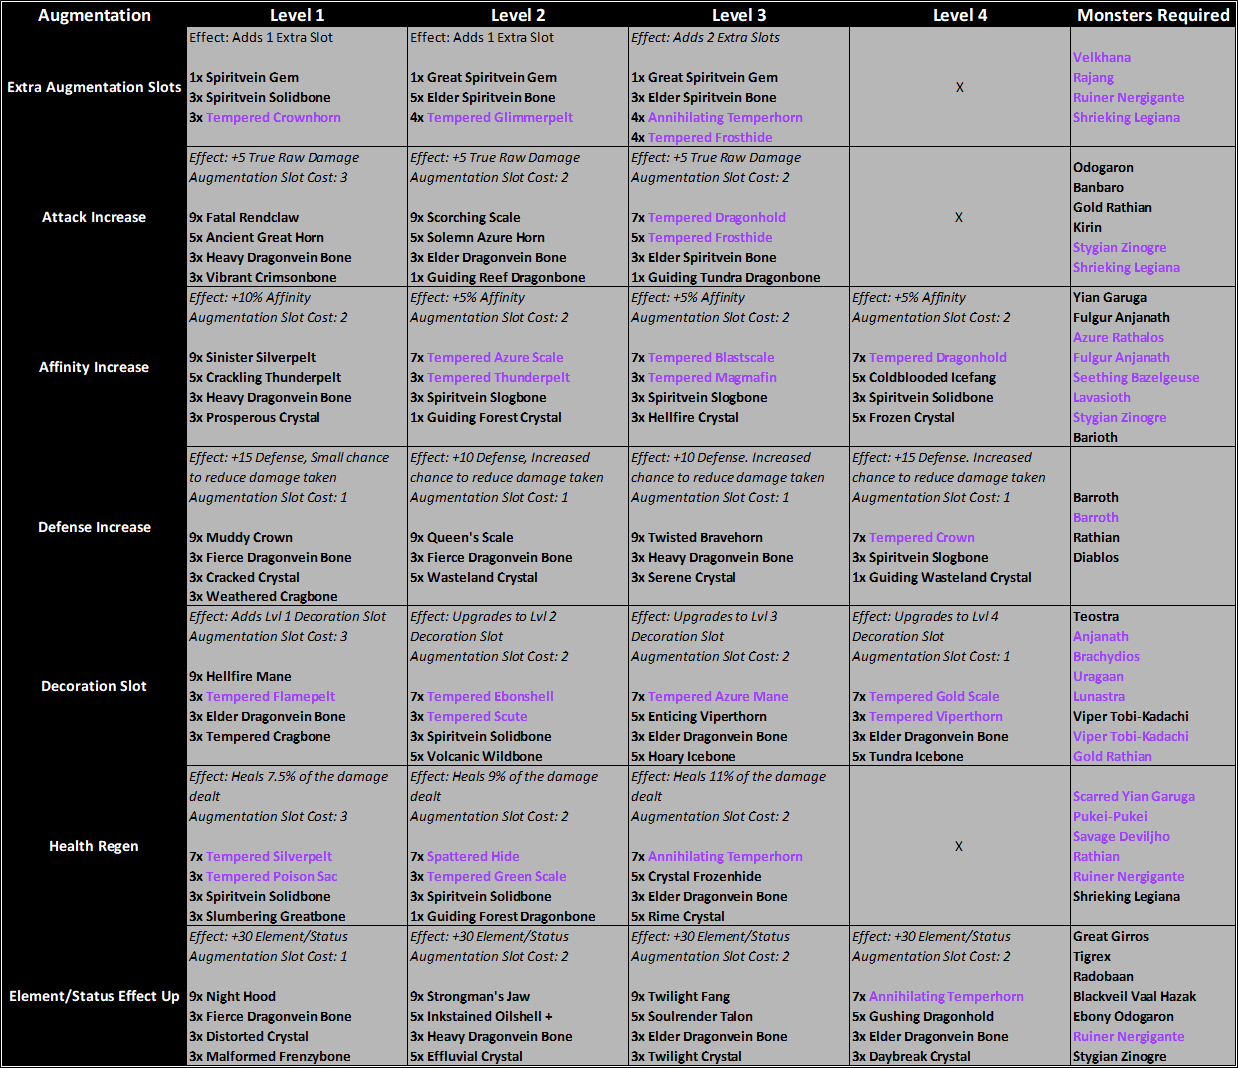
Augmentation
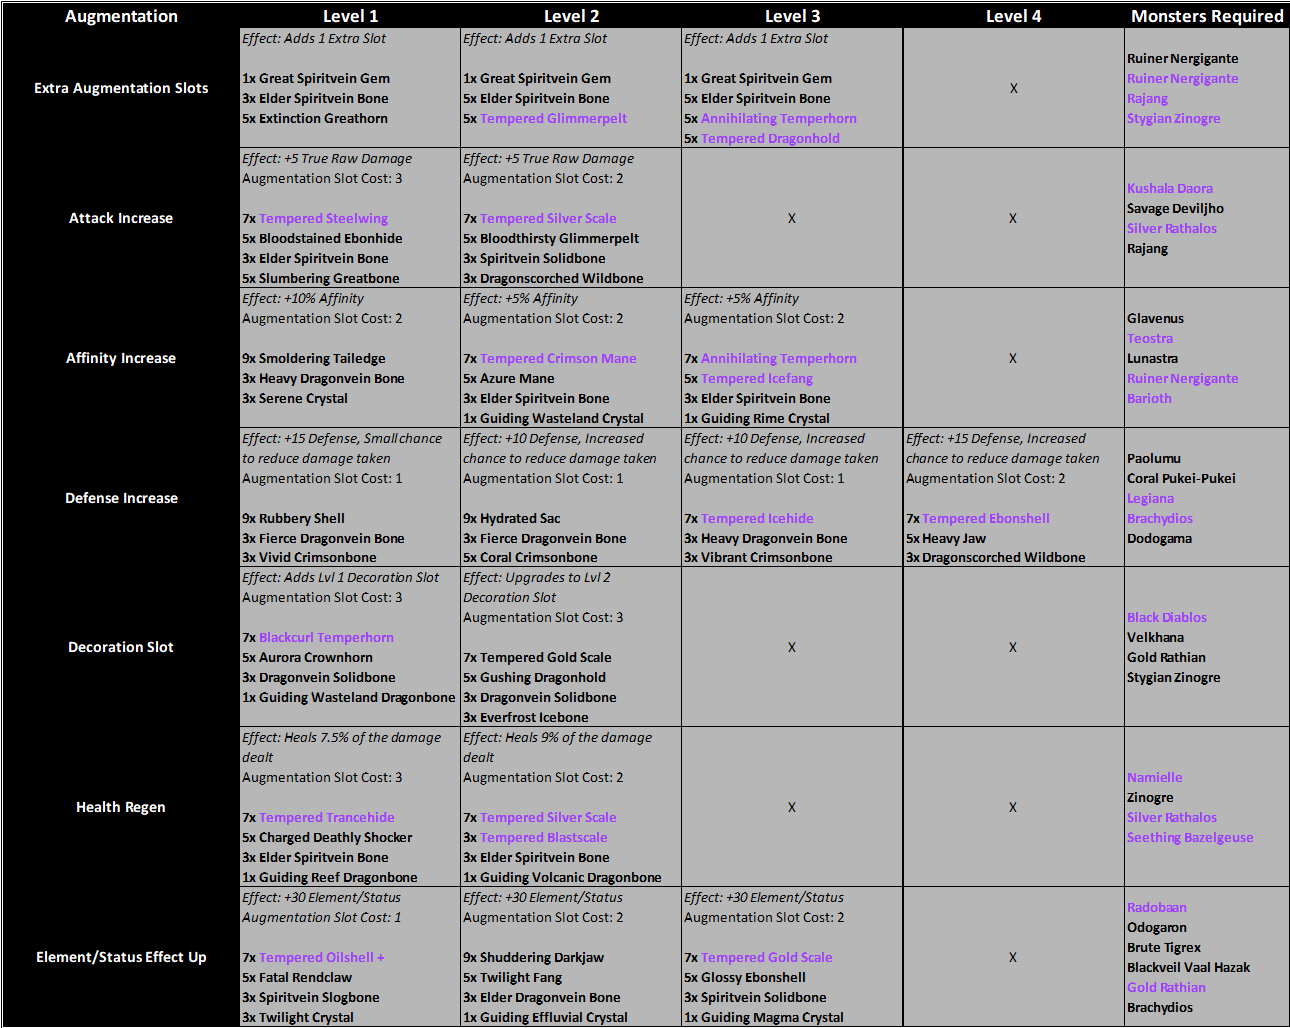
How to Analyze Special Tracks / Lure Out Monsters
As you hunt monsters, break monster parts, and pick up Signs of a Turf War in the Guiding Lands, you may get a progress bar on the side of your main screen. It will say a type of monster such as "Fanged Wyvern" and then have a few dots ending in a footprint.
These are special tracks left by monsters within the Guiding Lands, and are how you come to be able to lure out specific monsters at your leisure. Each dot represents a stage of progress. The monster you can lure out once the analysis is complete will fall under the category of the track.
The length of the bar often will indicate how rare of a monster it is. A Great Jagras may only have 2 dots while an Elder Dragon may have 8. Here's how to progress the analysis level:
- Break Monsters Parts
Find a monster in the Guiding Lands, and break a part. This is the only way to guarantee your current analysis progress level will go up. Also, this only works once per individual monster, so it may be most efficient to go from monster to monster breaking parts. Lastly, try to go after a monster that shares the category of your current track being analyzed for a bonus. For example, breaking a part from Rathalos, a Flying Wyvern, will increase a Flying Wyvern special track progress bar by two instead of one. If you break a part from the monster whose track you're analyzing, it will be completed instantly! - Collect Signs of a Turf War
There are some special tracks marked as “Signs of a Turf War.” Collecting these guarantees at least one track is received, either an entirely new one or progress on a current one, depending on what type of monster left it behind. These Turf War signs will pop up in the same spots, so be on the look out for larger-than-usual piles of remains or goo on walls.
- Kill or Capture Monsters
Killing or capturing a monster in the Guiding Lands only gives you a chance to unlock new special tracks to analyze or increase your current track’s levels, but the type of monster doesn’t matter. - Defeat Tempered Monsters
Defeating a Tempered Monster in the Guiding Lands guarantees that either one of your current analysis bars will be completed automatically, or you'll receive a pre-completed analysis track immediately.
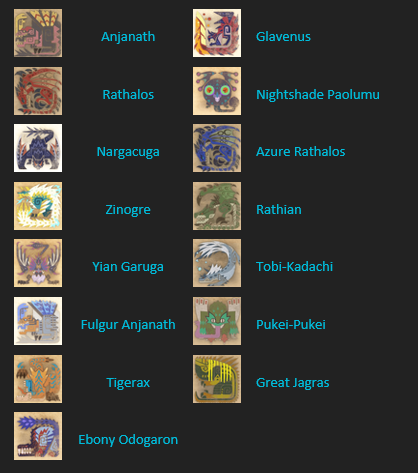
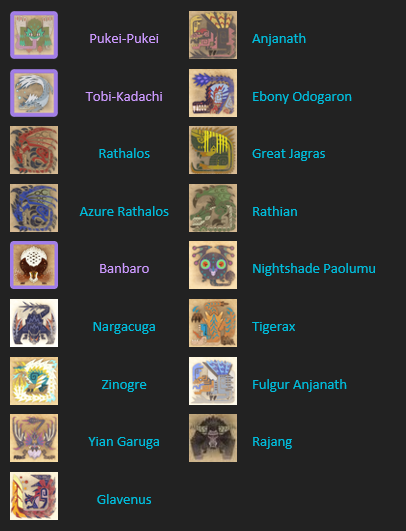
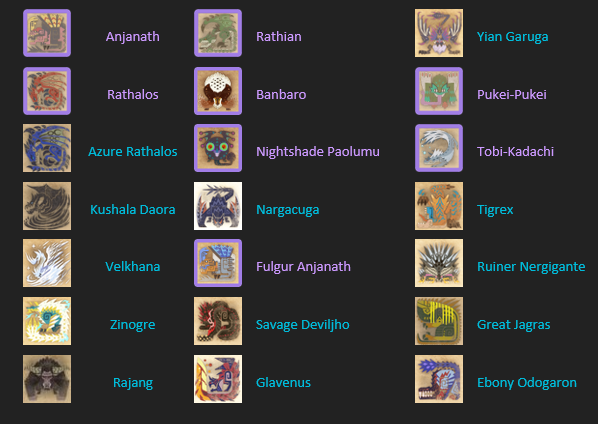
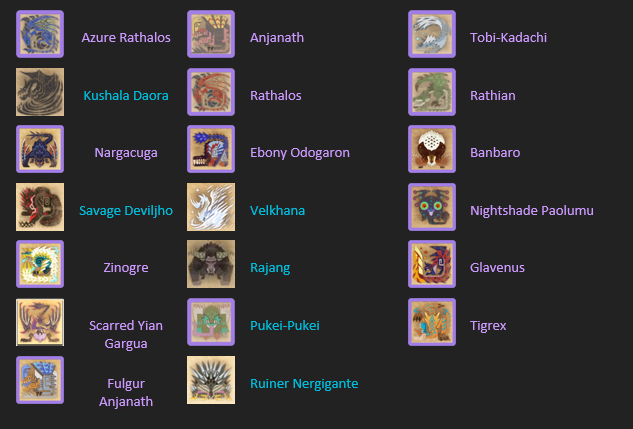
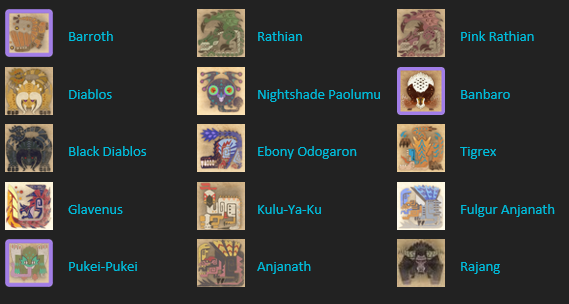
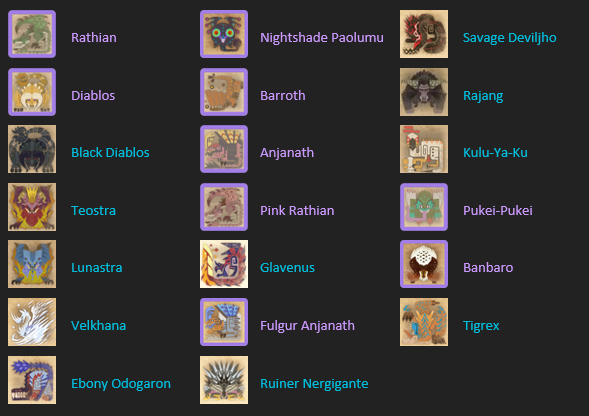
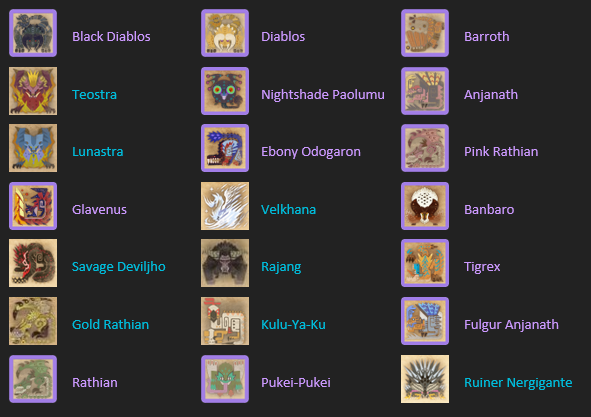
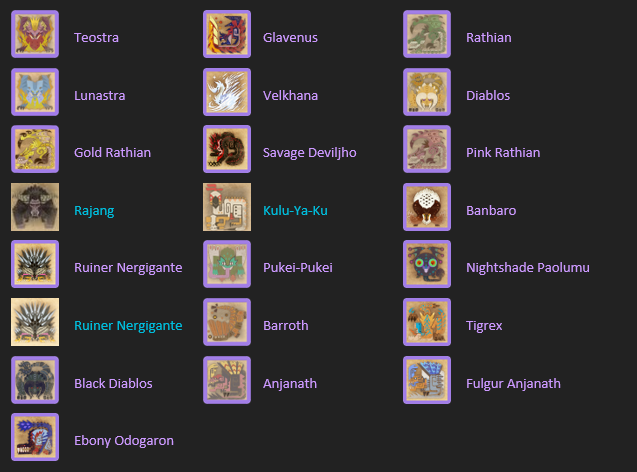
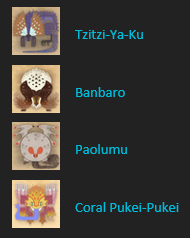
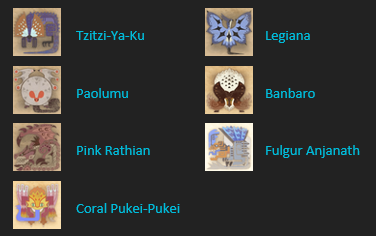
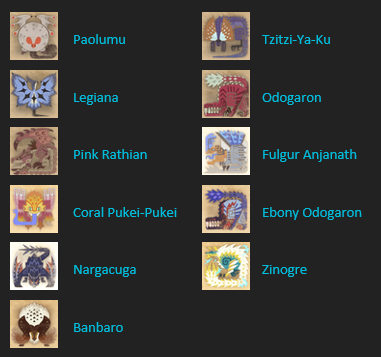
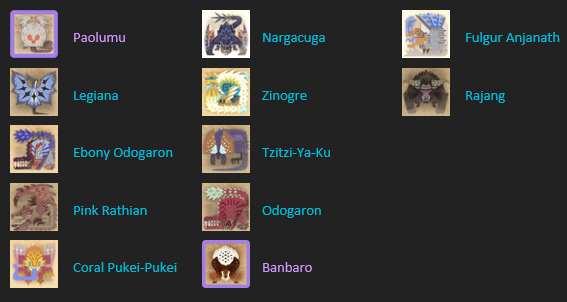
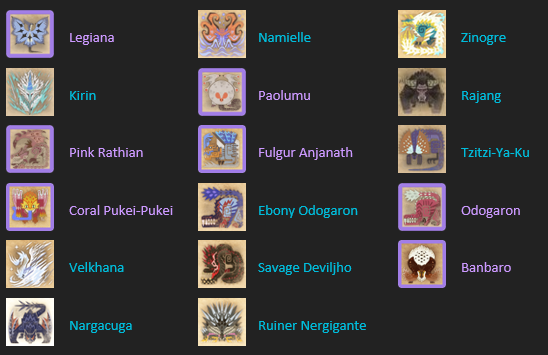
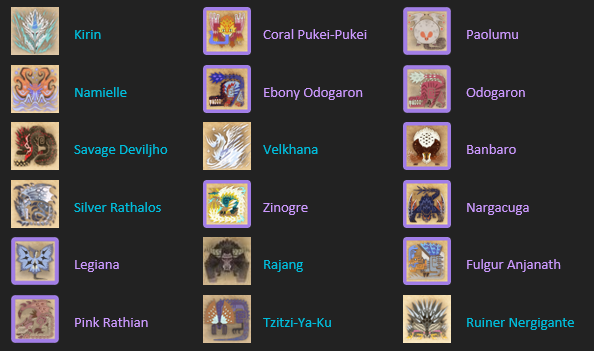
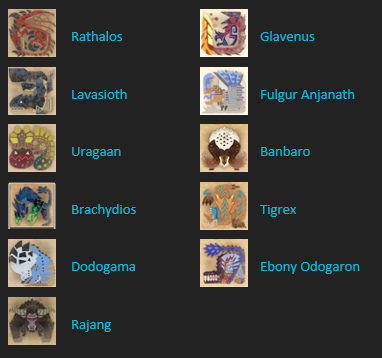
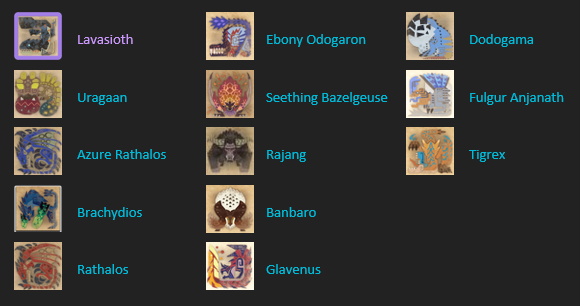
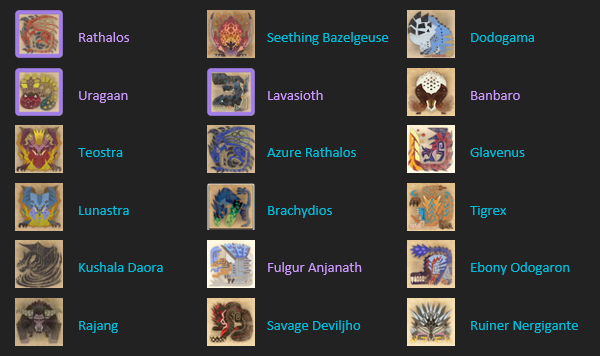
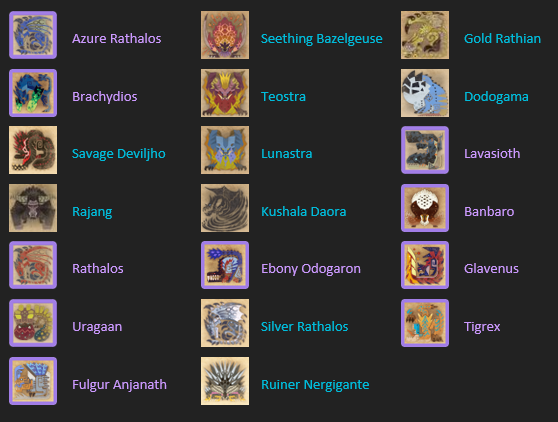
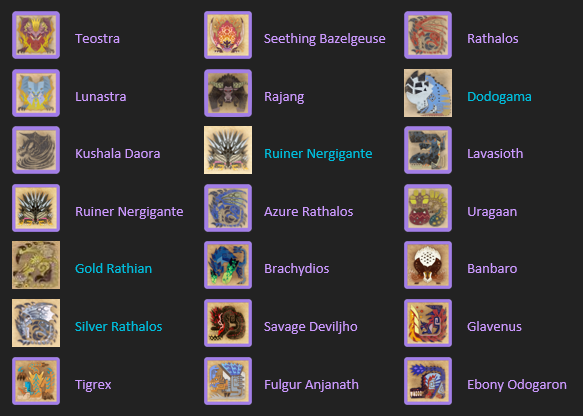
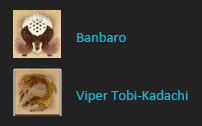
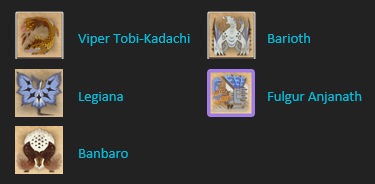
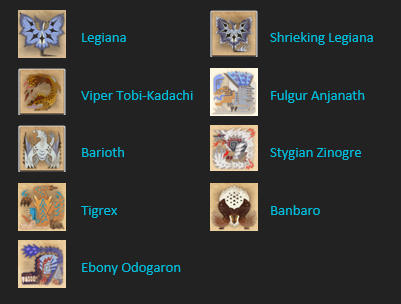
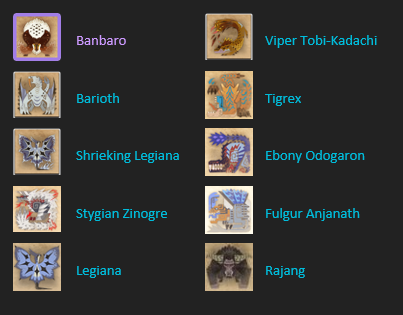
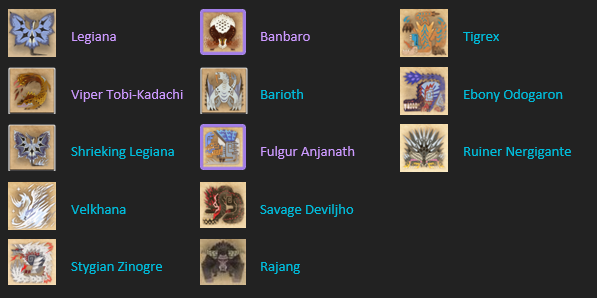
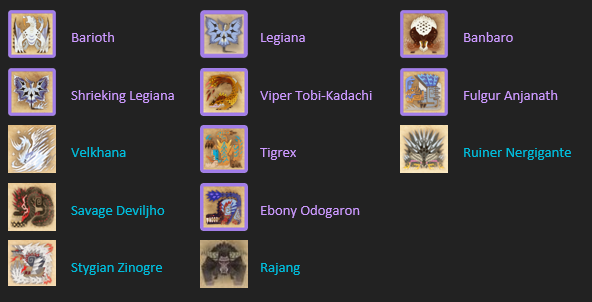
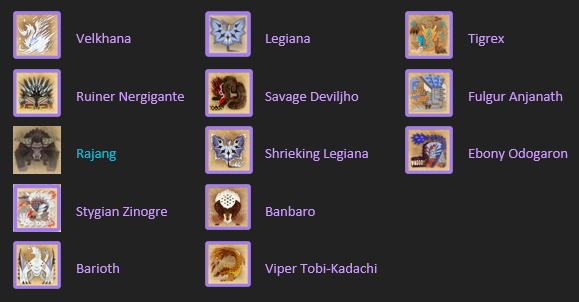
Guiding Lands Regional Monster List
This section lists all the Regions and the monsters found within them at the different levels.
In General:
- At Level 4, Tempered Monsters will begin to spawn
- At Level 5, Elder Dragons will begin to spawn
- At Level 6, Tempered Monsters and Elder Dragon will primarily spawn
- At Level 7, Tempered Elder Dragons will spawn
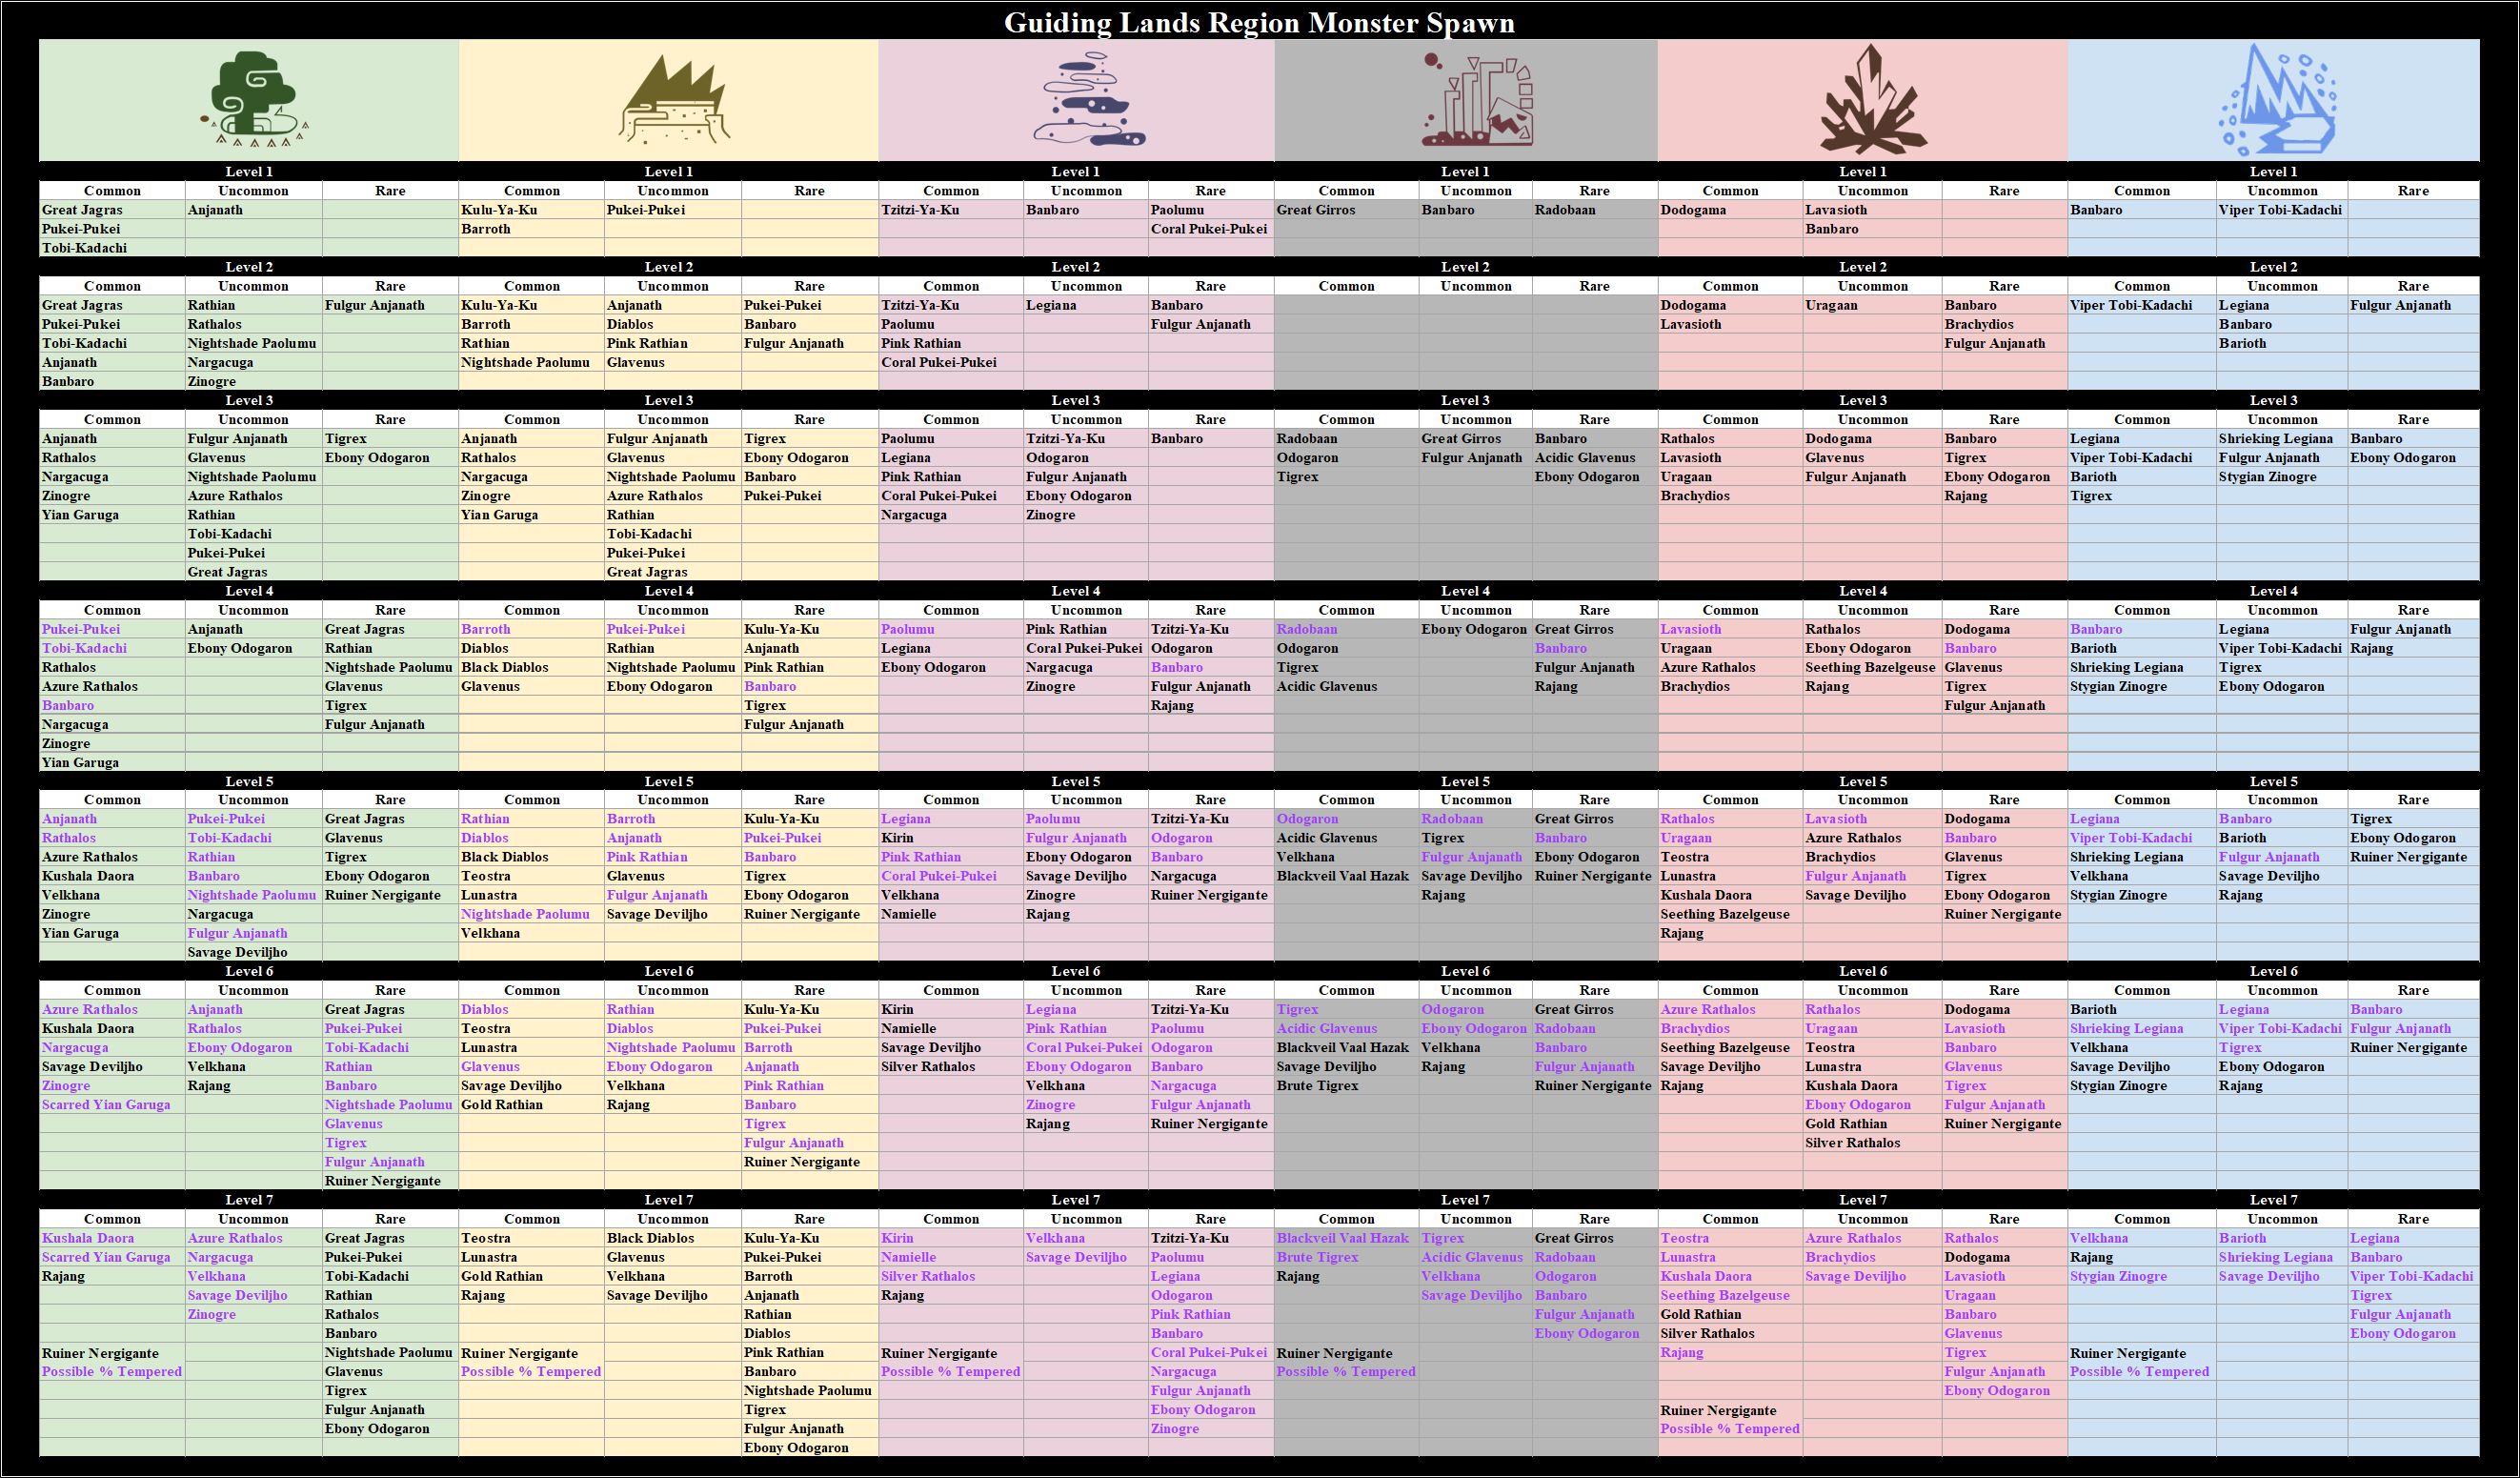
Forest Region
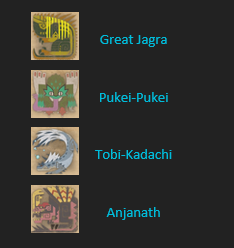
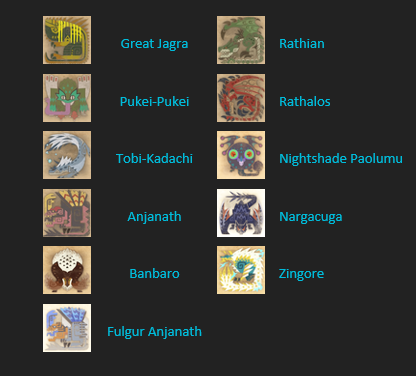
Wildspire Region
Coral Region
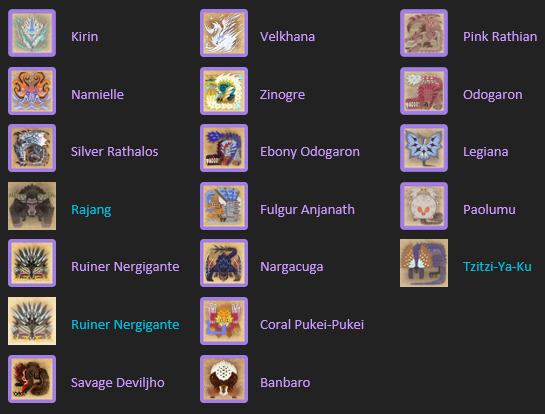
Rotted Region
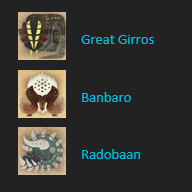
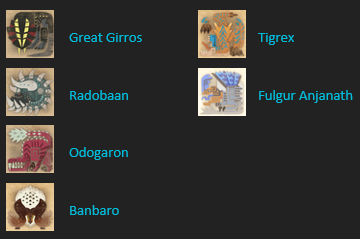
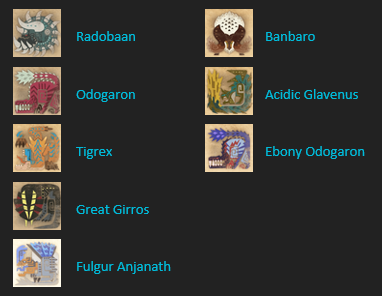
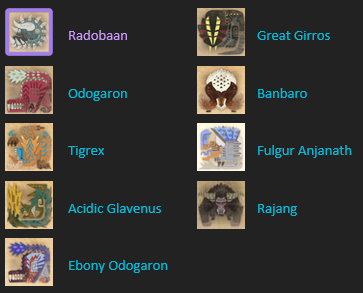
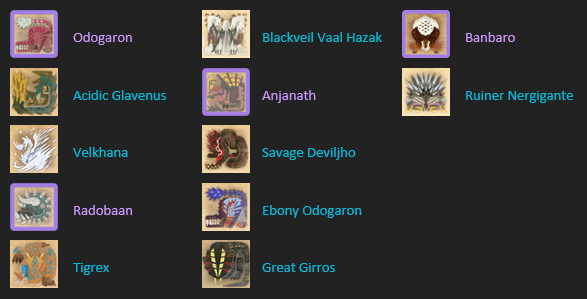
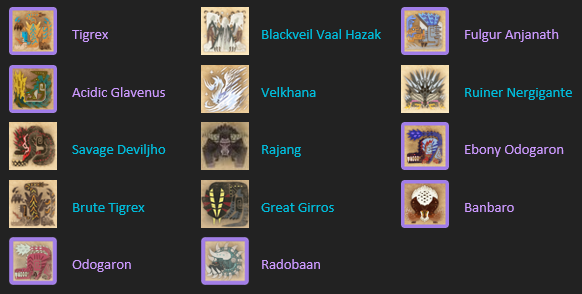
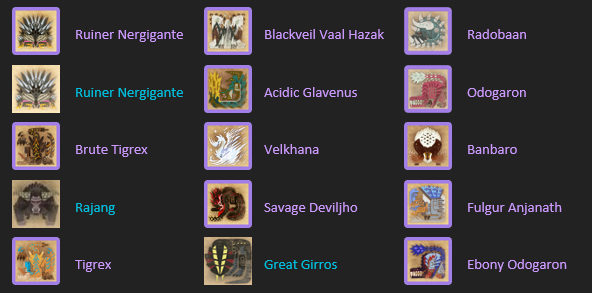
Volcanic Region
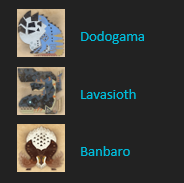
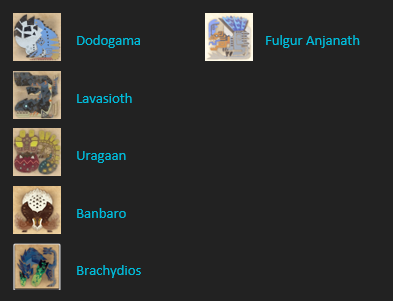
Tundra Region
- Guide to Modding and Recommended Mods★ 5 (1.4k)77k views2.8k ♥100 minUpdated 9 Jul
- Monster Hunter: World - 100% Achievement Guide★ 5 (2.3k)72k views5.3k ♥14 minUpdated 21 Mar, 2025
- 休闲游戏玩家 MOD推荐★ 5 (1k)45k views2.6k ♥1 minSimplified ChineseUpdated 18 Sep, 2022
- The Hunter’s Handbook: A Beginner's Guide to the New World★ 5 (1.4k)39k views2.8k ♥110 minUpdated 22 Feb, 2025
- All about Crowns 👑★ 5 (1.3k)38k views2.8k ♥8 minUpdated 18 Sep, 2022
- Monster Hunter World: Iceborne [DLC] - 100% Achievement Guide★ 5 (1.3k)34k views3.4k ♥19 minUpdated 21 Mar, 2025


- Upgrading to PremiumTeam Fortress 2★ 5 (20k)1441k views11k ♥6 minUpdated May 11, 2022
- No More Room in Hell Official ManualNo More Room in Hell★ 5 (2.8k)569k views2.1k ♥29 minUpdated Apr 22, 2019
- NMRiH Community Hosting GuidesNo More Room in Hell★ 5 (526)351k views653 ♥1 minUpdated Aug 10, 2022
- Лучшие кооперативные игры SteamPAYDAY 2★ 5 (1.5k)315k views2.1k ♥56 minRussianUpdated Apr 27, 2025
- Desert Eagle Heat Treated | Blue GemCounter-Strike 2★ 5 (1.6k)292k views1.5k ♥2 minUpdated Jan 16
- Treasure Hunt Puzzle SolutionsTotal War: WARHAMMER II★ 5 (6.9k)281k views15k ♥3 minUpdated Aug 19, 2021






This guide was created by its original author on the Steam Community. Are you the author and want it removed? Request removal.