Tips for the Hard Achievements
Before You Start
Before you start I would advise playing through the game and reaching both endings through normal play before you start trying to get any of the extra challenge achievements. This will clear out a lot of the basic achievements and give you good progress towards both the "addicted" achievement and the "seen it all" achievement. Furthermore, having a good grasp of the game and how to play it well will certainly help with some of these trickier achievements later on. There are many other guides covering the basic progression of the game and how to get the secondary hell ending, that's not the focus of this guide. All achievements are listed below in the order I think is best to complete them.
Speedlunky
 I think this is the best one of the extra challenge achievements to start with as I think it's the easiest and will teach you some useful skills that will make the rest of the achievements easier as well. The game only has four zones with four levels each including the final boss Olmec, which is all you need to complete for this achievement and for any of the other challenge achievements that stipulate completing the game (low scorer and good teamwork specifically). So that works out to 16 levels total, meaning you have 30 seconds per level (minus the ten seconds you have to sit through for the cutscene on Olmec), while that again might sound like nothing when you try it you'll find it's actually nowhere near as bad as you'd think. Below are a bunch of tips and tricks I found really helped me out in getting this achievement, and it only took me a few hours of serious attempts to get it.
Movement Tech:
I think this is the best one of the extra challenge achievements to start with as I think it's the easiest and will teach you some useful skills that will make the rest of the achievements easier as well. The game only has four zones with four levels each including the final boss Olmec, which is all you need to complete for this achievement and for any of the other challenge achievements that stipulate completing the game (low scorer and good teamwork specifically). So that works out to 16 levels total, meaning you have 30 seconds per level (minus the ten seconds you have to sit through for the cutscene on Olmec), while that again might sound like nothing when you try it you'll find it's actually nowhere near as bad as you'd think. Below are a bunch of tips and tricks I found really helped me out in getting this achievement, and it only took me a few hours of serious attempts to get it.
Movement Tech:Finishing the game fast is all about moving fast! Therefore learning some more advanced ways to move can help you speed up your gameplay considerably!
- Fall Damage Cancelling:
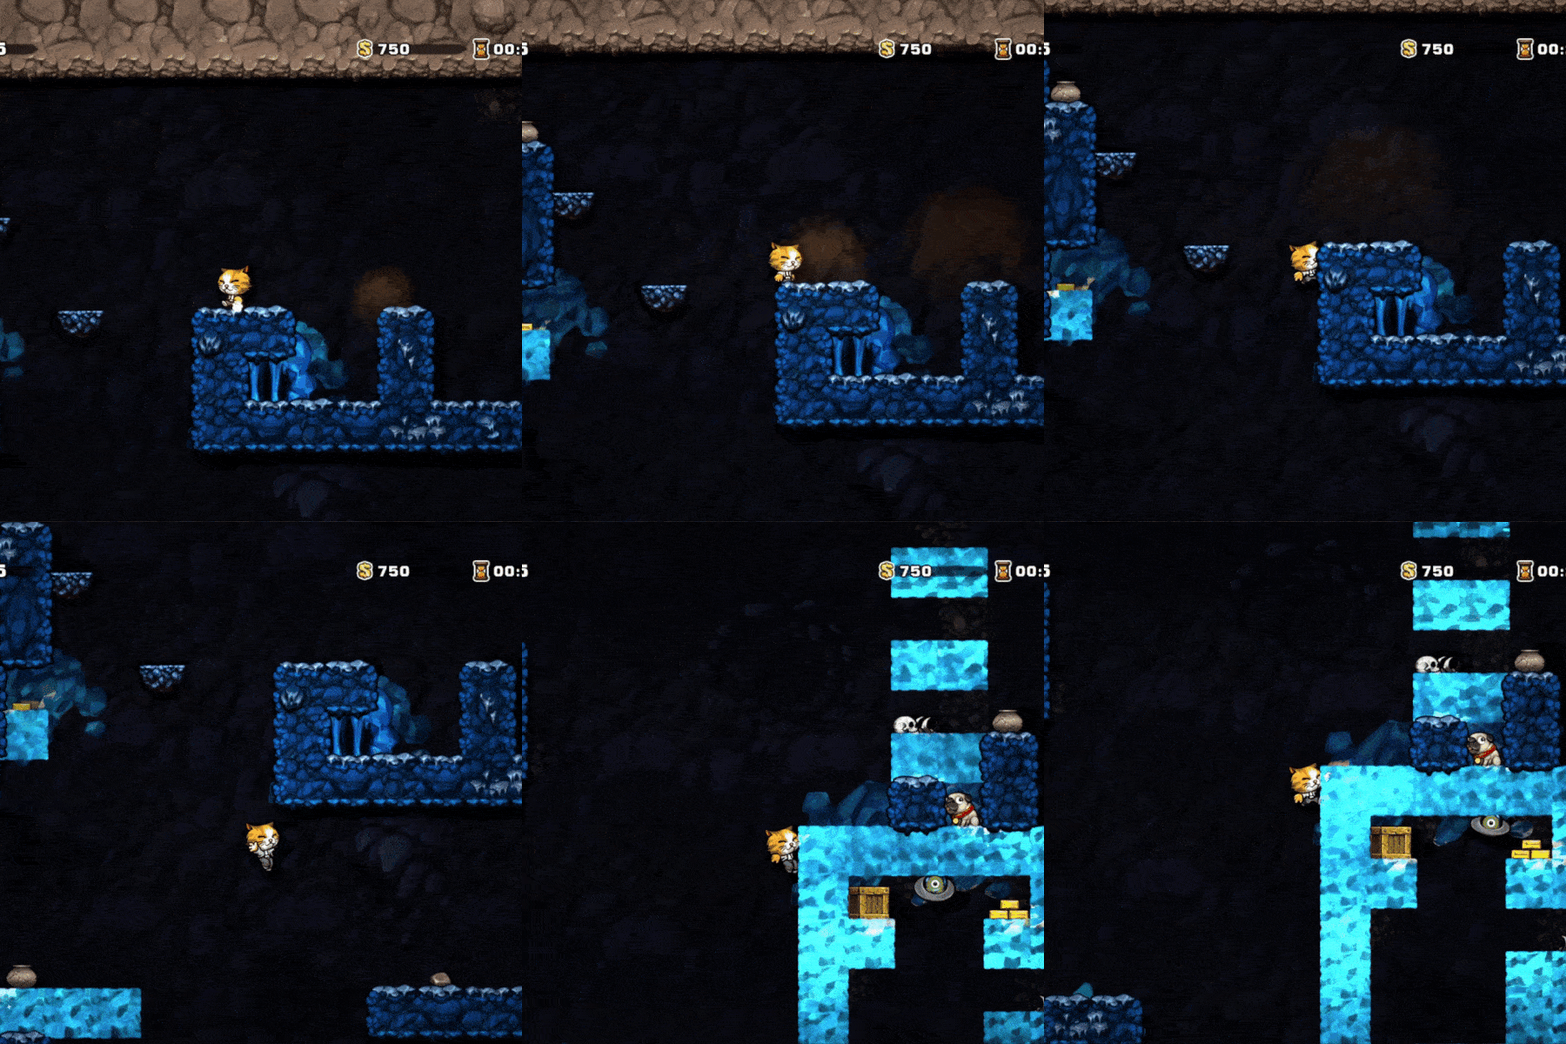
Fall damage can be really annoying when trying to speedrun as often the fastest way down is just dropping, but dropping from a high enough height can easily get you killed as it stuns you. Therefore you should be looking out for a specific scenario. When you are in the ledge hang state you do not take fall damage no matter how far you fell before grabbing a ledge, therefore if there is any block edges below your drop you can use them to cancel all fall damage. This can be made even easier if the ledges are in line, as if you hang off the top ledge then just press down and jump to drop off it then just don't press anything else the game will automatically make you grab the ledge below as you fall by! This can be super useful speeding up both the jungle and the ice caves as both often have large drops in them. - Shotgun Jumping:
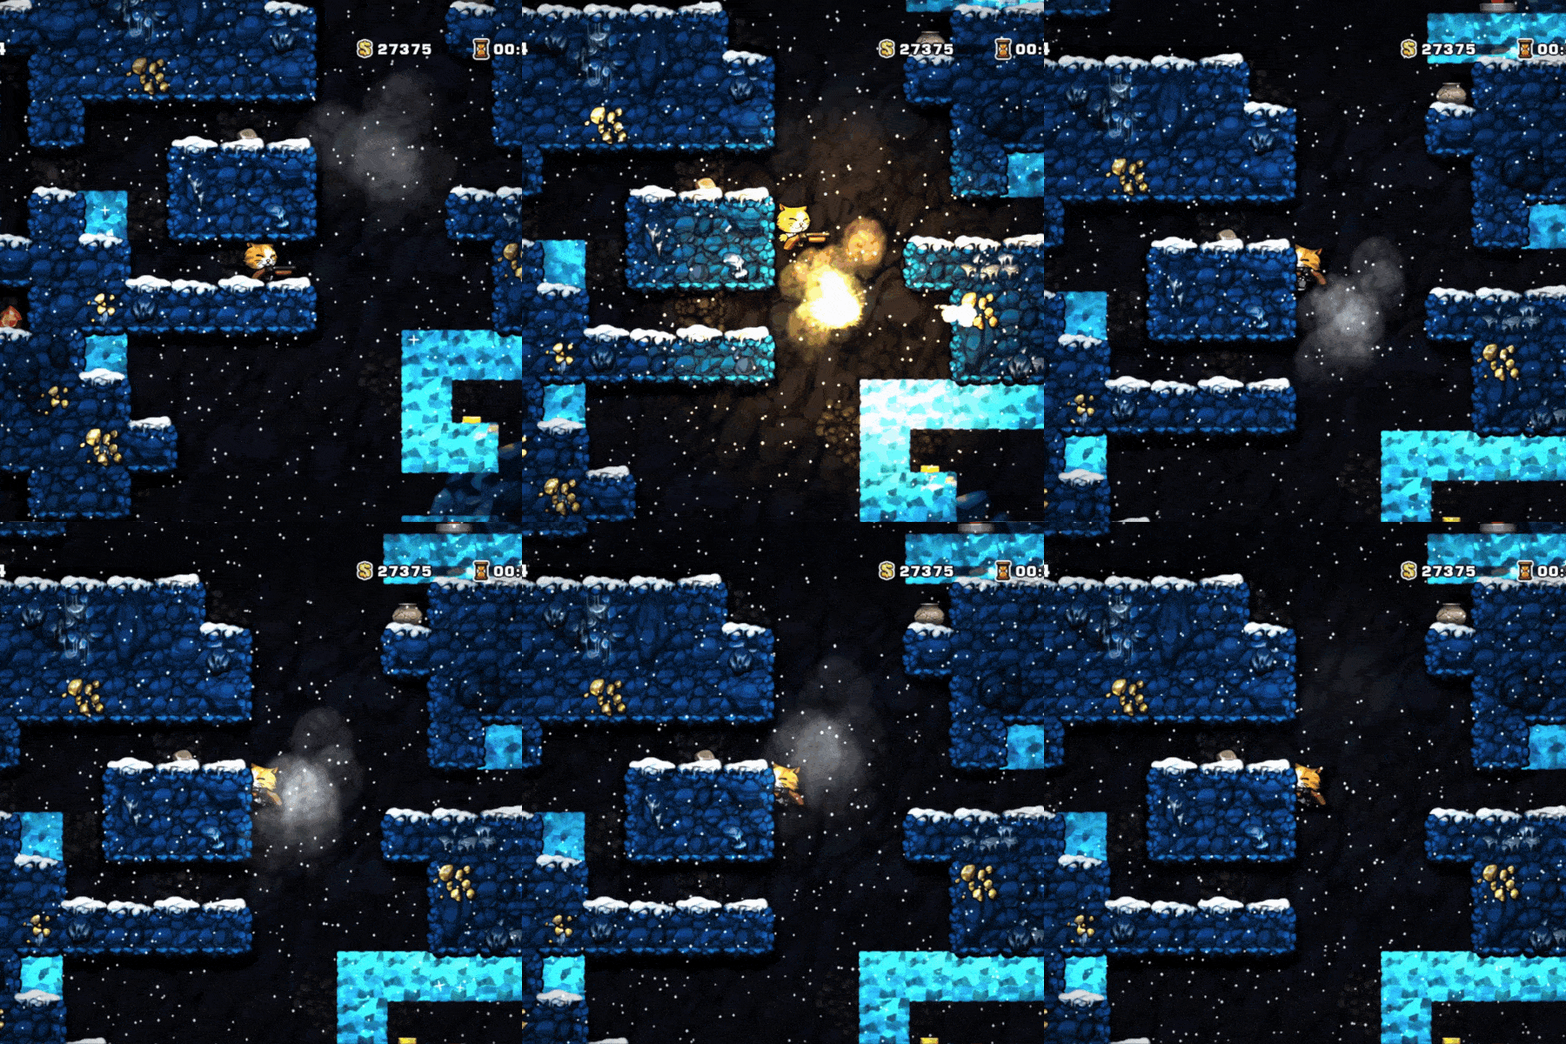
If you are lucky enough to have found any of the guns (this trick works with the web gun and the ice ray not only the shotgun) then you can use them to get an extra block of jump height! If you hit jump just barely after you hit shoot the recoil will give you just enough height to grab a ledge one block higher than your current jump height, so 3 blocks normally or even 4 blocks if you have the spring shoes! If you get good enough at it you can even do it around edges as well!
Treasure/Damsels:
The general idea is to ignore EVERYTHING from treasure to damsels to shops unless it is directly in your path. Basically grab any treasure that is easy to just walk over on your way to the exit and this can come in handy as in the next section I'll list the items that can be really helpful in going fast. Grab the damsel if she's easily within reach on your way to the exit as you can often use your health as a resource by jumping down long distances and taking fall damage to save time navigating a safer route down.
Here are the items I have found to be the most helpful for going fast:
- Compass, one of the most useful items, as all you are trying to do is get to that exit, so knowing exactly where it is can save you a ton of time!
- Cape, lets you fall any distance without taking fall damage and negates spikes, especially useful in the ice caves as you can often fall right to the exit in literal seconds
- Jetpack, same reasoning as the cape, but you can't bypass spikes, not super impactful so really it's personal preference on which you think will make you faster
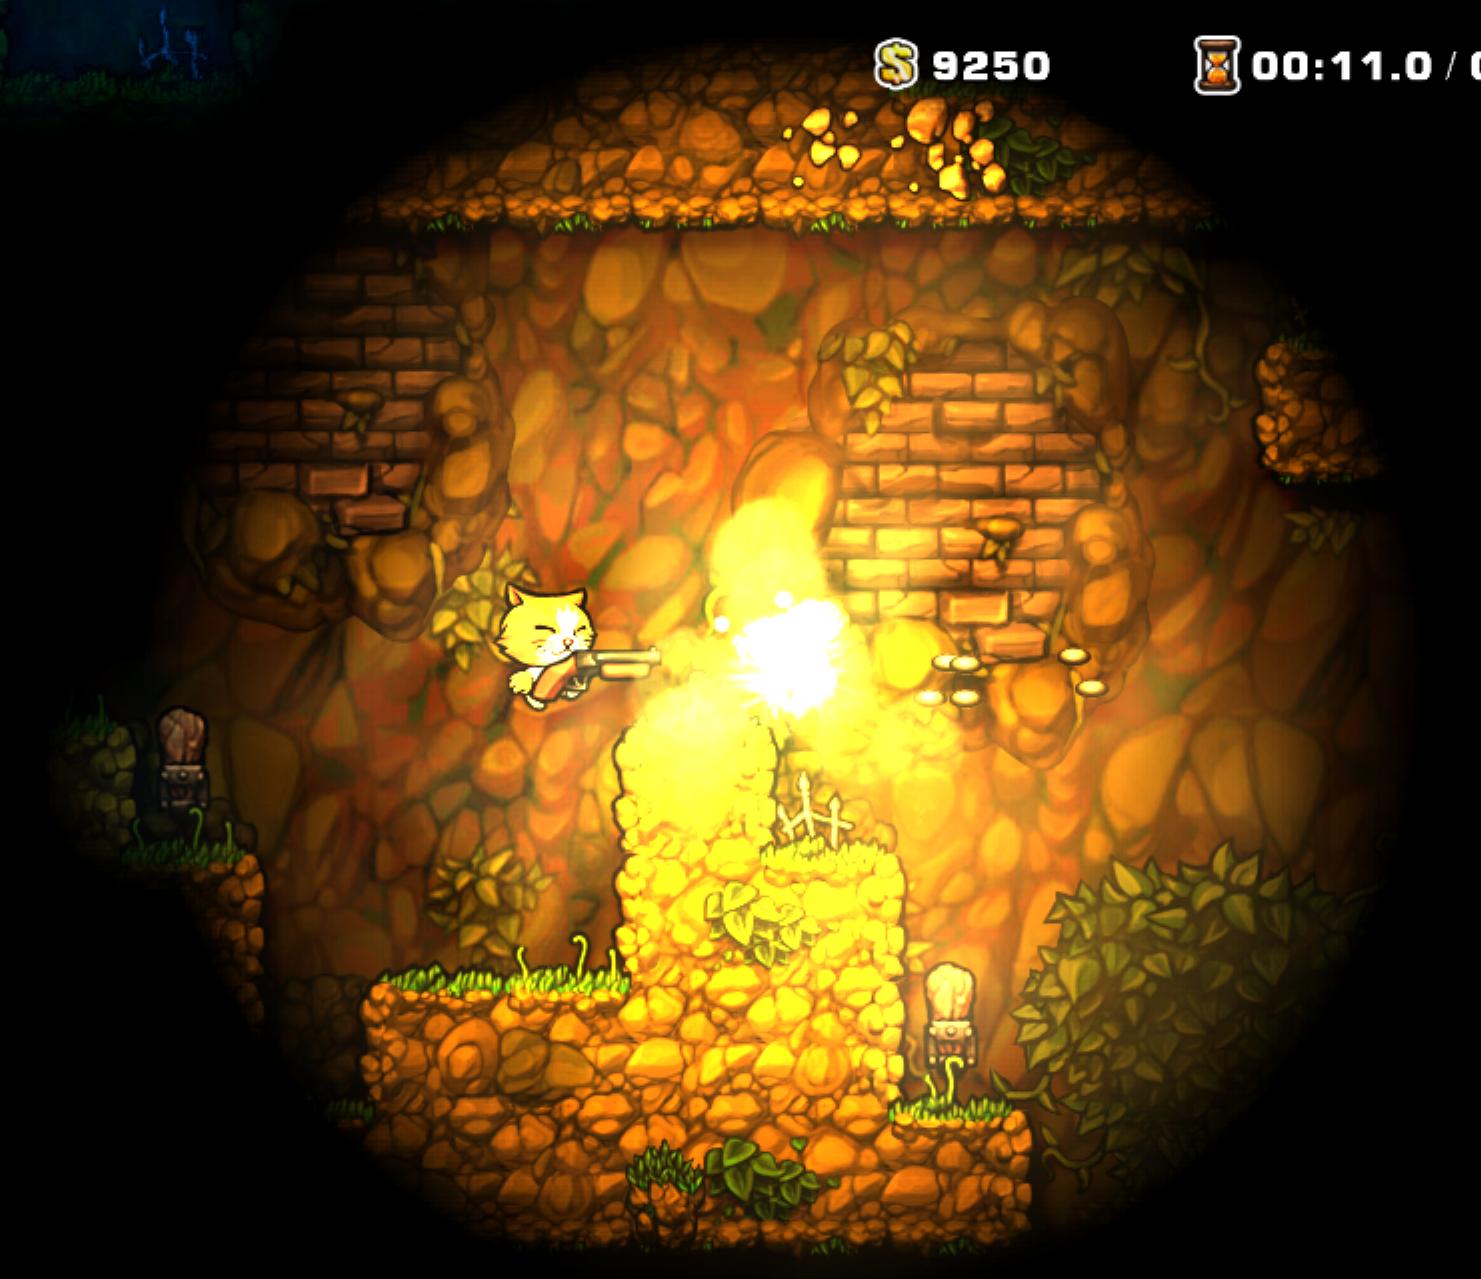
- Shotgun, as shown in the movement section it can be a replacement for the spring shoes, and can help with mummies and Anubis blocking your path in the temple, furthermore, on dark levels you can use it as an alternative to carrying the torch, overall very useful and versatile item
(shooting the shotgun provides light in dark levels) - Spring Shoes, sometimes the extra jump height can help you bypass enemies or hazards that would otherwise have required a bomb or rope
- Paste Jar, being able stick bombs to walls or ceilings can sometimes really speed up a level letting you more easily bomb to the exit, also more easily blowing up mummies and anubis can really speed up the temple levels
Special Note on the Black Market:
The black market can actually be great for a speedrun because you can just blitz top to bottom in seconds or you can use it to try and get some of those useful items really fast, but again, it's not worth going too far out of your way to get. If you see the key in the mines and it's on your path, then grab it and hope you find the chest, but if you don't, then don't worry about it, but you can still look out for the black market in the jungle, so look for those distinctive leaves that show up around level exits poking out from behind blocks!Arrow Traps:
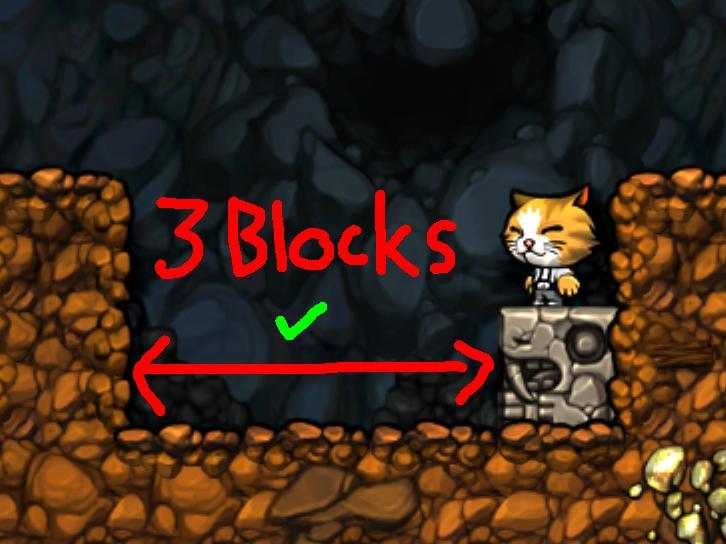
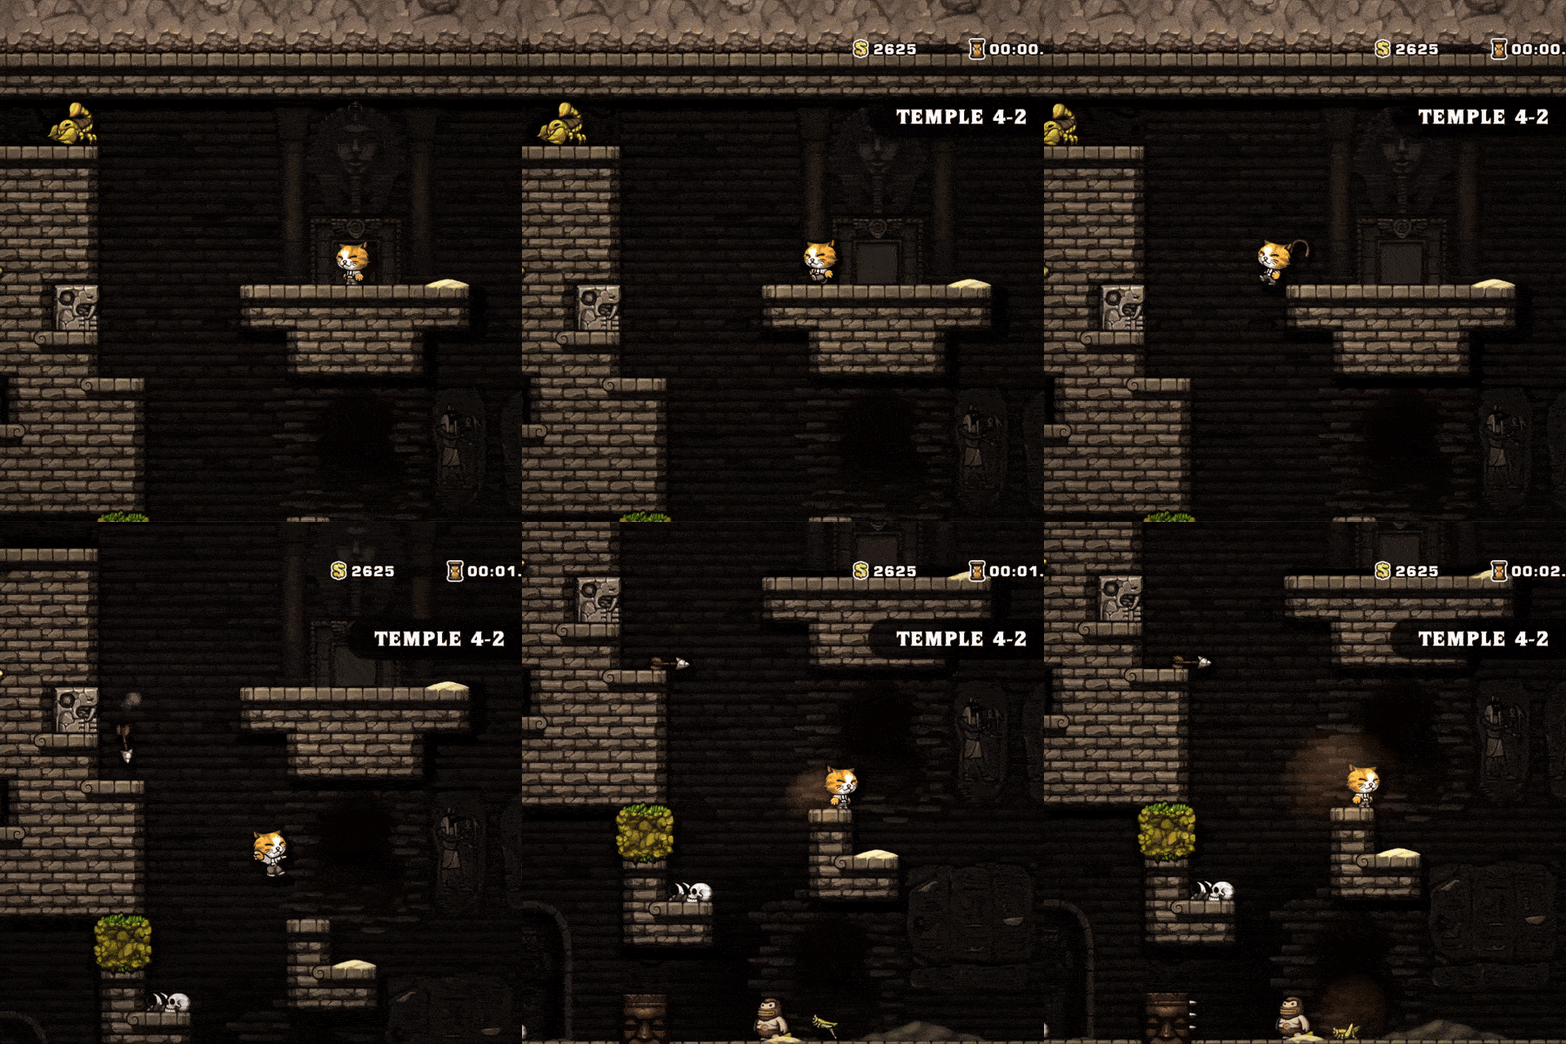
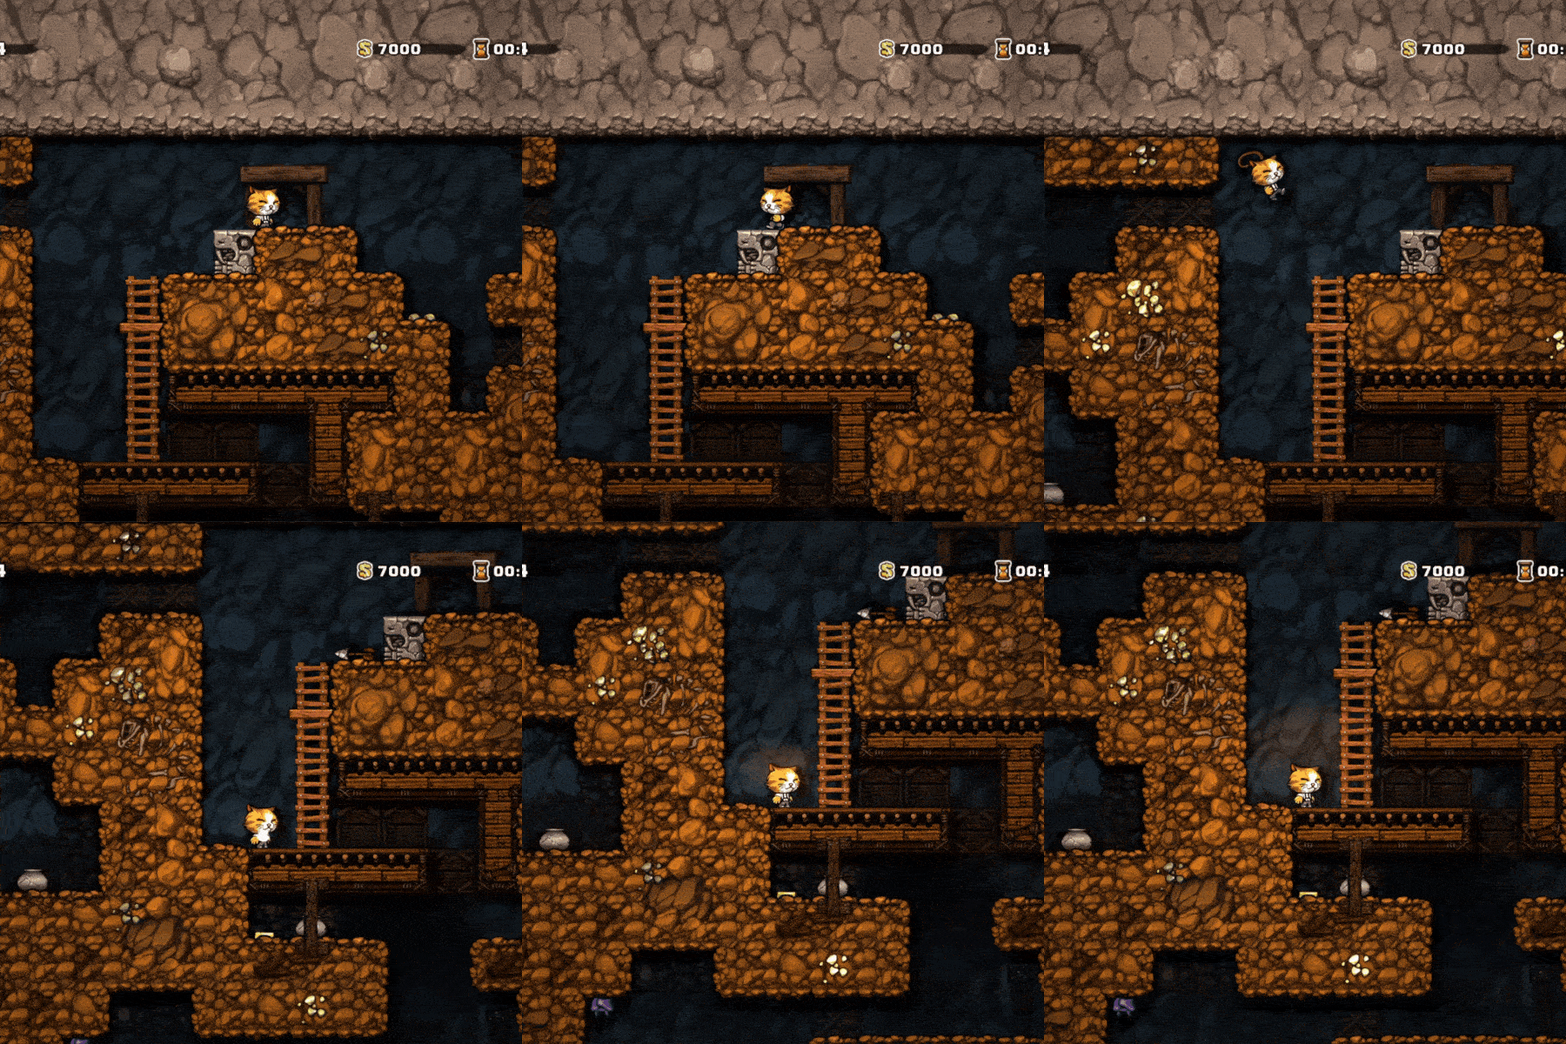
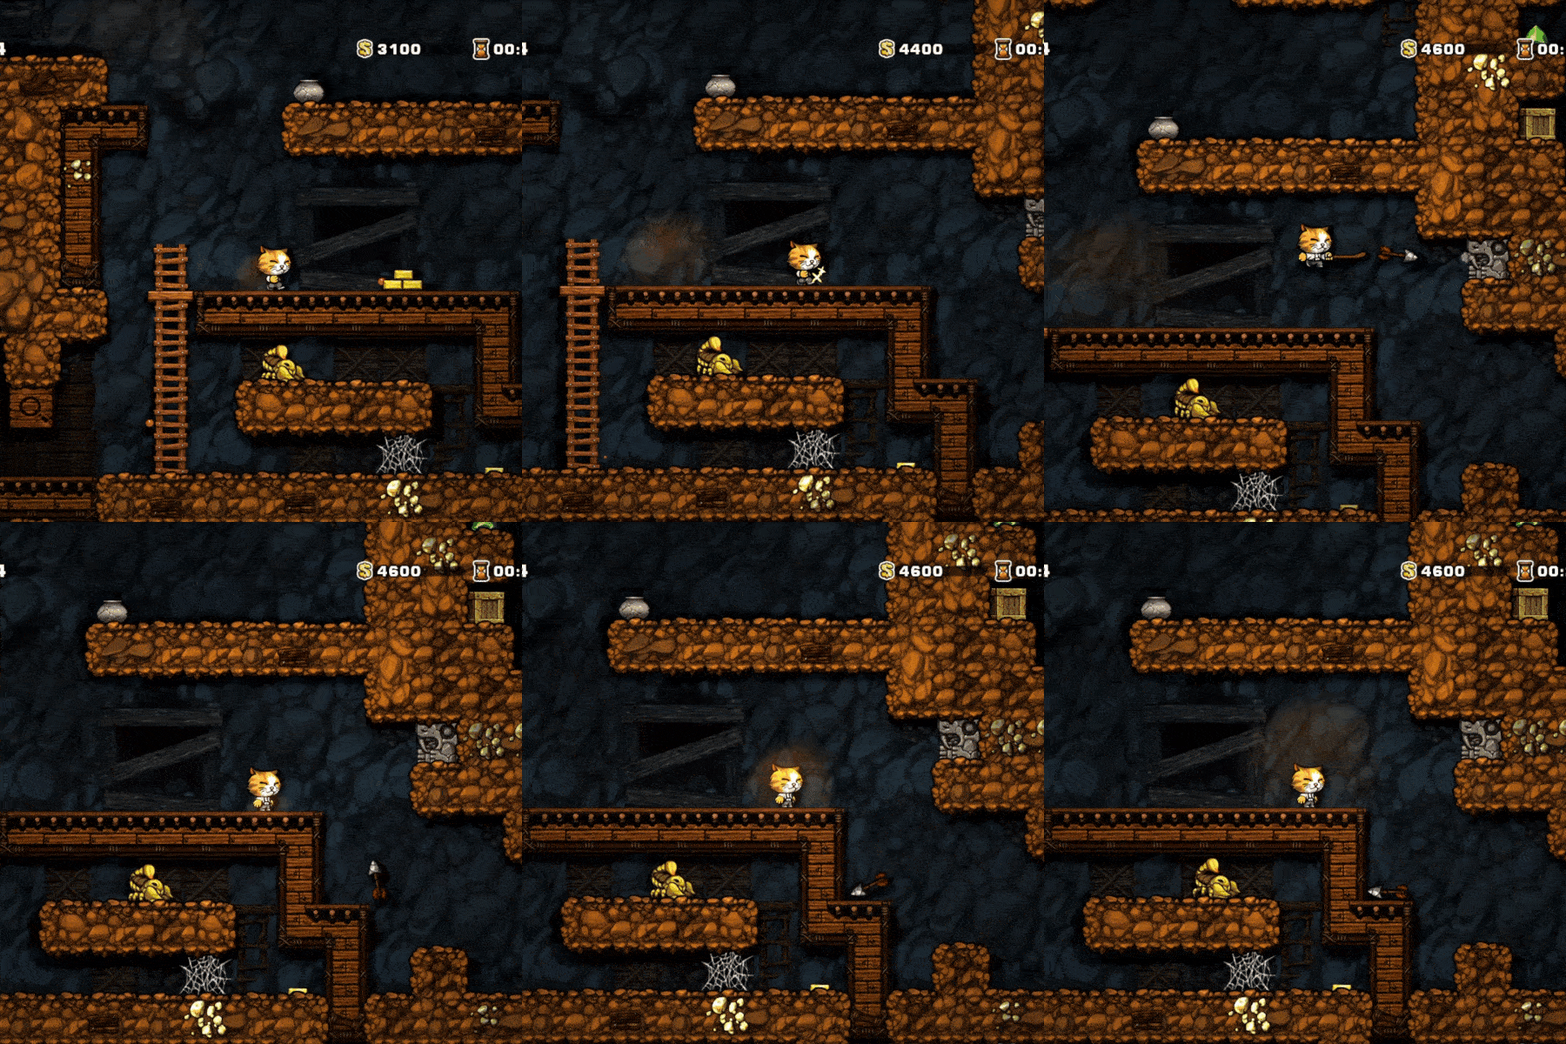
When going fast Arrow traps can be an issue as you have to either slow down and find some thing to throw in front or waste a bomb/rope to disarm it. However, there is a cool trick where you can actually disarm most dart traps without using any items! All you need to do is start your whip animation just before you come in line with the arrow trap, and the arrow will get pushed away from you by the whip. There are a few things you need to keep in mind though! First off, this only works if there is at least 3 blocks of space after the arrow trap, as you have to be in the third space or further to have enough time for the whip to hit the arrow.
Secondly the timing will be a little different if you are dropping in front of an arrow trap vs if you are jumping past one then hitting the arrow behind you vs jumping up into the path of a dart trap, all work, but all will have a slightly different timing to them.
falling into the trap
jumping over the trap then hitting the arrow behind you
jumping into the trap Olmec:
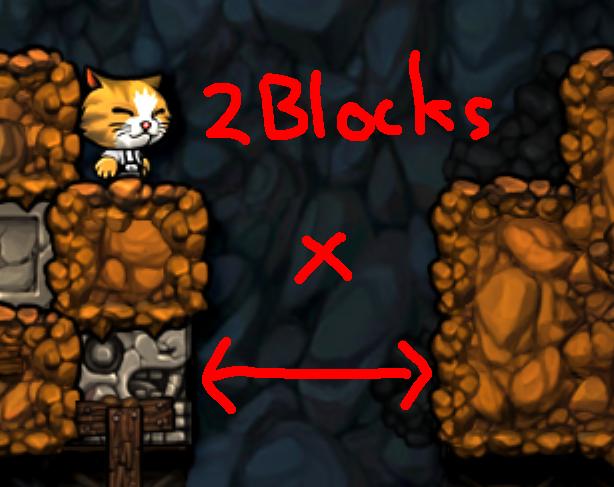
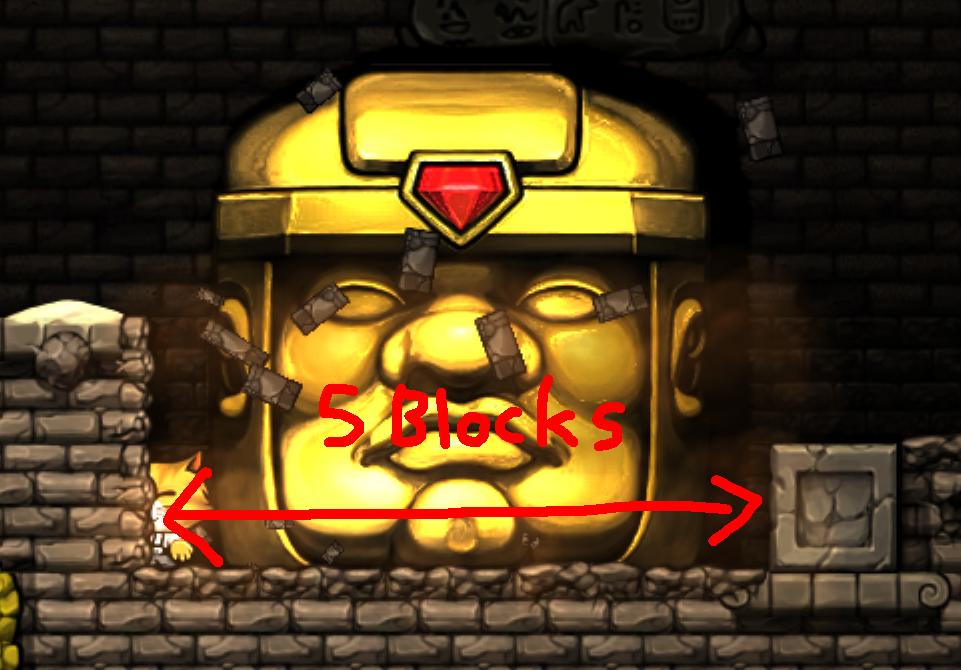
The last true challenge of this run, how do you kill Olmec fast? Well the method is actually very simple, but the execution can be somewhat tricky. What you want to do is get olmec inbetween the seams of the block grid the arena is made out of, so that he is punching a 5 block wide hole into the floor rather than a 4 block wide hole, as this will give you just enough space to sit in that extra 5th block and just repeatedly run under then out again to keep him just slamming in place and can get him to the bottom extremely quickly! The one thing you have to watch out for is the basic enemies Olmec spawns as he slams, you have to use ropes to get them as they fall if any make it into the same hole that you are in. Then finally, once you are at the very bottom, put a rope up to climb out as Olmec will destroy the floor you are standing on!
Low Scorer
 This is definitely my LEAST favorite achievement as with the others there is a margin for error, but with this one you have to be perfect, as a single piece of treasure will void the whole run, even if you spend it somewhere, simply picking up any treasure will forfeit the run. I recommend doing this one right after speedlunky as you will be using mostly the exact same techniques! My best advise is to just go slow, whip any treasure that can't be avoided to push it in front of you and look carefully any time you jump down from a ledge to make sure you aren't gonna land on any off-screen treasure! Also, the tops of the jungle trees can perfectly hide a single gold nugget, so just be wary of the tree tops in general. Below are some more specific tips I found helped me out as I progressed:
- More Movement Tech!
There is one final piece of movement tech, but it's far more applicable for this challenge than for the speedrun challenge, as it's slow and situational. If there are spikes one block below a block you can stand on, then you can actually get into the spikes without taking any damage! All you have to do is crouch, then crawl towards the lip of the spike pit and let your character do the vault over the edge animation, then when you drop out of the ledge hang state you will be in the spikes without taking any damage! Very useful if an important item falls into spikes, or if you want to avoid something above the spikes. - Items:
Because you get no treasure, that means no shops! so you really want to prioritise going for any crates you find as they will be your only source of items throughout the run! To help with this, I would actually recommend going for the Udjat Eye whenever possible as it will show the rare times when an item is hidden in a block and you can try to bomb for it, also having the Udjat Eye/glasses can really help you avoid accidentally blowing up a block containing a gem and accidentally picking up treasure that way. - Olmec:
Olmec crushes anything underneath him, including treasure! So assuming you haven't gotten lucky enough to just make your own hole for him with bombs and have to use the same olmec fighting technique from the speedlunky section (scroll up to that section for a video example) all you have to worry about is that you are not standing in a vertical line with any treasure as sometimes due to the gap Olmec will not crush it, and losing a run that late is truly the worst feeling! - Pots:
Pots are usually really useful as they are one of the most common throwable items that spawn, but in this run you have to be careful of them as they can also spawn treasure. However, if you use a pot to kill an enemy, it will never drop anything! So try to use them on enemies where possible so you don't have to worry about accidentally putting a gem on your landing below an arrow trap.
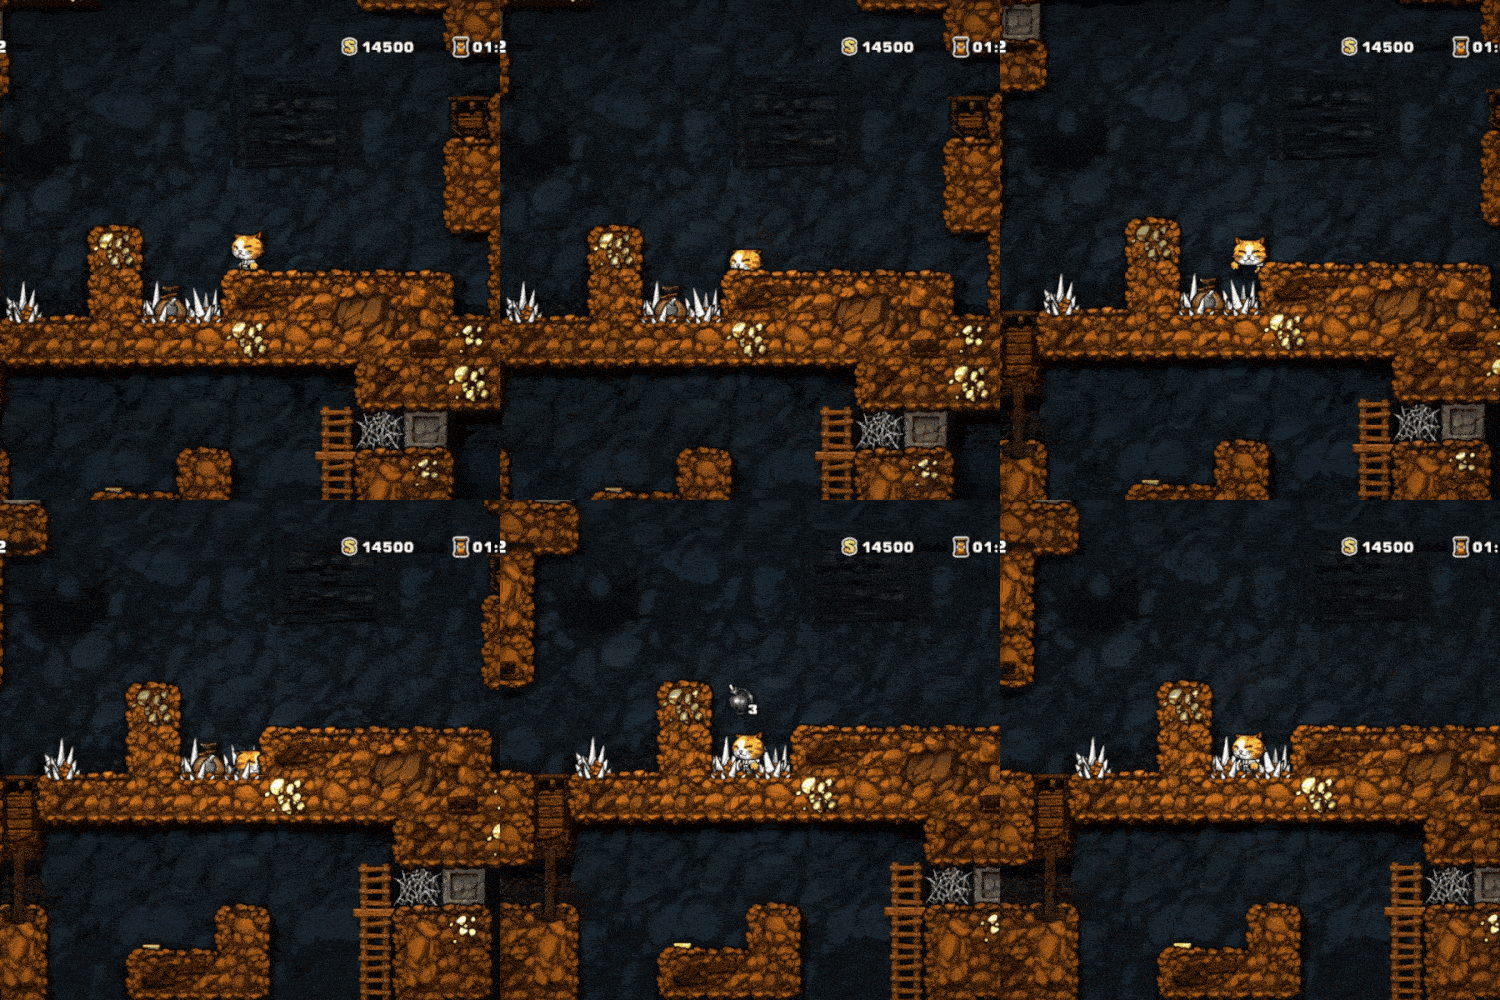
Sadly, apart from that it just comes down to good luck, getting a level generation that lets you progress easily without any treasure, and hoping you get enough bomb and rope crates to complete the game.
Big Money
 This achievement is actually more kind than you might think, as you don't have to complete the game with that amount of gold, you just have to have that amount of gold in your inventory at some point during the run, the achievement will pop the moment you get over $500000! For me, using the techniques I'll list below, I managed to get it in the ice caves, without even having to go to the temple or the city of gold! I did get quite lucky on that run, but hopefully these tips can still help you get there without too much trouble either.
Shops/Items:
This achievement is actually more kind than you might think, as you don't have to complete the game with that amount of gold, you just have to have that amount of gold in your inventory at some point during the run, the achievement will pop the moment you get over $500000! For me, using the techniques I'll list below, I managed to get it in the ice caves, without even having to go to the temple or the city of gold! I did get quite lucky on that run, but hopefully these tips can still help you get there without too much trouble either.
Shops/Items:Items are good, but you need to keep your gold, therefore there is one solution: rob all the shops you can! This has the benefit of letting you get huge amounts of items, and you get a little bonus gold for each shopkeeper killed. Below are some tips for robbing shops easily at any point of the game:
The Jump Technique:
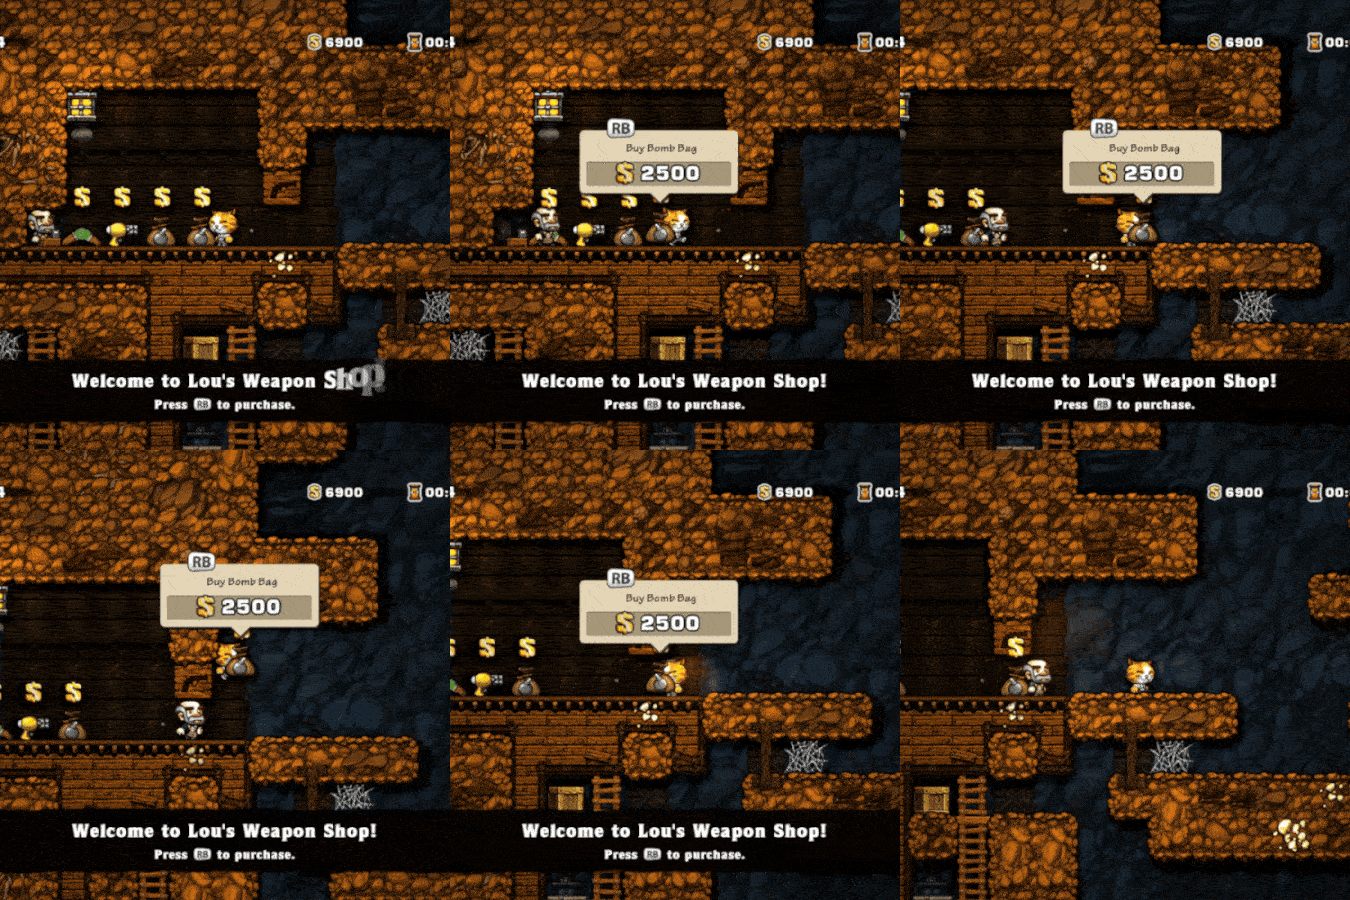
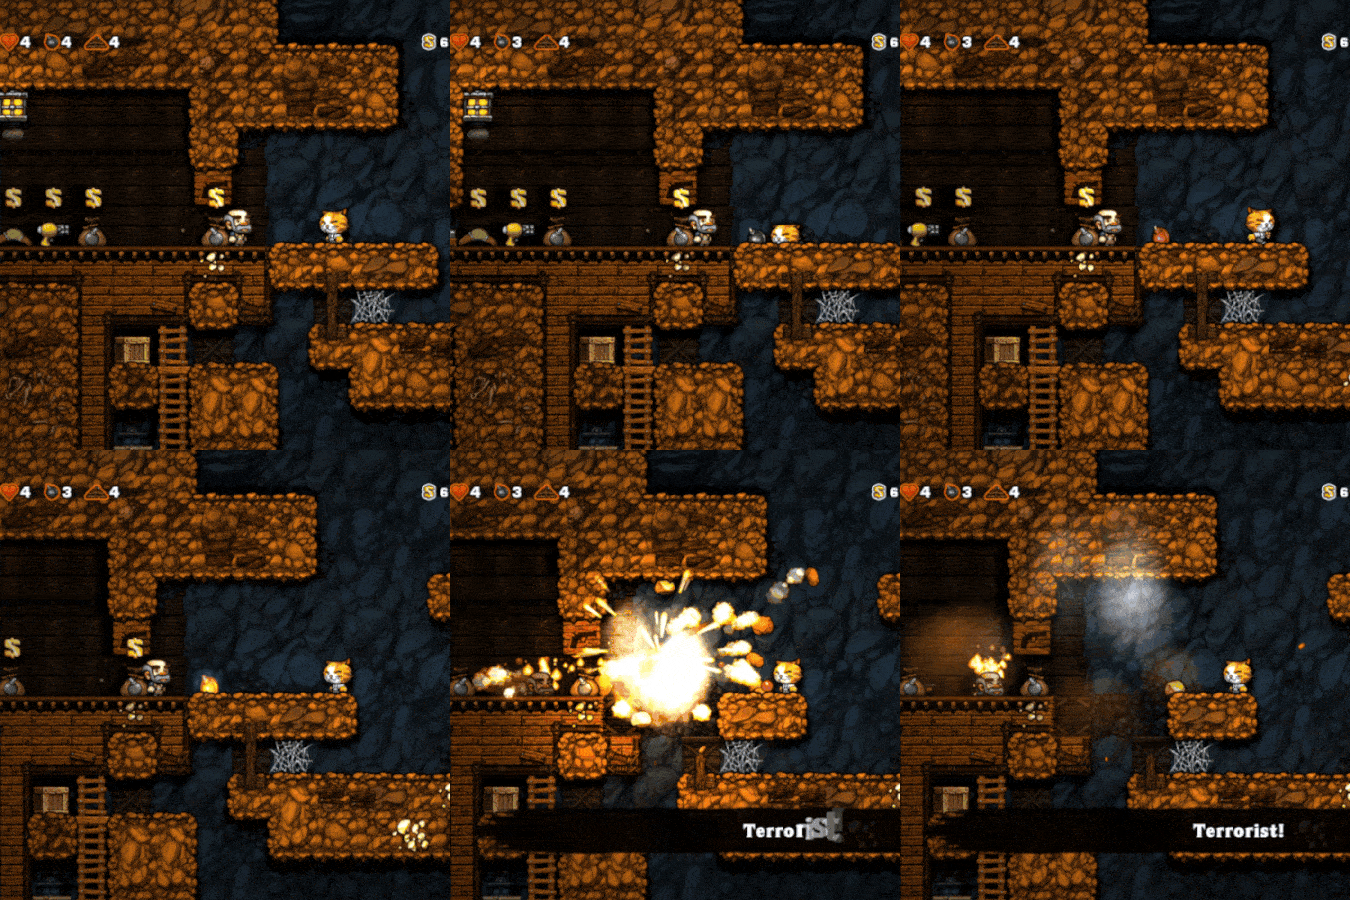
If you pick up an item you haven't bought from a shop, walk to the last block of the shop space, then jump as the shopkeeper follows you it will cause him to walk onto the last block of the shop, if you then drop the item back in the shop he will just sit there, then you can drop a bomb right next to him and he won't aggro because the bomb is outside the shop, but he's close enough it will kill him instantly, letting you take his shotgun to deal with shopkeepers in the rest of the game.
 Vaults and Ghosting:
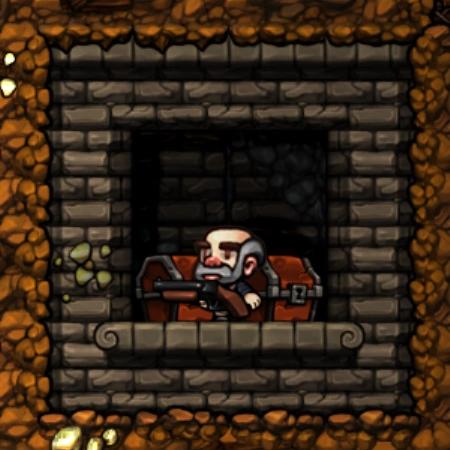
You've probably seen those vaults that spawn in various zones, but if you are anything like me, you never bothered to go and steal from one, but for this achievement they become SUPER useful! As you are already angering the shopkeepers by robbing them, you will have a ton of bombs already and there's no downside to stealing from the vault as they are already aggressive! The chests in the vaults are different from the regular treasure chests as they will always spawn full size gems, rather than the mini gems that the regularly spawning treasure chests contain, so they are worth wayyyy more, and we can make them EVEN MORE VALUABLE by using a technique called "ghosting". For those unfamiliar, if the ghost that spawns after you spend two minutes and thirty seconds in a level touches any gem it gets turned into a "ghost diamond" and they are always worth $5000 each! So with the vaults that spawn 12-16 jewels each, if you ghost the whole vault that is roughly $60-$80000 PER VAULT! If you can do that to every vault that spawns, you can hopefully get a run like mine where you get the achievement before you even need to go to the temple.
Seen it All/The Entire Gang
 Hopefully as you've gotten all the earlier achievements you will have gotten almost all of the guide filled out. Here I will be giving tips on how to get the last few tricky ones that are either hard to get or locked behind secrets. Nicely the guide will show you blank entries for anything you are missing, so it's pretty easy to figure out what you need to get to fill out the final entries. The spelunky wiki has a great in-depth guide if you want a checklist of everything you need to grab and which levels to find them in, so go there if you want a guide on literally everything, as I will just be discussing the ones that I was missing at this point in my 100% grind. While you do this, it's also the best time to try and get the last few characters you haven't unlocked yet as well!
Mothership: The plasma cannon is found at the top of the alien mothership level accessed by entering the door in the alien spaceship found in the ice caves, there are also entries for every type of alien in there so be sure to blow up one of each kind, as well as making sure to destroy a turret and a forcefield with a bomb to get their entries too. Finally you can get the Robot spelunker from a green pod in the mothership as well.
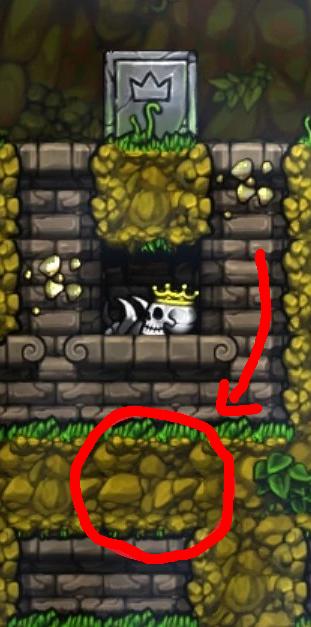
Haunted Castle: Found in any "the dead are restless" levels in the jungle, you have to find the grave with the skeleton wearing the crown in it, then bomb your way two blocks below the skeleton to access the secret area, then while in there you have to kill a green knight and then the black knight for his entry and for the shield's entry and you can also rescue the van helsing spelunker at the top of the castle as well.
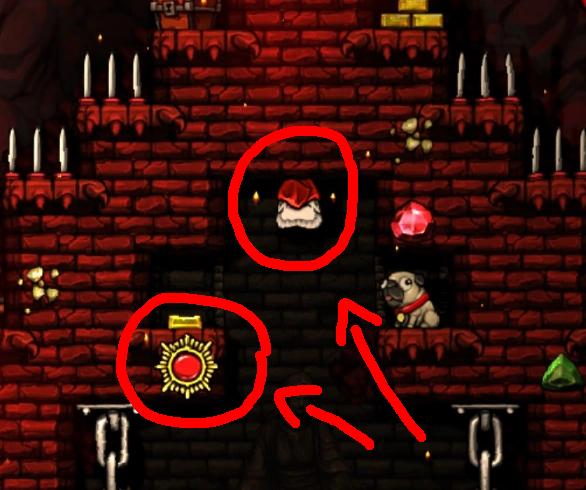
Vlad's Cape/Amulet: Found in Hell at the top of Vlad's Castle, you get it by killing Vlad himself, which is pretty easy if you just bomb into the top of the castle and then use either sticky bombs or the shotgun to blast him from a distance. Then once he's dead you can bomb the block containing the amulet in there as well, which you will be able to see with the effect of the Udjat Eye which you will already have to be in Hell. You will also get the entry for Vlad by killing him
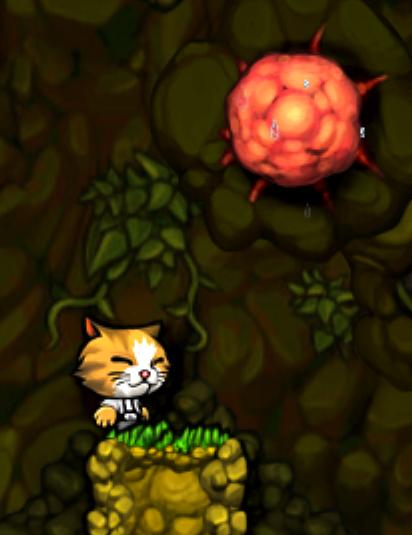
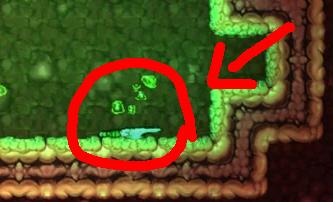
Worm: This is the weirdest secret area to find, but you've probably noticed the weird, orange sticky things that spawn in the jungle and the ice caves, well if you throw a damsel so she gets stuck in one, then jump into it yourself and wait a few seconds, you will both get swallowed by a giant worm and you will enter the worm level, which has one spelunker and one unique item in it. The Crysknife will be in the bottom of an acid pool, and is most easily obtained by simply bombing a hole in the bottom of the acid pit then jumping in and grabbing it, and the spelunker is in a big dark green pod right near the end of the level, you can't miss it.
Good Teamwork
 You could really do this one at any time after speedlunky, but I think it's best to do it when you aren't worried about anything else and can just play a really simple, basic run. This achievement is actually 100x easier to do solo than doing it with an actual co-op partner because you get a chance to revive them on every level and you can actually carry them like an item when they are alive. So essentially all you need to do is just have two controllers plugged in, start a two player adventure, then immediately kill the second play and take their bombs/ropes. Next you want to progress through the whole game normally, but look out for any Kali altars as you can sacrifice the damsel, then rescue your co-op partner, then sacrifice them too and get an instant Kapala, making the rest of the run way easier! You probably also want to use a lot of the speedrun strats as you are probably getting pretty tired of doing this. Finally, make sure to rescue your co-op partner ON LEVEL 4-3, as 4-4 is Olmec and you cannot rescue your co-op partner in the boss arena. Then all you have to do is drop Olmec while holding your co-op partner as an item and then boom, easy as that you're done!
Wrap-up/Outro
Congratulations on 100% the game! I honestly think this game has a really fun and not too infuriating 100%, and I felt it was well worth the extra challenge to go for it. I put a ton of effort into making this guide, and I know that probably no one is ever going to actually see it due to how old the game is, but if you liked it or it helped you out, please let me know as I would love to know I helped out someone else in getting this 100%. If you have any other questions or anything isn't clear enough in the guide then I'd suggest checking out the wiki as it has some great guides on it that I used when working on the 100% or just leave a comment below and I'll try my best to reply to it! Best of luck and happy spelunking!
🏆
Beat Spelunky's achievements?
Flex it — let your friends know you pulled it off.
More Spelunky guides
- SPELUNKY MEGA GUIDE★ 5 (1.3k)37k views1.5k ♥70 minUpdated Aug 14, 2020
- Characters & How to Unlock Them★ 5 (408)30k views456 ♥3 minUpdated Sep 9, 2013
- Robbing & Fighting Shopkeepers★ 5 (345)26k views301 ♥5 minUpdated Nov 30, 2013
- Developing good habits in Spelunky★ 5 (295)19k views333 ♥16 minUpdated Apr 8, 2014
- 10 Tips to Surviving Spelunky★ 5 (317)15k views118 ♥1 min
- Spelunky Achievement Guide★ 5 (267)13k views358 ♥10 minUpdated Aug 25, 2013


🔥 Popular guides
- Upgrading to PremiumTeam Fortress 2★ 5 (20k)1441k views11k ♥6 minUpdated May 11, 2022
- No More Room in Hell Official ManualNo More Room in Hell★ 5 (2.8k)569k views2.1k ♥29 minUpdated Apr 22, 2019
- NMRiH Community Hosting GuidesNo More Room in Hell★ 5 (526)351k views653 ♥1 minUpdated Aug 10, 2022
- ULTIMATE GUIDE FOR GAME DEV TYCOONGame Dev Tycoon★ 5 (5.8k)326k views10k ♥4 minUpdated 23 Jan, 2014
- How to 'Git Gud' Soon™MORDHAU★ 5 (2k)318k views3k ♥68 minUpdated Nov 16, 2024
- Лучшие кооперативные игры SteamPAYDAY 2★ 5 (1.5k)315k views2.1k ♥56 minRussianUpdated Apr 27, 2025






This guide was created by its original author on the Steam Community. Are you the author and want it removed? Request removal.