Warframe - 100% Achievement Guide (2026 / U42)
ALWAYS LAUNCH VIA STEAM!
If you want to 100% Warframe on Steam, you need to unlock all achievements, while playing it through steam!
If you launch the game through Warframe's own launcher and unlock the ingame counterpart of a steam achievement, you'll be locked out of obtaining that achievement on steam permanently!
If you launch the game through Warframe's own launcher and unlock the ingame counterpart of a steam achievement, you'll be locked out of obtaining that achievement on steam permanently!
This Guide is about Achievements
This guide is designed to cover Warframe's achievements, and nothing beyond that.
If you're new to the game and want some basic information, check out any of the available beginner guides, like:
For a compilation of some other guides, which I consider to be quite helpful, check out the last chapter of this guide.
If you're new to the game and want some basic information, check out any of the available beginner guides, like:
- Steam Guides:
https://steamcommunity.com/sharedfiles/filedetails/?id=538000942
https://steamcommunity.com/sharedfiles/filedetails/?id=1424069013 - Youtube video by Zaric Zhakaron:
For a compilation of some other guides, which I consider to be quite helpful, check out the last chapter of this guide.
Mastery Rank
Let's get the most time consuming achievements out of the way first. Getting to the highest available rank will require hundreds of hours, if not thousands. So, here we go:


There's more than 2,500,000 potential mastery available at this point of the game, so you don't have to do absolutely everything anymore.
For a full list of all things, which can award mastery, check the warframe fandom at: https://warframe.fandom.com/wiki/Mastery_Rank
Almost all mastery is earned by leveling your equipment or companions. Helpful tips for those can be found here:
And here's an overview of all items, which can award mastery, but are hidden on your profile, until you actually obtain them (last updated for U31):
*Paracesis has a max rank of 40, using the same Forma mechanic as Kuva & Tenet weapons, as well as Necramechs.
Picture
Rank
Mastery Points
Initiate
Silver Initiate
Gold Initiate
Silver Initiate
Gold Initiate
2,500
10,000
22,500
10,000
22,500
Novice
Silver Novice
Gold Novice
Silver Novice
Gold Novice
40,000
62,500
90,000
62,500
90,000
Disciple
Silver Disciple
Gold Disciple
Silver Disciple
Gold Disciple
122,500
160,000
202,500
160,000
202,500
Seeker
Silver Seeker
Gold Seeker
Silver Seeker
Gold Seeker
250,000
302,500
360,000
302,500
360,000
Hunter
Silver Hunter
Gold Hunter
Silver Hunter
Gold Hunter
422,500
490,000
562,500
490,000
562,500
Eagle
Silver Eagle
Gold Eagle
Silver Eagle
Gold Eagle
640,000
722,500
810,000
722,500
810,000
Tiger
Silver Tiger
Gold Tiger
Silver Tiger
Gold Tiger
902,500
1,000,000
1,102,500
1,000,000
1,102,500
Dragon
Silver Dragon
Gold Dragon
Silver Dragon
Gold Dragon
1,210,000
1,322,500
1,440,000
1,322,500
1,440,000
Sage
Silver Sage
Gold Sage
Silver Sage
Gold Sage
1,562,500
1,690,000
1,822,500
1,690,000
1,822,500
Master
Middle Master
True Master
Middle Master
True Master
1,960,000
2,102,500
2,250,000
2,102,500
2,250,000
There's more than 2,500,000 potential mastery available at this point of the game, so you don't have to do absolutely everything anymore.
For a full list of all things, which can award mastery, check the warframe fandom at: https://warframe.fandom.com/wiki/Mastery_Rank
Almost all mastery is earned by leveling your equipment or companions. Helpful tips for those can be found here:
- https://steamcommunity.com/sharedfiles/filedetails/?id=2622542663
- https://steamcommunity.com/sharedfiles/filedetails/?id=1390561846
And here's an overview of all items, which can award mastery, but are hidden on your profile, until you actually obtain them (last updated for U31):
"Wraith"
Variant
Variant
"Vandal"
Variant
Variant
"Prisma"
Variant
Variant
Founder-
Exclusives
Exclusives
Story / Quests
Miscellanious
Warframes
Excalibur Prime
Excalibur Umbra
Weapons
Gorgon
Karak
Latron
Machete
Strun
Twin Vipers
Viper
Karak
Latron
Machete
Strun
Twin Vipers
Viper
Dera
Opticor
Quanta
Snipetron
Opticor
Quanta
Snipetron
Gorgon
Lato Prime
Skana Prime
Skana Prime
Nataruk
*Paracesis
Skiajati
Xoris
*Paracesis
Skiajati
Xoris
Dex Dakra
Dex Sybaris
Mara Detron
Sheev
Snipetron
Verdilac
Dex Sybaris
Mara Detron
Sheev
Snipetron
Verdilac
Arch-
Weapons
Weapons
Imperator
Veritux
Companions
& C.equip
& C.equip
Shade
-> Burst Laser
-> Burst Laser
Akaten (Hound)
Batoten (Hound)
Kacerten (Hound)
Batoten (Hound)
Kacerten (Hound)
Other
Feverspine (K-Drive)
Plexus (Railjack)
Plexus (Railjack)
*Paracesis has a max rank of 40, using the same Forma mechanic as Kuva & Tenet weapons, as well as Necramechs.
Leveling Equipment
The number of achievements in Warframe may seem intimidating, but we can get another 66 achievements out of the way real quick - level the given number of each given weapon type to 30 and you're done.


One Weapon
Several Weapons
Description
Primary
Any five Rifle
or Machine Gun weapons.
or Machine Gun weapons.
Any two Shotgun weapons.
Any two Bow weapons.
Secondary
Any five Pistol
or Akimbo Pistols weapons.
or Akimbo Pistols weapons.
Any three Boomerang,
Throwing Discs
or Throwing Daggers weapon.
Throwing Discs
or Throwing Daggers weapon.
Melee
Any five Longsword
or Dual Short Blades weapons.
or Dual Short Blades weapons.
Any three Dagger
or Dual Daggers weapons.
or Dual Daggers weapons.
Any two Heavy Axe,
Heavy Hammer,
or Heavy Sword weapons.
Heavy Hammer,
or Heavy Sword weapons.
Any three Scythe,
Polearm
or Staff weapons.
Polearm
or Staff weapons.
Any three Gauntlets
or Hand-to-Hand weapons.
or Hand-to-Hand weapons.
Sentinel
Any three Sentinels.
Orbiter
All the achievements below happen within your Orbiter / your space ship, in which you always start your session.


These achievements are SO basic, I won't insult your intelligence by talking about them.


While you can just sell Mods for 10k credits - which would move this to the collection of achievements just above - you can also sell items from your inventory by pressing:
[Esc] -> Equipment -> Inventory
Which the game does not tell you about.
Picture
Achievement
Description
Tailor Made
Customize the color of a Warframe.
We Shape Our Tools
Apply a Mod to a weapon or Warframe.
Our Tools Shape Us
Apply 4 different Mods to a single weapon or Warframe.
Greater Than the Sum
Fuse mods together to create a more powerful mod.
Alchemist
Complete 10 successful Mod Transmutes.
Weaponsmith
Build an item in the Foundry.
Inventor
Build 10 items in the Foundry.
Scientist
Build 20 items in the Foundry.
These achievements are SO basic, I won't insult your intelligence by talking about them.
Picture
Achievement
Description
Entrepreneur
Sell an item in the market.
Merchant
Sell 10,000 credits' worth of items.
While you can just sell Mods for 10k credits - which would move this to the collection of achievements just above - you can also sell items from your inventory by pressing:
[Esc] -> Equipment -> Inventory
Which the game does not tell you about.
General Gameplay
Picture
Achievement
Description


Payday
Nestegg
Where Credit is Due
Money is Power
Nestegg
Where Credit is Due
Money is Power
Earn 1,000 Credits.
Earn 10,000 Credits.
Earn 100,000 Credits.
Earn 1,000,000 Credits.
Earn 10,000 Credits.
Earn 100,000 Credits.
Earn 1,000,000 Credits.


Secrets of the Orokin
Behold the Possibilities
Collector
So Many Choices
Behold the Possibilities
Collector
So Many Choices
Find 1 Mod.
Find 20 Mods.
Find 100 Mods.
Find 1,000 Mods.
Find 20 Mods.
Find 100 Mods.
Find 1,000 Mods.


Hooked
It Keeps Getting Better
Pride of The Lotus
It Keeps Getting Better
Pride of The Lotus
Play for 2 hours.
Play for 10 hours.
Play for 100 hours.
Play for 10 hours.
Play for 100 hours.
These achievements are borderline impossible to miss. Just do what the missions ask you to and get to extraction. You'll unlock all of them waaay before unlocking all the other achievements.
For the x hours achievements, only in-mission time counts. This is not to be confused with your played time according to steam.
Picture
Achievement
Description

Counter Intelligence
Solve a Cipher in under 5 seconds.

Angel of Death
Get 100 kills in a single mission.

No Witnesses
Successfully perform 100 stealth kills.

Hats off to you!
Destroy 200 Corpus Crewman helmets.

The Camera Adds 10 Pounds
Destroy 150 Security Cameras.

Shield Saver
Deflect 1,000 projectiles with your melee weapon.

Tenno of all Trades
Score a kill with your equipped primary, secondary and
melee weapons in 5 seconds or less.
melee weapons in 5 seconds or less.
It is almost impossible to unlock all other achievements without ever getting these. Theoretically possible, but highly unlikely. In other words: ignore them; they will unlock eventually, BUT can be unlocked very quickly, if you want to do so.
Picture
Achievement
Description


Agent
Special Agent
Operative
Cryptographer
Special Agent
Operative
Cryptographer
Solve a Cipher.
Solve 10 Ciphers.
Solve 100 Ciphers.
Solve 1,000 Ciphers.
Solve 10 Ciphers.
Solve 100 Ciphers.
Solve 1,000 Ciphers.


All for One
Healer
Field Medic
Cheater of Death
Healer
Field Medic
Cheater of Death
Revive an ally.
Revive 10 allies.
Revive 100 allies.
Revive 1,000 allies.
Revive 10 allies.
Revive 100 allies.
Revive 1,000 allies.
These achievements will take a lot of time. There are a lot of opportunities to make progress, but doing them a 1,000 times is still going to be a slow process AND your squad members can lock you out of your progress on them, if you aren't fast enough.
You can easily farm ciphers by doing Spy type missions.
And from what I can tell, only the revival of other players count; companions do not.
For an efficient way of grinding those 1k revives, check this guide:
Complete Missions | Part 1
Picture
Achievement
Description

The Sword Alone
Complete 10 missions without any primary or secondary weapons equipped.

Tenno and Hooch
Complete any 10 missions with a Kubrow equipped.
Doesn't matter which kind of mission you're playing for these two, it works with everything.
You actually need to play 5 mission on Uranus with just your Melee weapon equipped, so you might wait with this achievement until you get there; but Melee weapons are really strong and you can easily do this early on.
Obtaining a Kubrow is one of the earliest quests available and the game will tell you step by step how to do it. For more information, check the [Miscellanious] chapter below or [Ctrl]+[F] for "Egg Timer".
Picture
Achievement
Description

Liberator
Set 10 hostages free without triggering the execution timer.
Not exactly difficult. The execution timer will only be triggered within the last room before the actual prison cells and only if one of the enemies spots you and you don't engage it.
Earliest available Rescue mission is Earth -> Pacific.
Picture
Achievement
Description

Control Freak
Complete an Interception node and extract with the enemy capturing 40% or less territory.
This becomes WAY easier with at least 1 other squad member and is basically guaranteed to unlock the first time you're playing an Interception with a Squad of 3 players.
Earliest available Interception mission is Earth -> Gaia.
Picture
Achievement
Description

Ride the Wave
Complete 20 waves of Defense and successfully extract.

The 8-fold Path
Survive 8 waves of Defense using only melee attacks.
Completing 20 waves of Defense becomes a lot easier with middle to late game equipment / mods. Don't try to force this too early on.
But if you want to get this out of the way anyway... There's a higher chance for your current squad members to continue, if you are the first person to make a choice and choose to continue yourself. I've rarely seen people to reconsider, once they clicked to extract.
The description for The 8-fold Path is actually wrong. NEITHER squad member is allowed to have Primary & Secondary weapons EQUIPPED. Using Warframe abilities or a companion is fine though (as of the publishing date of this guide).
Which means your best choices for this one are to do it solo (easy enough, tbh), or choose a Nightmare Mission, which only allows for Melee.
I do NOT know, if the use of Exalted weapons (like Mesa's Pistols or Ivara's Bow) lock you out of this achievement.
Earliest available Defense mission is Earth -> Lith.
I'd recommend to try these 2 achievements against Infested enemies though, which would mean:
Earth -> Coba (level 6-16) or
Mercury -> Lares (level 6-11)
Picture
Achievement
Description

Without a Hitch
Complete a Hijack mission without allowing the payload to travel backwards.
Earliest available Hijack mission is Ceres -> Ludi. So a good few hours into the game.
The payload travels by absorbing your Shield. Which means this becomes a lot easier by operating in a squad with several members and by using the [Redirection] mod.
If you don't find a squad to help you though, use Trinity. Since Trinity has an ability to generate Energy and another one to replenish your Shield, you can easily do this solo without ever stopping.
Alternatively, use Limbo + a Sentinel with the [Guardian] mod and remain in the rift for the entire mission.
Picture
Achievement
Description

Hive Five!
Complete any 5 Hive Infestation missions.
Hive missions are currently only available on the planet Eris -> Naeglar node.
You'll have to do 3 of them for the [Patient Zero] quest, and a fourth one for the [Hidden Messages] quest, though.
Complete Missions | Part 2
Picture
Achievement
Description

Dark Sectors
Complete 5 missions for a Clan that then wins a contested Dark Sector.
Complete 5 Dark Sector missions
Complete 5 Dark Sector missions
This achievement is outdated! The current requirement is to complete 5 Dark Sector missions.
Dark Sector missions are the missions with 3 kinds of % based bonuses and the icon illustrated below.
The earliest available Dark Sector missions are Earth -> Tikal and Earth -> Coba.

Picture
Achievement
Description

What a Nightmare
Complete 10 Nightmare missions.
Nightmare missions appear randomly on your normal star chart and are a little bit harder than the mission they are replacing usually is, since they add additional challenges.
Nightmare missions are only available for planets, for which you've completed all mission nodes.
For those planets, there'll be one nightmare mission per planet, per day, which you can only choose to start once.
They look like this, with a noticable red border around the node:

Picture
Achievement
Description

Mercenary
Earn Battle Pay from 5 Unique Invasions.
Invasions are "limited-time" events, appearing on random nodes on the star chart. They aren't really limited though, since there's basically always an active invasion... or sometimes up to six.
Note: You need to clear a given node 3 times in order to receive battle pay, and you'll receive the battle pay, once enough people have done the missions. You'll receive an ingame mail, once that's done.
A full list of all currently available Invasions can be found in the upper right corner of the star chart:

Picture
Achievement
Description

Into the Void
Complete 10 Void Fissure missions.
Void Fissures are "normal" missions on randomly chosen nodes, which you can use to crack open relics. A full list of all currently available Void Fissures can be found in the upper right corner of the star chart and the nodes show a distinctive icon with an expiration date in the mission description.

Picture
Achievement
Description

Combat Specialist
Complete 3 Sorties.
To unlock Sorties, you need to have completed the quest [The War Within]. See the [Quests] chapter for more information.
You'll only be able to use level 30 Warframes for Sorties and you can only receive the rewards for one Sortie per day.
Sorties feature high level enemies. Should you struggle with them, look up some existing build guides for your favorite warframe/weapon.
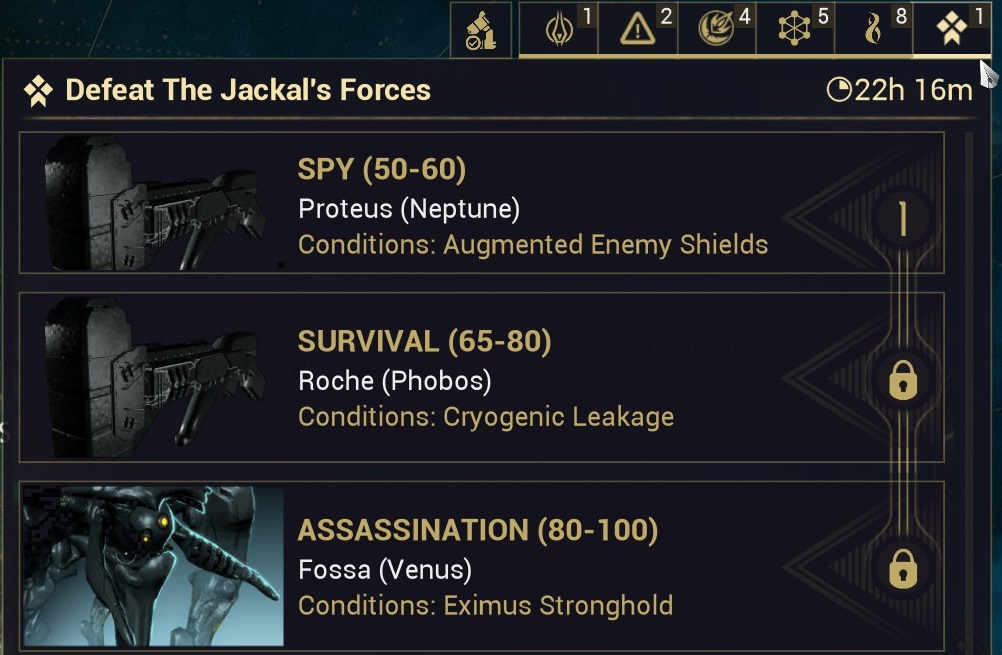
Bosses & Quests
Picture
Achievement
Description

Saviour of Venus
Kill the boss in the Venus region and get to extraction.
Node: Fossa | Boss: Jackal
Node: Fossa | Boss: Jackal

Saviour of Mercury
Kill the boss in the Mercury region and get to extraction.
Node: Tolstoj | Boss: Captain Vor
Node: Tolstoj | Boss: Captain Vor

Saviour of Uranus
Kill the boss in the Uranus region and get to extraction.
Node: Titania | Boss: Tyl Regor
Node: Titania | Boss: Tyl Regor

Saviour of Sedna
Kill the boss in the Sedna region and get to extraction.
Node: Merrow | Boss: Kela De Thaym
Node: Merrow | Boss: Kela De Thaym
Just progress through the game and these 4 will unlock along the way. All 4 of them are rewarded for Assassination missions.
There are a lot more of these "Saviour" achievements in the ingame achievement overview, but only the 4 above made their way to steam.
Picture
Achievement
Description

Saya's Vigil
Complete "Saya's Vigil" quest.
I won't spoil what this quest is about, but here's what you need to do in order to unlock it:
- Be Mastery Rank 1+
- Completed at least 1 bounty given by Konzu on Earth -> Cetus
- Completed the quest [Vor's Prize]
To unlock that one, you need to:- Completed the quest [Awakening]
Awakening starts immediately upon starting the game.
- Completed the quest [Awakening]
Picture
Achievement
Description

The War Within
Complete "The War Within" quest.
I won't spoil what this quest is about, but here's what you need to do in order to unlock it:
- Be Mastery Rank 5+
- Completed the Sedna Junction (located on Pluto)
- Completed the quest [The Second Dream]
To unlock that one, you need to:- Be Mastery Rank 3+
- Completed the Neptune Junction (located on Uranus)
- Completed the quest [Natah]
To unlock that one, you need to:- Be Mastery Rank 3+
- Scan drones in Grineer Sealab on Uranus
-> Drones are the floating, blueish thingies, which spawn randomly
- Be Mastery Rank 3+
- Be Mastery Rank 3+
Picture
Achievement
Description

The Sacrifice
Complete "The Sacrifice" quest.
I won't spoil what this quest is about, but here's what you need to do in order to unlock it:
- Completed the quest [Apostasy Prologue]
To unlock that one, you need to:- Obtained the Personal Quarters Segment
- For which you obtain the blueprint upon completing [The War Within] (achievement just above)
- Completed the quest [Chains of Harrow]
To unlock that one, you need to:- Completed the quest [The War Within] - the achievement just above
- Completed the Void -> Mot node, for which you need to enter the Void through Sedna
- Completed the quest [The War Within] - the achievement just above
- Obtained the Personal Quarters Segment
Picture
Achievement
Description

The Abyss Gazes Into You
Create a Kuva Lich

That Which Does Not Kill Us
Kill a Kuva Lich commander
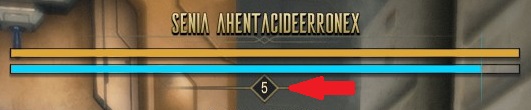 "Kuva Lich Commander" refers to a Kuva Lich on the highest level - level 5.
You may need to purposefully fail a killing attempt or two, so that he can escape and level up in doing so.
(Note: I've heard, that this might only trigger, if you're the Host of the railjack mission for the final kill... This needs confirmation, though.)
Kuva Lichs will be unlocked, once you've completed the quest [The War Within] - see 2 achievements above this one.
Once you've done so, check out this guide:
Miscellaneous
Picture
Achievement
Description

No Longer a Rookie
Reach Rank 2 with any Warframe.

Practice Makes Perfect
Reach Rank 2 with any weapon.
Complete the first mission or 2 after the tutorial and these 2 achievements will unlock.
Picture
Achievement
Description

Building a Stable
Obtain 2 Warframes.

The Right Tool for the Job
Obtain 5 Warframes.

Each Tool with Its Own Purpose
Obtain 10 Warframes.
You need to own 10 Warframes at the same time. Warframe slots can be aquired for 20 platinum each. You can find guides on how to obtain platinum in the last chapter.
There are several guides on how to obtain the different warframes. The most up-to-date guide being:
Picture
Achievement
Description

A Watchful Eye
Obtain a Sentinel.
The earliest Sentinel is Taxon, for which you obtain the blueprint upon completing the Venus Junction on Earth.
Picture
Achievement
Description

Polarize This
Polarize a Weapon, Companion, or Warframe.

Polarize That
Reach Rank 30 with a polarized Weapon, Companion, or Warframe.
Polarizing works by applying a [Forma] on a rank 30 frame, weapon or companion. Forma blueprints are most commonly rewarded by opening relics via Void Fissure missions. They can also be bought on the ingame market for 20 platinum, or a bundle of 3 for 35 platinum.
Using a forma adds a mod polarity of your choice, but it also resets the rank of the object it was applied to.
Picture
Achievement
Description

Egg Timer
Begin Genetic Lab Incubation for a Kubrow.
This can only be unlocked during the [Howl of the Kubrow] quest. You can start the quest as soon as you've completed the Mercury Junction on Venus.
The quest will require an [Incubator Power Core], which is one of the rewards for completing the Mars Junction on Earth.
The quest itself will guide you through the rest of the process.
Picture
Achievement
Description

KABOOM!
Kill 10 or more enemies with a single explosion (Tonkor, etc).
There are several ways of doing this, several of them mentioned here:
Another method not mentioned there as of now is to use Rhino's Stomp ability.
Picture
Achievement
Description

This is What You Are
Fully unlock a Focus skill tree.
Come back here, once you've completed the quests [The War Within] and [Saya's Sigil].
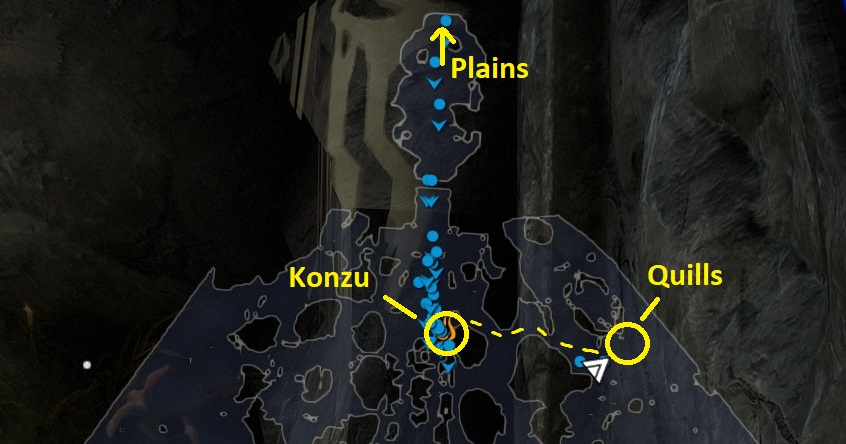
Check the achievements of the same name in the chapter above for more information on how to unlock them. You'll also need to have visited The Quills in Earth, Cetus at least once - location illustrated below.
Once that's done, check out this guide for a few solid tips, on how to farm focus efficiently:
In order to unlock the achievement, you only need to UNLOCK each ability, you do NOT need to MAX it. So only the first level of each ability is required.
Here's a quick overview, how much focus you need to unlock all nodes per school. Since Naramon is the cheapest, it's the recommended school to go for, if you only care for the achievement.
School
Focus req.
Naramon
450k
Madurai
515k
Vazarin
565k
Zenurik
565k
Unairu
595k
Railjacks
The following achievements are related to Railjacks.
To get access to them, you need to have completed the quest [The Archwing], which you can do, once you've completed the Mars Junction on Earth.
For a thorough guide about Railjacks, click:

The Dry Dock is one of the interactive rooms that can be added to a Clan Dojo. Join a clan with all research completed, craft the clan key, enter the dojo via the star chart and once there, press [Esc] to fast travel to the Dry Dock.

This achievement is the result of completing the quest [Rising Tide].
To unlock that one, you need to:

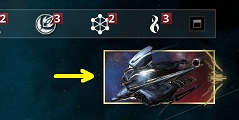
Once you've assembled the Railjack, visit it in your Dry Dock and enter it to start a mission.
Alternatively click the Railjack button in the upper right corner of the star chart and choose a mission from there.
And now, start shooting.

During a Railjack mission, leave the Railjack to enter Archwing mode. Approach an enemy crewship, board it, kill the enemy units and hijack the ship.
To get access to them, you need to have completed the quest [The Archwing], which you can do, once you've completed the Mars Junction on Earth.
For a thorough guide about Railjacks, click:
Picture
Achievement
Description
Gonna Need a Bigger Boat
Enter the Dry Dock
The Dry Dock is one of the interactive rooms that can be added to a Clan Dojo. Join a clan with all research completed, craft the clan key, enter the dojo via the star chart and once there, press [Esc] to fast travel to the Dry Dock.
Picture
Achievement
Description
Some Assembly Required
Collect and assemble all Railjack components
This achievement is the result of completing the quest [Rising Tide].
To unlock that one, you need to:
- Be part of a clan, which has a Dry Dock in the dojo - see the achievement just above.
- Visit the Dry Dock, interact with the Research panel and replicate the [Railjack Cephalon] blueprint
- Completed the quest [The Second Dream]
To unlock that one, you need to:- Be Mastery Rank 3+
- Completed the Neptune Junction (located on Uranus)
- Completed the quest [Natah]
To unlock that one, you need to:- Be Mastery Rank 3+
- Scan drones in Grineer Sealab on Uranus
- Be Mastery Rank 3+
- Be Mastery Rank 3+
Picture
Achievement
Description
From out of the Sun
Shoot down 100 enemies while in a Railjack
Once you've assembled the Railjack, visit it in your Dry Dock and enter it to start a mission.
Alternatively click the Railjack button in the upper right corner of the star chart and choose a mission from there.
And now, start shooting.
Picture
Achievement
Description
I'm the Captain Now
Pilot a hijacked enemy crewship during a Railjack mission
During a Railjack mission, leave the Railjack to enter Archwing mode. Approach an enemy crewship, board it, kill the enemy units and hijack the ship.
-----------------------------
Open Worlds:
Picture
Achievement
Description

Master Angler
Catch 10 fish.
Master Angler can be unlocked in all three open world areas of the game; Plains of Eidolon, Orb Vallis and Cambion Drift.
For more information:
- https://steamcommunity.com/sharedfiles/filedetails/?id=1228202625
- https://steamcommunity.com/sharedfiles/filedetails/?id=2211132083
You will also need to aquire the [Archwing Launcher] to unlock achievements in both Plains of Eidolon and Orb Vallis. This requires:
- Completed the quest [The Archwing], which you can do, once you've completed the Mars Junction on Earth.
- Aquired the Archwing Launcher Segment. This can either be bought from the ingame market for 175 platinum, or through the Tenno Lab in your Clan Dojo.
- Crafted the Archwing Launcher, once you've crafted the segment.
Plains of Eidolon
If you want more information on the Plains, these 2 guides got you covered:

This excludes all open world exclusive features, like the K-Drive and Archwing Mode.
Everything else works; so everything you can use in "normal" missions too.
People reported, that rubberbanding did not work for them (walking in narrow circles).
Gauss has the highest movement speed of 1.4. Loki / - Prime being second with a speed of 1.25.
Some Frames have helpful abilites for this, including Volt & Nezha, if you can somehow generate the energy, while aimlessly running across the plains.
Having the melee weapon [Karyst Prime] equipped grants 10% movement speed.
The melee weapon [Telos Boltace] provides a 20% passive boost to bullet jump velocity, roll distance and aim glide.

Point at an enemy and press [G] to waypoint it, if you want to make sure, that it is 100 meters away. Can be done with a lot of weapons; doesn't even require a sniper, even if it would be helpful.

A night on the Plains is 50min long. You need to get there, before the night has started. The navigator in your Orbiter will show you, how much time is left until the night starts. Just set your game mode to Solo and afk at the entrance and you're done. Or play regularly at your own risk.

Here's a full map, both the old (left) and new (right) version - click to enlarge:

Kinda misleading. Bounties are only given by Konzu. Just complete 10 bounties on the plains; no further tips required.

Aquire 500 Standing by completing bounties given by Konzu. After that approach Old Man Suumbaat (one of the NPC highlighted on the map of Earth -> Cetus) and buy the [Nosam Cutter]. Equip it in your Gear Wheel and you can begin mining. For more information visit the 2 guides at the top of this chapter.

Probably easier during the night, where the beasts are hostile towards you, instead of running away.

You need the Archwing Launcher for this one. See the chapter above for more information.
(This has been reported to also work while playing Titania and using her 4th ability.)
If you want more information, take a look at this very thorough guide:

There are 2 easy ways to go about this:
Craft the Archwing Launcher (see chapter above). Equip it, fly as high up to the sky as possible, get out of the archwing and immediately start sliding while in the air. The free fall counts toward the 500m.
Alternatively:

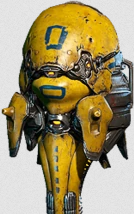 There are multiple ways that a player can commandeer a Dargyn:

Zaws can be crafted via one of the NPCs in Cetus.
Buying a pre-made Zaw with platinum as "Today's Special" will NOT unlock this achievement.
More information on Zaws here:

You need to have completed the quests [Saya's Sigil] and [The War Within] before you can do this.
Check out the achievements of the same name in the [Star Chart & Quests] chapter, if you want more information on how to to get there.
Once you've completed the 2 quests mentioned, check out these guides:
Or use the Recruiting chat to join an Eidolon (or "Tridolon") hunt. If so, make sure to mention, that you're new to Eidolons though.
- https://steamcommunity.com/sharedfiles/filedetails/?id=1169187443
- https://steamcommunity.com/sharedfiles/filedetails/?id=1184218383
Picture
Achievement
Description
Marathoner
Travel 100,000 metres across the Plains of Eidolon.
This excludes all open world exclusive features, like the K-Drive and Archwing Mode.
Everything else works; so everything you can use in "normal" missions too.
People reported, that rubberbanding did not work for them (walking in narrow circles).
Gauss has the highest movement speed of 1.4. Loki / - Prime being second with a speed of 1.25.
Some Frames have helpful abilites for this, including Volt & Nezha, if you can somehow generate the energy, while aimlessly running across the plains.
Having the melee weapon [Karyst Prime] equipped grants 10% movement speed.
The melee weapon [Telos Boltace] provides a 20% passive boost to bullet jump velocity, roll distance and aim glide.
Picture
Achievement
Description
Sharp Shooter
Kill an enemy from over 100 metres away across the Plains of Eidolon.
Point at an enemy and press [G] to waypoint it, if you want to make sure, that it is 100 meters away. Can be done with a lot of weapons; doesn't even require a sniper, even if it would be helpful.
Picture
Achievement
Description
By the Dawn's Early Light
Survive a night on the Plains of Eidolon.
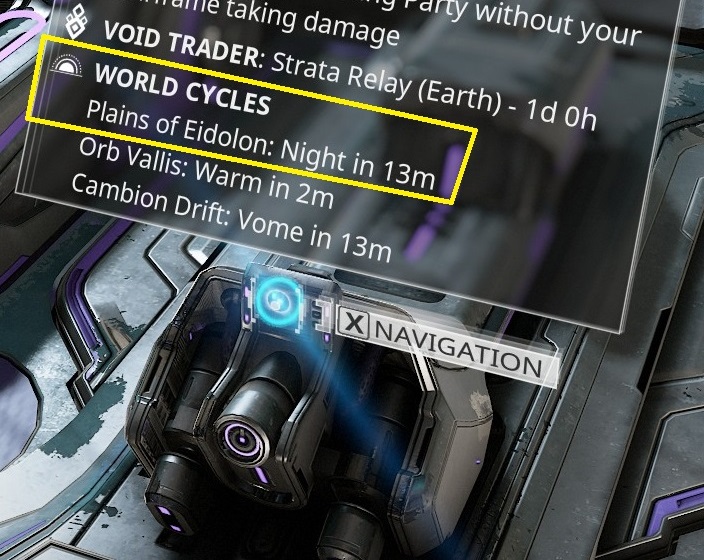
A night on the Plains is 50min long. You need to get there, before the night has started. The navigator in your Orbiter will show you, how much time is left until the night starts. Just set your game mode to Solo and afk at the entrance and you're done. Or play regularly at your own risk.
Picture
Achievement
Description
Tomb Looter
Explore all of the Eidolon Caves.
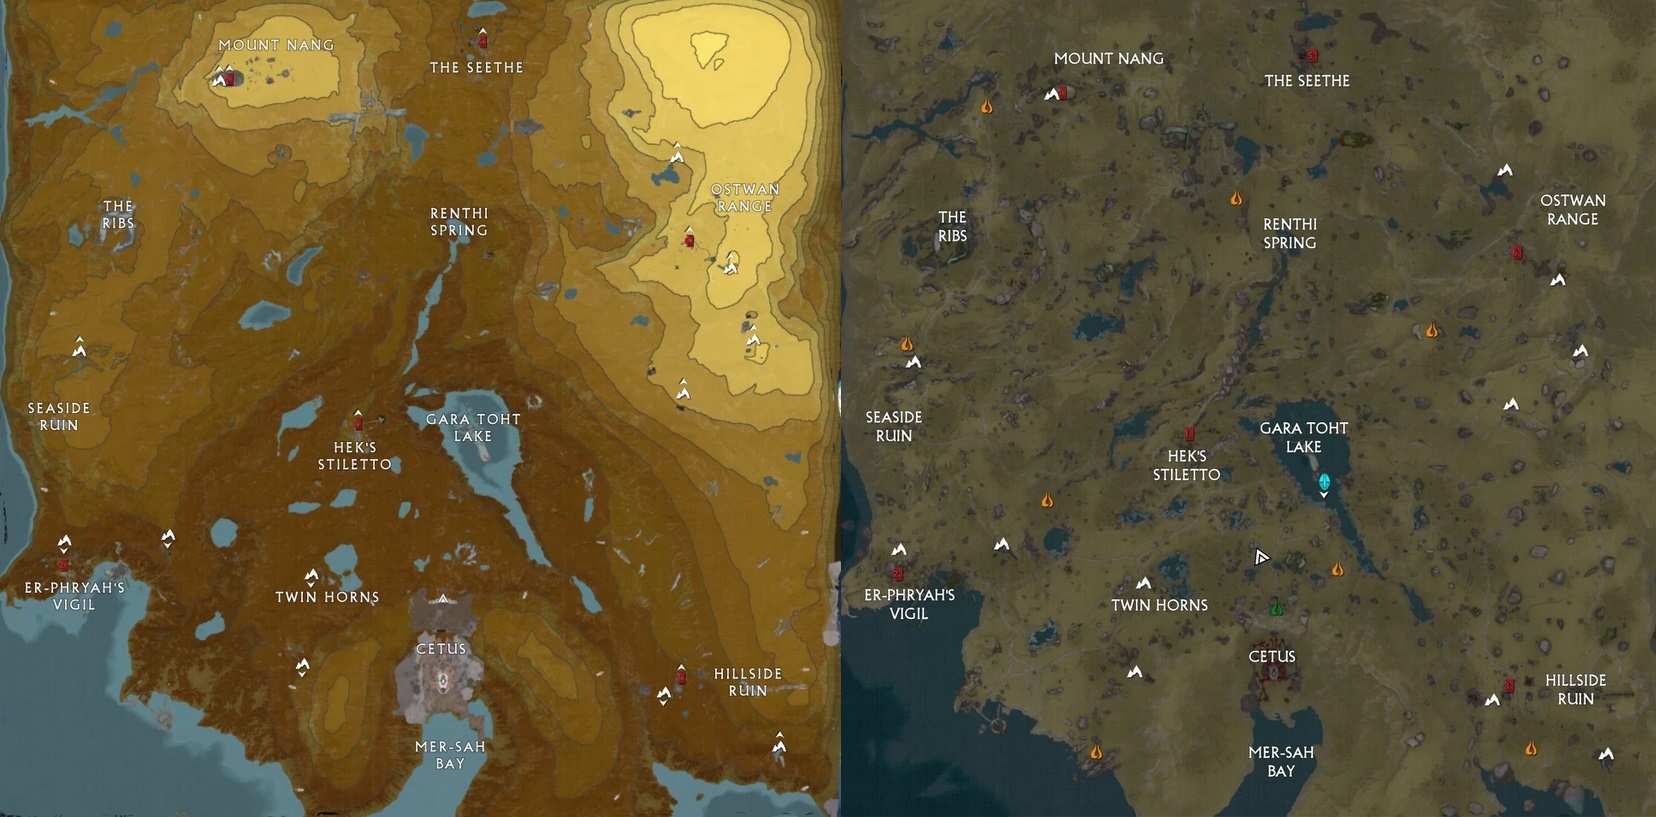
Here's a full map, both the old (left) and new (right) version - click to enlarge:
Picture
Achievement
Description
Champion of the People
Complete 10 bounties given by Ostron townspeople.
Kinda misleading. Bounties are only given by Konzu. Just complete 10 bounties on the plains; no further tips required.
Picture
Achievement
Description
Plains Prospector
Unearth 100 Deposits from the Plains of Eidolon.
Aquire 500 Standing by completing bounties given by Konzu. After that approach Old Man Suumbaat (one of the NPC highlighted on the map of Earth -> Cetus) and buy the [Nosam Cutter]. Equip it in your Gear Wheel and you can begin mining. For more information visit the 2 guides at the top of this chapter.
Picture
Achievement
Description
Pest Control
Kill 100 Plains Beasts.
Probably easier during the night, where the beasts are hostile towards you, instead of running away.
Picture
Achievement
Description
From on High
Kill 100 grounded enemies while in Archwing Mode above the Plains of Eidolon.
You need the Archwing Launcher for this one. See the chapter above for more information.
(This has been reported to also work while playing Titania and using her 4th ability.)
If you want more information, take a look at this very thorough guide:
Picture
Achievement
Description
Sleds of Sunshine
Travel over 500 metres in a single slide across the Plains of Eidolon.
There are 2 easy ways to go about this:
Craft the Archwing Launcher (see chapter above). Equip it, fly as high up to the sky as possible, get out of the archwing and immediately start sliding while in the air. The free fall counts toward the 500m.
Alternatively:
This has been posted by Munhumutapa[www.trueachievements.com]:
"when in a team at the end of the mission, do not go to evacuation with everyone else.
stay as far away from the cetus as you can.
check the evacuation timer and initiate a slide whe it is about to time out. if it times out on you as you slide you will be teleported to outside cetus to be with your team and the whole distance counts as a slide."
Picture
Achievement
Description
Joyride
Travel over 10,000 meters on a stolen Dargyn across the Plains of Eidolon
There are multiple ways that a player can commandeer a Dargyn:Taken from: https://warframe.fandom.com/wiki/Dargyn
- By scouting for parked, unmanned skiffs. There are occasionally Dargyn Pilots nearby, and will board their Dargyns if they are alerted to the Tenno's presence.
- By shooting off the pilot off an active Dargyn.
- By hijacking an active Dargyn off the air with an Archwing.
- By using Loki's Switch Teleport on an active Dargyn.
Picture
Achievement
Description
Forged in Fire
Craft your first Zaw.
Zaws can be crafted via one of the NPCs in Cetus.
Buying a pre-made Zaw with platinum as "Today's Special" will NOT unlock this achievement.
More information on Zaws here:
Picture
Achievement
Description
The Great Eidolon Hunt
Defeat an Eidolon Teralyst.
You need to have completed the quests [Saya's Sigil] and [The War Within] before you can do this.
Check out the achievements of the same name in the [Star Chart & Quests] chapter, if you want more information on how to to get there.
Once you've completed the 2 quests mentioned, check out these guides:
- https://steamcommunity.com/sharedfiles/filedetails/?id=1443554929
- https://steamcommunity.com/sharedfiles/filedetails/?id=2444836048
Or use the Recruiting chat to join an Eidolon (or "Tridolon") hunt. If so, make sure to mention, that you're new to Eidolons though.
Orb Vallis / K-Drives
If you want more information on Orb Vallis, this guide got you covered:

You can gain standing with Solaris United, once you've completed the quest [Vox Solaris].
Just visit Venus -> Fortuna and talk to Eudico to start it; no further requirements.
The normal way of obtaining standing with Solaris United is to complete bounties given by Eudico. Though you may also turn in rare gems, for which there's quick guide here:
Or you go for wild animal conservations, which is by far the most efficient way. Check the achievement just below for more info.

Getting a perfect score requires you to tranq the animal without alerting it.
Here's a compact video guide how to do this, by Faceless Beanie:
Playing with a frame, that can turn invisible (Ash, Ivara, Loki), can make this a lot easier. It's not required though.
For a more thorough guide, check the corresponding fandom page:

Grab your best equipment & the Archwing launcher and do the easiest bounty 6 times. You do NOT need to do 6 different quests (at least as of publishing this guide.)
Bounties rotate every few hours, so if your first bounty takes to long, just abort and come back later.
Make sure you do NOT return to Fortuna! This NEEDS to be done, while staying in Orb Vallis the entire time! As such, start your bounties at the NPC just to your left, once you enter Orb Vallis.
I recommend to do this solo in order to trim voting time.

This guide gives you a good map for all cave locations:

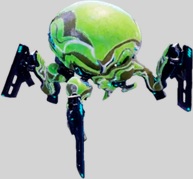 This does NOT require the Archwing Launcher. Double-/Bullet jump, go into air glide by aiming and kill of the Raknoids.
They spawn in groups of 3, which means you'll need 4 groups to spawn. Be aware, that a companion can make this harder on you by killing them before you do; or easier, if you use Artax, Taxon's cold beam weapon.
The Raknoids spawn randomly, usually buried underground or dangling from the ceiling of a cave / giant fungi.
People reported very different experiences with spawn spots, so just walk around and find something, that works for you.

MOAs can be crafted via one of the NPCs in Fortuna.
Buying a pre-made MOA with platinum as "Today's Special" will NOT unlock this achievement.
More information about MOAs here:
---------------------------------------------------------------------------------------------
The following achievements require a K-Drive, which you'll receive for free during the quest [Vox Solaris]. The quest has no start requirements, apart from visiting Venus -> Fortuna and talking to Eudico.


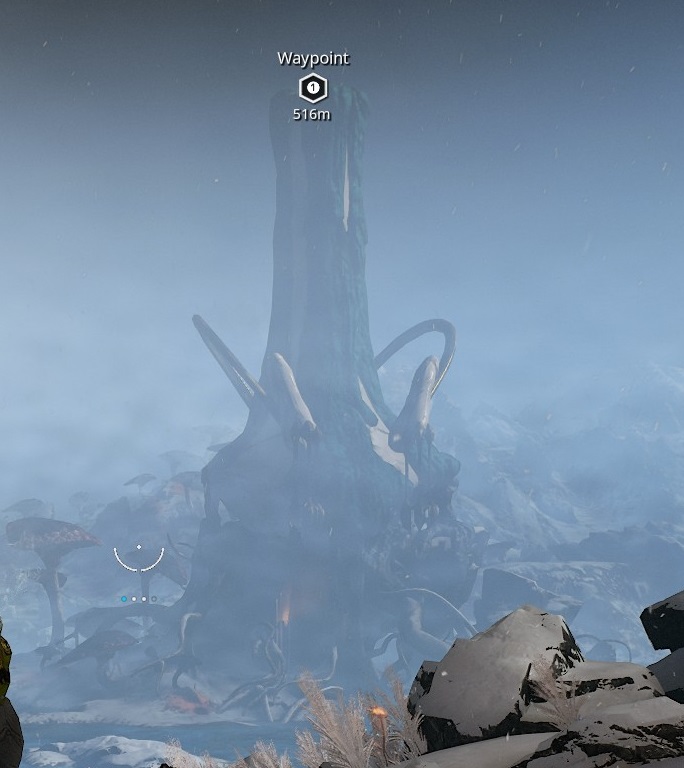 "Coolant" is just the fancy lore name for the water in Orb Vallis. Which means you need to land on a body of water after a 275 meter fall.
There are 2 ways to go about this:
1) IF you already own the Archwing launcher, use it to boost yourself up in the air, switch to a K-Drive and just fall straight down.
2) If you don't own the Archwing launcher, climb the tower illustrated on the right. This one immediately enters your field of view upon entering Orb Vallis.
You can climb it just by using a few bullet jumps for the lower half and wall jump spam for the upper one.
Once there, mount your K-Drive, keep your space bar pressed for 2sec to charge up a jump and go for it - preferably by leaving the tower at the highest point.
This achievement seems to be a little bit buggy for some people and might need to be repeated a few times.


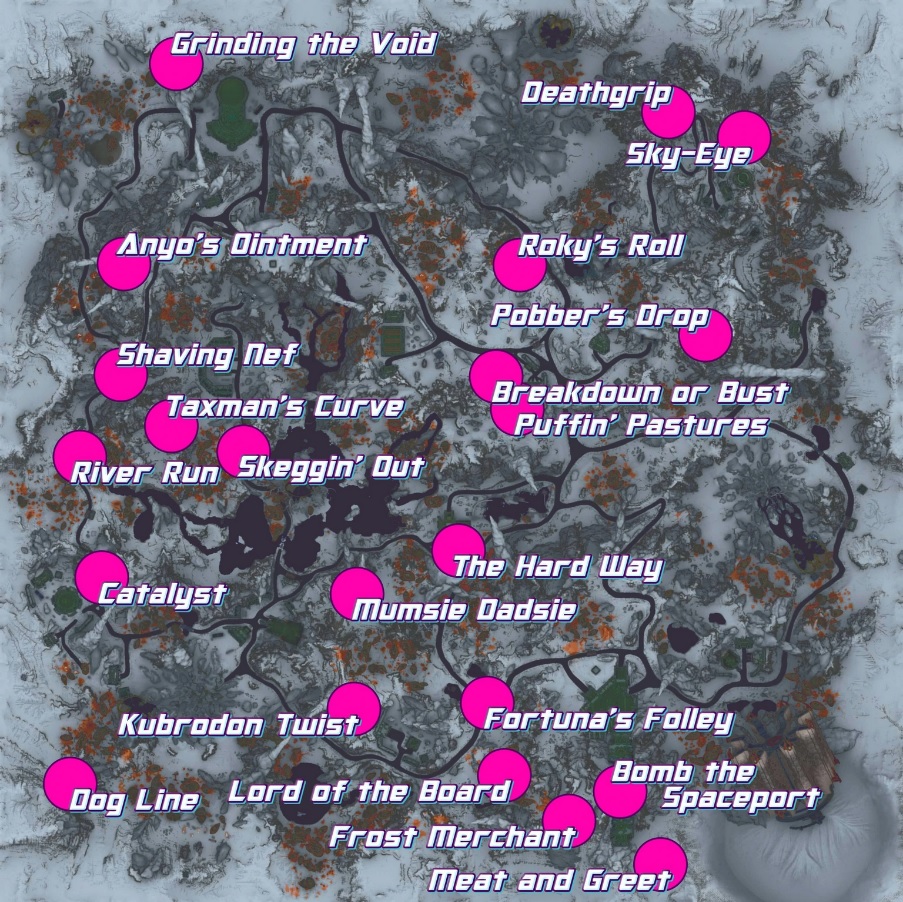 The Plains of Eidolon and Cambion Drift work just as fine for the 1,000,000 meters, but I'd recommend to do K-Drive races until you have unlocked both the [Race Ace] achievement and reached top rank with the Ventkids.
There are 22 races in Orb Vallis in total, but only 5 races are available per day. Those 5 are chosen randomly, so it might take a while to complete them all, should RNG dislike you.
Write down the names of the races you've completed and compare you're list with the map on the right to see, which of the races available you're still missing.
Click on the map to zoom in.

Like stated just above, I recommend to complete all K-Drive races first.
Once that's done, use this method:
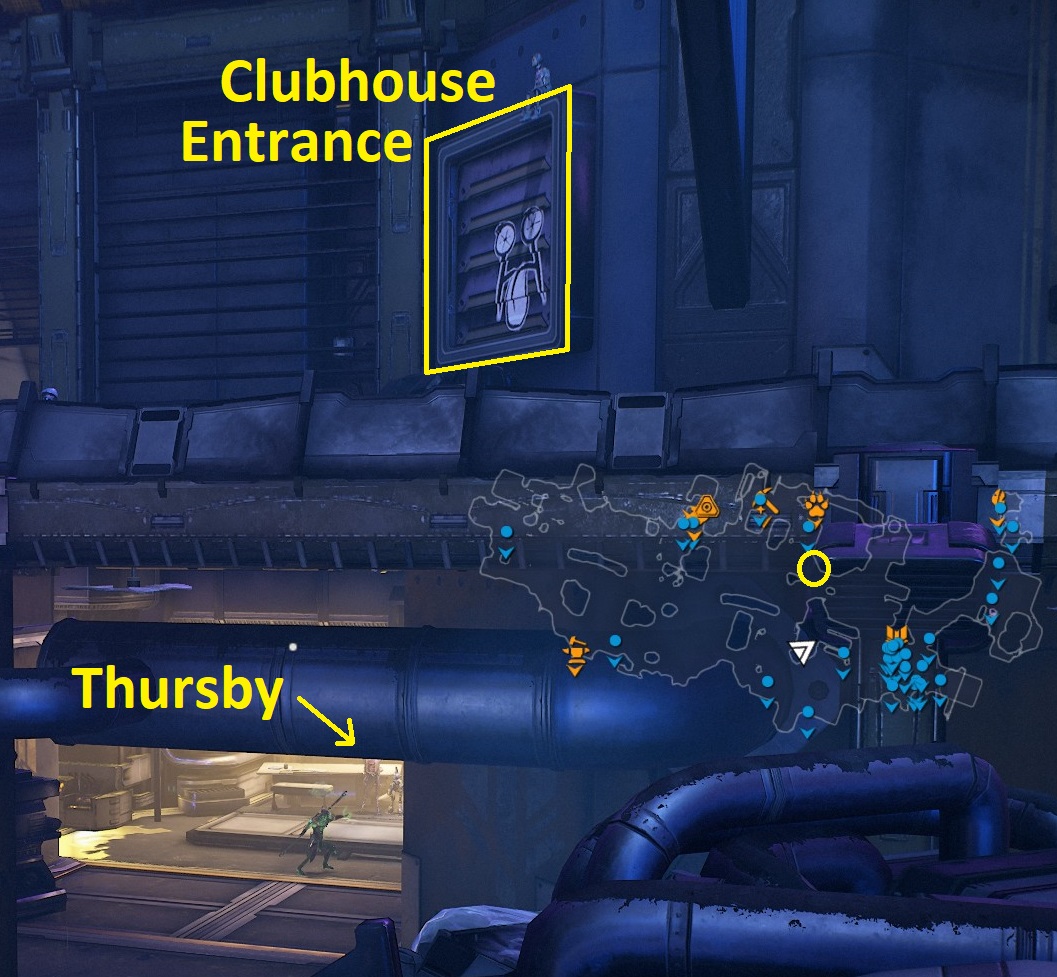 In order to rank up your standing with the Ventkids, you'll have to enter their clubhouse. To access it, you'll have to press [x] in front of the graffiti wall on the second floor of Fortuna, above Thursby's MOA shop ->
Picture
Achievement
Description
Money Can't Buy Happiness
Reach top standing with Solaris United
You can gain standing with Solaris United, once you've completed the quest [Vox Solaris].
Just visit Venus -> Fortuna and talk to Eudico to start it; no further requirements.
The normal way of obtaining standing with Solaris United is to complete bounties given by Eudico. Though you may also turn in rare gems, for which there's quick guide here:
Or you go for wild animal conservations, which is by far the most efficient way. Check the achievement just below for more info.
Picture
Achievement
Description
Animal Lover
Complete 10 perfect Conservation captures in Orb Vallis
Getting a perfect score requires you to tranq the animal without alerting it.
Here's a compact video guide how to do this, by Faceless Beanie:
Playing with a frame, that can turn invisible (Ash, Ivara, Loki), can make this a lot easier. It's not required though.
For a more thorough guide, check the corresponding fandom page:
Picture
Achievement
Description
Bounty Hunter
Complete 6 Bounties within 60 minutes while in Orb Vallis
Grab your best equipment & the Archwing launcher and do the easiest bounty 6 times. You do NOT need to do 6 different quests (at least as of publishing this guide.)
Bounties rotate every few hours, so if your first bounty takes to long, just abort and come back later.
Make sure you do NOT return to Fortuna! This NEEDS to be done, while staying in Orb Vallis the entire time! As such, start your bounties at the NPC just to your left, once you enter Orb Vallis.
I recommend to do this solo in order to trim voting time.
Picture
Achievement
Description
Vallis Spelunker
Explore all of the caves in Orb Vallis
This guide gives you a good map for all cave locations:
Picture
Achievement
Description
Airborne Exterminator
Destroy 10 Raknoids in Orb Vallis while airborn
This does NOT require the Archwing Launcher. Double-/Bullet jump, go into air glide by aiming and kill of the Raknoids.They spawn in groups of 3, which means you'll need 4 groups to spawn. Be aware, that a companion can make this harder on you by killing them before you do; or easier, if you use Artax, Taxon's cold beam weapon.
The Raknoids spawn randomly, usually buried underground or dangling from the ceiling of a cave / giant fungi.
People reported very different experiences with spawn spots, so just walk around and find something, that works for you.
Picture
Achievement
Description
Moa Money, Moa Problems
Acquire a Moa pet
MOAs can be crafted via one of the NPCs in Fortuna.
Buying a pre-made MOA with platinum as "Today's Special" will NOT unlock this achievement.
More information about MOAs here:
---------------------------------------------------------------------------------------------
The following achievements require a K-Drive, which you'll receive for free during the quest [Vox Solaris]. The quest has no start requirements, apart from visiting Venus -> Fortuna and talking to Eudico.
Picture
Achievement
Description
Hang Tenno
Make a 50 meter jump on a K-Drive
Stay Frosty
Fall in coolant on Orb Vallis from 275 meters while on a K-Drive
"Coolant" is just the fancy lore name for the water in Orb Vallis. Which means you need to land on a body of water after a 275 meter fall.There are 2 ways to go about this:
1) IF you already own the Archwing launcher, use it to boost yourself up in the air, switch to a K-Drive and just fall straight down.
2) If you don't own the Archwing launcher, climb the tower illustrated on the right. This one immediately enters your field of view upon entering Orb Vallis.
You can climb it just by using a few bullet jumps for the lower half and wall jump spam for the upper one.
Once there, mount your K-Drive, keep your space bar pressed for 2sec to charge up a jump and go for it - preferably by leaving the tower at the highest point.
This achievement seems to be a little bit buggy for some people and might need to be repeated a few times.
Picture
Achievement
Description
K-Driven
Ride 1,000,000 meters on a K-Drive
Race Ace
Complete all of the K-Drive races in Orb Vallis
The Plains of Eidolon and Cambion Drift work just as fine for the 1,000,000 meters, but I'd recommend to do K-Drive races until you have unlocked both the [Race Ace] achievement and reached top rank with the Ventkids.There are 22 races in Orb Vallis in total, but only 5 races are available per day. Those 5 are chosen randomly, so it might take a while to complete them all, should RNG dislike you.
Write down the names of the races you've completed and compare you're list with the map on the right to see, which of the races available you're still missing.
Click on the map to zoom in.
Picture
Achievement
Description
Ride or Die
Reach top standing with Ventkids
Like stated just above, I recommend to complete all K-Drive races first.
Once that's done, use this method:
In order to rank up your standing with the Ventkids, you'll have to enter their clubhouse. To access it, you'll have to press [x] in front of the graffiti wall on the second floor of Fortuna, above Thursby's MOA shop ->-----------------------------
Other useful Guides
For a guide of the ingame only achievements, check out this one:
If you want more general information, check out any of these guides, which I liked and used a lot myself:
You'll also notice sooner or later, that getting all achievements in Warframe won't be possible without a good amount of platinum - the premium currency of Warframe, which can be bought for real money.
There are, however, ways to obtain platinum via ingame trading, without paying any money.
More information given in any of these guides:
If you want more general information, check out any of these guides, which I liked and used a lot myself:
- https://steamcommunity.com/sharedfiles/filedetails/?id=2616946893
- https://steamcommunity.com/sharedfiles/filedetails/?id=1303185143
- https://steamcommunity.com/sharedfiles/filedetails/?id=1733258640
- https://steamcommunity.com/sharedfiles/filedetails/?id=900619498
You'll also notice sooner or later, that getting all achievements in Warframe won't be possible without a good amount of platinum - the premium currency of Warframe, which can be bought for real money.
There are, however, ways to obtain platinum via ingame trading, without paying any money.
More information given in any of these guides:
- https://steamcommunity.com/sharedfiles/filedetails/?id=689822346
- https://steamcommunity.com/sharedfiles/filedetails/?id=969115276
🏆
Beat Warframe's 100% run?
Flex it — let your friends know you pulled it off.
More Warframe guides
- Synthesis Target Locations★ 5 (8.2k)220k views13k ♥27 minUpdated Apr 15
- 🤗Ultimate Beginner's Guide To Warframe 2026🤗★ 5 (1.7k)41k views3.5k ♥149 minUpdated Feb 3
- Shawzin codes/songs (UPD 11.10.2020)★ 5 (434)35k views1.1k ♥4 minUpdated Oct 11, 2020
- The Ultimate Shawzin Collection★ 5 (1.3k)31k views3.3k ♥12 minUpdated Sep 30, 2020
- Починка чата с помощью Zapret без VPN★ 5 (367)26k views621 ♥2 minRussianUpdated Sep 28, 2025
- Duviri Archarbor Puzzle Guide★ 5 (175)26k views341 ♥5 minUpdated Nov 27, 2023




This guide was created by its original author on the Steam Community. Are you the author and want it removed? Request removal.