Workshop Tips, Tricks & Essentials
Navigating the Workshop Page
Searching for specific items in the Workshop Page can feel like looking for a needle in a haystack. Fortunately, we have a magnet to help you out.
The Haystack:
There are various other important details to know about using workshop items, which are covered in the later sections of this guide.
The Haystack:
- Over 29,000 Workshop Scenarios
- Nearly 200 finalized Workshop Routes with tailor-made scenarios
- Over 500 Workshop Routes (work in progress) available for preview
There are various other important details to know about using workshop items, which are covered in the later sections of this guide.
Finding Items - Via the Route List
Most Train Simulator routes you purchase on Steam come with a small selection of official scenarios created specifically for that route. However, there are usually many more available for free in the Workshop.
In addition to free scenarios, there are also free Workshop Routes.
The following link is the best way to find whatever you want.
TSC Routes & Scenarios[www.railsims.com]
This guide shows you how to use it. You will be able to access all the route's Workshop Scenarios (one click will pull them up from the Workshop).
Summary of what's included:
And of course, besides scenarios you can also find free Workshop routes to download and add to your collection.
Click and you're there. It's that simple.
In addition to free scenarios, there are also free Workshop Routes.
The following link is the best way to find whatever you want.
TSC Routes & Scenarios[www.railsims.com]
This guide shows you how to use it. You will be able to access all the route's Workshop Scenarios (one click will pull them up from the Workshop).
Summary of what's included:
- Scenarios written specifically for the route
- Route Length
- Publication Date
- ID Number & Region
- Scenarios Using Assets of the route
- Route Manual
- Store Page Link
- Developer Link
- Included Locos & Rolling Stock (mouseover route title)
- Path to the Route Assets
- Any included Loco & Asset Packs
- Feedback Link
- Workshop Page Link
- Author Link
- DLC used as Base Template
And of course, besides scenarios you can also find free Workshop routes to download and add to your collection.
Click and you're there. It's that simple.
Finding Items - Via the Quick Finder
Another way to find what you're looking for is via the Quick Finder.
It even includes maps and route folder numbers.
You can access it by clicking the following link and choosing 'Quick Finder' from the Menu.
TSC Workshop Menu[www.railsims.com]
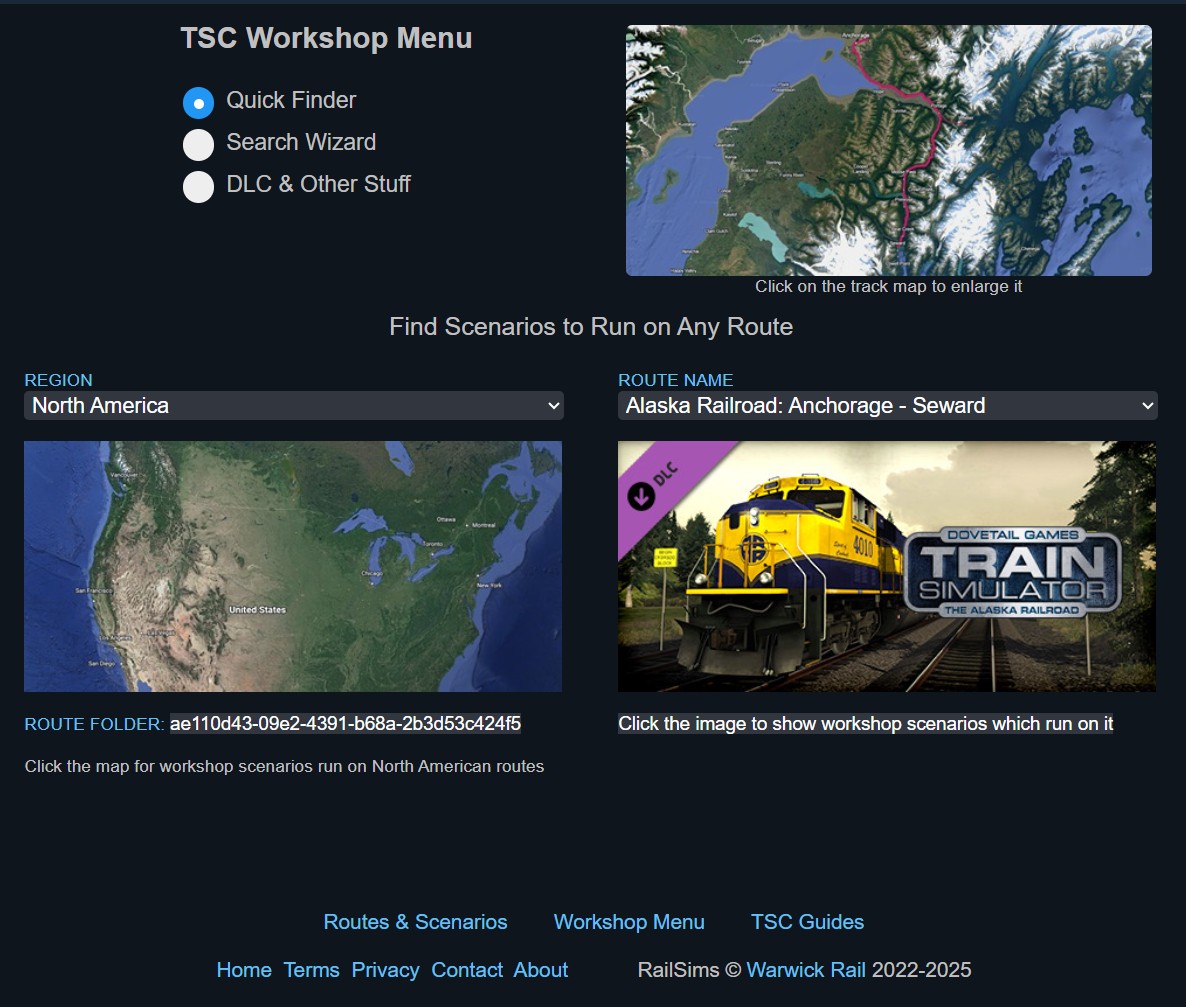
Just choose any route and instantly get a set of scenarios for it.
It even includes maps and route folder numbers.
You can access it by clicking the following link and choosing 'Quick Finder' from the Menu.
TSC Workshop Menu[www.railsims.com]
Just choose any route and instantly get a set of scenarios for it.
Finding Items - Via the Search Wizard
The most powerful way to find what you're looking for is via the Advanced Search Wizard.
You can access it by clicking the following link and choosing 'Search Wizard' from the Menu.
TSC Workshop Menu[www.railsims.com]
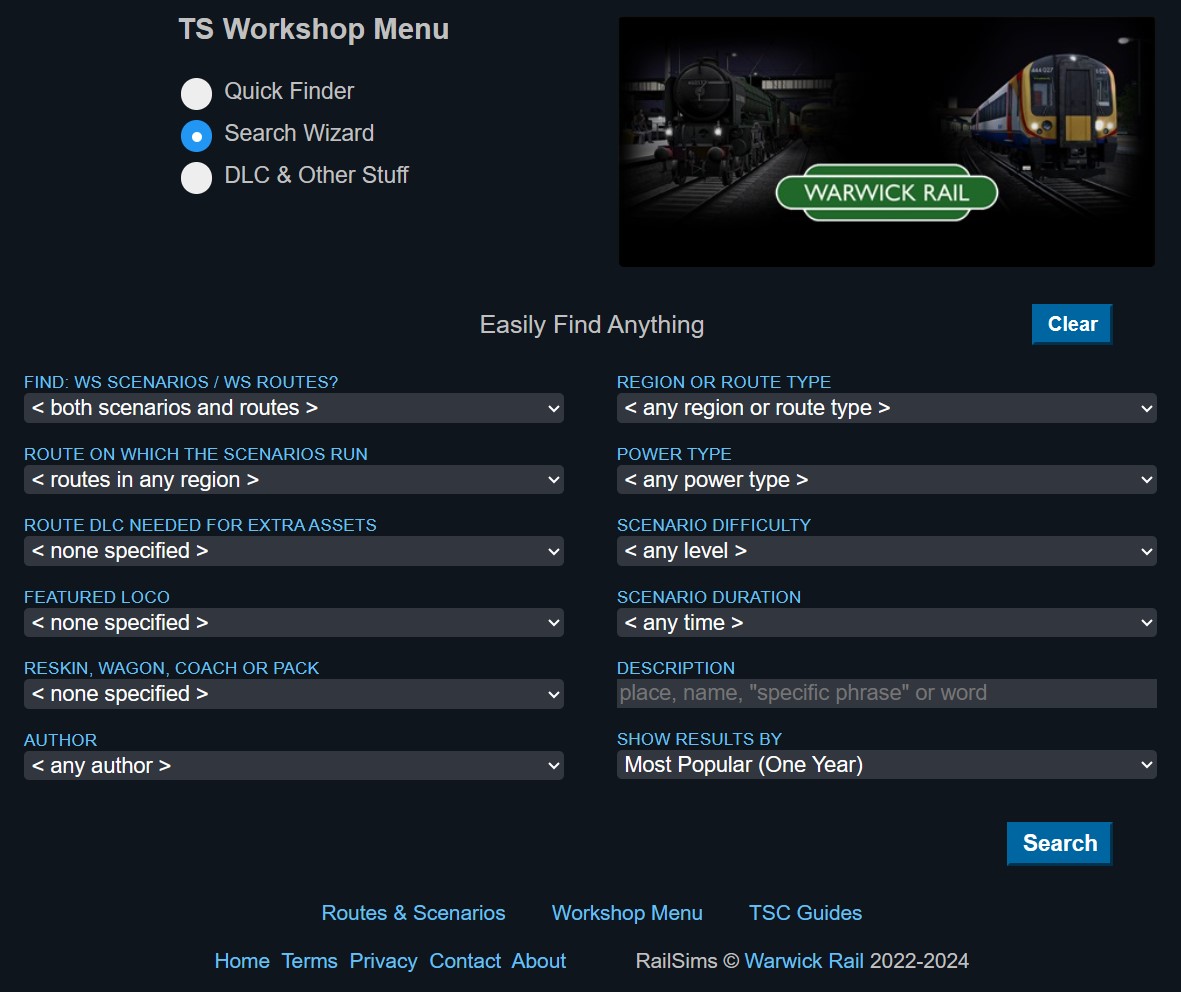
Now you can enter any info you like and instantly get the results you need.
You can access it by clicking the following link and choosing 'Search Wizard' from the Menu.
TSC Workshop Menu[www.railsims.com]
Now you can enter any info you like and instantly get the results you need.
Subscribing to Scenarios
Browse the routes from the menu described in the first section. Here's the link to it
TSC Routes & Scenarios[www.railsims.com]
Once it is open, you can filter the list by route type and region if desired.
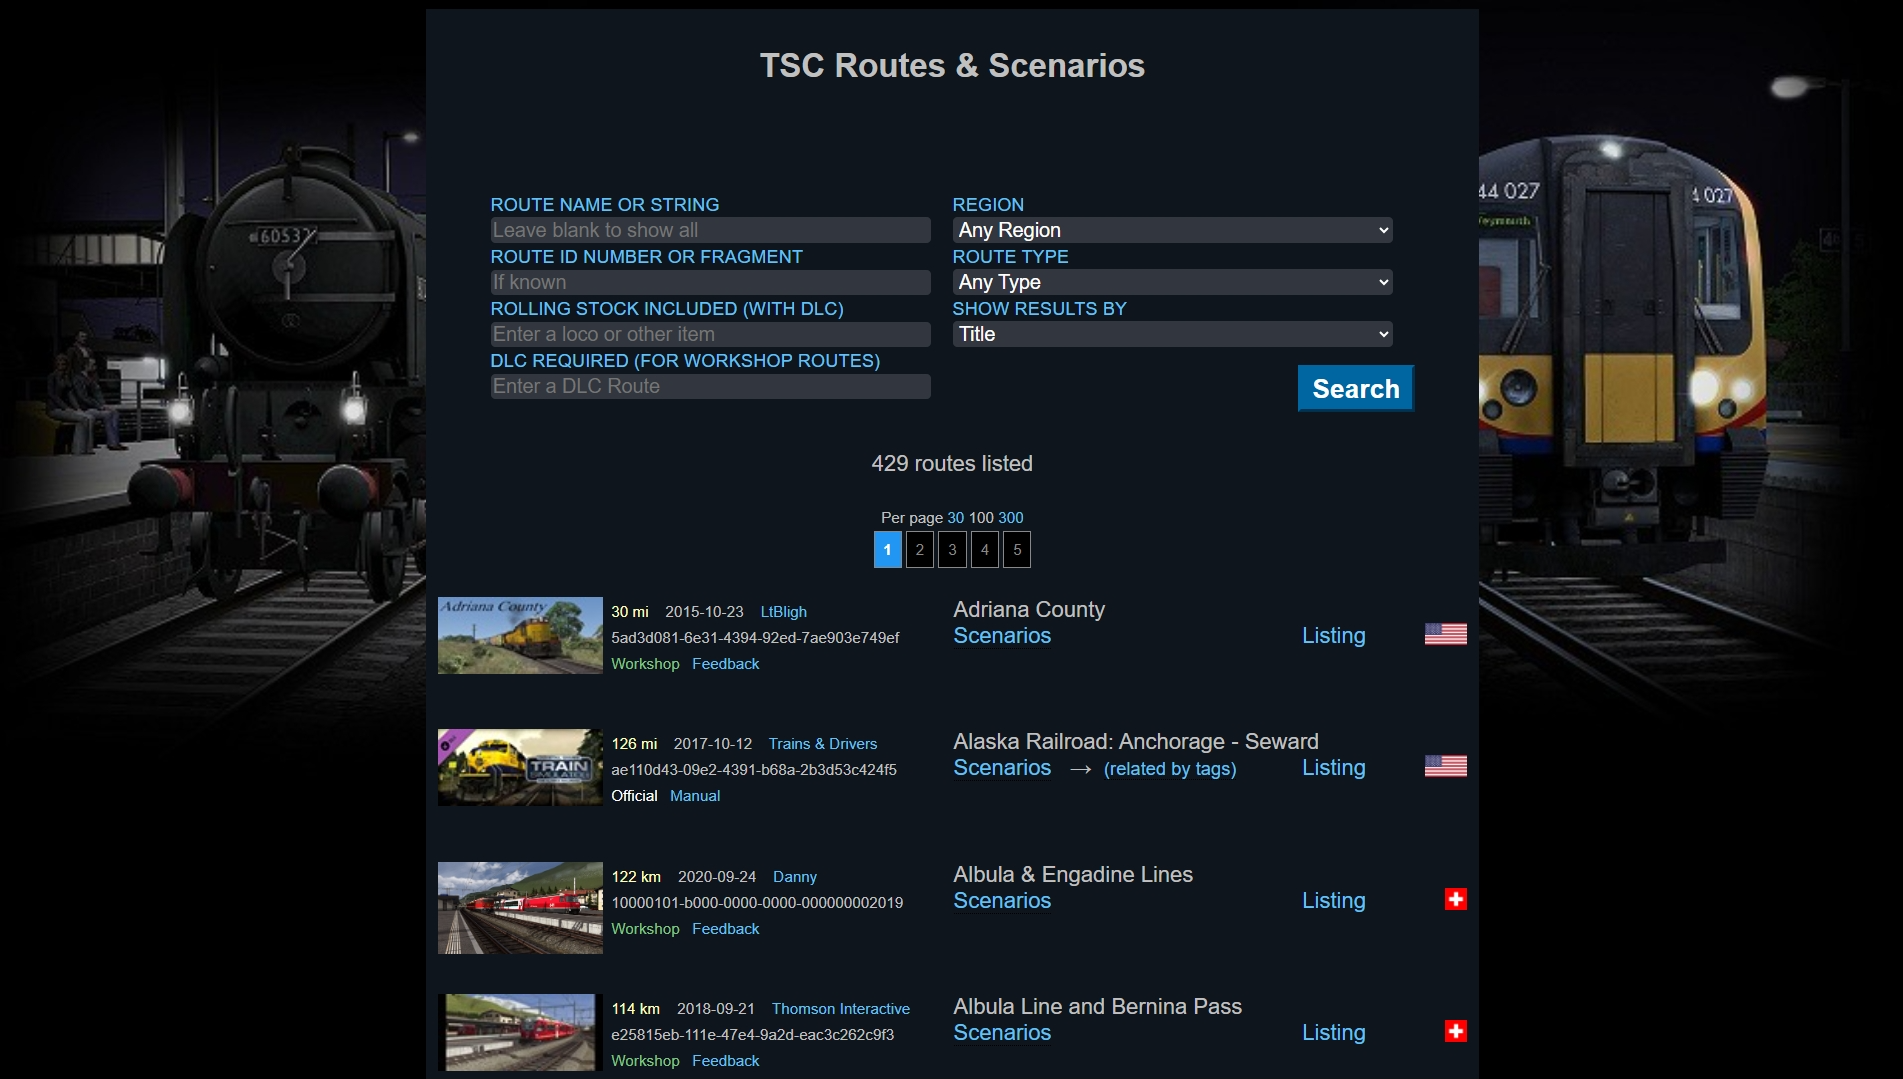
Find any route which you have in your collection and click the "Scenarios" link.
This triggers the Workshop to open and display all the scenarios written for that route.
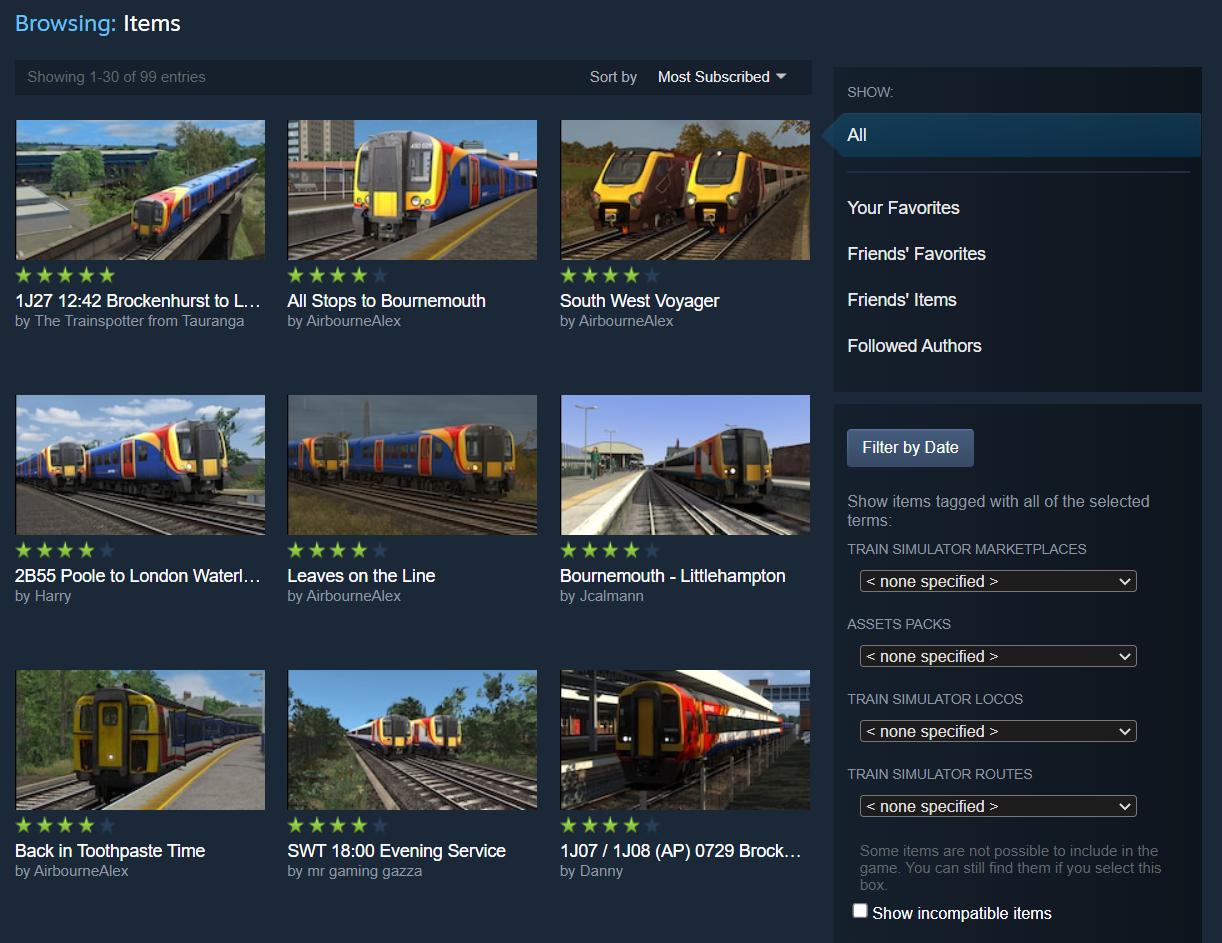
Browse through this until you find a scenario which you might like to play, and then click on it to open its Workshop Page.
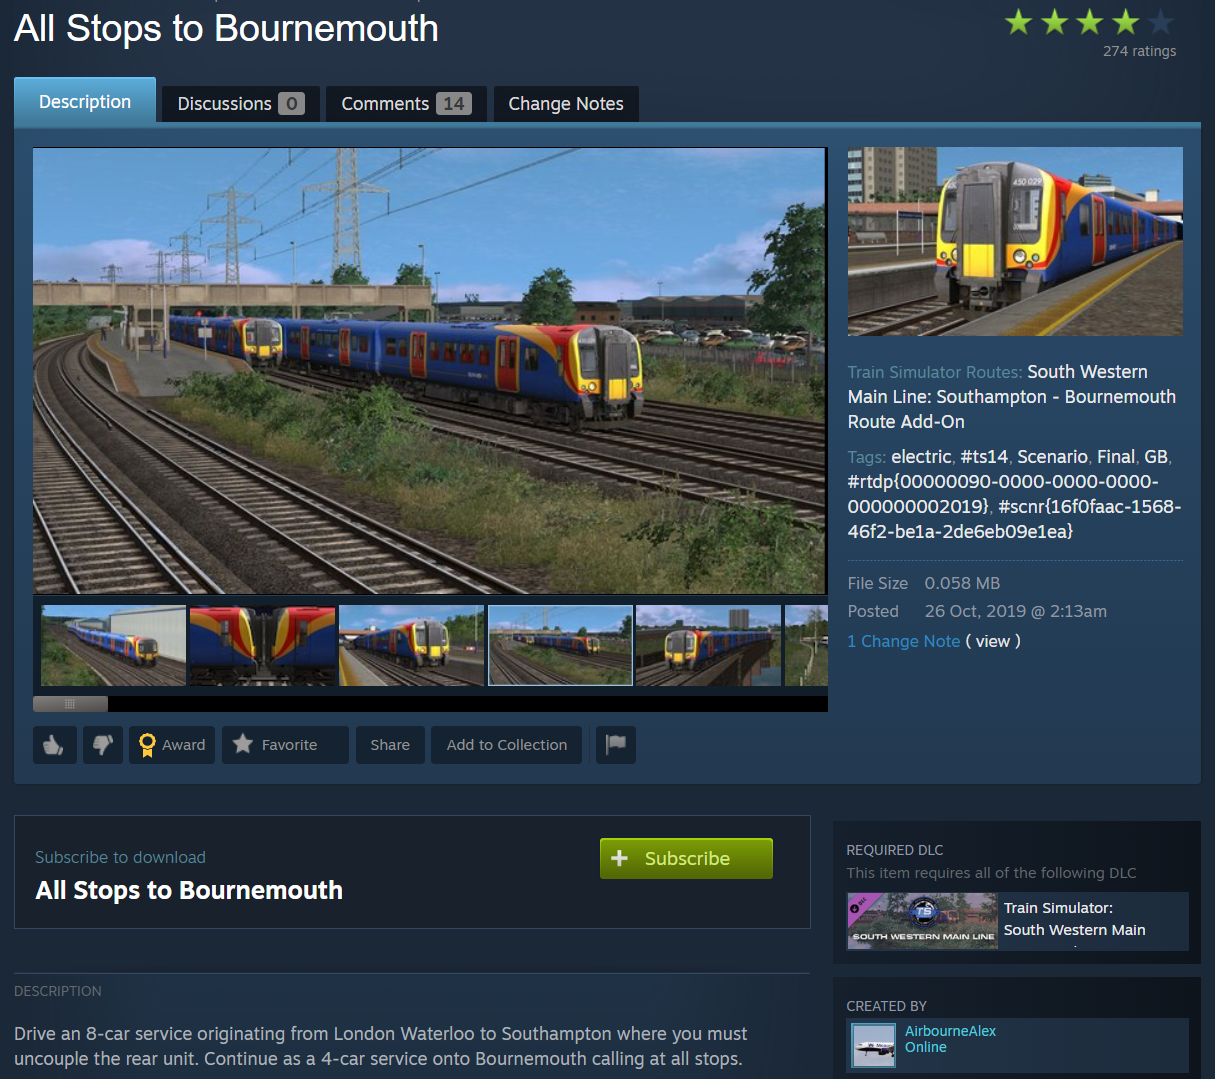
If you like what you see, you can flag it to be automatically downloaded and added to your game by clicking the "Subscribe" button.
The Subscribe function serves two purposes:
Please note: By unsubscribing, you merely disable the "update overwrite" function. The item itself will remain installed and playable in your copy of the game.
If you wish to delete the item, follow the steps explained later in this guide.
TSC Routes & Scenarios[www.railsims.com]
Once it is open, you can filter the list by route type and region if desired.
Find any route which you have in your collection and click the "Scenarios" link.
This triggers the Workshop to open and display all the scenarios written for that route.
Browse through this until you find a scenario which you might like to play, and then click on it to open its Workshop Page.
If you like what you see, you can flag it to be automatically downloaded and added to your game by clicking the "Subscribe" button.
The Subscribe function serves two purposes:
- It flags the item to be downloaded to your machine the next time you start the game.
- It flags the item to automatically download and overwrite with any future updates.
Please note: By unsubscribing, you merely disable the "update overwrite" function. The item itself will remain installed and playable in your copy of the game.
If you wish to delete the item, follow the steps explained later in this guide.
Subscribing to Routes
If you subscribe to a Workshop route you will also be able to subscribe to and run all the Workshop scenarios made for that route. If you wish, you will also be able to make your own scenarios for it and publish them to the Workshop for others to enjoy.
Browse all the Workshop routes from the menu described in the first section. Here's the link to it
TSC Routes & Scenarios[www.railsims.com]
Once it is open, select "Workshop" as the type. You can also filter the routes by region if desired.
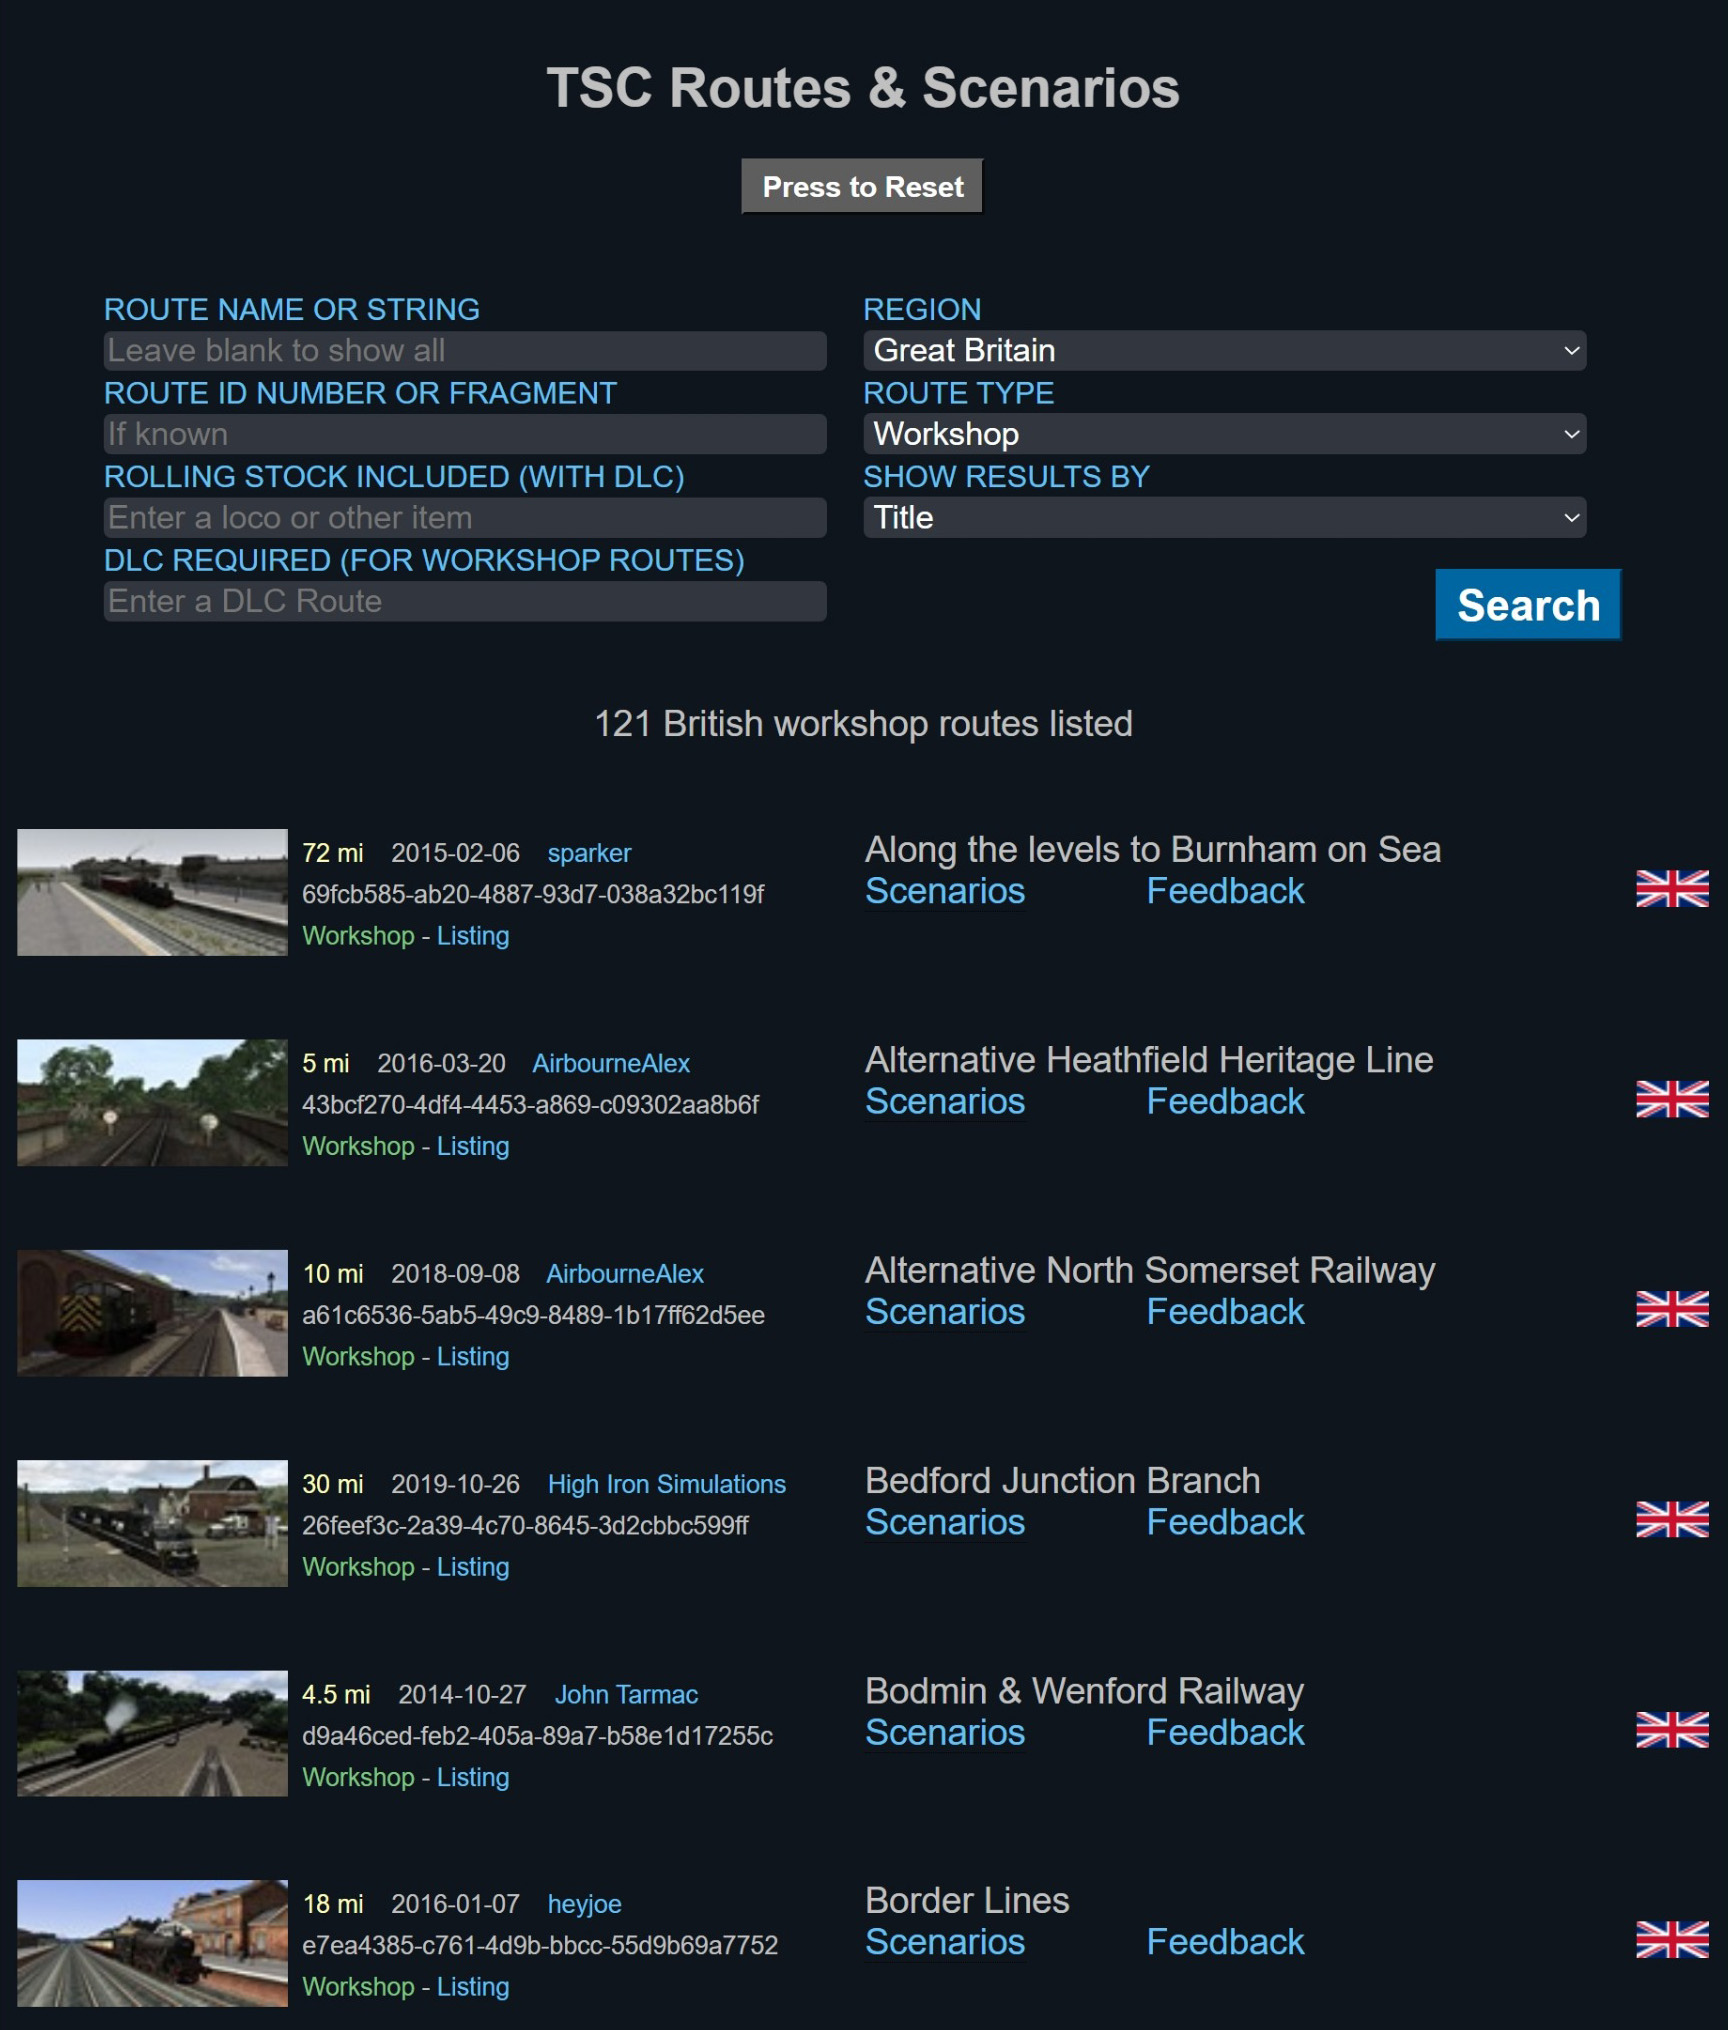
If you see something of interest, click on its image. This will trigger the Workshop to open and display the special page for that particular route.
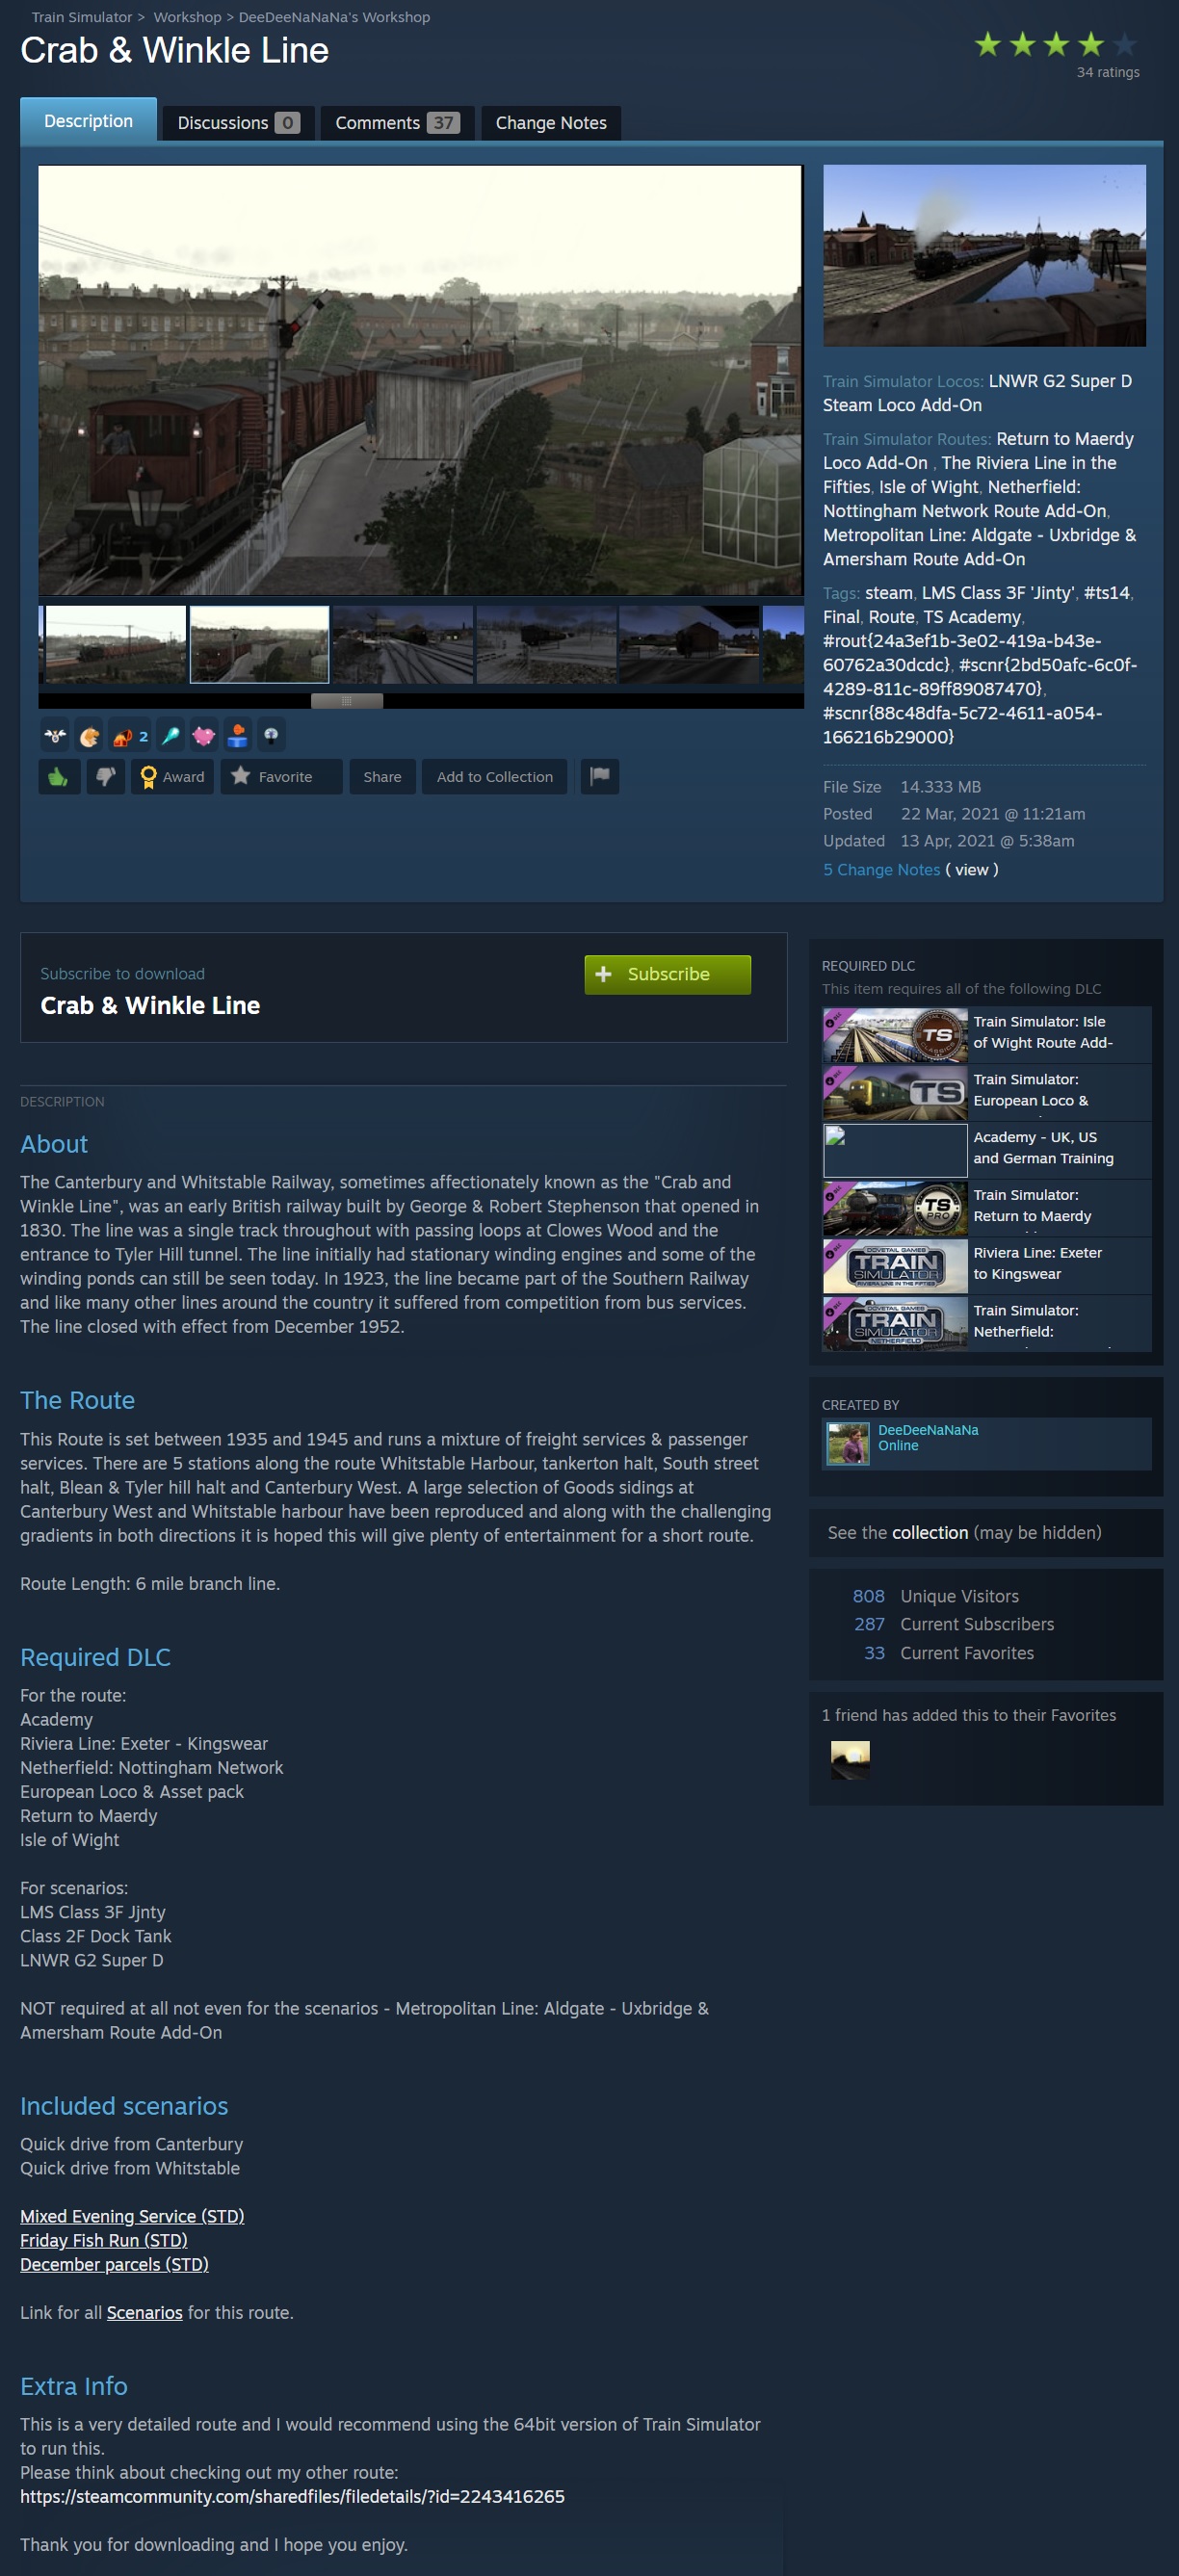
Take a look at the DLC requirements in the route's description.
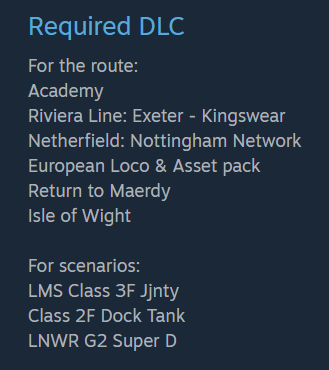
If you own the required DLC, you can flag the route to be automatically downloaded and added to your game by clicking the "Subscribe" button.
Remember, the Subscribe function serves 2 purposes:
Please note: By unsubscribing, you merely disable the "update overwrite" function. The item itself will remain installed and playable in your copy of the game.
If you wish to delete it, follow the steps explained later in this guide.
Browse all the Workshop routes from the menu described in the first section. Here's the link to it
TSC Routes & Scenarios[www.railsims.com]
Once it is open, select "Workshop" as the type. You can also filter the routes by region if desired.
If you see something of interest, click on its image. This will trigger the Workshop to open and display the special page for that particular route.
Take a look at the DLC requirements in the route's description.
If you own the required DLC, you can flag the route to be automatically downloaded and added to your game by clicking the "Subscribe" button.
Remember, the Subscribe function serves 2 purposes:
- It flags the item to be downloaded to your machine the next time you start the game.
- It flags it to automatically download and overwrite the item with any future updates.
Please note: By unsubscribing, you merely disable the "update overwrite" function. The item itself will remain installed and playable in your copy of the game.
If you wish to delete it, follow the steps explained later in this guide.
Installing
Once you have subscribed to a Workshop item, there is a simple but vital procedure to follow before it will appear in game for the first time.
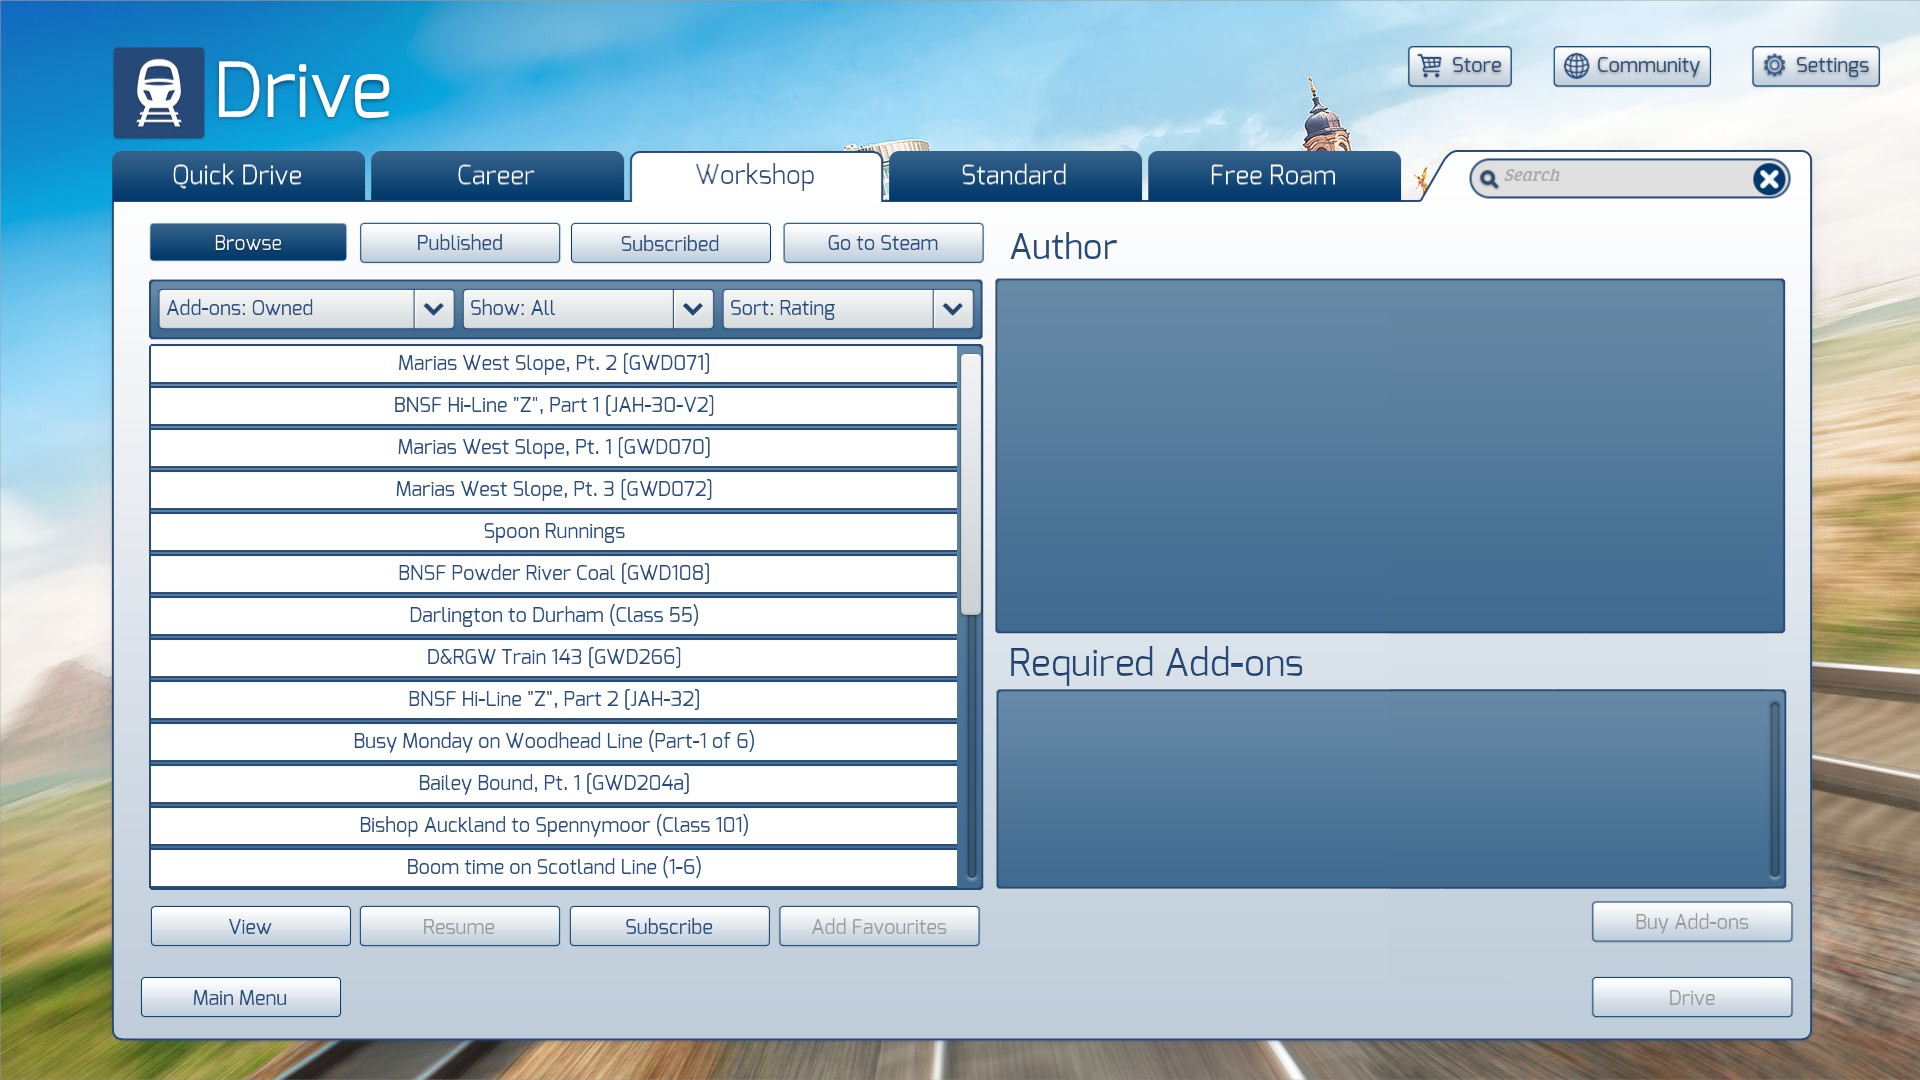
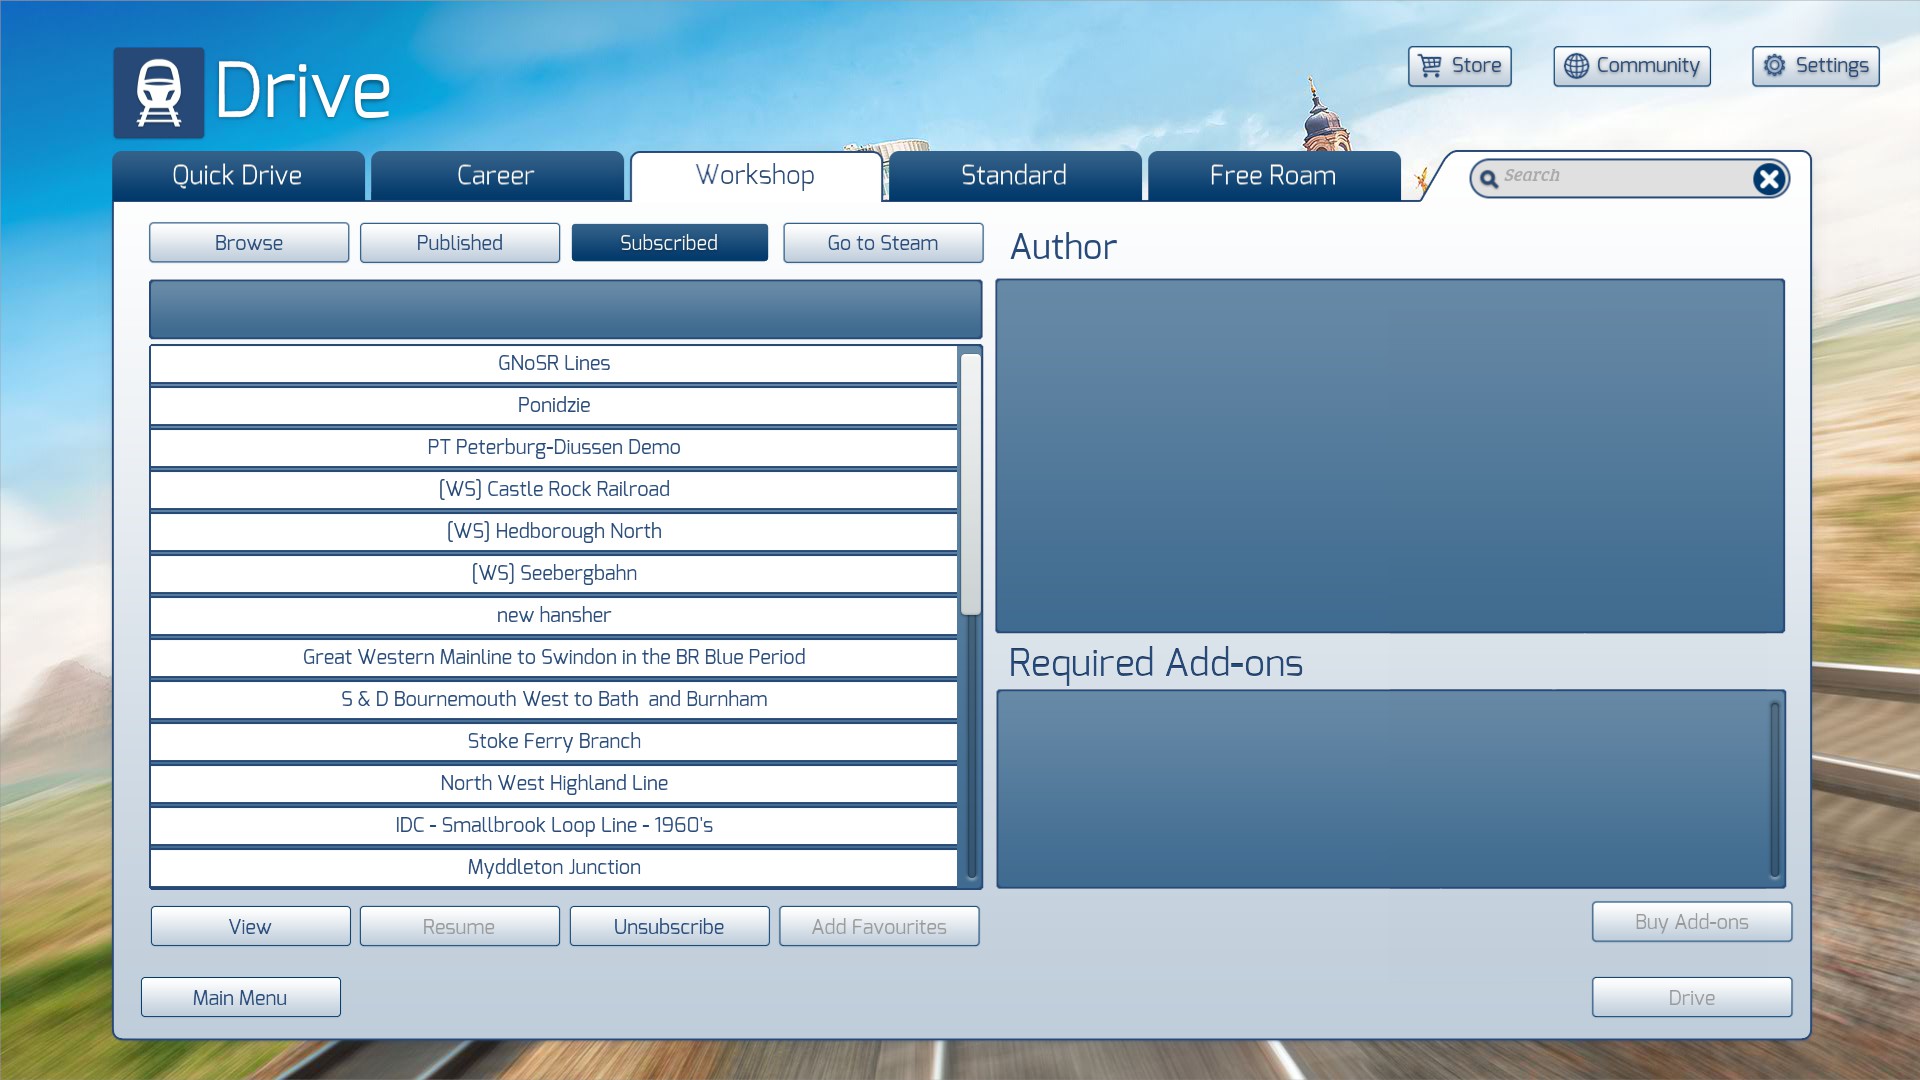
Your new workshop item will then be installed and you should see it added to the "Subscribed" list.
It is now ready to be used. But we advise you NOT to run a scenario using the "Drive" button on this menu. Our advice is to follow the recommendations in the next section.
- Launch the game
- Go to the Drive Menu
- Choose the Workshop tab
- Select "Subscribed"
Your new workshop item will then be installed and you should see it added to the "Subscribed" list.
It is now ready to be used. But we advise you NOT to run a scenario using the "Drive" button on this menu. Our advice is to follow the recommendations in the next section.
Running a Scenario
If your newly installed Workshop item is a scenario, it will probably be a Standard scenario.
Instead of running your scenario from the Workshop tab, we recommend using the Standard tab. The reason for this is that the Drive button under the Workshop tab menu relies on the workshop tagging system and will be disabled if a route or scenario is tagged with an item you do not own. Often, incorrect tags are attached—particularly the tag for the Metropolitan Line.
So...
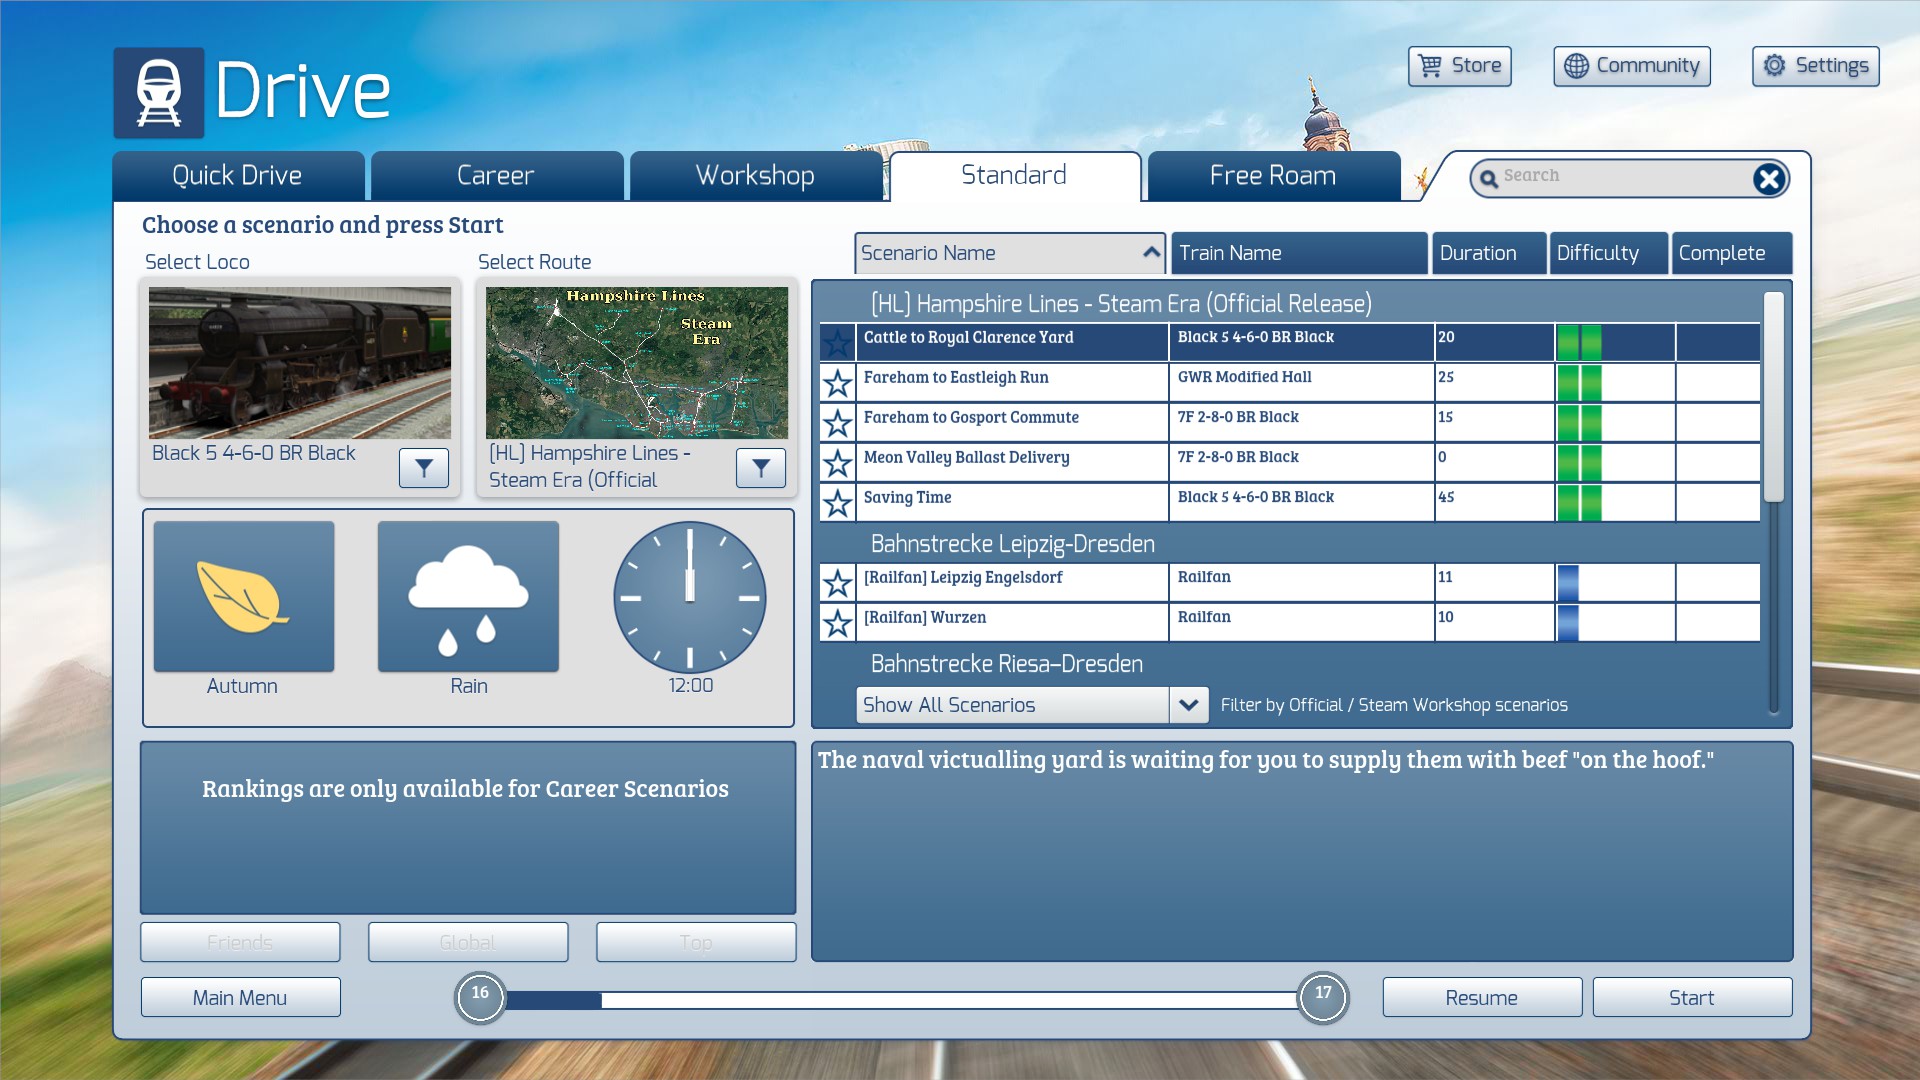
For Freeroam or Career scenarios, select the appropriate tab and follow a similar procedure.
Instead of running your scenario from the Workshop tab, we recommend using the Standard tab. The reason for this is that the Drive button under the Workshop tab menu relies on the workshop tagging system and will be disabled if a route or scenario is tagged with an item you do not own. Often, incorrect tags are attached—particularly the tag for the Metropolitan Line.
So...
- On the Drive menu, select "Standard"
- You will find your new scenario listed under the route for which it was made
- Click on its name to select it
- Press "Start" to launch the scenario
For Freeroam or Career scenarios, select the appropriate tab and follow a similar procedure.
Quick Driving a Route
If your newly installed Workshop item is a route, it may come with a Quick Drive menu enabled.
On the Drive menu, select "Quick Drive"
Click on the "Route" image box (lower left) to bring up the page(s) of possible routes on the right.
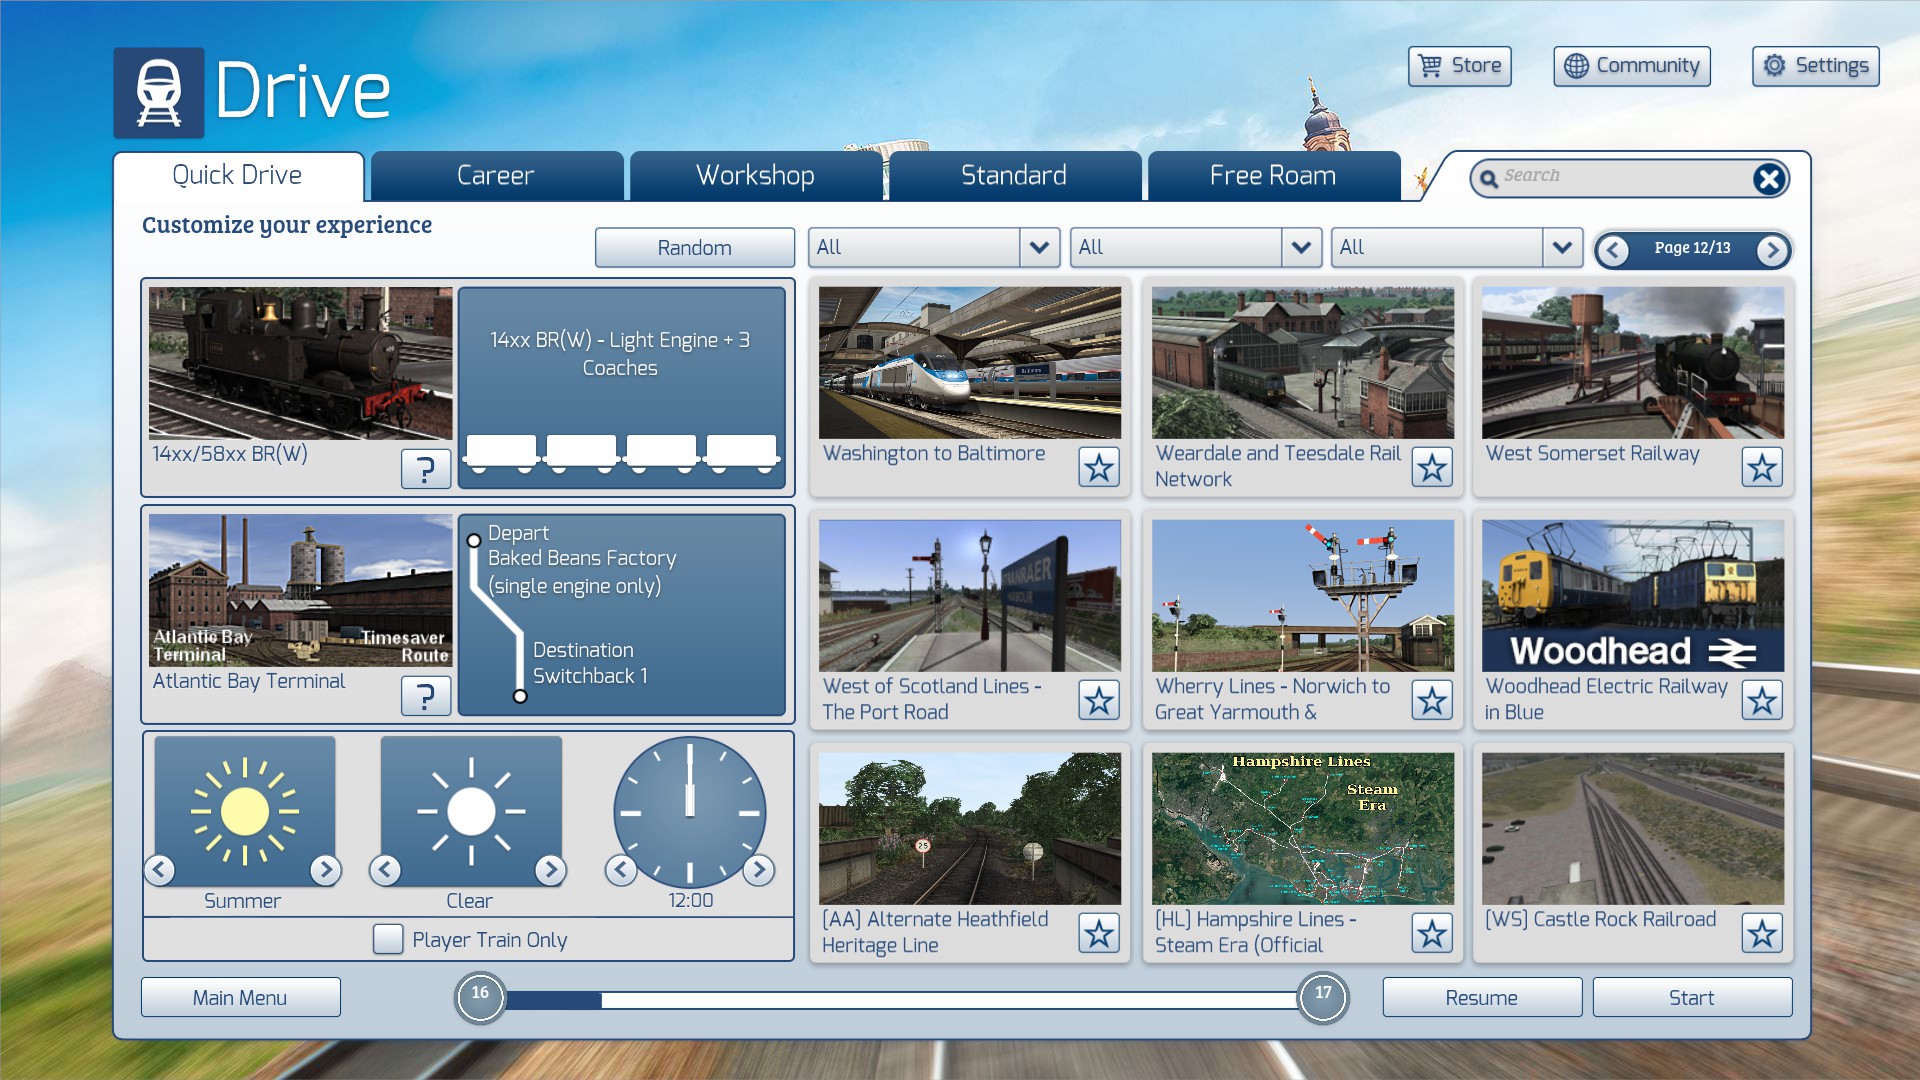
Browse the page(s) until you find your new route.
Click on its image to select it.
A Quick Drive menu should now appear where you can choose a departure point and destination for your journey.
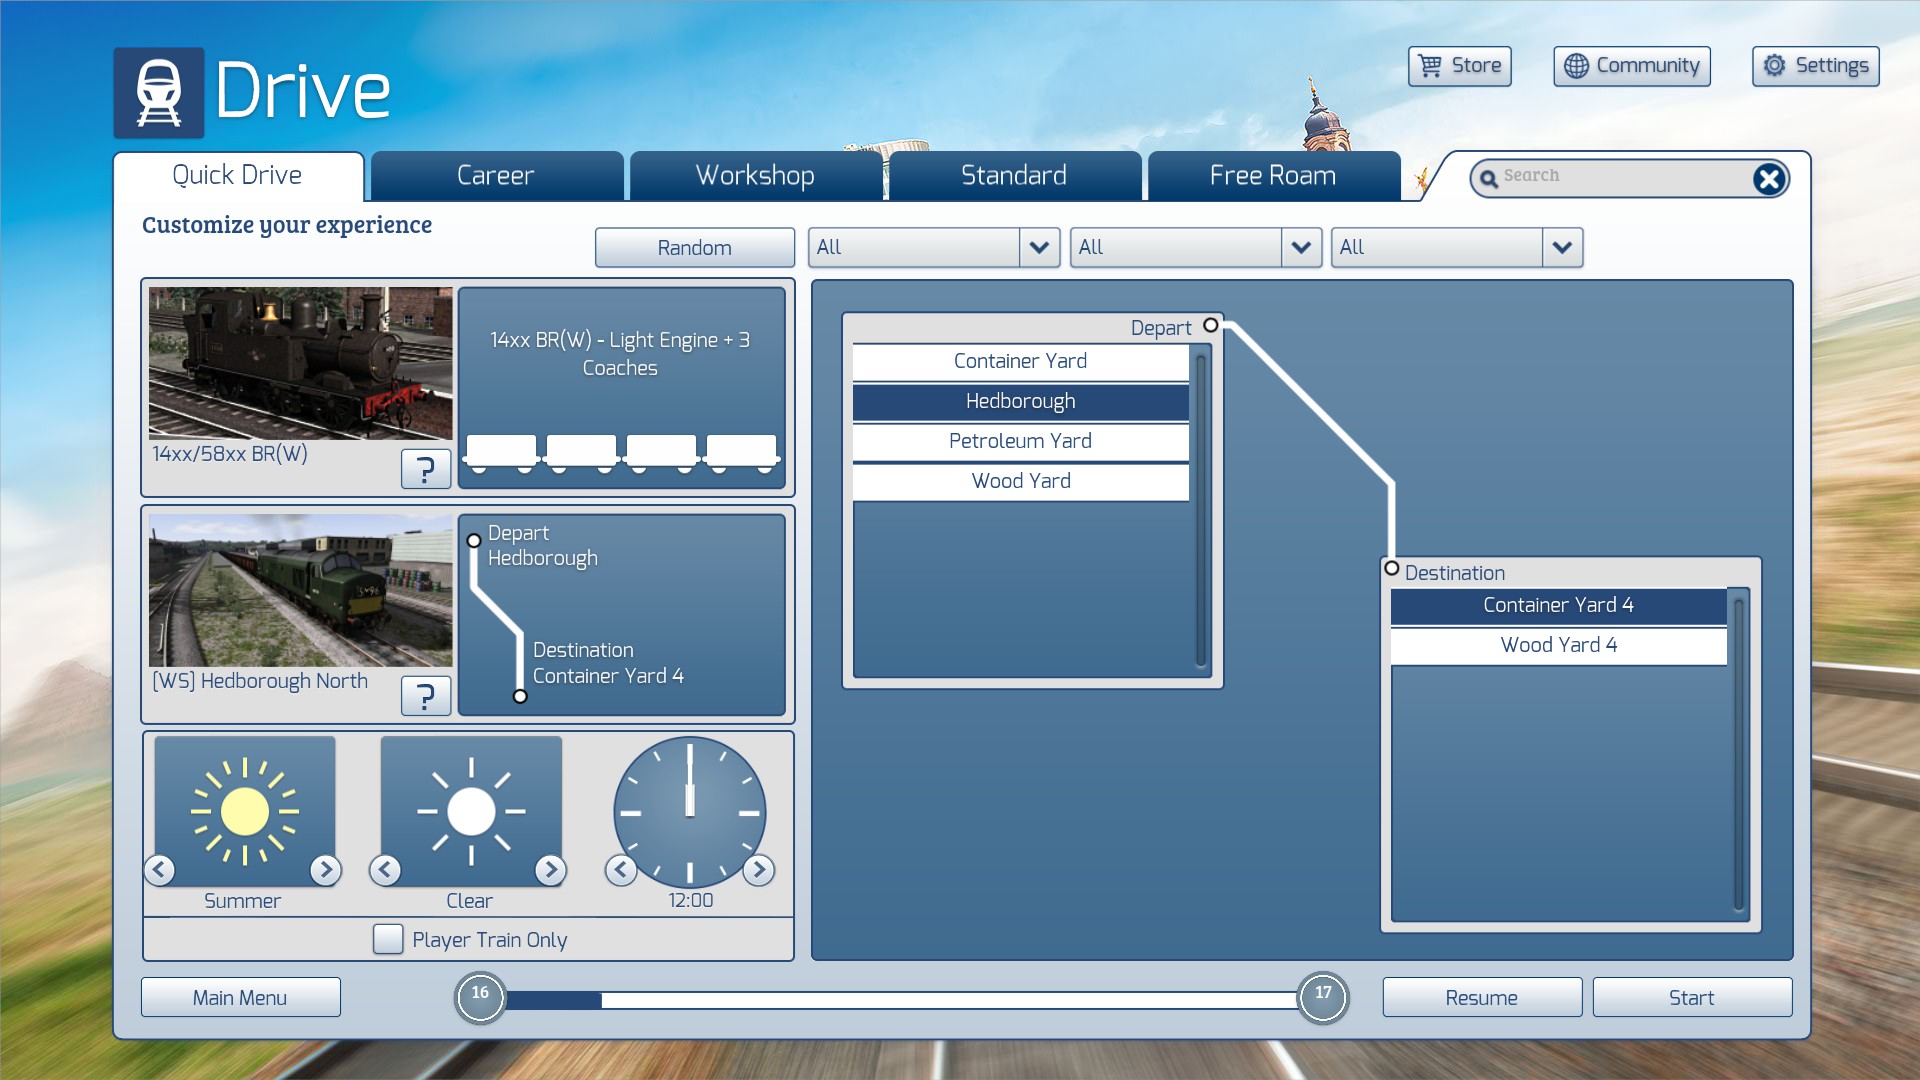
On the Drive menu, select "Quick Drive"
Click on the "Route" image box (lower left) to bring up the page(s) of possible routes on the right.
Browse the page(s) until you find your new route.
Click on its image to select it.
A Quick Drive menu should now appear where you can choose a departure point and destination for your journey.
- Select Departure point
- Select Destination
- Choose season, weather and time of day (lower left box)
- Choose whether to exclude AI trains (this works for official routes only)
- Press "Start" to launch the Quick Drive scenario
Restoring Missing Routes
Are certain workshop routes missing from your Drive Menu? Occasionally, you may notice that most or even all the workshop routes in your Drive Menu have disappeared. Fortunately, this is a caching issue and can be easily remedied.
- Go to your RailWorks folder.
- Open the Content folder.
- Remove the following files:
- SDBCache.bin
- SDBCache.bin.MD5
- RVDBCache.bin
- RVDBCache.bin.MD5
Problems While Running
After hitting the Start button, your quick drive scenario will load into the game. Once all the loading screens have been passed, you might be confronted with an error message similar to the following:
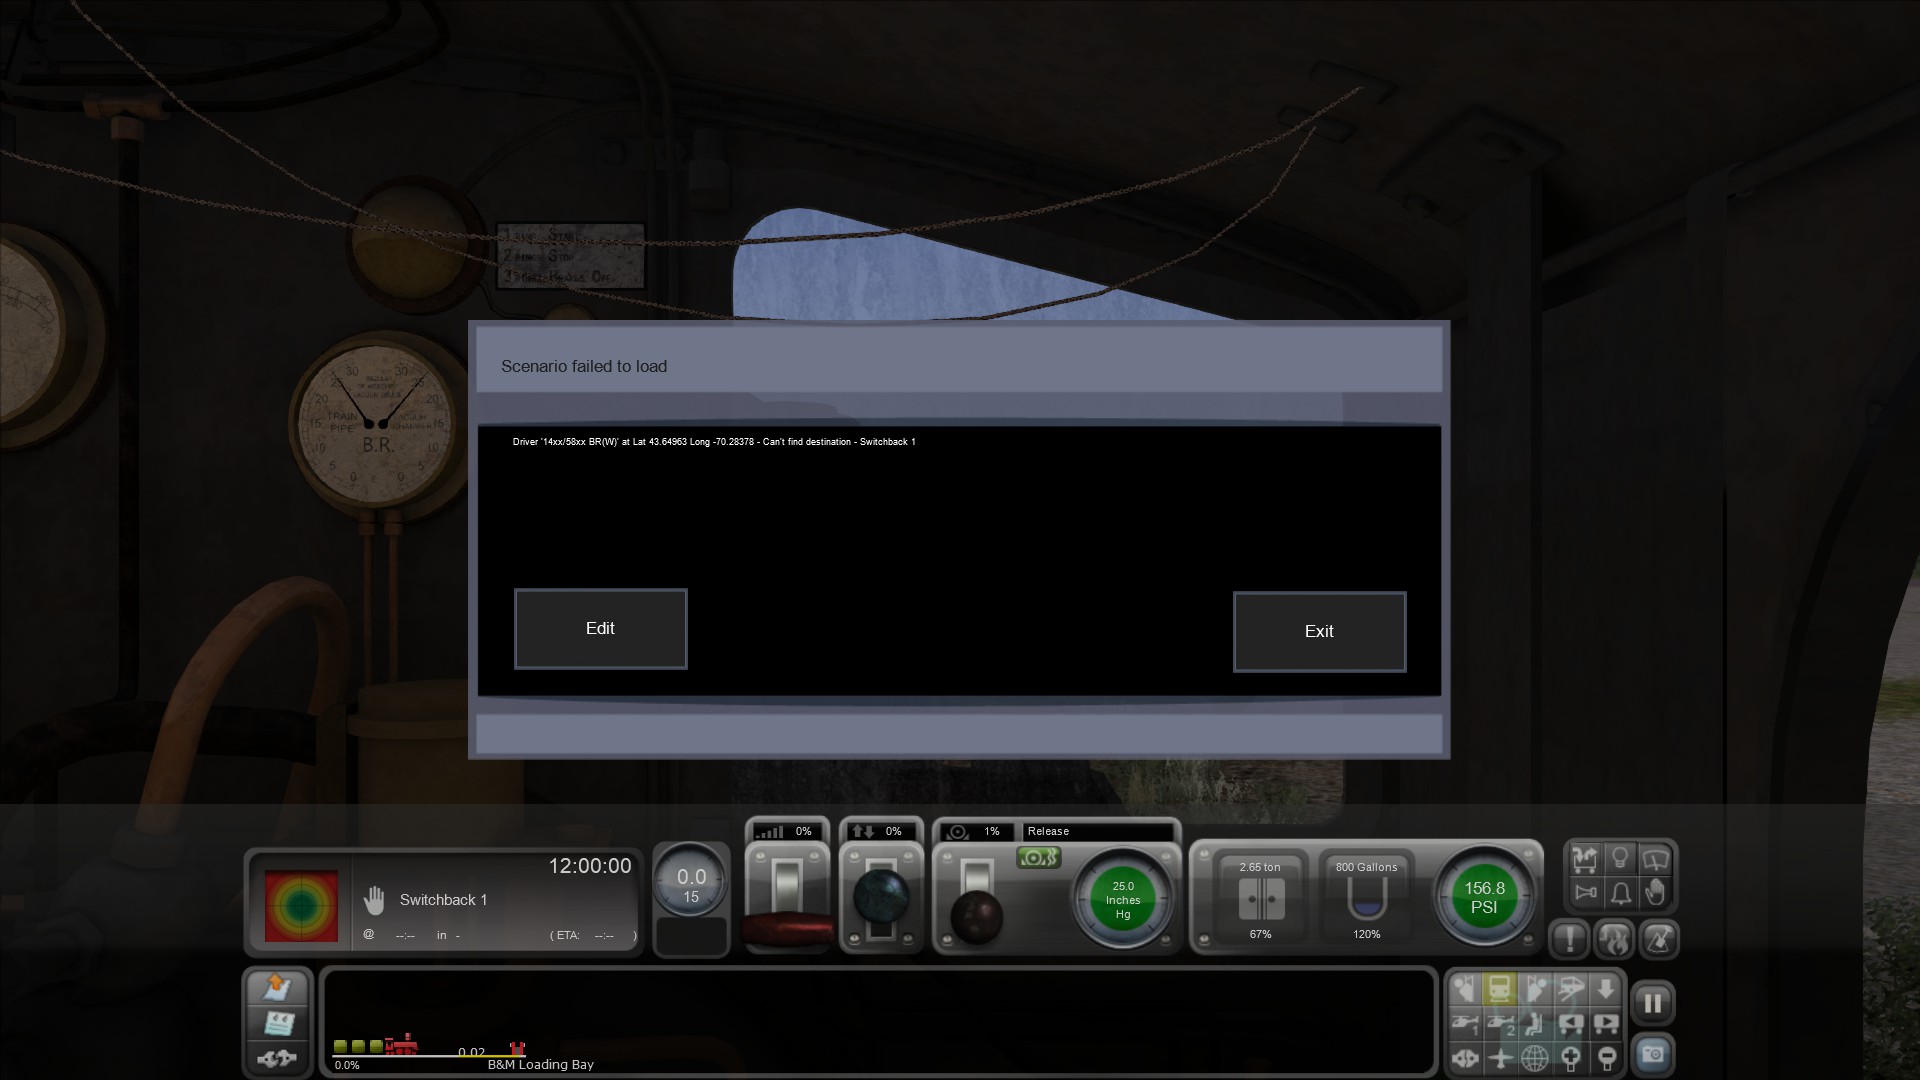
This may be caused by an error in the quick drive or perhaps an item of scenery or a rail vehicle placed on the route which you do not have in your library.
The message box gives you 2 choices - either to Edit or Exit.
The trick is to do neither. Just press F2 (as though you were trying to save the scenario). You will see the following:
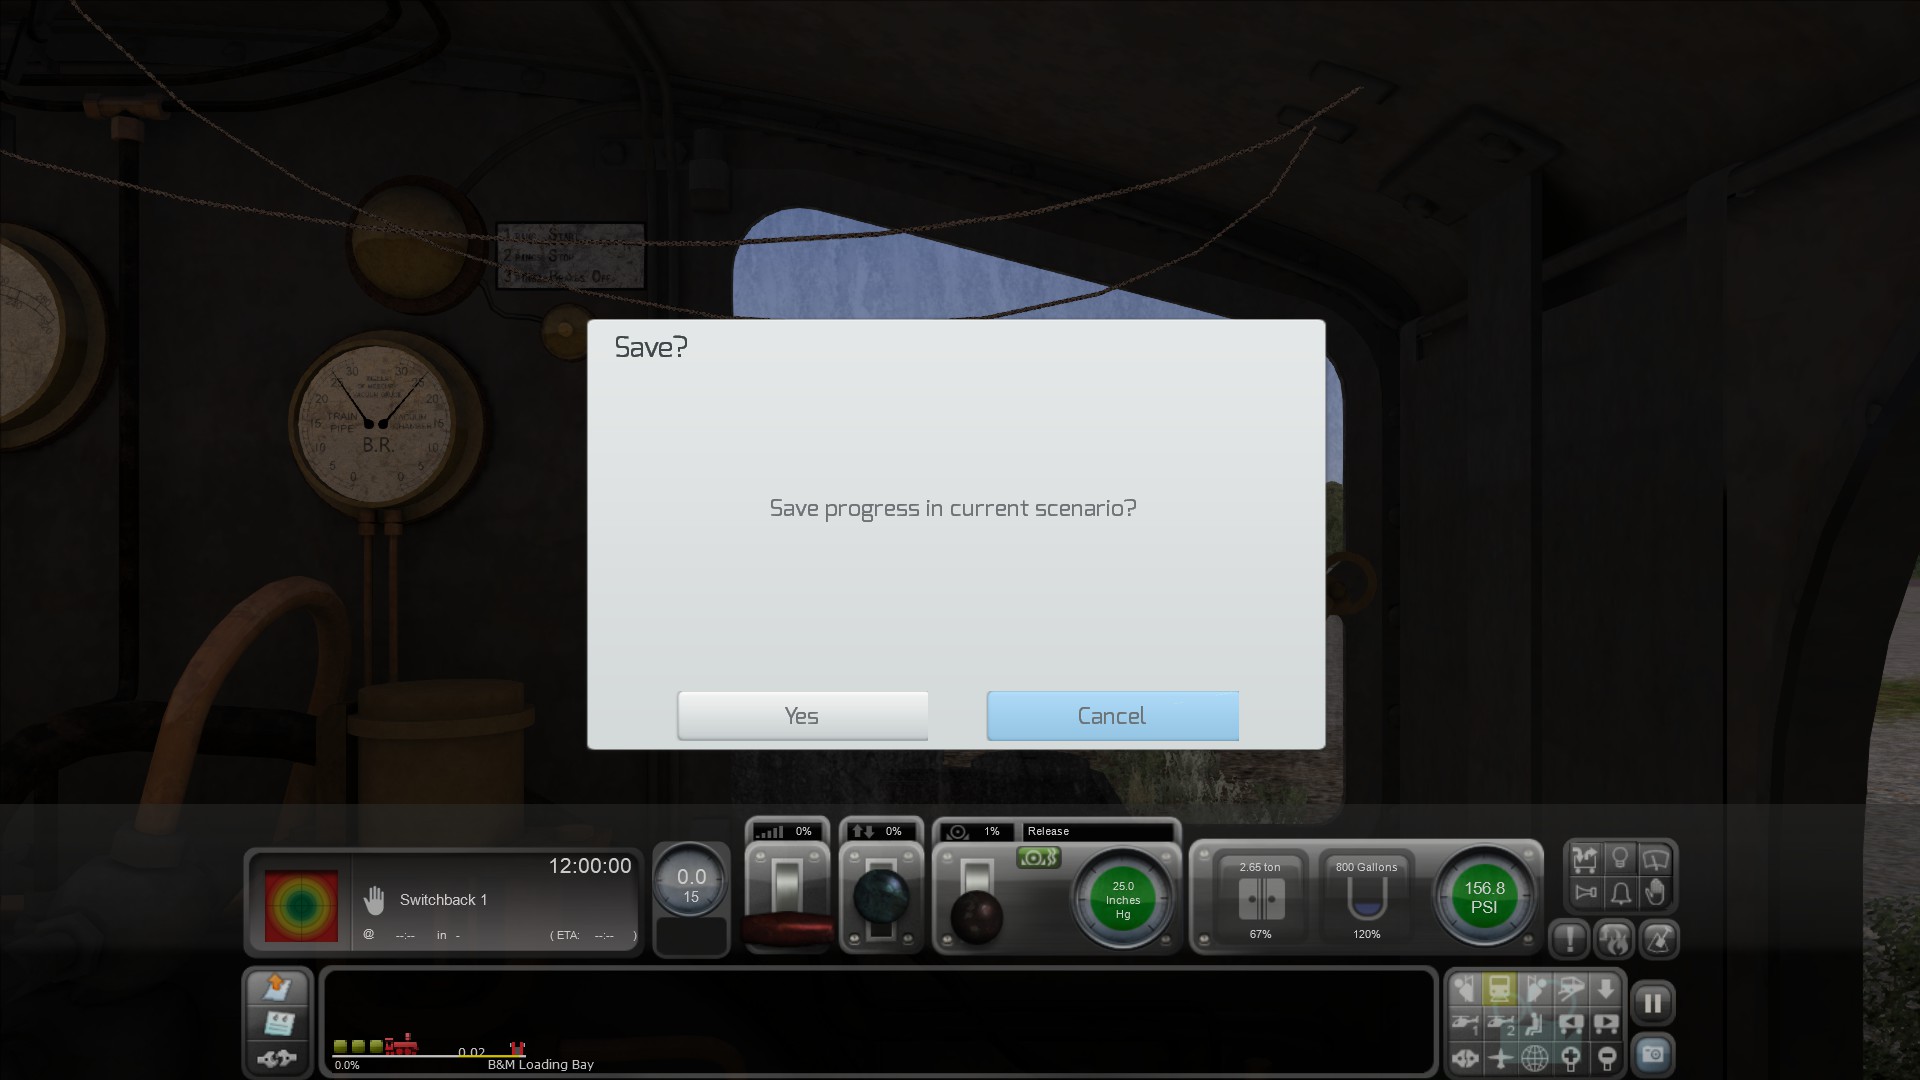
Again, do not proceed to save anything. Simply press Cancel. Miraculously you will return to the scenario and hopefully should now be able to play it.
During the trip, you might get stuck at a stop signal or red light.
Try to alert the dispatcher and ask permission to proceed by pressing 'Tab' (or 'Ctrl+Tab' if reversing).
This may be caused by an error in the quick drive or perhaps an item of scenery or a rail vehicle placed on the route which you do not have in your library.
The message box gives you 2 choices - either to Edit or Exit.
The trick is to do neither. Just press F2 (as though you were trying to save the scenario). You will see the following:
Again, do not proceed to save anything. Simply press Cancel. Miraculously you will return to the scenario and hopefully should now be able to play it.
During the trip, you might get stuck at a stop signal or red light.
Try to alert the dispatcher and ask permission to proceed by pressing 'Tab' (or 'Ctrl+Tab' if reversing).
- If your path is not safe, either because an AI train has not finished crossing your path or if the points are against you, the reply message will say "Permission to pass signal at danger denied."
- Once all is well, you will be granted permission to proceed with the reply "Permission to pass signal at danger approved."
Viewing Your Subscriptions
You can check the list of Workshop items to which you have subscribed in 3 ways.
1. Via the Steam desktop App:
Right click on the game title and click "Properties" to bring up the dialogue menu:
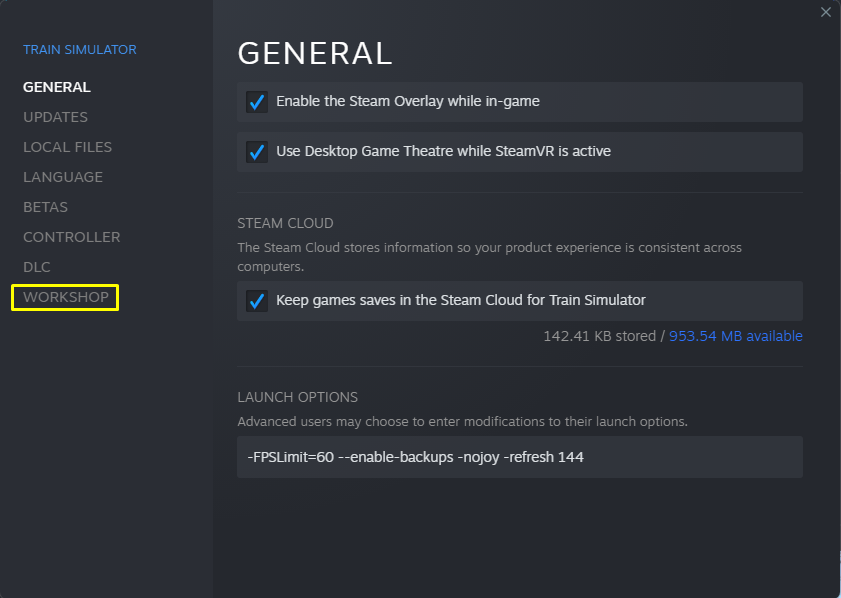
Select "Workshop" to show the list of items to which you have subscribed.
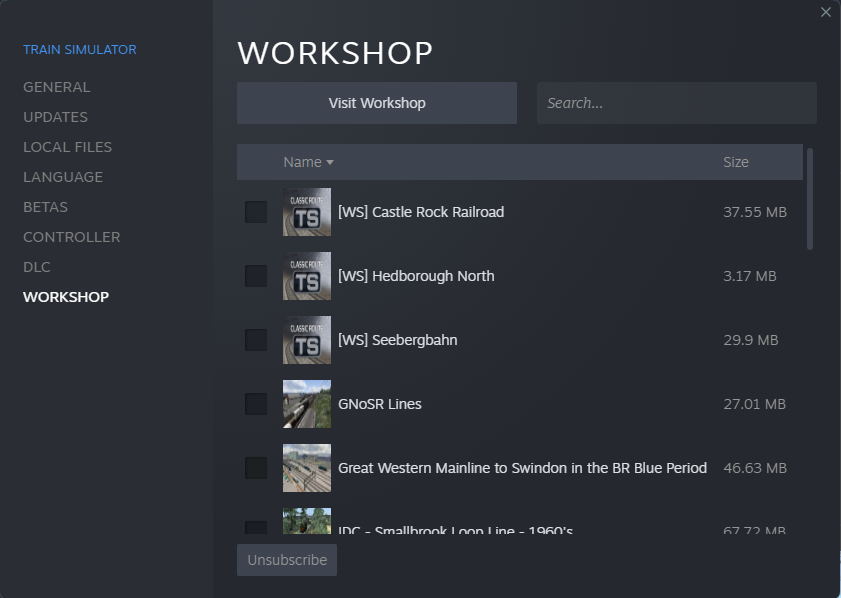
You can order the items either alphabetically or by size. If you have a large number, you can search for them by name.
You can also unsubscribe to multiple items in one go simply by ticking the checkbox next to each and then pressing the "Unsubscribe" button.
2. Via the in game menu:
From the Drive menu choose the Workshop tab and then select the "Subscribed" section.
This will list your subscribed items in no particular order.
You can unsubscribe them one by one by selecting each and clicking the "Unsubscribe" button.
3. Via the Steam Workshop itself, either directly through the desktop app or by logging in to it online via a web browser:
From the top menu bar mouseover your username and select "Content." Click the tab that says "Workshop Items." This displays your creations (if any). Now from the right menu box select "Subscribed Items."
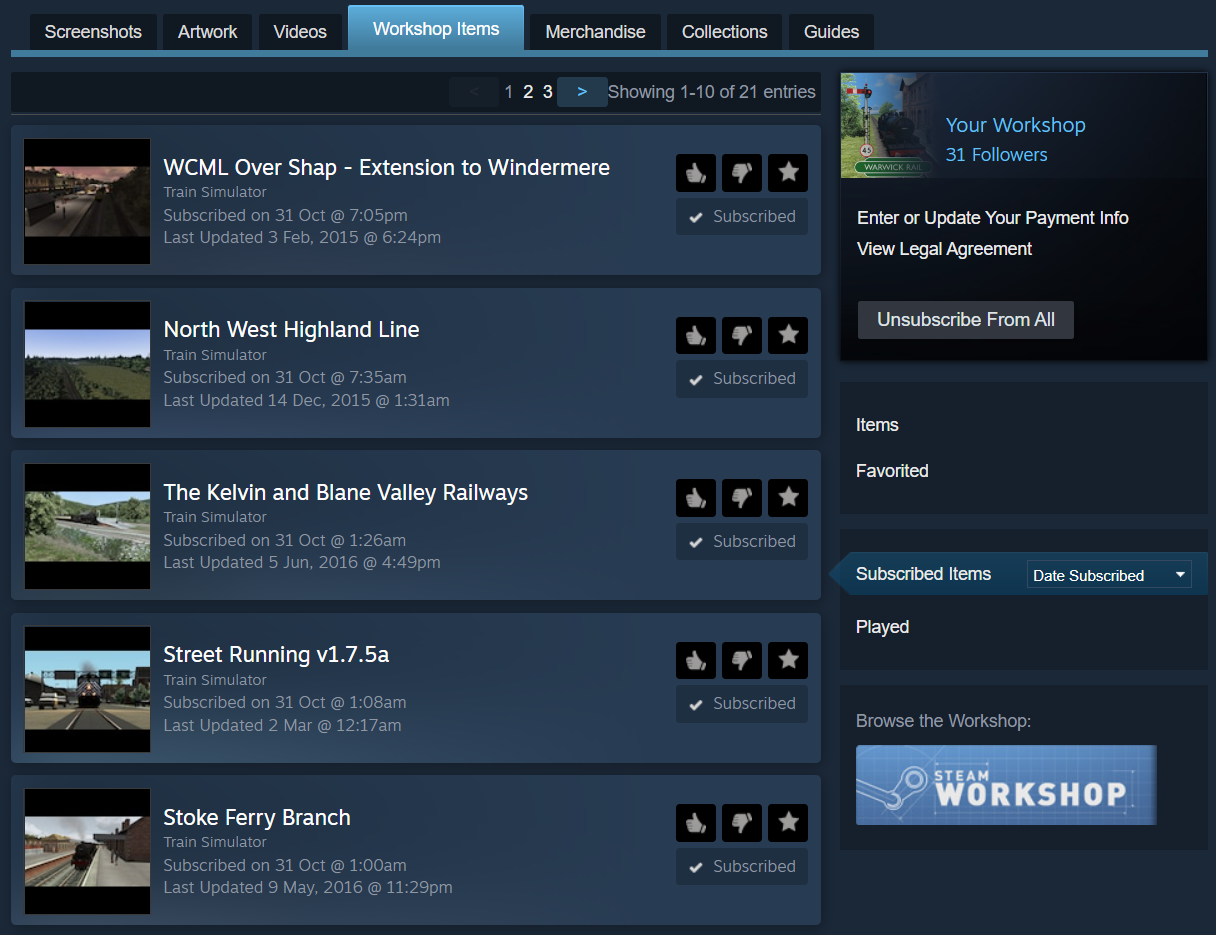
This will list your subscribed items in default order of 'Date Subscribed.' You can change this to list them 'Alphabetically' or in order of 'Date Updated' or 'Date Created.'
Each item can be rated up or down, or added to your 'Favorites.'
You can unsubscribe to each individually by unticking the 'Subscribed" box.
If you wish, you can even unsubscribe to all workshop items at once by clicking the "Unsubscribe From All" button in the upper right dialogue box.
1. Via the Steam desktop App:
Right click on the game title and click "Properties" to bring up the dialogue menu:
Select "Workshop" to show the list of items to which you have subscribed.
You can order the items either alphabetically or by size. If you have a large number, you can search for them by name.
You can also unsubscribe to multiple items in one go simply by ticking the checkbox next to each and then pressing the "Unsubscribe" button.
2. Via the in game menu:
From the Drive menu choose the Workshop tab and then select the "Subscribed" section.
This will list your subscribed items in no particular order.
You can unsubscribe them one by one by selecting each and clicking the "Unsubscribe" button.
3. Via the Steam Workshop itself, either directly through the desktop app or by logging in to it online via a web browser:
From the top menu bar mouseover your username and select "Content." Click the tab that says "Workshop Items." This displays your creations (if any). Now from the right menu box select "Subscribed Items."
This will list your subscribed items in default order of 'Date Subscribed.' You can change this to list them 'Alphabetically' or in order of 'Date Updated' or 'Date Created.'
Each item can be rated up or down, or added to your 'Favorites.'
You can unsubscribe to each individually by unticking the 'Subscribed" box.
If you wish, you can even unsubscribe to all workshop items at once by clicking the "Unsubscribe From All" button in the upper right dialogue box.
Deleting an Item
There are two important steps involved in deleting a Workshop item from your game.
So if you wish to delete the item, first of all unsubscribe from it and then delete it.
To delete, go to the Build menu.
If it is a scenario, select the Scenarios tab, then from the list choose the route which the scenario relates to and find and delete the scenario from its individual list.
If it is a route, select the Routes tab, then from the list select the route and delete it from the list.
- Unsubscribe from the item, either in game or from the Workshop online.
- Delete the item via the in game Build menu
So if you wish to delete the item, first of all unsubscribe from it and then delete it.
To delete, go to the Build menu.
If it is a scenario, select the Scenarios tab, then from the list choose the route which the scenario relates to and find and delete the scenario from its individual list.
If it is a route, select the Routes tab, then from the list select the route and delete it from the list.
Keyboard Controls
The official manuals are very thorough in listing which keyboard controls are appropriate for any given route or locomotive, but there is a handy list of controls which covers most situations. The guide was written in 2015, but is still very useful.
https://steamcommunity.com/sharedfiles/filedetails/?id=243521602
Click here to open the above guide in a new window
For convenience, I am placing the main keyboard controls here - with thanks to morrelo
A - Throttle/Regulator UP
D - Throttle/Regulator DOWN
W - Reverser UP
S - Reverser DOWN
E - Gear UP
Shift+E - Gear DOWN
' - Train Brake UP
; - Train Brake DOWN
] - Loco Brake UP
[ - Loco Brake DOWN
. - Dynamic Brake UP
, - Dynamic Brake DOWN
/ - Handbrake toggle
Backspace - Emergency brake
J - Small ejector on/off
C - Cylinder valves on/off
F, Shift+F - Open/close the locomotive fire box
R, Shift+R - Increase/reduce the rate the fireman shovels coal
I - Turn on/off the live steam injector
K, Shift+K - Increase/reduce flow of steam to the live injector
O - Turn on/off exhaust injector
L, Shift+L - Increase/reduce flow of steam to the exhaust injector
N, Shift+N - Increase/reduce blower
M, Shift+M - Increase/reduce damper
T, Shift+T - Open doors/Load/Unload/Refuel (depens on your train and position)
H, Shift+H - Headlights cycle
J - Secondary lights (some locos)
K - Tertiary lights (some locos)
L - Cab lights toggle
V - Windscreen wipers ON
Shift+V - Windscreen wipers OFF
U - Blinds/glare panels toggle
Z - Engine toggle start/stop
P - Pantograph UP
Shift+P - Pantograph DOWN
Q - Alerter CANCEL
C - Guard Acknowledge (non-steam locos)
K - DRA toggle
X - Sander toggle
Space, Shift+Space - Horn (high/low)
B - Bell
Tab - Red Signal request permission to pass AHEAD
Tab, Ctrl+Tab - Red Signal request permission to pass BEHIND
G - Points (junction switch) change AHEAD
Shift+G - Points (junction switch) change BEHIND
Ctrl+Shift+C - Couple/uncouple rolling stock
T, Shift+T - Open doors/Load/Unload/Refuel (depends on your train and position)
Ctrl+-, Ctrl+= - Change cab
1 - Cab view
2 - External front camera
Shift+2 - Head-out-of-cab camera
3 - External back camera
4 - Trackside camera
5 - Passenger view
6 - Front coupling camera
7 - Overhead camera
8 - Exploration (free) camera
9 - Toggle 2D map
Left arrow, Right arrow - Alternative cameras for the current view
Ctrl+, Shift+, Arrow keys, Mouse scroll wheel, Holding RMB - Various options for adjusting your view
Esc - Pause menu
Pause/Break - Pause game without showing pause menu
Ctrl+Q - Quit menu
Ctrl+E - Enter world editor
F1 - Task info
F2 - Save menu
F3 - Small HUD (ON/OFF)
F4 - Full HUD (ON/OFF)
F5 - Technical HUD
F6 - Toggle labels
F7 - Toggle rail vehicle number
F8 - Toggle destination overlay
F9/Shift+F9 - Reload assets
Shift+Z - Show framerate
Ctrl+S/F12 - Take screenshot
Ctrl+Shift+1, Ctrl+Shift+2 - Increase/decrease braking difficulty
https://steamcommunity.com/sharedfiles/filedetails/?id=243521602
Click here to open the above guide in a new window
For convenience, I am placing the main keyboard controls here - with thanks to morrelo
Train Motion Controls
A - Throttle/Regulator UP
D - Throttle/Regulator DOWN
W - Reverser UP
S - Reverser DOWN
E - Gear UP
Shift+E - Gear DOWN
' - Train Brake UP
; - Train Brake DOWN
] - Loco Brake UP
[ - Loco Brake DOWN
. - Dynamic Brake UP
, - Dynamic Brake DOWN
/ - Handbrake toggle
Backspace - Emergency brake
Additional Steam Locomotive Controls
J - Small ejector on/off
C - Cylinder valves on/off
F, Shift+F - Open/close the locomotive fire box
R, Shift+R - Increase/reduce the rate the fireman shovels coal
I - Turn on/off the live steam injector
K, Shift+K - Increase/reduce flow of steam to the live injector
O - Turn on/off exhaust injector
L, Shift+L - Increase/reduce flow of steam to the exhaust injector
N, Shift+N - Increase/reduce blower
M, Shift+M - Increase/reduce damper
Train Equipment Controls
T, Shift+T - Open doors/Load/Unload/Refuel (depens on your train and position)
H, Shift+H - Headlights cycle
J - Secondary lights (some locos)
K - Tertiary lights (some locos)
L - Cab lights toggle
V - Windscreen wipers ON
Shift+V - Windscreen wipers OFF
U - Blinds/glare panels toggle
Z - Engine toggle start/stop
P - Pantograph UP
Shift+P - Pantograph DOWN
Q - Alerter CANCEL
C - Guard Acknowledge (non-steam locos)
K - DRA toggle
X - Sander toggle
Space, Shift+Space - Horn (high/low)
B - Bell
Train Task Controls
Tab - Red Signal request permission to pass AHEAD
Tab, Ctrl+Tab - Red Signal request permission to pass BEHIND
G - Points (junction switch) change AHEAD
Shift+G - Points (junction switch) change BEHIND
Ctrl+Shift+C - Couple/uncouple rolling stock
T, Shift+T - Open doors/Load/Unload/Refuel (depends on your train and position)
Ctrl+-, Ctrl+= - Change cab
Train Views
1 - Cab view
2 - External front camera
Shift+2 - Head-out-of-cab camera
3 - External back camera
4 - Trackside camera
5 - Passenger view
6 - Front coupling camera
7 - Overhead camera
8 - Exploration (free) camera
9 - Toggle 2D map
Left arrow, Right arrow - Alternative cameras for the current view
Ctrl+, Shift+, Arrow keys, Mouse scroll wheel, Holding RMB - Various options for adjusting your view
Other Controls
Esc - Pause menu
Pause/Break - Pause game without showing pause menu
Ctrl+Q - Quit menu
Ctrl+E - Enter world editor
F1 - Task info
F2 - Save menu
F3 - Small HUD (ON/OFF)
F4 - Full HUD (ON/OFF)
F5 - Technical HUD
F6 - Toggle labels
F7 - Toggle rail vehicle number
F8 - Toggle destination overlay
F9/Shift+F9 - Reload assets
Shift+Z - Show framerate
Ctrl+S/F12 - Take screenshot
Ctrl+Shift+1, Ctrl+Shift+2 - Increase/decrease braking difficulty
Conclusion
Do not be afraid of taking full advantage of the Steam Workshop. It exists with the aim of unlocking the full potential of the game to give you limitless enjoyment.
The workshop is a virtual treasure trove of user-created content, and with over 30 thousand items on the menu it is a veritable feast - so get stuck in and enjoy the meal.
Have fun!
The workshop is a virtual treasure trove of user-created content, and with over 30 thousand items on the menu it is a veritable feast - so get stuck in and enjoy the meal.
Have fun!
Give this Guide a Thumbs Up
If you have found the above advice and information useful, please rate this guide by giving it a thumbs up - and of course don't forget to add it to your favourites.
Our TSC Guides
We have written a range of guides for Train Simulator Classic
Click the link below to access them all:
Warwick Rail's TSC Guides
Here are the top 10.
https://steamcommunity.com/sharedfiles/filedetails/?id=2739089566
https://steamcommunity.com/sharedfiles/filedetails/?id=2365689194
https://steamcommunity.com/sharedfiles/filedetails/?id=2577919604
https://steamcommunity.com/sharedfiles/filedetails/?id=2361991441
https://steamcommunity.com/sharedfiles/filedetails/?id=2364751070
https://steamcommunity.com/sharedfiles/filedetails/?id=2205267954
https://steamcommunity.com/sharedfiles/filedetails/?id=2222378782
https://steamcommunity.com/sharedfiles/filedetails/?id=2297125586
https://steamcommunity.com/sharedfiles/filedetails/?id=2373171986
https://steamcommunity.com/sharedfiles/filedetails/?id=2940948768
Click the link below to access them all:
Warwick Rail's TSC Guides
Here are the top 10.
https://steamcommunity.com/sharedfiles/filedetails/?id=2739089566
https://steamcommunity.com/sharedfiles/filedetails/?id=2365689194
https://steamcommunity.com/sharedfiles/filedetails/?id=2577919604
https://steamcommunity.com/sharedfiles/filedetails/?id=2361991441
https://steamcommunity.com/sharedfiles/filedetails/?id=2364751070
https://steamcommunity.com/sharedfiles/filedetails/?id=2205267954
https://steamcommunity.com/sharedfiles/filedetails/?id=2222378782
https://steamcommunity.com/sharedfiles/filedetails/?id=2297125586
https://steamcommunity.com/sharedfiles/filedetails/?id=2373171986
https://steamcommunity.com/sharedfiles/filedetails/?id=2940948768
Copyright
This guide © Copyright Warwick Rail 2022-2025, all rights reserved. This item is not authorised for posting on Steam, except under the Steam account named Warwick Rail.
More Train Simulator Classic guides
- Driving and Firing Steam Engines★ 5 (1.1k)33k views1.1k ♥14 minUpdated Jan 3, 2013
- [ENG] TS2015 - Controls Overview★ 5 (641)26k views837 ♥3 minUpdated Mar 10, 2015
- Route maps★ 5 (408)22k views575 ♥28 minUpdated Mar 21
- Fixing the Out of Memory Error★ 5 (206)13k views302 ♥12 minUpdated Jun 15
- Horn and Bell Use★ 5 (352)11k views345 ♥11 minUpdated Dec 26, 2025
- The Simple guide to - Scenario Creation★ 5 (278)10k views541 ♥15 minUpdated Nov 25, 2015


This guide was created by its original author on the Steam Community. Are you the author and want it removed? Request removal.