[1.34] A Very Thorough Primer on Uniting Japan as Oda [Or Anyone]
What Makes a Good Daimyo?
Feel free to skip this section if you don't care about daimyo nuances, but if you've seen Japan's HRE-like starting scenario in 1444, you'll no doubt be curious about how daimyos fare when it comes to the challenge of unifying Japan under your rule. Broadly speaking, the stronger a daimyo's ideas, the worse their starting position is and vice versa. The three best-known daimyo for their ease in unifying Japan are the Hosokawa, Yamana, and the Uesugi. Like most of the other daimyo in Japan, their ideas are solidly okay. They make up for this in their multi-province starting position, which allows them a bit more flexibility in their Sengoku targets. I wanted to mention these in particular because when it comes to unifying Japan, it doesn't get any more brain dead than these. You'll still need to be aware of what's going on and what can happen in this unification phase, but it's pretty hard to fail if you know what you're doing.
When we exclude these relative major powers and look at everyone else, however, is when it gets interesting. Unfortunately, not every daimyo's ideas were created equal, and most are a hodgepodge of garbage mixed in with some gems. I won't exhaustively go through each daimyo's list, but let's look at a couple of examples before moving onto the best five.
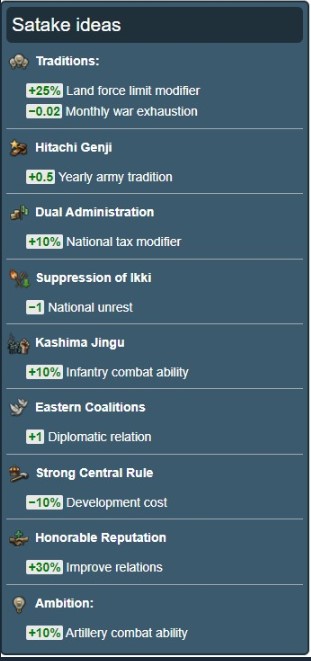 First, we have Satake, located on the northeastern side of Japan, located next to Uesugi. These guys are notable because they have a number of solid ideas, but these are marred by aggressively mediocre ones and a tougher starting position. Personally, I consider the +25% force limit and -0.02 war exhaustion traditions to be a compelling duo that goes well with their +10% Artillery Combat Ability (ACA) ambition. This is because there's only ten sources of ACA in the entire game, with 8 of them belonging to national ideas or ambitions and the other two being linked to Quality's Massed Battery idea and the Offensive-Economic Policy (Horse Artillery). And of these 8 national idea sets, two belong to daimyos— the second being Otomo to the southwest.
Putting aside their ACA ambition, Satake is also the daimyo with the largest force limit modifier in their idea set, matching the generic daimyo idea set (used only for two daimyos that appear in much later start dates (and yes, those ideas are also pretty bad)). The next closest daimyo-specific ideas aren't far-off, however, with Toki, Imagawa, and Shoni having 20% in their traditions. Other daimyos have a similar idea later on as an idea: Ando, Hosokawa, and Mori (a releasable in 1444, albeit not from day 1). Of course, force limit ideas/traditions/ambitions aren't the end-all be-all, but with Quantity's nerf as of this patch, I felt that these daimyos were worth listing. And as always, you can bolster your force limit by taking Quantity or Offensive, recruiting an advisor, increasing development, building regimental camps or conscription centers, or taking one of four policies: Diplomatic-Quantity (+10%, +1 diplomatic reputation), Economic-Quantity (+10%, plus -5% land maintenance), Quantity-Expansion (+10%, +10 global settler increase), and Divine-Exploration (+5%, +5% recover army morale speed).
And as for Satake's war exhaustion perk, there are also only a few other national idea sets that exist. 18, to be exact, with three belonging to policies and one being the well-known Innovative idea (#6, Optimism). Of the remaining 14, three are traditions, two are ambitions, and the remaining nine standard ideas. With regard to the daimyos in Japan, Satake's war exhaustion tradition is only matched by Ashikaga's tradition and Tsutsui's second idea. This being said, it is worth noting that there are additional sources of war exhaustion reduction outside of the normal traditions/ideas/ambitions/policies. These include various niche things, such as being Defender of the Faith of a tier 2-5 nation or having a kind-hearted ruler. With regard to these niche items that apply for us out here in Japan, a few stand out. The first would be reaching the strictest tier of isolationism (tier 4), which requires a minimum of three events in which you go fully isolationist over a span of roughly 90+ years. This is due to the 30-year cooldown between incidents and a longish mean-time-to-happen of 100-200 months, depending on which incidents you're eligible for. Full isolationism is also notable for its additional missionary alongside the -0.03 war exhaustion reduction, but I'll cover isolationism later. Other potential sources of reduction include being the emperor of China at 100 mandate for a 0.03 reduction or having the relevant active issue in parliament.
Of course, sources of war exhaustion reduction mostly serve as a good way to offset wartime attrition or blockade attrition, as being at peace gives a huge -0.10 monthly. As long as you keep your wars short and to the point (unless you're aiming to explode Ming), maintain naval superiority, and refrain from having your armies defeated, you'll probably be fine to not worry so much about this mechanic as Japan.
That's enough of the moderate deep dive for Satake. Because unfortunately for Satake, their starting position is in the northern part of Japan on a 6-development (2-2-2) forest province, incurring a +15% development penalty from the get-go. While their situation is definitely manageable, there are just better daimyos to choose from. So let's move on.
Cabinet of Daimyo Curiosities
I may or may not do a similar analysis on other daimyos outside the Big Five, but here's a short list of unique modifiers for everyone's convenience, since I felt like they should be noted somewhere. Feel free to move onto the next section if you're just looking for Oda or the Big Five, as this section is purely about the oddball daimyos.
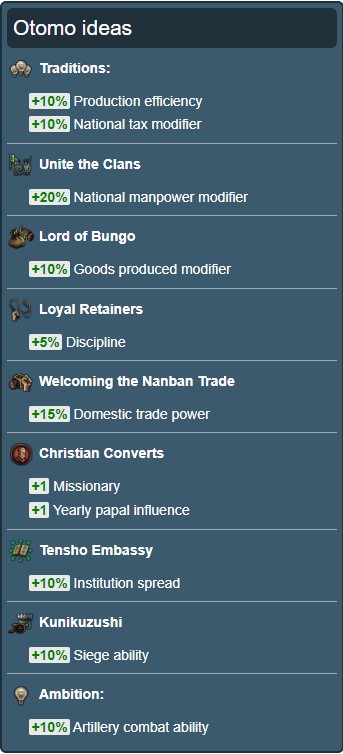 I mentioned these guys earlier, but these guys are notable for having the lone source of papal influence in Japan. It's not exactly going to be winning any awards at a paltry +1 a year, but it's better than nothing. It also comes paired with a missionary. Their ideas are also pretty good, with 10% goods produced, 20% national manpower, 10% siege ability, 5% discipline, and the aforementioned 10% ACA. Also, it bears mentioning that while there is an achievement for converting yourself and all of Japan to Christianity (starting as a daimyo), there's absolutely no reason that you have to start as Otomo to do so. This is because later on, once you've made contact with the Europeans, you'll become eligible for an isolationism incident involving Christianity.
This is actually a rather complex series of events that attempts to reflect the complicated relationship that Japan (as a whole, not the nation-state) had with early Christian missionaries, so I strongly advise checking out the Isolationism part of the guide (or the wiki's event listing to see what open/isolation values you want to hit). Regardless, if you choose to fully embrace Christianity in the series of events, you'll be converted and be able to start converting provinces to Catholic.
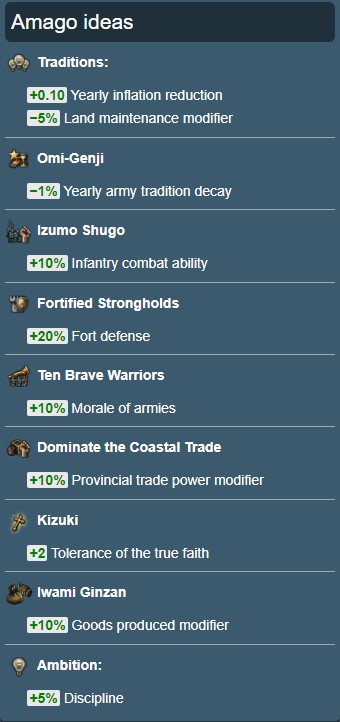 Amago is the orange daimyo sitting right next to Yamana on the western side of Japan. Their starting position is not particularly enviable, but they do have one of Japan's only forts, making their starting position an annoying headache for upstart daimyos pre-Renaissance. These guys are interesting because they have the only source of passive inflation reduction in Japan as a tradition. Their ideas are also solid, with really only a few ideas that do not spark joy, like provincial trade power or -5% land maintenance. Taken alone, the inflation might not seem like that big a deal, but the permanent reduction can help keep it from spiraling out of control in the first 50 years, should you mismanage your economy. It also remains relevant when your two gold mines spawn via event (and if you get treasure fleets), but it'll eventually fall off later on in the game as production and trade income become much larger shares of your income (in a healthy game). Still, the reduction will always help whittle down the inflation caused by large donations of money by your defeated enemies, so it's worth keeping in mind.
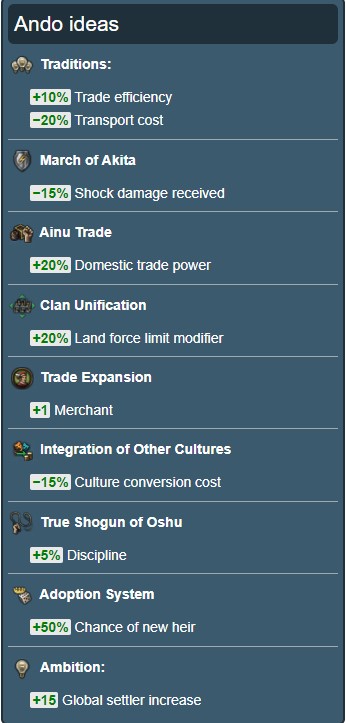 At first glance, Ando is a rather unremarkable daimyo. It owns two provinces towards the northern part of the island, but its total development is only 9. Both provinces produce fish, and your 2-2-2 capital sits on rolling hills, while your other province is a lovely 1-1-1 coast. Still, it's worth noting that you're only one dev point away from hitting the next force limit breakpoint of 4 (without going over). Of course, the development penalties to both provinces make developing Renaissance here an unattractive prospect, but sometimes it is what it is. I mention these guys because in their National Ideas mixture is the only daimyo-specific source of global settler increase (+15). I say daimyo-specific, as savvy Japan players will know that Japan's old-fashioned National Ideas gives it +20 settlers as their sixth idea, which is technically sooner than Ando's ambition. Unfortunately, both of these ideas come far too late in the colonial game to be especially important (given the objective of cutting off other colonizers, etc.). That's not to say that they aren't useful ideas (they are), but it's their timing that leaves much to be desired, as you'll only unlock Japan's sixth idea group after you take Admin Tech 10 in 1531 (or earlier) and take four ideas from the new group, assuming you finished the previous two idea groups. While every colonial game is different and you'll likely be colonizing most of the game, you'll already be well past 100 settlers a year by the time you take Admin Tech 10.
At this point, you may be wondering why anyone would pick what appears to be a subpar Japan idea set, and to be perfectly honest, so was I. Their ideas looked like they were mediocre at best, especially when I first saw that incredible -20% transport cost tradition. Some ideas were good, like their 20% force limit, their merchant (arguable, but just having one is another level 3 Center of Trade), 10% trade efficiency (okayish), -15% shock damage received, and 5% discipline. But then I looked into sources of culture conversion cost reduction, of which Ando have 15%. While we all know what culture conversion really is in the game, I wasn't sure why Ando was apparently better at it than anybody else in Japan. And as of writing this guide, I still don't actually know. But what I do know is that Ando effortlessly hits -30% culture conversion cost if they go full isolationism (level 4). From there, you can continue stacking these modifiers with the bonus from fully religious (-25%), the policy from Influence-Religious (-20%), and the -10% from the Divine idea group for a concerning total of 85% reduction in culture conversion.
But that's not all, because you have a few options for reaching 100%, at which point all conversion costs will cost a single point in diplomatic mana. Of these, you can opt for a perfect reduction of -15% by having an active issue in Parliament. Or, you might look at just being lazy and waiting until 1700 to embrace Englightenment, which will give you a -25% bonus, allowing you to forego Divine ideas completely (unlocked for Japan through a government reform). But if both options are just as unappealing to you, you can opt for the truly ridiculous: heisting the Buddha Statues.
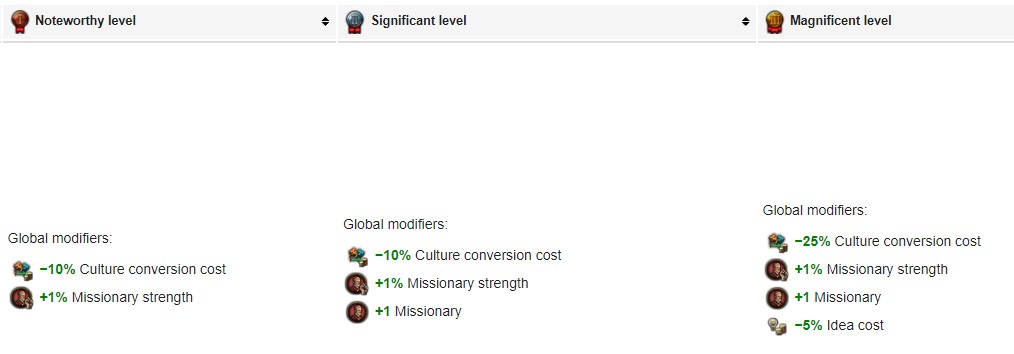
For the unawares, the Buddha Statues is a monument located in...Persia. Bamyan (2225), to be precise. And it's this little marvel of masonry, which hopefully doesn't have real monks contained within, which gives us the home stretch of bonuses. What makes it even better though is the fact that it's one of five heistable monuments in the game, and one compatible with Shinto. As you can see above, these bad boys give a whopping -25% modifier to culture conversion, meaning that with just full isolationism, Ando's national ideas, and fully religious, you can hit 80% culture conversion and watch the people of the world vanish into thin air. And should you take Influence, you can simply run the aptly-named Cultural Unity policy for 100%. I have no idea why you'd go to such lengths to do so, especially with Ando of all countries, but there it is.
But What About THIS Daimyo?
Anon, look. There are 30 daimyos in Japan in 1444 (31 including the shogun). That's 30/31 idea unique idea sets and at the end of the day, a lot of these are just not going to make the cut. Mind you, these numbers don't even include the releasable daimyos that can appear early on. While all five are releasable almost from the start (or via event you receive as the shogun (not emperor)), their idea sets are not as immediately compelling to warrant a complicated run that would involve essentially conquering Japan, becoming shogun, and then releasing everybody and then the vassal you wanted to play as just to do it all again. But if anyone knows a more efficient way, I'm all ears.
Ah, and before I forget, the releasable daimyos in 1444 are Akamatsu, Asakura, Chosokabe, Hojo, and Mori. These five all have their own unique idea sets that can be interesting in their own right, and if there's enough interest I can go over their ideas and whatnot (and I probably will at a later date). An additional detail for these five notable daimyos is that with the exception of the Asakura, they'll all prompt you as the shogun to decide their fate when you own the province during a specific time period. Each event's MTTH is only 24 months, so they'll happen quick.
Here's the list of event releasables in chronological order. Do also note that these can be released normally, as part of a peace deal, or even by lucky rebels, so you don't need to do these for the relatively mundane bonuses, but if you're looking to RP your run, go wild.
- Akamatsu: Own five provinces, one must be Harima, and be shogun. Releasing them grants a 300 opinion modifier that decays by 5 yearly, gives you 15 legitimacy, and 1.5x years worth of manpower. Declining gives you 5 prestige, because lore. No notable ruler.
- Chosokabe: Own Tosa at any time before 1560 as a non-Hosokawa shogun. Accepting grants the same opinion bonus, 15 legitimacy, and 1.5x years worth of manpower. Motochika Chosokabe comes to power as a 4/4/5 ruler in their country. Declining gives you 5 prestige, because lore, probably, and Chosokabe still gets a core. Tosa will also get a 25% autonomy penalty.
- Mori: Own Aki as a non-Yamana shogun between 1490-1550 with four or more provinces. Accepting gives the same relations, 15 legitimacy, and one year's worth of manpower. Motonari Mori comes to power as a 5/6/4 in their country. Declining gives you 5 prestige for simply existing, and because you exist, Mori rebels will rise up anyway in Aki.
- Hojo: Own Musashi as a non-Uesugi shogun between 1490-1515 with at least four provinces. Accepting gives the same relationship bonuses, only 15 legitimacy, and Soun Hojo will come to power as a 5/4/5 ruler in their country. Declining will also give you five prestige, which you can immediately put to good use as a minor morale bonus as a minor stack of Hojo rebels spawn in Musashi.
These special daimyos aside, there's really nothing too incredibly special about many of the 30+ daimyos. The vast majority of them will have no special events to speak of (I'll go over the few that do later on), and really just exist to die in the great Japanese Thunderdome of 1444. If you look closely enough at a lot of their idea sets, you'll notice some common themes, however. And if you know a thing or two about this period of time in Japanese history, you won't be surprised to see that there are a lot of military ideas scattered about. Without doing the hard math myself, I would estimate that out of the combined idea category totals across all daimyos and Japan, that the largest two categories belong to various military buffs and trash buffs. For me, military buffs are all your land-based bonuses like Infantry Combat Ability (ICA), discipline, morale, and so on. As for trash buffs, I consider these to be things that are generic or bland, which would be things like 10% tax income, -20% transport cost, or the overpowering -1% prestige decay. Essentially, filler that either never becomes useful or just remains mediocre forever is what I'd consider to be a trash idea. And unimportant daimyos in history are full of these, which really bring down the value of their idea sets.
In addition to the broad categories of daimyo ideas, there are also a fair number of daimyos with -10% development cost and -10% construction cost, for those of you seeking more economical ideas.
At any rate, I'll likely go for a more exhaustive review of these daimyo ideas to better encapsulate what I mean in a future version of the guide. So let's move onto the Big Five.
The Big Five: Shimazu and Date
- Shimazu, Date, Ouchi, So, and Oda
If you've played in Japan before or done some reading into good daimyo picks, you likely already expected some of these choices. Which is fine, since Oda and Shimazu aren't terribly controversial picks for unifying Japan. Still, let me go over each of them briefly so you can see the rationale for each daimyo.
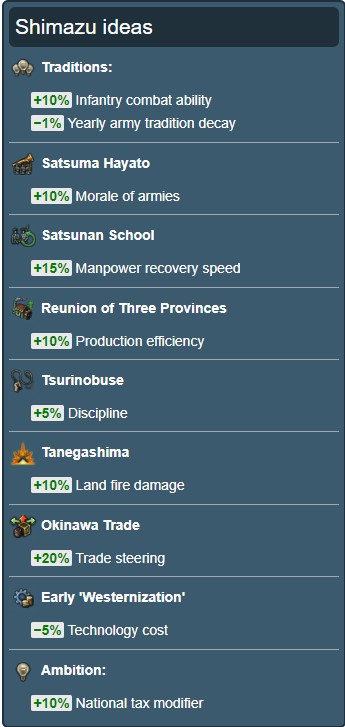 Understandably referred to as the 'Japanese Prussia', Shimazu's ideas are all about grinding your enemies into dust, and then grinding that dust into nothingness. Seriously. They begin with 10% ICA and -1% yearly army decay traditions that ensure you'll stay ahead of your enemies from the get-go, only being thwarted by flimsy limits like force limits and attrition (as well as other military daimyos that start with similar ideas). But building on that is their 10% army morale, 5% discipline, 10% fire damage, and 15% manpower recovery speed. A veritable tranche of military bonuses to go along with Shinto's innate 10% morale bonus and any other military group you take.
Unfortunately, however, the price of Shimazu is their more lackluster ideas, such as 20% trade steering (while useful, it feels like filler), 10% production efficiency (not as bad, but it could be better), and a loathsome 10% national tax modifier. There's also a -5% technology cost idea, which will at least refund you a couple hundred points over the course of the game.
In addition to essentially being able to run Slaughterhouse Five wherever you want (except the high seas), you also start on the grasslands province of Satsuma, which has 9 development and produces tea (something that'll get boosted in value later on). As if that wasn't good enough, you also start with a reconquest CB on your neighbor Ito. While you might not always be able to immediately attack them due to the ever-shifting RNG of daimyos and alliances, being able to reconquer a 7-development province and nearly double your 0% autonomy in short order is a feat no other daimyo can match, if only due to the lack of cores that can be reconquered (the other being Hosokawa fighting to reconquer Harima). While that may not seem like much compared to your capital, when you develop for Renaissance on your grasslands capital, that extra 7 can easily push your force limit max to the next threshold ending in 0.
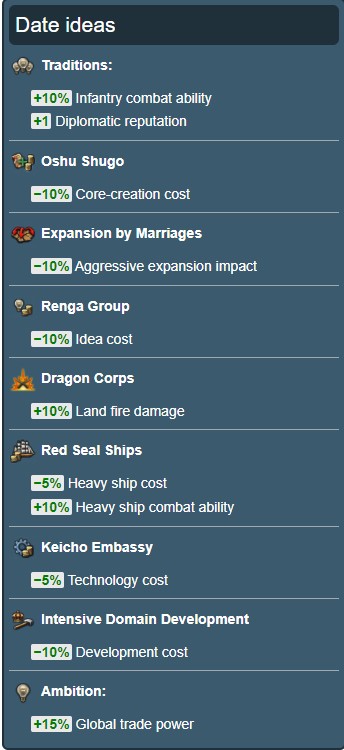 Next, we have the Date. They're also a strong contender for unifying Japan when it comes to their post-unification idea set quality, vying for the top dog slot with Oda and Shimazu. To the right, we can see that Date also begins with 10% ICA and a filler idea from the start in +1 diplomatic reputation. However, they're the first ones in Japan to get the coveted Core-Creation Cost bonus (Oda gets this as its second idea, requiring 6 ideas to be taken), allowing them to capitalize on the savings as soon as possible. Then, we have -10% aggressive expansion impact, -10% idea cost, +10% fire damage, a Date-unique -5% heavy ship cost/+10% Heavy Ship Combat Ability, another -5% technology cost modifier, a noteworthy -10% development cost bonus, and an ambition for +15% global trade power.
These are all pretty damn strong ideas in their own right, with only the +1 diplomatic reputation being their weakest link in my view. Everything either contributes to expansion, military matters on land and sea, trading abroad, or saving as much mana as possible from technologies and ideas so you can then develop Japan further. Essentially, compared to the others, it's as close to a Jack-of-all-trades build if there ever was one.
But like most things in life, there's always a catch. And in this case the catch is Date's unfortunate starting position. First, their capital of Rikuzen sits next to Uesegi, an existential threat, and four other provinces— three of which belong to One-Province Minors (OPMs). The last belongs to the two-province Shiba, which start allied to the Oda. Of course, the OPMs don't actually matter too much, aside from maybe the Nanbu sitting to the north on top of mountains. No, it's mainly the Uesegi that you'll need to be dealing with, which is somewhat unlike Shimazu's starting situation, as they actually have room to expand before getting the Sengoku casus belli on Hosokawa. Thus, your starts may be tempered by quite a bit of luck with alliances and endless war declarations. However, if you do manage to expand and look for an opportunity to strike Uesegi down, they're guaranteed to have a comparable stack of pretender rebels spawn within the decade, allowing you to declare war when they begin combat, emerging victorious just as your fresh stack wipes them from existence.This trick is applicable for anyone able to declare on Uesegi and paying attention.
Secondly, your navy begins its existence as being mostly composed of light trading ships (a trait only you and your mountainous neighbor Nanbu, to the north, share), compared against other daimyo fleets that initially begin with more galleys. This'll also mean that you'll take a huge amount of war exhaustion if you can't achieve naval superiority and you get blockaded. Remedying this with more galleys of your own would be highly recommended.
Thirdly, Date begins on a 9-dev forest that produces grain. While the terrain is not necessarily ideal for the start, there is something to be said for it not being Nanbu's start to the north— a OPM on mountainous terrain suffering from a 35% development cost penalty. In addition, beginning on a grain province gives you an additional 0.50 force limit, meaning that you might be well within reach of an additional point of force limit once you develop Renaissance.
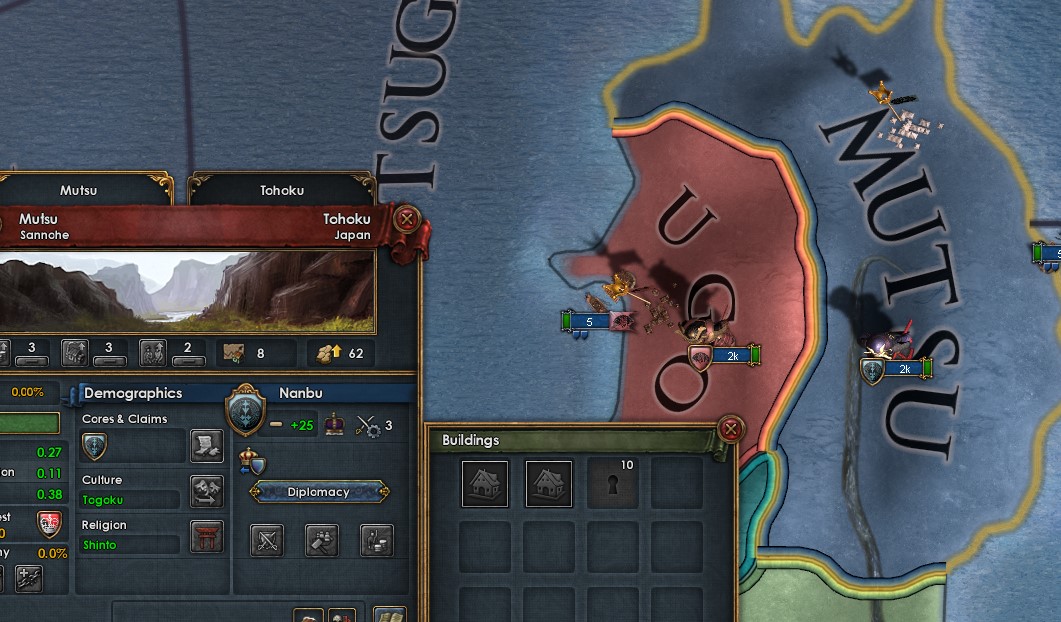 Imagine developing on that province. Horrifying.
The Big Five: Ouchi and So
Author's Note: I'll return to flesh this section out later, as I feel that Ouchi is more of an outlier daimyo that's very trade-focused, and So's pirate republic mechanics merit a more robust review.
The tl;dr, though:
Ouchi for trade, gets unique province modifier Kyoto of the West for -10% dev cost on Suo.
So for exclusive pirate reform, top tier naval ideas.
The Big Five: Oda at Last
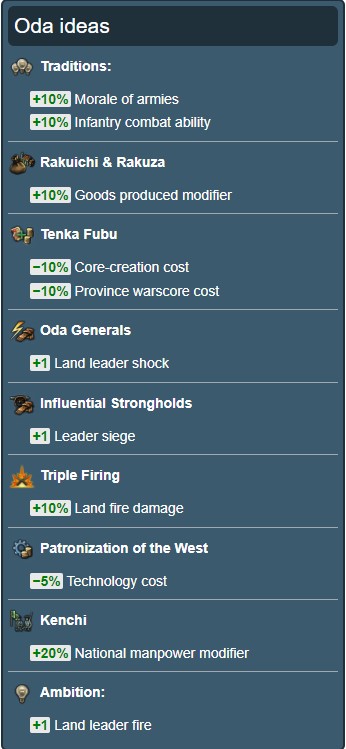 And after much ado, we've arrived. Or if you're just skipping to this part, the ado is all mine, I suppose. We've looked at a number of daimyo idea sets and their starting positions, from debatably good daimyo like Satake, to unquestionably specific contenders for their dominion (Shimazu, Ouchi, So), and onto more well-balanced sets like Date's. But now we come to the cream of the crop— the Oda.
And whew, what an idea set. Right out of the gate we have the strongest possible combination of military strength for a starting daimyo: 10% morale with 10% ICA. To my knowledge, no other daimyo matches this. But such bonuses don't matter as much as terrain, general pips, and sheer numbers in this stage of the game, so it should be known that we are not invincible here. Then, we follow this up with a very respectable 10% goods produced modifier that only a handful of daimyos in Japan can match. Then, we have Tenka Fubu, an Oda-unique idea that doubles as one of the single best ideas in all of Japan, matched only by the Ando's -20% transport ship cost, giving us -10% CCR and -10% province warscore cost (a modifier that'll come in more handy much later in the game). Unlike the Date's inferior idea, however, the Oda require 6 ideas from their first group to unlock it, with the silver lining being that you'll get your goods produced bonus as well.
Elsewhere in Oda's National Ideas is a curious and unique trifecta demonstrating their superior leadership in the form of a +1 to all general fire/shock/siege pips. And at first blush, you might only be inclined to care about the coveted siege pip, but a quick read of how general pips are assigned underscores its true value. Allow me to briefly elaborate. First, your army tradition (AT) is run through a formula when you hire a general (this varies on the type of leader, with rulers/heirs with bad MIL scores and explorers/conquistadors incurring an additional penalty), giving a range of points that are then allocated through the leader's four stats. If you roll the best possible number of points, you begin the next phase with a flat 2-2-2-2 before any additions are made. Then, your pip bonuses come into play. For Oda, you'd be looking at 3-3-2-3 on this hypothetical perfect roll at 100% AT. Then the game would roll to see where the remaining points (9) would go. Each of the three main pips has a 30% chance of being assigned these points, leaving siege with a measly 10%. And based on my understanding of the system, it seems that as long as you refrain from overflowing bonuses in any one category (trying for 7 free shock pips to get one pip redistributed elsewhere, for instance), you'll always benefit from this trifecta of pips.
Calculations aside, the pips are also great at maintaining some semblance of general quality in the years after you form Japan but have no more foes to fight (yet), as they'll always ensure you have a 1/1/0/1 ready to fight. In addition, sources of leader fire and siege are especially rare, with only two policies and 7 other nations also receiving a leader fire pip (two being daimyos, Utsunomiya and Mori). And as many players know, free leader siege pips are even harder to come across, with Oda being the sole daimyo with it out of a grand total of 8 sources (5 nations, Full Aristocratic, and a policy).
Their leader trifecta aside, even Oda's filler ideas are pretty great. A -5% technology cost reduction is no substitute for a development cost modifier, but it's certainly a lot better than something dreadful like 10% national tax. Their other military ideas (10% fire damage, 20% national manpower) are also solid as heck.
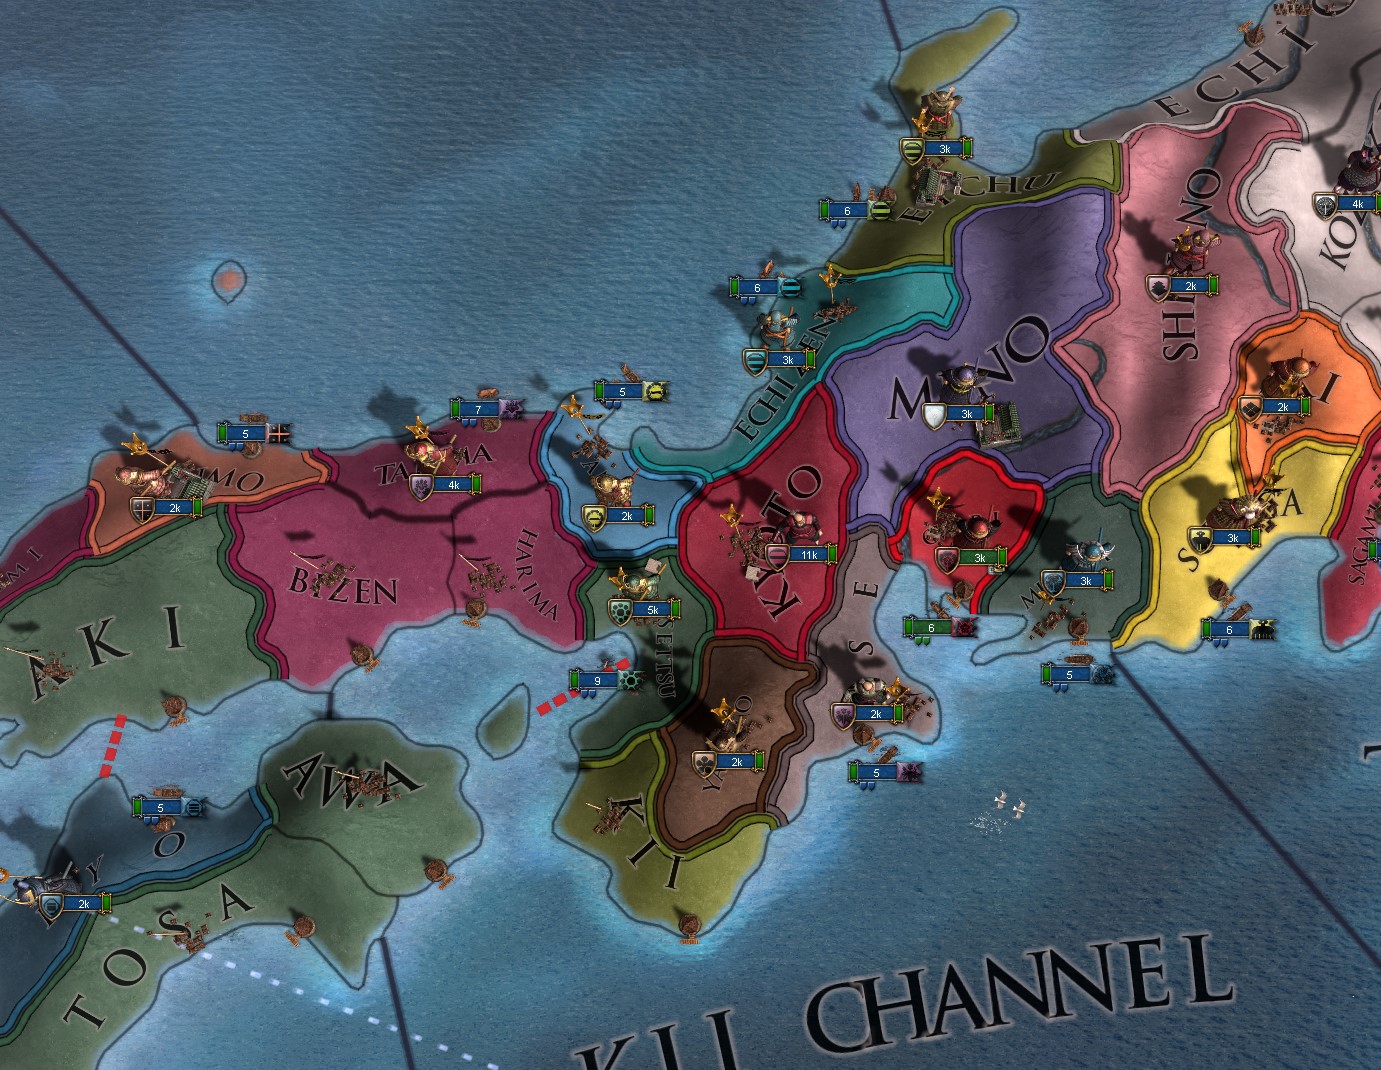 The Oda capital is the tremendously based capital of Owari, a 10-development farmlands province that produces Dyes. If you've been reading this guide until now, you no doubt know the significance of that 10-development marker (even if having this level of development (at least 3 in a category) means that the shogun can steal dev from you via subject interaction). The local provincial bonus for dyes is unfortunately not that special (10% trade power in province) in our opening scenario, though it does help us gain a bit more trade income. However, Dyes are worth a hefty amount, and will buoy your income after we develop for Renaissance in a few years. I also want to emphasize the rarity of these farmlands in Japan, as there are only three other provinces that have it: Kyoto, Musashi, and Settsu. To be clear, there are also a fair number of grassland provinces that are solid sites for development (whether as another daimyo, Oda, or in the future), but it's tough to beat the value of the farm.
I think that just about covers it for the overview of the Big Five. Now that I've talked at far too long a length about all the daimyos thus far, let's take a look at our starting position and opening moves.
Honorable Mention: Tokugawa
Opening Moves: Army, Navy, Estates, Diplomacy
At long last, we've arrived to what the hell we should be doing as Oda. While your first answer might be something along the lines of unifying Japan as quickly as humanly possible, I've recently come to the realization that this isn't actually all that beneficial. While you could indeed do this at a breakneck pace and unify Japan in something like 15 years, you'd have a crumbling economy held together by your army fighting off rebel stack after rebel stack. You'd also be behind on Renaissance, having spent all your mana on techs, coring, or lowering war exhaustion (please don't do this) in the 1460s. Not a great position to be in.
Indeed, there seems to be this subliminal sense that Japan must be unified as quickly as possible, and I'm still unsure where it stems from. I assume it's something from just playing a time-limited game like EU4, but in this part of the world, time moves much slower. Take Ming, for example. Sure, Ming might have their emperor captured by Oirat from time and time and that might rarely result in some surprising happenings, but the region you're in is very static for the first fifty years or so. That isn't to say that 1490 is when you should be unifying Japan. On the contrary, you should aim for a middle ground approach, being as opportunistic whenever possible and keeping an eye on the shogun's annexations, ensuring he doesn't ever go over 100% total province warscore cost. That way, you can annex him in a single go and form Japan right then and there.
Thus, I'd recommend aiming for a unification time of 1475. Obviously, the earlier the better, but you don't need to speedrun this. The mongols aren't coming, and if you've followed the guide, you'll be good to go on Renaissance, tech, colonies, and be conquering the daimyo. So let's get to it.
As we saw before, we're surrounded by OPMs that don't hold a candle to us in a straight fight. But be wary about fighting when outnumbered this early, as any loss early on without allies to be sieged down will likely result in a restart. As will any surprise war declarations. Aside from maybe a coalition of daimyos or the shogun himself, you should be declaring all the wars that you'll be fighting (allies excepted of course). And at first blush, you might be tempted to do what all the other AI will be doing to the friendless OPM who has the misfortune to border you and declare war on them. But that would be a mistake, as we don't want their land yet. In fact, we won't be taking any land at all for a good while.
I've talked long enough about all this, so let's break things down into a more compact format.
- Recruit one infantry unit.
We won't be needing this unit, but they'll be ready to join the first siege so we can start progressing the siege due to casualties from the stackwipe.
- Move 3k army to Kyoto, hire a general. Do not make your ruler a general.
Your ruler has 3/4/3 and a good heir is not guaranteed. If you're especially lucky, you'll get one of the various heir events or a daimyo-specific heir event with a MTTH of 480 months. This MTTH is multiplied by 0.8x if you border a rival and further 0.8x if you have a truce with another rival. It's still a MTTH of roughly 300, but you've got time, as your ruler is rather young. He's also got a good set of traits that don't change along with a handful of other rulers, so your start is fairly consistent. Also, aggressively disinherit ♥♥♥♥♥♥ heirs. If you play your cards right, you won't get sudoku'd by the shogun, but your ruler can technically drop dead at any time. Everyone's threshold for heirs is likely different, but I don't settle for anything less than perfection. And then when I see my ruler is getting up there in age, I settle for anything 3/3/3 or over.
- Combine fleet, move to ocean tile outside. Hire an admiral.
You might scoff at the idea of hiring an admiral for early game, but you'll need one if you want a chance against multiple navies at the same time or Hosokawa's (relative) naval deathstack. Plus, we'll make those points back and then some, so it's irrelevant. The blockade bonus and naval superiority (not being blockaded) will prevent you from accumulating war exhaustion out the wazoo. In addition, the extra maneuver will help you nab a few extra ships here and there, which will come in handy since you'll hopefully only need to build ships toward the final stages of the unification.
- Hand out estate privileges for +1 monarch points in all three categories. Enable Supremacy of the Crown for Nobility. Call the Diet and if you're lucky, you'll get an issue from the Nobility to get your prestige to 30 for 50 admin points.
This will usually be achieved naturally, but feel free to take the Burghers privilege for 20 prestige and slightly higher passive gain for the low cost of -5% tax modifier and some influence. The income won't really matter, but depending on your luck, you may be rerolling a lot of heirs. So this one is up to you. If you don't get a good agenda issue, just pick whatever is most appropriate, which will probably include developing your capital twice. But don't do anything just yet, since we'll do that in a few years.
Next, I personally seize land and then give it out to the Clergy via the Religious Culture privilege that gives me +1% missionary strength and -2 tolerance of heretics and heathens. We won't be dealing with either of those for a good long while, but the other perks of the privilege is that it gives every province in Japan (sans Ainu and Ryuyku) +10% tax/production/manpower and -1 unrest. We can evaluate what we want to do later on with this privilege anyway, so don't sweat it. Alternatively, you can give an estate a +100 governing capacity privilege, the main merit being that you can fully state and core a couple more states before uniting Japan and upgrading to empire rank. You'll also want to enable Free Enterprise (10% loyalty, influence) for the Burghers to help get you closer to 60% loyalty and influence. This is so we'll have their -10% development cost discount for Renaissance.
- Break your alliance with Shiba, begin fabricating claims in Hosokawa and Yamana.
In my more recent runs, Shiba has been dead weight. Their starting ruler won't join defensive Call-to-Arms for most of their allies, but breaking your alliance generally ensures they get devoured. However, they are able to survive until 1449, allowing you to potentially rival them for another humiliation war. I've also noticed that breaking your alliance with them sometimes persuades them to join wars against you, so keep that in mind. It ultimately doesn't matter quite as much though.
Opening Moves II: The Humiliation CB and Show Strength
Next, let's talk about rivals.
On the subject of rivals, don't assign any just yet. Wait until around Nov 25 to look at your potential rivals. In most games, your initial potential rivals will be roughly the same, and will always include Isshiki as an option. This is good, because they frequently end up being one of the few daimyos on Dec. 11 without any alliances, and die soon after. Look to see which of your potential rivals are friendless and rival the best two. This isn't a guarantee, of course, but we have to take some risks in order to get the Humiliate Rival CB for Dec. 11.
It's this last part that I want to draw more attention to, as I feel that this is the crux of the run— the Humiliate Rival CB. With this CB, we don't need to claim a single province and declare an illegal war that'll have the shogun demanding our ruler commit sudoku. That is, not yet. Instead, what we're aiming for is to declare opportunistic humiliation wars on our weak rivals as fast as possible. Instead of provinces, however, we're only seeking to use the 'Show Strength' peace deal, so we can reap 100 mana of each type. This is also why we aim for Isshiki first, as they're usually undefended. And even if they are, they usually ally Kono or some other weak OPM that you can mop up after stackwiping Isshiki (and leaving a partially damaged unit on it to block recruitment. Don't leave them unprotected, or you'll be out the cost of recruiting a new unit.
We also want to change our message settings so we're alerted when daimyos declare war. While you can click 'Best Guess' to add to a selection, you'll want to add all the daimyos manually. This is to ensure we know exactly when someone begins fighting. Thankfully, you can scroll down the list and find Mongolia, which will have Tsutsi right above them. Simply click on all of the daimyo until you run out and hit Dai Viet. This doesn't include So, but they're inconsequential to you anyway.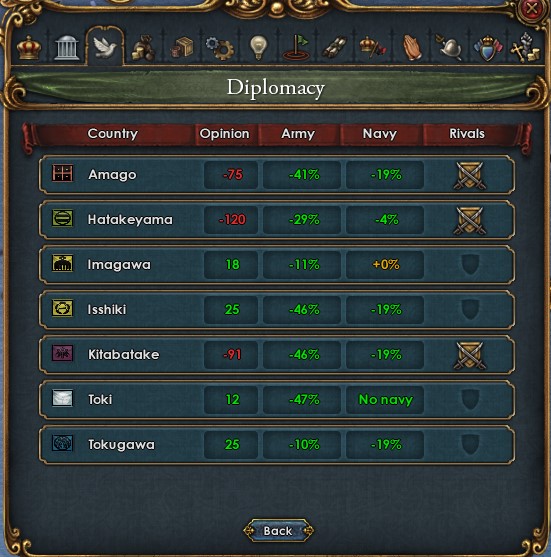
Finally, there is the matter of the third rival. Depending on your options, you may not have many attractive choices. In this sample run that I started for this guide, I have a typical selection of my neighbors, plus Isshiki and Amago, who I don't share a sea zone with at all. Of these, we can always rule out Hatakeyama and Toki, as one is a two-province minor and both have capital forts that'll require a stack of 9k. That doesn't mean these are off-limits, however. Rather, we should weigh the pros and cons of setting a 'fortified' rival as our third, as they won't be going anywhere anytime soon.
Now, unpause the game and pause it on Dec. 11. Check your rivals to see your potential targets. For this particular run, I got unexpectedly lucky with my rivals: Kitabatake, Imagawa, and Isshiki had no allies on Dec. 11. Of course, that doesn't mean any offers in-transit couldn't still be accepted, but this was still fine.
As such, we declare on Isshiki and stackwipe them. Or, if RNG is not on our side, we pursue them until we do. At some point after crushing them, you'll also see that other daimyo are all too happy to jump in on the defenseless daimyo. Depending on how deep you want to get into all this, you can choose to maintain one war at a time, or you can see if your second or third rivals are available targets. This is because as long as we keep one unit on the capital, we'll maintain control of the siege, even if the Yamana troops join us and actually progress the siege. Just don't merge units together during a siege or you may lose control to the next earliest unit there.
Along with a handful of vulnerable daimyos on Dec. 11, another constant in our quest to unite Japan is the fate of Kono. Mentioned elsewhere in the guide, Kono is a rather unique daimyo in that it has a particularly strong emphasis on its navy, a trait shared by So and Mori. Unfortunately for them, Kono is almost always targeted by Hosokawa in the first year, as their most common ally is Amago, who is easily dispatched.
At this point in the guide, it's up to you how you want to proceed. You'll likely receive the pop-up notification telling you that Hosokawa is about to declare on Kono, which will drag in Amago to the war. One approach is to wait with an army for this war declaration, and then when Kono has been occupied and won't join the war, you position a stack on top of Amago after stackwiping them. Then, either Hosokawa or an opportunistic Yamana will declare and hopefully join your siege. Meanwhile, you'll bring back your two units at Isshiki and continue the siege.
But, you don't have to do this (or rival Amago at all). Instead, you can just move onto another rival as the opportunity allows. One potential reason that you might not want to bet on Hosokawa/Yamana joining your siege is the simple fact that you won't be able to assign new rivals while your army endlessly sieges down Amago. This isn't a bad thing quite yet, but it can be problematic if you're still at war and have already finished your wars with your other two rivals. It's ultimately up to you, but the payoff can be another easy Show Strength mana gain.
Author note: In revisiting this guide many weeks later, I've yet to be able to convince the AI to join me in a siege if we're in two different wars and one is a humiliation war. For example, if I declared war on Amago, Hosokawa and Yamana will refuse to join my stack of troops if I'm first to the siege. But if I was engaged in a war of conquest, they'll happily join. Of course, leaving the province will also have them gladly take over for you, defeating the purpose of declaring on Amago/Toki/Hatakeyama in the first place if they don't have other provinces for you to occupy (allowing the third party to take the fortified capital in their war).
Regardless of what you decide, when the Isshiki siege concludes, don't peace out. Wait for your navy to engage theirs and earn some naval tradition. Depending on your luck in the next 20 years or so of war, you may or may not need to build very many galleys, but make sure you always wait for the post-siege naval battle to maximize your odds. You won't be able to sink them completely, since they'll just hide in another daimyo's port, but the battle is enough for now.
Typically, your main route will consist of Isshiki and Kitabatake, with the former being declared on very soon. Sometimes they'll ally Kono or Amago or something, and as mentioned earlier, you can usually deal with two OPM daimyo at the same time as long as you block recruitment and stackwipe one on the first day (maintenance slider and Oda's starting traditions). In Isshiki's case for if they ally Kono, you can simply wait until Hosokawa declares on Kono and lays siege to their province, as this will cause them to decline a defensive Call-to-Arms. If you're in a hurry, you can also declare on them and lay siege to their ally's capital after stackwiping them. They'll usually give in to a white peace without having to fully siege it down.
Then, you'll look at your other options. If you were rivaled by a soon-to-be-extinct daimyo like Takeda (and sometimes Chiba) at game start, then you'll always want to prioritize them, even if they get an ally, since Uesugi is very trigger-happy with them. Chiba is also in a triple alliance of daimyo that can look intimidating, but they're all malevolent ♥♥♥♥♥♥♥♥ that won't join defensive calls when you declare, so they're also easy pickings. Just remember that you can set up to 3 rivals before going to war, and process all three if you so choose.
And that's about it for this phase. Just show strength on as many daimyo as you can and rake in the mana. You can usually average one war per year until your rival's allies become more intimidating (Hosokawa, Yamana, Ouchi, Uesugi) and your options narrow.
Phase 1: 1444-1454
As covered in the previous section, your main goals in this phase will be to get as many humiliation wars as you possibly can, with the expectation that these daimyo will be consumed by other daimyo that you can either declare a rival now or just consume yourself in the future. A common roadblock you may run into is the inevitable alliances with Yamana, Hosokawa, or Uesugi. These are challenging, though not insurmountable. For the most part, Hosokawa's early alliances can be ignored, as their starting ruler begins with the malevolent trait, ensuring that the hapless Tokugawa are defenseless as you invade their land. Uesugi is a bit trickier, especially considering they always start the game allied to Imagawa, but if you're lucky, they'll screw up and declare war on two or three daimyo at a time and get sieged down (about 2-3 provinces are needed for them to decline, but rebels don't seem to count), giving you ample opportunity to snipe their allies for more mana. Yamana is a bit less likely to fall prey to this, but they'll gladly siege down Amago for 5+ years if nobody's bothering them.
Besides these three, however, is Hatakeyama. They're an annoying daimyo that start with two provinces and usually ally Tokugawa, who is otherwise an easy humiliation war. Unfortunately, in this phase, there's just not enough point to recruiting an additional 5k soldiers to siege them down. However, their development doesn't give them an intimidating army like it does for Uesugi or Hosokawa, so we can still declare on Tokugawa and white peace Hatakeyama out. Alternatively, you can stackwipe both and see if another daimyo exploits their newfound weakness while you take down Tokugawa. Depending on how busy their neighbors are (mostly Uesugi), you might find that you can nab an additional treaty if you rivaled them beforehand (and after their capital gets annexed). Sadly, you can't separate peace a rival with the show strength CB, but you can still humiliate them for the age objective, allowing us to get Higher Developed Colonies much sooner. There's also the money if you'd prefer. Alternatively, you can white peace to allow you to conquer them faster.
Otherwise, once you stackwipe Hatakeyama, you can just occupy their free province and begin an endless siege on their fort and they'll usually agree to a white peace. On rare occasions, I've also seen them move their capital to their unfortified province, allowing you to actually do some damage. But I'm still not sure what causes this event.
In the first few years of the game, you'll likely trigger your first isolationism event chain. This can only be a few different things, but if you're not planning on staying at your starting isolationism level (Adaptive, level 1), then this can be considered a time limit for you to develop Renaissance. This is because Adaptive gives -10% development cost, and we'll want all the modifiers we can get for Owari.
Likewise, we're also waiting for a favorable monsoon event (Rains Bring Fertility to [Area]). The good version of this event grants a whopping -20% development cost for five years in a given area. The MTTH is only 90 months, which is considerably better than the negative version of the event, which has a MTTH of 180 months.
The Burghers bonus is fairly straightforward, but this is another one we definitely want. Unfortunately, there usually isn't enough time for them to hit 60 loyalty before we have to develop for Renaissance, so you may need to call another diet and/or pick their mission. If you haven't developed yet or got unlucky with your starting mission and have their 'develop Owari to 6 production development' agenda, then you can do that first and then let the game run a day for the bonus. You're also able to hit 60 influence from all the Burghers events, though you may prefer not taking them and just settling for the -7.5% development cost bonus instead.
Thus, if you've been following the guide's recommendation to use show strength on as many rivals as possible, you should be flush with monarch points. If you're really penny pinching your monarch points, you'll put off buying technologies until you get the -5% bonus, but the AI can be a bit slow on the uptake when it comes to these things. Regardless, you'll be able to grab an easy breezy 12 innovativeness from the first three techs. And depending on how many wars you were able to fit in before your isolationism or rain modifier expires, you'll either have a surplus of points to develop Renaissance and buy the techs, or just be a year or two late on the techs.
Author's Note: Depending on when you develop for Renaissance, it's technically feasible to stab up at the first opportunity and try your luck at hitting 100% prosperity by the time you're forced to develop. Your starting ruler is a 3/4/3, giving you a straight 50% chance per month to gain one point a month. But this is a bit too unreliable to be counted on, especially considering the fact that there are barely 100 months before 1454 rolls around. Still, something to think about.
As for developing Owari, be sure to set the state edict for the -10% dev cost modifier. If you've achieved the perfect combination of all the dev cost modifiers available to you at this stage in the game, Owari's cost to develop will only be 22 or 23. If you're developing production twice for the burgher mission, you may also need to wait a month for the dev cost modifier to update properly, so just hover over that to ensure you're good to go. That aside, I personally develop Owari to 12/12/12, beginning with the type I'm lowest on (usually military). Take care to use the handy expand infrastructure button as well for a cool -25% dev cost once you get to 15 development. Then, I just put points in tax/production as needed until manpower hits 12. Then, I'll evenly (or prioritize admin) develop the remaining two until they hit 9/9, which allows me to expand infrastructure a second time for the home stretch.
The resulting province of Owari is now a behemoth of a province, giving you a monthly income of roughly 2 ducats a month. Comically, you're also the world's production leader of dyes at this moment in time. Your force limits have also increased, so go ahead and recruit two more infantry units.
It's also important to mention the crucial divide in rival quality here. When we first started the game, we were able to rival anyone who rivaled us back (such as Takeda or Date) or those who were reasonably close (such as Isshiki or Imagawa). But now that we've developed Owari up to 36 dev for Renaissance, our potential rivals have plummeted. However, it's important to note that while some of your potential rivals have dropped off from being contenders, not all of them have. Keep this in mind before you embrace Renaissance fully and you pull further ahead even more of the weaker rivals.
From here, you can also sell Renaissance to Ashikaga to boost your income by another 0.60 for a decent length of time. But this won't always work due to them having loans or other shenanigans.
Phase II: 1454-Unification
If you've been diligent in humiliating rivals and staying ahead of your neighbors technologically, you're basically all set to declare on the rest of Japan. Everyone's situation will look different, but your economy is actually now able to support you recruiting three more regiments (putting you at 9/6, nice), which you'll need to do to take Toki out if they're still alive. The Mino fort is a huge boon to dominating in Japan as well, since it effectively cuts Japan in half if you get coalitioned from both sides.
[As a side note, even small OPM daimyo will recruit 6 units over their force limit to siege down Toki to win the war, and then immediately go bankrupt and disband them all.]
From here, it's up to you to decide on how you want to approach unification. You can opt to collect one more round of show strengths from everyone, just to reap the mana harvests while they last (as Ashikaga will inevitably annex more daimyo as time progresses or you'll eclipse them for good). Generally speaking, it seems like 6 shows of strength is a good metric to hit in Oda runs, as this gives you significant mana to develop, research, and buy ideas with. In one of my runs, I got especially lucky and was able to reach 10, but I had focused exclusively on humiliations, and didn't have other outlets for my surplus mana besides Owari, which ended up being 50 dev by the time I united Japan.
So there's definitely an opportunistic balance that needs to be struck here, as the actual process of uniting Japan will starve you of administrative mana. This is doubly true if you're choosing to go with Exploration-Expansion for an aggressive colonization game in Asia, allowing you to begin colonizing Taiwan as early as the late 1450s. Complicating this is the fact that colonies themselves cost 2 ducats each, and your economy is still rather small. That money could also be used to hire two advisors (or three, if you get lucky with event advisors and use privileges).
There's also the matter of when you should unite Japan. It used to be the consensus in the community that you wanted to unite Japan as fast as humanly possible (so 1450s or 1460s), and damn the consequences. With shows of strength, however, this strategy doesn't really hold a lot of weight anymore (unless in MP, I guess), since early-game mana is a very valuable resource, and you're able to acquire a lot of it in a very short period of time. But in some games Ashikaga is diplo-annexation happy, and in others, they're utterly worthless and never annex anyone. So it really just depends.
Further compounding this consideration is the simple question: what's the rush? You're not able to conquer Korea until you can take on Ming, who we'll be able to take down in a few decades anyway, so they're not a threat. And if you're colonizing, we already have a colony going (or two if your economy is stable). You're also able to diplovassalize Ainu and Ryuyku shortly after unification, so there's not a lot of urgency needed there.
Still, an argument can be made for heading down into Southeast Asia to intervene as much as possible in their regional affairs. If you strategically place your colonies, for example, you can diploannex most of the region's smaller nations with just Japan and an adjacent colony (that you can even abandon if you so choose).
Regardless of your idea group picks, you'll still likely be starved for admin mana (especially when you factor in the -3 stab hit from uniting Japan to avoid a Peasants' War). This can be offset by the usual suspects: hiring an admin advisor, setting it as the national focus, and preferring it in events. Fortunately, Oda also has -10% CCR in their ideas, allowing us to further reduce costs. Unfortunately, this idea is only unlocked once we pony up enough diplomatic mana to get 6 ideas in Exploration (or whatever group you choose first). You can get a solid 10% off if you went full isolationism in your first event, as well as a strong -10% construction cost modifier.
The other main way to reduce coring costs is, of course, fabricating claims. For the most part, this is fairly straightforward work for a further -10% discount. You're also able to get all claimable provinces nearby from your Owari start, further easing the initial burden on you. Sadly, you'll also eventually snowball to such a point that every other daimyo in Japan will commit a diplomat to Counter-Espionage, effectively freezing all of your spy networks. If you've hit this point, then there's nothing further to be done besides outright conquering those you can.
A further way to reduce coring costs that I'm still experimenting with is deliberately leaving partially-conquered states unstated. Because a province always costs its territorial core value (50%) up front, you could theoretically unite Japan for a greatly-reduced up-front cost. Here, the trade-off is the longer duration of higher autonomy that you'd have to deal with (soft-cap of 90% versus its 50-90% value might be (or capped at 50% if stated, but not fully cored)). It's also worth noting that unless the autonomy is being modified by Statutory Rights (which sets the value itself to a hard 25%), you can safely decrease autonomy and have it tick down invisibly until you fully core the province. With this strategy, you would only state something once you had the entire state cored as territories, allowing you to strike a middle ground between coring and autonomy. This allows you to avoid paying full cost for cores that would likely be high autonomy anyway for the immediate future. You can maximize your savings here by waiting to fully core anything until you get Oda's CCR idea as well.
A final consideration in all of this unification talk is your manpower, economy, and rebels. Depending on how loose and fast you've been managing these things, you may be in for a bad time. This is because in the case of manpower, you essentially have roughly 30-31 daimyo as eligible tags for revolting in your newly-conquered territories. The rebel stacks themselves are usually weak (about 7k, or 11k if provoked), but those casualties eat away at your manpower reserves (even with god-tier generals from your high army tradition). Normally, this isn't a big deal, but when you declare on the emperor, you also incur a nasty -3 stability hit and 3 war exhaustion. If you unite Japan in a hurry and let your manpower drop during this step, then that -3 stab hit all but ensures you'll start progressing toward the Peasants' War. And as previously covered, admin mana is extremely precious. So you really have two ways out of this issue: stab up four times (or fewer if you're lucky), or slacken recruitment to breach the 50% manpower threshold.
The other approach in this scenario would be to conquer Japan in somewhat staggered phases, allowing your manpower to recover somewhat between rebel stacks. Everyone's approach is different, of course, so definitely experiment to find a good balance for you. I would say that regardless of your approach, however, that you conquer enough of Japan to keep Ashikaga under 100% total warscore. You can go a bit past this number if you haven't taken Oda's second idea, since this also gives -10% province warscore cost, since you don't want to be sitting on any daimyo or the shogunate past a specific point.
Phase III: Unification and Beyond
By now, you've likely united Japan, and if you've just taken the decision and become Japan, congratulations, you've just locked yourself out of the events Oda is able to receive in the 1550s. I wish I was kidding, but you do lose out on four Oda-exclusive events if you immediately click that decision button. These include the special event for Nobunaga himself, who is a 5/5/6 ruler that only costs 2 stability to accept as your immediate ruler. Then, if you're able to have a heir, you can pick up the second of Japan's unifiers, Toyotomi Hideyoshi, a 5/6/5. This does change your dynasty, though, so you're also able to recruit him as a 4/4/4/1 general instead, if you prefer keeping the Oda dynasty. These events conclude with a final event between 1560 and 1580, some economic reforms. It has a MTTH of 60 months, but it's a point of mercantilism and 75 diplomatic and administrative mana.
Outside of these three events, with the Nobunaga event specifically requiring your capital to still be Owari and you to not be shogun, you'll have to be Oda for any of them to fire in the 1550s and 1560s. However, Oda's fourth event is Azuchi Castle, a permanent country modifier you can purchase for 1.5x years of income once you become shogun (but NOT Japan). The modifier isn't anything crazy, but it gives 0.25 yearly prestige and 10% fort defense. The MTTH is quick, at 30 months, so you won't have to wait long after becoming shogun.
Oda's unique flavor aside, the world is essentially your oyster. If your economy hasn't ♥♥♥♥ the bed, you'll likely be recovering and stable to start colonizing very aggressively in whatever direction you want. Or begin managing a comical daimyo swarm if that's your thing. You're also able to take on up to 8 vassals at a time as you expand your reach into Southeast Asia, if you so choose, thanks to your base of 4 relations, 2 from Strong Duchies, 1 from Expansion, and final one from your mission tree (which has easy prereqs and only requires +3 stab and 80 legitimacy). By diverting trade and enabling scutage on all of these vassals, you can make as much as 10 ducats a month at a peak (especially attainable if you pick the T1 government reform for the vassal income bonus). You'll also want to pick the Bushi Integration Policy privilege as well so you can fully ignore the diploannexation penalty and continue full steam ahead.
On the subject of vassals, you can also force convert Ainu as soon as they accept vassalization. This allows you to start converting their provinces to Shinto, which is a requirement for your mission tree. You can then placate local rulers with your capped prestige at this point, getting a partial refill from the Unite Japan mission giving another 50. This knocks the age objective out of the way, and allows you to conquer the Siberian tribes early, if you so choose.
In fact, you can vassalize almost all of the minors in Southeast Asia if Malacca, Brunei, or Majapahit haven't conquered them already. Of these, Malacca tends to be the most aggressive, so the minors around them are usually a priority. The island of Java that Majapahit is based on tends to consolidate into a single entity very quickly, but if you're lucky, you can snag a one-province Majapahit to use reconquest with.
A special mention must also be made for vassalizing Ternate or Tidore, as they are one of the most reliable sources of a vassal colonist in the region, if not the only. Luckily, you're able to vassalize both of them just by colonizing the island inbetween them. For them to begin colonizing, however, one of them has to stop existing. Then, they'll automatically start a predesignated colony in a nearby province. This is typically one of the 7 islands able to produce Cloves, but it can also be the closest province on the islands to the east or west. After they colonize two or three of these provinces, they'll receive a colonist via event that allows them to more freely colonize around them. For your purposes, you may want to colonize the islands that have the potential for Cloves, ensuring that they all produce Cloves, and then annexing Tidore or Ternate so they can begin colonizing for you.
Colonization and Trade Companies
This section is rather extraneous for those of you who have no desire to colonize aggressively, but consider this a helpful compendium of tips and tricks for those possessed of fierce imperialistic tendencies.
While I discussed the importance of vassalizing Ternate and Tidore (as well as annexing one of them), you should approach colonization with a clear goal in mind. Do you aim to colonize it all before the grubby Portuguese get there? If so, you'll want to beeline to Cape as soon as possible. Or maybe you just care about funneling as much trade as possible from the New World and making Nippon fabulously wealthy? If so, you'll want to hit the New World as soon as possible (Diplomatic Tech 7).
These provinces are the 7 provinces located around Ternate and Tidore, and are extremely important in making you immense amounts of cash. Cloves have a trade value of 8, making it a trade good only eclipsed by coal and gold. As long as you colonize these provinces yourself, you'll generally not have to suffer too much RNG before you roll the 60% likely Cloves in the uncolonized 5 provinces. But if you're an honorable sort, you can recall your colonist and abandon the colony to restart the whole thing and reset the trade good, knowing that those 400 souls could have gone to a different colony.
This should be one of the first provinces you colonize, as Micronesia is home to the gloriously unknown Nan Madoll monument. At level 1 (the default when you start colonizing), this monument gives +10 global settler increase. This effect is activated as soon as a colony is established too, providing an immediate benefit. When the monument is upgraded, this gets bumped up to +15 global settlers and provides a 0.5 yearly naval tradition. At level 3, it provides +25 global settlers, 1 yearly naval tradition, and an all-important 5% global settler chance. These modifiers might not look like much, but if your economy is booming before the good manufactories are unlocked, it may very well be worth upgrading this monument and getting it online with all haste. Besides, even after colonization ends, you'll still benefit from the naval tradition's yearly tradition, leaving you with 4 other point sources to acquire for a permanent 100 naval tradition.
This is listed after the other two, since you'll only be able to get your feet wet when you get enough range from Exploration ideas and Diplomatic Tech 7. But all you need to spawn Colonialism is a single province, though I am uncertain if it's required to be fully colonized or not. Unfortunately, you won't get a notification if you've not gotten Colonialism, even if it's spawned somewhere in the world. This means it's very possible you've missed your window to savescum if you weren't paying close attention to the year. On this subject, it's also worth going over what the conditions are, as if you meet the other conditions, Colonialism has a 5% chance of spawning in each eligible province. First, a coastal capital is always eligible. Second, any coastal province is eligible if it has 12 development. Third, a coastal Center of Trade is always eligible. You'll likely have some excess mana by the time 1500 rolls around, especially military mana, so don't be shy about boosting up your CoTs for their inevitable level 3 upgrade requiring 25 dev, or just some of the states around Japan.
After colonialism spawns though? It's really up to you. You can focus your energies on sealing off Cape from the Europeans to have Asia to yourself for longer, or you can divide your efforts in getting Colonial Nations off the ground. If you're willing to be patient with the travel times involved and don't have your diplomats busy, you can diplovassalize and annex tribes to speed up the formation. This is actually a solid tip for Australia in particular, where you can start a colony (either in Australia or New Zealand) and vassalize the natives for Colonial Nation with just a single colony invested. From there, you can just give them 100 years of a 5 ducat subsidy, and they'll colonize two provinces each. I mentioned New Zealand just now for good reason, as Portugal or any other plucky European will inevitably reach Asia from their South American colonies, and New Zealand will be much closer. You can snipe a lot, if not all, of the islands if you're diligent enough, but I'm not so sure about getting all of Australia done before at least one European arrives. Maybe if you hit South America's southern colonies or something.
As for the type of Colonial Nation? In a perfect world, where natives didn't ruin all of the trade good spawns in the Americas through their bugged migration/tribal land system, I would go with Private Enterprise every time for their Encourage Cash Crop ability. This doubles a CN's chances of spawning a cash crop (which includes things like furs, etc.) in their colonies (note: theirs, not yours), encouraging the aforementioned subsidies. But because much of the New World is claimed by tribal land garbage, I would just go with Crown Colony.
Trade Companies are an entirely different beast, and I'll only go over them briefly, as everyone will have different preferences. In short, you want a trade company present in every single trade company region possible. For Japan, this means one in Philippines, each China node, Girin, The Moluccas, Malacca, Polynesian Triangle, and so on and so on. Essentially, your strategy should be to minimize how many states you give to trade companies, as this translates into less benefits for your full states. This is because your states benefit from a goods produced bonus that scale with how strong a trade company is in a charter. However, your trade company provinces do not benefit from this, and you can't have full cores in a state with a trade company, so you need to plan ahead. And of course, if a charter hits 51% power in a trade node, you receive an extra merchant that also extends your allowed number of CoTs at level 3.
As far as selecting a particular state to be a trade company, though? That really just depends. Sometimes the answer is easy, as it is in the East China Charter. Here, you have a state with two CoTs. An easy decision, especially compared to the other state in the charter with zero CoTs. But what about a region like the Philippines? There, every state is either not fully colonized or has a CoT. And the one state that possesses two CoTs, Maynila, has coal as a latent good in its second CoT province. Here, you might need to add two different states to your trade company in order to achieve that coveted 51%. A final tip on this matter is to consider the number of provinces in a potential trade company state, as you can buy the 400 ducat investment that adds a flat 4 trade value to every province in an area.
Conclusion
Let me know if you have any questions or concerns. I'll go back through and update the guide with more pictures, corrections, and information (especially for the two sections I didn't finish).
- How to win battles★ 5 (770)40k views1.5k ♥13 minUpdated 21 Aug, 2020
- Extensive Guide to Trade★ 5 (914)37k views1.8k ♥22 minUpdated 9 Oct, 2023
- Console Commands★ 5 (756)36k views1.8k ♥24 minUpdated 25 Jan, 2022
- Army Composition Through Early to Mid Game★ 5 (335)34k views684 ♥7 minUpdated 22 Aug, 2016
- How to go outside after playing EU4★ 5 (826)25k views189 ♥1 min
- Для русскоязычных новичков★ 5 (416)25k views780 ♥1 minRussianUpdated 8 May, 2014






- Upgrading to PremiumTeam Fortress 2★ 5 (20k)1441k views11k ♥6 minUpdated May 11, 2022
- No More Room in Hell Official ManualNo More Room in Hell★ 5 (2.8k)569k views2.1k ♥29 minUpdated Apr 22, 2019
- NMRiH Community Hosting GuidesNo More Room in Hell★ 5 (526)351k views653 ♥1 minUpdated Aug 10, 2022
- ULTIMATE GUIDE FOR GAME DEV TYCOONGame Dev Tycoon★ 5 (5.8k)326k views10k ♥4 minUpdated 23 Jan, 2014
- How to 'Git Gud' Soon™MORDHAU★ 5 (2k)318k views3k ♥68 minUpdated Nov 16, 2024
- Лучшие кооперативные игры SteamPAYDAY 2★ 5 (1.5k)315k views2.1k ♥56 minRussianUpdated Apr 27, 2025






This guide was created by its original author on the Steam Community. Are you the author and want it removed? Request removal.