Extensive Guide to Trade
Introduction
Greetings humble merchant! You've come seek advice from an experienced trader to bolster your wealth, expand your trade routes and empower your nation through plutocracy? Look no further, for I shall teach you the many nooks and tricks that every member of the trading business should understand: from the lowly spice merchant to the powerful doge!
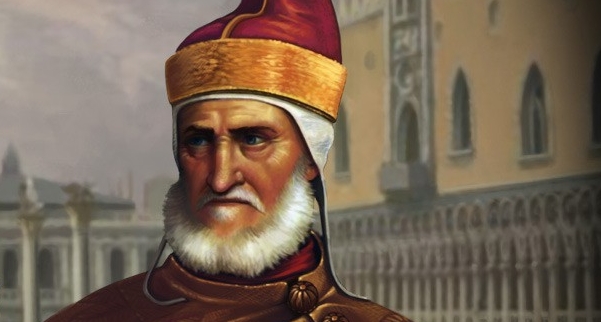
This guide was written to expand on a less explored but not less important aspect of the world of Europe Universalis IV: Trade. While powerful monarchs and zealous bishops and popes might desire to see their borders grow so they can tax more and more, they must not forget the powerful tool of trade!
Early on, till the year 1500, most nations will find their biggest source of income to be the taxation of the people. Investing in the production of goods, and thus indirectly the power of trade, is not yet looked at as a good source of income. But, as technologies and national ideas shape and form countries, the income from production, and therefore the power of trade, increases substationally.
What does it take to dominate the large amounts of wealth that grow over time? Many, many aspects - all of which I'll tell you!
 When more tactical advice is given, rather than simply elaborating on mechanics, a "tactics" symbol is given.
This guide is written from the perspective of someone possessing all relevant DLC for EU4.
Understanding the Trading Interface
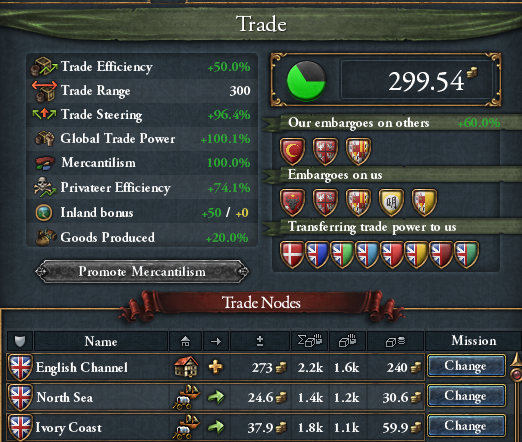
One of the most important tools of learning the trading business is understanding the trading tab interface. It shows a comprehensive list of almost everything important to trade, with the notable exceptions of trading companies.
Although it gives a quick glance of many comprehensive statistics, a real master of trade understands the meaning behind every factor and how they come to play in the grand scheme of trade nodes, merchants and exchanged ducats. Lets go in to the finer details of the trade interface and the important modifiers that come to play.
Trade Modifiers
 Trade Efficiency
The most straight-forward modifier, trade efficiency directly increases the income you gain from trade. It is the final modifier applied to the income and increases it by a certain percent. This makes it one of the stronger modifiers when it comes to generating ducats. Every 1% of Trade Efficiency directly increases trade income by 1%.
 Trade Range
There is a limit to the range your merchants can travel to interact with a trade node. This is known as Trade Range. Trade nodes are measured from your nearest cored provence (subjects and naval basing rights count as well) to the province at which a trade node is located (e.g. English Channel is located in Coast of Holland). It is still possible to have trade power in a node beyond your trade range, you simply cannot send a merchant there to interact with it.
 Trade Steering
When instructing merchants to influence a trade node to move goods from this node to the next, that is known as Trade Steering. It is a modifier to the worth of trade goods being transferred from one node to the other; up to 5 merchants flowing in to a certain direction can apply their trade steering bonus, depending on their trade power (the strongest merchant provides the largest bonus). The base trade steering gain is then multiplied by the Trade Steering modifier.
Trade Steering bonus is compounding, and as such being capable of generating long chains of steering trade through trade nodes drastically increases the worth of trade goods. A single good produced of 3.0 ducats worth of tea from Nippon with 0% trade steering will double in price (6.24 ducats) when it arrives in English Channel. Having 100% trade steering increases this to quadruples the price (12.53 ducats).
 Mercantilism
In these stages of history, it was a common economical thought that there was a finite amount of goods available on the market and maximizing exports whilst minimizing imports was the most sound method of achieving economical prosperity. This is known as mercantilism; each 1% of mercantilism provides 2% provincial trade power (meaning a trade power boost in provinces you own and control) as well as 0.5% embargo efficiency (meaning your trade power is more effective at barring the trade power of those you embargo) and 0.05% loyalty equilibrium with either the Burghers or Vaishyas, if these estates are present in your government.
Mercantilism also has a negative side-effect: every 1% of mercantilism increases the liberty desire in colonial subjects by 0.25%; due to your the practice of tarrifs, imperialism and seizing resources that is associated with mercantilism.
Most nations start the campaign with 10% merchantilism, though a handful of countries (primarily in Europe) start with 25%. Mercantilism is increased by exchanging 100 diplomatic points for 1% mercantilism in the trade interface, granting and refreshing trade monoplies to estates, as well as many various events, missions and religious interactions.
Having a high mercantilism in comparison with other nations is a sure-fire way to dominate the trading scene. Having 100% mercantilism triples trade power in all owned and controlled provinces, additive with other modifiers (such as trade companies, global trade power modifier and trade-focused buildings).
 Inland Trading
Understanding Trade Nodes
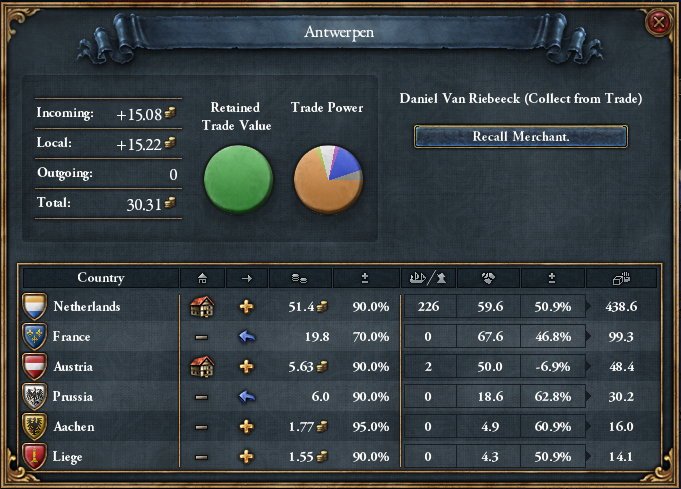 Now that we have an understanding of the trade interface and what every modifier does, lets jump into the second most important trading interface: The Trade Node!
The trade node interface shows all the information you need about the various nodes around the globe. They represent the market control of various provinces (there is a trading map mode to see just what provinces are part of what trade node!).
In the top of the trade node is shown the name of the node. Whilst not important, it helps you to keep oversight if you're not familiar with all trade nodes yet!
To the middle-left is the gold flow. These are the defining factors how wealthy a trade node is.- Incoming is the amount of trade wealth coming in from previous nodes that are being steered by other merchants, light ships or province's mercantalism.
- Local is the amount of wealth being produced in the trade node - this is the total sum of Trade Value in a trade node (something that'll be discussed more extensively later!); a good thumb of rule is: the more production income being produced by a province, the higher it's trade value, the higher wealth in a trade node.
- Outgoing is the amount of wealth being traded away from this trade node. This can happen in any trade node with the exceptions of Genoa, English Channel and Venice.
- Total is the amount of wealth left over in the trade node to be competed over.
Spot on in the middle is a graphical visualization of the aforementioned gold flow. It easily shows how much is being steered away and how much is left in the trade node. It also shows how much of the trade node's wealth is being controlled by a nation - both in handy pie charts. To the middle-right are two possible options (unless an end node, in which Steer Trade is unavailable). Collect trade and Steer Trade. Both do exactly what you think.
- Collecting spends a merchant to use your trade power to grab wealth. This amount is roughly the same as Your Trade Power % * Total Wealth. This is ofcourse then increased by trade income modifier! There is a very hefty penalty to your trade power % if you are collecting in trade nodes that are not your trade port ("capital" of trade, so to speak) - so only do that if you're experienced enough to know if it's worth the cost!
- Steering spends a merchant to use your trade power to steer trade. You are now sending your trade power in wealth to a trade node of your choice further down the line. This amount of trade power is also increased by Trade Steering - so a high trade steering can really chip away a big chunk of trade power! There is no penalty to trade power for trade steering.
In the bottom is a detailed list of every nation who has trade power in the node, what their merchant is doing, how much they are collecting, and how much trade power they have,
- Merchant Job can either be collecting, steering, or in the rare case of there not being a merchant in a trade node: "up stream" steering. Up stream steering happens when it is a trade node past your trade port. Collecting is shown with a yellow +, steering down stream is shown with a green arrow pointing to the right, steering up stream is shown with a blue arrow pointing left.
- Amount of wealth collected or steered is shown in the middle of the table. It shows how much you are steering or gaining after all modifiers - so Trade Steering and Income Modifier are already measured in this number!
- Trade Power has a few ways of being obtained. A merchant alone give 2 trade power, which is not a lot. But the merchant can get up to 50 more trade power with a Caravan Bonus bonus if it's an inland trading node. Light ships are ships of mediocare cost that can "patrol" a trade node to increase trade power and are one of the main ways to gain trading power in naval trade nodes. Lastly, provinces also give trade power, depending on their location and buildings.
Merchants & Trading
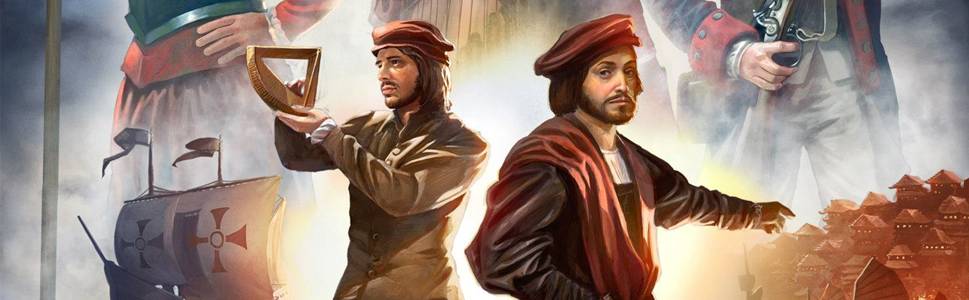 The centerpiece of your trading empire, the very soul and heart of people working for you in the essence of plutocracy, wealth and trade: Merchants
 Merchants are an agent much like a diplomat - they are limited in numbers and very important to your nation when it comes to controlling trade.
Just like diplomats, missionaries and colonists, they are no use if they are inactive. You must put them to work on a trade node, where they make use of all your gathered statistics and modifiers to work trade for you.
When you want to send a merchant to a trade node, it will have two options:- Collect Trade: The merchant will put the trade power to use to take a direct cut of the wealth in the trade node. If there is 100 ducats in a trade node and your merchant has 50% trade power of the total trade power in a node, it sends 50 ducats (multiplied by your Trade Efficiency income modifier) to your monthly treasury listed as "Trade Income".
- Steer Trade: The merchant placed will put the trade power to use by sending ducats further down the line. If you have trade power in a trade node and no merchant, you automatically steer trade, but without a merchant you do not control where your trade power/ducats are going.
Having enough land or naval power to influence a trade node is step one in maximizing trading income. Correctly applying your merchants is the second, most important step!
 Merchants collecting in your Home Node (e.g., where your trading capital is located) increase your trading income by 10% in that node. However, merchants collecting outside of your Home Node instead inflict a 50% trading power penalty from all sources in that trading node.
Merchants steering trade forward will increase the value of that trade, through both an innate steering bonus (up to 5 merchants from any nation) and through your own nation's Trade Steering modifier.
As such, the general tactic for maximizing your trading income is to apply merchants to trade nodes downstream of your Home Node to ensure they will flow wealth where you can most easily collect without penalty.
Merchants collecting in your Home Node (e.g., where your trading capital is located) increase your trading income by 10% in that node. However, merchants collecting outside of your Home Node instead inflict a 50% trading power penalty from all sources in that trading node.
Merchants steering trade forward will increase the value of that trade, through both an innate steering bonus (up to 5 merchants from any nation) and through your own nation's Trade Steering modifier.
As such, the general tactic for maximizing your trading income is to apply merchants to trade nodes downstream of your Home Node to ensure they will flow wealth where you can most easily collect without penalty.However, some nations struggle in their home node; such as having many outgoing streams or a rival naval power dominating trade. The rule of thumb to apply your merchants as follows:
- Ensure you have a home node as far upstream trading nodes as you can if you can dominate trade there. If not, look for a trading node you can potentially make your Trading Capital (done at 200 diplomatic points, much like moving a capital for administrative points).
- Send your merchants to trading streams downstream from your Home Node to siphon trade towards your Home Node.
- Depending on the amount of merchants you own: prioritize downstream nodes that need merchants to successfully move trade upstream. For example, if you dominate a trade node that only has one downstream flow to a node you want to use anyway, a merchant isn't required there (though could still apply trade steering!)
- If affordable, increase the number of merchants available to match the number of trade nodes you dominate. The largest possible income through trade is to make the longest uninterrupted downstream chain of merchants (whilst having plenty of trade power in those nodes as well) - this is because Trade Steering and the innate merchant steering bonus apply a compounding effect.
Navy Guide

Truly understanding the grand concepts of naval warfare is a different subject, but having a good navy is important for trade. The most important tools of a trading empire are Light Ships and Naval Tradition.
 The biggest navy tool are Light Ships, also known as Merchant (Class) Ships. They are fast with a decent hull size and have an okay amount of cannons; they can contribute to naval warfare, but their primary tool is Protecting Trade.
It's important to defend your light ships when they are on this route! Consider putting Heavy Ships or Galleys in their fleet or otherwise turn the "Retreat when at war" option so you don't have to worry about losing them!
Protecting your trade is a lot like using naval ships to patrol. However, when you send Light Ships on a Trade Mission, they will patrol in a set route and will increase the trade power you have in a trade node. You must set the trade node with your trade mission. They can also be used for Privateering, similiar to a trade mission, but with different rules as mentioned below.
 Naval Tradition is extremly benificial for trade and navy in general. You will gain navy tradition through naval combat. You can also gain navy tradition by sending your fleets on trade missions. If 100% of your naval units are on trade missions (or helping with, so it doesn't have to be all light ships), you gain +2 naval tradition yearly.
Navy Tradition give wonderful effects for trading. Every 1% of Navy Tradition gives, in terms of trading:
Naval Tradition is extremly benificial for trade and navy in general. You will gain navy tradition through naval combat. You can also gain navy tradition by sending your fleets on trade missions. If 100% of your naval units are on trade missions (or helping with, so it doesn't have to be all light ships), you gain +2 naval tradition yearly.
Navy Tradition give wonderful effects for trading. Every 1% of Navy Tradition gives, in terms of trading:- 1% Trade Steering
- 0.25% Privateer Efficiency
 Privateers are state-sanctioned pirates that directly take wealth from trade nodes. Light Ships are send on Privateer missions to a trade node, where they are capable of collecting wealth (much like a merchant, but without a penalty from collecting out of home trade node) by using their ship trade power.
They work mostly as a seperate entity, calculating their trade power based on only two things: ship trade power and privateer efficiency. Privateers benefit from a 50% bonus to their ship trade power. National modifiers that increase ship trade power (or a flag ship with Trade Route Map) will still increase ship trade power of privateers. A fraction of pirated trade node wealth is recieved as Spoils of War to the privateer's country.
Privateers allow you to interact with trade nodes normally not accesible to your trade network (either by being divergent of your home trade node, further downstream or simply out of trade range), as well as hinder the income of countries using that trade node. Privateering is also a source of Navy Tradition and Power Projection, use them against your rivals!Hostile Trading

Although trade is a source of peaceful income, it is still a form of income: and thus a source of possible conflict between nations aspiring to increase their wealth. Whilst privateers generally act outside the confines of government, a country possesses various tools to engage in hostile trading practices, such as embargoing, requesting merchants from other nations to steer trade or transfer trade power and outright conflict through (trade) wars.
 Embargo's
Embargoing a non-rival penalizes you with 5% reduced trade efficiency per non-rival embargo. Embargoing a rival has no penalty and instead increases your power projection depending on the strength of the embargo. Non-mutual embargos grants the embargo'd country a Trade Dispute casus belli, regardless of rivalry. You cannot embargo a nation you have a truce with and losing a war removes an embargo aimed at the victor.
Steer Trade & Transfer Trade PowerTransfer Trade Power directly transfers a part of the nations trade power (A maximum of 50%; peace deals are always maxed) in their provinces to the benefactor - only provincial trade power is calculated. Colonial nations automatically transfer 50% of their trade power. Vassals, marches and client states can transfer 100% of their trade power at the cost of liberty desire.
Steer Trade instead uses the merchants of a nation to steer trade towards the benefactor of the Steer Trade agreement. The nation keeps their own trade power, but the merchants can steer trade towards the home node of the recipient - if both nations share the same home node the target will still collect (thus nullifying the use of the agreement).
Neither options cost a diplomatic slot, and both options cannot declare war on eachother whilst these agreements hold. Having one agreement gives a severe malice for requesting the other, but both can be active at the same time. Canceling the agreement grants the benefactor a Trade Conflict casus belli.
It's common practice to always embargo your rivals - they'll always try to embargo you. You can choose not to embargo to make use of a Trade Conflict casus belli, though this will require a focus on their coastal provinces (if they have any) and will only inflict economic harm.Diplomatically requesting the transfer of trade power or steering trade is usually only accepted by smaller nations that benefit from gaurenteed peace, rarely do these nations dominate a trade node enough to justify these actions. Third party participants in wars whom are too costly to annex and have no other justifiable peace treatries are great targets to enforce war reperations, transfer trade power and steer trade - this often allows for a very prosperous income to recover wars from.
Global Trade Guide

Securing your home trade node to ensure a fair share of income from your own produced goods is a good start, but nations that engage in global trade practices will benefit from ludicriously high amounts of income - it is not uncommon for a well-developed nation with a well-established trading network to have an income many times greater than its development would suggest.
The primary gain of trade companies is a large amount of trade power gained whilst requiring less attention when it comes to unrest or development. It's high minimum autonomy mostly nullifies regular province bonusses such as manpower and tax - however, trade company investments can compensate for this high minimum autonomy, sometimes even nullifying the penalty all together. Trade Companies that controls 51% of the provincial trade power grants one merchant.
They key to ludicrious amounts of wealth is the correct application of trade companies. With their incredible trade bonuses as well as possible investments and Goods Procuded increase, it's possible to dominate a trade node with just one to three strategically development provinces. Making a long chain of trade companies to steer trade from far off lands to your home trade node provides income greatly surpassing production and tax combined.Understanding Trade Income
Trading income often ends up being the highest source of wealth in the game, and as the game has developed with more depth in all aspects, the wealth of trading has only increased at earlier dates. Why is that?
Unlike directly-linked sources of income such as Tax being increased by Tax Efficiency and the Gold trade good directly being minted from development, Trade is multi-tiered.
- First, a province produced a good. This good has a base price (such as fish at 2.5) which can permanently change over the duration of the game through world events. There is also an amount of goods produced, determined by the Production Development (0.2 per point) and buildings (such as Manufactures increasing it by a static +1). Global & Local Goods Produced modifiers further change this (such as state prosperity or national ideas)
- Second, this produced good is given a "Market Value". This is simply calculated by the Goods Produced times Base Price. The nation producing this good directly receives this "Market Value" in the form of 'production income', modified by (local) production efficiency. You can view this as the nation "selling" this good to the market.
- Third, the "Market Value" of this good is added to the "Local" wealth of a Trade Node. From here, it can be adjusted and modified by all previously mentioned modifiers, such as Trade Steering, Trading Efficiency, etc.
This means that Trade Income, whilst looking like a straight forward "take-a-piece-of-the-pie" game in a trade node, is actually influenced by the most amount of modifiers in-game - even more than combat!
By dominating a trading node, regardless of your actual provinces directly owned, you cash in on all goods produced in that node! And if you own all provinces in a trading node, you are cashing in twice on the wealth: first by 'selling' the goods to the market and then 'selling' the market!
The true skill of a EU4 player maximizing their trading income is to understand this flow of goods to income: how a province with a goods produced value and it's associated price can be capitalized on in the trading nodes you wish to dominate.
- How to win battles★ 5 (770)40k views1.5k ♥13 minUpdated 21 Aug, 2020
- Console Commands★ 5 (756)36k views1.8k ♥24 minUpdated 25 Jan, 2022
- Army Composition Through Early to Mid Game★ 5 (335)34k views684 ♥7 minUpdated 22 Aug, 2016
- How to go outside after playing EU4★ 5 (826)25k views189 ♥1 min
- Для русскоязычных новичков★ 5 (416)25k views780 ♥1 minRussianUpdated 8 May, 2014
- [RUS] Описание всех достижений Europa Universalis IV★ 5 (1.3k)24k views1.9k ♥37 minRussianUpdated 25 Oct, 2022




- Upgrading to PremiumTeam Fortress 2★ 5 (20k)1441k views11k ♥6 minUpdated May 11, 2022
- No More Room in Hell Official ManualNo More Room in Hell★ 5 (2.8k)569k views2.1k ♥29 minUpdated Apr 22, 2019
- NMRiH Community Hosting GuidesNo More Room in Hell★ 5 (526)351k views653 ♥1 minUpdated Aug 10, 2022
- ULTIMATE GUIDE FOR GAME DEV TYCOONGame Dev Tycoon★ 5 (5.8k)326k views10k ♥4 minUpdated 23 Jan, 2014
- How to 'Git Gud' Soon™MORDHAU★ 5 (2k)318k views3k ♥68 minUpdated Nov 16, 2024
- Лучшие кооперативные игры SteamPAYDAY 2★ 5 (1.5k)315k views2.1k ♥56 minRussianUpdated Apr 27, 2025






This guide was created by its original author on the Steam Community. Are you the author and want it removed? Request removal.