100% Achievement Guide: Assassin's Creed 4 - Black Flag
Introduction:

To earn 100% in Assassin’s Creed 4 – Black Flag we will need to complete a full run of the main Campaign as well as complete all Optional Objectives to earn the By the Book Achievement. If you ever fail an Optional Objective, you can typically reload your Last Checkpoint to attempt them again without having to replay the whole Memory. There are no missable Achievements either, & we can replay Memories to earn any you might have missed.
Unlike in other AC titles, we do not need to earn “100% completion of the game” & we do not really need to worry about finding Collectibles at all such as Animus Fragments, Shanties, or looting all the Chests. That being said, we will need A LOT of Reales & Materials to Upgrade our Ship as well as purchase all our Hideout Upgrades.
Unfortunately for us… the Multiplayer Achievements were not removed from the game, & we will have to complete a long & tedious foray into the Online Multiplayer. A good chunk of the Achievements can actually be unlocked in Solo play in the Wolfpack Game Mode. But there will be others that will require us to have at least 1-2 players in our server. More on Multiplayer later…
Lastly we will also need to complete the Freedom Cry DLC Campaign, which is a pretty short & easy 100%, with Optional Objectives we will need to complete as well.
Though optional, having the Time Saver DLCs can make exploring the world a lot easier as everything will be marked on our Map as well as we will start with the Elite Ship Blueprints without needing to collect them. These DLCs are included in the Gold Edition of the game.
For those interested, here is an organized list of all the Achievements/Secret Achievements. This is how I derive my Achievement Breakdowns & the first reference I create before I begin my 100% journeys.
https://steamcommunity.com/sharedfiles/filedetails/?id=3699776132
Before You Play!: Before you are able to play this game, you will have to make a Ubisoft Connect Account (if you do not already have one). As well, you will also be asked to use the CD Key given to you (you will be shown it when you first boot up the game) copy & paste it somewhere on your PC or write it down, as they actually make us enter the codes in to activate our game!
If you are playing on PC, there is a good chance that the Kenway’s Fleet Mini-Game will be broken for you; you will just see a perpetual loading screen. If this happens to you the only fix so far is from a Nexus Mod user named Nynoen.
https://www.nexusmods.com/assassinscreedivblackflag/mods/426
Download the Mod which will just give you a file called AC4BFSP. Rename it to AC4BFSP.exe & it will turn into an Application/launcher for the game. Next, in the Uplay Launcher, you need to go into Assassin’s Creed 4 – Black Flag’s Properties & disable Auto-Update “When Recently Played” or else our Mod will get overwritten when the game updates. Do the same thing for the game in Steam now, & go into its Properties – Updates & set Automatic Updates to “Wait Until I Launch the Game”.
With the Auto Updates turned off, go to your Steam – Steam Apps – Common – Assassin’s Creed IV Black Flag Folder, & copy the new AC4BFSP.exe Application File into it which will overwrite the current one; you may wish to make a Backup of this Folder just in case. That should fix the issues as well as making loading times a lot shorter as a bonus.
Community Content: Unfortunately, all Community Challenge content is no longer accessible in the game. There is a whole list of Weapons, Outfits, & Jackdaw aesthetics that are permanently locked.
Like most 3rd Party Launchers… Ubisoft Connect sucks & just adds another level of complication to trying to play their games. To play Assassin’s Creed 4 – Black Flag on Steam, you need to simultaneously be playing it through Ubisoft Connect; it will do this automatically when you play the game through your Steam Library…
Guide contains major spoilers*.
Sequence 1: Our Fading Fortunes
1. Dry Tortuga: Cape Bonavista, Havana
- Sequence #1 Memories: Edward Kenway
- Sequence #2 Memories: Lively Havana
- Optional Objectives: 2/80
- Mayan Stones: 1/16
- Locations: 2/50
- Achievements: 4/60
-----------------------------------------------------------------------------------------------------
This guide is written under the assumption you own the Gold Edition of the game & therefore have the Timer Saver – Collectibles Pack DLC & the Time Saver - Technology Pack DLC which will automatically give you all Elite Prerequisite Plans for the final Tier Jackdaw Upgrades & mark all Collectibles/Locations on our Map.*
Memory #1 – Edward Kenway: As soon as we begin the game, we will be thrust into the action & we will receive a Tutorial on how to use our Ship in combat. This will be brief, as the Ship will explode & we will wash up on the beaches of Cape Bonavista.
Chase after the leader of the enemy Ship that attacked us, & kill them.
Location #1 – Cape Bonavista: We will automatically unlock this area as a known Location.
Mayan Stone #1: After we kill the Assassin, we will hear the sounds of gunshots. Before we head to it, there is something we should collect on this island or we will have to return here later. A Mayan Stone, marked as a Mayan Stelae on the Map. Head to it, & we will have to align the symbol on the highlighted stones below us. Do so, & it will mark where the Mayan Stone is buried.
If you do not collect it now, so long as you Synchronized with at least one Viewpoint here, we can Fast Travel back to Cape Bonavista later…
Memory #1 – Edward Kenway: With the Mayan Stone collected, inquire after the sound of those gunshots, & rescue a merchant from British Soldiers. Before we swim over to his Schooner however, we can earn the below Achievement if you fancy.

Achievement #1 – Owned: Complete every activity in a single Location.
There are many Collectibles to find in Black Flag, but few contribute towards Achievements – essentially only the Mayan Stones. However, for this Achievement we need to locate all Collectibles for a single Major Location, such as Cape Bonavista. There are 16 Chests, 1 Shanty, 4 Animus Fragments, & 2 Secrets (a Mayan Stone & a Treasure Map) to find here.
This is the soonest we can unlock this Achievement, but can also be earned by finding all Collectibles in: Havana, Nassau, Kingston, Long Bay, Great Inagua, Tulum, Principé, & Isla Providencia.
Once the Achievement is out of the way, all you really have to worry about now is Mayan Stones. I do recommend still going after Viewpoints & especially Chests still though; we will need a lot of Reales for our Ship & Hideout Upgrades… Shanties are also pretty awesome to collect too & make sailing a lot more enjoyable.

Achievement #2 – Excavator: Find a Buried Treasure.
Now that we have the Treasure Map from Cape Bonavista, open it up for a sketch of Bonnet’s Schooner in the bay & a dotted line leading West into a cave in the cliff wall close by. Head West towards the cliff wall from the beach here, & enter into a flooded cave. Go to the back of the cave to a dead end, & we can dig beside a rock to uncover a Buried Treasure, unlocking this Achievement.
There are many Treasure Maps/Buried Treasures in the game. To figure out what Location the Buried Treasure is at, just check the Coordinates in the bottom corner of the Treasure Map.

Achievement #3 – Heroes Aren’t Born: Complete Memory Sequence #1.
Story Related. With all that out of the way, swim with Mr. Stede Bonnet to his Schooner, the Revenge. Take control of the helm, & sail out of Cape Bonavista to complete Sequence #1.
Present Day Mission #1: After we complete Sequence #1… we will be pulled from the Animus & wake up in Abstergo Entertainment. Ah yes… this part of the Assassin’s Creed games. What is sneaky Abstergo up to now? Video games & merchandising.
Follow Melanie Lemay along for our day one orientation & collect our Communicator. Head up to Floor 2 – Sample 17, & we will be shown our workstation. There is nothing we can do here for now apart from entering back into the Animus; there are Sticky Notes as a Collectible for Present Day, but there is no Achievement for finding them all…
Memory #1 – Lively Havana: In Sequence #2, we will arrive in Havana with Stede Bonnet. Follow him through the city, buy some new Swords, Synchronize a Viewpoint…
Location #2 – Havana: We will automatically unlock this area as a known Location.
Optional Objective #1 – Tackle the Pickpocket: After we Synchronize the Viewpoint, Stede Bonnet will get robbed by a Pickpocket. Simply rush after them, & Tackle them to retrieve his items; since we do not have Pistols or Throwables, Tackling is the best way to take him down anyways.
Optional Objective #2 – Use Smoke Bombs to Escape Combat: Continue to follow Bonnet to a local Tavern, & we will almost immediately initiate a bar fight with the patrons. Do a brief combat Tutorial, & Spanish Guards will arrive.
We must escape, & we will get a Tutorial on how to use Smoke Bombs. While we can complete this Optional Objective during any combat in this stretch, you may as well get it out of the way now with this first encounter. Just throw a Smoke Bomb down while in combat to complete the Optional Objective.

Achievement #4 – Hungover: Wake up in a Haystack.
With Memory #1 complete, we can now free roam Havana before starting Memory #2. From the dock that The Revenge is moored, head directly West two blocks through the city, & we can find the Tavern at the end of the second block; it will not appear on our Map until we get close to it. This is the same Tavern we were previously at in Memory #1 as well…
While we are here at the Tavern, approach a glowing bottle on the side of the bar counter, & we can pay 5R for a drink of Rum. Do this 5 times, & we will black out… & wake up somewhere else in the city in a Haystack which will unlock this Achievement.
This can be done at any Tavern.
Assassin Contracts: In free roam, we will also have access to local Assassin Contracts; these are optional & not tied to any Achievements.
Abstergo Challenges: Lastly, we will also have access to Abstergo Challenges. Though there are 100 in total, we just need to complete 25 to earn the Employee of the Month Achievement. I wouldn’t worry about these very much as we will definitely complete more than we need through natural progression in our 100%.
These can unlock Cheat Codes we can use in game. Do not use any of them however as they will disable Achievements!
Sequence 2: But My Heart Is In Havana
1. Dry Tortuga: Havana, Dry Tortuga
- Sequence #2 Memories: And My Sugar, Mister Walpole I Presume, A Man They Call the Sage, Claiming What’s Due, The Treasure Fleet
- Optional Objectives: 12/80
- Mayan Stones: 1/16
- Locations: 2/50
-----------------------------------------------------------------------------------------------------
Memory #2 – …And My Sugar?: When you are ready to proceed, head to the Eastern docks where The Revenge is, & we can find Bonnet here as well… in another pickle. The Spanish Guards took all his sugar.
Optional Objective #1 – Hire Dancers to Distract Guards: As soon as the Memory begins, we will receive this Optional Objective. Conveniently, there will be a group of Dancers right at the docks in front of us. Hire them, & Blend with them to tail the Spanish Guards.
Eventually they will enter into a Restricted Area blocked by other Guards; use our Dancers to Distract the Guards blocking the entrance to complete this Optional Objective.
Memory #2 – …And My Sugar?: With that Optional Objective out of the way, you can now more expediently tail them from the rooftops. Keep following the Spanish Guard & his associate, & we will eventually have to Eavesdrop on their conversation; employing more Dancers is the perfect mobile Blend spot.
Reach the hanging scaffolds, & we will now tail a Spanish Captain who will enter into a Restricted Area; once again, Dancers will easily get us inside by Distracting the door Guards. Steal the Captain’s Key off of him.
Optional Objective #2 – Stay Out of Combat: The moment we take the Captain’s Key, we will activate this Optional Objective; from here on we cannot be Detected & enter combat. This is challenging as we now have to enter into Castillo San Salvador de la Punta which is the most heavily defended area of Havana.
Use Dancers or some sneaky parkour to get past the Guards at the front drawbridge, get to the main courtyard, & quickly ascend the stairs up to the second floor. Once up here it is a straight shot to the warehouse; you can alternatively infiltrate the fort via the Eastern loading dock, but there is no clean way to get up to the second floor really.
Collect our package, ignoring Bonnet’s sugar, & quickly leap over the walls into the water to flee the fort. This Optional Objective is continuous until we link up with Bonnet on The Revenge & complete the Memory.
Memory #3 – Mister Walpole, I Presume?: Head to the Governor’s Mansion, & it will be time for us to lay down the charm as Duncan Walpole.
Optional Objective #1 – Complete Rogers’ Shooting Challenge: Enter the mansion grounds, & we will meet two associates of the Governor – one by the name of Woodes Rogers. Rogers will hand us a Pistol & give us a shooting challenge to complete… hands us one, so we take four.
Complete the shooing Tutorial & we will then get the option to talk with Julien du Casse or accept a shooting challenge from Rogers. Choose the shooting challenge first!
In 22s, we need to shoot all 6 targets; pretty simple to complete, though we only have six shots & cannot miss once.
Memory #3 – Mister Walpole, I Presume?: After we complete Rogers’ shooting challenge, speak with Julien to progress the Memory. Complete a seemingly, but not intendedly, patronizing showcase of various Hidden Blade Assassinations.
Complete this, & we will then go on to meet the Governor of Havana, Torres, the Templar Grandmaster this side of the world…
Optional Objective #2 – Pickpocket All 3 Templars: Once the meeting commences, Torres will begin speaking to us about war plans with Rogers & Julien gathered around the table. While Torres speaks… casually Pickpocket all three of them to complete this Optional Objective. Classic Kenway.
Memory #4 – A Man They Call the Sage: Meet Woodes Rogers down at the Eastern docks & we will escort this “Sage” with the full Templar retinue.
Optional Objective #1 – Use the Pistol In Combat: As we escort the Sage through the city, we will soon be attacked by Assassins; for this Optional Objective, simply kill one of them using our Pistol.
Optional Objective #2 – Tackle the Sage From Above: In the chaos, the Sage will escape from us & we will have to chase him down. For the Optional Objective, we cannot just Tackle him, we have to do so from above. Stick to the rooftops & the Sage will be below us shortly into the chase; we will have a few opportunities for an air Tackle.
Memory #5 – Claiming What’s Due: Head to our Memory marker, & we can go have a drink with our partner in crime, Stede Bonnet. Here we will decide, for the better interest of ourselves, we will rescue the Sage & have him tell us where the Observatory is… so we can sell it to the highest bidder.
Optional Objective #1 – Stay Out of Combat: We cannot be detected or enter combat for this entire Memory.
Optional Objective #2 – Kill 3 Guards From Stalking Zones: “Stalking Zone” kills just means kills from Blend spots like Haystacks, Bushes, Wells, Benches, etc. As we approach the Governor’s Mansion from the Eastern end, we will have plenty of opportunities for these kinds of stealth kills.
Memory #5 – Claiming What’s Due: With Optional Objective #2 taken care of, use Eagle Vision to identify the Warden. Steal his Key off of him via Pickpocket or looting his body, & proceed to where the Sage is being held.
Memory #6 – The Treasure Fleet: Of course… it will be a set up, & we will soon find ourselves in shackles in the hold of the Spanish Treasure Fleet on sail to future enslavement… or worse.
Optional Objective #1 – Kill 3 Guards From Behind Corners: As soon as we break ourselves free, we will need to find our gear. Slowly move through the hull & get to corners when Guards are near. Whistle to lure them over, & take them down from the corners. We only have three opportunities to earn this, so do not loot a Weapon, or at least use it yet, from the dead Guards until you complete this Optional Objective first.
For the final Guard, you may need to move the nearby bodies into the other room so he doesn’t investigate them instead of your Whistle.
Optional Objective #2 – Free 23 Pirates: Once we escape, we now need to get a crew together. There are 4 groups of Pirates we can save; free all 4 of them to accrue over 23 Pirates before you all regroup on the El Dorado.

Achievement #5 – Good While It Lasted: Complete Memory Sequence #2.
Story Related. With the Pirates all freed, takeover the El Dorado & sail away from the impending hurricane. Get to safety to safety & we will complete Sequence #2.
Sequence 3: Under Black Sails
1. Eleuthera: Abaco Island, Nassau, Cat Island
- Dry Tortuga: Salt Key Bank, Matanzas, Florida
- Sequence #3 Memories: This Tyro Captain, Now Hiring, Prizes & Plunder, Raise the Black Flag
- Optional Objectives: 20/80
- Taverns: 1/8
- Mayan Stones: 3/16
- Locations: 8/50
-----------------------------------------------------------------------------------------------------
Memory #1 – This Tyro Captain: With the Jackdaw now in our possession, we now need to scrounge up some supplies to keep it & the crew going.
As we sail from here on, always be on the lookout for stranded sailors in the water that can be recruited into our crew. For the Cannon Fodder Achievement, we need to recruit over 500 people into our crew.
Location #3 – Abaco Island: Sail to Abaco Island to unlock it as a new Fast Travel Location.
Optional Objective #1 – Shoot An Iguana: Sail to nearby Abaco Island & we will need to hunt some of the local wildlife for some food… Ocelots & Iguanas to be exact. For one of our kills, use our Pistol to take out an Iguana.
Optional Objective #2 – Air Assassinate An Ocelot: For our other kill, we need to Air Assassinate an Ocelot. This is much trickier to do, especially without any kind of bait. You really need to be opportunistic as well as just find a good spot… & wait. Most times if you run to where an Ocelot is near a high place, it will see you & run off.
Memory #1 – This Tyro Captain: Once we have the animal meat/pelts, we will receive a Tutorial of how to Craft. Craft the Pistol Holster II & Health Upgrade I.
Memory #2 – Now Hiring: Set sail for Nassau & explore around the settlement as much or little as you like. When ready head to the Old Avery Tavern to link up with Adéwalé & go meet our old mates.
Location #4 – Nassau: We will unlock Nassau as a Location automatically after landing on it.

Achievement #6 – Siren Song: Rescue pirate hostages by Distracting enemies with Dancers.
This Memory is the perfect opportunity to unlock this Achievement, though it can be done anywhere. Hire some Dancers (some can be found just outside the Tavern) & carefully head around to the different Save Pirates events. Some will have Pirates in combat with Guards while others will have the Pirates as prisoners; this will only work with the Pirates as prisoners event.
Use the Dancers to Distract one to potentially two groups of Guards overseeing the Pirates, & free them to unlock this Achievement.
Optional Objective #1 – Disarm & Kill 3 Guards: Very simple to do & we have no shortage of opportunities to complete this Optional Objective; make sure you are Unarmed to Disarm.
Optional Objective #2 – Shoot the Rope to Save the Pirate: After we free at least 15 Pirates to join our crew, we will be tasked with rescuing a Pirate that is to be hung. Quickly get to them, & try to sneak as close as possible to them; aim your Pistol & shoot the rope before 30s ends.
You can do this in combat, but since you have to aim the Pistol manually it can be tricky to pull off.
Pistol Holster IV: While here in Nassau, we can hunt Crocodiles in the nearby swamp for their Crocodile Leather. Kill two (easiest done just by using your Pistol) & skin them to Craft the Pistol Holster IV Upgrade.
Memory #3 – Prizes & Plunder: Meet up with Hornigold & Thatch on the beach, & Hornigold will accompany us out to see to do some jolly plundering.
Optional Objective #1 – Use A Swivel to Kill 3 Sailors: When we go to Board an enemy Schooner, we will have the option to manually use our Swivel Gun in combat. Take control of the mounted Swivel Gun, then shoot down three enemy Guards on board the Schooner with it; it is only equipped with 5 shots per Boarding attempt.
Optional Objective #2 – Plunder 20 Rum: Ideally, we will loot enough Rum right off the bat from our first Schooner, if not, then you should after plundering our second one. You can view what loot Ships have using your Spyglass; make sure to pick ones with Rum.
Location #5 – Salt Key Bank: After we are done plundering, we will need to sail to Salt Key & purchase the Intermediate Hull Upgrade for the Jackdaw; sail to Salt Key Bank to unlock it as a new Fast Travel Location.
Tavern #1 – Salt Key Banter: Before we purchase the Hull Upgrade, look on your Map & there should be a marked Tavern here; it will be located in the upper Eastern side of the settlement.
Speak with the bar keep, & a bar fight will initiate. Defeat all the lads, & we will unlock the Salt Key Banter Tavern. We need to activate all Taverns scattered around the world for the Barfly Achievement; the Taverns in Havana & Nassau do not count for some reason…
Memory #4 – Raise the Black Flag: Now we must go out & plunder some more, at least 70 Metal; we can use our Spyglass to know what the Ships are carrying.
Optional Objective #2 – Plunder 30 Sugar: You may already have plundered enough Sugar to complete this Optional Objective, but if not, target Ships carrying it.
Optional Objective #1 – Plunder A Hunter Ship: As soon as we have collected the 70 Metal, we will instantly become Notorious & Hunter Ships will appear to chase us. Do not head to Salt Key Bank yet, & wait for a Hunter to engage us. Defeat & Board them to complete this Optional Objective; they are a stronger form of Brig.

Achievement #7 – All Aboard!: Board a Ship without losing any Crew Members.
There is a very high chance this Achievement will unlock for you naturally as we play; we will be Boarding/Plundering well over a hundred Ships to earn Materials we need for 100%. Use the Swivel Cannon to soften up the enemy numbers & quickly Board to take out the rest before any of our Crew dies; winning just using the Swivel Cannon & not actually setting foot on the enemy Ship does not count unfortunately.
Location #6 – Matanzas: Before we proceed further, let us explore around Dry Tortuga & plunder some Ships as we go. First, head to the Matanzas & we can unlock it as a new Fast Travel Location.
Mayan Stone #2: As well, we can also find a Mayan Stelae at the Southeastern corner of the island; align the symbols & collect the Mayan Stone.
Location #7 – Florida: Next, we can sail North up to Florida; there is nothing Achievement related here outside of marking it as a known Location.
Location #8 – Cat Island: Now sail to Cat Island in Eleuthera & we can unlock it as a new Fast Travel Location.

Achievement #8 – Silence, Fool!: Kill a Guard ringing a bell.
Around Cat Island (& all other Plantations) will be Alarm Bells. If you are detected by Guards near them, some may run to ring it. Wait until a Guard is actively ringing an Alarm Bell & rush up to Assassinate them using the Hidden Blade; killing them with our Swords or Pistol will not count for some reason.
Mayan Stone #3: We can also loot another Mayan Stone at the Northwestern corner of the island.
Sequence 4: A Hell of Your Own Creation
1. Eleuthera: Andreas Island
- Gibara: Jiguey, Crooked Island, Mariguanna Island, Salt Lagoon
- Punta Guarico
- Sequence #3 Memories: Sugar Cane & It’s Yields, Proper Defences, A Single Madman
- Optional Objectives: 26/80
- Taverns: 3/8
- Mayan Stones: 3/16
- Locations: 13/50
-----------------------------------------------------------------------------------------------------
Location #9 – Andreas Island: Sail to the Andreas Island where our next Memory is located & we can unlock it as a new Fast Travel Location.
Tavern #2 – The Andreas Inn: We can also find a marked Tavern we can unlock here too; speak with the barkeep to initiate the bar fight & defeat the 4 Bandits.
Memory #5 – Sugarcane & Its Yields: Link up with Captain Kidd on Andreas Island, & discuss the plans to raid a nearby plantation. To start, we need to locate & tail the plantation owner’s agent to their Ship, then quickly get to the Jackdaw to tail them overseas.
Optional Objective #1 – Stay Out of Combat: As we tail the enemy Schooner, we will enter Restricted Waters; for the duration of this chase, we cannot be detected by anyone & enter combat. Get within 1000m of Cat Island to complete this Optional Objective during the tail.
Optional Objective #2 – Sabotage 2 Alarm Bells: Dock the Jackdaw at Cat Island, & quickly regroup with Bedford’s agent to begin Eavesdropping on their conversation. As we follow the Eavesdrop with the agent, he will eventually reprimand a drunk Guard near an Alarm Bell; this is the first Alarm Bell to Sabotage. The Guard beside it is too drunk to even notice us.
When the agent approaches the plantation Warehouse, we can now be free of the Eavesdrop. We can find the second Alarm Bell to Sabotage right beside the Warehouse near its Northeastern corner.
Find the Guard with the Warehouse Key, & loot it so we can raid the Warehouse.

Achievement #9 – Employee of the Month: Complete 25 Abstergo Challenges.
This will unlock for us naturally as we playthrough the game. There are essentially completing Abstergo Challenges for everything under the sun – 100 in total. Complete any 25 Challenges to unlock this Achievement
Location #10 – Jiguey: Our next Memory is located on Salt Lagoon in Gibara. Before we head there, let us explore around this area & discover the Locations here. Jiguey is one that we need to find, though it has nothing Achievement related.
Location #11 – Abaco Island: Now we sail for Crooked Island to unlock it as a new Fast Travel Location.
Tavern #3 – Crooked Island Canter: Here we can where can also find a Tavern to unlock. You know the drill, speak to the bar tender, start a bar fight & finish it.
Location #12 – Mariguana Island: Sail to Mariguana Island to unlock it as a new Fast Travel Location.

Achievement #10 – Roped In: Perform 5 Air Assassinations from a swinging rope.
This is easiest done through Boarding enemy Ships. Off the four corners of the Jackdaw near the mast riggings will be ropes that we can swing off of. When going to Board a Ship, pilot the Jackdaw towards it at an angle so its front is as close as possible to the enemy Ship. Rush off towards that closest point & use the rope to swing over above the enemy Ship to Air Assassinate an enemy. Do this through 5 Boardings to unlock this Achievement.

Achievement #11 – Thug Life: Plunder 30 Ships.
This will come naturally to us over the course of our 100%; we need thousands of Reales & Materials, & Boarding enemy Ships to plunder them is the best source.
Location #13 – Salt Lagoon: With Gibara explored, let us now sail to Salt Lagoon where our next Memory is headed; we will also unlock this area as a Fast Travel spot.
Memory #5 – Proper Defences: Link up with Thatch & Captain Kidd on the Salt Lagoon beaches & we will scheme to take on a Spanish Man O’ War, La Arca Del Maestro. Sail close to the center of the marked area… & we will find it.
Optional Objective #1 – Use One Broadside to Sink 2 Boats: Tail La Arca Del Maestro out of the storm, & it will be reinforced by 8 Ships. Right off the bat, we will want to attempt this Optional Objective as it will only get harder with fewer Ships.
Do your best to align two Gunboats while aiming the Broadside, & destroy them both with one volley; you may need to do this twice, & damage them before defeating them in the final volley depending on your Round Shot Strength.
Optional Objective #2 – Use Heavy Shot to Sink 2 Ships: With the first Optional Objective out of the way, we can now move on to this one. Heavy Shot acts like our Broadside only we cannot aim them; consider it like hip-firing. You can run out of Heavy Shot, so use it deliberately!
Memory #6 – A Single Madman: Sail into Punta Guarico & we will land on Great Inagua to locate & kill the Templar, Julien de Casse.
Optional Objective #1 – Stay Out of Combat: Once on the shores of Great Inagua, we will be unable to be detected & enter combat; we can still Assassinate Guards though.
The White Jaguar: Climb up the ruins & enter into the jungle. Take the path off our left & begin heading towards where a Shanty is near a small waterfall pool. As we approach it, a red paw print marker will appear on our Mini-Map denoting a predator; it will be the White Jaguar.
Pull off the two quick time button inputs to kill it, & skin it for the White Jaguar Pelt; this is one of two Materials we need to Craft the Hunter Outfit needed for the Redingote Up! Achievement.
Optional Objective #2 – Air Assassinate Du Casse: With Optional Objective #1 still active, get through the last of the jungle to the small settlement where Du Casse’s Man O’ War is docked. Your best bet is to move along the outer Western cliffs down to the beach to avoid the most Guards, then swing wide & swim around to the Ship.
Du Casse patrols the entire top deck of his Ship in a large circle, if you can get up to the lower mast arms & wait for him to pass under you, it is very easy to line up an Air Assassination.

Achievement #12 – A Pirate’s Life For Me: Complete Memory Sequence #3.
Story Related. Assassinate Julien Du Casse, & we will takeover the Great Inagua cove as our own.
Sequence 5: The Secrets of Tulum
1. Punta Guarico: Great Inagua
- Dry Tortuga: Havana
- Conttoyor: Telum
- Sequence #4 Memories: This Old Cove, Nothing Is True, The Sage’s Buried Secret
- Optional Objectives: 28/80
- Taverns: 3/8
- Abstergo Computers: 5/15
- Mayan Stones: 5/16
- Locations: 14/50
-----------------------------------------------------------------------------------------------------
Present Day Mission #2: With Sequence #3 complete, we will be forcibly pulled from the Animus for a non-consensual Present Day mission. Head up to Floor 15 – CCO, & meet with the director of this project, Olivier.
Security Clearance Level #1: After we meet with him, travel back down to Floor 2 & John (from IT) will ask us to Hack into a computer to take some files off it for him. To access the room, we will need Security Clearance Level #1, which he will kindly give us.
Abstergo Computer #1: Follow the waypoint to the Abstergo Computer John needs us to Hack, & use our Communicator to access it. Hacking Computers functions like a simple maze puzzle; simply rotate around the core until you land on the circular green line. Once on it, you can rotate the core to crack it open.
For the Ghost In the Machine Achievement, we need to Hack 15 Abstergo Computers. With our Level #1 Clearance, we can go & Hack some; for others, we will need to wait until we get higher Clearance.
Abstergo Computers #2 – #3: In the same room as the previous Abstergo Computer we just Hacked, we can also Hack the other two workstations here as well.
Abstergo Computers #4 – #5: Before we head down to the Lobby, go over to the opposite end of Sample 17 to find another hall with a Level #1 Security Clearance door & a Level #2 one. Pass into the Level #1 room, & we can find two smaller Abstergo Computers we can Hack into.
These Computers have a different Hacking Mini-Game to complete where you have to guide your cursor past moving security firewalls to reach the end.

Achievement #13 – Routine Hacking: Complete Present-Day Mission #2.
Story Related. Deliver our Hacked information downstairs to the courier in the Lobby… & we will see some familiar faces. Hand over the data, then return back to your workstation to re-enter the Animus, completing this “Present Day mission”.
Location #14 – Great Inagua: We will unlock this Location as a new Fast Travel point at the start of Sequence #4.
Memory #1 – This Old Cove: Explore around our new hideout on Great Inagua with James Kidd & he will lead us to a Mayan Stelae in the jungle.
Mayan Stone #4: Story Related. Align the symbols on the Mayan Stelae, & we can collect a new Mayan Stone.
Memory #1 – This Old Cove: Continue to follow Kidd around & we will be shown the Templar Armor & the locations of where to find the Assassin Bureaus that will lead us to more Templar Keys.
Link up with Kidd at the docks, & he will tell us to meet him near Yucatan in a few weeks…
Cove Upgrades: As of now, we can Upgrade our Hideout on Great Inagua. For 500R, we can purchase the Harbourmaster Upgrade which is a good idea to do. Another good Upgrade to get next would be the General Store for 700R.
For the FTFY Achievement we will need to purchase all 8 Hideout Upgrades.
Kenway’s Fleet: When we leave Great Inagua, Adéwalé will tell us to check out some nautical maps located in the Captain’s Cabin. Do so, & we will gain access to Kenway’s Fleet. Unfortunately, for PC versions of the game this is a broken feature. We can progress the Memory just by interacting with it & leaving however; there are also no Achievements tied to Kenway’s Fleet, but it is the best source of income in the game as it is passively earned.
Unfortunately though, if you do not own the Timer Saver - Technology Pack DLC, you DO in fact need Kenway's Fleet to obtain the Treasure Map for the Elite Fire Barrel Storage. To fix Kenway’s Fleet, check out the link in the Before You Play section of this guide’s Introduction.
Templar Hunt #2 Mission #1 – Bureau Under Attack: Now that we can begin searching for the Templar Keys, we can start doing Templar Hunt Missions; there is one in Havana as well as Nassau currently. For Havana, head to the Assassin’s Bureau & assist the Den Leader, Rhona, in defending it.
Templar Hunt #2 Mission #2 – A Thief In the Market: With the Bureau safe, speak with Rhona again for our next Mission. We must locate a certain Pickpocket in the markets… & well, Pickpocket them. Find them using Eagle Eye, chase & Tackle them, then quickly loot the documents off of him.
Templar Hunt #2 Mission #3 – Arms Race: Our next Mission from Rhona will be to eliminate the three Powder Reserves around the city.
Templar Hunt #2 Mission #4 – Flint’s End: Now we will take down the Templar agent himself, Flint. Engage him with Rhona, & Assassinate him. Flee the area after the deed has been done.

Achievement #14 – Help A Brother Out: Complete a Templar Hunt Sequence.
We will unlock this Achievement after completing any of the 4 Templar Hunt Sequences & acquiring our second Templar Key.
Though there are still 3 other Templar Hunt Sequences to complete, they are not required for 100% & are optional; complete them at your leisure.
Memory #2 – Nothing Is True…: When ready, chart across through Conttoyor to where Captain Kidd told us to meet up with him. Land on the isle of Tulum, & track down where he is.
Optional Objective #2 – Loot 4 Treasure Chests: Simple enough to do, there are 7 Chests in total on Tulum; use your Map to locate them.
Optional Objective #1 – Knock Out 3 Assassins: Though we are unable to kill anyone, we are able to knock them out instead. With intent, this can also be achieved very easily. It will be difficult to obtain the 4 Chests we need without knocking Assassins out anyways…
Mayan Stone #5: Right at the very end of the stealth section through the jungle, right before we find Captain Kidd in front of the temple, veer left up towards a side path where we can find a Mayan Stela; complete the puzzle to receive a Mayan Stone.
There is a Chest up in this area as well that may be your 4/4 Chest.
Meeting up with Captain Kidd will complete the Memory.
Memory #3 – The Sage’s Buried Secret: Follow Captain Kidd into the Mayan temple & reach the statue puzzle at the end. Pull the statue heads up or down so the land on the same coloured floor tile in the spinning circle.
Solve the puzzle to complete the Memory.
Sequence 6: This Land, Is My Land
1. Conttoyor: Tulum
- Eleuthera: Nassau, Fort Eleuthera
- Punta Guarico: Fort Punta Guarico, Petite Caverne, Tortuga, Cumberland Bay
- Gibara: Fort Gibara
- Dry Tortuga: Fort Dry Tortuga
- Sequence #4 Memories: Overrun & Outnumbered
- Sequence #5 Memories: The Forts
- Optional Objectives: 32/80
- Naval Contracts: 4/15
- Taverns: 3/8
- Forts: 4/11
- Abstergo Computers: 5/15
- Mayan Stones: 6/16
- Locations: 22/50
-----------------------------------------------------------------------------------------------------
Memory #4 – Overrun & Outnumbered: Leave the Mayan temple & the British will have found us; we need to free the Assassins & our crew members taken prisoner.
Optional Objective #1 – Use Sleep Darts On 8 Guards: At the start of the Memory, Captain Kidd will give us the Blowpipe that can use Sleep Darts & Berserk Darts. Go slow, & use as many Sleep Darts as you can.
We start with only 5 Sleep Darts & will need to loot another 3 more. We can earn more Darts by freeing Assassin prisoners.
Optional Objective #2 – Use Berserk Darts On 2 Guards: Similarly, make sure to use two Berserk Darts on at least two Guards; we start with 5 Berserk Darts.

Achievement #15 – No Apologies: Complete Memory Sequence #4.
Story Related. Drive off the British assault to defend Tulum & complete Sequence #4.
Location #15 – Tulum: We will unlock this Location as a new Fast Travel point after completing Sequence #4.
Memory #1 – The Forts: Fast Travel to Nassau & we will have a brief encounter with Captain Charles Vane who will tell us of a sizeable amount of loot stashed away in a neighboring Fort…
Memory #1 – The Forts: Set sail to the meeting point in Punta Guarico & initiate the Memory once in range of the Fort. Before you begin this Memory, make sure your Jackdaw has its Broadsides, Round Shot Strength, & Mortars Upgraded as high as you can. A Mortar is mandatory to have for this Memory!
Optional Objective #1 – Use the Mortar to Damage the Fort: You must have a Mortar Upgrade to complete this Optional Objective. If you have one, this is easy to complete, simply target a defensive structure on the Fort & damage it with the Mortar.
Optional Objective #2 – Use A Running Assassination to Kill the Officer: When the Fort’s defences are destroyed, breach the walls on foot & we will have to locate & kill the Fort’s Officer. Once you find them, you do not want to openly engage them in combat. Instead, stalk them through the Fort, & wait for a good opportunity for you to charge at them to perform the Running Assassination.
Fort #1 – Punta Guarico: Story Related. We will capture our first Fort at the end of this Memory; there are 7 in total to capture.
Location #16 – Fort Punta Guarico: We will unlock this Fort as a Fast Travel Location after we take it.
Naval Contract #1 – Weathering the Storm: Now that we have a Fort captured, we can begin to complete Naval Contracts; it has the same icon as Assassin Contracts. At Punta Guarica, this will be our first Contract. There are fortunately no Optional Objectives we need to worry for these.
Sail out towards the Petite Caverne & locate the British Ships; eliminate all 5 of them to complete the Contract. There will be 3 Brigs & 2 Gunboats.
Location #17 – Petite Caverne: Instead of Fast Traveling back to the Fort, since we already down in this corner of the sea, sail over to Petite Caverne & discover it as a Location.
Location #18 – Tortuga: Carry on North to Tortuga & unlock this as a new Location as well.
Mayan Stone #6: We can also find a Mayan Stone here.

Achievement #16 – Business & Pleasure: Earn 50,000 Reales.
This will come naturally as we play through the game; it is accumulated Reales, you do not need 50,000 all at once. It will require 6 times this much to purchase all Jackdaw Upgrades…
Make sure to plunder as many Ships as you can since it is the best source of revenue.
Location #19 – Cumberland Bay: As our final Location to explore in Punta Guarico, head over to Cumberland Bay & unlock it as a Fast Travel destination.
Fort #2 – Gibara: Now, we can sail back though the “easy” seas & take over all Level 1 Forts. Sail up to Fort Gibara & destroy its 3 Defences; infiltrate the Fort & kill its Officer then its Commander to take it over.
Location #20 – Fort Gibara: We will unlock this Fort as a Fast Travel Location after we take it.
Naval Contract #2 – Silk On the Waves: With Fort Gibara taken over, we can now receive this Naval Contract to complete. All we need to do for this Contract is plunder & turn in 30 Cloth; you may already have that much & can instantly complete the Contract. Easy.
Fort #3 – Eleuthera: Next we sail North up to Fort Eleuthera. Destroy its 4 Defences; infiltrate the Fort & kill its Officer then its Commander to take it over.
Location #21 – Fort Eleuthera: We will unlock this Fort as a Fast Travel Location after we take it.
Naval Contract #3 – A Spanish Plague: With Fort Eleuthera taken over, we can now receive this Naval Contract to complete. For this Contract, we need to sail out & destroy at least 3 Spanish Gunboats. There is no waypoint for these, so we need to manually sail around & find them.
Fort #4 – Dry Tortuga: Lastly, now we will sail over to Fort Dry Tortuga, & we will take it too. Destroy its 3 Defences; infiltrate the Fort & kill its Officer then its Commander to take it over.
Location #22 – Fort Dry Tortuga: We will unlock this Fort as a Fast Travel Location after we take it.
Naval Contract #4 – Private Escort: With Fort Dry Tortuga taken over, we can now receive this Naval Contract to complete. For this Contract, we need to sail over to a marked Spanish Frigate, the Neptuno, & we will need to defend it from a British ambush. Sink the first two Spanish Gunboats, then a second wave with three more Spanish Gunboats. There will then be a third & final wave with two Brigs & two Schooners.
Legendary Ships: You may have noticed that there are 4 Legendary Ships marked on our Map in the four corners. These are extremely powerful & dangerous naval Bosses we need to defeat for the Devil of the Caribbean Achievement.
While you are more than welcome to go check them out, we will definitely want/need a fully Upgraded Jackdaw before taking these on.
Sequence 7: There's Trouble Brewing
1. Navassa: Fort Navassa, Ile à Vache, Kabah Ruins
- Charlotte: Kingston
- Eleuthera: Nassau, Antocha Wreck
- Dry Tortuga: San Ignacio Wreck
- Sequence #5 Memories: Travelling Salesman, Unmanned
- Sequence #6 Memories: Diving For Medicines
- Optional Objectives: 38/80
- Naval Contracts: 6/15
- Taverns: 5/8
- Forts: 5/11
- Abstergo Computers: 5/15
- Mayan Stones: 6/16
- Locations: 27/50
-----------------------------------------------------------------------------------------------------
Fort #5 – Navassa: Our next Memory will take us into “medium” difficulty waters which will mean we will definitely want to be working on our Jackdaw Upgrades if you have not already been doing so. To test yourself, let us go take down a Level 2 Fort, Fort Navassa. There will be 9 Defences we need to destroy for this Fort.
Infiltrate the Fort & kill its 3 Officers before dealing with the Fort Commander.
Location #23 – Fort Navassa: We will unlock Fort Navassa as a new Fast Travel Location after we capture it.
Naval Contract #5 – Blind Justice: For our Naval Contract here at Fort Navassa, we will need to locate & sink a British Man o’ War; these are the most difficult Ship type in the game. First, find their escort of 3 British Brigs, & sink them. Once they are destroyed, the Man o’ War will arrive; knock it down, & Board it.
We can then destroy it, or send it to Kenway’s Fleet to keep…
Location #24 – Ile à Vache: While we are down in this corner of Navassa, sail up to Ile à Vache & we can discover it.
Tavern #4 – Vino A Vache: On Ile à Vache, we can also find a new Tavern to unlock; approach the bar keep, start a brawl, & finish it.
Mystery Island: Mystery Island is also nearby, but it is DLC, & does not contribute to our discovered Locations.
Naval Contract #6 – A Personal Matter: There will be a second Naval Contract available to us at Fort Navassa to complete this time. Locate the British Frigate, The HMS Defiance, & destroy it.
Tavern #5 – The Kingston Crown: Once in Kingston, we can head to the marked Tavern & unlock it by fighting off the 4 Bandits when we speak to the barkeep.
Memory #2 – Travelling Salesman: When you are done exploring Kingston, head to the Memory waypoint on the docks & meet up with Adéwalé. We must stock Laurens Prins as he makes the trade with Torres for the Sage…
Optional Objective #1 – Kill 4 Gunners: These two Optional Objectives will have to be done in tandem so keep both in mind as we play. Whenever we see British Gunners up on the rooftops, make a point of taking them out; you can even take them out with a Smoke Bomb to contribute to the second Optional Objective…
We will alternate between moments where we need to employ Smoke Bombs & when we need to scale the rooftops to kill the British Gunners.
Optional Objective #2 – Kill 5 Guards Stunned By Smoke Bombs: As we tail Prins & Torres, they will pass through multiple Restricted Areas barred by British Guards. To get through, throw down Smoke Bombs to stun the Guards, & quickly kill them. Just make sure Prins & Torres are far enough away before we engage…
Memory #3 – Unmanned: Meet up with Captain Kidd on top of the marked Viewpoint, & assist him in infiltrating Laurens Prins’ mansion.
Optional Objective #1 – Use Berserk Darts On 2 Brutes: Pretty simple to do, just keep your eyes out for British Brutes (the big axe guys) & use Berserk Darts on them.
Optional Objective #2 – Use Sleep Darts On 2 Gunners: Similarly, we will need to use Sleep Darts on 2 British Gunners.
These are easiest done while we are sabotaging the Bells.

Achievement #17 – Death of A Salesman: Complete Memory Sequence #5.
Story Related. Infiltrate the mansion grounds, & locate Laurens Prins. Rescue the Sage… only it won’t be that easy unfortunately.
Memory #1 – Diving For Medicines: Return to Nassau, & walk with Ben Hornigold & Blackbeard Thatch to discuss some new events. Nassau needs medicine, but the British are putting pressure on the republic. We need to figure out a better means than plundering.
Head to a Harbourmaster & purchase the Diving Bell for 5000R. As of now, we can go explore Underwater Shipwrecks.
Memory #1 – Diving For Medicines: Once you have the Diving Bell, meet up with Thatch at the San Ignacio Wreck in Dry Tortuga. Approach the shipwreck, & use the Diving Bell to scour it…
Optional Objective #1 – Loot 3 Treasure Chests: As we search for Medicine, keep an eye on your Mini-Map & go after at least 3/6 Chests here in the Shipwreck.
Optional Objective #2 – Avoid Being Attacked By A Shark: When we find the Medicine, we will need to swim through a cave system to reach an accessible side. When we exit, there will be Sharks in the water. Be very attentive on staying inside the Seaweed patches to stay hidden as we navigate back to the Jackdaw’s Diving Bell.
If you get attacked, reload your last Checkpoint.

Achievement #18 – Mer-Man: Swim a total of 1 nautical mile.
For context, 1 nautical mile is approximately 1.8km which isn’t that far in the grand scheme of things. This will most likely unlock for your naturally as you play, especially if you go on to explore Underwater Shipwrecks.
For the Seven Deadly Seas Achievement we need to explore all Underwater Shipwrecks. By “explore” all we actually have to do is enter them using the Diving Bell – we can leave right afterwards & it will still count.
Location #25 – San Ignacio Wreck: We will unlock this Location as a Fast Travel site after completing the Memory.
Location #26 – Antocha Wreck: Sail over to the Antocha Wreck & use the Diving Bell to enter it to unlock it as a new Location; we do not need to explore it if you do not want to.
Location #27 – Kabah Ruins: Lastly, sail down to the Kabah Ruins & use the Diving Bell to enter it to unlock it as a new Location; we do not need to explore it if you do not want to.
Sequence 8: Blackbeard Thatch
1. Gibara: Salt Lagoon
- Eleuthera: Charles-Towne
- Sequence #6 Memories: Devil’s Advocate, The Siege of Charles-Towne
- Optional Objectives: 42/80
- Naval Contracts: 6/15
- Taverns: 5/8
- Forts: 5/11
- Abstergo Computers: 15/15
- Mayan Stones: 6/16
- Locations: 27/50
-----------------------------------------------------------------------------------------------------
Memory #2 – Devil’s Advocate: Head to the meeting place off the coast of Salt Lagoon to find Hornigold… damaged. Blackbeard has gone after the British for more medicine.
Optional Objective #1 – Rescue 5 Survivors: When we start to sail after Blackbeard, keep your eyes out for shipwrecked Survivors we can rescue in the water. We should be able to scrounge up the 5 along our way, but just in case if you see any out of your way, go after them anyways to be safe.
Optional Objective #2 – Kill 3 Guards Stunned By Smoke Bombs: We can find the Queen Anne’s Revenge near Mariguana Island & Blackbeard will be in trouble. Land on the island & rush to defend him & his men; during the fight, throw down Smoke Bombs to kill at least 3 Guards when they are stunned.
Memory #2 – Devil’s Advocate: Once Blackbeard is rescued, the British Man o’ War will reappear, & we will need to defeat it using the Queen Anne’s Revenge; unfortunately for us, it is not equipped with Mortars or Heavy Shot. It does have maxed out Broadside Cannons however.
Memory #3 – The Siege of Charles-Towne: Meet up with Stede Bonnet on the Revenge, West of Abaco Island, & wish him well on his own voyage. With our goodbyes said, we will sail to meet Blackbeard outside of Charles-Towne.
Carefully tail the British Gunboat & avoid the Guard Towers by swinging wide. Eventually we will have to disembark the Jackdaw & disable one of the Guard Towers.
Optional Objective #1 – Use Sleep Darts On 3 Crocodiles: When we have to disembark the Jackdaw for the second time, our Optional Objectives will cue up. As we chase after a Rowboat there will be many Crocodiles in the water; take them out with Sleep Darts whenever you see them.
Optional Objective #2 – Skin A Crocodile: We can skin the first Crocodile we use Sleep Darts on; the Crocodile must be dead before we can skin it, best done by shooting it. The further into the area we go, the harder it will be to use our Pistol without being detected.

Achievement #19 – Mixing Up the Medicines: Complete Memory Sequence #6.
Story Related. Tail the Rowboat, then kill the Charles-Towne Captain to retrieve the medical stockade key so we can bring medicine back to Nassau… though Blackbeard won’t be coming with us.
Present Day Mission #3: Naturally, Melanie will pull us from the Animus & have us meet her at the elevator to meet up with Olivier. We are planning the Assassin’s Creed – Black Flag trailer. Abstergo? Or is this just Ubisoft fan-fic…
Level #2 Security Clearance: When we get to Oliver’s office, we will have to wait for him to have a conversation with Melanie. While we wait, our voice over the radio will ask us to do another job for him. Follow our waypoint to a Level #2 locked door, & he will give us the Security Clearance to pass through it – & all other Level #2 doors going forward.
To hack the computer he needs, we will have a new Hacking Mini-Game to complete – matching wave frequencies. The code will be 572.
Abstergo Computer #5: The voice over the radio will then blackmail us into breaking into Olivier’s office from the outside windows & Hack his personal computer.
Abstergo Computer #6: Before we leave Floor 15 – CCO, we can also Hack the receptionist’s computer while she is gone.
Present Day Mission #3: Take the elevator down to Floor 1 – Lobby now, & pass off the data to our familiar contacts once again.
Abstergo Computer #7: While down on the Lobby floor, we can find a Level #2 Security door we can now enter across from the Shaun’s coffee kiosk. Enter inside, & we can Hack the computer. The code is 5733.
Abstergo Computers #8 – #15: Return to Floor 2 – Sample 17, & we can Hack a bunch more Abstergo Computers. In the main wing we can find 2 Animus Workstations to Hack, through a side office with a Level #2 Security door we can find 4 more Animus Workstations, & a final Level #2 Security door that has 3 Animus Computers in it to Hack.

Achievement #20 – Ghost In the Machine: Hack 15 Computers in Abstergo Entertainment.
By this stage in the story, we will have access to 16/15 Abstergo Computers we can Hack. There are actually 33 Abstergo Computers in total we can Hack by the end of the Present Day Missions, but all that is required for the Achievement is 15.

Achievement #21 – Getting Weird Around Here: Complete Present-Day Mission #3.
Story Related. After completing all our task for John, the voice over the radio, re-enter the Animus to return to Edward & we will unlock this Achievement.
Sequence 9: The Pirate's Republic
1. Eleuthera: Nassau
- Conttoyor: Fort Conttoyor
- Castillo de Jagua: Fort Castillo de Jagua, The Black Trench, Cayman Sound, Pinos Isle, Arroyos
- Sequence #7 Memories: We Demand Parlay, The Gunpowder Plot, Commodore Eighty-Sixed, The Fireship
- Optional Objectives: 50/80
- Naval Contracts: 9/15
- Taverns: 6/8
- Forts: 7/11
- Mayan Stones: 8/16
- Locations: 33/50
-----------------------------------------------------------------------------------------------------
Memory #1 – We Demand A Parlay: Once back with Edward in Nassau, the British will have arrived to forcefully demand parlay with our pirate republic. Follow Woodes Rogers as he speaks with Ben Hornigold about their proposal.
Optional Objective #1 – Kill 3 Guards While Hanging From A Ledge: After the emissary enters inside the fort, we will need to infiltrate it & activate this Optional Objective. These are “death from below” kills where we hang from a ledge, & use Assassinate to kill a Guard patrolling above us, pulling them off the ledge.
If you are quick, you can complete this Optional Objective off the first 3 Guards around the Northern walls of the fort. Otherwise, keep it in mind to set up these Assassinations…
Optional Objective #2 – Sabotage the Alarm Bell: When we enter the fort proper, we will engage this next Optional Objective. The Alarm Bell is of course in the center grounds of the fort; get down to it in the Bushes & Assassinate any Guards you need to from here before sabotaging it.
Memory #2 – The Gunpowder Plot: Return to the Tavern to speak with Captain Vane. We will need to gather supplies for a counter attack…
Optional Objective #1 – Kill 4 Guards In One Kill Streak: This may be easier or very hard depending on how many Guards you can engage at once. Once you begin a Kill Streak with Counter, chain together at least 4 kills in one Kill Streak.
Optional Objective #2 – Use Blowpipe Darts On 10 Guards: This can be either Sleep Darts or Berserk Darts; you can use Bones to Craft more Darts.
For either of these Optional Objectives, there is no Memory boundary, so we can complete these on random Guards outside of the Gunpowder Keg zones if you need to.
Memory #3 – Commodore Eighty-Sixed: With the Powder Kegs seized… there will be a hiccup in the plans. The Commodore plans to destroy all our Ships in the harbor.
Optional Objective #1 – Kill 3 Guards From Stalking Zones: As we tail the Guards heading to the Commodore, we will need to kill Guards near Bushes, Haystacks, Wells, etc.
Optional Objective #2 – Air Assassinate Chamberlaine: After we finish tailing the Guards to the British Man o’ War, we will need to Assassinate Peter Chamberlaine; do so from an Air Assassination from the upper masts of the Ship like we did for Julien du Casse.
Memory #4 – The Fireship: With the preparations set, sail out with Captain Vane & escort the Royal Phoenix to destroy the British blockade.
Optional Objective #1 – Use the Mortar to Sink 3 Ships: Pretty self explanatory; Gunboats & Schooners being the quickest to sink.
Optional Objective #2 – Use Fire Barrels to Sink A Ship: A bit trickier to do but fortunately we only need to sink one Ship using them. Sail up to a Gunboat or Schooner & pull a 180 in front of it. Throw Fire Barrels directly onto the enemy Ship to instantly sink them.
You can also just anchor your Ship & have enemies sail right up behind you, then throw your Fire Barrels in their way; they will typically avoid the Fire Barrels if they are too far away & not sail up to them.

Achievement #22 – The Hammer Falls: Complete Memory Sequence #7.
Story Related. Protect the Royal Phoenix, & it will smash through the British blockade; once it explodes, sail through & escape to complete Sequence #7.
Fort #6 – Fort Conttoyor: Before we continue on with the next Sequence, let us sail out & take over the remaining “medium difficulty” seas starting with Conttoyor. Sail over to Fort Conttoyor, & destroy its 7 Defences, kill the 3 Officers, then kill the Fort Captain to take it over.
Location #28 – Fort Conttoyor: We will unlock the Fort as a Fast Travel Location after we take it over.
Naval Contract #7 – The Law of the Ocean: For this Naval Contract, sail to the ambush location & destroy the 4 Spanish Gunboats & Board the Brig, the Heracles.
Naval Contract #8 – The Realities of War: For the next Naval Contract at Fort Conttoyor, link up with our nearby ally Ships & assist them in sinking the Spanish convoy made up of 4 Brigs & 1 Man o’ War.

Achievement #23 – Killer Killer: Harpoon a Killer Whale.
In Conttoyor, we can find an instance of Killer Whale Harpooning; before you attempt this, you will want the Advanced Rowboat, Elite Harpoon, & Advanced Harpoon Storage. Kill a Killer Whale, & we will unlock this Achievement.
Fort #7 – Fort Castillo de Jagua: Sail over to Fort Castillo de Jagua next, & destroy its 6 Defences, kill the 2 Officers, then kill the Fort Captain to take it over.
Location #29 – Fort Castillo de Jagua: We will unlock the Fort as a Fast Travel Location after we take it over.
Naval Contract #9 – Eye For An Eye: For this Naval Contract, sail out to locate the Frigate, San Lorenzo. When you find it, Board it & take it out.
Location #30 – The Black Trench: Sail over to the Black Trench & use the Diving Bell to enter it to unlock it as a Fast Travel Location. We do not have to explore it if you do not want to.
Location #31 – Cayman Sound: Sail over to the Cayman Sound to unlock it as a Fast Travel Location; there is nothing Achievement related on it.
Location #32 – Pinos Isle: Sail to the Mayan Ruins, Pinos Isle, next & we can discover it as a Fast Travel Location.
Mayan Stone #7: We can find a Mayan Stelae close to the where we can land on the Eastern side of the island; use it to find a Mayan Stone.
Mayan Stone #8: We can find a second Mayan Stone closer to the main temple as well.
Location #33 – Arroyos: Lastly, we can sail over to Arroyos & discover it as a Fast Travel Location.
Tavern #6 – Arroyos Arms: We can find a new Tavern here on Arroyos; beat up the Bandits to unlock it.
Pistol Holster III: For our final Pistol Holster, we need two Humpback Whale Skins to Craft it; we can find Harpooning instances for them here in Castillo de Jagua & back in Navassa. Harpoon at least two of them, & we can Craft our last Pistol Holster Upgrade to have 4 Pistols.
Sequence 10: Way, Hey, & Up She Rises
1. Cruz: Fort Cabo de Cruz, San Juan, Devil’s Eye Caverns, Grand Cayman
- Eleuthera: North Carolina
- Serranilla: Isla Providencia
- Sequence #8 Memories: Do Not Go Gently, Vainglorious Bastards, Marooned
- Optional Objectives: 58/80
- Naval Contracts: 10/15
- Taverns: 7/8
- Forts: 8/11
- Mayan Stones: 10/16
- Locations: 38/50
-----------------------------------------------------------------------------------------------------
Fort #8 – Fort Cabo de Cruz: Sail over to Fort Cabo de Cruz, & destroy its 4 Defences, kill the 2 Officers, then kill the Fort Captain to take it over.
Location #34 – Fort Cruz: We will unlock the Fort as a Fast Travel Location after we take it over.
Naval Contract #10 – Driftwood: For this Naval Contract, we simply need to collect & deliver 60 pieces of Wood. Good chance is you will already have that much & can instantly complete the Contract.
Location #35 – San Juan: Sail over to San Juan & use the Diving Bell to access it, unlocking it as a new Fast Travel Location. We do not need to explore it.
Location #36 – Devil’s Eye Caverns: Sail over to Devil’s Eye Caverns & use the Diving Bell to access it, unlocking it as a new Fast Travel Location. We do not need to explore it.
Location #37 – Grand Cayman: Lastly, sail over to Grand Cayman & we can discover it as a new Fast Travel Location.
Tavern #7 – The Randy Cayman: We can find a new Tavern here on Grand Cayman; beat up the Bandits to unlock it.
Memory #1 – Do Not Go Gently: Sail out to Northern Eleuthera & we will meet Thatch & Vane – it is Thatch’s retirement party.
Optional Objective #1 – Kill 4 Guards: Before we start the party, we will have to tail a suspicious fellow who will lead us to a British Guard ambush. As we Eavesdrop on his conversation, carefully take out patrolling Guards.
Optional Objective #2 – Use Heavy Shot to Incapacitate the Man o’ War: Things will escalate & we will need to fight off British Ships back on the Jackdaw. Of these will be a Man o’ War – we need to finish it off using our Heavy Shot. We can whittle it down with other weapons, but the last shot must be from Heavy Shot (they can’t be Swivels either).

Achievement #24 – Wild West Indies: Kill 4 enemies in a row using Multi-Pistols.
We can earn this Achievement as soon as we have all 4 Pistol Holsters. Find an area with a high amount of enemies (like on board a Ship) & unload all 4 Pistols into them for kills to unlock this Achievement. Each shot must be a kill.
Typically, shooting Brutes once won’t kill them & may mess up your run. Try making a group of only regular Guards or Scouts for instant kills.
Memory #2 – Vainglorious Bastards: Sail out to the Memory start in Castillo de Jagua & meet up with Vane aboard The Ranger. Here we will come up with a plan to track down the Sage… Sail into Cruz, & we can locate the Royal African Pearl South of San Juan & North of the Devil’s Eye Caverns in between some unnamed islands.
The Ship will flee, & we will have to chase after it, slowly whittling down its health as we go so we can Board it. When African Pearl reaches an open section of sea, The Ranger will begin to sink, & we will have to rescue Captain Vane.
Optional Objective #1 – Damage the Royal African Pearl With An Upgraded Ram: You must have the Reinforced Ram at a minimum to count as an Upgraded Ram. If you have the Reinforced Ram or higher, simply ram into the Royal African Pearl at least once to damage it for this Optional Objective.
Depending on your Ram, & how much you damaged it during the chase, one ram attack may be enough to open up the African Pearl to Boarding; do not Board it until you complete Optional Objective #2 though!
Optional Objective #2 – Use the Fort’s Defences to Sink A Ship: The Royal African Pearl will be assisted by two Spanish Brigs. We need to guide them over towards Fort Cabo de Cruz & have their defences sink one or both them; you need to whittle down their health a bit to speed the process up, just be sure not to sink them yourself.
You will have to guide the Brigs pretty close to the Fort for it to start engaging them unfortunately.
Memory #3 – Marooned: Picking up after Memory #2, we will be stranded on Isla Providencia with Captain Vane… who will have mentally deteriorated almost immediately somehow.
Optional Objective #1 – Skin 3 Animals: As soon as the Memory begins, we can begin exploring around Isla Providencia, but Animals (aka Black Jaguars) will be the only Animal we are able to kill – Crocodiles & the Red Howler Monkey need Pistols to kill. You need to perfectly perform the Quick Time event against the Jaguar to kill it, or kill it via Stealth Assassination. There are also unfortunately exactly 3 Black Jaguars we can kill as well, so we must find them all.
The first Black Jaguar can be found on our way to finding Vane. Instead of taking the fallen log up to where the Red Howler Monkey is, continue straight/Northwest down the path to encounter a Black Jaguar.
Mayan Stone #9: When we first re-encounter Vane, we will be in a large Mayan temple section. Before we pursue him higher up in it, head over to the nearby Mayan Stelae & we can locate a new Mayan Stone.
Optional Objective #1 – Skin 3 Animals: After Vane blows up the log he was on, the weather will shift on us to pouring rain & we will have to chase after him; stay along the ground & do not ascend up any of the wooden walkways/scaffolding.
Our second Black Jaguar can be found below the first set of wooden walkways we encounter along the path.
Continue to ignore the walkways & instead cross over a gorge using a fallen log to the other side where we can find the third & final Black Jaguar near a Leaf Pile.
Mayan Stone #10: When we finally corner Vane, we will be tasked with taking him out. Get around to the far backside of the ruins he is standing on, & before we ascend to take Vane out, we can find a second Mayan Stellae we can use to locate a new Mayan Stone.
Optional Objective #2 – Air Assassinate Vane: With the Mayan Stone collected, get up onto the highest point of the ruins above Vane & from here, we can Air Assassinate him…

Achievement #25 – Adrift: Complete Memory Sequence #8.
Story Related. Leave Thane be on Isla Providencia, & we will get rescued by our friends Adé & Captain Kidd.
Location #38 – Isla Providencia: We will unlock Isla Providencia as a Fast Travel Location after completing Memory #3.
Sequence 11: Plots & Counter-Plots
1. Serranilla: Isla Providencia, Misteriosa, Fort Serranilla, New Bone, The Blue Hole
- Charlotte: Kingston, Fort Charlotte, Anotto Bay
- Punta Guarico: Principé
- Sequence #9 Memories: Imagine My Surprise, Trust Is Earned
- Optional Objectives: 62/80
- Naval Contracts: 12/15
- Taverns: 7/8
- Forts: 10/11
- Mayan Stones: 13/16
- Locations: 44/50
-----------------------------------------------------------------------------------------------------
The Red Howler Monkey: With Isla Providencia unlocked as a Fast Travel Location, & now that we have our Pistols back, return to the first Viewpoint along the beach we started at. Look on your Map, & use the waypoint to locate where the Red Howler Monkey is. Once you are in the area, go slowly & search the trees with Eagle Vision to find it.
Get as close as you need to & shoot it down with your Pistol so we can skin it.

Achievement #26 – Redingote Up!: Craft the Hunter Outfit.
Now that we have the Red Howler Monkey Skin, we can Craft the Hunter Outfit as long as you also got the White Jaguar Pelt from Great Inagua. We can also technically purchase the Red Howler Monkey Skin for 5000R or the White Jaguar Pelt for 6000R from any General Store.
Memory #1 – Imagine My Surprise: Travel to Kingston for more information regarding the Princess’ whereabouts, & we will learn that Woodes Rogers is in town.
Optional Objective #1 – Kill 4 Brutes: This Objective can be completed anywhere across Kingston, though we can find many Brutes in the marked area where we need to search for Woodes Rogers.
Optional Objective #2 – Sabotage 2 Alarm Bells: Similarly to the previous Optional Objective, we can find three Alarm Bells in the marked Restricted Area where Woodes Rogers is. They are found in the lower Southeast & Southwest corners of the green search area as well as the far Northern corner.
You will want to try & complete both Optional Objectives before locating Woodes Rogers who will be close to the Northern Alarm Bell. A few more Brutes can be found as we tail Rogers, but we will not encounter any more Alarm Bells…
Memory #2 – Trust Is Earned: With the location of the Princess & ideally the Sage learned, set sail for Principé. Arrive in the bay, & sink the Portuguese Ships defending our entrance. Land on shore, & track down the Sage.
Optional Objective #2 – Free 2 Pirates: Ignore going after our targets, & instead head to both Save Pirates events. Complete them, & free the Sage’s men. If we fail either event, we will have to reload/die to spawn them back in.
Optional Objective #1 – Double Assassinate Cockram & Burgess: With the Pirates saved, head to the marked green area to search for our targets. There are lots of Guards in the area, & though we can be detected by them to clear some out, we cannot be detected by Cockram or Burgess as it will make a Double Assassination extremely difficult.
Cockram & Burgess will patrol a wide square around the area standing side by side. If you can find & tail them, wait for a good opportunity to either sneak or sprint behind them to perform the Double Assassination.
You can take advantage of stunning them with Smoke Bombs & making sure you line up a sprinting Assassination to take them out as well; Assassinating them too closely will probably just result in a solo Assassination.

Achievement #27 – A New Hope: Complete Memory Sequence #9.
Story Related. The Sage, Bartholomew Roberts, will take up his own Ship & crew upon his rescue & will ask us to seek him out in two months time for answers to where the Observatory is located…
Location #39 – Misteriosa: When we begin Sequence #10, we will be at the Mayan Temple Misteriosa & automatically unlock it as a new Fast Travel Location.
Mayan Stone #11: Before we leave, we can find a Mayan Stellae at the top of the ruins just above us that will lead us to a Mayan Stone.
Mayan Stone #12: We can find a second Mayan Stellae over at the far Western beach as well that will reward us with another Mayan Stone.
Fort #9 – Serranilla: Destroy its 7 Defences, breach the walls & kill the 3 Officers, & take down the Fort Commander.
Location #40 – Fort Serranilla: We will unlock Fort Serranilla as a Fast Travel Location after we capture it.
There is a Naval Contract here, but we need to beat further into the game to unlock it.
Location #41 – New Bone: The only other place for us to explore here in Serranilla is the Plantation, New Bone. Sail to it, & unlock it as a Fast Travel Location.
Mayan Stone #13: While we are here, we can locate another Mayan Stellae & use it to find a Mayan Stone.
Location #42 – The Blue Hole: Now we sail over into Charlotte, & we can reach the Blue Hole on our way to the Fort. Enter the Underwater Shipwreck using the Diving Bell to unlock it as a Fast Travel Location; we do not need to explore it.
Fort #10 – Charlotte: Sail over to Fort Charlotte & destroy its 5 Defences, breach the walls & kill the 3 Officers, & take down the Fort Commander.
Location #43 – Fort Charlotte: We will unlock Fort Charlotte as a Fast Travel Location after we capture it.
Naval Contract #11 – Hunter Gatherer: We can acquire this Naval Contract at Fort Charlotte; we need to raise our Wanted level to at least 1 Notoriety & dispatch 2 Hunter Ships. Outright destroying Ships without Boarding gives you the most Notoriety, with Boarding Ships then using them to Repair the Jackdaw being the second best option.
Naval Contract #12 – Papers, Please: We can acquire a second Naval Contract at Fort Charlotte, this one tasking us with locating the HMS Courage. The HMS Courage can be located over in Cruz close to the Devil’s Eye Caverns; dispatch it. Be warned, it is a max Level Man o’ War… unfortunately, they won’t let us keep it.
Location #44 – Anotto Bay: For our last Location in Charlotte, sail over to the Anotto Bay Underwater Shipwreck & use the Diving Bell to unlock it.

Achievement #28 – Cannon Fodder: Recruit 500 Crew Members.
For recruited Crew Members to count, you do not need to fully replace missing Crew from the Jackdaw; excess/extra Crew Members gained through Boarding Ships & other events will continue towards the Achievement.
If you want to see your progress towards the Achievement, go into the Database – Statistics tab, & scroll down to the Pirate Statistics.
Sequence 12: Brotherhood Betrayed
1. Chinchorro: Fort Chinchorro, Corozal, Ambergris Key, La Concepcion Wreck, Santanillas
- Serranilla: Fort Serranilla
- Gibara: Great Inagua
- Sequence #10 Memories: Black Bart’s Gambit, Murder & Mayhem
- Optional Objectives: 66/80
- Naval Contracts: 15/15
- Taverns: 8/8
- Forts: 11/11
- Mayan Stones: 15/16
- Locations: 49/50
-----------------------------------------------------------------------------------------------------
Fort #11 – Chinchorro: We now only have one final Fort to capture, Fort Chinchorro. It fortunately only has 4 Defences. Destroy them, kill the 3 Officers, & deal with the Fort Captain.

Achievement #29 – King of the Castle: Capture all 11 Forts.
There are 11 different ocean waters each with its own Fort controlling them. Capture all 11 Forts, & we will unlock this Achievement. There are 3 Forts in “easy waters”, 5 Forts in “medium” waters, & 3 Forts in “hard” waters.
Location #45 – Fort Chinchorro: We will unlock Fort Chinchorro as a Fast Travel Location after we capture it.
Naval Contract #13 – Contraband: With Fort Chinchorro now unlocked, we can receive two new Naval Contracts – this is the first one. For this Contract we simply need to track down & sink any 1 Spanish Frigate & 2 Spanish Brigs.
Naval Contract #14 – Smuggler’s Den: For this Naval Contract, we will need to locate some Spanish Ships near Corozal & break through their blockade to complete it.
Location #46 – Corozal: Since we are already down here, sail over to the island Corozal & discover it as a Fast Travel Location.
Tavern #8 – The Corozal Inn: While on Corozal we can find our final Tavern to unlock. You know the drill, fist fight the 4 Bandits, & it is ours.

Achievement #30 – Barfly: Unlock all 8 Taverns.
We will unlock this Achievement after unlocking all 8 Taverns in the game; there are more than 8 Taverns however, but the ones in Nassau, Havana, & Great Inagua do not count. Only the “extra” Taverns we have to physically unlock do.
Location #47 – Ambergris Key: Sail down South to the Shipwreck, Ambergris Key, & head down with our Diving Bell to unlock it as a Fast Travel Location.
Location #48 – La Concepcion Wreck: Fast Travel back to Fort Chinchorro, & sail down to La Concepcion Wreck & use the Diving Bell to unlock it as a Fast Travel Location.

Achievement #31 – Seven Deadly Seas: Explore all 10 Underwater Shipwrecks.
There are 10 Underwater Shipwrecks in the game, & using the Diving Bell to access them all will unlock our Achievement; we do not need to fully explore them, just unlock them as Fast Travel Locations.
Location #49 – Santanillas: Lastly, sail over to the island Santanillas & discover it as a Fast Travel Location.
Mayan Stone #14: We can find a Mayan Stellae on Santanillas near its Northwestern end; complete the alignment puzzle to collect a Mayan Stone.
Mayan Stone #15: We can also find a second Mayan Stellae here as well to collect a Mayan Stone.
Naval Contract #15 – The Final Contract: With all other Naval Contracts completed, we will unlock the final Contact at Fort Serranilla to complete next. Locate the Hollander, a friendly Man o’ War Ship, & defend it from 3 waves of British Ships increasing in difficulty as it escapes.

Achievement #32 – Sea Legs: Complete all 15 Naval Contracts.
When we capture Forts, we can acquire new Naval Contracts to complete. Capture all 11 Forts & we will gain access to all available Naval Contracts – complete the first 14, & we can acquire the final Contract at Fort Serranilla. Complete it to unlock this Achievement.

Achievement #33 – FTFY: Purchase all 8 Upgrade for your Hideout.
There is a total of 8 Upgrades that we can purchase for our Hideout on Great Inagua. It will run us a total of 90,700R to purchase them all. If you frequently use Kenway’s Fleet to complete Missions, you should have no issues earning the Reales for it.
- Harbourmaster 500R
- General Store 700R
- Tavern 3500R
- Campfire 7000R
- Brothel 15,000R
- Manor – Façade 6000R
- Manor – Tower & Garden 18,000R
- Manor – Guest House 40,000R
Memory #1 – Black Bart’s Gambit: When you are ready, it will be time to link up with the Sage in Southern Chinchorro. The Sage will board the Jackdaw, & he will task us with raiding a Portuguese Ship containing a shipment of crystal vials for the Observatory.
Optional Objective #1 – Stay Out of Combat: We will first need to steal a Portuguese Flag off a nearby Brig to disguise the Jackdaw. Stealthily climb to the very top of the Ship to tear the Flag off, & remain out of combat – we can kill enemies, just not be detected. Steal the Flag, & get back to the Jackdaw.
Sail further through the channel, & we will find some Portugese Guards unloading some cargo off a Man o’ War. Get onto their small island, & while still undetected, loot the contents from the Chest.
Still out of combat, tail the Spanish Man o’ War & we will have to go ashore once again to clear out some enemies stealthily; Berserk Darts are very useful for clearing out enemies.
Optional Objective #2 – Use A Rope Swing to Kill the Captain: On top of the second Guard tower where we need to kill the Sniper, there will be a Rope that will guide us directly above the Ship Captain. Swing off it, & Air Assassinate the Captain.
The moment we do, we will complete both Optional Objectives.
Memory #2 – Murder & Mayhem: Sail to the Mission marker, & link up with the Sage aboard the Royal Fortune to head to the Observatory.
Optional Objective #1 – Stay Out of Combat While Finding Hornigold: Unfortunately, we will have been followed by none other than Ben Hornigold. Sail after his Ship, but do not engage with any others – give all Ships a wide berth while trying to find the Schooner, the Benjamin.
Once we locate the Schooner, destroy it.
Optional Objective #2 – Air Assassinate Hornigold: Once his Schooner is destroyed, Hornigold will retreat to Santanillas. We can be detected along the way, so long as Hornigold himself does not see us.
Climb up to the highest point of the Mayan ruins above Hornigold, & Air Assassinate him.
Sequence 13: A Broken Man
1. Charlotte: Long Bay, Kingston
- Conttoyor: Tulum
- Sequence #10 Memories: The Observatory
- Sequence #11 Memories: To Suffer Without Dying, Delirium, Everything Is Permitted
- Sequence #12 Memories: A Governor No Longer
- Optional Objectives: 74/80
- Mayan Stones: 16/16
- Locations: 50/50
-----------------------------------------------------------------------------------------------------
Memory #3 – The Observatory: With Hornigold dealt with, meet up with the Sage at the Observatory in Charlotte.
Location #50 – Long Bay: We will unlock this Location as a Fast Travel spot as soon as we arrive here.

Achievement #34 – Cartographer: Visit all 50 Locations of the game.
This is our final Location to discover that we are able to Fast Travel back to that will unlock this Achievement. DLC Locations do not contribute to the Achievement.
Optional Objective #1 – Incapacitate All Guardians While Unarmed: We cannot use any Weapons other than our Fists to deal with Guardians. We can be detected by them, but they must be taken out with our Fists.
Optional Objective #2 – Incapacitate 5 Guardians From Stalking Zones: Use Eagle Vision ahead of time to mark where the Guardians are hiding. Stealthily enter into the Bushes they are in, & take them out in them for Stalking Zone takedowns – do this with our Fists.
There are a least 4 Guardians at the very end where we enter the cave that are easy to dispatch from Stalking Zones, but ideally, you can take some more out like this along the way.
Mayan Stone #16: At the very end of Long Bay, we will have to clear out the final set of Guardians, do so, & we will be then tasked with following the Sage onwards. Before we do, while still in this area, we can locate our final Mayan Stellae that will lead us to the last Mayan Stone.

Achievement #35 – My Elusive Fortune: Complete Memory Sequence #10.
Story Related. Follow the Sage to the Observatory, & naturally, we will be betrayed. Find our way out of the flooded temple, climbing up the Northern end & navigating up & out along the temple walls.
Security Clearance Level #3: With Sequence #10 completed we will re-awaken in the Present Day… as whoever we are. We are now locked in the “bunker” as a precaution. Fortunately, it will be short lived as the “man over the radio” will give us Level #3 clearance to get us out of it.
Hack the security camera with the code: 5773.
Hack the main sever next with the code: 7773.

Achievement #36 – Bunker Buddies: Complete Present-Day Mission #4.
Story Related. After averting being bodily puppeteered, return to our Animus workstation like nothing happened to complete this Present-Day Mission.
Memory #1 – To Suffer Without Dying: Sequence #11 will begin with us imprisoned in Kingston. Fortunately, Ah Tabai will come rescue us. We do not need to be stealthy & can be detected during this Memory.
Optional Objective #1 – Sabotage 3 Alarm Bells: As we head towards the prison entrance, keep your eyes on your Mini-Map for Alarm Bells; we need to make a point of sabotaging three of them.
Optional Objective #2 – Visit 2 Old Friends: After we disable the Alarm Bells, before we head to the prison, walk over to the Southwestern end of the Restricted Area & we can find two prisoner cages above the water to the right of the fort – one will have a body inside it. Approach the cage, & interact with it to say our goodbyes to Jack Rackham.
Enter inside the prisons now & head down the first hall to enter a larger cell block room. Clear out the Guards, but before continuing, head back towards the stairs we came down. To the bottom left of them, we can interact with a cell door that has Charles Vane behind it.
With our friends visited, go & rescue Anne & Captain Kidd… Mary.
Memory #2 – Delirium: This is a purely story related/cinematic Memory & does not have any Optional Objectives to complete.

Achievement #37 – Vault Raider: Unlock the secret door in Tulum.
With all 16 Mayan Stones now collected, head to the Mayan temple in Tulum & place them all in the locked door. When they are all placed in, we will unlock the Achievement.
Memory #3 – …Everything Is Permitted: Return to the Assassins at Tulum & speak with Ah Tabai on how we can make amends. Before we can, the Spanish will arrive for another assault, & we will help – we will also receive Rope Darts.
Optional Objective #1 – Use the Rope Dart to Hang 2 Guards: Naturally, of course our Optional Objectives have to do with Rope Darts for this Memory. The first Guards we will encounter will give us a Tutorial for how to Hang enemies; the first will be free, & we will only need to Hang one other Guard.
Optional Objective #2 – Use the Rope Dart to Pull 3 Guards: This move is done in combat. Use a Rope Dart on an aggro’d Guard & we will pull them down onto the ground, just do this 3 times.
We can Craft more Rope Darts using Bones.

Achievement #38 – Been Down So Long…: Complete Memory Sequence #11.
Story Related. Fend off the Spanish, & we will have re-earned the trust of the Assassins. We may not be one of them, but we do share common goals. Nothing is true, everything is permitted.
Memory #1 – A Governor No Longer: With our new Quartermaster at the helm (Adé is off doing the Freedom Cry DLC right now) set sail for Kingston once again & link up with the Assassins.
Optional Objective #1 – Kill the Diplomat From A Haystack: To infiltrate Rogers’ event, we will need to tail & dispatch an Italian Diplomat. When the Diplomat stops, & we are tasked with killing him, he will conveniently be standing beside a Haystack. Enter it undetected, & stealth kill him from it.
He will not stay there forever & we have about 15s to kill him from the Haystack before he moves on. If you have to reload your last Checkpoint, you can get to the Haystack ahead of time to set up for the Diplomat.
Optional Objective #2 – Kill Rogers From A Bench: Take on the persona of the Italian Diplomat, somehow, & infiltrate Rogers’ party. The only bench in the area is located near the building close to where we entered underneath a white pergola with pink flowers growing off it at the Southwest of the party grounds. Rogers has a set patrol path that will eventually take him past it as he speaks with guests; wait for him here, & Assassinate him. It may take him a bit to get there though…
Sequence 14: Future Premonitions
1. Punta Guarico: Principé
- Dry Tortuga: Havana
- Charlotte: The Observatory
- London: Theatre Royal
- Sequence #12 Memories: Royal Misfortune, Tainted Blood, Ever A Splinter
- Sequence #13 Memories: Epilogue
- Optional Objectives: 80/80
-----------------------------------------------------------------------------------------------------
Memory #2 – Royal Misfortune: Following Rogers’ lead, we will sail for Principé in the hopes of tracking down the Sage.
Optional Objective #1 – Kill 8 Guards By Destroying Powder Barrels: As we track down the Sage on Principé, keep your eyes out for Powder Barrels. Aggro as many Guards as you can, then lure them over to the Powder Barrels before detonating them with your Pistols. It is pretty easy to do.
Optional Objective #2 – Use the Rope Dart to Kill Roberts: Locate the Sage, & we will instantly need to rush over to the Jackdaw & sail after him as he escapes. Chase after the Royal Fortune, & take its health down so we can Board it.
To take out the Sage with a Rope Dart, we will need to be up in the masts undetected – we can get up there easily be leaping over from the Jackdaw’s own masts. What can make this frustrating… is he may get lured away by our Crew members & take a while to get under us – killing our Crew all the while. Be patient.
Memory #3 – Tainted Blood: Next we go to Havana to deal with Governor Torres next. With no discretion, we will entrust Rhona with the Observatory Key, & we will search the city to take Torres down.
Locate & tail El Tiburón, all the way to Castillo Morro.
Optional Objective #1 – Stay Out of Combat: When El Tiburón enters the fort, we will gain this Optional Objective. Make your way around the far-right side of the fort to get inside from the harbor loading docks & exploit using Sleep/Berserk Darts to clear the way for us. Navigate up to the walls, & we can Air Assassinate Torres; we can technically kill him any way you’d like so long as we do not enter combat.
Optional Objective #2 – Use 2 Guards As Human Shields: Were it so easy. It will be a trap set by El Tiburón & we will have to defeat him. While we do so, we will need to use 2 Guards as Human Shields to block bullets. Play defensively, & do not kill anyone until you have completed this Optional Objective.
Very rarely will El Tiburón pull out his Pistol to shoot us, when he does we need to be ready & grab a nearby Guard as a Human Shield.
Memory #4 – Ever A Splinter: Now we sail after Torres for real this time – he has gone to the Observatory.
Optional Objective #1 – Free the 7 Guardian Hostages: When we arrive outside the Observatory, we will need to navigate through the jungle until we reach the Restricted Area. Once here, before we enter the cave, we can find a group of 2 Guardians being held prisoner along the beach; free them without the Gunner killing them. The Guardian prisoners are easy to locate as there will be a Gunner marked on our Mini-Map where they are at.
Pass through the cave, & when we exit, take a pathway down off our right to rescue another 2 Guardians. In the same area, head up along the cliff walls to where two Gunners are marked, & we can rescue another 3 Guardians.
Optional Objective #2 – Use the Observatory Defences to Kill 4 Guards: Pursue the Spanish inside the Observatory, & after getting through the first room, we will enter a room with many Guards & alternating dissolving forcefields that appear. Engage the Guards, & when the forcefields appear, Counter Throw them through it to kill them – do this 4 times.

Achievement #39 – Just Like Starting Over: Complete Memory Sequence #12.
Story Related. Take out Torres, & the Observatory will be turned over to Ah Tabai & the Assassins, we are almost fully redeemed now.

Achievement #40 – It’s All Good: Complete Present-Day Mission #5.
Story Related. With Kenway’s story almost wrapped up, it will be time for us to wrap up… whatever “present day” nonsense that is going on as well. Stuff will go down, but we will end up being alright, & when we wake up in Melanie’s office (hopefully fully clothed) we will immediately bring up our Abstergo iPad so we must be doing alright.
Watch… or skip the cringey trailer we are rewarded with for all our efforts, & enter back into the Animus to finally be done with the Present Day…
Memory #1 – Epilogue: This is an entirely cinematic Memory with no Optional Objectives.

Achievement #41 – Saw That One Coming…: Complete Memory Sequence #13.
Story Related. Witness the Epilogue & Edward’s future, & we will complete Sequence #13 & beat the game!

Achievement #42 – By the Book: Complete 100% of all Main Mission constraints.
Complete all 80 Optional Objectives for the Main Missions to unlock this Achievement. This is not 100% Synchronization like other AC titles & we just need to complete all the Optional Objectives.
Sequence 16: Scourge of the West Indies
1. Legendary Ships: 4/4
2. Achievements: 45/60-----------------------------------------------------------------------------------------------------

Achievement #43 – Sharing Is Caring: Share each type of Discovery with Friends once.
This Achievement is misleading as we only need to witness the Discovery event – it actually has nothing to do with sharing it with Friends. There are 3 different types of Discoveries: the White Whale, a Naval Convoy, & a Social Chest. They will appear blue on our Map & only remain for a limited amount of time before they disappear. Unfortunately, they are randomized but do have set spawn points. You will have to sail/Fast Travel around to the different Locations in the hopes what you are looking for spawns; they should reset every 6-10 hours, but there is no way of knowing when the change over times are.
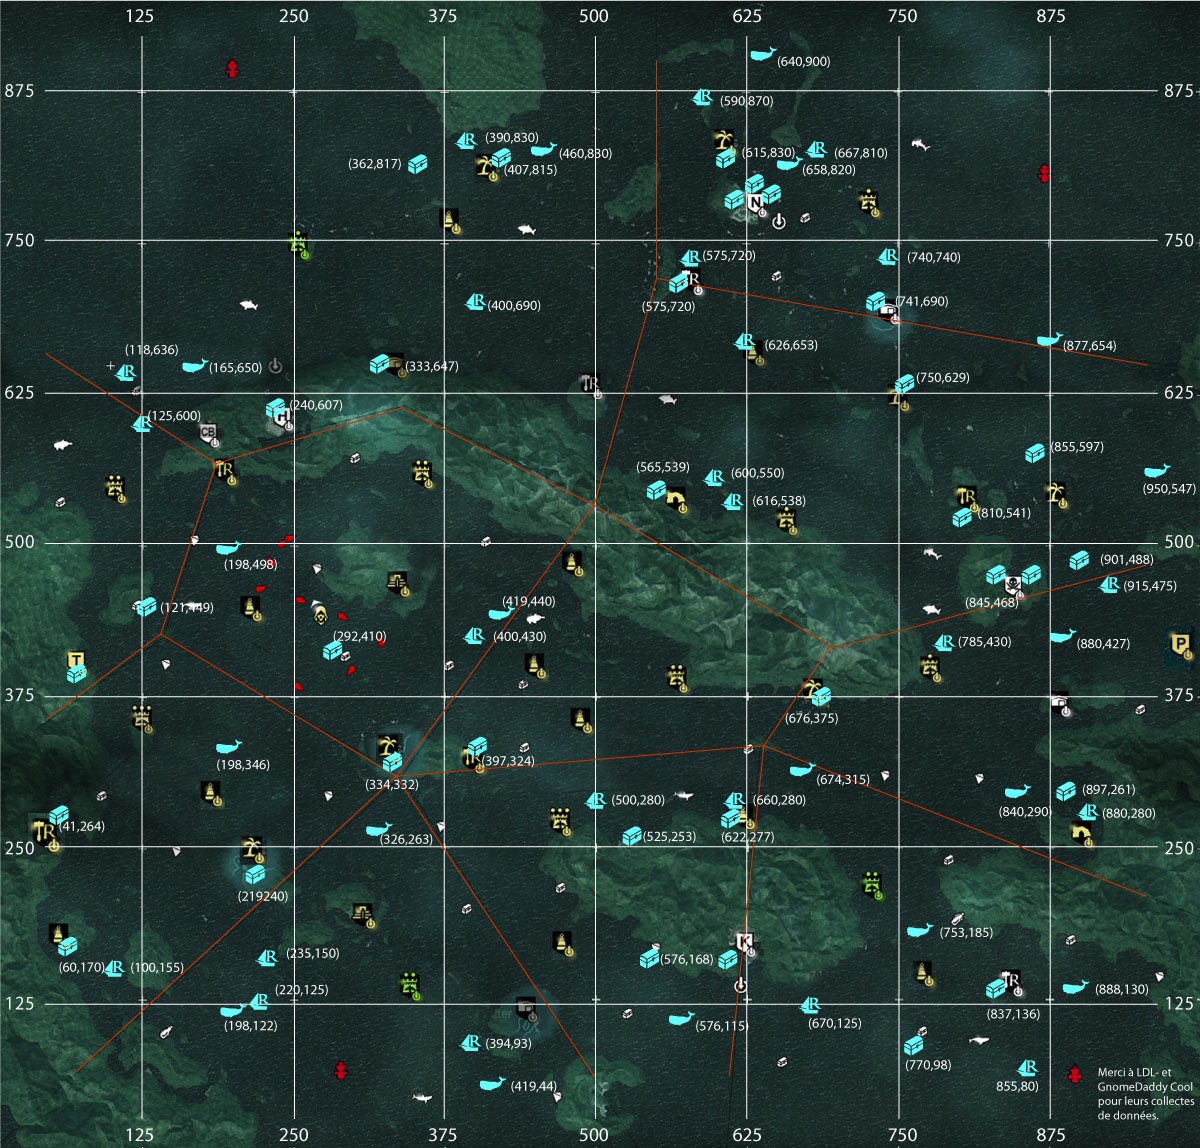
This Map was not created by me, & I take no credit for it; the acknowledgement in the bottom right corner is in French so I had to translate it. As far as I am aware, the original creators are LDL & GnomeDaddy Cool.
If you are lucky, you may have already encountered one or all Discovery types; I managed to find 3 White Wales & 1 Naval Convoy naturally. Chests are the most difficult to find. Finding a Social Chest was the last thing I needed… & it took me days to find it, even by going to all spawn locations. I whittled the list down to an easy few spots to check in under 15 minutes & if those weren’t the spawn spots, I quit the game & waited until the next day. It took me over two weeks to finally find my Social Chest. I initially just stuck to only checking a few spots a day (Great Inagua, Nassau, Abaco Island, Andreas Island, & Tulum) but that just didn’t seem to work. So I went on to use video guides showing where to find each just & found one on the marked beach Southeast of Ambergris Key.
For more in depth help on where each of the Social Chests is located, here is a great video guide playlist created by Ashley Hicks; make sure you Like their videos that helped you & leave them a nice Comment if they help you find your Social Chest!
https://www.youtube.com/playlist?list=PLdwXTe0faYd3SDNnoeTHlILWa3g9bPflj
The Achievement IS still unlockable & they do spawn (I found my Social Chest December 2025), it can & will just take a while if you are unlucky. For your sanity, you can sprinkle in daily spawn checks while we do the Freedom Cry DLC & the Multiplayer.

Achievement #44 – Destroyer: Fully Upgrade the Jackdaw.
There are a total of 68 Upgrades for the Jackdaw – 41 for Weapons & Armor, 18 for Storage, & 9 for Harpooning. These will run us 315,000R, 4905 Metal, 2750 Wood, & 400 Cloth. If you use Kenway’s Fleet, the Reales will not be an issue. The Metal will most likely be the largest grind; anytime you see a Ship containing 100+ make sure you Board & plunder it.
If you purchased the Time Saver – Technology DLC, you will automatically own all Elite Blueprints. IF you do not, you will have to manually track them down & loot them from Chests.
- Elite Heavy Shot – Misteriosa Island
- Elite Hull Armor – San Ignacio
- Elite Ram – La Concepcion Shipwreck
- Elite Broadside Cannons – The Blue Hole
- Elite Round Shot Strength – Kabah Ruins
- Elite Mortars – Antocha
- Elite Swivel Guns – Devil’s Eye Caverns
- Elite Fire Barrels – San Juan
- Elite Heavy Shot Storage – Petite Cavern
- Elite Mortar Storage – Mantanzas
- Elite Fire Barrel Storage – Isla Providencia
- Elite Harpoon – Andreas Island
Some of these are actually Buried Treasures as well & can only be collected if you first have their corresponding Treasure Map. These can be found:
- Elite Heavy Shot Map - Ambergris Key
- Elite Fire Barrel Map - Santanillas
- Elite Mortar Storage Map - Tortuga
- Elite Fire Barrel Storage - Can only be earned by completing the Scarlatina Mission (Eastern Canada) in Kenway's Fleet.
- Elite Harpoon Map - Mariguana Island
Legendary Ship #1 – El Impoluto: El Impoluto is located to the far Northwest of Fort Dry Tortuga. Its gimmick is a very powerful Ram, & we will want to try to stick close to the sides of the Ship to avoid it. Always make sure you Brace against its Ram attacks (& cannon fire) as it will do a lot of damage to us.
All in all though, I found El Impoluto the easiest of the Legendary Ships to defeat.
Legendary Ship #2 – HMS Prince: Next on our list will be the HMS Prince which is located in the Southeastern corner of Navassa Southwest of Mystery Island. The HMS Prince has very powerful Broadside Cannons so you need to watch out; it is best to fight it from the rear if you can manage. The other problem for this fight, is the whole sea will be shrouded in fog making sightlines poor.
Legendary Ship #3 – La Dama Negra: Our next Legendary Ship will be La Dama Negra located in the bottom Southwestern corner past Fort Serranilla. This Ship will be a little different from the others – its hull is clad in impenetrable armor. Its only weak point is located on the Ship’s rear though we can also damage it from the top using our Mortars.
It is imperative you stay behind this Ship as best as you can because its own Mortars & Broadsides are devastating. This is one of those fights where you really need to have a good run & have it go your way to win.
Legendary Ship #4 – HMS Fearless & Royal Sovereign: Our final Legendary Ship… is actually two Legendary Ships – the HMS Fearless & Royal Sovereign. Since there are two of them… this is the most difficult fight in the entire game. The Ships themselves are pretty standard without a special gimmick; make sure not to sail in between the two of them or you will be annihilated by their Broadsides.
When one of the two Ships is defeated, the other will fight a lot more aggressively & immediately follow up with a Ram attack. It is best, if you can, to whittle them both down to low health before finishing one off. Fighting from afar is the best strategy & use your Mortars often.

Achievement #45 – Devil of the Caribbean: Defeat all 4 Legendary Ships.
We will unlock this Achievement when all 4… 5 Legendary Ships have been destroyed. El Impoluto & the HMS Prince are not very difficult, but La Dama Negra & the duo pair can be quite challenging.
75% Complete
Sequence 17: Freedom Cry
1. West-Indies Sea: Port-au-Prince
- Memories: The Calm Before the Storm, A Common Enemy, Laying the First Brick, A Ship of His Own, Lifting the Veil, A Scientific Inquiry
- Optional Objectives: 10/16
-----------------------------------------------------------------------------------------------------
With the Main Campaign completed, we can now move on to the Freedom Cry DLC where we play as Adéwalé when he left Kenway’s crew. We can select it from the Main Menu.
Memory #1 – The Calm Before the Storm: As soon as the DLC begins, we will be at sea in our own Ship going after some Templars; destroy the supporting Ships & Board the Templar’s own, the Royal-Louis.
Optional Objective #1 – Locate the Templar Admiral’s Ship Using the Spyglass: As soon as we take control of our Ship, immediately view the Royal-Louis with the Spyglass to complete this Optional Objective.
Optional Objective #2 – Use the Mortar to Surprise the Templar Fleet: With the Royal-Louis identified, follow up as our first attack on the fleet using our Mortar.
Memory #2 – A Common Enemy: When we awaken on the shores of Port-au-Prince, chase after a Slave Overseer & give him a good ol’ classic dirt nap.

Achievement #46 – Liberation Day: Free your first Slave.
Story Related. Kill the Overseer & rescue the Slave he was chasing to unlock this Achievement.
Plantations: For the Seeds of Independence Achievement, we need to free 500 Slaves which can take a while to do. In Port-au-Prince, there are 3 Plantations & 1 Jail we can raid to free Slaves; whenever you see them full, make a point of stopping by & rescuing as many as you can.
Memory #2 – A Common Enemy: Follow through with tailing a “gentleman” & meet with Bastienne Joséphe; there are no Optional Objectives to complete for this Memory.
Memory #3 – Laying the First Brick: Head to the marked Plantation & locate our contact for Joséphe. Head to the Maroon Hideout & help them fight off the Slaver attack.
Optional Objective #1 – Push An Overseer Into the Water: Lure any Overseer towards the rock ledges & perform a Counter Throw to throw them down into the water below.
Optional Objective #2 – Perform An Air Assassination From A Height of 10m: For this Optional Objective we need to Air Assassinate an Overseer who is down below us while we are up on the upper level. The best place to do this is back over to where we first entered the hideout. There is a Pulley Elevator we can stand on top of with an Overseer below us to perform the Air Assassination onto.

Achievement #47 – Firepower: Kill 5 Guards at once with a Blunderbuss.
We will acquire the Blunderbuss after completing Memory #3. Once we have it, run around Port-au-Prince & aggro as many Guards/Overseers as you can. Run away from them, 180 around so they are all grouped together chasing after you & blast at least 5 of them to turn this Achievement.
Memory #4 – A Ship of His Own: To unlock this Memory, we first must rescue & recruit 20 Maroons. Meet up with Dieufort & we will scheme to steal a French Brigatine from the harbor.
Optional Objective #1 – Use Bastienne’s Girls to Distract the Guards: These next two Optional Objectives can be done simultaneously. First, search the Restricted Area for a group of Dancers & hire them. Use the Dancers, but stay away from Guards if you can help it, to find & get close to a group of at least 4 Guards.
Some Dancers may distract a portion of them (or others along the way) which will complete this Objective.
Optional Objective #2 – Distract 4 Guards with Firecrackers: When you are near a group of 4+ Guards, throw down a Firecracker to draw them to it; this can be done while still blending with the Dancers. Guards around the Powder Kegs are good targets.
Memory #5 – Lifting the Veil: To unlock the next Memory, we need to accumulate 150 liberated Slaves as well as liberate a Slave Ship. When ready, go & see Josèphe at the brothel & she will task us with spying on the Gouverneur.
Optional Objective #1 – Kill the Overseer Who Led the Slaves: Infiltrate the mansion grounds, & when it is nightfall, we will sneak outside. Before we go after the Gouverneur, sneak over the front entrance of the mansion grounds & we can find the Overseer speaking to a Guard. Wait for them to finish their conversation, then carefully follow the Overseer & dispatch him when he is out of sight from the others…
Optional Objective #2 – Liberate Slaves From the Slave Barracks: Turn your attention to the mansion now & we can locate the Gouverneur through a window at the Southern side on the second floor. Eavesdrop on his two conversations, but before we leave, we need to liberate the remaining Slaves here in the Slave Barracks; we can be detected, but no Alarm Bells must sound!
As well, if all the Slaves die, it won’t complete the Optional Objective & we must reload our Checkpoint. There are 3 Slaves & 3 Overseers; at least 1 Slave must survive.
Memory #6 – A Scientific Inquiry: We will be able to jump into the next Memory right away when we return to see Josèphe at the brothel. We must figure out what the Gouverneur’s man, Godin, is after with his theory of easier naval navigation.
Optional Objective #2 – Do Not Kill Anyone While Investigating: Self explanatory; knocking people out with our Fists counts as a kill, but Sleep Darts do not. Being detected is also fine, just don’t kill anyone.
Optional Objective #1 – Complete All 5 Investigations: Though our main Objective only states we need to do 3/5 Investigations, for the Optional Objective, we need to do all of them. We need to investigate a Courier, Scientist, Fisherman, Messenger, & Carrier.
Sequence 18: My Brotherhood, My Creed
1. West-Indies Sea: Port-au-Prince
- Memories: Plant the Seeds, Down With the Ship, de Fayet’s Last Stand
- Optional Objectives: 16/16
-----------------------------------------------------------------------------------------------------
Memory #7 – Plant the Seeds: To unlock our next Memory, we must first set sail for the Wellington Plantation & liberate the Slaves there. When they area rescued, return to see Josèphe for the next phase of the plan.
Tail Godin, & swap out the manifests for whom they are taking aboard as their “literate Slaves”.
Optional Objective #1 – Sink the Pirate Schooners Before Sinking the Brig: Were it so easy. When the Vautour sets sail, they will immediately be attacked by Pirates & we will have to rescue them. There are 7 Ships total, 6 of which are Schooners & 1 is a Brig; we need to destroy all the Schooners before taking out the Brig. As we chase the flotilla down, take advantage of our Mortars to chip away/kill the Schooners as we go ahead of time.
Pay attention to the next Optional Objective.
Optional Objective #2 – Destroy the Pirate Flotilla In 6:00 Minutes: We will need to be pretty quick in sinking the Schooners & Brig. Though the Experto Crede does come mostly Upgraded, what it does not have is Round Shot & Heavy Shot Upgrades which are a must for dealing maximum damage.
You will most likely need these to take out the Pirates expediently.
Memory #8 – Down With the Ship: With the Vautour safely on its journey, go see Josèphe once again in Port-au-Prince where we will learn of another large Slave Ship sailing the West-Indies – we will intercept it.
Optional Objective #1 – Take Less Than 50% Damage During the Naval Fight: When we catch up to the Slave Ship, it will be escorted by 3 Frigates we will need to dispatch; we cannot fall below 50% health. Similarly to the previous Memory, having your Round Shot & Heavy Shot Upgraded will make things a lot easier.
Hull Upgrades of course are also useful, but will require you to plunder Metal which can be a tedious process to farm all over again...
Optional Objective #2 – Liberate 15 Slaves: Enter into the Slave Ship & it will be flooding. Hurry through the different rooms & break the shackled Slaves free. The first room doesn’t have too many, but in the second room you will free multiple Slaves at a time.
I am unsure if you are genuinely timed, or if the time decreases when you fail an attempt to free a Slave. Either way, if you focus on freeing them, you shouldn’t have any issues.

Achievement #48 – Seeds of Independence: Liberate 500 Slaves.
We are one Memory away from beating the Freedom Cry DLC. Before we do so, we should sail around & liberate the 500 Slaves for this Achievement; we will get good loot out of doing so as well.
Slave Ships are the best source of freed Slaves, but in their place, Plantations are the next best though a lot more tedious. By the time you do a Plantation, a new Slave Ship should spawn so you can just alternate between the two.
Memory #9 – de Fayet’s Last Stand: As of now, we only have one final Memory to complete before beating the DLC. Return to the Gouverneur’s mansion & deal with him…
Optional Objective #1 – Kill de Fayet With the Branding Iron: There is an Achievement associated with this Optional Objective; view the below Optional Objective before proceeding in case you want to do it first.
When we confront/fight the Gouverneur, approach him with open Fists & Counter Disarm the Branding Iron from him. Once we have it… beat him to death with it.
If he is alerted, the Gouverneur will run & has the chance to drop the Branding Iron if bumped into making it difficult to locate. Chase after him & he will lead us close to the harbour where a massive amount of Guards are; an excellent opportunity for Optional Objective #2.

Achievement #49 – His Own Medicine: Disarm the Gouverneur & kill him with the Branding Iron.
We will unlock this Achievement for completing Optional Objective #1. Should you kill him through another means, you can simply replay this Memory.
Optional Objective #2 – Kill 5 Guards With the Blunderbuss: Either before or after we kill the Gouverneur, we must make sure to kill 5 Guards at once with the Blunderbuss. Aggro a large group of the, run away, then immediately turn around while they are bunched together to take them all out.
If done carefully, you can aggro the 4 Guards at the front entrance to clear them out & add on a couple Overseers patrolling the streets to dispatch them & this Optional Objective without alerting the Gouverneur.

Achievement #50 – His Word Was “Perhaps”: Freedom Cry – Complete all Missions.
Story Related. We will unlock this Achievement after killing the Gouverneur & beating all 9 Memories in the Freedom Cry DLC.

Achievement #51 – His Full Attention: Freedom Cry – Achieve 100% Synchronization.
Memory #9 will only count as completed until after the Credits finish rolling. Once they do (or you likely skip them) we will unlock this Achievement if you completed all 16 Optional Objectives in the DLC.
85% Complete
Sequence 19: Multiplayer (Offline)
1. Game Modes: Wolfpack, Discovery Mode,
- Ranged Weapons: 5/5
- Abilities: 15/15
- Approximate Level: 48/55
- Achievements: 54/60
-----------------------------------------------------------------------------------------------------
When you are ready for our final grind of the game, it will be time for us to turn our attention to the Online Multiplayer. Fortunately we can boost a lot of these Achievements either in Solo or with a boosting Friend. These are best done in Wolfpack Private sessions.
Mission #1 – Mayan Ruins: There are 3 Sequences we need to complete by earning Points through killing our Target.
Ability #1 – Disguise: We will begin the game with this Ability; use it at least once during any Mission.
Ability #2 – Money Bomb: We will begin the game with this Ability; use it at least once during any Mission.
Game Mode #1 – Wolfpack: Complete any Mission of Wolfpack to count it towards our completed Game Modes.
Game Mode #2 – Discovery Mode: Complete any Mission of Wolfpack Discovery Mode to count it towards our completed Game Modes.

Achievement #52 – Personal Bag of Tricks: Finish a game session with an Ability Set that you customized in Multiplayer.
Even though we only have two Abilities unlocked currently all we need to do to earn this Achievement is swap their Slots to count as a new Ability Set. Simply swap the Slots Money Bomb & Disguise are in & we will unlock this Achievement after beating a Mission.
Mission #2 – Sad Memories: There are 4 Sequences we need to complete by earning Points through killing our Target; there is a timer on this Mission.
Mission #3 – Big Fish: There are 5 Sequences we need to complete by earning Points through killing our Target; there is a timer on this Mission.
Mission #4 – No Time For Rest: There are 6 Sequences we need to complete by earning Points through killing our Target; there is a timer on this Mission.
Mission #5 – Sound of Mind: There are 8 Sequences we need to complete by earning Points through killing our Target; there is a timer on this Mission.
Mission #6 – Tomb Looter: There are 10 Sequences we need to complete by earning Points through killing our Target; there is a timer on this Mission. We will also be introduced to Chest Defence.
Ranged Weapon #1 – Disruption: Rank 4 190 Credits. When we reach Rank 4, we will be able to purchase the Disruption Ranged Weapon for 190 Credits; ignore the EC… that is real money.
Mission #7 – Right to Kill: There are 10 Sequences we need to complete by earning Points through killing our Target; there is a timer on this Mission.
Mission #8 – Jailbreak: There are 15 Sequences we need to complete by earning Points through killing our Target; there is a timer on this Mission.

Achievement #53 – Master of the Caribbean: Complete the Discovery Mode of Wolfpack in Multiplayer.
Complete all 8 Missions of the Wolfpack Discovery Mode
Ability #3 – Time Phase: Rank 6 190 Credits. When we reach Rank 6, we can purchase these next two Abilities for 190 Credits; equip & use them in a Mission.
Ability #4 – Decoy: Rank 6 190 Credits.
Note that some Abilities such as Bodyguard & Booby Trap can only be used against other Players & using them against Targets or AI enemies will not count.
Ability #5 – Morph: We will earn this Ability at Rank 12 & can purchase it for 390 Credits.
Ability #6 – Firecrackers: We will earn this Ability at Rank 12 & can purchase it for 390 Credits.
Ranged Weapon #2 – Knives: We will earn this Ranged Weapon at Rank 12 & can purchase it for 390 Credits.
Ability #7 – Tripwire Bomb: We will earn this Ability at Rank 18 & can purchase it for 390 Credits.
Ability #8 – Bodyguard: We will earn this Ability at Rank 18 & can purchase it for 390 Credits; must be used against Online Players to count.
Ability #9 – Booby Trap: We will earn this Ability at Rank 26 & can purchase it for 590 Credits; must be used against Online Players to count.
Ability #10 – Glimmer: We will earn this Ability at Rank 26 & can purchase it for 590 Credits.
Ranged Weapon #3 – Sabotage: We will earn this Ranged Weapon at Rank 28 & can purchase it for 390 Credits.

Achievement #53 – Pre-Emptive Strike: Playing as The Orchid, block 10 Abilities from opponents with Sabotage.
Now that we have the Sabotage Ranged Weapon we can begin working towards this Achievement; this is best done in Wolfpack. Play games as the Orchid & make sure you have Sabotage equipped. When you are detected by Strikers or enemies that are going to Stun you, quickly hit them with Sabotage to block the Stun Ability.
Do this 10 times as the Orchid to unlock this Achievement; it does not need to be in the same game.
The best place is during Defence sections & using it on the Thieves before they turn Invisible; if they use the Ability before you Sabotage them, it won’t work. Brutes during Infection also work as they are hyper aggressive; alert them, & quickly use Sabotage before they use their Wipe Ability.
Ability #11 – Wipe: We will earn this Ability at Rank 34 & can purchase it for 790 Credits.
Ability #12 – Animus Shield: We will earn this Ability at Rank 34 & can purchase it for 790 Credits.
Ranged Weapon #4 – Pistol: We will earn this Ranged Weapon at Rank 38 & can purchase it for 790 Credits.

Achievement #54 – From Queen Anne’s Revenge: Playing as Blackbeard, perform an acrobatic kill & a Pistol kill in less than 10s.
Note we have the Pistol unlocked, we can earn this Achievement; this is best done during Wolfpack. Wait until you reach a Defence section where the enemies will keep spawning; ideally the Chests spawn close together. When an enemy gets near you, perform your Acrobatic Kill then immediately rush for a second enemy to kill with the Pistol. If done in under 10s, we will unlock the Achievement.
To perform an Acrobatic Kill, you must be hanging off a ledge or crouching up high on something (by crouching, you’re on a small structure like a pole & cannot move around on it), & kill your Target like that. Hanging above Chests is the easiest if they spawn underneath or near something.
Ability #13 – Teleport: We will earn this Ability at Rank 42 & can purchase it for 990 Credits.
Ability #14 – Poison: We will earn this Ability at Rank 42 & can purchase it for 990 Credits.
Ability #15 – Smoke Bomb: We will earn this Ability at Rank 48 & can purchase it for 990 Credits.
Ranged Weapon #5 – Poison Dart: We will earn this Ranged Weapon at Rank 48 & can purchase it for 990 Credits.
Sequence 20: Multiplayer (Online)
1. Game Modes: Man Hunt, Artifact Assault, Domination, Assassinate, Wanted, Deathmatch, Wolf Pack
- Approximate Level: 55/55
- Achievements: 60/60
-----------------------------------------------------------------------------------------------------
With all Abilities & Ranged Weapons unlocked, you can push on to farm the remaining Ranks to reach Rank 55. Before we do this (unless this is as far as you plan to go in Multiplayer) we may as well try earning the other Online Achievements as we will be earning Xp along the way & can save ourselves grinding time.
If you need to link up with other Players, try using this guides Comments section or the Community Tab I made in my Steam Group; see the Conclusion below. I personally have not unlocked these Achievements myself so these descriptions are a bit plain; as I chip away at them, I will add more information regarding the Game Modes,
Game Mode #3 – Manhunt: Go into the Custom Match settings now, & we can play these next few Game Modes in Private Matchmaking. However we are unable to do so in Solo; there is a mandatory number of Players that will need to be in the session, even for Private Matchmaking.
For Public games, you will always need 4 people.
Man Hunt needs a minimum of 2 Players in the session (including yourself).
Game Mode #4 – Artifact Assault: Needs a minimum of 2 Players in the game session.
Game Mode #5 – Domination: Needs a minimum of 2 Players in the game session.

Achievement #54 – Sacred Land: Playing as The Jaguar, be the highest scoring Player of a Domination game session.
While we play this Game Mode, be sure to select the Jaguar Character & have your Friend deliberately lose the game. Accrue as high a score as you can, & when you win, you should unlock this Achievement.
Game Mode #6 – Assassinate: Needs a minimum of 2 Players in the game session.
Game Mode #7 – Wanted: Needs a minimum of 3 Players in the game session.
Game Mode #8 – Deathmatch: Needs a minimum of 3 Players in the game session.

Achievement #57 – All Rounder: Play on every Game Mode, & use every Ability & Ranged Weapon once in Multiplayer.
Play a game on all 8 different Game Modes (we do not have to win the match) & use all 15 Abilities & 5 Ranged Weapons at least once to earn this Achievement.
There is no way to track if you have used an Ability before or not. If you have not kept it in mind as we played, you may have to backtrack through & reuse them to unlock this Achievement.

Achievement #58 – Lab Technician: Play & complete a game session of Game Lab in the Multiplayer Public Playlist.
For this Achievement we need to participate in a Public Playlist on any Game Mode; we do not have to win the Match. Note that Public Playlists are random Matchmaking with other Online Players & you need at least 4 Players to begin a session.
With how dead the Multiplayer is, if you can coordinate a game with 4 other Players the odds of you all joining the same session is very likely.

Achievement #59 – Elevator to the Gallows: Kill a Player using a lift that has been trapped with Booby Trap.
Unfortunately, though the Achievement does not say so, we cannot earn this Achievement with a Friend in a Private Match. This must be done in a Public Match, though as stated above, you can probably still coordinate one if you have 4 people.
To earn this Achievement we need to have the Booby Trap Ability equipped. Locate any Pulley Lift, Booby Trap it, then have another Player try to use it; they will be killed & you will unlock the Achievement. If you are playing with random people, you can stand at the top of the Pulley Lift to bait them to use it, but this is much harder to do naturally…

Achievement #60 – Committed to the Cause: Reach Level 55 in Multiplayer.
With all other Achievements out of the way, all we have left is the final grind; ideally you Ranked up a bit more in the process. Solo Wolfpack (or with friends) is still the most reliable way to earn Xp. Especially if you have multiple Players in the session, you can go for quite a long time in the harder Wolfpack Difficulties & earn a substantial amount of Xp.
If you are completing the Difficult Tier Wolfpack Maps, you can run them in about 20 minutes & earn roughly 55,000 - 58,000 Points which translates to a Level per run.
Getting to Rank 55 will require 526,000 Xp.
Conclusion:
Apart from Assassin’s Creed – Brotherhood, Black Flag is my favourite game in the series. Though you may not really be an Assassin, being a pirate is just as good, if not even more fun. I think the really nailed the feel of piloted the Jackdaw, & exploration or combat never felt like a chore.
All in all, if you ignore the Online Multiplayer, this is a pretty easy 100%. On the topic of Multiplayer, though extremely grindy, the bulk of the Achievements can be earned in Solo play. On that note…
In theory, because no one plays Online, if you did get 4 people (including you, so technically 3 people) if you enter a Game Mode / session at the same time, the odds of you all matching up would be almost guaranteed.
All you need to do Online is:
- Complete a round of the: Artifact Assault, Assassinate, Deathmatch, Domination, Man Hunt, & Wanted
- Play a round of Game Lab
- Playing as the Jaguar, earn the most points in the team
- Kill a Player using a Pulley Lift after using the Booby Trap Ability on it
Feel free to ask for or offer assistance down below. All I ask is that if you no longer need help or no longer wish to give it, delete your comment so that people do not try to contact you in vain. I also have a dedicated Community Tab in my Steam Group as well for linking up with other Players; it is easiest using it as your Comment could get buried in this guide’s Comments Section.
https://steamcommunity.com/groups/cynicalguides/discussions/0/803469937487177506/
If this guide helped you achieve 100%, rate the guide or let me know in the comments. Helps me know if I am doing things right!

100% Complete
Thank you for choosing Cynic, & I will see you in the next one!
If you are interested in a little bit of patronage, support my projects & consider buying me a coffee. If not, no worries; my guides are, & will always be free content. Achievement Hunting is my passion, & writing these guides is a way for me to give meaning to a life long hobby!
https://www.buymeacoffee.com/cynic0055
https://steamcommunity.com/sharedfiles/filedetails/?id=3411505049
https://steamcommunity.com/sharedfiles/filedetails/?id=3469240607
https://steamcommunity.com/sharedfiles/filedetails/?id=3469374668
Check out my profile for a full list of my works.
https://steamcommunity.com/sharedfiles/filedetails/?id=2992727030
Beat Assassin's Creed IV Black Flag's 100% run?
Flex it — let your friends know you pulled it off.
- How to remove stutter and lag from the game + Fix for the Vsync bug★ 5 (277)23k views568 ♥5 minUpdated Jan 31
- Multiplayer achievements with Cheat Engine★ 4 (152)13k views369 ♥3 minUpdated May 19, 2023
- Все достижения в Assassin's Creed IV: Black Flag (Uplay)★ 5 (245)12k views637 ♥13 minRussian
- AC4 story or multiplayer crashes on startup or loading and freezes fix★ 4 (91)10k views114 ♥1 minUpdated Dec 10, 2024
- Величие Эдварда Кенуэя★ 5 (511)9.4k views336 ♥16 minRussianUpdated Feb 4, 2021
- ⭐Снятие ограничения 60 FPS Assassin's Creed IV Black Flag⭐★ 4 (45)8.2k views70 ♥1 minRussian


- Upgrading to PremiumTeam Fortress 2★ 5 (20k)1441k views11k ♥6 minUpdated May 11, 2022
- No More Room in Hell Official ManualNo More Room in Hell★ 5 (2.8k)569k views2.1k ♥29 minUpdated Apr 22, 2019
- NMRiH Community Hosting GuidesNo More Room in Hell★ 5 (526)351k views653 ♥1 minUpdated Aug 10, 2022
- ULTIMATE GUIDE FOR GAME DEV TYCOONGame Dev Tycoon★ 5 (5.8k)326k views10k ♥4 minUpdated 23 Jan, 2014
- How to 'Git Gud' Soon™MORDHAU★ 5 (2k)318k views3k ♥68 minUpdated Nov 16, 2024
- Лучшие кооперативные игры SteamPAYDAY 2★ 5 (1.5k)315k views2.1k ♥56 minRussianUpdated Apr 27, 2025






This guide was created by its original author on the Steam Community. Are you the author and want it removed? Request removal.