Amnesia Custom Story Tips for Minimal Scriptings
Introduction
First and foremost. A few things I gotta point out after I began creating my first Amnesia Custom Story (Love is Love: Sunrise). I began to notice a lot of interesting - I wouldn't really say inconsistencies, but rather for the lack of a better word, illusions - that were in the stock Amnesia game. A lot of these have to do with either monsters or sanity. I have noted them down as follows:
- Laboratory - in the Laboratory map, there is a grating under which is supposed to be a Kaernk (invisible water monster; aka Water Lurker) according to the game story. But if you open it in the map editor, you'll find that that is all scripted; the sphere that represents a Kaernk isn't there at all, and only a few sounds are played when the player walks past that grating and looks down. The script also cuts the player's sanity. So there really isn't a Kaernk there.
- Well in the Nave - again, there is supposed to be a Kaernk there according to the story, where you drop down the meat supposedly for it to eat and turn into a bone. But if you fall down, you'll find that you just die in the darkness. In the map editor again there is no Kaernk sphere, only sounds played and a script added.
- Gatherers - interestingly, all the maps that they appear in only spawn them when the player goes past certain (script) areas or picks up certain items or completes certain tasks. Reason? Too much scripting. Were not the monsters supposed to be there all along? The most obvious example is in the Storage, where there is a Servant Grunt behind one of the doors. After the player gets all three rods, that door is scripted to be opened, that Servant Grunt despawns, and another spawns OUTSIDE that door and patrols the entire area. Not long after that Grunt despawns, another one respawns outside the steps just as the player is about to go up. But according to game lore, was not all of those three Servant Grunts supposed to be the same one?
- Spawning/despawning - I'm not sure if the developers intended the monsters to despawn at path's end for increased playability, but for me I think this spawning/despawning thing is kind of not really necessary. A map can be playable even if the monsters do not despawn, depending on how you make it. This has been proven in the Justine addon pack, most clearly in the case of the Suitor Basile, who does not despawn. My point: Make a good map with monsters in the right place, from the get-go, WITHOUT DESPAWNING, and it can and often will be still playable.
This guide is NOT to teach you how to create a custom story - because I assume all of you already know that. This guide is meant to give some tips on how to make a playable ATDD custom story with as little scripting as possible, with the same monsters still very much present even after you die and respawn.
Also, make as much use as you can of Sanity Potions, Large Oil Potions, and Thalers. They are in the level editor for a very good reason.
I will explain more in the coming few chapters of this guide.
This guide is dedicated to the memory of my friend and gaming teacher Huascar Leon (1996-2020), known on Steam as "stewardbrony" (with a d), who sadly did not make it past the height of the covid pandemic. Requiescat in pace, amigo mio.
Creating monsters that will be there from the get-go and NEVER despawn
No, it's actually easier than you think. First and foremost, here is the basic scripting you will need. (Yes, scripting is unavoidable, but overscripting IS avoidable.)
Firstly, do not use the monster entities in the game (servant_grunt and servant_brute), they are programmed to despawn at path's end. What you'll need to do is create alternative entries with the exact same content, and program them such that they will NEVER despawn.
These will basically be almost the same as the original servant_grunt and servant_brute entities, with the sole difference being this line in their .ent files. In the originals, this would look something like:
<Var Name="AutoRemoveAtPathEnd" Value="true" />
Change the "true" value to "false", now it should look something like this:
<Var Name="AutoRemoveAtPathEnd" Value="false" />
Then of course make sure you distinguish them from the stock by setting them as separate entities, copying and pasting where you need. For me I have called mine alt_grunt and alt_brute respectively. Now your monsters should never despawn.
Then you create your map. I don't care how you wanna make your map look like in the editor, but in your map's corresponding HPS file, you should have three main variables which I assume you already know: void OnStart(), void OnEnter(), and void OnLeave(). We will be discussing a lot about the middle one here.
Under void OnEnter(), make sure you have something like this:
void OnEnter()
{
SetEntityActive("alt_grunt_1", true);
SetDeathHint("Messages", "death1");
CheckPoint("", "PlayerStartArea_1", "MonsterRespawn", "Messages", "death1");
}
The "MonsterRespawn" is an important variable here, it is a script that is triggered to make sure that the monster will ALWAYS respawn whenever you die. Here's how it is run:
void MonsterRespawn(string &in asEntity, int alCount)
{
SetEntityActive("alt_grunt_1", true);
}
Now everytime you die, the Grunt will respawn at the same place the very minute YOU respawn. And he will be there from the get go and will never despawn. This is important because in the original stock game, the devs wanted the monsters to not respawn everytime the player died, so we are fixing that here.
As for the Death Hint that I put above, this is whatever you want to say when the player dies. This will be in the "extra_english" file located in your custom story's main folder, under the "Messages" section (I'll assume you know how to find it from here). In my case above, I have given it the name "death1". You can make it say whatever you like - in my case, see the screenshot here.

In the next chapter, I'll talk about how to make a playable map with monsters that never despawn.
Making a playable map with non-despawning monsters
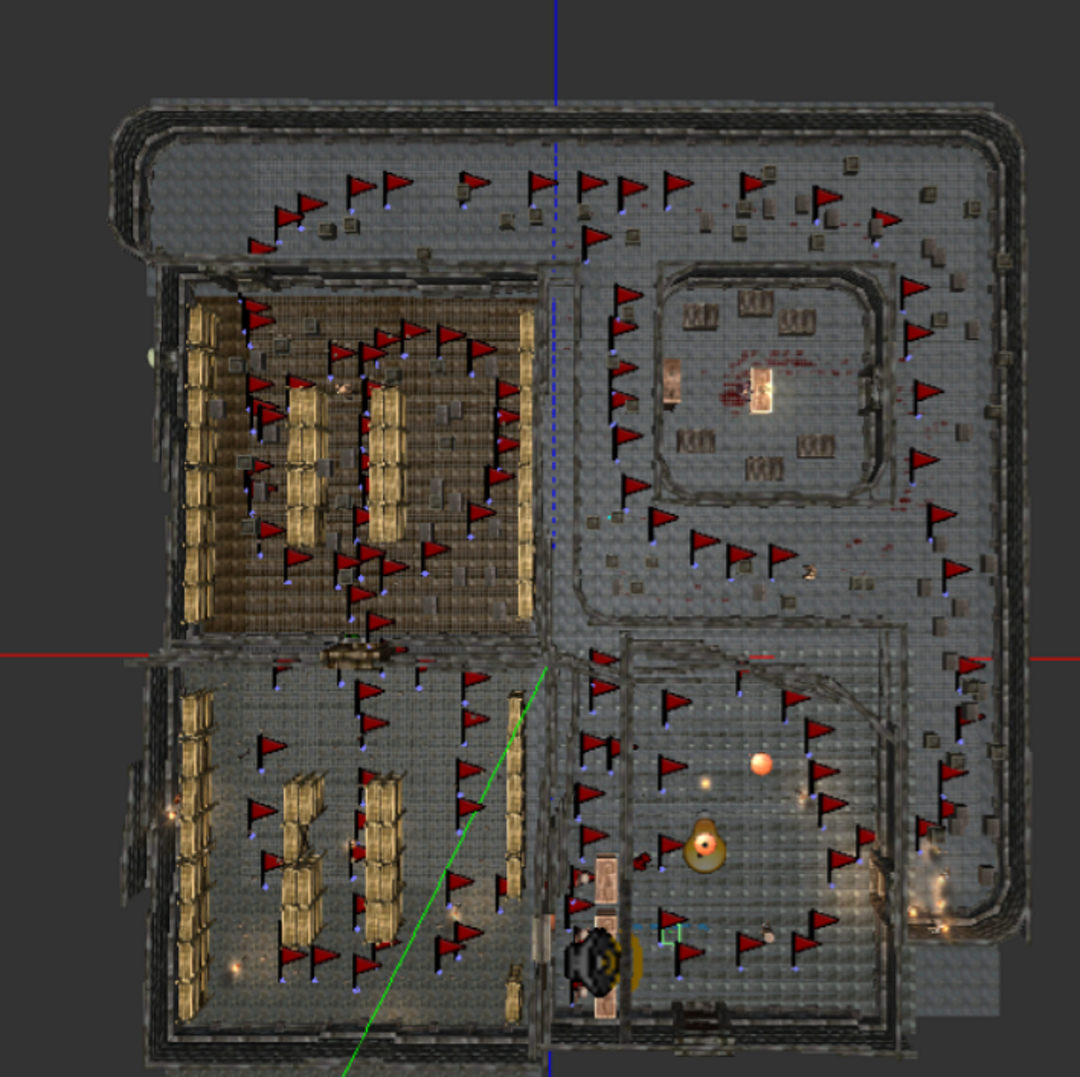
For this chapter, we'll use this map of a pawnshop which I made for an upcoming mod.
This map contains two Servant Grunts (herein given the entity names alt_grunt_1 and alt_grunt_2) and several patrol nodes, as can be seen. In the HPS file, I have assigned these monsters to patrol specific routes with pathnodes. The first grunt patrols the top right square, clockwise surrounding that square room in the top right corner, while the second patrols the upper of the two rooms in the bottom left in an anticlockwise direction. The player starts in the bottom of the map. The objective is to get the Pot of Acid at the bottom of the map, otherwise inaccessible to the player because it is inside a desk behind some grilles. While this map is certainly difficult, not least because of the non-despawning grunts, it is definitely playable nonetheless, and I know cos I have tried it out several times. Here's what you will do in this situation.
First, go into the door on the right. Do NOT turn on your lantern, whatever you do. Monsters LOVE light and they will run to you if they can see you. Try to crouch as you go up this hallway. Hug the left wall. At the first left turning, turn left, and then follow the path to the right. If you see the Servant Grunt in front of you, keep your distance, crouch if you can, and follow him discreetly. Wait till he disappears around the corner to the right, which he will, then slowly turn left in the opposite direction from the Grunt, all the way to the end. He should not notice you. Remember - these monsters are no danger unless you deliberately run towards them!
You should now be at the top left of the map as seen in the picture. There is a door. Be careful when you open it, a Servant Grunt will be in this room patrolling, there is a chance he might be near the door. If you see him, duck out of sight and peek around until you can see his back turned towards you (taking sanity potions at this time will be of help; when your sanity is high enough you can see monsters more clearly due to their glow), and slowly follow him, crouching down. This room is full of shelves. Pick up the thalers on the floor slowly as you go, but don't get greedy or the Servant Grunt might notice you. Make your way to the door at the end of this room, slowly push it open, run in and close the door. Stand up.
This room is now the room at the bottom left of the map in the picture. This is a safe room, but don't risk the Servant Grunt in the previous room breaking down the door. Pick up all the thaler bags in this room if you like, and then go into the door on the other side.
You should now be in the thin room at the bottom of the map, on the other side of the grilles, opposite where you started. You couldn't have accessed this area otherwise. In this thin room, there are three desks. One of them has the Pot of Acid - you can't miss it. Pick it up. Head back out the way you came into the previous room.
When you get to the door leading to the room where the second Servant Grunt was. Slowly open the door, (you're crouching down, aren't you?) and check to see if he's there. Which he will be. When he comes around, duck out of sight and wait until you can see his back, and then slowly follow him from behind, picking up thalers as you go until the other end of the room, the previous door where you came in at the top left of the map. Be careful though, if you hear a growl when you get too close (even if the door is closed), it means he spotted you! Run back to the grilles room and wait a minute or two until you're sure he's gone, then head back out. He should have broken down the door in this case, so make sure you don't get too near the door frame. Duck out of sight (make sure you're crouching) and watch as he passes you and turns his back on you, then follow him discreetly as above, to the door at the top left of the map and go through the door. Close the door!
Now, don't care, run as fast as you can to the other side. You will pass through the area at the top right where the first Servant Grunt is still patrolling. Run to the end (the top right corner of the map), turn right and head down the hallway, if you see him (his back should be turned towards you and he should be heading to the right), crouch and follow him carefully (remember - a little noise can set him off!) and wait till he's turned the corner, then run down the hallway and through that door you originally came through, and slam it shut. Then head out of the level door to exit.
There you go, an example of a playable level with monsters that do not despawn! What can we take away from here?
- Never make a situation on a map where the player has to face a monster head-on. In the above example, while the player does have to face the monsters, the monsters' backs are turned to the player, which the player can then use to their advantage. This way, the monsters can be on the map till hell freezes over, but as long as the player plays correctly, they can avoid the monsters and get through the level. (I have no idea how the devs didn't notice this until the Justine expansion pack!) Interestingly, this works more easily for Grunts than for Brutes. If you are using Servant Brutes in your map, ensure that your player keeps a wider distance, because Brutes can easily outrun the player.
- Always ensure sufficient distance between the player and the monster. This can mean physical distance yes, but also can mean to ensure that the player has a safe way out of trouble should a monster spot the player. In the above example we have, the room with grilles is a good place to hide to throw off the Grunt from two rooms before. The fact that this map is very dark also helps - darkness can act as a cover.
Making luft
Whenever you encounter monsters, your sanity will drain. This happens even without scripting. In many cases too, you are bound to get physically hit by a monster, or a fall, or whatever; and you will surely lose lantern fuel at some point in time, that's indisputable. This is why it is important to do what I call "making luft" for the player character.
"Luft" is a German word meaning air. This means to give the player a bit of breathing space at specific levels. These "luft levels", as I call them, are meant for the player to catch their breath, usually after a particularly difficult level. Monsters should never spawn on luft levels (unless you want to create a Kaernk-containing well - which I'll explain in the next chapter). There should be as many laudanums, sanity potions, large oil potions, and tinderboxes for the player to collect to prepare for their next difficult encounter. For the record, the devs did actually take this en bord (their luft levels include the Back Hall, the Entrance To Cistern, the Nave, and - in the case of Justine - the Crypt), if not to the extent that we as fans would have expected. This chapter will cover the parts that the developers missed.
I don't know if it was intentionally or accidentally overlooked, but first I will start by saying that I cannot stress enough the importance of sanity potions. Bearing in mind that when your sanity is high enough, you will be able to see the "glow" that surrounds Grunts and Brutes, making it easier - if nonetheless patience-consuming - to follow them as they patrol so that you can get around them to your destination. As you observe them, your sanity will drain; you know how it is. So you'll need to keep taking sanity potions so that you can still see that "glow" around the gatherers you're tailing. Always put some sanity potions in your custom stories, and especially on any luft levels you create - you'll need them when the time comes. The devs for some reason didn't do this - you won't find any sanity potions in the stock ATDD or in the Justine Pack. I'm very thankful that many fans picked up on this and have used the sanity potions in their custom stories.
There are two kinds of oil potions: the small and the large. The small refills only about 25% of your oil meter, the large 50%. The devs have used the small oil potions, but they have failed to use the large ones - again, the real reasons why have never been publicly disclosed. Just like their small counterparts, large oil potions are very helpful, especially if the player is going to have to go through extended dark or foggy areas.
A note about hard mode: if you are playing in hard mode, like any other items, sanity potions and large oil potions will be less common. So it still works the same. I don't understand how or why the developers chose to not include them. But luckily, the fan base is still going strong and there are many custom stories out there which make use of them, so a special shoutout to all the fellow custom story creators out there.
Monster environments
What makes for a good environment for which monster? Correct answer: Any environment - as long as the level designer can put the monsters in such a way that there is a way for the player to work around the monsters to achieve the level's desired aim.
Two chapters ago, we explored an example map which is designed to be difficult but playable with regard to the positioning of the monsters and their respective patrol nodes. In this chapter, we will look at some possibilities you could use to make the most out of monsters and their respective behaviors. Let's start with something pretty obvious:
Watery areas
Yes, the only areas in any Amnesia game, stock or custom alike, where Kaernks are found. Grunts and Brutes also work well in watery areas; the water doesn't deter them (though from the player's POV you might be able to hear them if they are approaching).
Remember that Kaernks will work only in areas which are designated as "Liquid" as specified in the Level Editor (if you put down a Kaernk outside of a "Liquid" area, the map might crash!). When creating any Liquid area for a Kaernk, you will of course need to have some "stepping stones" for your player's character to hop on to avoid being nommed by the Kaernk (but you already knew that). But what you may also wanna do, is to make such an area as quick as possible for the player to get through, with no puzzles except just a run from the monsters. This is especially true if you're gonna combine Kaernks with Grunts and/or Brutes. If you're using Brutes, give your player lots of safe areas to run and hide in, and ensure they got enough sanity potions!
You can choose to make an area fully watery such as the Cellar Archives in the stock ATDD, or you can make it a part of an area, such as the map I am about to share now.
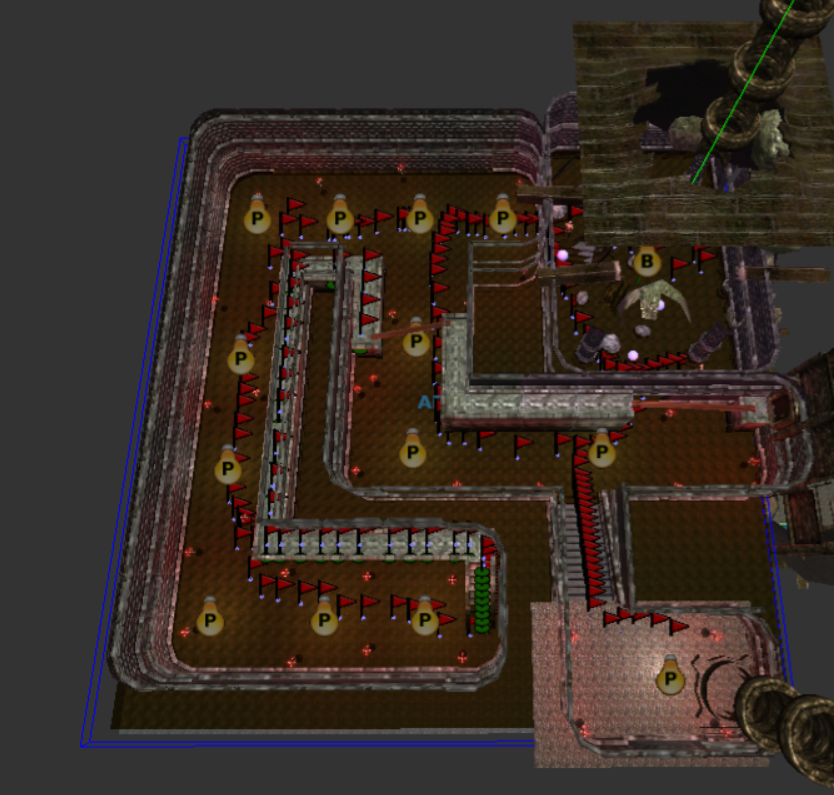
Here^^ is a map from one of my workshop mods, Love is Love: Sunburn (which I believe is still on the workshop; you may sub to it if you like). This is actually the second part of the map, where there is a liquid area which the player has to enter to get to the other side. In this part, there are at least three Kaernks and two Grunts, all in the same area (top right square - supposed to be the bottom of a lavatory!).
Again, this map is difficult, but it is playable. When the player enters the water, the Kaernks will chase straightaway, and depending on whether or not the Grunts see you (due to their patrol nodes), you might hear the Terror Meter blaring over the Kaernk's theme music. The chase is very straightforward: run left, right, left, left, left again, till you see a flight of steps leading up to a pavement you can't otherwise access. (This is at the bottom of the map btw.) Run up those steps, you're safe from the Kaernks, but the Grunts might chase you (patrol nodes are there too as you can see), so at the top of the steps, run left, right, right again, then you'll see a wooden board leading upwards to a much higher pavement. Carefully crouch and go up that board. You're safe from the Kaernks AND the Grunts now! Taunt them as much as you like before you make your way to the exit - there's another board that you'll have to cross over, so make sure you don't fall down or else you'll be back at the start of the liquid area.
You can make watery areas where the player is not supposed to go to also. These can be accessible or inaccessible. We've seen two examples of no-go Kaernk areas in stock ATDD: the Laboratory (inaccessible) and the Nave (accessible). However, as mentioned in the intro to this guide, both are only scripted areas; the Kaernks are not actually there. Here, we are going to show you how to make ACTUAL no-go liquid areas with ACTUAL Kaernks.
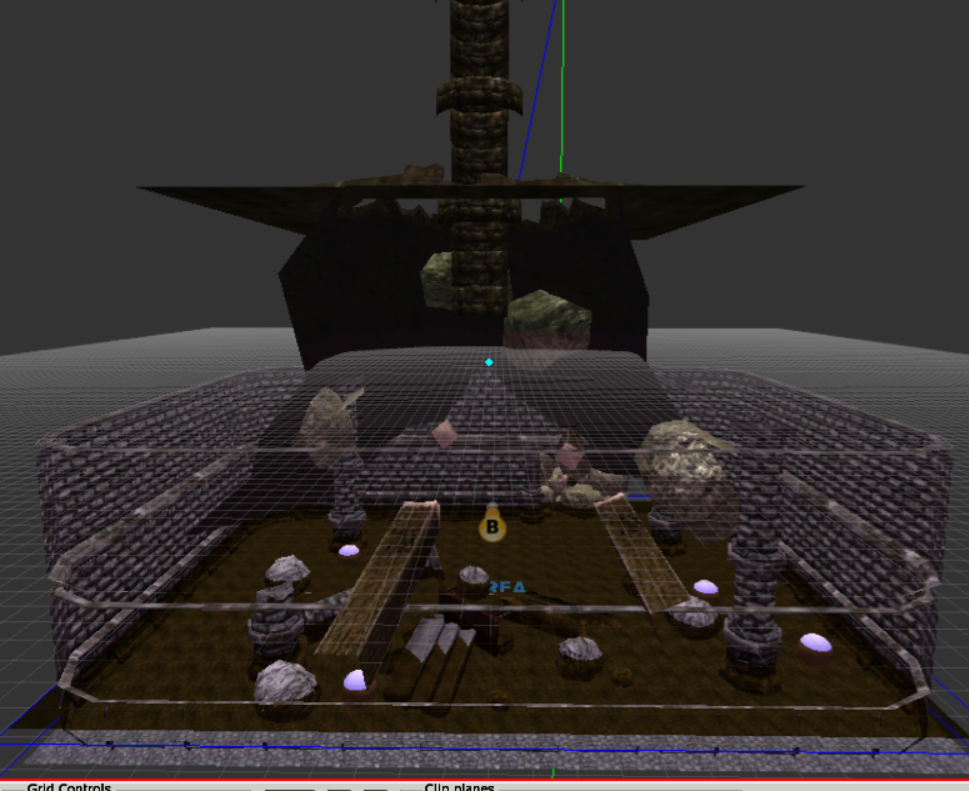
Here^^ is a common no-go area I use in a lot of maps I make in all of my workshop custom stories. This is supposed to be the bottom of a lavatory. The lavatory itself is just a hole in the ground in the map; the player must take care not to fall into that hole, or they will end up in that no-go area you see in the picture above. The player will of course take damage on impact; and the four Kaernks will finish the player off in no time. This, in my opinion at least, is far better than just a scripted area where you fall into total darkness, hear the Kaernk's theme music, and die.
Large open spaces
Both Grunts and Brutes work well in these spaces. Of course, it is important to make sure that their patrol nodes are programmed in such a way that the player can get around them without being noticed. (Bearing in mind once again that the monsters we're using in this guide are NOT going to despawn!) Stock ATDD doesn't have very many large open spaces apart from the Choir and Chancel, both late in the game.
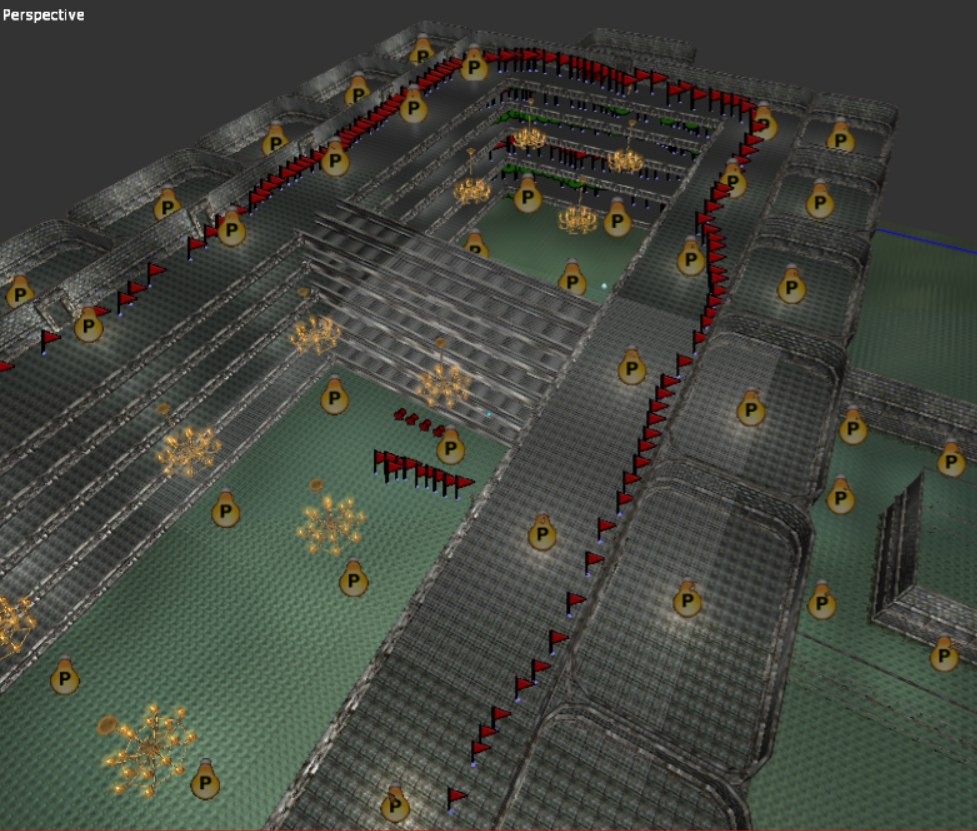
I like to create "abandoned shopping mall" maps because they make for very good areas where the player can hide from monsters when absolutely necessary in order to throw them off the search. The screenshot above^^ is again from Love is Love: Sunburn, and is a map of a mall where the player has to carefully tread around each storey to get down to the lowermost storey where the exit will be (but which is apparently flooded). In every storey, there is a monster patrolling in a clockwise direction. The player has to follow the monster from behind on each storey discreetly in order to get to the next staircase, without being tempted to turn on the lantern. At the bottom, it's a big death-run from a Brute, a Grunt, and two Kaernks to the exit.
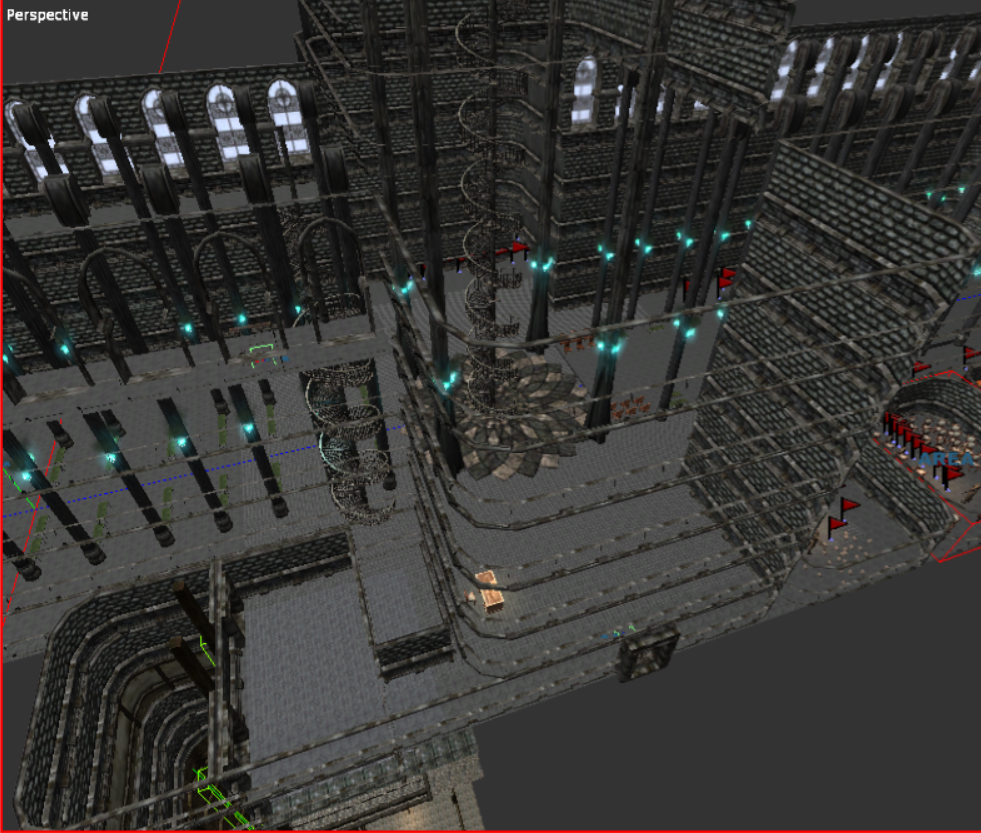
Churches and cathedrals also make for very good wide open spaces for Grunts and Brutes to patrol; their pillars also make for very good hiding places for the player. Stock ATDD doesn't really make very much use of these in their maps.
In the picture above^^ is a screenshot from an upcoming mod I am working on. This was especially difficult for me to work on - as always, bearing in mind that the player has to always have a successful way around the monsters, and that the monsters must NEVER despawn. So the player has to start from a high-altitude "safe" area where there are no monsters, make their way down the spiral stairs, carefully walk towards the long spiral stairs in the center of the map to go up and grab a key from the room at the top, then come down and head to the ladders (at the bottom of the screenshot) and go down to access the crypt. The monsters in this map (2 Grunts and 5 Brutes) patrol only the areas to the right, which are not in the player's way and therefore should make it harder for them to spot the player, especially in darkness. They may, however, occasionally spot the player as they (the player) are descending the middle spiral stairs, in which case the player might have to jump off the stairs and dart to the ladders (taking damage in the process), but it is of course the lesser of two evils in here.
Close quarters
Oh yes, Grunts and Brutes work very well in close quarters too! However, you will need to be a bit more careful where you position them and their patrol nodes if you're doing close quarters, as it will be harder for the player to run and hide in such an event. We have already seen a good example of this in the example map I shared two chapters ago to illustrate monster positioning (the Pawnshop map).
- Idiotic Monsters and You: A Guide for Outwitting the Grunts and Brutes★ 5 (586)24k views504 ♥18 minUpdated Nov 16, 2017
- Insanity Incarnate: 100% Achievement Guide (Does Not Include Masochist Achievement)★ 5 (1k)23k views1k ♥14 minUpdated Mar 29, 2020
- A Simple guide to Amnesia★ 5 (361)23k views365 ♥7 minUpdated Mar 25, 2013
- Достижения Amnesia: The Dark Descent★ 5 (811)19k views867 ♥3 minRussianUpdated Oct 12, 2018
- Dark Descent + Justine: Collectibles locations maps★ 5 (832)16k views1k ♥1 minBulgarianUpdated Dec 29, 2016
- 100% Achievement Guide [Amnesia: The Dark Descent] 💯✅★ 5 (453)15k views928 ♥40 minUpdated Feb 18, 2025



- Upgrading to PremiumTeam Fortress 2★ 5 (20k)1441k views11k ♥6 minUpdated May 11, 2022
- No More Room in Hell Official ManualNo More Room in Hell★ 5 (2.8k)569k views2.1k ♥29 minUpdated Apr 22, 2019
- NMRiH Community Hosting GuidesNo More Room in Hell★ 5 (526)351k views653 ♥1 minUpdated Aug 10, 2022
- ULTIMATE GUIDE FOR GAME DEV TYCOONGame Dev Tycoon★ 5 (5.8k)326k views10k ♥4 minUpdated 23 Jan, 2014
- How to 'Git Gud' Soon™MORDHAU★ 5 (2k)318k views3k ♥68 minUpdated Nov 16, 2024
- Лучшие кооперативные игры SteamPAYDAY 2★ 5 (1.5k)315k views2.1k ♥56 minRussianUpdated Apr 27, 2025






This guide was created by its original author on the Steam Community. Are you the author and want it removed? Request removal.