Basic Guide/First Time tips
First Tips
- Completing the letter/blacksmith quest gives you all the tools you need to start progressing. You can use the Simple iron parts to create you first Forge, but you'll need to buy a few more to create your Wooden anvil. Once you have both, you can create your own Iron nails and Simple iron parts
- There's more than one technology tree! Browse them and buy the first skills once you can
- Forget about getting blue skillpoints at first. You won't get them until you can access the Church
- After you access the Church, the donkey will demand Carrots. This is a blessing in disguise, because now you control when you can and can't receive bodies.
- Sellers have different Tiers which unlock once you have done enough business with them, either selling or buying. You can also use the prayer for prosperity which gives you an item you can sell to anyone with the sole purpose of increasing their trust.
- You can eat flowers for like 2 Energy. I did it to get inventory space when trying to get Moths.
- You can buy Carrot seeds (among others) from the Farmer south of the Wheat Mill. Lentils will require a Garden bed with sticks
- You can sell Carrots, Beats and Lettuce to the same farmer. Or you could cook them in your house.
- The Compost heap requires Crop Waste to create Peat (which is used as fertilizer). Crop Waste can be bought in town, but you'll get it from your own harvests.
- Grape seeds are sold by the Merchant and can only be planted in the Vineyard which is northwest of the entrance to Witch Hill
- Hop seeds are sold by the miller, but only until you reach Tier II. Hop seeds can be planted in the vineyard and are necessary to make beer.
- There's a teleport stone for sale in the tavern. It's a bit expensive for beginners, but you should get it once you can. It'll save you loads of time
- Your biggest enemy is inventory, don't be afraid of creating a couple more trunks. Just be mindful of its position/orientation
- When crafting, you don't need to have the elements on you, they can be in a trunk nearby. For example, you can create a Plank as long as you have Flitch on a trunk outside your house. The same applies for some tools like the grindstone and chisel.
- Once you unlock the Church, you can get blue points by writing, studying body parts or creating stone crosses and fences
- Grindstones can only be bought and they are quite expensive for beginners. So keep in mind that every time you sharpen your tools, you damage 5% of the grindstone regardless of how blunt the tool was (giving you 20 uses). So try to use it only if a tool is at about 30% damage. Once you can build your own tools, you won't need any more grindstones.
- If you want to build your own bee hives, collecting the 10 bees per hive via honey gathering is a very slow process. However, the beekeeper in the village sells bees.
- Sticks are a semi-limited resource: the dry bushes you dig up don't replenish. You do get a few with every tree you chop down, whether live tree (respawns) or dead (doesn't respawn). And you don't get them from zombies. You could buy them in the village from Tress (near the sawmill)
- Anything you don't want and can't sell or destroy can be left on the empty shelves in the dungeon. Which floor shelves are on depend on your game: my 1st run, they were on several floors including the 3rd. For my current run, I've been down 10 floors and only seen them on the 2nd. In any case, anything you leave there is erased once you leave the floor, so make very sure you don't need it any more and/or can easily replace it if need be.
Days
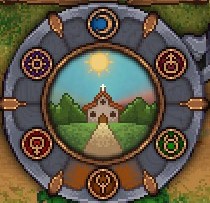


The symbol directly below the image is the current day. However the time is indicated by the fraction of the image currently on top. So if the image has the moon right in the middle, it's 00:00 (midnight). If the image has a black left half and a shiny right half, it's 06:00 and the image has the sun right in the middle, then it's 12:00 (midday). Shops and so usually open around 9:00, so making the trip around 7:00 will be best to not waste time waiting.
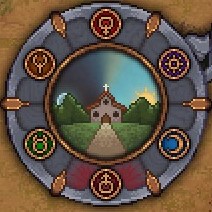 In this example the day is . And it's around 7:00
Locations
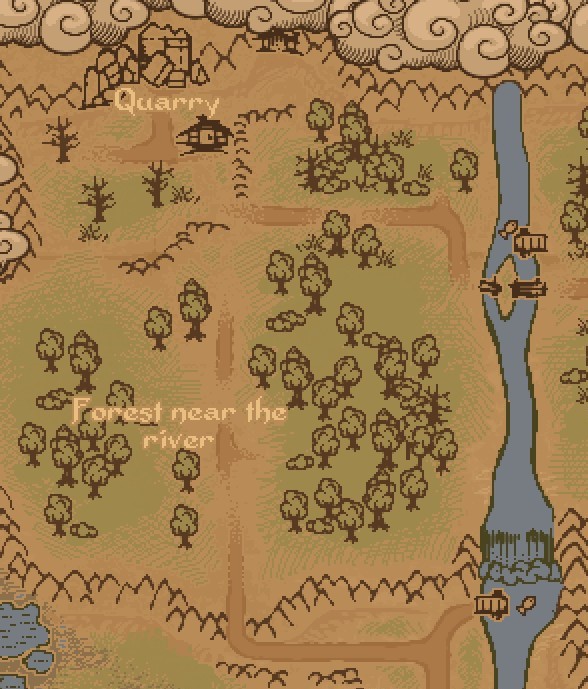
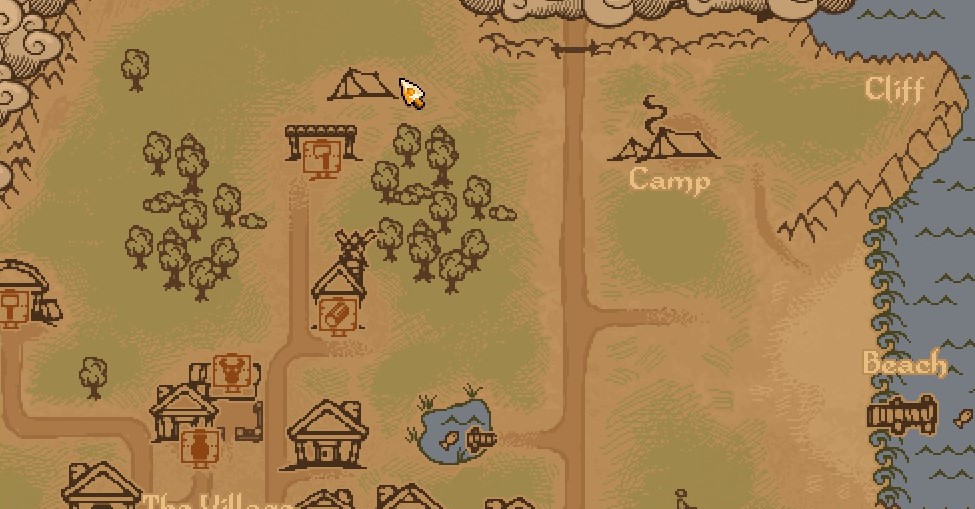
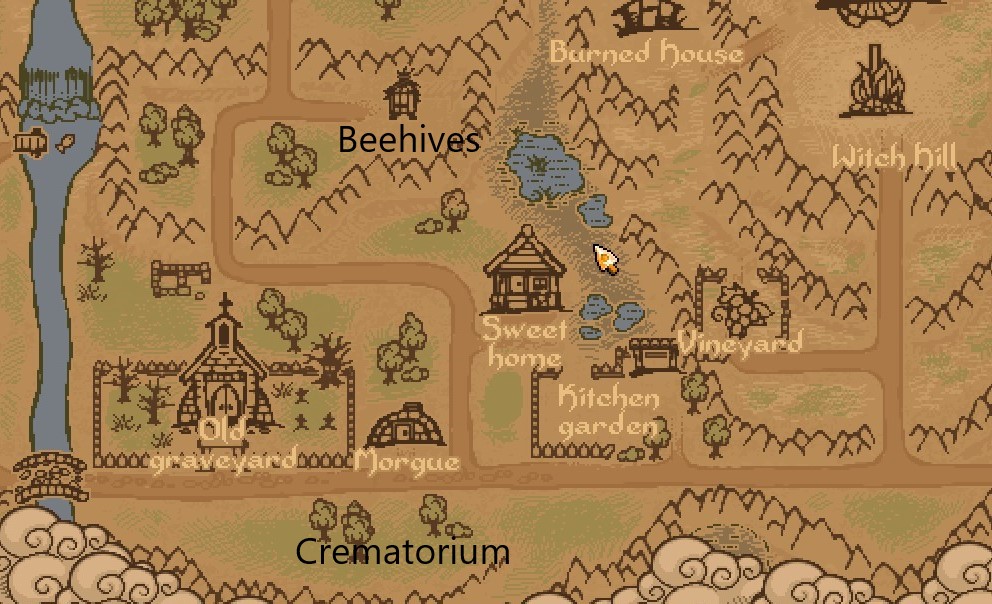
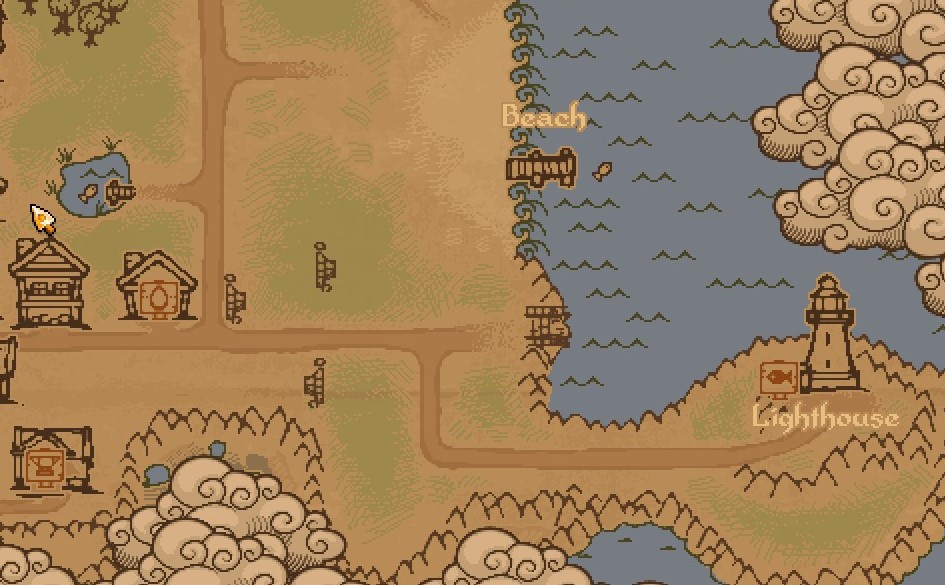
Lighthouse. It's in the southeast corner of the map.
Merchant's house. It's close to the tavern. Southwest of it.
Blacksmith's house. Southeast of the tavern.
Bridge. West of the Church.
Swamp. West of the Bridge. You'll have to build it.
Coal Vine. North-northeast of the Swamp.
Iron Vine. North-northwest of the Swamp.
Marble quarry. North-northwest of the Swamp.
Sand dig site. North of the Bridge, from either side.
Clay dig site. South of the Church.
Vineyard. East of your house.
Witch Hill. Northeast of the vineyard.
Mill. North of the wheat field, east of your house
Opening the church
- First unlock your technology to create Wooden crosses. You'll need a Sawhorse, a Chopping spot and a Carpenter's workbench. Now you create Wooden crosses and Wooden fences and place them on the graves without one to increase their grade. Also, create the Wood Repair Kits necessary to fix the ones already in place.
- Follow the basic corpse preparation and the basic corpse burial sections, and you'll get a 5 grade in no time
- Once the church is open, you can use the basic prayer to get faith. Faith is used to study items and get skillpoints. Study bodyparts or graveyard items to get blue skillpoints.
- The ammount of Faith you get by praying depends on the quality of the church. Increase it by making more Benches and Candelabres
- The ammount of money you get by praying depends on the cemetery grade
- You can eventually make Stone Crosses that increase your grade even more.
- You can also remove the existing crosses and fences to place better ones
Basic corpse preparation
- Always remove the Blood and the Fat. You need to unlock the skill
-Removing anything else is a gamble as far as I know See the "not so basic" part.
- At first your only income is corpse burial, so maybe bury every corpse for now. You can fix this later.
- Occasionally, removing a part will result in failure, and the destroyed part will remain in the body. If this happens you might consider removing everything and throwing the body into the River west of the Church(on the south side of the bridge). You'll eventually be able to cremate bodies, but this requires blue skill points. The Crematorium is south of the Morgue.
- If you do remove everything you'll get inventory problems, because the Brain, Heart and Intestines occupy a whole inventory square, and it takes a while for you to create a Shelf to put those on.
- The Skin can later by turned into Paper, so if you think your cemetery grade is good enough, try removing some
- The organs will range from -2 red to +3 red, and -1 white to +3 white. I've never seen an organ with only negative values, but +3 red +3 white organs definitely happen.
- Deep into the Inquisitor's quest line is a tech tree unlock that allows you to reach a perk to see red/white skull values.
- Before this, you can guesstimate fairly well if you pay very close attention to the values before & after you remove an organ.
- Surgical errors happen until you get both the perks to reduce errors for those part types and the 2nd level prep table.
- Conveniently, the 2nd level tables (embalming, too) also halt corpse decay.
Basic corpse burial
 , which depends on the skulls the body has. The more white skulls it has, the better possible grade. If a body only has red skulls, the best possible grade it can have is 0, so burying it will only be worth it if you need money (via a certificate). But once you can cremate bodies, you can get certificates this way without ruining your cemetery.
You can always buy an Exhumation permit, but it's more expensive than what you get for for a Burial Certificate, so only use it once yo have enough money and need to increase your cemetery grade.
The skulls by themselves get you no positive grade. For this you need a cross and a fence. Each type of cross and fence gets you a different grade, but it is capped to the white skulls, so there's no need to place a Stone Cross on a body with only 1 white skull.
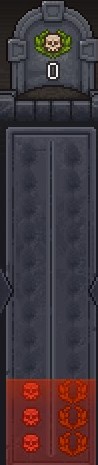
 , it turns it into a 0.
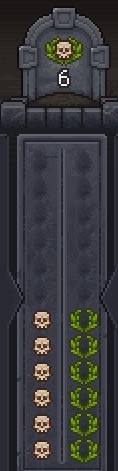 it gets a 6 .
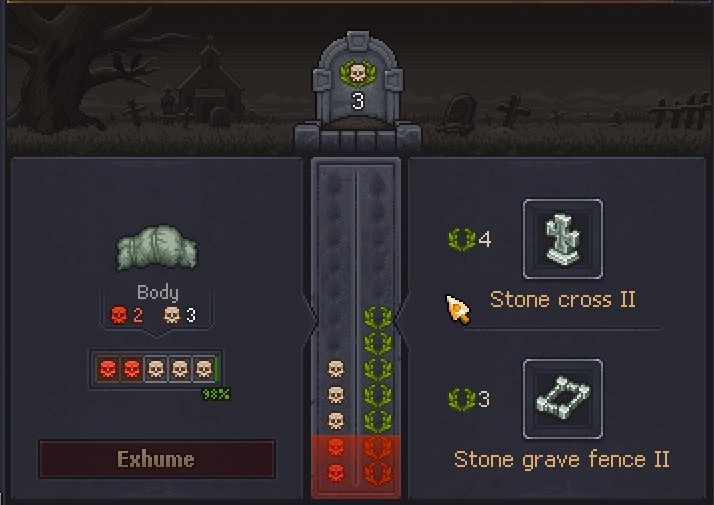 which don't help the grade get any better. 3 white skulls can only mean 3
- Game of Crone adds decorations that use up to 16, and Better Save Soul goes up to 26 to match the new white skull cap.
Some item's info


Quest Info
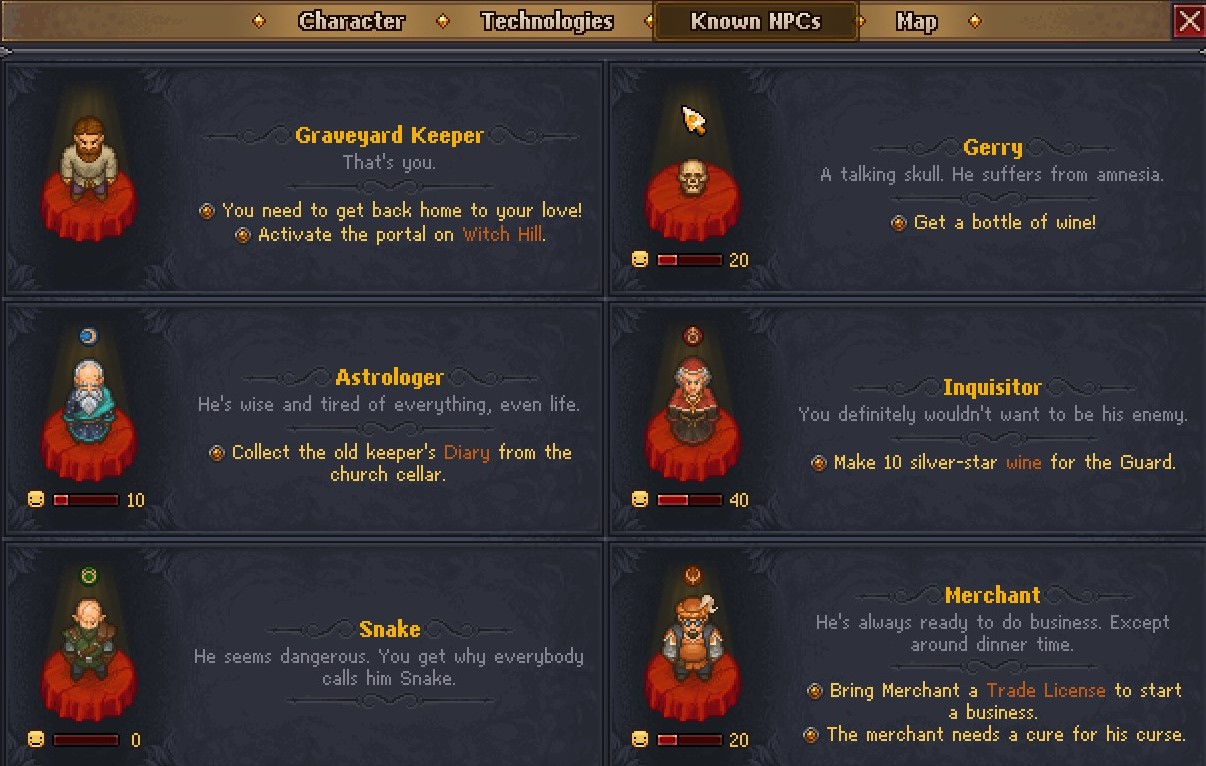
You can read the currently active quests in the Known People section. But it'll only tell you what you need to get, not how to get it. This enters spoiler territory, but the game is really vague so I wouldn't feel bad about reading it
- You don't need the poet to talk to Ms Charm, you just need 5 Faith (so unlock that church pronto)
- The poet however gives you Silver grade Notes for each Silver Grade Wine you bring him, which is great
- You can make Flyers on your Church cellar's Desk. You'll need Pen and Ink, which you can buy from the Astrologer
- The Keepers key by itselft is useless. You need to talk to Snake (5 Faith) so he will give you a paper needed to study the key
- The Keeper's Diary is inside the room that burned you the first time (south of the dungeon entrance). You can just go in, you won't be burned a second time.
- If you follow Ms Charm's Quest you'll eventually find Koukol (west of the Fortress). He can buy those weapons and armors you couldn't get rid of.
- You can find a cure for hiccups on the Swamp. And you might as well try and find the witch, who helps you get started on Alchemy
- For golden burgers and beer, check the Item Grade Section below
- You can get a Red Potion by clearing a few levels of the dungeon. The same goes for the bucket of blood and bloody nails (DO NOT CREATE YOUR OWN BUCKET OF BLOOD, it only wastes space and takes blood that could be used somewhere else)
- Dinners are made with 3 dishes: a snack, a meal and a dessert. The higher the grade of each dish, the better chance of a better grade dinner. It's still possible to get a golden dinner with one silver grade item and two golden grade items. My recommendation is going for golden onion rings, golden Royal Fish and cake (which is golden), but the onion rings can be silver and still make a good grade. You can get golden grade fish a bit southeast of the Coal Mine, try bringing different lures (moths/butterflies/maggots/iron lure). Any dish below gold you can just destroy.
Item Grade

Some items will have a Star which indicates it's grade. Some quests require items of a certain grade, and no, you can't use items of better grade, so pay attention to that.
The grade of a seed indicates the grade of it's harvest, but when crafting you could end up with lower grade products, such as Bronze grade wine from Silver grade grapes.
You get better every time you perform an action, which then results in better products, but there's also Perks that help with your grade depending on the action.
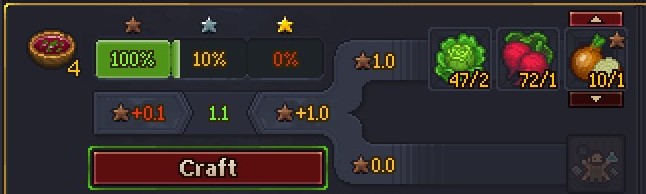
To make a burger golden, the biggest factor is the onion you use, so here's how to get golden onions (can be used to make any golden harvest):
- Get (bronze/silver) onion seeds from the farmer south the Mill
- Get an Alchemy table I & II
- Create Quality Booster I or II (requires fertilizer perks)
- Create a garden bed. First put the Quality Booster, then the onion seeds.
- The booster will turn a few of those seeds into silver/golden grade
- Repeat a few times until you turn all your seeds to golden
- Plant your golden seeds to get golden onions.
The onion alone doesn't guarantee a golden burger, so try cooking a bunch (doesn't have to be hamburgers apparently), as well as getting perks that increase your overall quality
Fishing
Fishing can be done in one of the several fishing spots around the map. Each spot has a different variety of fish. Here's a few locations:
East, on the beach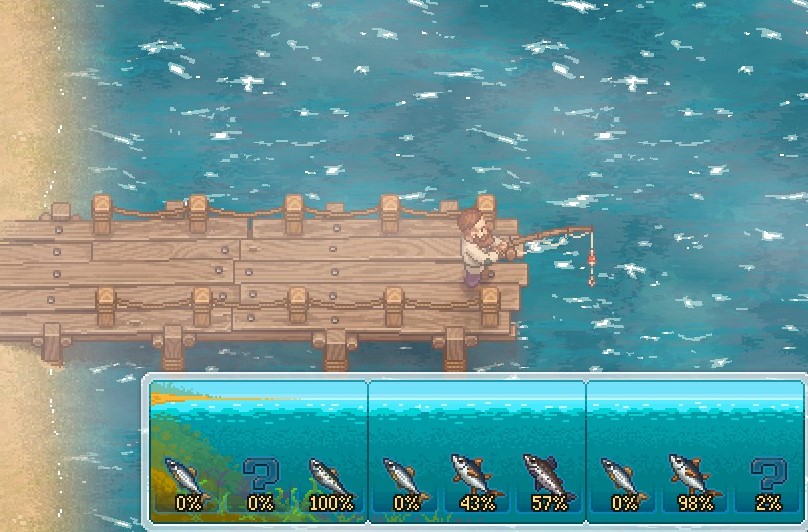
North of your house
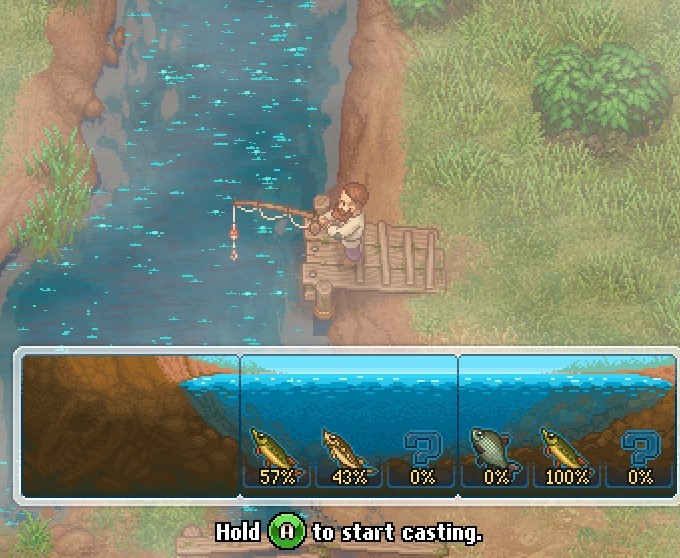 Northwest of your house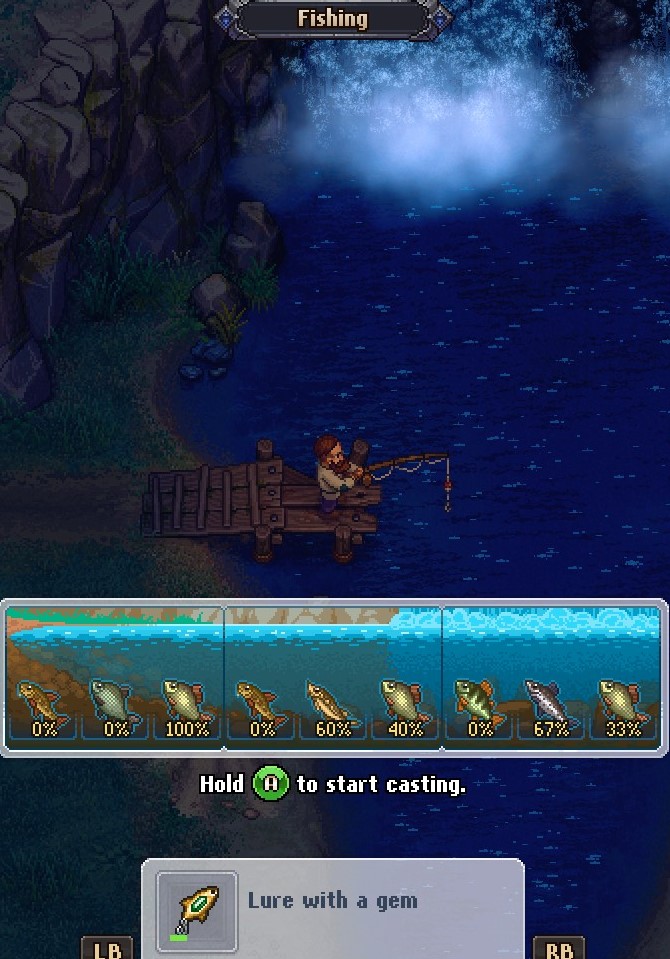
The percentage shown here indicates how likely you are to catch that type of fish, but this will depend enterily on the bait used. So using no bait might have 100% to catch fish A, and 0% to catch fish B, but Moths have a 30% to catch fish A and 70% to catch fish B. Be sure to bring a variety of baits and lures when you plan to go fishing.
To start fishing, equip a rod and press A on a fishing spot. then, hold A to reach the section you when to cast at (normally there's 3 sections, and each has its own type of fish. Then wait for the lure to go underwater. You must press A exactly when this happens. If you missed it, you'll lose your bait and will have to try again. Once you do this right, a minigame will take place. You must keep the fish contained within the yellow line until the green bar fills completely. Each fish will move differently, but as far as I know, there's no time limit, so pay attention and you'll get it right.Zombies
Zombies are unlocked by opening the gate in the Church's cellar and talking to the chained zombie on the left. You'll get 3 zombie potions and you can find a zombie buried under ruble north of the Apiary.
Zombies need certain technologies to be of use and also certain structures to work on.
One of the most useful things a zombie can do is write stories, which are necessary to write notes and chapters, so I recommend your third zombie to be on a Random text generator. Just be sure to supply it with loads of paper.
Another thing you can do is place them in the quarry to get Stone and Marble. Again, with another zombie making deliveries. Placing a zombie in the mine east of the quarry will get you coal and iron.
You can have them farm rather slow, but this way you can ensure you'll always have carrots a wheat available for the donkey and beer. If you upgrade the farming structure, they'll be able to grow silver/golden grade seeds. There's also grape/hop growing at the vineyard.
Other uses include making wine and beer, but I didn't find this very useful (in the base game).
Zombie efficiency only considers white skulls and ignores red skulls.
You can go back later to take a zombie out of work and put them back into the morgue to rearrange their internals for a better skull count.
- Wine production can be fully automated, Beer has ingredients, like Water, that must be carried in by the player.
- Once a job is started, the craft menu will let you alter the queue, either to add other jobs or increase/decrease job repetitions or make a given job infinitely repeated.
Misc
I finally finished the game, so I think that's as far as I will leave it
- The Ultimate Guide★ 5 (750)59k views1.6k ♥10 minUpdated 31 Aug, 2018
- Advanced Starting Tips (Updated: Game of Crone!)★ 5 (599)45k views1.6k ♥59 minUpdated 23 Jun
- [UPDATED] Graveyard Keeper - 100% Achievements Guide (+ DLCs)★ 5 (1.4k)43k views3.5k ♥36 minUpdated 3 Jun
- Graveyard Keeper- Beginners Guide★ 5 (607)41k views1.1k ♥12 minUpdated 25 Apr, 2021
- Beginner Tips / Tricks / How to / Money / Research★ 5 (246)30k views558 ♥5 minUpdated 24 Aug, 2018
- Preparing 26-White Skull Corpses★ 5 (394)27k views1.1k ♥9 minUpdated 10 Sep, 2024


- Upgrading to PremiumTeam Fortress 2★ 5 (20k)1441k views11k ♥6 minUpdated May 11, 2022
- No More Room in Hell Official ManualNo More Room in Hell★ 5 (2.8k)569k views2.1k ♥29 minUpdated Apr 22, 2019
- NMRiH Community Hosting GuidesNo More Room in Hell★ 5 (526)351k views653 ♥1 minUpdated Aug 10, 2022
- Лучшие кооперативные игры SteamPAYDAY 2★ 5 (1.5k)315k views2.1k ♥56 minRussianUpdated Apr 27, 2025
- Desert Eagle Heat Treated | Blue GemCounter-Strike 2★ 5 (1.6k)292k views1.5k ♥2 minUpdated Jan 16
- Treasure Hunt Puzzle SolutionsTotal War: WARHAMMER II★ 5 (6.9k)281k views15k ♥3 minUpdated Aug 19, 2021






This guide was created by its original author on the Steam Community. Are you the author and want it removed? Request removal.