[UPDATED] Graveyard Keeper - 100% Achievements Guide (+ DLCs)
Introduction


This guide will provide you with an organized list of all the achievements available in the base game as well as the DLCs together with useful tips, lists, and walk-throughs.
I arranged the achievements to roughly resemble the order in which you will be meeting the NPCs and completing their questlines. Additionally, all references to items, workbenches, locations, NPCs, and game concepts are bolded out to improve the overall readability of the contents.
There are missable achievements!
Unlocking all of the achievements may take up to 70 hours.
Feel free to ask questions in the comments, I will try my best to answer.
To avoid getting locked out of achievements, do not complete any endgame NPC questlines until you have finished all DLC content and any remaining side quests.
Useful tips
- The Iron and Stone outcroppings are finite. Later in the game you will unlock alternative ways of acquiring mined resources. You can also purchase them from Krezvold or Cory (respectively) at any time.
- The bushes do not grow back. You can purchase more Sticks from Tress at any time.
- You can transport more Logs or Blocks by carrying one and pushing a few more with your character.
- Applying Peat before any fertilizers improves the crop yields even further.
- The giant tree in front of your house will not grow back if you cut it down!
- Extract Skulls every once in a while (as it adds a Red skull). You will need at least 25 Skulls for quests.
- Extract Meat from time to time (as it removes a White skull). You will need it for recipes and opening the Buffet tent.
- Burn Bodies regularly. Ash will come in very useful once you unlock alchemy.
- Farm crops every day (and start early). You will need a plethora of vegetables for cooking and quests.
- Craft Peat and Maggots at Compost heap with the use of Crop waste frequently.
- Always use the Circumspect effect (from cakes and pies) when studying new items in a bulk. You will be getting a lot more points that way.
- Fish a lot! There's an achievement to catch a total of 200 fish and doing that in one sitting is extremely tedious (trust me I know). You will thank yourself later.
- Eat Meat, you will need it for Burgers (Buffet tent).
- Discard the various powders looted from the Dungeon, they are essential for alchemy.
- Throw Bodies into the river (except the first time during the quest), it's a waste of Ash.
Quick reference
- Quest-related (OG)
- Missable (OG)
- Upgrades (OG)
- Crafting (OG)
- Incremental (OG)
- Miscellaneous (OG)
- Secret (OG)
- Quest-related (DLC1)
- Tavern (DLC1) (includes Excellent events)
- Miscellaneous (DLC1)
- Secret (DLC1)
- Quest-related (DLC2) (includes the endings)
- Missable (DLC2)
- Miscellaneous (DLC2)
- Secret (DLC2)
- Quest-related (DLC3)
- Secret (DLC3)
Graveyard Keeper (OG)
Quest-related (OG):
Sweetheart Bishop

You meet him immediately after burying your first Body.
After that, he appears every
 , near the Church.
Charm itself

 .
.
Perfume

Impossible to miss; unlocked during Ms Charm's questline.
Tip: The perfume requires 12 Frogs. You can purchase up to 10 from Clotho and fish the rest at the swamp's fishing spot by using Moth as bait.
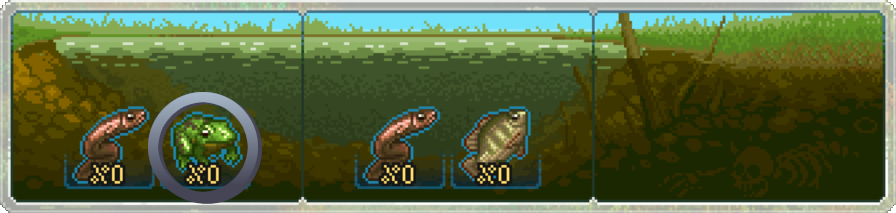
Ideal song

back home.
Impossible to miss; unlocked during Ms Charm's questline.
Note: It will unlock after you return the song to Ms Charm.
Shady Snake

You first spot him in a cutscene right after you enter the Cellar. Once the cutscene finishes, Snake will come back to rummage around the gate every night. To get to him, you need to clear one of the two blocked pathways (10× Wood wedge, 2× Wooden plank, 4× Simple iron parts).
After that, he will come back to that spot every
 .
.
Summon a chicken

Once you unlock the Dungeon, Snake will ask you to fetch 5 Bloody nails (an Iron Maiden drop) and a Bucket of blood (5th floor chest reward). Iron Maiden:

The achievement will unlock after his ritual attempt.
Note: If your bag is full, the Bucket of blood may drop behind the chest, making it seem as if it vanished. You will automatically pick it up once there's at least one free space in your inventory.
It is also craftable (10× Blood and 3× Flitch at Church workbench), thus no need to worry either way.
A book with funny pictures

Impossible to miss; unlocked during Snake's questline.
Simple but stylish

Decorating the Sacrifice Zone is quite costly in materials. Below, you can find a list with all the necessary materials.
- Materials list:
- 24× Skull,
- 8× Wooden beam,
- 4×
Pumpkin,
- 10× A polished brick of stone,
- 10× Polishing paste,
- 2× Stone repair kit,
- 20× Blood (to fill up both fountains).
Tip: The Farmer sells
Pumpkins and Pumpkin seeds at tier III. Alternatively, you could purchase a  Pumpkin seed and then improve it with Quality Fertilizer I (or Quality Fertilizer II).
Side quest

Impossible to miss; unlocked during Snake's questline.
Tip: Bring one Wooden plank to the trap spot.
Wealthy Merchant

 .
.
Graveyard Veggies

You will need to obtain the Trade license. Go to Royal services box (left of the Church) and purchase the Rightful citizen status (
Bring it to the Merchant on any
to unlock the achievement.Tip: Gaining access to his Trade Office will allow you to improve your income significantly by selling crops in crates.
Dream dinner

Below, you can find an ingredients list for a simple gold-star dinner recipe together with useful notes.
- Ingredients list:
Onion rings (bought from Horadric at tier III),
Burger (recipe unlocked quite early; a
Tip: You can save the game before crafting anything percentage based and then keep reloading until you get the desired item quality.
Tip: The map below depicts two easy to access wild Honey spots, they regen every day (hold F on the marked trees).
North of the Old Graveyard.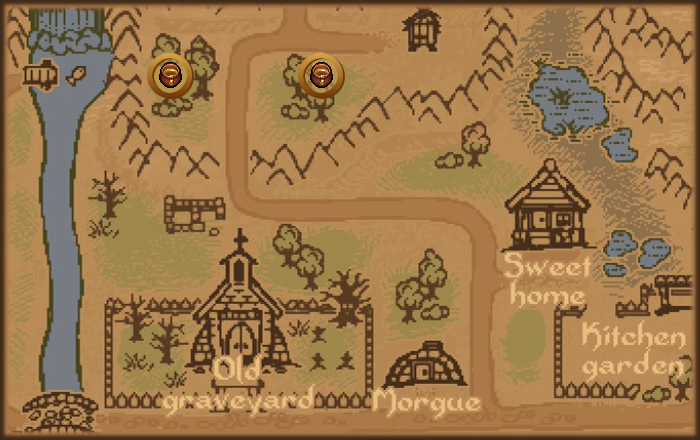
On every shelf

You can improve Fame by bringing Flyers to the table at the Trade Office. Each 10 Flyers improves Fame by 1. Consequently, you need to craft and redeem 50 of them to unlock the achievement.
Tip: You can purchase Ink (not Pen and ink) from the Astrologer on any
 and craft Clean paper (from Skin or Bat wing) at Church workbench. Combine them together at Printing press to craft Flyers in bulks.
Holy Inquisition

 .
.
Not a hot dog

Firstly, build the Buffet tent (5× Hemp rope, 15× Wooden plank, 20× Nails) at the Witch Hill. Secondly, purchase either
Onion seeds or Onion seeds (at tier II) from the Farmer and Hops seeds (at tier II) from the Miller (north of Farmer's house).
Thirdly, use Quality fertilizer I (or Quality fertilizer II) together with the seeds to gradually improve the quality of the crops.
Once you start gettingOnions and Hops, use them in the recipes. You will need 5 Burgers and 10 Beers.Note: The buffet can only be opened on
and will reward you with Note: You can only grow Hops at the Vineyard (west of the Witch Hill).
Tip: Continue to growOnions to sell them in crates later or to keep opening the Buffet tent.Night watch

Impossible to miss; unlocked during the Inquisitor's questline.
Match 3

Impossible to miss; unlocked during the Inquisitor's questline.
Note: It will unlock after you return all 3 Dark organs to the Inquisitor.
Old Astrologer
 .
.Tip: Use the Teleportstone to get to and from the Lighthouse quickly, it's very far east.
A perfect gift

Impossible to miss; unlocked during the Astrologer's questline.
Tip: Use the Teleportstone to get to and from the Lighthouse quickly, it's very far east.
Missable (OG):
Best seller

At some point during the Astrologer's and another NPC's combined questline, the Astrologer will require a
Book. Make sure you do not give him a Research Obsidian (a Book substitute from the Stranger Sins DLC). Doing so, will skip the second part of the quest about bringing him the titular Best seller, a Book, thus locking you out from ever receiving the achievement.
Tip: Instead of crafting a Book using only (expensive) gold-star components, try purchasing a Hard cover from the Astrologer and combining it with a Chapter.
Tip: You can save the game before crafting anything percentage based and then keep reloading until you get the desired item quality.
He trusted you...

A week after returning 3 Dark organs to the Inquisitor, he will ask you for more evidence.
- There will be 3 dialogue options:
- About Gerry. (unlocks the achievement)
- About a cult.
- About not having any more evidence.
Note: Don't worry about Gerry's safety. After choosing the first dialogue option, the Inquisitor won't be interested in taking him.
Upgrades (OG):
Even here

Use the Garden certificate on the blueprint table in the Garden to unlock this achievement.
Bridge builder

The bridge is located to the west, repairing it (6× Flitch, 3× Wooden plank, 10× Nails) unlocks the achievement and allows access to the Swamp.
His house

Once you meet the requirements set by the BIshop, you will need a total of
 50 for all necessary documents. Providing the Bishop with the Building permission unlocks the achievement.
WARNING: You will not be able to preach in the upgraded church until you purchase Rightful citizen papers!
The Mill

The Mill is located to the north of the Farmer's house, repairing it unlocks the achievement (5× Complex parts, 6× Wooden plank, 1× Calculation papers).
Note: Calculation papers are difficult to obtain; you will have to complete several questlines to receive them from the Astrologer.
Marble

Once you unlock the Quarry, you will be able to build a Marble quarry there (12× Flitch, 4× Simple iron parts, 4× Nails), which will unlock the achievement.
Note: To unlock the achievement you need to build the regular Marble quarry, not Zombie marble quarry.
Stone fence

You will need to fix the fence first (10× Nails, 10× Wooden plank, 6× Piece of stone) and then build the stone fence (24× Polished brick of stone, 2× Carved piece of stone, 12× Complex iron parts) to unlock the achievement.
Note: In order to get the option to fix the fence, you will need to gain access to the west side of the Graveyard from the Inquisitor first.
His mansion

Once you meet the requirements set by the Bishop, you will need 3
Carved pieces of marble to upgrade the Church and unlock the achievement.Tip: The questline of the Refugee camp from the Game of Crone DLC rewards you with
3
Carved pieces of marble quite early.
Crafting (OG):
Golden pumpkin

First, purchase either
Pumpkin seeds or Pumpkin seeds (at tier III) from the Farmer.
Then, start gradually improving them with Quality fertilizer I (or Quality fertilizer II) until you reach Pumpkins.
Tip: Continue to grow Pumpkins to sell them in crates later.
Tip: Store a couple of Pumpkins for quests.Winemaker

If your Merchant is at tier III, you can purchase
Grape seeds immediately. Otherwise, purchase the lower quality ones and gradually improve them with Quality fertilizer I (or Quality fertilizer II).
Incremental (OG):
Burying

Advanced gravedigger

Shovel master

Burying Bodies is an inevitable part of the game. All three achievements will unlock naturally while you play.
Tip: You can repeatedly exhume and bury the same Body in order to unlock these achievements faster. It will still yield Burial certificates each time. An Exhumation permission costs
75 which means that you only lose 25 per exhumation.
Meat

Sashimi master

Extract Meat regularly. You will need a lot of it for Burgers (opening the Buffet tent) and other necessary recipes. Both achievements will unlock along the way.
Cooking

Cook

Chef

The following table breaks down an example set of recipes available in the game (DLC recipes excluded). Complete the "Recipes" column to unlock all three achievements.
A full ingredients list can be found below the table.
Pumpkin" questCabbage soup, 1× Pumpkin soup, 1× Vegetable soupLasagna, 1× PastaGrape pieBurger, 1× Sandwich, 3× Baked meatCake- Ingredients list:
- 14× Water,
- 11× Red apple (foraged from wild apple trees around the Village and the Lighthouse),
- 11× Berry (foraged from wild berry bushes around the Garden and the Church),
- 10× Carrot,
- 9× Cabbage,
- 8× Flour,
- 8× Green jelly (Slime drop),
- 7× White fish fillet (purchased from the Lighthouse Keeper or crafted),
- 6× Chicken egg (purchased from the Fresh egg basket),
- 5× Edible mushrooms,
- 4× Beet,
- 4× Honey (gathered from beehive trees; check the Dream Dinner achievement),
- 4×
- 3× Jug of milk (purchased from Rosa),
- 3× Raw sliced meat,
- 2×
- 2× Oil (purchased from Dig, right-click and press "use" on Seed oil),
- 1×
- 1× Cheese (purchased from Rosa),
- 1× Butter (purchased from Rosa),
- 1×
- 1× Salt (gathered from burned Bodies).
Note: The DLCs add some recipes that make it even easier to complete the cooking achievements.
Fishing

Fish collector

Ichthyologist

Brutal fisherman

Check out this fishing guide! It will aid you in unlocking the first three achievements.
Note: If you followed the tip about fishing from the Useful tips section, you should not have much problem with the last achievement.
Alchemy

Alchemist

Master alchemist

There is a total of 26 alchemy recipes (10 for Alchemy Workbench tier I and 16 for Alchemy Workbench tier II). Check out this alchemy guide and start crafting!
Tip: If you followed the tip about powders from the Useful tips section, you should have lots of different types of powder to work with.
Dungeon

Scary dungeon depths

Nothing underneath

As you become stronger and more resilient through gear upgrades, you can go deeper into the Dungeon.
Note: The 11th level blockage can be cleared after completing a few quests from Snake.
Tip: At some point, it is worth purchasing the Damask sword with a gem from Koukol (found next to the Mountain Fort at night) for 1
1 Points

More red points!

Just green points

More green points!

Just blue points

More blue points!

You receive points by performing certain actions (e.g. cutting trees, mining ore, harvesting crops), as well as crafting and studying items (at Study table). Out of all three types of points, the Blue points are the most arduous to acquire (check the tips).
Tip: Craft Stone grave fences! You basically exchange 2 Pieces of stone and some energy for 5 Blue points, each. It's also possible to recycle them and receive one Piece of stone back. Additionally, always use the Circumspect effect (from cakes and pies) when studying new items.
Ultratip: Set up your Zombies at the Quarry - 2 miners, 2 portiers, and 1 stone cutter (check out this zombie guide). Use the stone brought by the portiers to craft Stone grave fences. Put them all in an empty trunk afterwards. Turn one of your yard Zombies into a professional Stone grave fence recycler and... repeat for infinite stone and lots of Blue points!
WARNING: If you pass the mark of 3000 points with the help of a Techbook (e.g. using a blue Techbook while at 2990 Blue points) the related achievement may become unobtainable. Since the exact nature of the issue is unclear it is safer to obtain the last points by either gathering, crafting, or studying.
Miscellaneous (OG):
Health care

Drink 50 Health potions. The ones you loot in the Dungeon count as well.
Tastes like home

Purchase a Fish nugget from Horadric (at The Dead Horse tavern) and eat it to unlock the achievement.
MacPlayer

Die 10 times. Anything goes.
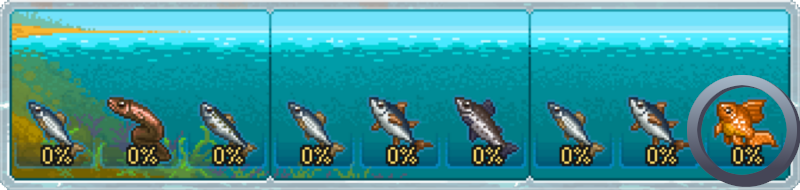
Gold fish

You will need a lot of luck! Other than that: an Excellent fishing rod (
(
There's a 5% chance to catch it during the night and a 2% chance during the day. Fortunately, fishing seems to freeze time, therefore if you fish without pauses it will be night for as long as you need.
Secret (OG):
The following achievements are impossible to miss. Continue the main questlines!
A father and a son

Helped Snake with his dark ceremony.
Twin brothers

Helped Merchant forgive his brother.
Prodigal father

Helped Astrologer reunite with his family.
Back home

Switched on the portal. Are you sure you want leave?
Stranger Sins (DLC1)
Quest-related (DLC1):
Landlord

The mound with cognac that Gerry asks you to dig up is located directly north of Dig's barrel.
An example mound can be seen in the image below.
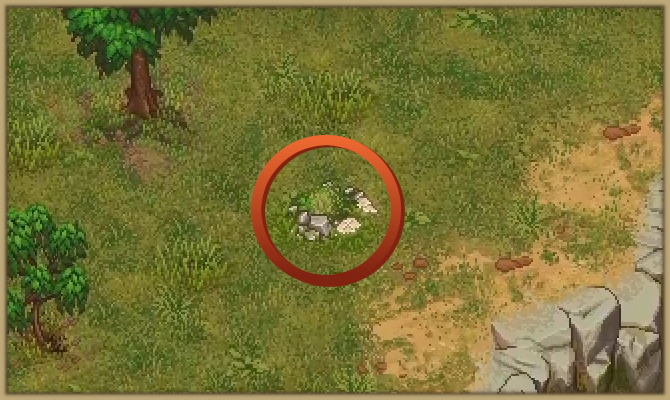 Once you go through a few more errands, Horadric will offer you the land for
 Note: There are more mounds around the map that contain crafting materials.
Talking Skull

Following Horadric's advice, you will be visiting Cory.
- At this point, you can choose between the two following options:
- Supplying him with materials (12× Simple iron parts, 12× Wooden plank, 12× Nails,
50).
- Paying him (
After you choose, you will have to go to sleep. The achievement will unlock once you wake up.
Employee of the month

Craft the Barman doll at Carpenter's workbench II (4× Wooden plank, 4× Complex iron parts, 2× Wooden beam) and take it back to the bar of The Talking Skull tavern. After a brief conversation with Yorick, the achievement will unlock.
Tip: You can teleport while carrying the Barman doll.
Forward to the past

Insert the first Artifact, the Statuette, into the archaeological time machine to unlock the achievement.
Tavern (DLC1):
Extra tavern tip (Reputation bar)
Follow the list below for an efficient method of filling up the Reputation bar.
- Prepare:
- Three (or more) high efficiency Zombies (check out this zombie guide),
- Lots of
- Do:
- Put one (or more) at a Zombie vineyard (upgraded to tier III) and queue it up,
- Put one at a Zombie-winery and queue it up,
- Put one at a Zombie-brewery and queue it up,
- Transport
- Transport
This setup will provide you with steady income and will keep your Reputation bar filled.
You can improve it even further by adding a portier to transport the alcohol to The Talking Skull tavern immediately after it is crafted.
Tavern quality

Well-known skull

Epic skull

Thoughout the archaeological time machine questline you will be unlocking upgrades for your tavern. However, maximum tavern quality acquired from furniture upgrades adds up to only 59/80 quality points. The rest will come from filling up the Cabinet with Artifacts
Tavern events

Open mic

Locking up the sun

Rat race

Thoughout the archaeological time machine questline you will be unlocking Events for your tavern. You will need to organize every single one of them to unlock the four achievements. Stock up on alcohol!

5× Faith,
1× Reputation

5× Faith,
2× Reputation

5× Faith,
2× Reputation

10× Faith,
3× Reputation
Note: You can organize Events without putting anything in the Barman's inventory. You will only receive the base income, but it's useful if you're trying to unlock the four achievements fast.
Tip: Check the Extra tavern tip section for a useful tip on filling up the Reputation bar and improving your income.
Excellent tavern events

Best mic

Best concert

Best race

To organize Excellent events follow the list and the table below.
- Materials list:
- 100×
- 100×
- 60×
- 60×
- 40× Pasta,
- 10× Faith,
- 15× Flyer,
- 3× Reputation.
Save the game before you organize any Events. Now go through the table below, reloading after every Excellent event.
5× Faith,
1× Reputation
Mug of beer,100×
Red wine5× Faith,
2× Reputation
Mug of beer,60×
Onion rings5× Faith,
2× Reputation
Mug of beer,60×
Onion rings10× Faith,
3× Reputation
Red wine,60×
Burger,40× Pasta
Credits: a guide by Merukuru (check for more details).
Note: The items must be placed in the Barman's inventory, not the basement pallets.
Tip: Check the Extra tavern tip section for a useful tip on filling up the Reputation bar and improving your income.
Tip: There is a Professional oven inside the cellar of The Taking Skull tavern that can be used to cook food in bigger batches. That should speed up the process! (credits: a comment by Nefrarya)
Miscellaneous (DLC1):
The show must go on

You can organize Events without putting anything in the Barman's inventory (you will only receive the base income). Start the Graveyard Fest every time the Reputation fills up until the achievement unlocks.
Tip: Check the Extra tavern tip section for a useful tip on filling up the Reputation bar and improving your income.
Secret (DLC1):
The following achievements are impossible to miss. Continue the DLC questline!
Witnessed him

Watched the Master being summon. Is that Grace you feel?
A nation divided

Watched the scene at the Coliseum. Unemployment benefits is everything.
Viva la King

Watched the destruction of the Bridge. Always think before destroying bridges!
Read before signing

Witnessed the Contract signing. Who are "truly guilty men"?
King Gerry

Watched the scene in the bath house. You saw that one coming, didn't you?
Game of Crone (DLC2)
Quest-related (DLC2):
An unexpected guest

The first time you wake up after unlocking the Church, he appears inside your Sweet Home.
Refugee camp

Developed camp

Strengthened camp

Paradise

Unlocked throughout the Improving the Refugee camp questline. Each major upgrade unlocks one of the achievements.
Refugees

Beheaded horse

More forest thugs

The refugees have their own unique questlines. Each finished questline unlocks one of the achievements in accordance with the following list.
- Refugees in the camp:
- Cook (after you build 2 Beehives),
- Undertaker (after you bring her 5
- Tanner (after you purchase a cow for
50 from the Fresh egg basket).
Vampires in the Village

Once the discussion about the vampire threat in The Dead Horse tavern concludes, the achievement will unlock.
The face of the enemy

Impossible to miss; unlocked during Vampires in the Village questline.
To stop an Ancient Curse

As the Vampires in the Village questline concludes, stopping the ancient curse becomes the next priority. After speaking to Master Alaric about it, the achievement will unlock.
Blood supplier

Unlocks whenever you quench Master Alaric's thirst for Blood for the first time.
Mysterious woman

Impossible to miss; unlocked during To stop an Ancient Curse questline.
Awkward interrogation

Impossible to miss; unlocked during To stop an Ancient Curse questline.
Revolution

Cook of Revolution

Writer of Revolution

Ideologist of Revolution

Long live the Revolution

Unlocked throughout the Revolution questline. Each completed request unlocks one of the achievements.
One more inquisitor

The first time you wake up after speaking to Master Alaric about his secret, she appears inside your Sweet Home.
Lesser evil

During the dialogue cutscene with Lady Beatrice (where the achievement will also unlock), you will be choosing one of the three endings for the Game of Crone DLC.
WARNING: Contains major spoilers, including all the endings of the Game of Crone DLC. Read only if you want to know the possible choices, none of which are explained properly in the game.
Save before you build the Viewing tower!
If you wish to play through all the endings, copy the save and store it somewhere safe.
Savefile location: C:\Users\(Your user)\AppData\LocalLow\Lazy Bear Games\Graveyard Keeper
- Agree to help Lady Beatrice.
- Betray her by speaking to Koukol.
- Continue as explained in-game.
- Finally, speak with Marquis Teodoro Jr. about them leaving the Refugee camp forever.
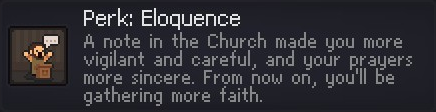
You obtain more faith from Sermons.
- Refuse to help Lady Beatrice.
- Speak to Koukol and choose the last dialogue option (if you choose one of the first two, you will get The Sad Ending).
- Pay Koukol
- Continue as explained in-game.
- Finally, speak with Marquis Teodoro Jr., the Refugee camp will rejoice and stay.
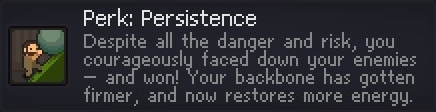
Your energy automatically regenerates.
- Agree to help Lady Beatrice.
- Craft the Emulsions of Death.
- Bring the potions to the Mountain Fort.
- Finally, speak with Marquis Teodoro Jr. and receive the rewards.
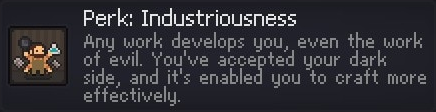
You craft items at higher quality. After that, speak to Master Alaric. You will obtain the same perk as in The Right Choice ending:
Your energy automatically regenerates.
Credits: a guide by Keeper Of Monsters, Quinn, and The Wizland (check for more details).
Missable (DLC2):
Exterminate!

After you and Marquis Teodoro Jr. are ambushed by a Golem, you will have to find and defeat three more. The Golem ambushes despawn whenever you continue the story after building the Viewing tower, therefore make sure to defeat them before doing that.
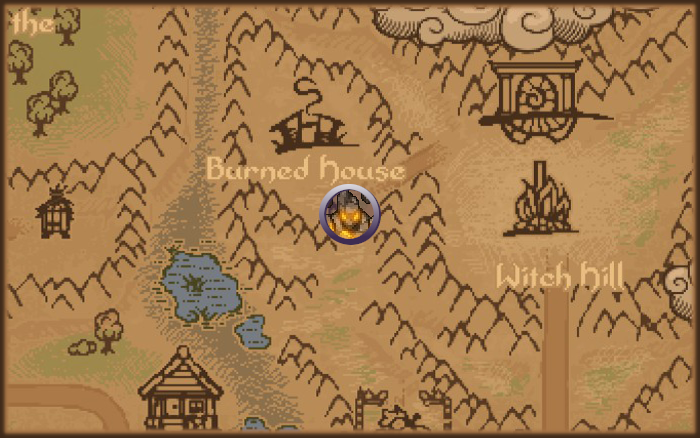
The maps below depict the locations of the Golems.
North-west of the Graveyard, south of the Quarry.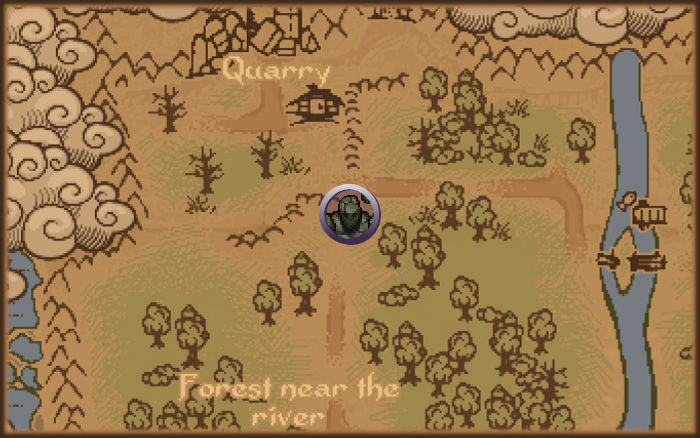 North-east of the Graveyard, south of the Burned house.
 North-east of the Village, south of the Camp.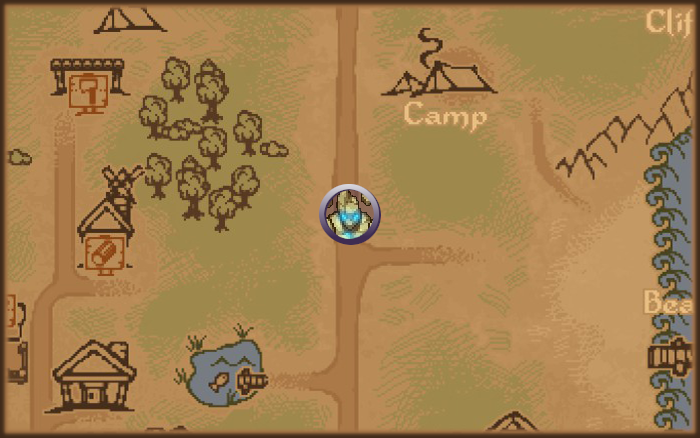
Killing the last Golem unlocks the achievement.
Refugees are safe

The Sad Ending will not unlock this achievement!
Note: Check the Quest-related (DLC2): Lady Beatrice: Lesser evil section for more information on endings.
Secret (DLC2):
The following achievements are impossible to miss. Continue the DLC questline!
Spirit summoner

Brought some smelly and useless filth into Dungeon, giving all the local ghosts a laugh.
Vampires are over

Told Horadric the vampire was no more. Oh, if only everyone were so trusting!
Between worlds

Worked on someone's memory. Time to add "Neurosurgeon" to your CV.
Better Save Soul (DLC3)
Quest-related (DLC3):
Strange delivery

After progressing a bit into the game (unlocking the Church), the first time you receive a Body from Donkey, you will notice something unusual: there is more than one!
Interact with the extra one to initiate a cutscene where you meet Euric, thus unlocking the achievement.
A locked ghost from the past

You will have to obtain an Old rusty key from cleaning Gerry (1× Mug of beer, 1× River sand) which opens a hidden room in the Morgue. Opening the room initiates a cutscene where the achievement will unlock.
A habitable room

You need to repair every single piece of broken furniture in Euric's room (Woodbox, Table, Side rack, Old carpet, Old bed). Below, you can find a complete materials list for all necessary repairs.
- Materials list:
- 11× Flitch,
- 4× Wooden plank,
- 4× Wooden stick,
- 1× Wooden beam,
- 18× Nails,
- 3× Skin.
The achievement unlocks immediately after fully repairing Euric's room.
A lost stained glass window

Unlocked immediately after repairing Euric's room.
Tip: After finishing the DLC, add all left-over Infused sin shards (Pride, Wrath, Gluttony, Sloth, Lust, Envy) to the stained glass window!
Euric's curing therapy

To begin curing Euric you will need to complete a couple of steps.
Firstly, the Souls room requires some renovations. Build the Human soul healing upgrade (4× Wooden plank, 4× Nails, 2× Complex iron parts) as well as the Healing from pride extension (1× Conical flasks, 2× Simple iron parts) unlocked from the Tech tree.
Afterwards, you will be tasked to obtain the sin of Pride from the Bishop. To do so, you will have to write a letter to Wagner through the Royal services box (1× Pen and ink). Wait a day for the response.Finally, meet the Bishop on any
day and read the poem to him (secret achievement [1/7]) to receive a Pride charged shard.
The achievement unlocks immediately after returning to Euric with the Charged sin shard.
Note: You need at least one Sin shard (from soul cleansing with the Soul healer in the Souls room) to be able to charge it with the appropriate sin (e.g. Pride).
The second session of curing therapy

Wait a day after the first curing session.
Unlock the following Tech tree upgrades: Healing from wrath and Healing from gluttony. Build the appropriate extensions in the Souls room to continue.
Next, two quests to complete: Bring 2× Honey to Clotho, Craft Mysterious food sauce (1× Seed oil, 2× Chicken egg, 1× Salt) at Church workbench.Meet the Inquisitor on any
and show him Unusual ash to get Wrath charged shard (secret achievement [2/7]).Meet the Merchant on any
and give him Mysterious food sauce to get Gluttony charged shard (secret achievement [3/7]).
Returning to Euric with the Charged sin shards unlocks the achievement.
Note: The Merchant has to be cured of his "No Taste" curse for the appropriate dialogue option to appear.
The third session of curing therapy

Wait a day after the second curing session. Unlock the following Tech tree upgrades: Healing from sloth, Healing from lust, and Healing from envy. Build the appropriate extensions in the Souls room to continue.
Speak to the Astrologer on any
to get Sloth charged shard (secret achievement [4/7]).Persuade Ms Charm to dance on any
to get Lust charged shard (secret achievement [5/7]).Share the rumor with Snake on any
to get Envy charged shard (secret achievement [6/7]).
Return to Euric with all three Charged sin shards to unlock the achievement.
Dissatisfied villagers

After "curing" Euric meet him in his room and ask how he feels. That will allow you to continue with the questline.
The next time you go to sleep a couple of villagers will wake you up. During the following cutscene you will unlock the achievement.
Help the villagers

To complete the questline you have to fix the havoc left by Euric's drunken rage.
A list of needed materials to complete all of the repairs can be found below.
- Materials list:
- 13× Flitch,
- 3× Wooden plank,
- 4× Wooden stick,
- 20× Nails,
- 2× Complex iron parts,
- 2× Simple iron parts,
- 3× Piece of stone,
- 1× Glass,
- 10× Bee,
- 4× Ash,
- 2× Hemp rope,
- 2× Wooden repair kit (crafting materials included in the list)
All required repairs are listed below. Remember that between each set of repairs you have to speak to Horadric to continue.
- The broken table at The Dead Horse tavern: 4× Flitch, 5× Nails, 2× Complex iron parts,
- The toilet door at Krezvold's: 2× Wooden plank, 4× Nails, 1× Wooden repair kit (3× Flitch, 1× Wooden plank, 2× Nails).
- The potter's wheel at Adam's (south-west of The Dead Horse tavern): 2× Flitch, 1× Piece of stone, 3× Nails,
- The Egg Basket: 2× Wooden stick, 1× Wooden repair kit,
- Two beehives at Beekeper's (north-west of The Dead Horse tavern): 2× Flitch, 3× Nails, 5× Bee (×2).
- The lantern at Farmer's: 2× Piece of stone, 2× Simple iron parts, 1× Glass,
- Wash the cow at Rosa's: 4× Ash (talk to Rosa with the Ash).
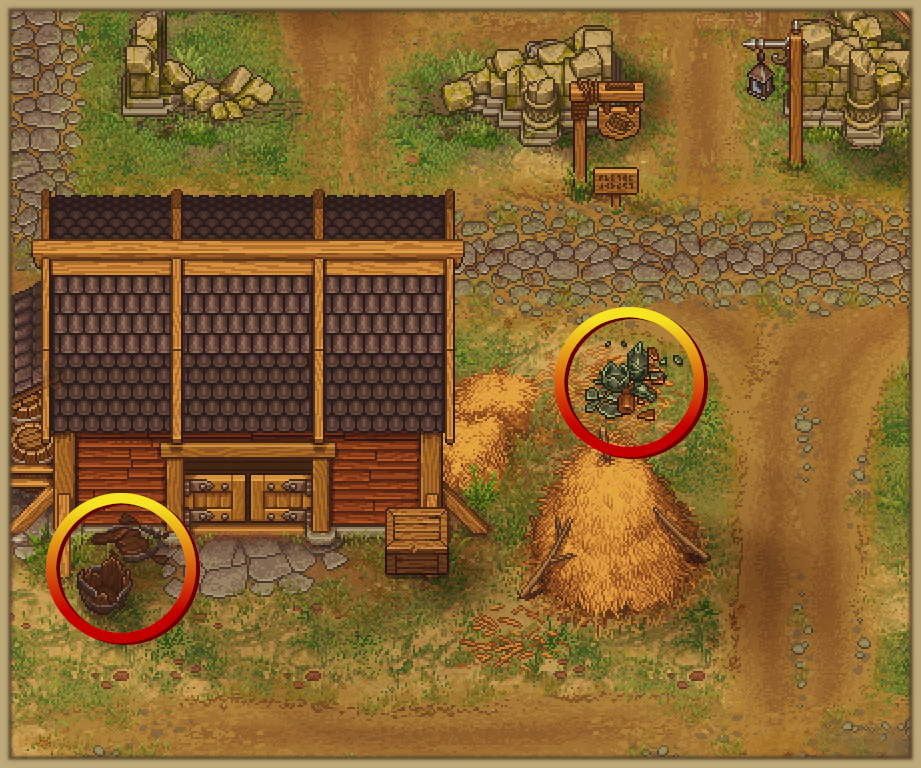
The final set of repairs along with marked locations can be found below. In front of The Dead Horse tavern: An assortment of broken glass and two barrels.
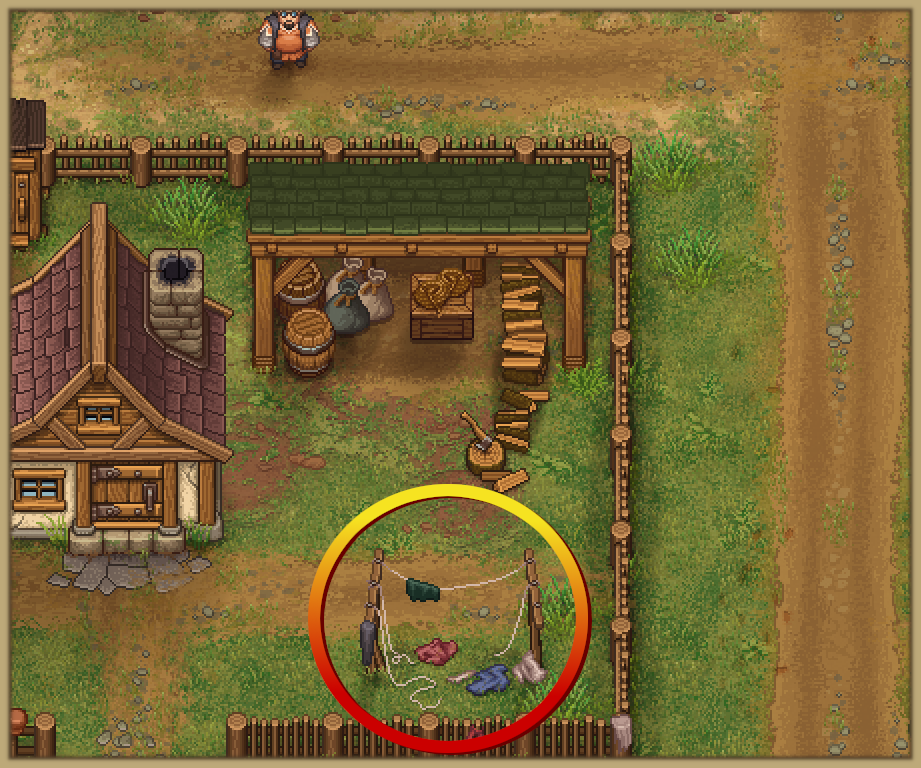
 Clothesline (south of the Merchant): 2× Wooden stick, 2× Hemp rope.
 At the southern border of the map: A bunch of garbage.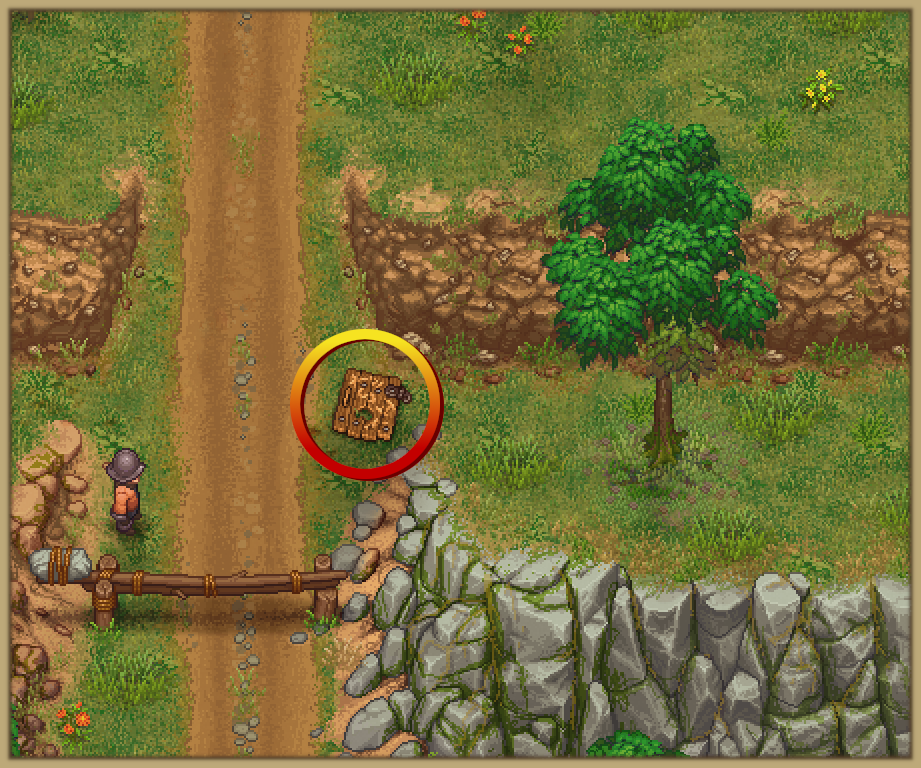
Speak to Horadric after all the repairs are completed to unlock the achievement.
Note: Continue the questline to unlock the last secret achievement [7/7].
Secret (DLC3):
The following achievements are impossible to miss. Continue the DLC questline!
You can find the unlock points of all the following secret achievements throughout the Quest-related (DLC3) section ([1/7]-[7/7]).
Long-awaited appreciation

Fill the Bishop.. with pride.
A fortunate gift

Share the secrets of haute cuisine with the Merchant.
A controlled ignition

Fire is so mesmerizing - even moreso when there's a boiling Inquisitor involved.
Endless sadness

Practice makes perfect! Even if it's the sadness of the Astrologer.
The birth of passion

Witness an embarrassingly hot scene.
A vulnerability for authority

Even the strongest and most unswerving have their weakness.
Return to the beginning

Nothing is keeping Smiler here any longer. Let him continue his journey - to a new beginning.
Credits
Xeeran (Fishing guide)
https://steamcommunity.com/sharedfiles/filedetails/?id=1487490851
Roc_Computer and Malytha (Alchemy guide)
https://steamcommunity.com/sharedfiles/filedetails/?id=1482751853
Music Master (Zombie guide)
https://steamcommunity.com/sharedfiles/filedetails/?id=2275207503
Merukuru (Excellent tavern events)
https://steamcommunity.com/sharedfiles/filedetails/?id=1903244863
Keeper Of Monsters, Quinn, and The Wizland (Game of Crone endings)
https://steamcommunity.com/sharedfiles/filedetails/?id=2287782157
Beat Graveyard Keeper's 100% run?
Flex it — let your friends know you pulled it off.
- The Ultimate Guide★ 5 (750)59k views1.6k ♥10 minUpdated 31 Aug, 2018
- Advanced Starting Tips (Updated: Game of Crone!)★ 5 (599)45k views1.6k ♥59 minUpdated 23 Jun
- Graveyard Keeper- Beginners Guide★ 5 (607)41k views1.1k ♥12 minUpdated 25 Apr, 2021
- Beginner Tips / Tricks / How to / Money / Research★ 5 (246)30k views558 ♥5 minUpdated 24 Aug, 2018
- Preparing 26-White Skull Corpses★ 5 (394)27k views1.1k ♥9 minUpdated 10 Sep, 2024
- 26-Skull Corpse Preparation★ 5 (606)26k views1.6k ♥17 minUpdated 26 Oct, 2023


- Upgrading to PremiumTeam Fortress 2★ 5 (20k)1441k views11k ♥6 minUpdated May 11, 2022
- No More Room in Hell Official ManualNo More Room in Hell★ 5 (2.8k)569k views2.1k ♥29 minUpdated Apr 22, 2019
- NMRiH Community Hosting GuidesNo More Room in Hell★ 5 (526)351k views653 ♥1 minUpdated Aug 10, 2022
- Лучшие кооперативные игры SteamPAYDAY 2★ 5 (1.5k)315k views2.1k ♥56 minRussianUpdated Apr 27, 2025
- Desert Eagle Heat Treated | Blue GemCounter-Strike 2★ 5 (1.6k)292k views1.5k ♥2 minUpdated Jan 16
- Treasure Hunt Puzzle SolutionsTotal War: WARHAMMER II★ 5 (6.9k)281k views15k ♥3 minUpdated Aug 19, 2021






This guide was created by its original author on the Steam Community. Are you the author and want it removed? Request removal.