Carthage Tactical
Preface
The formations and tactics demonstrated in this guide are largely universal to all factions. This guide is written for play against the AI. There is nothing original to the formations demonstrated here, this is an explanation into the use and AI reactions as I see them. The battles will always develop in slightly different ways but the AI has a few absolutes in their logic. The purpose of these formations is to minimize your casualties so that you mcan continue an aggressive campaign strategy. Properly executed these tactics will often net you a decisive or heroic victory. Heroic victories require the balance of power bar to be approximately 75% in the favor of the enemy while you take minimum casualties.
The following battles were done on very hard so I could take tactical view screenshots, but these formations work just as well against legendary AI.
These battles were fought in vanilla, but work just as well if not better in games with battle mods.
AI Absolutes
Superior Firepower: If you have longer range than the AI they will always come to you, unless they have far more firepower. The general range progression is: Javs<Arrows<Slings<Scorpions<Ballistas<Onagers. This makes it worthwhile to have 1 slinger in your army in certain cases, or 1 siege weapon to capitalize on this.
Skirmish Mode: The AI's skirmishers are almost always in Skirmish mode, you can use this to clump the AI up or cause general disarray in their ranks. You may even use your own skirmishers to cause them to retreat if you take yours out of this mode. I generally keep mine out of this mode unless it is applicable.
Charge: The AI will always charge once they enter approximately Slinger range, even up hills, around rocks, through trees, or into a weak flanked position as demonstrated in the Arrow.
Weakness: The AI is draw to weak points, leaving your pikes out of phalanx until the enemy is charging them helps to draw the enemy in, especially if your other units are in defensive formations. Placing buffers of skirmishers or light infantry in front of your pikemen tends to draw in the enemy as well. If ranged attacks are not an issue you can about face the pikes with the 'J' key taunting the enemy with you backs.
The Bow
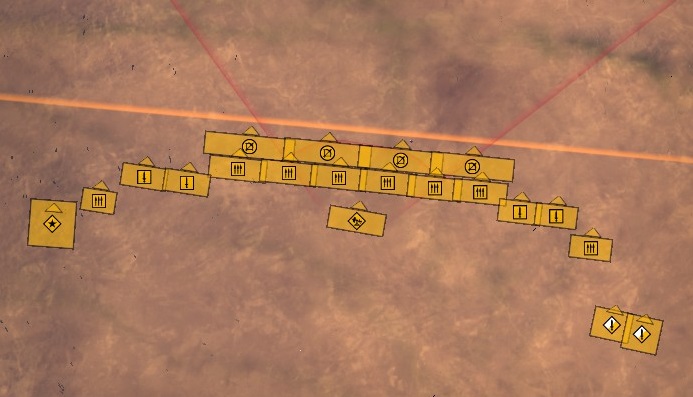 The basic army consists of:
- General with Armored African Elephants.
- 6 African Pikemen.
- 4 Libyan Infantry.
- 2 Carthaginian Hoplites.
- 4 Libyan Peltasts.
- 1 Ballista.
- 2 Carthaginian Cavalry.
*This army can be built by turn 13 if you focus on the appropriate tech.
The pikes are not in phalanx to reinforce the illusion of the weak mid.
The single Ballista is to cause the Superior Firepower effect. If you have better range than the enemy they will come to you. This allows you to choose where the fight happens, choose high ground, set up ambushes, and force them to charge you causing some fatigue.
The staggered line presents a long flank and generally causes the AI to charge mid, the Carthaginian Hoplites are farthest back in the flanks making cavalry have to run a very long way to outflank them. Also the Hoplites have a rapid advance to allow them to get into a flank position as the battle develops.
The Libyan Infantry serve as meat grinders once they get in flanking position, quickly killing off units and will bait cavalry into premature charges before they make it all the way around your flanks. This allows your Carthiginian Hoplites and Cavalry to easily address enemy flanking cav before they become a real threat.
This formation is easily altered to address the strengths or weaknesses of the enemy army. For me this is generally the most widely useful formation against all factions.
The battle develops: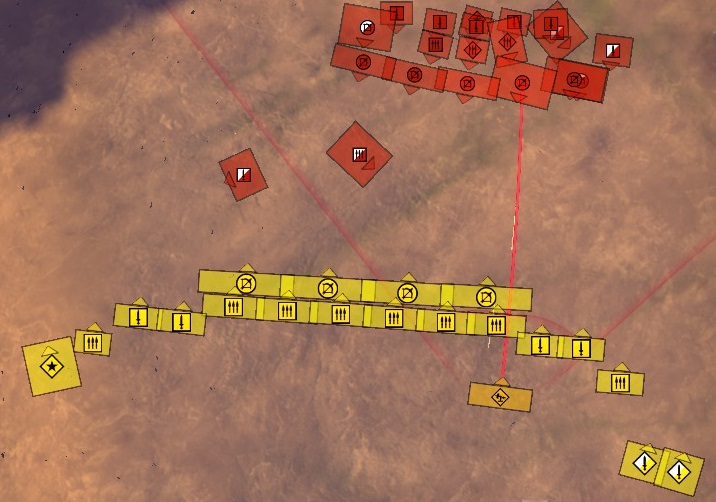
I slide my formation left to take a defensive position on a small ridge.
I target skirmishers first, in this case Syrian Archers, with my Ballista because they are easy to route and will likely cause a lot of casualties to your army.
Their Praetorian Cavalry starts to head to my flanks then doubles back to charge the peltasts due to the long uninviting flank.
The battle develops: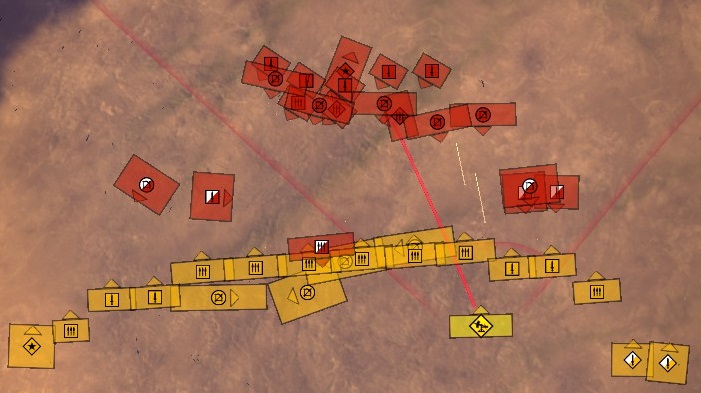
Their shock cavalry attempts to charge my peltasts as they retreat behind my pikes, my pikemen enter phalanx and steady, routing the cavalry shortly after. Waiting to phalanx after the Skirmishers pass through speeds up the retreat.
I begin to advance my cavalry and hoplites on the right flank to answer their cavalry seeming to choose my libyan infantry as a target. The infantry enters shield wall and the two nearest peltasts target the cavalry.
On the left flank I choose the two closest peltasts to target the skirmisher cavalry and enter shield wall with the libyan infantry. I advance the elephants and the hoplites at a walk, the elephants start to shoot as well.
The battle develops: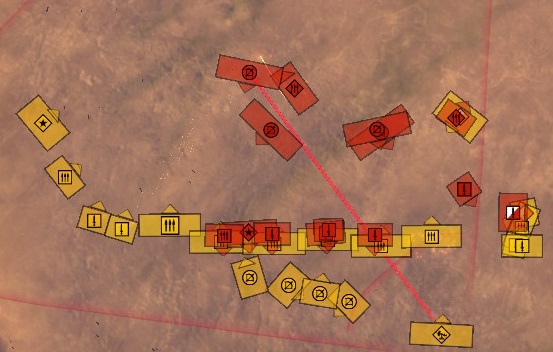
The skirmisher cavalry on the left flank is quickly routed, the left flank curls up into a hook.
The right flank is winning easily and the extra cavalry begins to kill off their skirmishers that fell back, they send light spear infantry to answer the cavalry.
The Ballista targets skirmishers away from the main battle to reduce friendly fire casualties.
The battle develops: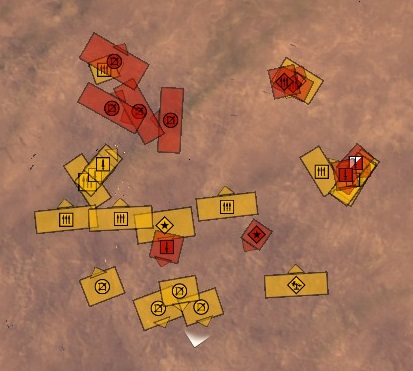
The Praetorian Guard have busted through my mid but they have elephants charging their back. The right most unit of pikes broke formation to take a flank position on the rest of the Praetorian Cavalry. The left flanks have wrapped around and routed the rest of their infantry, their general is dead, all their units are blinking on the verge of routing, broken, or shattered. Victory:
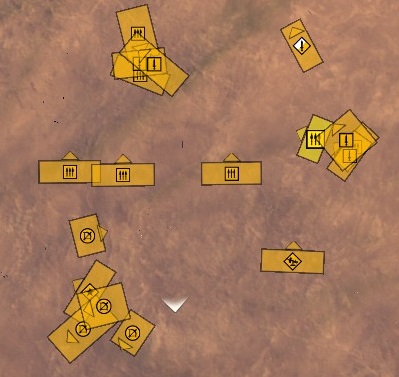
5 seconds later the entire army is shattered.. This battle was fought in custom battle, the Romans fought at a much higher tech level. (I was too lazy to replicate a campaign army for the Romans)
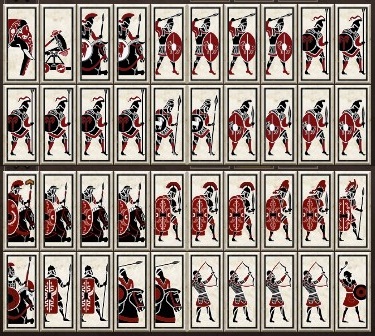
In campaign battles you won't come across such a unit tech discrepancy, for instance I didn't even use late hoplites or noble cavalry. Also you rarely see so much strong cavalry in a single army unless it is very late game, but you'll have comparable units by then.
The Arrow
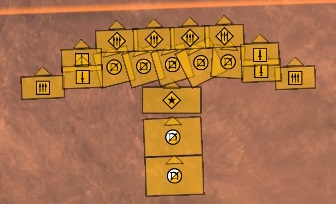 The basic army consists of:
- General with Armored African Elephants.
- 4 Libyan Hoplites.
- 4 Libyan Infantry.
- 2 Carthaginian Hoplites.
- 5 Libyan Javelinmen
- 2 Merc Cavalry.
*This army requires a muster field and no tech.
The main battle line of Libyan Hoplites create an inviting squishy mid.
The Libyan Infantry are double stacked so the back two units can reinforce mid if it gets pummeled too fast, or they can advance with the front two for a flank and spank.
The Carthaginian Hoplites create the long uninviting flank, they are far enough back to easily rapid strait to mid and reinforce if needed, or rapid advance into a strong flanking positiion.
The Elephants are kept in position to grant morale to the weak mid and the merc cavalry is kept behind them in a neutral position to react to possible flankers or once again to charge mid.
The battle develops: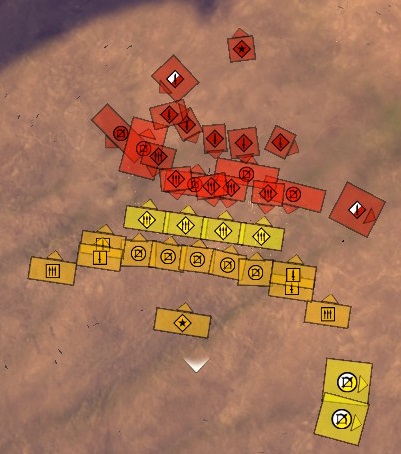
As our armies meet, just before I enter their jav range, I advance my Libyan Hoplites forward to flush their skirmishers behind enemy lines as I position my skirmishers and use quick reload to pelt their main battle line as their skirms retreat through it. This nets a lot of kills.
I notice their cav swinging toward my right flank and move my cav to intercept.
The battle develops: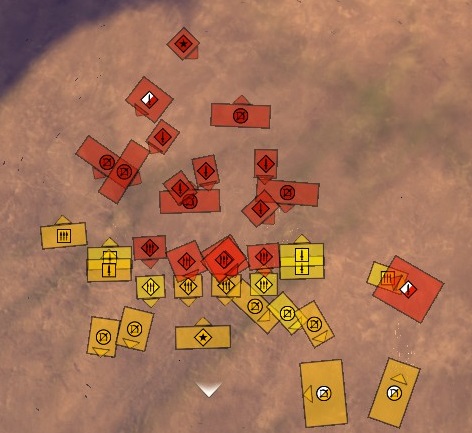
I pull the Libyan Hoplites back with Rapid Advance, ironic, and enter the Hoplite Wall stance to receive the enemy charge. The Libyan Infantry and left Carthaginian Hoplite advance. The merc cav and the right Carthaginian Hoplites meet their cav on the right flank.
I split the javs toward the left and right flanks.
The battle develops: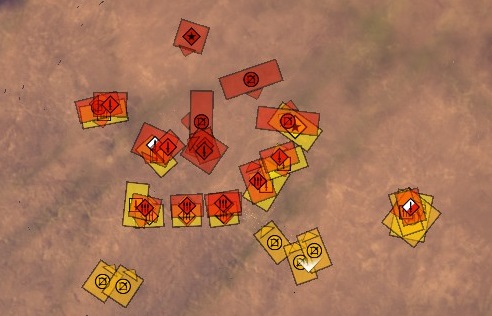
The Libyan Infantry have rolled up the right flank with Use the Whip, as the left flank meets heavy enemy reinforcement.
The general's elephants swing wide along the right flank, inside their flanking cav. He begins to route their skirmishers before descending on the backs of the main Roman battle line.
The battle develops: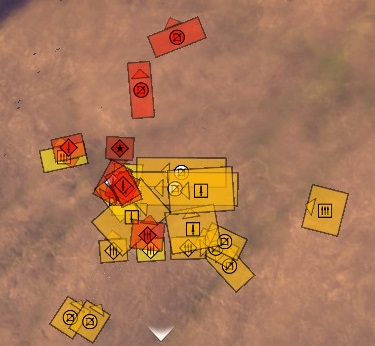
With the right flank crushed my army converges on the only strong point left as their general charges finally. Victory:
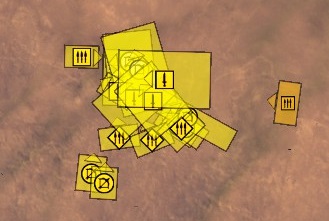
The Roman army shatters as the right flank completely encircles them, their general routing before he meets my troops.
- The Noob's Guide To: Taking A City Without Going Into "Total War"★ 5 (758)57k views667 ♥4 minUpdated Aug 15, 2021
- Rome 2: Formations (unit control tips)★ 5 (1k)49k views1.5k ♥5 minUpdated Sep 21, 2013
- ROME 2... EMPEROR EDITION. Easy public order and money income guide★ 5 (1.4k)47k views2.9k ♥33 minUpdated Feb 1, 2019
- A Comprehensive Guide to the Power & Politics System★ 5 (575)45k views1.1k ♥13 minUpdated Jul 5, 2018
- The one and only mod list for Rome II★ 5 (649)44k views1.6k ♥7 minUpdated Oct 19, 2023
- Ancient Roman Battle Formations★ 5 (650)34k views1.1k ♥38 minUpdated Mar 31, 2015


- Upgrading to PremiumTeam Fortress 2★ 5 (20k)1441k views11k ♥6 minUpdated May 11, 2022
- No More Room in Hell Official ManualNo More Room in Hell★ 5 (2.8k)569k views2.1k ♥29 minUpdated Apr 22, 2019
- NMRiH Community Hosting GuidesNo More Room in Hell★ 5 (526)351k views653 ♥1 minUpdated Aug 10, 2022
- ULTIMATE GUIDE FOR GAME DEV TYCOONGame Dev Tycoon★ 5 (5.8k)326k views10k ♥4 minUpdated 23 Jan, 2014
- How to 'Git Gud' Soon™MORDHAU★ 5 (2k)318k views3k ♥68 minUpdated Nov 16, 2024
- Лучшие кооперативные игры SteamPAYDAY 2★ 5 (1.5k)315k views2.1k ♥56 minRussianUpdated Apr 27, 2025






This guide was created by its original author on the Steam Community. Are you the author and want it removed? Request removal.