Colony 101: space exploration (end-game)
Introduction
Warning: the last time I played was in June 2022. This guide was up-to-date to the best of my knowledge at that time, but updates may have rendered part of it obsolete or flat out wrong. I will not be updating this guide anymore or answering to comments.
This is a continuation from my previous guide:https://steamcommunity.com/sharedfiles/filedetails/?id=2382276982
This part assumes you understand everything explained there and have a self-sufficient colony that can run hundreds of cycles with minimal intervention, a large power source and a consequent
 stash of Ceramic and Steel. At least 20 to 30 tons of Steel is advised to really start getting serious about space.
The final goal is now in sight: conquer space and reach the Temporal Tear.
Launching rockets allows you to:-
Get Data Banks, which are required to finish Rocket research.
- Get materials from space, in particular materials that are not available on Terra, such as Aluminium (or other Forest/Rust biomes materials), and space materials: Fullerene, Niobium and Isoresin which are required to craft Thermium, Super Coolant, Insulation and Visco-Gel.
Those space materials are greatly superior to what you can get on your asteroid, and unlock some new possibilities, which are also required to advance through the different rockets:
-
Thermium has a much higher temperature overheat bonus, which makes possible Regolith-cooled machinery and Thermium Aquatuner as a heat source for a Petroleum Boiler.
-
Super Coolant cannot freeze and is necessary to make Liquid Hydrogen, which is used in later rockets (Hydrogen Engine). It also makes Liquid Oxygen much less power intensive, and doubles any Aquatuner-based setup efficiency compared to Polluted Water.
-
Insulation has perfect thermal insulation when used to build Insulated buildings. It's especially useful for pipes, because Insulation Insulated Pipes won't exchange heat with their content.
-
Visco-Gel does not flow like other liquids: this makes vertical liquid airlocks much easier to build.
Space Biome
Before we get into rocket launches, you'll have to reach the space biome. Dig up until you reach it if you didn't already.
When you reach the space biome, Meteorites will start falling onto your asteroid. This is very important, because they bring renewable resources, all coming in very hot:-
Regolith: it's a filtration medium. This means you will no longer be limited to the plentiful but non-renewable Sand.
-
Iron: it's already in its refined state, which can be used directly for Steel production.
-
Copper Ore: useful both as a construction material as-is or when refined to Copper.
-
Gold Amalgam: it's the most important renewable from Meteors, as it's the only source of renewable Gold Amalgam, albeit in limited quantities. Do not make the mistake of refining it, because you cannot transform Gold back to Gold Amalgam.
Side-note: Copper Ore, Pyrite (which can be smelted to Iron), and Wolframite are available from Space expeditions. This will cover your renewable Ore/Refined Metals later on, but Gold Amalgam, which is very useful for its +50°C Overheat property in unrefined state, is not available from Space expeditions.
While Regolith is plentiful, Iron, Copper Ore and Gold Amalgam will only be brought by Meteors in a very limited quantity. Don't expect more than a few tens of kg per cycle overall.
Aside from Meteors, which we will see how to protect against soon, there are two other things you need to be aware of in the Space Biome:-
Space exposure: any exposed cell will slowly suck up any liquid or gas that's on it, at a rate of 100g/s. You can build Drywalls to prevent that. Note that Mesh Tiles, Airflow Tiles and Pneumatic Doors also act as Drywalls despite letting gases through and not giving a visual indication of that.
-
Shove Voles: critters that eat debris, poop half of the debris' mass as tiles, and can burrow in almost everything.
 One of the materials Shove Voles cannot burrow into is Abyssalite, which is why you haven't seen them before reaching the Space biome. Once you break that abyssalite layer, , they will happily burrow through your asteroid, eat debris (including valuable Iron Ore and Dirt) and poop it at the most inconvenient spot if you don't take precautions. It's best if you build an access to the space biome that prevents them from going through.
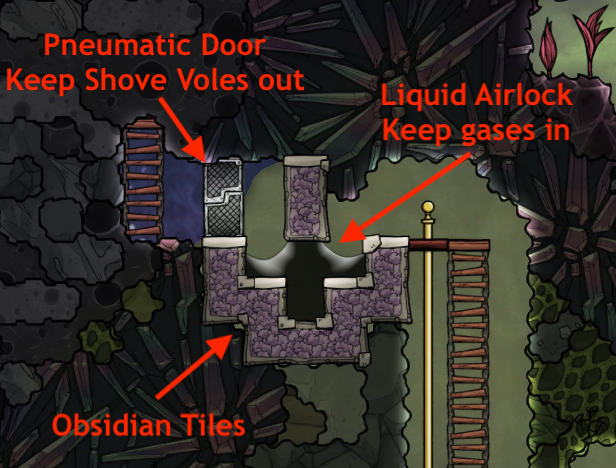 Luckily, Shove Voles cannot burrow through pneumatic doors of any materials, or any tile built out of obsidian, refined metal, or other materials made out of "Nearly Impenetrable" elements.
While space exposure won't delete a lot of gas if you only have a narrow access, it's a good idea to have a liquid airlock too, so that gases are kept in your asteroid.
Combine both to create a safe space access. Check it from time to time though: Shove Voles can poop in pneumatic doors, then use that natural tile to burrow through the pneumatic door. If that happens, promptly dig the natural tile.
Shove Vole Containment
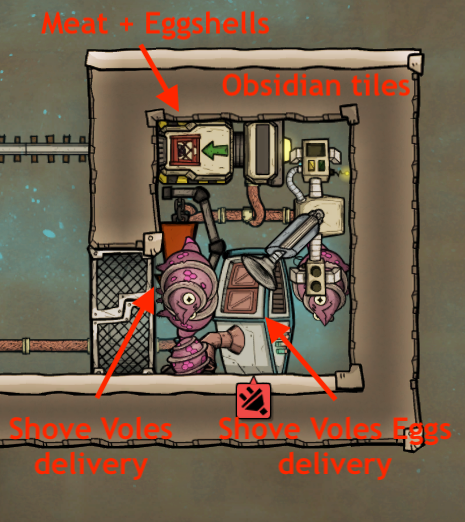 Shove Voles are mildly annoying, because they eat Debris (Regolith, Dirt and Iron Ore) and excrete 50% of the eaten mass as natural tiles, which will again lose 50% mass when mined, greatly reducing the mass of anything they eat.
While the lost Regolith is not an issue since it's so plentiful, the real annoyance is the formation of solid tiles, in addition to Meteors impact: this will make your surface mining to collect aforementioned renewables slower.
Instead, it's a good idea to contain them in a room. Because they can burrow and travel pretty much anywhere in most materials, that room must be specifically constructed with materials they cannot travel through. The cheapest solution is Obsidian Tiles with a Pneumatic Door entrance.
Add in an Auto-Sweeper and Conveyor Loader to the room to ship the Meat to the Kitchen and Egg Shells to the Rock Crusher, as seen in previous parts.
Space roof
To work safely in the Space biome without having to repair everything all the time because everything gets damaged by Meteors, you need to build a Space roof, using buildings that are impervious to Meteor Damage. There are only two of them and both require Steel: Bunker Doors and Bunker Tiles.
Bunker Doors take 4 cells and can only be operated with automation, but are slightly more costly than Bunker Tiles, at an additional 25kg/cell of Steel.
When you open a Bunker door, tiles that formed above it will fall down below. This means buildings below will be entombed, and you must plan a solution to dig up those tiles, either with manual Dupe labor or using Robo-Miners.
For Bunker Doors automation and power, you might be tempted to use Lead, as it's cheap and plentiful. It's a bad idea: Lead melts at 327.5°C, which is well below the 400°C+ temperature of incoming Meteors. Given enough time, wires will melt. Don't use Lead in the Space biome.
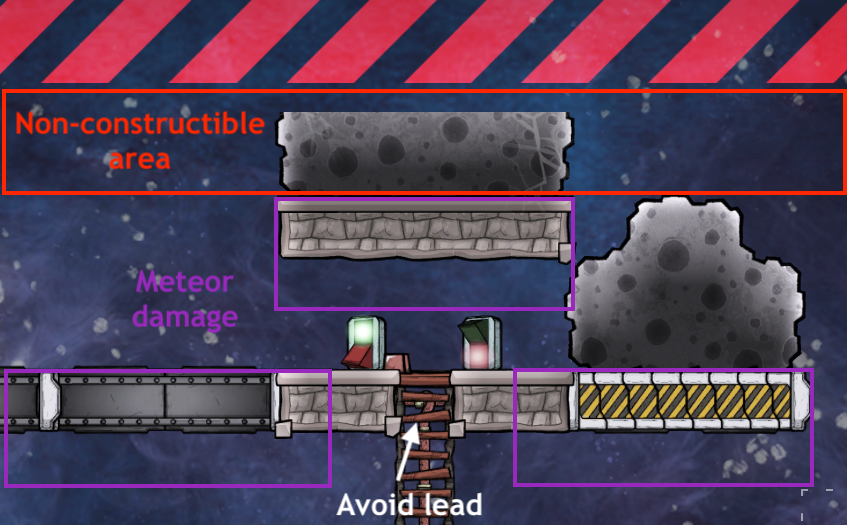 The strategy to build your roof is to quickly scaffold Ladders as high as you want to go, then build a small roof to protect it and expand right and left from there. Note that destroyed Ladders can still be used without any disadvantage, so an alternative strategy is to not protect Ladders and disable auto-repair on them instead, if you don’t mind the constant red icons.
When you build below your Bunker Tiles/Doors, be careful of Meteor Damage: it also damages tiles just below Bunker Tiles/Doors. Always leave one cell of space below.
On the other hand, buildings like Auto-Sweepers and Robo-Miners can be directly under a Bunker Tile/Door without taking any damage, as long as Meteors don't pass through them when a Door is opened.
How high should I build my roof? The limit is the constructible area, which is 2 cells below the red-stripped area. If you do so, you will lose some Meteor tiles, because tiles don't form in the red-stripped area. Give a few more cells of clearance if you care about those, or construct right at the limit of the constructible area if you don't.
What's the automation for Bunker Doors? When starting out, you don't need advanced automation for Bunker Doors. Just plug them to a Switch to manually close them when a Meteor Shower starts, and open them again after the Meteor Shower ends and you clear any Regolith on top of them. It’s a good habit to always clear Regolith before opening doors, as it’s otherwise easy to overheat any machinery that the Regolith tiles would fall through.
Telescope
While you can launch your first rocket to the 10.000km ring without actually researching a space destination, you'll need to at least build a Telescope to access the Starmap. The Telescope allows you to research space destinations to have some information on those, and more crucially to be able to launch rockets to further and further destinations.
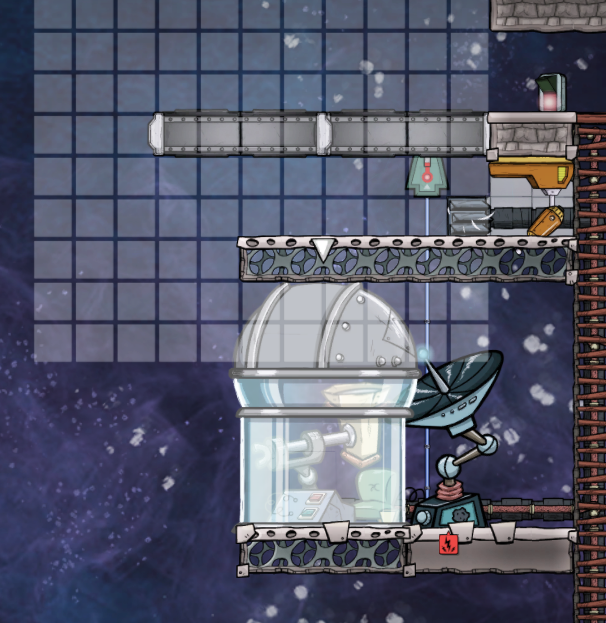
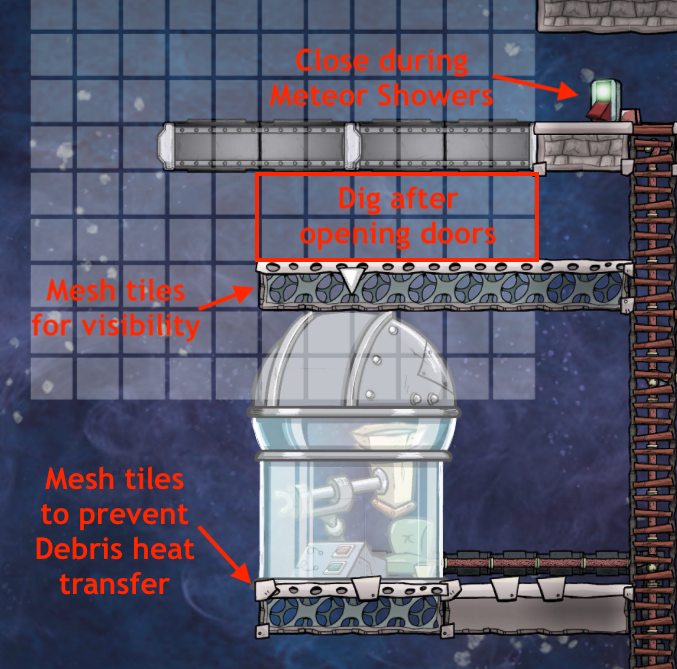 In order to work, a Telescope needs a clear line of sight to the Sky. The Show Building Ranges mod highlights this line of sight.
You will need to place at least 2 Bunker Doors above to protect it from Meteors. Note that it doesn't have to be that close to the sky: it's actually recommended to put it near your space access to minimize Dupes travel.
I recommend building Mesh Tiles above your Telescope to protect it from Regolith Tiles. You'll need to dig it out each time you open the Bunker Doors.
While it's not necessary in this design, it's a good practice to build the Telescope on Mesh Tiles as well, so that any debris being left on the floor cannot exchange heat with it.
In the configuration shown, you can even research at a reduced rate when the Bunker Doors are closed.[oxygennotincluded.fandom.com]
To complete the build, provide power, pipe in excess Oxygen from your SPOM, then select a space destination to research in the Starmap. Your Dupes will do the rest! You will need to manually select a new destination each time or use the Starmap Queue mod to have the next destination auto-selected.
For more details about Telescope visibility, here is a nice explanation, courtesy of Hotep Thunderbolt: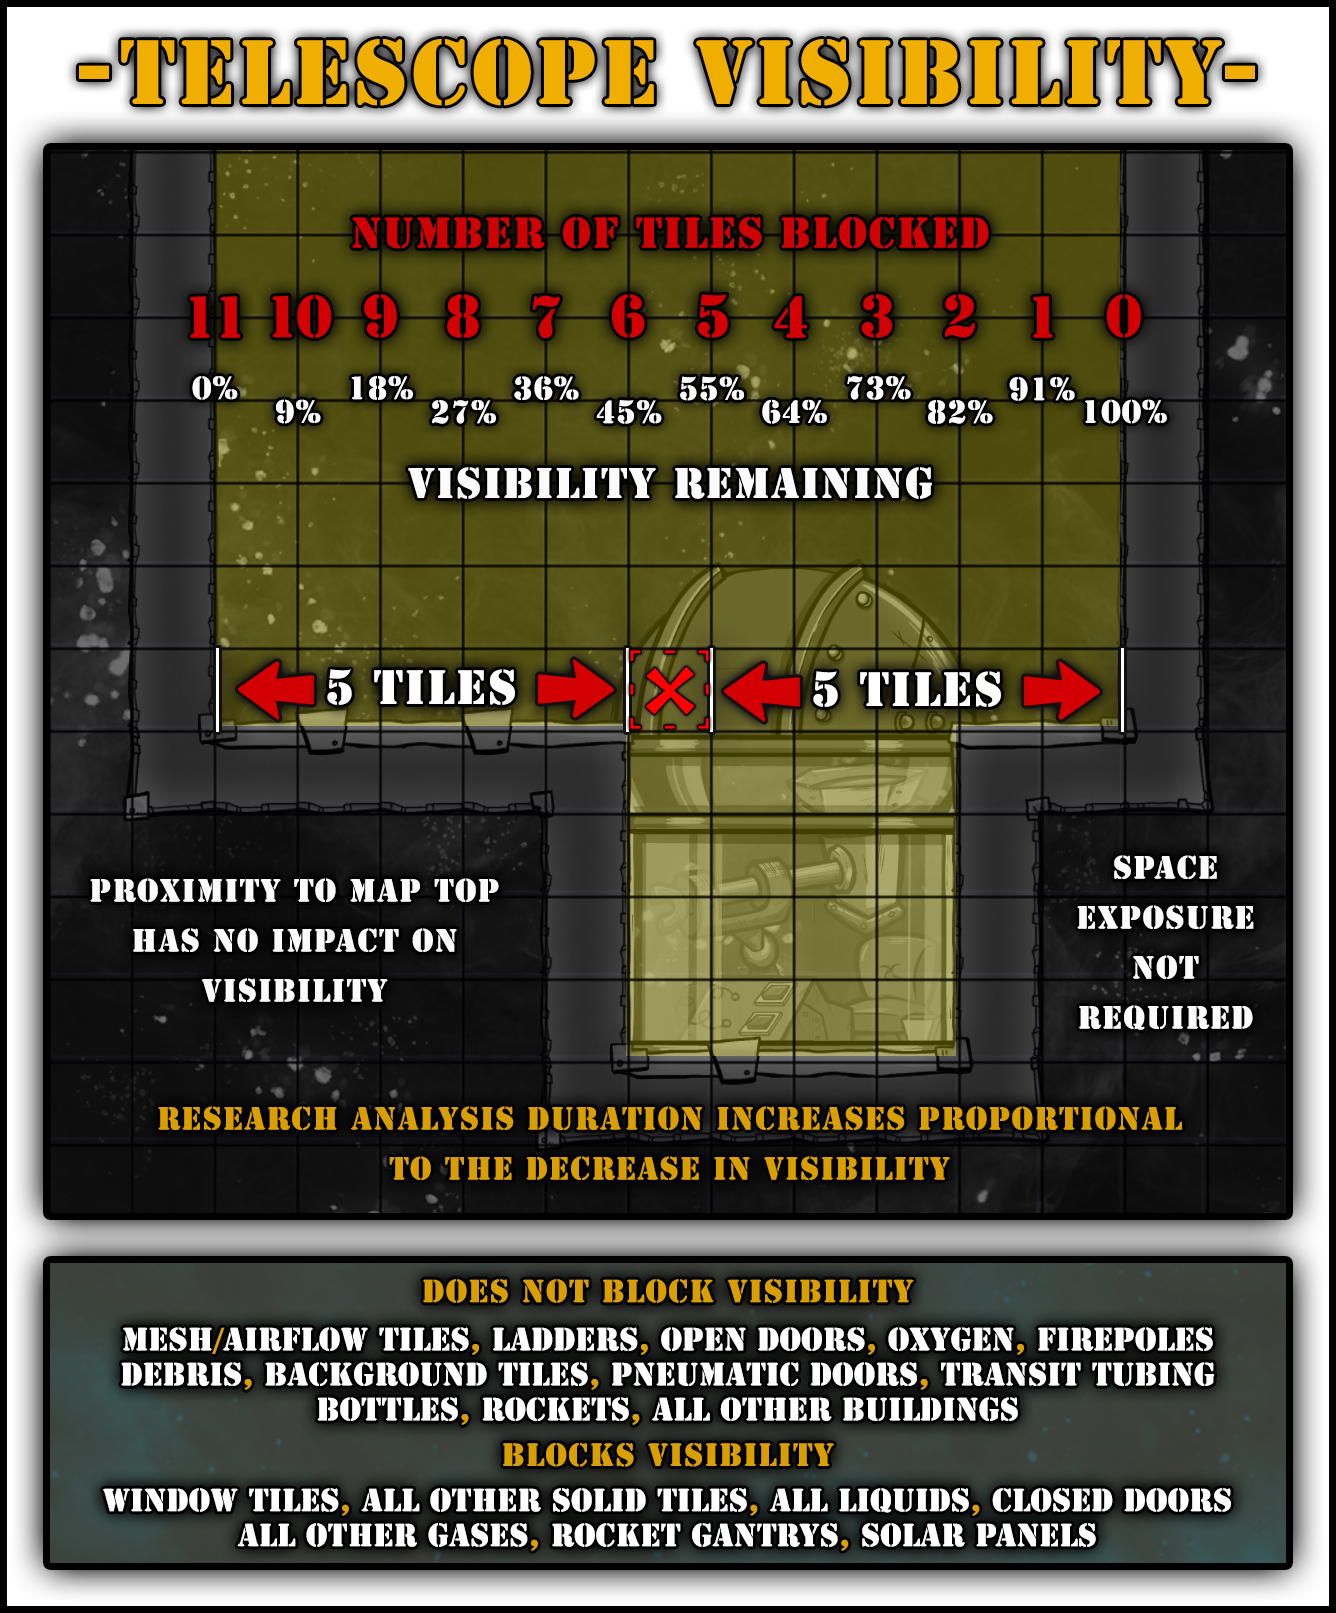
Rockets basics
Before going into the details of each rocket, let's go over the basics of rockets.
First, you need an Engine, which is the basis of a rocket.The progression is Steam => Petroleum => Liquid Hydrogen.
The optimal way is to use each one to unlock the next one:
-
You will need 2 or 3 Steam Rockets to gather enough Data Banks to unlock Petroleum Engine research
-
Then you will need to gather Fullerene with a Petroleum Rocket using Solid Oxidizer to make Super Coolant. Super Coolant is necessary to produce Liquid Hydrogen and allows to efficiently make Liquid Oxygen.
- Optionally, switch from Solid to Liquid Oxidizer to go further/gather more materials once you have some Super Coolant.
-
Lastly, the Hydrogen Engine will allow you to go everywhere and reach the Temporal Tear.
Note that apart from the Engine and Command Capsule, there is no set order for all the other modules in-between.
Oxidizer? What's that? In addition to fuel, Petroleum and Hydrogen engines require an Oxidizer, which is either solid (Oxylite) or liquid (Liquid Oxygen, abbreviated as LOX).
While liquid oxidizer is better as it increases the rocket range, it is quite inefficient to produce it before getting Super Coolant (but possible), and thus I won't cover this way.
If you want to try out pre-Super Coolant LOX, the only way is using Hydrogen cooled using a Thermo Regulator, because no currently available liquid can be cooled that low. As you can see in this thread, the Thermo Regulator is very inefficient compared to the Aquatuner.
To build your rockets, you will need, top-down:-
A Command Capsule at the top, for the rocket's pilot.
-
A payload: Cargo Bays / Research Modules / Sightseeing Modules. You will need to compute how much of each the rocket can carry according to the destination and fuel.
-
Optionally, a Solid Fuel Thruster. In practice don't bother, this is explained below.
-
For Petroleum/Hydrogen, 1Oxidizer Tank (Solid or Liquid) every 3 Liquid Fuel tanks.
-
For Petroleum/Hydrogen, Liquid Fuel Tanks, generally up to 3.
-


 Why shouldn't I use a Solid Fuel Thruster? In theory, it adds some range, but in practice, it weighs so much that it cancels out that range, actually removing range for most rockets.
The main niche use is with a Steam Rocket, in order to reach 20 000km destinations for Research before switching to Petroleum rockets. In practice, it's better to switch to Petroleum directly instead.
How do I configure my rocket? The best way is to use ONI Rocket Calculator[oni-assistant.com], so that you can see how far a rocket can reach and how much fuel it requires.
Cookie-cutter rockets
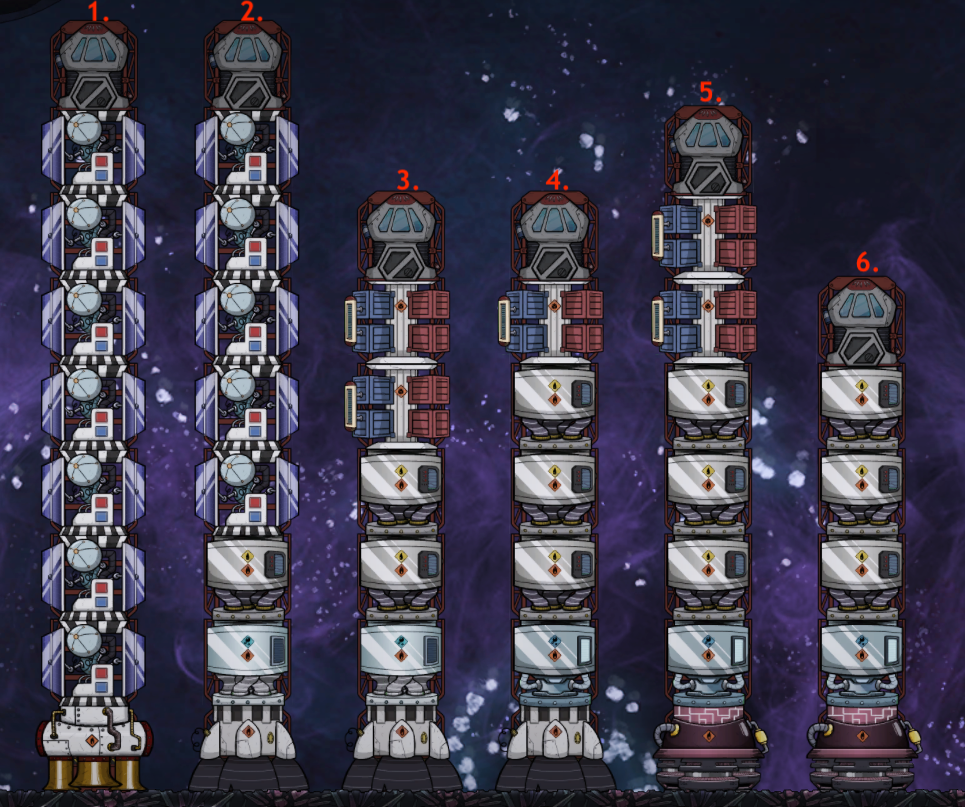
- Very short range Research (10.000km): Steam Engine + 7 Research modules + Command Capsule. Your very first Rocket, which goal is to gather 600 Data Banks to unlock the Petroleum Engine.
- Medium range Research (80.000km): Petroleum Engine + Solid Oxidizer Tank + 1 to 3 Liquid Fuel Tanks (depending on range) + 5 Research modules + Command Capsule. Optionally, you can add a single Carbo Bay up to 60.000km. Its goal will be to gather enough Data Banks to finish all your rocket research.
- Short range Cargo (30.000km): Petroleum Engine + Solid Oxidizer Tank + 2 Liquid Fuel Tanks + 2 Cargo Bays + Command Capsule. This rocket goal will be to gather enough Fullerene to make Super Coolant. Replace a Cargo Bay with a Liquid Fuel Tank to go up to 60.000km if you don't find Fullerene within 30.000km.
- Medium range Cargo (optional) (60.000km): Petroleum Engine + Liquid Oxidizer Tank + 3 Liquid Fuel Tanks + 2 Cargo Bays + Command Capsule. Remove a Cargo Bay to go up to 100.000km. If there is an interesting planet that the Short range version cannot reach, you can upgrade to Liquid Oxidizer before building a Hydrogen Engine rocket. You will generally skip this one because you either have to make Liquid Oxygen inefficiently before Super Coolant (not covered), or you have Super Coolant, and thus the ability to produce Liquid Hydrogen as well.
- Long range Cargo (optional) (120.000km): Hydrogen Engine + Liquid Oxidizer Tank + 3 Liquid Fuel Tanks + 3 Cargo Bays + Command Capsule. Remove a Cargo bay to go up to 170.000km (or even more by adding Oxidizer and Fuel tanks). This is optional, because at that point, you have everything you need to go directly to the Temporal Tear and complete the game. Use that to collect more rare resources from farther planets.
- Temporal Tear (180.000km): Hydrogen Engine + Liquid Oxidizer Tank + 3 Liquid Fuel Tanks + Command Capsule.
You can replace a Cargo Bay (2000kg) with 10 Research/Sightseeing modules (200kg each) in any of the builds, as they weigh the same.
Steam Rocket
 After all that theory, it's finally time to build your first Rocket, powered by a Steam Engine.
The goal is to get 600 Data Banks to be able to research Hydrocarbon Combustion and unlock Petroleum Engines.
After all that theory, it's finally time to build your first Rocket, powered by a Steam Engine.
The goal is to get 600 Data Banks to be able to research Hydrocarbon Combustion and unlock Petroleum Engines.When you launch a rocket with Research Modules, each module gives 10 Data Banks, plus 50 Data Banks for each area studied . Those areas can only be studied one time, which is why you switch destinations every time.
 Since there are always 5 areas per destination, the optimal rocket should be a 5 Research Modules one, getting back 300 Data Banks per new destination.
That's when you don't take into account ONI weird rounding issues: if you gather exactly 600 Data Banks, you'll often be 1 Data Bank short because one somehow got rounded down.
To prevent that, add another module to get 310 Data Banks instead.
While you are at it, since the next rocket will need a Liquid Fuel Tank and a Solid Oxidizer Tank, you might just as well go for 7 Research Modules, for 320 Data Banks per launch, so that 2 Research Modules can be switched out without rebuilding the entire rocket.
What about the roof? Rockets don't need to be protected from Meteors. They are impervious to Meteor Damage, and any Regolith accumulating at their base will be dug up by the Engine when launching and landing.
Adding a roof to a Rocket is a needless complication unless you are trying to trap its exhaust, which is a vanity project and not covered in this guide.
On the other hand, you must keep an eye on it when it's refueling: the Engine being entombed prevents refueling, so you must dig it up if a Meteor lands there during refueling.
Steam Engine fuel
To launch this rocket, you need to fill the engine with Steam, 763kg exactly to reach 10.000km destinations according to the Rocket Calculator. I advise to overshoot a bit, it isn't always 100% accurate, so 780kg will do nicely.
Unfortunately, this is pretty much a one-off: apart from a Sauna (which is far from essential), nothing really uses Steam as-is. As such, it's really not a good idea to invest in a complicated setup for just 1560kg of Steam.
There are two ways I recommend to create that Steam:- Using hot Regolith.
- Using an Aquatuner and a Tepidizer.
What about Steam Vents/Volcanoes? Since it's unlikely you'll get those near your rocket, you will have to transport Steam long-range. Since gases (liquids too) exchange heat with the pipes they are in (even if they are insulated), those gases have a very low mass that gets cooled easily. Pipes get built between 10°C and 45°C because of temperature clamping, so you will have issues with burst pipes because of Steam cooling down below its condensation threshold.
It's not worth doing a complicated setup and dealing with this issue just for 2 launches.
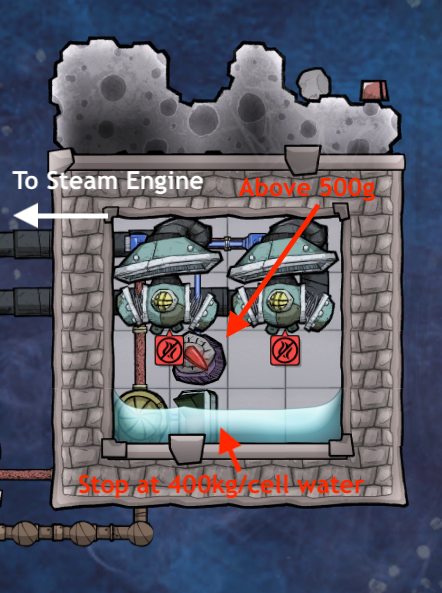
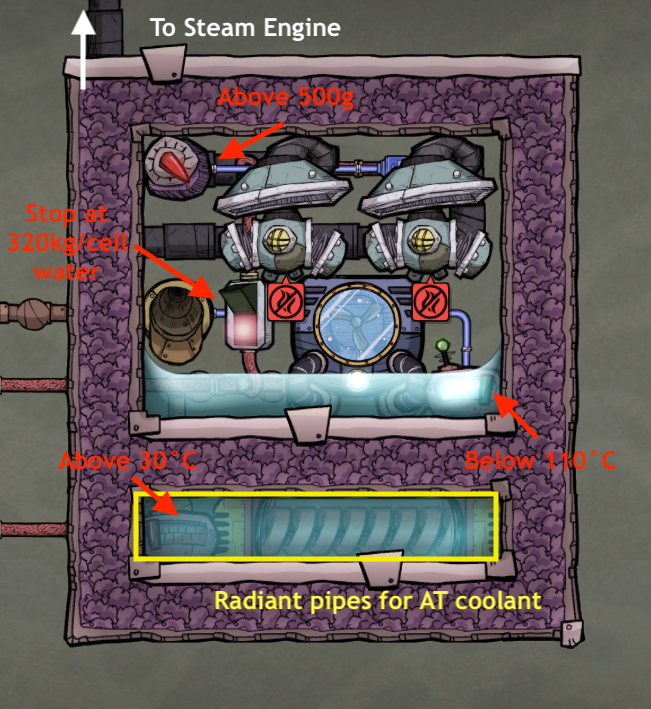
Let's see two example builds. Both have some common features:- A Liquid Vent to input hot Water, with a Signal Switch to stop Water input once there is about 1600kg in the room. It can be replaced with a Bottle Emptier or an Automatic Dispenser for Ice.
- 2 Gas Pumps with an Atmo Sensor set to Above 500g to avoid pumping partial packets.
 Using Hot Regolith
The simplest option in my opinion: a box with Bunker Tiles where you bring in Water with a Bottle Emptier or by running a pipe. You can also bring Ice with an Automatic Dispenser, though it will take longer to heat up to Water, then all the way up to Steam.
After that, you just wait. There is no power being used to heat it up, but if you wanted to speed up the process by heating water well under 85°C, you could add a Tepidizer.
In the example, since there are 4 cells, you can stop the input once there is about 400kg of water per cell.
The main drawback of that method is that it can be a little slow, especially if you build it during a No Meteor season and you have to wait a long time for Meteor Showers. Or because of RNG, sometimes Meteors decide to avoid your box.
 Using an Aquatuner and a Tepidizer
If you'd rather have a slightly more complicated but non-Meteor dependant method, you can use an Aquatuner as a heat source and a Tepidizer to counter-balance it (or a sufficiently large body of liquid to absorb the cooling power of the Aquatuner). Obviously, this will use a fair amount of power, which shouldn't be a problem if you have a 10KW Petroleum loop running already.
This time, build a box with Insulated Tiles under the surface (to avoid having to build Drywall) but close to your Rocket, and place an Aquatuner and Water in it. Then run the Aquatuner pipes through a second room with a Tepidizer to absorb the Aquatuner cooling and avoid bursting pipes.
In the example, since there are 5 cells, you can stop the input once there is about 320kg of water per cell.
Summary of first rocket infrastructure
 That was quite a long read and a lot of details.
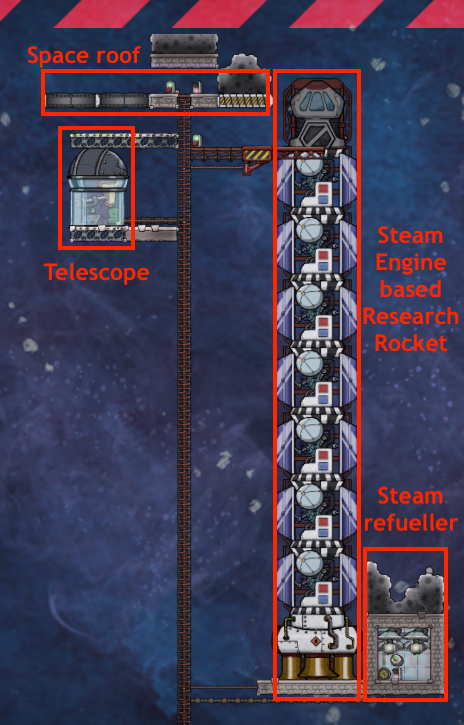
To sum up everything explained so far, you need 4 pieces of infrastructure:
That was quite a long read and a lot of details.
To sum up everything explained so far, you need 4 pieces of infrastructure:- Space roof to protect your Telescope.
- Telescope to discover new space destinations.
- Steam refueller to refuel your rocket.
- Steam Engine-based research rocket to acquire Data Banks.
About the Gantry
While the example includes a retractable Gantry (via a Signal Switch), a simpler option is to load an Atmo suit, a Pilot, then deconstruct the Gantry altogether.
Once a Pilot is inside a Rocket, he is in a cryo-stasis state and does not need to be let out, ever, not even between Space missions.
You do not even need to let a Pilot out to deconstruct a Rocket: deconstruct it and the Pilot will automatically pop out.
If you still decide to use Gantries, you do not need to power or repair them. They work just fine when broken.
Once the Engine is fueled, the Atmo suit delivered and the Pilot on board, select a destination, and you are ready! All that's left is clicking the Launch Rocket button in the Starmap and enjoy your first Rocket launch!
(Optional) Robo-Miners
 Tired of ordering Dupes to dig Regolith after a Meteor Shower ends? Robo-Miners are the solution to that: they will automatically dig out any tile they can reach (except Abyssalite, Diamond and Obsidian).
There are a few considerations before building Robo-Miners though. The first one is that Robo-Miners can become Entombed if any Regolith tiles stay on them. This is solved by building them facing downward, by having a 2 tiles roof when built sideways, or by ensuring Regolith can never reach them after opening Bunker Doors.
When built in vacuum, Robo-Miners will heat up until eventually overheating and breaking, as they have nothing to transfer heat to. You will need to plan a cooling solution, here are a few possibilities:-
Thermium Robo-Miners can be Regolith cooled, if Regolith falls through them, since their overheat temperature is way above Regolith temperature. You have to ensure Regolith can fall below in that case.
- Venting waste Oxygen nearby will allow the Oxygen to pick some of the heat before being deleted.
Build a few drywalls behind the Vent and the Robo-Miner and you are done. This is especially useful when using Hydrogen Engines: you will need equal amounts of Hydrogen and Oxygen, but Electrolyzers produce nearly 8 times more Oxygen than Hydrogen, so you will have a huge Oxygen overproduction.
-
Building a long cooling loop and having a transfer medium, generally a droplet of Crude Oil sitting on an Airflow tile with a Drywall behind. This is a decent option if you don't have Thermium and don't want to vent Oxygen, or if you plan on building multiple Robo-Miners.
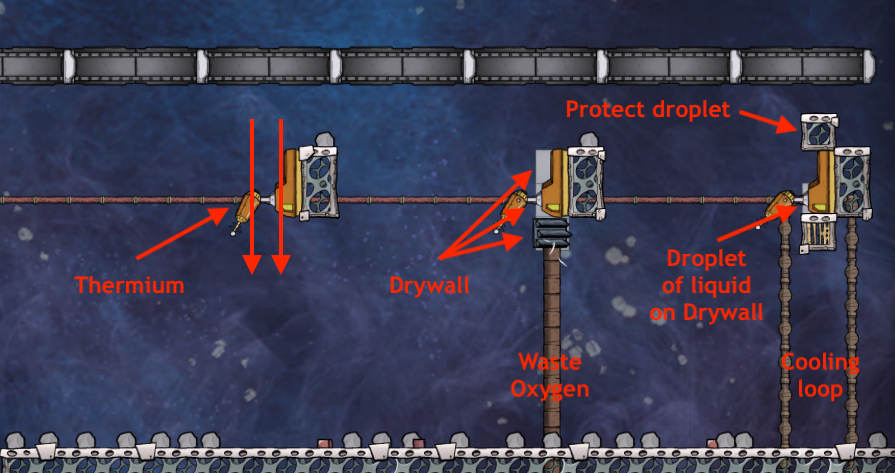
Those 3 solutions are all equally valid, it's up to you to choose which one you prefer.
If you are unsure, go for the Thermium option as soon as you have some, otherwise venting Oxygen for small-scale builds and a cooling loop for large-scale builds.
(Optional) Space Scanners

While manually opening and closing bunker doors is a good enough solution when starting out, it gets old very fast. It can be automated using Space Scanners to detect Meteor Showers. Space scanners have 2 different concepts that work together:
- Scan Quality: how good a single Space Scanner is at detecting incoming objects. There are a lot of conditions to have a good Scan quality, refer to the wiki page[oxygennotincluded.fandom.com] for details.
- Scan Network Quality: the sum of all Space Scanners scan quality. It's wireless, you don't need to link them in any way.
What's important to us is the Scan Network Quality. Each Space Scanner at 100% scan quality gives ~17% network quality. Each percent of network quality gives 2s minimum of advance detection time. Note that it's a minimum: the advance detection time is random and can trigger earlier.
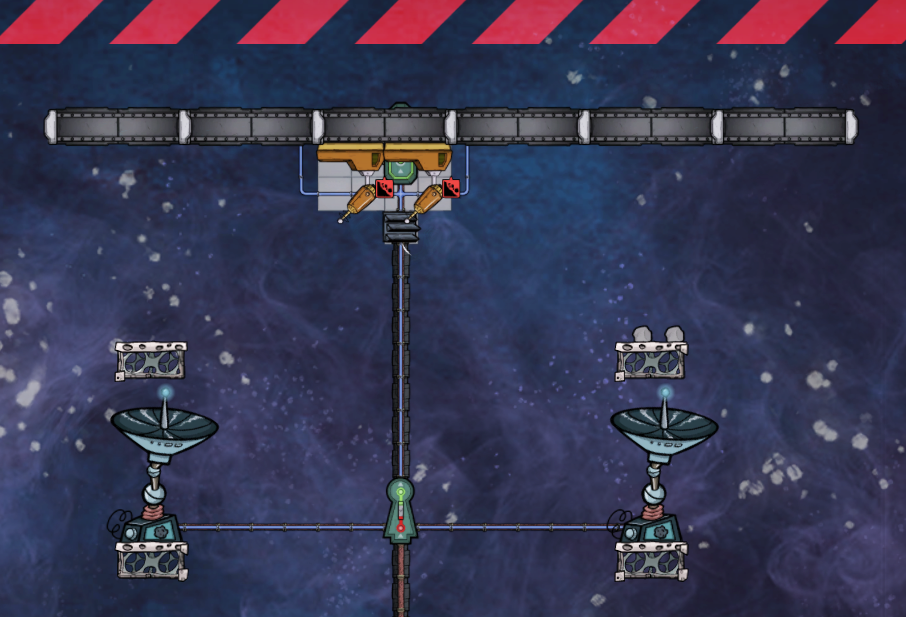
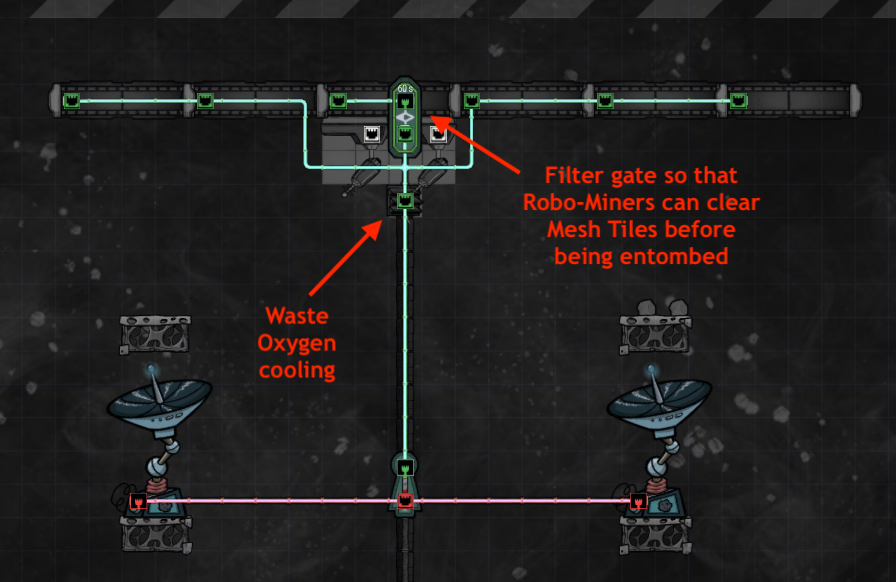
 This means 2 Space Scanners at 100% scan quality will give 33% network quality, which guarantees at least a 68s advance warning on incoming objects: this is more than the 44s it takes for Bunker Doors to close.
Those 2 Space Scanners don't even need to be at exactly 100%, a slightly worse scan quality will work fine as well.
Once you have 2 detection Space Scanners up and running, you can add other Space Scanners anywhere to provide an automation signal. It doesn't matter if those scanners have 0% scan quality: they will still provide an automation signal thanks to the wireless Network Quality.
To open doors above your telescope, build a Space Scanner nearby, add a NOT gate, and connect that to your bunker doors.
Rockets exhaust
Before upgrading to Petroleum Engines, let's talk about Rockets exhaust.
While launching a Steam Rocket two times had nearly no consequence because its exhaust didn't create a lot of heat, that's something to be careful about from now on.
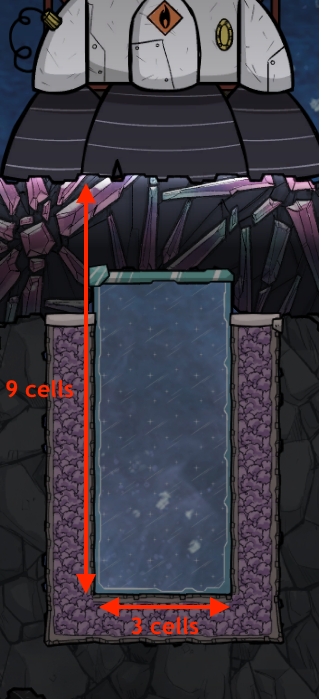 Rockets exhaust is separated into 2 parts:
- Gas Exhaust: the visible Steam or Carbon Dioxide around the engine when the rocket takes off and lands.
- Dry Exhaust: an invisible heating factor that heats tiles below the engine in a 3x9 rectangle up to 2926.9°C, at a factor depending on engine type.
The Dry Exhaust is sneaky because it goes through tiles, even if they are insulated. This means if you built your rocket right at the start of the Space Biome, it will heat up the biome below.
The Gas Exhaust is just a gas emission below the rocket, which doesn't go through tiles. The Steam Engine produces 150°C Steam, the Petroleum Engine produces 1226.85°C Carbon Dioxide and the Hydrogen Engine produces 1726.9°C Steam. All of those will be slightly heated up by the Dry exhaust just after being emitted as well, so you will see slightly hotter temperatures in practice.
To handle rocket exhaust properly, you can either vacuum the area below or make a heat-insulated box to prevent the heat from spreading.
Since the easiest way to vacuum a place is to create tiles and deconstruct them afterwards, you might as well use tiles with materials that can go up to 2926.9°C without melting and leave them in. This means Window Diamond Tiles or Metal Tungsten Tiles, as all other materials (even Obsidian or Steel) will melt below that temperature.
Add heat-insulation to that box with Ceramic Insulated Tiles to prevent heat transfer to the outside, and you are done.
Later on, if you wish, you can easily use that box as a heat source for other projects, like a petroleum boiler, salt water / polluted water boiler, or anything else that uses a heat source: just put a heat bridge anywhere and you're good to go! As mentioned earlier, this is a vanity project and won't be covered here.
Solid Oxidizer production
As explained before, in addition to Petroleum, Petroleum Engines require an Oxidizer.
You need an equal amount of Fuel and Oxidizer. Any more than equal amounts is wasted, so don't forget to adjust your Fuel and Oxidizer Tanks just after building them to prevent overfilling.
 At this point, you do not yet have Super Coolant. Producing Liquid Oxygen without Super Coolant is possible, but painful and not worth it. That's why right now, your best solution is to use a Solid Oxidizer, namely Oxylite.
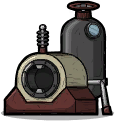 You might remember Oxylite as tiles producing Oxygen right when you start the game. This time, it's the reverse: an Oxylite Refinery is required to transform Oxygen into Oxylite, using a tiny bit of Refined Gold.
Ensure you have a bit of Gold that your Dupes can supply to the Oxylite Refinery, pipe in excess Oxygen from your SPOM and you're good to go!
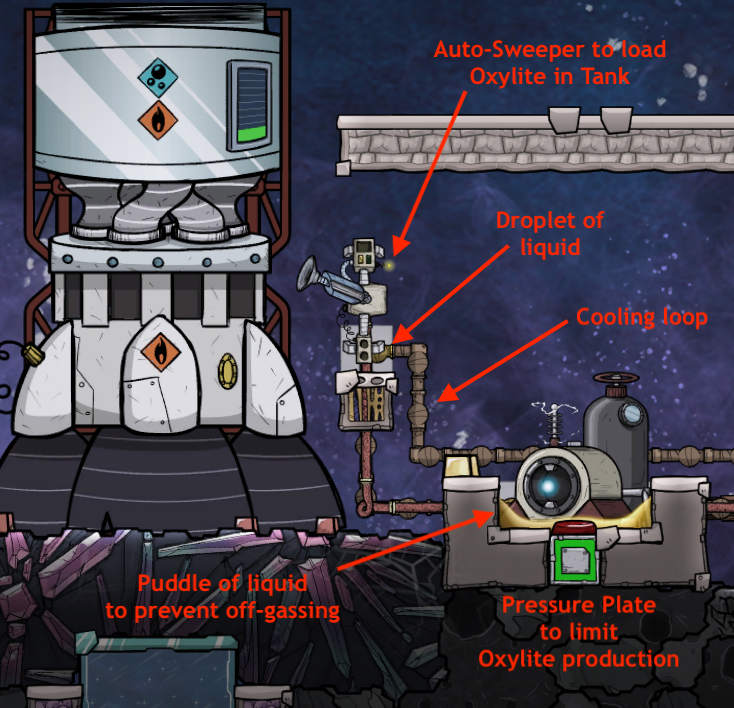 If the atmosphere isn't dense enough, you will need to drop Oxylite in a puddle of liquid to prevent off-gassing. You might as well build the Oxylite Refinery in a puddle and add a Pressure Plate where the Oxylite is produced to prevent over-producing Oxylite. Set the Pressure Plate to "Below" and a mass slightly above what will be needed to refill rockets oxidizer tanks.
The example shows an Oxylite Refinery in the space biome, but it doesn't need to be right next to the rocket. In fact, if you use another method than an Auto-Sweeper to supply Oxylite, it's better not to, as exhaust gases will heat up the surroundings before being absorbed by space exposure.
Petroleum Rockets
It's now time to build a Petroleum-powered Rocket! Your first one will be a research one, in order to finish all the Interstellar Research.
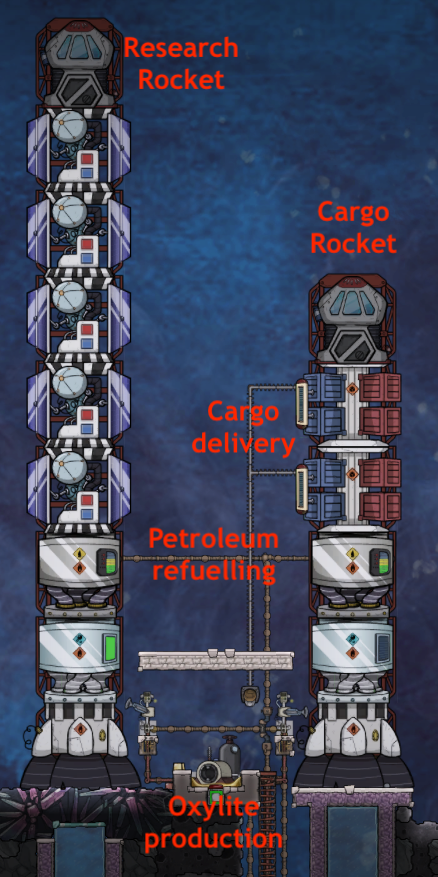 If you followed my recommendation and built a 7 Research Modules Steam Rocket before, all you need to do is deconstruct the bottom 3 parts and build a Petroleum Engine, Solid Oxidizer Tank and Liquid Fuel Tank instead, leaving you with a 5 Research Modules Petroleum Rocket able to reach destinations up to 30.000km.
The Liquid Fuel Tank needs to be hooked up to a Petroleum source. You are supposed to have one by now, but if you don't, a quick Oil Refinery setup can take care of that.
The Solid Oxidizer Tank needs to be filled with Oxylite, either by Dupes or an Auto-Sweeper. If you use Dupes, you will need a Gantry or Jet Suits, as Dupes cannot access the Solid Oxidizer Tank storage otherwise. Jet Suits are often avoided because they have a terrible impact on the game's performance, which is the reason I don't talk about them and don't recommend them.
In total, you will need 2800 Data Banks to complete all the Interstellar Research. At about 300 Data Banks per trip, that means a total of 10 different destinations to research. Since you already researched 2 with the previous Steam Rocket, you will need to research 8 new destinations, which will likely mean adding a second Liquid Fuel Tank to your research Petroleum Rocket to reach 50.000km destinations, and perhaps a third one to reach 90.000km destinations if your Starmap doesn't have enough destinations up to 50.000km.


 While you are at it, I advise building a second rocket to start bringing back valuable cargo.
What you are looking for are space materials: Fullerene, Niobium and Isoresin.
Start collecting them from the nearest destinations, even if they are at trace amounts: you don't need a lot of those anyway, and it's very unlikely you will find a planet with more than trace amounts in range of a Cargo rocket. That's because Cargo modules are really heavy, which greatly limit rockets range.
For example, you can get 1.5kg of Fullerene at trace amounts, which translates into 150kg of Super Coolant, which is enough to fill 15 pipe segments.
 The most important material is Fullerene, as you will need some Super Coolant for Liquid Oxygen and Hydrogen production.
(Optional) Rockets Launch automation
Once you have your first Cargo rocket always launching to the same destination, it starts to get boring to have to manually launch it every time it's ready.
That's where the automation comes in: the Command Capsule has an automation output telling you when the rocket is ready, and an automation input so you can tell the rocket to launch.
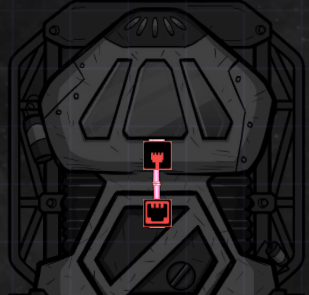 Rocket automation gets complicated really fast when you add Bunker Doors and Gantries into the mix.
To get started, don't use any Bunker doors or Gantries at all. Just load your Astronaut once and deconstruct the Gantry. Then provide Oxylite with Jet Suits or Auto-Sweepers, so you don't need a permanent Gantry at all. You will switch to Liquid Oxidizer soon enough anyway, which is piped in and does not require a Gantry.
Without Bunker Doors and Gantries, the automation is as simple as drawing a line (using Steel automation wire to avoid melting it) between automation input and output of the Command Capsule.
If you want to have a more complicated setup with Bunker Doors, you can start with this basic example[forums.kleientertainment.com]. If you want precise control of bunker doors, you will need to take into account the fact that Space Scanners are not very precise. Instead here is an example of Rocket Launch automation using buffers and counters and this thread contains an example using a Water-clock[forums.kleientertainment.com], which work around the long standing imprecision bug on seconds-based timed automation gates.[forums.kleientertainment.com]
Liquid Oxygen/Hydrogen production
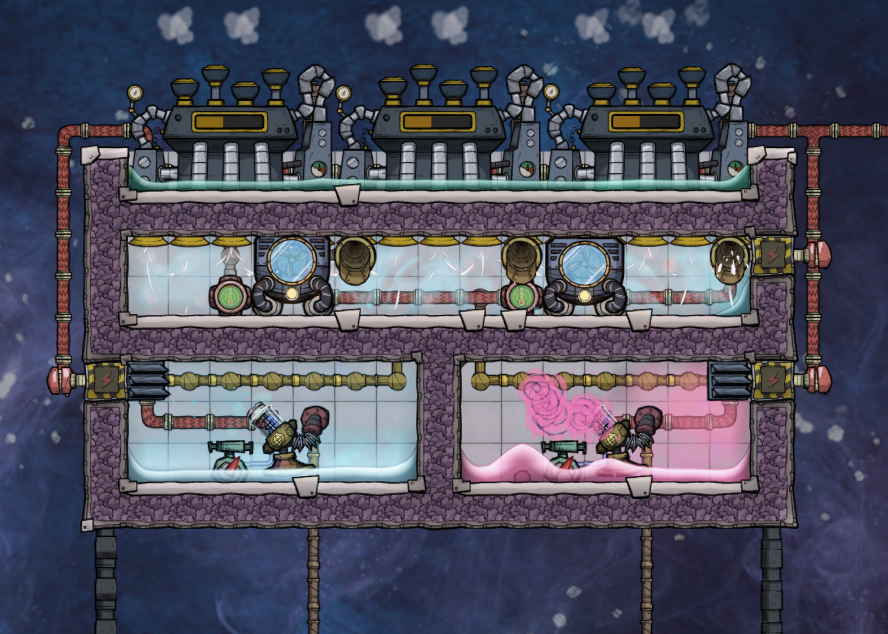
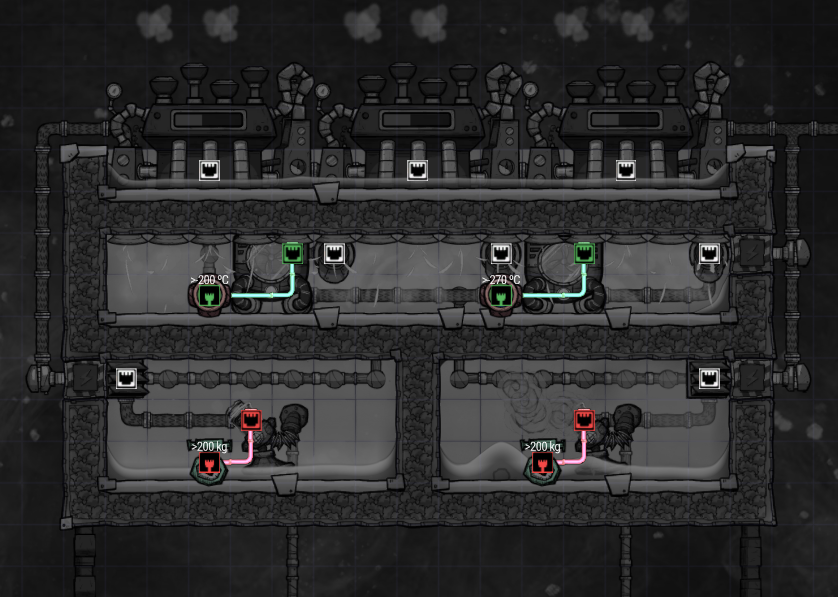
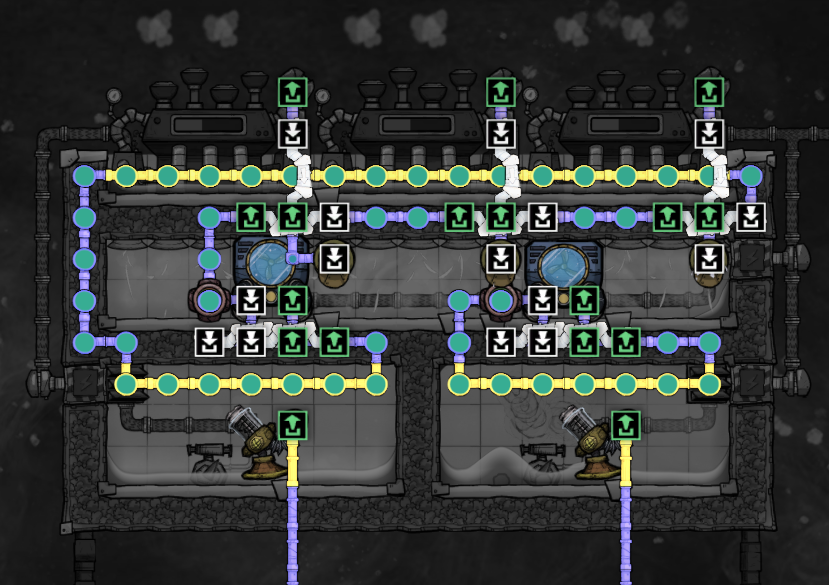 If your radiant pipes don't contact liquids like shown in the example, you can dial the temperature as low as you want.
Note that during initialization, you will see a lot of flaking from the tiles that form the floor of your tanks until they get down to temperature. There might be a bit of Oxygen/Hydrogen turning into debris too. Both of those issues fix themselves given enough time and enough liquid in the tanks, which is why you should always leave a healthy puddle.
If you directly want an optimized setup, here is Hotep Thunderbolt Integrated Rocket Refueller: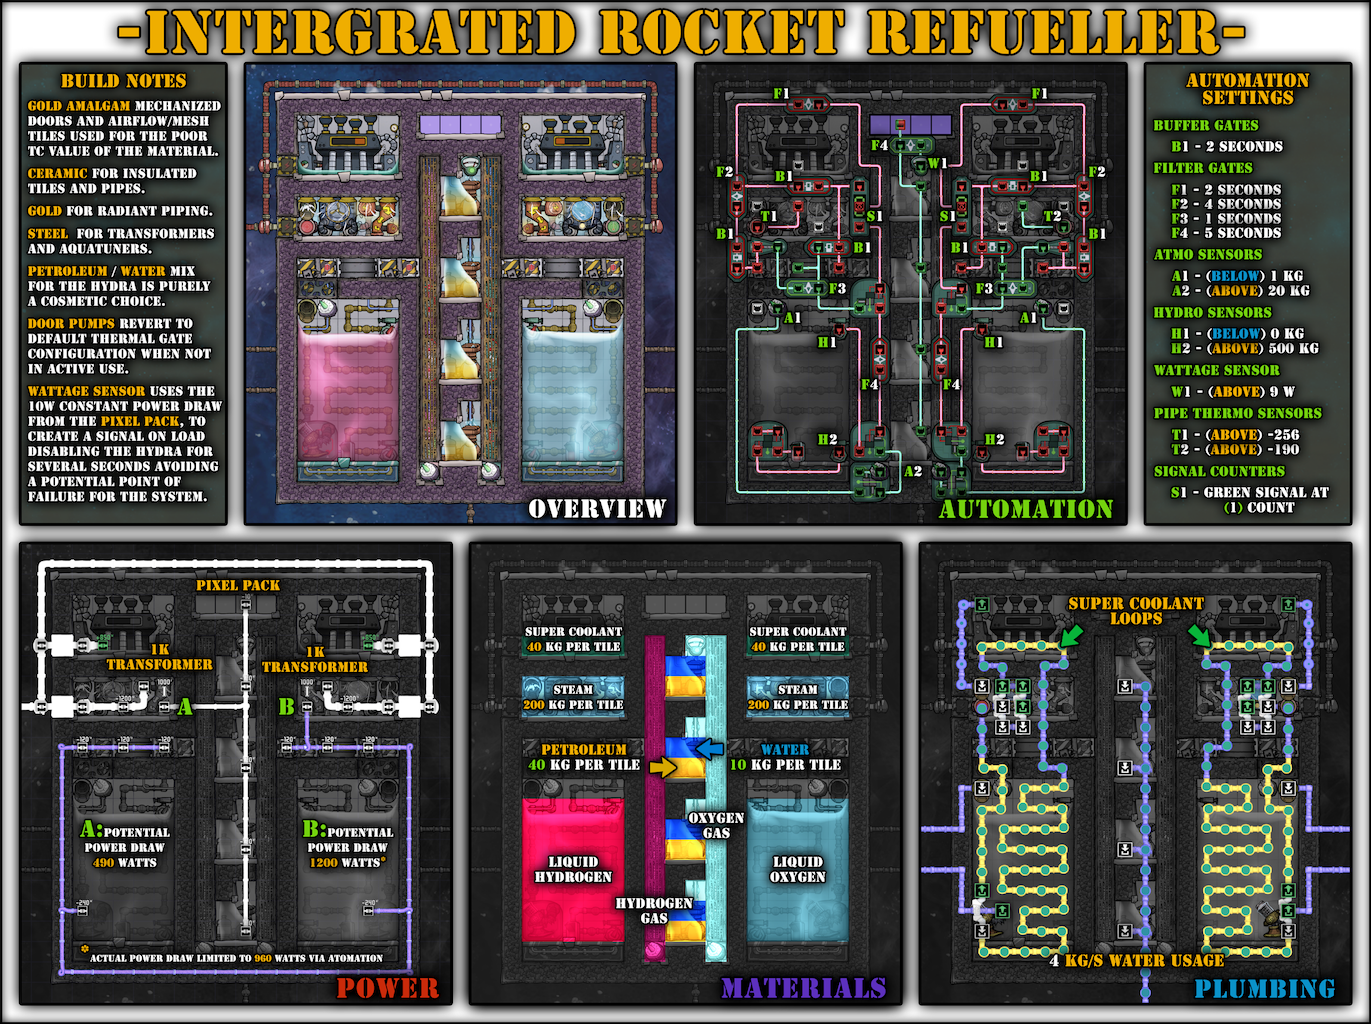
This thread from a while ago has several other setups and is worth a read.[forums.kleientertainment.com]
Liquid Oxygen/Hydrogen transport
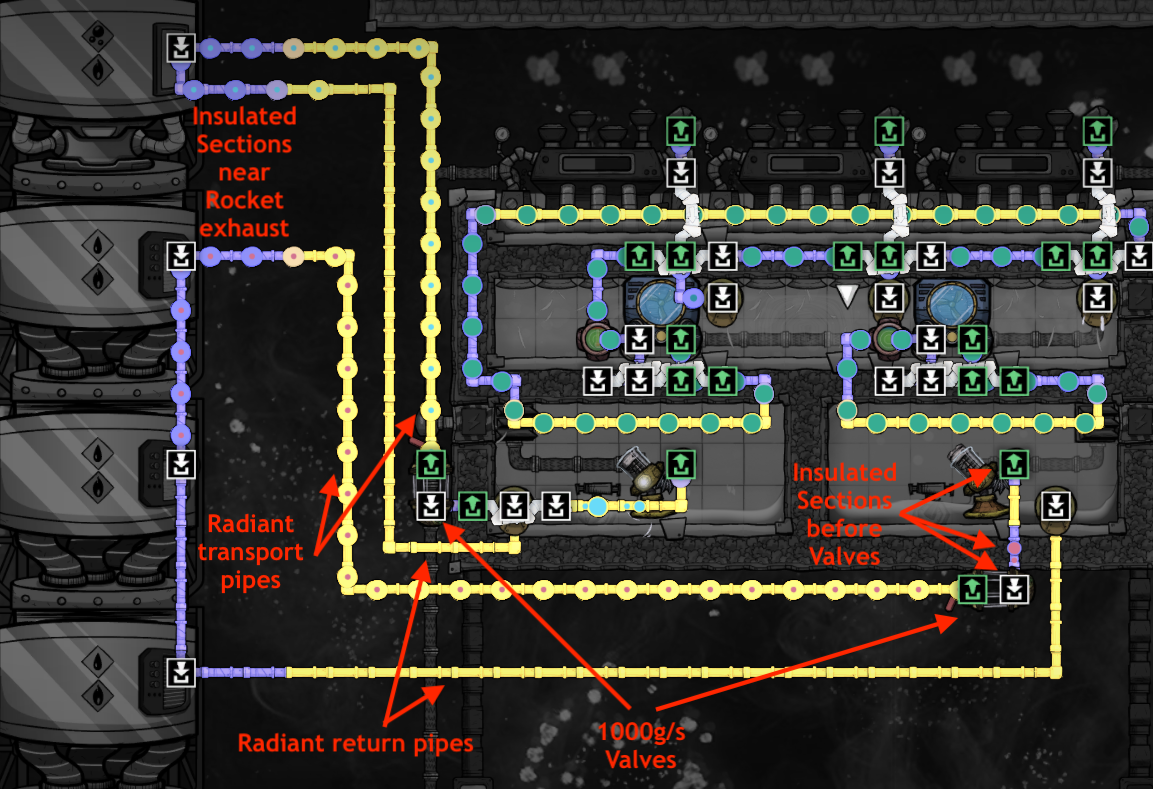
If you already tried to transport very cool or very hot liquids/gases long distance, you know this is often a mess of broken pipes because of state changes. This is especially an issue with Liquid Oxygen and Liquid Hydrogen, unless you build Insulation Insulated Pipes, which trivialize this issue.
If you don't have enough Insulation, it's a bit more complicated, because even Ceramic Insulated Pipes will exchange heat with their content, and pipes will break.
To have a robust option that doesn't break all the time, there are several countermeasures. The first one is, counter-intuitively, to use Radiant Pipes: since pipes (like any other building) are always constructed between 10°C and 45°C, pipes themselves have to be cooled down. Radiant Pipes speed that up significantly and will not exchange heat with anything else since they are in vacuum. Just be careful of rocket exhaust during take-off and landing.
Another option that works well with the previous one is to pre-cool pipes by sending in 1kg packets: 10% packets will never break pipes as long as they do not merge together. Once the pipes are cool enough, you can remove that restriction.
Last but not least, building a return pipe will avoid liquid stagnating in the pipes.
Temporal Tear Rocket

You now have all the pieces in hand to create a Rocket able to send a Dupe to the Temporal Tear!
Before you do so, be careful because the Rocket and the Dupe will not come back. Do not send a Dupe you got attached to.
Configure the rocket with 2450kg of Fuel and Oxidizer, launch it, and it's only a matter of time before you reach the Temporal Tear!
What's next?
Congratulations, after reaching the Temporal Tear, you "finished" the base game!
On the other hand, you might have only touched about half of the game content or even less.
From now on, you could switch to Spaced Out! DLC, which offers an entirely different gameplay, or have fun with any vanity projects that are not required to complete the game but are a lot of fun to get them working! Don't expect detailed guides for those though, it's up to you to figure them out.
I've prepared a non-exhaustive list of useful things not covered here and vanity projects, roughly ranging from easiest to hardest:- Rust-based Oxygen Machine: for asteroids that have a lot of Rust.
- Clay farm: generally based on Polluted Water off-gassing, to be able to create a lot of Ceramic (especially on Clay-less asteroids).
- Shove Vole ranching: to create huge amounts of Meat with less Dupe labor. This replaces Hatch/Slickster ranching.
- Ethanol loop: to create huge amounts of Dirt, because we all dreamed of a Mealwood-only diet when we first started out.
- Efficient CSV Tamer: to have a barely power-positive tamer.
- Salt Water boiler: to remove the Dupe labor of Salt Water refining and lower the power use.
- Train Dupes: I have an entire guide dedicated to that.
- Improve Dupes Morale: as high as you can go.
- Longhair Slicksters ranching: a way to turn Oxygen into Meat.
- Gassy Moo ranching: one of the ultimate flexes of the game, which has an achievement tied to it with the lowest completion rate (under 1% of the players have completed it).
- Shine-bug Reactor: because you want to murder your computer and use real electricity to produce in-game electricity.
- Puft ranching: because you somehow need some Bleach Stone, Slime, or want to produce Oxylite the painful way.
- Turn Oxygen into Power: it's possible through a long series of successive refinements.
- Salt boiler: to boost a heat source by using Molten Salt/Gas Salt SHC differential.
- Rocket Chimneys: to produce huge amounts of Water and Power by abusing Rocket's exhaust.
- Sour gas Boiler: because the 10KW and 750g/s of Water excess of a 10kg/s Petroleum boiler isn't enough for you.
- Meteor Harvesting: automatically round up all that Regolith and metals falling from the sky.
- Regolith Melter: to put all that Regolith to good use by creating a lot of Heat.
- Sand Melter: to remove the Dupe labor of Glass refining, at the cost of half the mass of Glass.
- Abyssalite Flaker: to get more Tungsten to create more Thermium.
- Make use of hammers: do you have a creative mind? Try to make a good song with hammers. Or even a scenario.
- Find exploits: it's well-known the game has a lot of bugs. Some of those can be exploited. It can be an entirely different experience to find those and the worst way they can be exploited. I've made it one of my missions to document them on the wiki Exploits[oxygennotincluded.fandom.com] and Unusual Use of Gameplay Mechanism[oxygennotincluded.fandom.com] pages.
You can also challenge yourself with various goals and constraints, here are a few ideas:
- Max-difficulty.
- All-achievement colony: can you complete all achievements in a single colony? Hint: only 3 achievements can be failed in Vanilla.
- Don't use any Geyser.
- Don't use any Atmo-Suit except the ones required for Command Capsule.
- No Aquatuner and/or No Steam Turbines. You'll have to figure out other cooling methods.
- Speedrun the game. How fast can you launch your first Rocket? Build a Great Monument? Reach the Temporal Tear?
- Populist challenge: every time the Printing Pod offers a Dupe, you have to take one. How long can you last?
- Lights Out, a mod that punishes you for not using lights.
- Diseases Restored, to make germs actually challenging.
- Duplicant Lifecycles, to force you to recruit new Dupes and train them instead of always using the same ones.
- MiniBase, because big asteroids are overrated.
- 100K Challenge, an extremely cold Asteroid (much more than Rime).
- Baator (Spaced Out! only), an extremely inhospitable Asteroid.
Did I miss something significant? Ping me on Discord!
Conclusion
Feel free to leave a comment if I made a mistake, if you think there is a better option that doesn't add complexity, or if there is something I forgot to explain.
It's highly unlikely I will ever make a guide for Spaced Out!, as it would be a massive undertaking again. It's also unlikely I'll make a guide for specific vanity projects, though I did make a guide specifically for training:
https://steamcommunity.com/sharedfiles/filedetails/?id=2507923687
See also this list of designs:
https://steamcommunity.com/sharedfiles/filedetails/?id=2736463085
A big thank you to Sonia_k for proofreading.
Special thanks to all the super-friendly guys in the Unofficial ONI Discord[discord.gg] who helped me understand the game mechanics and suggested improvements.
Happy building!
- ONI - Surviving the Early Game★ 5 (2.4k)83k views6.3k ♥54 minUpdated 6 Aug, 2019
- Useful Construction Patterns★ 5 (1.8k)74k views5.2k ♥66 minUpdated 29 Aug, 2020
- 10* things I wish I knew sooner...★ 5 (754)58k views1k ♥4 minUpdated 6 Oct, 2017
- ONI - Surviving the Mid-Game★ 5 (1.3k)44k views3.8k ♥150 minUpdated 6 Sep, 2019
- Not Quite Beginner's Guide★ 5 (361)32k views1.1k ♥91 minUpdated Mar 26, 2023
- Руководство для начинающих. (ОСНОВЫ)★ 5 (629)32k views1.2k ♥21 minRussianUpdated 20 Apr, 2019




- Upgrading to PremiumTeam Fortress 2★ 5 (20k)1441k views11k ♥6 minUpdated May 11, 2022
- No More Room in Hell Official ManualNo More Room in Hell★ 5 (2.8k)569k views2.1k ♥29 minUpdated Apr 22, 2019
- NMRiH Community Hosting GuidesNo More Room in Hell★ 5 (526)351k views653 ♥1 minUpdated Aug 10, 2022
- ULTIMATE GUIDE FOR GAME DEV TYCOONGame Dev Tycoon★ 5 (5.8k)326k views10k ♥4 minUpdated 23 Jan, 2014
- How to 'Git Gud' Soon™MORDHAU★ 5 (2k)318k views3k ♥68 minUpdated Nov 16, 2024
- Лучшие кооперативные игры SteamPAYDAY 2★ 5 (1.5k)315k views2.1k ♥56 minRussianUpdated Apr 27, 2025






This guide was created by its original author on the Steam Community. Are you the author and want it removed? Request removal.