DARK SOULS: REMASTERED 100% Achievement Guide
Disclaimer
- Now uses Dark Souls III multiplayer system with passwords.
- Multiplayer player count increased from 4 to 6.
- Going up Ash Lake is a pain in 60fps. Clipping issues.
- Can use multiple of the same item at once now. This includes offering items to covenants.
- New bonfire near Vamos. Can be warped to.
- Phantoms now have a limited number of estus when summoned instead of the host healing phantoms.
- Covenants can be swapped at bonfire.
https://steamcommunity.com/sharedfiles/filedetails/?id=1085600991
Missable
Using this Guide
The focus of this guide is achievements. This will not run through every possible item in the game, even loot spot, every item drop. For the most part, the instructions will take you from the previous point to the next point of interest skipping everything along the way.
Note: Bonfires will be labeled with their names AND their description. This is due to the fact that the player will not be able to see the names of the bonfire until they obtain a certain item. Also due to the nature of the game (no warping until late game), I will also cover the areas the player must traverse in between areas up until the ability to warp is obtained.
- Can be done on multiple characters.
- Shards, Large Shards, Large Chunks, and Slabs of all colors
- All Sorceries
- All Miracles
- All Pyromancies
- All Unique Weapons
- 2.5 Playthroughs Solo
- 2 Playthroughs Co-op
- DLC content is NOT required for any collection achievement.
In Co-op, if you and your friends are sharing weapons, you can drop weapons to each other. Since Boss Souls are not shared between games, By the end of your second playthrough, you would have a combined 4 Soul of Great Wolf Sif easily getting the three requirement.
Side Note: Gwyn's Soul actually forces you into NG++ regardless as you cannot get his Soul and stay in the current playthrough. If you're doing in coop, it's okay for both players to make the Great Lord Greatsword after the first playthrough and then do the Miracle after the second playthrough (unless you're in faith build). Then you would only have to make it to the Sunlight Altar in NG++.
Walkthrough - Introduction
- While the Master Key is probably the best starting item, I will not be writing the guide to force players to pick that Master Key in terms of routes, so that will be up to you.
- Note: Master Key is by far the best item to pick, but this can be purchased for 5,000 souls fairly early into the game.
- After the opening cutscene, loot the Dungeon Cell Key and free yourself. Go down the hall turn to your left for your first bonfire. Quick note: The weapon you pick up here is required much later on in the game. Make sure you keep the Straight Sword Hilt.
- Bonfire: Undead Asylum 1 | Courtyard
Enkindle - Light bonfire flame
- Enter the doorway in front of you. You will face the first boss. Now, if you defeat him here and now with your Straight Sword Hilt, you will get a weapon required for Knight's Honor, Demon's Great Hammer. For beginners, this is tough to do unless the player selects Black Firebombs as their item of choice or simply complete this task during NG+ or trade a Sack with the Snuggly the Crow.
- Otherwise, simply run to the gate to your left.
- Bonfire: Undead Asylum 2 | After Asylum Demon
- Continue here. The items here will be part of your starting gear for your class. Keep going until you reach a fork, go right then you should spot some stairs. A hollow is waiting to push a giant ball onto you when you go up the stairs, bait him into doing so. The ball will break the wall where you were, go into the hole.
- You'll spot the knight who helped you out of the cell. Talk to him to receive a key and the Estus Flask.
Estus Flask
Acquire Estus Flask. - Head up the stairs and open the gate. Take the one way path, and through the fog gate.
- Boss Fight: Asylum Demon | Using a light attack while falling will perform a plunging attack that will do massive damage. Other than that, get used to learning how to roll and managing stamina.
- After the fight, open the large doors. I'll make an early mental note here, this hill on the right contains a small bird's nest. This is Snuggly the Crow who lets you trade various items. I'll cover this in a separate section of its own.
- Head to the top of the hill to complete this area.
Reach Lordran
Arrive in Lordran.
- Welcome to your hub. Firelink Shrine serves as a home base for the entire game, so make sure you're familiar with it.
- Bonfire: Firelink Shrine | Yes, indeed.
- In Dark Souls, you can kindle bonfires which increases the number of estus flasks you'll get when resting at that specific bonfire. By default, Bonfire with a Fire Keeper present will start at 10 estus flask with every other bonfire starting at 5 estus flask.
- From the bonfire, you can take the path to the right up the ruin stairs. This will lead you to Petrus of Thorolund (husky fellow). If you pester him enough, he'll eventually offer to let you join the Way of White covenant as well as unlocking the achievement. (Knights and Clerics are by default in this covenant)
Covenant: Way of White
Discover Way of White covenant. - From there, loot what you want here. Head towards the aqueducts to proceed to the Undead Parish.
Walkthrough - Undead Burg/Parish & Darkroot Garden
- Once you exit the aqueducts, you'll arrive in the Undead Burg. Proceed along the linear path to shortly reach your first bonfire.
- Bonfire: Undead Burg | Just across a wooden bridge after encountering the Hellkite Dragon
- Now, just before the bonfire, there is a route to your left (from the bonfire) with two spear wielding undead. Go down the stairs behind them, then out the door to find the Male Undead Merchant.
- He sells a majority of beginner equipment used to create boss weapons. You will need the Resident's Key later on in the Lower Undead Burg.
- There's a Black Knight here as a note regarding Black Knight weapons.
- Now continuing from the bonfire, follow the path. Once you go start going up some stairs, an enemy is gonna roll a barrel onto you. Continue up that tower and a boss fight awaits you after the fog gate.
- Boss: Taurus Demon | When you enter the tower wall area for the boss fight, there's a ladder behind you letting you perform the plunging attack on the Taurus Demon. The Taurus Demon can jump the platform though, so be careful. He has a chance of dropping the Demon's Greataxe, but this can be easily purchased.
- After the fight, go downstairs and to your left. You'll find Solaire of Astora. Talk to him to receive the White Soapstone Sign used for co-op.
- Onto the bridge, the dragon will definitely blow flames onto you. Your main goal here is to make it to the halfway point on the right side and go down the stairs. Keep going down until you spot the previous bonfire, kick the ladder down connecting the shortcut. It's safer to bait the dragon into blowing fire, then rushing afterwards.
- From here, go back to the bridge. The obvious point of interest is the Hellkite Dragon. Dealing enough damage to his tail will grant the player the Drake Sword for the weapon collection, but also serves as an overpowered early weapon. You can use the shortbow and shoot the drake's tail until it breaks.
- You can kill the dragon later. You can also use the dragon to farm souls by having him blow fire onto the bridge.
- Now, you have two options. Completely avoid the dragon, or run under it. Make sure you have arrows and a bow (doesn't have to be stat required). Shoot the Hellkite Dragon to make him jump down. Then simply run under him into the gate.
- Bonfire: Sunlight Altar
- Pulling the lever will lift the gate permanently.
- Head to the right instead to the broken statue for the Covenant: Warrior of Sunlight. Requires 25 Faith, decreases by 5 per boss beaten as a White Phantom.
Covenant: Warrior of Sunlight
Discover Warrior of Sunlight covenant. - The tower behind the gate has a Black Knight at the top. The ladder takes you down to some rats that connects under the bridge to the Undead Burg bonfire. Rats can be used to farm Humanity.
- Now in this next area, one of the hollows is going to run behind the gate and close it (the one in front of you, not the one you just opened). Go downstairs to the right. In this room, you'll find the Mystery Key.
- Continue onto this linear path, until you reach a fork with a wooden bridge in front of you and a stone path to your left. Go straight and then turn right (away from the church). Follow this path for a bonfire.
- Bonfire: Undead Parish | Just above Andre of Astora and connects to Sen's Fortress and Darkroot
- Now backtrack to the church. Inside is a Berenike Knight (does not respawn) and a Fire Keeper Soul on the coffin. Fire Keeper Souls are used to reinforce Estus Flasks (up to +7). Speak to any Fire Keeper to perform this (Firelink Shrine has one just under it in a cage).
- Above you will be a Channeler (also does not respawn). The only important point of the Channeler is that he drops the Channeler's Trident (rare) required for the weapon collection.
- Before that, under the stairs leading to the channeler is a pair of elevators connecting the Undead Church to Firelink Shrine. This is also required in order to revisit the Undead Asylum.
- Now if you pass the channeler and turn left. You'll see a breakable doorway here. At the top is a cell containing Knight Lautrec of Carim. You can free him using the Mystery Key, the Master Key also works here. You want to free him so he can give you a Sunlight Medal, and later a Token of Reprisal related to covenant rewards.
- SPOILER: Lautrec will move out on his own regardless, but the point of the spoiler is to hide the fact that he will kill Anastacia, the Firelink Shrine firekeeper once both bells are rung or the player collects both Fire Keeper Soul at each bell location. You will be able to revive her later when you take revenge while obtaining the Token of Reprisal. During this period, the Firelink Shrine will be not operational. If you do not want this, just kill him now or kick him off the ledge after the Gargoyle Fight in Firelink Shrine.
- Once you've let him out, you can face the boss of this area on the roof. Where you met the Channeler, just take the right path to find some ladders. Both Solaire and Lautrec can be summoned here. The Gargoyle's tail can be cut for a weapon, it is not required for Knight's Honor.
- Boss: Bell Gargoyles | There are two gargoyles with the second spawning after a certain amount of time. The first has full health with the second coming in with just half health, but with fire breathing capabilities.
- After the fight, climb the ladder, go outside to climb another ladder. Pull the lever to ring the bell at the top.
Ring the Bell (Undead Church)
Ring Bell of Awakening at Undead Church. - On the way down, you will find Oswald of Carim who serves as both a merchant, but also the Pardoner of sins in Dark Souls. This proves extremely useful when the player starts swapping covenants or aggro NPCs.
- Now, before we move on, head to the front of the church. To your right is a corpse holding a Halberd. Halberds cannot be purchased and thus are rare. Keep that in mind. Then at the bottom of the stairs is a corpse containing the Basement Key. If the gate is closed, feel free to open it.
- Head to the Undead Parish bonfire now. From there, head downstairs passed Andre of Astora and you'll find a Titanite Demon. You can ignore it for now.
- Now, this area is fairly straightforward. At the first fork, right takes you to Darkroot Basin (ignoring for now). So continue straight until the path turns right. Then you'll get a giant stone door.
- This stone door can be opened with the Crest of Artorias which can be purchased from Andre of Astora for 20,000 Souls. But the latter half of the Darkroot Garden will be done later. To the left of the doorway is an illusory wall.
- Bonfire: Crest Gate Bonfire
- Now, take the other path towards the fog gate. The only thing to note here is that the Stone Knights here will drop both the Stone Greatsword and the Stone Greatshield required for the weapon collection.
- Go to the end and go up the stairs for the boss.
- Boss: Moonlight Butterfly | If you're not ranged, this fight might be a bit long waiting for the Moonlight Butterfly to land. So have fun rolling.
- The soul is required twice for boss weapons: Moonlight Butterfly Horn & Crystal Ring Shield
- After the fight, go up the long flight of stairs. You'll see a corpse loot. Loot it three times, the second being the Divine Ember.
- Divine Ember can be given to Andre in order to ascend +5 weapons into Divine.
- Return to the Undead Parish bridge where the Hellkite Dragon is.
- Once here, go to the beginning of the bridge and you should be able to open the door using the Basement Key found in front of the church.
Walkthrough - Lower Undead Burg & The Depths
- Once in, go down. At the bottom, take the right stairs up and open the door to unlock the shortcut back to the Undead Burg bonfire.
- Now make sure to buy the Residence Key now from the Male Undead Merchant nearby.
- Return back down and then go all the way down.
- At the bottom of the stairs, go right towards the torch wielding enemies. To your left you will spot various doors that can be opened with the Residence Key. One of them contains Griggs of Vinheim, a sorcery merchant. Free him. He'll move to Firelink Shrine.
- Now from here, simply make your way to the worst boss ever.
- Boss: Capra Demon & Dogs | The dogs and the size of this room makes the boss ridiculously annoying. Run up the stairs and take out both dogs. Then enjoy an easy 1v1 against the Capra Demon.
- You'll get the Key to the Depths from the boss fight giving you access to the Depths.
- Now, go to the beginning of the room and go downstairs. You'll find two passages here. Take the stairs up.
- Once you're at the top, enter the aqueduct. To your right is the Female Undead Merchant. Go left, and unlock the shortcut to Firelink Shrine.
- Return to the fork where you went upstairs and open the door to the Depths.
- Progress in the area. You'll face off with a butcher. After the butcher is a chest containing the Large Ember.
- Side Note: Behind the butcher's table are several boxes that you can break to reveal a hole in the wall which will drop you above the giant rat. You will find the Spider Shield on a corpse here.
- After that, you'll go through some water. Once you get out, you'll face another butcher. The butcher will be sitting over a doorway. That doorway will have Laurentius of the Great Swamp, a pyromancy merchant. He'll move to Firelink Shrine. Roll into his barrel to free him.
- In the next area, be wary of the ceiling.
- After you make your way to the end of the long sewer path filled with slimes, you'll reach a door. The Master Key can open this door immediately to reveal a bonfire.
- Bonfire: The Depths | The only bonfire here
- From there, go downstairs. You'll see a giant rat behind a metal fence. You can actually deal a lot of damage, or even kill, the rat if you have a very long weapon. Between hits, if you go up the ladder, the rat will start to approach the gate again.
- Else, continue on your way above. Left at the fork, and down the stairs. You should see a corpse near the gate in front of you. It's the Sewer Chamber Key which opens the room to the previous bonfire should you not have the Master Key. Go ahead and open it if you haven't and return here.
- Now, go into the doorway under the stairs. At the fork, ignore the right path and go straight. Follow that path to a fog gate.
- You'll encounter your second channeler of the game, also non-respawning. It is highly recommended that you kill him as he can buff the boss as well as attack you during the boss fight. Head right into the doorway.
- Take the first right, then the first left. The rat in front of you is just baiting you into the hole in the ground. At the end of this longer path, take a right and you'll end up int he room where the Giant Rat is. Kill it if you want, otherwise, slide down the ramp in front of you making sure to use the left/right side to avoid the giant hole while sliding.
- At the bottom. go immediately to your right for a staircase. Go to the top and open the door to unlock the shortcut back to the bonfire.
- Back to where we were, behind the gate before the door is a merchant. Otherwise, head to the doorway to the right just before him and proceed to the boss.
- Boss: Gaping Dragon | First off, cut the tail off for the Dragon King Greataxe. Then, simply just have the boss lay down a bunch and then get a bunch of hits in. Rinse repeat. Do not underestimate the size of the boss, he covers a lot of ground.
- After the fight, you'll get the Blighttown Keys. Return to the merchant NPC and open the locked doors near him.
Walkthrough - Blighttown
- First make your way down all the ladders. Heads up, equip some poison healing and use a shield. If you do have the Master Key, you can retrieve the Spider Shield from the Valley of Drakes.
- Once at the bottom, make your way straight until you reach a fork with two paths going slightly down. Take the left path.
- They both lead to the same spot, but the right wobbles. Now, follow the linear path here and down the ladder. Cross the beam and there will be a torch which is the top of the ladder. Take the ladder.
- From here, head left straight to the bonfire on the support of the bridge.
- Bonfire: Blighttown Catwalk
- Continue on your path and take the ladder to the right. You'll then want to take the ladder in front of you to go to the giant spider in the well.
- Pyromancy: Power Within | Just in front of the Cragspider
- From here, you can make your way all the way down to the swamp.
- To the right of the swamp entrance, you'll find a sewer.
- Bonfire: Blighttown Swamp
- Pyromancy: Poison Mist | From the bonfire, go forward to the other side of the swamp. The pyromancy is on a corpse tucked into the corner on the right.
- From the bonfire, go right and you should encounter some more scaffolding. This time, this will take you to a waterwheel elevator lift. Take it up. Take one ladder up.
- Sorcery: Remedy | From the first ladder, proceed along the linear path including the very narrow branch path to the other side to find this spell.
- Fire Keeper Soul | From the first ladder, climb up one more ladder. This will lead you to another sewer segment loaded with several toxin dart enemies and fire dogs. The soul is located on the lower section behind a sewer grate guarded by two dogs
- Where you encountered the first toxin dart enemy, there is a ladder here going up. It may be difficult to see. Climb it to the top.
- Key to New Londo Ruins | In a chest next to the last ladder
- This key will let you unlock the shortcut between Blighttown/Valley of the Drakes/New Londo Ruins which connects back to Firelink Shrine.
- The rest of the loot here isn't required, but you may get them as you wish. If you are having trouble with the boss here, you may pick up the set of items two towers the opposite direction from the boss from the Poison Mist Pyromancy.
- Boss: Chaos Witch Quelaag | Overall a simple boss as most of her attacks are heavily telegraphed. Her sword swipes cannot reach point blank so you're able to attack her while hugging her as she swings. She spits lava onto the ground that lingers for a period of time. The horizontal lava spit takes longer giving you time to get some hits in. Then the only move you actually have to be worried about is when both Quelaag and the Spider somewhat kneel telegraphing her explosive attack that deals massive damage and may one shot you. Other than that, manage her position away from her lava pools and you're set.
- After the fight, ring the bell.
Ring the Bell (Quelaag's Domain)
Ring Bell of Awakening in Quelaag's domain. - Now, head downstairs. You should see a doorway or broken wall that leads to a lava area. Ignore this doorway, and to the right of that doorway should be a flat wall, roll into it to reveal an illusory wall.
- Talk to the egg guy, so he moves out of your way.
- Bonfire: Daughter of Chaos
- Now, also talk to the speechless spider on the wall. You'll eventually get the prompt to enter the covenant.
Covenant: Chaos Servant
Discover Chaos Servant covenant.
Walkthrough - Blighttown Connections
From Blighttown, you can access several non-required areas that contain important items for completing achievements. You may revisit these later if you want.
- This place can be accessed from either New Londo Ruins (if you have the New Londo Ruins Key), Blighttown, or from Darkroot Basin.
- You should notice a dragon sleeping. Walk carefully to him. Now you can get one of the two loot items that are on the same side; however, you do need both.
- Knight's Honor: Astora's Straight Sword | The one closer to his hand can be safely picked up. A side note is that this word contains divine properties that will help later on in the catacombs.
- Knight's Honor: Dragon Crest Shield | The one closer to his head cannot be picked up safely.
- You can risk picking up the item, or you can kill him with poison arrows, or just kill him outright. He uses a lot of poison.
- For Dark Souls veterans, the Red Tearstone Ring is located here on the other side at the top of a tower next to the giant closed gates to New Londo Ruins.
- Note: This is a lot of traveling, so if you want to keep this for later when you finish Anor Londo, that's fine.
- From the Blighttown Swamp, the direction away from the Quelaag, you should find a large branch that acts like a ramp. Take that path up to a corpse. To the left of the corpse, roll into the wall to reveal an illusory wall. You'll then find another chest, roll behind it to reveal yet another illusory wall.
- Proceed to the Great Hollow.
- Bonfire: The Great Hollow
- Warning: There are tons of basilisks here, so avoid being cursed. Bring a Purging Stone if you want.
- While there aren't any required items in here, you'll find tons of chunks and crystal lizards here that will make leveling up equipment later much easier.
- Make your way to the bottom of the trunk.
- Once you enter ash lake and walk down the trunk, you should see the bonfire to the right.
- Bonfire: Ash Lake
- Now, the first thing you'll notice is probably the Hydra here. Fight it if you'd like for souls. There's also a few Dragon Scales that you can pick up here.
- Halfway through the lake, you should see a giant tree on the left. Climb up the root ramp. Now shortly after you're going up, you should keep your eyes peeled for a hollow trunk UNDER the path you're taking (this is OUTSIDE of the vertical trunk).
- Miracle: Great Magic Barrier | If you dropped into the hollow trunk, it will lead you to a corpse with this spell.
- Continue down the lake to the end.
- Bonfire: Stone Dragon
- First off, talk to the dragon to prompt the covenant joining.
Covenant: Path of the Dragon
Discover Path of the Dragon covenant. - Knight's Honor: Dragon Greatsword | Now cut off his tail for this weapon. He won't aggro.
- You're done here!
Walkthrough - Sen's Fortress
- I hope you like platformers!
- Siegmeyer of Catarina was sitting outside of here if you talked to him. If you didn't, he will relocate inside regardless. His quest remains active, and you will need his quest for a miracle.
- Be wary of pressure plates and misplaced enemies. This is also your first place that you will encounter a mimic. I'll mention it now, the way to determine if a chest is a mimic is by looking at the chain on the right side of the chest. If the chain is pointing TOWARDS you as you look at the chest from the front, that's a mimic. Regular chest chain will curl to the right up and up.
- Enter the fortress, follow the linear path. Now, once you make it passed the first two catwalks with swinging blades, you'll be in a room with a chest. The NEXT room will be a catwalk with an enemy. This room is a point of interest as you will need to return here with the Cage Key. If you have the Master Key, that will do at this point too; however, we will still want the Cage Key.
- Continue to the next area which is a ramp that contains a boulder rolling on it. Let the boulder kill the first enemy, then once a boulder passes, run up the ramp and to the left to the fog gate. You can get the item at the top in the chest if you want. Go through the fog gate.
- In this next room, you'll get an ambushing enemy as well as another path to the boulder.
- With the boulder here, you CAN actually run up and make it to the room untouched, but its a very narrow margin.
- Instead, once a boulder passes, run up the ramp halfway then drop off onto a wooden platform with a caster enemy. Go towards the doorway.
- Sorcery: Hush | On the corpse in this room
- Go out the other direction and go up the ramp. You will now be located at the boulder mechanism and can direct it any path you want.
- Sidequest: Siegmeyer of Catarina | Make sure it's not pointing outside where you first encountered the boulder, and head out that way using the boulder path. If you drop off to your left, you should find Siegmeyer sitting on the ledge. Exhaust his dialogue.
- Return to the boulder mechanism.
- Return down the ramp that you just ascended from (right after Hush) and go left. You will see an elevator in here. Before getting on the elevator, MAKE SURE it goes up before getting on, then get on as it's going back down.
- Item of Interest: Lightning Spear | Mimic in this room
- Now, walk out of the room and you will see that the boulders will slot down into the hole here. Once the hole fills up, the next boulder will smash the wall open.
- Item of Interest: Covetous Gold Serpent Ring | If you're brave, run in and get the item. Otherwise, return to the mechanism and turn it clockwise then retrieve the item safely.
- Once that's done, return to the boulder mechanism.
- Siegward Questline: You can walk out to the FIRST path that you encountered the boulder. Drop off to the left for a Shotel. Then drop off again to find Siegward sitting on the ledge. Talk to him and exhaust his dialogue.
- Return to the boulder mechanism and head into the hallway. Follow the linear path until you reach the fog gate.
- Once you're through the fog gate, you'll be on the roof. First off, go upstairs, twice and then you'll see a broken wall off to your right. This ledge will let you drop down to a bonfire.
- Bonfire: Sen's Fortress
- Item of Interest: Flame Stoneplate Ring | On the roof, at the lower end in a chest guarded by Balder Knights.
- Make your way up four sets of stairs, then follow the wide catwalk. Take the right (left is a jump that we'll do later). You'll get another fork, left takes you to a balder knight, go right. In this room, you'll need the cage key to unlock the shortcut. Go upstairs some more and onto the catwalk where a crossbow hollow is shooting at you. Get by him to the final area.
- The fog gate leads to the boss, ignore this for now.
- Go upstairs and kill the giant. He's the giant throwing fire everywhere and he DOES throw fire into the boss arena.
- Key Item: Cage Key | The first fork on the large catwalk, you can jump across if you jump on the left side. Make the jump, then in the tower go all the way down and find the Cage Key at the end.
- With the Cage Key, you can unlock the cage shortcut just before the boss. Make sure to go in it so that the shortcut is activated.
- Sidequest: Big Hat Logan | Head back to the boulder mechanism and send just one boulder down the straight path then rotate it. Head down the path, and the wall will be broken here. Unlock both cages here, you'll free Big Hat Logan for his questline as he moves to Firelink Shrine.
- Quest Note: You will need 15 INT before Logan teaches you at this time. You can wait later for him to lower his requirements completely.
- Now, when you're ready, just head up to the boss fight.
- Boss Fight: Iron Golem | He's big, but his attacks are fairly telegraphed. You can hug his feet for most of the fight, except when he goes for his grab attack. Besides that and falling off, should be an easy but long fight.
- After the fight, examine the ring.
Walkthrough - Anor Londo
 Reach Anor Londo
Arrive in Anor Londo.
- From here, just head down the stairs. You can ignore the giants for now and head outside. At the center, go left for a bonfire.
- One of the three chests is a mimic, the other two are upgrade materials.
- Bonfire: Anor Londo | This is a fire keeper's bonfire.
- From here, head down the elevator. You'll be faced with a Gargoyle. If you didn't cut off the Gargoyle tail at the church, you'll get another chance here for the Gargoyle Tail Axe.
- Now, head left and go up the roofing to the building to the left. It's a bit narrow, so be careful.
- Once you're in the next building, go into the window and you'll be attacked by Painting Guardians. Climb up the ladder, and cross it. Important note here is that you need to attack the chain of the chandelier to drop the item hanging on it.
- Finish crossing and go through the fog gate.
- You'll reach the elevator here. Push the lever to move the elevator. You'll probably aggro the second Gargoyle here, his tail doesn't drop anything.
- Go downstairs and enter the building you were just on but on the first floor.
- Sorcery: Great Magic Weapon | Chandelier
- Knight's Honor: Black Iron Greatshield | Back left corner
- Side note: The painting is another area that we can't reach unless we have the Peculiar Doll (Undead Asylum)
- Head back to the elevator and go up the stairs. Go up to the main entrance now and head right. You'll have to dispatch of several demons and then two really annoying greatbow knights. After the right knight, you'll drop down from the ledge to a balcony.
- Bonfire: Anor Londo Residence | After dropping down, it's in the room to the left. Solaire is here as well.
- Head to the spiral staircase in the middle and go up. The staircase here only goes 2 floors. 1st and 3rd. Then the other staircase on the same spiral goes 2nd and roof. Once on the 3rd floor, both chests in the open are mimics. Head over to the archer, enter the room to the left. This will take you to the roof.
- While on the roof, the ignore the archer and go into the other tower.
- Sidequest: Siegmeyer of Catarina | If you've kept up with this questline, Siegmeyer will be here at the window. Kill the three knights inside and then talk to him. He'll give you a ring.
- You'll be able to open the door here. Head back to the roof, now take the stairs behind the archer. You'll be on the second floor now. The left door has a prowling demon you can kill. Otherwise head to the right door, and open up the door at the bottom to the first floor.
- Knight's Honor: Dragon Tooth and Havel's Greatshield | Enter the doorway in front of you, and roll into the fireplace to reveal an illusory wall. At the bottom will be several chests, the only non-paired chest is a mimic.
- Head back up to the second floor and go up the stairs to enter main foyer room. Go upstairs and towards the glass windows.
- Knight's Honor: Dragonslayer Bow | From the broken glass window, drop down several times.
- After dispatching of the demons here, you can open the gate to unlock the shortcut between the elevator and the Giant Blacksmith.
- Giant Blacksmith | Important NPC as he forges Boss Weapons.
- When you're ready, the iconic boss fight occurs.
- Boss: Ornstein & Smough | The important part of this fight is that you can only get one boss soul per playthrough. If you kill Ornstein first, you can only get Smough's Soul. If you kill Smough first, you can only get Ornstein's Soul. This is important in terms of obtaining both of their weapons. So remember which one you get.
- Bonfire: Chamber of the Princess | At the top after the boss fight
- Talk to Gwynevere. Amazing Chest Ahead. Whatever you do, DO NOT ATTACK HER.
Lordvessel
Acquire the Lordvessel.Covenant: Princess's Guard
Discover Princess's Guard covenant. - Warning: Do NOT place the lordvessel in Firelink Shrine if you're following this guide exactly, this will make a later Covenant missable. See Covenant: Darkwraith in New Londo Ruins
- Sidequest: Siegmeyer of Catarina | He will be right next to the bonfire. Talk to him.
- Miracle: Emit Force | Above
Walkthrough - Darkroot Garden & Firelink Shrine Surrounding
- You have two options here, either go here from Darkroot Basin through the Hydra, or by purchasing the Crest of Artorias for 20,000 from Andre of Astora. It's recommended to the latter as you can farm souls easily here.
- If you enter from Darkkroot Basin, you'll go up the linear path then go right towards all the human-type enemies. Once you enter the building, you'll be able to talk to Alvina for the Forest Hunters. Alvina is the cat in the window. Prompt the covenant.
Covenant: Forest Hunter
Discover Forest Hunter covenant. - From here, go through to the next area. You're going to look for a bunch of mushrooms guarding a chest in the lake, you want the chest for the Enchanted Ember.
- Make your way towards the cliff with the giant glowing door.
- Boss Fight: Sif, the Great Grey Wolf | His attacks are pretty basic, but being able to roll-dodge his attacks is a must.
Art of Abysswalking
Acquire the Art of Abysswalking. - The Covenant of Artorias ring will allow you to progress to the boss in New Londo Ruins.
- Side Note: There's another ring behind the grave.
- Whatever you do, don't talk to the giant snake in the pool. Especially do not put down the Lordvessel for him.
- If Lautrec was still alive when you rang the second bell, then this bonfire here should be disabled (although it can be warped to, but not warped from). If you move downstairs under the bonfire, you should see a gate where Anastasia was, and some items. Her Dingy set and a Black Eye Orb should be dropped.
- Take the Black Eye Orb.
- Warp to the Chamber of the Princess bonfire, then head outside of Ornstein & Smough's boss room. The Black Eye Orb should give you a message, so use it to invade Lautrec.
- Once you defeat him, you should get Anastasia's soul back, so you can return it to her where you picked up the orb.
- If you're really having trouble killing him, you can shoot him from afar with poison arrows, he won't aggro.
- From the bonfire, head towards the elevator that lead you to the Undead Church in Undead Parish. When the elevator goes up, you want to drop off onto the roof. Once there, follow the land to the right then you should see an arch support to the left. From the cliff, just run towards it and roll so you'll land on it. From here, climb up to the top to the bird nest. Imitate the bird egg and you'll be taken to Undead Asylum
- Boss Fight: Stray Demon
- If you go to the arena where you fought the Asylum Demon, you'll fall through the ground and face off against the Stray Demon.
- Knight's Honor: Crest Shield | Return to where you got your Estus Flask and you should find a knight hollowed (Oscar). Kill him for the shield.
- Key Item: Peculiar Doll | Return to the very first spawn point of the game in the cell.
Walkthrough - The Catacombs and Tomb of the Giants Bonfire
- I recommend having someone with a divine weapon for this section as skeletons here can revive unless necromancers are killed. Necromancers DO NOT respawn.
- Another note here is that Blacksmith Vamos is located here where you will be doing all your upgrades regarding Chaos and Fire given that you have the respective embers given to him. This guide will unlock all the bonfires here so that returning to this point will become easier.
- From Firelink Shrine, run towards the graveyard and you should find some stairs leading to the catacombs.
- Once inside, if you have a divine weapon or spells then you can fight freely. Otherwise, just run through.
- Run into the area, down the spiral stairs, and into the next area. Climb down the ladder, and enter the door to the left. The next area has a hole in the wall to the left, go through there to find a Necromancer and the first Bonfire.
- Bonfire: The Catacombs
- First warning here: the statues are traps with spikes. Be wary. Second warning here: Walkways need to be activated before you can walk on them. So avoid rolling onto platforms below until you know you've unlocked them.
- Walk outside, the first necromancer is to your right. Either run to him, or kill him from range.
- Head through the very linear path. When you return outside, head to the right where you'll find several flying skulls and skeletons. Run through all of these and hit the switch at the end to rotate the bridge. The next necromancer is at the end of the bridge. You can kill him before hand.
- Proceed to the next area. Here, make your way to the very bottom through all the skeletons to find your next necromancer and the next switch.
- Now from here, if you drop down the spiral staircase some more you'll meet Blacksmith Vamos who will open up a path at the bottom. By this point, you are actually in the next area. So don't go here yet, just remember it's here.
- Head back up and you should see a small narrow pathway leading outside to a dead end and a drop off to the right. Before going outside, there's a narrow path to the left that will also lead you outside. Take this path.
- Head to the end of the path, climb up the ladder and use the switch. The wall next to the bottom of the ladder is an illusory wall and takes you to the bonfire.
- Bonfire: Illusory Wall in the Catacombs
- With that, head across the newly rotated bridge and into the next area. You can kick the skeletons off the ledge here outside, but you'll need to go into the broken wall room with several skeletons here. Drop off, go straight into the room.
- Key Item: Darkmoon Seance Ring | You will find a giant skeleton. The ring is in the tomb behind him.
- From the giant skeleton, there's a broken wall to his right. Go in. Follow this very narrow pathway to find the necromancer here.
- Miracle: Tranquil Walk of Peace | From the necromancer, go upstairs and you'll find the spell
- In this room, you can walk over one of the graves that will give out and put you back near the beginning. Progress to the next bridge. Make your way to the outside path where you can drop off, you will need to drop off here. The closest path is right before the previous bonfire. Once here, drop off to the right and you'll find a Great Scythe and a hole in the tomb. (You need to walk over it to reveal it). This will drop you to the next area. Go into the doorway and you'll find a prowling demon. Kill it or don't, but make sure to loot the Eyes of Death (3x) behind him.
- To his left, you should see an open coffin, get inside that coffin and wait until you are transported.
Covenant: Gravelord Servant
Discover Gravelord Servant covenant. - Knight's Honor: Gravelord Sword | Join the covenant
- In terms of achievements, you do want to join this covenant and if you have a friend farm this quickly. Once the lord of this area dies (Tomb of Giants boss), the covenant becomes unavailable.
- Transport back to the Catacombs using the small coffin, from there simply walk into the next area and climb down. The ground here will break in the center if you walk over it. Make your way all the way down to the bottom.
- This area houses several Pinwheel Skeletons, they're extremely dangerous so dispatch of them carefully. Once you make your way across the gauntlet of pinwheels, you'll get to the boss.
- Boss: Pinwheel | I think it's a boss.
Rite of Kindling
Acquire the Rite of Kindling. - There really isn't a bonfire after this boss, so I'll guide you to the next bonfire in the following area.
- This area does not allow for summons.
- The only good source of light is either the Skull Lantern (Left hand) or the Cast Light miracle.
- Guiding you will be extremely difficult in the dark, but we'll see what we can do with the prism stones.
- Head to the first prism stone.
- Head to the second prism stone to the left.
- The third prism stone is to your right, head there. You will be descending slowly on a large coffin used as a bridge.
- You will soon encounter a large skeleton to your left. The fourth prism stone is behind him.
- At the 4th prism stone, you will be sliding down TWICE. First slide takes you to the fifth prism stone, then the next slide you won't see much as there are no more stones to follow.
- Now at the bottom, you will go to your RIGHT. You will encounter two large skeletons. You can hug the right wall if you want safety.
- Soon, you will see another light ahead and an NPC. Do not go near the prism stone here. It's a trap. Instead, go to the left of that and you should find a ladder.
- Follow the path to the bonfire.
- Bonfire: Tomb of the Giants | Yes, you can teleport here.
- Important Note: If you're exploring on your own, I will put a warning here now. The prism stone above that I said to avoid that triggers an event. You get kicked down to an area with Rhea of Thorolund and you must save her from some enemies. If you happen to save her (which you WILL need to do, but I like to delay it). When you save her and talk to her after, she will relocate to Undead Parish Church where you fought the Bell Gargoyles. From this point, she will sell miracles for a period of time. That period ends if you kill a combination of two bosses from the following list: Gaping Dragon, Bell Gargoyles, Sif, Nito, Quelaag, the Bed of Chaos, Iron Golem, O&S, Four Kings and Seath. Bosses killed prior to saving her do not count.
- The 3 exclusive miracles she sells are: Magic Barrier, Wrath of the Gods, and Great Heal.
Walkthrough - New Londo Ruins
- Go under Firelink Shrine via the elevator to New Londo Ruins. You cannot summon here until you lower the water in the area (opening the gate to Valley of Drakes). Also, make sure you have the New Londo Ruin keys from Blighttown or the Master Key as well as the Covenant of Artorias ring.
- The ghosts here cannot be harmed by regular weapons. You can only attack them using cursed weapons, or by using Transient Curse items. I'll leave it up to you to either kill them all or run passed them.
- Once down the elevator, head towards the docks. Just before the wooden planks, there is a pot containing a 2x Transient Curse.
- Go across the bridges until you get to the first wall.
- Key Item: Fire Keeper Soul | To the right across the catwalk from the first wall. You have to walk through the narrow set of arches.
- Transient Curse x2 | To the right of the base of the stairs in a pot behind the wall.
- Go up the stairs, and across the catwalk. To the left are two paths. The first is an elevator you can access as a shortcut later when you've unlocked it. The second one is a stairs leading to your next spot. Go down the stairs.
- Once out, immediately take the path to your right. Follow this path and watch for a doorway on the right. Take it and go up.
- Just go across this walk-way towards the church.
- Once you're at the entrance to the church, go in, take the door to your right. Then you'll have two choices, take the left path to the main room of the church. Go into the fire place and climb the ladder to the roof.
- On the roof, you'll find Ingward. As we've already collected the Lordvessel, he will give you the Key to the Seal. This key will let us open the gates and lower the water.
- Sorcery: Resist Curse | Purchase from Ingward for 5,000 Souls
- Climb back down the ladder, and go out the first door. Take the right door then go right and downstairs and take the door to the left.
- Once out, follow the linear path. Take the right at the fork and up the stairs. At the top of the stairs, run straight into the tower. (Don't climb the second set of stairs).
- Once in, go down stairs and stay on the left and you'll find a gated door, open it with your newly obtained key and rotate the lever inside.
- With that, the water will be drained and the door to Valley of Drakes will be opened. Now you can summon phantoms as well as take giant shortcuts.
- Taking the elevator here will take you to the very bottom of New Londo Ruins. once you exit the elevator, go straight and up the ramp between the walls. Take this linear path until you reach a church-like building with several Darkwraiths (black enemies with black glowing shields) and a Mass of Souls (giant blob enemy).
- Behind the Mass of Souls, take the left path and activate the shortcut elevator. Back to the same area, take the right path now up the stairs.
- Key Item: Very Large Ember | Once up the stairs, follow the linear path until it takes you upstairs and to a chest. The item is in the chest.
- Now back to the Mass of Souls once more, go out the other door into a pool of water. Climb out of it and go across to your left and up the stairs to another building containing Darkwraiths and Mass of Souls. Exit out the left side and the fog gate will be right in of you. Enter the fog gate.
- This spiral staircase will lead to the boss; however, make sure you have the Covenant of Artorias ring equipped as you will die without it when falling into the Abyss at the bottom. You CANNOT swap the ring out after dropping down during the fight. You will die instantly.
- Boss Fight: The Four Kings | They deal a good bit of magic damage, but most of it is pretty tolerable. The only attack that's truly dangerous is when one hugs itself and starts glowing with magic. This is a large blast which may kill you one hit. The strategy here is to deal enough damage where you kill a king before a second one appears. The rest is up to your DPS and ability to dodge. When a king dies, you can actually still hit him while he's in the dying animation to deal more damage to the boss health pool (hence Three Kings nomenclature).
Defeat the Four Kings
Defeat the Four Kings, inheritors of souls. - After the fight, as we have not placed the Lordvessel yet, you will find Kaathe near the bonfire. Read this portion CAREFULLY. This next segment will show you how to both join the Darkwraith covenant as well as retain Frampt's services.
- Rest at the bonfire to have a teleport point. Make sure you have a Homeward Bone, or use your souls so you can use the Darksign when needed.
- Talk to Kaathe and he will ask you to place the Lordvessel for him by transporting you to Firelink Altar. Once you get teleported, use a teleport item: Homeward Bone, Homeward, Darksign etc
- You will be back at the Abyss bonfire. Talk to Kaathe and enter covenant.
Covenant: Darkwraith
Discover Darkwraith covenant. - Knight's Honor: Dark Hand
- Now, you can place the Lordvessel using either Kaathe or Frampt. It's highly recommended that you place it for Frampt for his exchange services. Frampt is the serpent in the pool of Firelink Shrine.
- Head to the pool, and talk to Frampt. If he's asleep, just hit him to wake him up.
- Talk to him until he moves you to Firelink Altar, then place the Lordvessel.
- With the Lordvessel placed, all golden fog gates will be removed giving you access to the latter half of Tomb of the Giants, Duke's Archive through Anor Londo, and the latter half of Demon Ruins.
Walkthrough - Painted World of Ariamis
- Make sure you have the Peculiar Doll key item from Undead Asylum Revisited. Also warning here: If you aggro the boss in the Painted World of Ariamis, you cannot leave until you defeat it. You cannot warp out.
- Make your way to Anor Londo, then in the giant room with the chandelier outside the castle, go downstairs and go up to the giant painting and interact with it.
- Upon arriving, follow the linear path.
- Bonfire: Painted World of Ariamis | Note: This is the only bonfire in the area.
- Proceed and go to your right. Go up the stairs. Warning now: The pus-like enemies inflict toxin upon death if you're within the splash radius.
- Once up the stairs, you can go left or go up the stairs to the right. Take the stairs. Go across the bridge where you'll find several more pus enemies. Continue straight and exit the building and head right to a circular building.
- Take the stairs to the left and you'll be faced with a dragon. It mainly inflicts poison, but you should be able to take it out.
- Knight's Honor: Bloodshield | On the bridge where you fought the dragon
- After the dragon, head back to the circular tower. At the top is a Red Sign Soapstone if you want otherwise head to the bottom and open the doorway to the courtyard.
- Ahead is an enemy known as the Phalanx, go across the courtyard and open the gate that unlocks the shortcut to the bonfire. I will describe each area FROM the bonfire gate.
- Pyromancy: Acid Surge | From the gate, go to the right. Hug the right until you're near the cliff and you'll find the pyromancy behind a wall
- From the gate, go left and up the stairs. At the top of the stairs, go straight and go down the ladder inside. This next area is filled with pinwheels.
- Straight in front of you is the handle that opens the gate to the boss area.
- From the switch, the wall to the left in the corner is an illusory wall. Break it and go straight all the way to the dead end. Take the left and right at the fork.
- Pyromancy: Fire Surge | Kill the enemy here.
- Return back down to the fork and go left. Now, at the right turn, don't turn, roll into the wall in front of you to reveal an illusory wall.
- Key Item: Annex Key | Take the left at the fork to find this
- Now back at the bonfire gate once more, go straight to the phalanx and enter the building to the right. Using the Annex Key, open the door and climb up the stairs here. Exit the building.
- Knight's Honor: Velka's Rapier | Once outside, break the wooden wall to the right to find this
- Key Item: Dark Ember | Once outside, go straight and down the stairs passed several pus enemies to find this on a petrified blacksmith
- Miracle: Vow of Silence | Once outside, take the left at the fork and go up the stairs. The miracle is on the corpse at the very top
- Head to the bottom floor of the circular tower and the other door should be opened now. Make your way to the boss.
- Knight's Honor: Priscilla's Dagger | Cut her tail
- Boss Fight: Crossbreed Priscilla | Upon attacking her, she aggros and goes invisible, staggering her will make her visible again. If you have no methods to stagger her, then simply watch the snow for her footprints to locate her.
Defeat Crossbreed Priscilla
Defeat Crossbreed Priscilla, the Lifehunter - You may exit.
Walkthrough - Demon Ruins & Lost Izalith
- Before we head to Demon Ruins, if you've followed Siegmeyer's quest he will now be in Blighttown. Make sure you have 3 SPARE purple moss clumps (non-blossomed). From the Daughter of Chaos bonfire, go backwards into Blighttown and stay on the right side. Once you go get to the area with the large slugs, you'll find Siegmeyer. Talk to him and give him 3 Purple Moss Clumps.
- Warp to the Daughter of Chaos bonfire.
- Go outside to Demon Ruins.
- Bonfire: Infestation Bonfire
- Wound one of the egg enemies here so that they attack you until your character starts scratching their head. Once you start scratching, head back to Eingyi at the Daughter of Chaos bonfire and talk to him. He will offer to sell you Toxic Mist (exclusive) for 25,000 Souls. You only need to do this once per playthrough, the offer to buy will always remain afterwards.
- Roll off to the right of the bonfire and head across the bridge.
- Boss Fight: Ceaseless Discharge | I'll say this now, if you run to the end of this area and loot the equipment before attacking the boss, he will aggro onto you and if you ignore him and run back to the fog gate, he will get stuck and will grab onto the ledge. Attack his hand to kill him.
- After the boss fight, the lava levels will rescind.
- Key Item: Chaos Flame Ember | In the first area, it's located in the lava at the very end behind 7 Taurus Demons.
- Head right near the beginning of the big area, you'll find a Capra demon guarding the route where you want to go.
- Follow the linear path and once you get to the bottom, you can drop down to the right.
- Bonfire: Second Bonfire
- Go down the steps.
- Key Item: Large Flame Ember | At the bottom of the steps, you'll want to take the left path to a chest containing this.
- From the bottom of the steps, go straight up through the fog gate.
- Boss: Demon Firesage | Similar to the Stray Demon you fought in Undead Asylum except fire attributed.
- After the boss, the left stairs up will take you to an elevator that connects back to the Daughter of Chaos bonfire.
- Eventually, take the stairs down to your next bonfire.
- Bonfire: Bonfire between Bosses
- Boss: Centipede Demon | If you go to the area to the right of the boss entrance crossing the lava twice, you will find a good area to fight the boss (where there's 2x Green shards).
- Exit the boss area to the left of the entrance.
- Warning: Before completing the boss here, make sure you have a Pyromancy Flame +10 and have met up with Quelana of Izalith in Blighttown. (Encountering another player with a Pyromancy Flame +10 or higher is also an alternative provided it's in The Depths, Blighttown, Demon Ruins, or Lost Izalith)
- Bonfire: Lost Izalith Entrance | Solaire is here.
- The Centipede Demon drops the Orange Charred Ring. Make sure you have it equipped before venturing into the lava.
- Head straight into the lava, climb the branch there. Follow it til it forks, taking the left. At the end of this branch, go right to the next set of branches.
- At the end of that branch, go straight to the first tower. The left wall of the tower is illusory. Go around the tower to the right. Going up the branch above the second tower is an item, but you want to go to the base of it and break the illusory wall which is also on the left.
- Bonfire: Lost Izalith
- From the bonfire, go straight to the branches ahead and climb then to the second half of Lost Izalith.
- Follow the linear path until you climb the stairs with a giant Chaos Eater.
- Take the first branch down at the top of the stairs.
- If you run towards the item in the cave, the floor will give out. Hug the left side so you stay up top.
- Sidequest: Siegmeyer of Catarina | If you've followed his quest to this point, he will be here near the top. Kill off three Chaos Eaters from ranged, then talk to him until he says he'll join you in battle. Once you jump in, he joins you. Kill the fourth and final chaos eater with Siegmeyer's health above 50% to clear this stage.
- Key Item: Red Titanite Slab | Looking at the exit down here, take the left and left. You'll find a dead end on your next right. It's in the chest
- From the chest, go out go left, right, go to the end and go left. Climb the stairs then take the branch to the top.
- Once back up top, continue on your route.
- Go straight to the end and encounter another Chaos Eater
- Pyromancy: Chaos Fire Whip | In the chest behind the chaos eater
- See warning beginning of Lost Izalith before entering fog gate.
- Boss: Bed of Chaos | This is a scripted boss fight. Bed of Chaos has three parts, two roots and the actual boss. The two roots are located inside the orange spheres to the left and right. The more you break, the more holes there are in the ground. The right one is harder to break, so you should go for that one first, then the left. After that, go to the middle and the floor will break making you roll onto the branch. Go up and kill the Bed of Chaos.
Defeat Bed of Chaos
Defeat the Soul Lord Bed of Chaos.
Walkthrough - The Duke's Archive & Crystal Cave
- Warp to the Anor Londo bonfire, go out and take the left passed two iron boars.
- Bonfire: Entrance to the Duke's Archive
- Head inside and up the main stairs, go to the right and head to the end of the floor to the right. The chest is a mimic containing the Crystal Knight Shield (this is helpful for the Crystal Weapon achievement if you don't fancy a crystal weapon and want to limit the number of items you use).
- Go to the other end and take the elevator up.
- If you're carrying a hefty number of souls, I would equip the Ring of Sacrifice here.
- Fake Boss Fight: Seath the Fake | You cannot kill him here, just die.
- PRISON STAGE
- Bonfire: Archive Prison Tower
- After dying, you'll wake up at the bonfire.
- Key Item: Archive Tower Cell Key | Attack the serpent at the gate to get the key.
- Key Item: Archive Tower Extra Key | From the bonfire cell, go down to the 4th door. Open this one
- Head to the very bottom dispatching all of the octopus enemies.
- Miracle: Soothing Sunlight | Dropped by the non-hostile octopus enemy near Big Hat Logan
- Miracle: Bountiful Sunlight | Dropped by the non-hostile octopus enemy near Big Hat Logan
- Outside the cell is a ladder, climb the ladder.
- Key Item: Archive Tower Giant Door Key | In the chest up here
- With the key, climb to the very top of the tower and open the door.
- EXIT PRISON STAGE
- Follow the linear path until you return to the Duke's Archive. This is the south side.
- Once here, take the left and go through the hallway. Take the stairways from the current floor to the upper floor and use the switch midway. Go up and you'll be on the floor above on the same side.
- Cross back through the hallway here and you'll notice the stairs on this south side has also rotated. You can simply drop down to the stairs and go up it to the Channeler.
- Sorcery: Strong Magic Shield | After dropping down in the previous instruction, the chest is at the top to the right.
- Return to the staircase and rotate it. Then go down the stairs and you can access a room with an archer and a ladder.
- Climb down the ladder, pull the lever. Run out to the foyer and turn left for the bonfire.
- Bonfire: The Duke's Archive
- Return to the lever and go into the library and loot all the chests. The far right chest is a mimic.
- Key Item: Crystal Ember | Chest to the right behind a bookshelf
- Key Item: Archive Tower Giant Cell Key | Chest before the lever on the left inside the library
- The previous key is used in the bottom room
- Pull the switch to lower the ramp, go down and outside. Under the ramp is a chest with 20 prism stones which may help.
- Sidequest: Siegmeyer of Catarina | This is actually Sieglinde but the quest is tied to Siegmeyer. Kill the gold golem to free Sieglinde. Talk to her and answer 'Yes'. She will relocate to Firelink Shrine now.
- Go down the slope to enter Crystal Cave
- Follow the slopes until you see a crystal butterfly. They respawn, so unless you're farming them ignore them. Go passed it and at the end you should see several floating messages to the left.
- Crystal Cave has invisible paths. If you see the crystals dropping, you can see them colliding with the floor. If you're online, you will also find several orange messages. Those will show you the safe routes. Shooting arrows, or dropping prism stones will also land on the invisible flooring.
- Go straight along the path to the next crystal slope. Kill this golem, he does not respawn.
- Once on this path go straight and you should see a drop off with more messages. Drop down.
- Three crystal lizards behind you.
- Key Item: Blue Titanite Slab | On the path with the crystal lizards, you can keep going up turn right then immediately left after four-five steps. Go parallel to the first path after the crystal lizard until you line up with the lower ledge and go straight that way. You can save this for later.
- From the spot you dropped off, go left a bit and cross the invisible path. Take the right path to an area with several clams.
- Boss Notes: Having the cursebite ring is quite helpful from Oswald at the Undead Church.
- Knight's Honor: Moonlight Greatsword | Cut the boss tail, you MUST hit the very tip of it to count for tail damage.
- Boss: Seath the Scaleless | If you break the crystal on the far end, Seath will be stunned for a bit giving you bits of damage. Most of Seaths attack are tail slaps or his curse breath.
Defeat Seath the Scaleless
Defeat Seath the Scaleless, inheritors of souls.
- Key Item: Large Magic Ember | Found where you first encountered Seath. Seath MUST be dead for this to appear.
Walkthrough - Tomb of the Giants
- Warning: If you want to obtain the Gravelord spells in this playthrough, do so before defeating this area boss. If you plan to wait until next playthrough, make sure you DO NOT turn in any Eye of Death.
- Warp to the Tomb of the Giants bonfire. Climb up the ladder.
- Sidequest: Rhea of Thorolund | You should see a prism stone and Patches. If you walk to the prism stone, Patches will kick you down into a pit. Here you will find Rhea, Vince, and Nico. Kill Vince and Nico.
- Miracle: Replenishment | Talk to Rhea after exhausting her dialogue after saving her from Vince and Nico.
- Key Item: Skull Lantern | Located in this pit, when used in the left hand, the block action will hold the lantern up lighting your way. Not required, but helps.
- Sidequest Note: See Rhea's questline
- From the bonfire, go up and to the right. You should find a ladder.
- Key Item: Large Divine Ember | Climb the ladder down and it's in the far end
- From the previous ladder, go left along the narrow path. Climb the ladder into a structure then go straight and climb both ladders to the left.
- Covenant Item: Eye of Death (x3) | On the ledge near the ladder
- From the bonfire again.
- You can talk to Patches and if you forgive him, he will relocate to Firelink Shrine where you can purchase 3 more Eye of Death.
- From the bonfire, go up and head straight past Patches. You'll encounter a dog skeleton. When you encounter the second dog skeleton, take a left into a ramp that goes down.
- Fix your camera to look down the ramp.
- Knight's Honor: Effigy Shield | Take the only right and it's at the end of the path
- From the ramp again, take a left to the ledge, drop off to the left of the ledge. Going straight will lead you to another ledge. There's a ramp to your right and a path to your left, take the path to the left.
- Bonfire: Second Bonfire | You can also start summoning here.
- You NEED to be human for this section.
- From the bonfire, head to the area with the ramp, you can roll or jump up the ledge to the item up above for a ring.
- Stay near the wall and drop off to the small platform. Turn around, and drop down again. You should see a ladder, take it.
- Along this narrow path, once you take the right entrance, you will be invaded by Paladin Leeroy. Kill him, but make sure he doesn't fall off. You need to loot him.
- Knight's Honor: Sanctus | Dropped by Paladin Leeroy
- Knight's Honor: Grant | Dropped by Paladin Leeroy
- Enter the cave. Side note is that the baby skeletons in the pool spawn infinitely.
- Key Item: White Titanite Slab | At the top of the other side of this cave, the left side has a drop down where you can find this slab.
- Boss Fight: Gravelord Nito | He's weak against fire, but your best strategy is to stay really close to him. If you hug him a lot, he tends to use his AoE attack which kills all of the skeletons in range which makes it easier to fight him without worrying about the skeletons.
Defeat Gravelord Nito
Defeat the Soul Lord Gravelord Nito.
Walkthrough - Dark Anor Londo
- Equip the Darkmoon Seance Ring found in the Catacombs.
- Kill Gwynevere
If you kill Gwynevere, Gwyndolin will be hostile requiring sin absolution at Oswald to join the Darkmoon covenant. This will also make the Anor Londo firekeeper hostile permanently thus losing the bonfire completely.
Else, get the ring and you can omit this completely.
- Head to giant rotating staircase elevator in the beginning of Anor Londo. Climb to the very bottom.
- Bonfire: Darkmoon Bonfire
- Head to the fog gate here, but do not enter it. Entering the fog gate will make Gwyndolin hostile (duh, boss fight).
- Interact with the carpet and prompt to join the covenant.
Covenant: Blade of the Darkmoon
Discover Blade of the Darkmoon covenant. - Now you'll need to collect 10 total Souvenirs of Reprisals and offer it up to Gwyndolin before moving on. Killing the boss now will force you to wait until the next playthrough to get the miracle related here.
- This guide covers how to get the guaranteed Souvenir of Reprisal by invading Lautrec in Anor Londo.
- Another can be obtained by trading the Pendant from Rhea's questline with Snuggly the Crow in the Undead Asylum.
- The rest can be obtained through the covenant invasions or by farming Demon Crows in the Painted World of Ariamis.
- Note: Fighting Gwyndolin will make the Anor Londo firekeeper hostile.
- Boss: Dark Sun Gwyndolin | Gwyndolin has a lot of ranged attacks, and will continuously teleport backwards (the hallway is not infinite so he does run out of room eventually). Use the pillars to the left and right if needed for cover.
Defeat the Dark Sun Gwyndolin
Defeat Dark Sun Gwyndolin, the Darkmoon God. - Miracle: Sunlight Blade | In the chest after the boss fight
Walkthrough - Kiln of the First Flame
- Head to the Firelink Altar and offer up the four Great Souls: Four Kings, Bed of Chaos, Seath the Scaleless, and Gravelord Nito.
- The door will open and thus give access to the Kiln of the First Flame.
- WARNING: Defeating the final boss will send you to NG+, do the clean-up first.
- Very straightforward area, home to every type of Black Knight.
- Boss: Gwyn, Lord of Cinder | Parry him.
- There are two endings to Dark Souls and there are two achievements for each ending. For guide sake, I'll put one here and the other in NG+. You can pick your ending, and then pick the alternate in NG+.
- After the boss, light the bonfire.
To Link the Fire
Reach "To Link the Fire" ending.
Walkthrough - Clean Up Spells
Any covenant related entries here will assume you have NOT leveled it up at all.
- Griggs of Vinheim
- Purchase Fall Control from Griggs of Vinheim: 1500 Souls
Dusk of Oolacile - Make sure you're human. Head to Darkroot Basin where you encounter a Hydra. The guide avoided this, so it may be dead already if you did it yourself. Go into the cave to the left, and there should be a gold crystal golem. Defeat it. Dusk will be freed as a result.
- Now, reload your game, or rest at a bonfire and come back. There should be a summon sign near a rock to the right of the Hydra lake. You can summon Dusk of Oolacile. Purchase all of her sorceries: 18,000 Souls
Big Hat Logan - With Seath the Scaleless defeated, Big Hat Logan moves out of the cage to the library before exiting Duke's Archive.
- Buy all of his spells: 183,000 Souls
- After that, exhaust his dialogue. Rest at a bonfire, and head back to where you fought Seath the first time (invincible Seath).
- Kill Big Hat Logan
- He drops White Dragon Breath, the final Sorcery.
Wisdom of a Sage
Acquire all sorceries. - Key Item: Large Magic Ember | In the chest in the room.
- Laurentius of the Great Swamp
- Meet Laurentius in Firelink Shrine after saving him in The Depths.
- Purchase Iron Flesh and Flash Sweat: 4,000 Souls
Quelana of Izalith - You should already have Quelana unlocked. If not, you must do this in NG+.
- Head to Quelana
- Pyromancy: Fire Tempest | Talk to Quelana after defeating Bed of Chaos
- Purchase all of her pyromancies: 84,300 Souls
Eingyi - Head to Eingyi next to the Daughter of Chaos bonfire, purchase Toxic Mist for 25,000 souls if you haven't yet. He will only sell it if you've spoken to him before while infected with the egghead.
Chaos Servant - Obtain 30 Humanity
- Join the Chaos Servant covenant in Quelaag's Domain
- Pyromancy: Great Chaos Fireball | Join Chaos Servant
- Offer 30 Humanity to Quelaag's Sister
- Pyromancy: Chaos Storm | Rank 2 Chaos Servant (Above step)
Bond of a Pyromancer
Acquire all pyromancies.
- You should already have all the gravelord miracles, if not you must do this in NG+.
- You should have Darkmoon Blade from the Blade of the Darkmoon Covenant, if not you must do this in NG+.
Rhea of Thorolund - You should already have purchased: Wrath of the Gods, Magic Barrier, Seek Guidance, Great Heal, Force, Homeward, Great Heal Excerpt and Heal. Following this guide should make Rhea available end-game.
Oswald of Carim - Purchase Karmic Justice from Oswald of Carim near the Bell Gargoyles: 40,000 Souls
Join the Warrior of Sunlight Covenant - Miracle: Lightning Spear | Join
- Offer up 10 Sunlight Medals
- Sunlight Medals are obtained by completing boss fights by summoning gold phantoms or helping others as a gold phantom. Solaire is valid.
- Three sunlight medals are a guaranteed chest loot in Anor Londo across the bonfire in the castle.
- Else, you can farm Chaos Bugs in the shortcut between Demon Ruins and Lost Izalith (requires Lvl 2+ Chaos Servant)
- Miracle: Great Sunlight Spear | Above
- Offer up Soul of Gwyn | Must be Rank 1 of the covenant
- Miracle: Sunlight Spear | Above
Prayer of a Maiden
Acquire all miracles.
Walkthrough - Clean Up Knight's Honor
- Silver Knight Straight Sword: Farm the Sword wielding Silver Knights in Anor Londo. Does not spawn in Dark Anor Londo.
- Black Knight Sword: Farm the Sword wielding Black Knight in Kiln of the First Flame
- Stone Greatsword: Farm the Stone Giants in Darkroot Garden
- Black Knight Greatsword: Farm the Greatsword wielding Black Knight in Kiln of the First Flame
- Crescent Axe: Purchase/Kill via Patches
- Black Knight Greataxe: Farm the Greataxe wielding Black Knight in Kiln of the First Flame
- Channeler's Trident: Farm Channelers in the Duke's Archive (Rare drop)
- Demon's Spear: Farm Demons in Anor Londo or Purchase from Shiva of the East in Blighttown
- Silver Knight Spear: Farm the Spearwielding Silver Knights in Anor Londo. Does not spawn in Dark Anor Londo.
- Black Knight Halberd: Farm the Halberd wielding Black Knight in Kiln of the First Flame
- Giant's Halberd: Farm the Giants in Anor Londo or Purchase from Giant Blacksmith
- Silver Knight Shield: Farm any Silver Knight in Anor Londo. Does not spawn in Dark Anor Londo.
- Black Knight Shield: Farm any Black Knight in Kiln of the First Flame
- Stone Greatshield: Farm Stone Giants in Darkroot Garden
- You only get one soul per playthrough. If multiple weapons are listed, then you need multiple playthroughs for them. If you're cooping with friends, you can drop trade them to lower playthrough amount.
- To upgrade to boss souls, you'll need a required weapon type upgraded to +10 (via Andre) for that weapon.
- Soul of Sif: Cursed Greatsword of Artorias (It's black) | Any Sword
- Soul of Sif: True Greatsword of Artorias (It's white) | Broken Straight Sword or Straight Sword Hilt
- Soul of Sif: Greatshield of Artorias | Shield
- Soul of Quelaag: Quelaag's Fury Sword | Curved Sword
- Soul of Quelaag: Chaos Blade | Katana
- Core of an Iron Golem: Golem Axe | Axe
- Core of an Iron Golem: Dragon Bone Fist | Claw or Caestus
- Soul of Smough: Smough's Hammer | Hammer
- Soul of the Moonlight Butterfly: Moonlight Butterfly Horn | Spear
- Soul of the Moonlight Butterfly: Crystal Ring Shield | Shield
- Soul of Ornstein: Dragonslayer Spear | Spear
- Soul of Priscilla: Lifehunt Scythe | Scythe, Halberd, or Whip
- Soul of Gwyndolin: Darkmoon Bow | Bow
- Soul of Gwyndolin: Tin Darkmoon Catalyst | Catalyst (+0)
- Soul of Gwyn: Great Lord Greatsword | Sword
- Due to Sif, a solo run would require 2.5 playthroughs, the minimum run requirement.
For weapon upgrades, see the respective area for it.
Walkthrough - NG+
Note: DLC is NOT required and will not be covered here. I do recommend it though. It can be accessed where you saved Dusk in Darkroot Garden.
Make sure you purchase the Master Key from Domhnall under the Aqueduct in Firelink Shrine. It'll shorten the next runs.
Stock up on any items that you think you may want as all merchants will be reset. You can kindle bonfires if you'd like. Their kindled state will be carried over.
Once you're ready to move to NG+, interact with the main bonfire at Firelink Shrine. I will only list the required areas that you must go to.
Things that don't carry over:- Blacksmith Embers
- NPC Questlines
- Sins
- Keys
If you need specific items, covenants or questlines, make sure you keep track of that yourself. Those will not be covered here.
- If you defeat the Asylum Demon before you get the weapons, he will drop a Demon Great Hammer.
- The usual.
- Boss: Taurus Demon
- Boss: Bell Gargoyle
- Ring the bell.
- Boss: Moonlight Butterfly
- You need a second soul for Knight's Honor.
- Boss: Sif, the Great Grey Wolf
- Access Sif either through Darkroot Basin or using the Crest of Artorias
- Skip the Depths using the Master Key
- Boss: Chaos Witch Quelaag
- You need a second soul for Knight's Honor.
- Ring the bell to open Sen's Fortress.
- Boss: Iron Golem
- You need a second soul for Knight's Honor.
- Boss: Ornstein and Smough
- You need a second soul for Knight's Honor.
- If you have Smough's soul, then make sure you kill Smough FIRST.
- If you have Ornstein's soul, then make sure you kill Ornstein FIRST.
- Place the Lordvessel
- Boss: Stray Demon
- If you don't need Titanite Slabs, ignore this.
- Boss: Ceaseless Discharge
- Boss: Centipede Demon
- Boss: Four Kings
- Blue Titanite Slab here.
- Boss: Seath the Scaleless
- Boss: Pinwheel
- White Titanite Slab here.
- Boss: Gravelord Nito
- Red Titanite Slab here.
- Boss: Bed of Chaos
- Boss: Dark Moon Gwyndolin
- Boss: Gwyn, Lord of Cinder
- Make sure to pick the opposite ending to what you picked in your first playthrough.
Dark Lord
Reach "The Dark Lord" ending.
- See the weapons clean up from NG. Create any weapons you need here at the Giant Blacksmith.
Walkthrough - NG++
Once you're ready to move onto NG++, go for it.
- If you defeat the Asylum Demon before you get the weapons, he will drop a Demon Great Hammer.
- The usual.
- Boss: Taurus Demon
- Boss: Bell Gargoyle
- Ring the bell. We need access to the Giant Blacksmith
- Boss: Sif, the Great Grey Wolf
- You need a third soul for Knight's Honor.
- Access Sif either through Darkroot Basin or using the Crest of Artorias
- Skip the Depths using the Master Key
- Boss: Chaos Witch Quelaag
- Ring the bell to open Sen's Fortress.
- Boss: Iron Golem
- Giant Blacksmith: If you've followed everything, this should be the last step if you're playing solo. Craft the final Sif weapon.
Knight's Honor
Acquire all rare weapons.
 The Dark Soul
All achievements completed. Congratulations!
Sidequest: Big Hat Logan
- Located in a cage in Sen's Fortress behind a wall that can be broken with a large boulder. It's the wall with a serpent leaning on it near the start.
- You need either the Master Key (starting item for Thief, gift item, or purchase from Domhnall of Zena in Firelink after ringing both bells) or the Cage Key found in Sen's Fortress in a tower accessed from the roof.
- Rotate the boulder contraption and point it towards the leaning serpent wall.
- Unlock Big Hat logan's cage. Exhaust his dialogue
- Whenever he moves over here possibly related to your time in Anor Londo, he will begin selling some of his spells, but you need 15 Intelligence.
- You do NOT need to buy anything from him now.
- After placing the Lordvessel, he will appear in the prison cell at the bottom with several Pisacas. The key to this cell is located in the library before you exit The Duke's Archive.
- Once you defeat Seath, he will exit the cell himself regardless if you free him from the cell. You should open the cell as there lies a Firekeeper Soul.
- Purchase all of his spells. Exhaust his dialogue.
- He relocates to the first boss arena where you fought Seath. Defeat him for his sorcery, White Dragon Breath.
Sidequest: Rhea of Thorolund
- Appears in Firelink Shrine next to Petrus upon defeating Capra Demon.
- Talking to Petrus here will move them to Tomb of the Giants.
- In the ditch that Patches kick you down, you'll find Rhea as well as her bodyguards. The latter of whom are hollowed.
- Defeat Vince and Nico.
- Talk to Rhea and she will give you the Replenishment miracle.
- Here she will sell all of her miracles.
- After saving her, if you defeat any two of the following bosses FROM THIS POINT, she will die: Gaping Dragon, Bell Gargoyles, Crossbreed Priscilla, Sif - the Great Grey Wolf, Gravelord Nito, Chaos Witch Quelaag, Bed of Chaos, Iron Golem, Ornstein and Smough, Four Kings, and Seath the Scaleless.
- Note: Petrus is the one who kills her, so if you kill Petrus, you will make Rhea hostile. But you can absolve your sins with Oswald.
- Any of the bosses who are already dead will not count towards this.
- Purchasing all of her miracles prior to her death condition in Undead Church will have her hollowed and trapped in the Duke's Archive prison.
Sidequest: Siegmeyer and Sieglinde of Catarina
- Originally found outside the Sen's Fortress gates. Will move automatically once you open them.
- After the gates are opened, you'll find him sitting on the ledge to the right of the first boulder path. Talk to him here and exhaust his dialogue.
- Found in a window room accessed from the roof of Anor Londo. Talk to him here and exhaust his dialogue.
- Next, kill the three silver knights in the adjacent room. Go back him and exhaust his dialogue.
- He will give you a Tiny Being's Ring, then relocates.
- He moves to the central bonfire, and talk to him. Respond with "Yes" for the Emit Force miracle.
- Note: this is as far as you NEED to go. If you keep going, you'll get a Titanite Slab.
- Exhaust his dialogue: this will trigger Sieglinde's questline.
- You will find him in the swamp near the Ash Lake branch to the right.
- He will ask for 3x Purple Moss Clumps. Say yes, and you'll give him 3 clumps.
- You will receive his Pierce Shield in exchange.
- In the open area between the Duke's Archive and the Crystal Cave, a golden golem will now appear in the middle. Defeat this to save Sieglinde.
- Exhaust her dialogue.
- At the main bonfire, exhaust Sieglinde's dialogue.
- Located in the pit with the broken floor you can fall down to.
- In order to continue this questline, you need the following conditions: All four chaos eaters cannot be killed before jumping down with Siegmeyer, Siegmeyer MUST have at least half his health when the last Chaos Eater is killed.
- So to do this EASILY.
- Defeat 3 Chaos Eaters in the middle with range. You can damage the fourth one.
- Exhaust his dialogue, then jump in and defeat the fourth chaos eater. Siegmeyer will jump down with you.
- Exhaust his dialogue.
- If you pass the condition of saving Siegmeyer in Lost Izalith, talk to Sieglinde once more at the bonfire.
- Exhaust her dialogue.
- You will find both located at the first bonfire here.
- You will be rewarded with a Titanite Slab.
Covenants
Covenants are similar to factions in several games and Dark Souls provides several types of factions. Below will list every faction, their requirements, how to join them, and any related information.
The most important note here is: If you leave a covenant, the amount of points you've accumulated in that covenant will be halved. (i.e. if you gave 20 humanity to a covenant, leaving it will make it seem as if you only gave it 10).
Covenant: Way of WhiteDiscover Way of White covenant.
Tags: Missable | Starter | Co-op
Missable Condition: Petrus and Rhea are dead/hostile. Petrus becomes permanently hostile after saving Rhea in Tomb of the Giants.
Location: N/A | Firelink Shrine | Undead Parish
Join Condition: Talk to Petrus or Rhea | Automaticly joined if Knight/Cleric Class
No Rank
Covenant: Princess's GuardDiscover Princess's Guard covenant.
Tags: Missable | Co-op
Missable Condition: Gywnevere is killed.
Location: Anor Londo
Join Condition: Talk to Gwynevere after Ornstein and Smough
No Rank
Covenant: Blade of the DarkmoonDiscover Blade of the Darkmoon covenant. Tags: Missable | PvP | Territorial Defense
Missable Condition: [Boss] Gwyndolin is killed.
Location: Dark Anor Londo
Join Condition: Talk to the Gwyndolin before his fog gate.
Covenant: Warrior of SunlightDiscover Warrior of Sunlight covenant. Tags: Co-op
Location: Altar of Sunlight | Undead Parish Bridge under Hellkite Dragon
Join Condition: 25 Faith - (5 * Bosses cleared as White Phantom)
Covenant: Forest HunterDiscover Forest Hunter covenant. Tags: PvP | Territorial Defense
Location: Darkroot Garden
Join Condition: Talk to Alvina and respond with "Yes". If you mess up, absolve your sins with Oswald.
Covenant: DarkwraithDiscover Darkwraith covenant. Tags: Missable | PvP
Missable Condition: Place the Lordvessel for Frampt before talking to Kaathe
Location: The Abyss [New Londo Ruins]
Join Condition: Talk to Kaathe
Covenant: Path of the DragonDiscover Path of the Dragon covenant. Tags: PvP
Location: Ash Lake
Join Condition: Talk to the Stone Dragon
Covenant: Gravelord ServantDiscover Gravelord Servant covenant. Tags: Missable | PvP
Missable Condition: [Boss] Gravelord Nito is killed
Location: The Catacombs
Join Condition: Interact with Nito's sarcophagus with at least one Eye of Death
Covenant: Chaos ServantDiscover Chaos Servant covenant. Tags: Missable | PvE
Missable Condition: Quelaag's Sister is killed.
Location: Quelaag's Domain
Join Condition: Talk to Quelaag's Sister
Knight's Honor - Guidelines
- All weapons MUST be on a single character.
- Weapons CAN be dropped from other players (in +0 form).
- You should NOT use weapons required for Knight's Honor to ascend weapons to their Boss equivalent UNLESS you have another. (i.e. using a Bloodshield to create the Greatshield of Artorias)
- If the achievement does not register and you're certain that you've got everything, try dropping weapons and picking them back up or putting them into the bottomless box and taking them out.
- Weapons gained through glitches do not count.
Knight's Honor - Sorted by Categories
Weapons are listed in order of bosses that you encounter in the walkthrough.
Spear sold by Male Undead Merchant
Knight's Honor - Sorted by Inventory Order
Miracles - Prayer of a Maiden
Must be on the same character.
Rhea of Thorolund - Firelink Shrine: After you defeat the Capra Demon, she will show up near the elevator in Firelink Shrine. If you talk to Petrus while the group is here, they will go to the Tomb of Giants. This also occurs when defeating Pinwheel in The Catacombs. Once in the Tomb of Giants, find Patches and fall prey to his tricks. In the pit, you will find Rhea and some hollowed buddies. Kill off the hollowed enemies to save Rhea. She will give you the Replenishment Miracle. From here, she moves to the Undead Parish Church where you looted the Fire Keeper Soul. The Berenike Knight must be killed before she spawns here.
Now the complicated part is that once she moves to the Undead Parish, if you kill any two of the following bosses, she will die and move to the Duke's Archive.
Bosses: Bell Gargoyles, Gaping Dragon, Great Wolf Sif, Chaos Witch Quelaag, Bed of Chaos, Iron Golem, Priscilla, Ornstein & Smough, Seath the Scaleless, Four Kings, or Gravelord Nito.
Note: This does not count if these bosses were dead prior to her moving there, only after she moves there.
To save her, buy all of her miracles, or kill Petrus before killing two additional bosses listed above.
Pyromancies - Bond of a Pyromancer
Must be on the same character.
Laurentius of the Great Swamp - The Depths: Once you face the first butcher, you should find a room filled with barrels. Laurentius is stuck in one of the barrels. Pro-tip: Roll, don't attack.
Quelana of Izalith - Blighttown: Be in Blighttown with a +10 Pyromancy Flame BEFORE defeating Bed of Chaos. The flame can be carried by the host, a phantom, or an invader. She spawns between the waterwheel and the shore to the boss.
Eingyi - Quelaag's Domain: After the Chaos Witch Quelaag bossfight, you can ring the bell and go downstairs and break one of the spider egg walls revealing Eingy and Quelaag's Sister. In order for Eingyi to sell pyromancies, you must have an egg-head. Become infected in Demon Ruins and return to Eingyi (only required once).
Sorceries - Wisdom of a Sage
Must be on the same character.
Griggs of Vinheim - Lower Undead Burg: You will either need the Residence Key (sold by Male Undead Merchant in Undead Burg). From there, head to the Lower Undead Burg. Go down the stairs and turn right. Griggs is in the second room on the right.
Note: On spells that are listed for both Griggs and Logan, you'll need Logan to leave for the Duke's Archive.
Dusk of Oolacile - Darkroot Basin: After you defeat the Hydra, reload your game. A gold crystal golem will spawn in its place. Kill it and Dusk will be freed. After this, you can summon her on the shore near a boulder. Also, do not use any spells with a lingering effect on the golem (i.e. mists attacks, lasting fireballs). Dusk spawns right on the golem.
Ingward, the Guardian of the Seal - New Londo Ruins: On top of a building in upper New Londo Ruins. The roof can be accessed by a ladder inside the fireplace.
Big Hat Logan - Sen's Fortress: After obtaining the Cage Key (at the top of Sen's Fortress in bottom of the isolated tower where you have to jump a gap), turn the boulder mechanism so it follows a path to break a wall. Now, the part you want to go to with the wall is the just before the boulder paths where you're at the final set of swinging blades. To your right, you should see a serpent next to a wall. After you break that wall (with the boulder, or by baiting the serpent's attack into the wall), you'll find Big Hat Logan in a cage to the right. He will then sell you spells at Firelink Shrine.
Logan will move once you enter the Duke's Archive. After you encounter Seath the Scaleless in Duke's Archive (in his invincible form), make sure to die to him so you wake up in a cell. Big Hat Logan will be here with you in this tower at the bottom. You'll need to get the Archive Tower Giant Cell Key in the Duke's Archive at the end just before the Crystal Golem Garden. He will then relocate to the area where you exit the Duke's Archive until you buy all his spells.
After you buy all of his spells, he goes crazy. He will become hollowed and move to where you first fought Seath in the Duke's Archive. Kill him here for White Dragon Breath sorcery. A chest will spawn in his previous location with his catalyst and the rest of his armor.
Weapon Upgrades - Achievement List
You do not personally have to upgrade the weapons. Having a maxed out weapon in the specific element will trigger the achievement, so picking them up will trigger it.
 Strongest Weapon
Acquire best weapon through standard reinforcement.
Upgrade a weapon in the normal path to +15.
 Crystal Weapon
Acquire best weapon through crystal reinforcement.
Upgrade a weapon in the crystal path to +5.
 Lightning Weapon
Acquire best weapon through lightning reinforcement.
Upgrade a weapon in the lightning path to +5.
 Raw Weapon
Acquire best weapon through raw reinforcement.
Upgrade a weapon in the raw path to +5.
 Magic Weapon
Acquire best weapon through magic reinforcement.
Upgrade a weapon in the magic path to +10.
 Enchanted Weapon
Acquire best weapon through enchanted reinforcement.
Upgrade a weapon in the enchanted path to +5.
 Divine Weapon
Acquire best weapon through divine reinforcement.
Upgrade a weapon in the divine path to +10.
 Occult Weapon
Acquire best weapon through occult reinforcement.
Upgrade a weapon in the occult path to +5.
 Fire Weapon
Acquire best weapon through fire reinforcement.
Upgrade a weapon in the fire path to +10.
 Chaos Weapon
Acquire best weapon through chaos reinforcement.
Upgrade a weapon in the chaos path to +5.
Weapon Upgrades - Paths
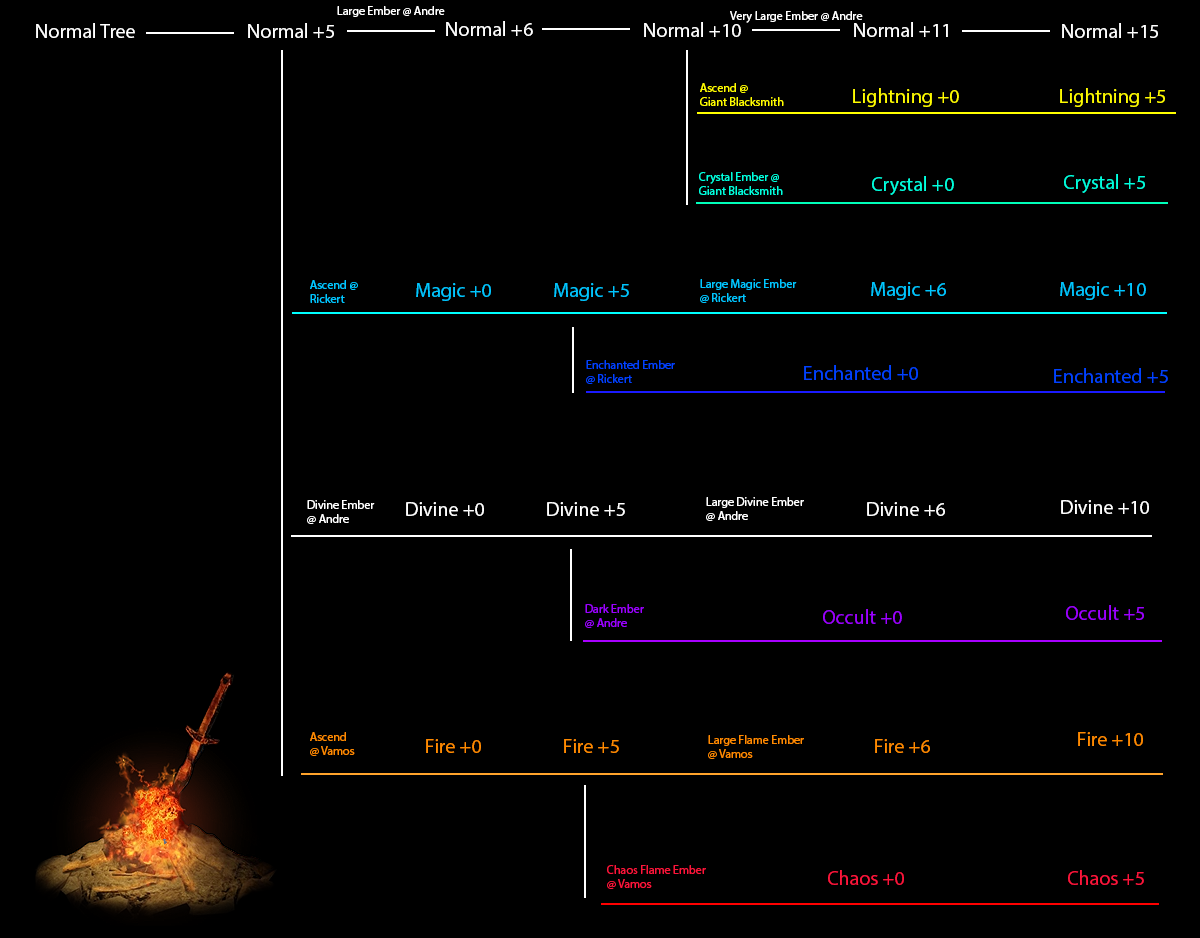
Weapon Upgrades - Ember List
Weapon Upgrades - Upgrade Material List
Large Titanite Shard - Sold by Giant Blacksmith | Dropped from Leeches in Blighttown
Green Titanite Shard - Sold by Giant Blacksmith | 5x Drop from Leeches in Blighttown
100% Drop Rates for Chunks
Titanite Chunk - Dropped by Black Knight (Sword) in Kiln of the First Flame
White Titanite Chunk - Dropped by Black Knight (Greataxe) in Kiln of the First Flame
Blue Titanite Chunk - Dropped by Black Knight (Halberd) in Kiln of the First Flame
Red Titanite Chunk - Dropped by Black Knight (Greatsword) in Kiln of the First Flame
Titanite Slab - Rare Drop by Darkwraiths in New Londo Ruins
White Titanite Slab - Rare Drop by Pinwheels in Tomb of the Giants
Blue Titanite Slab - Rare Drop by Crystal Butterflies in Crystal Cave
Red Titanite Slab - Rare Drop by Chaos Eaters in Lost Izalith
Titanite Slab - Complete Siegmeyer/Sieglinde's Sidequest
Titanite Slab - (DLC) Chest behind waterfall in Kalameet's boss area
Blue Titanite Slab - Corpse Loot in Crystal Cave
Blue Titanite Slab - (DLC) Chest in Royal Wood
Red Titanite Slab - Chest in Lost Izalith
Red Titanite Slab - Trade unupgraded (+0) Ascended Pyromancy Flame with Snuggly
White Titanite Slab - Corpse Loot in Tomb of the Giants right before Nito
White Titanite Slab - (DLC) Corpse Loot in Chasm of the Abyss
Other Stuff
Beat DARK SOULS™: REMASTERED's 100% run?
Flex it — let your friends know you pulled it off.
- 100% Achievement Guide: Dark Souls - Remastered★ 5 (2k)53k views5.5k ♥183 minUpdated 8 May
- Прохождение Dark Souls★ 5 (1k)40k views2.6k ♥66 minRussianUpdated 16 Jan, 2022
- Dark Souls NPC Questlines in Order★ 5 (864)31k views2.2k ♥11 minUpdated 18 Sep, 2023
- Пошаговое получение 100% достижений в DARK SOULS™: REMASTERED★ 5 (1.3k)26k views3k ♥19 minRussianUpdated 26 Nov, 2023
- DARK SOULS™: maps★ 5 (206)25k views539 ♥1 min
- Dark Souls Remastered – Full Walkthrough, Optimized Build, All NPC Quests★ 5 (587)23k views1.7k ♥51 minUpdated 22 Apr


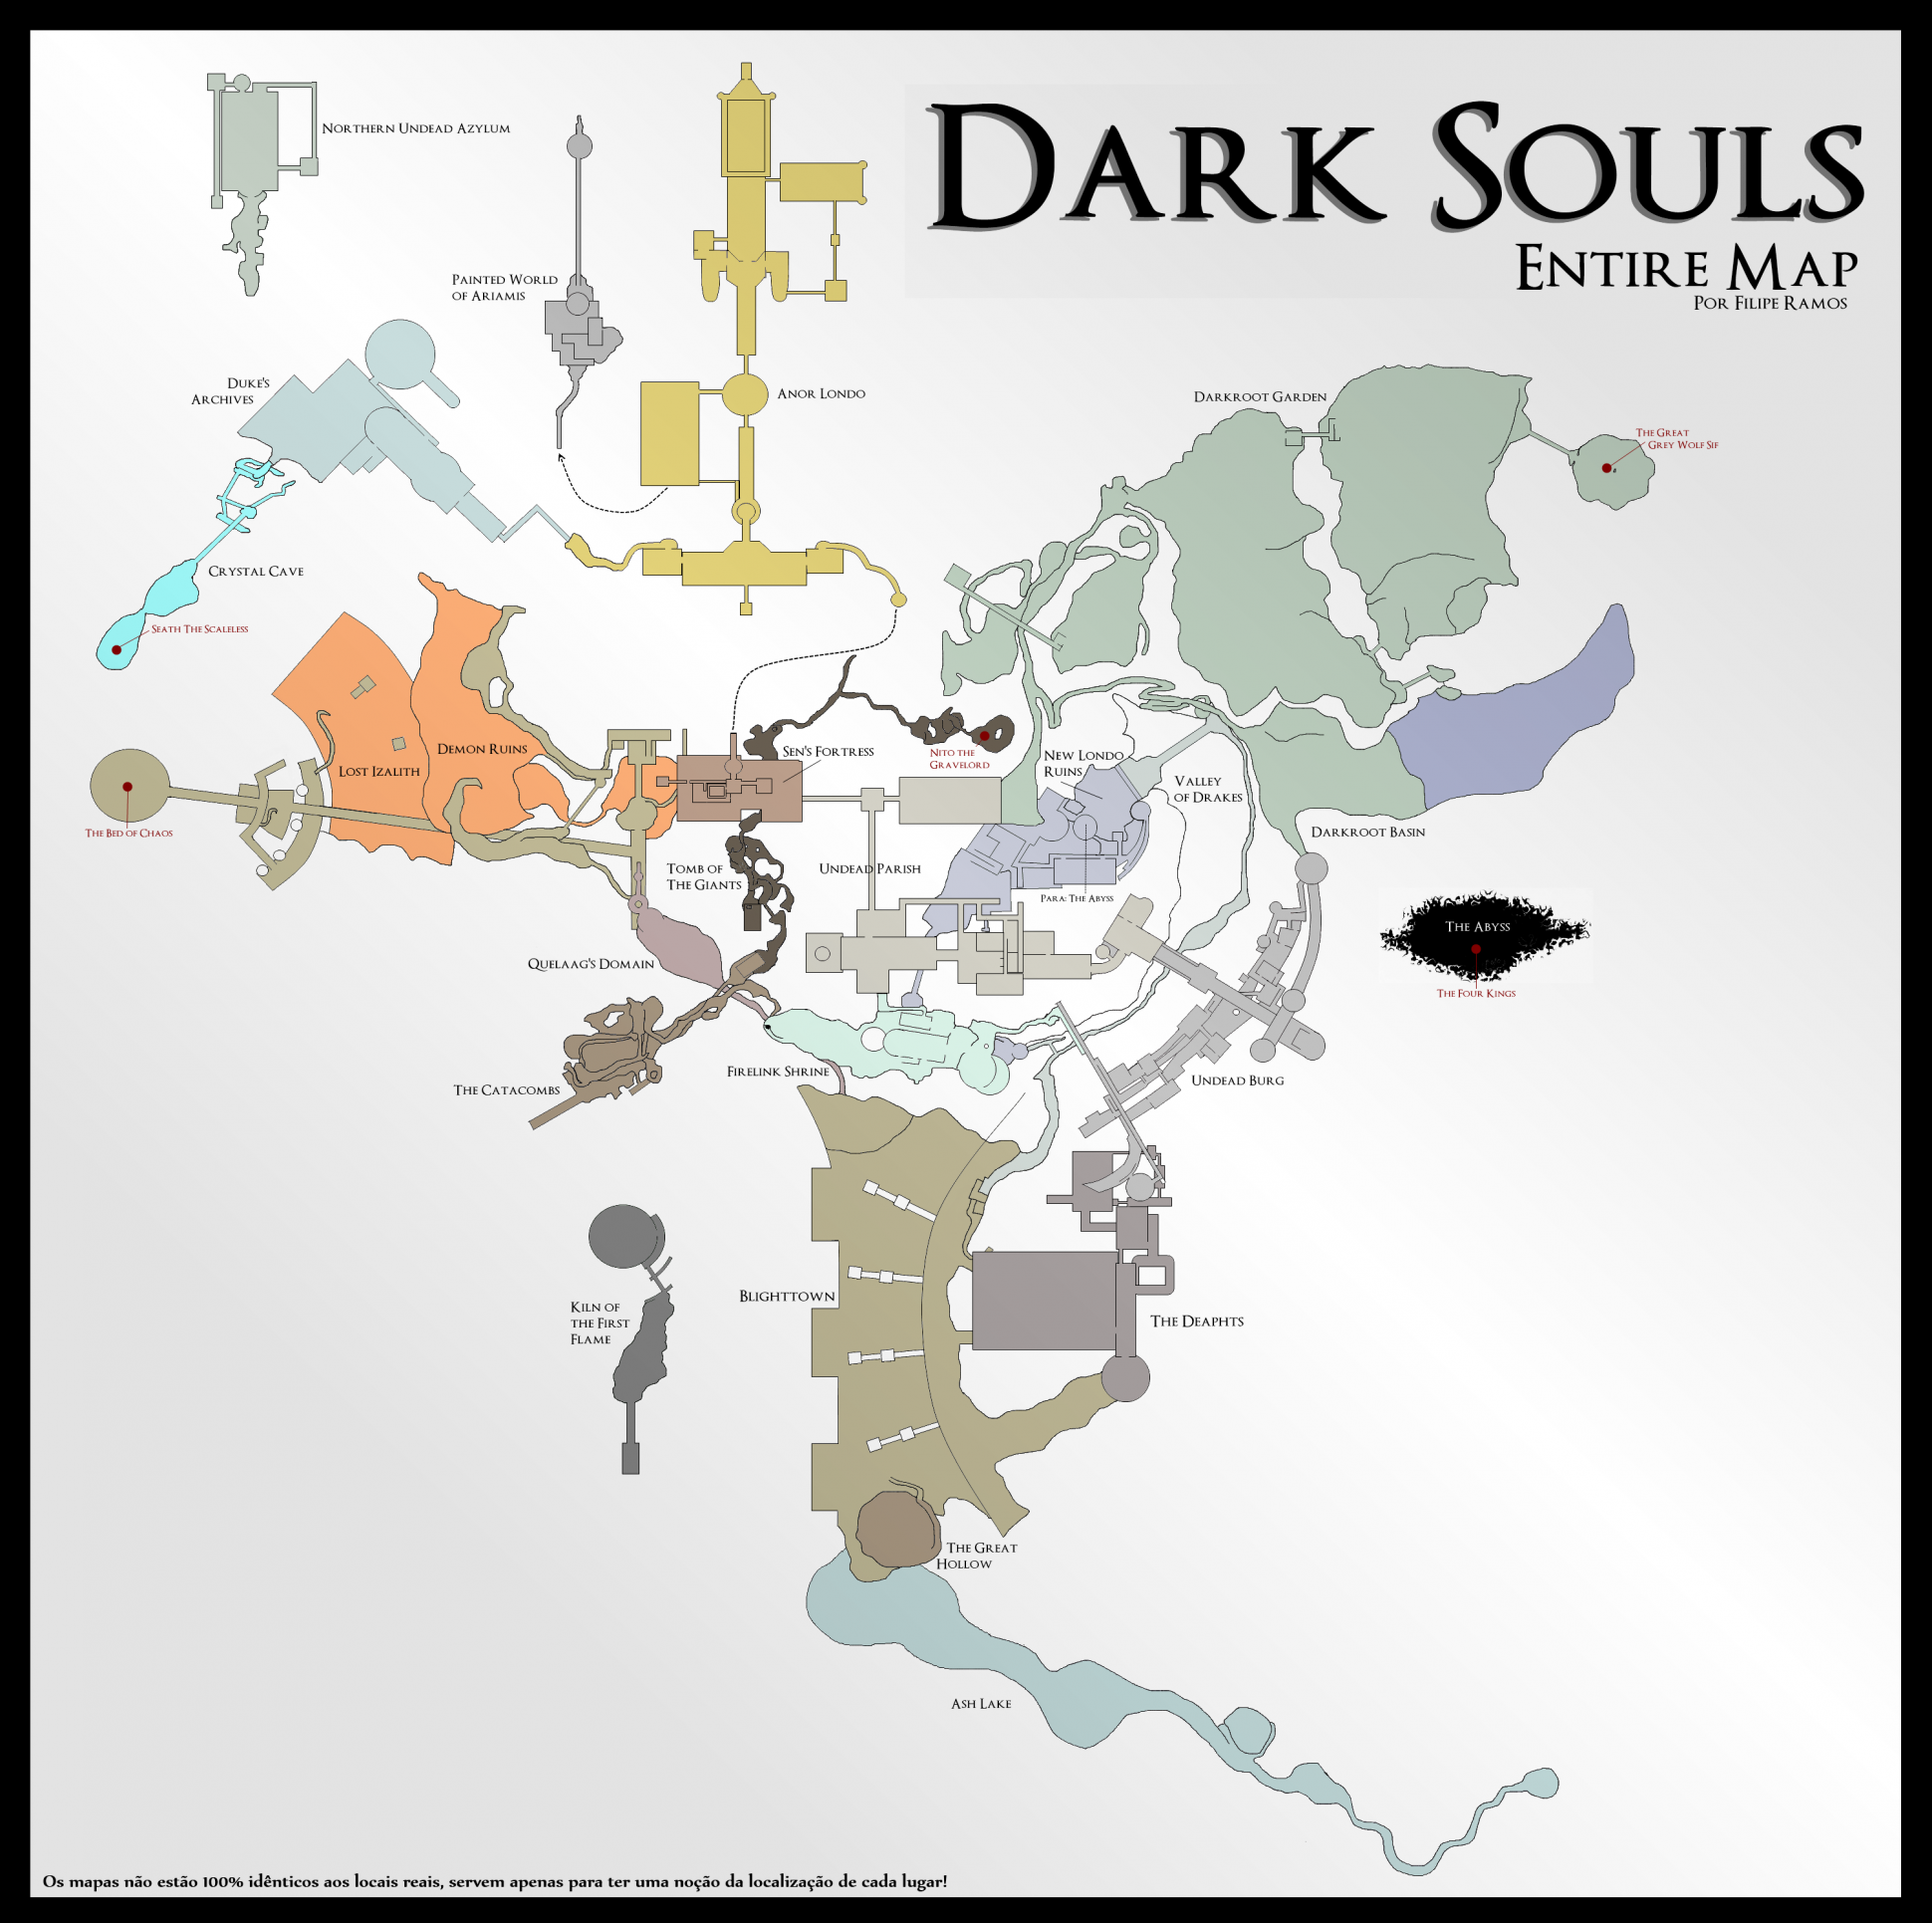

- Upgrading to PremiumTeam Fortress 2★ 5 (20k)1441k views11k ♥6 minUpdated May 11, 2022
- No More Room in Hell Official ManualNo More Room in Hell★ 5 (2.8k)569k views2.1k ♥29 minUpdated Apr 22, 2019
- NMRiH Community Hosting GuidesNo More Room in Hell★ 5 (526)351k views653 ♥1 minUpdated Aug 10, 2022
- Лучшие кооперативные игры SteamPAYDAY 2★ 5 (1.5k)315k views2.1k ♥56 minRussianUpdated Apr 27, 2025
- Desert Eagle Heat Treated | Blue GemCounter-Strike 2★ 5 (1.6k)292k views1.5k ♥2 minUpdated Jan 16
- Treasure Hunt Puzzle SolutionsTotal War: WARHAMMER II★ 5 (6.9k)281k views15k ♥3 minUpdated Aug 19, 2021






This guide was created by its original author on the Steam Community. Are you the author and want it removed? Request removal.