Easy Kitchen and "Core Base" Guide
1. Introduction
This guide will be a little different from my previous guides on critter ranching. There's nothing particularly new or unique in this guide, it's really just a primer to help you think about the design of your kitchens and great rooms.
My typical playstyle, after getting through the first few cycles with emergency outhouses and cots, is to begin fleshing out a "core base" consisting of my cooking, eating and relaxation areas. It may start as simple as a CO2 pit to throw food in, but getting up a nearby great hall for +6 morale is always a high priority. Generally this core encompasses my portal, placing it in the great hall or occasionally in a recreational room. Around this core I move the earlier bedrooms, bathrooms, research labs and early game infrastructure. Then further out from the core goes industry, power generation, etc as the base expands.
With kitchens in particular, I see a lot of questions about how to build them efficiently. Creating infinite frozen food storage is a bit different after the changes to diagonal construction, and automating multiple sweepers and loaders close to each other without making infinite food loops can be tricky for beginners. I hope to show at least one practical construction method for solving those problems.
What I'll describe in this guide is not meant to be the "best" way to build a kitchen or the surrounding core. It's meant to show how easily a "good" setup can be constructed, so you can experiment and find a configuration that works best for you.
2. Objectives
- Must include a kitchen, great hall and recreation room
- Must include an automated infinite frozen food storage
- Must automate removing ingredients from storage to load appliances for cooking
- Must automate returning cooked food to storage until needed
- Must automate retrieving food from the freezer to a duplicant accessible area
- Must automate removing ingredients from storage to load appliances for cooking
- Must provide a "well lit" bonus for all cooking appliances and mess tables
- Must be able to be surround the printing pod, if desired, but must also work independently
- Should fit within "standard" 16x4 room layouts
- Great hall should be extendable into a second stacked room to accommodate a minimum of 20 duplicants
- Should be relatively easy to build, no tricky order of operations or dupe pathing
- Should try to keep automation requirements reasonable (subjective, I know)
- Should be able to provide high decor, especially around the cooking appliances
3. Bottom Line Up Front - The Design
My design is a fairly simple stack of either three or four 16x4 rooms. In general, the recreation room (top/left) and kitchen (middle/right) sit on top of the 1- or 2-story great room.
The below images show examples of completed three and four level designs: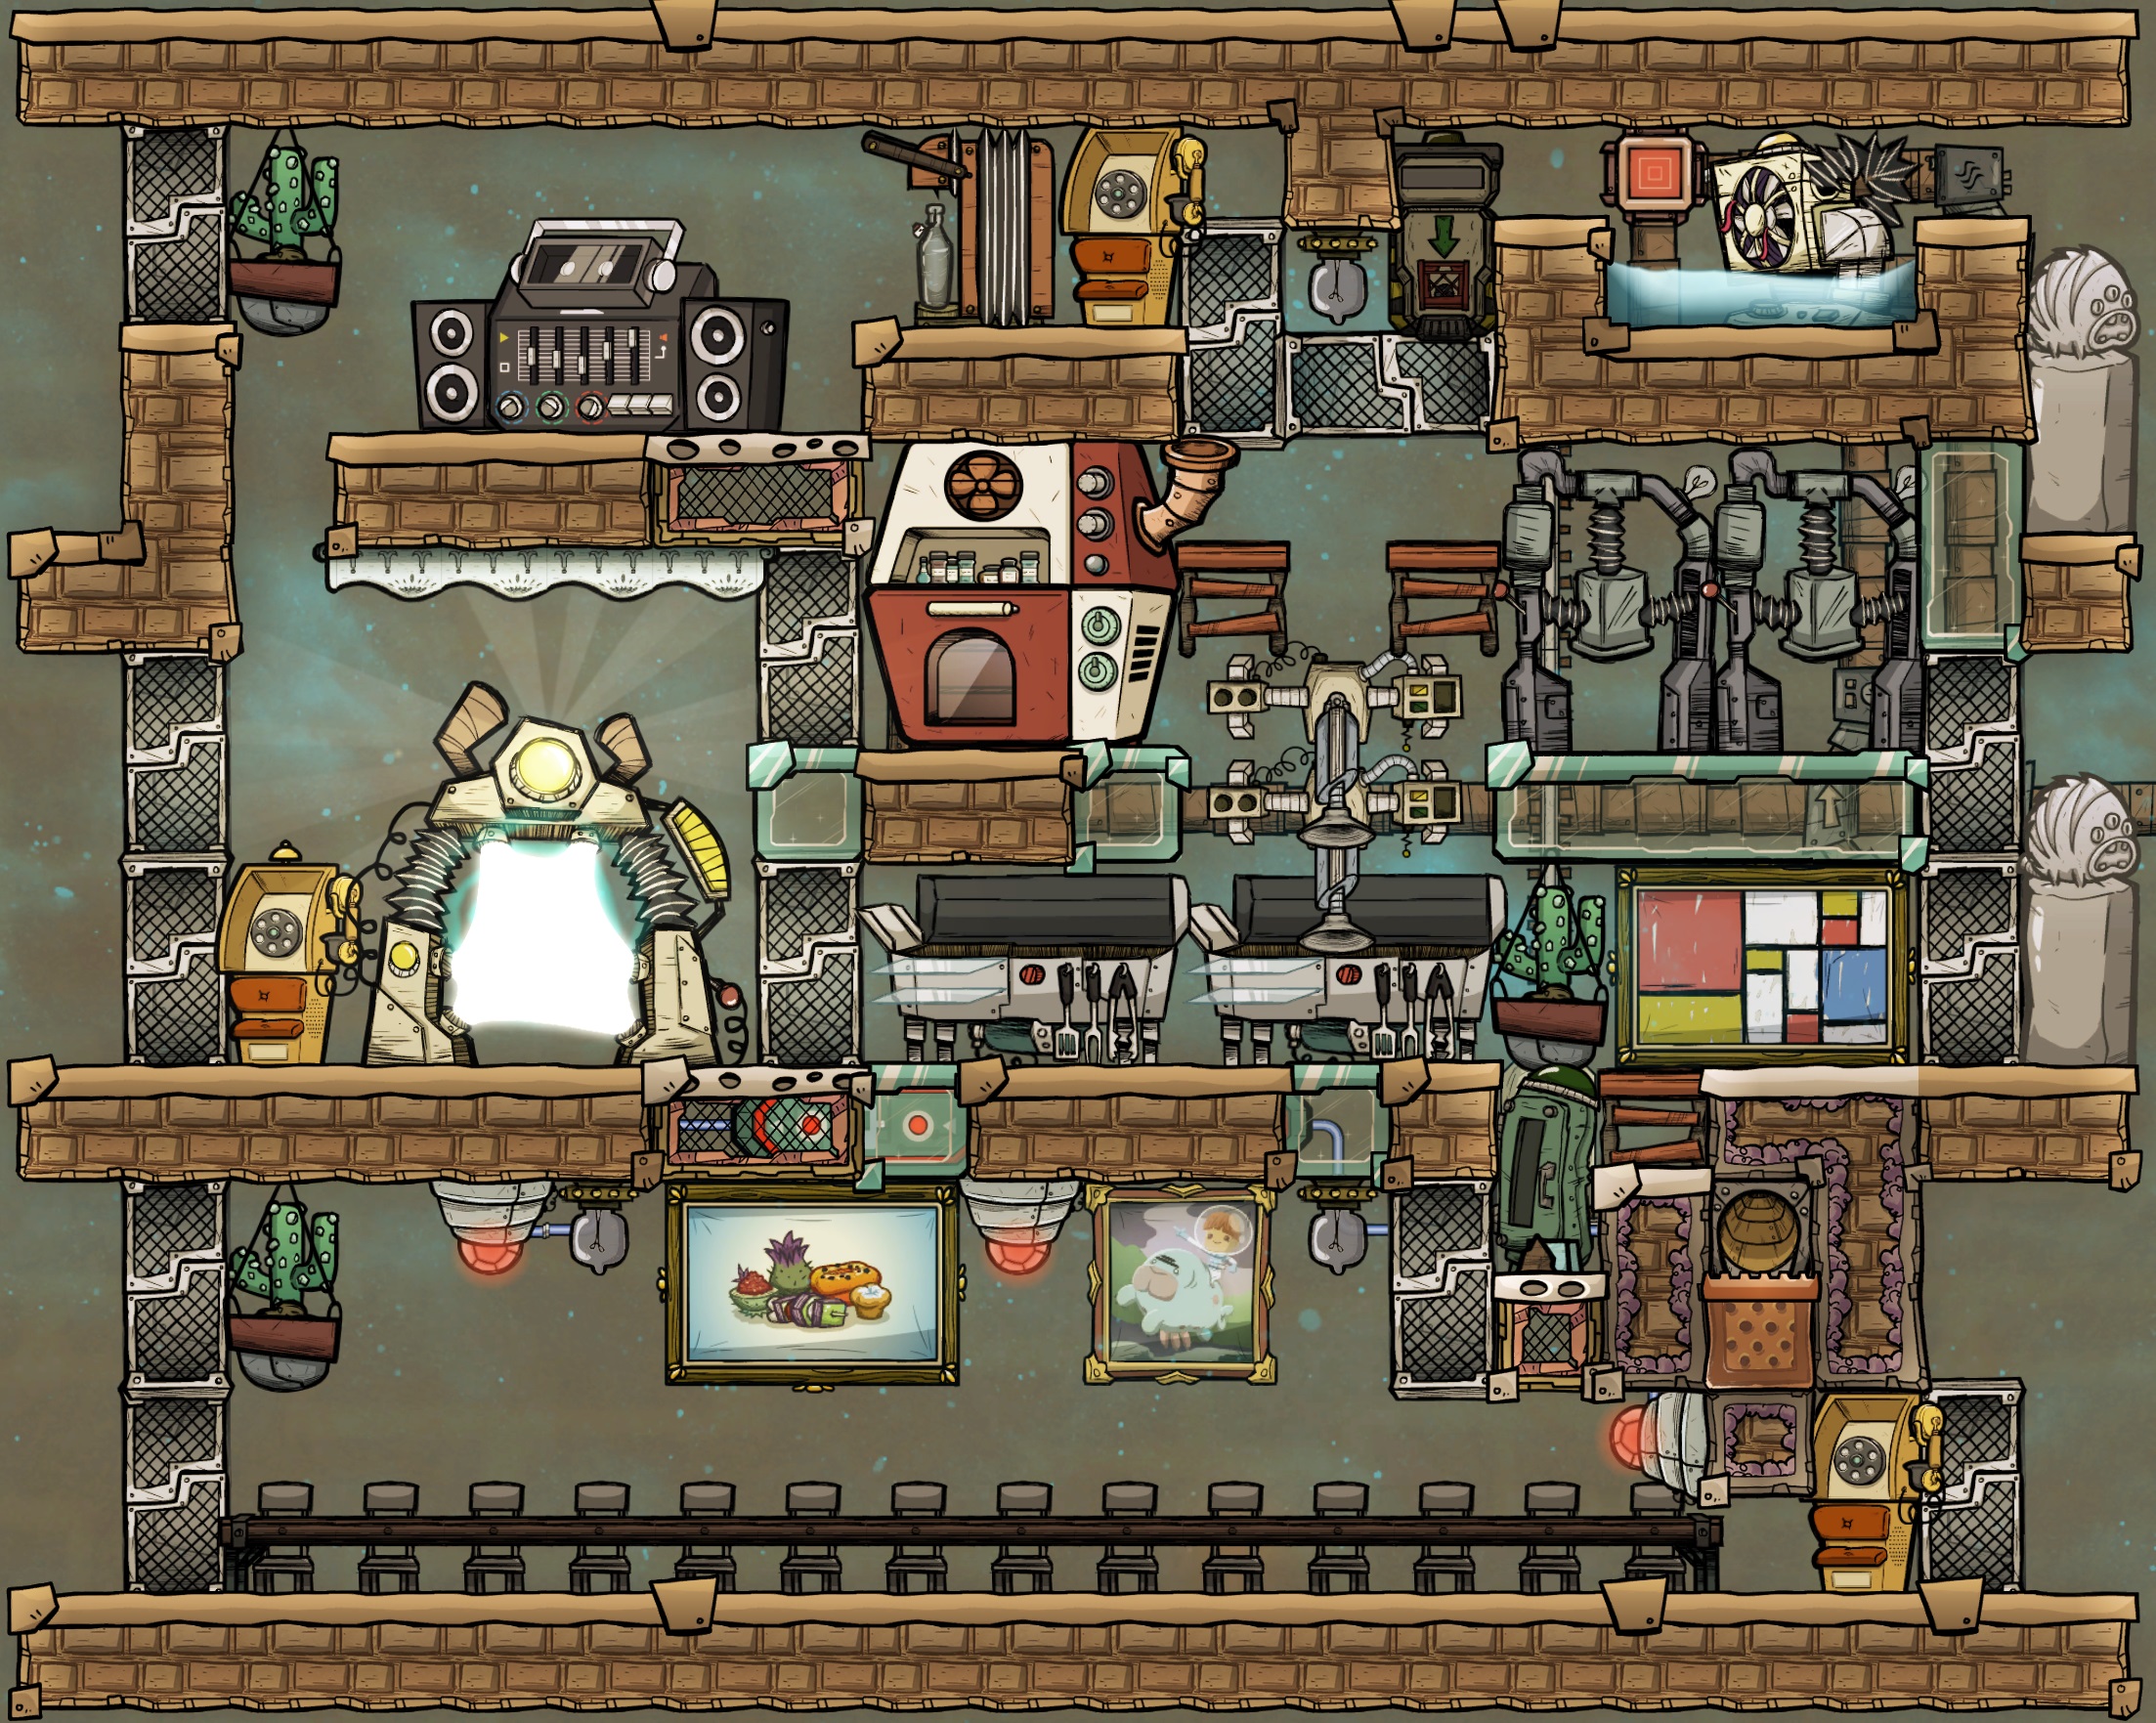
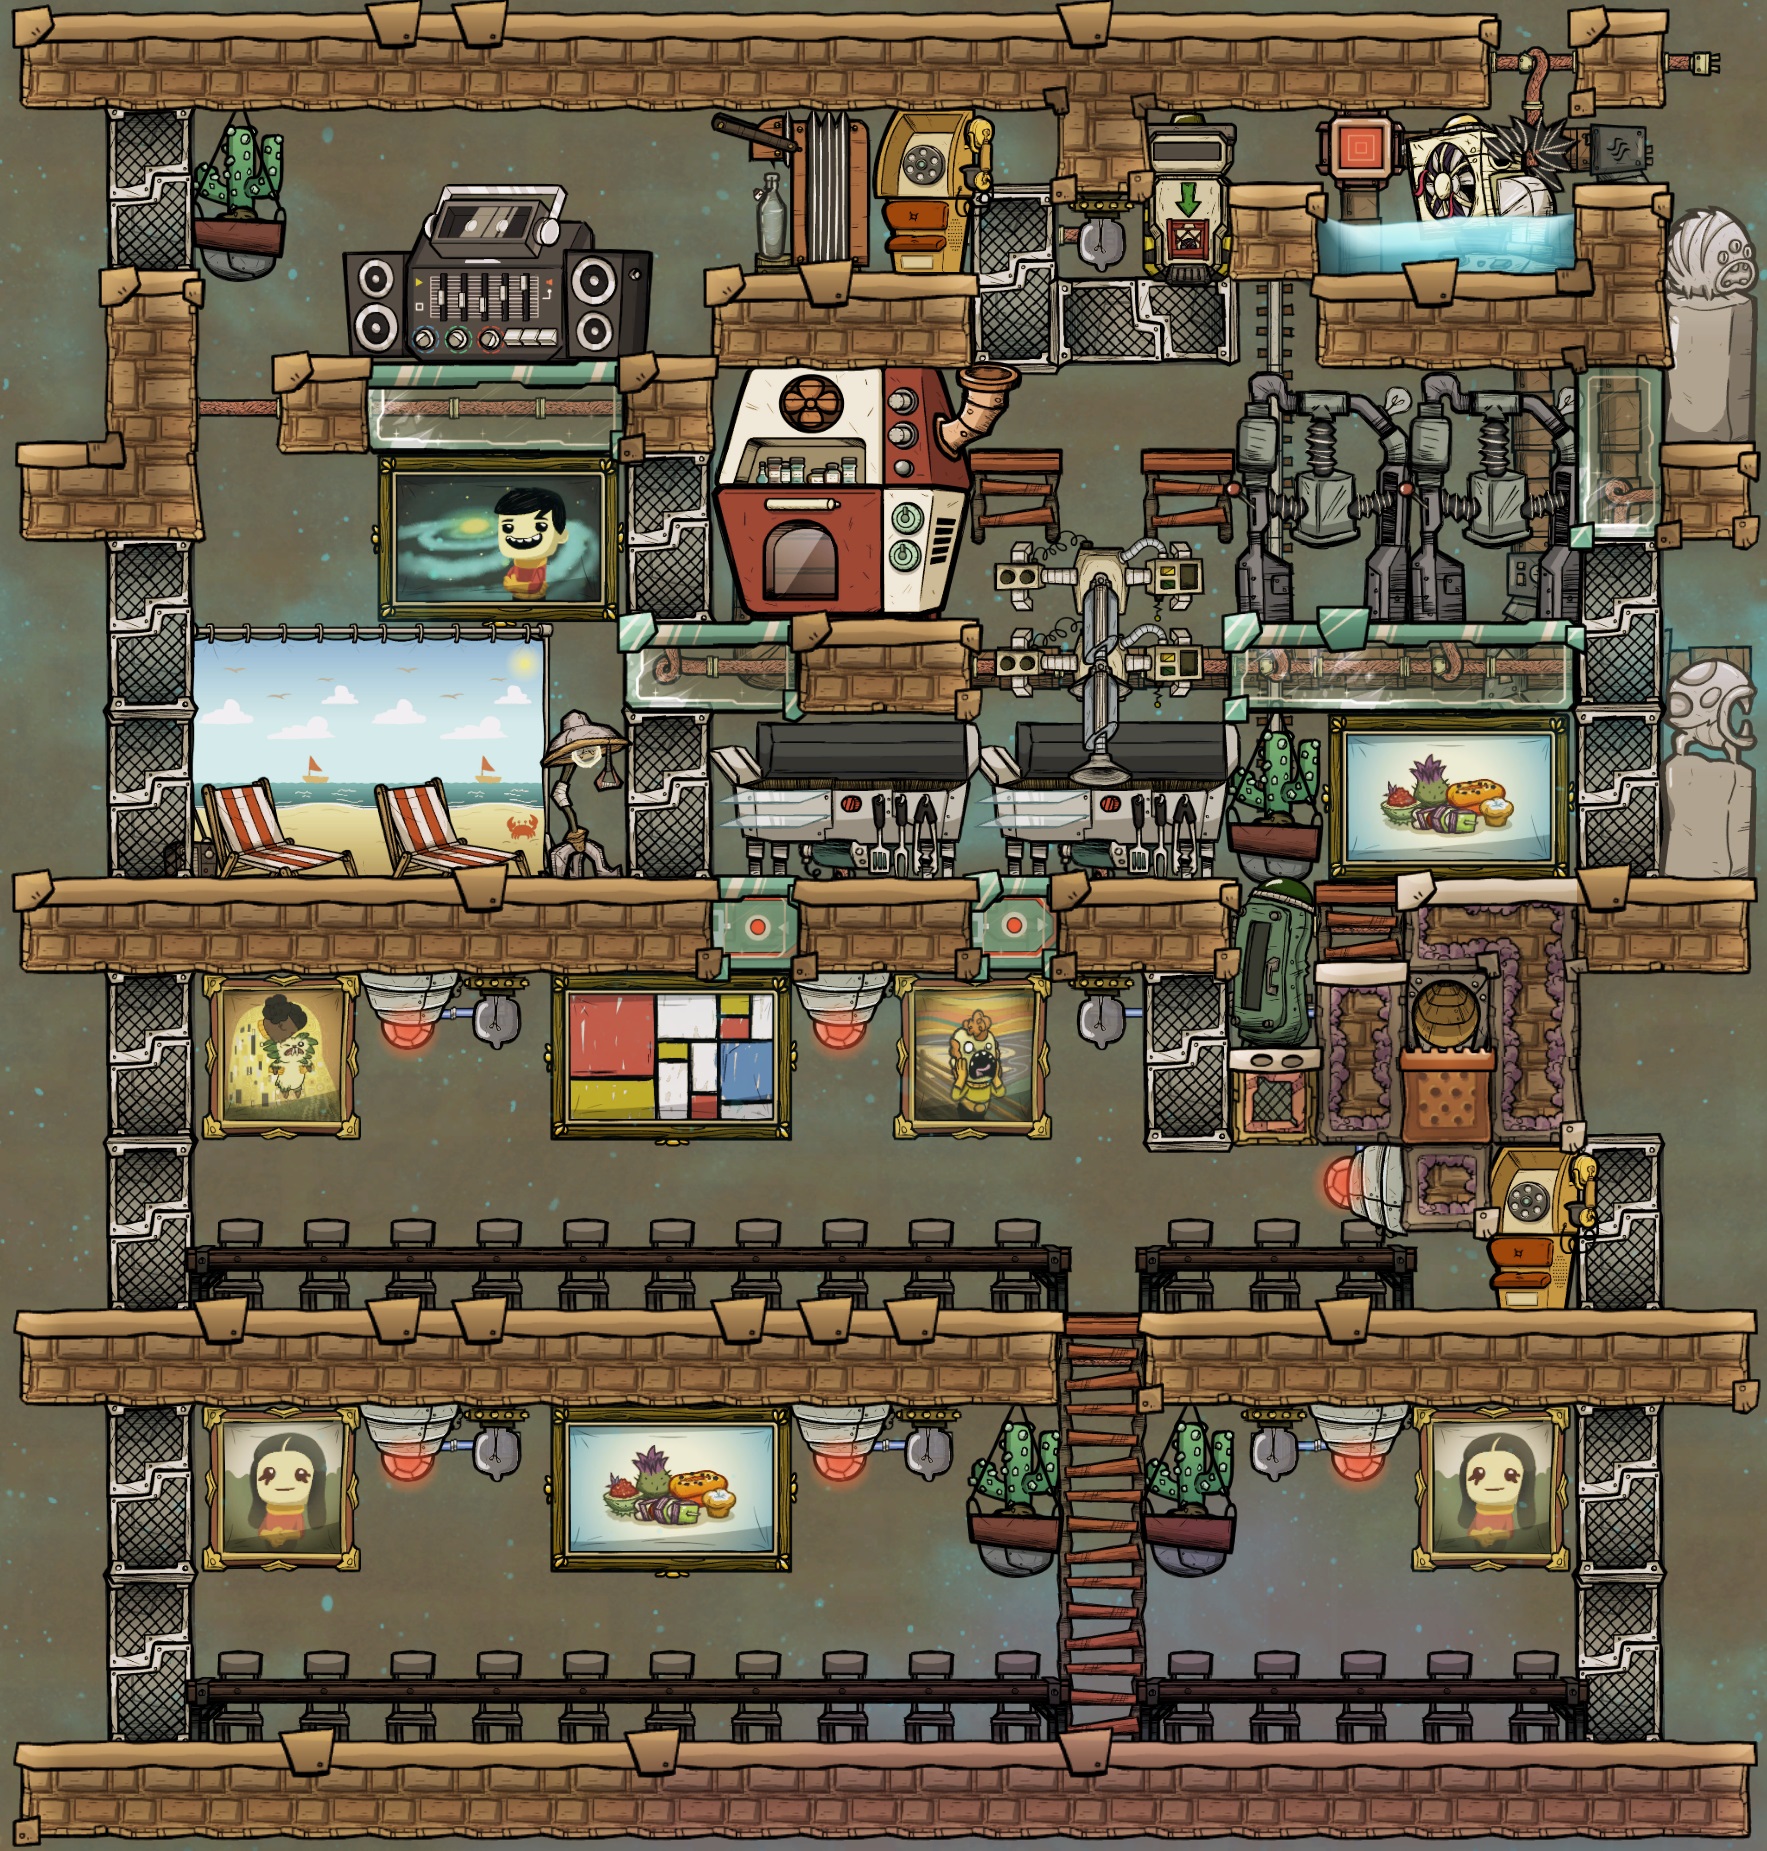
- 51-tile recreational room containing up to 5 recreation buildings
- 57-tile kitchen with room for the following appliances
- 2x Electric Grill
- 1x Gas Range
- 2x Microbe Musher
- If you don't use berry sludge, these two can be replaced with a second Gas Range
- 1x Refrigerator
- 1x Infinite storage deep freezer
- 2x Electric Grill
The 3-story design can accommodate the printing pod in the recreation room, if desired, and provides a 53-tile great hall with room for 14 duplicants.
The 4-story design can accommodate the printing pod in either the recreation room or the great hall, if desired. The great hall is 118-tiles in size and provides room for either 24 or 28 duplicants (with or without printing pod, respectively)
4. Construction
- Early Base - Zero Automation
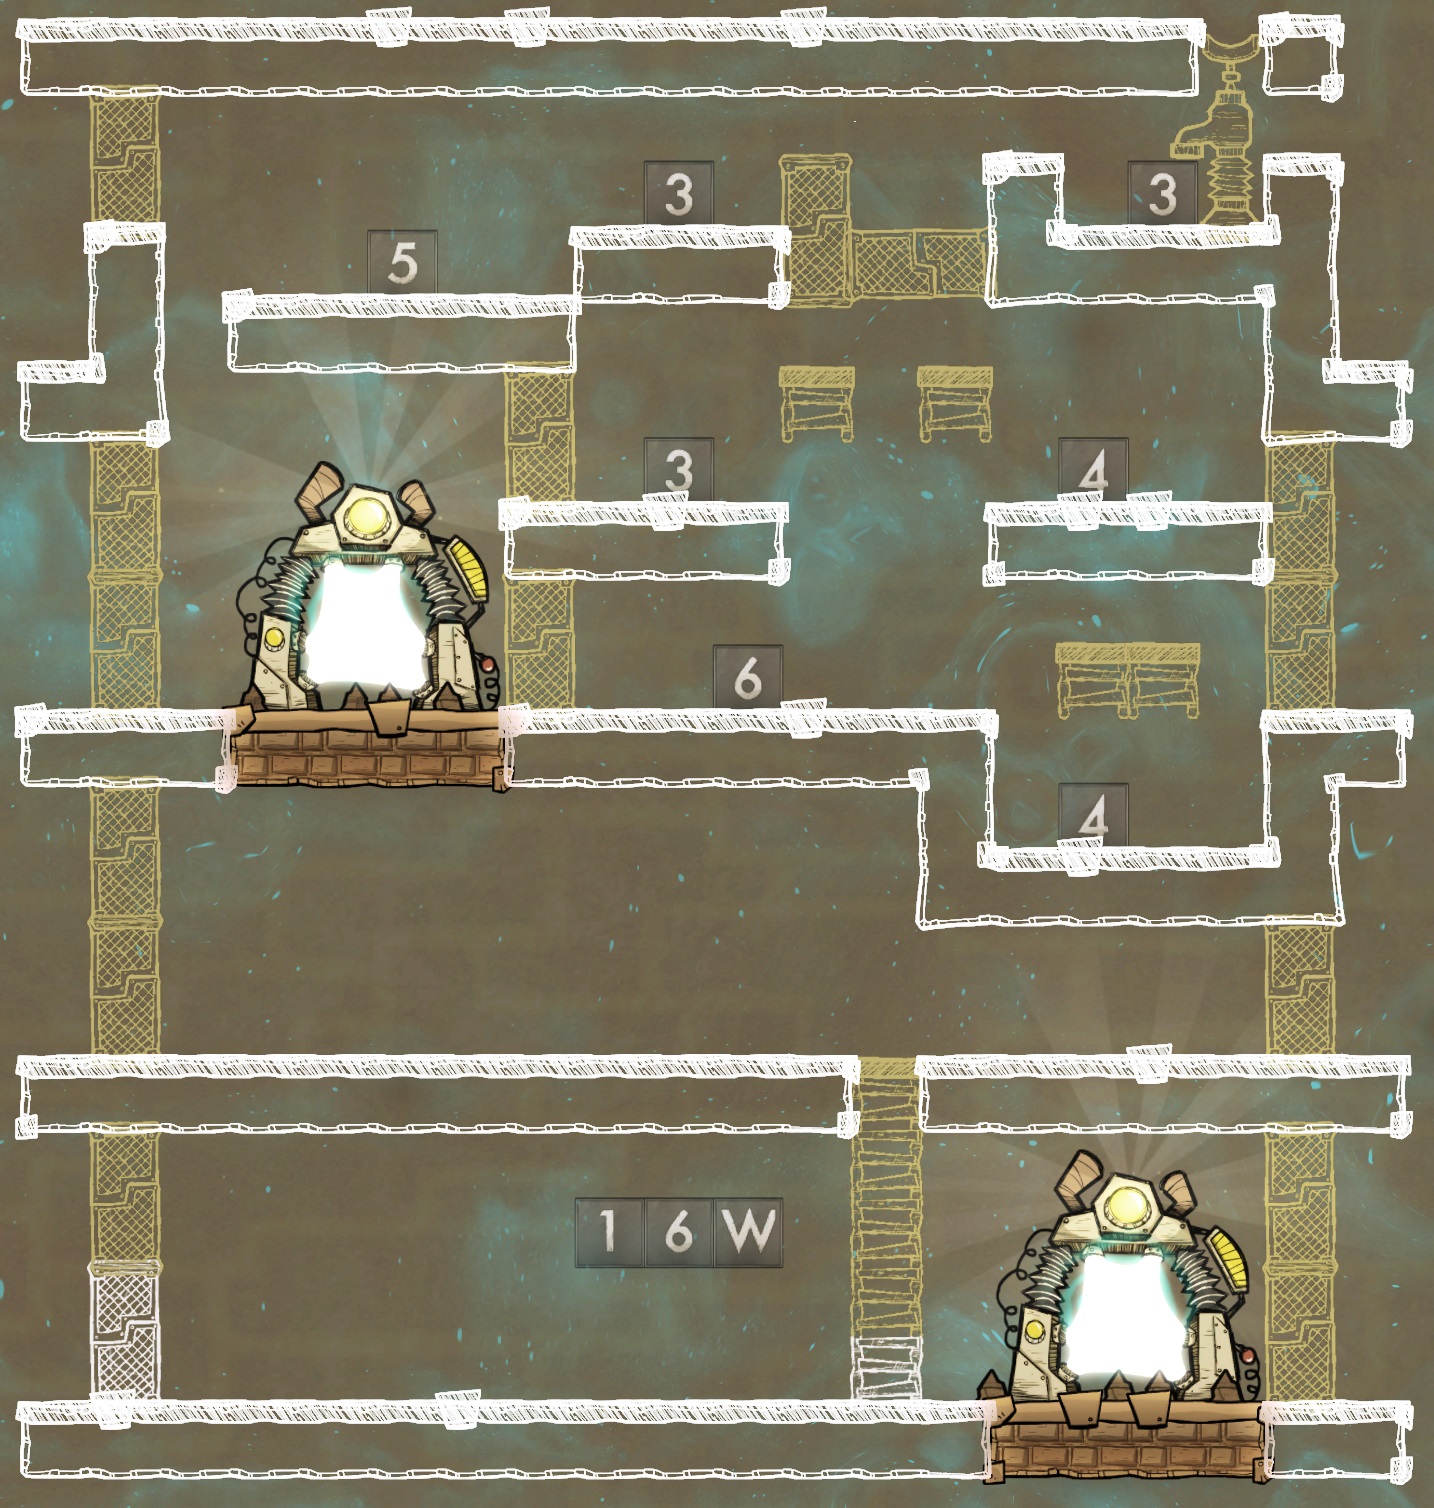
If you don't plan to expand beyond 14 dupes on this planet, the three-story version might be perfect. You can follow the plans shown and simply ignore the bottom floor, tiling over where the connecting ladder would go.
In the short term, you can even use some of the empty space in the top two floors for outhouses or cots, or throw a research station near the printing pod for light. You'll eventually want to move bedrooms and bathrooms out of this core, but a little mingling now can push an even faster start without having to relocate everything around the pod.
Once the initial skeleton is complete, and you've researched some basic technologies, you can throw in the first equipment and decor items: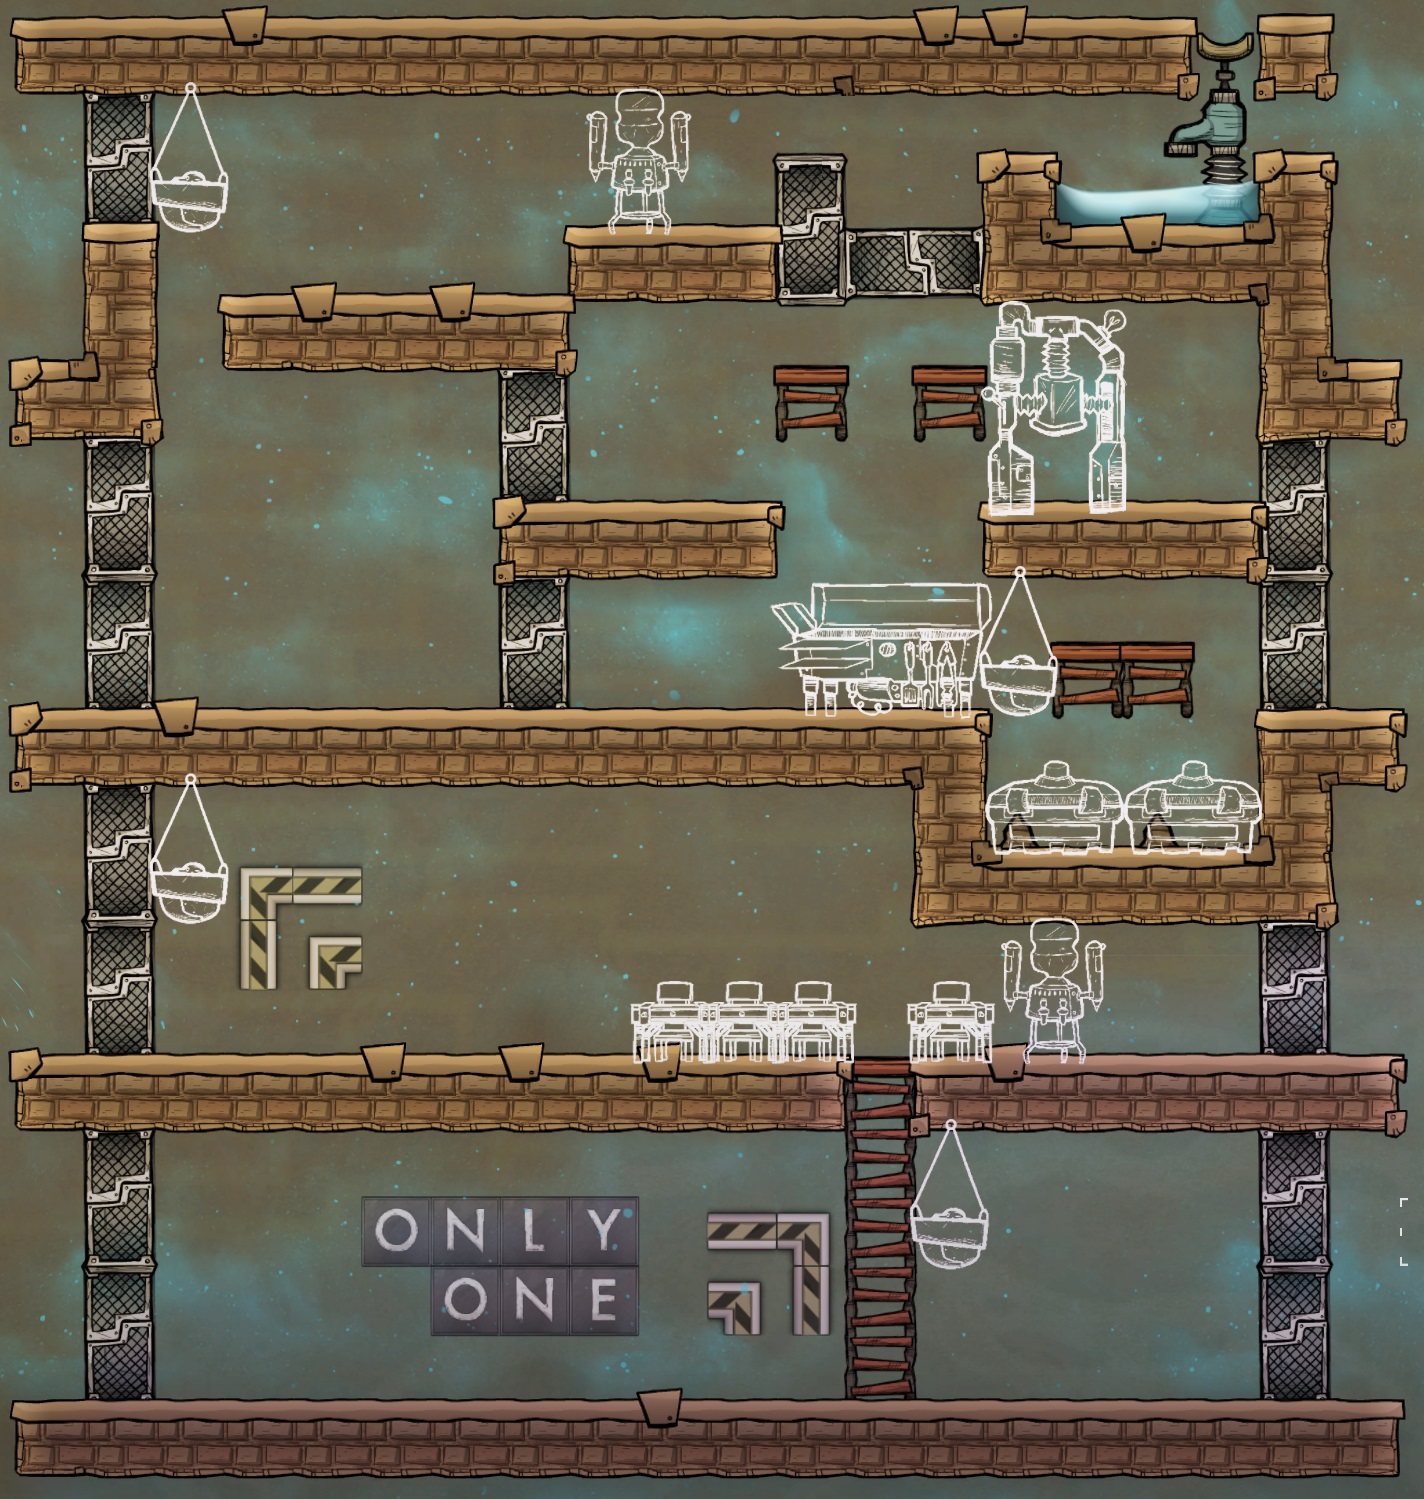
We're using a simple CO2 pit for the start, with ration boxes to collect food we find scattered around the map. It's not the best, but until we can freeze our food this is a good way to help preserve it. I'm also assuming this construction is started very early game, so I'm showing four mess tables. As you add new dupes you simply add additional tables.
The bottle emptier should be used to empty five full 200kg bottles (total 1000kg) of water from a pitcher pump. This will spread into the three tiles leaving 333.33kg per tile, just below the 350kg which would trigger flooding. You could also use polluted water, salt water or brine in order to conserve regular water, as they have almost identical SHC and TC properties. The only two liquids better than water variants in this regard are nuclear waste and super coolant, and I don't suspect you'll have access to either of those at this stage :) I don't recommend polluted water unless you're on a swampy biome start, due to the off gassing, but it is a great choice if you can deal with the polluted oxygen. If you're using brine (not salt water!), you can empty a 6th 200kg bottle for 1200kg total and 400kg per tile, which is just below the 420kg required to trigger flooding.
Note that only one of the two flower pots is required in the 3rd and 4th floors, as indicated in the screenshot. If you're building the four-story design I recommend the pot on the right, otherwise your only choice is the one on the left.
As soon as that construction finishes and a seed is planted in the bottom planter, the great hall will be enabled in the room overlay for +6 morale: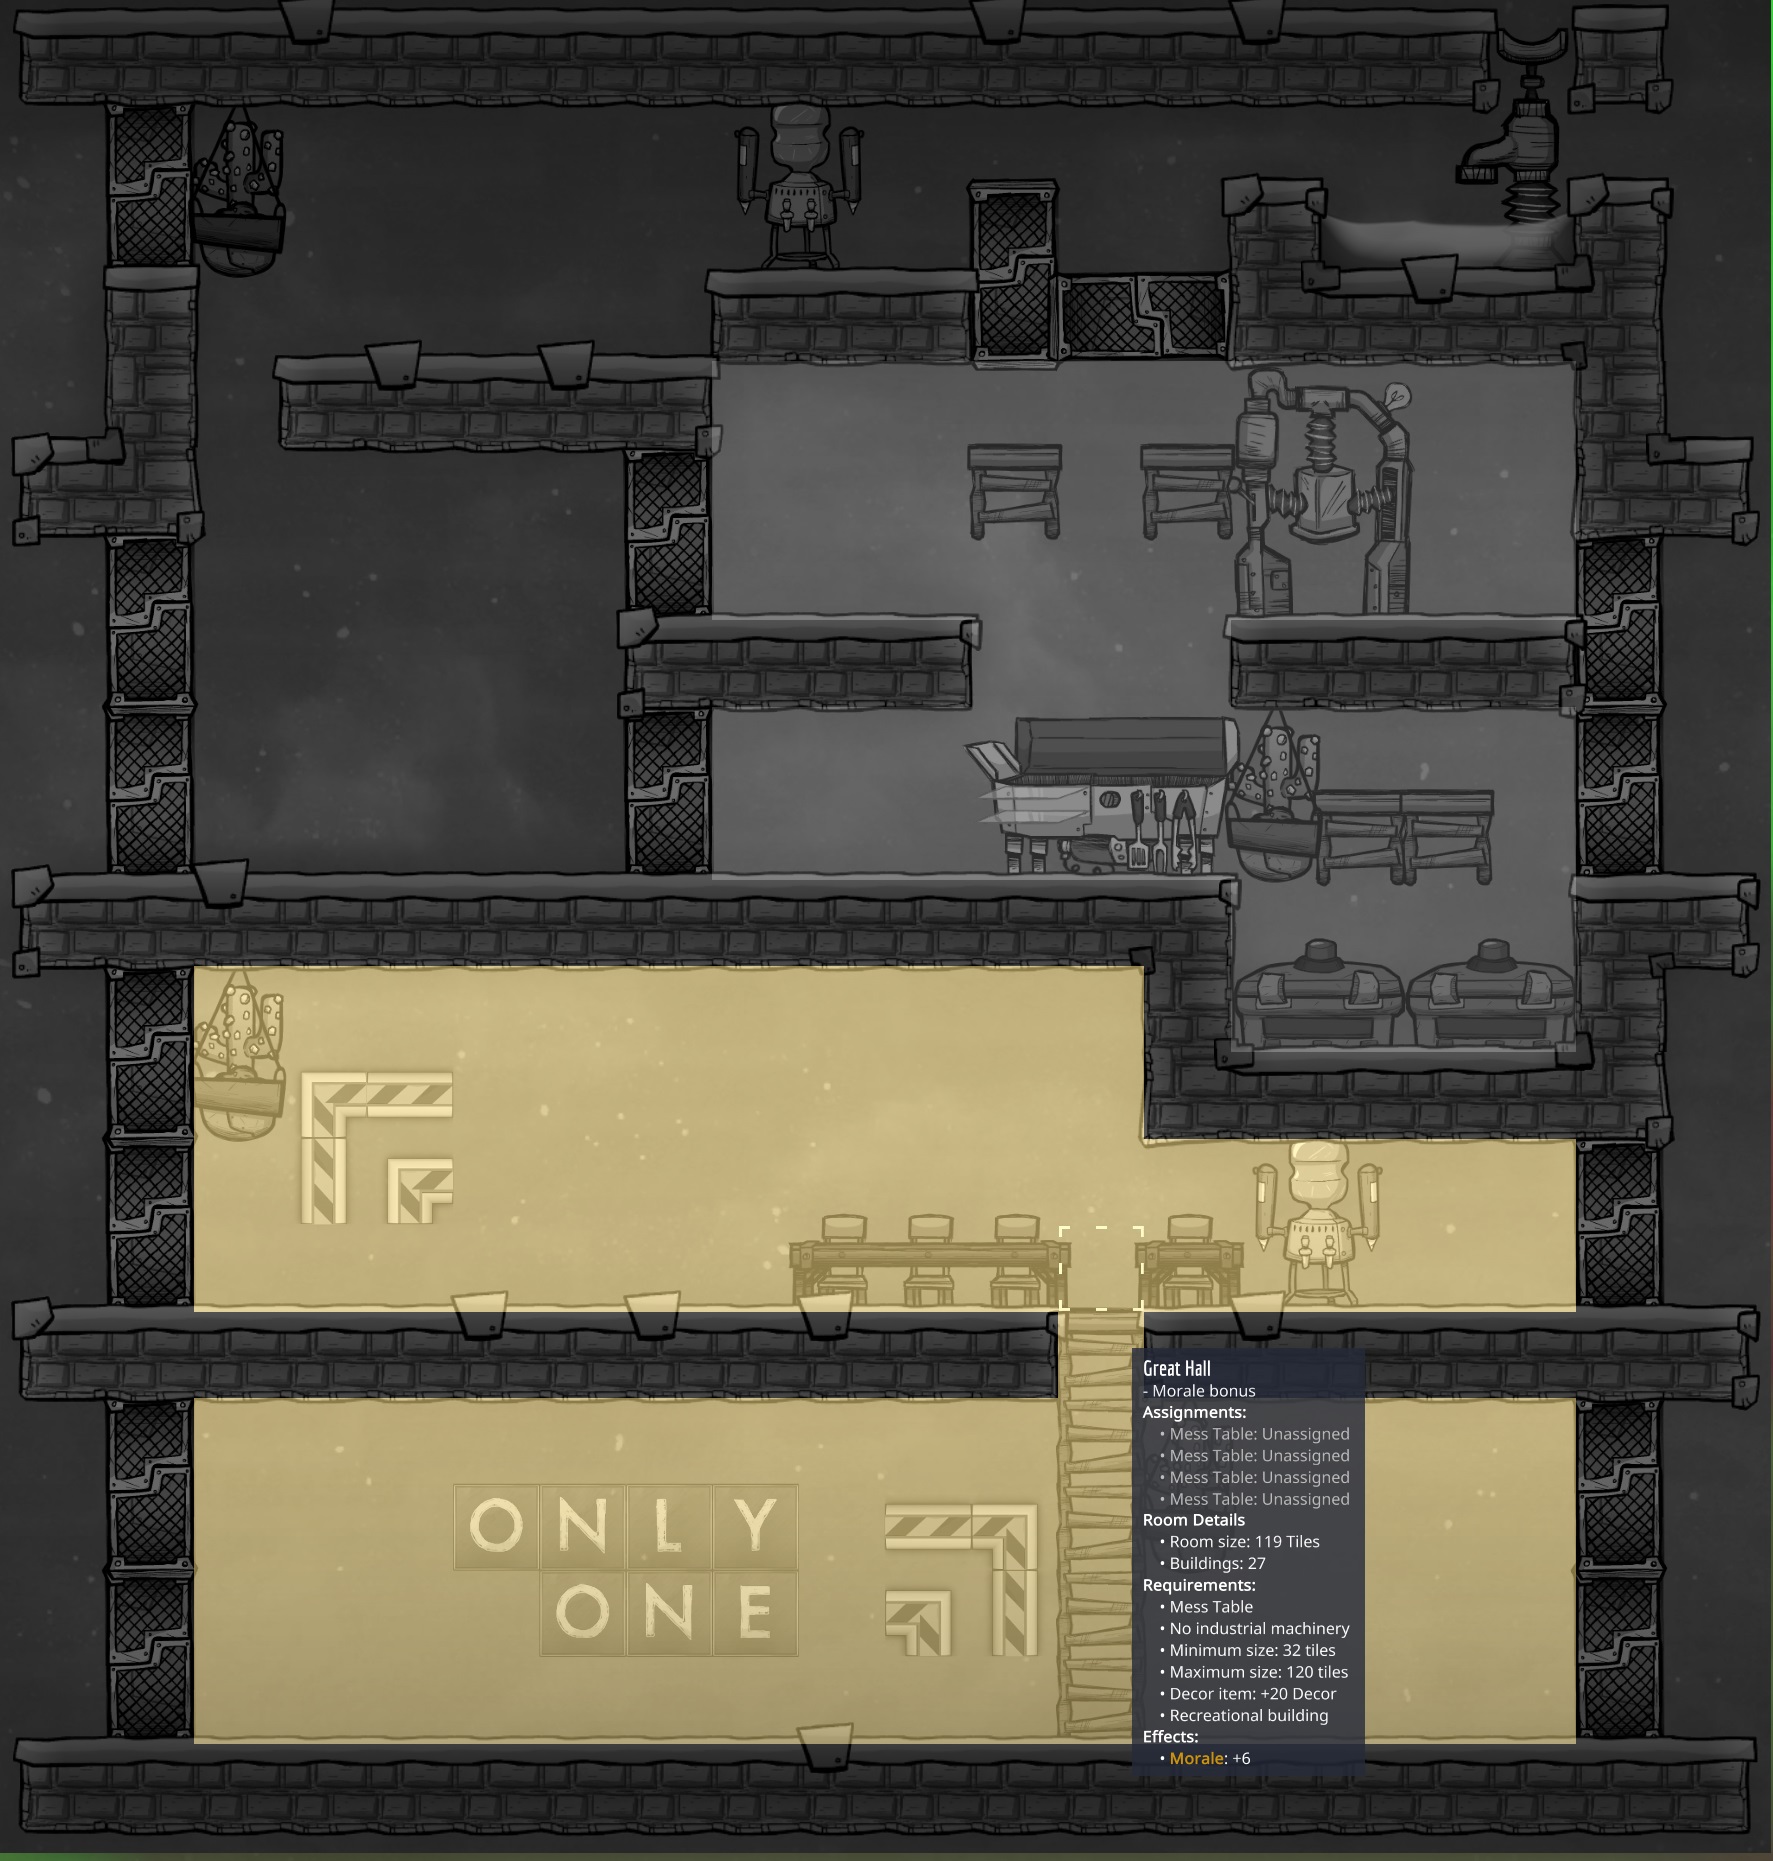
If you're playing with the Rooms Expanded mod you'll be able to obtain a Kitchen as well, but it requires a refrigerator. At any time you can place one or two in the CO2 pit in place of a ration box to get the room bonus, but I wait until I'm ready to freeze the food. Additionally, the Rec Room is currently not enclosed so will not be enabled on the room overlay. You could enclose it temporarily if this bothers you, but I wait until later construction steps are complete to reduce the chance of dupes getting stranded. There's no direct morale bonus from a Rec Room anyway, so the Great Hall was the priority.
- Deep Freeze Upgrade
This is where we really kick the kitchen into gear, but you'll need to meet a few pre-requisites before getting started.
- You must have 735 refined metal
- You must have a dupe trained in the Mechatronics Engineering skill
- You should have built an electrolyzer or SPOM
An electrolyzer or SPOM will provide us an easy source of Hydrogen for the build. You might be able to use natural hydrogen from the environment, but you need 25kg worth (20-25 full tiles) and filtering it out of mixed gasses adds complication. If you have enough floating around and don't mind filtering it, go ahead and skip the electrolyzer.
My kitchens always use a Thermo Regulator to drive the cooling loop, instead of a Thermo Aquatuner. There is no debate that the Aquatuner is "better", especially paired with a steam turbine, however it consumes 5x the power and is much more of a mid-game (post-plastic) asset. It also provides far more cooling than necessary here. The thing to be careful of with the Thermo Regulator is that without some outside cooling it will overheat after 100+ cycles. The mass of the water we poured around it will absorb a lot of heat and delay this, but until you have a way to actually delete heat it's always a question of "when", not "if". I generally build the regulator from a basic metal like copper which is only good to 75C. You could use gold amalgam which is good to 125C and will delay the problem for much longer, but at ~102C the water will boil anyway, quickly overheating the now-dry regulator and causing other problems with 1000kg of steam in your base. One notable exception to this would be a swamp biome start with a gold amalgam regulator in a polluted water pool. Your whole base will be dealing with polluted oxygen anyway, and the polluted water won't boil until ~121C, right before the regulator overheats. Regardless of which metal you choose, the goal is to get some other form of cooling for the regulator before it overheats and breaks. This could be as simple as a wheezewort for localized heat deletion, or a liquid cooling loop once you install an aquatuner and steam turbine somewhere else. In an emergency, even a tempshift plate made of ice in the corner tile above the musher can reverse some of the heating.
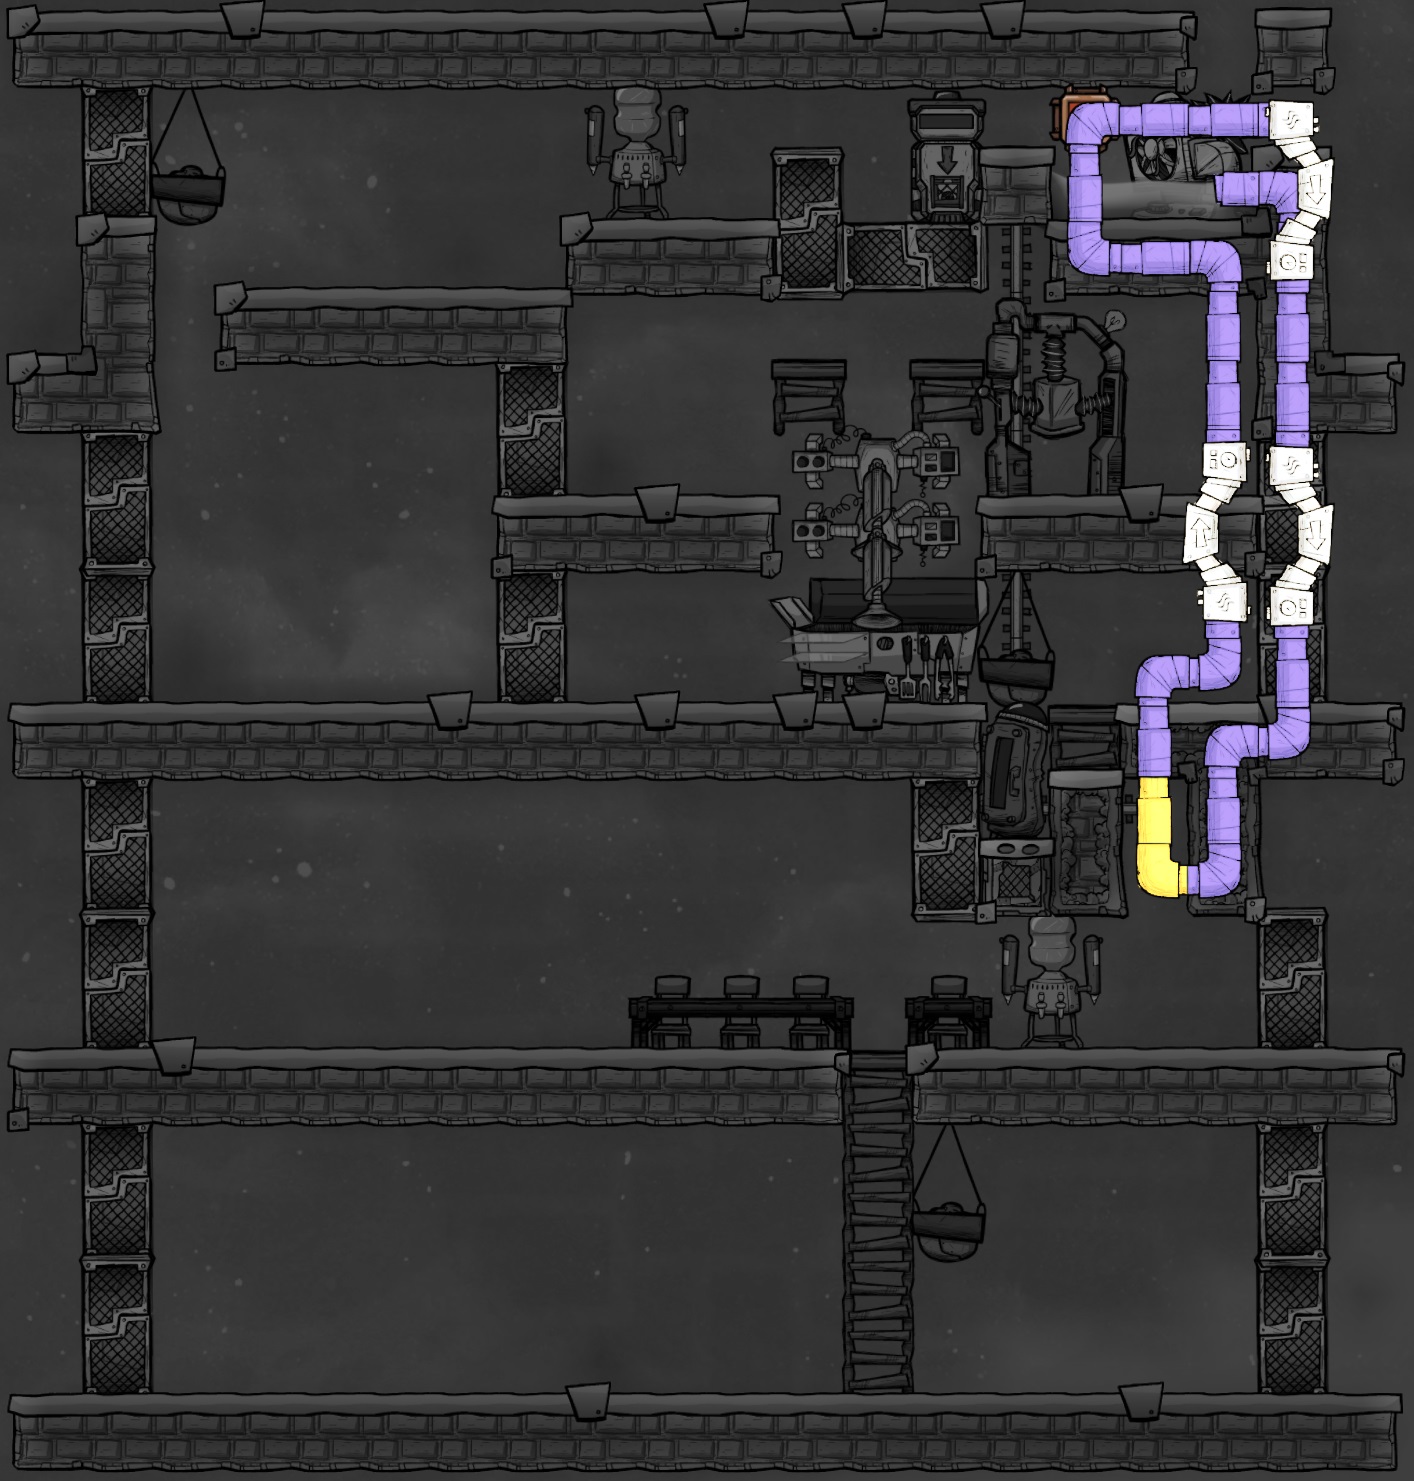
The build orders are shown below, followed by the gas and shipping overlays. Note that you must deconstruct a corner tile directly above the Microbe Musher in order to construct one pipe segment.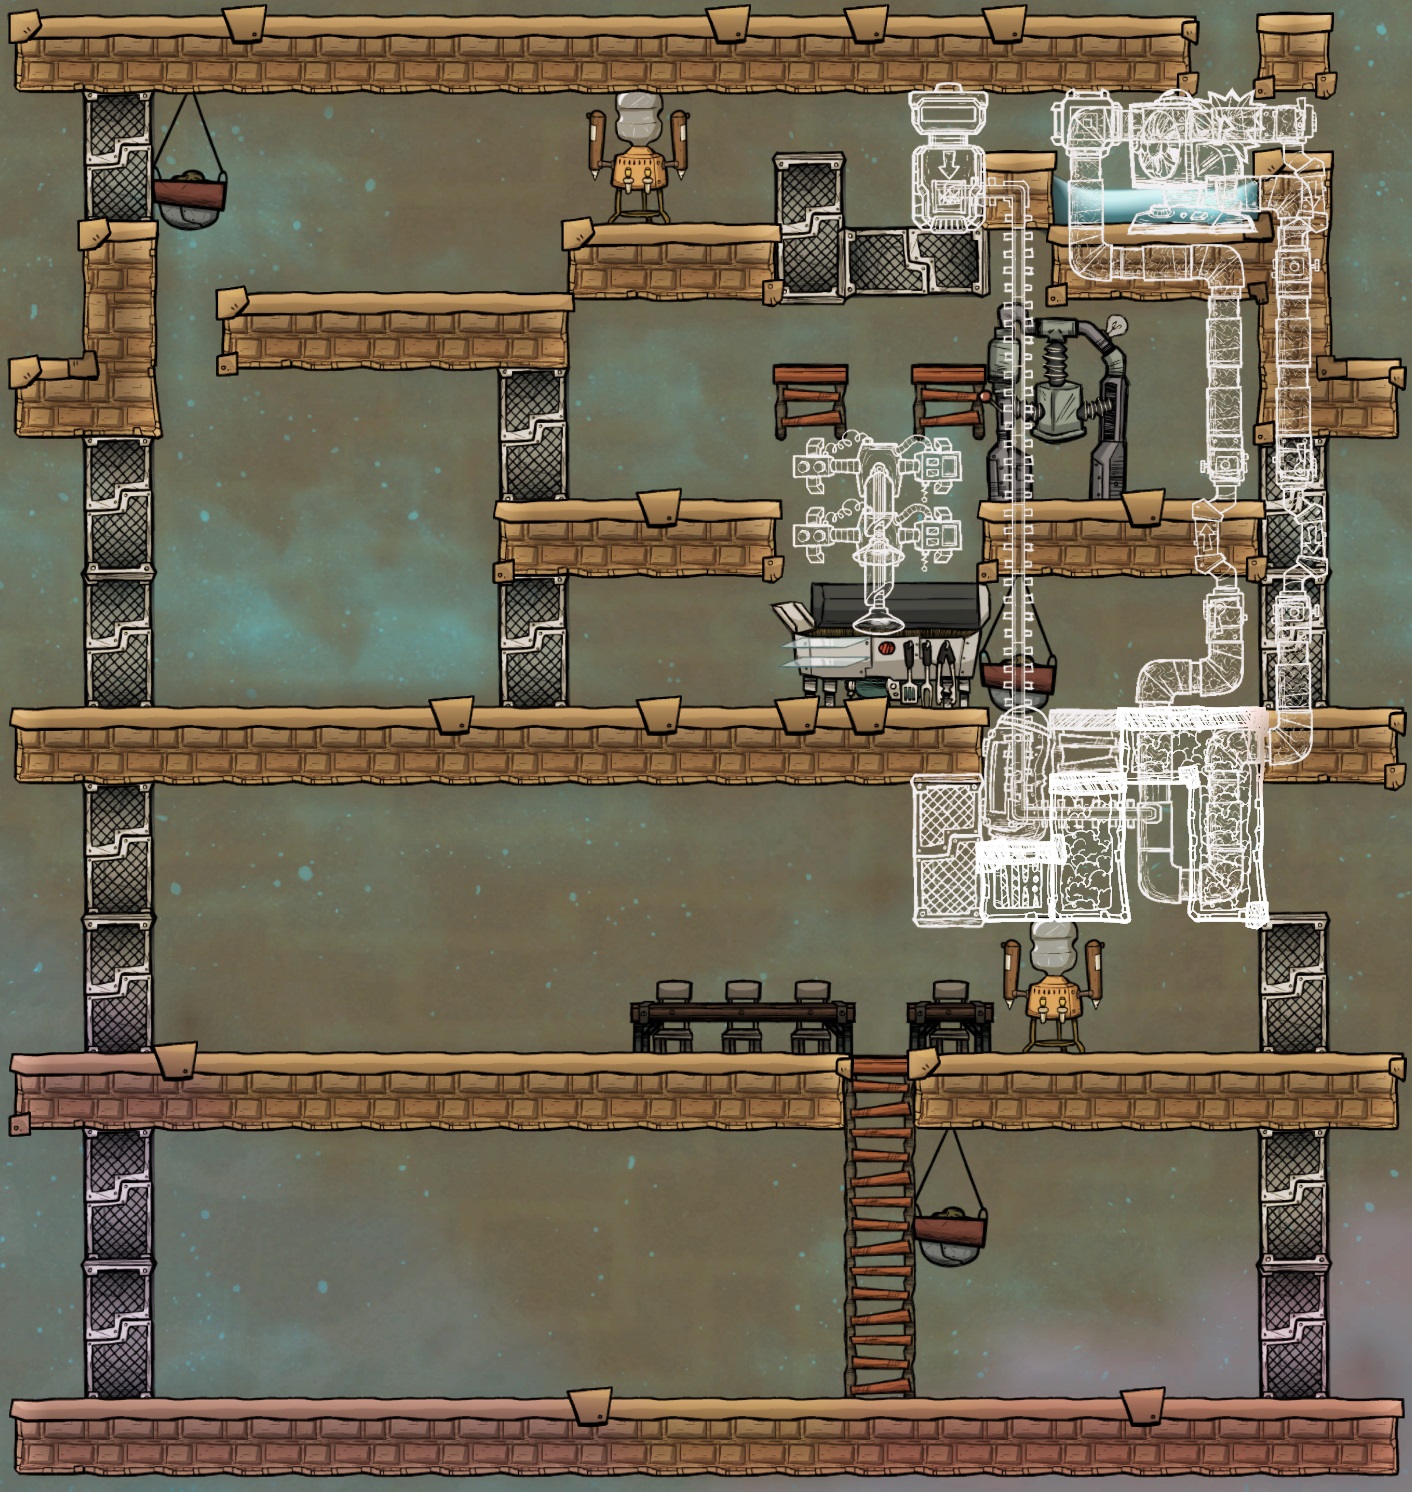
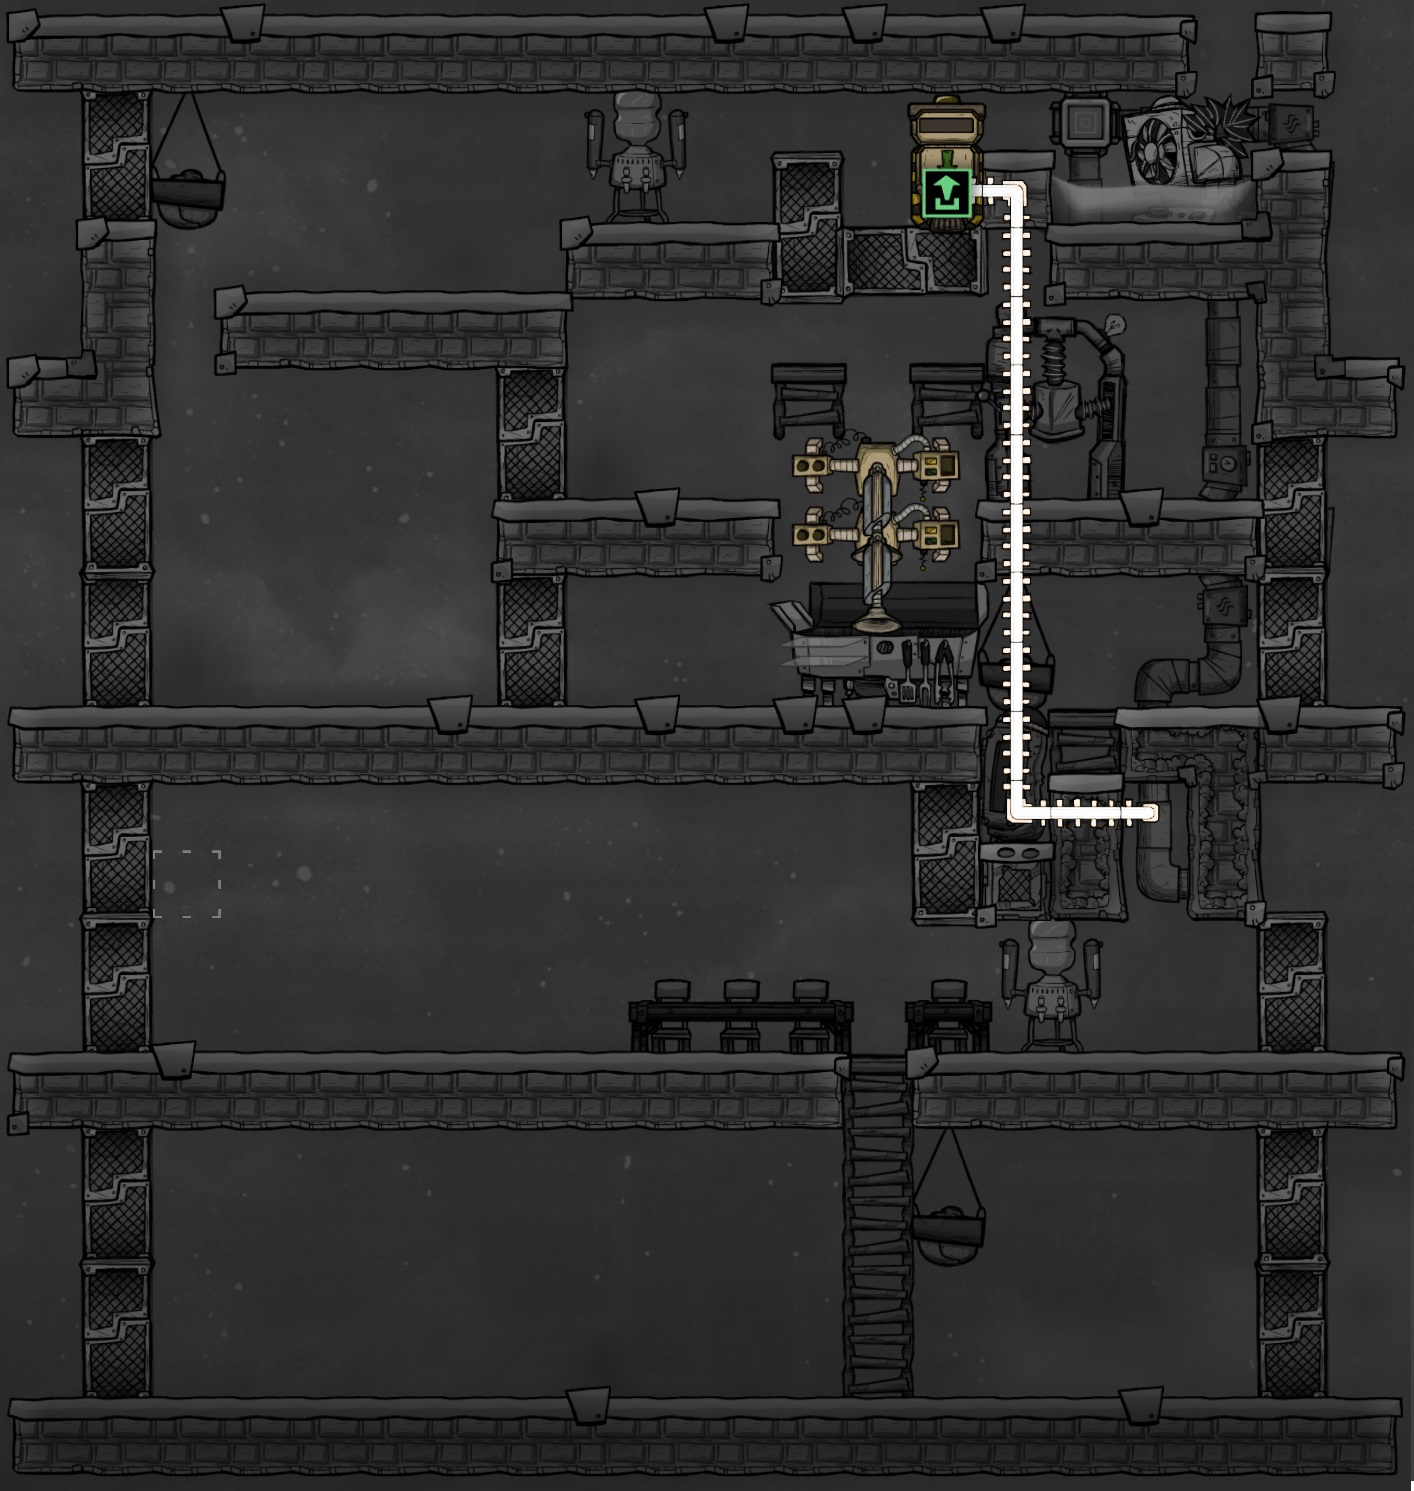 Once construction is finished, there are some final steps that must be performed in sequence to complete the freezer:
- Fill the cooling loop completely with Hydrogen
- Do not delete the pipe/bridge being used to fill the loop
- Deconstruct the top of the two radiant pipes. Hydrogen will spill and fill the tile
- Reconstruct the radiant pipe to complete the cooling loop
- The pipe/bridge being used to fill the loop will push on one tile of gas to replace the one lost
- Delete the pipe/bridge being used to fill the loop
- Construct a conveyor chute at the end of the conveyor rail, in the tile full of hydrogen
- Construct a metal tile just below the conveyor chute
- Construct an insulated tile just below the metal tile
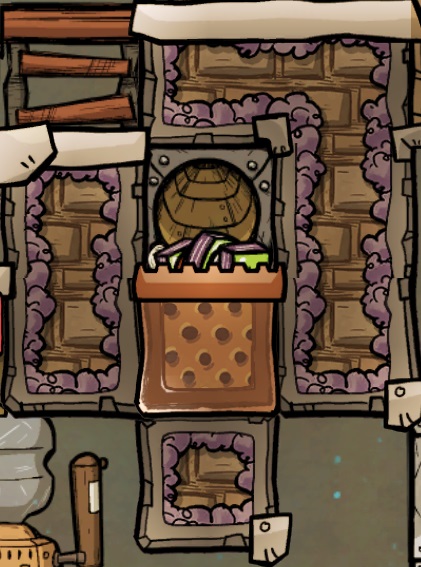
The conveyor loader should be set to allow all edible items and all cooking ingredients, which it will dump into the freezer. If you're playing with the Manual Override mod the loader should be set to allow manual use. This will allow duplicants to clean up after themselves and return food from the ground to storage. I recommend a medium-high priority in this case so that the dupes are incentivized to put food away.
The refrigerator is the only way the dupes can access food, so it should be set to allow whatever food you want the dupes to eat. It should also be limited to store 2-4kg of food at a time, as food in the fridge will be neither frozen nor in a sterile environment and will quickly spoil. As dupes grab food the autosweeper will pull more from the freezer to restock the fridge.
Finally, the thermo regulator cooling loop is controlled by the thermo sensor just to the left with a short piece of automation wire. Food has to stay below -18C to remain deep frozen, and I like to give myself some cushion so I set this to enable the regulator if the cooling loop is above -40C.
The primary reason is the condensation point. Hydrogen is the hardest gas in the game to turn to liquid, with a condensation point below -250C. You couldn't run a freezer that cold if you wanted to without super coolant, so you'll never have to worry about it. CO2 and Chlorine have condensation points around -48C and -35C, respectively, both fairly close to the -40C setting I recommend for running the cooling loop. Both gasses can work great in a freezer with slightly higher settings on the thermo sensor, but I've accidentally liquefied CO2 and/or accidentally thawed my freezer enough times that the switch to "worry-free" hydrogen seemed worthwhile. Food touching any liquid is not considered a sterile environment, so your first warning that your non-hydrogen freezer got too cold or too warm is usually when all your stored calories go rotten at once.
The other advantage to hydrogen, even if it's not very noticeable here, is that it has the highest SHC *and* the highest thermal conductivity (TC) of any "cold" gas in the game. From an energy efficiency perspective it's the best gas you can get, with the exception of things like gassified metals and nuclear fallout, but those all recondense to liquids at hundreds or thousands of degrees, making them useless in a freezer. This is why everyone always uses hydrogen in their cooling loops. In my opinion it just makes sense, if you're collecting 20-30 tiles worth of hydrogen for the cooling loop, why not collect *one extra tile* for the freezer? Using hydrogen as both the coolant and the sterile freezer environment will (negligibly :)) optimize your energy efficiency and eek every last cycle out of your thermo regulator before it overheats.
- Scaling Up
- Close in the recreation room to get the room overlay bonus
- This can be done anytime after the regulator and cooling loop construction is complete
- More seating in the great hall
- Lighting over the cooking appliances and mess tables to increase cooking and eating speed
- Optional motion sensors to disable lights, saving energy and heat
- More appliances (grill, musher, gas range) as you add chefs or demand higher quality foods
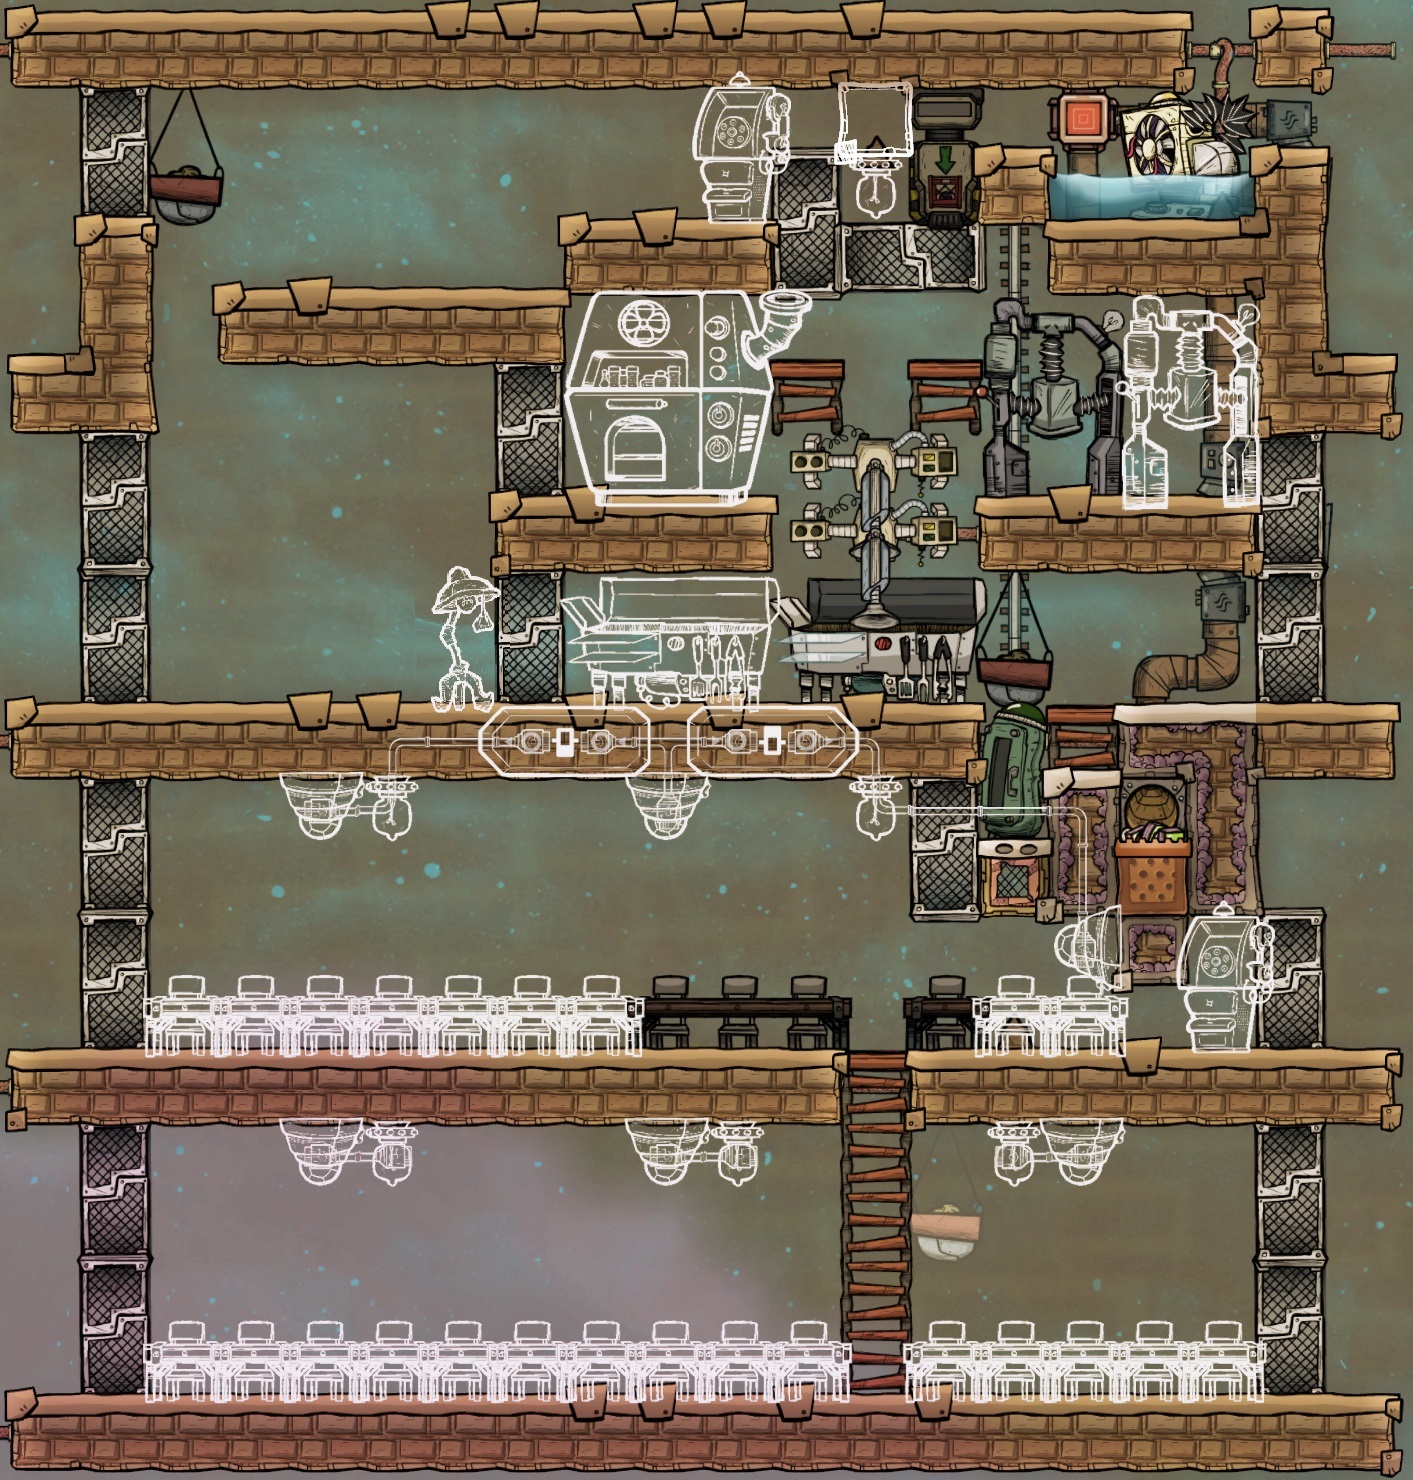
As shown in the image, I recommend replacing the original water coolers with party line phones at some point. Most people disable the water coolers to conserve water anyway, so while they enable the room overlays for the early game they provide +0 morale. Phones take up half the space, and if you don't power them they provide exactly the same decor and +0 morale. The only drawback is that they cost metal ore instead of raw minerals, so that's analogous to a "refined metal" opportunity cost. If you do power them, however, they can provide +2 morale when two dupes talk to each other, or a whopping +4 if talking to a dupe in space.
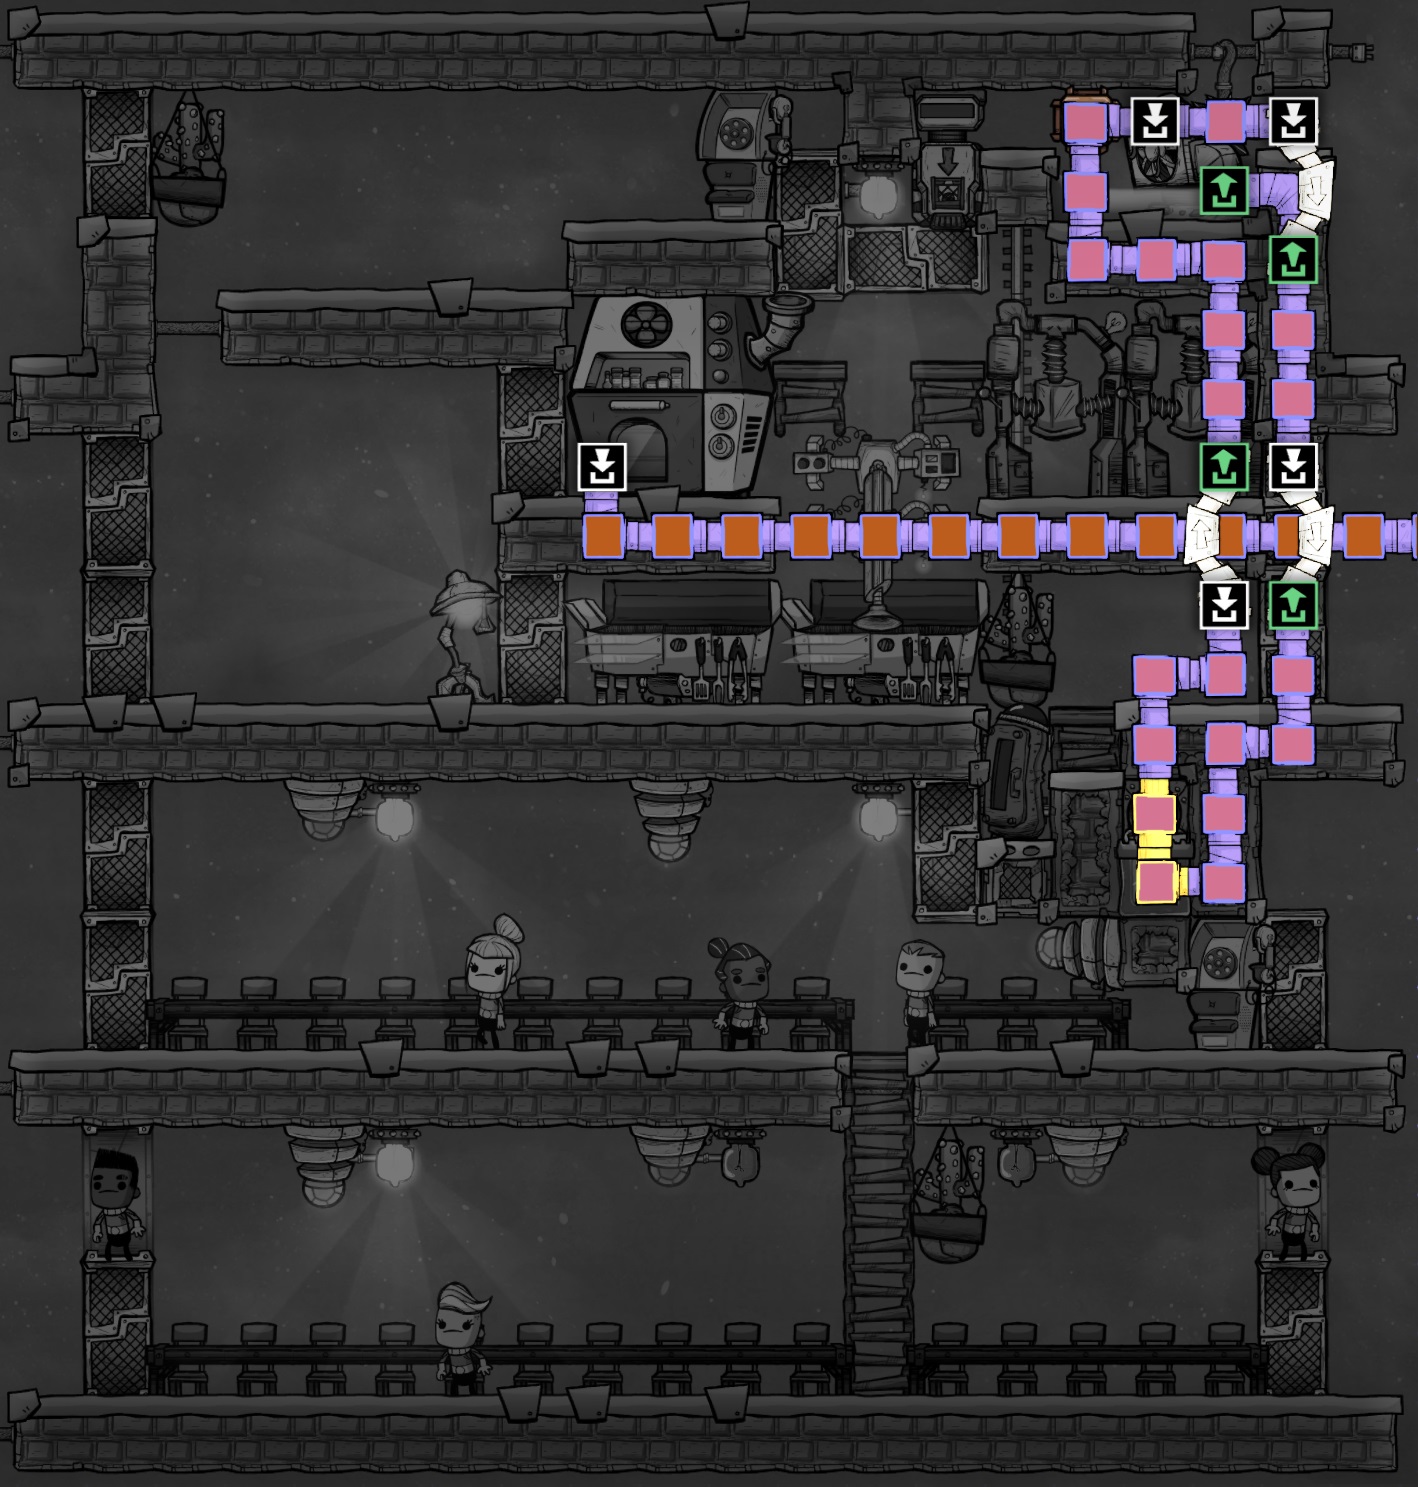
If you decide to add a second gas range in place of the microbe mushers, it can even be plumbed onto the same gas line directly below it.
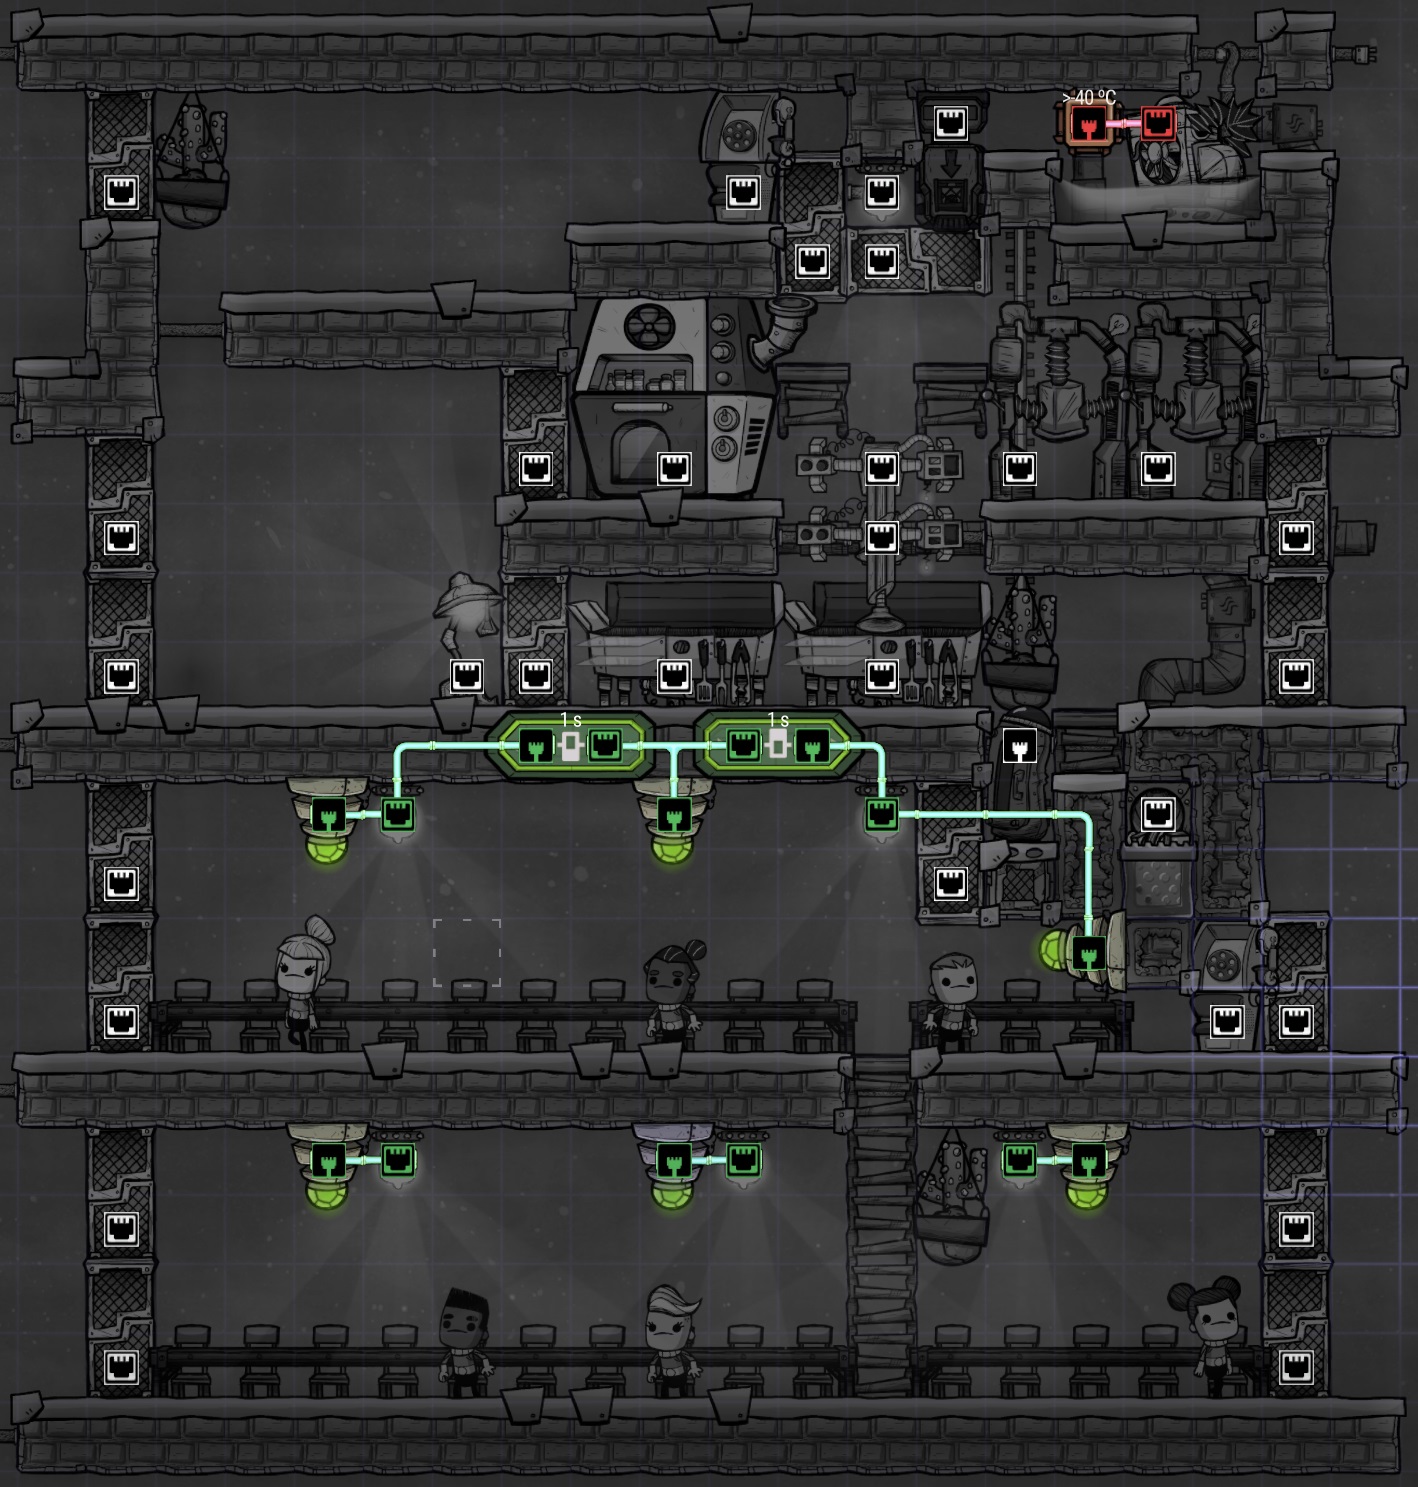
The two buffer gates are optional and in this case are only acting as diodes, preventing a green signal from flowing from either the left or right detector, across the middle, to the light on the other side of the room. The logic we want is for the left light to be on if either the left or center detector is triggered, and the right light to be on if either the right or center is triggered. We could use OR gates for this, but ONI logic always overwrites red signals with green, essentially giving you a free OR gate. However, if we simply wired all three sensors and both lights to a single wire that would give us 3-way OR logic, turning on *both* lights if *any* of the three detectors is triggered. Frankly that would be perfectly fine and you might even choose to do that and save yourself 50 refined metal, but I wanted to show how to create the desired logic by breaking the wires into isolated segments for those who prefer it.
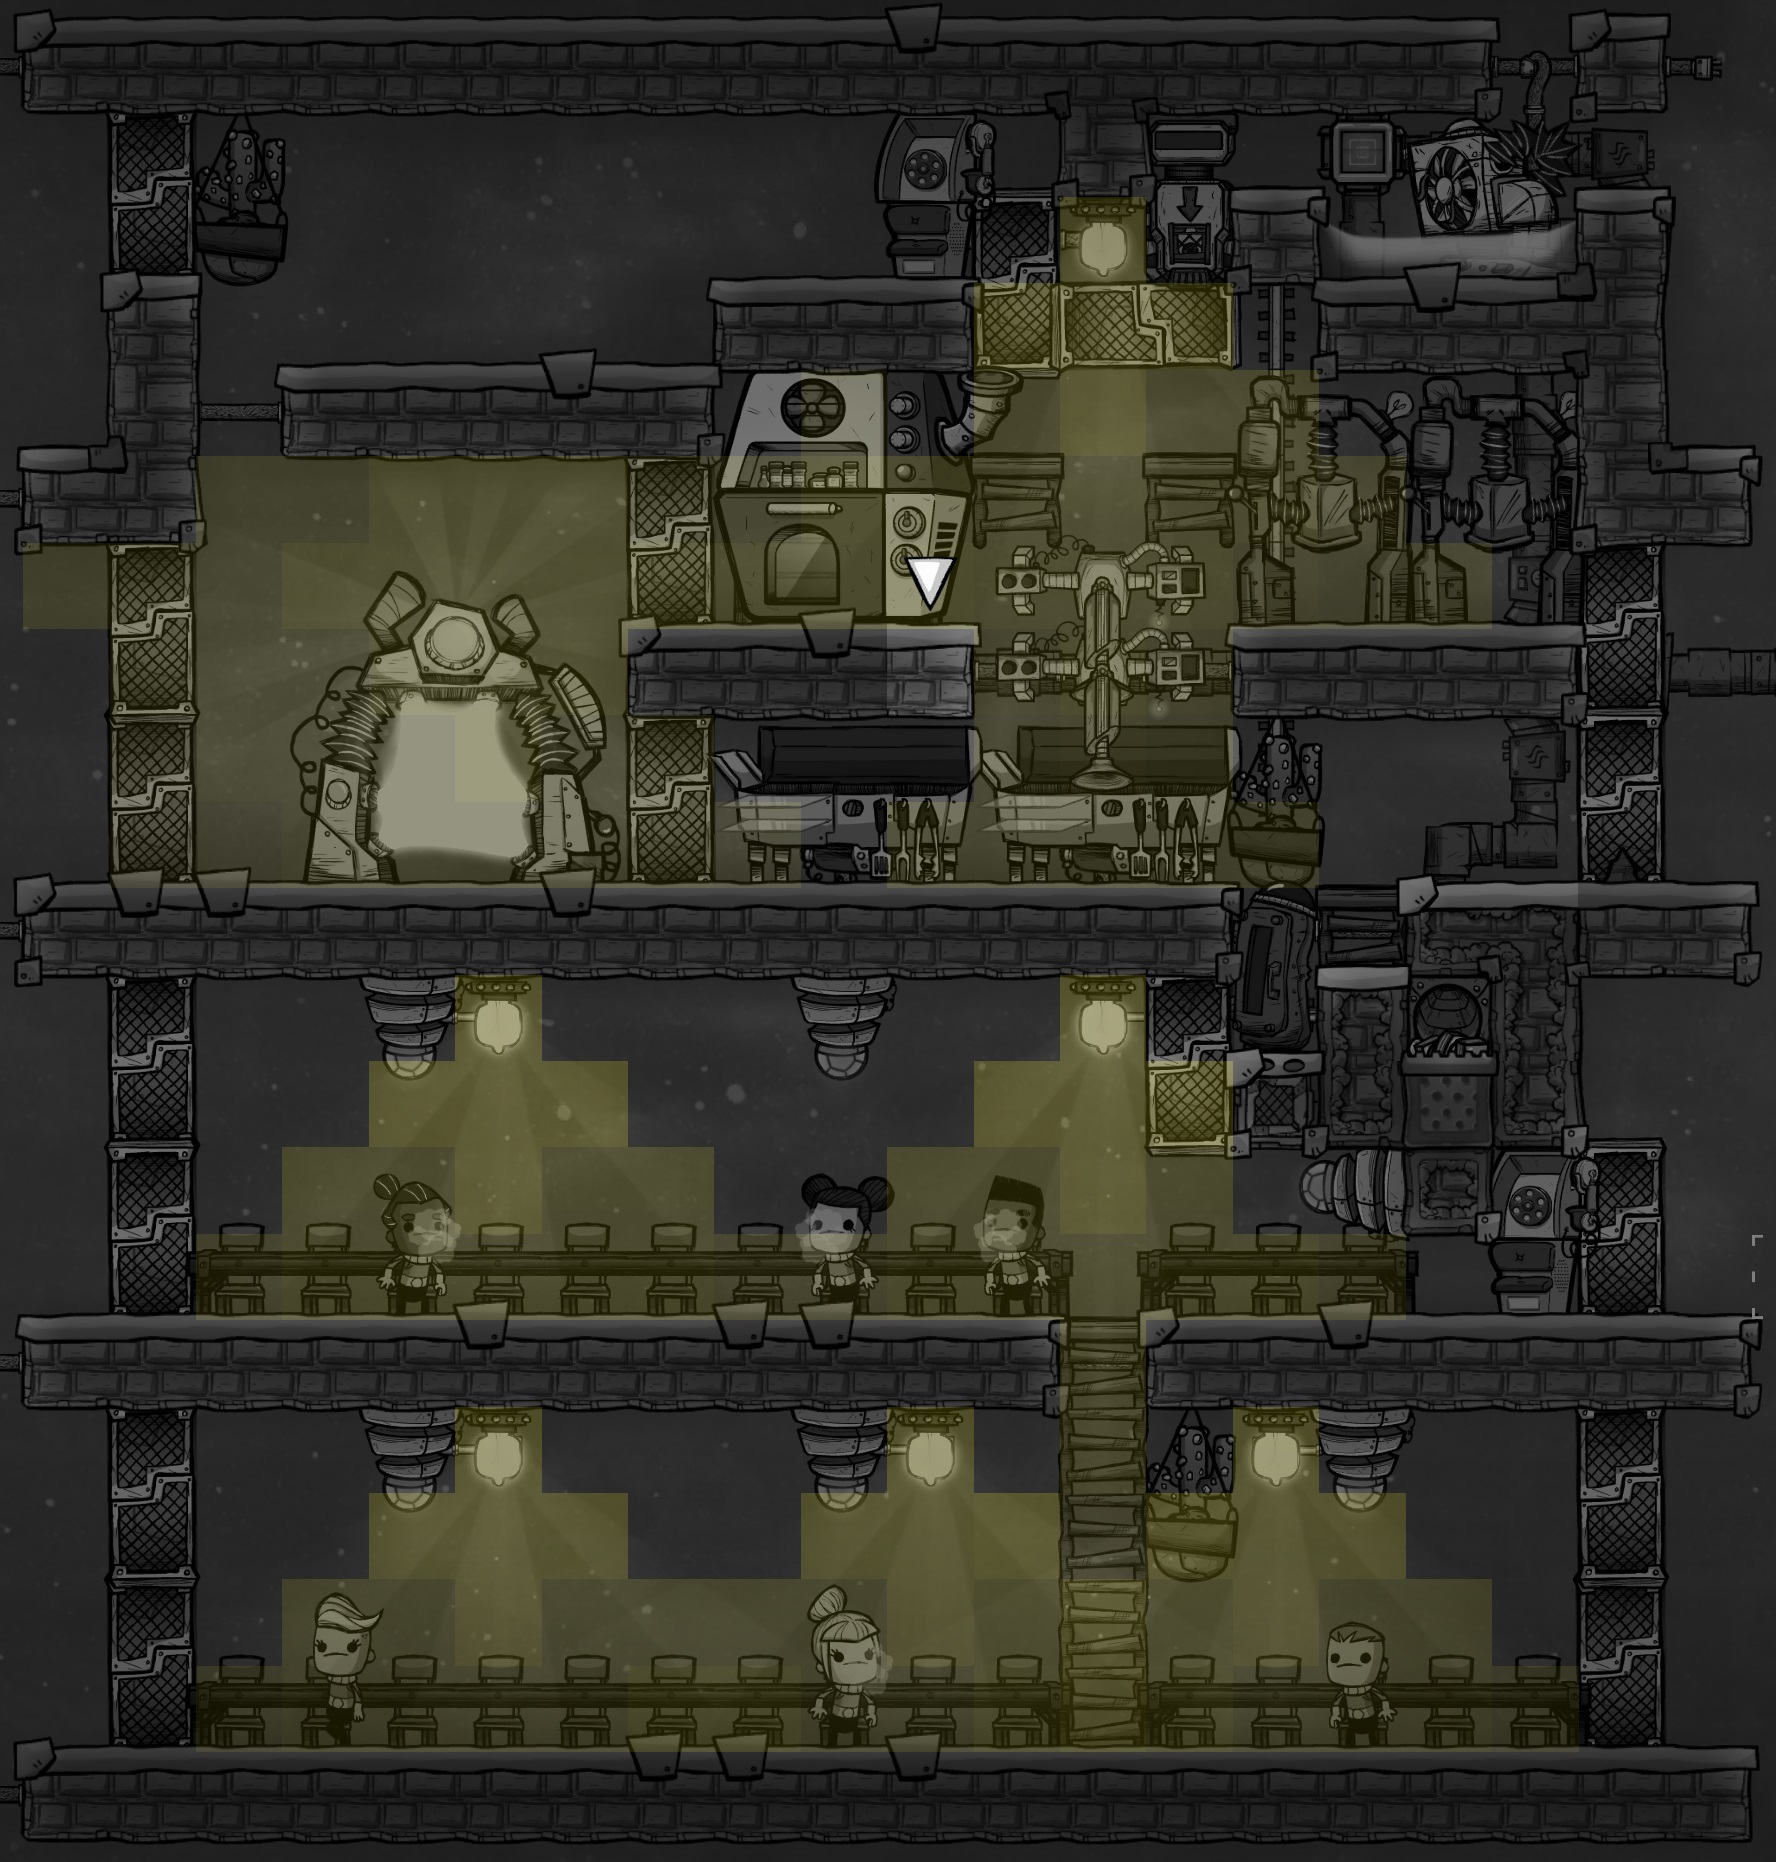
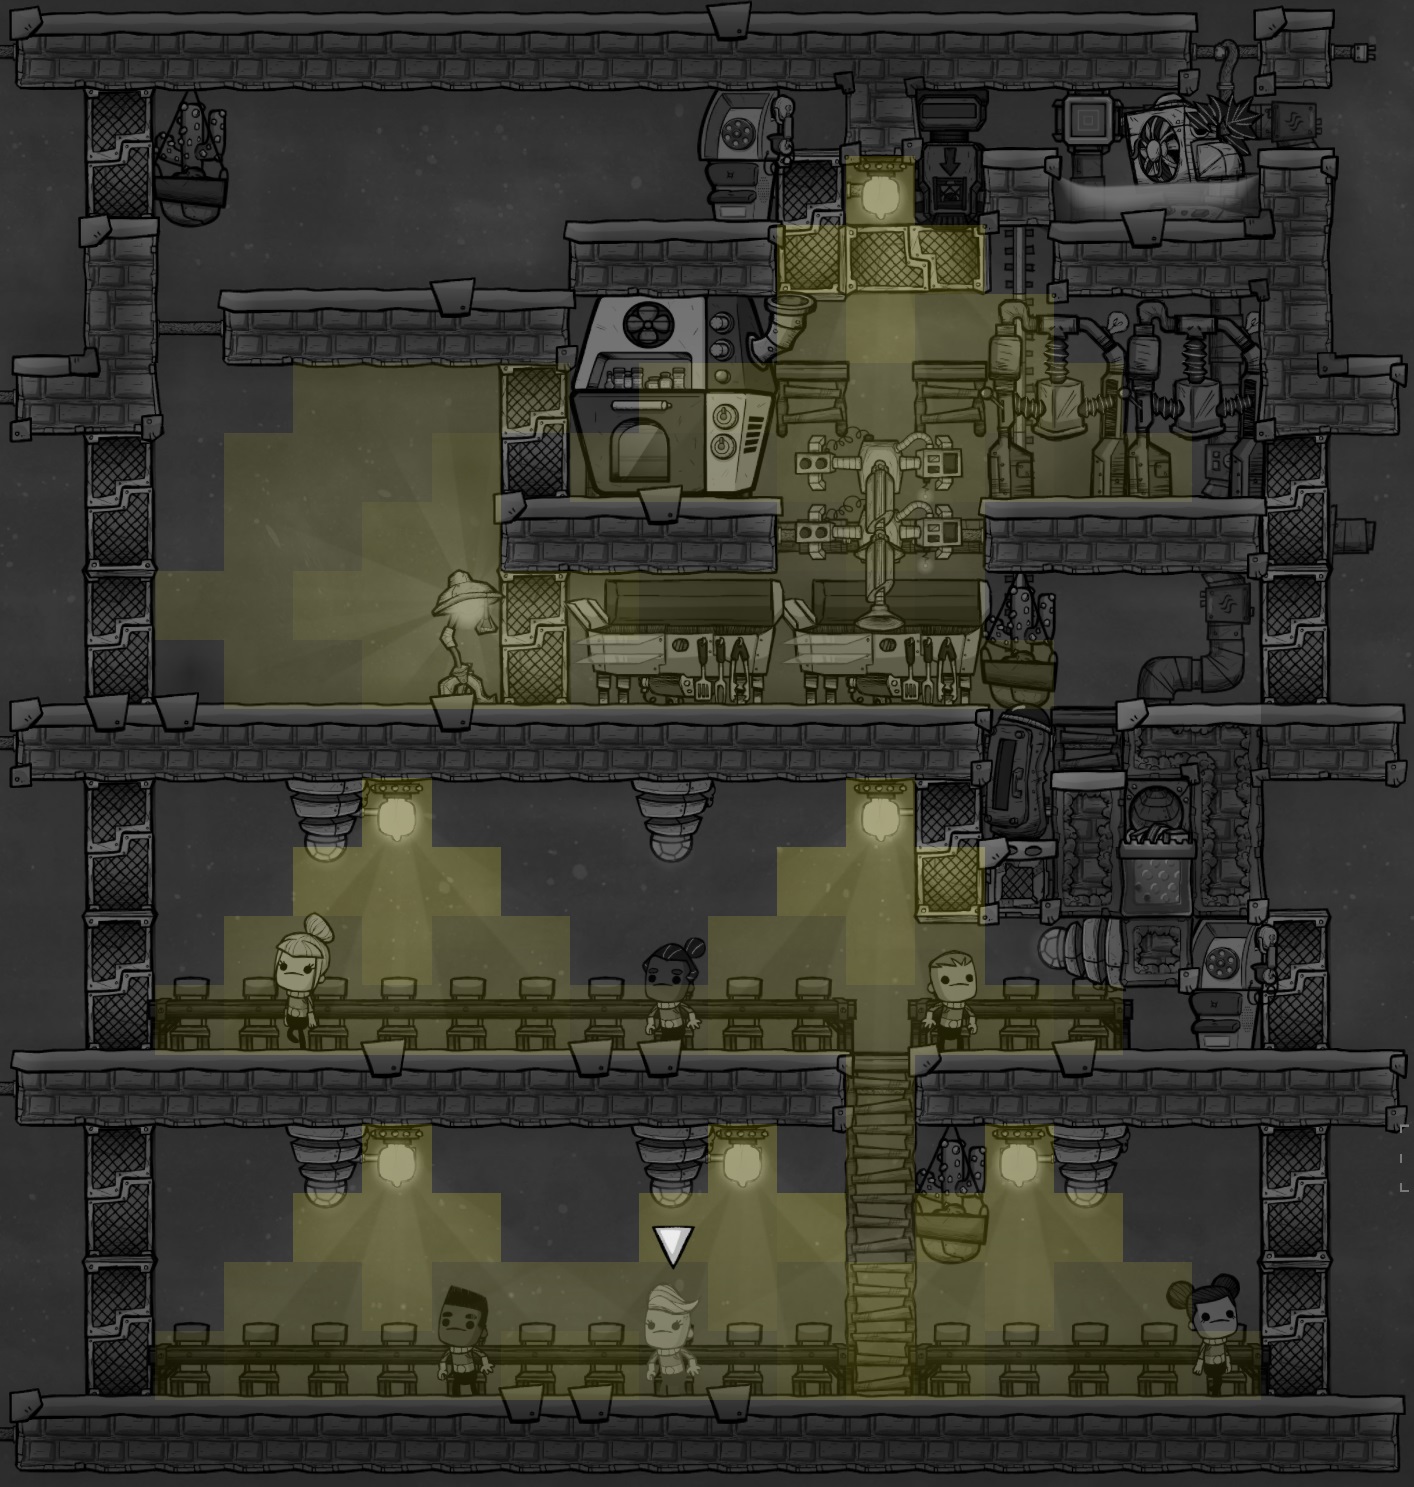
If you use a printing pod here instead of a floor lamp, there is one space where the light does not reach to provide the grill the "lit workspace" buff (+15% task completion speed). In this case, the tile selected in the top screenshot, indicated with an arrow, can be replaced with a window tile to allow light through from above. With that change, all cooking appliances and all mess tables are well lit and will provide the buff.
Note: I found out after publishing the guide that the floor lamp is completely unnecessary, if you replace the indicated tile with a window tile. The floor lamp's purpose was to light the left most tile of the grill, which I thought had to be lit to provide the buff. It turns out only the center tile has to be lit, which can be done with the ceiling light and window tile just like in the printing pod example. So you may want to install the lamp until you find some glass or diamond, then build the window tile and reuse the lamp's space for more decor or another recreational building.
- Recreation Room Upgrade
At some point you'll probably want to upgrade the recreation room to provide more forms of entertainment for the dupes. This isn't that important since the room doesn't provide a direct morale bonus, however it allegedly enhances the morale and/or stress reduction dupes get from using equipment in the room.
Both of the designs, with and without the printing pod, have the same options for the top half of the room. You can place either the jukebox or the hot tub (the largest rec buildings at 5x3), and add a soda fountain to the existing party line phone. If you don't want a jukebox or hot tub, any other rec building except the juicer will fit in this space.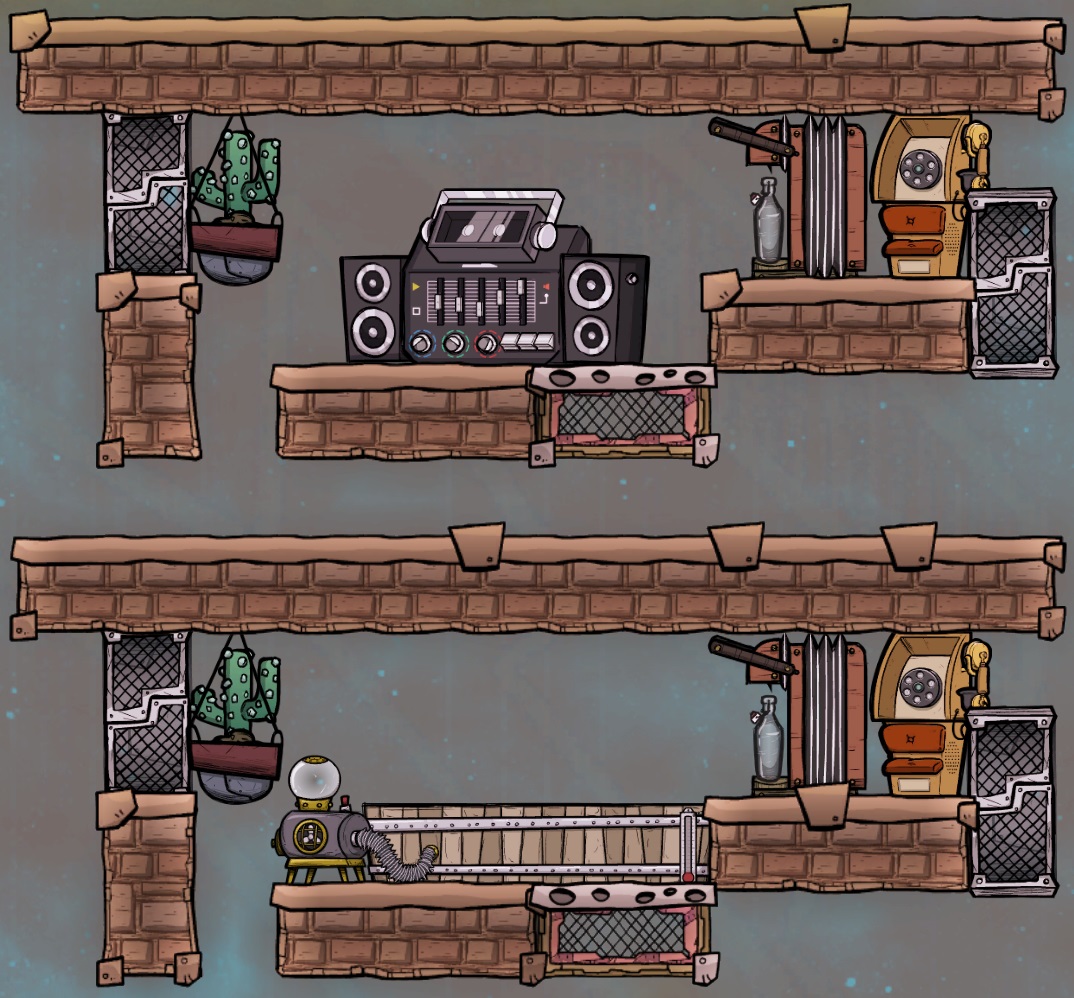 If your rec room contains the printing pod, you're far more limited on what you can do in the bottom half of the room. There is a single tile to the left of the pod that in my opinion is best used for another party line phone. If you did not build this room around the printing pod, you have a huge number of other options, as shown below: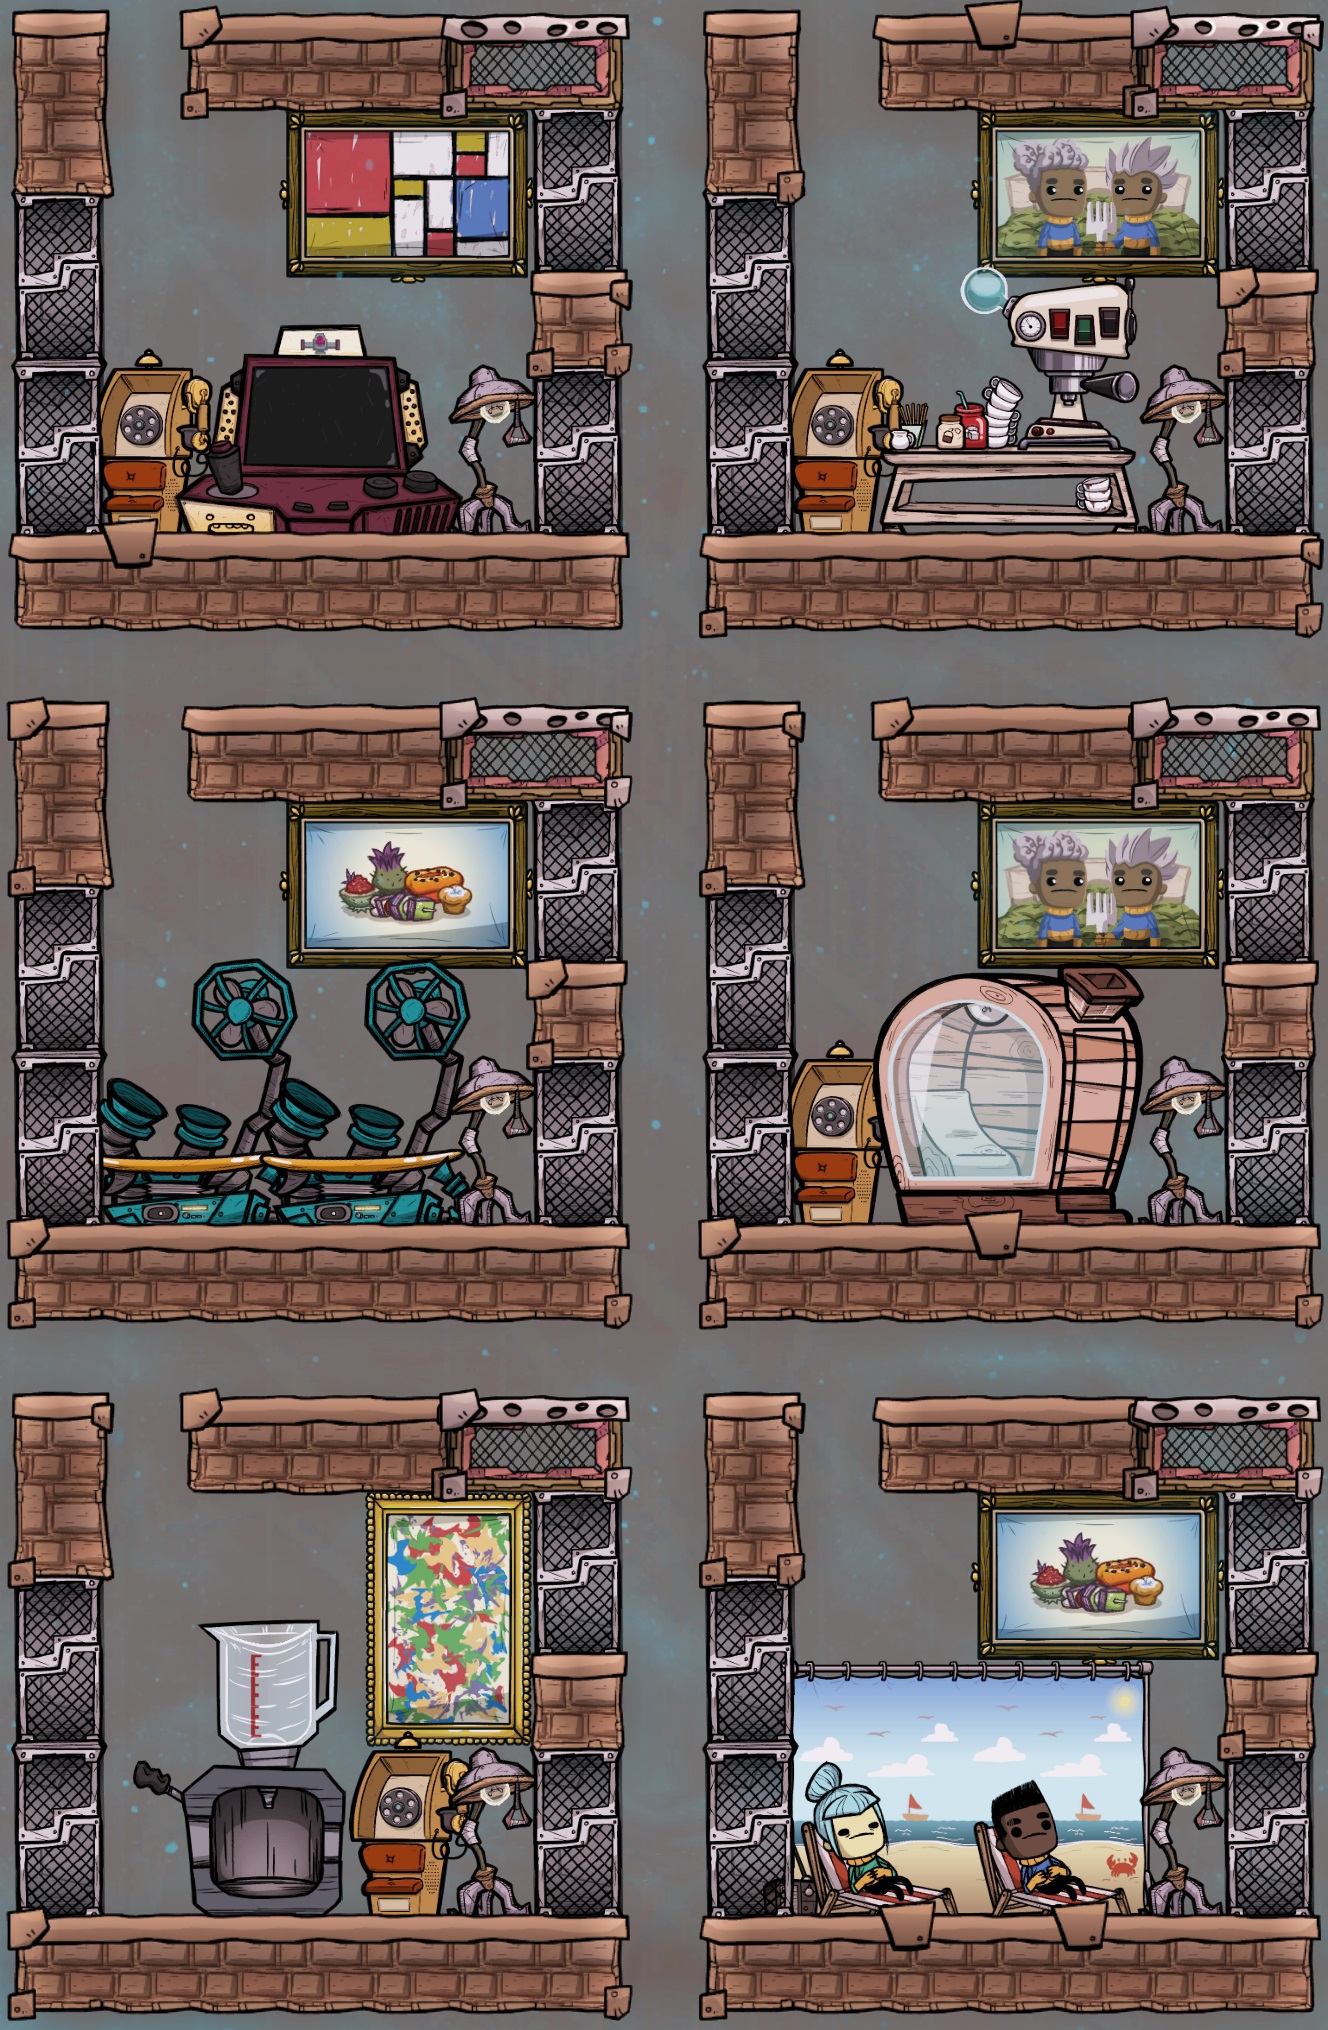
This area can accomodate two beach chairs or mechanical surfboards (or one of each) at 2x3, or any one of the larger 3x3 recreational items plus a party line phone. No matter which option you choose, there is room for a large painting to help boost decor near the gas range.
- Decor Bombing
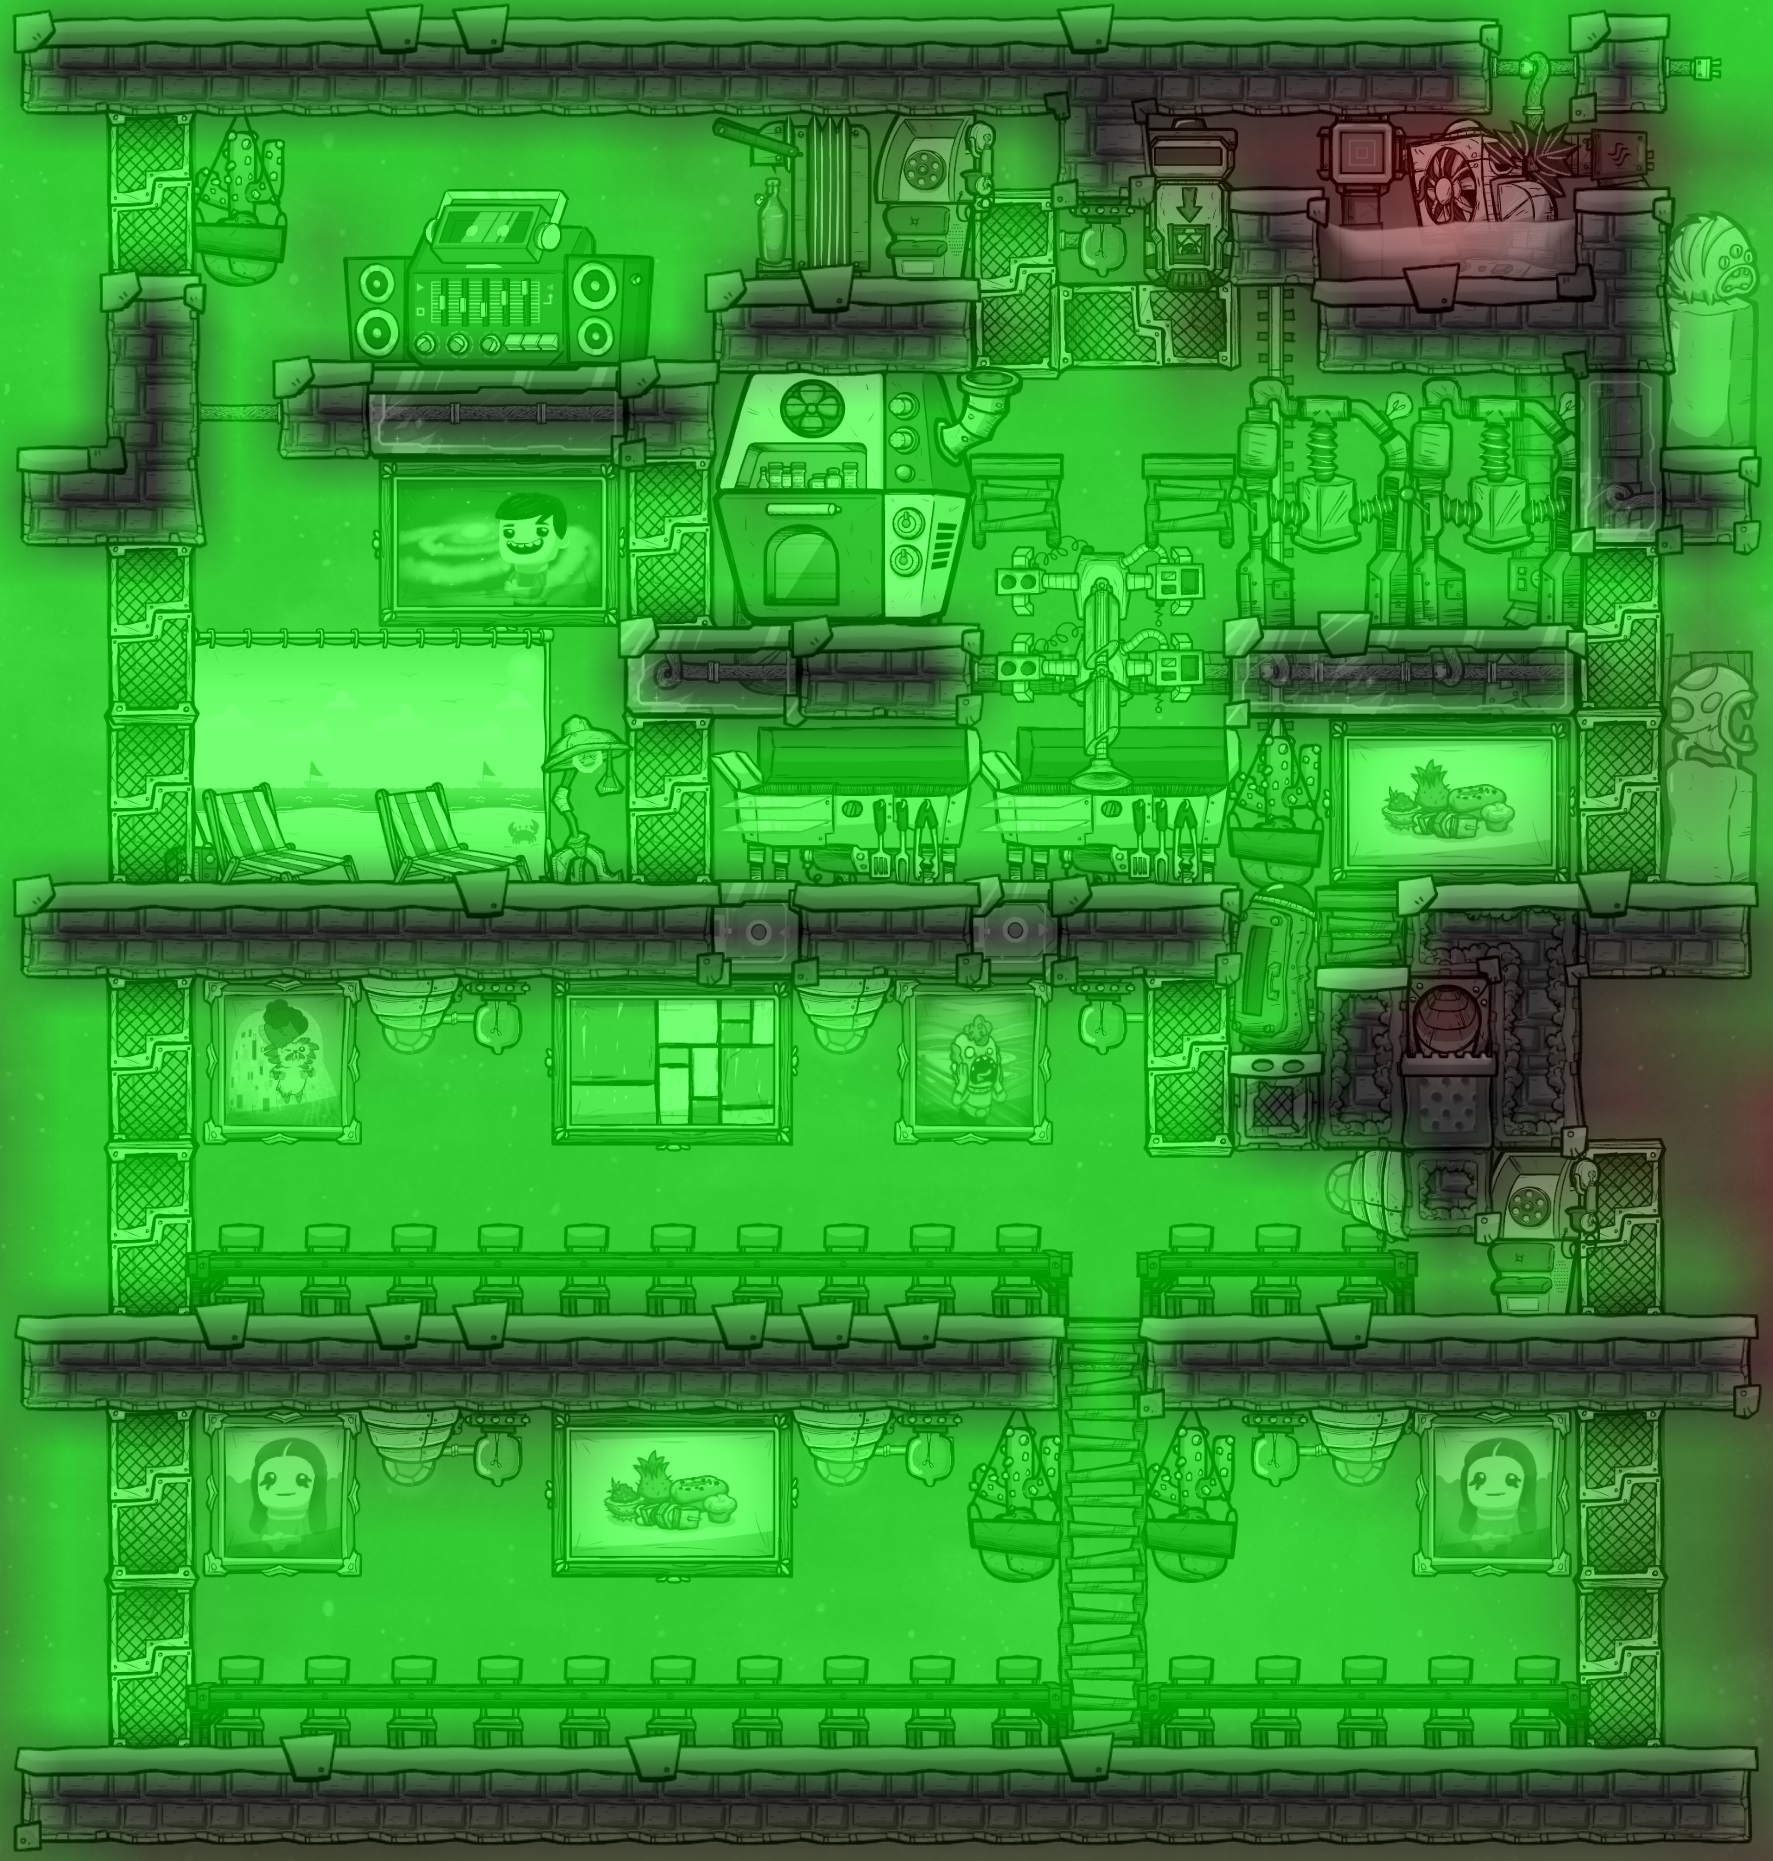
The screenshots in the "Bottom Line Up Front" section show example builds with window tiles and decor items. The screenshot below shows an example overlay after reaching max decor:
- BONUS: Warehouse Option
Right after completing this guide I realized that for all its versatility I had overlooked one major component of my typical core base. Something I set up early every game is an infinite "sweeper pit" storage which later serves as a distribution warehouse. Because I build this pit so early and it can be a pain to move, it often ends up right in my core near the printing pod. In addition, I don't generally make large rec rooms with multiple stations the way I depicted in the guide. A small rec room with a machine or two is perfectly fine for me, so why not recapture some of that space and put in a warehouse instead? If you aren't sure what I'm talking about I'll describe the concept under the next two headers, otherwise you can jump right to the example at the end.
Of note, there's really no reason this warehouse functionality needs to be (or arguably even should be!) in the "core" of your base. You could build it in any awkward nook without space for "standard" 16x4 room. You might even intentionally build it outside the main base to not care about accidentally storing debris at extreme temperatures. As I said above though, I tend to build the pit very early and never move it, so it's quite often right in my core.
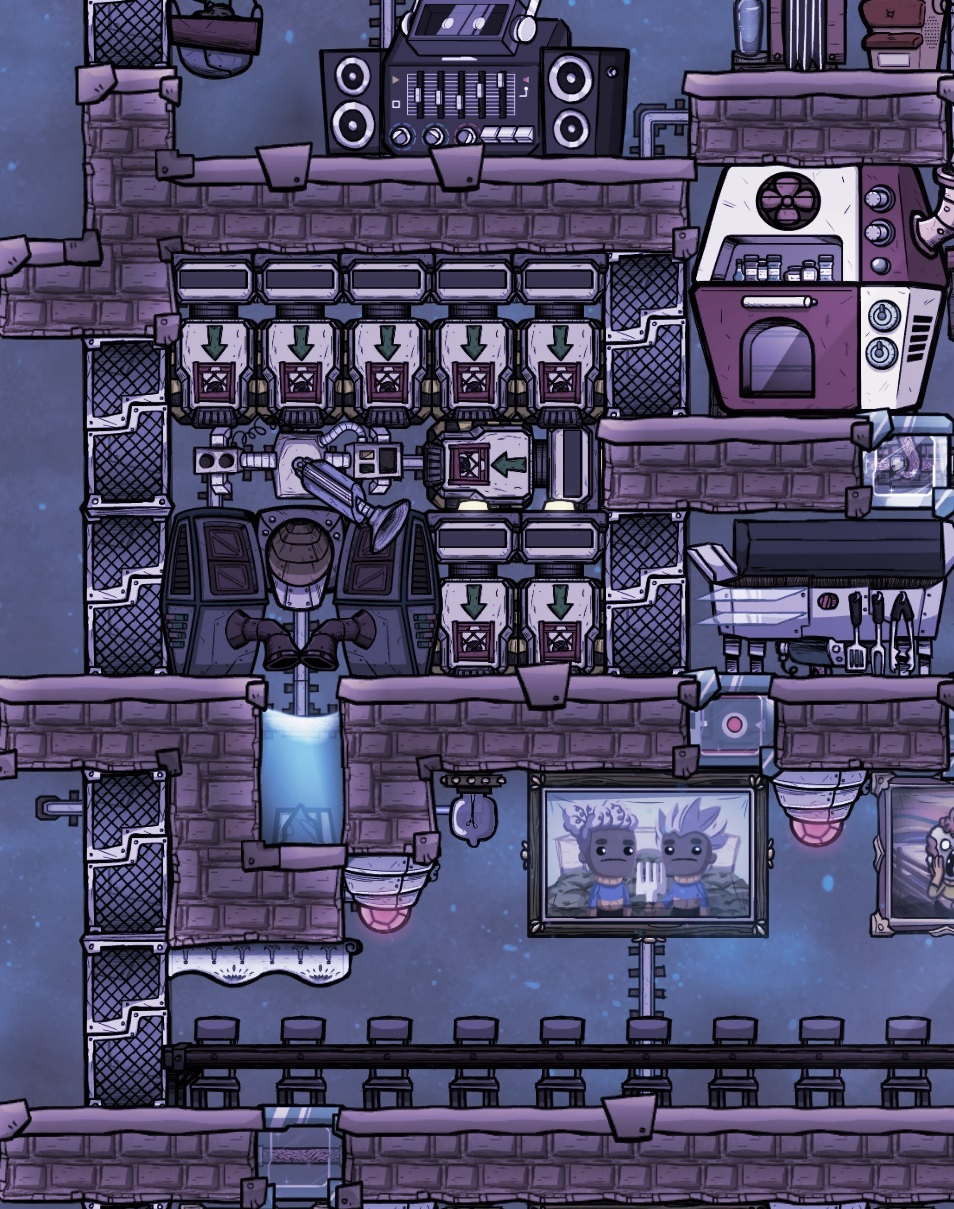
The pit does not affect the coverage of the motion detector or light in the great room. You'll take a pretty major hit to decor at the Gas Range and left side Grill, but you can fit at least eight conveyor loaders around the pit with an autosweeper. You can cram in two more on the left side of the pneumatic doors in the ladder corridor, or you can replace some on the far right with a flower pot or statue to bring decor in the kitchen back over 100. The rec room gets cut down to ~23 tiles but it still meets the requirement for the overlay and can still hold at least one of any sized entertainment machine, plus the soda fountain and party line phone.
It's important to remember that this kind of shipping design is not required or even necessarily right for everyone. It's something that I frequently build, perhaps as a crutch, but even I've never built it exactly the way I show here. I often place the sweepers underneath and access material diagonally, but this layout worked better without disturbing the great hall.
In any case, this core base guide is really centered around the kitchen and great room, with enough flexibility to support a rec room and "maybe something else". This warehouse space could just as easily be repurposed into a small gym for training athletics or anything else you need. I encourage everyone to experiment and see what makes sense for you.
5. Summary
If you were having trouble diagonal-building a freezer after the patches, or ending up with food loops between three sweepers and two loaders in your kitchen, maybe this design will give you a simpler foundation to build from. I've also seen threads where people are shocked to see a two-story great hall, having never considered such a thing. I pushed this design within a couple tiles of the maximum great hall size and gave an option to build it right around the starting printing pod if you so desire.
This guide is just another way of showing what's possible, while hopefully giving you a foundation for experimentation that can work from cycle ~3 to cycle 3000.
6. Thank You!
Thank you for reading this guide and I hope you found something worthwhile to take away from it!
There is one additional person I would like to thank for their inspiration but unfortunately I don't know who they are. There was a Reddit Thread where a user was asking for kitchen ideas and another user posted a screenshot of their build. The build had some odd dimensions (17 wide, inconsistent floor heights) and it used an aquatuner and steam turbine for the freezer cooling, but looking at that build I took away some great ideas. In particular the central concept of two sweepers in between five cooking appliances was directly lifted from that example. I changed quite a bit to suit my own playstyle, but I'd really like to thank that designer for their contributions.
Unfortunately, while the thread still exists (along with my replies praising the original design) the user deleted their posts and their screenshot. If by chance you are that poster and you stumble into this guide, please give me a shout and I'll credit you here.
- ONI - Surviving the Early Game★ 5 (2.4k)83k views6.3k ♥54 minUpdated 6 Aug, 2019
- Useful Construction Patterns★ 5 (1.8k)74k views5.2k ♥66 minUpdated 29 Aug, 2020
- 10* things I wish I knew sooner...★ 5 (754)58k views1k ♥4 minUpdated 6 Oct, 2017
- ONI - Surviving the Mid-Game★ 5 (1.3k)44k views3.8k ♥150 minUpdated 6 Sep, 2019
- Not Quite Beginner's Guide★ 5 (361)32k views1.1k ♥91 minUpdated 26 Mar, 2023
- Руководство для начинающих. (ОСНОВЫ)★ 5 (629)32k views1.2k ♥21 minRussianUpdated 20 Apr, 2019




- Upgrading to PremiumTeam Fortress 2★ 5 (20k)1441k views11k ♥6 minUpdated May 11, 2022
- No More Room in Hell Official ManualNo More Room in Hell★ 5 (2.8k)569k views2.1k ♥29 minUpdated Apr 22, 2019
- NMRiH Community Hosting GuidesNo More Room in Hell★ 5 (526)351k views653 ♥1 minUpdated Aug 10, 2022
- How to 'Git Gud' Soon™MORDHAU★ 5 (2k)318k views3k ♥68 minUpdated Nov 16, 2024
- Лучшие кооперативные игры SteamPAYDAY 2★ 5 (1.5k)315k views2.1k ♥56 minRussianUpdated Apr 27, 2025
- Desert Eagle Heat Treated | Blue GemCounter-Strike 2★ 5 (1.6k)293k views1.5k ♥2 minUpdated Jan 16





This guide was created by its original author on the Steam Community. Are you the author and want it removed? Request removal.