Few builds to spice up the gameplay
Noob-friendly build (LS)
Although this section aims to be spoiler-free, some mild spoilers can be seen in the gear section. Generally speaking, there are two (conventional) somewhat distinct ways to play – "fighter" and "caster". Fighter can be both light and dark sided (LS and DS), while caster really wants to go light side for 3 reasons: circlet of saresh, Qel-Droma/SF robes and lightside mastery. Moreover, caster probably wants to have as many force powers as they can get meaning saving levels in the early game which is rather unpleasant and I wouldn’t recommend doing that to a newer player. Keeping the above in mind, I strongly suggest the fighter build which I consider to be the most suitable for newer players. Going for LS is also canon.
Starting class – scout. Scout is chosen for its skills, and preferred to scoundrel because of higher number of feats and repair being a class skill. Jedi class – guardian.
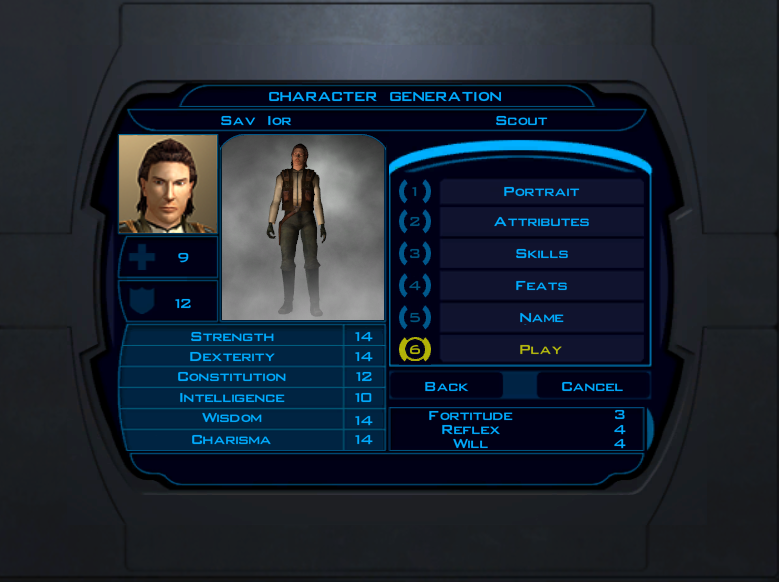
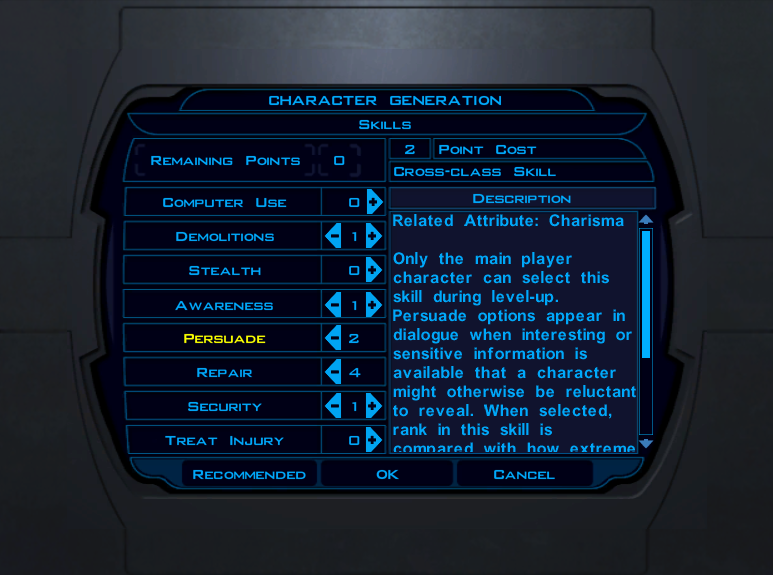
Skills: assuming you went for 10 INT, you have 12 points at the generation and 3 per level while you’re non-jedi, and 1 per level afterwards. Your goal is to reach 17 repair (maximum needed for the plot) asap while maintaining decent persuasion. Putting 4 points into repair at the start and then 1 point at each level up ensures that you can get the necessary repairs done at level 10 (13 repair+3 from belt (on dantooine for 3k)+1 from valor) at which point you can choose to stop investing in repair. For persuasion, it is recommended to maintain ratio of (PERS/(LVL+5)) > 0.75, meaning 12 at level 10, for example, to have 75% chance of success on even the most difficult persuasion checks (some will still be impossible at any persuasion level). With 14 starting CHA and force valor (that adds 1 and at max rank 2 to your persuasion) you need 15 base persuasion to maintain >0.75 at the max level, which should be achievable as early as level 15, if you become a jedi at 7 (and had max persuasion of 10 at the time) and put ranks in repair first. Depending on your starting CHA, you may fluctuate around the ratio, but if you only stopped putting points into persuasion to get the repairs asap, you will never fall below 0.5 thus always having at least some chance of success. The rest of the points can go anywhere you wish. The only skill that have direct combat usefulness is Treat Injury. One point in Security helps early on (you won't need to switch to a companion to open most things), Awareness allows to see the mines (again so you don't need to switch to a companion to see those).
Feats:
- Master 2-weap – mandatory for its massive attack boost; (3 points spent)
- Master combat skill – since Bastila is likely to max flurry and Juhani is likely to max power attack, I suggest going for critical strike to be able to see all the animations. Note here however, that if you’re planning to have double-bladed lightsaber then critical strike is not recommended; instead go for one of two other options (and give Juhani crit if you need to see all the animations); (2-3 points spent)
Number of feats you get in total depends on the level you become a jedi. The most likely levels are either 7 or 8 giving either 12 or 11 feats respectively, however as a scout you get implant levels for free at 1, 4 and 8, meaning that effectively if you decide to max out implant tree (you probably should) your character gets 14 feats, if you become jedi guardian on either level 7 or 8.
Few important notes about feats: first, you should stick with just one weapon in the early game even while maxing 2-weap fighting until you at least get to level 5 (where you should put your second point into 2-weap fighting), because the attack penalty is massive and would make you miss often. Second, critical strike (and power attack, but to a lesser extent) gets significantly better with rank. It means that you probably want to avoid using it in harder fights until you have it maxed (level 10 or 11, depending on your split).
Also, if you want to, you can go for one single-bladed sabre build. The game is absolutely beatable even on the hardest difficulty with it and early game would even be easier! In case you do, switch 2-weapon fighting for Dueling.
Powers:
In total you will have either 13 or 14 powers. Master Speed and Master Valor are the only two mandatory power trees. Cure (NOT Heal, just Cure) is recommended for LS, Life Drain tree for DS. If you went DS route with lower WIS and CHA, your force DC will be rather pathetic meaning enemies will often resist the effects of your force powers, meaning you’d be better off just buffing yourself, eg Improved Energy Resistance; Affliction and Plague have fixed DC (and the latter cannot be resisted), so you can pick them. Feel free to pick up Force Lightning - can’t imagine DS route without it. Dominate Mind is another possible DS choice. On the LS, you’re likely to have noticeably higher force DC, so you can pick Stasis Field and Stun Droid. Force Wave (over Stasis), Improved Energy Resistance are other good options. Ironically you can go for DS powers as LS jedi and have more success than your DS counterpart, though at higher Force Point cost.
Avoid: Throw Lightsaber (too weak and has a drawback of not being able to reflect blasters); Heal (barely improves cure); Force Aura (defense is capped at 10 from armor+powers, and good robes (5) and knight speed (4) almost reach the cap, while your saves should be decent enough except for maybe will, which can be improved by immunity: mind affecting instead); Force Resistance until the very late game, ie can be taken as the very last two powers if you want to (saves+immunity should be enough).
Equipment:
Implant: +3/5 DEX from Kashyyyk/Yavin or +hp regen from Korriban or immunity: Crits (which you can get super early in the game on Taris in the Undercity)
Head: +5 WIS for LS from Kashyyyk; +2 DEX from Manaan/Immunity: Crits (Tatooine/Kashyyyk)/Mind Affecting (Manaan/Yavin/Korriban academy)
Hands: best +STR you got (+1 Taris, +2 Dantooine Mandalorian, +4 Manaan Hulas, +5 Korriban late-game shop)
Belt: +2 STR Dantooine
Body: best robes you can find (Qel-Droma for LS (Korriban)) swapping to SF robes late-late in the game.
Weapon: whether you go for 2 sabers or a single double-bladed saber is entirely up to you. Their combat power is mostly very close (and any combination is enough to comfortably beat the game). Keep in mind though that double-bladed saber is significantly (~20k) cheaper, so if you can’t afford both late game crystals, then you probably should go double-bladed.
Crystal combinations: Opila/Sigil/Phond early; MotF: Solari>Sigil/Phond, HotG: Upari>Sigil/Phond/Pearl late. MotF and HotG are two super late game crystals bought on Yavin.
Note that Solari is restricted to the light-side, unless you’re using it with MotF (or HotG).
Getting started
Before going into the rest of the guide, an important thing to mention is how one would acquire the gear necessary to complete a build. Most of the items are available from certain vendors while some are found out in the world. Here's the list of significant cash sources:
• 2k from vulkar base hangar
• 7.5k from manaan swoops
• 18.72k from tatooine swoops (sell the currency on Yavin for extra profit)
• 7.5k from Suvam Tan (on Yavin) by winning in pazaak 10 times (which also provides 20% discount in his store – a must!)
Also worth noting that after leaving Taris the Yavin station is your best destination to sell items, since it gives you 65% of the item value compared to just 25% elsewhere. This also means that you shouldn't sell randomly before you first visit Yavin (sell just enough to afford necessary items).
Main shops:
Yavin station - available once you leave Dantooine. Restocks, so check back;
Dantooine - shop near the landing zone (Crattis Yurkal);
Kashyyyk - Czerka Landing Port;
Tattooine - Czerka Office and Docking Bay (Mic'Tunan'Jus Orgu);
Manaan - East Central (Tyvark's Shop);
Korriban - several sources, in Dreshdae: Mika Dorin, Czerka store, B'ree
The rest of the builds will assume your familiarity with the game.
Blaster master (leaning LS, but can be DS)
Class: Scoundrel for sneak attack or Soldier for high innate attack and more feats; Consular – for better force DC and better alignment bonus (if LS) or Guardian – for higher attack and better alignment bonus (if DS).
Feats: Two-Weapon Fighting (MVP), Rapid Shot (3rd level is low priority), Implants, Weapon Focus->Spec (11 total; all of this can only be taken by soldier-consular). Consider leaving Rapid Shot at level 2, if you decided on an 8 feat route.
Powers: Speed, Stasis, Valor (these 3 are core and non-replaceable, except for substituting stasis for Insanity which comes earlier, but is dark sided, and is countered by Immunity: Mind Affecting); Cure (not Heal), Destroy droid, Breach/Improved energy resistance/Force whirlwind (mostly for the last boss) – 15 total; can be acquired by level 12 consular.
Attributes: 8-18-8-10-14-14. 8-16-10-10-16-14 and 8-16-10-14-14-14 are viable alternatives.
Skills: Persuasion -> Treat injury. Can add Stealth/Awareness/Security if scoundrel or save points for repair, if you decide on being Consular (recommended).
Equipment:
Implant: +1 DEX Taris -> +3 DEX Kashyyyk -> +5 DEX Yavin. Alternatively, you could go for Advanced Combat Implant if you went Scoundrel route.
Head: +2 DEX Manaan (early game) -> Weapon Focus+Spec on Manaan (can use right away) /+5 WIS (LS) Kashyyyk
Hands: +3 DEX Yavin
Body: Best jedi robes -> Qel-Droma (Korriban, LS) -> SF robes
Belt: +3 DEX Yavin
Weapon: Carth-Bendak-Cassus (Korriban, over Carth's)-Calo (over Bendak's)-Saul (over Calo's) blasters. Alternatively you may want to swap your blasters for heavy Baragwin weapons. Baragwin Assault Gun is available on Yavin after the 3rd (Dantooine+2) star map and the best ranged weapon in the game is there after the 5th - Baragwin Heavy Repeating Blaster. These two don't benefit from the 2-Weapon feat, so you may want to cut the feat in favor of something else and adjust your earlier game accordingly (rely on teammates for combat, get better attribute distribution, carry only a single weapon into the fight, etc.) and add Heavy Weapons Proficiency, so you can actually use the big guns. In case you switch, make sure to buy an appropriate head gear piece on Manaan (there is one for blasters and one for heavier guns).
Total cash required for the build then is 7.5+22+6+8+8.5+10+10=72k some of which can be reduced by acquiring pazaak discount on Yavin or not swapping the implant/head and waiting/buying the other one straight away (not recommended).
Class split at level 7/8 for Scoundrel-Consular; level 5/6 for Soldier-Consular; level 7 or 8 for Scoundrel-Guardian (DS). With 8-12 Scoundrel-Consular split, you can acquire 9 feats for 2-Weap, Rapid Shot and Implants, 15 powers and have a respectable force DC of 42/45 late game. Alternatively, you can split at 7 (losing a feat, but gaining 2 powers). Since basically almost all the good implants are level 3, it’s likely impractical to get level 2 implants, instead level 2 toughness is recommended (which goes nicely with improved energy resistance for some tankiness, for example). Yet another alternative is to split at level 5 without sacrificing any feats, but sacrificing a level of sneak attack (which you’d get at level 7) and scoundrel’s luck (at level 6); this way you get 4 more powers compared to splitting at 8. When going dark side, it's likely optimal to split at 7, because Guardian has enough feats. Note that the earlier you split, the harder your early game is.
Late game you will have enough attack to almost always hit the last boss who has 38 DEF:
15 (base at level 20) + 16 (DEX*) + 5 (weapon attack mod) + 1 (weapon focus) + 3 (echani stim) -1 (rapid shot) -2 (dual wielding) = 37 ATK from range, which translates to 95% (maximum) accuracy, attack is boosted further by +10 if the enemy is in close proximity, meaning that at that point the boss won’t even be able to deflect anymore. This can even further be boosted by equipping a balanced blaster (Bendak’s), which would eliminate the -2 penalty from the main hand (and thus from all the additional attacks acquired through feats or powers), but is at a dmg loss and isn’t necessary.
*DEX: 18 (initial) + 4 (level up) + (5+3+3) (from items) + 5 (Master valor) + 4 (stim) = 42 ((42-10)/2= +16 DEX mod)
The build can also have a respectable force DC:
5 (base) + 20 (max level) + 7/10 (WIS with/out Saresh) + 6 (CHA) + 4 (force focus at consular 12) = 42/45, which would allow for a very decent stasis success percentage to activate sneak attacks (goes down to 40/43 if no LS mastery).
Force powers focus (LS)
Class: at the start – irrelevant, so pick whatever you want or whatever makes the early game easier (Soldier), because early game is hell. As a Jedi, consular is the only option.
Attributes: 8-10-10-8-16(18)-18(16) – both CHA and WIS take equal parts in force DC. Moreover, through items and force you can get even bonus to CHA (8) and odd to WIS (15), therefore all odd number of leveling attribute points goes into WIS and the rest can go into CHA. You can do a different distribution, except for WIS and CHA, if you want (it’s just 4 points). In the end of the game this build will achieve force DC of 50.
Feats: irrelevant, so pick whatever you want or whatever makes the early game easier. For example, dueling, toughness
Powers: Master Valor, Force Whirlwind (yes, only Whirlwind - level 2 power) for the last boss; otherwise – whatever you want, but be mindful that this is a LS build, so DS powers cost more. This means you might want to save as many levels as possible early to get as many FP and powers as possible, especially because the juicy ones are on the dark side and you will want people to suffer after you suffered through the early game!
Sample:
Master Valor, Cure, Stasis Field/Insanity, Force Whirlwind, Force Breach, Death Field, Force Storm, Plague, Kill.
Total powers: 3+1+3+2+2+2+3+3+3=22 (required split 3-17).
When deciding what to cut start with Plague/Kill as both are single target and Plague is only really useful for boss targets because it takes long to ramp up and is single target; meanwhile Kill is really an overkill, but should be fun to use. Both are available at level 12. Cutting one of the two allows for a 5-15 split. If you still want to cut something, choose between cure and death field, there really is no need to have both. Note, you shouldn't split later than level 8.
Possible additions: Speed (just for faster movement) instead of cure/death field, Destroy Droid instead of Plague or Kill (can really get rid of both), Improved Energy Resistance (instead of Death Field).
Skills: irrelevant (8 INT LOL), can get Persuasion/Treat Injury.
Equipment:
Implant: irrelevant, and you also might be unable to use any good ones, depending on your choices in the starting class and level saving. Some good ones are +3/5 DEX (for DEF), +2 HP Regen (Level 3); Immunity: Crits.
Head: Circlet of Saresh (Kashyyyk, LS) – absolutely must have asap, since it gives +5 WIS (the most an item can).
Hands: irrelevant, but you can get +3 DEX, +BBD gloves right after leaving dantooine at Yavin and you probably should.
Body: Best jedi robes -> Qel-Droma (Korriban, LS) – get this asap, since it gives +WIS -> SF robes
Belt: irrelevant – stealth generator to survive; save the belts that you can swap depending on the fight/your lowest save (Fort +3 from mandalorian in dantooine; Ref +3 in Korriban valley, +2 from Selven/Taris sith boss); Immunity: Mind Affecting belt from Tatooine; Strength Enhancer from Dantooine (mostly for +2 all saves); late game either +3 DEX from Yavin or +2 DEX and +4 saves from Korriban
Weapon: Lightsaber with mantle of force, rubat (crystal cave) and damind (dark jedi on tatooine or kashyyyk, Kel Algwin on Korriban) for FP regeneration. Depending on your feat choices you may insert these into a two-bladed saber or equip another saber with HotG and BBD (deflection) combo (eg, Jenruax, Solari).
Other: Brejik’s armband and lots of consumables, especially Adhesive Grenades.
Total cash required: the build only really requires mantle of the force for 25k, however other accessories are obviously welcome and can add 7.5-29.5k for implant; 8.5k for hands; 8.5-18.5k for belt.
While this build aims to have maximum possible DC, you could sacrifice few points to make a more well-rounded character. Since with very high DC your enemies are likely to be incapacitated in some form, you can even go for offense with your lightsabers. For example, starting with X-X-X-X-16-14 will lower your DC by three points throughout the game, but will allow for a much smoother early game. Sample: 14-12-10-10-16-14. With such distribution you can go for +STR gear (+5 gloves, +2 belt) and 2-weap fighting feat tuning one saber for FP regen and the other for damage coupled with Master Speed, you’d be quite a menace.
Why this build? For offensive force powers DC is calculated as 5+LVL+WIS mod+CHA mod+Force Focus (consular). Using this build achieves the most possible DC (50)*, thus it is exceedingly impossible to withstand your force powers. During the final boss fight you can guarantee 100% chance to succeed with force whirlwind (this incapacitating ability uses Reflex to save, and while boss’ lowest save is Will, he is immune to mind affecting, and thus cannot be incapacitated that way through Fear, for example) if you first use adhesive grenade to lower boss’ DEX a bit (which also lowers their reflex save).
*Calculation:
WIS: 16 (start) + 5 (leveling) + 5 (SF robes (LS)) + 5 (Saresh (LS)) + 5 (Master Valor) = 36 (or (36-10)/2= +13 WIS)
CHA: 18 (start) + 3 (LS mastery as consular) + 5 (Master Valor) = 26 (or (26-10)/2= +8 CHA)
Total DC: 5 (base) + 20 (max level) + 13 (WIS mod) + 8 (CHA mod) + 4 (force focus at consular level 12) = 50.
Heavy armor, no lightsabers (DS)
Class: Soldier-Guardian, I suggest a "murder hobo" approach with this build. Level 7 or 8 split gives 14 feats, and we’re gonna use them all.
Attributes: 17-14-13-14-8-8. This build allows you to repair your droid even without repair as a class skill. 17 Str with all level up bonuses put into it gives maximum STR. Odd Con is weird, but Con in general is rather weak and irrelevant.
Feats: 2-Weap, Flurry, Weapon spec, Implants and Toughness. Order: Melee Focus, Flurry, 2-Weap, 2-Weap (this is where you definitely should equip your second weapon), Flurry, Weapon Spec, Implant, 2-Weap, Flurry, Implant, Implant, Toughness. Since the build assumes no speed power, flurry outperforms other special attacks and thus highly recommended.
Alternatively, you can go 2-Weap, Implant, Toughness, 2-Weap, Implant, Implant (and get crit and mind-affecting immunity early) and then see if you're still going for the saberless build. If so, continue getting the previously mentioned feats. Otherwise adjust accordingly, eg max any combat feat and refrain from getting Melee Weapon Spec.
Powers: Improved Energy Resistance, Force Wave, Destroy Droid, Cure, Affliction/stasis (both up to level 2, NOT 3)/Insanity/Dominate mind. In case you picked up some WIS and CHA, you can also get Kill. Obviously since we’re going to be wearing armor and not going to have lightsabers, some powers become completely useless. Most unfortunate are the losses of Master Speed and Master Valor. If you get all three of Force Wave, Stasis and Insanity, you will be able to attack each of the opponents’ saves (Reflex, Fortitude and Will respectively), meaning that even though your force DC is likely to be abysmal, you could still find opponents’ weak spot and incapacitate them if there's such a need. Of course you could get Master Speed and/or Valor and take off your armor, use them and then don it back, but I advise against it. Not even because it’s “cheating”, it’s just too much hustle which would likely burn you out.
Equipment:
Implant: you are free to decide whether you want implants level 3 for stats or are fine with just level 2 and Immunities, for example, and spend a feat on something else.
Head: Stabilizer Mask (Manaan) -> (can later switch to Sith Mask (Korriban Academy).
Hands: best +STR you got (+1 Taris, +2 Dantooine Mandalorian, +4 Manaan Hulas', +5 Korriban late-game shop).
Belt: +2 STR CNS enhancer Dantooine
Body: Republic Mod Armor/Echani Armor (Taris, immune mind affecting/good stats) -> Davik Armor -> Calo Nord Armor -> Heavy Exoskeleton (Yavin, after the 3rd star map).
Weapon: Prototype Vibroblade (solo), buy Echani Ritual Band (sold in Taris emporium and can be bought in the very beginning of the game, if you sell junk you got in the prologue) and equip it once you get the second 2-Weap feat -> swap the band for Prototype and Mission's Vibroblades once you can fully upgrade the former and have one upgrade for the latter -> Yusanis’ Brand once you leave Dantooine (sold on Tatooine) and keep it until you get both of Bacca’s ceremonial sword and Baragwin assault blade (from Kashyyyk plotline and Yavin after the third star map). Finally, get the second Baragwin blade after the fifth map.
Pivot: this build can be easily turned into a simple dark-side guardian by wearing robes instead of armor, getting sabres and choosing appropriate force powers (most important of which is the Force Speed branch).
Level 2 solo Taris on highest difficulty. The build.
- Soldier: +1 ATK, 20 hp at level 2, abysmal skill points;
- Scout: Implant level 1 for free; 16 hp at level 2; average skill points;
- Scoundrel: +2 DEF, Sneak attack level 1 for free; 12 hp at level 2; most skill points, class skill stealth.
Usually Sneak Attack I is meaningless, but during this solo run you’ll be regularly opening fights from stealth (and disengaging to abuse it later), so for this particular build it’s a very good feat to have, so I suggest Scoundrel.
0-4-4-4-4-0-0-0 (save points for Computer Use (CU) and Repair (REP) once you’re consular) or 2-4-4-4-4-2-0-0 for cheaper droid repair and computer access in the early game (recommended). You also must put a point into Demolition to be able to set mines. Whoever steps on your mines will get a nasty shock. Another must have is Stealth. While 5 Stealth that you’ll have at level 2 won’t make you invisible with 100% certainty, it will provide you with a chance to sneak by anyone if it's at all possible. Note here that this build has 0 points in Security, meaning you’ll have to hit the doors which can take a while especially early on. Feel free to put a point in Security instead of CU. If you went for 10 INT, you can try X-1-4-X-4-X-X-X, but be advised that this will mean only 1 skill point/level once you become jedi and thus likely either no proper Persuasion ratio or no HK repair. Treat Injury is useless, unless you decided to go soldier, because you will basically full heal with a single medpac anyway (14 or 16 hp healed depending on your starting WIS).
- You can save a lot of credits and some time if you decide to soften the “solo run” challenge to “solo combat” challenge and use companions as skill bots. Most useful will be Missions with her high demolition. At level 2 you cannot realistically have more than base 5 + 2 (INT) + 1 (item) = 8 Demolition. This is not enough to recover a minor mine on “Difficult”. Mission can level up freely and get 10 Demolition to recover mines for you. It can save you some time and up to 3.5k credits. She can also surpass you in CU and REP to save you some spikes and parts along the way. Another helper is T3-M4, particularly in CU and REP, though he comes rather late. He can help a bit on the Sith Base and if you wanted, you could take him with you to repair some droid you left unrepaired before for some extra EXP. Another shoutout goes to Carth very early in the game for his 1 point in Security. Could also use Bastilla (once you get her) for her Force Speed, if you wanted.
- Consumables are extremely important. While most of them are infinite on Taris, Energy Shields are not, and you can only buy one from Larrim (in the very starting apartment area), rest are looted. While you can buy infinite amount of Frag and Sonic Grenades, you will save time and credits by using those you loot sparingly, preferably to aoe 3+ targets or for bosses. Also, do not waste any Parts or Computer Spikes randomly; they are quite expensive and are needed at particular spots.
- You can full heal by going back to your hideout through the map menu – save on Medpacks. It can also save time while travelling.
- Upgrade your weapons and armor asap. Got a new upgrade? Teleport to hideout and put it in, then teleport back.
- You can use one defensive consumable item per round “for free” if you open your inventory while in combat and use it from there (no need to stop attacking). Some might consider it an “abuse”, and you can beat the planet without it, but you will have to reload after dying significantly more. Your choice.
- When you are in melee against an enemy that uses a ranged weapon, you both have +10 ATK against each other. Can be used together with energy shield to significantly increase your hit chance while staying healthy yourself. While many enemies will switch to a melee weapon once you close in on them, you can then run away enough for them to switch to ranged weapon again. Can repeat until they die.
- Many enemies will stop attacking/chasing you, if you turn the corner (kind of “forgetting” about you) where they lose line of sight on you. You can use this in several ways:
- Disengage to reapply invis for a sneak attack;
- Lure a single enemy away (some may forget, while others will chase, because for example some were closer to you than others);
- Attack an enemy (with ranged weapons), while the rest of the enemies stay in place not having line of sight on you (the most obvious place where it’s applicable is Kandon fight on the Vulkar Base);
- Throw grenades at them. This will make them chase you again, but it’s still an action you’ve done “for free”.
- Disengage to reapply invis for a sneak attack;
- Remember that ion weapons do additional damage to droids. Also, ion damage (such as from blasters or rifles) is double against shielded targets. What this means is that while Carth’s blaster is the best in the early game, it actually deals less damage (w/o upgrades) against a shielded target than an Ion Blaster you find on endar spire. Always think what’s the most damaging against your current enemy!
Level 2 solo Taris on highest difficulty. The walkthrough.
Unless stated otherwise, you go through the whole area looting everything available.
While you’re with Trask, you cannot die – don’t use any consumables. After Trask is gone, use stealth field generator to sneak past the siths to gain extra EXP, then kill them anyway. Use computer terminal to go through. Don’t forget to loot everything.
Equip combat suit, upgrade your prototype vibroblade with vibration cell, take Carth’s Blaster from him and head out. Even if you went for as low as 10 DEX, as a Scoundrel you’ll have 10 (base) + 2 (feat) + 4 (armor) = 16 DEF, 17 with Dueling.
Visit equipment emporium and buy permacrete detonator for 50 (you should have some money from looting) and 1 or 2 ion grenades, if you can afford it; it is recommended to sell something to afford at least one. Ignore the cantina for now (but buy pazaak deck here once you visit it) and head to the Upper City North Apartments. Your goal here is to get the Sith Armor. Fortunately, the sith are very weak opponents and you can also lure them away from each other. Another thing to do is to kill Largo. You don’t get any DS points if you exit the dialogue the first time you speak with him and then provoke him by asking him to hand you over the credits twice (“That's too bad. Say hi to Davik's men when they stop by”). Get the Energy Projector from him and upgrade your Vibroblade asap. Next stop – Lower City.
As soon as you exit the elevator, you’ll get in a fight. While one of the vulkars is running to you, you can enter invisibility to help you take him out alone and faster or run. As you go around the lower city, you’ll encounter more vulkar patrols, feel free to occasionaly use a grenade to hit 3+ of them. Also note that the sith (and his turrets) near the elevator to the Undercity will assist you against the vulkars (if in range), and so should the bouncers outside the Bek's and the Cantina.
Visit Apartments (East). Do not repair the droid. If you want to open a door, make sure there are no vulkars nearby. If there are, kill them first. Use invisibility before any encounter to get additional sneak attack damage (while it’s “just” 3.5 damage on average, a basic vulkar has only 17 hp, 24 for enforcer and 40 for gang boss, thus 3.5 is 9-20% of their HP). The goal in this complex is to do Matrik’s quest (already have the detonator for him) and grab Echani Fiber Armor (best early game armor). Feel free to skip the northwestern room that has Gang Boss and an Enforcer in it for now.
Not much to do in the Lower City Cantina. You can collect cash for the bounties if you want. You can also talk to Holdan about Dia - hard check. Alternatively, once you get Bastilla she will force persuade him.
Stop by Beks’ base and get documents to access the Undercity and then proceed to the Apartmets (West).
There’s a patrol inside the complex going clockwise, you can use invisibility to let them pass if they catch up to you, however I suggest you kill the patrol and loot an Energy Shield from them, if you don’t have one yet. Your goal here is to kill Vulkar Boss in the southwestern apartment and loot Armor Reinforcement (and use it asap on your echani armor!). Ignore Selven for now. At this point you're basically as strong as you're gonna get melee and defence wise, so on to the Undercity. Be advised that Undercity+Lower sewers is the most tedious part of the planet (and likely the whole game).
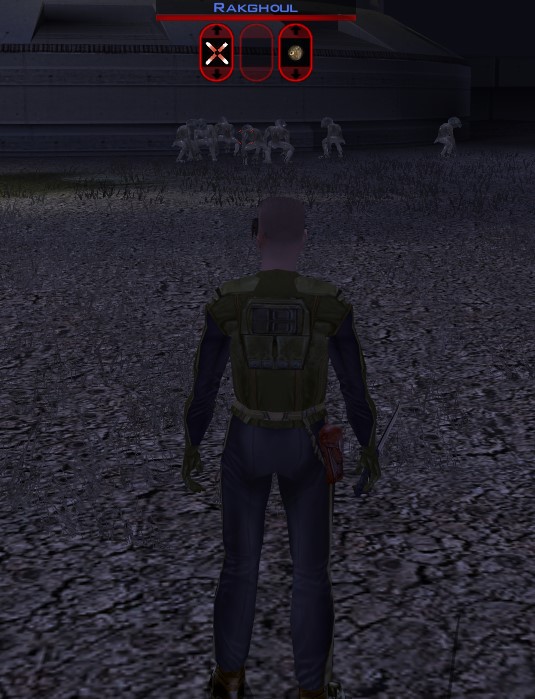
Ignore the infected for now, head to Igear and buy Frag Grenades. You can also buy -2/-3 cards and a Scope, but you will soon find a Scope anyway. Once you approach the gates stay inside and let Hendar die. Unfortunately, it’s unrealistic to save him with this build: the Rakghoul is a boss, it has 82 HP, 12 ATK and 11 dmg on average. Once it kills Hendar, it will run to the northeast of the gate and let you out. Note here that for Mission to approach you, you need to kill this “boss” rakghoul. Leave him for now. Also ignore the Infected Republican for now. Canderous is to the west of the village. Once you talk to him, there’ll be an encounter, let him handle the rakghouls: he’s invulnerable, you're not.To explore the area you have to deal with the rakghouls. Generally it is done by running around them close enough to draw agro, but not close enough to get hit. Once all of the desired rakghouls are following you, run back to the village gate and enter. Rakghouls cannot follow through the gate and will instead run to the northeast, where the previously mentioned “boss” rakghoul is. Once you do it a few times, it may look like this.
Once you looted the western part, go east by the wall to not agro your rakghoul zoo. Sith patrol is very weak: preapply Energy Shield, wait for them to stop approaching and make them attack then run away a little and use frag grenade. They have low hp, so you have a good chance to oneshot all three.
Time to deal with the zoo. If you stay as close to the village wall as possible and attack the rakghouls, they shouldn’t be able to approach you and instead run around while you use a few grenades and finish them off with Carth’s blaster. If you cannot make this work and they attack you, then throw a nade and run to the gate to drop agro; repeat until finished. Once the “boss” rakghoul is dead and you approach the village gate, Mission will join you. All that’s left to do is loot the Serum in the eastern part (you know how to deal with the rakghouls by now) and enter the sewers from the entrance closest to the village. First thing you should do inside is fight your way to a Broken Droid (check the map). Reactivate and either make it patrol or just leave it be. It is very strong with 112 VP, 24 DEF, 16 ATK and 5 DMG. Whenever there’s a fight you cannot handle, lead the enemies towards the droid and while they fight, stand as far away as possible and shoot with either Carth’s blaster or, once you get it, Zaalbar’s bowcaster. Likely every rakghoul fiend and all gammorean chiefs will have to be dealt with using the droid.
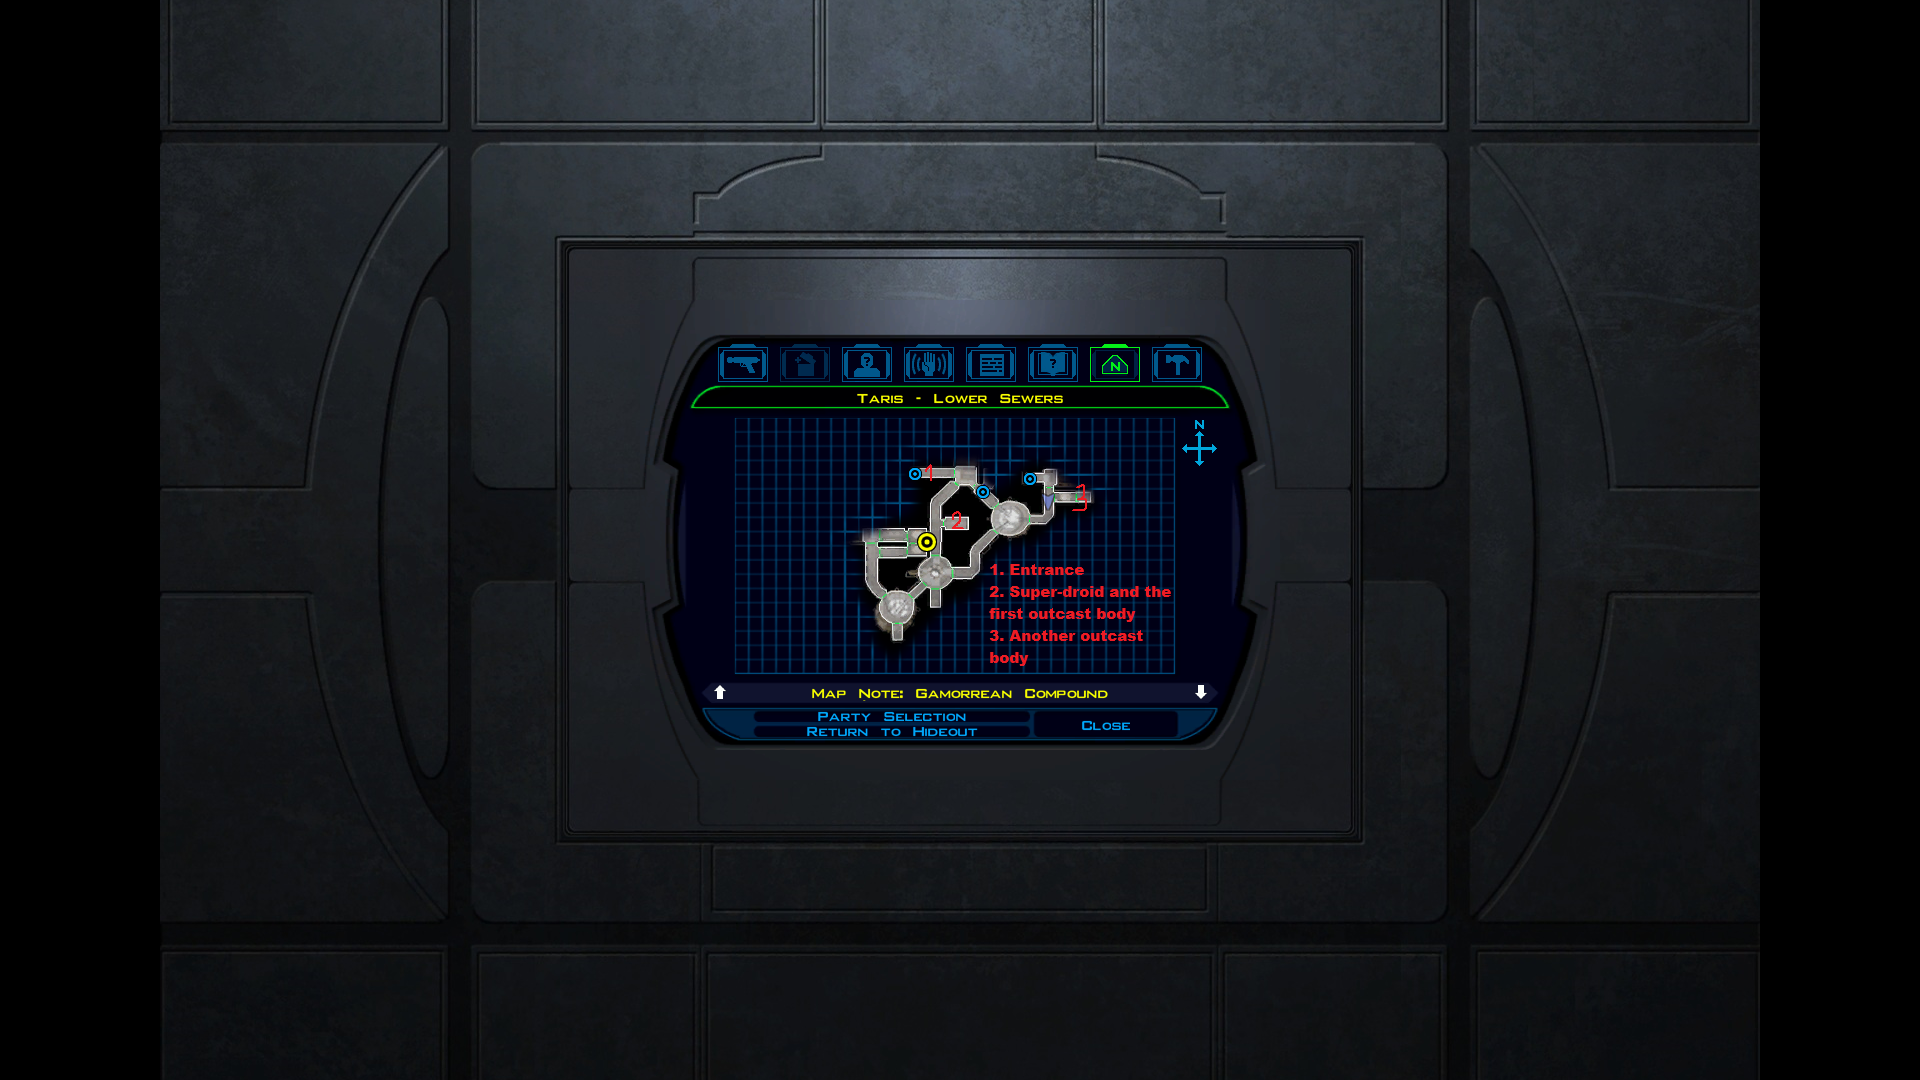
Explore the area, grab Outcast Journal, if you want to complete the quest and move on.
Upper Sewers should be no problem. Once you reach the Vulkar Base, make sure your gear is upgraded (you cannot reach your hideout from within the base). Explore a little until you run into a Disabled Sentry. Engage it in patrol mode. The sentry is invulnerable (but deals very little damage), so you can draw enemies you cannot handle towards it to tank them for you, however it shouldn’t be necessary if you lure them patiently one by one and use stealth to it's fullest. There is a computer console in the main hub with the armory, your goal is to overload the power conduit in the barracks to kill both lieutenants (green male twi’lek), so check the camera. If they are not in range, you’ll have to get into the barracks and try to draw them closer to the conduit. Loot the Armory, the Pool (walk slowly, trigger the invisible mines one by one and instantly use antidote+medpac), get the Passcard and move on.
Your goal is to go down the west tunnel in the southwestern corner of the garage, turning north around the corner. There are two standard doors in the east wall towards the end of the tunnel, and the Garage Head's office is behind the northern door. Use the computer inside to overload swoop bike, which should kill the Garage Head, his entourage and 4 other vulkars. Now decide whether you want to access the Loading Bay using computer spikes and thus opening all security doors (3 spikes (base) once you’re in) or by making a broken droid ram into the bay door (1+6 parts). Inside the loading bay is a very powerful droid (and lots of good loot), so upgrade your gear on the workbench nearby.
Level 2 solo Taris on highest difficulty. The walkthrough (cont.).
Although the upgraded Echani Armor gives 20 dmg resist to cold damage, the bay droid will still likely kill you the next round after using that special attack with his normal attack, so the goal is to never get hit by it. A exploity smart way to beat the droid is to hug the wall near the bay door after the bay is opened in such a way that you'd see the droid patrolling, but not aggro it. If you did it right, then you can throw a nade at him at the very end of his patrolling route (when he would turn around) while not aggroing him. It has 96 HP, therefore theoretically 2 ion grenades (which you should have looted from the vulkar armory, if you were diligent) and a frag grenade should be enough to kill it, however it has reflex save of 6, so it resists ion grenade's damage on the rolls of 9 to 20 (60% of the time), thus both will do full damage only 0.4*0.4=16% of the time – meaning a lot of reloads; this is why we bought an ion grenade at the emporium wayyy back. 1 full grenade and 2 half grenades should do the trick together with a frag grenade to finish the deal. If you want, you can wait for his shields to fall off depending on how many nades you got. Loot the Loading Bay and go to the Engine Room. Here you have a choice: you can ease the fight by agreeing to Kandon’s proposal to kill Gadon (you won’t actually kill Gadon as it’s basically impossible with this build). If you do this, you will be escorted outside the vulkar base. Immediately turn back and get to the engine room again. Kandon won’t be there, so you will only have to fight 2 weak bodyguards and 1 strong one, which makes the fight significantly easier, however you won’t loot the Response Package from him (irrelevant if you don’t have level 1 implant feat) to upgrade your DEF (together with gloves) further and Sith Energy Shield and won’t get his EXP. Up to you to try the fight first, and if it’s too hard, ease it later.
Next is the swoop race. Once you win and the fight breaks out, let Bastilla handle Brejik, while you shoot from far away.
By now you should have some money. Spend it on T3 and 35 (yes, thirty-five) to 39 Minor Plasma Mines and 2 Flash ones – 5.2k credits altogether. A small note: if you weren't randomly spending Computer Spikes, you should be fine; however, if you were, replace 11 Plasma Mines with 15 Frag Mines instead. In this case, you should use the frags on the Sith Base droid (more on it later). If you need more cash, turn in the bounties – 300 (400 with medium Persuasion check) each, use Davik’s name to get T3 (DS points) – 1.5k or give the serum to Zax (DS points) – 1k. You can also fight on the dueling arena to get a lot of money (2.2-2.4k) before going to the sith base. Dueling is completely trivial compared to some of the fights you had to go through so far, just remember to use Energy Shields appropriately:- Duncan and Gerlon are trivial, but you should use an energy shield while facing one of them and take some time to place mines near the spot where you spawned, 6 minor plasma mines in one group and 8 plasma + 1 flash mines in the other;
- Ice should die from 5 frag grenades (or be left at 2 VP, if you’re extremely unlucky);
- Marl should be led towards the smaller batch of mines which will at worst deal 72 damage to his 75 HP;
- Twitch has 84 HP, so you’ll need 5-9 sonic or frag grenades for him (if you use both types, start with sonics, which can decrease target’s DEX (and thus Reflex) meaning later grenades are more likely to cause full damage);
- Bendak always starts with throwing 3 Plasma Grenades at you, which you have to sidestep while throwing grenades of your own in between. He has 148 HP, so 3 Frag (Bendak’s has 25 sonic dmg reduction) Grenades you threw while he was throwing his and the bigger batch of mines (to lead him to the mines run into melee so that he swaps his weapon and then proceed to slowly run away making sure he’s following) at worst will leave him with 22 VP. At this point, if he’s not dead you can either hope that the flash mine stuns him (40% chance) or choose to use Plasma Grenades (3 is enough) instead of the frag ones in the beginning - likely the optimal way, since you can have 8 by that point in the game and there're not many reasons to use grenades past Taris.
Once you have T3 head into the Sith Base. Bribe the receptionist and use the console to deactivate the droid’s shield (crucial, otherwise plasma mines (that do energy damage) won’t damage the droid). You can also hack Target Filtering if you can spare the Spikes. Note here that “Sith Troop” enemies' grenades are likely to oneshot you. Go through the base using energy shields, grenades and stims (adrenaline alacrity, str and con as well as battle stims) where appropriate.
Once you reach the elevator door, mine it before opening. 11 plasma mines will definitely kill it and you can retrieve the rest.
Go up using the elevator, but put more mines before you enter. Sith governor has 148 HP and uses energy shield in his first round, effectively providing 168 HP against plasma mines. If you were diligent with looting, you should have a single average frag mine, use it here together with 10 plasma mines and a flash mine. This setup will deal at worst 135 damage, leaving the boss at 33 hp. You can decide what to do:
- hope that the flash mine stuns him (25% chance);
- throw different grenades at him while he’s activating his Energy Shield in the first round (you can even get lucky with a Concussion Grenade here (25% chance));
- just fight.
Having dealt with the governor proceed to finishing off all the remaining quests and exploring all the remaining areas. Cure the infected (kill the rakghouls by abusing the infected zone gate), give Rukil the journals, give away the Serum, help the dancer, take care of Dia’s bounty and kill Selven with (leftover) mines (she has 78 HP, so 9 Frag or 7 Plasma mines always do the job).
After you’re done with Taris, make sure you have at least 14 Minor Plasma Mines or 4 Plasma Grenades; have around 6 Ion Grenades and proceed to Davik’s Estate. You can also buy a Battle Stimulant (from Larrim) and other stims at a discount (if you chose LS version of the Serum quest).
Once you’re inside explore the estate until you get to the computer console. Check the cameras and spend Computer Spikes if you wish.
The only enemies really worth mentioning are the two droids guarding the pilot. The right one can cast a stun ray, but is rather harmless. The left one, however, may actively try to use Advanced Flamethrower, which oneshots you. You have to throw ion grenades from outside his line of sight, then, once it starts moving, run away until it stops (might have to turn a corner) and throw another grenade. Both droids have 90 vitality, so 2 ion grenades kill them if you're super lucky (~2.5%), but the grenades only deal full damage 40% of the time (hence you have at least 6 you bought beforehand). 4 grenades almost always kill the deadlier droid, and you can decide how you finish off the lesser one.
Once you acquire the Hangar Codes, get inside. Use defensive consumables: Energy Shield, Adrenaline Alacrity and Adrenaline Stamina. Try focusing Calo with grenades. If you only spent 3 on Bendak, you can have up to 5 Plasma Grenades by this point. 4 of those will always deal at least 72 damage -- just enough (If needed, 1 plasma = 2 frags).
Alternatively, put 14 mines at the place you spawn inside the hangar before your enemies do anything, use consumables and run to Davik (he moves, Calo doesn't), once he puts away his ranged weapon run back towards the mines. Davik has 124 HP plus Arkanian Shield (40). 14 mines always deal 168 damage. Congratulations!
Onwards to Dantooine!
Useful links
https://strategywiki.org/wiki/Star_Wars:_Knights_of_the_Old_Republic
- The Definitive Improvement Guide★ 5 (1.6k)158k views4.1k ♥22 minUpdated Mar 25, 2021
- KotOR Cheat Codes★ 5 (1.6k)123k views4.2k ♥4 minUpdated Nov 23, 2014
- Make your KOTOR playthrough more enjoyable★ 5 (1.8k)97k views5k ♥13 minUpdated Jun 24
- [How-To] KotOR on modern systems (incl. Widescreen)★ 5 (778)95k views1.8k ♥4 minUpdated Nov 24, 2015
- KoToR Best Order of Planets★ 5 (689)73k views1.6k ♥1 min
- [Windows 10] My Steps To Running The Game On WIndows 10★ 5 (617)64k views1.7k ♥2 minUpdated Nov 2, 2018




- Upgrading to PremiumTeam Fortress 2★ 5 (20k)1441k views11k ♥6 minUpdated May 11, 2022
- No More Room in Hell Official ManualNo More Room in Hell★ 5 (2.8k)569k views2.1k ♥29 minUpdated Apr 22, 2019
- NMRiH Community Hosting GuidesNo More Room in Hell★ 5 (526)351k views653 ♥1 minUpdated Aug 10, 2022
- ULTIMATE GUIDE FOR GAME DEV TYCOONGame Dev Tycoon★ 5 (5.8k)326k views10k ♥4 minUpdated 23 Jan, 2014
- How to 'Git Gud' Soon™MORDHAU★ 5 (2k)318k views3k ♥68 minUpdated Nov 16, 2024
- Лучшие кооперативные игры SteamPAYDAY 2★ 5 (1.5k)315k views2.1k ♥56 minRussianUpdated Apr 27, 2025






This guide was created by its original author on the Steam Community. Are you the author and want it removed? Request removal.