Fistful of Mods: A Comprehensive Fistful of Frags Modding Guide
Foreword
- GCFScape [nemstools.github.io]
- VTFEdit [nemstools.github.io]
- Crowbar
- Image editor of your choice (if you want to mod textures)
- Audacity or similar audio editing software (if you want to mod sounds)
- Blender with Blender Source Tools addon[steamreview.org] (if you want to mod models)
Texture Replacement
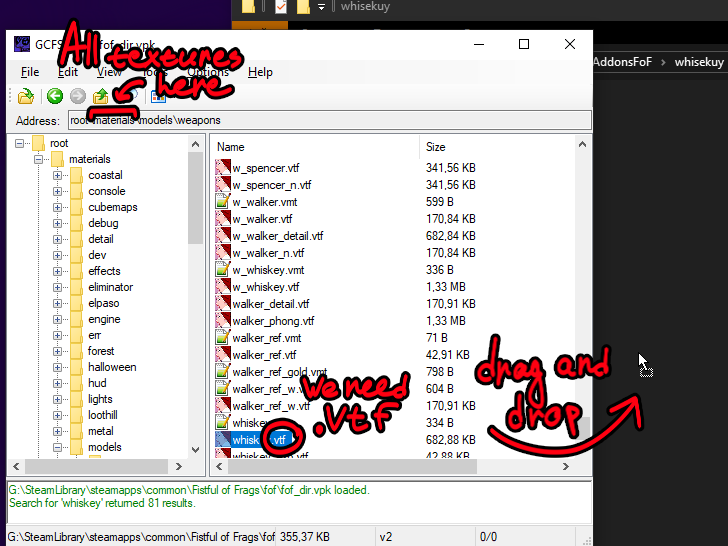 ⠀⠀
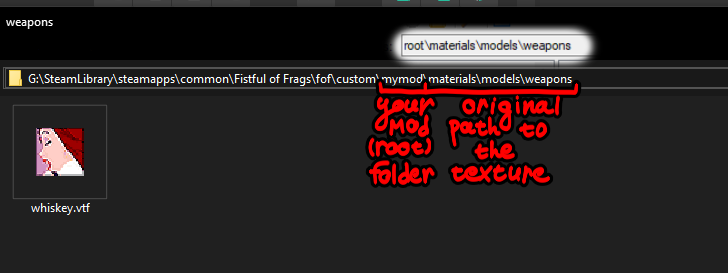
⠀⠀⠀⠀How do you find the right texture you ask? For starters, all the textures in FoF are located under "materials" folder within the root directory. If you want to replace the texture of a brush (the "building blocks" that make up the map), you can launch a map, set "sv_cheats" to 1, look at the brush you're interested in and use "surfaceprop" command, it'll output the surface name, model and texture to the console, for physics props and such educated guesses will have to do. And now that you have your .vtf sitting comfortably wherever you extracted it to, open it with VTFEdit, export it as a .png (or one of the other formats if you're a weirdo) and tailor it to your vision. Import the result into VTFEdit and save as .vtf. ⠀⠀And now a VERY important part. First, make a new folder in your "Fistful of Frags\fof\custom" folder (from now on – root folder). Now, remember me telling you to remember the path to the texture file a paragraph ago? Well, now you have to recreate it in your freshly made root folder. E. g. if you want to replace the whiskey texture, you'd have to put it under "materials\models\weapons" within your root folder, because that's where it exists in fof_dir.vpk.
 ⠀⠀
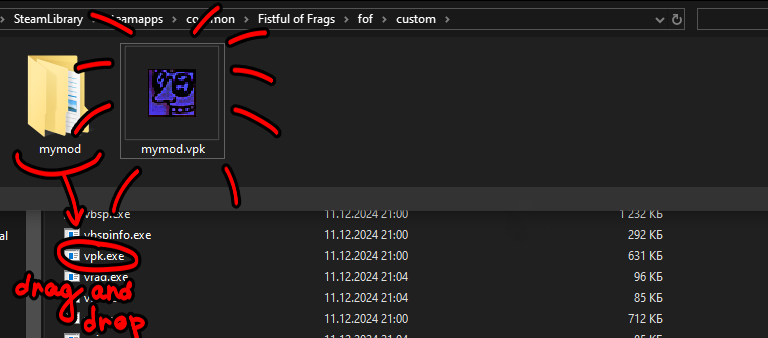
⠀⠀⠀⠀Now that you have everything in place, make a quick test run and see if everything is to your liking before we can move onward to sharing your piece of art with the rest of the world. ⠀⠀Navigate to your "Fistful of Frags\sdk\bin" folder, find vpk.exe and drag and drop you root folder onto it. That should create a .vpk file in the same folder as your root folder. And that is basically your mod, your child, so treat it with care and love.
 ⠀⠀
⠀⠀⠀⠀Now, before we can publish it, we need a preview image. Ideally it should be a square picture with filesize under 1mb (if your preview is larger than ~1.2mb (I don't remember the exact size), uploading will fail, so keep that in mind). After you got that, we can actually publish the result of your hard work. You just need to fire up the game and use the following command:
Sound Replacement
⠀⠀The procedure is pretty much the same as with texture replacement, except you tinker with the .wav files instead.
⠀⠀First open up fof_dir.vpk via GCFScape. It should be in your "Fistful of Frags\fof" directory. Then, find the sound file (.wav) you want to replace, remember the path to it (you can just copy the contents of the address bar into notepad or smth) and extract it. How do you find the right sound you ask? First, all the sound files are located under the "sound" folder within the root directory (duh), from there it's just educated guesses.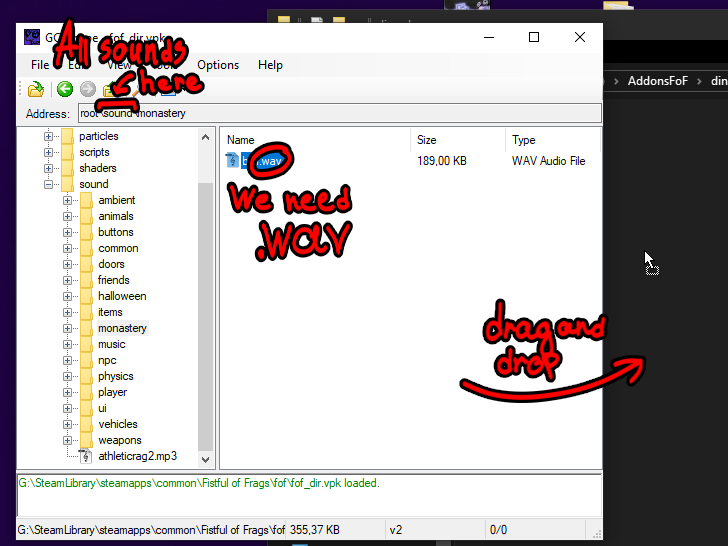 ⠀⠀
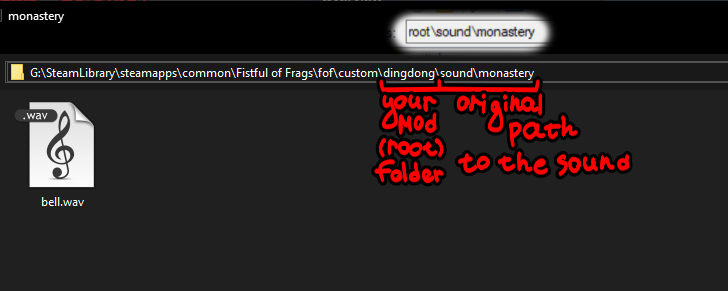
⠀⠀⠀⠀Now that you have your .wav sitting comfortably wherever you extracted it to, tinker it to your vision (or hearing ig) and export the results as a .wav. ⠀⠀And now a VERY important part. First, make a new folder in your "Fistful of Frags\fof\custom" folder (from now on – root folder). Now, remember me telling you to remember the path to the sound file half a paragraph ago? Well, now you have to recreate it in your freshly made root folder. E. g. if you want to replace the bell sound, you'd have to put it under "sound\monastery" within your root folder, because that's where it exists in fof_dir.vpk.
 ⠀⠀
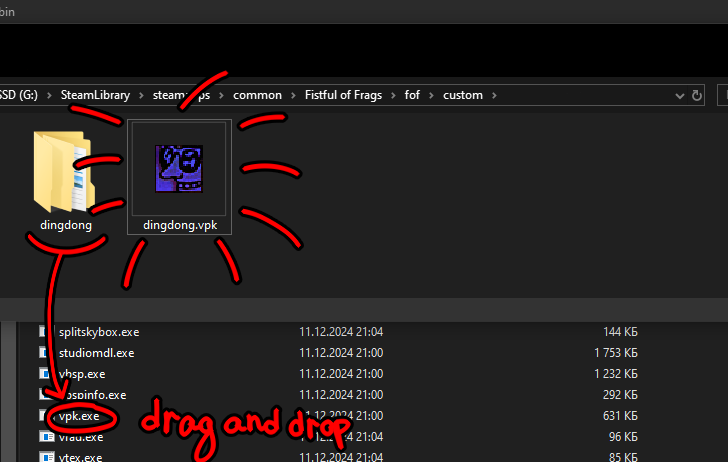
⠀⠀⠀⠀Now that you have everything in place, make a quick test run and see if everything is to your liking before we can move onward to sharing your piece of art with the rest of the world. ⠀⠀Navigate to your "Fistful of Frags\sdk\bin" folder, find vpk.exe and drag and drop you root folder onto it. That should create a .vpk file in the same folder as your root folder. And that is basically your mod, your child, so treat it with care and love.
 ⠀⠀
⠀⠀⠀⠀Now, before we can publish it, we need a preview image. Ideally it should be a square picture with filesize under 1mb (if your preview is larger than ~1.2mb (I don't remember the exact size), uploading will fail, so keep that in mind). After you got that, we can actually publish the result of your hard work. You just need to fire up the game and use the following command:
Model Replacement
⠀⠀Warning! Requires SOME Blender experience.
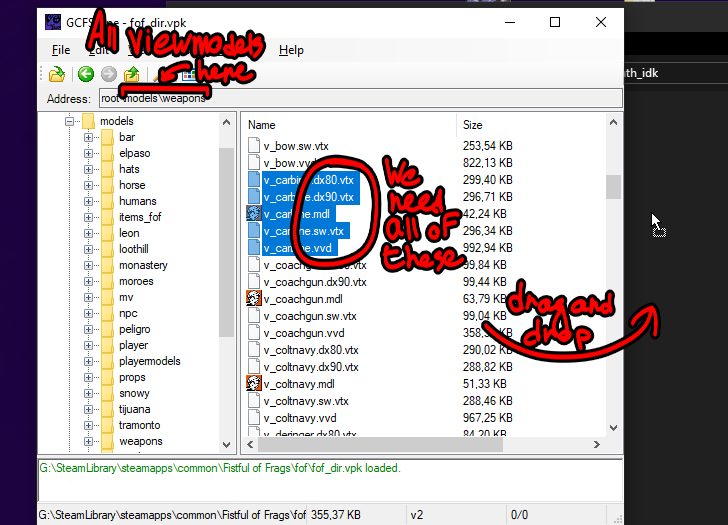
⠀⠀Be warned: you are only allowed to replace weapon viewmodels (indicated by the v_ prefix).
 ⠀⠀
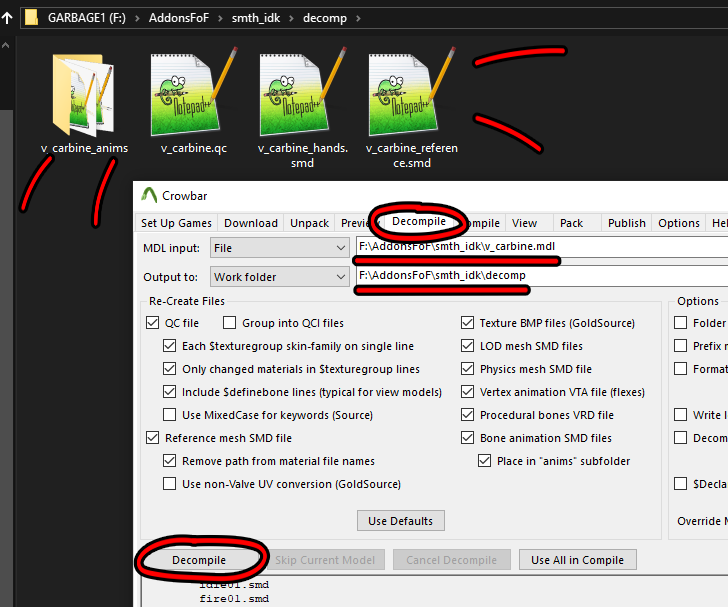
⠀⠀⠀⠀Open Crowbar and switch to the "Decompile" tab, under "MDL input" specify the path to your .mdl and under "Output to", well, where to output the decompiled stuff. Now you should have a bunch of files (handful of .smd and one .qc).
 ⠀⠀
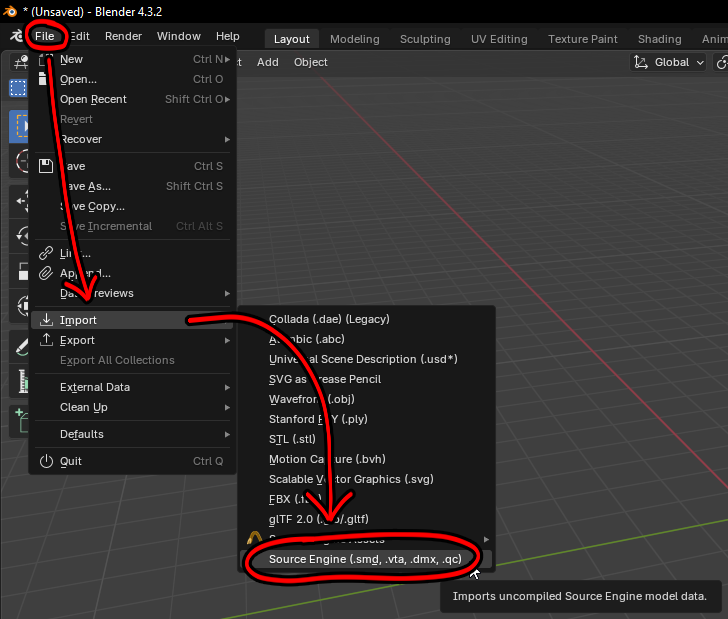
⠀⠀⠀⠀Open up Blender. Thanks to Blender Source Tools (that you most definitely installed), you can import the .smd files directly into Blender. So do exactly that (Top left, File→Import→Source Engine (.smd, .vta, .dmx, .qc)).
 ⠀⠀
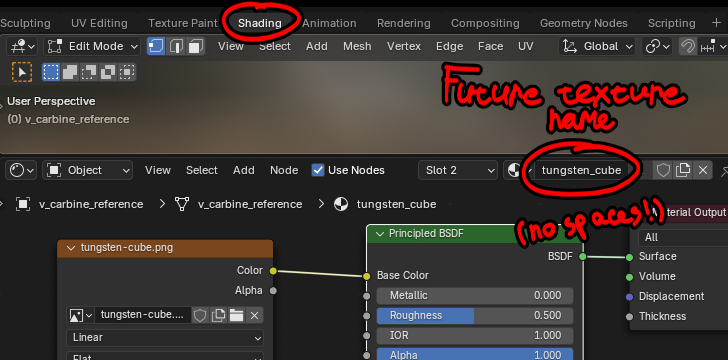
⠀⠀⠀⠀Now tinker the model to your vision and BE SURE to attach whatever geometry you add to the bones, otherwise it just will not compile into the model. Do so by first joining your geometry to the model, then selecting the vertices and assigning them to the corresponding vertex groups. ⠀⠀But you probably also want to add custom textures to your model, so let's go over that, because it can get tricky. First, make a new material (it's name will be our texture name, so it shouldn't have spaces), assign the vertices you need to it and slap the texture onto it through the "Shading" tab. Also, when you join your geometry to the model, the entire UV of the geometry hides in a corner of the texture for some reason, so keep that in mind.
 ⠀⠀
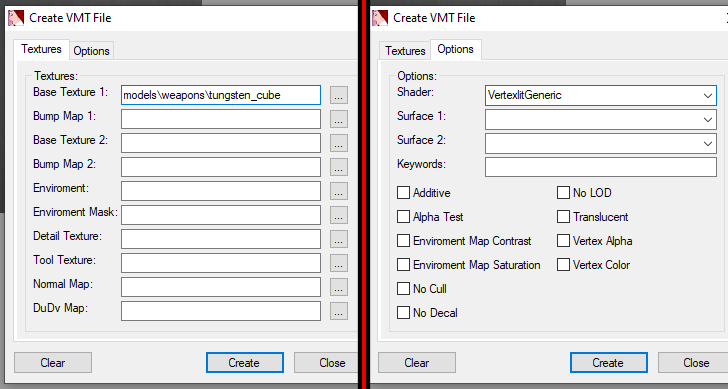
⠀⠀⠀⠀Open VTFEdit and import the image you slapped onto your geometry. Save it as a .vtf (make sure the name is the same as your Blender material name), then press "Tools"→ "Create VMT File" and under "Base Texture 1" write "models/weapons/(your texture name)". In the "Options" tab under "Shader" pick "VertexlitGeneric" and press "Create". Repeat for every texture.
 ⠀⠀
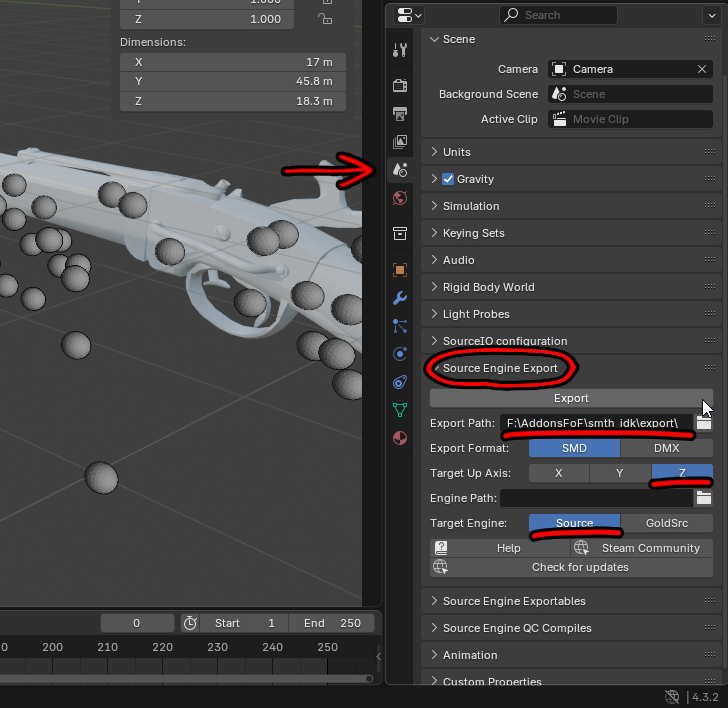
⠀⠀⠀⠀After you carefully crafted your magnificent model, let's make sure it looks alright. Add a camera to the scene, in the properties editor click the green camera icon, set "Lens Unit" to "Field of View" and "Field of View" to 54°, set the rotation on X to 270° and on Y to 180° and press F12. If all is fine, go to the "Scene Properties"→"Source Engine Export", input the export path, choose the export format (To my knowledge .dmx is better, but I'm used to .smd so that's what I do) and hit the big "Export" button.
 ⠀⠀
⠀⠀⠀⠀And bam! You have your thingie as an .smd. Now just drag and drop it where your decompiled model is, overwrite the original one, and open up Crowbar again. Switch to the "Compile" tab, input the path to the .qc file and the output folder, set the "Game that has the model compiler" to Fistful of Frags and hit "Compile".
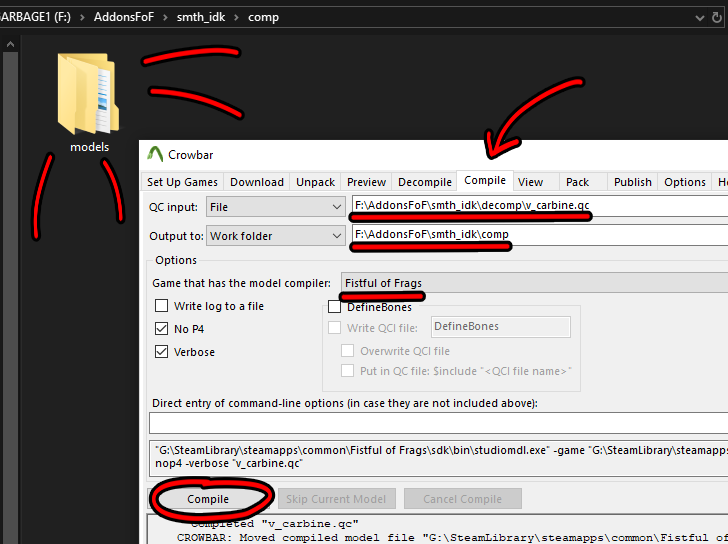
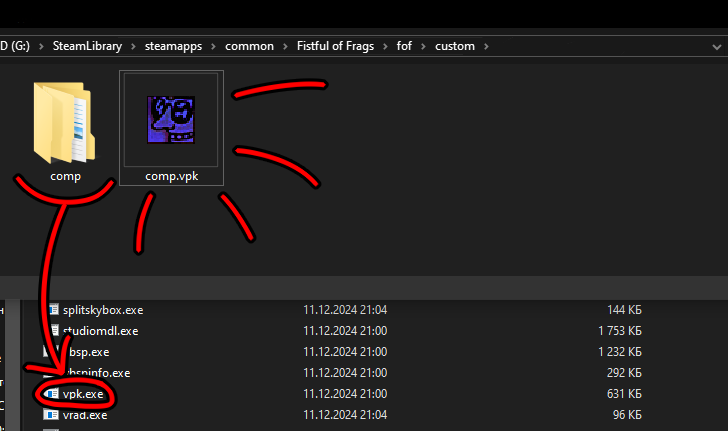
⠀⠀Now let's do a quick test run to see if everything's alright. Copy and paste your output (root) folder to "Fistful of Frags\fof\custom". If you use some custom textures, go into the root folder and create "materials\models\weapons" directory (i. e. full path starting with the "custom" folder should look smth like "custom\(root folder name)\materials\models\weapons") and plop your .vtf and .vmt files (that we made in the sixth paragraph) in there. Launch the game and check if everything is to your liking (on a local server you can use sv_cheats 1 with impulse 101 to give yourself every weapon). If all's fine, we can proceed to share your piece of art with the rest of the world. ⠀⠀Navigate to your "Fistful of Frags\sdk\bin" folder, find vpk.exe and drag and drop you root folder onto it. That should create a .vpk file in the same folder as your root folder. And that is basically your mod, your child, so treat it with care and love.
 ⠀⠀
⠀⠀⠀⠀Now, before we can publish it, we need a preview image. Ideally it should be a square picture with filesize under 1mb (if your preview is larger than ~1.2mb (I don't remember the exact size), uploading will fail, so keep that in mind). After you got that, we can actually publish the result of your hard work. You just need to fire up the game and use the following command:
Some Closing Thoughts
⠀⠀As you might have noticed, Source modding is not exactly the most user-friendly experience, mostly because the thing is old enough to drink even in the US. That means that it can be a pain in the ass, sometimes for unexplainable reasons that only the eldest wizards of the Source community can even begin to understand. And THAT in turn means that sometimes you will have to dig up old and dusty forum threads and rummage through ancient archives to figure out why your cat model is halfway across the screen from where it's supposed to be or what the actual ♥♥♥♥ is "vertex format". So be ready for that. I wanted to write like an inspiring ending to this section, but I couldn't come up with one, so… Th-th-th-that's all, folks!
⠀⠀Also before we go I want to shout out this guide for... existing I guess? That guide was how I got into modding to begin with, and without it I probably wouldn't have made any of my mods and wouldn't be sitting here and writing this guide. So there's that. And now for real
- Fistful of Frags Console Commands★ 5 (313)21k views542 ♥4 minUpdated Feb 6, 2016
- How to set up a "Listen Server"!?★ 5 (216)17k views285 ♥5 minUpdated Mar 13, 2016
- The Weapons of FOF★ 5 (247)13k views243 ♥23 minUpdated Dec 3, 2024
- A dumb FoF player-types guide (No pictures, sorry!)★ 5 (315)11k views280 ♥15 minUpdated Jan 6, 2018
- Создание сервера для игры с друзьями★ 4 (150)9.2k views254 ♥1 minRussianUpdated Jun 19, 2018
- "Курс Молодого Ковбоя" от русского сообщества по FoF★ 5 (210)9k views208 ♥30 minRussianUpdated Nov 14, 2018





- Upgrading to PremiumTeam Fortress 2★ 5 (20k)1441k views11k ♥6 minUpdated May 11, 2022
- No More Room in Hell Official ManualNo More Room in Hell★ 5 (2.8k)569k views2.1k ♥29 minUpdated Apr 22, 2019
- NMRiH Community Hosting GuidesNo More Room in Hell★ 5 (526)351k views653 ♥1 minUpdated Aug 10, 2022
- ULTIMATE GUIDE FOR GAME DEV TYCOONGame Dev Tycoon★ 5 (5.8k)326k views10k ♥4 minUpdated 23 Jan, 2014
- How to 'Git Gud' Soon™MORDHAU★ 5 (2k)318k views3k ♥68 minUpdated Nov 16, 2024
- Лучшие кооперативные игры SteamPAYDAY 2★ 5 (1.5k)315k views2.1k ♥56 minRussianUpdated Apr 27, 2025






This guide was created by its original author on the Steam Community. Are you the author and want it removed? Request removal.