Fully Automated Hatch Ranching
1. Introduction
Ever since I discovered that you could ranch critters, hatches have become a core component of my ONI playstyle. Having an essentially infinite supply of coal (thus power) and barbecue (thus calories and morale) relatively early in the game seems too good to pass up. I rely on it so much that I always take a ranching dupe as one of my first three to get running as fast as possible.
Right up front I’ll say that this whole guide might be a solution in search of a problem. Before I started experimenting on my own I generally used the ‘Francis John’ stable design: two feeders, a bin for storage, and limited to no automation. In my colonies I’ve never had issues with dupe labor using that approach. I tend to have extra supplier / errand runner dupes in the main base, and my ranchers will chip in and haul goods once all the critters are groomed. Even so, I thought it’d be fun to automate as much as possible about the ranching process, ideally everything but the grooming.
I’m by no means the first to try this, and I’ve borrowed and built upon bits from several other designs. I like what I came up with, and I wanted to share my results in case it helps anyone else.
2. Objectives
I’ve seen a lot of other automated ranch designs that are quite good, but there was something about all of them that left me wanting something different. Many designs don’t try to automate repopulating the breeders at all, or rely on incubators or critter drop-offs to call a rancher when hatchlings are ready to join the herd. Designs that do automate repopulation (e.g. via critter droppers) would often glitch and allow too many hatches into the stable. The few that seemed to work perfectly, for example ‘pez dispenser’ designs, seemed overly complicated to build in-game.
Most designs appeared to be intended for mid game deployment, constructed all at once from scratch after your base was established. I wanted a design with a natural evolution from early game fully-manual ranching through partial automation to final stage full automation. For these reasons I decided to experiment on my own, using existing designs as inspiration. My design objectives are listed below:
- Must be a “horizontal” stable
- This is just personal preference. I’ve seen some amazing “vertical” designs, but I like to use the empty space for farming in the early game until meat gets going.
- Must automate all required resource delivery
- Hatch Food (e.g. granite)
- Must automate all required resource extraction
- Coal
- Eggshells
- Meat
- Coal
- Must automate population maintenance to keep eight hatches in each stable
- Removal of eggs
- Addition of new breeding hatches when required (e.g. after natural death)
- Removal of eggs
- Must not allow hatchlings into the breeding population
- Hatchlings should grow to adulthood prior to being chosen as a new breeder or slaughtered for meat
- Must not use incubators (powered or unpowered) to manage eggs
- Again just a personal preference. They take up a lot of room, a lot of power, and require dupes to interact with them. We’re aiming for full automation.
- Should minimize time between breeder death and replacement
- i.e. should not wait 25 cycles for a new egg to hatch and grow to adulthood
- Should confine hatches to a small area (≤6 tiles) to expedite grooming
- Should be a scalable design pattern that can expand and work for any number of stables
- Should be relatively easy to build, no tricky order of operations or dupe pathing
- Should try to keep automation requirements reasonable (subjective, I know)
3. Mark II - What's New?
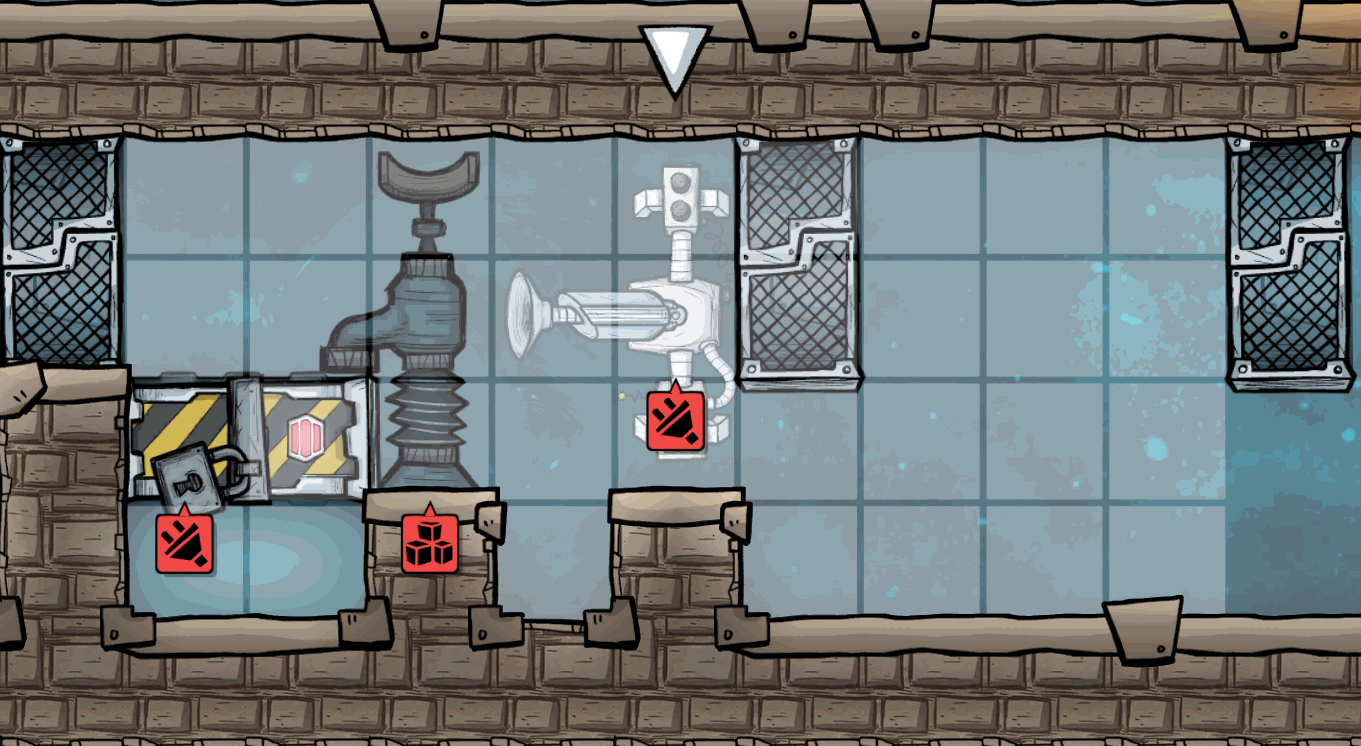
Secondly, after multiple runs of building this ranch, especially post Spaced Out!, I realized that it takes a lot of rushing mechatronics skills and research to get to a half-functional state. The big impediment was the solid filter for sorting eggs, which in the first design was the very first upgrade from the fully-manual ranch. In Spaced Out! this tech requires 40 Applied Science research (400 radbolts) plus 30 Data Science research. This requires either launching a rocket to collect databanks, or analyzing 2-3 geysers (~10ea) and collecting a few more databanks from POIs around the map. Not to mention researching and building a virtual planetarium to use the databanks... it's really a whole lot of effort for one simple conveyor filter.
This improved build fixes both of the above, allowing you to delay solid filter research until much later, right before the ranch becomes fully automated. You'll still need to skill up a Mechatronics Engineer fairly early, but I feel like almost everyone does that anyway. You'll also have to crank out 200 radbolts (probably from a manual generator) to research the conveyor receptacle. But this design can get up and running in a productive way much earlier in the game.
Finally, in addition to the above, I wanted to rebaseline the guide and give it a general cleanup. There was a lot of clutter from previous build options that really wasn't necessary, particularly with everything for some of those options being tagged "this variant is no longer recommended", etc. I don't see a need to preserve the outdated designs, and by removing all that clutter I hope the guide is now simpler to follow.
4. Bottom Line Up Front - The Design
My design consists of a single control room paired with as many stable rooms as you need. The control room is a standard four tile height room that contains the automation logic and other infrastructure to support the stables. A single control room is built at the top of a stack of stables, and additional stables can be added at any time to the bottom of the stack. Each stable is 25x4 internally.
An example ranch with four stables could look something like this: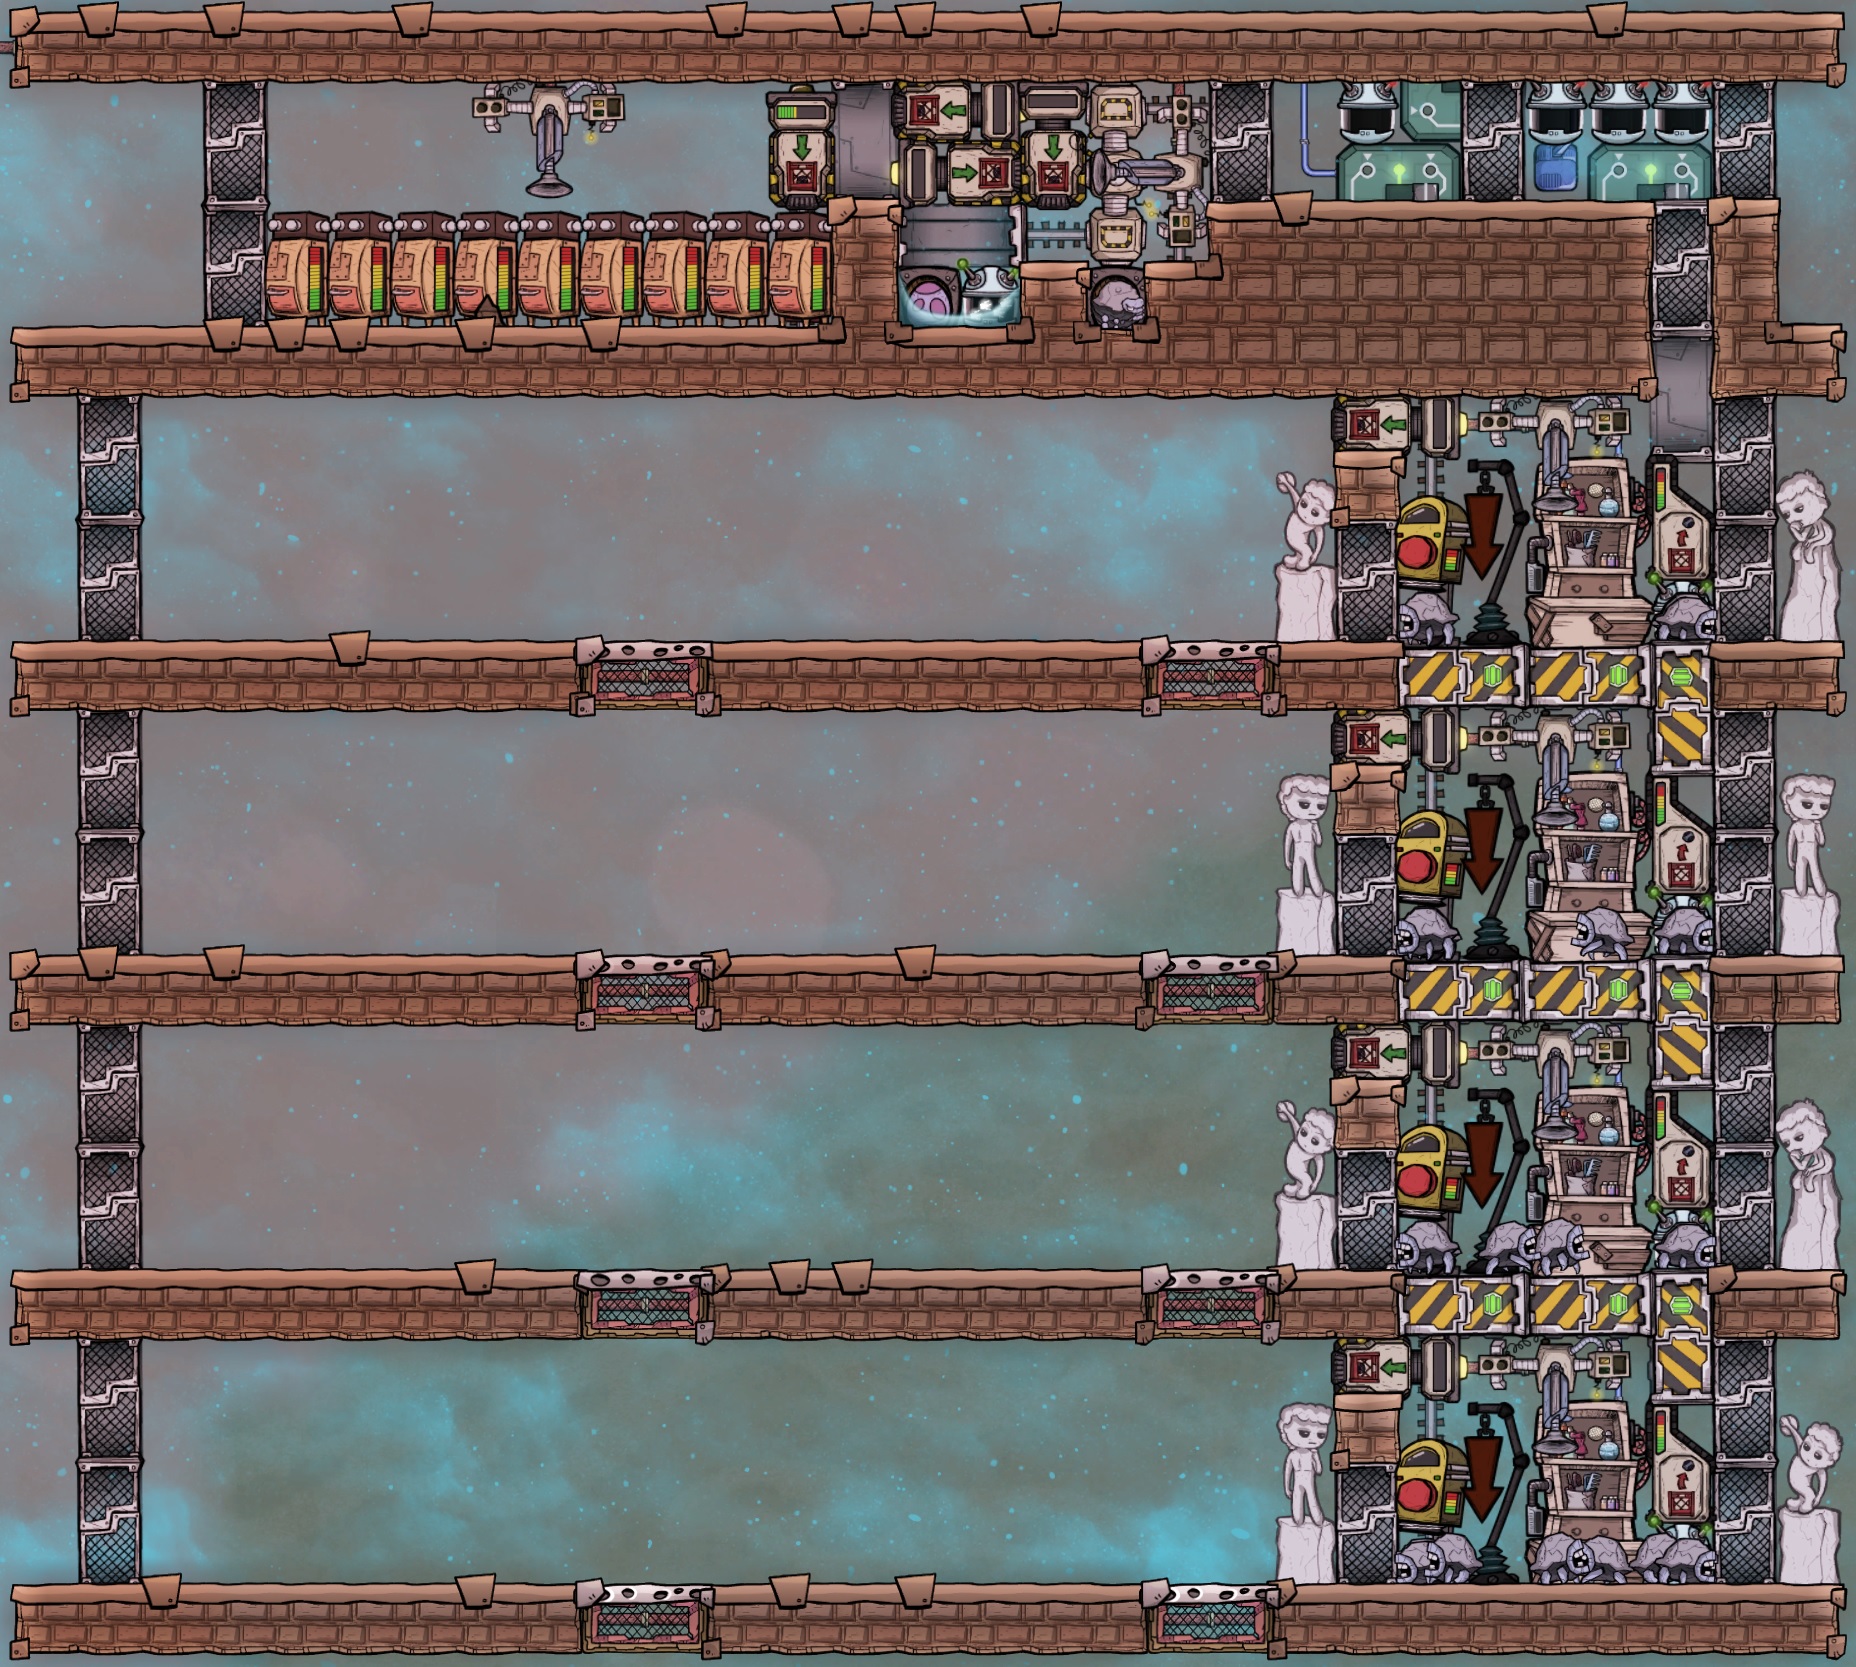
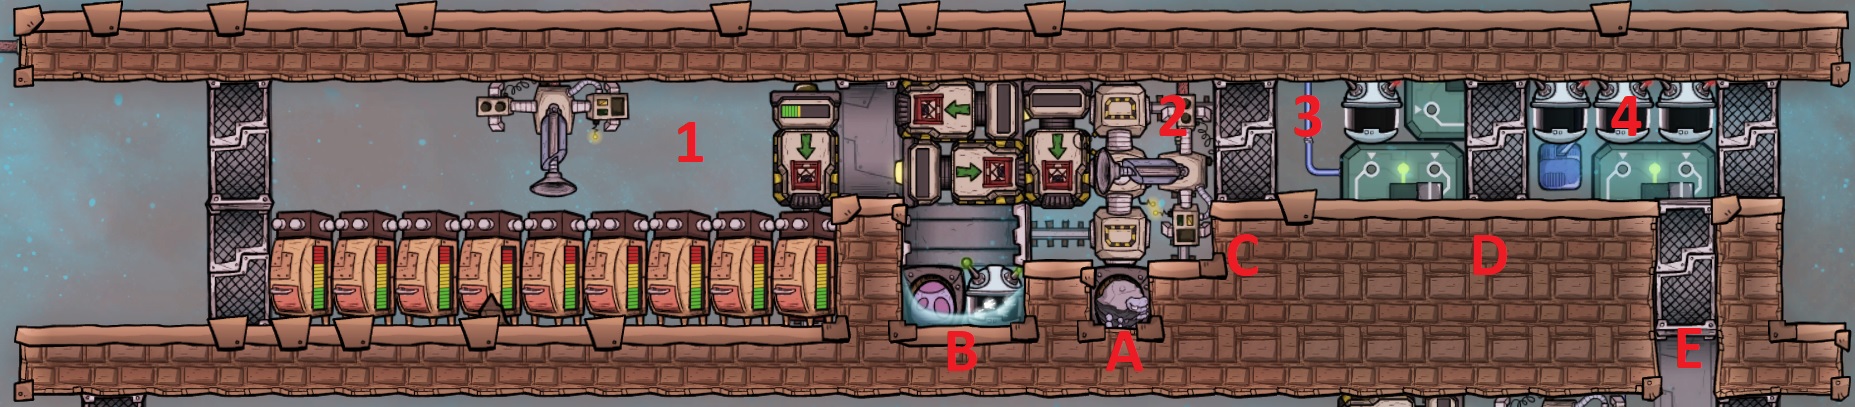
Alternatively, you could create a smaller infinite granite storage here if you like, having dupes load granite via conveyor to a tile they cannot access, or you could ship in hatch food from a centralized warehouse elsewhere in your base, and this whole area can be repurposed. See section 6 for ideas on filling the empty space if you choose not to use the warehouse.
Once the control room is fully automated, I recommend that the door on the right of this chamber and the door on the right of chamber 4 be set with access restrictions to block all dupes from using them. This will prevent dupes from trying to do anything funny with the eggs, shells or meat produced in the core of the control room. It will also prevent dupes from getting trapped inside if the repopulation logic toggles some doors. In the early game the doors can be left open to allow dupes to collect resources until the conveyors take over. The door on the left of this room should always be left open, so dupes can restock the warehouse.
Any coal, eggs, shells or meat produced in a stable will enter this chamber via conveyor and go directly to the solid filter straddling the two pits marked A and B. The filter will separate out one type of egg of your choice (I use stone hatches) and deposit them in the chute marked A. All other eggs, as well as coal, shells and meat, will be deposited in the chute marked B.
The design behind this room is fairly standard. Eggs deposited in A will incubate and eventually hatch, and the hatchlings will not be able to jump up out of the pit. They will be stuck until they reach adulthood and are able to jump up and out. Once adult hatches can jump out of A, they’ll be presented with one of two life-altering scenarios. If any of the stables require a new breeder, the mechanized door above B will be closed and door C will be open, allowing the hatch to exit this room. If all of the stables are full, the two doors will be as shown in the screenshot instead. This will cause the hatch to eventually path into pit B, colloquially known as an evolution chamber. Once inside, the critter detector closes the door above and the surface tension of the water floods the pit and drowns the hatch. This unlocks the hatch’s final evolutionary form, better known as meat. Once there are no more critters in the pit, the mechanized door re-opens, resetting the trap. Eggs of the non-selected type are also routed to this pit, where they will eventually hatch, triggering the critter detector and drowning the hatchlings before they can reach adulthood and jump out.
The sweeper in this room can reach the bottom of both A and B (even while the door is closed) and will extract coal, eggshells and meat. Each resource can be deposited into it's own dedicated conveyor loader (there is room for exactly three), to be routed wherever you need them.
5. Construction
- Early Ranching - Zero Automation
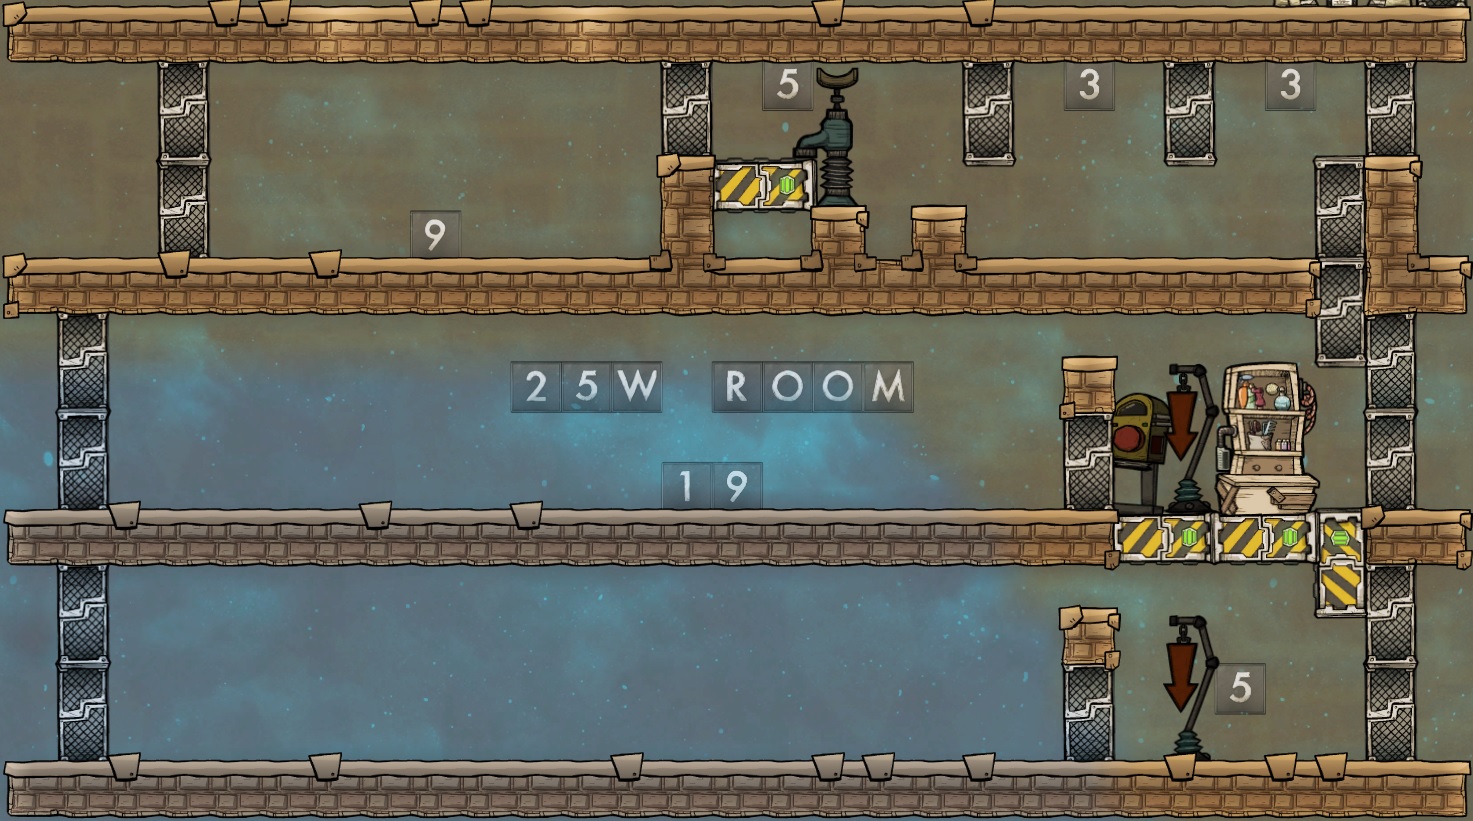
A small amount of water needs to be put into the trap while there is room for a bottle emptier. I’ve read that too much water might prevent hatches from pathing into the trap, but I’ve tested with as much as 100 kg per tile (emptying a single 200 kg pitcher pump bottle into the trap) and that works well. You could save water by mopping up a 40-50g spill and emptying that bottle, it's up to you.
Finally, the bottom "stable" will not initially be used as a stable, but rather to handle egg removal before the Mechatronics and automation come online. As many regular stables as you like can be built in between the control room and this bottom floor, and towards the end of the build the bottom floor will convert to a regular stable.
- 1st Upgrade - Egg Removal
It is still very important to remove eggs from the stables as quickly as possible. This is because if eggs are left in a stable you will suffer from the ‘cramped’ debuff, preventing more eggs (and thus meat) from being produced.
My original design required a mechatronics engineer and the solid filter technology, which is locked behind both radbolts and data banks. This new design borrows from the "Eggspam" design by neroiscool to temporarily remove eggs using only a simple critter sensor.
The entire upgrade requires 60 refined metal per stable, 25 for the critter sensor, and 35 for 7 pieces of automation wire.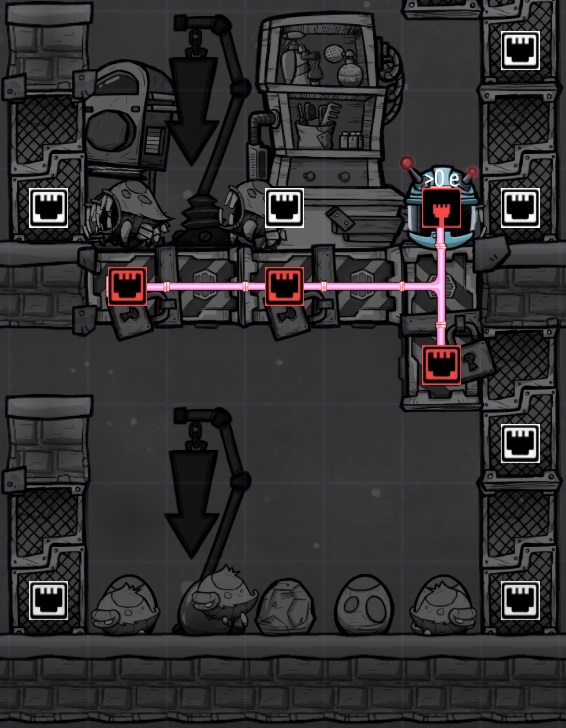 The critter sensor should be set to detect eggs only (uncheck critters) and send a green signal when greater than 0. As soon as an egg is laid the doors on the floor will open, dropping the egg, but not the hatches, to the floor below. If the floor below is a stable this will trigger that critter sensor, and the egg will continue to fall to the bottom floor. This is what it looks like in action: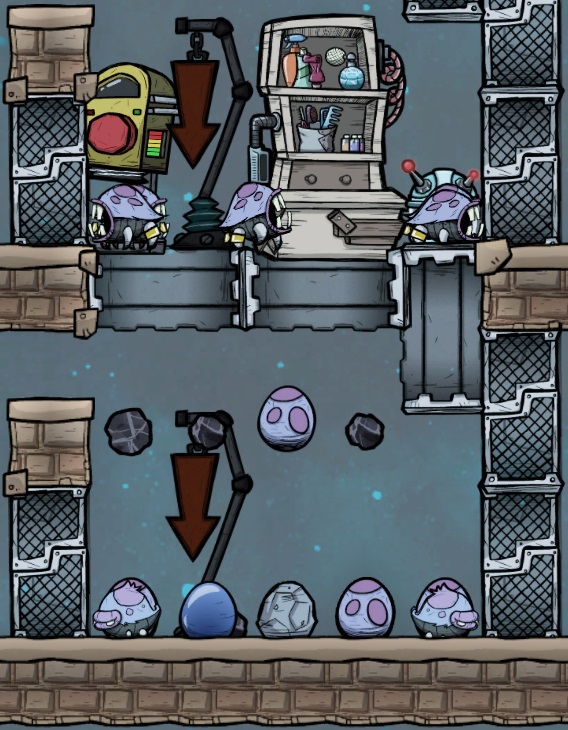
Note that it is possible to install a drowning trap in the bottom floor, but I don't believe that is optimal this early for two reasons. First, in the early game you're likely to find 5-7 hatches from digging, but you'll want to fill up at least one and most likely 2 stables as soon as you can. This isn't just to get more barbecue production, but to increase the chances of stone hatch eggs from consuming sedimentary rock. Rather than drowning your first few hatchlings, I let the ranchers carry them back to stables above where they'll hopefully start making stone hatch eggs. This can be "automated" by setting priorities and auto-wrangling on the critter dropoffs.
Secondly, my design as shown allows the bottom floor to be converted to another standard stable at any time, and a new "bottom floor" can be built underneath it without disturbing operation of the ranch. If the bottom floor were a drowning pit it would be much more complicated to expand downwards in this way.
- 2nd Upgrade - Coal, Eggshells and Meat
This upgrade requires a minimum of 400 refined metal in each stable to build one auto-sweeper and one conveyor loader. These will carry all products produced in the stables (except eggs) to the control room.
Eventually you'll want to add another auto-sweeper and 1-3 more conveyor loaders (400-800 refined metal) to the control room to distribute these materials throughout your base. For now, your dupes can run in and grab the materials manually if you're short on metals.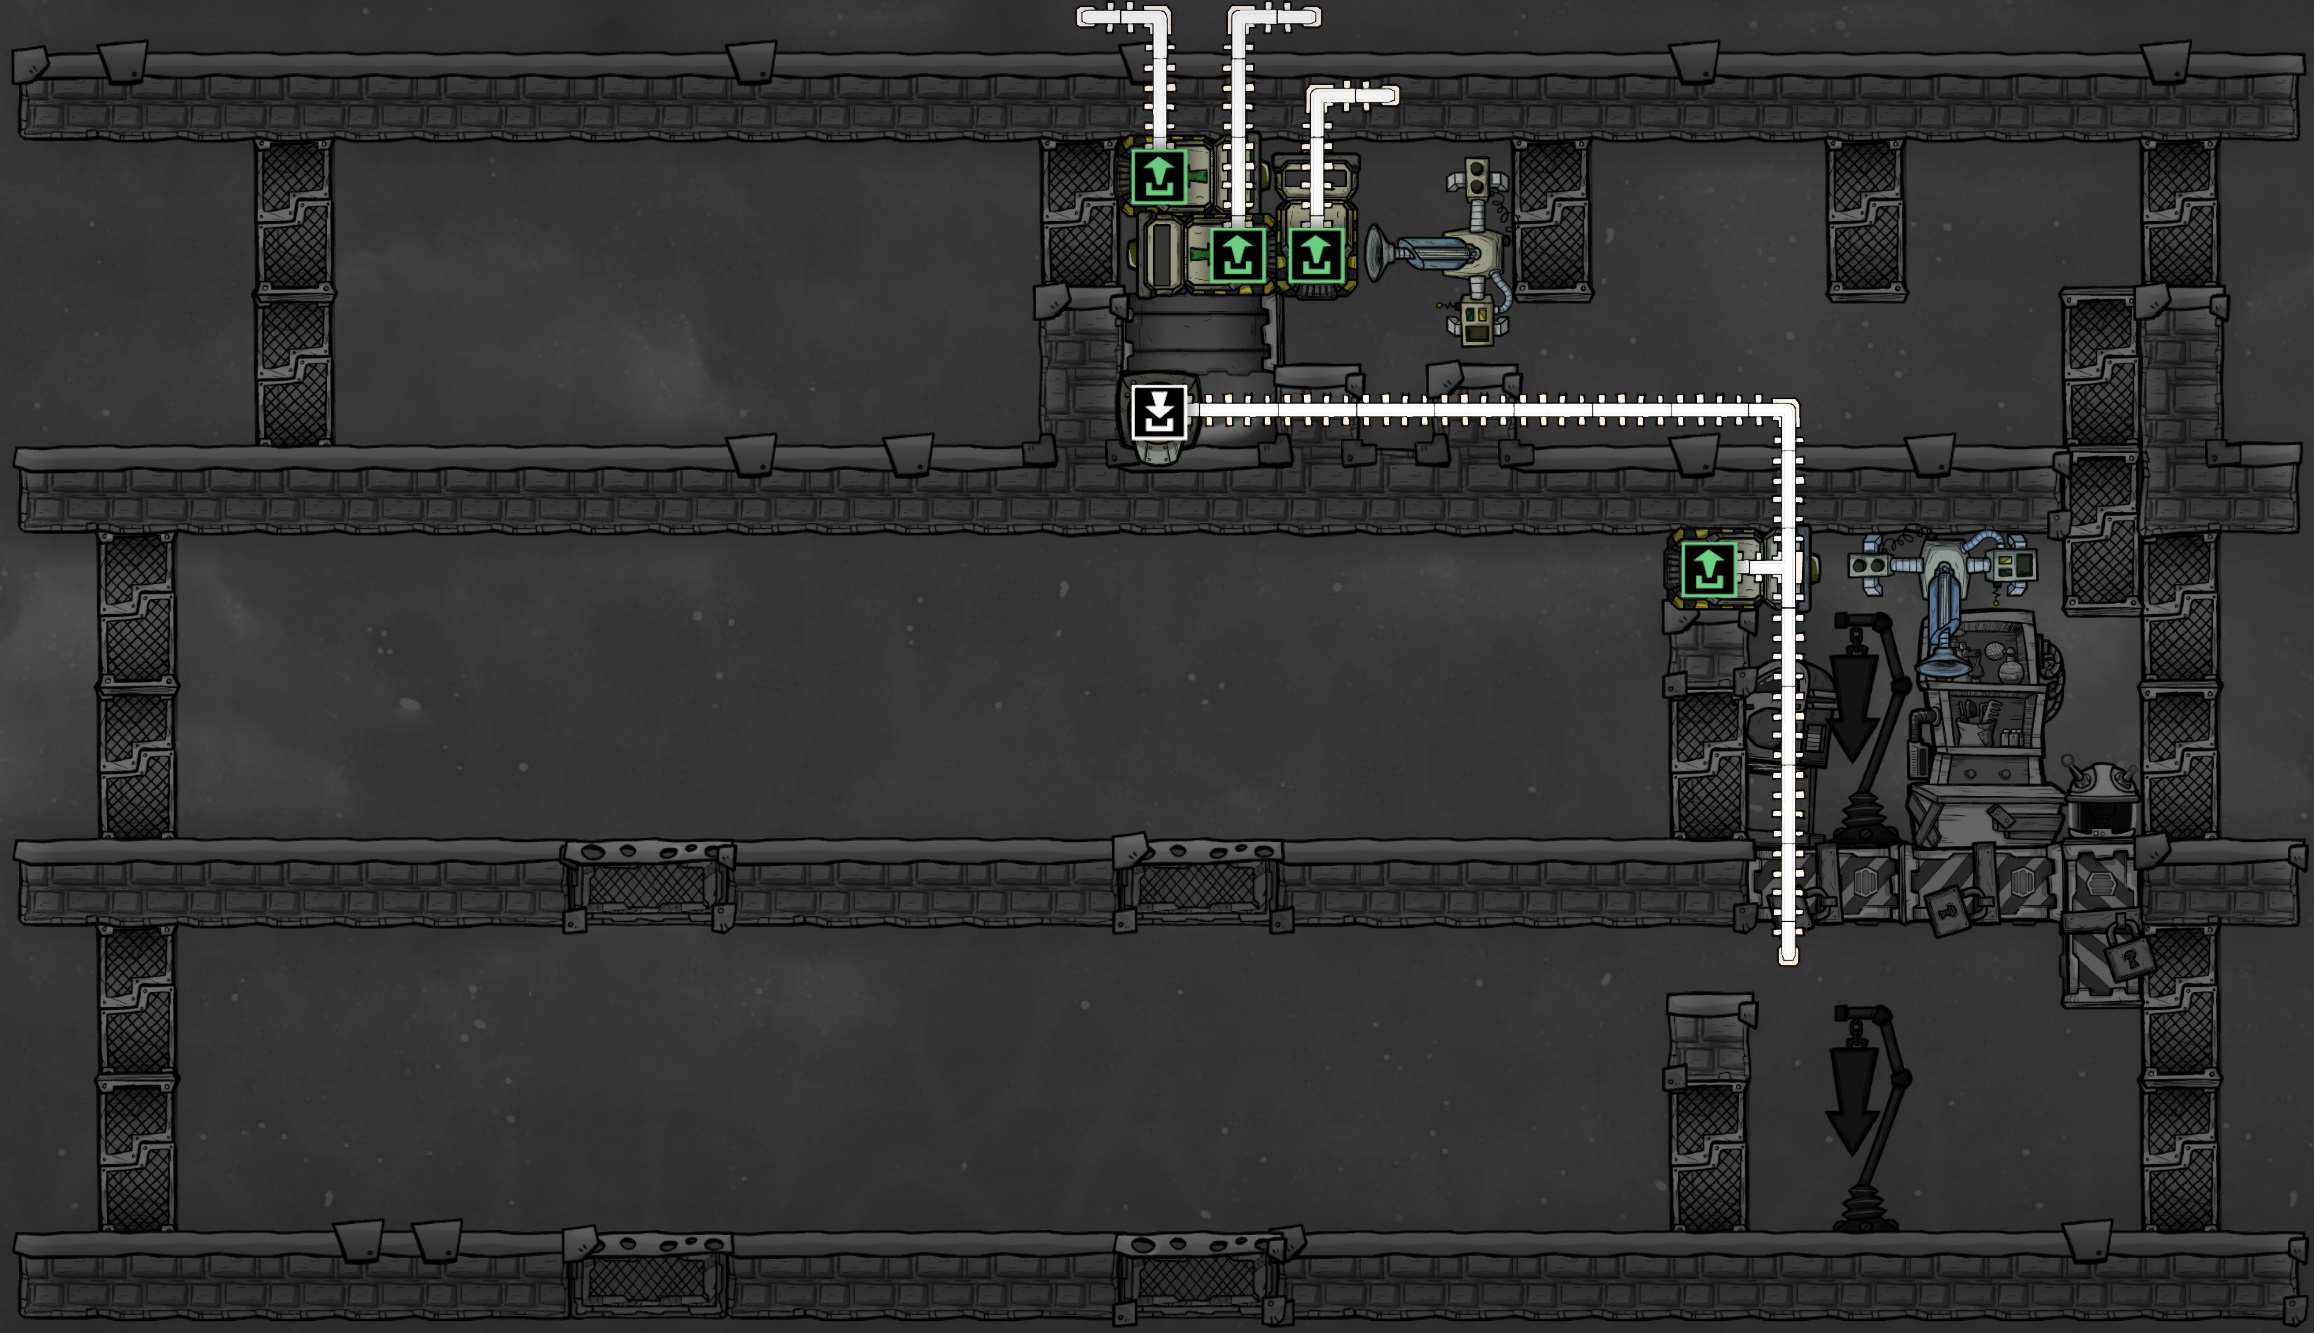
The conveyor rail on the right runs straight down through all the stables, into the bottom room which will later become your final stable. The conveyor rails in the control room run straight up and out, then wherever you need the materials to go.
- 3rd Upgrade - Hatch Food Supply
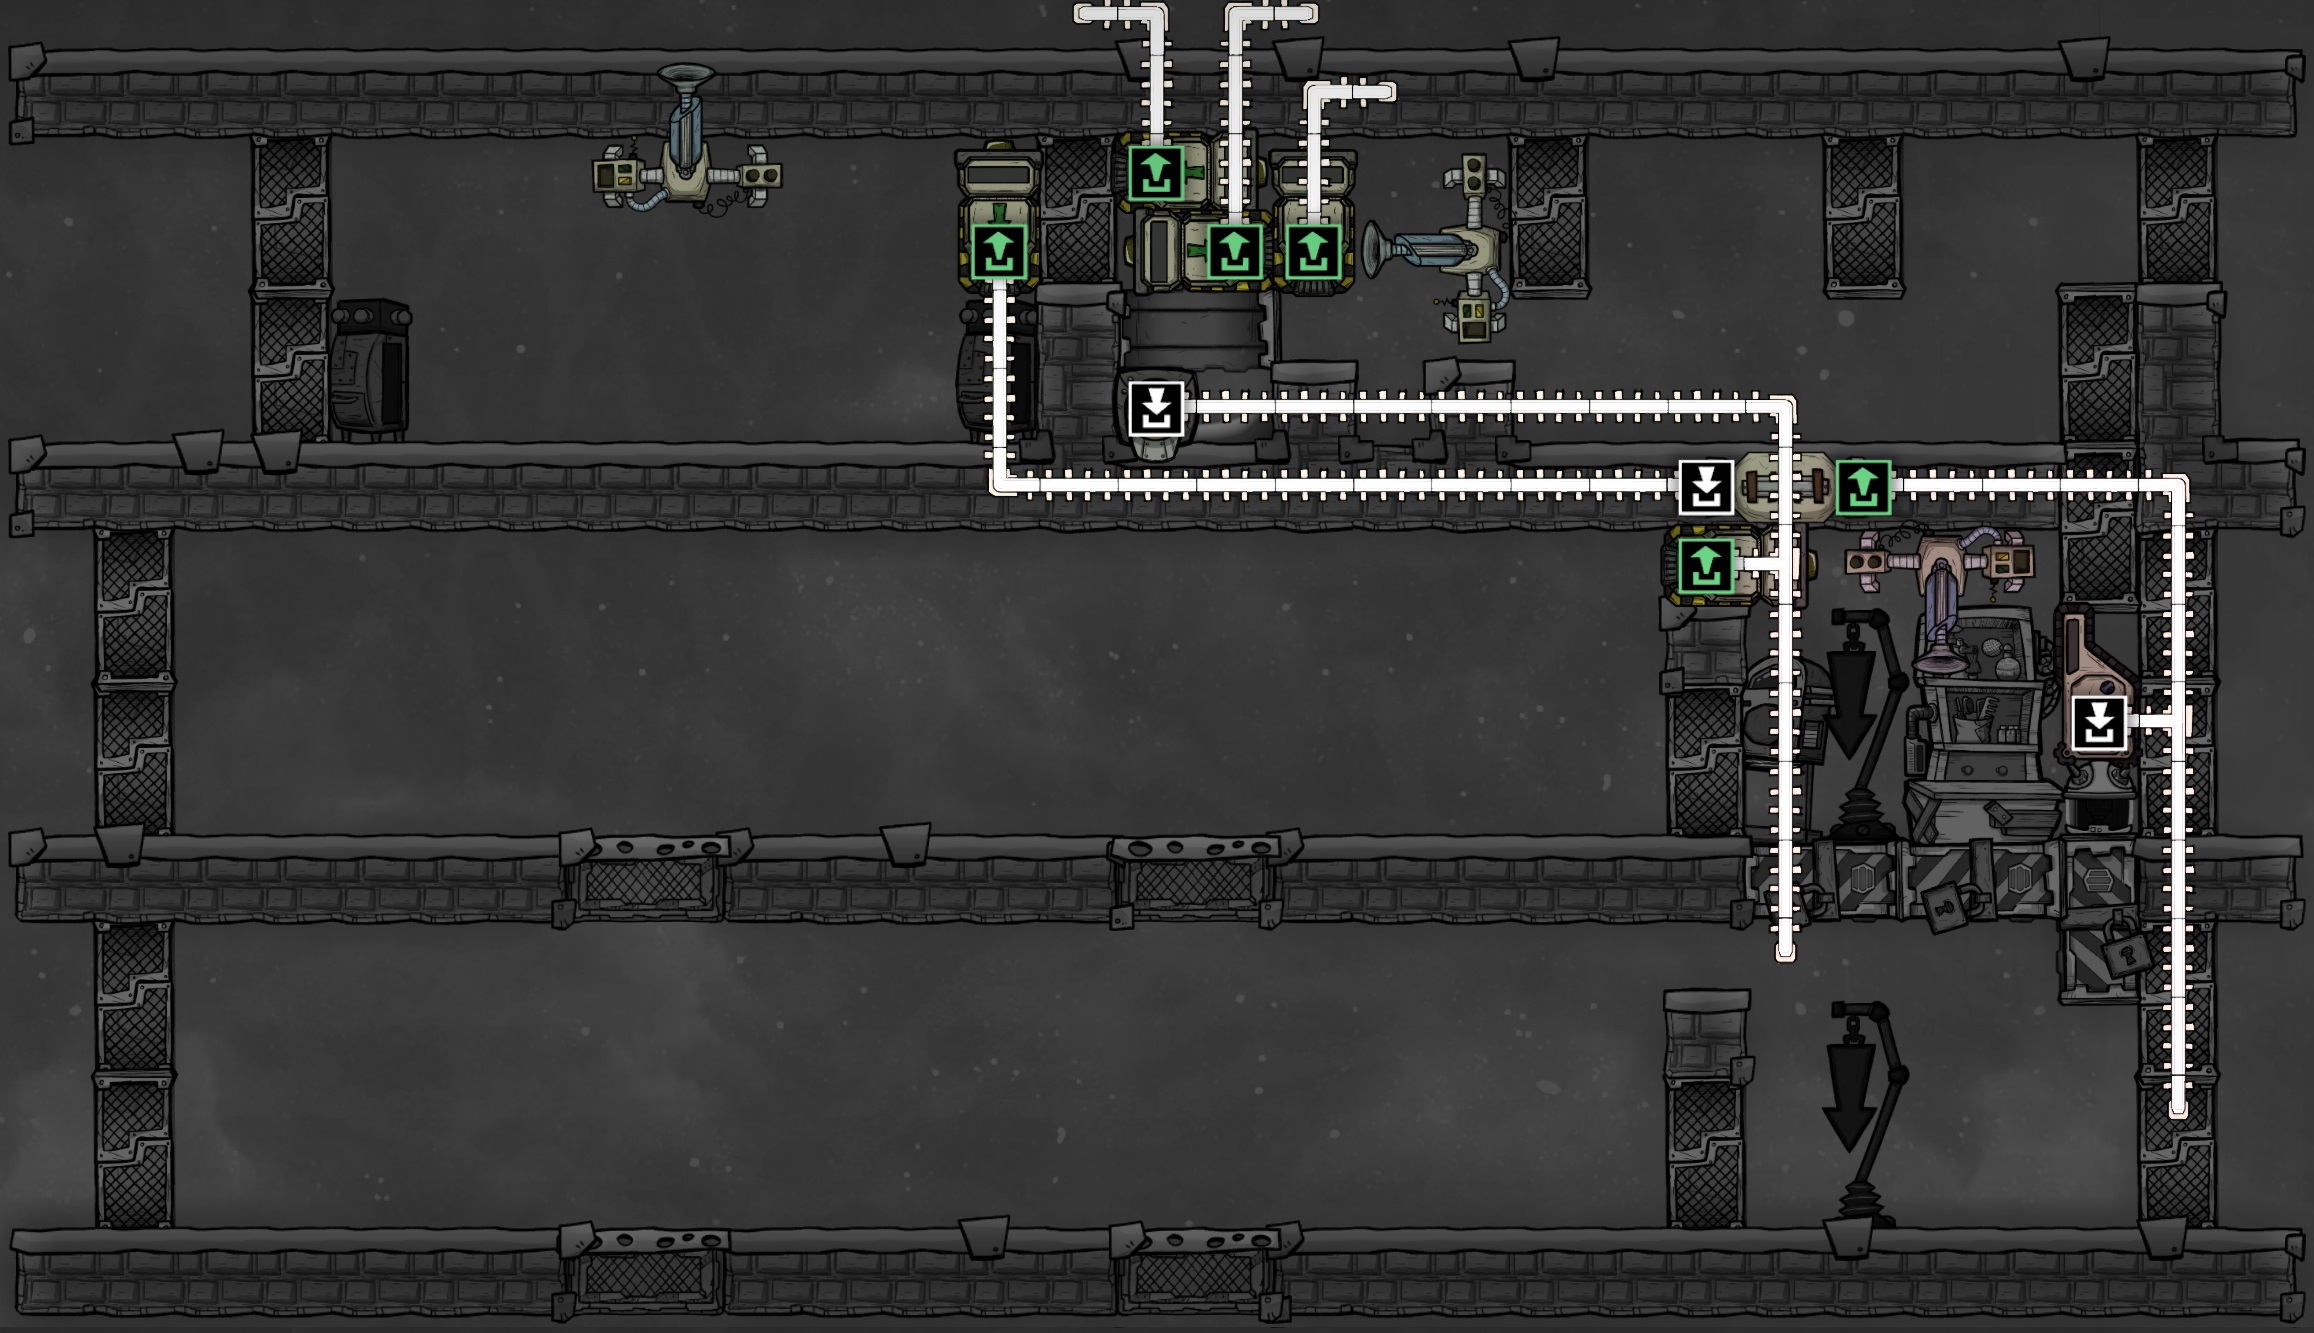
This upgrade requires 400 refined metal to install an auto-sweeper and conveyor loader in the control room warehouse. The warehouse can hold up to 9 storage bins for hatch food, or you can also bring the food in from somewhere else in your base, if you don't want to store it in the warehouse.
Wherever the material comes from, the conveyor rail of hatch food runs straight down the right side of the stables to load the receptacles, which in turn are emptied by the previously-installed auto-sweeper to load the feeders.
- 4th Upgrade - Egg Sorting
Now we finally have to bite the bullet on researching solid filters. We can't automate repopulation until we have a way of sorting eggs, and once we're able to sort eggs we can convert the bottom floor to a regular stable. So this is the final preparation step before we get to full-blown automation.
If you prefer, you could skip this section and the next section entirely and still end up with a decent partially-automated ranch. In that case I would recommend installing a drowning trap in the bottom floor, and installing some incubators somewhere else in your base, e.g. the warehouse, or to the left of the bottom floor drowning trap. Unfortunately you can't install them in the empty space of a regular stable, or the hatches will still sense them and get the cramped debuff. With this approach ranchers can rescue the eggs you desire from the trap, bring them to an incubator to hatch, then carry them to a stable for repopulation. It's not "automated" from a dupe labor standpoint but it's hand's off for you. This was essentially the gold standard before crazy critter droppers and pez dispensers, and it still works great.
This upgrade requires 425 refined metal to convert the bottom floor (1 auto-sweeper, 1 conveyor loader and 1 critter sensor) plus 25 per stable for a NOT gate and some extra for a few automation wires. I'd expect it to be about 550 refined metal for an average ranch.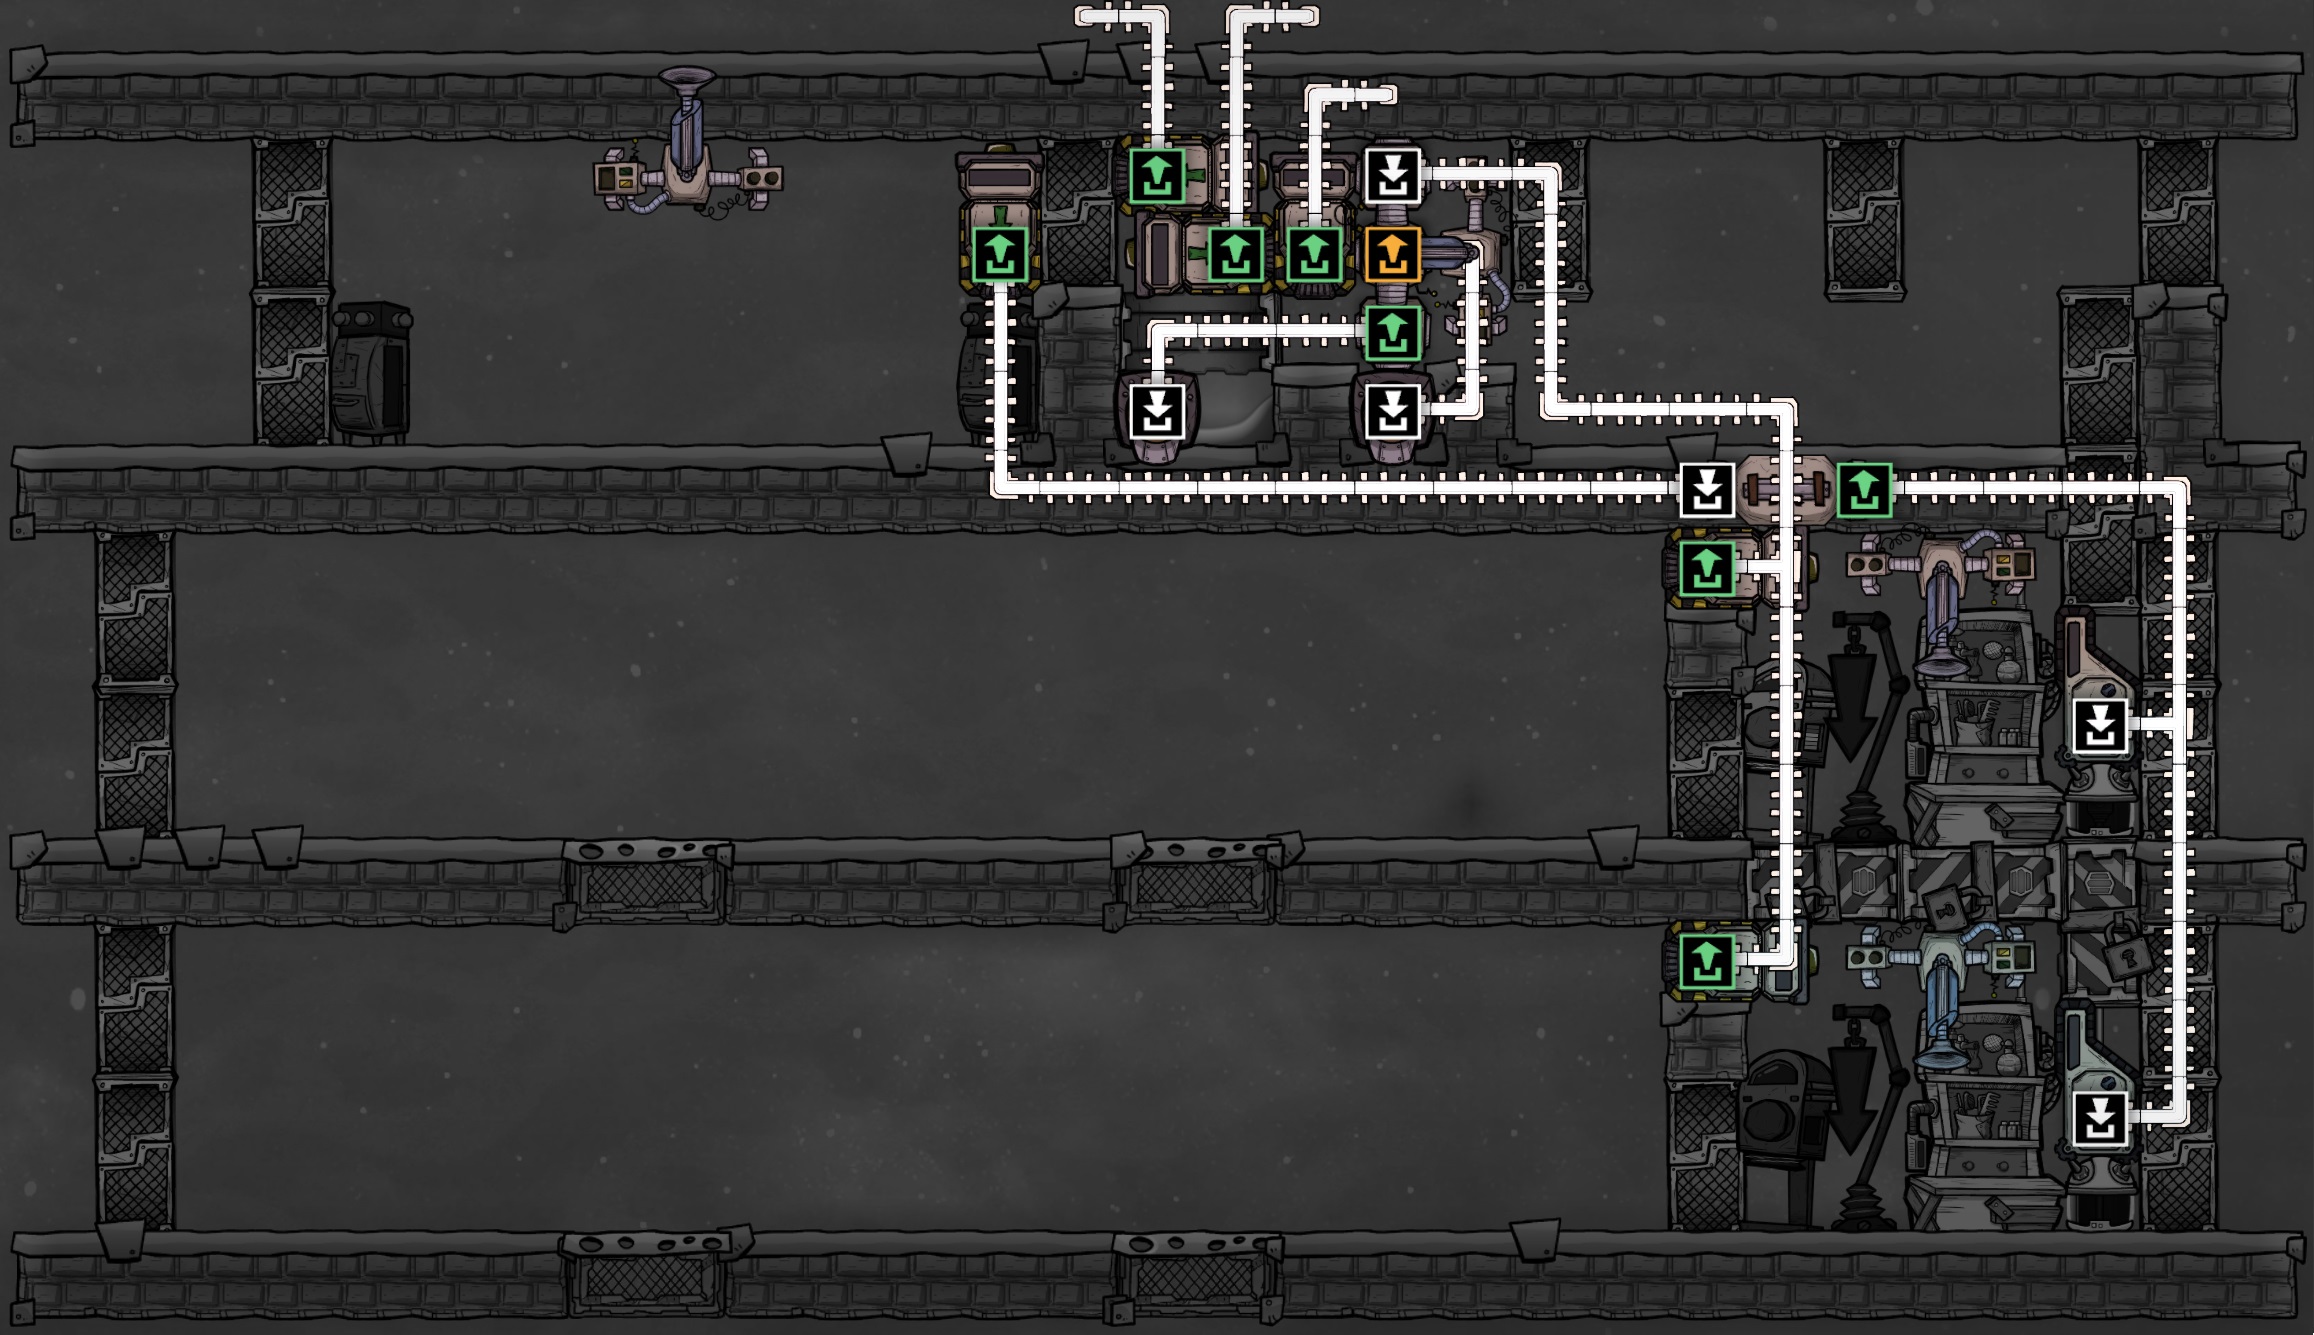 The solid filter must be set to the type of egg you would like to propogate, so in my case that's stone hatches. The conveyor rail up from the stables is rerouted to the white input, and the chosen egg will come out the orange output to the right, behind the auto-swpeer, and down to the floor beside the trap. All other materials will continue to be routed to the drowning pit through the green output.
 Finally, the original "Eggspam" automation wiring needs to be reworked for connection to the control room in the next step. We keep the critter detectors, but this time set them to send a green signal when the stable is full, i.e. when more than 7 critters are detected. This is the first part of the build that begins to diverge if you're building a mirror image ranch. From here on out I'll show automation overlays for both left-facing and right-facing ranches so you can build in either direction.
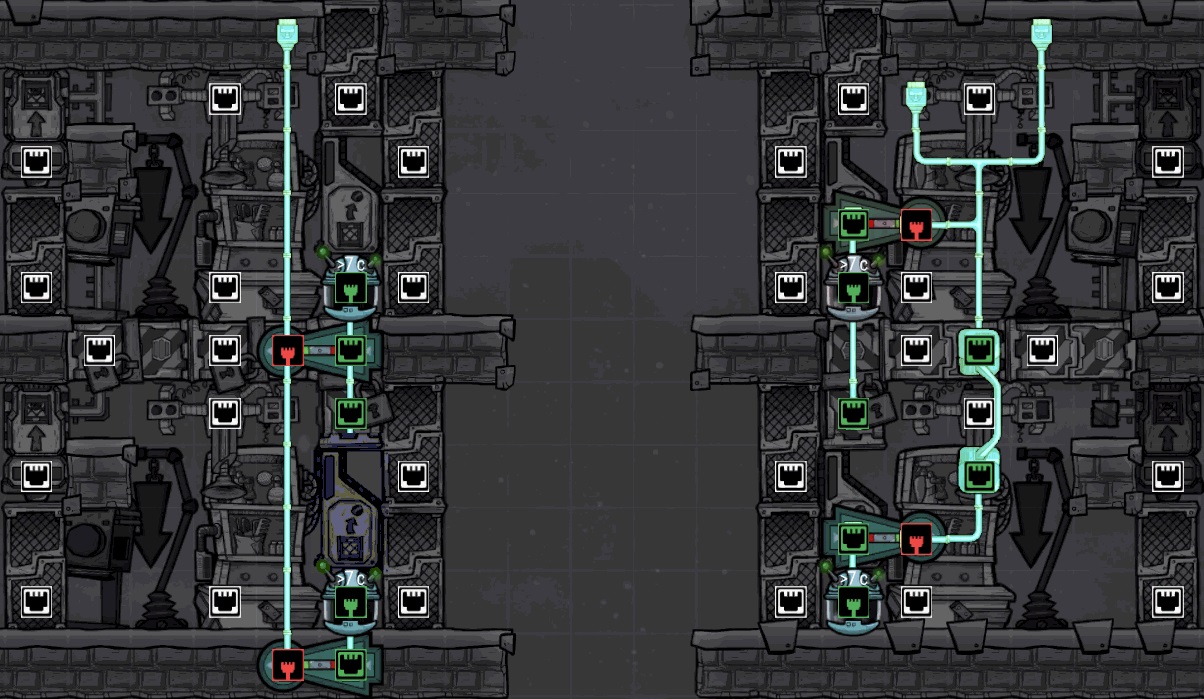 The “stable full” signal has two purposes in this build:
- It connects to the mechanized airlock in the floor of the stable, keeping it open so dropped hatches can fall through to other stables below. If less than eight hatches are detected in this stable, the door is instead closed to collect any falling hatches.
- It goes through an inverter and is connected with the same signal from all other stables, before routing up to the control room. Using OR gates to combine these signals is unnecessary, as a green signal from any stable will override the red signals from other stables. I refer to this inverted signal as the “breeder needed” signal, as if any stable is below 8 hatches it will trigger the control room to allow dispensing new breeders.
- 5th Upgrade - Repopulation
At this time your ranch is almost fully automated, with hatch food being delivered and all products removed and sorted for distribution. Depending on how many cycles have elapsed, you may not need to automate breeder repopulation for quite some time. Your first hatches won’t start dying until they reach 100 cycles of age, however you’ll want to complete this upgrade before then so you don’t face a population crash after cycle 100. You'll also want to be taking advantage of the meat that will otherwise wander around in the control room until you automate the drowning trap.
There is nothing to add in each stable, as they were prepared in the previous step. We now need to build the control room automation and connect it to the signal from the stables.
The upgrade to the control room requires five critter sensors, five AND gates, one OR gate, three NOT gates, a filter gate, a buffer gate and approximately 50 pieces of automation wire. The total cost in refined metal should be just under 650.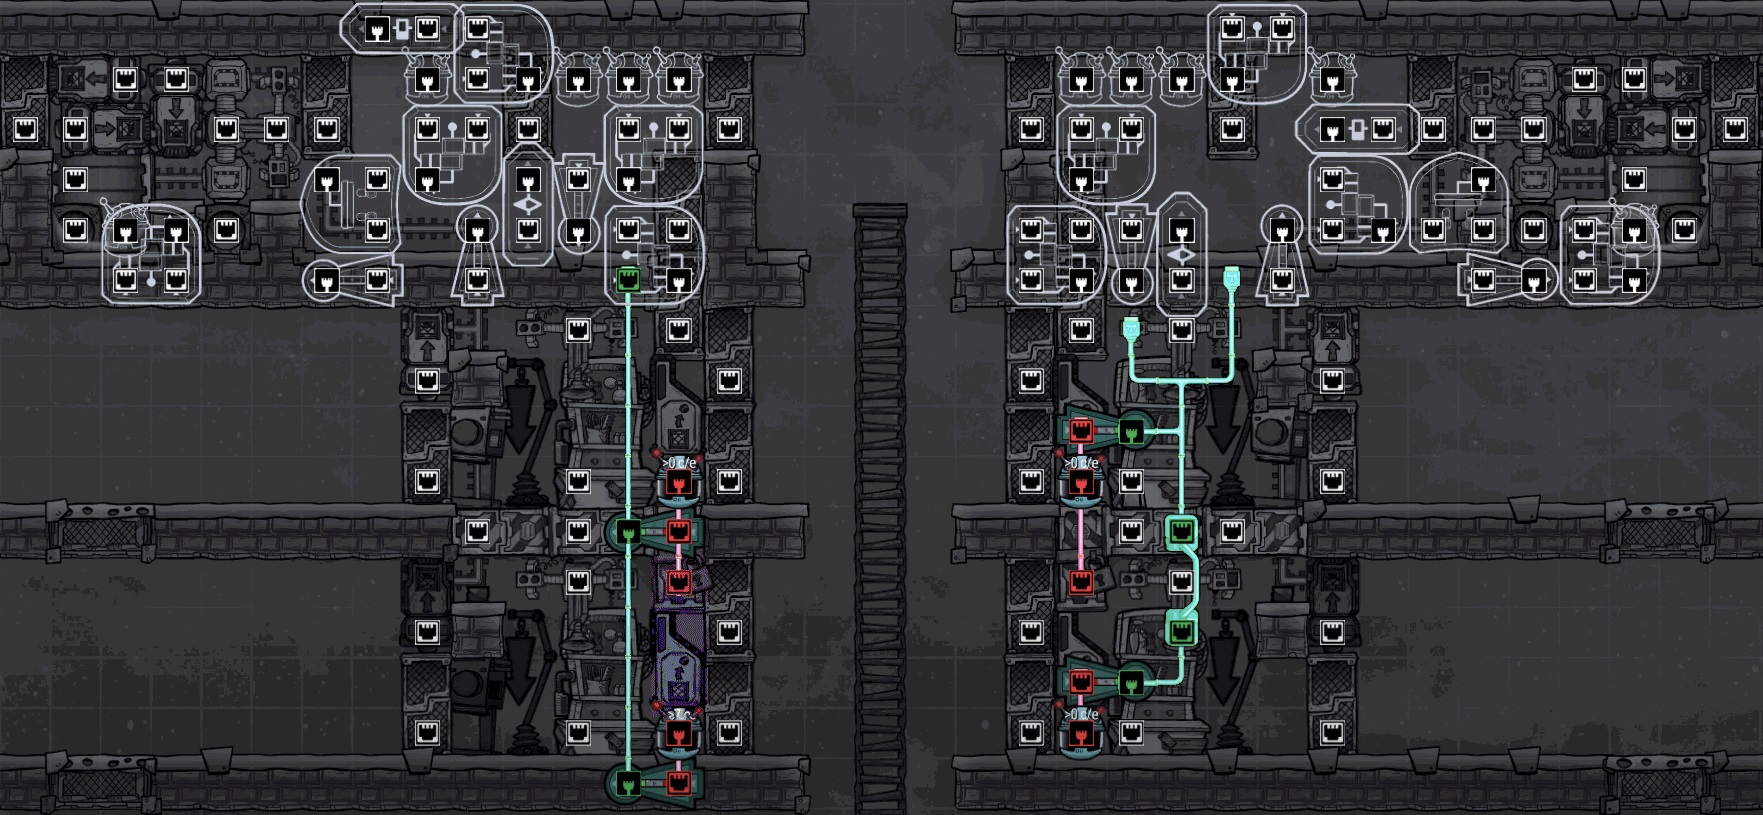
As this automation circuit gets built the doors in the control room will start to open themselves or lock. The only door that could give you any trouble, depending on the order dupes choose to build things, is the door to the drowning trap. It will likely lock itself, blocking access to finish building the critter sensor or some automation wires in the pit. Simply set the door to Open if this happens, and once construction is complete set it back to Auto, or else change the settings on the critter sensor (if it got built) to temporarily force the door open.
From left to right, the settings on the critter sensors should be: Below 1 (in the drowning trap), Above 0, Above 1, Above 0, Below 2. For the mirror image build on the right those would be the same values but from right to left, starting in the drowning trap. The buffer gate should be set to 2-3s and the filter gate to 15-45s. The following image shows the completed automation wiring.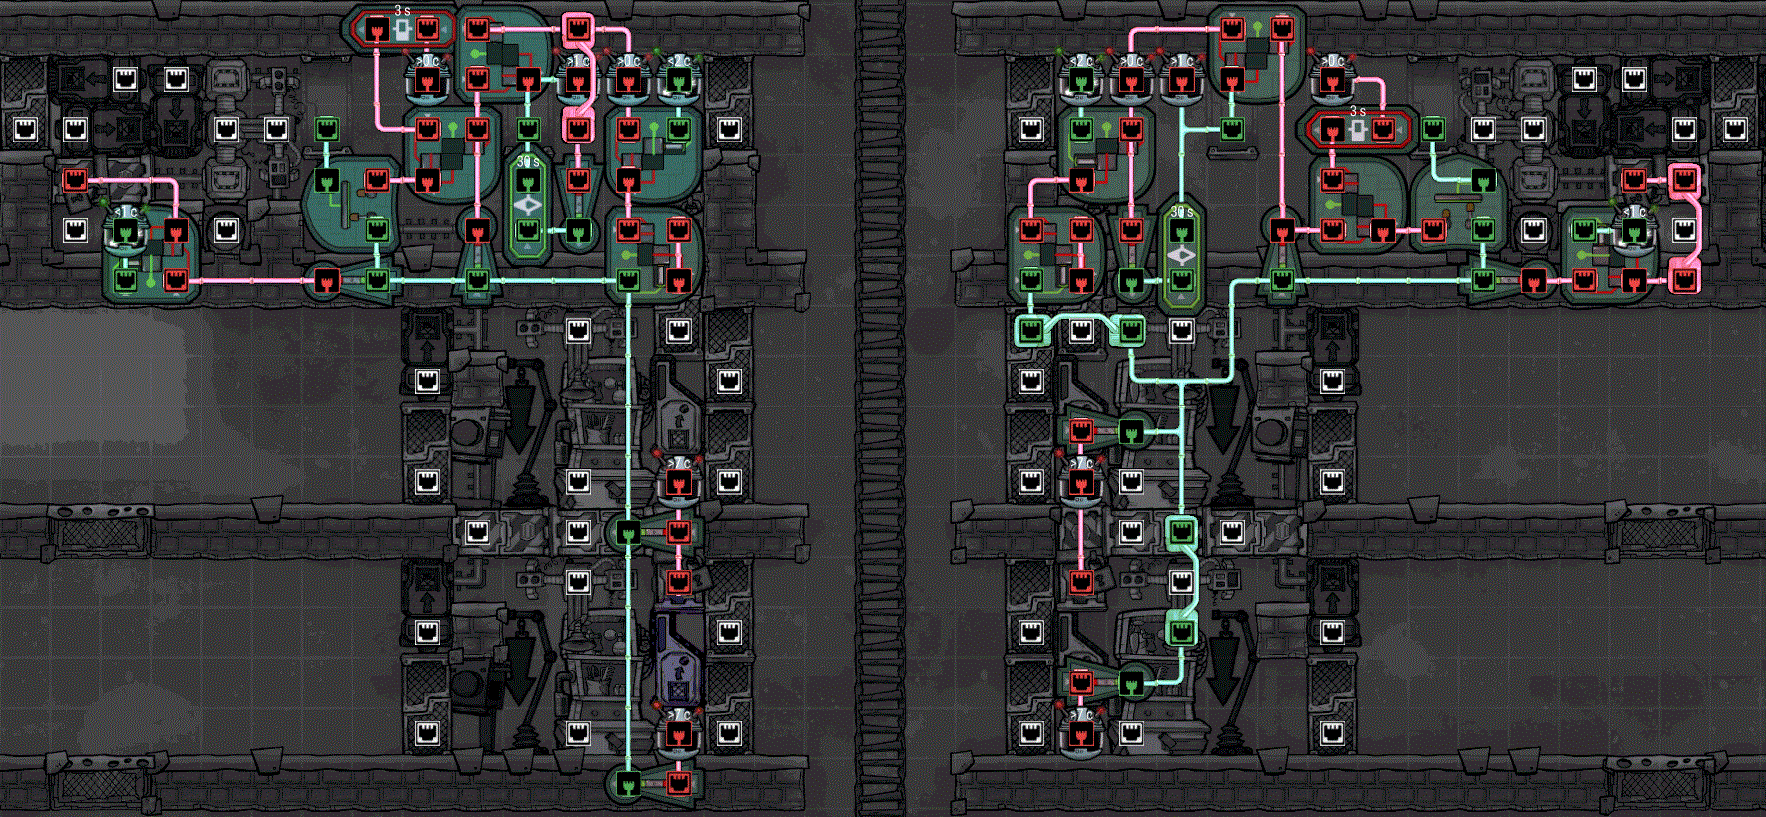
One note on the buffer and filter gate timings. Any automation elements with time settings are affected by your game speed. Something that works great set to 2s at 1x speed, would need to be set to 6s to maintain the same timing at 3x speed. The game does not auto-adjust your automation settings to be consistent when you change game speeds. This affects the game checking for critters stuck in doors to initiate the falling animation, and while 10-15s might be plenty of time on low speed, 45s might be required on high speed. I tend to play on high speed exclusively, so you can fiddle with the timing on these gates to suit your play speed. See the next section for detailed information on the gates' purpose.
- Explanation of Automation Logic
- None of the stables are driving the “breeder needed” signal.
- The critter detector in the drowning pit detects zero hatches.
The first condition is that any stable is driving the “breeder needed” signal. Just as that signal will force the drowning pit door to close, it will also force this door open, allowing hatches to exit the hatchery.
The second signal comes from an AND gate and requires both of the following conditions to open the hatchery door:- None of the stables are driving the “breeder needed” signal.
- One or more hatches are detected in chamber 3
- There is a 2-3 second buffer on this input, holding the signal true even after the hatch leaves the room. This is because the door space does not count as the room, and otherwise hatches may get stuck in the closing door when trying to exit. On a slower game speed you could try 1 second if the door is being held open too long and letting other hatches in.
Note that the OR gate in this circuit cannot be removed and its inputs wired together as a single wire like we did for the “breeder needed” signals from the stables. This is because a loop would be created where the output of the AND gate would be connected to the input of the inverter, and the output of the inverter would be connected to the input of the AND gate, all on one wire. This causes the two gates to constantly toggle between on and off, so we use the OR gate to combine and isolate the signals.
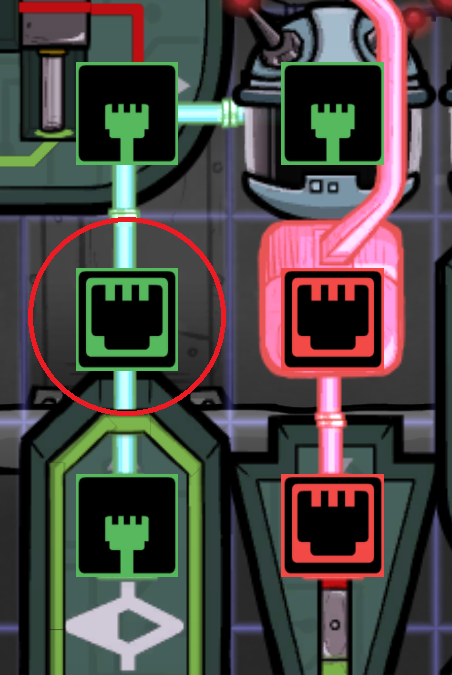
The door input (circled) is connected to the outputs of the filter gate, the AND gate and the critter sensor. If any of those outputs is true the entire wire will turn green and the door will open, without the need of extra OR gates. If you're having trouble visualizing it in this picture, scroll up to the mirror image build, as that wiring is in my opinion a little clearer. I’ll go through all three of these inputs.
The critter sensor is set to Above 1, and ensures that this door remains open if there is ever more than one hatch in the drop room. This allows the extra hatches to escape back to the left, and helps prevent accidental “double drops”.
The filter gate’s output is an inverted signal from the Above 0 critter sensor in the drop room. “Not Above 0” is the same as saying “Equals 0”, so this signal will open the door when there are no hatches in the drop room, allowing more hatches to enter. The reason for the filter gate is that as soon as a hatch enters the dropper door E it is no longer technically in the drop room. Without a delay on the sensor signal, the door would open immediately, more hatches could rush in, and an accidental “double drop” could occur. I set the filter gate to 30-45s to give ample time for the hatch in the dropper door E to be pushed out of the room completely before reopening the drop room door. This will vary based on game speed and you may find 10-15s is enough at low speed.
The final input to the drop room door comes from the AND gate just above it. The logic of this gate is identical to the AND gate on door C, it requires both of the following conditions to open the door:- None of the stables are driving the “breeder needed” signal.
- One or more hatches are detected in the drop room.
- At least one stable is asserting the “breeder needed” signal.
- The Below 2 critter sensor is true
- The Above 0 critter sensor is true
- Tidying Up
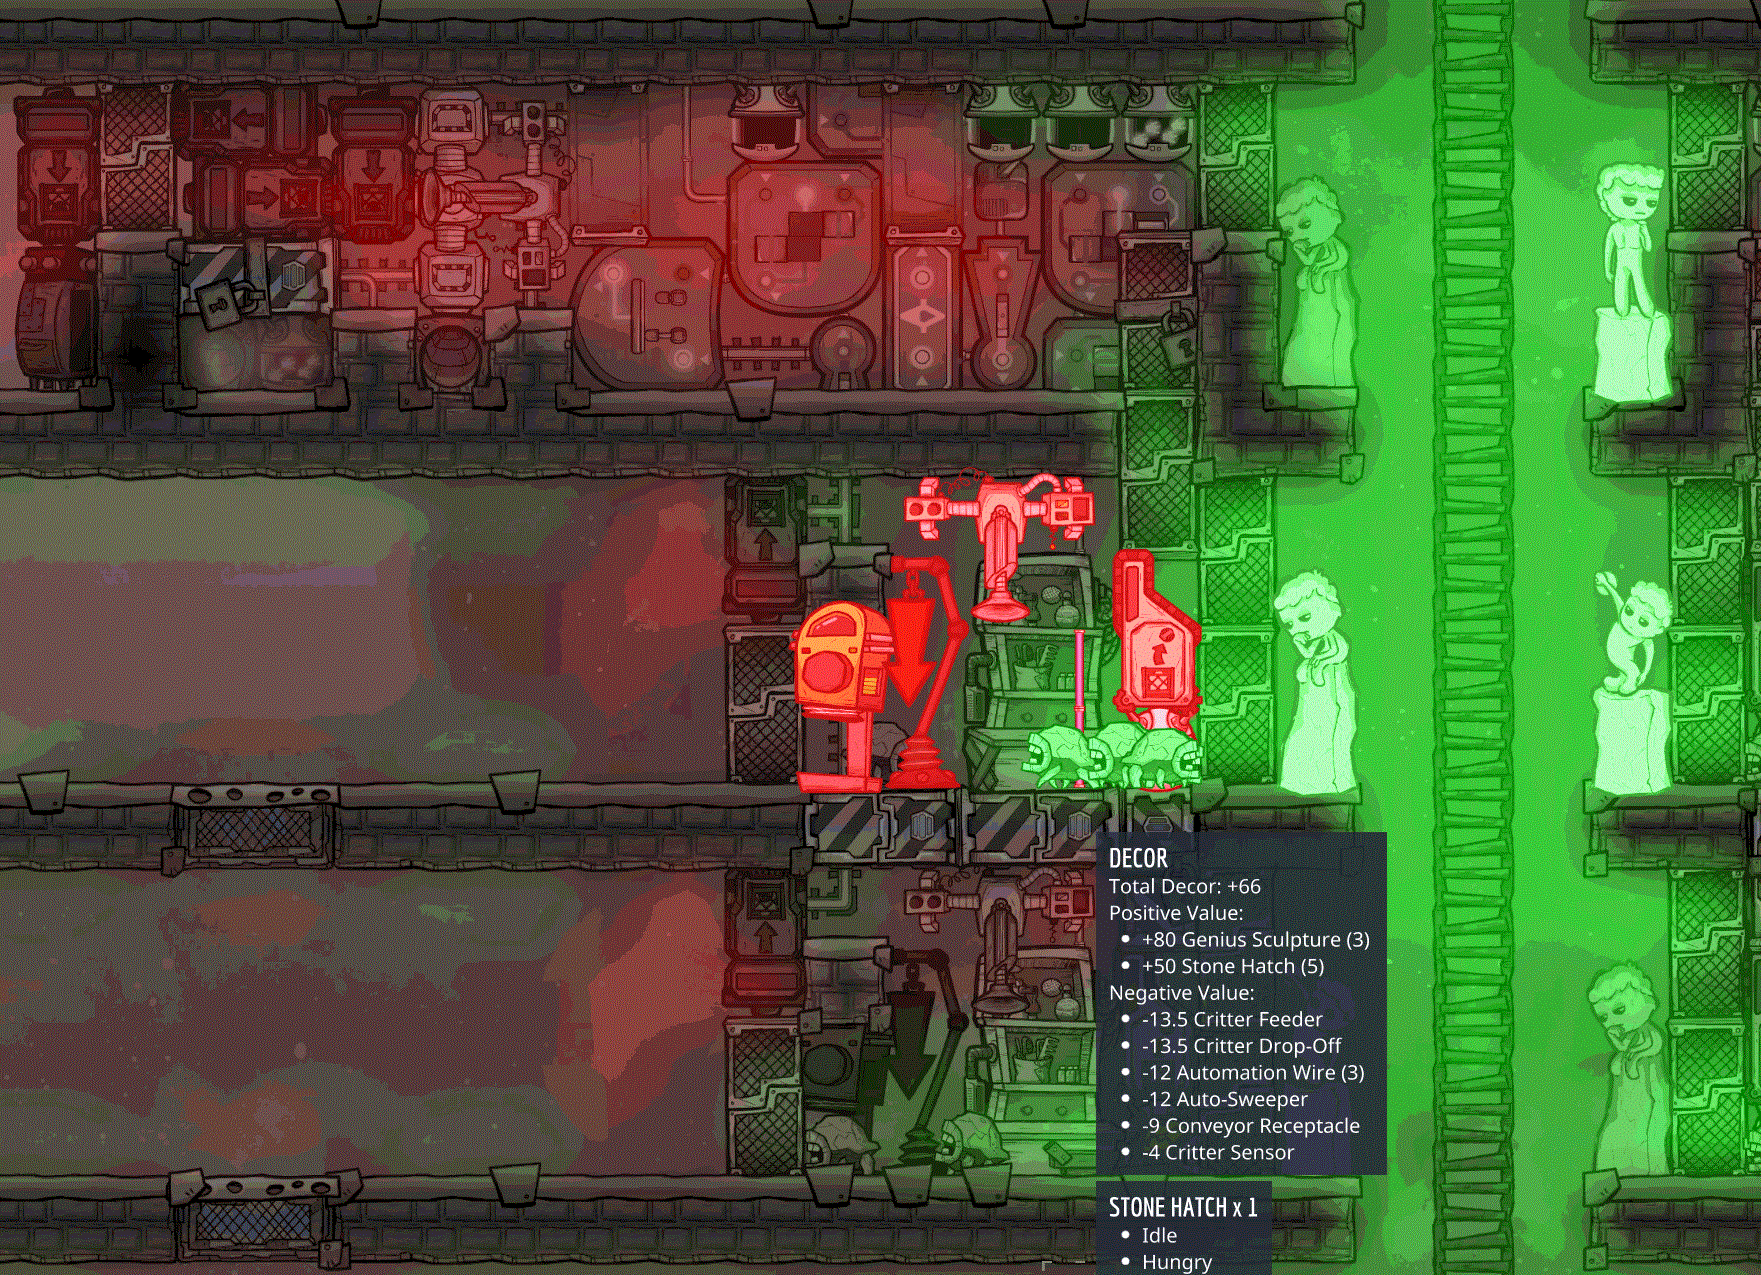
The only thing left to do now is add a bit of decor to the stables to keep your ranchers happy while they spend their days grooming critters. Unfortunately, the stable design doesn't have a single spare tile of space near the grooming station to put in any kind of plant pot or moulding. The good news is that all hatch breeds are worth +10 decor each, so eight of them will help to offset the negative decor from the machinery while they run around the grooming area. If you are using the 5-tile main corridor design, statues on each floor will help a lot, as three can be seen from each grooming station. In this case you should average around +50 decor while grooming.
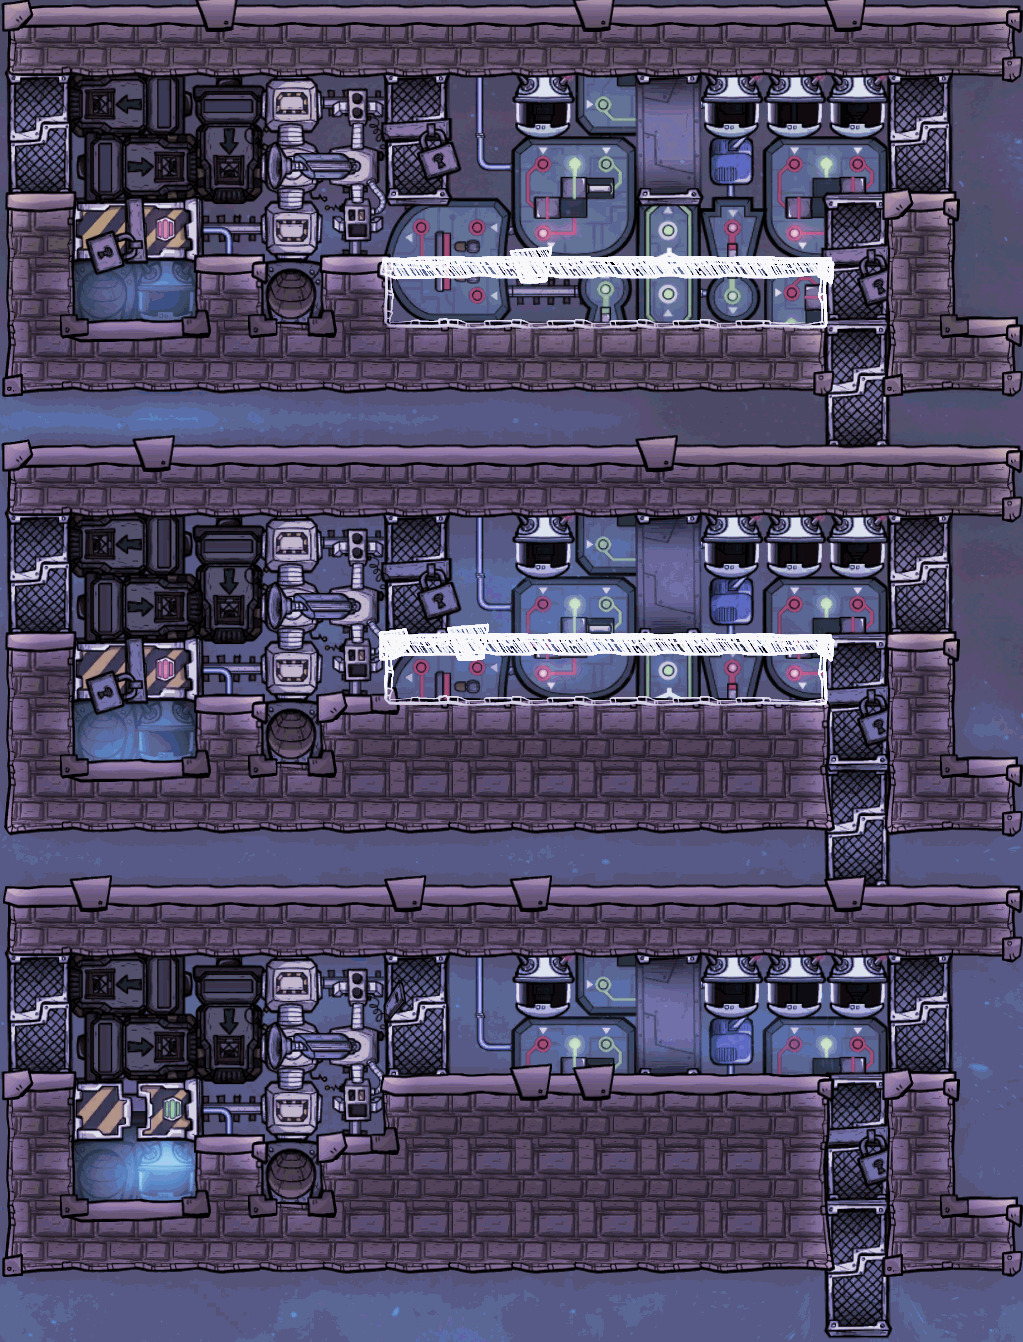
 To stretch it a little farther, you can replace the mechanized door floors from the Eggspam system with regular tiles. This will give a +16.5 decor bonus to each stable, or even more bonus with specialized tiles such metal and carpet.
6. Bonus Builds (All That Empty Space)
- Early Game Farming
Once you’re swimming in barbecue the planter boxes can be deleted, but then I’m back to not knowing what to fill the space with. One thing I used to do before I came up with an infinite storage and distribution system was fill the area with storage bins set to collect (almost) everything. The stables would then become the core of my in-base storage.
- Showers and/or Coal Plant
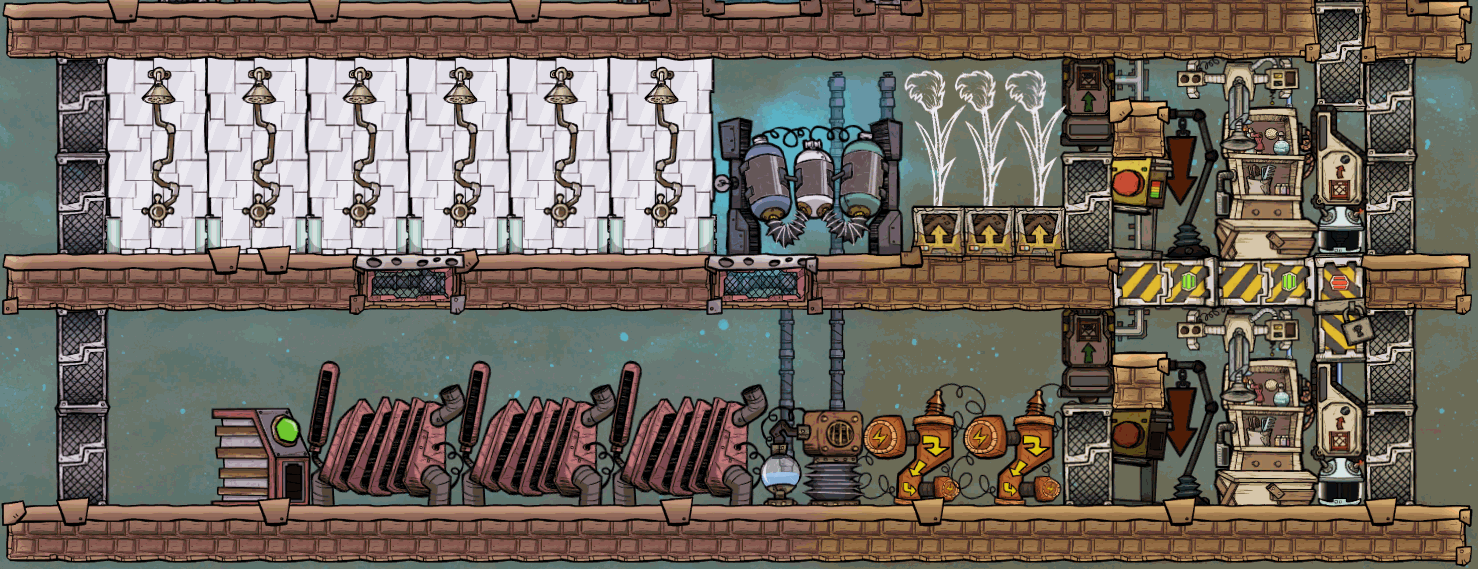
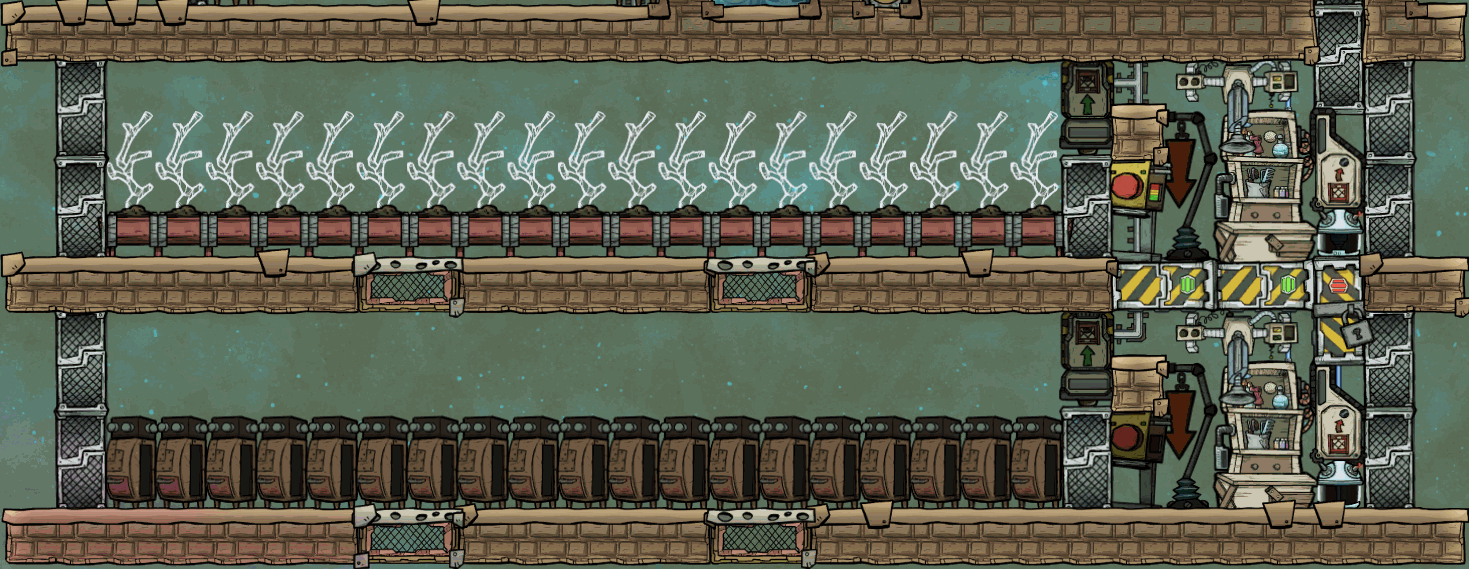
An option that goes fairly well with showers is an early coal plant. While not technically a "power plant" room (installing a power control station disables the grooming station), it’s simple to feed the coal from the stables through chutes to some auto-sweepers and coal generators for automated power production. A single auto-sweeper can keep three coal plants fueled, with plenty of room to install a transformer or two, a smart battery, and/or a carbon skimmer. The 1800W produced is more than enough to run the entire ranch stack (assuming no incubators) in addition to the carbon skimmer and sieve.
The carbon skimmer pairs well with the sieve for the showers, cycling water on the same loop, and if you decide to do this you’ll want the coal generators to be on your bottom stable in the stack. You'll also want to make the floor tiles solid to collect CO2 rather than the airflow tiles I usually use between floors. The generators produce a lot of CO2 and heat which I’d typically prefer to locate outside the base (and couple with a power control station for 50% more output). Even so, especially in the early game, three generators, a carbon skimmer and a battery could work well until you get a proper power plant running.
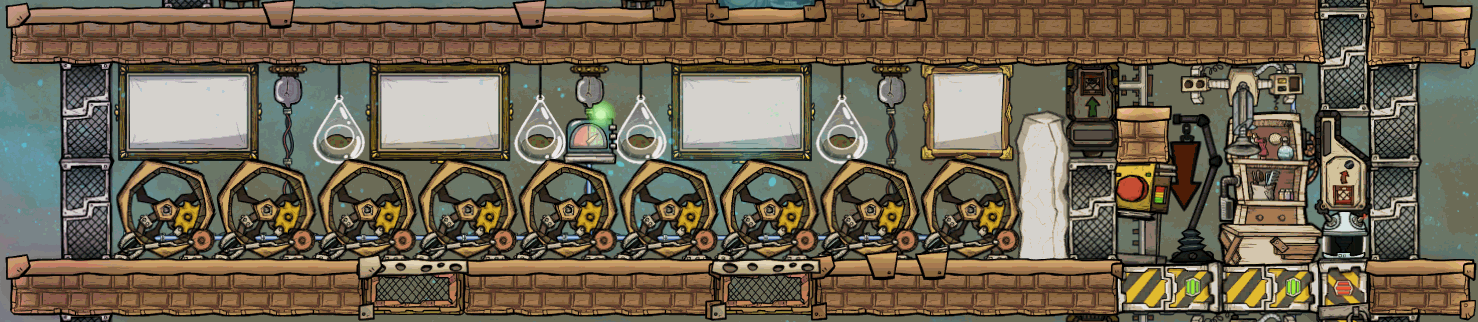
- Gymnasium
7. Summary
At the end of the day we built a fully automated hatch ranch that at least in my testing does not suffer from “double drop” when repopulating breeders. The construction process and required automation are both relatively simple, so it shouldn’t be difficult to build up to this in a survival playthrough.
Food for the hatches is delivered automatically, and all byproducts are extracted and sorted for distribution around the base. All your dupes have to do is groom the hatches and make sure the warehouse of hatch food doesn’t go empty. With smart storage bins you could even set up an alert if the warehouse gets low, and you'd have several dozen cycles to deal with the issue.
There are a lot of other partially and fully automated ranch builds out there, so this isn’t technically anything new or unique. I gave myself a set of design constraints to fit my playstyle and I like the design I came up with, but there are other designs available that accomplish essentially the same thing.
8. Thank You!
Thank you for reading this guide and I hope you found something worthwhile to take away from it!
I also want to thank several other designers whose ranches inspired me to create my own. I borrowed and tweaked elements from some of these designs while others simply saved me time by working through alternate approaches so that I didn’t have to.
https://imgur.com/a/esCY1dN
This last one is a bit different of a thank you. Twitch and Youtube streamer erisia_gaming recently found this guide and featured my build on his stream. It was a great opportunity to watch someone build this in a real playthrough. While I was super excited to see my design featured, watching him build in real time highlighted some areas of the guide that could be confusing. In particular there were some inconsistencies in the screenshots between older and newer designs that could be tricky when trying to follow along and manage a colony simultaneously.
With the Hot Shots update I've corrected almost all of the screenshots in the guide to reflect the latest design. There are still a few images where e.g. an automation overlay might have a background tile or two in the wrong place, but anything related to the pictured overlay is correct. In any case, I wanted to thank erisia_gaming for featuring my build and helping point out these points of potential confusion.
- ONI - Surviving the Early Game★ 5 (2.4k)83k views6.3k ♥54 minUpdated 6 Aug, 2019
- Useful Construction Patterns★ 5 (1.8k)74k views5.2k ♥66 minUpdated 29 Aug, 2020
- 10* things I wish I knew sooner...★ 5 (754)58k views1k ♥4 minUpdated 6 Oct, 2017
- ONI - Surviving the Mid-Game★ 5 (1.3k)44k views3.8k ♥150 minUpdated 6 Sep, 2019
- Not Quite Beginner's Guide★ 5 (361)32k views1.1k ♥91 minUpdated 26 Mar, 2023
- Руководство для начинающих. (ОСНОВЫ)★ 5 (629)32k views1.2k ♥21 minRussianUpdated 20 Apr, 2019




- Upgrading to PremiumTeam Fortress 2★ 5 (20k)1441k views11k ♥6 minUpdated May 11, 2022
- No More Room in Hell Official ManualNo More Room in Hell★ 5 (2.8k)569k views2.1k ♥29 minUpdated Apr 22, 2019
- NMRiH Community Hosting GuidesNo More Room in Hell★ 5 (526)351k views653 ♥1 minUpdated Aug 10, 2022
- How to 'Git Gud' Soon™MORDHAU★ 5 (2k)318k views3k ♥68 minUpdated Nov 16, 2024
- Лучшие кооперативные игры SteamPAYDAY 2★ 5 (1.5k)315k views2.1k ♥56 minRussianUpdated Apr 27, 2025
- Desert Eagle Heat Treated | Blue GemCounter-Strike 2★ 5 (1.6k)293k views1.5k ♥2 minUpdated Jan 16





This guide was created by its original author on the Steam Community. Are you the author and want it removed? Request removal.