Fully Automated Infinite Pacu Ranching (Deprecated)
1. Introduction
More than any other critter, pacu can really be the backbone of your colony's food supply for the entire game. Almost everyone starts out with hatches and barbecue, but in many cases we could skip that and go straight into pacu. In my last few colonies I've done a hybrid approach where I never fully automate my hatches. I build an "eggspam" hatch ranch (see my guide for more on that) and once I have mechatronics, instead of automating it I build a pacu ranch and start weaning off hatches.
In comparison to ranching critters for barbecue, pacu have a shorter lifecycle so food production ramps up faster. While sweetles can be overpowered barbecue producers (see my other guide for details), pacu absolutely demolish them. The ranch itself is much smaller and easier to build (no need to understand automation, and much less refined metal required), and there's essentially no input required to keep it running forever. Anyone who's seen hatches eat through 1500 tons of rocks should appreciate an infinite food supply that doesn't have a cost!
As you transition into the midgame, pacu are one of the best sources of lime through their eggshells. This can remove an important limiting factor on your steel production. Additionally, while cooked seafood has the same morale quality as barbecue (good, +3) it also provides a radiation resistance bonus for your dupes. This can be great for space exploration and radbolt research. In fact, if you're still producing barbecue, it can be cooked together with seafood to produce Surf'n'Turf. This is a great +4 quality food with the same radiation resistance bonus. This is a fantastic mid and late game food choice.
Finally, in the late game, pacu should be much better on your FPS than ranching other critters. Traditional ranches require separate stacked stables for each group of 8 critters, and then try to limit the pathing calculations in each stable down to 4-8 tiles. At the top of the stack is a control room with drowning traps and critter droppers, and many more critters walking around trying to path into one or the other. In a pacu ranch, you could have hundreds or even thousands of pacu and they would all be constrained to 2-3 tiles, greatly limiting pathing calculations.
All things considered, with the possible exception of shove voles (which are distinctly late game only), I believe pacu are the most overpowered food source in the game.
2. Pacu Farming Mechanics
As an additional benefit, pacu do not require grooming. They become tame by eating at a fish feeder. This is a great savings in dupe labor compared to running a grooming station for other critters, so a fully automated pacu ranch is a great early game investment.
Finally, cooked seafood is a great food as described in the introduction. On all of my colonies I shoot for obtaining Surf'n'Turf as early as possible for my "home world" food, saving things like pickled meal, grubfruit preserve or eventually berry sludge for rocketry and colonization of other planetoids.
Pacu are very easy to farm, since they are immune to all but two of the critter debuffs. The two to watch out for are cramped and confined, and as such there are only really three rules you need to follow:- Any tile a pacu is in must contain a minimum of 350kg of liquid(**). Otherwise they will flop around looking for liquid. In the flopping state the reproduction timer does not increase so the population will decrease.
- In order to prevent the confined debuff all pacu must be in a "room" with at least 8 tiles of space. It does not matter how many of those tiles contain liquid. As long as the room contains 8 tiles, and one of those tiles contains enough liquid, you can sustain an infinite population of pacu.
- Eggs of any type must be removed immediately from any room a pacu is in.
* - There is a bug(?) in all versions of the game since the Fast Friends update (June 2022) where populations of pacu might slowly decrease, especially if you're working on a different asteroid. This is believed to be due to the critter performance enhancements implemented, where it is believed some critter calculations are skipped for critters not on the focused asteroid. Whatever the root cause, the effect is that reproduction timers don't always increase when they should, and some critters die before reproducing.
** - The actual amount required varies by liquid and uses the same mechanic as the "flooded" building debuff. Essentially, if a tile contains 35% or more of the maximum mass of a liquid that the tile could hold, it is considered flooded. Pacu require that the tile they're in is flooded in order to prevent flopping. For water the maximum mass in a tile is 1000kg, thus it becomes flooded at 350kg. Denser liquids such as crude oil and petroleum become flooded at lower masses, but 350kg is enough for any liquid to sustain pacu.
- The 3-room Build
Based on the above mechanics, almost all pacu ranch designs rely on having three separate rooms or tanks. One tank for the breeders, a second for the starving pacu, and a third location for the eggs. Delivering fry (baby pacu) into one of the other two tanks when needed is where most builds diverge.
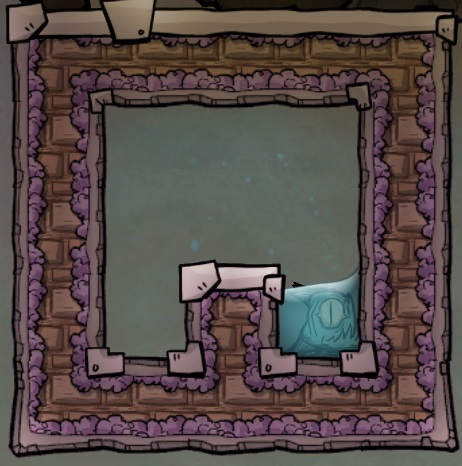
The only output of this tank (besides eggs) is pacu filet, which should be swept away to your kitchen.
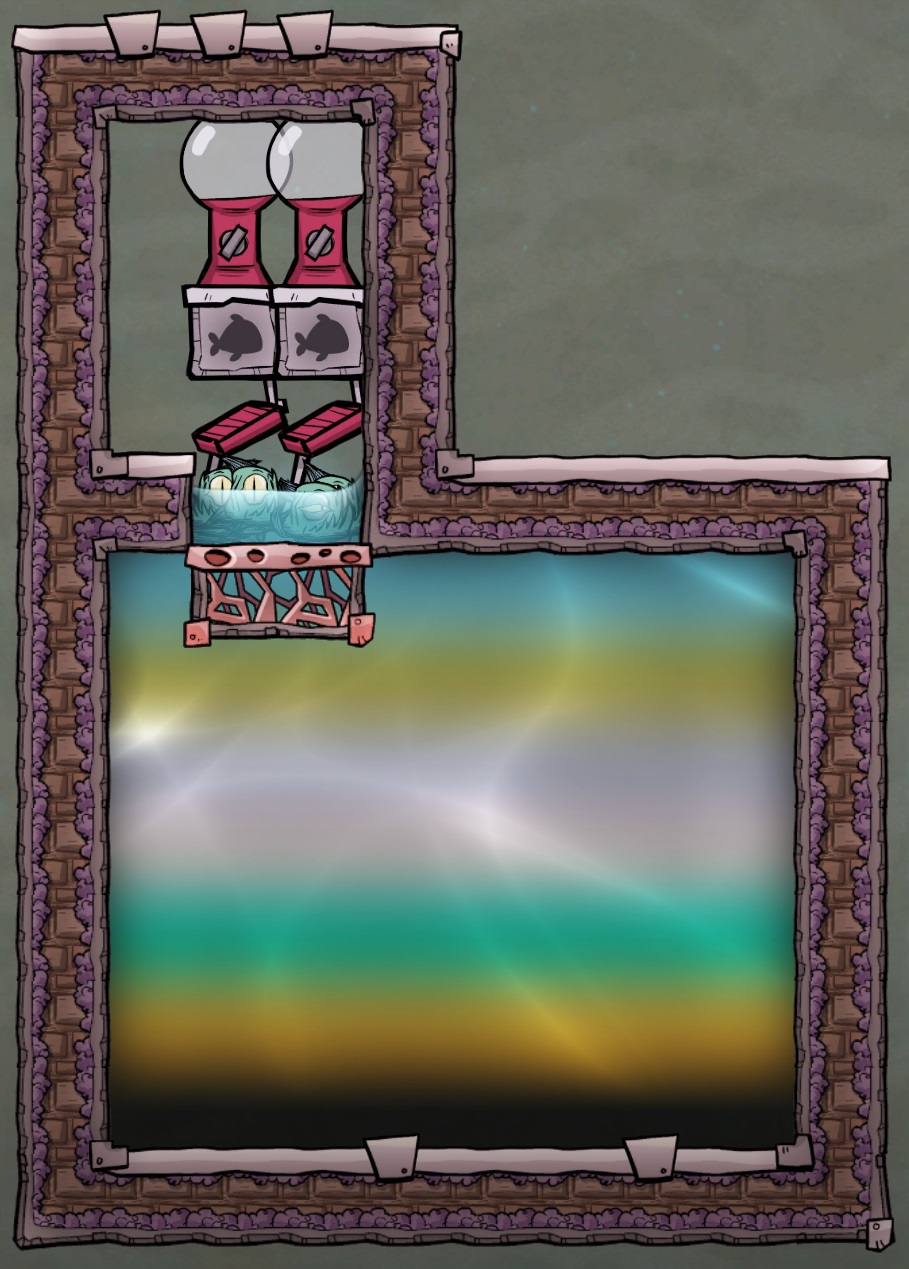
Of course the liquid stacking is not required, the entire tank could be full of water, or crude oil for that matter. The stacking only allows you to save several tons of liquid for other uses.
The outputs of this tank are both pacu filet and polluted dirt (fed pacu waste product). You will have to decide whether to load both onto the same conveyor, presumably to your kitchen, filter the outputs, or simply not collect the polluted dirt since it will be underwater and unable to offgas.
The final important note is that while the starvation tank and breeder tank may be in the same room, it is not allowed that they share the same pool of liquid. If the two liquids are ever allowed to touch, even if they are in two separate rooms (e.g. on opposite sides of a pneumatic door) the breeder tank will receive the overpopulated debuff and population growth will stop.
The important output of this room is egg shells from all the hatched eggs. Unfortunately we cannot collect those shells with any of the autosweepers in the other rooms, since those sweepers will be delivering eggs to this same location. If they can see the shells then they can see the eggs, and this would create an infinite routing loop. For this reason any pacu ranch requires a minimum of two autosweepers and two conveyor loaders, much like an automated kitchen with separate conveyors for cooked and raw items. When beginning a pacu ranch, you should expect to spend around 1100-1200 kg of refined metal, mostly due to this shipping equipment.
- The 2-Sweeper Design
This section provides more detail on what each of the sweepers and loaders is used for, and the rules a design must follow to reach this minimum goal.
- Used to transport eggs from both the breeder tank and starvation tank to the egg storage location in a third room.
- Used to transport eggshells, polluted dirt and pacu filet to your base.
- Must be able to reach the egg storage location in order to collect eggshells.
- Must be able to reach Conveyor Loader #2 to deliver eggshells.
- Must NOT be allowed to reach Conveyor Loader #1.
- This is the reason two loaders are required, otherwise a single loader with filters for eggs could have been viable.
- Optional: Must be able to reach all fish feeders to restock them with food.
- This could be left for dupes to do manually, but the goal is full automation.
- Optional: Must be able to reach an algae or seed storage location to restock the fish feeders.
- Algae and seeds can be delivered from your base to the same chute as eggs, making this simple. Otherwise you can add a storage bin nearby.
- Must be able to reach all cells of the starvation tank and breeder tank that could ever contain a pacu.
- These are the cells where eggs, pacu filet and polluted dirt will be generated.
- Must be able to reach Conveyor Loader #1 to deliver eggs.
- Must be able to reach Conveyor Loader #2 to deliver polluted dirt and pacu filet.
- Putting it All Together
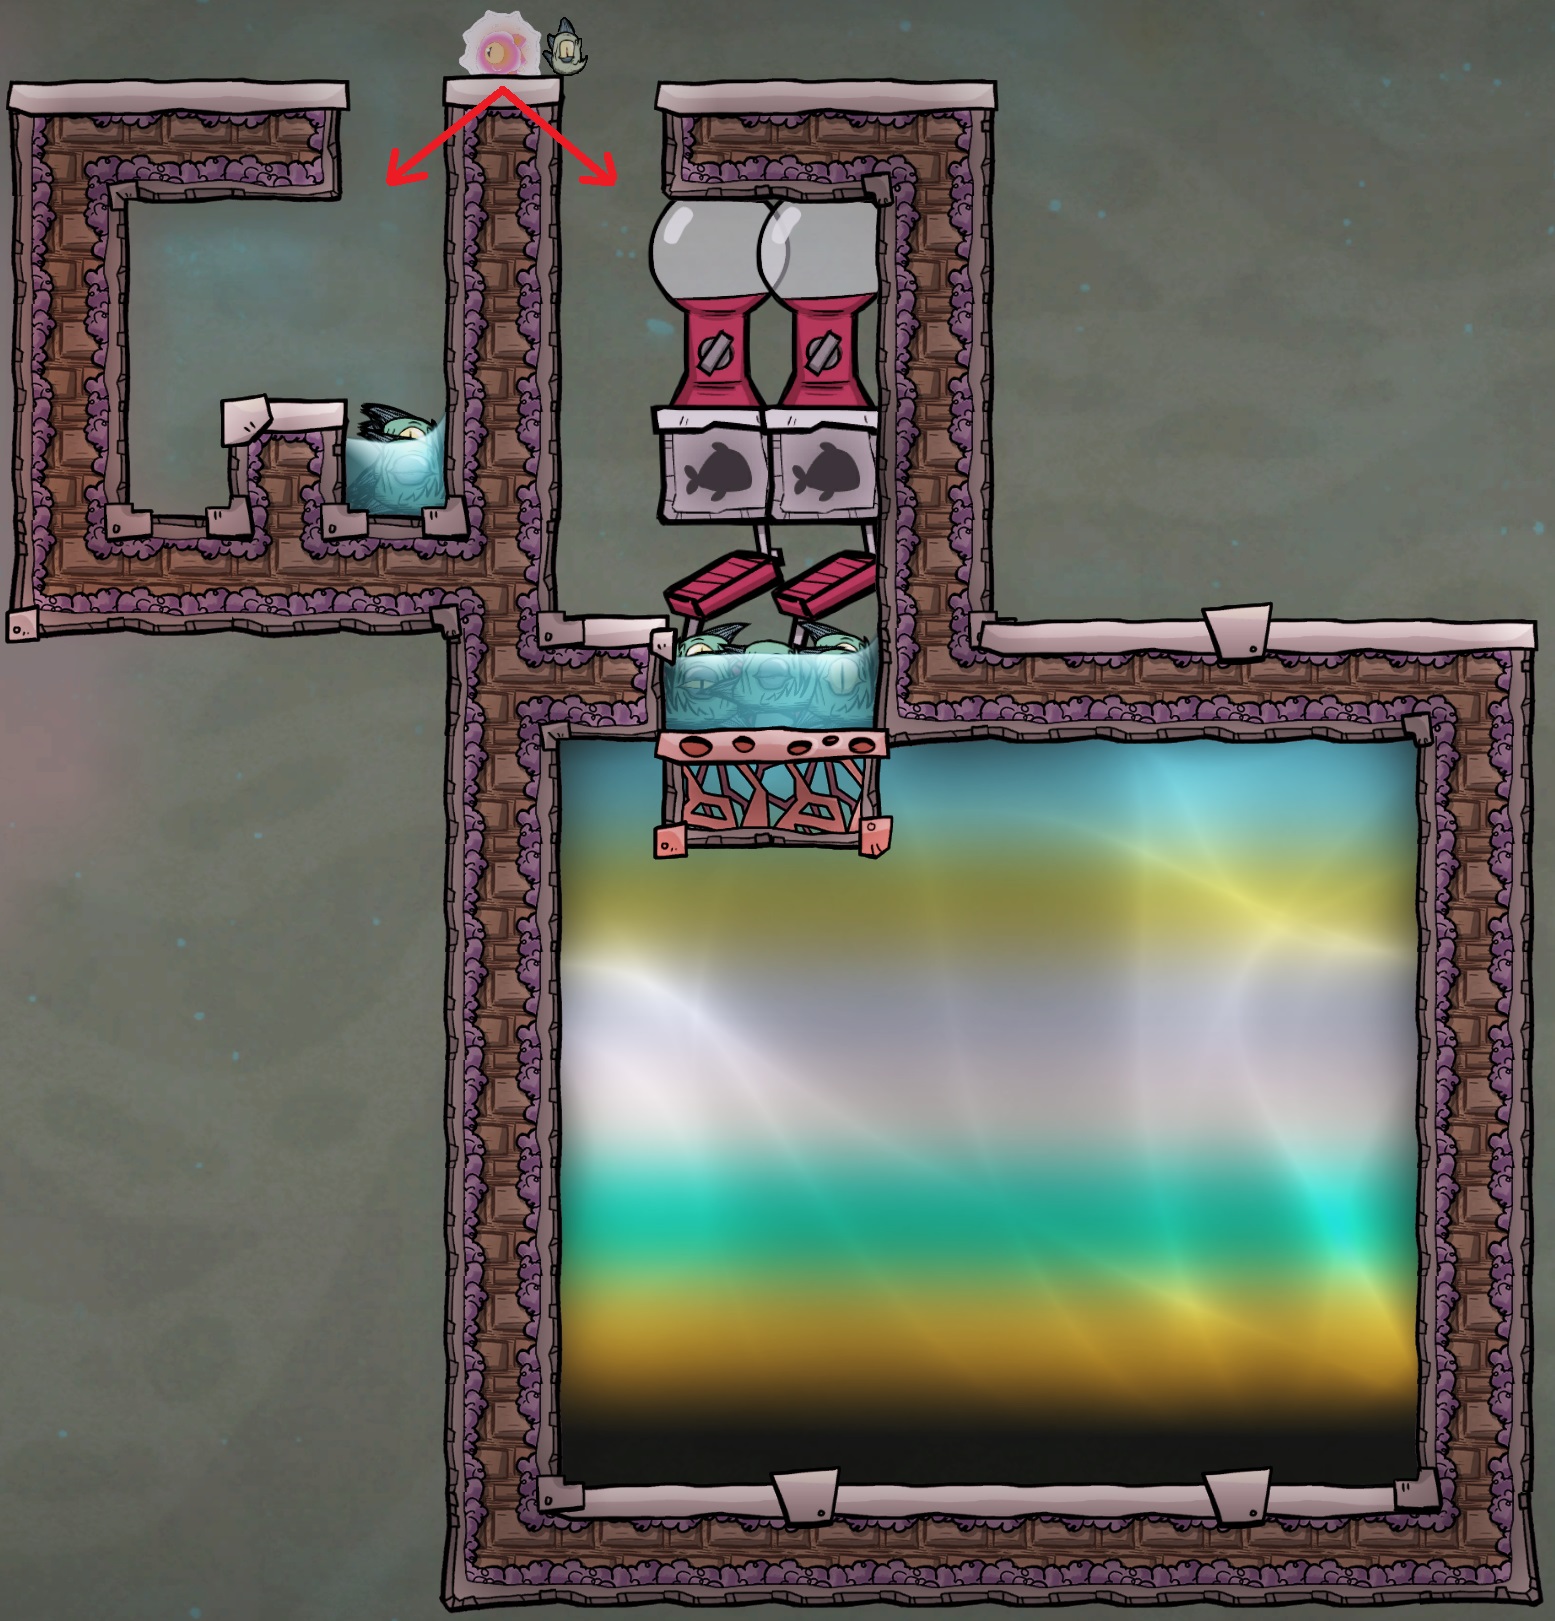
In this approach, the starvation and breeder tanks are located side by side, and eggs are removed to a third location above and in between them. When the eggs hatch, the fry will flop either left or right and join one of the two tanks.
As displayed this wouldn't work for a variety of reasons, not least of which is that all three tanks are technically the same "room" so the eggs would cramp all of the pacu. In addition, if we allowed the fry to flop randomly the breeder tank would become overpopulated. We would want to force them to go left into the starvation tank unless the breeder tank needs more pacu. Solving both of these problems is easily accomplished by surrounding the eggs with automated doors, controlled by a critter sensor in the breeder tank.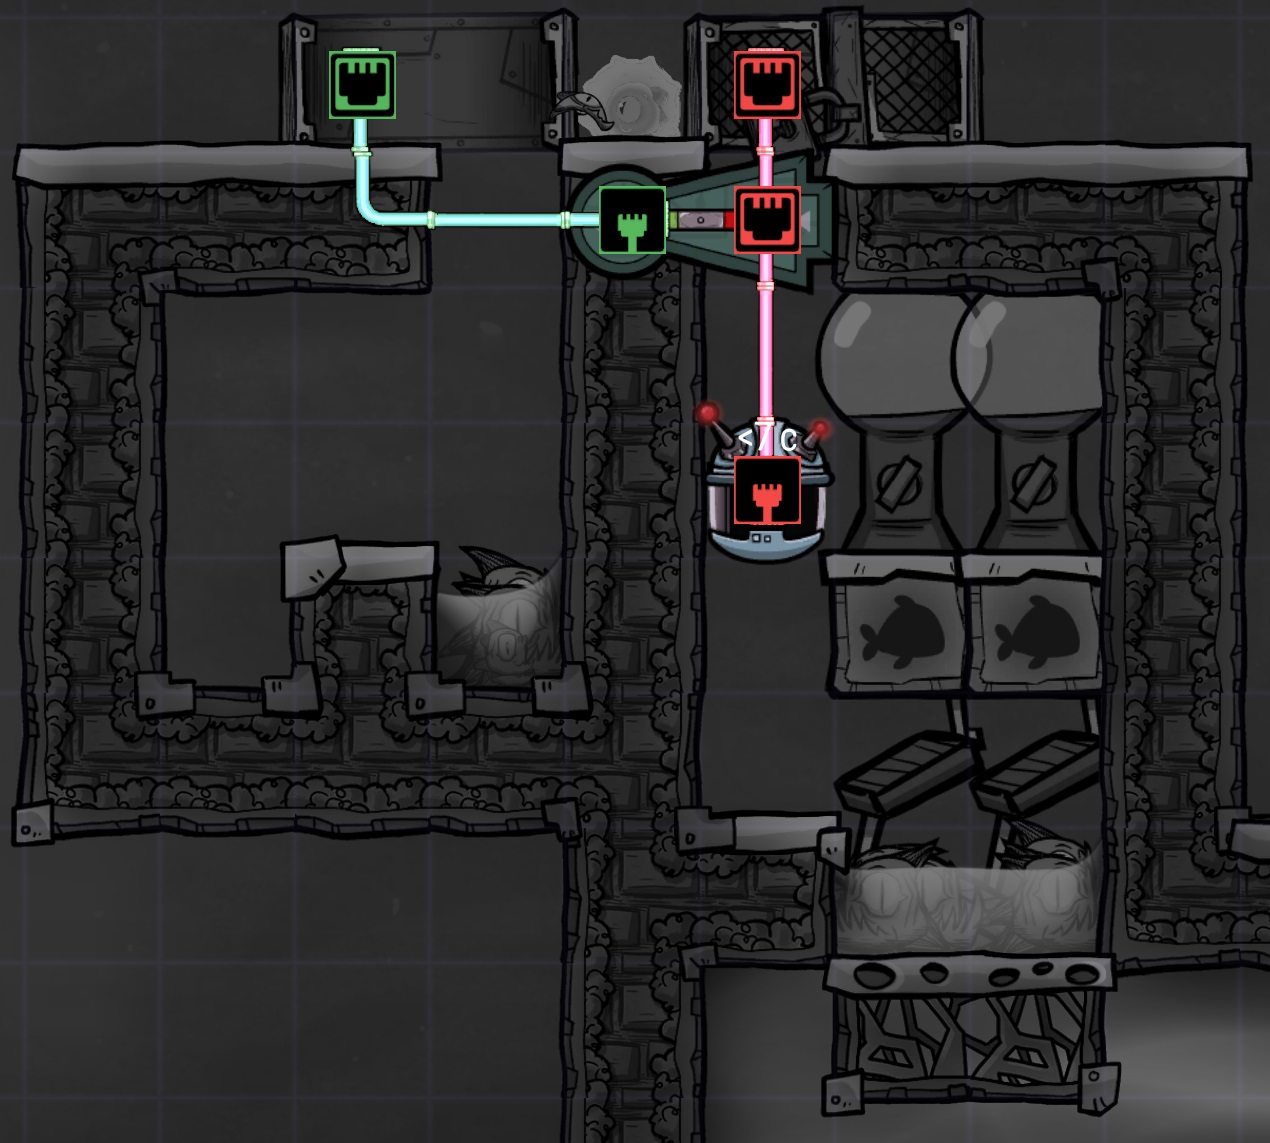
The two doors enclose the starvation and breeder tanks as their own rooms, with the eggs located outside in a third "room". One door is driven by the critter sensor directly and the other door driven by the same line after it goes through a NOT gate. This ensures that only one door can ever be open at a time, forcing the pacu to flop in whichever direction we choose. From what I've seen this has become somewhat of an obvious "standard" design pattern for pacu ranches, reinvented over and over by countless designers. In my opinion, any good / efficient pacu ranch must be based on some variation of this pattern, though it'd be interesting to see if any new and different design could compete.
An extremely simple implementation of such a design, using a naturally occurring pool of water, is shown below: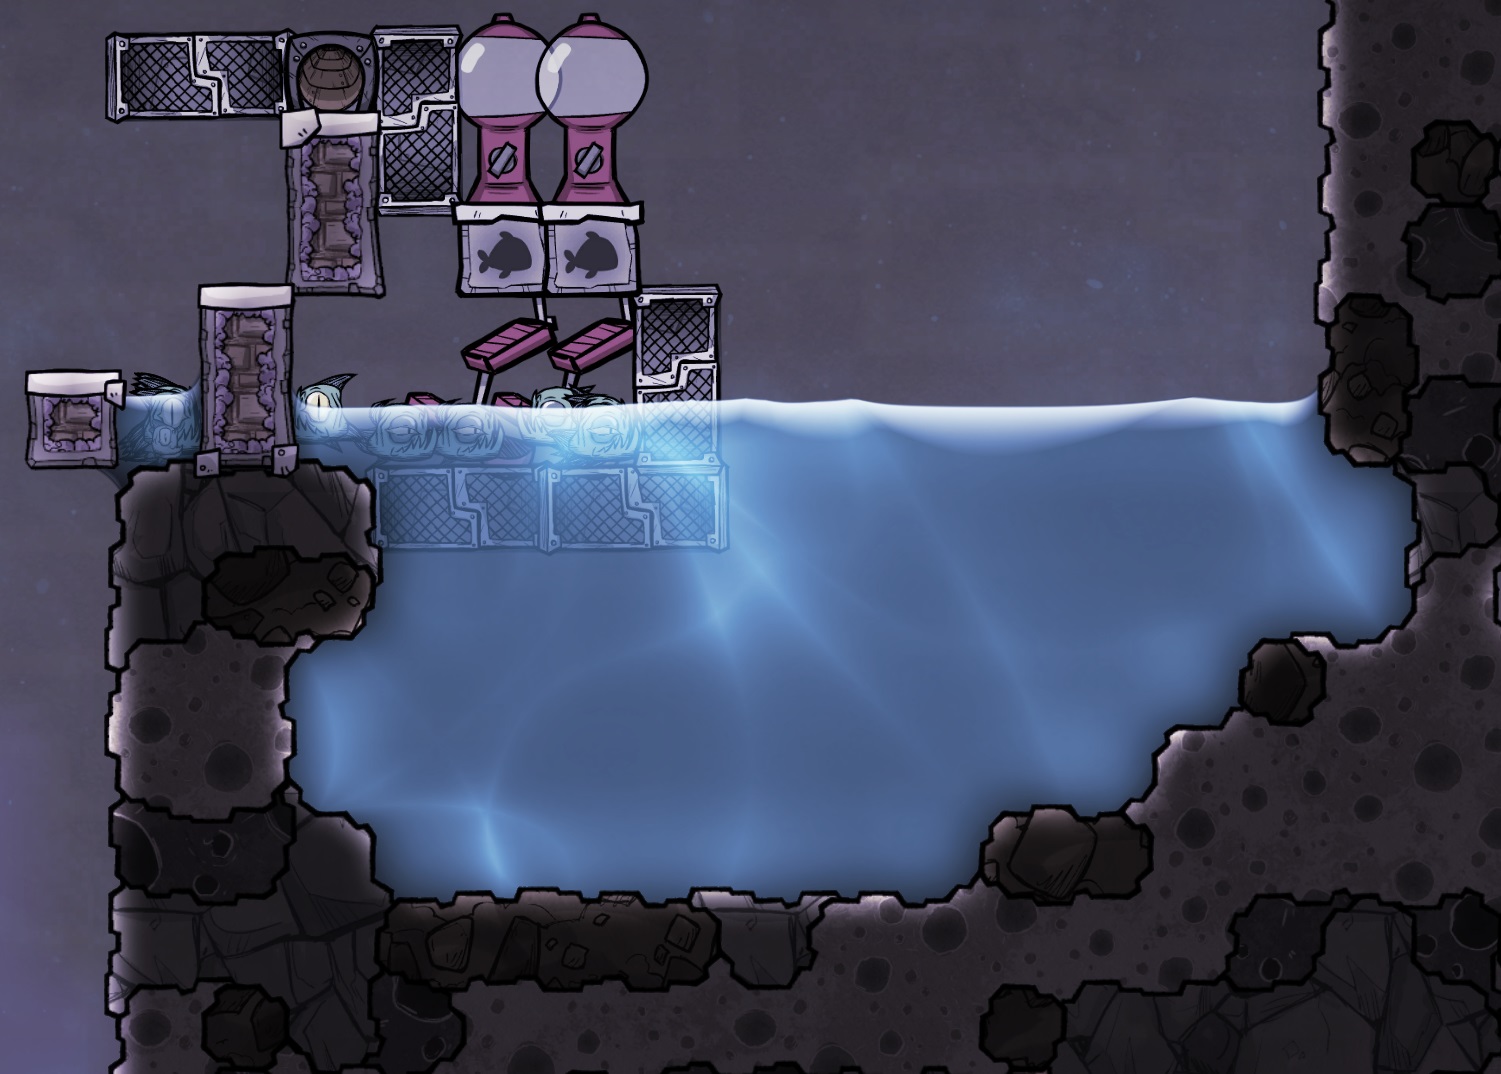
Note that as shown the starvation tank on the left and the eggs location are still in the same room. Additional tiles or doors would have to be constructed to separate the two, while maintaining a minimum of 8 tiles in the starvation room. The easiest way to do this might be a single tile on top of the conveyor chute, so that the eggs are surrounded on all 4 sides in their own 1-tile room.
That said, as soon as you research Solid Transport and skill a dupe into Mechatronics you could build something like this with autosweepers to move the eggs to the top chute, and a critter sensor to control the doors. Your reward would be an infinite amount of food for the rest of the game, without feeding every rock on the map to some hatches.
Further refinement of this design pattern comes from minimizing the number of cells pacu are allowed to path in, and maximizing autosweeper coverage to reduce the refined metal costs. As stated above the hard minimum is two autosweepers and two conveyor loaders, depending on the creativity and efficiency of the design.
3. Design Spotlight - BierTier
Normally I'd do a "Bottom Line Up Front" section and jump right into a preview of my design, then list out the design objectives I was shooting for. For this guide I chose not to do that and instead highlight another design that had a massive influence on my own. If you want to skip over this section you can jump right to construction in the following section. However, I believe the design considerations brought up here will be worth it.
The build highlighted in this section was created by BierTier, and you can see him talk about it in this video on his YouTube channel:
https://www.youtube.com/watch?v=Ssl0ybLu0CM As a bonus his Pokeshell designs in that video are pretty darn great as well. I don't have a guide out for Pokeshell yet because I don't ranch them often, but I have tried out his ranch and can recommend it.
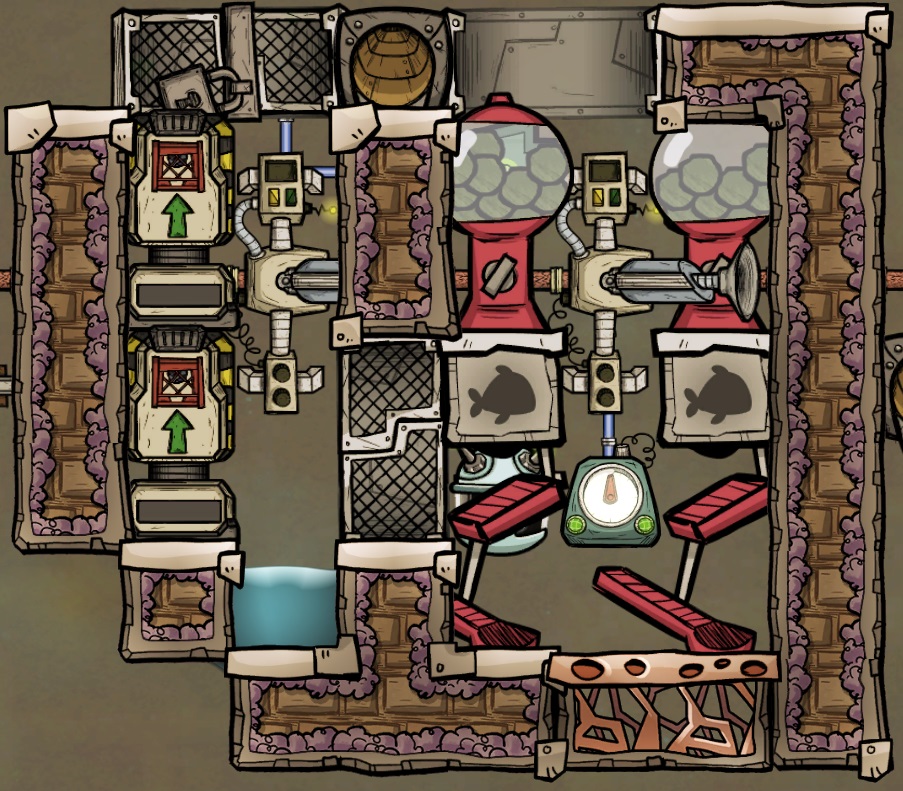
You simply "dip" the bottom right into a pool of water, either naturally occurring or a tank you build around it and fill. Set the critter sensor to however many breeders the tank can support (total cells / 8) and everything else is handled automatically. This design checks off all of the objectives from the prior section:
- Breeder pacu are confined to 3 tiles of movement with two fish feeders
- Starving pacu are confined to a single tile and the enclosed starvation tank is only 9 tiles compared to the minimum of 8
- Eggs are removed from both pools and delivered to a standard automated dropper above the tanks
- The minimum of two autosweepers and conveyor loaders are used
- You can deliver algae or seeds to the same chute as the eggs and the sweeper will refill the feeders. It's 100% automated!
It was very difficult to design something new that I could even consider "as good" as the BierTier build, nevermind something that I could dare hope to consider better. I'll discuss some of my failed designs in a later section to emphasize that point and show a bit of what goes into developing this kind of guide. In the meantime, I'll describe the tiny little nitpicks I've found with this build to show what I'll be trying to improve upon.
- Areas for Improvement?
This section serves the same purpose as the Design Objectives in my previous guides. The difference is that this time my stated objective is to improve upon BierTier's design by eliminating a handful of minor nitpicks.
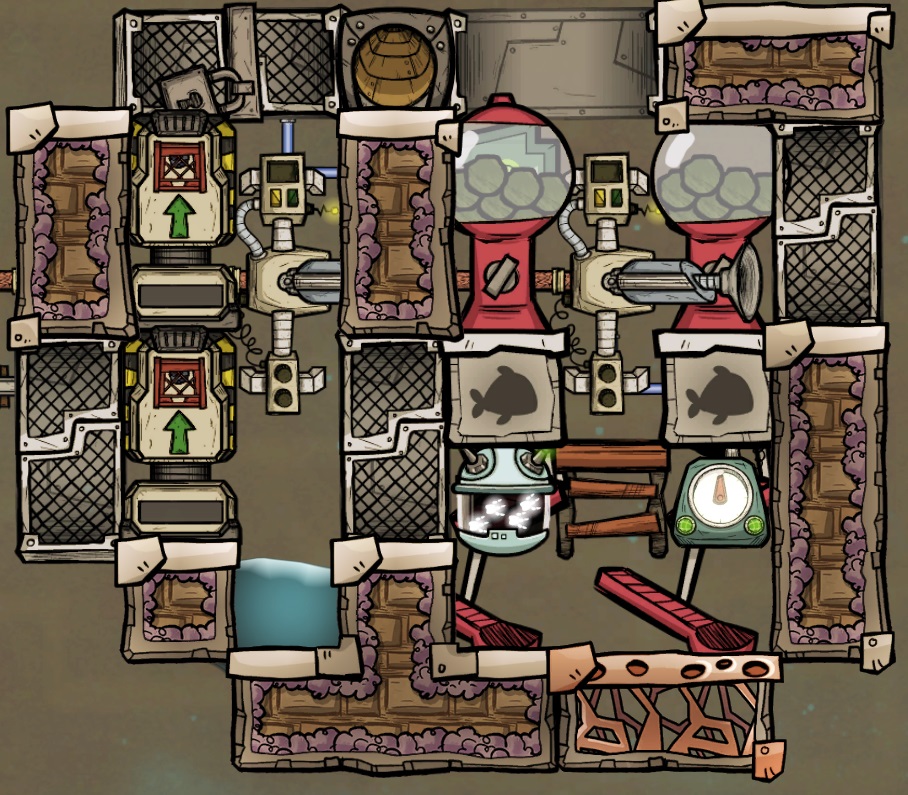
You only need a door on one side or the other, whichever side is easier for your dupes to access. I show both in the screenshot which is unnecessary. This modified design is actually what I've been running in all my colonies for those thousands of cycles. The shot below shows the navigation options for the build with and without this modification, demonstrating that a dupe can now access every cell and escape from locked doors:
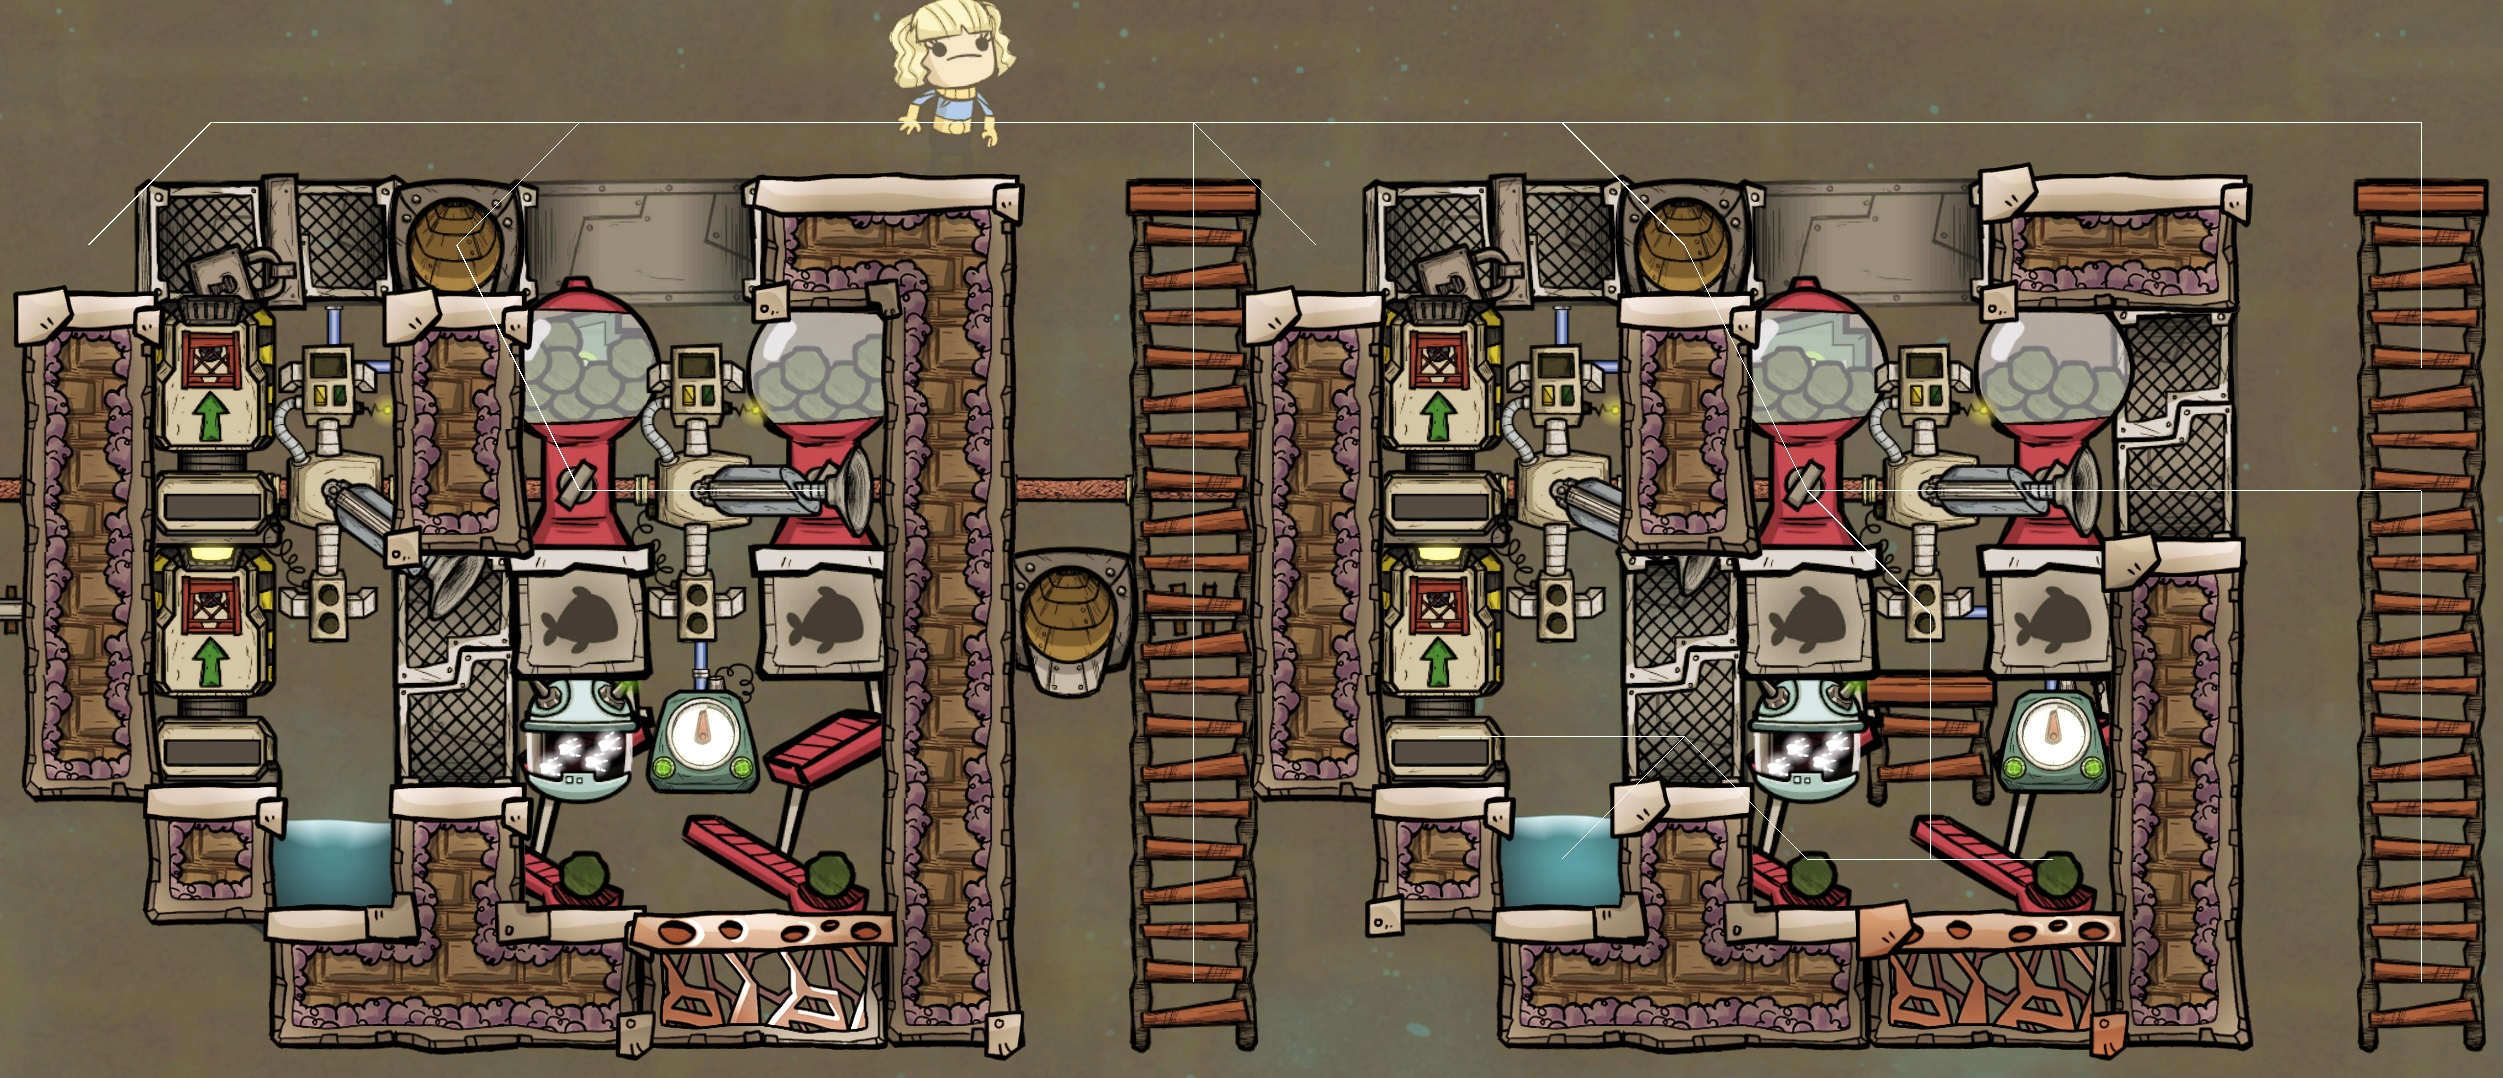
Regardless, I'm not going to write a guide about adding a ladder and a door to someone else's design, so we need more reason than this to reinvent the wheel.
In order to combat the problem, a simple notifier can be added to alert you when overpopulated, so that dupes can be dispatched to kill the excess breeders. It requires an extra critter sensor as well, so in some ways it's not even worth the extra 60+ refined metal, but it's a potential minor enhancement we could consider.
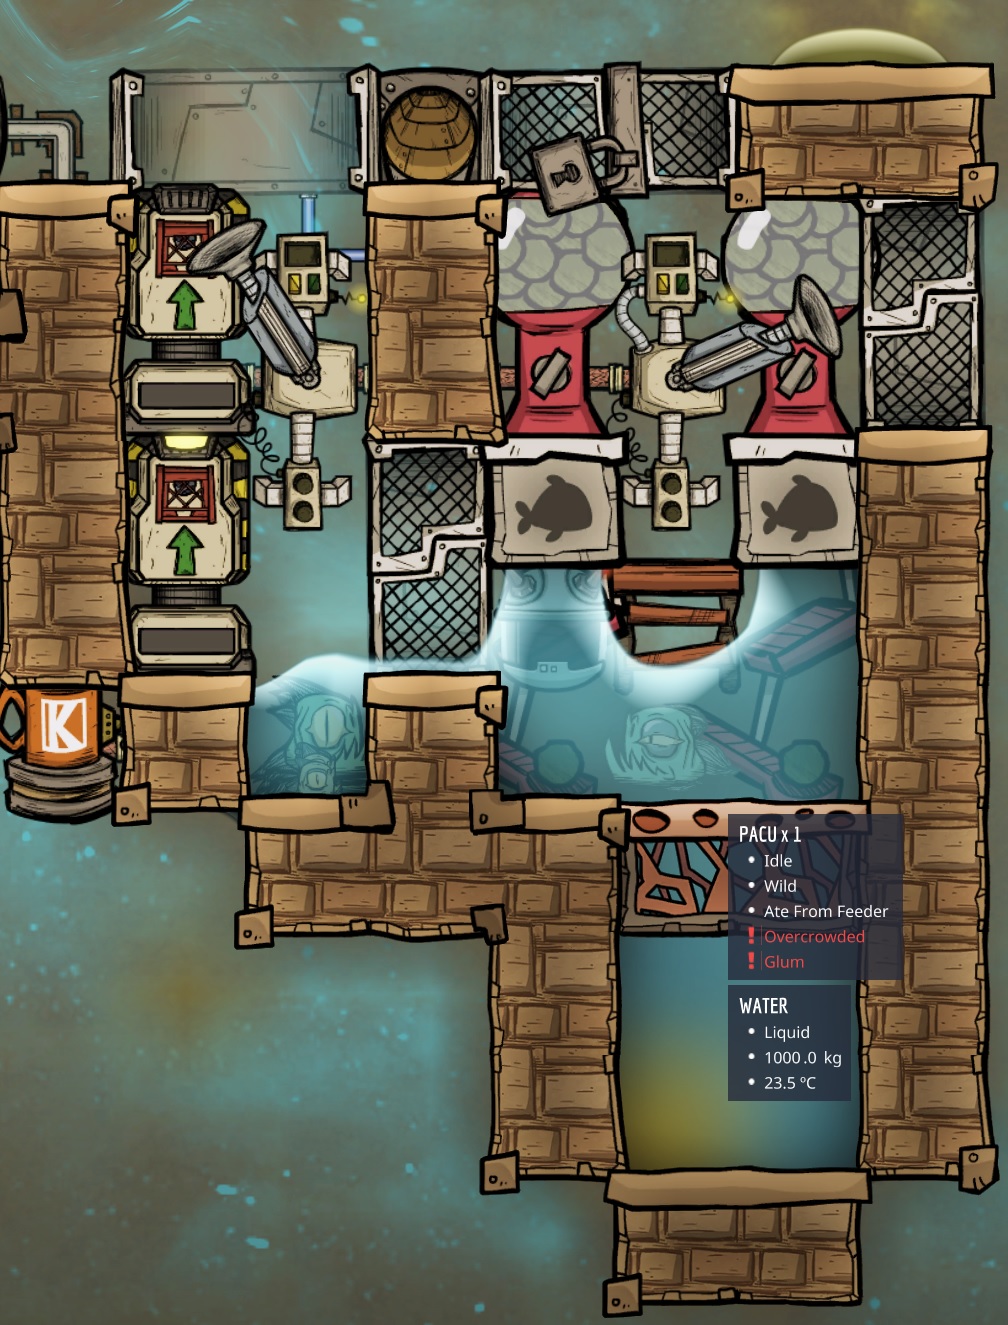
There are too many ways to list how this ends up happening in all of my colonies. Brine ice at the top of the map melts and runs down my ladder shafts. Pipes burst from heat or cold and spill liquid on the floor. Oh, and the aforementioned trapped dupes peeing all over the tank. Unless you cover the whole top of your ranch in tiles (which is honestly not a bad idea) you're probably going to run into this issue eventually.
The good news is, this is not deadly to the ranch, as described in Overpopulation above. The bad news is that you could go for hundreds of cycles with no growth before you notice that foreign liquid is ruining your ranch. The only decent workaround I've found is to add a hydro sensor immediately above the starvation pool, set to trigger a notifier if it ever detects any liquid whatsoever. That enhancement is well worth the 60-70 refined metal in my opinion.
This is also the actual reason I build the modified fully-accessible design I described above. As long as it's only a few kg of liquid, dupes can be sent in to mop it up and it's easy to return the tanks to normal. Without full access to the interior it's impossible to mop the spill so you'll be deconstructing walls to get in.
This minor annoyance was really the only thing I could find inspiring me to create my own pacu ranch design. A door and a ladder solve my only other nitpicks, and frankly a sensor and notifier could mostly solve this one. That's just how good BierTier's design is. Regardless, as I worked towards my own design my primary criteria was4. Failures and Lessons Learned
It's probably tempting to think that the people posting guides and Youtube videos just sit down and sketch something out and it magically comes together and works. You're only ever exposed to the final polished product, not the heaps of failures that let up to it.
Since this is one of my shorter guides, without many mechanics or statistics to bury you in, I thought it might be fun to shed some light behind the scenes. This section will present some (certainly not all!) of my failed attempts at pacu ranching, and show what I learned as I evolved towards the final designs.
- First Attempts
While not technically my "first" attempts, these were the first I felt pretty good about and willing to playtest. You may have even seen a variant of this design show up in my recently published Not Quite Beginner's Guide.
https://steamcommunity.com/sharedfiles/filedetails/?id=2918094086 I was using that colony to playtest a new SPOM design, and decided to work in some testing of the pacu ranch prototype as well. Thankfully the SPOM testing went perfectly, because the pacu ranch had several critical flaws.
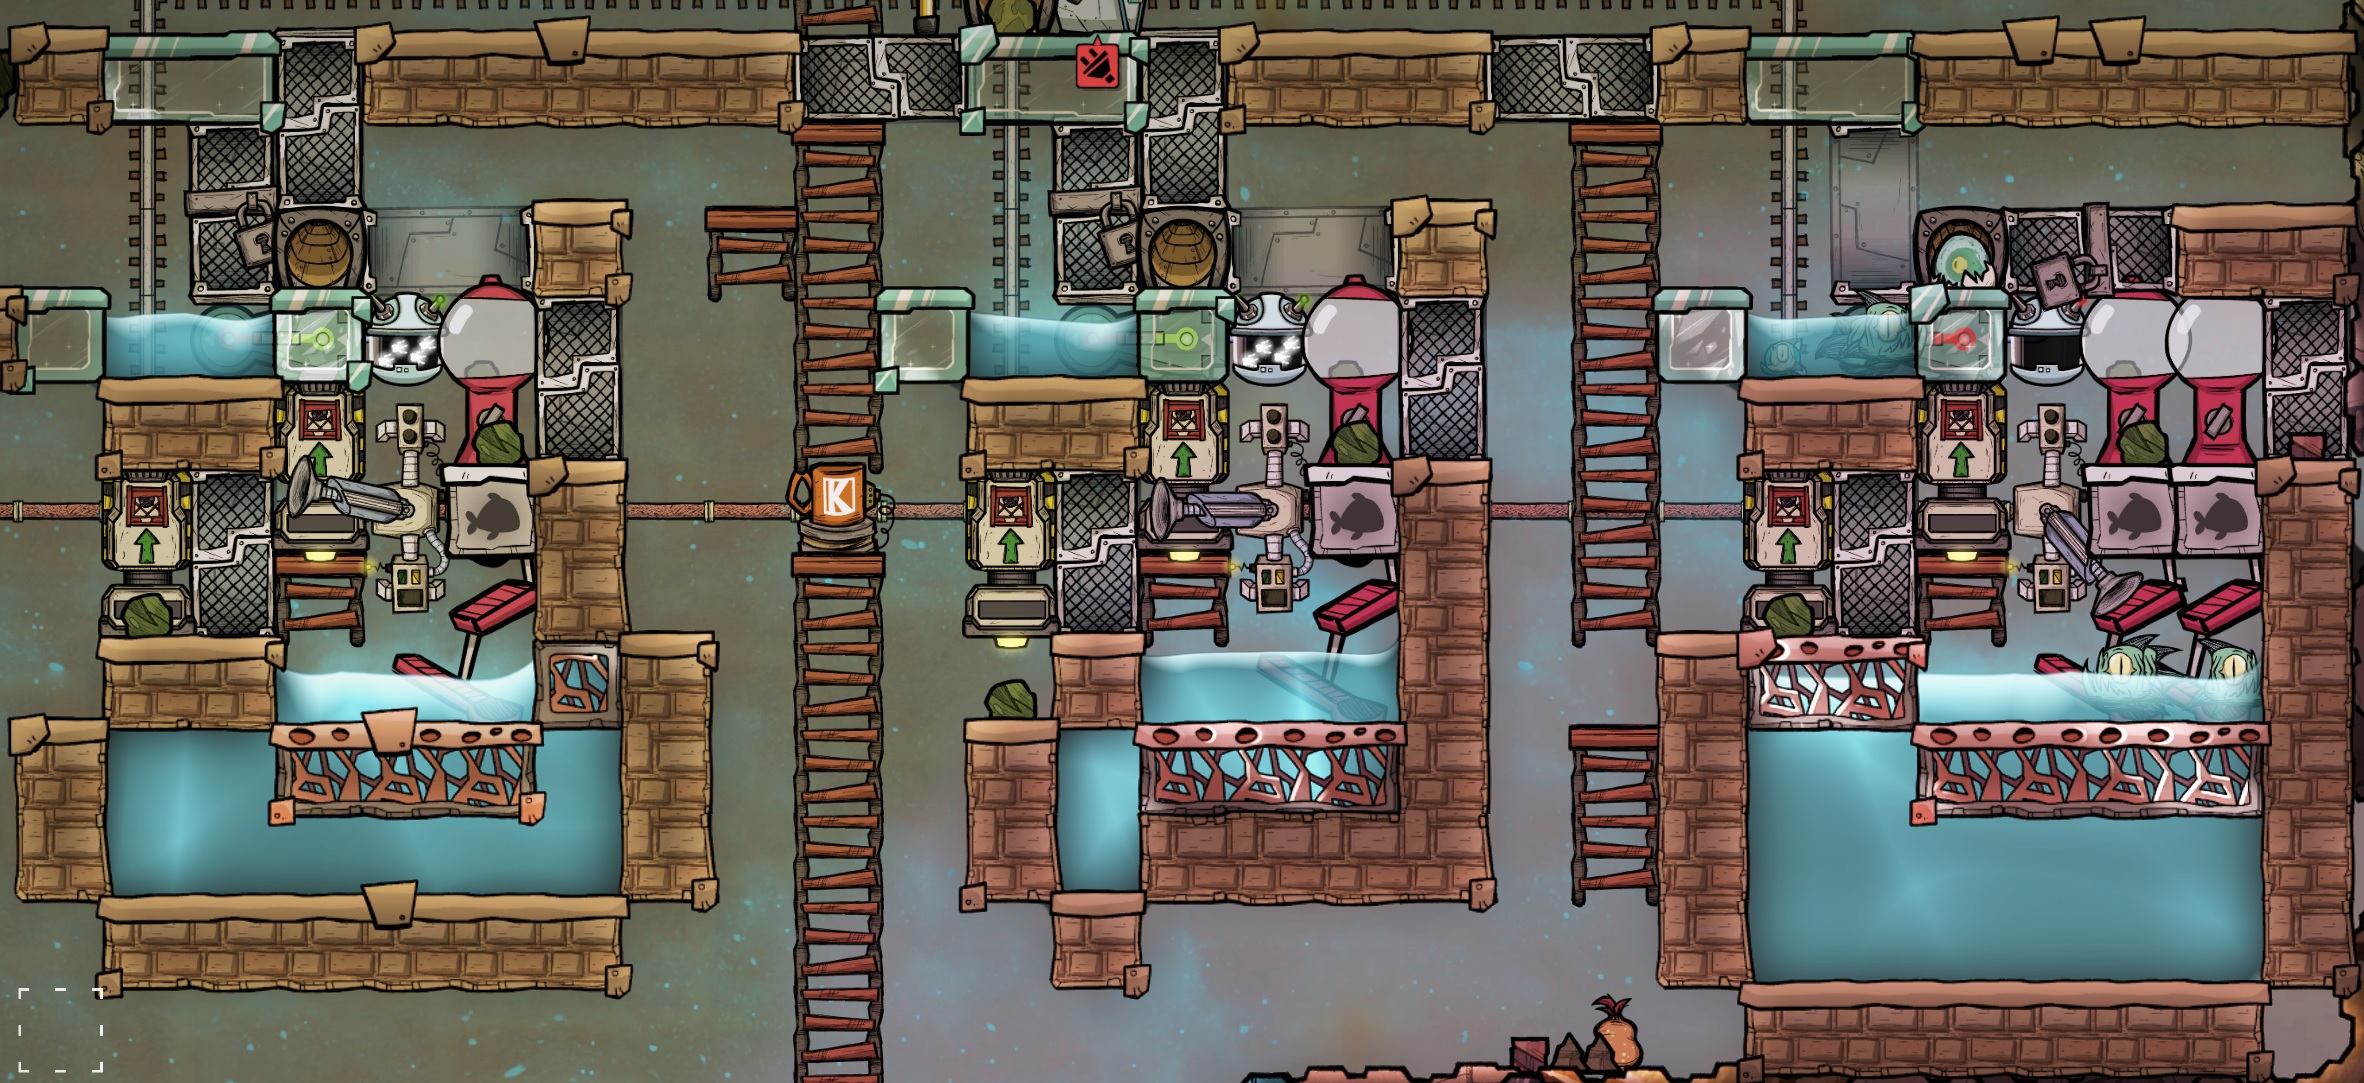
If you've read any of my other guides you've probably picked up that I like modular, expandable designs. That played into these first designs and I was hoping to produce a design that could expand the number of breeders on demand, or even add a second feeder when you felt it was necessary. At this point I wasn't even considering getting materials like eggshells from the ranch, so I hadn't yet realized that two autosweepers would be a mandatory minimum.
The first thing I didn't like about this build was that the starvation tanks were all 2 tiles, and the 2-feeder versions gave the breeder pacu 4 tiles to swim around in. Those are both strictly worse than the BierTier design which has 1 and 3, respectively.
More critically, I only found out much later that the sweeper could not reach the left-most tile in the starvation tank. My pacu count never really took off the way I expected and I kept wondering if something was wrong with my room size or food supply. It turned out that pacu eggs were being laid in that second tile and not being removed, essentially killing all the pacu in the starvation tank and resetting the population. Whoops!
- Second Attempts
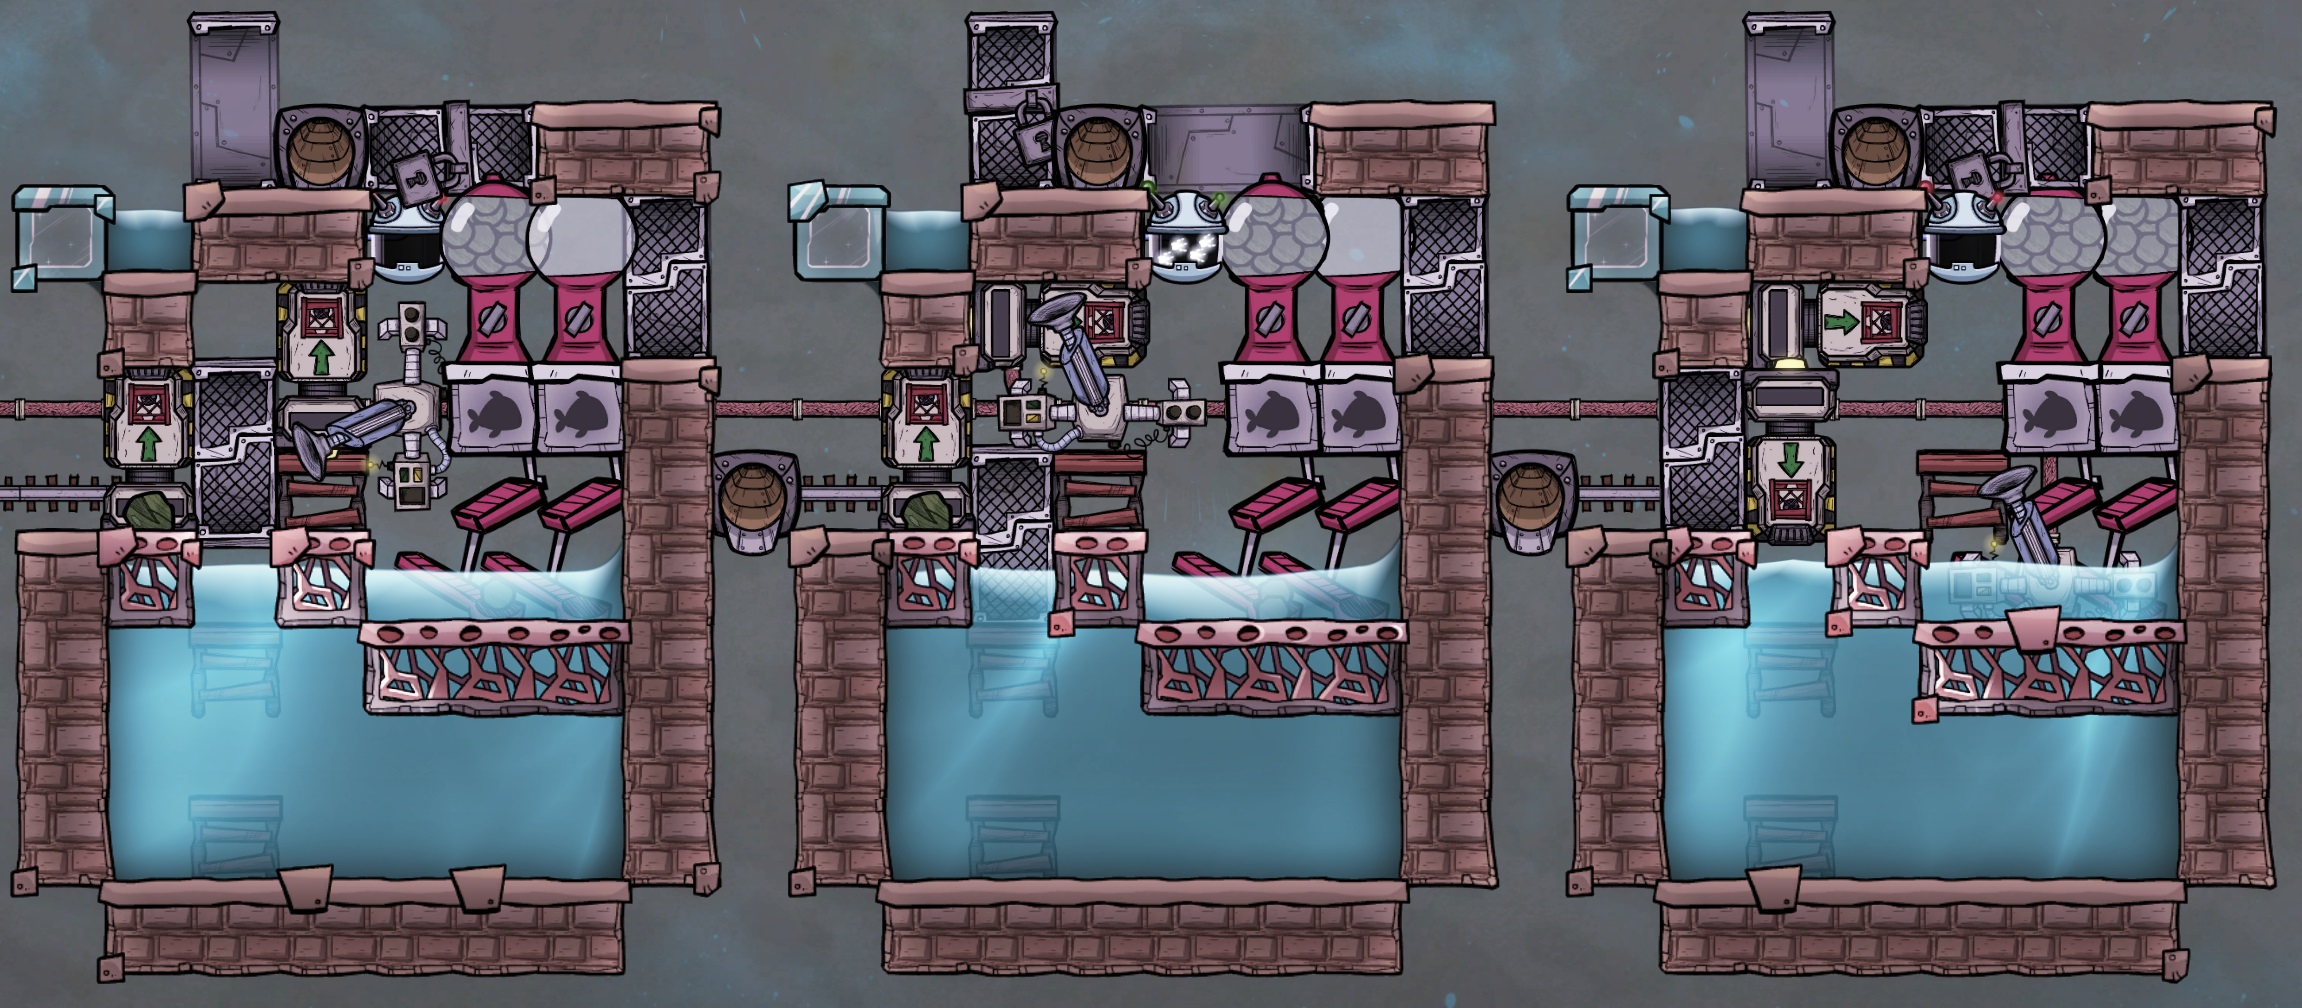
In general I liked this design a lot, but in further playtesting I noticed another small flaw. The single sweeper cannot supply both fish feeders when they're all in line with each other like this. I had previously thought that the active tile for filling the feeders was the "knob", but it turns out to be the gray tile with the fish on it. The only way to fill multiple feeders would be for the sweeper to be above or below them, rather than to the side.
This was around the time I realized that a second autosweeper was going to be required anyway, for collecting eggshells at the conveyor chute without creating an infinite routing loop for eggs.
This was also where I learned another important lesson. While the top 3 tiles of the fish feeder are considered foreground objects and you can't build anything on top of them, the bottom two tiles can be built over with other structures. I already knew the top of these two tiles could be built on, as that's where BierTier places his critter sensor. However, I had assumed that the bottom tiles with the spoon had to remain clear for the fish to access the food. This realization drove me to the right-most build in the above graphic, with the autosweeper right on top of the feeders. With some minor additional tweaks this led to what I considered my first viable design.
- First Viable Designs
I was pretty happy with this build overall. It's fully accessible with the two doors on either side, and even supports a line of ladders going down into the pool below the two loaders. It's strictly impossible for the liquid in the two tanks to touch, as the pneumatic doors provide a kind of overflow for extra liquids that may fall in. My only nagging regrets were that it seemed a little larger than necessary, and it didn't achieve the goal of a 2-tile breeder tank.
With the autosweeper in this location on top of the feeders, this particular design would never support a 2-tile tank, but I did feel that it could be shrunk slightly in other ways. After a bit of experimentation I came up with the following refined and miniaturized variation: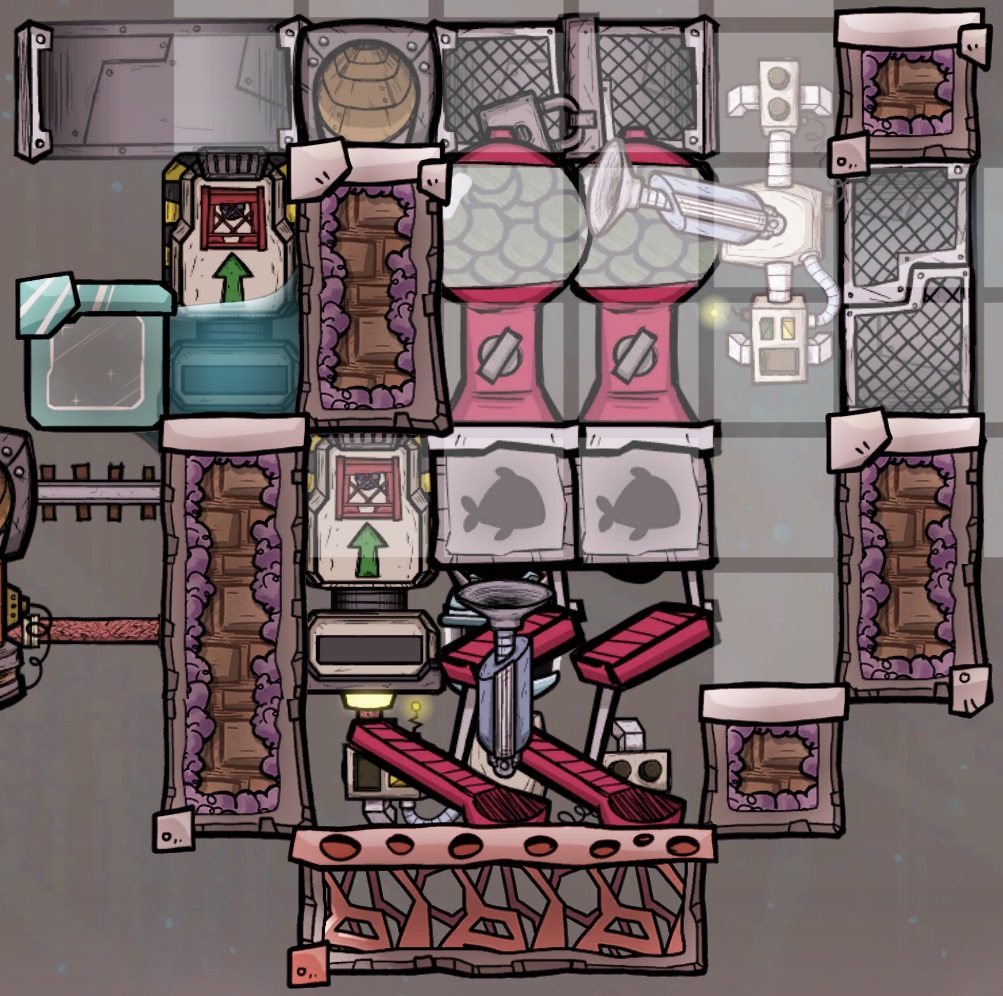
This build fits in a 7x7 space as opposed to the previous 8x8. It's not a major practical savings, 1 tile in either direction, but in terms of area it's 15 tiles less, just under 25% smaller. It still supports full accessibility, and if you wanted access to the pool below you could replace either of the bottom most insulated tiles with a pneumatic door, and a line of ladders below it.
The autosweeper positioning in both of these designs mandate a 3-tile space for the breeders, so I knew I'd have to move it to reach my 2-tile goal. The most obvious spot seemed like a single tile higher, and with a great number of additional failed layouts I settled on two that seemed to work well.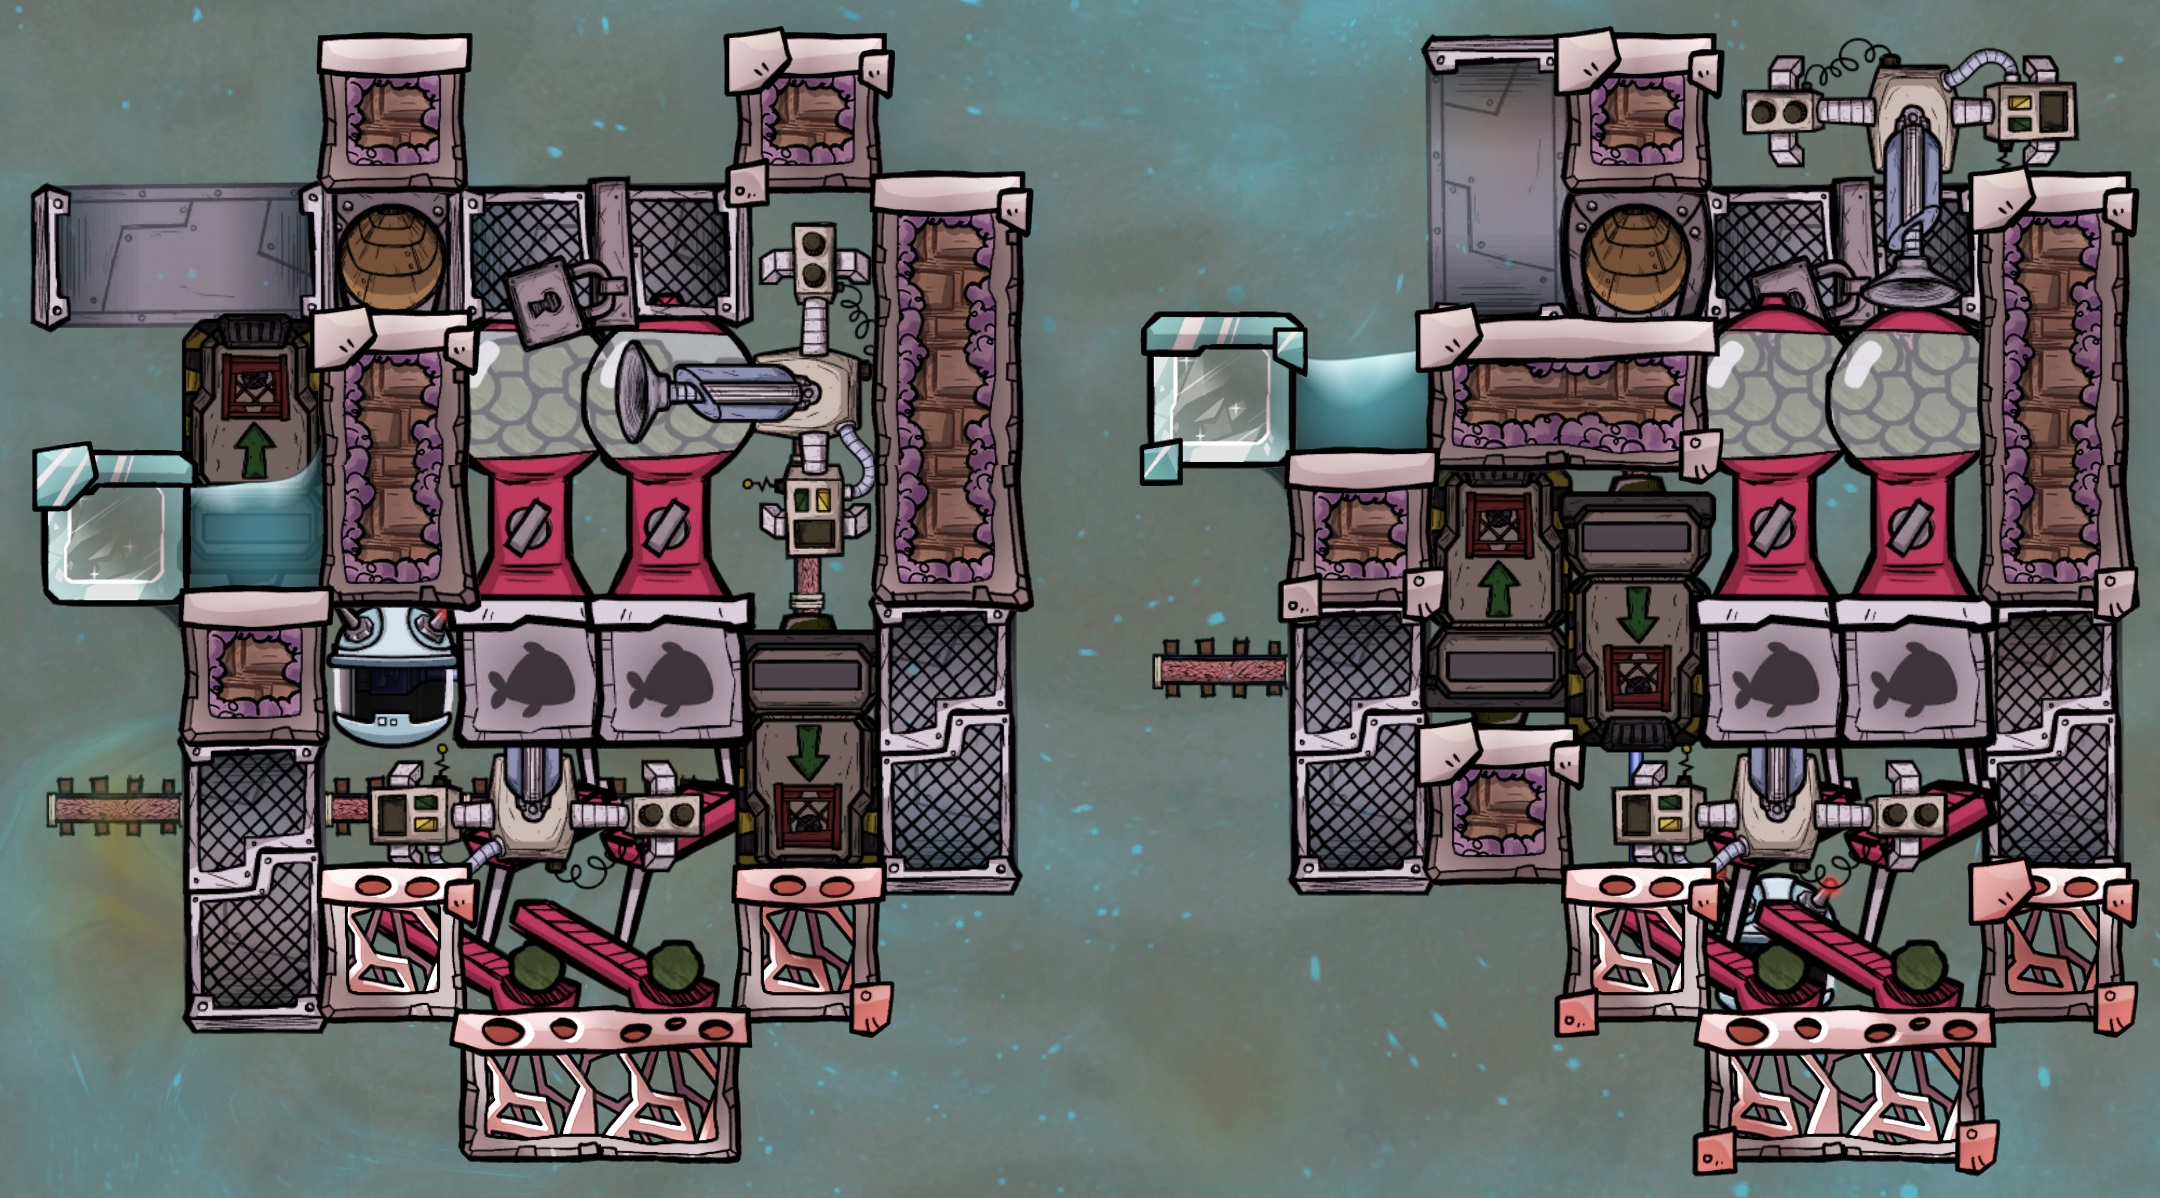
Both of these designs measure 7x8, splitting the difference between the former two. In both designs the top autosweeper can reach the loader on the right, but not that on the left, while the bottom sweeper can reach both. The top sweeper can reach the chute and both fish feeders, so we've met all of the requirements to properly supply material in and out of the ranch.
While it doesn't really affect the function, I moved the pneumatic access doors which provide dupe access lower in the design, so that any spilled liquids will overflow more quickly.
Finally, the builds contain one or two unused spaces where additional optional sensors could be added (such as the cycle sensor from BierTier's design). In the construction section I'll refer to these as builds 1A (left) and 1B (right), and show how they can be expanded further to support more optional features.
- Second Viable Design
While I was quite happy with the two results in the former section, I wanted to come at the problem again from an entirely new angle. From my prior work on control rooms for critter ranches, I knew that there is always exactly one tile where you can place an autosweeper in order to reach two adjacent tiles through a diagonal. In other words, somewhere below the breeder tiles would be a cell where a sweeper could reach them both.
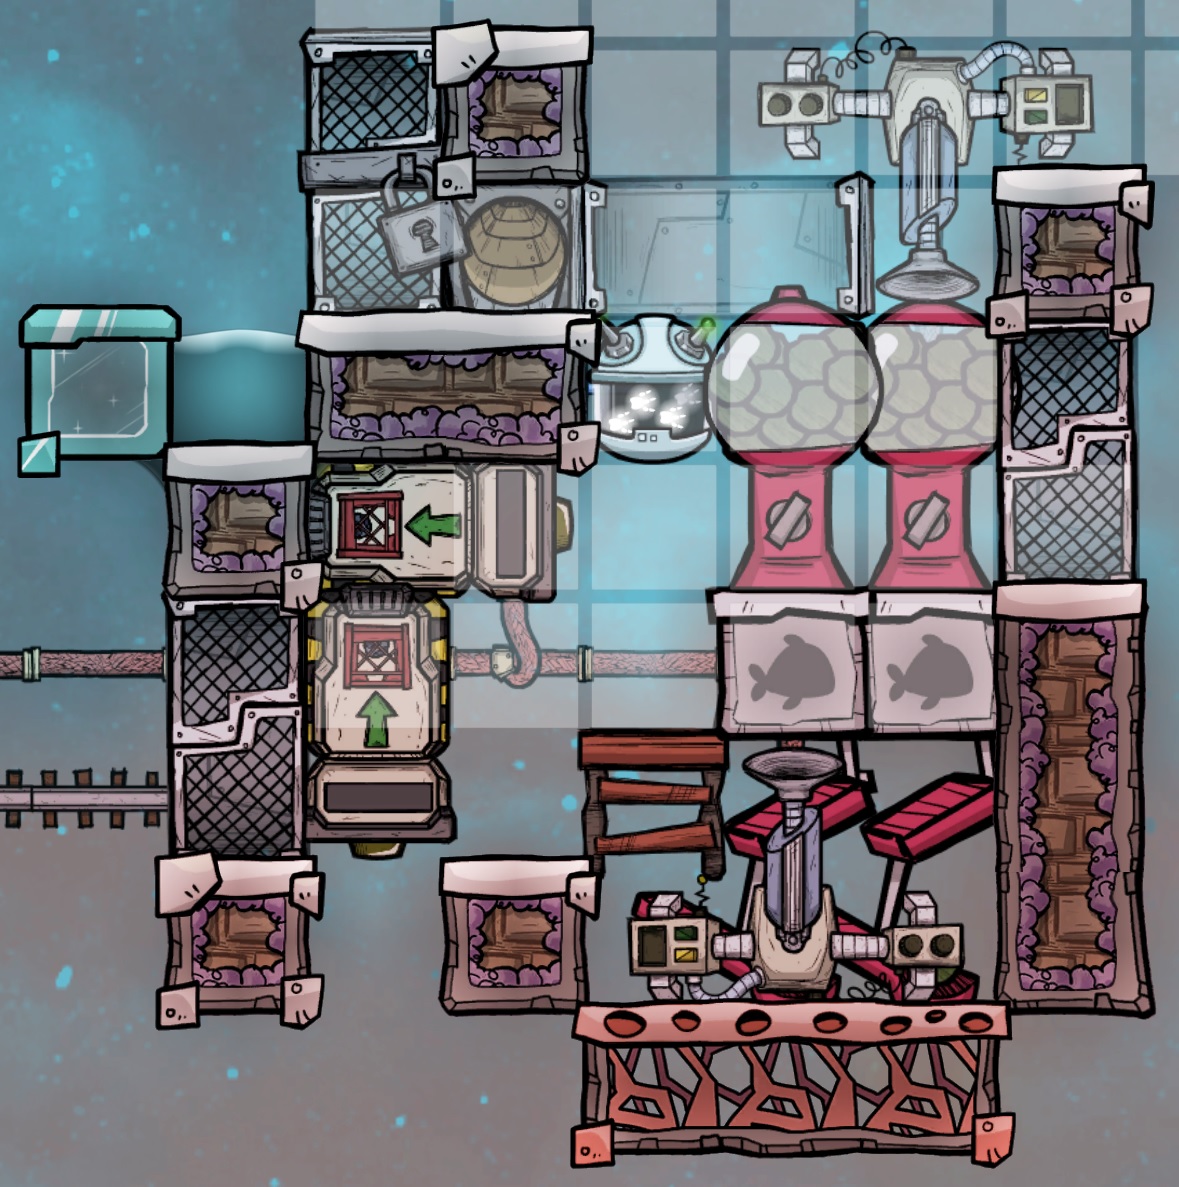
I played around with autosweeper positioning until I found this cell, which is shown in the graphic below: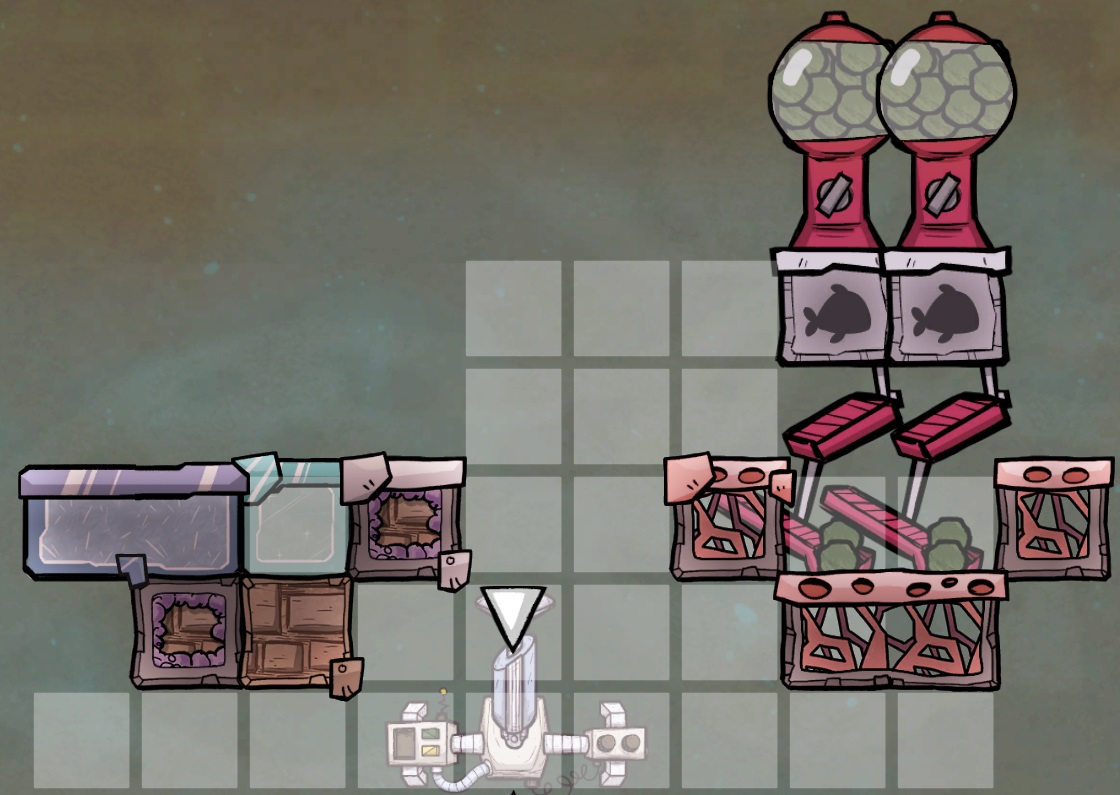
Given the breeder and feeder configuration I wanted to achieve on the right, the location shown (or it's mirror 7 tiles to the right) is the only place from below where a sweeper can reach both cells. From there I had to determine where I could place the starvation tank such that the same sweeper could remove eggs from both tanks and not require a third sweeper.
What I found out is depicted by the different tile types in the above graphic. There are only two options of where to put the starvation tank. The single glass (light blue) tile is the closest tile reachable by the autosweeper, and only when the right-most insulated tile (purple) and the bottom regular (brown) tile are constructed. This is what is shown in the above graphic. In this scenario you would build a third tile where the right-most plastic (gray) tile is, creating a single-tile starvation tank where the glass tile is.
The other option would be to delete the regular (brown) tile and build another tile where the glass tile currently is. In that arrangement the autosweeper would be able to reach both of the two plastic (gray) tiles, just like it's reaching the two breeder tiles on the other side. Ideally you would build a third tile over the left-most plastic tile, creating a single-tile starvation tank where the right-most tile is. You could have a two-tile tank where both plastic tiles are, but there's really no reason to have more than one cell for your starving pacu.
In any case, there's also no reason to make the ranch design any wider than necessary, so I decided to put my tank where the glass tile is shown, as close to the sweeper as possible per the first described option. That led to the following construction: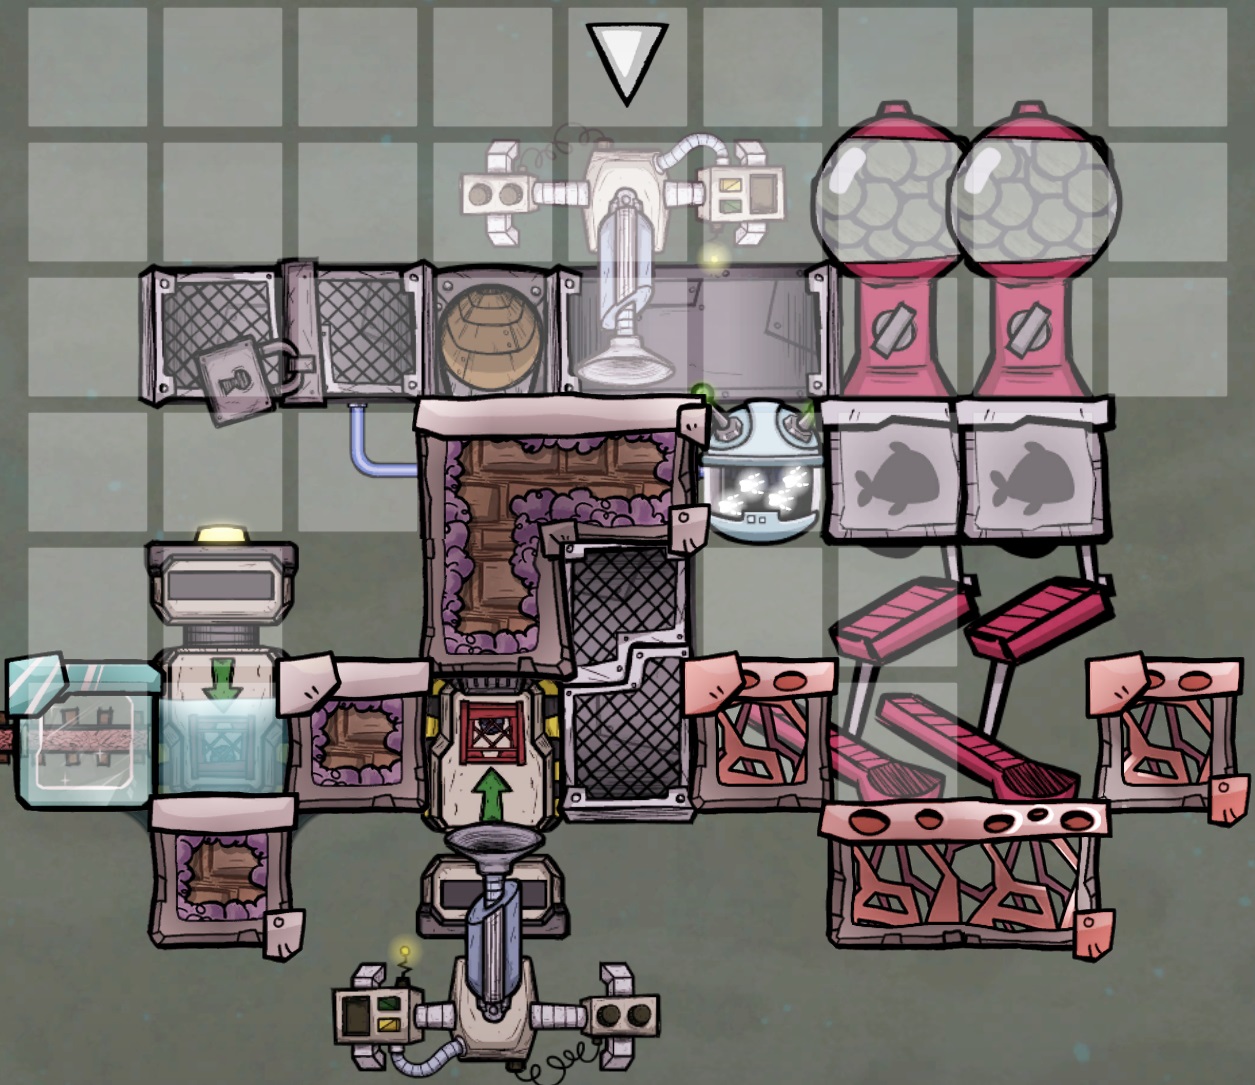
A shown in the graphic the top sweeper can fill both feeders and can reach the loader on the left for removal of eggshells. The bottom sweeper will be inside the liquid of the breeder tank, and will extract eggs from both tanks to the loader directly above it. With no sweepers below the feeders, there are lots of spare tiles for installing optional sensors and other features.
The penumatic door in the middle serves two purposes. First it prevents fry that just fell from the dropper from hopping left into the larger body of the breeder tank. This ensures they'll go right into the 2-cell area with the feeders. The second purpose is it allows access down into the tank if you install a line of ladders below it.
This design, which I'll refer to as Build 2, is significantly wider than the previous designs 1A and 1B. It measures 9 tiles wide vs. 7, however we'll see in the construction section that that's a bit misleading. Since each pacu in the breeder tank requires 8 tiles of water anyway, my typical approach is to build a tank with a width of 10. Two tiles on either end with 8 tiles of liquid in between ensures that for each level you build down (or for each liquid available, if you're stacking) you can handle one additional breeder in the tank. So in that kind of scenario the additional width of the ranch doesn't really matter, the liquid tank will be wider still.
At first glance Build 2 is one tile shorter in height than the other two, at 7 tiles instead of 8. However, that too is misleading. The bottom autosweeper in this build will be inside the liquid of the breeder tank thus doesn't consume any additional space. As such, the equivalent height of the ranch itself is only 6 tiles, 2 shorter than the others.
- Final Lesson Learned
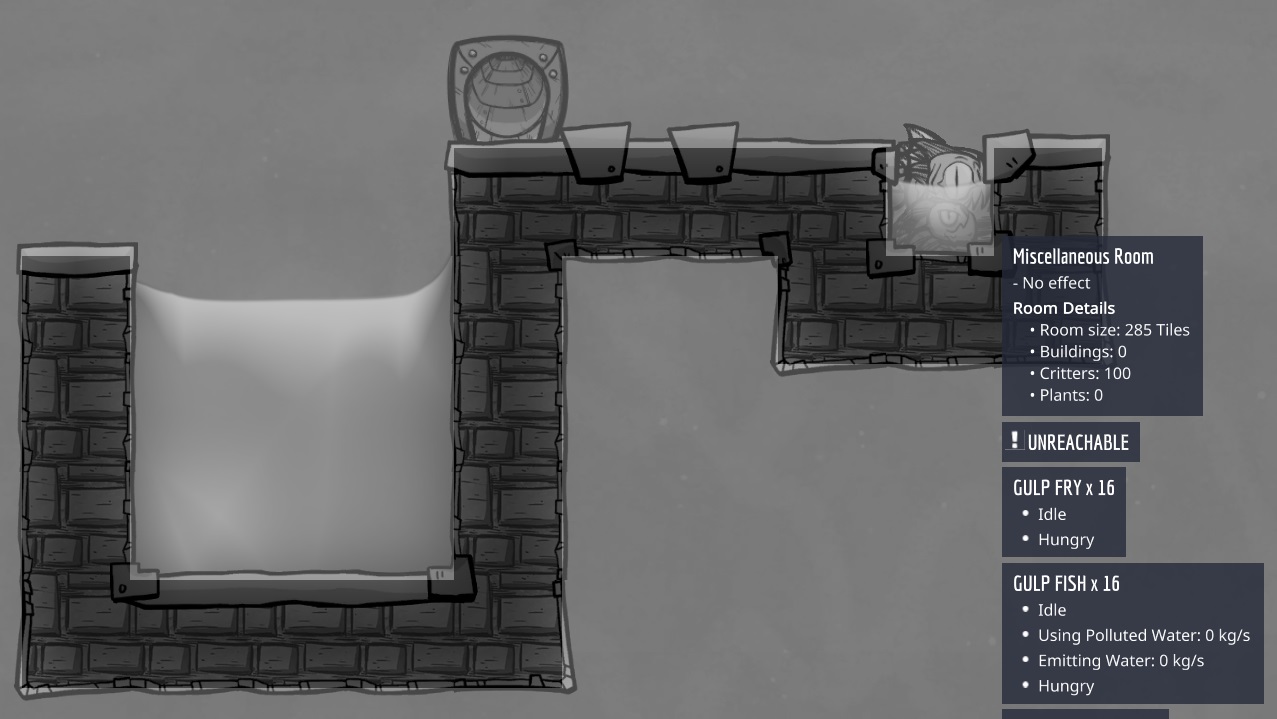
The only way I could get them to hop left was to block the path on the right. These tests were conducted in dev mode by spawning pacu directly, not by letting them hatch normally, which also means it was only tested on wild pacu and not tame. I find it hard to believe that hatched or tame pacu would behave differently, but in any case this got me experimenting looking for more viable designs.
Based on the above, there is no need to have a door over the starvation pool on the left. There is also no need for the NOT gate or automation wire to control that door, saving a little refined metal. A single door over the breeder tank should be enough to force the pacu to hop whichever direction we wish.
At first I thought this would help me miniaturize the design even further (see example image below), but where I ran into trouble was keeping the egg chute separate from the starvation tank.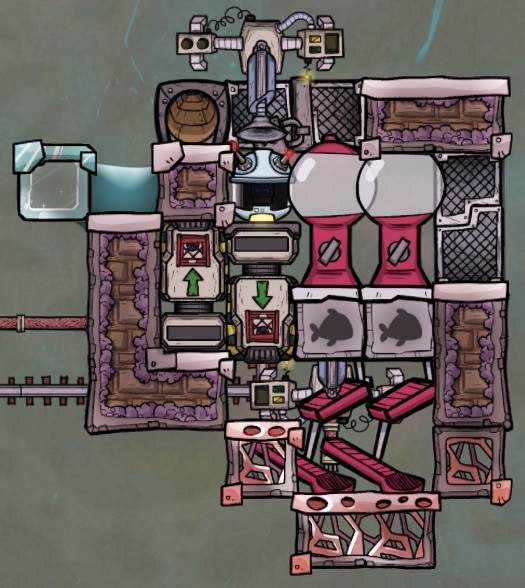
One way or another tiles or doors are required to separate the two, and a design like the above cannot support this without confining the starvation pacu to a single tile. As shown all pacu immediately get cramped and the ranch fails.
I also tried using a door below the egg chute so that eggs dropped on the door wouldn't count as being in any room, but this displaced the arrangement of the other tanks enough that I couldn't reach all of the cells without requiring a third sweeper. An example of such a build is shown below.
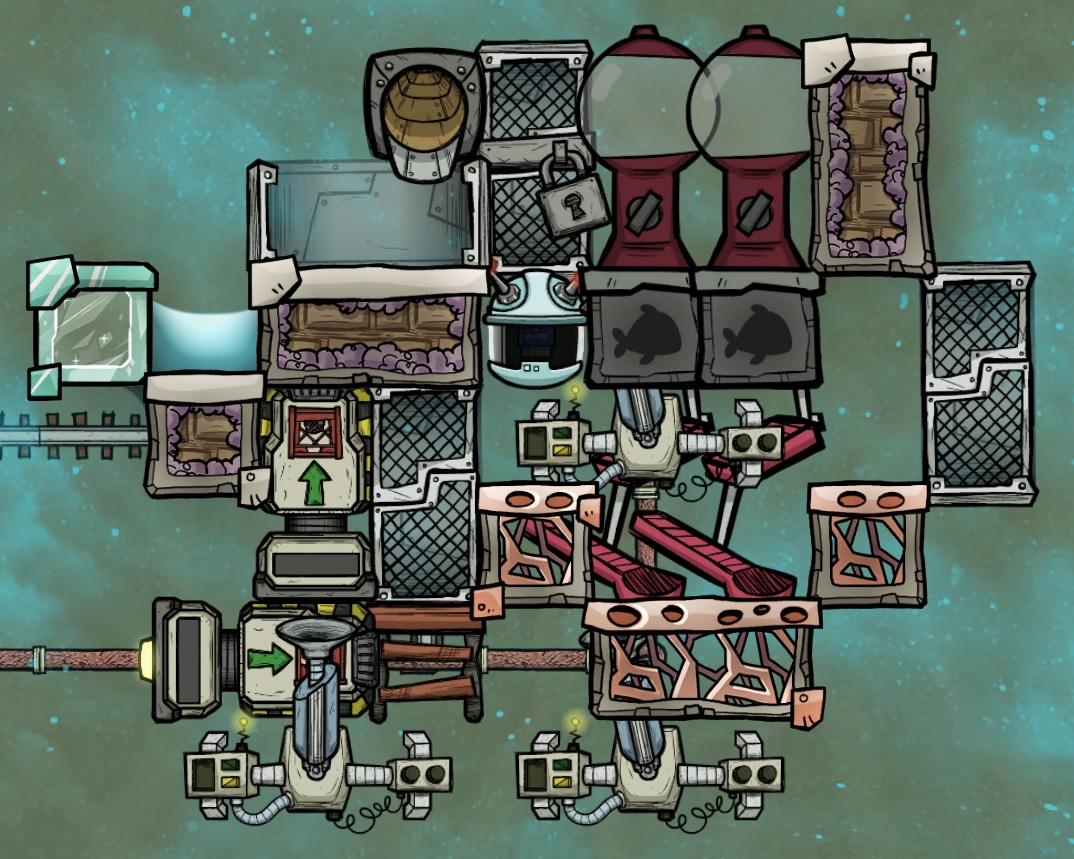
Saving refined metal on not automating a door only to spend even more metal on a third sweeper was not worthwhile, particularly because designs like this weren't really any smaller than the original builds. I gave up on any major design refinements from this discovery, and settled for the minor refined metal savings.
For the construction section I'll carry forward all three designs, 1A, 1B and 2. I'll also remove the automation wire and NOT gate for any doors over the starvation tanks. On the off chance something changes in the future with flopping behavior, the gate and wire can easily be added back to the designs to restore the expected function.
5. Construction
Unlike my previous guides this won't be a step-by-step build process with different phases and added features as the colony evolves. You really should build the pacu ranch all at once when you're ready for it.
In particular, until you can extract eggs with an autosweeper the ranch won't work correctly, and by that point you'll have all the tools you need to finish construction anyway. The automation and shipping overlays are all so simple there's no value in building a partially functional ranch to come back and upgrade. So survive for a while on mealwood or hatches, and once you have ~1200 refined metal jump right into construction all at once.
With that said, here are the three different designs I came up with shown side by side, as they might appear inserted into a natural body of water: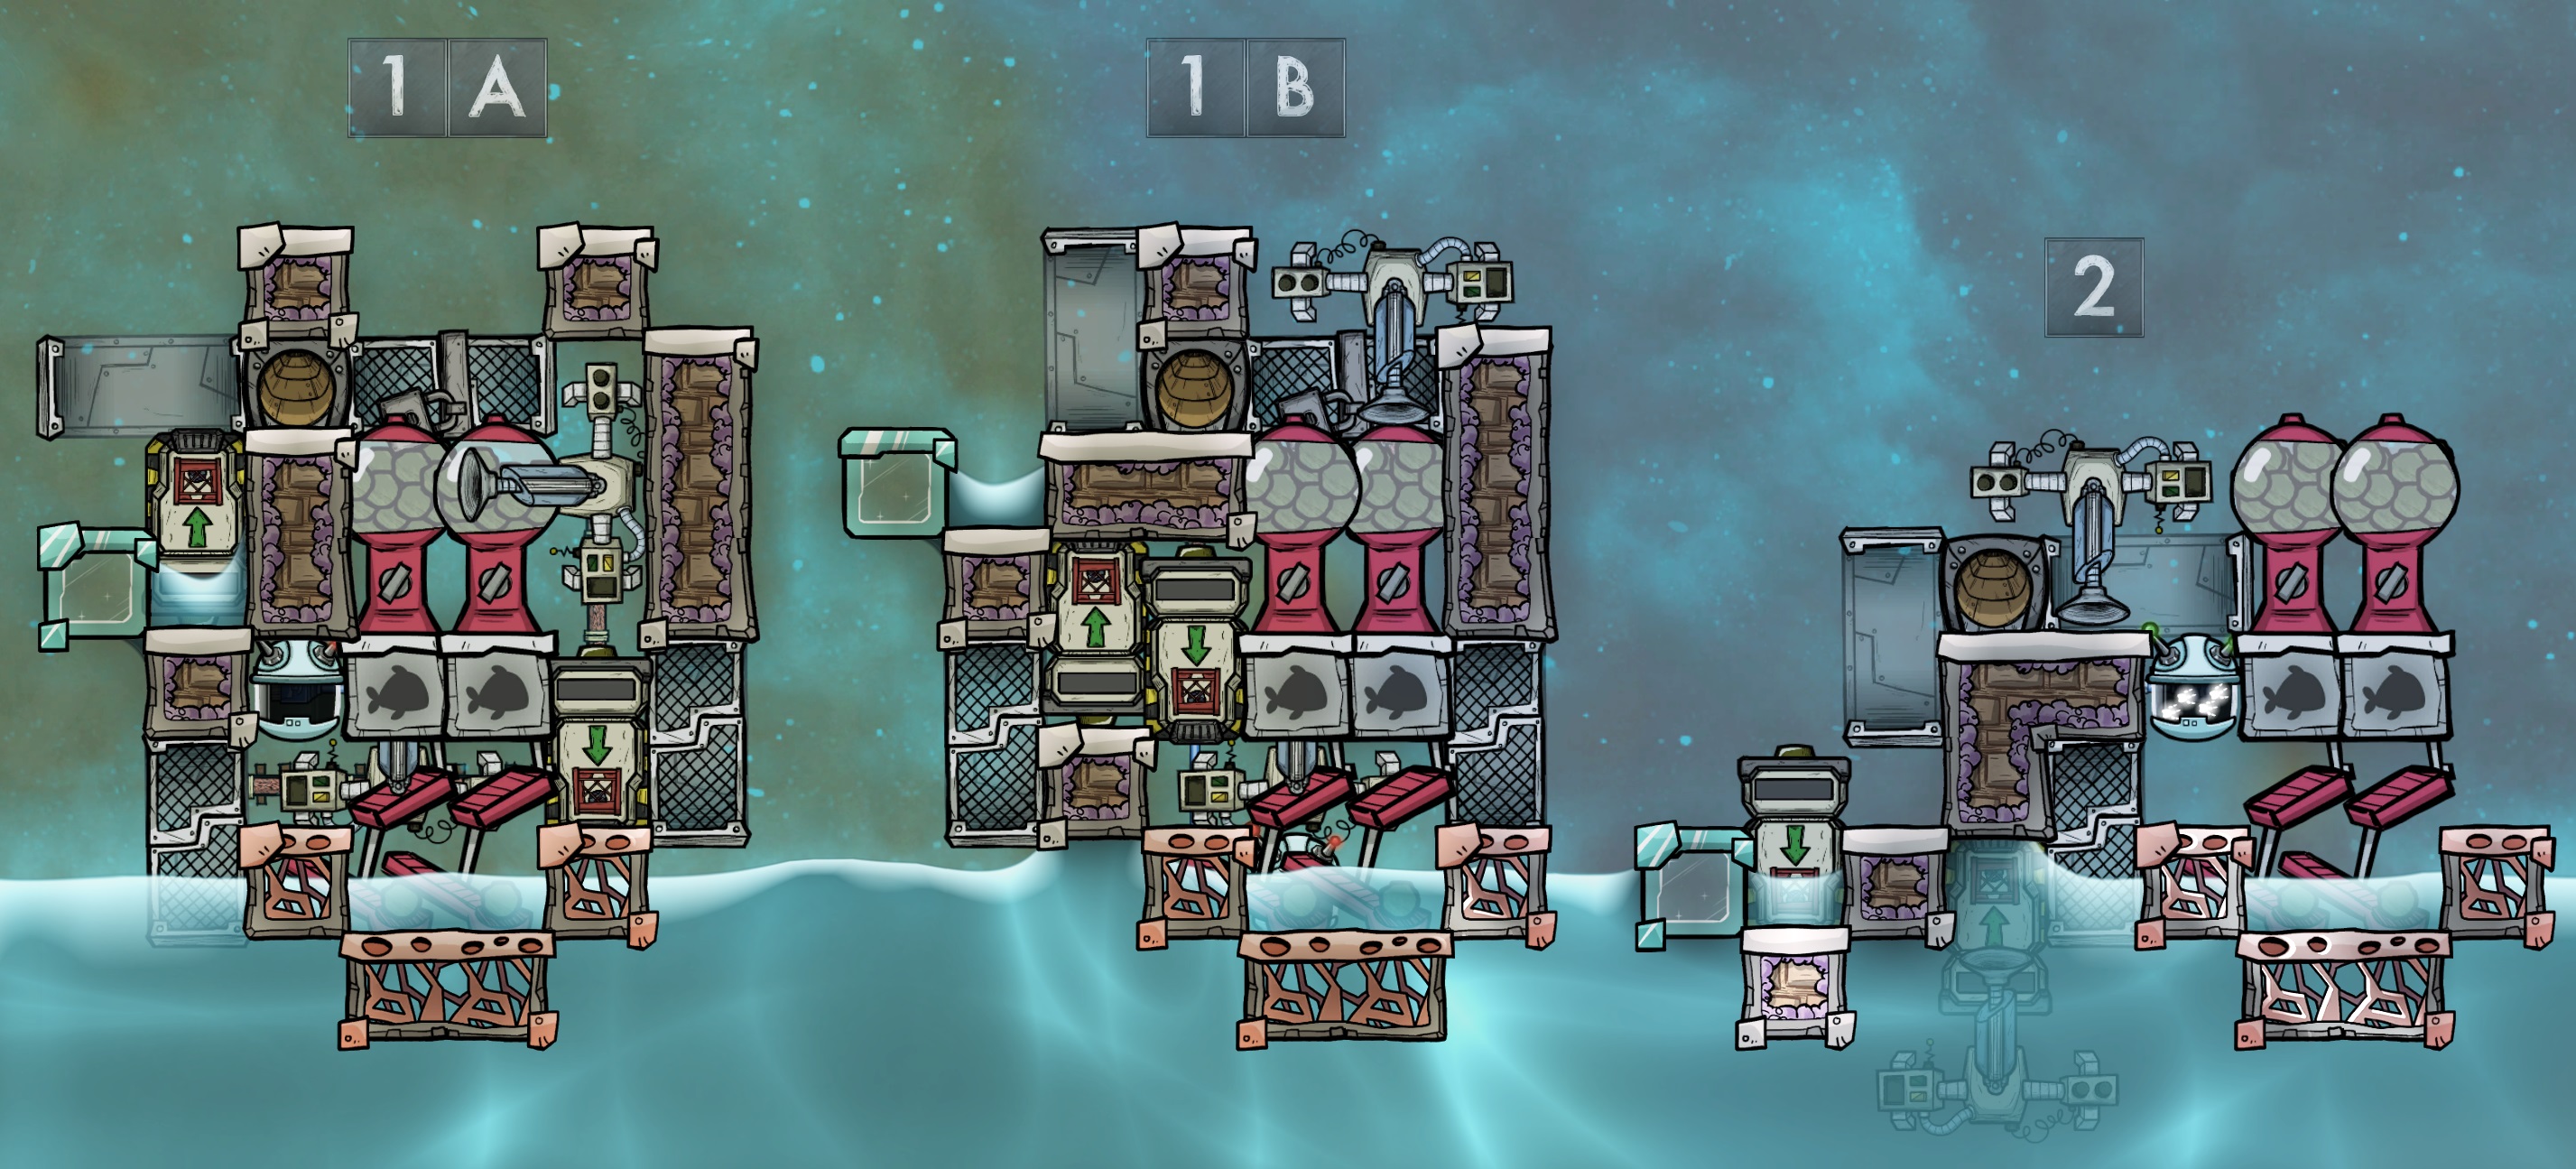
There are no major differences between the three, they all work exactly the same, they just move the pieces around to fit in different spaces. Notice that the water line needs to come up to the tiles with the spoons of the fish feeders, with at least 350kg of liquid in those tiles.
In the interest of full disclosure here are the same three designs after some massive liquid spills and flooding: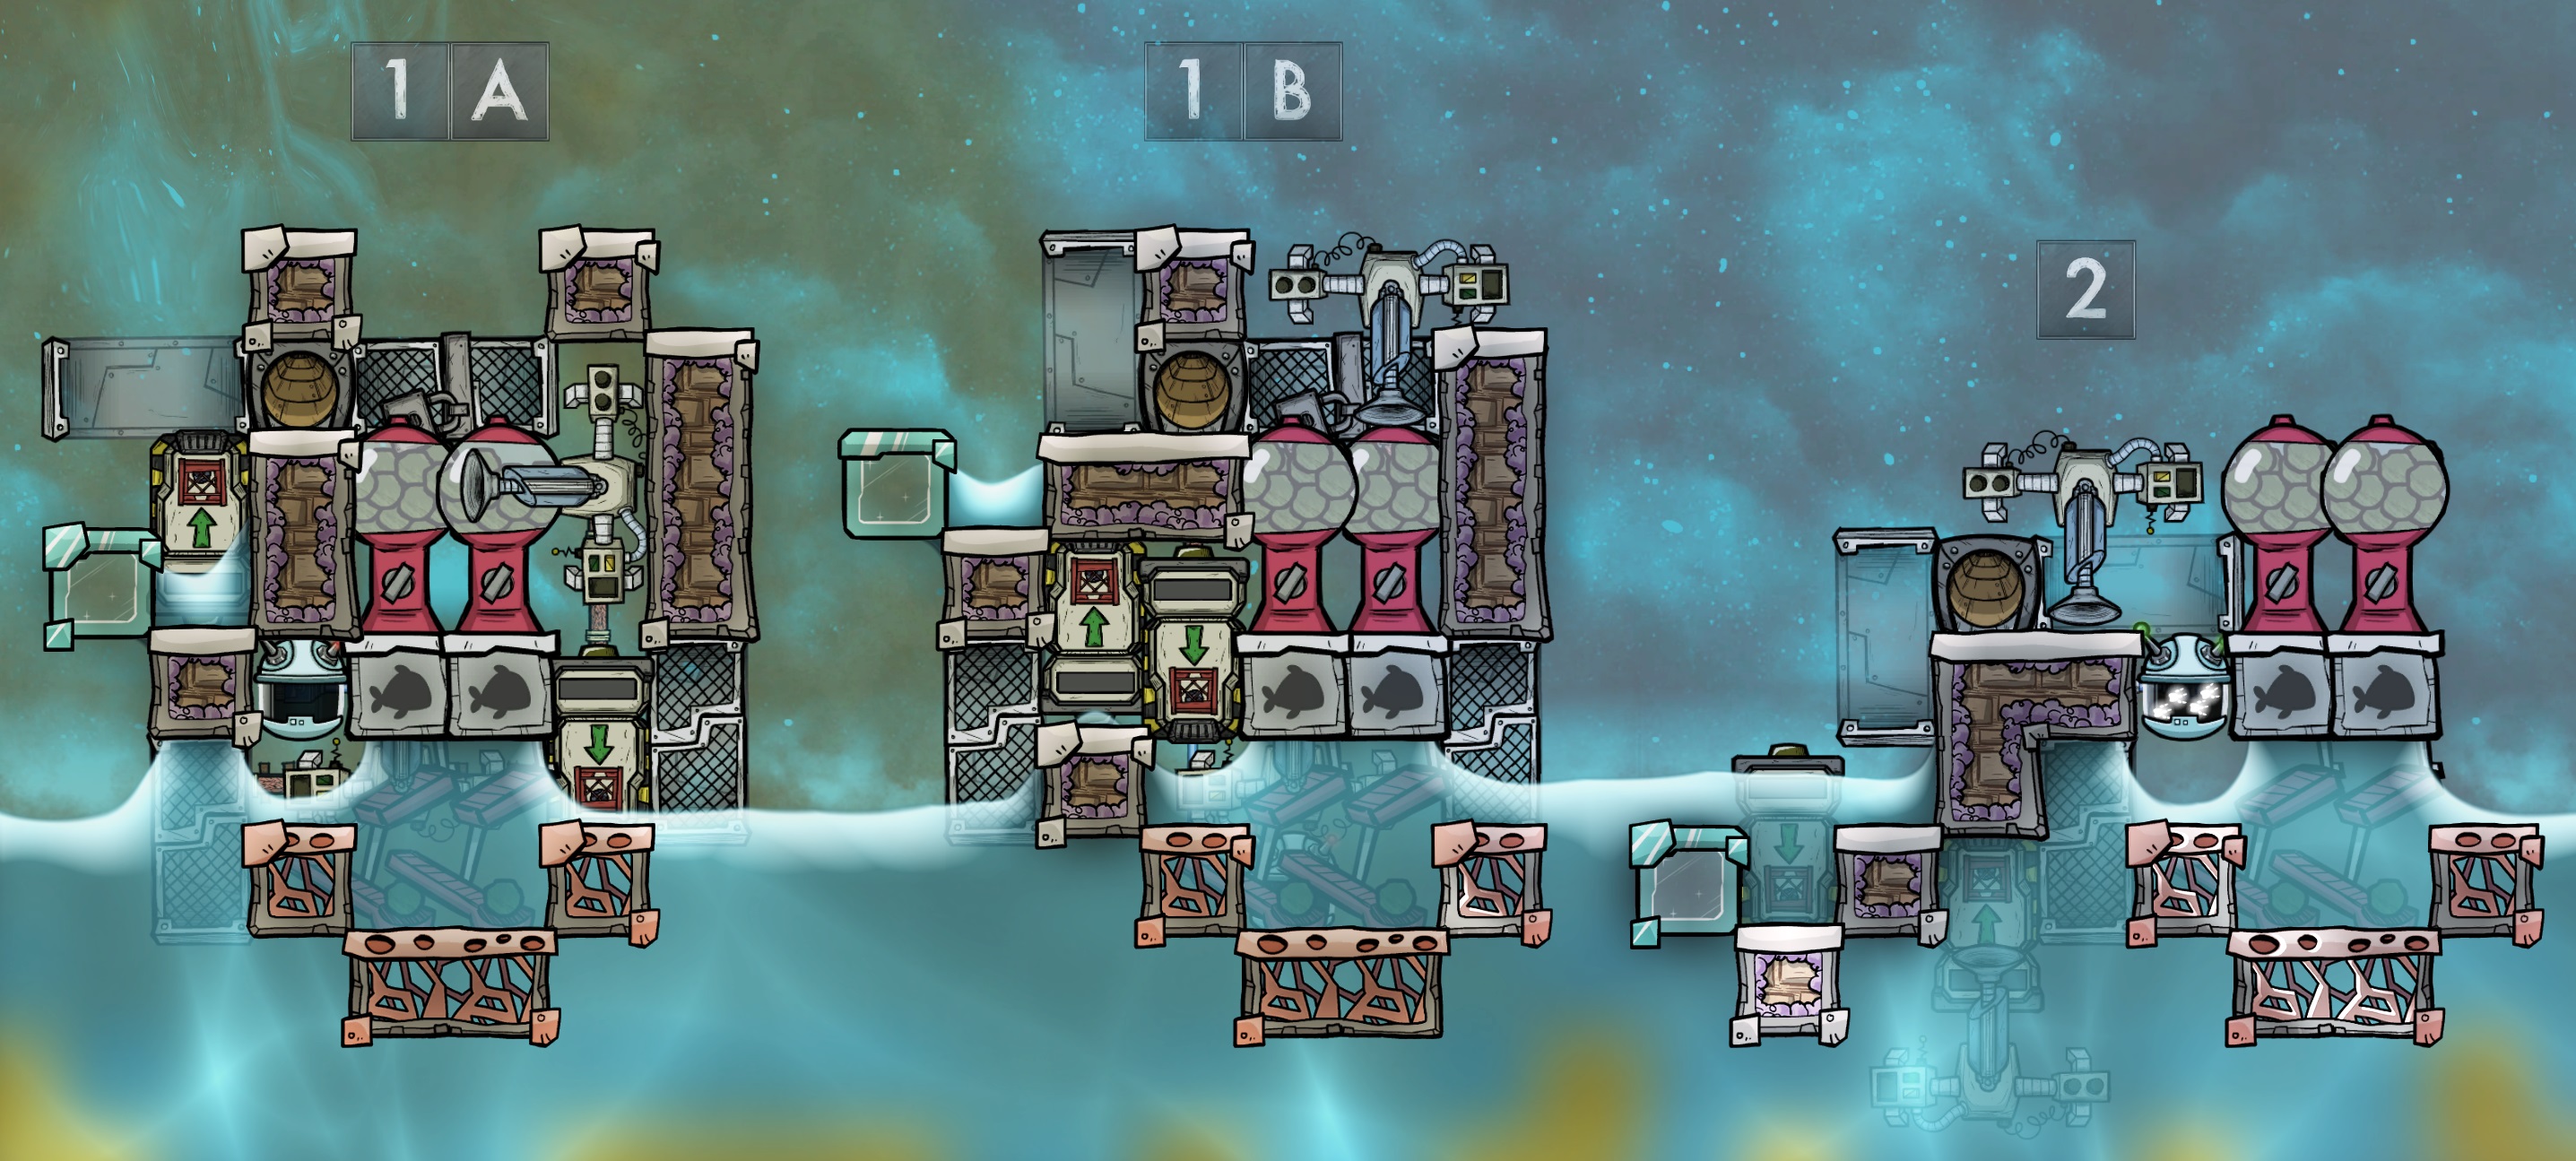
It's clear that builds 1A and 1B could never allow the liquid pools to touch, which was my primary goal. Design 2 is susceptible to this failure mode, but only if the entire ranch is built inside the same pool of water as shown. Below I will show how to construct a breeder tank that would prevent this scenario.
Here are all three designs again, this time shown with a man-made breeder tank sized for 3 breeders (24 tiles):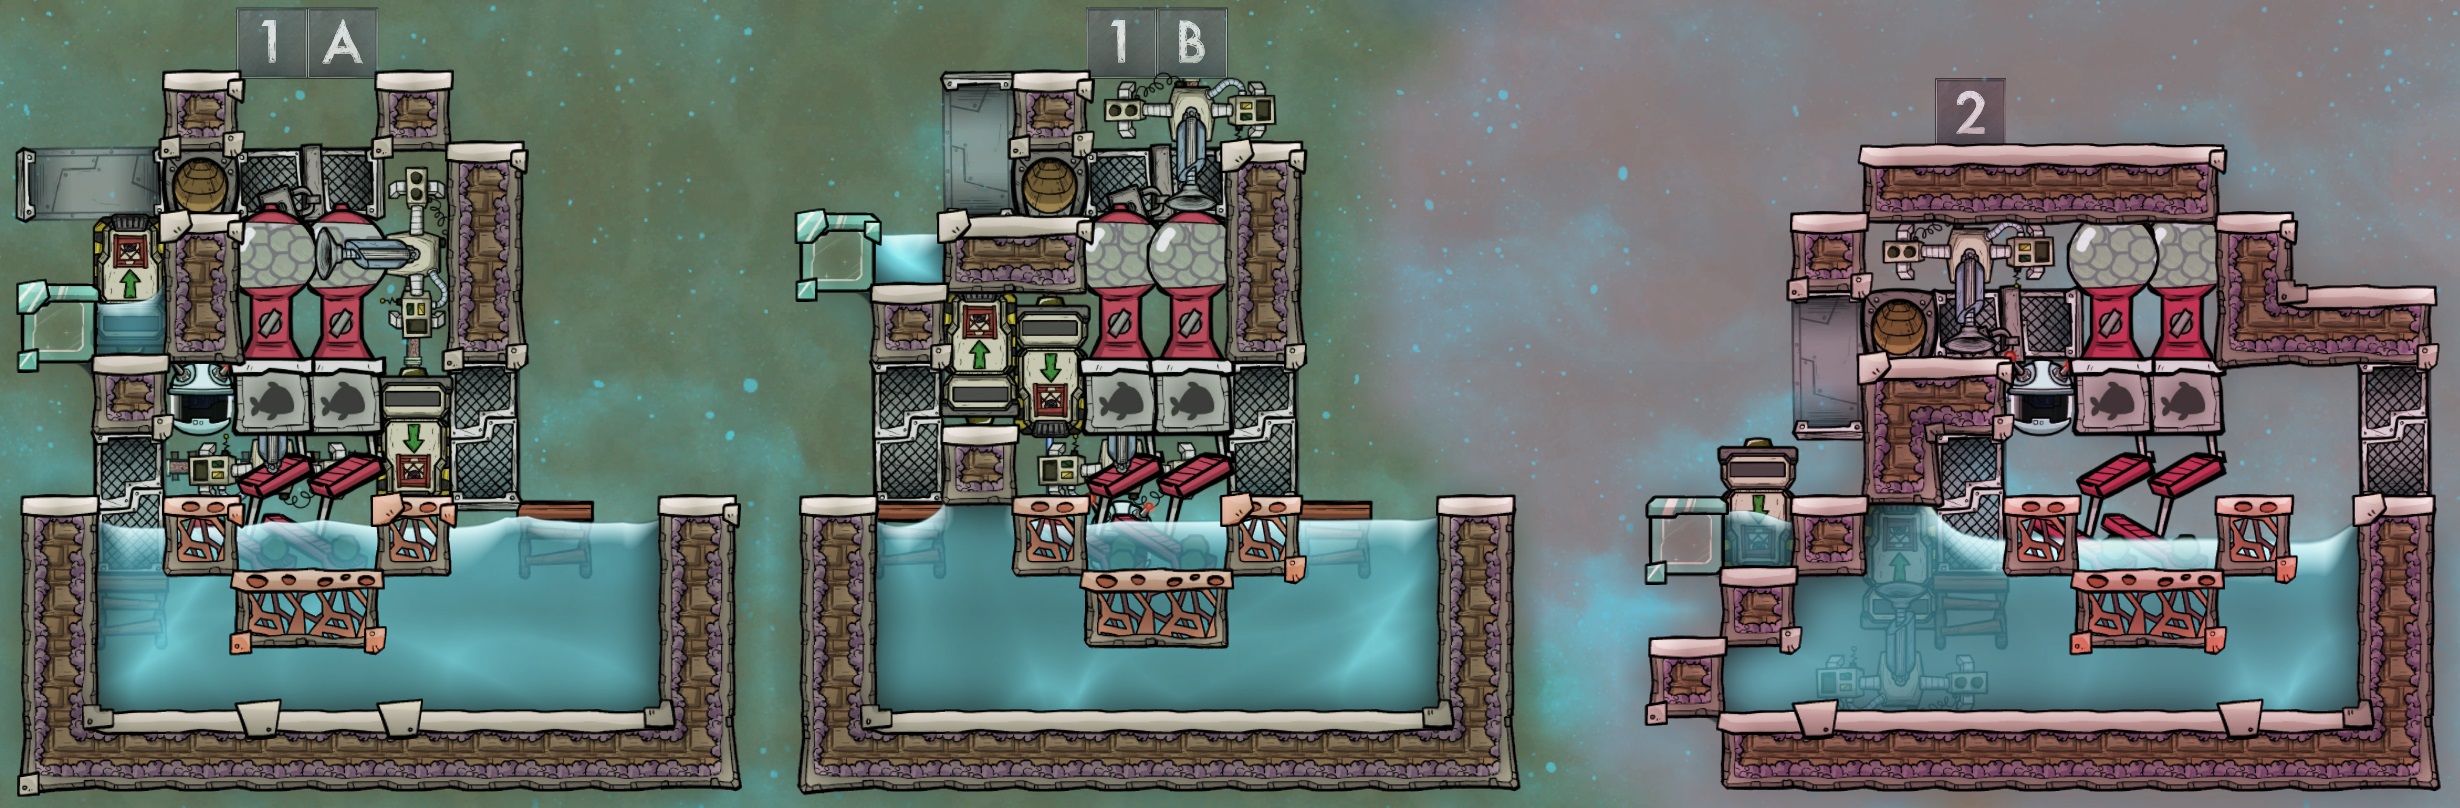
As mentioned above, I tend to build my breeder tanks 10 tiles wide, so that each level holds 8 tiles of water, enough for a single breeder. With design 2 the top level is only wide enough for 7 tiles (assuming a straight wall on the right side as shown) so I make the third level 9 wide to compensate. That's the reason for the diagonal wall on the left side. Also, with this kind of tank, design 2 is no longer at risk of its pools touching. As shown it has a row of tiles on top to enclose the eggs in their own room, but even if you chose to enclose the starvation tank instead and leave the top exposed, any spilled liquid will overflow through the door to the right, away from the starvation tank on the left.
For all three designs, expanding them downwards to support additional breeders is easy. Here they are sized for 8 breeders each (64 tiles) by adding 5 more rows of water: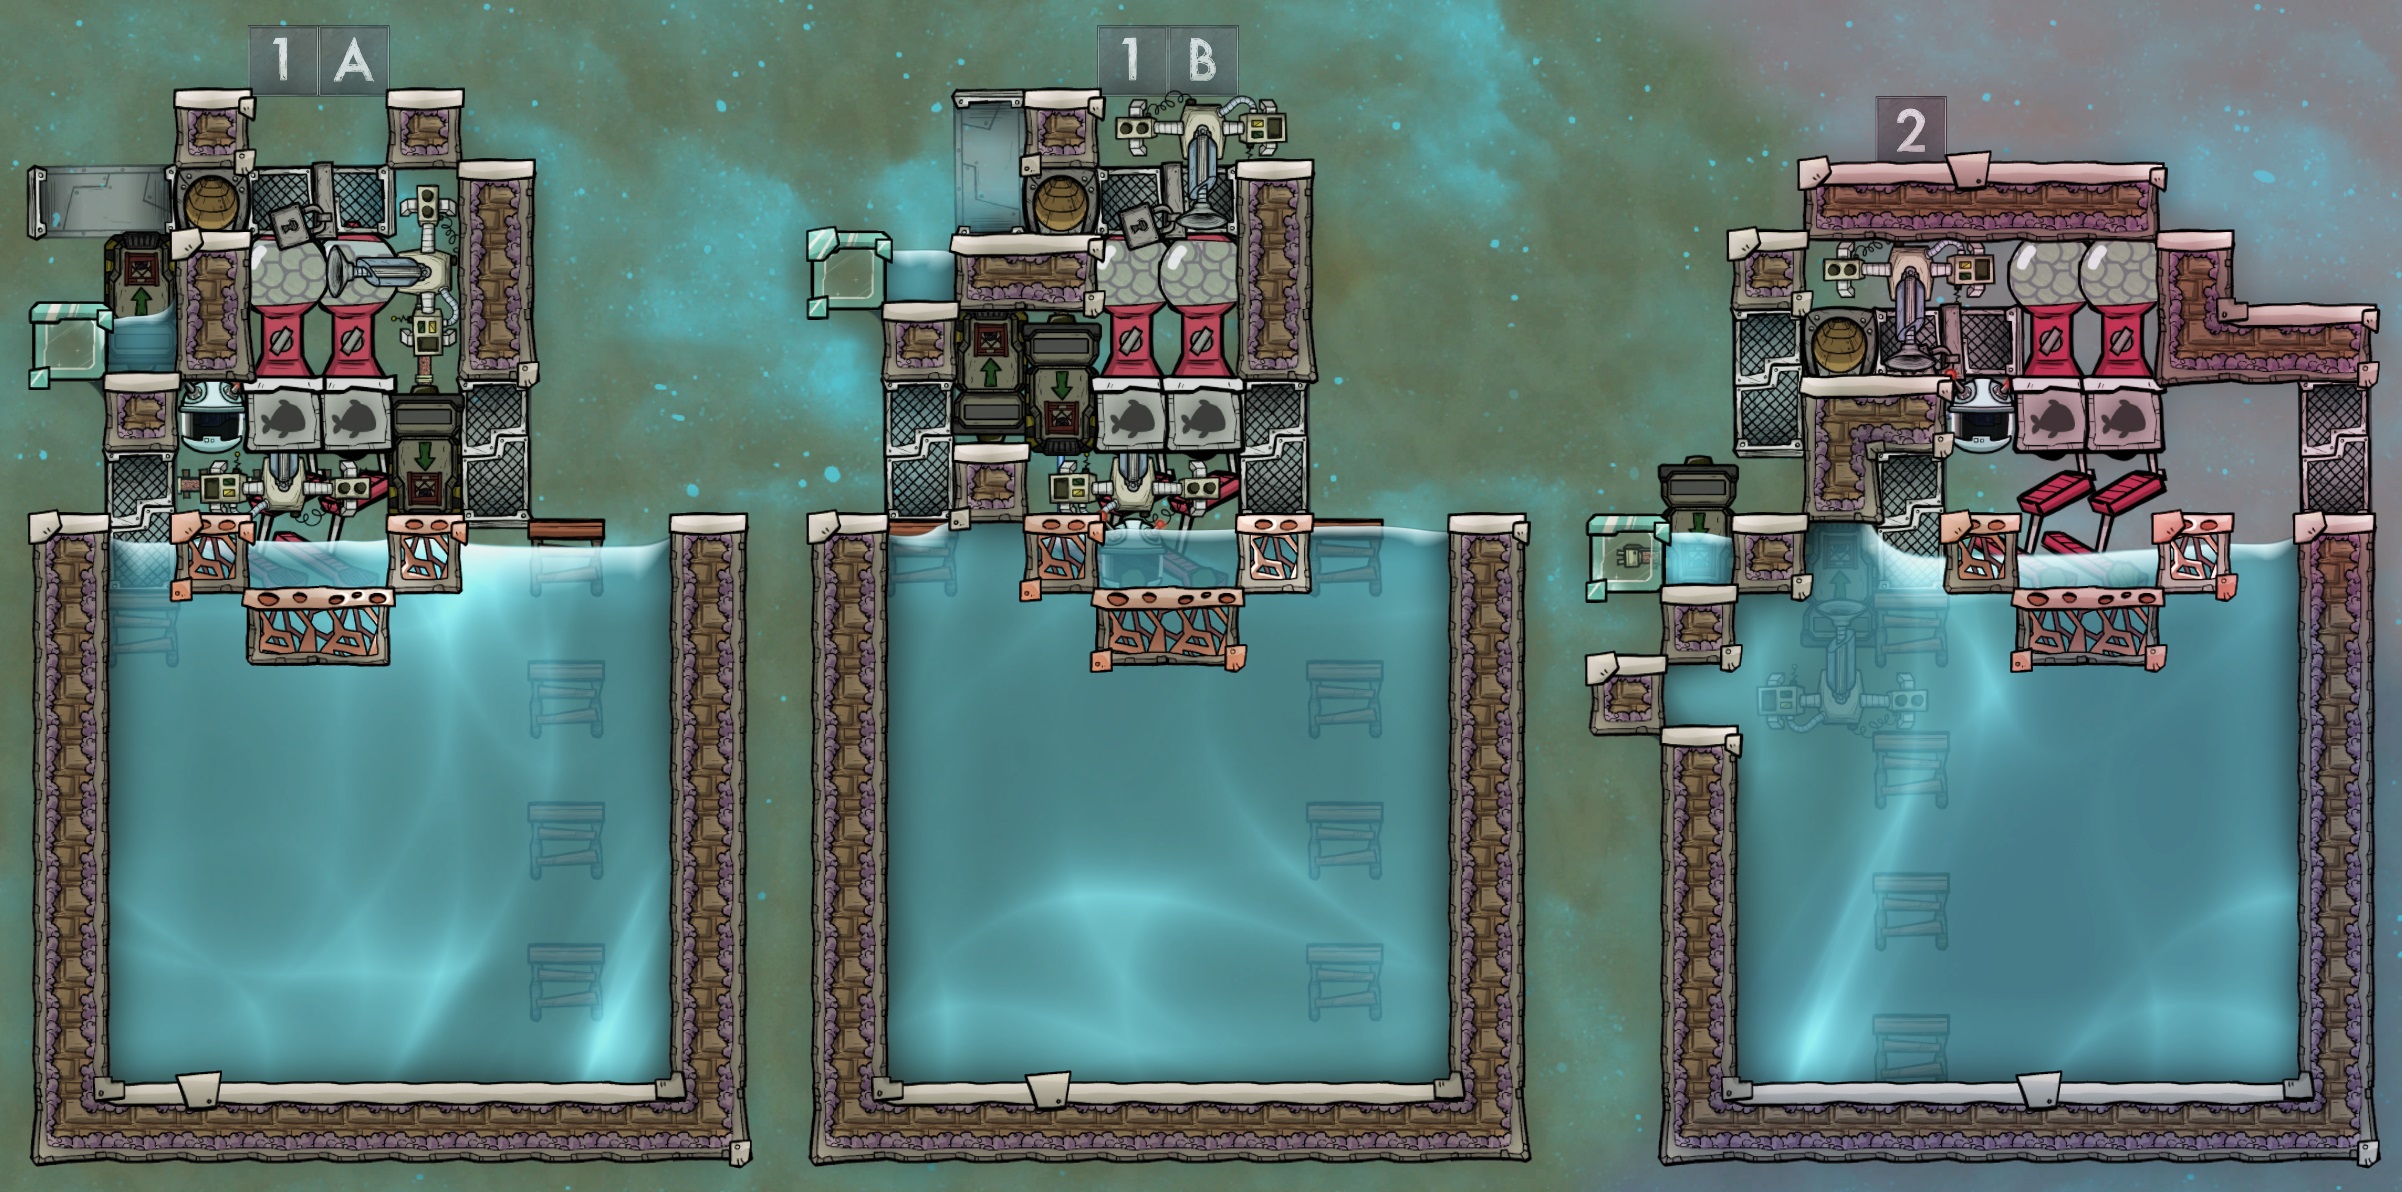
Obviously, how you construct your tanks is up to you, these are just examples. Don't forget the liquid stacking mechanics either, allowing you to use only a few kilos of different liquids to make each level in the tank.
The last thing of note is how to get these ranches started in the first place. I don't recommend critter traps and fish dispensers to move adult pacu into the new ranch. The traps are a waste of plastic, which you may not have this early in the game anyway. Instead, wait for wild pacu to lay eggs, then have a dupe sweep the eggs into an automatic dispenser above the ranch. The dispenser should pop the egg out where the conveyor chute exits, and once the egg hatches the fry will flop into the breeder tank.
- Overlays and Settings
Once your ranch is constructed you'll have to configure the settings on the conveyor loaders and critter sensor. The following shipping and automation overlays will assist with that task.
First, the shipping overlay, showing which conveyor will be delivering eggs to the chute, and which will deliver eggshells and other materials to your base: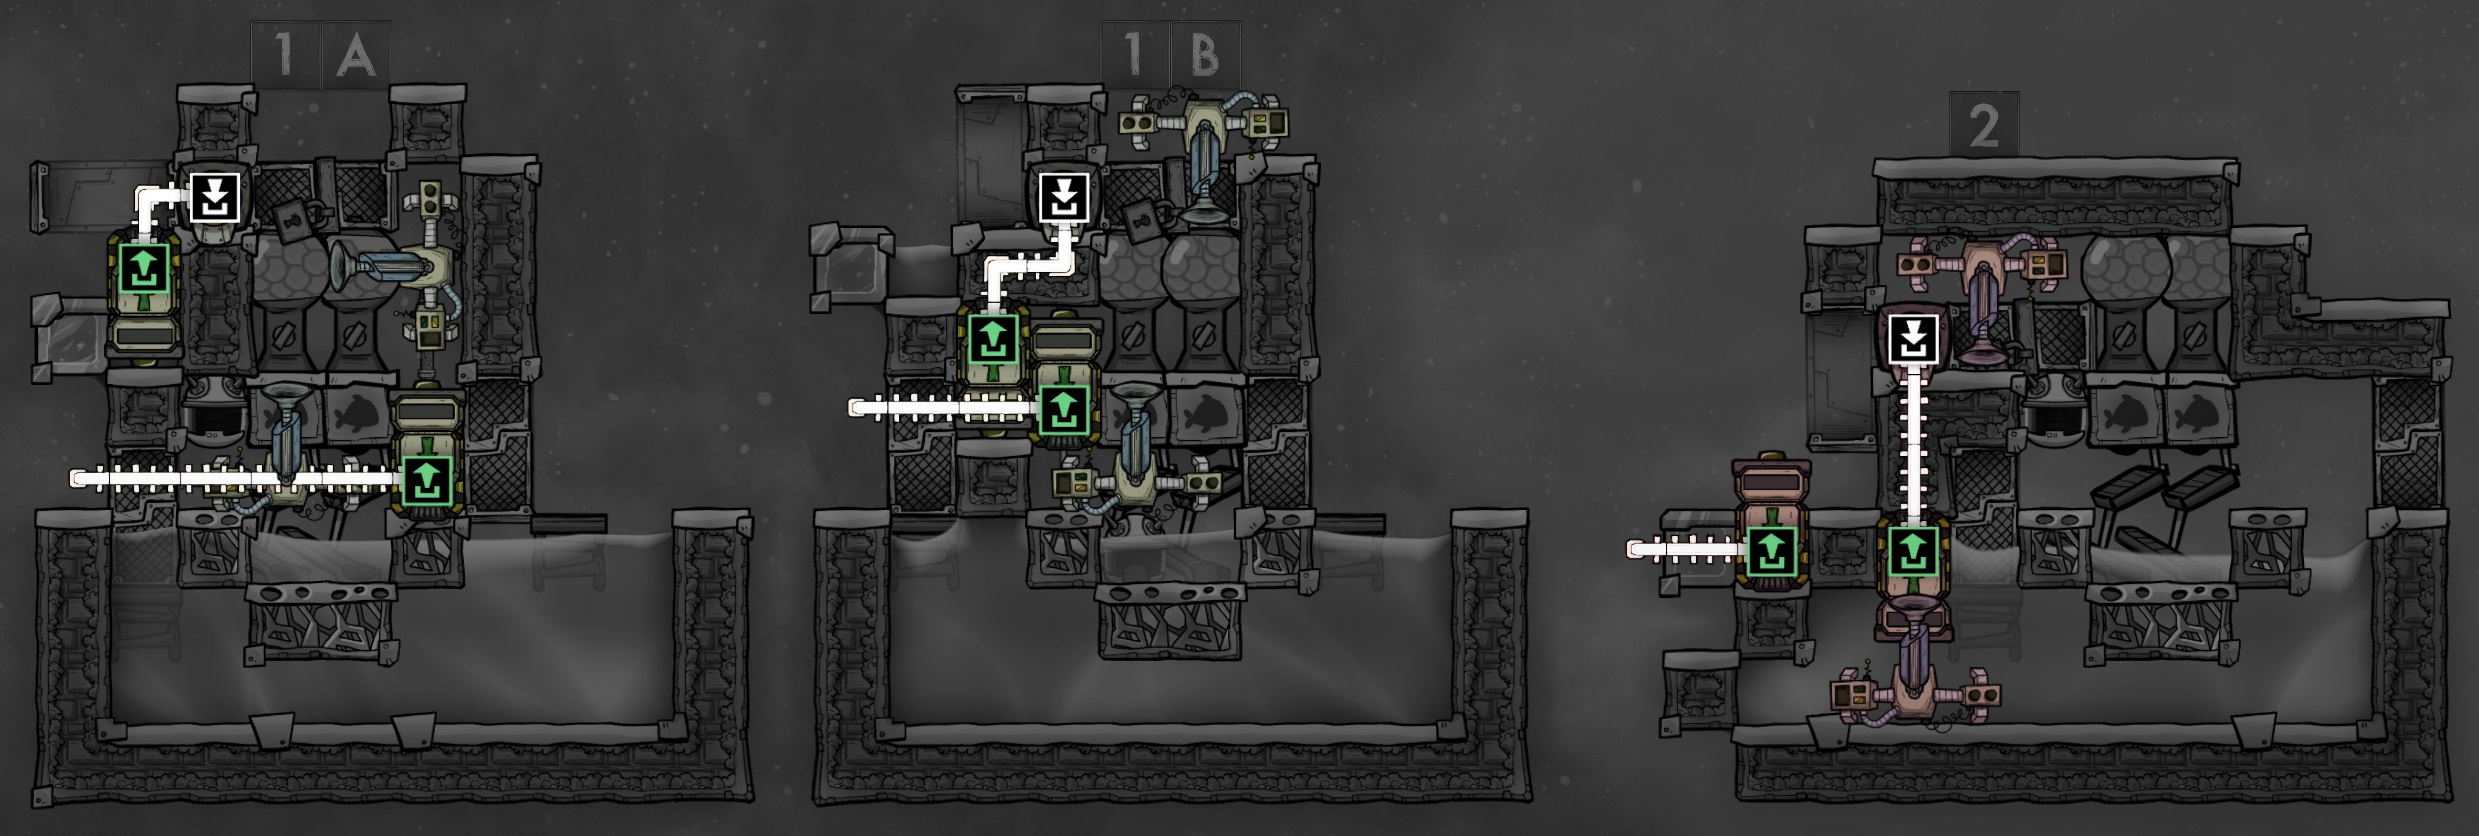 Now the automation overlay, showing the critter sensor controlling the dropper door. This should be set to send a green signal (opening the breeder door) when below X critters, where X is the number of breeders your tank size can support. Uncheck the counting of eggs, though there should never be an egg in this room for long anyway. Remember that you can add a NOT gate off the same critter sensor to control the second door, just in case a future patch breaks our "right-flopping" expectation.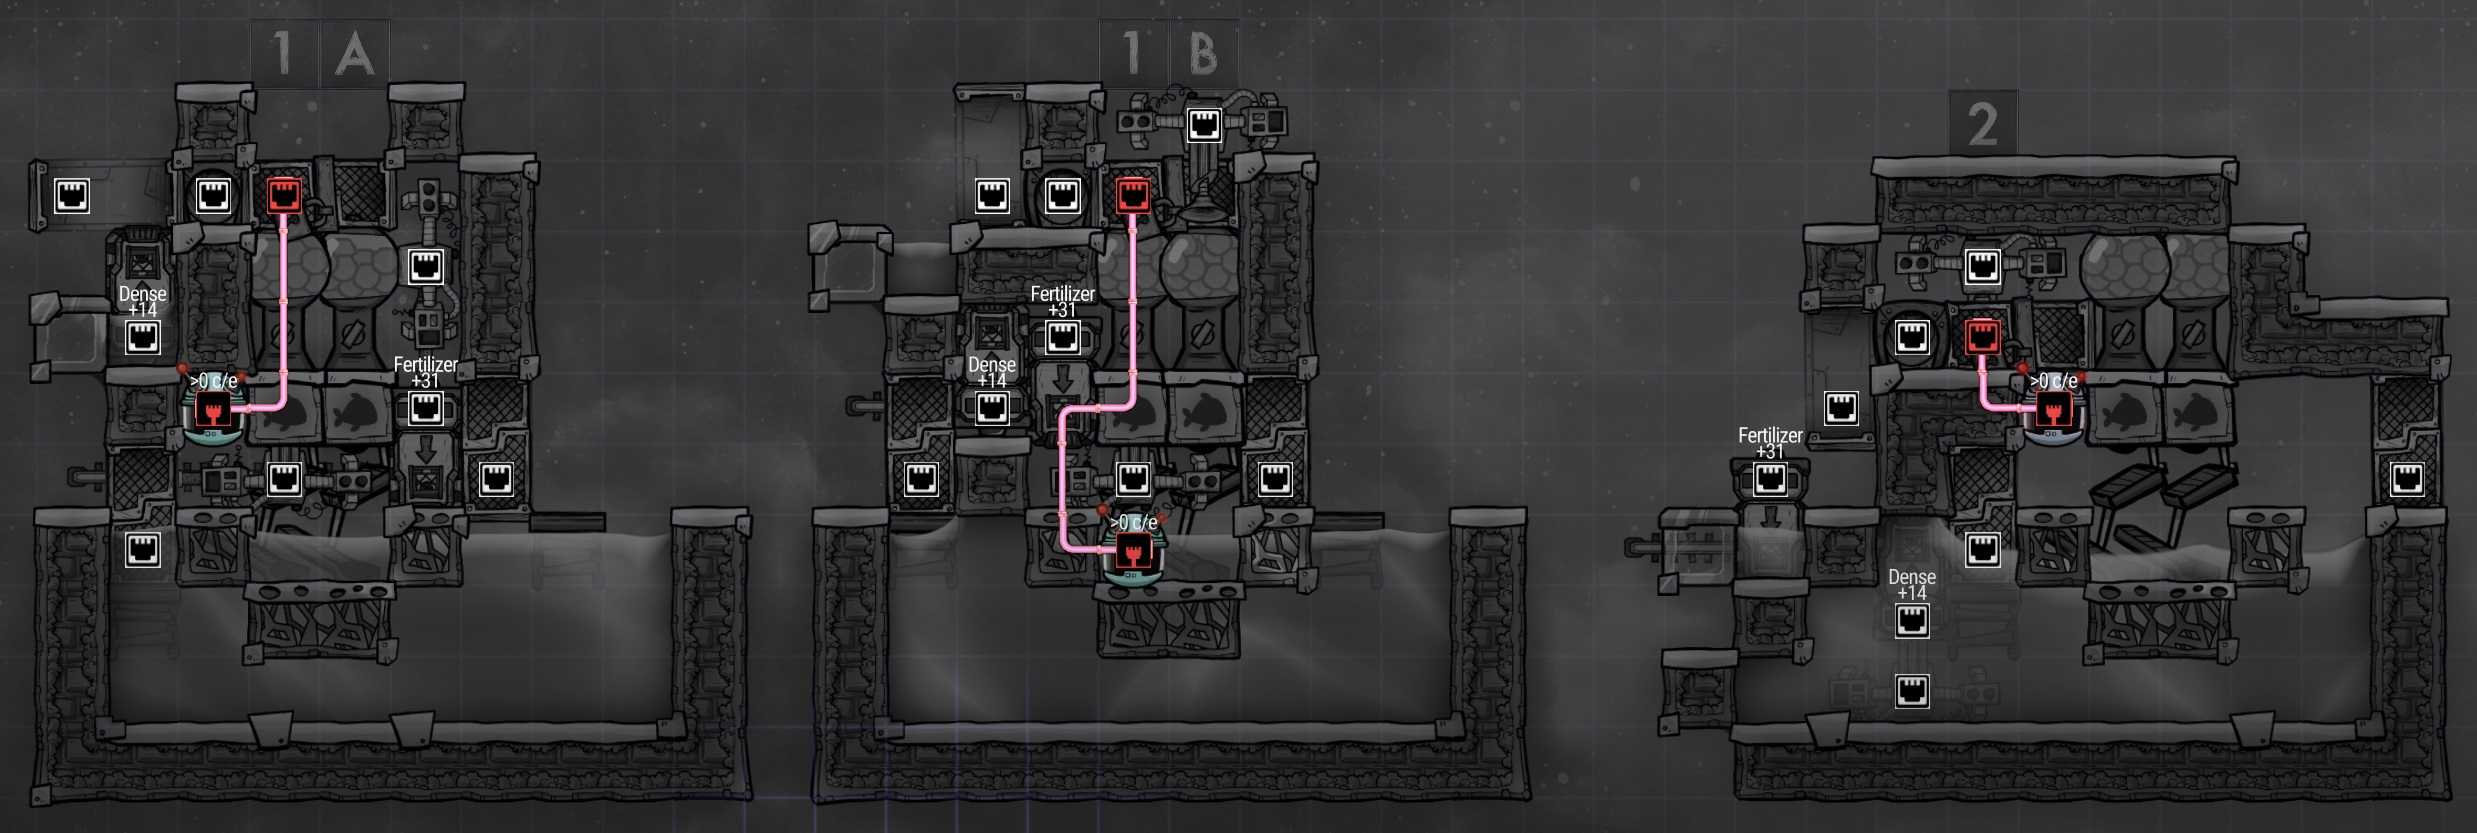
In the automation overlay you'll see that my conveyor loaders are named "Fertilizer +31" and "Dense +14". This is a side effect of one of my mods, but it will come in handy to describe their settings rather than talking about top or bottom, left or right loaders across all three designs.
Whichever design you're building, the loader labeled "Dense +14" in my graphic should be set to only critter eggs. Not just pacu eggs, but the whole subcategory of eggs in case another one happens to fall in. Its sole job is removing eggs from the tanks ASAP.
The other loader labeled "Fertilizer +31" should be set to "ALL", and then you should disable critter eggs and whatever you're feeding your pacu. Most likely this would start out as Algae and then transition to seeds. So you could uncheck Algae and the whole seeds subcategory to ship everything else out of the ranch.
I'm not going to show a power overlay, I'll leave it to you to wire up power to your new ranch however you desire.
- Optional: More Automation
I touched on some optional enhancements in the section highlighting BierTier's design.
First of all, BierTier uses a cycle sensor to disable the autosweeper refilling the fish food which saves power compared to moving food every time a pacu takes a bite. I'm usually not worried about the power savings, but you can easily add this sensor anywhere near the autosweeper for about 35 refined metal. The sensor can be set to activate at any part of the cycle you prefer, for example 0% is the start of the cycle. Then you can experiment with how long it should remain active for filling the feeders and shipping eggshells. Something like 5% of a cycle might be a good starting point.
The other convenience I mentioned was an automated notifier for when the breeder tank becomes overpopulated. This often happens because 6-8 fry will all flop into the tank at once rather than one at a time. By alerting you to the condition, you can send dupes to kill the excess fry and resume normal operation. This requires a second critter sensor to drive the notifier, and it should be set to send green when above X critters, where X is the number of breeders expected in your tank. Again, you can deselect counting eggs on this sensor.
Here's how I might add both of these features to each of the designs: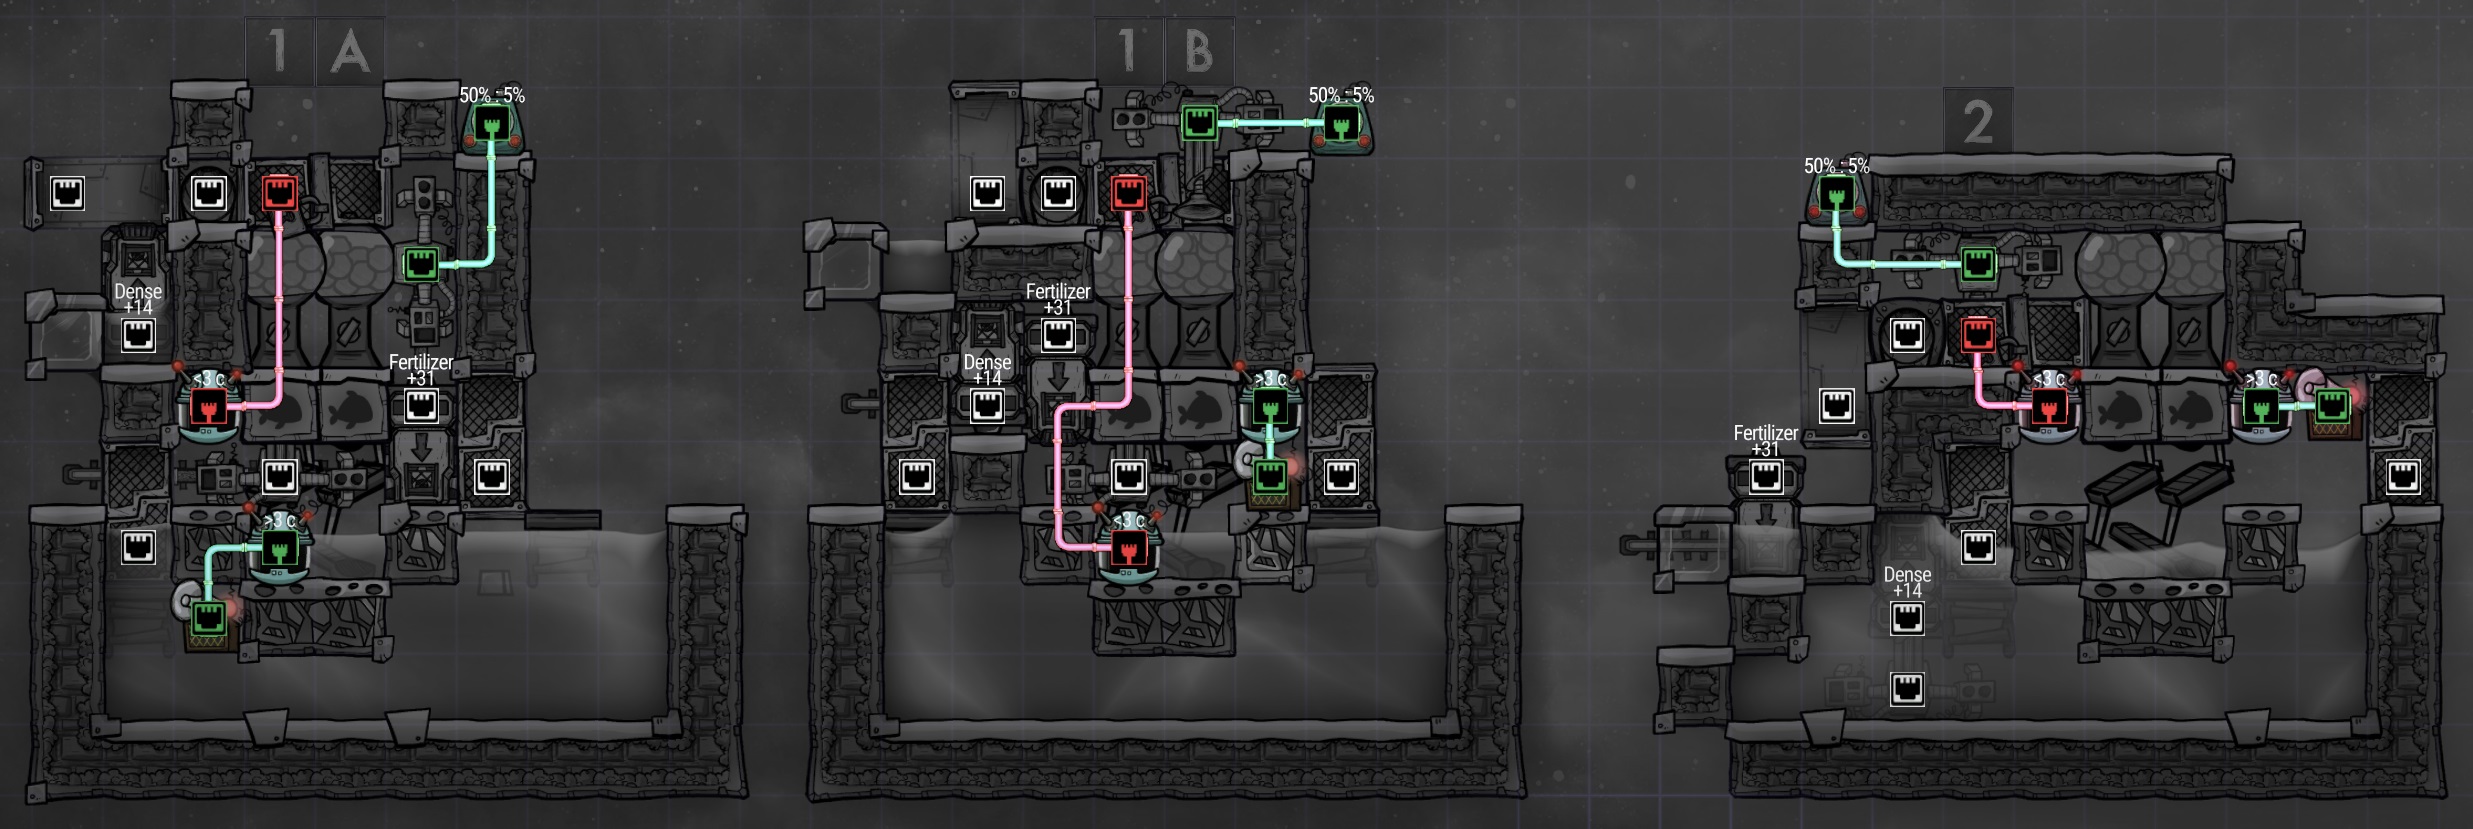
- Optional: Tropical Tepidizer
There are three types of pacu, regular, tropical and the cold water gulp fish. It really doesn't matter which kind we're ranching, however it's worth noting that tropical pacu produce a massive decor boost in a large 6-tile radius. For this reason you might want to consider producing a few of them and strategically locating your ranch where the dupes can see them.
Regular pacu have a 2% chance of laying a tropical fry egg by default, and this increases each cycle that their body temperature is above 35C. Since we'll be producing hundreds and hundreds of eggs you will eventually get some tropical fry naturally. Then once they grow to adulthood, tropical pacu have a 66% base chance of producing tropical fry eggs, so there will usually be a small number in your tanks even if you do nothing to encourage it.
But what if you wanted to encourage it? A liquid tepidizer is perfect for this job, as it produces massive amounts of heat for very little energy cost. If we control it with a thermo sensor set to 36 or 37C, then almost all of our fish will be tropical pacu. That would look something like this: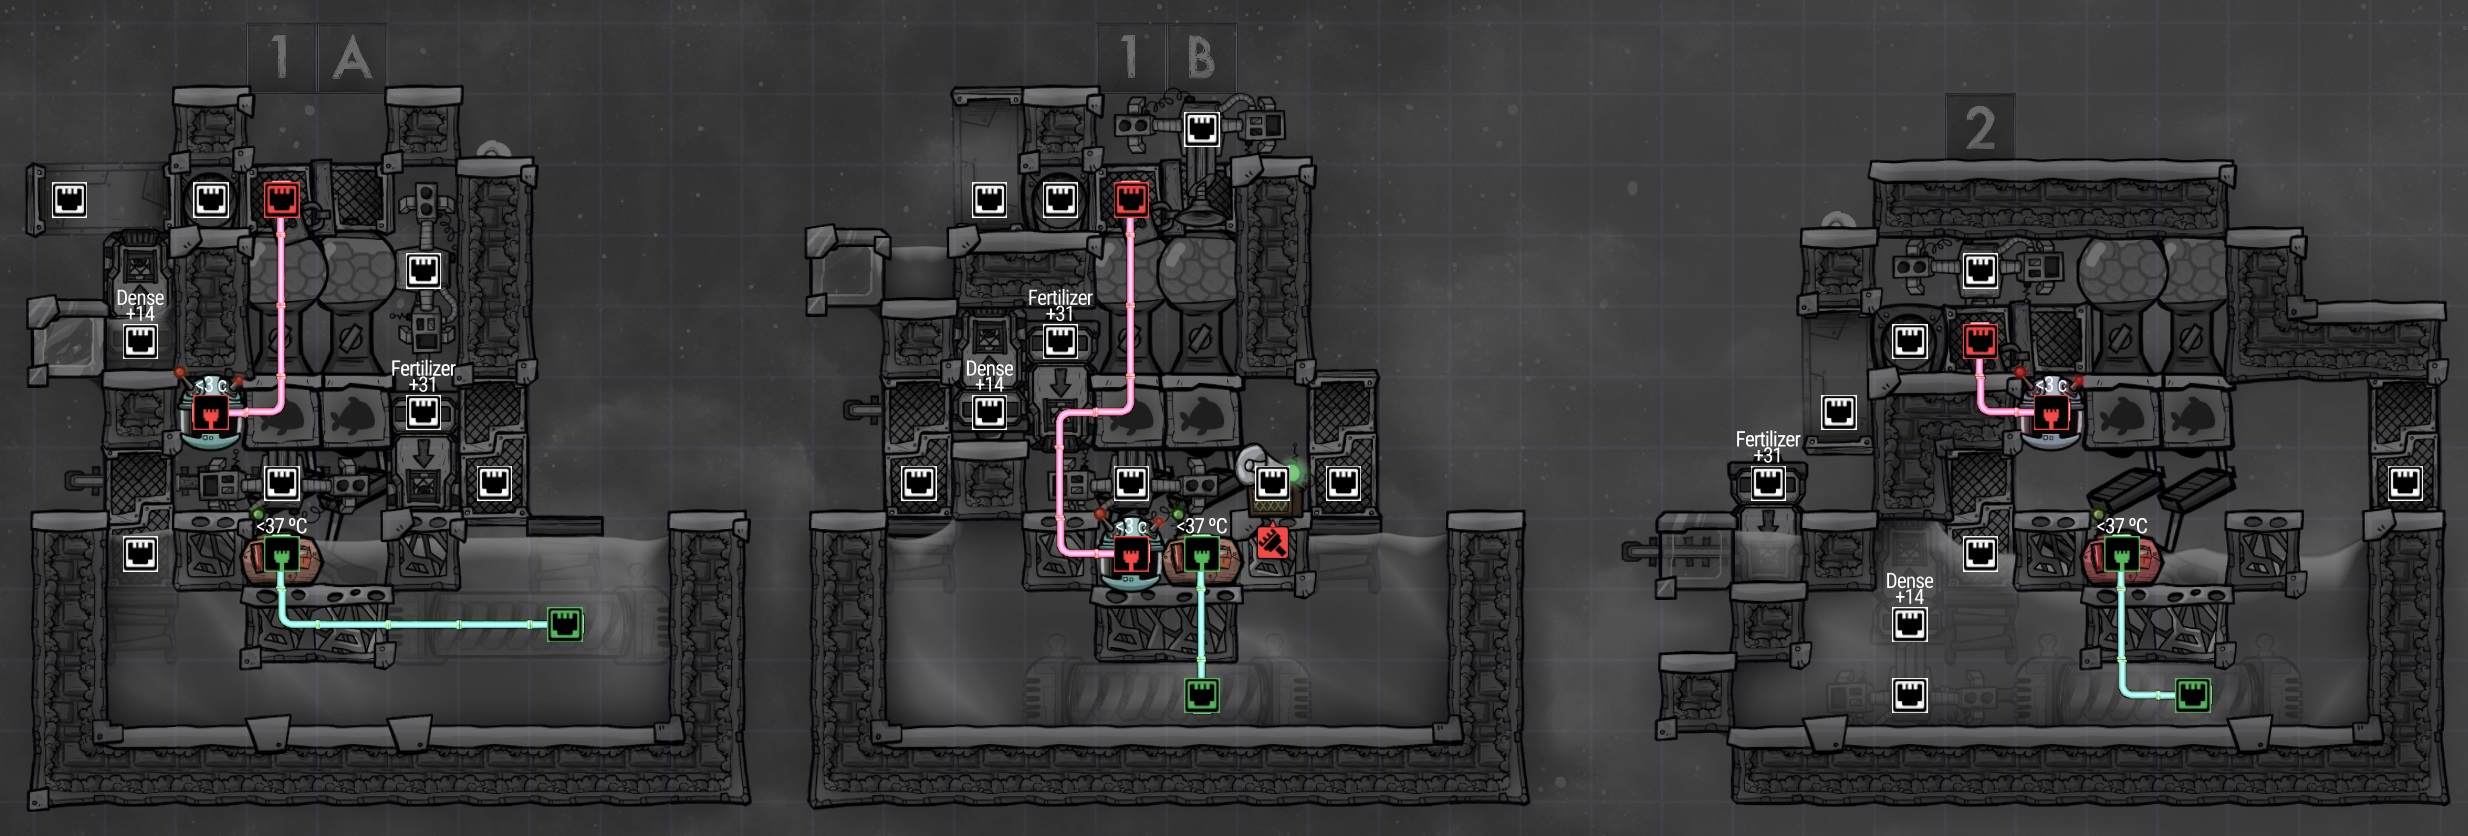
Once the liquid temperature reaches the set point the tepidizer will almost never run again. Especially once the tropical pacu start popping out, as their natural body temperature is 55C and will gradually warm the tank on their own.
This is certainly not a necessary addition, but it's cheap and the benefits will be further described in the following subsections. One thing to note, this add-on doesn't work as well with the liquid stacking technique, since- Optional: Why the Window Tile?
You may have noticed that all three designs have a window tile to the left of the starvation tank, This is purely optional and can be replaced with a regular or insulated tile as you see fit. There is a reason I placed it there, however, and it goes back to the decor boost provided by tropical pacu.
The below image shows how large of an area can be affected by the decor buff from tropical pacu: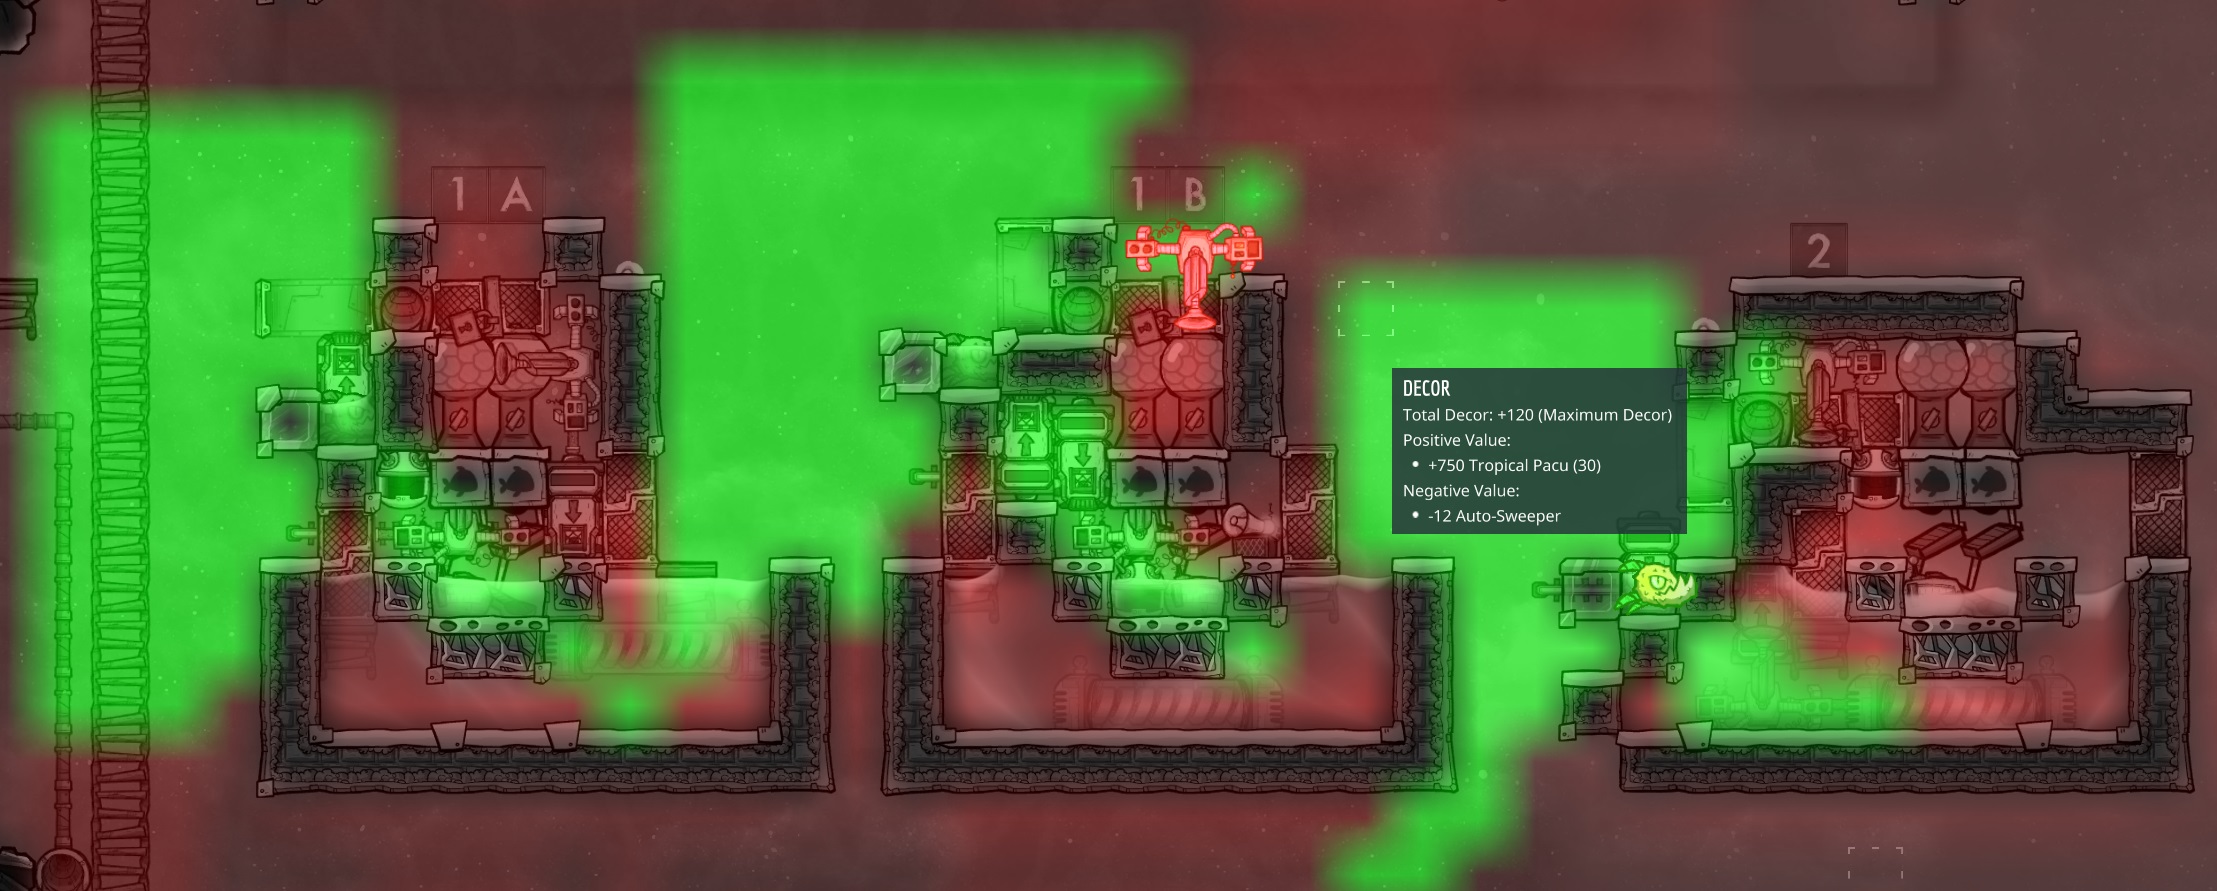
I should have spread the designs out a bit as they're blocking some of the decor area, but these are only examples.
Notice too that with only 30 pacu the decor boost is +750, and after a little while you're more likely to have 300 fish in that tile than 30. If you install the ranch just to the right of one of your main ladder corridors, any dupe passing through could be blasted with 5000+ decor. This can help wash out some of the negative decor experienced from working in the mines or an industrial sauna. I would recommend treating this like a nature preserve and placing the decor blast outside areas dupes will be forced to visit, such as bedrooms or bathrooms. Alternatively, you could build a recreation room to the left of the ranch, causing most of your dupes to idle there in the decor blast during their downtime. There are lots of possibilities, but I believe it's worth the initial investment in a tepidizer to make them all possible.
- Optional: Printing Pod Integration
Integrating the pacu ranch with the printing pod can be convenient for a couple reasons. You may have noticed in my Not Quite Beginner's Guide this is exactly how I was playtesting one of the early prototypes.
The idea builds upon the discussion above about decor blast and window tiles. Before you have a recreation room dupes will idle around the printing pod, so you could build the pacu ranch directly below the pod and let the decor blast penetrate the floor.
Alternatively, you could build a recreation room above the ranch in the same room as the printing pod, exposing idle dupes to massive decor.
The final, semi-silly reason this can be beneficial, is when you receive a care package of pacu from the pod itself. If the ranch is strategically placed below the pod, the pacu will flop right into the ranch. This is more of a very early game jump-start, perhaps a way to populate your first pacu rather than sweeping eggs from around the map. Especially if you set aside the space for the ranch long before you intend to build it, and hope to get a pacu care package in the meantime. Whenever you decide to build the ranch you could have 8 pacu ready to go as breeders. In the later game when you have a few hundred pacu in your starvation tank, adding 8 more from the pod is of no real value. At that time you could close up the gap in the floor between the pod and ranch.
In any case, here's an example of what this might look like using design 1A in a "standard" 16x4 base layout with a ladder corridor: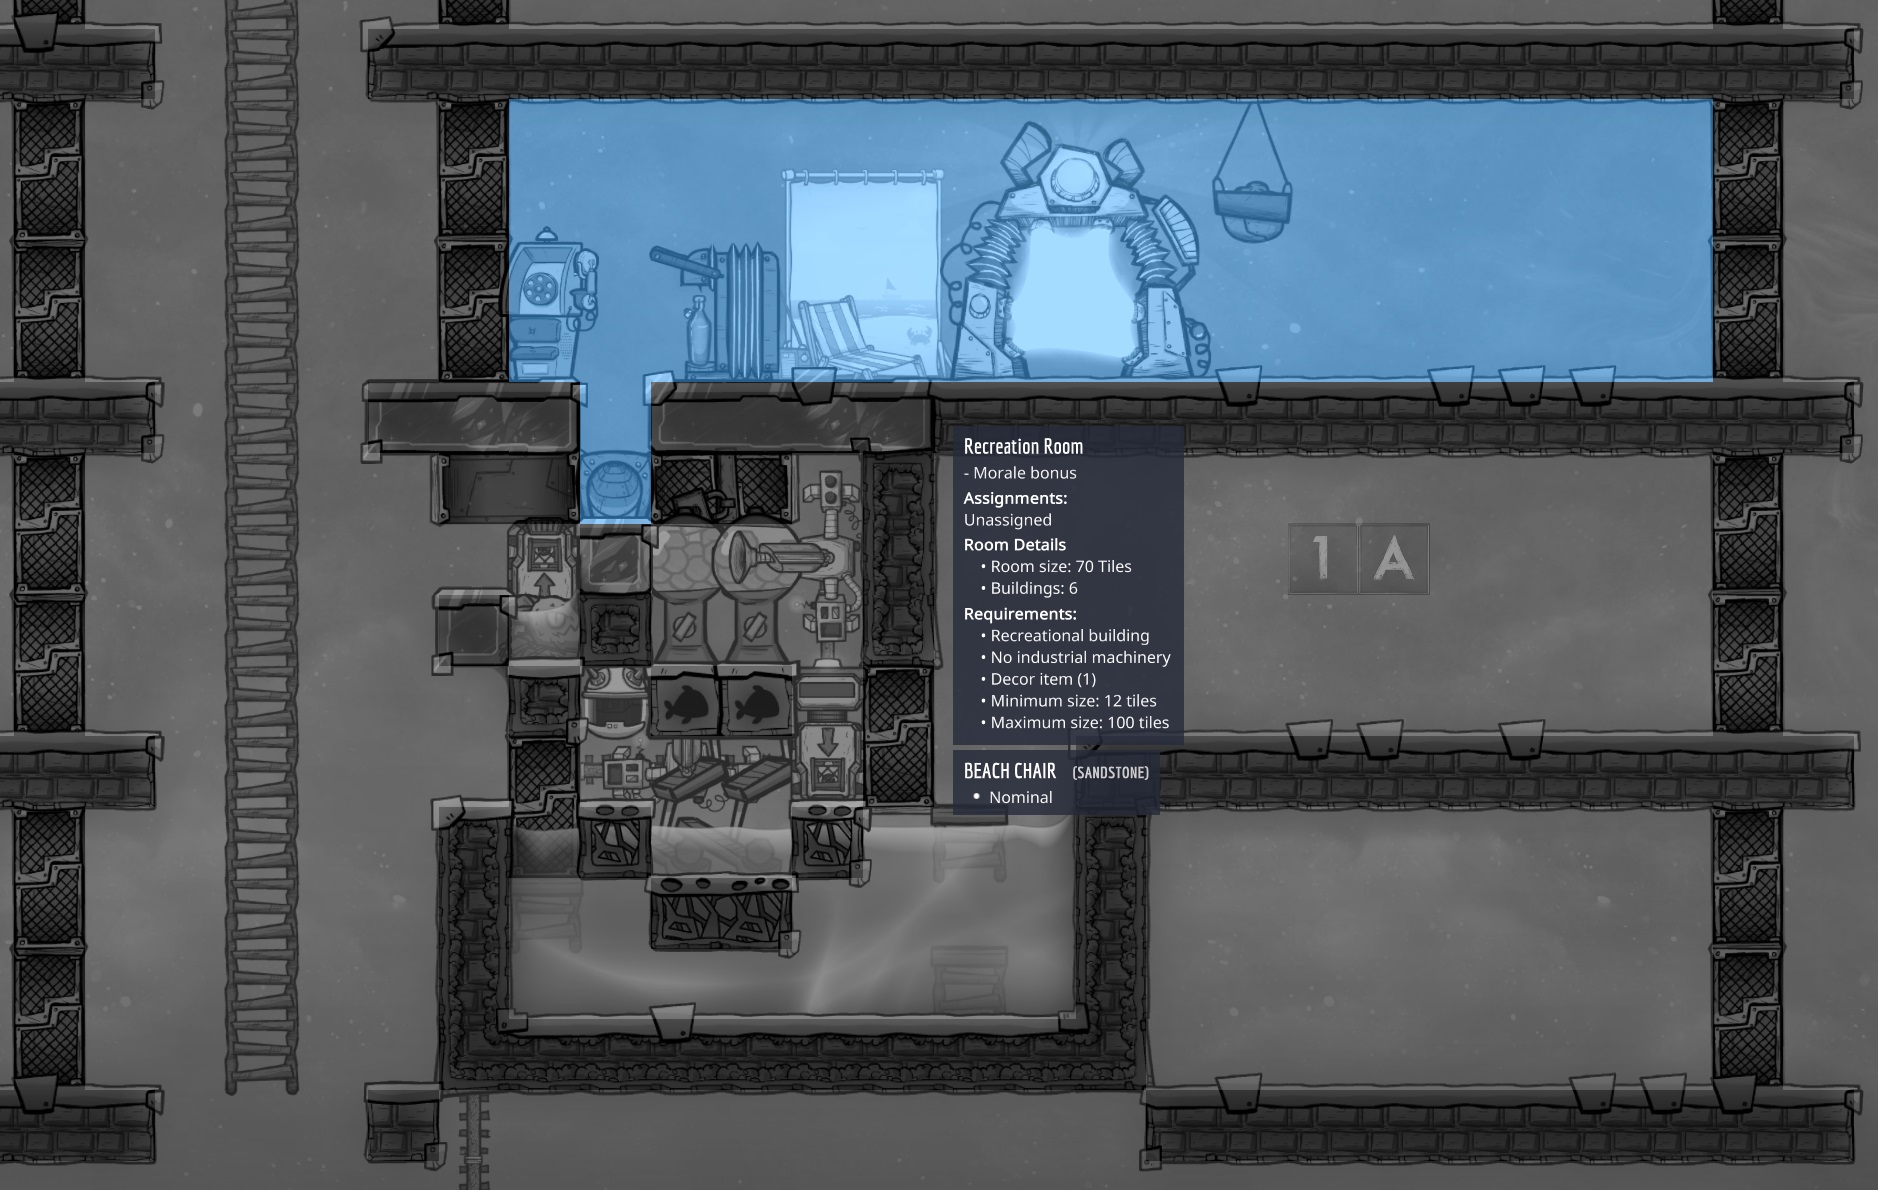
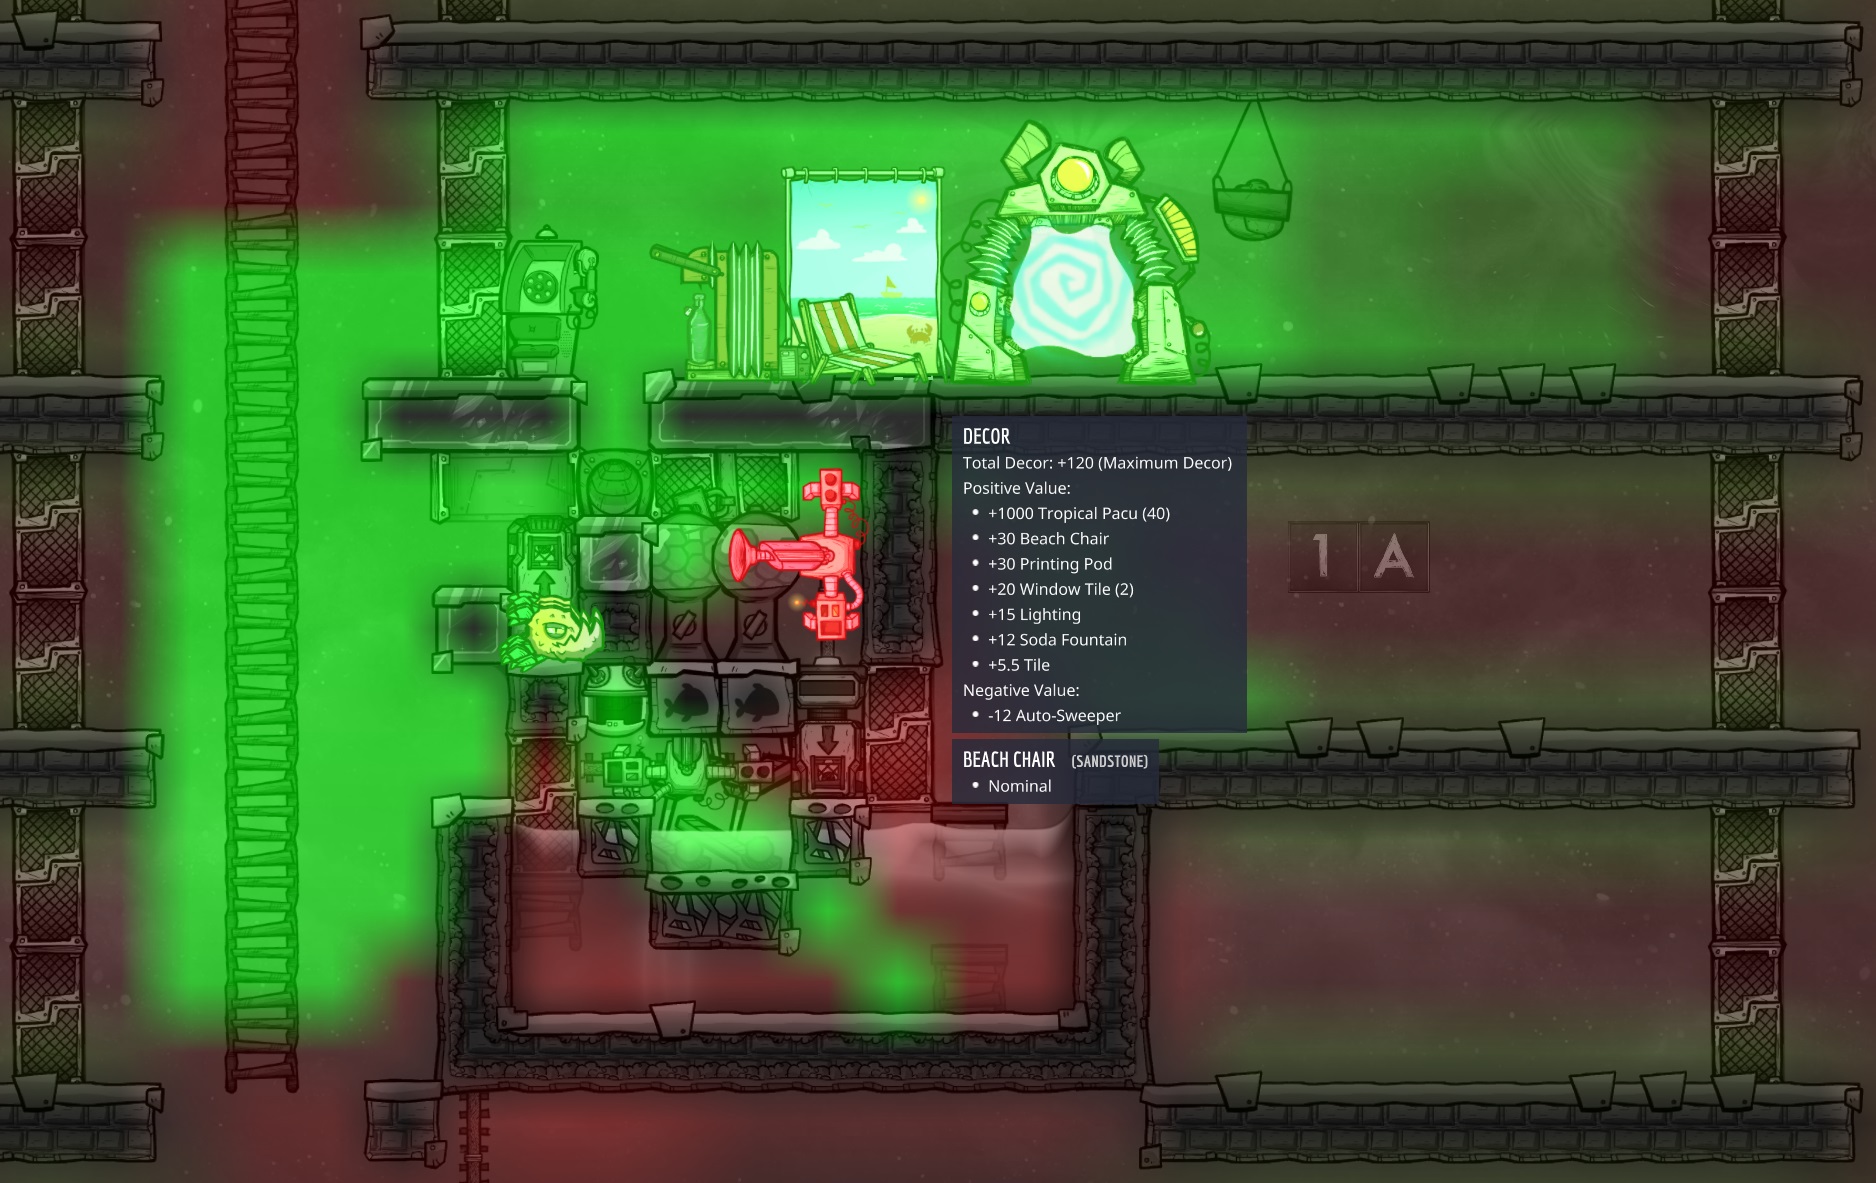
11 vertical tiles of ladder are covered by the blast (3 floors worth) and as mentioned above those floors could be used for bedrooms or bathrooms to increase exposure time.
The only real cost of this is a few extra window tiles, so you'll have to make some glass or mine diamond. Of course it's entirely optional and you can put it off until later in the game, replacing regular tiles with windows as you find the resources. Note too that this shows a tank sized for 3 breeders, while adding 1 extra liquid row (lining up perfectly with the bottom floor of the base) would fit a 4th breeder perfectly. I find that 4-breeder size to be a nice 2-story fit in a standard base layout like this.
A similar approach also works with design 1B, as shown: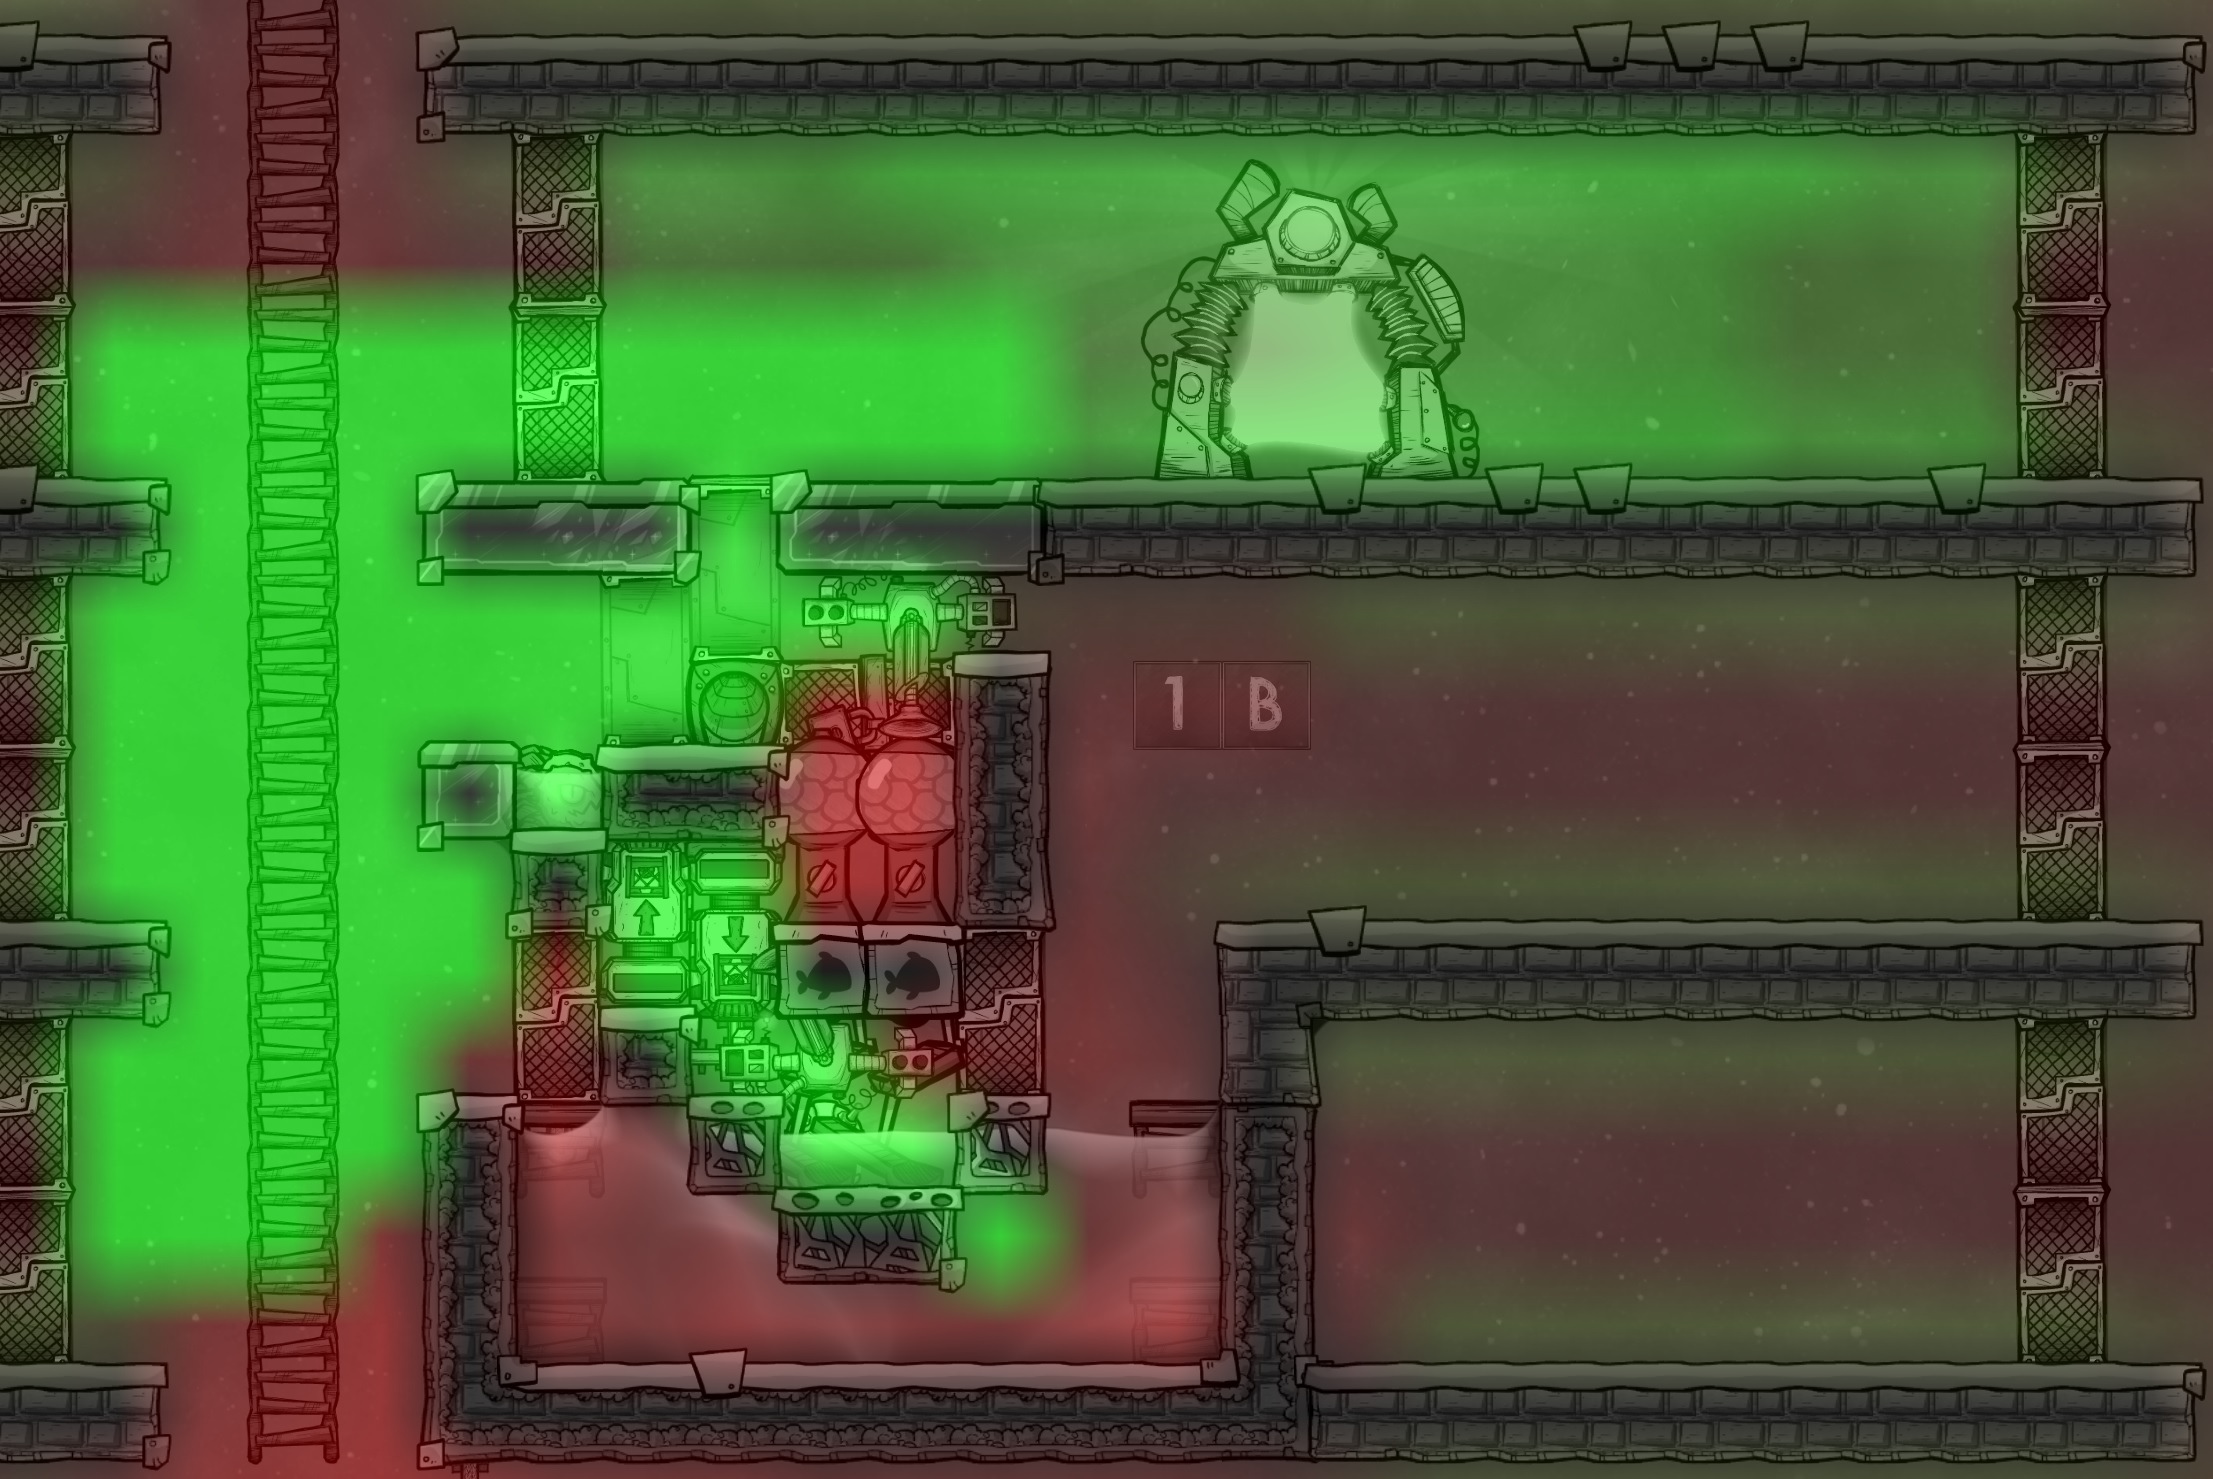
This approach is slightly less effective. The decor blast still covers 3 floors to the left, but onyl 5 tiles in the above floor instead of 6. In addition the standard base layout only accommodates a tank sized for 3 breeders. You can always expand down a second floor and fit up to 8 breeders, if you're looking for a larger ranch.
The final design 2 is not nearly as effective at this decor blast technique: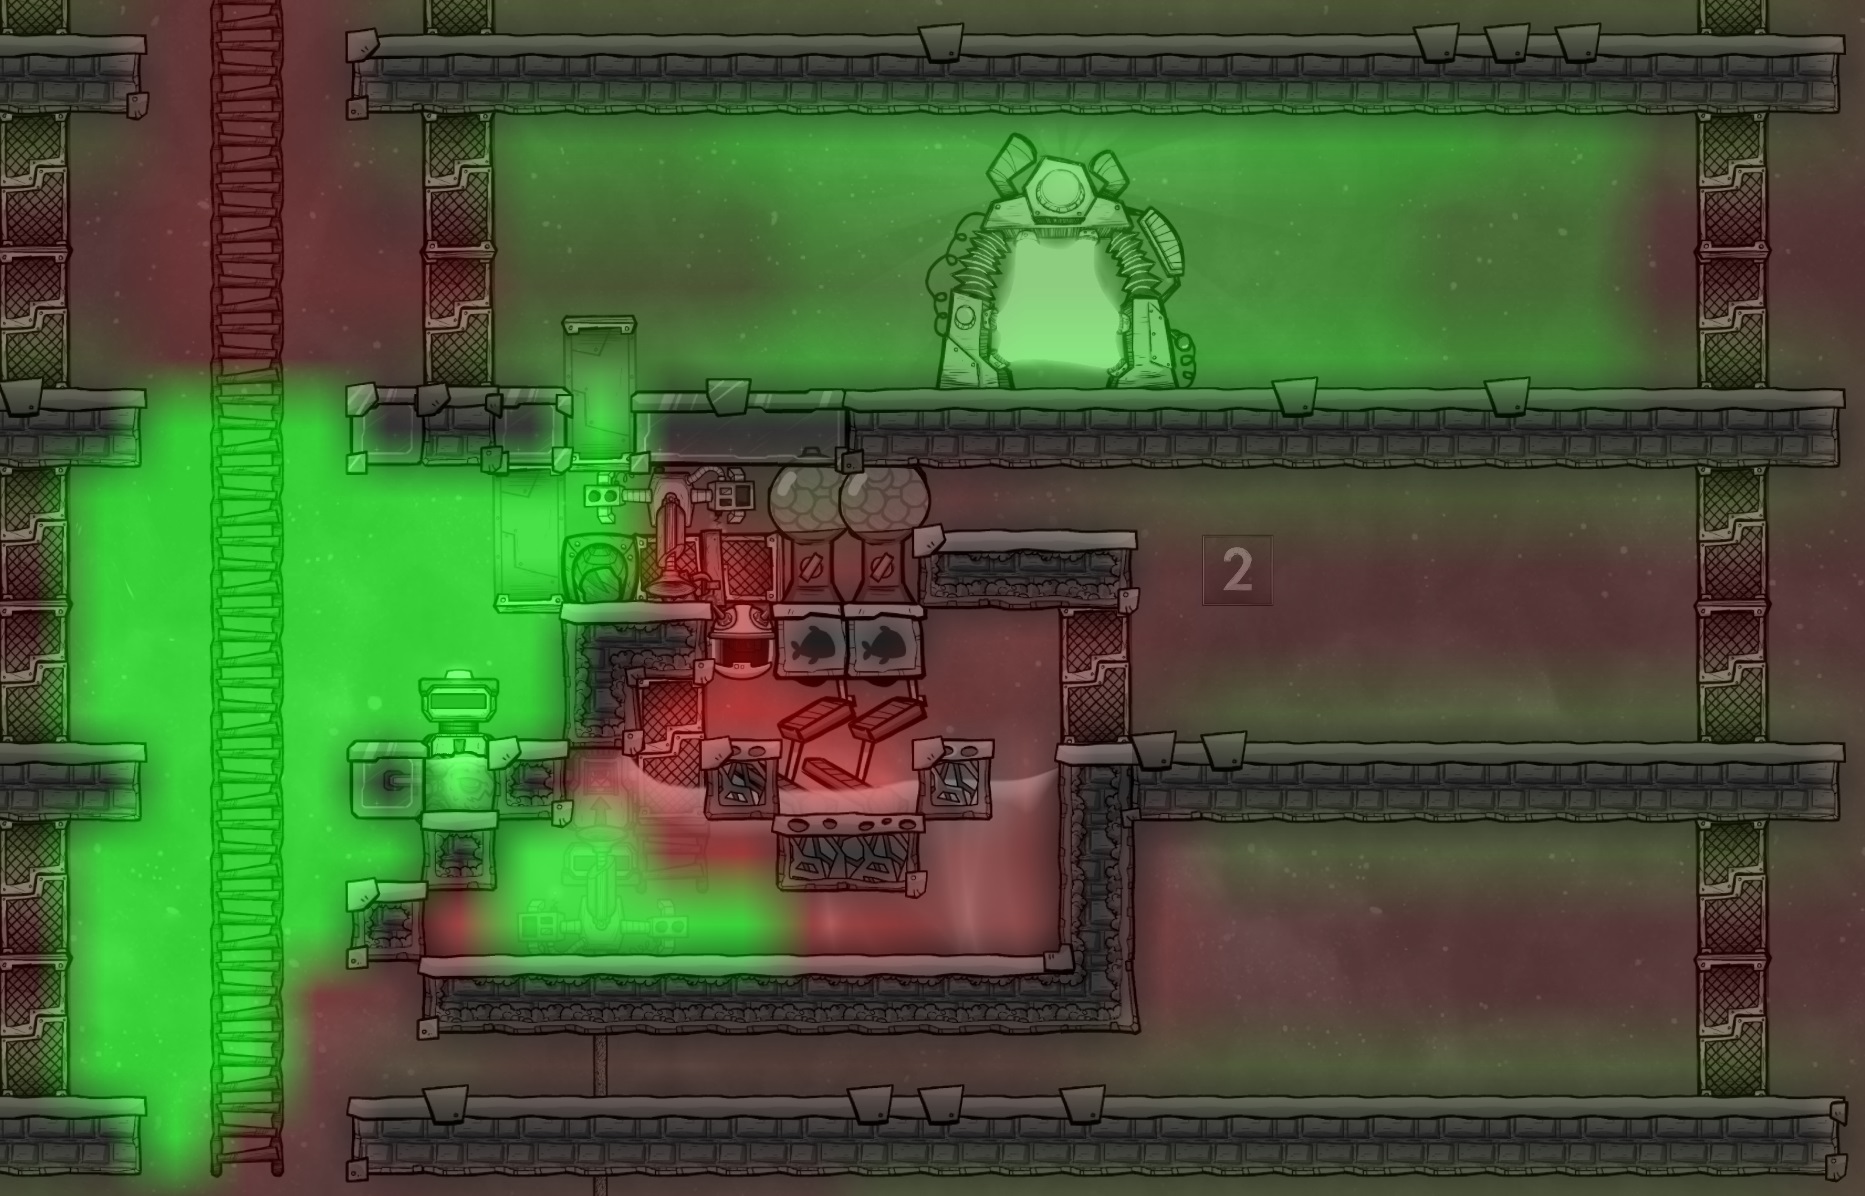
The sideways blast only covers the entrance to 2 floors instead of 3, and there is no upwards blast at all because the starvation tank is positioned so low in this build. The only advantage of this build is the shorter height, which allows a tank sized for 5 breeders to fit perfectly in the standard base layout.
6. Summary and Statistics
To summarize the guide, we looked at the mechanics of pacu ranching and set out the rules for what would make a good, efficient ranch. We then took a look at my personal favorite pacu ranch, designed by BierTier, and some minor modifications (a ladder and door) that I recommend to enhance it.
Despite the near-perfection of the BierTier design, I pointed out one minor annoyance that inspired me to design my own layout. This was to ensure that the liquid in the starvation tank and the breeder tank never be allowed to touch. In addition, I wanted to push the limits of the design to see if it was possible to restrict breeder pathing to 2 tiles instead of 3.
After multiple failures, I produced three different designs which met both of these goals. I don't claim that these designs are "better" than the BierTier baseline, but I believe they're on a similar level, at least worthy of publishing a guide to describe them.
In addition to the pacu ranches themselves, I demonstrated a variety of optional add-ons. One of these was a way to integrate the ranch with your main base (either a ladder corridor and/or a printing pod rec room) in order to decor blast your dupes with tropical pacu.
For sake of comparison I have a table of specifications showing the different builds discussed in this guide. As you can see they're all very similar, and at the end of the day they'll all make you an infinite amount of food. My ranches appear to be a little more expensive and a hair smaller, using extra mesh tiles to hold liquid and shave off a tile of space here or there.
While I said above that none of the designs are necessarily "better" than one another, the table seems to indicate that design 1A is strictly better than design 1B. At least if you're integrating it into your base 1A will cover more area in decor and hold 1 extra breeder without disturbing your floor layout. It even costs a bit less refined metal. This late into guide development it's not worth removing the information about 1B, but for all intents and purposes designs 1A and 2 seem to be the better options, each with their own pros and cons.
If nothing else, this guide should provide you all the information necessary to build your own automated pacu ranch, whether that's based on the BierTier design, one of my designs, or something brand new of your own!
7. Thank You!
Thank you for reading this guide and I hope you found something worthwhile to take away from it!
Before I go I feel it's necessary to once again thank BierTier for not only the pacu ranch I featured above, but for his Youtube videos and tutorials in general. I really hope he wont mind me using his name all over this guide, as I have nothing but glowing feedback for his designs. He is one of several designers I've taken a lot away from over time. I really enjoy his videos and encourage you all to subscribe to see what he does next! I linked the specific pacu ranch video above in the highlight section, so here I'll link to his channel instead.

Link: https://www.youtube.com/@BierTier
- ONI - Surviving the Early Game★ 5 (2.4k)83k views6.3k ♥54 minUpdated 6 Aug, 2019
- Useful Construction Patterns★ 5 (1.8k)74k views5.2k ♥66 minUpdated 29 Aug, 2020
- 10* things I wish I knew sooner...★ 5 (754)58k views1k ♥4 minUpdated 6 Oct, 2017
- ONI - Surviving the Mid-Game★ 5 (1.3k)44k views3.8k ♥150 minUpdated 6 Sep, 2019
- Not Quite Beginner's Guide★ 5 (361)32k views1.1k ♥91 minUpdated Mar 26, 2023
- Руководство для начинающих. (ОСНОВЫ)★ 5 (629)32k views1.2k ♥21 minRussianUpdated 20 Apr, 2019




- Upgrading to PremiumTeam Fortress 2★ 5 (20k)1441k views11k ♥6 minUpdated May 11, 2022
- No More Room in Hell Official ManualNo More Room in Hell★ 5 (2.8k)569k views2.1k ♥29 minUpdated Apr 22, 2019
- NMRiH Community Hosting GuidesNo More Room in Hell★ 5 (526)351k views653 ♥1 minUpdated Aug 10, 2022
- ULTIMATE GUIDE FOR GAME DEV TYCOONGame Dev Tycoon★ 5 (5.8k)326k views10k ♥4 minUpdated 23 Jan, 2014
- How to 'Git Gud' Soon™MORDHAU★ 5 (2k)318k views3k ♥68 minUpdated Nov 16, 2024
- Лучшие кооперативные игры SteamPAYDAY 2★ 5 (1.5k)315k views2.1k ♥56 minRussianUpdated Apr 27, 2025






This guide was created by its original author on the Steam Community. Are you the author and want it removed? Request removal.