Fully Automated Lumb Ranching
1. Introduction
First off, obligatory links to my other ranching guides for hatches, divergents and dreckos.
This is wild, I left ONI behind for about 2 years, and when I come back they have dinosaurs! I also have guides in the works for a combined Rhex/Dartle ranch, and a combined Bammoth/Flox ranch, since I never really played the Frosty Planet Pack before I left. But today, we're here for the Lumbs.
This was simultaneously the simplest design I've ever created, but also deceptively complex mechanically. I actually finished the Bammoth/Flox design first, so I was freshly used to the new pathing mechanics of 2x2 critters like lumbs. That came in clutch for this guide, especially for working around a pathing quirk. The bammoths had also forced me to redesign my old critter dropper to fit 2x2 critters, so that ported over nicely for lumbs. Everything else about this design mostly just fell into place, so hopefully you'll enjoy the simplicity!
2. Objectives
- Must be a “horizontal” stable
- This is just personal preference; Ovagro vines can grow along walls and would be well suited to a vertical stable, but I wanted to emulate my previous ranch designs
- Must integrate a "critter dropper" to deliver new lumbs to stables within the ranch
- This is pretty much my signature at this point, I wouldn't build a ranch any other way :)
- Must automate all required resource delivery
- Lumbs don't eat delivered materials, but consume figs directly off vines
- Vines only require water to grow, so in this case we won't be delivering anything else.
- Lumbs don't eat delivered materials, but consume figs directly off vines
- Must automate all required resource extraction
- Tough Meat
- Peat
- Eggshells
- Optionally: extra ovagro figs
- Tough Meat
- Must automate population maintenance to keep a set number of lumbs in each stable
- Removal of eggs
- Addition of new breeding lumbs when required (e.g. after natural death)
- Removal of eggs
- Should fit within a 'standard' 16x4 room layout
- If this is not possible, then the other 'standard' 24x4 layout should be used.
- Should minimize time between breeder death and replacement
- These dinos live long and reproduce slowly, so we'll use incubators to hurry the eggs along.
- Should be relatively easy to build, no tricky order of operations or dupe pathing
- Should try to keep automation requirements reasonable (subjective, I know)
3. Mechanics and Theorycrafting
- 2x2 Critter Pathing
Returning to ONI after so long I had a lot to learn about these new large critters. Fortunately I spent a lot of time designing a Flox/Bammoth ranch, which gave me the opportunity to get used to the new 2x2 critter pathing mechanics.
The most important thing about these critters is that they require 2 tiles of width in order to walk onto, or hop up and down onto, a tile platform. They also cannot hop across single tile gaps in the floor, or hop up two tiles, for example jumping from the floor to the top of a door like smaller critters. I guess on a positive note you could say they're easier to contain...
One strange mechanic that wasn't immediately obvious is that while other critters can stand on a pneumatic door, whether it's open or closed, these "heavy" critters cannot walk onto a pneumatic door at all. They can still walk onto mechanical airlocks, presumably those doors are more solid and can carry their weight.
All of these new mechanics obviously place constraints of the layout of a stable. Most importantly for this guide they also required a complete redesign of the critter dropper in the control room.
- Ovagro Fig Growth
Ovagro vines are interesting in that there is a single central node, from which a vine will grow on both sides. The vines will grow up to 12 tiles in length, along floors, up walls, across ceilings, etc. Doors also count as "floors, walls or ceilings" for this purpose, basically if a critter can stand on it a vine can grow on it.
Why this is interesting is that each tile of ovagro vine will produce figs, while the central node consumes the same amount of resources (water) whether the total length of the vines is 2 tiles or 24. It's important to ensure the vines can reach their full length to maximize fig production. At its maximum length of 24 vine tiles, a single node can provide enough figs to support exactly two lumbs.
The most naive way to grow ovagro figs would then be along a flat floor, where the vines would stretch for 12 tiles on each side of the node, or 25 total tiles. With a grooming station, such a stable would be a minimum of 27 tiles wide. I can't imagine anyone actually doing this, and as far as I can tell there are only two realistic ways to grow figs, if you intend to use the room as a lumb stable.
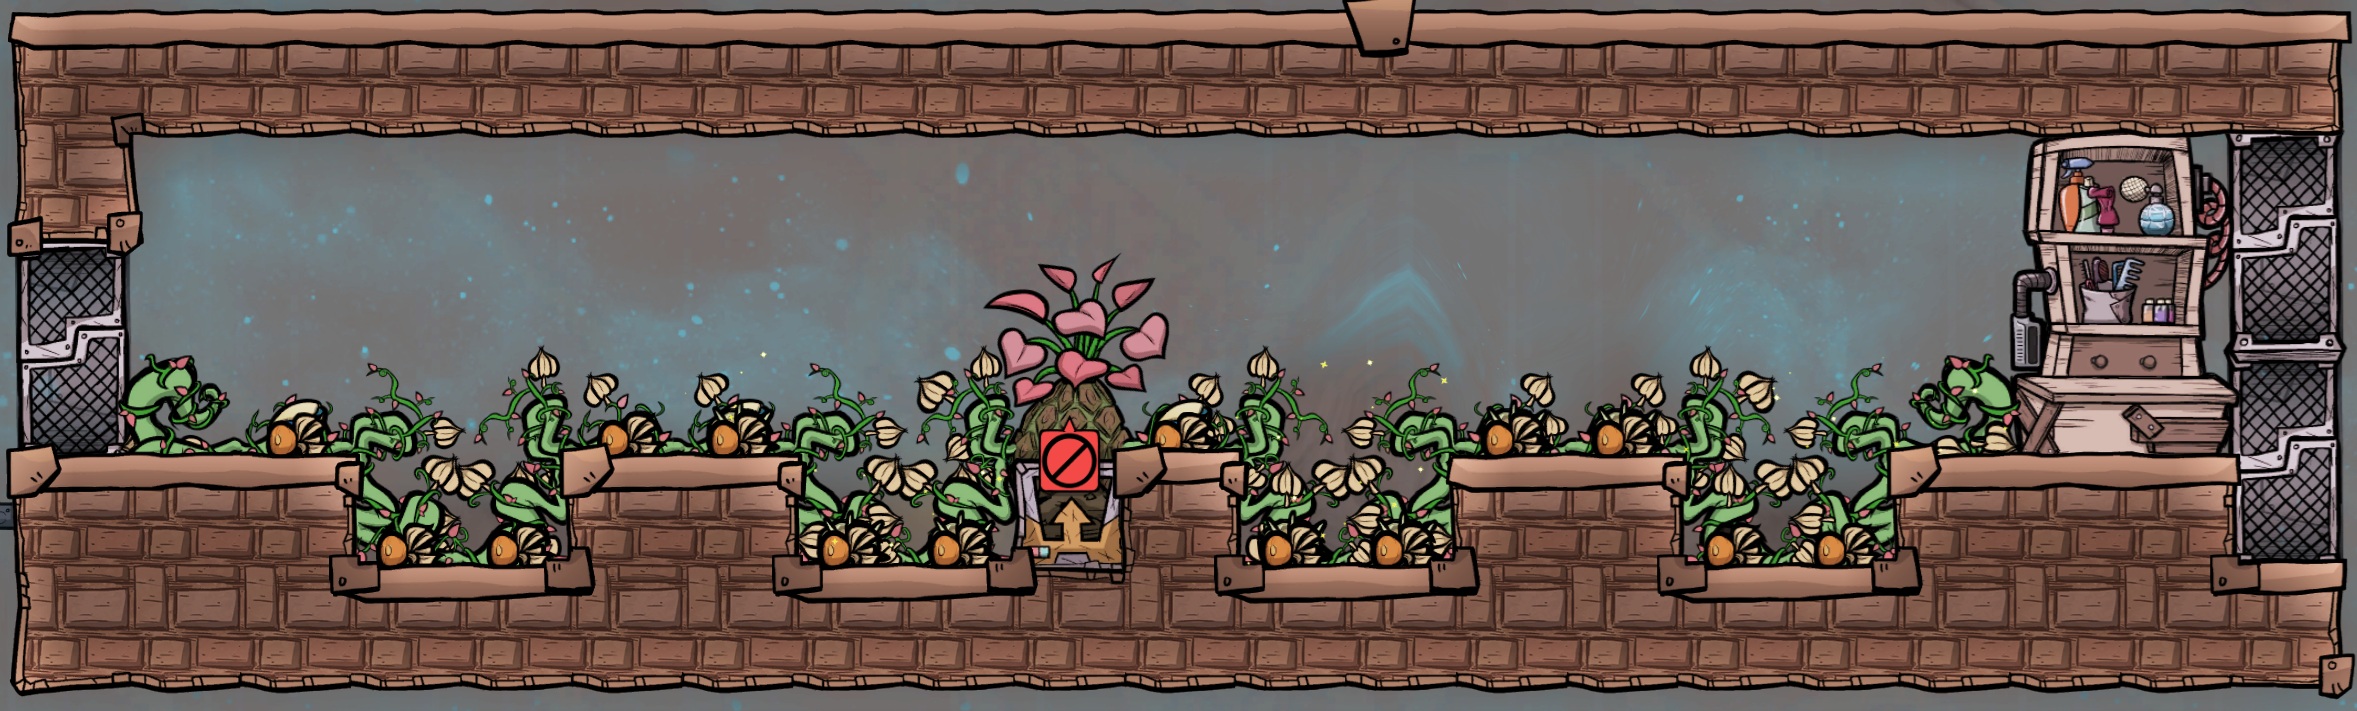
The vines growing up and down along these steps reduce the minimum stable width to only 19 tiles, including the grooming station. This is a good improvement over a straight floor, and could easily support a 'standard' 24x4 room layout.
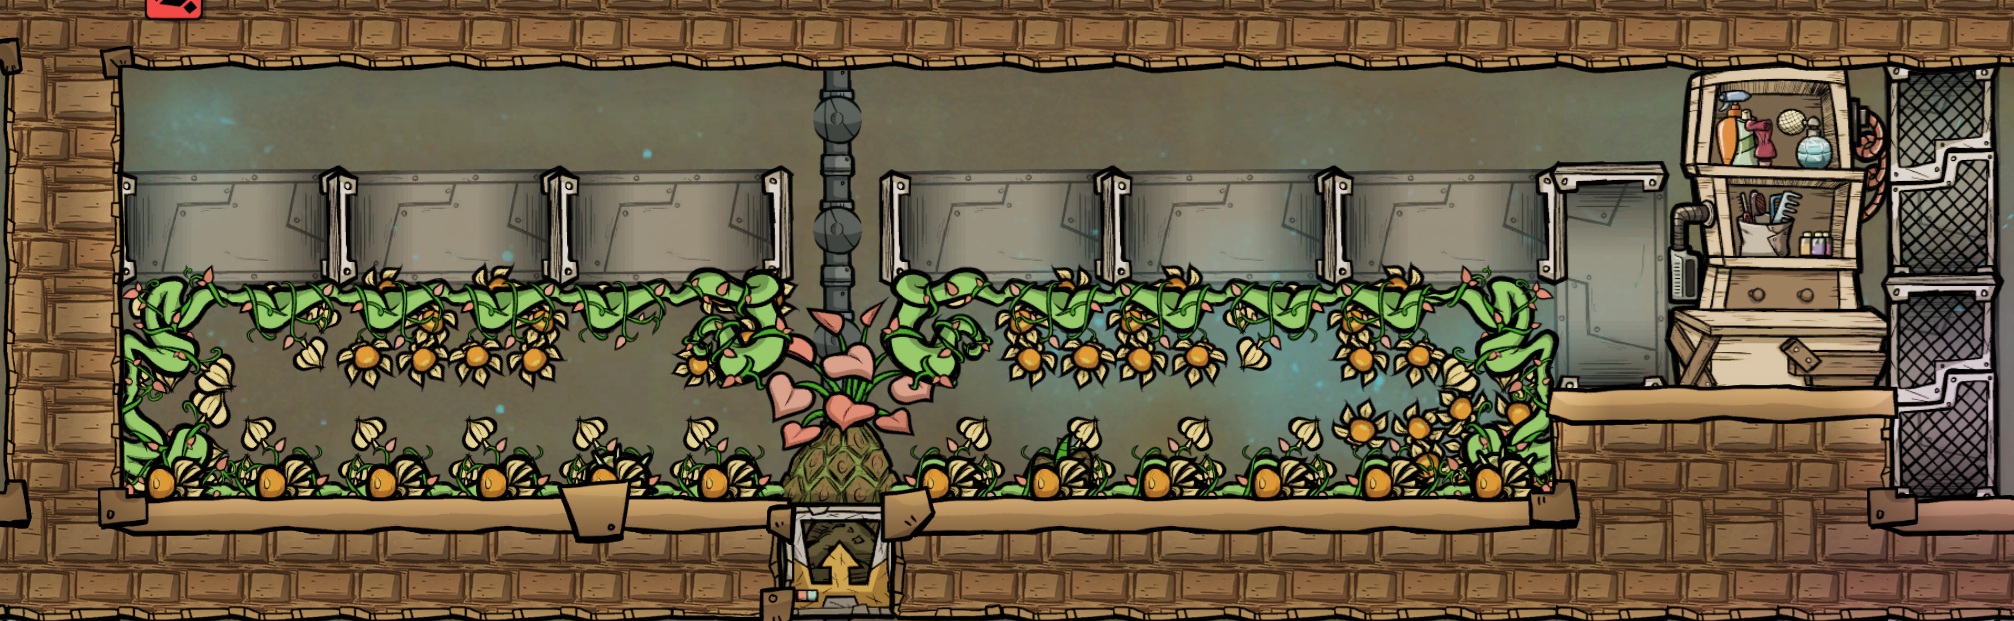
In this case the "ceiling" is built from doors so that autosweepers can reach through and collect any resources produced below. This approach reduces the minimum width of a stable to exactly 16 tiles with the grooming station, which is exactly what we're looking for as a 'standard' 16x4 room. For this reason I decided to use the loop approach in my stables.
I personally cannot imagine any other useful arrangement of ovagro vines if the room it's in is supposed to also be a lumb stable. After a cursory Google search, it was no surprise that I found several variations of lumb ranches using both of the above prototypes, but almost nothing using a completely different or unique approach. Unlike pretty much every other critter, this combination of plant growth mechanics and 2x2 critter pathing all but requires a ranch to follow one of the two above patterns.
- Critters and Doors
You may have already started wondering why the image of the "loop" above had the door on the right side elevated up to the same floor level as the grooming station. The grooming station is already sitting on a 2 tile wide platform, perfectly acceptable for a 2x2 critter to jump up to, so this isn't necessary from a pathing perspective. Placing the door directly on the floor would add a cell of space to the stable, and save the material of building the extra tile, so what gives?
The reason for this is that doors are not technically considered a part of the room which they are inside. This makes sense when you think of the more typical application of doors as part of the outer boundary of a room (like the two closed doors on the far right of the same picture). The walls around most rooms are mostly tiles, with a door or two allowing dupes access to the room. Only the cells inside that tile/door boundary are considered part of the 'room' itself.
We most often see this effect with our critter dropper designs. When a critter steps into an automated door, prior to the dropper engaging to shut the door and push them into the stables below, they have technically exited the room they were previously in. The automation for our critter droppers usually has to account for this or else we might let in more critters prematurely and drop too many at a time. So we're generally used to this mechanic already, just from a different perspective.
But the same issue applies with any door placed inside a room, such as the doors making up the walls and ceiling of our "loop" for figs to grow on. In this case, there is an open door in between the grooming station and the entire left side of the stable where the figs are growing. This leads to an odd behavior if the open door were simply placed on the floor. When a lumb is called for grooming it would have to walk along the floor, through that door, but upon entering the door cell it is no longer inside the stable, and thus not a valid target for the grooming errand. This cancels the errand and leaves the critter to wander back into the stable, where it will get called for grooming again, and the whole process can repeat over and over, wasting your rancher's time.
By raising the door up one tile it forces the critter to jump up to that platform. Jumping is an interesting mechanic in ONI, as it's really just a teleportation where the critter/dupe performing the jump never actually exists in the tile they jumped over. We exploit this mechanic all the time with "hop locks" to prevent our duplicants from getting soaking wet or soggy feet debuffs when jumping through liquid locks. 2x2 critters like lumbs can't jump across floor gaps like a standard hop lock, so instead we make them jump up a level. Using the same jump mechanic, the lumbs in our stable will jump completely through the door cell, never existing inside the door itself, thus never leaving the stable, so they can complete the grooming errand as expected.
It's a bit of a weird mechanic, and a bit of a weird workaround, but it's really nothing we aren't commonly taking advantage of in numerous other designs.
4. Bottom Line Up Front - The Design
As is typical for my ranch designs, we're using a single control room paired with as many stables as you'd like. I'm showing two stables in the example image, but there's no practical limit as long as you can supply the input water. The control room is a standard four tile height room that contains the automation logic and other infrastructure to support the stables. Each stable supports two lumbs with a single full-sized (24-vines) ovagro node.
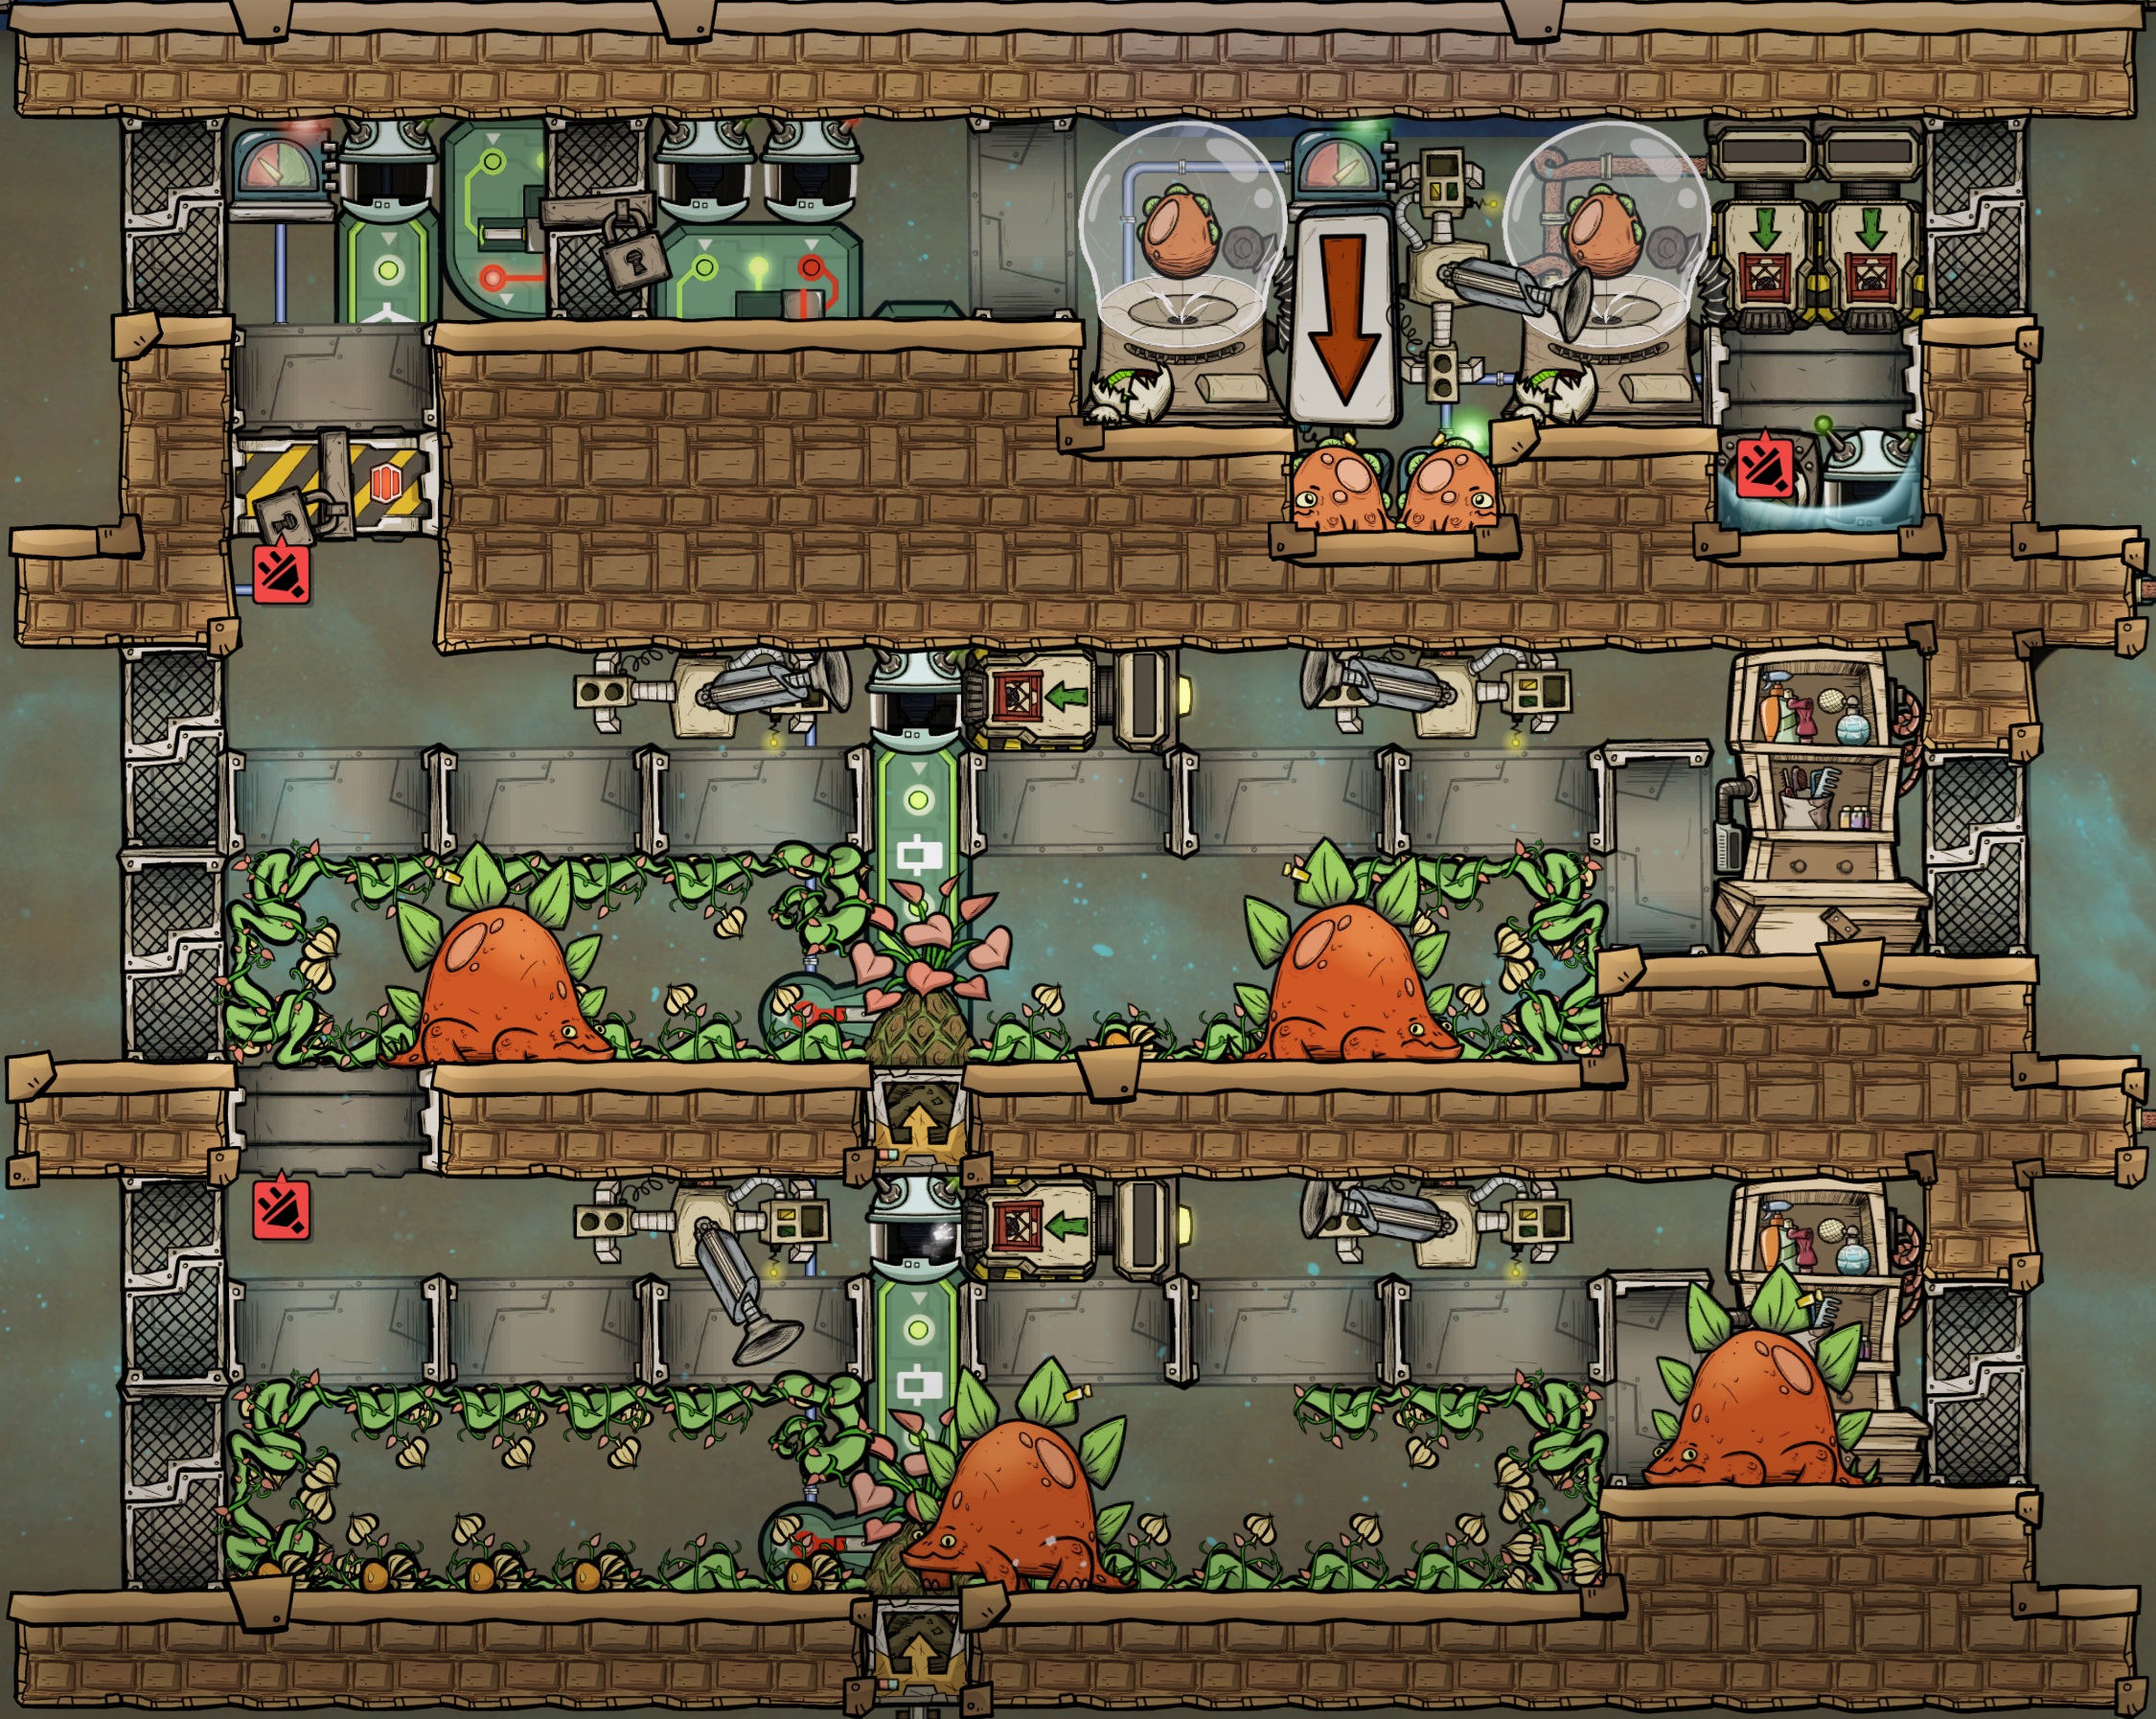
One difference between this design and my previous ones is that you should make every effort to decide on the number of stables up front. While it's entirely possible to expand the ranch downwards and add additional stables, this will destroy a large number of vines and disrupt the food supply for your lumbs. It's not catastrophic, but this isn't the type of ranch where I would gradually add another stable every 3rd or 4th dupe printed. Instead, I would aim for a certain size colony and build all the stables (and plant all the nodes!) up front.
- The Control Room
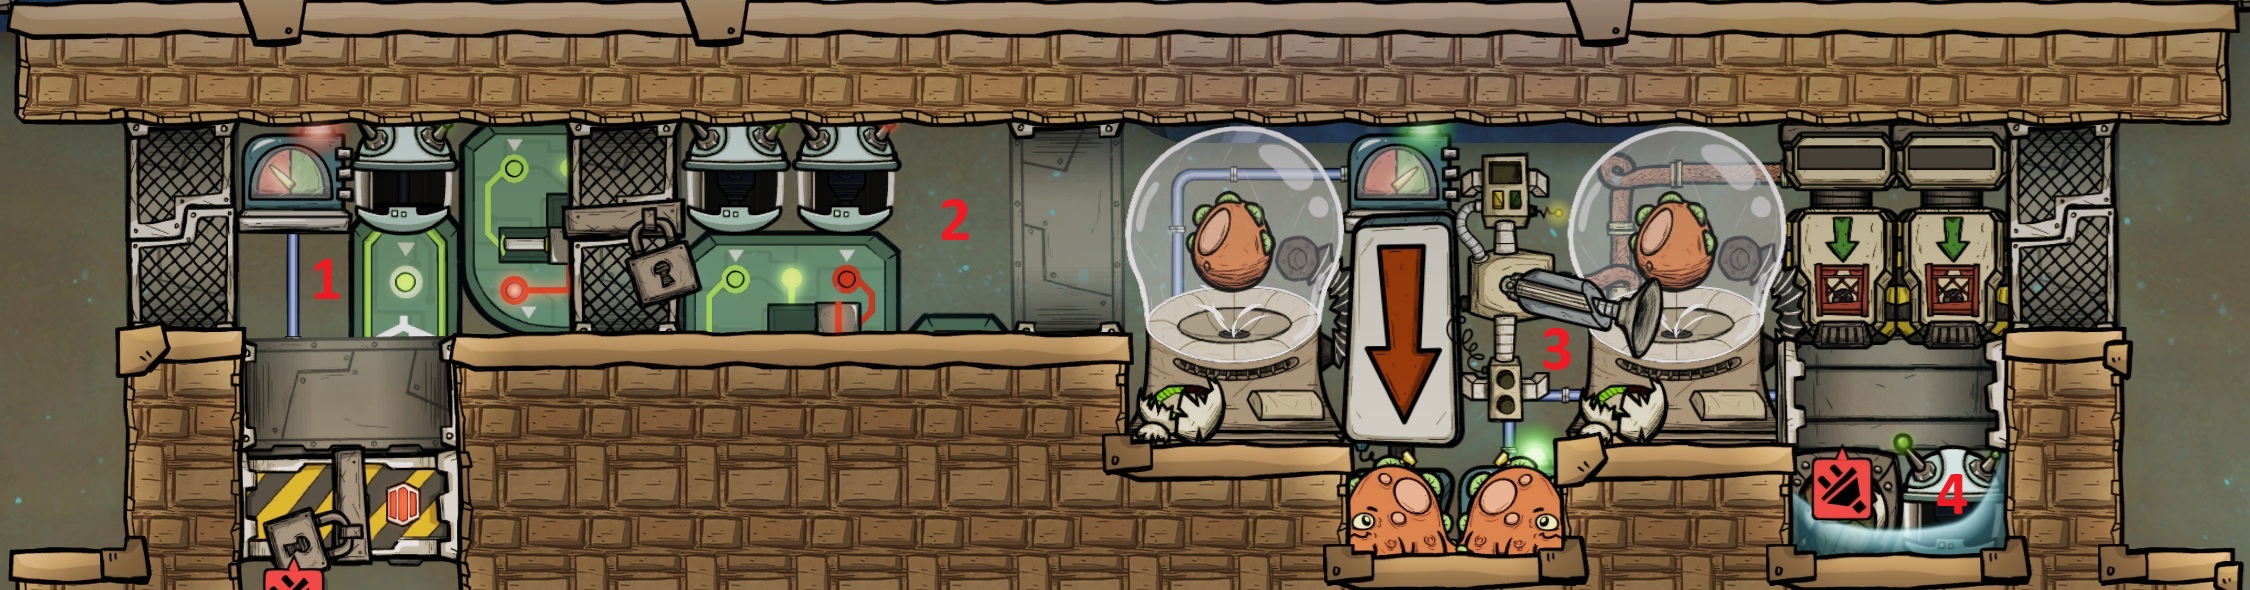
5. Construction
Note that the upgrades do not necessarily have to be installed in the order presented. You might choose to install resource extraction prior to incubators, for example. This was just a logical way to break the design up into smaller feature chunks that can be added whenever you have the appropriate research and materials.
- Early Ranching - Zero Automation
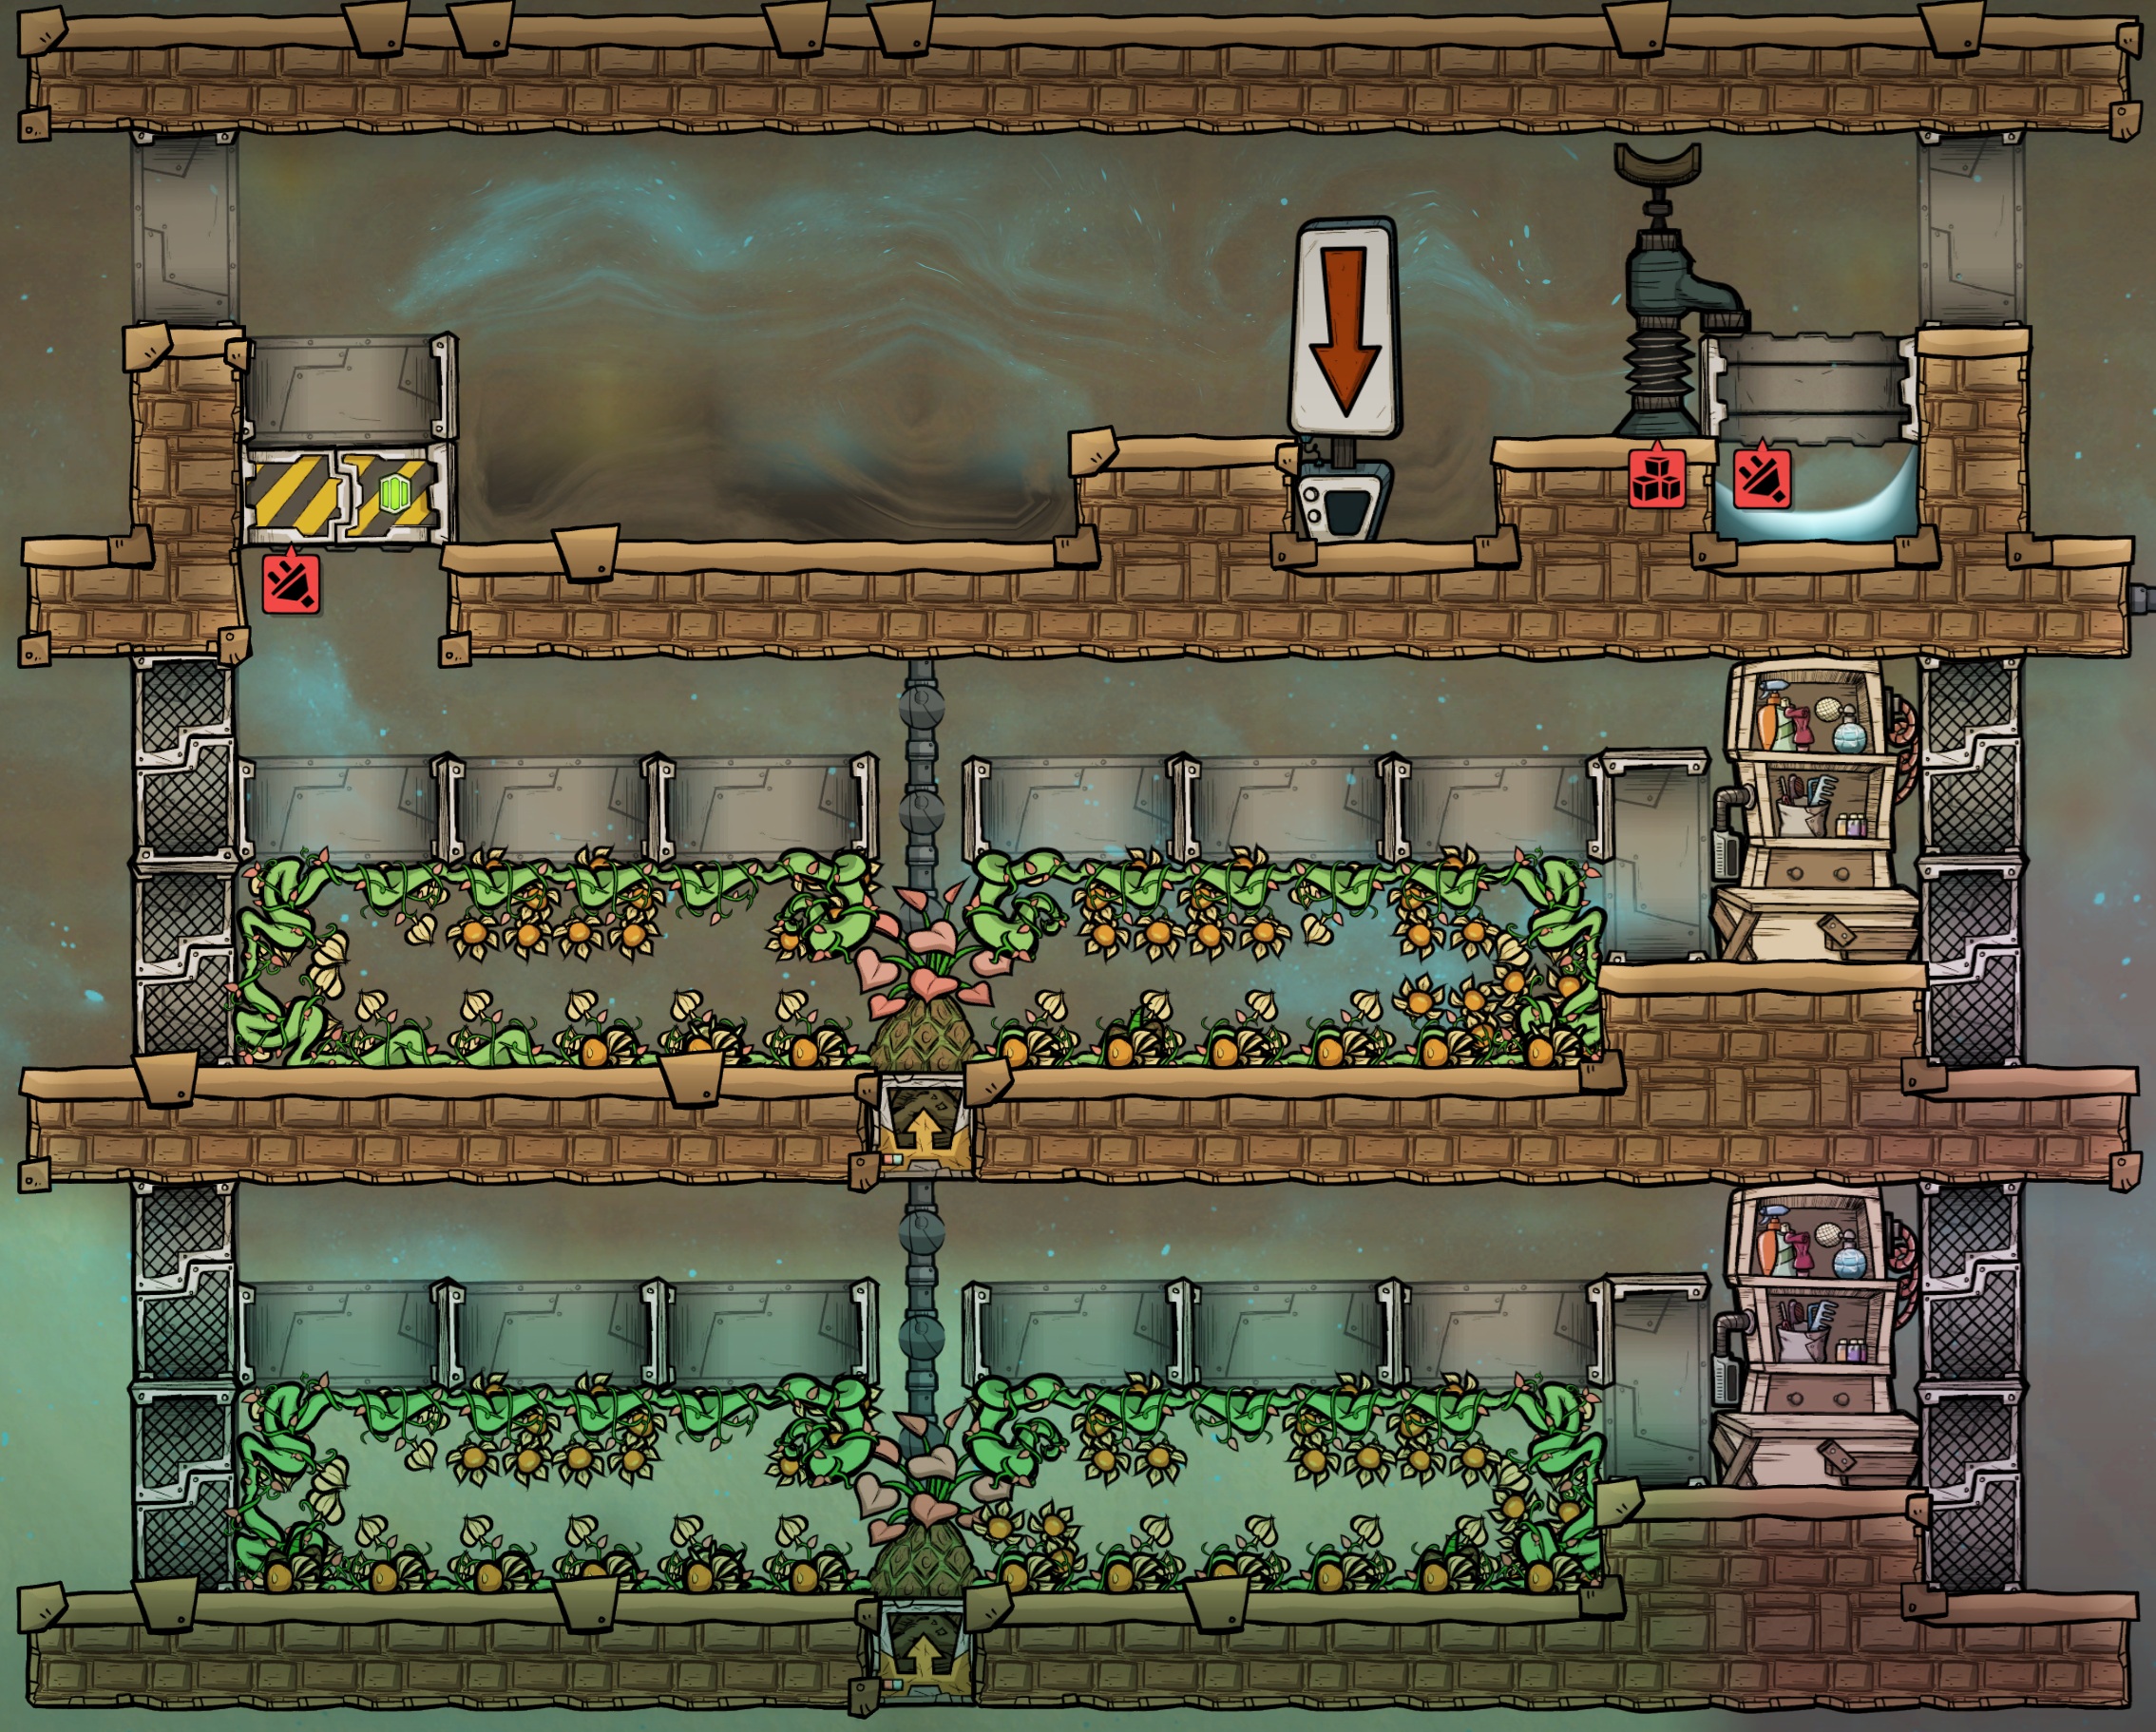
Once you've constructed this initial skeleton, you'll want to dump water (or another liquid) in the evolution chamber and then delete the bottle emptier. I recommend a full 200kg bottle, leaving 100kg in each tile, to ensure the trap will never glitch.
It is also important to connect a water pipe ASAP to your ovagro nodes, as it takes a long time, an excruciatingly long time, to grow out the full 12 vines on either side. Each lumb requires the fig production of 12 vines to survive, so I'd recommend not adding lumbs until the vines in each stable have mostly covered the floor, and then limiting each stable to a single lumb until the vines have mostly finished looping back on themselves.
- 1st Upgrade - Egg Removal
As soon as you acquire the mechanical engineering skill and the appropriate research, the first thing you’ll want to automate is extraction of eggs from the stables. This is primarily because if eggs are left in a stable you will suffer from the ‘cramped’ debuff, preventing more eggs (and thus meat) from being produced.
This upgrade requires 600 refined metal in each stable, to install two autosweepers and one conveyor loader.![.jpg]](https://images.steamusercontent.com/ugc/11174625089805886562/C8C0581D59F4C5EC51D2C991EC9D9ECB4637A905/)
The conveyor rail is shown continuing down to indicate that it should run through as many stables as you've decided to build. Each conveyor loader should be set to accept everything except ovagro figs. While the primary purpose at this time is to remove eggs, these same sweepers and loaders will form the backbone of your future resource exports as well. Peat and tough meat produced by the lumbs, and even random construction debris, will be swept up to a chute in the control room to be sorted later. We just want to make sure we don't remove extra figs laying on the ground, as each stable produces just the right amount to feed two lumbs.
- 2nd Upgrade - Incubation
The second thing you'll likely want to add is incubators in the control room. While this upgrade is purely optional, I highly recommend it because of the longer lifetime and slower reproduction of the lumbs. Like my previous guide for dreckos, without an incubator you'd have to wait an extremely long time before the first tough meat is produced.
![.jpg]](https://images.steamusercontent.com/ugc/17578596721857479069/72CB39DC33E159E60EE7C51CB7E7D771A8FD4ECF/)
This upgrade costs a total of 740 refined metal, 200 each for two incubators, 200 more for an autosweeper, 100 for two timer sensors, and 40 for eight tiles worth of automation wire.
The autosweeper will grab eggs from the evolution chamber and automatically load the incubators. At this time you should also set the critter drop-off to accept lumbs and lumblets, with a maximum of 40 critters. This will make sure that once eggs are hatched in the incubator they are removed and reloaded. Finally, the timer sensors are used to turn the incubators on for 60 seconds once per cycle to receive the lullabied buff, then turn them off for the rest of the cycle to save power.
- 3rd Upgrade - Output Distribution
The next upgrade consists of two conveyor loaders to carry resources produced in the ranch back to your base. The same autosweeper loading the incubators is used to load the conveyors.
![.jpg]](https://images.steamusercontent.com/ugc/15854996109375603717/585CE8D26AA2B20FEAF493403DE60C5481FF7B9B/)
The refined metal cost is 400 for the conveyors. I recommend setting one to allow all edible and cooking ingredient items (such as tough meat) while the other is set to allow everything except those two categories, and of course should not allow critter eggs. This way the first conveyor loader can be run directly to your freezer/kitchen, while the second can be run to a centralized storage warehouse, or to an industrial area.
- 4th Upgrade - Repopulation
The automation circuit in this build is a bit more complicated than some, but it's basically the same idea as my original hatch ranch. So if you've built that one, you can build this one! The image below shows both a left-facing and right-facing ranch, since the port locations require moving around some of the circuitry.
![.jpg]](https://images.steamusercontent.com/ugc/13309452191688819121/2B224DC9216D9C09D865C37148A02A3887EA9BDB/)
We should start with the simple circuit in the stables. Each stable contains a critter sensor set to '>1', so it will stay green as long as there are 2 lumbs in the stable. That signal goes through a buffer because lumbs will frequently be walking through the door next to the grooming station, and whenever they stand in that doorway they're not counted as "in" the stable. I have that buffer set to 30 seconds, but it could really be anything. The general idea is to slow down the reaction time of the circuit so that we don't accidentally drop in a 3rd lumb if one of the existing lumbs hovers in a doorway for too long.
After the buffer, the signal goes to two places. The first is the airlock in the floor of the stable, holding it open. This allows lumbs to fall through this stable if another stable further down the stack requests a replacement. The second destination is an inverter, which runs straight up to the control room. This is produces a 'critter needed' signal,. which in this example is red, but would turn green once the critter sensor sees less than 2 critters.
The 'critter needed' signal runs to two places in the control room, and AND gate directly above, and an OR gate near the evolution chamber. The latter is simpler so we'll explain that first. The second input to that OR gate is a critter sensor inside the drowning trap set to <1 critter. So the combined logic says that if any stable needs a critter, OR if there is no critter in the trap, the door above the trap should stay open. Conversely, if none of the stables requires a critter, and a critter walks into the trap, it will close the door and begin the evolution process.
Lets go back to the first AND gate where the 'critter needed' signal landed. The second input to that gate comes from an AND gate in the critter separator room, which in turn is fed from two critter sensors. These sensors are set to >0 and <2, so the only way they could ever both be true at the same time is if there is exactly one critter in this staging room. So the only time the first AND gate can be true is when there is exactly one critter in this room AND one or more stables below is requesting a replacement critter.
Once those conditions are satisfied, the AND gate sends it's signal through a buffer and inverter to the first door of this chamber. This closes the door and due to the buffer keeps it closed for 15 seconds. Another inverter connects through an AND gate to the door between this chamber and the critter dropper causing it to open.
The final circuitry in the critter dropper area is relatively simple. A critter sensor is set to <1, which goes through a buffer to the same AND gate mentioned above, always trying to open the door to the critter dropper area until a critter gets inside. Once a lumb is in the dropper compartment the door is held closed for 15 seconds. This accounts for the fact that once a lumb steps into the door portion of the dropper it is no longer inside this dropper room so can't be counted by the sensor.
Finally, the same critter sensor is connected to the dropper door below, telling it to close once a critter has been detected. A timer sensor alternates the door open and closed every 15 seconds, which should allow critters time to path into the doorway and then be squeezed out the bottom once the door closes.
The reason for all this "extra" automation is to try to prevent 'double drops' where more than one lumb can get into the critter dropper area and be dropped into a stable. We didn't have room in the stables to include a critter pick-up, so the simpler and more failure-prone droppers could easily over-populate our stables and destroy our meat production.
6. Summary and Statistics
As described at the beginning of this guide we constructed an expandable lumb ranch using a critter dropper within a 16x4 room layout. Our automation logic was a little more complicated than I'd like, but it was necessary to prevent 'double drops' and interruptions of our resource production.
Our stables contain the perfect amount of figs to feed two lumbs, and we can stack as many stables as we need to support our colony. The primary exports are Peat and Tough Meat which provide both food and energy to the colony. Additionally, when burning peat in a peat burner, polluted water is produced, which can be cleaned to offset the vast majority of the water required by our fig node. This ranch is not 100% self-sustaining, but it's pretty darn close!
Each "edible" egg will be evolved into 12kg of tough meet after hatching, so the 30 total eggs from each stable will produce 360kg of tough meat per 200 cycles, or 1.8 kg/cycle. When cooked in a smoker with 100kg of peat, this converts to 4,800 calories of tender brisket. So a single stable will produce enough food to sustain 4.8 dupes indefinitely.
A peat burner requires 600kg/cycle of peat to produce 480W. Normally this matches the exact output of three lumbs, but we've said we're siphoning off some of that peat to smoke our food. So using the 370kg per stable number, we can expect to produce 296W per stable.
All considered, for a measly 16kg/cycle of water, and 15kg/cycle of sand (or 90kg/cycle of water and no sand) each stable will produce large amounts of food and energy for your colony.
7. Thank You!
Thank you for reading this guide and I hope you found something worthwhile to take away from it!
I also wanted to acknowledge one particular build that I came across while looking for variations or improvements of my design. As I mentioned at the beginning of the guide, the mechanics involved generally dictate all lumb ranches to look like one of two possible designs. So it was no surprise to come across this particular design that also used a 'loop' and very closely resembled my own.
The design was a joint effort between u/Indeeeex and u/callmewoof on reddit, plus a few smaller contributors, and can be seen here:
https://www.reddit.com/r/Oxygennotincluded/comments/1lknsyb/compact_lumb_ranch_16x4_v3_i_think_we_are_close/
What I like about this design is two-fold. One, the collaboration of multiple designers chipping in to overcome problematic mechanics such as the door tile not being considered part of the ranch and cancelling the grooming errand. I really wish I'd come across their threads before working through my own as it would have saved me some time and troubleshooting. But just like how I try to write my guides to explain the mechanics and allow you to tailor or improve my designs to fit your needs, the spirit of the multiple threads with designers working through their challenges together is what I like to see in the ONI community.
Second, since their ranch didn't use a critter dropper for repopulation they had to get creative to keep a compact footprint. I was inspired by the use of a mimika bud to fertilize the ovagro vines and keep up fig production, while accommodating a critter drop-off within the 16x4 footprint. That simple tweak trades a little bit of dupe labor and some dirt consumption for an essentially zero-automation required ranch, and you don't even need a control room. To be honest, if I'd run into a problem squeezing my design into 16 tiles, I'm not sure I'd have thought of the mimika solution, that was quite clever.
In any case, I'm a critter dropper guy. That's just how I do ranching. So I'm still very happy with my own design, but I wanted to highlight this other design as a potentially simpler, and certainly somewhat clever alternative. As a fun side note, it is possible to build a hybrid version of these two ranches, replacing their critter drop-off with my critter dropper, and planting a mimika inside the stable where they have the drop-off. There's no real gameplay advantage to this hybrid design, but I found it quite enjoyable to see the butterflies flitting around and the sparkling of fertilized figs.
- ONI - Surviving the Early Game★ 5 (2.4k)83k views6.3k ♥54 minUpdated 6 Aug, 2019
- Useful Construction Patterns★ 5 (1.8k)74k views5.2k ♥66 minUpdated 29 Aug, 2020
- 10* things I wish I knew sooner...★ 5 (754)58k views1k ♥4 minUpdated 6 Oct, 2017
- ONI - Surviving the Mid-Game★ 5 (1.3k)44k views3.8k ♥150 minUpdated 6 Sep, 2019
- Not Quite Beginner's Guide★ 5 (361)32k views1.1k ♥91 minUpdated 26 Mar, 2023
- Руководство для начинающих. (ОСНОВЫ)★ 5 (629)32k views1.2k ♥21 minRussianUpdated 20 Apr, 2019




- Upgrading to PremiumTeam Fortress 2★ 5 (20k)1441k views11k ♥6 minUpdated May 11, 2022
- No More Room in Hell Official ManualNo More Room in Hell★ 5 (2.8k)569k views2.1k ♥29 minUpdated Apr 22, 2019
- NMRiH Community Hosting GuidesNo More Room in Hell★ 5 (526)351k views653 ♥1 minUpdated Aug 10, 2022
- How to 'Git Gud' Soon™MORDHAU★ 5 (2k)318k views3k ♥68 minUpdated Nov 16, 2024
- Лучшие кооперативные игры SteamPAYDAY 2★ 5 (1.5k)315k views2.1k ♥56 minRussianUpdated Apr 27, 2025
- Desert Eagle Heat Treated | Blue GemCounter-Strike 2★ 5 (1.6k)293k views1.5k ♥2 minUpdated Jan 16





This guide was created by its original author on the Steam Community. Are you the author and want it removed? Request removal.