Hero Guide - The Dryad “The Four Layered Defender”
Preface
This guide will not cover the very basics of the game or of the Dryad. It is intended as a mid to endgame one, for players who have at least some knowledge about the game.
When I'm talking about shards and mods, I will assume that they are not gilded or maxed, because no one will have these for each and every one of his towers. However, if you don't possess the basic version of these, you will need to make do with what you have until then.
All the numbers I'm using in this guide assume close-to-cap main stat C7 gear. Since most people will spend a lot of time at this point in the game, I figured these values would be the most telling for them.
…
Now you're probably wondering why this guide is called the “Four Layerer Defender”. It's very simple in fact - it's about the Dryad's defenses. I figured that the most interesting way to build as the dryad is to use all of her towers in a “layered” build. But now that I think about it, she has five defenses. So it should be called the Five Layered Defender? I guess it's too late for that now.
Anyway. Let's introduce the Dryad.
Introducing the Dryad
As you probably know, the Dryad is a premium character. As such, you will have to unlock her with DM or premium currency.
The Dryad is a potent character, both as a builder and a DPS.
As a DPS, she has the highest tier of life pool, the same as the Lavamancer, the Squire or the Mystic for instance. That alone gives her a very high survivability. Add to that Dryad Blessing which adds to her armor and the Mushrooms healing for 10% of her life per second. Stackable. Yes. The Dryad is an unkillable beast on the battlefield! But the damage side is not easily undone: her attacks can slaughter most hordes even on an AP build while her Starfall will turn anything to dust. With a lasting effect because why not. More on that in the dedicated section.
As a builder, she has a tower for every situation, as you'll see later in this guide. However, it comes with a downside: she needs her World Tree for her defenses to work and the said defenses can only be built inside the Tree's range. Also, most of her towers have a circular range, but they need to be placed in some specific ways in order to be really useful. Again, more on that in the dedicated sections.
Tower - World Tree
World Tree is the beating heart of any dryad build. And that's not even an exaggeration! Because World Tree actually allows you to build the Dryad's towers. And if for a reason or another it got destroyed, the Dryad's defense in its area of influence would stop working. Totally.
 But let's not think about that… No wait, let's. World Tree differs from any other blockade in the game in the sense that it can be rebuilt by anyone when destroyed – in exchange for the initial 30 mana cost. Of course, it will go back to a Tier 1 Blockade even if it was previously upgraded.
Besides the obvious usage it has, World Tree actually offers some support to heroes: any hero standing in its aura will recover 5% of his health per second and benefit from +20% Hero Critical Damage and +10% Critical Rate. Pretty neat.

 Range with Deadly Strikes + Low roll Range Mod.

The Dryad's Tree has a max range of 3500. For this reason, we aren't using both Deadly Strikes and Vicious Strikes. That would lead to the waste of a shard slot that we can replace with a range mod anyway. If you don't have a maxed range mod, you won't reach the range cap, but the difference is mostly negligible. Now, of course you could equip both, but you would have to relinquish Fortification or Health Pylon.
- Deadly Strikes/Vicious Strikes – This one is pretty mandatory. It increases the area in which you can build and benefit from buffs. Absolutely no alternative is better than this one. And it'll get even better once we get to the actual builds! In short, get it ASAP.
- Power Pylon — Improves the damage potential of any defense you put near the tree. And guess what? Most of the Dryad's defenses are traps. You can't say this shard wasn't made for this very Blockade. With the changes of Protean Shift, it's basically one free upgrade tier.
- Fortification OR Health Pylon — Now this one is up to debate. There are two schools: the one which uses World Tree as primary blockade (Fortification) and the one which prefers it as a support one (Health Pylon). With a proper defense, however, you'll never need another blockade than this one and as it happens, this guide will show you how to build one. But at the end of the day, it's your choice and it depends on how you'll build.
As for mods, it's pretty straightforward. Tenacity is not mandatory since your towers will still function even if the tree gets disabled but it's a good thing to have against hex throwers.
You may want to do that on your DPS Dryad, even more so if your ascension level is low. But since your trees won't take that much punishment to begin with, you may forego World Tree Health altogether.
 Until C4, you can simply put it down like that even on a large lane: mobs will attack it anyway. Now, once Lady Orcs come into play, you will have to think otherwise. They often ignore blockades so you will have to physically seal the way to be absolutely certain they can't get past the latter without destroying them.
 As you can see, although the lane is pretty narrow, I can easily fit on both side of the Tree –
and so can the Lady Orcs. Because of the latter's small size, you will more often than not need two of them to seal even narrow lanes. Only the narrowest can be sealed by a single Tree.


It only takes two Spike Blockades to seal a lane which would require three World Trees. Also, notice the pattern I used for my blockades? Never put them in a straight lane, but always in a triangle or diagonal formation. This way, even though you're using three blockades, most enemies will only damage the front one, leaving the other two alone. Also, if you're only using two blockades to seal a very narrow lane (any blockade + World Tree for instance) don't put them one behind the other! Keep the diagonal pattern, since this way spear throwers will only damage on of them in most cases.
Now, we are using 90 DU's in both examples, but one is more efficient than the other. And that's the one with the Spike Blockades. The reason is that you'll technically have Health Pylon on your Trees in this case. Still, we will all agree that 90 DU's to seal a lane is not efficient. So there is a third, better, option.
 Mixing things up! Notice that I kept the diagonal pattern… but only slightly. The fact is that World Tree is still smaller than any other blockade and because of that, you have to keep it closer from to other to seal the lane.
We'll see later, in the Builds section, that there are other, more advanced placements, but those are the main ones for defending and sealing lanes and they'll work all the way to the endgame.
Tower - Slime Pit
Slime Pit is actually my second favorite Tower in the game. Well. Trap, but let's not sweat the small stuff. Slime Pit is your first and foremost line of defense. As such, its role will be to thin the herd so the rest of your defenses can do their work. To the same token, it will reach crazy amount of total damage very reliably – even with few upgrades.


The trap spawns one slime every x second. The cap is once per second. When something come in range, slimes will go and explode at it, dealing AoE damage in the process. Note that only one slime per pit can target an enemy at any given time. So if you have a boss right on your slime pit for instance, only one will explode at once. However, if you have three mobs in range, each slime will target a different enemy.
When you are in corrupted form, the slime's explosion will oil the enemy, slowing them and priming them from an Ignite combo. Note that sometimes, they will self-proc the ignite combo. I'm not sure however if it is a bug or if some slimes randomly deal fire damage.*
*Not systematically the red ones as one could believe.

Slime Pit is quite straightforward as far as stats are concerned. You want damage in AoE. For that, we are using Rate, Destruction & Vampiric Empowerment, the usual DPS combo.
As mods, we are using +Rate to reach the 1s spawn rate. Tenacity is extremely important on this one since it's a frontline trap and you really can't put it otherwise than in the middle of the way without sharply lowering its usefulness - to such an extent that you'd better replace it altogether than do that. Finally, since this tower's role is to thin the herd, we're using Melee Boom to help in this task. The reason we are taking melee rather than support is that they are both the most numerous foes and the ones that will reach the Slimes first.
*The Range Gambit isn't absolutely necessary but it's still a good thing to have if you can spare the points.
- They need a LoS. Trees act as obstacles for them but don't strictly obstruct their LoS.
- They can't jump up ledges. If you put a pit near a ledge, some Slimes will spawn down and they'll become useless if you intend it for up the ledge.
- They need some room to move around. So they won't get blocked by a tree for instance.
Wrong placements examples
Don't do that please.
 Slimes will attack mobs coming from the front, but rarely or not at all near the tree; their LoS being obstructed by the tree since they are directly beside it. Obviously, they also won't attack anything behind the tree, making half of their range go to waste.
 Same thing as the previous one, but in the other direction.
 This one actually works quite well, but you need to space them a bit more from the tree. This way, they'll attack things coming from the front and pursue anything that happens to go past it… in theory only. Slimes are slow, and they'll probably be too busy with things coming from the front anyway: they prioritize things closer to them.
 ???
???
No, seriously. I tried this just for the sake of this guide, and although they actually jump down, they won't attack anything.
Weird placements examples
They work but… just why exactly would you ever do this?
 Being on the fence gives them a good LoS, but some will jump in the hole on spawn. Not the best idea.
 Okay. I have to admit, the idea is amusing. But it works better on the paper than it actually does. The problem is that Slimes will first have to travel for too long (because of the jump) and then, they won't catch mobs properly. Both because of the travel time and the positioning.
 If you use it like that, slimes will attack anything coming for your Blockade. However, it would go against its main use.
In any given build, the mass of the mobs should already be dead by the time they reach your blockades, leaving only the most resilient to be dealt with. Because of that, you won't really want your slimes positioned this way.
Tower - Slime Pit (Continued)
Good placements
Those are not examples because the amount of really good placements are limited. Ideally, you'll want them at max range from your Trees and close to the entrance, so they use as much of their range as possible and catch everything coming.
 This is a good placement for multiple reasons:
- Slimes have a LoS both on the entrance and behind. So they'll first catch everything coming from the front and if anything attacks your blockade, they'll then attack them.
- Wasted range is limited. They are pretty much at their max range from the entrance, so they'll jump at things as they come, and since it's quite close, chances are that they'll be able to hit mobs while they're still packed, but they are not so close as to attack them when most are still invulnerable.
- The pit is on top of a slight slope, so their LoS isn't obstructed. If it were down the slope, it could have happened, because their vertical LoS is a bit wonky.
 This one is a good placement too, but it will require better gear to really work. The reason is that it's farther from the spawn point. Because of that, by the time they reach the Pit, mobs will already be split between fast ones and slow ones. And you nees enough Defense Rate for it to replenish its stocks before the slow ones come. Alternatively, you could use another tower near the entrance to take care or weaken the slower ones and ease up the Pits task.
Besides that, it also has all the positive points from the previous example: a good LoS, no wasted range and it takes the slope into account. Basically, if you see a slope and need to put a Slime Pit, put it at the top of it, ideally where it starts angling.
The Dreaded Stairs
Slimes are good! Slimes are great! But they shall not defeat the stairs.
They have a lot of issues with stairs, and you will need to get very creative to deal with it. First of all, never put Slimes down some stairs. Their LoS will be obstructed and they probably won't attack anything that happens to be on it or farther.
 Basically, don't do this.
 You could kind of manage it like you would with a slope. That's to say, like that. But Slimes aren't… really intelligent. They most likely won't attack anything down the stairs for some reason. (Note that the same may happen on very angled slopes.)
Still, we're still not exactly there. Time to get creative.
 Because of the Pit's placement, Slimes will have a LoS on everything going through the stairs. But!
Keep in mind that it's not optimal. As said before, Slimes should be in the middle of the way, between the coming baddies and the rest of your defenses. As much as possible on level ground.
Cyborks
Tenacity made Cyborks a non-issue for Slimes. However, it's still a problem for your Hornets & Nimbuses. So you can put your Slimes ever-so-slightly off the center of the road, so cyborks' EMP go at an angle.
Tower - Angry Nimbus
IMPORTANT NOTE : Nimbus AI is acting strangely since Protean Shift released. I'll update this section at a later point once I have figured what's happening.
Wondered what my number one favorite defense was? Angry Nimbus of course. These bad boys will become your BFF.
When corrupted, they will deal electric damage to enemies once in a while, procing an Electrocute combo, since their rain primes them with Drenching.
They have three roles:- Anti-air: once they current target is down, they'll prioritize flying enemy if available.
- Boss killing.
- Encouraging the hell out of you.
Their AI is quite outstanding. Besides the fact that they'll prioritize air, they'll then prioritize most threatening enemies, starting with kobolds then special enemies like Geodes or Lady Orcs then high health enemies. Most of the time, they will simply ignore the smallest ones until there is nothing else available.
They have a very high range, the highest in the game in fact, with Lavamancer's Volcano. 6000 with maxed gambit and 8400 with Gambit + Deadly Strikes.
Note that only one Nimbus can attach to an enemy at any given time.
So, we're not using Deadly Strikes on Ni-
“What? No Deadly Strikes on Angry Nimbus? Blasphemy! Your guide is bad and you should feel bad, 0/10.”
Wait, come back. There is a reason for that. Okay so, we're using a full damage setup for our Nimbus. The reason is quite simple in fact. They work better when their range isn't that large. Because of their priority system, making them able to cover too many lanes will result in them taking way too much time traveling and not enough time actually doing their work. So you want them to stick to their lanes and not wander too far. In many cases, even just the Range Gambit is too much.
The other reason is the scaling. From T1 to T5, Nimbus hardly gain +50% damage, making any upgrade past T2 utterly pointless. De facto, you'll want to have as much damage from the get go as you possibly can. This can be achieved with the usual Rate, Destruction & Vampiric Empowerment trinity.
Gimmicky alternative: use Cthulhu's Influence rather than VE. Charmed mobs will fight each other - meaning just a bit more time of free DPS. The problem with that however is that Nimbus hits hard. Like, very hard. Most things will just die a few seconds after having been charmed.
And the mods…- Controller: Nimbus does drench things. So it will self-proc Controller. A natural match.
- Rate: you need it to reach the max rate of 0,25s, unless you have a gilded Rate shard.
- Anti-Chaos: because of its targeting AI, anti-chaos is a very good choice since it usually prioritizes these enemies.
*You may however actually not want the Range Gambit. Nimbus is the most useful when it sticks to its lane. So the decision here will depend mostly on how your build turns out. (With the builds introduced in this guide though, Gambit is not desirable.)
 Done.
Done.
They don't require any kind of LoS. Just place it next to your Trees so it benefits from Power Pylon.
Angry Nimbus has no weakness.
If you are going to use it as your main and only anti-air, you may want to use one per lane where flyers will spawn. (To cover both the ground and air lane.) Depending on the map, and in very rare cases, you may need a dedicated Nimbus for air duty. However, it would cost you either 60 or 90 DU so an alternative is advised.
Tower - Moss Hornets Nest
Hornets Nest is your third line of defense. If anything gets past your Slimes and your Nimbus, it will be their job to deal with them. These may include Witherbeasts, Ogres, Drakins, Warboars, Cyborks, Shield Geodes, Lady Orcs and Special Enemies. And once in a while, Hex Throwers.
You will have two Hornets per nest, but if you go in corrupted state, one more hornet per nest will spawn, netting you a +50% damage increase, given there are three enemies for them to lash out on.
Unlike Angry Nimbus, they attack the closest enemy from the Nest and when it dies, jump to the closest enemy from its previous position.
As you may have understood already, only one Hornet per nest can latch on a specific enemy at any given time. But unlike Nimbus, it means that if there are two nests but only one enemy, you'll have two Hornets attacking the said enemy.
Now, Hornets also attack air enemies, but we'll get to that in the placement section.


As shards, we're using Rate and Destruction and ideally Mass Destruction. You can replace Mass Destruction with Vampiric Empowerment, but in a Dryad defense, it's the best tower to use Mass Destruction since it will see a lot of action where it matters. For the same reason as Nimbus, we're not using Deadly Strikes on Hornets - that is, too much range will actually lower their efficiency. They must cover their lane (or two lanes if they are side by side) and nothing more.
Which leads us to the mods. There are a lot of possibilities here.- +Defense Rate is mandatory unless you have a gilded Rate shard.
- Anti-Melee is not mandatory but extremely good to have. The reasoning is that the things most likely to reach your blockades are berserkers. Thus the importance of dealing more damage to melees. Other options include Anti-Chaos or Controller if you have a source of CC to prime it. For instance, totally randomly, harpies. Or slimes. Or NImbus.
- Ranged Boom (or Melee Boom): by now, I'm quite sure you are wondering why I would use Anti-Melee but Ranged Boom. The thing is that you already have enough in this department with your Slimes. You will only very rarely have more than three berserkers that reach your walls - it means that the efficiency of Melee Boom is limited. Still, why ranged? Because it allows a neat counter to ranged lanes in Onslaught, for instance frosties with a lot of ranged. However, if you're using HMN as a standalone, you may want to use Melee Boom over its Ranged counterpart.
Also, bonus fun combo. You can use Fire Servo so your Hornets deal fire damage and proc ignite combo with the slime's oil - but it's not an effective strategy. This combo consumes the oil and therefore the slow. That's not something you want.
*Remember when I said we don't want Deadly Strikes because we don't want to give it too much range? That was actually half true: we still want a bit of range so the Hornets start attacking things leaving the spawns ASAP. (And also if anything happens to get past your Trees, they'll pursue for a bit of distance.) Unlike Nimbus that simply doesn't work when they have too much range, Hornets need LoS to some extent so it's easier to work with.
Also, you may not need the full 50 points into the gambit. As soon as you deem it satisfactory, you can invest elsewhere and come to that one later.
 Done! Next!
Not really. In fact, in most cases, you'll place it like that, because MHN doesn't actually require a horizontal LoS. But what if you wanted to use it against flyers?
First, you have to know that their upward range is limited. Not their downward range however. Also, Deadly Strikes will very slightly improve this; but not enough to be an end-all to the problem. But there is an easier solution. You simply have to put the Nest on a higher ground.
Dealing with flyers However, if you do so, remember that even if they don't need a horizontal LoS, solid ground will block their vertical LoS. In other words, you'll rather want to place them as shown in this screenshot.
Most of the sides don't obstruct the LoS. The one where there is solid ground is not a problem since nothing will come from this direction; and even if it did, it's on a slope.
Dealing with flyers, with added creativity This is another placement example on the same map and relies a bit on creativity. Being here, the Hornets are higher than any flyer on the map, so it will be able to reach them all. At the same time, it's too high to reach ground enemies, so placing it here will convert MHN into an AA-exclusive tower. Pretty neat, right?
As an added bonus, World Tree's vertical range is virtually infinite so you can put a Slime Pit down without any issue.
But if you want to have a tower which can deal both with air and ground, place it high enough for it to reach air lanes and low enough so it can still reach ground targets. And be mindful of the placement: Hornets don't prioritize enemy types.
Tower - Harpy's Perch
We finally get to Harpy's Perch. The Black Horse. The forgotten tower which never gets into the spotlight. And we can wonder why!
If we go by the numbers alone, it's a beast of a defense, towering at a staggering two and a half millions DPS at Tier 1.
However… Once we test it on a dummy, we see that it barely reaches half this value as time goes on. The reason is that Harpies fire volleys, and have some cooldown time between each one - time that the tooltip fails to take into account.
So, is this tower worthless? Certainly not. Once you enter corrupted state, it gains 7,5% damage (actually bugged and it's in fact 0) and gains the ability to pierce one target (actually bugged? because it actually pierces two targets), ideally increasing its DPS by no less than 115%. Or more, or less depending on how it works vs. how it's supposed to work.
Because of that, Harpies gains the role of your last line of defense. Single target with very high damage, it deals with anything that miraculously manages to get past your other defenses and tears it apart. You have, however, two ways to use it…

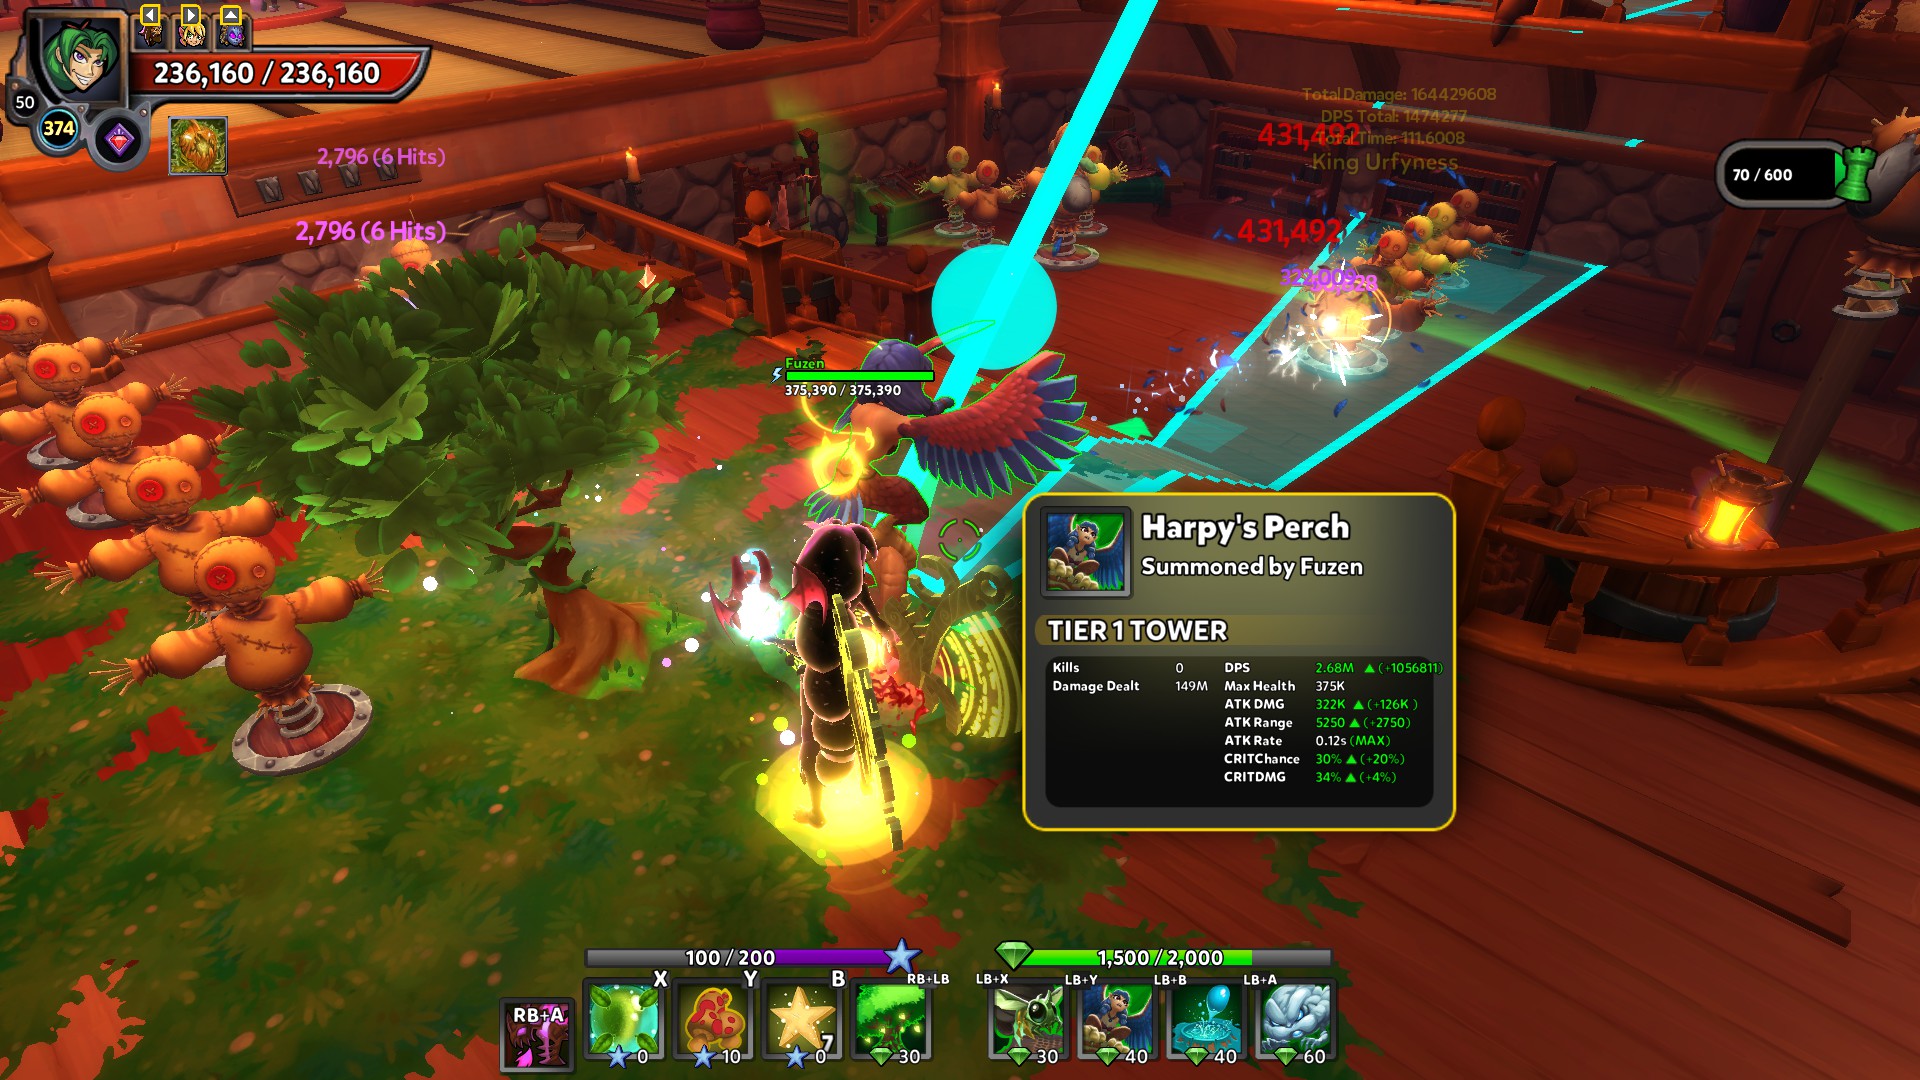
No matter how you plan to use it, Harpies is a pure DPS tower. So you'll want Defense Rate, Deadly Strikes and Destruction. Yes, Deadly Strikes - its range is not that great by default and the sooner it can start to attack, the more free DPS. Note however that just like any other tower of this kind, it only works in long straight lanes where you can actually exploit the added range.
Now for mods…- Plantera's Blessing: it's important to know what the description actually means. It doesn't deal X damage for Y seconds but over Y seconds. Basically, the DoT is negligible. However, being poison, it will provide a source of CC which can trigger CC mods and counter Controlled Burn.
- Piercer Servo: Harpies are a projectile tower. You pretty much need Piercer in order to counter Geodes and Vanguards. And it becomes all the more important in Controlled Burn lanes. (Remember however that you still have your Slimes if needed. So depending on how you actually build, you may not even need this mod - even though it's really handy.)
The second choice is more gimmicky, somewhat like the Fire Bees thing. That is, Storm Harpies. The idea is to proc multiple Electrocute combos on Special Enemies and high HP threats with Nimbus constantly drenching things.
Also, you'll notice that we aren't using a +Rate mod. Harpies reach the attack rate cap with nothing but Defense Rate shard. Of course, for the very same reason you may want use the third mod slot for +Rate and replace the rate shard with another DPS shard but it will probably be less effective since you can't really argue against a +30% DPS increase.
You really don't want to use this defense without the gambit, because it has an extremely low base range. But if you insist in doing so, you will most likely have to equip Deadly Strikes no matter how you plan to use it.
But should you upgrade it further? As said, it will depend on your build. If you reliably get things getting to your Harpies, ask yourself if you could reliably prevent it by upgrading something else. If that's the case, go for it. Otherwise, upgrade your Harpy's Perch(s).
 The base idea is very simple. Put down your Tree, then get your Harpy behind it, at the limit of Power Pylon's range. Make sure to rotate it so it is best suited for the lane it will defend. In my case, it can reach both the lanes if the need arises.
If you're playing in C7 and can't reliably kill Kobolts before they explode on your Blockades, give up on Power Pylon's buff and place it farther away.
Also, if there are Hex Throwers, you may want to put your Harpies slightly on the side rather than directly behind your trees, in such a way that a single spear wouldn't pierce the Blockade and end up damaging your Harpy. Remember that Harpies have a large firing arc, so you can capitalize on that!
Using it differently Of course, Harpy is extremely potent against Bosses. And that includes Rollers. If you know your defense can hold as is, you can absolutely put down a Harpy in such a way that it can hit Roller's weak point and swiftly deal with it, allowing for a fully automated lane.
 Build - The Classic
The Classic is a build which only uses four of the five Dryad's towers. The basic rule is to never go over 200 DU per lane since most maps have this limit.
 For a normal lane, it uses:
- World Tree
- Angry NImbus
- Slime Pit
- Moss Hornets Nest (2×)
The same logic applies if you want to manage two lanes at once with the same build. Throne Room for instance.
This build passed the “MP No Blockade” test and can clear any content without using blockades, with a minimal player participation. (Meaning, you have to put the trees out of the way for that.)
Build example on DD2 Tools: https://dd2tools.com/layouts/the-classic/
Build - The Four Layered Defense
Finally. The build eponymous to this guide. If you've followed until there, you probably already understand how it looks and works. It's not so different from the Classic, in fact.
 In a nutshell, Slime Pit will deal with most incoming mobs and thin the heard, leaving only the most resilient enemies to stand. Usually, these will be the Lady Orcs and maybe a few other.
Then, Hornets which had already started their task will quickly shift to these survivors, leaving usually only the Berserkers standing. That's when the Harpies enter into play and will finish them. In the meantime, Nimbus will neutralize Kobolts and flyers before coming to help to kill the Lady Orcs.
The build costs 200 per lane, but if you happen to have remaining DU's, you may want to add in some more Nimbus or Hornets. More Slimes are nearly always overkill.
Stay vigilant in waves 5 however: a lot of mobs are leaving the spawns at once, and since AoE towers have a limited amount of targets, some may be left standing although the damage would usually kill them.
This build passed the “MP No Blockade” test and can clear any content without using blockades, with a minimal player participation. (Meaning, you have to put the trees out of the way for that.)
Build example on DD2 Tools: https://dd2tools.com/layouts/the-four-layered-defense/
DPS - Ability Power & Critical Damage
The idea is to remain in Purify form the most of the time, keeping your Resource reserves high. While in Purification form, your survival relies on Dryad's Blessing, Bulwark and the heal from your Mushrooms. If you need to kill something, quickly shift into Corruption form, throw a Starfall or two and back to Purification.
DPS - Hero Damage & Critical Damage
Miscellaneous Notes
- With Protean Shift, Critical became largely irrelevant. When you invest your Ascension Points, you can leave it for last.
- Whenever you see Rate mod & shard on a tower, chances are that you can replace one of these if the other is maxed or gilded. In this case, replace it with more DPS.
Afterword
You may have seen in my screenshots that I tend to put my Trees anywhere and everywhere.
You're not limited to putting your Trees in the middle of the lanes; you're free to use different blockades for this purpose. That will open new possibilities and make your builds even better. At some point, you may even decide to forego blockades altogether!
Keep in mind however that if you put a blockade out of a kobold's reach but in their immediate LoS, their AI will act… weirdly.
So don't hesitate to experiment and get creative to maximize the way you place your towers. And although this guide used full Dryad builds for the sake of showcasing the potential of her defenses, you can just as easily mix them with defenses from other heroes. Just remember to include the cost of the Trees as you plan out your DU's.
However, feel free to contact me here or on Discord @Fuzen#6224 if you have any question that you can't find the answer either on the Internet or in this guide.
Glossary
DM = Defender Medal. In-game currency.
DP = Defense Power. Tower stat.
DR = Defense Rate. Tower stat or shard.
DS = Deadly Strikes. Shard. +40% Tower Range.
DPS = Damage Per Second. Defines either the amount of damage a hero or tower deals per second or a character role; dealing damage during waves in opposition to building.
HCD = Hero Critical Damage
HD = Hero Damage
- [Outdated!] Complete Beginners Guide to DD2 (Class Overview and Builds)★ 5 (1.1k)55k views1.7k ♥56 minUpdated Aug 29, 2022
- Dungeon Defenders II Ultimate FPS Guide★ 4 (161)26k views166 ♥3 minBulgarianUpdated Jun 1, 2017
- NM4 April 2016 Gear Guide for Primary Building Characters★ 5 (363)16k views672 ♥8 minUpdated Apr 25, 2016
- How to be a badass , ultimate noob friendly guide v1★ 4 (124)14k views271 ♥49 minUpdated Feb 15, 2020
- [Archived] SAS Soft Caps★ 5 (172)13k views285 ♥8 minUpdated Mar 9, 2017
- How to farm EXP | Level up fast★ 4 (77)13k views95 ♥4 minUpdated Oct 26, 2015





- Upgrading to PremiumTeam Fortress 2★ 5 (20k)1441k views11k ♥6 minUpdated May 11, 2022
- No More Room in Hell Official ManualNo More Room in Hell★ 5 (2.8k)569k views2.1k ♥29 minUpdated Apr 22, 2019
- NMRiH Community Hosting GuidesNo More Room in Hell★ 5 (526)351k views653 ♥1 minUpdated Aug 10, 2022
- ULTIMATE GUIDE FOR GAME DEV TYCOONGame Dev Tycoon★ 5 (5.8k)326k views10k ♥4 minUpdated 23 Jan, 2014
- How to 'Git Gud' Soon™MORDHAU★ 5 (2k)318k views3k ♥68 minUpdated Nov 16, 2024
- Лучшие кооперативные игры SteamPAYDAY 2★ 5 (1.5k)315k views2.1k ♥56 minRussianUpdated Apr 27, 2025






This guide was created by its original author on the Steam Community. Are you the author and want it removed? Request removal.