How to create FoF map thumbnails (2025)
0 - Translations & Revision History
- Google Translate (a last resort): Do NOT click the URL below. Copy and paste the text below into your browser! Just clicking the link will NOT work - due to how the Steam Community web-site mangles URLs.
1 - About the HSB and thumbnails
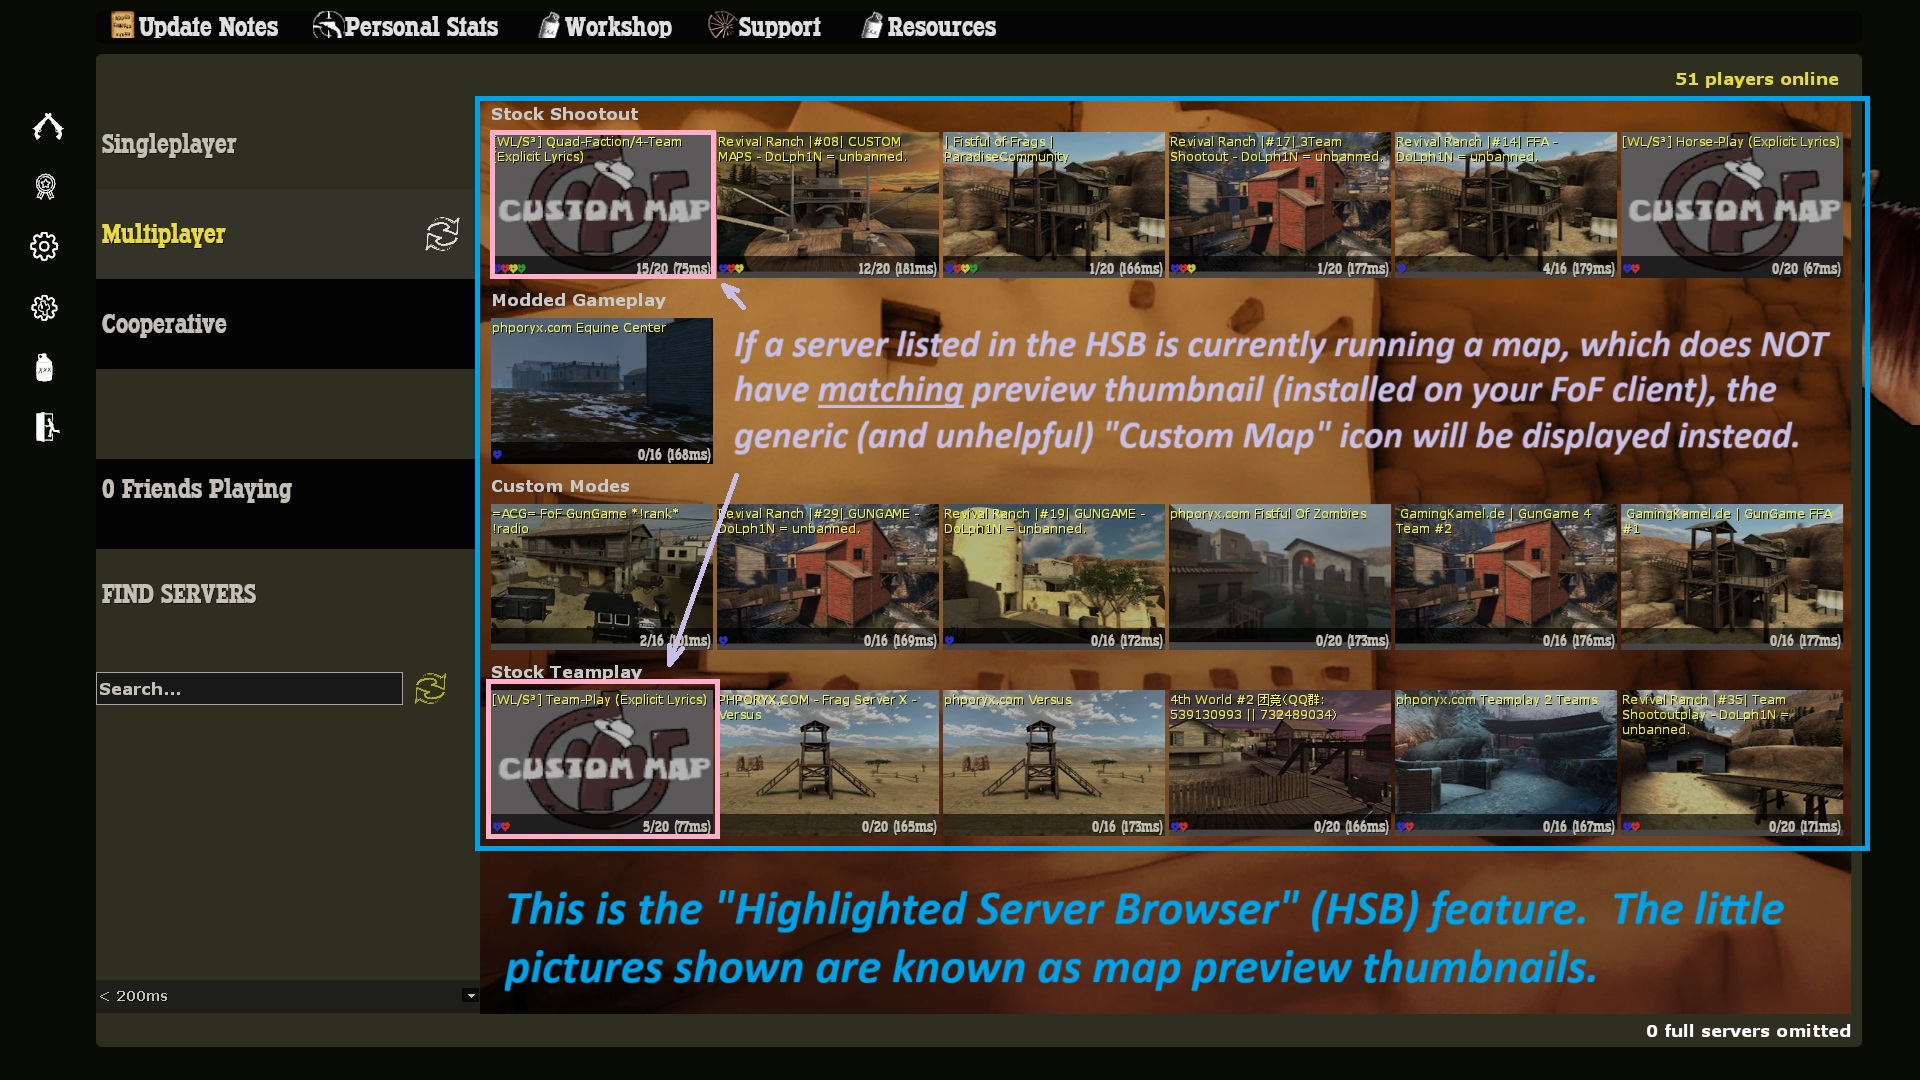
- This is the screen you see when you first enter the game, showing thumbnail preview images of different maps running on available game-servers. Because of its visual nature (images), this is referred-to as the Highlighted Server Browser (or HSB).
- This feature is how most Fistful of Frags (FoF) players find and connect to servers to play the game. This is especially true for those new to the game.
- Having a map preview thumbnail shown is extremely helpful to players, who may only recognize maps by what they look-like visually. Also the HSB, does not by itself show the name of the map currently being run by the server - only a matching preview thumbnail or the generic "Custom Map" icon.
- Unfortunately, FoF currently only includes preview thumbnails for maps that shipped with the game at the time of its last update - nearly two (2) years ago. So no preview thumbnails are included for any custom maps released by the community - resulting in the generic "Custom Map" icon being shown instead of an actual map preview.
- Ideally map authors, would create preview thumbnails for the maps and include them when they distribute the maps. However, many (mostly really) map authors are currently unfamiliar with this process, in part because (as far as I can determine) its not well documented. Also, many custom / community maps pre-date the existence of the HSB feature entirely.
- That's correct, the HSB did not even exist in earlier releases of FoF.
- This guide aims to remedy that situation - for both map authors creating new maps for FoF, as well as for server operators hosting community maps on their FoF game-servers.
2 - Prerequisites (things you need first)
- Fistful of Frags already installed.
- A computer capable of running Fistful of Frags with HDR enabled.
- Whichever map (you are making a thumbnail for) installed in the fof/maps sub-folder.
- Any text editor. For these examples, Windows Notepad will be used - since it is widely available.
- Paint.NET - available here[www.getpaint.net]. You may actually use any imaged editor with equivalent features. Unfortunately, Windows Paint will not easily suffice.
- VTFEdit[github.com] for converting the image file into Valve's proprietary VTF image format.
- VIDE[www.riintouge.com] for manipulating the map BSP file (more info here)
- VPKEdit[github.com] for creating VPK files (more info here).
- 7-Zip[www.7-zip.org] for various file/folder compression tasks.
- Obviously, the paths for everything will be different, and the screens will not look the same.
- Whatever default text-editor comes with your Linux distribution.
- Whatever image editor you prefer (Pinta[www.pinta-project.com], Gimp[www.gimp.org], etc.).
- VIDE[www.riintouge.com] is actually available for Linux also! (although, I have not tried it myself).
- VIDE[www.riintouge.com] has a built-in function similar to VTFEdit[github.com] that should suffice (although, I have not tried it myself).
- VPKEdit[github.com] is actually available for Linux also! (although, I have not tried it myself).
- Whatever file archiving / compression tool you prefer (p7zip, bzip2, etc.) for generating .zip and .bz2 files.
3 - Capturing a screenshot
Generally, it is best practice to base the map preview thumbnail on a screenshot of the map, in order to best present what that map looks like to the player. However, if you are the map author, alternative option might be to create some artistic representation of the map - if you feel that would better represent the map. For the purposes of this guide, I will use a screenshot as the basis for the preview thumbnail.
At a high-level the part of the process is:
- Launch Fistful of Frags (FoF).
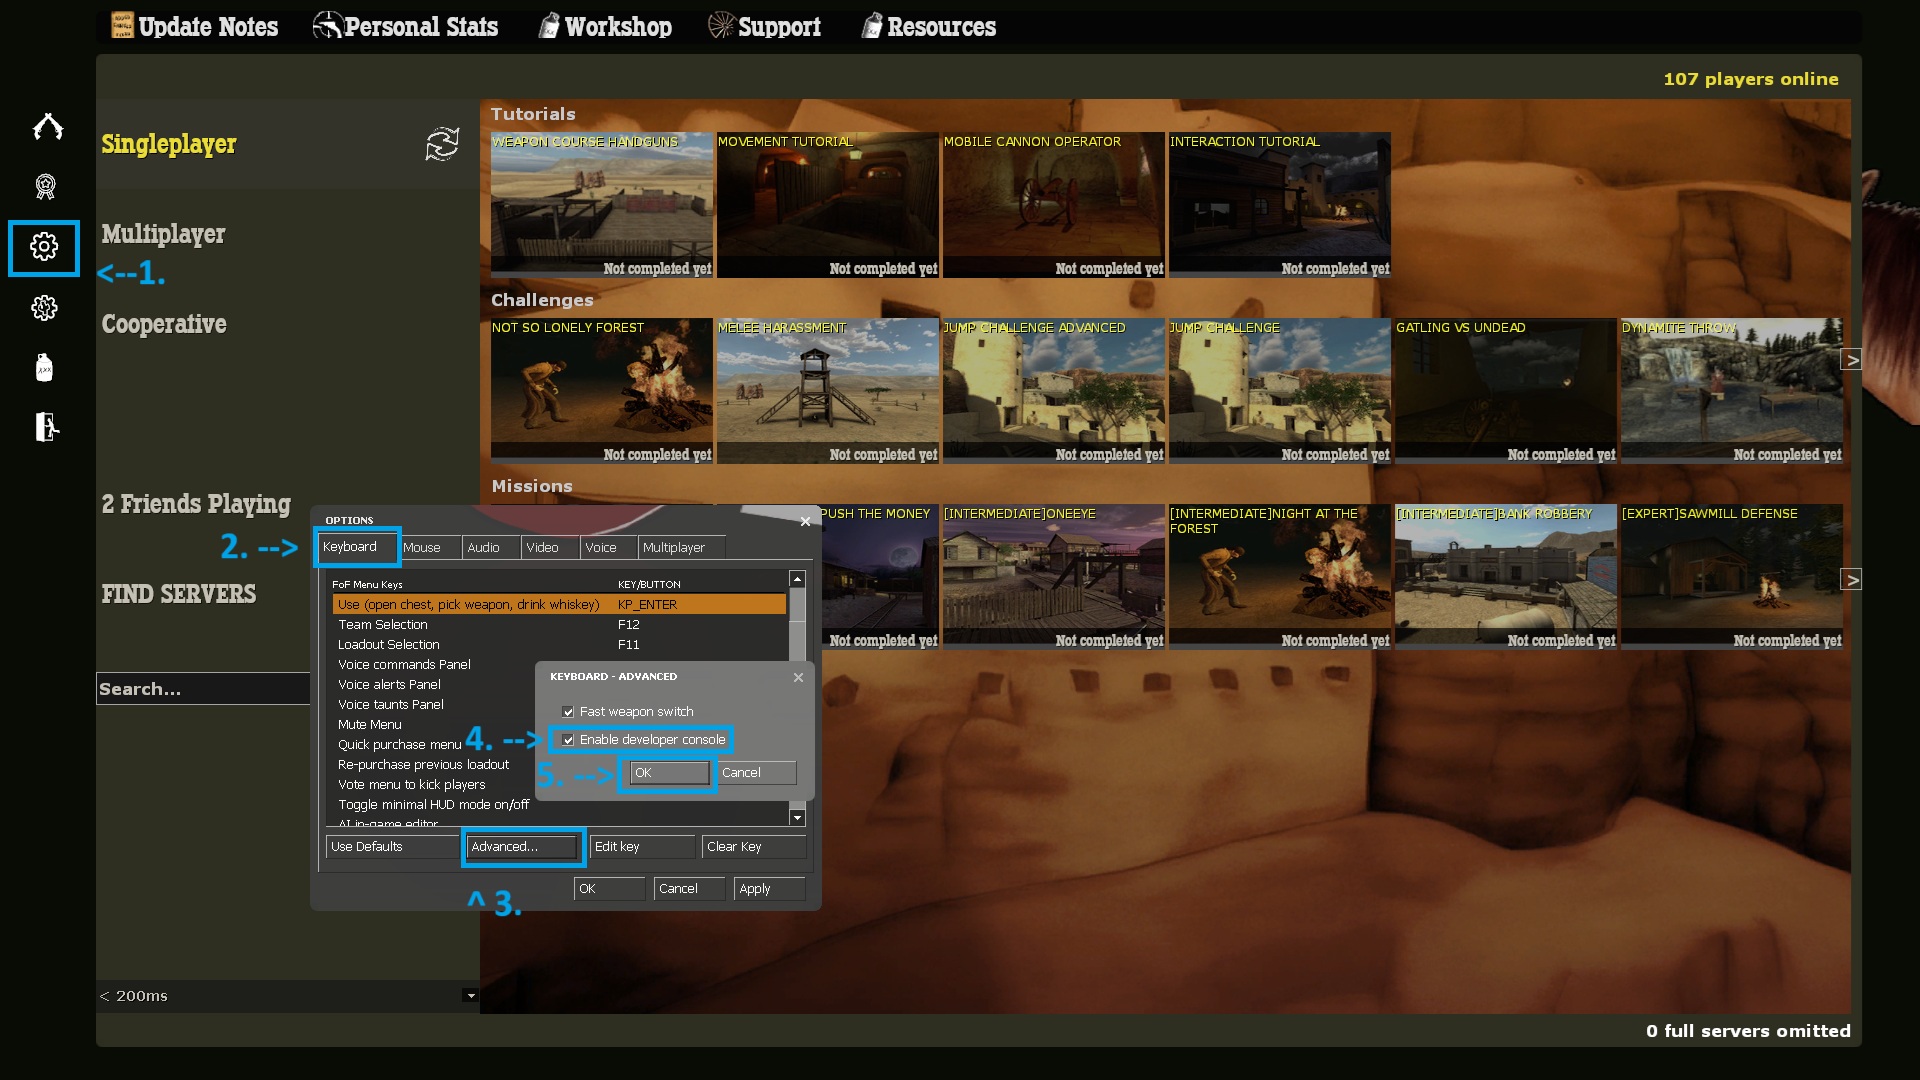
- Make sure the "developer console" is enabled. If you are not sure how to do this, see the notes and image below for how to do this.
- Start a game using the map you wish to create a preview thumbnail for. Be sure that you also configure the game for the appropriate FoF game-mode the map requires. If you are not sure how to do this, see the notes and image below for how to do this.
- If you have net_graph enabled, turn it off (e.g. set net_graph 0).
- Switch to spectator mode (e.g. change to the Spectator team).
- Move around in spectator mode until you have a good point-of-view on-screen the best represents what this map is like (and that players will later recognize it as).
- Capture a screenshot, and save it to a file you can edit.
- Open the options menu, by clicking the gear-shaped icon the left-side of the screen.
- Make sure you have the "Keyboard" tab selected/shown.
- Click the "Advanced" button.
- Ensure that the "Enable developer console" option is selected/checked.
- Click the "Ok" button to close that dialog.
- Be aware that (by default) you toggle the developer console open and closed using the tilde ("~") key. You can also re-map this to another key if you desire. It is listed in the Keyboard tab as "toggle console".
- If you are done making changes, click the "Ok" on the options dialog to close that screen.
- Launch Fistful of Frags (FoF).
- Press the tilde ("~") key - or whichever key you have "toggle console" bound-to.
- The developer console window should open.
- This developer console is essentially a command-line interface[en.wikipedia.org] - where you can enter various text-based commands, one-line at a time.
- Set the fof_sv_currentmode console variable (or CVAR) to the mode that the map is compatible with.
- For example, enter this command and press ENTER to set the game for FoF "Shoot-Out" mode (used by maps with names starting with "fof_":fof_sv_currentmode 1
- Alternatively, enter this command and press ENTER to set the game for FoF "Team-Play" mode (used by maps with names starting with "tp_":fof_sv_currentmode 2
- The full list of possible game-modes are:1 = Deathmatch and/or Team-Deathmatch 2 = Team-based Objectives, Zone-Capture, etc. 3 = Break Bad 4 = Elimination 5 = Versus 6 = Cooperative
- The command to start the game (using the map of your choice), is the not-ironically-named "map" command. Simply enter "map", followed by a space, then the name of the map you want to start, and then press ENTER. For example:map fof_cripplecreek
- Use whatever hot-key you have setup for Steam's screenshot function. The default if F12.
- Close FoF.
- Right-click on the Steam icon in the bottom-right corner of the Windows task-bar.
- Select the Screenshots option.
- Browse through the recent screenshot and click on the one you want to use.
- Right-click on the image, and select the Copy to clipboard option.
- Open your image editor (Paint.NET or whatever editor you are using) and paste the clipboard contents into it.
- Save a copy of the image somewhere you can find it easily.
4 - Resizing and editing the screenshot
Overall, here is what you need to accomplish at this stage:
- Open the screenshot.
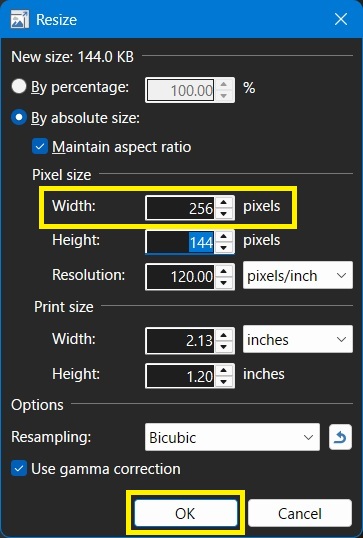
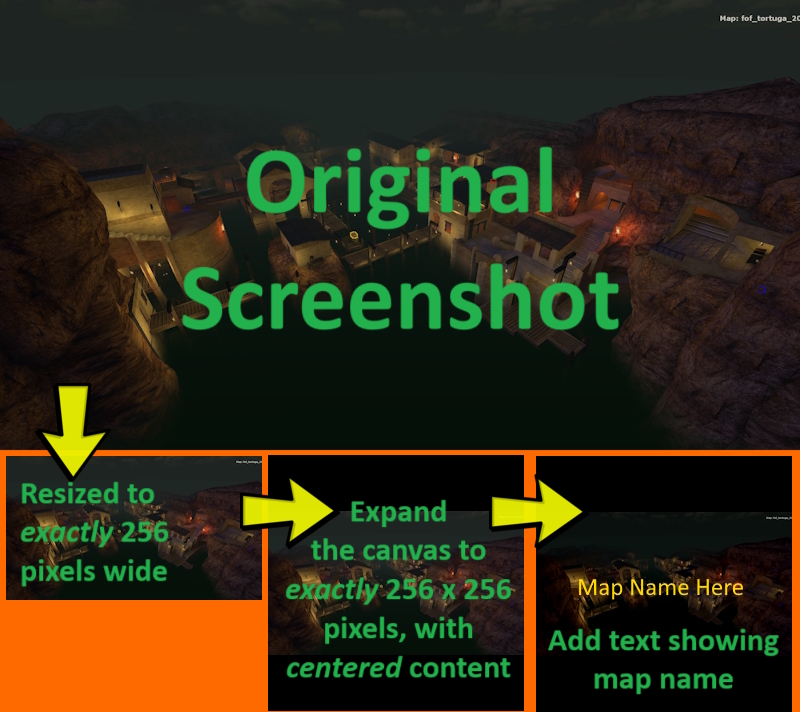
- Resize it to a width of (exactly) 256 pixels.
- Allow the height to be resized proportionally automatically.
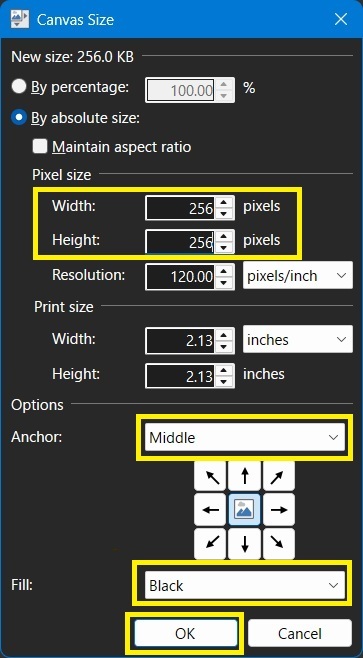
- Resize the image "canvas" to be exactly 256x256 pixels, the with existing image contents being centered on the newly-expanded canvas.
- Optionally, darken the image some to allow the (later added) text to stand-out better.
- Optionally, overlay text on the center of the image - containing name of the map.
- Save the image someplace you can find it later.
- Open the screenshot.
- Select the"Resize... option from the Image menu.
- Set the Width option to 256 pixels.
- Click Ok to apply the image resize change.
- Select the"Canvas size... option from the Image menu.
- Set the Height option to 256 pixels.
- Ensure the Anchor option is set to Middle.
- Ensure the Fill option is set to Black.
- Click Ok to apply the canvas resize change.
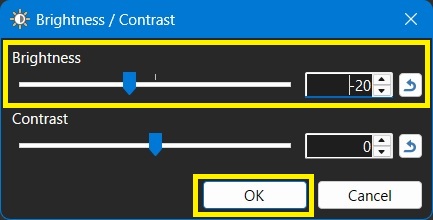
- Select the"Brightness / Contrast option from the Adjustments menu.
- Adjust the Brightness option to darken the image some (in particular if it is an outdoor daylight map) to allow the text (that you will apply next) show to better.
- Click Ok to apply the brightness change.
- Press F8 to open the color-selection tool.
- In the color-selection tool, select which color you want to use for the text. I strongly suggest some shade of yellow - in keeping with FoF's dusty look.
- Select the Text tool from the left-side tool-bar (Hint: It looks like a capital "T").
- Click on the image, type the name of the map. Reposition the resultant text as needed to get it approximately centered.
- Save the (now resized, darkened and labeled) image someplace you can find it later.
5 - Converting to VTF format
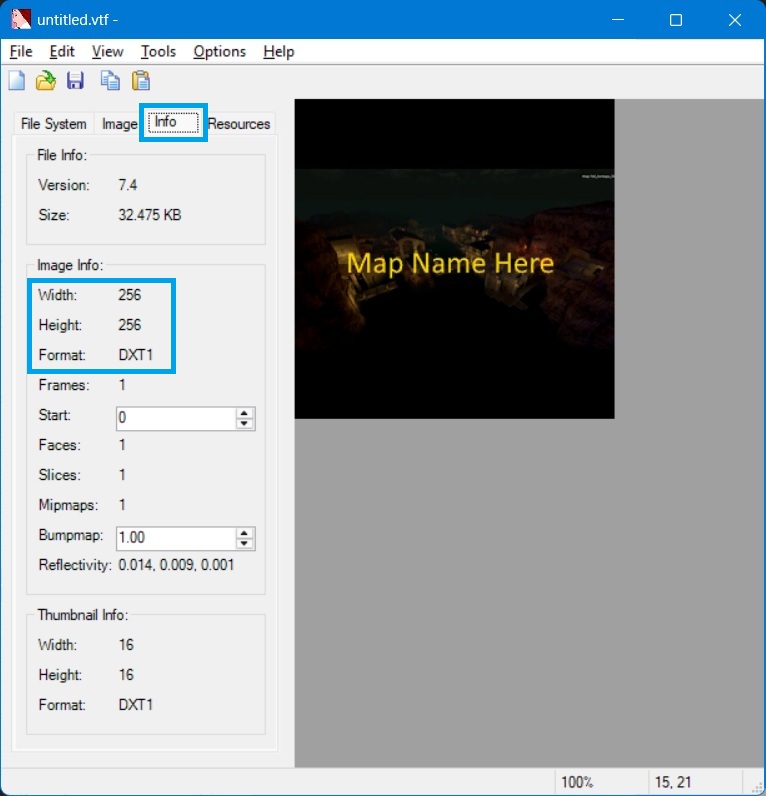
Once you have the thumbnail-sized image created in the correct size (exactly 256 x 256 pixels) with the visual content you like, the next step is to convert it to the Valve-proprietary VTF that is used by the Source game-engine for handling images.
The reason for the exact 256 pixel by 256 pixel size, is a bit more technical. If you ever had cause to make a custom in-game "texture" to use as part of a new map, then you are probably already familiar with this. But, I will discuss it a bit here for the benefit of those not already familiar with it (i.e. server operators, etc.).
Most game-engines (including Source, which FoF is based-on) only work with images whose dimensions are even powers-of-two. They do not necessarily have to be specifically square, but both dimensions must be even powers-of-two. These would include either X or Y axis being numbers such as:- 16
- 32
- 64
- 128
- 256
- 512
- 1024
- 128 x 128 (square)
- 256 x 256 (square)
- 128 x 256 (rectangular, horizontal)
- 256 x 128 (rectangular, vertical)
Although the VTF is square, the thumbnails are largely based on screen-captures with either a 4:3 or 16:9 screen ratio. As a result, although the VTF is 256x256 pixels (square), the image gets resized slightly and cropped to roughly 238x162 pixels (a roughly 4:3 ratio) when displayed in the HSB.
This is why when resizing the canvas of the original image earlier, it was important to center the content in the middle of the resized canvas. Additionally, the resultant black bands at the top and the bottom (although partially cut-off by the on-screen resizing/cropping) provide good contrast for the lighter-colored text that the HSB will overlay on the thumbnail with information about the server.
Further, the way the Valve-proprietary VTF system works, VMT files (referred to as "textures") are typically accompanied by VMT files (referred to as "materials"). A material may actually have multiple different textures associated with it. Think of the VTF as the image portion, and the VMT as the meta-data that provides the game-engine (Source) additional information it need to know how to use it properly.
- Open VTFEdit[github.com].
- Ensure automatic VMT creation is enabled.
- Import your existing image.
- Set the VTF Options correctly.
- Save the resultant VTF with the expected naming-convention.
- Open VTFEdit[github.com].
- Ensure the Auto Create VMT File option is checked the Options menu.
- Select Import from the File menu, and select the thumbnail image you have made.
- The VTF Options dialog should pop-up, asking that properties you want for this VTF.
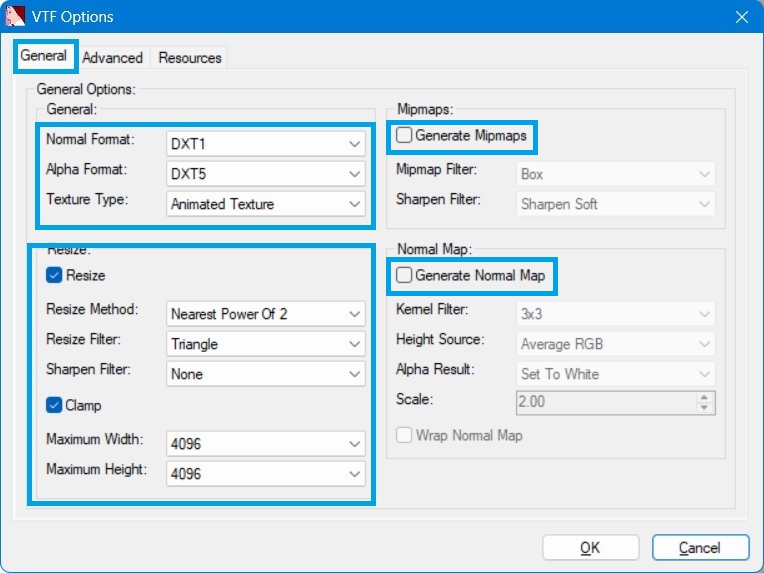
- On the General tab, ensure the options selected match what is shown in this image:
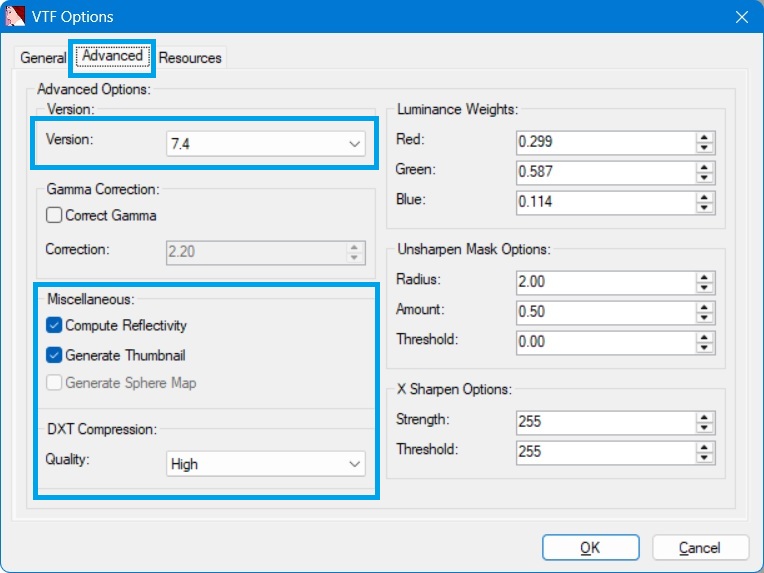
- On the Advanced tab, ensure the options selected match what is shown in this image:
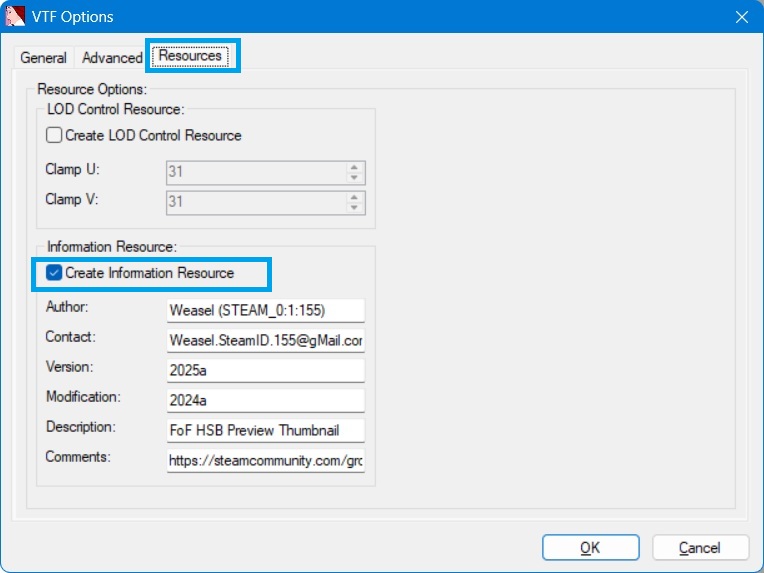
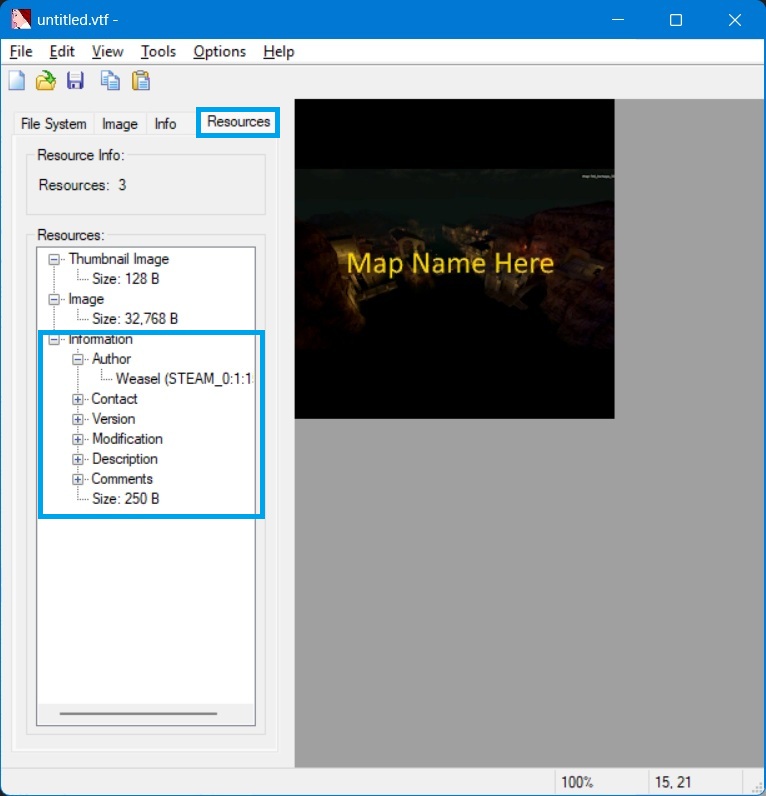
- Optionally, on the Resources tab, enable the Create Information Resource option and fill-out the information in a similar manner as shown in this image - but with whatever information of your own that you think would be appropriate:
- Click the Ok button to close the VTF Options dialog.
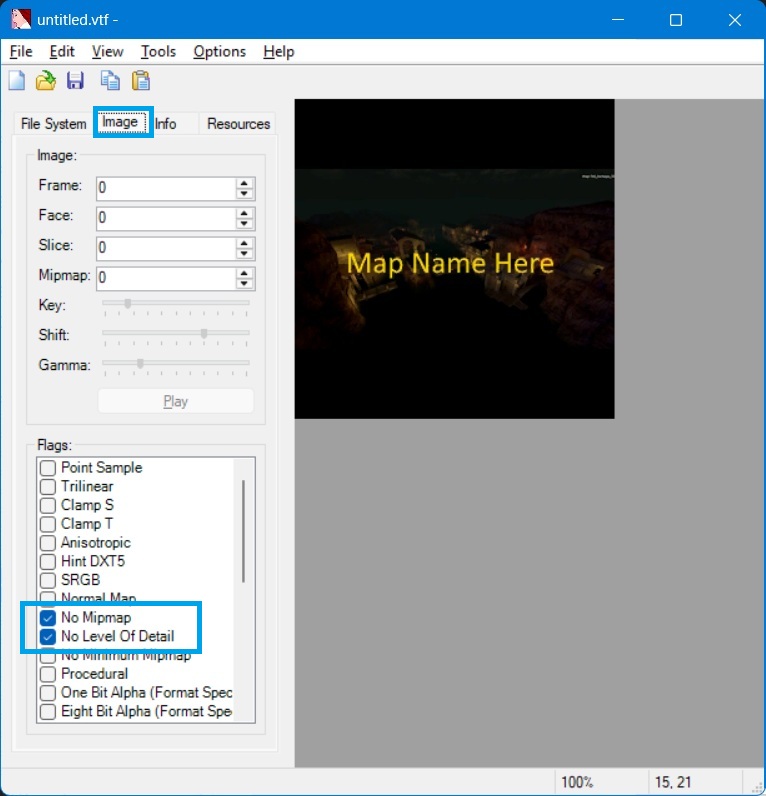
- The screen should then look something like what is shown in the following images:
- Select Save from the File menu to save the file. Be sure to name the file with the following convention: "menu_thumb_" (exactly) followed by the exact map name. For example:menu_thumb_fof_somemapname.vtfNOTE: The .vtf part should be added automatically.
- Open the .vmt file in a text-editor (Windows Notepad, Notepad++ or whatever you use).
- The existing content will look something like this:"LightmappedGeneric" { "$basetexture" "blah/blah/blah/menu_thumb_fof_somenewmap" }
- Replace the contents with the equivalent of this, substituting the actual name of the map instead of "fof_somenewmap":"UnlitGeneric" { "$baseTexture" "vgui\maps/menu_thumb_fof_somenewmap" "$translucent" 1 "$ignorez" 1 "$vertexcolor" 1 "$nolod" "1" }
- Save the updated .vmt file.
6 - Getting the thumbnail(s) to players
Commonly, these might be:
- Navigation files (.nav) - for servers hosting the map (or players running it locally) to be able to use in-game "bots".
- Readme type text files (.txt) - to provide additional information to players.
- Configuration files (.cfg) - for servers hosting the map.
- Custom sound files (.mp3 and/or .wav) that the map requires.
- Custom 3d model files (.mdl) that the map requires.
- Custom texture files (.vtf and .vmt) that the map requires - including map preview thumbnail textures for the HSB feature of Fistful of Frags (the reason for this guide)!
- Embedding everything directly into the map's BSP file. To a limited extent, this method pre-dates the Source engine, dating back to the prior GoldSrc engine. It has now become the very-much preferred/standard practice for distributing any map that requires other files that are not part of the base game installation (i.e. "custom" files) - in particular regarding custom sounds, models and/or textures.
- Using a map-specific resource list - typically used when distributing the map as a zipped-archive (.zip) file. This is the oldest technique, and pre-dates the Source engine entirely, dating back to the prior GoldSrc engine - possibly even further to some version of the Quake[en.wikipedia.org] engine. Game-servers still often use this technique to work-around custom maps that do not already have everything embedded.
- Packaging everything in a VPK file. This newest method has become common, since the advent of the Steam Workshop. It accomplishes something similar to embedding directly into the map's BSP file, without some of the downsides. However, it has its own downsides for servers hosting custom maps.
- For server operators, using a 3rd-party server-side modifications (such as SourceMod[sourcemod.net]) to download the files to players as they connect to the server to play the map. This last method, is typically used by server operators to work-around existing maps that require related files but do not include them already embedded, or to download files that apply to multiple maps - or are associated with custom server-side plug-ins.
7 - Embedding into the BSP
NOTE: This method will require a computer capable of running Fistful of Frags with HDR enabled. See the "Consequences" sections below for more information. This is not necessarily true for all Source-based games. But, it is for Fistful of Frags specifically.
Another method for ensuring file dependencies (such as HSB map preview thumbnails) are met, is to embed them directly into the .bsp file, after compiling (or re-compiling) the map.
- Map-specific configuration (.cfg) files that contain any default settings the map may need to be best experienced. NOTE: Server operators can override this behavior by having a file with a matching name installed in the correct path on the server - which will take precedence over the version embedded into the map.
- Custom sound (.mp3 and/or .wav) files played by entities in the map.
- Custom 3d model (.mdl) files used as props in the map.
- Custom texture (.vtf and .vmt) files applied to various architecture of the map. Or in the case of this guide - HSB map preview thumbnails!
This creates one downside: If there is a need to update any of those embedded files after the map's release. For example: Sometimes a map author might want to re-generate or (repeatedly) manually alter the navigation (.nav) file for a map - while doing some trial-and-error troubleshooting of the navigation mesh that in-game "bots" use.
Alternatively, if you keep the navigation (.nav) file external to the .bsp, you will not encounter that issue - short of modifying some other embedded files of course.
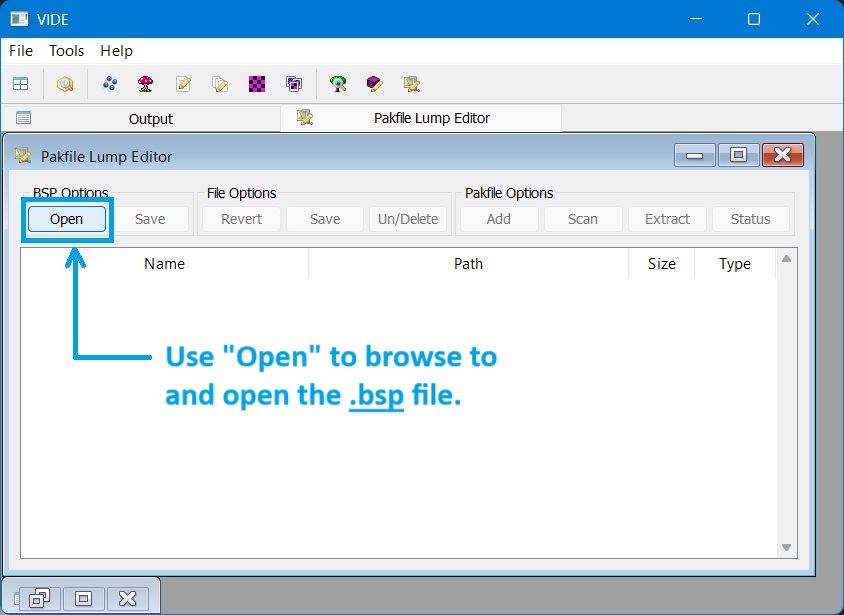
- Open VIDE.
- Open VIDE's "Pakfile Lump Editor" feature (last icon on the right of the tool-bar).
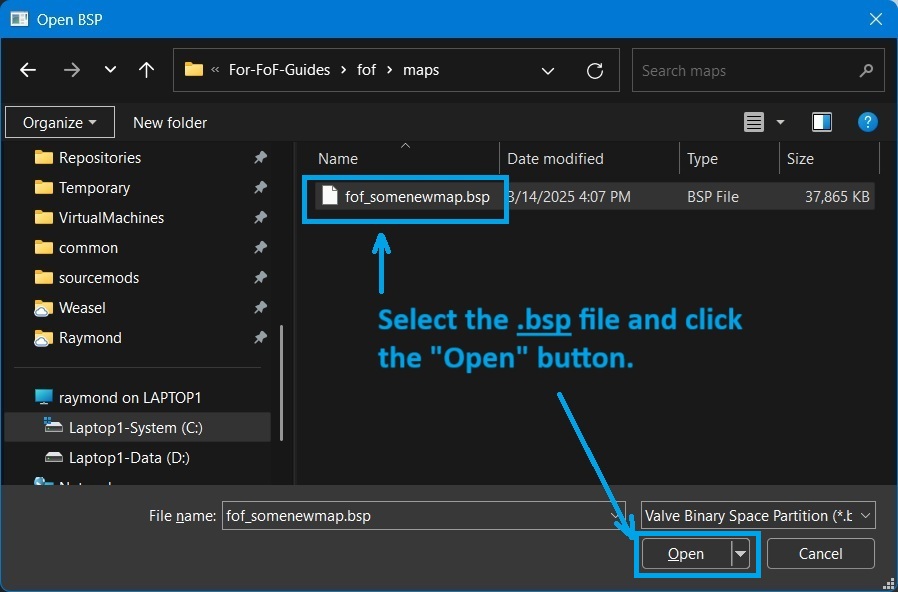
- Click the Open button to browse for and select the .bsp file.
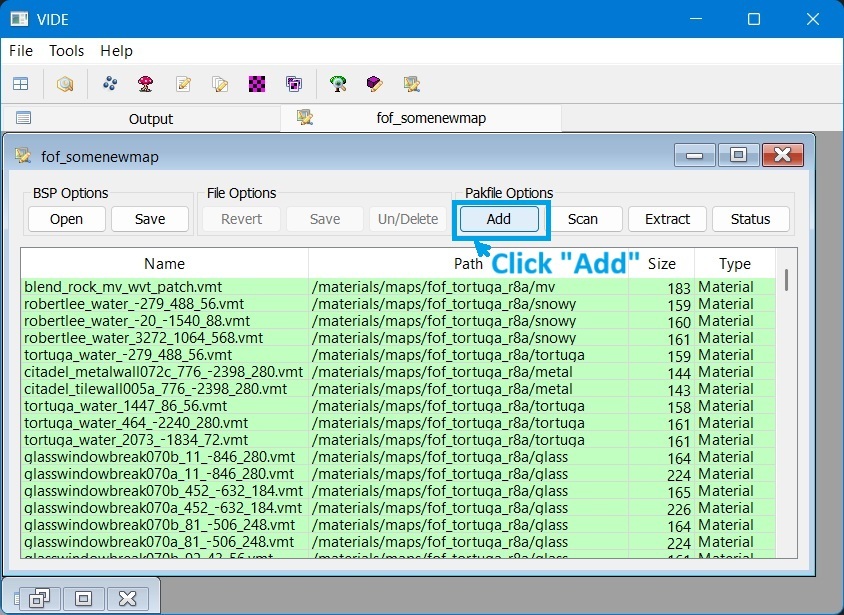
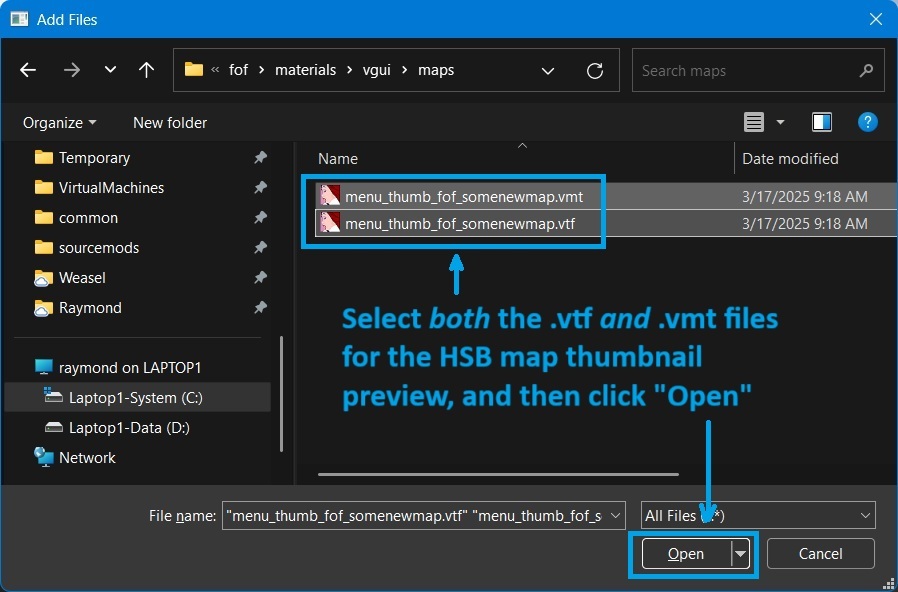
- Click the Add button to browse for and select both the .vtf and .vmt files.
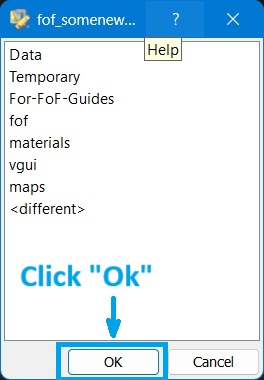
- Click Ok to close the next screen.
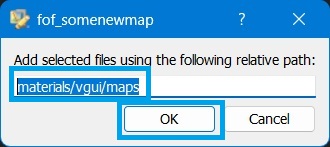
- On the screen after that, remove the existing text and enter exactly:materials/vgui/maps
- Click Ok to close the that screen.
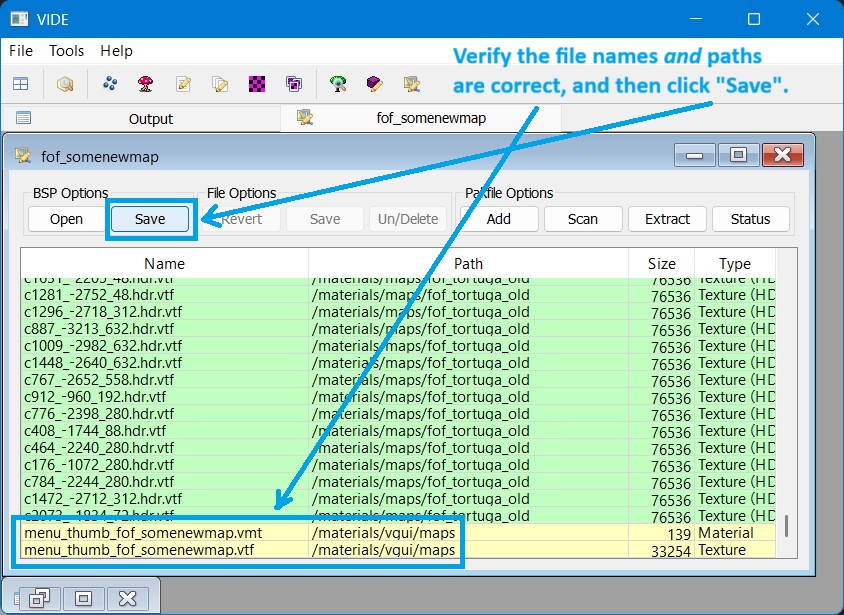
- Check that the new files are in the list now. You may have to scroll-down to find them.
- Click the Save to save the changes to the .bsp file.
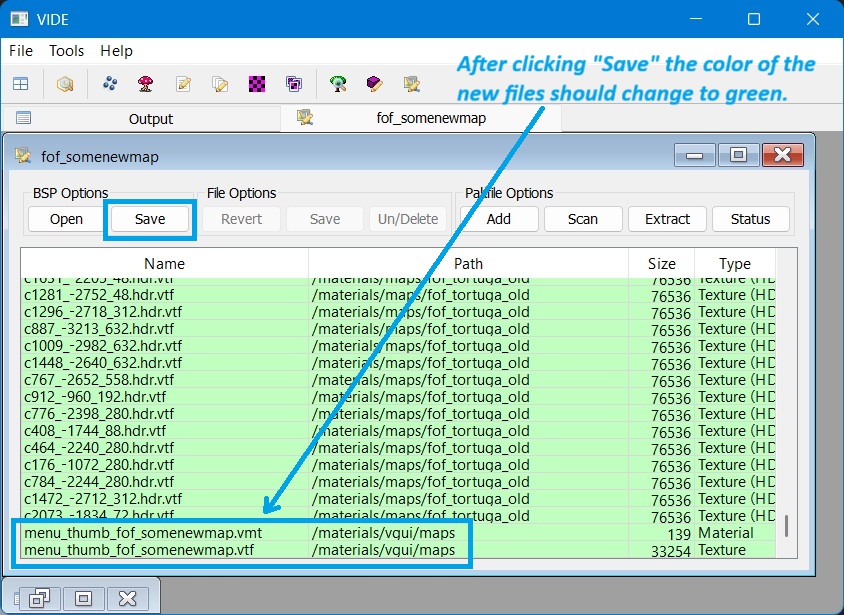
- After the changes are saved, the new files should change color in the list to green.
- You may now close the Pakfile Lump Editor, by clicking the check-box in the upper-right corner of the sub-window.
- You may now close VIDE, by selecting Exit from the File menu.
- Open VIDE's "Pakfile Lump Editor" feature ...
- Click the Open button to browse for and select the .bsp file ...
- Click the Add button to browse for and select both the .vtf and .vmt files ...
- Click Ok to close this next screen ...
- On the screen after that, remove the existing text and enter exactly:materials/vgui/maps
- Check that the new files are in the list now. You may have to scroll-down to find them ...
- Click the Save to save the changes to the .bsp file ...
8 - Consequences of embedding
- Re-generate the navigation-mesh (.nav) file. Yep, another good reason to not embed the navigation file.
- Rebuild the SDR (standard dynamic range) cubemaps.
- Rebuild the HDR (high dynamic range) cubemaps.
- Start Fistful of Frags (FoF).
- Ensure the "Developer Console" is enabled in FoF. See prior notes under the Capturing a screenshot section for this.
- Start a game (locally) with the map. See prior notes under the Capturing a screenshot" section for this.
- Press tilde ("~") to open the Console.
- Enter the following commands into the Console:sv_cheats 1; nav_generate;
- It may take some time for that to complete.
- When it is complete, you can exit FoF.
- Save the resultant matching .nav file for distribution with the map.
- Start Fistful of Frags (FoF).
- Ensure the "Developer Console" is enabled in FoF. See prior notes under the Capturing a screenshot section for this.
- Start a game (locally) with the map. See prior notes under the Capturing a screenshot" section for this.
- Press tilde ("~") to open the Console.
- Enter the following commands into the Console:sv_cheats 1; mat_hdr_level 0; mat_specular 0; buildcubemaps;
- It may take some time for that to complete.
- Proceed to also perform the HDR cubemap repair (next) also.
- Start Fistful of Frags (FoF).
- Ensure the "Developer Console" is enabled in FoF. See prior notes under the Capturing a screenshot section for this.
- Start a game (locally) with the map. See prior notes under the Capturing a screenshot" section for this.
- Press tilde ("~") to open the Console.
- Enter the following commands into the Console:sv_cheats 1; mat_hdr_level 2; mat_specular 0; buildcubemaps;
- It may take some time for that to complete.
- When it is complete, you can exit FoF.
- Save the resultant matching .bsp file, this is now your updated map.
9 - Resource Lists
Probably the oldest technique for ensuring maps get accompanied with any files they are dependent upon, is the use of resource list files.
- Obviously, include a .res file - as detailed in this guide.
- Do NOT just make a .zip file with everything in the same folder. Make all the file paths relative to the fistful of frags\fof folder. This would mean making a "maps" sub-folder to put the .bsp, .nav and .res files into, as well as the other folders for any required files - all relative to the fistful of frags\fof folder.
- Included are part of the default game installation, nor
- Embedded directly into the map's .bsp file.
If a server is hosting a map, and there is a matching .res file for it, the server will automatically "pre-cache" all the files listed in the .res (assuming they exist on the server) - effectively causing them to be downloaded. Further, if the server is using the "sv_downloadurl" feature to off-load downloads to a back-end web-server, it will cause the player's game-client to download them from there - as it would with the map file itself.
10 - Packaging in a VPK
Another mechanism for ensure maps get distributed with various files they are dependent-upon, is to package everything together in a VPK file. This newest method has become common, since the advent of the Steam Workshop.
It accomplishes something similar to embedding directly into the map's BSP file, without some of the downsides. However, it has its own downsides for servers hosting custom maps.
Fistful of Frags (FoF) does implement the Steam Workshop as part of it's client-side functionality.
Unfortunately, FoF does not implement the Steam Workshop in any meaningful server-side mechanism - unlike some other Source-engine games.
Consequently, publishing your map into the Steam Workshop generally does not help get server-operators to host games with it. Server operators would have go through extra hoops (especially if it is wrapped in a VPK) to host games with it.
Regardless, if you want to tinker with packaging your map into a VPK, you will need to get familiar with the VPKEdit utility.
A tutorial on using VPKEdit is beyond the scope of this guide. It is mentioned largely because it is something some map and/or mod authors may already be familiar with, or have "heard of".
11 - Using SourceMod to help
From a dedicated game-server operators perspective, clients not already having HSB map preview thumbnails installed for the maps you are hosting can really effect the traffic going to your server. This is because, players (especially new players) have a tendency to not want to click on servers in the HSB with the generic "Custom Map" icon shown - instead of an actual preview of the current map.
Having HSB map preview thumbnails distributed with each map does help, but only in the case where a player has played on that map at least once before (resulting in it, and hopefully its HSB map preview thumbnail) getting installed to be visible in the future.
As with many things with Source-engine games, SourceMod[sourcemod.net] is your friend!
Using the Downloader/Pre-Cacher[forums.alliedmods.net] plug-in for SourceMod[sourcemod.net], could download the HSB map preview thumbnails associated with all the custom maps you host - at the same time. In this manner, when a player connects to play, in addition to downloading the map (if they do not have it already) they will automatically get the HSB map preview thumbnails for it and all the other custom maps you host at once. This will have the benefit (to the player) to see map preview thumbnails for all the custom maps you host - and hopefully never see the dreaded generic "Custom Map" icon for your server(s).
12 - The community thumbnail archive
For Fistful of Frags game-server operators, the three relevant files are:
- A sample downloads_simple.ini file, available here[raw.githubusercontent.com]. It contains entries for all the HSB map preview thumbnails in the archives below. Obviously, you might want to edit a copy of this, leaving-in just the entries for the custom maps that your server hosts. If you are already using the Downloader/Pre-Cacher[forums.alliedmods.net] plug-in, you can just add the relevant entries to your existing fof/addons/sourcemod/configs/downloads_simple.ini file.
- An archive (in .zip format), available here[github.com] It contains a collection of HSB map preview thumbnails (matching pairs of .vtf and .vmt files) for a large number of custom maps for FoF - collected from various servers.
- Another archive (in .zip format), available here[github.com]. It contains the same files as above, but with each individually compressed with Bzip2 for use in the case where servers are using sv_downloadurl to re-direct content downloads to a back-end web-server (for better download speeds).
- Fistful of Frags Console Commands★ 5 (313)21k views542 ♥4 minUpdated Feb 6, 2016
- How to set up a "Listen Server"!?★ 5 (216)17k views285 ♥5 minUpdated Mar 13, 2016
- The Weapons of FOF★ 5 (247)13k views243 ♥23 minUpdated Dec 3, 2024
- A dumb FoF player-types guide (No pictures, sorry!)★ 5 (315)11k views280 ♥15 minUpdated Jan 6, 2018
- Создание сервера для игры с друзьями★ 4 (150)9.2k views254 ♥1 minRussianUpdated Jun 19, 2018
- "Курс Молодого Ковбоя" от русского сообщества по FoF★ 5 (210)9k views208 ♥30 minRussianUpdated Nov 14, 2018





- Upgrading to PremiumTeam Fortress 2★ 5 (20k)1441k views11k ♥6 minUpdated May 11, 2022
- No More Room in Hell Official ManualNo More Room in Hell★ 5 (2.8k)569k views2.1k ♥29 minUpdated Apr 22, 2019
- NMRiH Community Hosting GuidesNo More Room in Hell★ 5 (526)351k views653 ♥1 minUpdated Aug 10, 2022
- ULTIMATE GUIDE FOR GAME DEV TYCOONGame Dev Tycoon★ 5 (5.8k)326k views10k ♥4 minUpdated 23 Jan, 2014
- How to 'Git Gud' Soon™MORDHAU★ 5 (2k)318k views3k ♥68 minUpdated Nov 16, 2024
- Лучшие кооперативные игры SteamPAYDAY 2★ 5 (1.5k)315k views2.1k ♥56 minRussianUpdated Apr 27, 2025






This guide was created by its original author on the Steam Community. Are you the author and want it removed? Request removal.