HOW TO -- Never Rejoin a Modded Lobby Again EZ
Preamble
Since the fake dedi servers make it hard to get their ip address, and a lot of you are using this to block out that garbage I will start posting the subnets of the dedi servers here, and yes it changes somewhat
ip I have seen the dedigamer servers use are:
103.231.88.102
103.231.88.105 <---- Current IP
43.245.165.110
103.25.58.145
103.231.88.100
163.47.16.167
43.245.165.100
subnets i have
103.25.58.0/24
103.231.88.0/24 <----- Current Subnet
163.47.16.0/24
43.245.165.0/24
you can place one of these in the section that needs an ip in this guide.
also fwiw, this guide doesnt appear correctly (text behind pictures) in chrome, and possibly other browsers, view this throught the steam client, and it is fine.
also the windows gui method is more towards the bottom, and is unfortunately the only part that is affected by this text behind pictures glitch.
ip I have seen the dedigamer servers use are:
103.231.88.102
103.231.88.105 <---- Current IP
43.245.165.110
103.25.58.145
103.231.88.100
163.47.16.167
43.245.165.100
subnets i have
103.25.58.0/24
103.231.88.0/24 <----- Current Subnet
163.47.16.0/24
43.245.165.0/24
you can place one of these in the section that needs an ip in this guide.
also fwiw, this guide doesnt appear correctly (text behind pictures) in chrome, and possibly other browsers, view this throught the steam client, and it is fine.
also the windows gui method is more towards the bottom, and is unfortunately the only part that is affected by this text behind pictures glitch.
Forward
are you tired of constantly rejoining hacked and modded lobbies?
tired of those ♥♥♥♥♥♥♥♥ that remove the exit function?
really dont like the fact that you keep ending up in some ♥♥♥♥♥♥♥ hosts lobby... whether he's cheating or not?
this guide is VERY VERY VERY SIMPLE and very stupid proof at that...
I have even made screenshot diagrams to show you guys...
sooo.... here goes...
Note:
It has come to my attention that alot of people dont understand how to switch the mp program to windowed mode... first set your desktop resolution to the resolution you use in game... otherwise it will be less than or more than a whole screen...
then at the very first intro screen hit ALT+ENTER this helps a ton with doing all of this...
tired of those ♥♥♥♥♥♥♥♥ that remove the exit function?
really dont like the fact that you keep ending up in some ♥♥♥♥♥♥♥ hosts lobby... whether he's cheating or not?
this guide is VERY VERY VERY SIMPLE and very stupid proof at that...
I have even made screenshot diagrams to show you guys...
sooo.... here goes...
Note:
It has come to my attention that alot of people dont understand how to switch the mp program to windowed mode... first set your desktop resolution to the resolution you use in game... otherwise it will be less than or more than a whole screen...
then at the very first intro screen hit ALT+ENTER this helps a ton with doing all of this...
Step 1
Start resmon.exe by holding the windows key down and hitting r then typing resmon into the run box.
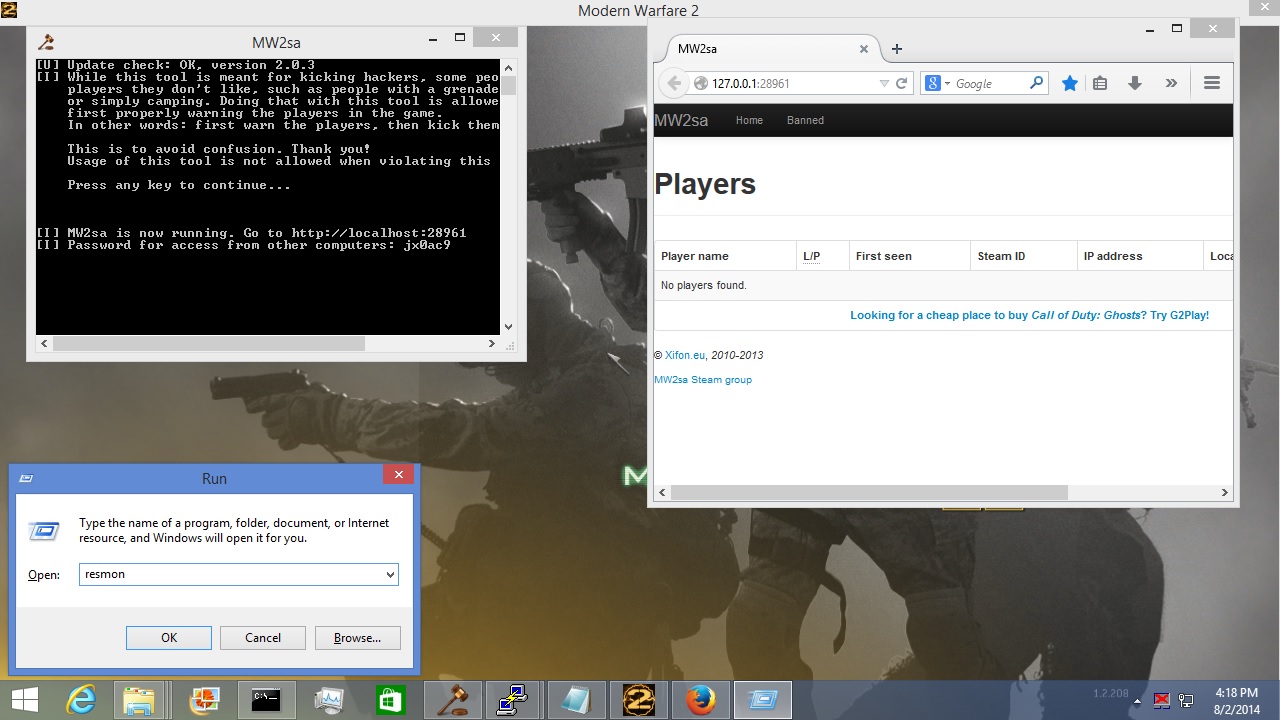
resmon or resource monitor should look something like this.
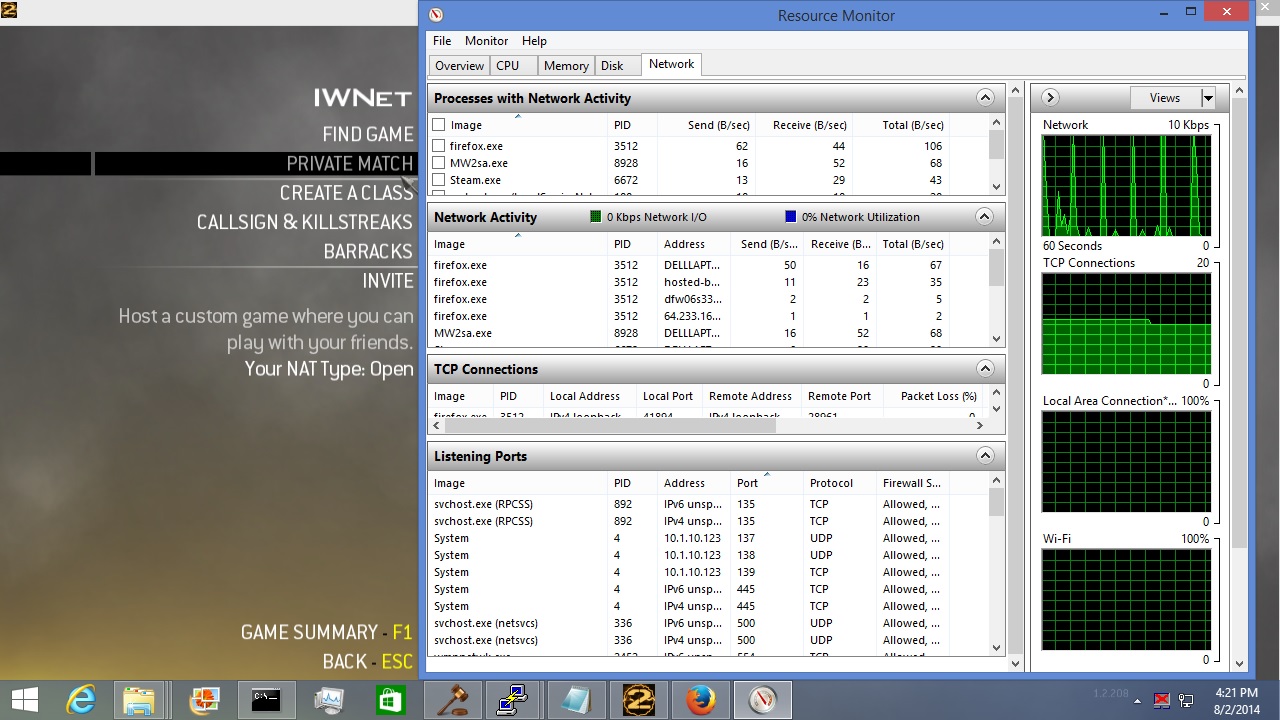
resmon or resource monitor should look something like this.
Step 2
Move over to the networking tab, and make sure that no other process in the "processes with network activity" section has a check-mark except for iw4mp.exe (having this checked off will auto-check the image box) Then shrink all the underlying tabs except for the network activity tab, this is the only one you will want to look at.
If you are not host then you should only have one active connection that is drawing anywhere near 1KB/s, and to best see this in the chart click the send (B/sec) tab to make the maximum value be on the top (i didnt, but it was already on top).
It should look something like this
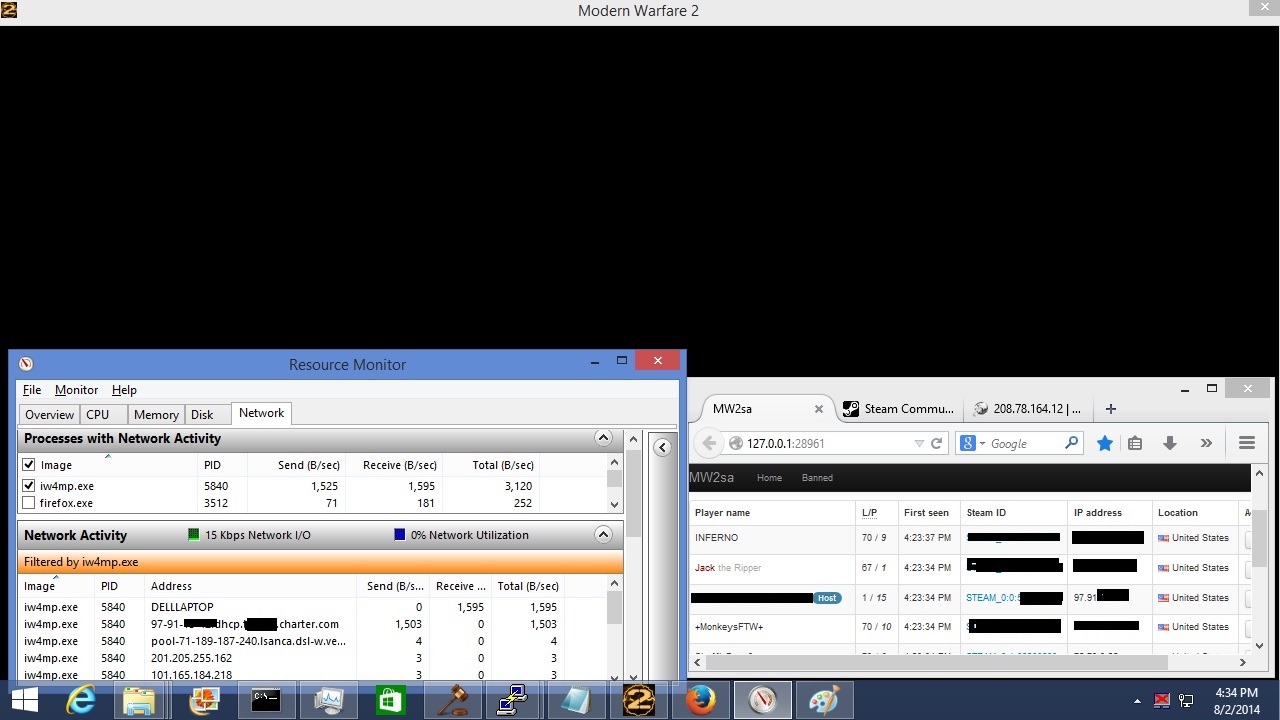
If you are not host then you should only have one active connection that is drawing anywhere near 1KB/s, and to best see this in the chart click the send (B/sec) tab to make the maximum value be on the top (i didnt, but it was already on top).
It should look something like this
Step 3
Open up an admin command prompt, by right clicking over the windows key on the bottom left of the desktop, and select command prompt admin.
once open you will need to take the four numbers out of the hosts resolved ip address... and sometimes you may have to actually unresolve the name if the address isnt in the name like this one is
this is easily done by typing in the same command prompt that you just pulled up a ping request like this
C:\WINDOWS\system32>ping 97-91-XX-XX.dhcp.XXXX.XX.charter.com
Pinging 97-91-XX-XX.dhcp.XXX.XX.charter.com [97.91.XX.XX] with 32 bytes of data:
Request timed out.
Ping statistics for 97.91.XX.XX:
Packets: Sent = 1, Received = 0, Lost = 1 (100% loss),
see how it put the ip address in the brackets? now to block the ♥♥♥♥♥♥♥♥ that help ruin this game... like this
once open you will need to take the four numbers out of the hosts resolved ip address... and sometimes you may have to actually unresolve the name if the address isnt in the name like this one is
this is easily done by typing in the same command prompt that you just pulled up a ping request like this
C:\WINDOWS\system32>ping 97-91-XX-XX.dhcp.XXXX.XX.charter.com
Pinging 97-91-XX-XX.dhcp.XXX.XX.charter.com [97.91.XX.XX] with 32 bytes of data:
Request timed out.
Ping statistics for 97.91.XX.XX:
Packets: Sent = 1, Received = 0, Lost = 1 (100% loss),
see how it put the ip address in the brackets? now to block the ♥♥♥♥♥♥♥♥ that help ruin this game... like this
Step 4
Step 4
adding a firewall rule to the windows firewall
if you arent using the windows firewall and you are on a windows machine, please remove whatever firewall you have installed and replace the windows firewall, it is one of the most highly modifiable firewall, and because of this we are able to add a rule to it from the command prompt which makes things VERY SIMPLE
the ONE LINE command that you need to type in the ADMIN COMMAND PROMPT is this
c:\>netsh advfirewall firewall add rule NAME=NAMEOFHOST action=block REMOTEIP=97.91.XX.XX dir=out enable=yes
you have to name it and you also need to put the ip address you got from the resource monitor... those are the only two things you need to change in that command... the things that are underlined
I have censored out the poor guys ip address i used in the screenshots, and have removed them... sorry
if you get locked into a lobby with no exit function the above command with the direction changed to IN will drop the connection all together...
adding a firewall rule to the windows firewall
if you arent using the windows firewall and you are on a windows machine, please remove whatever firewall you have installed and replace the windows firewall, it is one of the most highly modifiable firewall, and because of this we are able to add a rule to it from the command prompt which makes things VERY SIMPLE
the ONE LINE command that you need to type in the ADMIN COMMAND PROMPT is this
c:\>netsh advfirewall firewall add rule NAME=NAMEOFHOST action=block REMOTEIP=97.91.XX.XX dir=out enable=yes
you have to name it and you also need to put the ip address you got from the resource monitor... those are the only two things you need to change in that command... the things that are underlined
I have censored out the poor guys ip address i used in the screenshots, and have removed them... sorry
if you get locked into a lobby with no exit function the above command with the direction changed to IN will drop the connection all together...
Final Thoughts and Things that Make this Easier
this is really simple and this uses NO other programs other than what windows already has available so this is definitely not something that ANYONE needs to worry about getting a VAC ban for...
and believe this... you will be adding a lot of names and ip addresses to the firewall, but have no fear, because as you add you will notice that you are finding less and less bs from the lobbies you join.
a really great program known as mw2sa makes getting the hosts ip address a whole lot easier as it will show it in its resolved state (just numbers) and will be easier to cut and copy.
also using the gui for the advanced section of the windows firewall can make this easier by having only one rule added and adding ip addresses to a list of hosts you dont want to join.
getting to the windows firewall is easy through the gui... window key+r then control panel... it is in the control panel then click the advanced section... all the rules you will create through the command prompt will be in the outgoing section
sure ip addresses change but really they dont, and they definitely dont change in one night...
two steps, you can even control-c to copy from resmon.exe
hopefully if there is no one in these lobbies they will disappear or maybe just maybe steam will do something
and believe this... you will be adding a lot of names and ip addresses to the firewall, but have no fear, because as you add you will notice that you are finding less and less bs from the lobbies you join.
a really great program known as mw2sa makes getting the hosts ip address a whole lot easier as it will show it in its resolved state (just numbers) and will be easier to cut and copy.
also using the gui for the advanced section of the windows firewall can make this easier by having only one rule added and adding ip addresses to a list of hosts you dont want to join.
getting to the windows firewall is easy through the gui... window key+r then control panel... it is in the control panel then click the advanced section... all the rules you will create through the command prompt will be in the outgoing section
sure ip addresses change but really they dont, and they definitely dont change in one night...
two steps, you can even control-c to copy from resmon.exe
hopefully if there is no one in these lobbies they will disappear or maybe just maybe steam will do something
The Windows Advanced Firewall GUI Method
Obviously command line prompt computing can get confusing to some, and since there is this crappy windows 10 update, I thought I would check the method windows 10 as well.
To use the gui method, which is nice because it keeps all your blocked lobbies in one rule's list, you must first create a rule in the windows advanced firewall control panel page.
You can get there by running ([Windows Start Key] + R) wf.msc
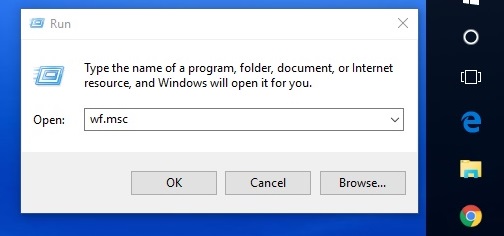
This brings up something like this:
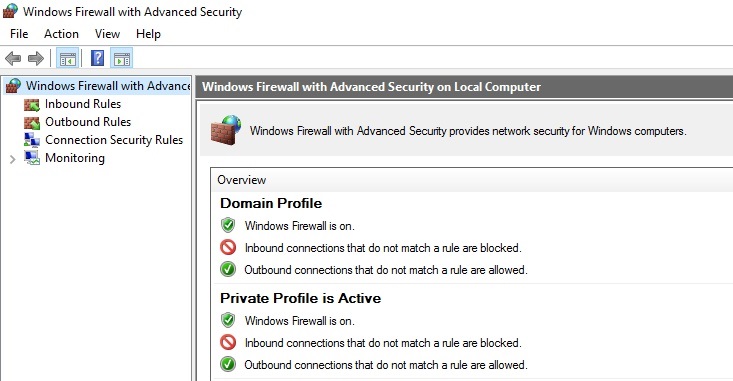
Select outbound rules on the left side panel.

now select new rule on the right side panel, which brings up the new rule helper.
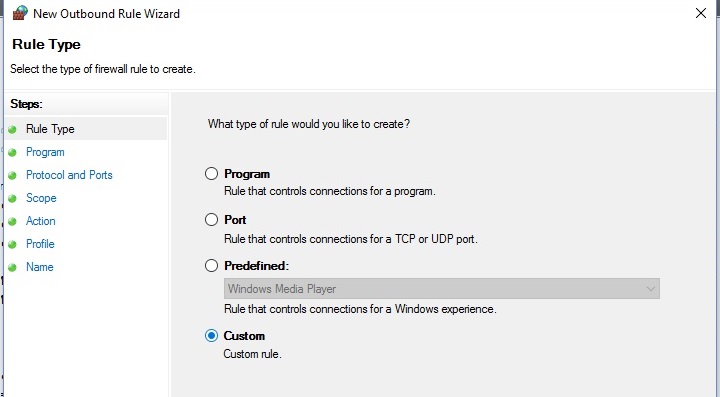
Select custom rule and leave everything as it was set through all the next pages except for selecting block the connection for action.
ALSO MAKE SURE YOU PUT AT LEAST ONE ADDRESS IN THE REMOTE IP ADDRESS WINDOW BOX UNDER SCOPE
if you dont do this you will block all outgoing internet connections!!!!!!!!!!!!!!!!!!!!!!!!!!!!!!!!!!!!!!!!
Dont have something to put? put these 2 for sure
163.47.16.0/24
43.245.165.0/24
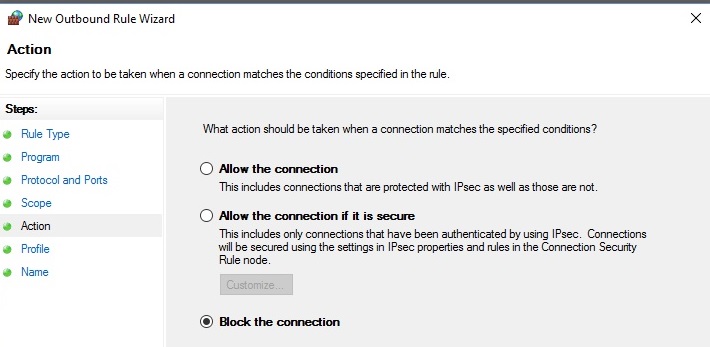
On the final page name it something you will remember, but include something in front of it like an ! for example that way it shows up at the top of the rule list if you sort by name. This allows it to be easily found, as you will be returning here everytime you need to add another lobby ip address to your block list.
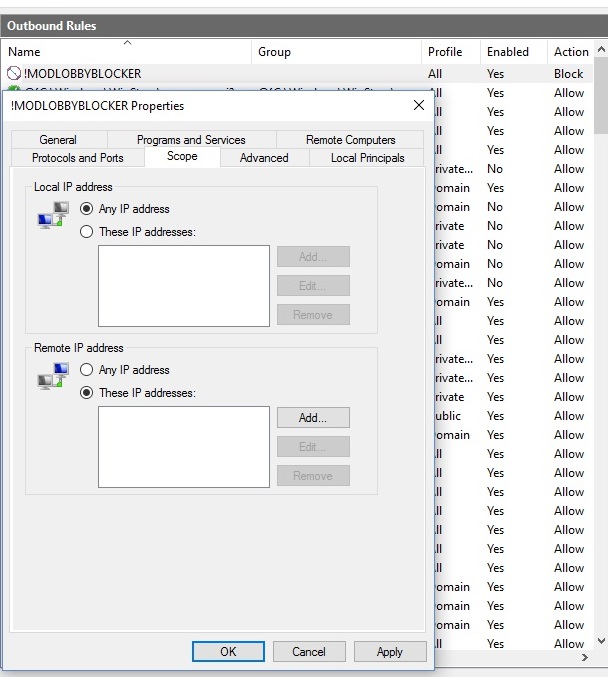
Now for the banning with this method:
once inside the lobby go to resmon, or mw2sa if you choose that option... it is obviously preferrable to use mw2sa, but when i made the guide the intention was to be able to do this with windows and windows only. get the hosts ipaddress and add it to the scope of the your newly created rule.
Results are instantaneous after you click ok, but since your are only blocking outgoing, you will have to leave the lobby. Exit function removed, create a similiar rule in the inbound rule section, and add the ip there as well. This will instantly drop you from the lobby. You will not have to block this hosts again unless he changes his ip. Wanna know about subnets, like I used above to create the rule initially?
http://google.com/search?q=subnets
This works on windows 10, so does the original command line method, like the gui method, just make a shortcut link on the desktop to wf.msc and your custom rule is really easy to get too.
To use the gui method, which is nice because it keeps all your blocked lobbies in one rule's list, you must first create a rule in the windows advanced firewall control panel page.
You can get there by running ([Windows Start Key] + R) wf.msc
This brings up something like this:
Select outbound rules on the left side panel.
now select new rule on the right side panel, which brings up the new rule helper.
Select custom rule and leave everything as it was set through all the next pages except for selecting block the connection for action.
ALSO MAKE SURE YOU PUT AT LEAST ONE ADDRESS IN THE REMOTE IP ADDRESS WINDOW BOX UNDER SCOPE
if you dont do this you will block all outgoing internet connections!!!!!!!!!!!!!!!!!!!!!!!!!!!!!!!!!!!!!!!!
Dont have something to put? put these 2 for sure
163.47.16.0/24
43.245.165.0/24
On the final page name it something you will remember, but include something in front of it like an ! for example that way it shows up at the top of the rule list if you sort by name. This allows it to be easily found, as you will be returning here everytime you need to add another lobby ip address to your block list.
Now for the banning with this method:
once inside the lobby go to resmon, or mw2sa if you choose that option... it is obviously preferrable to use mw2sa, but when i made the guide the intention was to be able to do this with windows and windows only. get the hosts ipaddress and add it to the scope of the your newly created rule.
Results are instantaneous after you click ok, but since your are only blocking outgoing, you will have to leave the lobby. Exit function removed, create a similiar rule in the inbound rule section, and add the ip there as well. This will instantly drop you from the lobby. You will not have to block this hosts again unless he changes his ip. Wanna know about subnets, like I used above to create the rule initially?
http://google.com/search?q=subnets
This works on windows 10, so does the original command line method, like the gui method, just make a shortcut link on the desktop to wf.msc and your custom rule is really easy to get too.
More Call of Duty: Modern Warfare 2 (2009) - Multiplayer guides
- Changing Name Color★ 5 (291)47k views311 ♥1 minUpdated Dec 22, 2020
- How to use your UAV★ 5 (501)37k views200 ♥3 minBulgarianUpdated May 26, 2016
- Add Different Colors to your Name/Classes★ 5 (391)28k views454 ♥1 minUpdated Apr 22, 2019
- Little-Known Tube Rifle Secret★ 5 (588)27k views248 ♥2 minUpdated Oct 4, 2017
- Changing your FoV (Field of view) [Guide restored and updated]★ 4 (166)26k views215 ♥3 minBulgarianUpdated Aug 6, 2023
- How to use a controller on MW2 (360/XB1/XSX, PS3/PS4/PS5)★ 4 (118)22k views128 ♥2 minUpdated Jul 19, 2023


This guide was created by its original author on the Steam Community. Are you the author and want it removed? Request removal.