Introduction to map courses (co-op and single player missions)
What is a “map course”
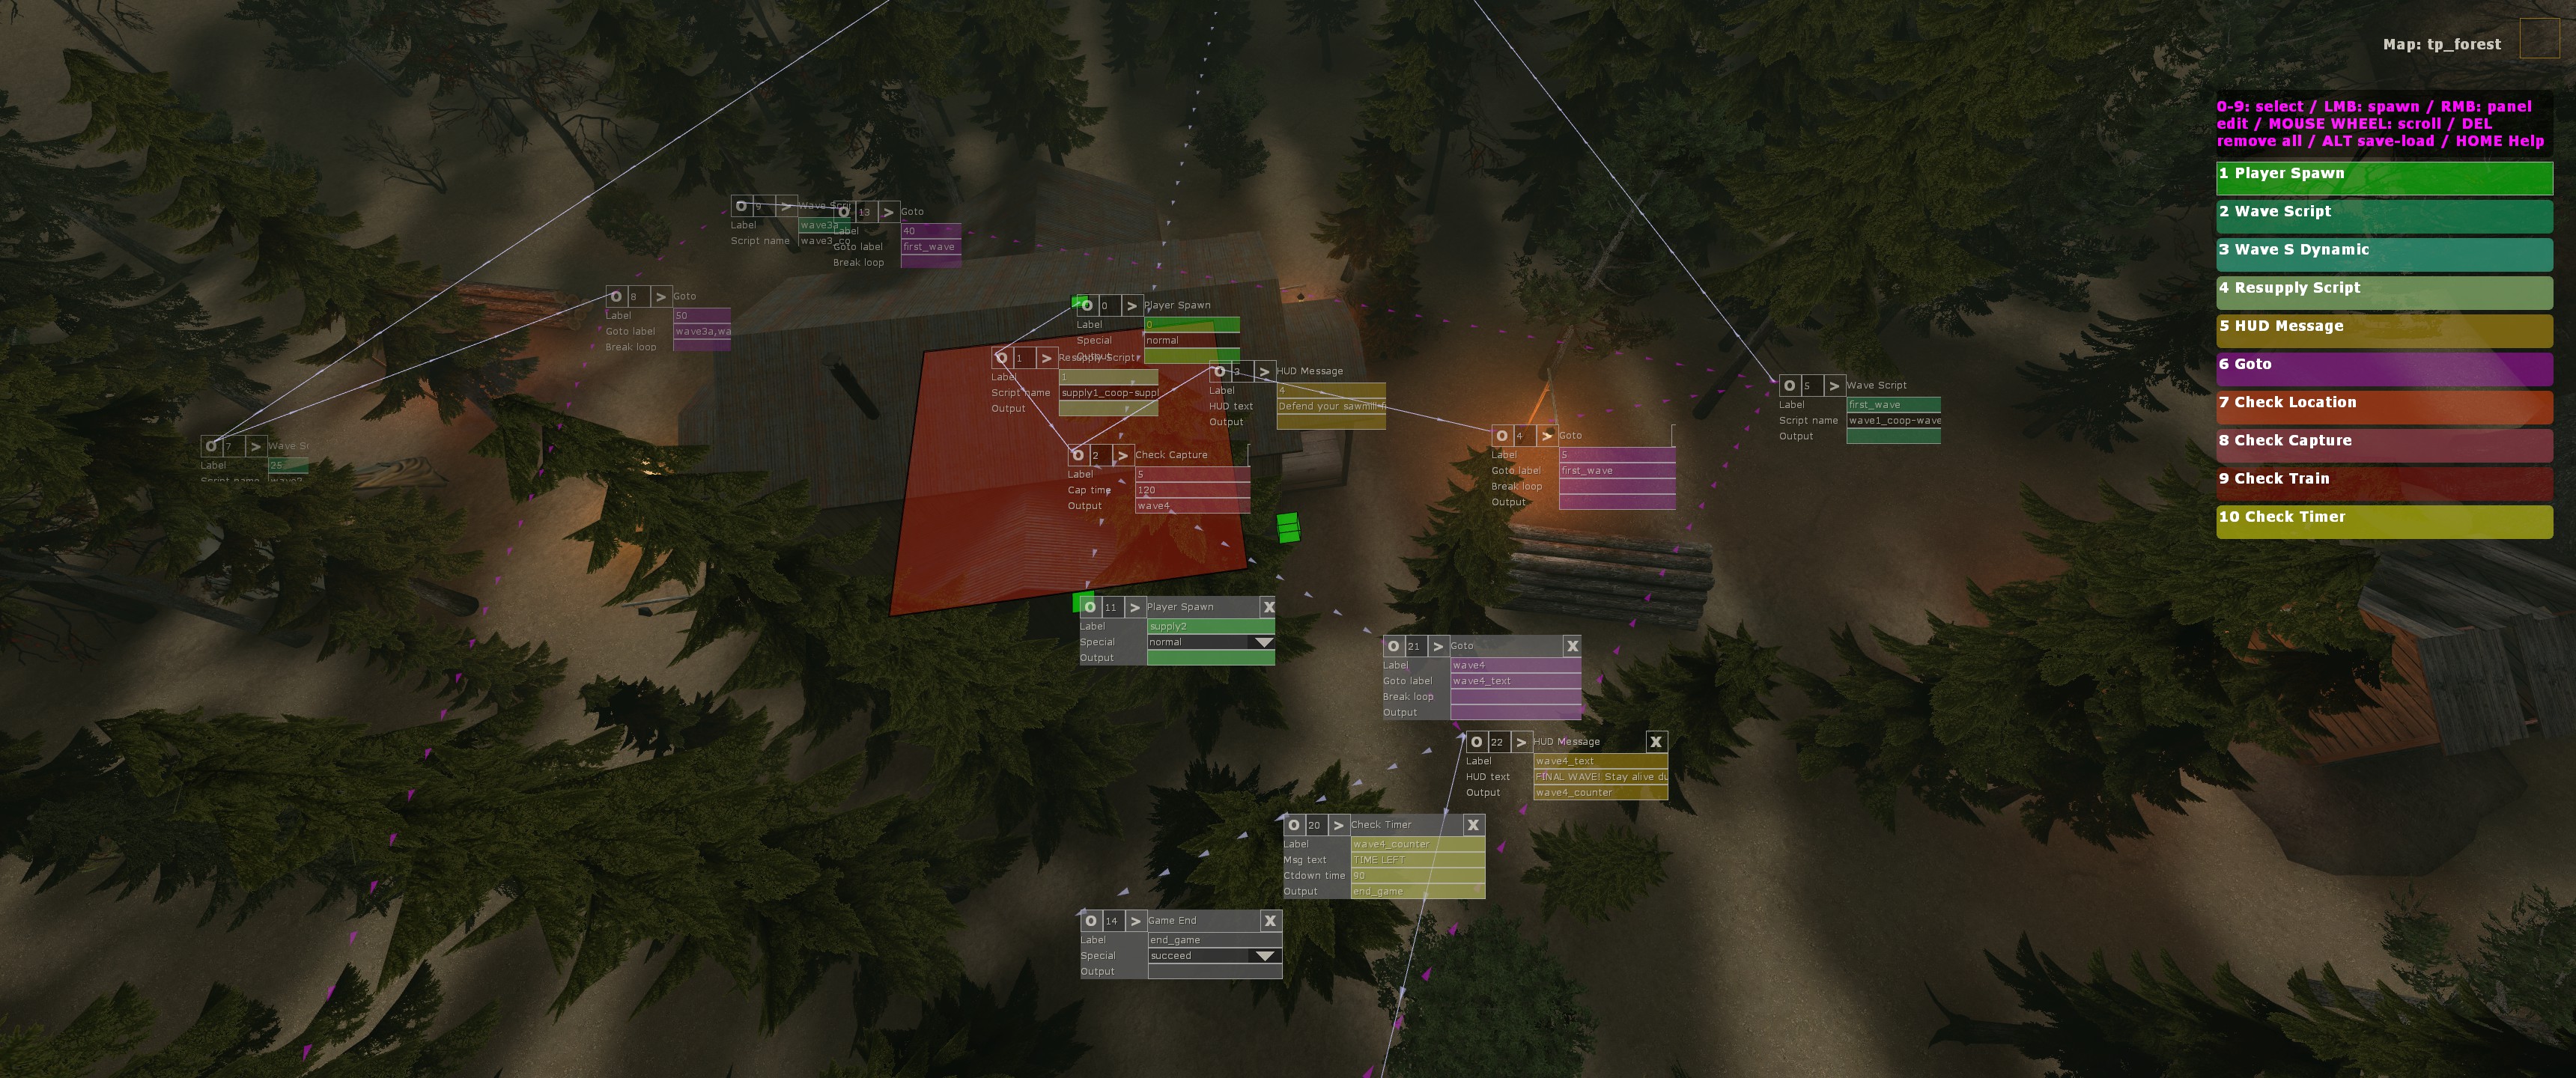
Any course usually begins by creating a player spawn, followed by some on screen text / instructions, then some weapons and other items are spawn and finally enemies begin to show.
How it works
Instruction structure
Available instructions can be selected from right side menu. Use number keys to select them, mouse wheel scrolls between all available instructions.
Press left mouse button to place an instruction over the map, wherever the pointer was placed.
Press right mouse button to edit instructions. Each instruction panel has several elements (from top-left to bottom):
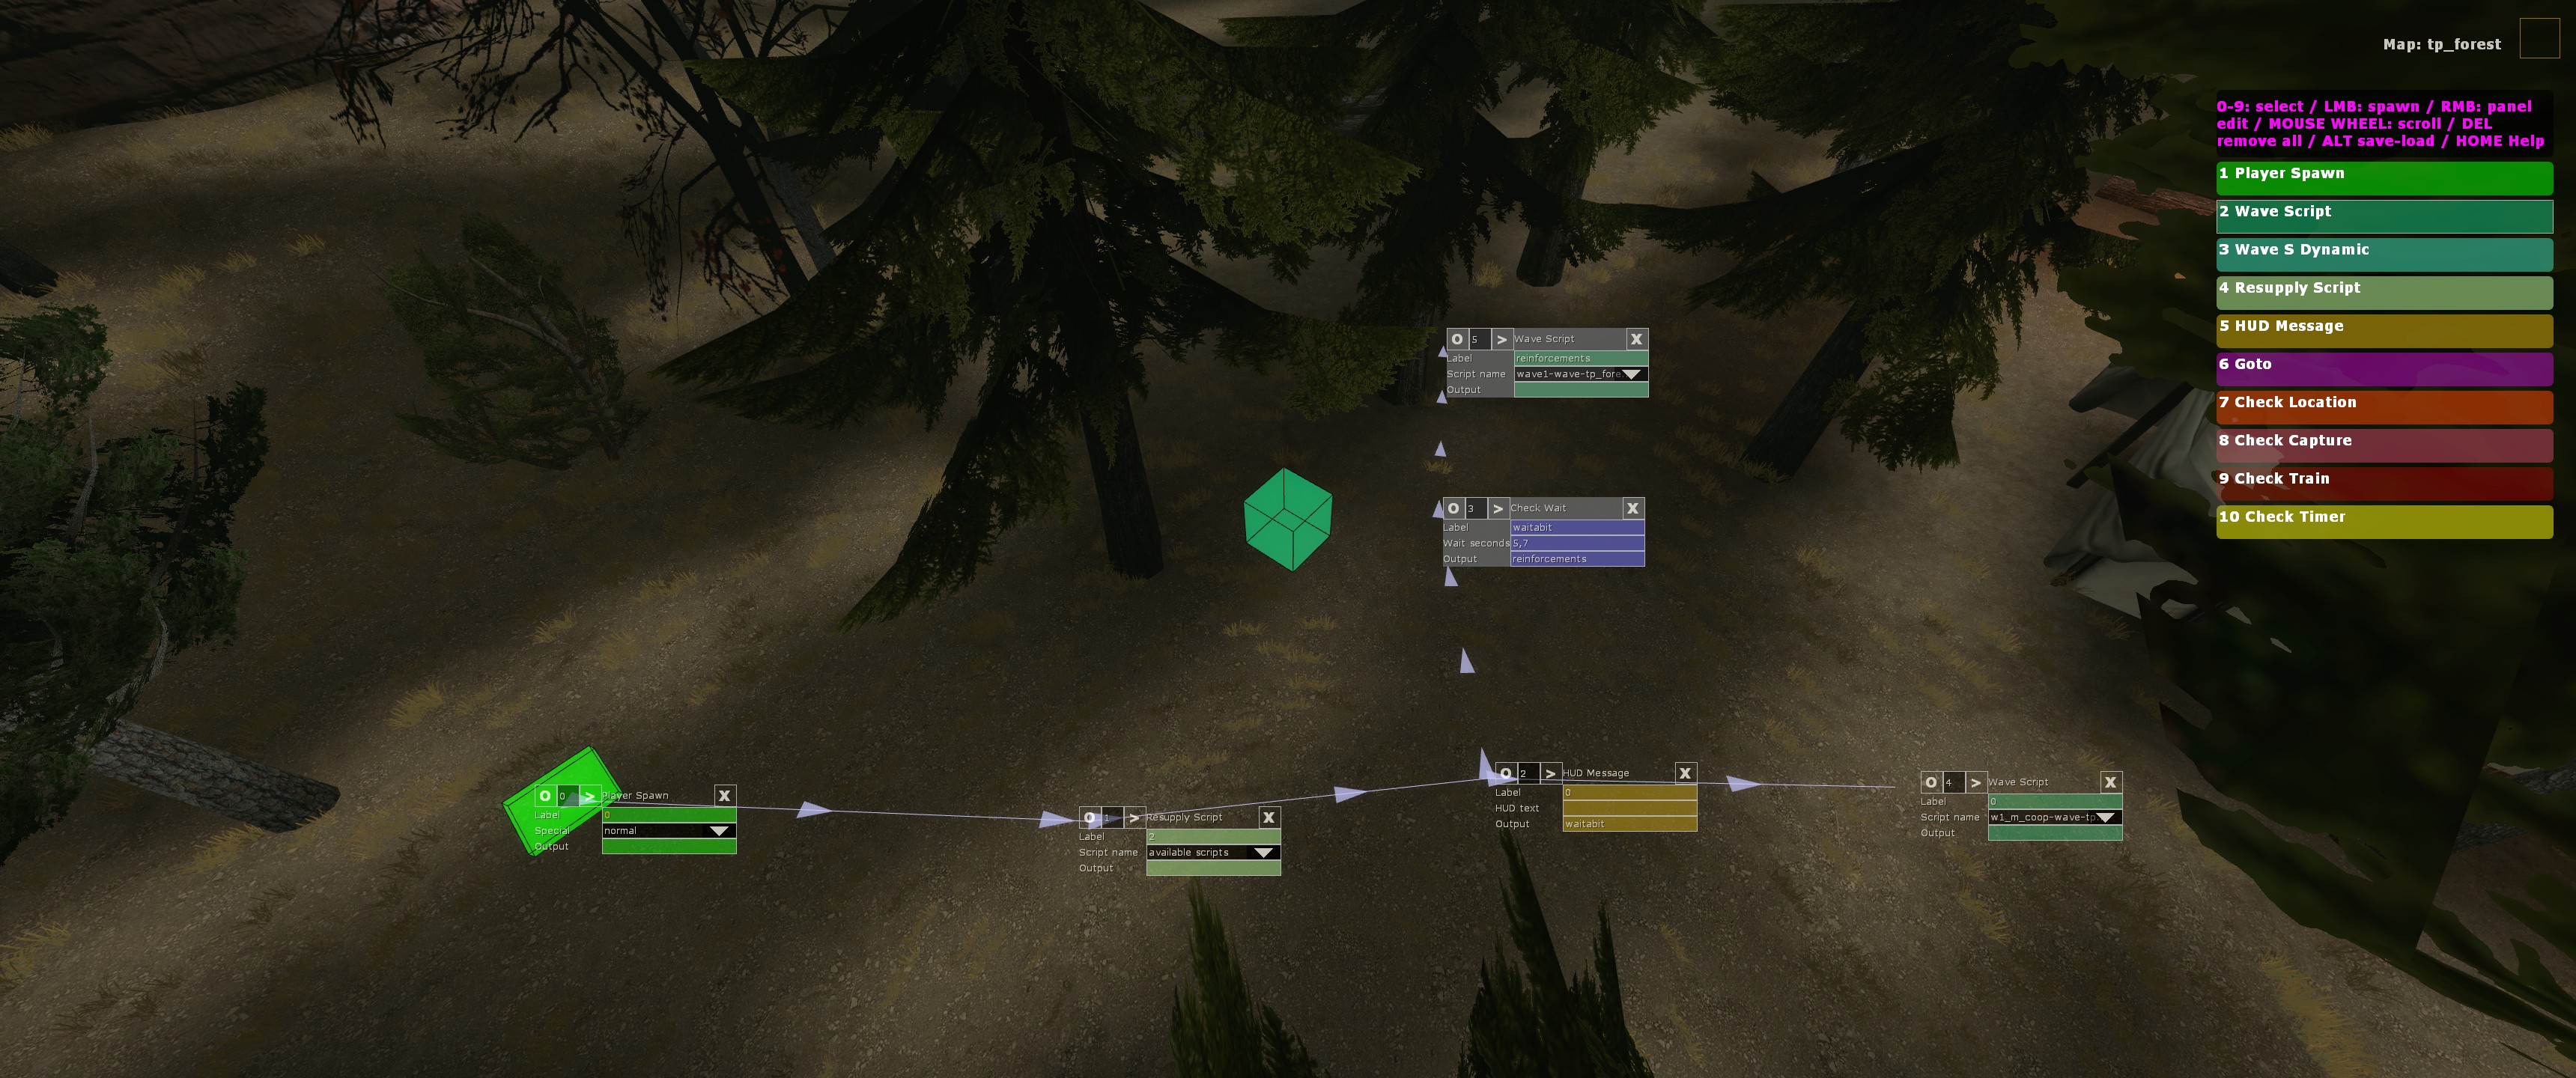
[O] move button: click it to place this instruction at some other location
[>] reorder button: changes the inner order in the instruction chain, this allows to insert instructions or rearrange them at whatever time you need them to be
[X] delete button: just removes the instruction forever
( LABEL ) Either a number or a text string.
A label named with an integer number adds delay to its execution. Instruction is executed after these many seconds from previously executed one. Connection between numbered labels is shown as a continuous line.
A label named with any text string (no number in its first character) disables its automatic execution so is only run when called explicitly by another instruction's output. Connection between outputs and its triggered instruction are displayed as green/lime lines.
Field 1
Bot script names to spawn, text to display, etc. Varies depending the instruction.
Field 2
Usually integer based input as seconds to capture an objective, distance radius, etc
Output
Label name for instruction target to be executed. This works in 2 ways, normal instructions call its output always while "checks" only call it if their check condition becomes true eventually.
Instruction types
- Field 1: “autosave” parameter (optional) respawns players from this point after course restart
- Field 1: script name, runs a bot wave spawn script. Note: use in-game's AI editor to generate bot spawn scripts (close course editor and press F4 to open it)
- Field 1: script name, runs a bot wave spawn script. Note: use in-game's AI editor to generate bot spawn scripts
- Field 2: radius in Hammer units around instruction to look for bot spawn spots
- Field 1: script name, runs an object spawn script. Note: use in-game's AI editor to generate item spawn scripts
- Field 1: text to display
- Field 1: label name to go to, if 2 or several names separated by commas are specified it'll go to one of them randomly
- Field 2: number to count down each time this instruction is called, only will do the jump when count down reaches 0. This can be used as a break inside a loop, for instance break a loop when it has been executed 3 times
- Field 1: executes output when alive enemies is lower than specified
- Field 1: text to display near marker, optional.
- Field 2: trigger radius, If 0 is set then trigger will be 64 units and an outlined circle will show. Any other number won't show this circle model. If no text is displayed then it'll become invisible for players
- Field 1: capture time in seconds
- Field 1: text to display near count down
- Field 2: count down time in seconds
- Field 1: amount of seconds, intervals separated by comma are also accepted (as 3,8 for instance). In that case a random time in chosen
- Field 1: data to input to entity as "target entity name,target input,input parameter,delay". Example: "back_door,Unlock,0,3" (without quotes) unlocks an entity door named "back_door" after 3 seconds. Note that input parameter can be anything if not needed but it's mandatory to write something
- Field 1: text1;text2;count, example: Whiskey restores your health;Drink whiskey to continue;2 displays those messages and requires player to execute requested action 2 times. If text1 and text2 parameters are set as 'null' then message window won't show but check still will detect player actions. Leaving this field empty will cause a similar effect except this check will close any other message window when tested true
- Field 2: check type (list)
- Order: freeze (bots do not move at all), magnet (bots stay near instruction's center), magnet only ranged (same as previous but only affects ranged bots)
- Field 1: item list separated by commas as for instance weapon_coltnavy,boots,skill_right
- Field 2: "just add" adds requested items, "strip previous" removes any item player may have and adds requested items, "strip and avoid retry" same as strip previous but prevents player to receive more items from this instruction
- Field 1: end state "failed" or "succeed"
Commented example
A practical example should be the best way to familiarize yourself with courses. Next picture shows a course that spawns player and a weapon, then instructs player to wait until a timer ends. Enemies spawn after timer finishes countdown, a few seconds later player is instructed to go to a place to reunite with his lost father. So much in so little!
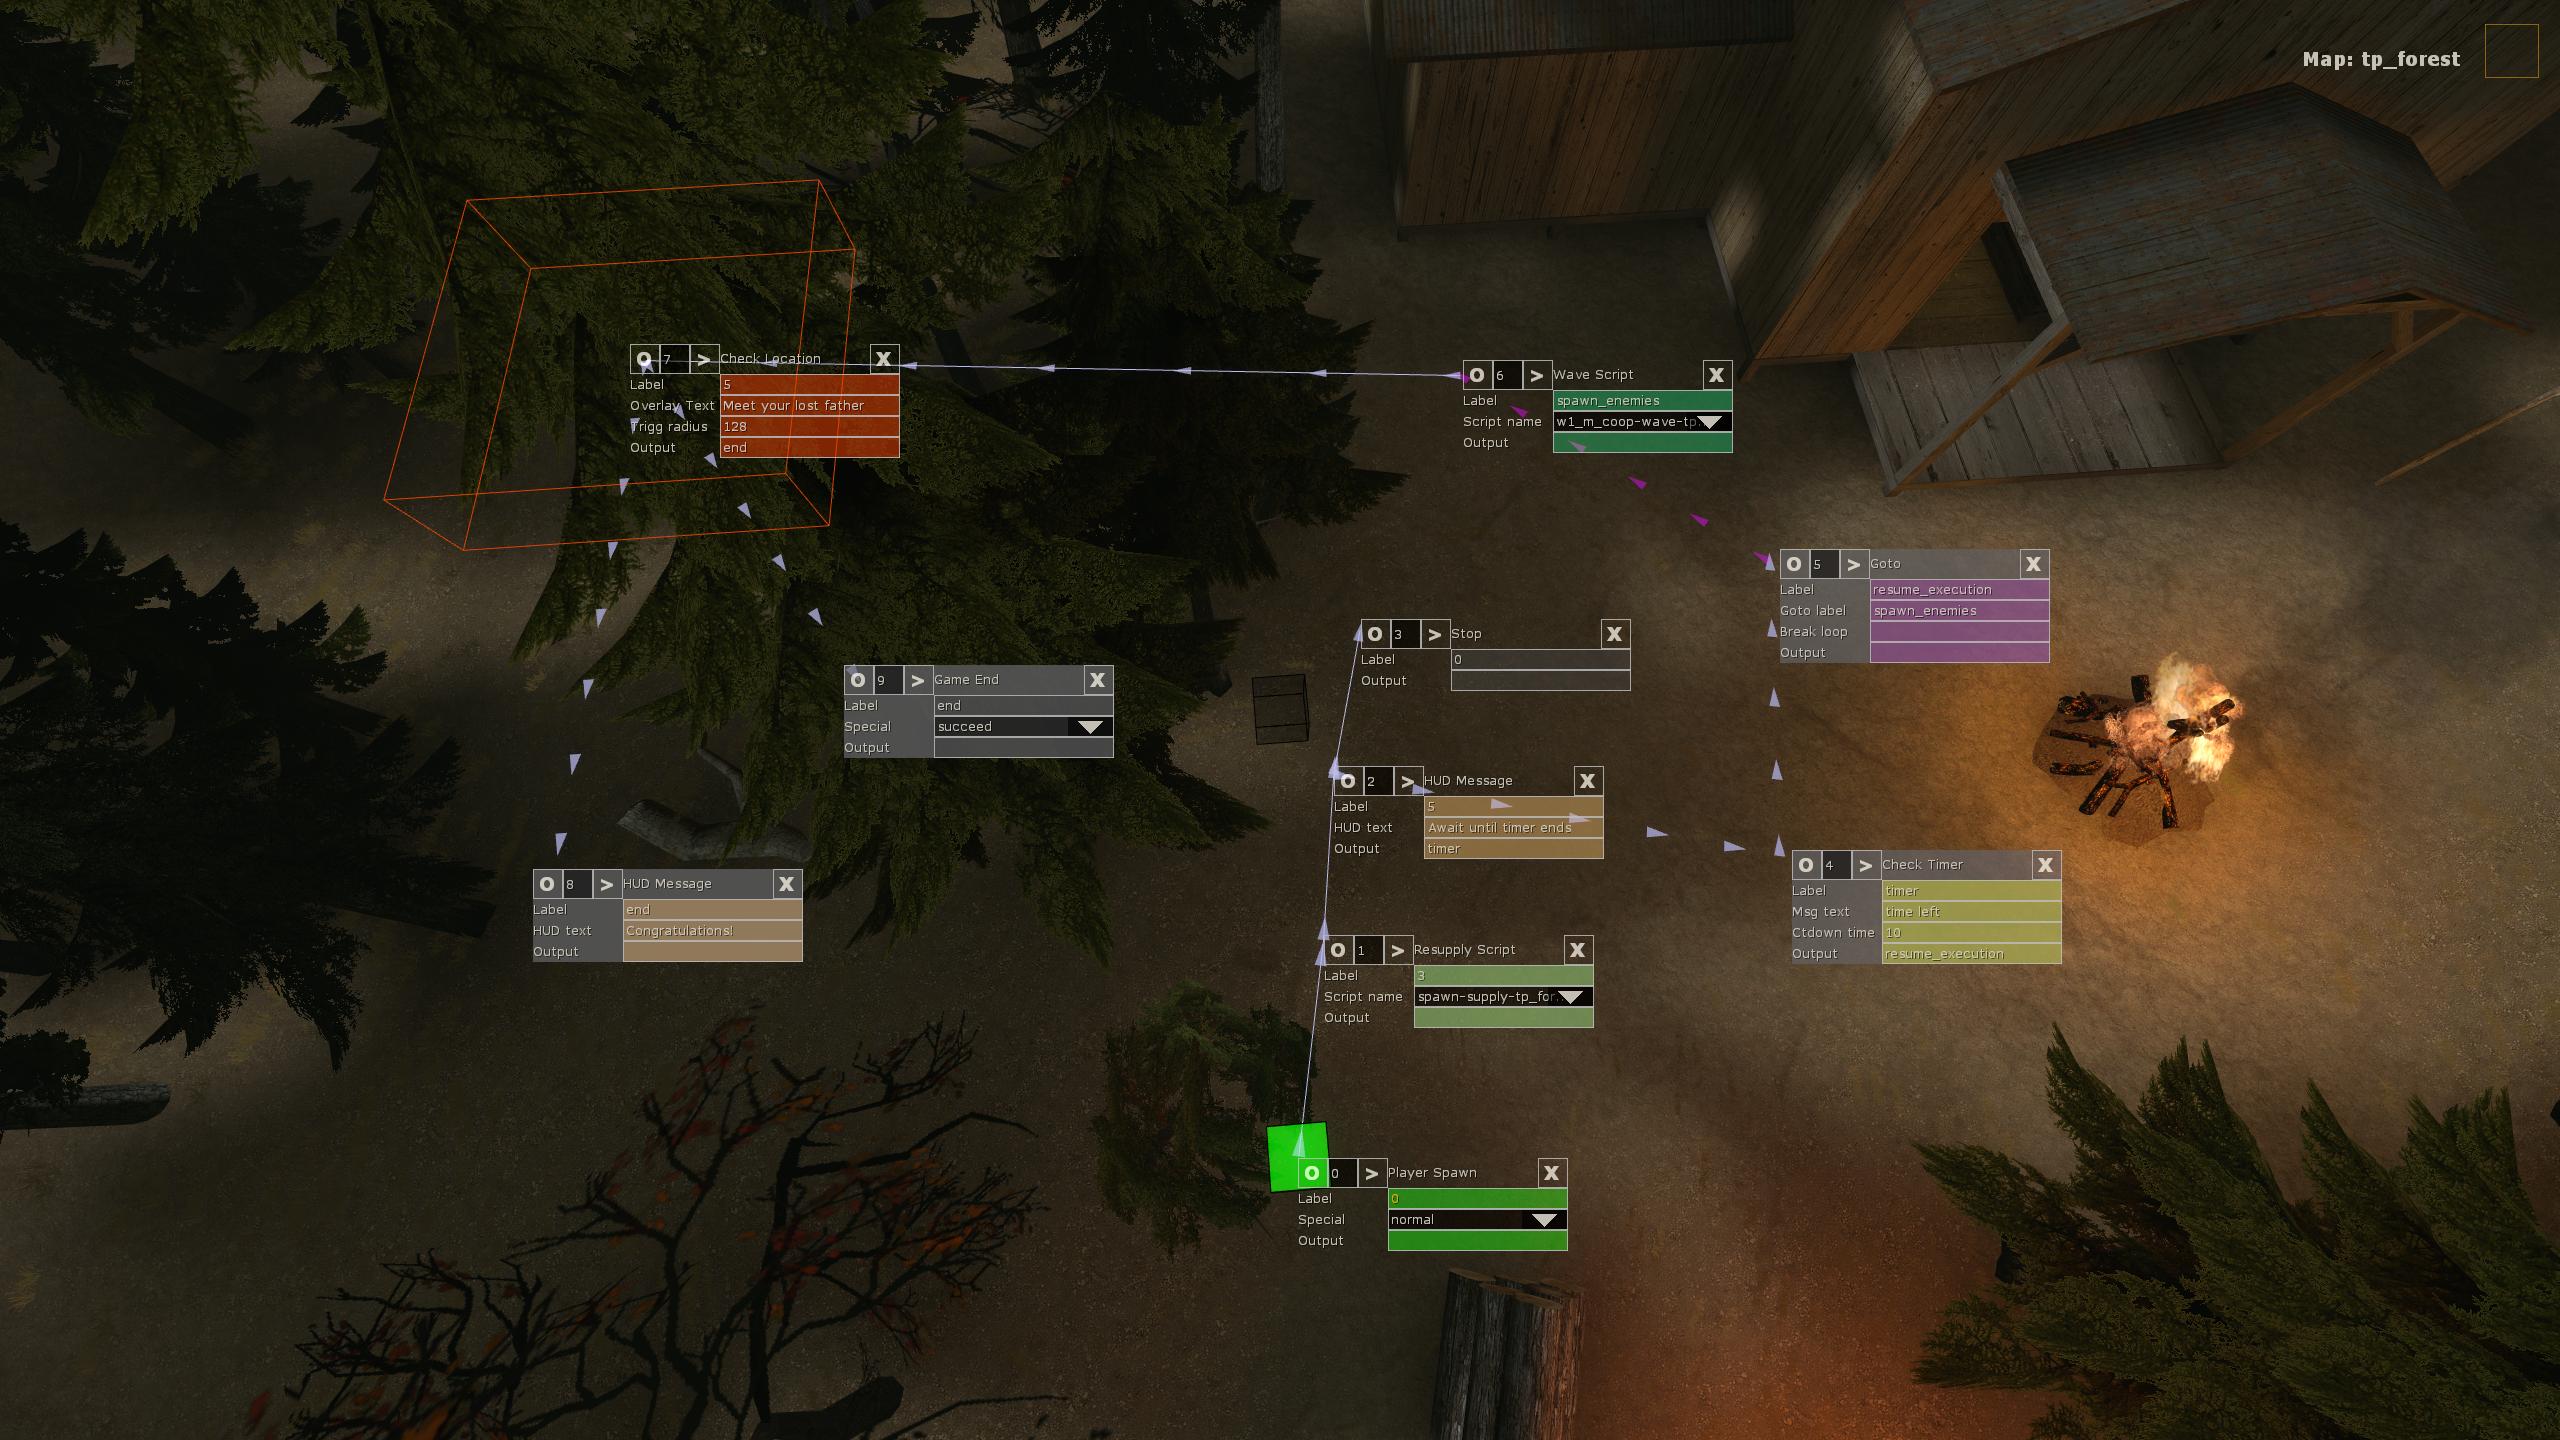
Here's a more detailed explanation. If you look at the instruction order (number between [O] and [>] symbols):
- player spawns
- resupplies spawn 3 seconds later (note label as a number indicates delay in execution)
- a HUD message informs player to wait (in this case delay from previous instruction is 5 seconds). Note that it also executes instruction nr. 4 (timer countdown) by output
- execution is halted by a stop instruction, this is important because we don't want instruction nr. 5 and up to be executed until the "check timer" (yellow) finishes countdown. Without this stop check timer wouldn't work as supposed in the example.
- timer countdown is 10 seconds, when 0 is reached output to next instruction is sent
- this goto instruction serves no other purpose than restarting execution after next instruction because course got halted at 3
- Spawns enemies
- Check location, sends output to end course upon player's arrival, note that same output name calls two different instructions
- congratulatory message
- effectively ends the course as "success"
Conclusion
May the whiskey be with you.
- Fistful of Frags Console Commands★ 5 (313)21k views542 ♥4 minUpdated Feb 6, 2016
- How to set up a "Listen Server"!?★ 5 (216)17k views285 ♥5 minUpdated Mar 13, 2016
- The Weapons of FOF★ 5 (247)13k views243 ♥23 minUpdated Dec 3, 2024
- A dumb FoF player-types guide (No pictures, sorry!)★ 5 (315)11k views280 ♥15 minUpdated Jan 6, 2018
- Создание сервера для игры с друзьями★ 4 (150)9.2k views254 ♥1 minRussianUpdated Jun 19, 2018
- "Курс Молодого Ковбоя" от русского сообщества по FoF★ 5 (210)9k views208 ♥30 minRussianUpdated Nov 14, 2018





- Upgrading to PremiumTeam Fortress 2★ 5 (20k)1441k views11k ♥6 minUpdated May 11, 2022
- No More Room in Hell Official ManualNo More Room in Hell★ 5 (2.8k)569k views2.1k ♥29 minUpdated Apr 22, 2019
- NMRiH Community Hosting GuidesNo More Room in Hell★ 5 (526)351k views653 ♥1 minUpdated Aug 10, 2022
- ULTIMATE GUIDE FOR GAME DEV TYCOONGame Dev Tycoon★ 5 (5.8k)326k views10k ♥4 minUpdated 23 Jan, 2014
- How to 'Git Gud' Soon™MORDHAU★ 5 (2k)318k views3k ♥68 minUpdated Nov 16, 2024
- Лучшие кооперативные игры SteamPAYDAY 2★ 5 (1.5k)315k views2.1k ♥56 minRussianUpdated Apr 27, 2025






This guide was created by its original author on the Steam Community. Are you the author and want it removed? Request removal.