Kbar's comprehensible guide to mech making
Introduction
(If not comprehensive) guide to the ins and outs of making mechs for ravenfield.
During this guide, only the concepts that you might not have stumbled upon while making other mods will be explained, others I'd consider as a prerequisite. Should you have come across this guide with no foreknowledge whatsoever, you may still try and even succeed, yet I reccomend starting with something a little more stable for starters.
To go along with this guide, there is a unity package provided at the end, containing the Mech built during the making of this guide. This is supposed to serve as reference material for your own mech making endeavours, especially if the "vanilla" walker is not available, or screws unity when importing.
1. Blender:
1.1 Modeling
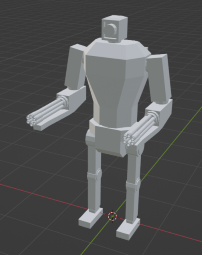 Arms, etc.
 However this should not pose too much of a challenge to those that have already spent a fair amount of time modeling with Blender. When making the model,
it is preferable to make the joints you want to animate later with a slight bend to them, rather than maximally extended and straight.
This makes setting up the inverse kinematics later easier.
The exact amount of bending is Up to you.
Generally I'd reccomend making the Legs and whatever else your mech consists of into seperate objects in blender for ease of continuing
Your finished model may look something like this
1.2 Skeleton
1.2.1 Inverse kinematics
These allow the Animator (you) to only pose the last bone in a chain of bones with Blender taking care of the rotations of all parent bones of the chain.
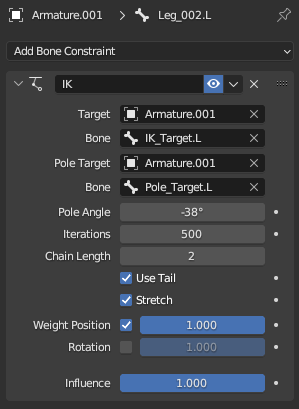
The IK modifier should be located on the bone above the foot bone and target the foot bone itself. The chain length should be set so that the dotted indicator line connects to the upper end of your last leg bone.
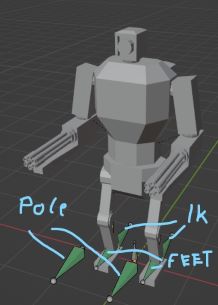
An IK pole target is also necessary being a sibling bone of the root (1.2.2 hierarchy). This bone helps Blender decide, which way your IK chain should face. Once the Pole Target is in place, you can set the pole angle
on the ik modifiert until you get good bending when moving the IK target up and down.
Overall, your bones should look something like this
1.2.2. Hierarchy
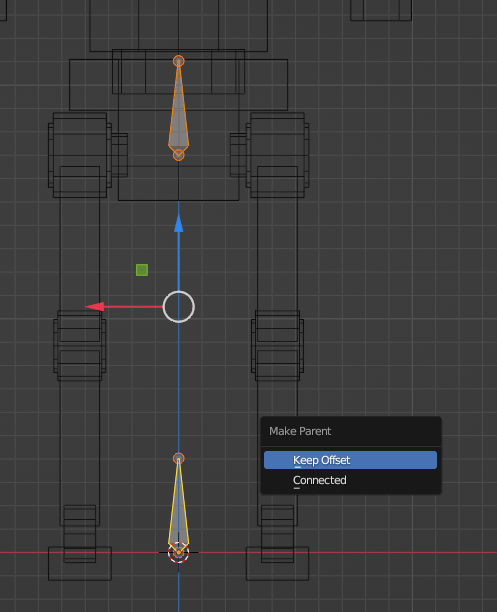 In Order for animations to work correctly in unity, the hierarchy of your Armature/Skeleton needs to start with a root bone. This bone should be located at 0 0 0 and have no scaling or rotation on it.
 Above the root you should have a hip bone, from where the rest of the body starts. These two bones ar not directly connected but parented (ctrl+p) with "keep offset". You can create the hip bone by duplicating the root.
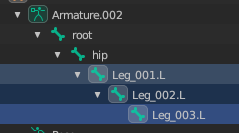
Starting from the hip bone, you should have your Legs and other appendages either as a connected child or as duplicates set as child with offset.
The bones relevant to the Inverse kinematics (Targets, Pole targets) should be siblings of the root, inheriting its Position and Rotation with a corresponding modifier. (see 1.3.1)
Keeping these general rules in mind, we can start making the actual skeleton. Make sure, to align your model and skeleton so that it is facing in the negative y direction.
Assuming you already have the root and hip bones in place, you can start extruding the bones of one Leg, moving their ends to fit the joints of your model.
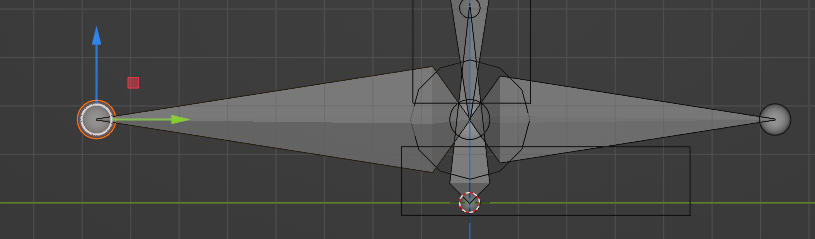 This makes wheightpainting a lot easier when we get to that. For the foot, you use a normal bone and extrude an additional bone from its base.
 This bone will be the IK Target of that leg and has to be removed from the bone hierarchy with alt+p -> clear parent. This bone should face the opposite direction of your normal foot bone.
 Duplicate the bone again and flip it by 180 degrees and move to about the height of the knees, to
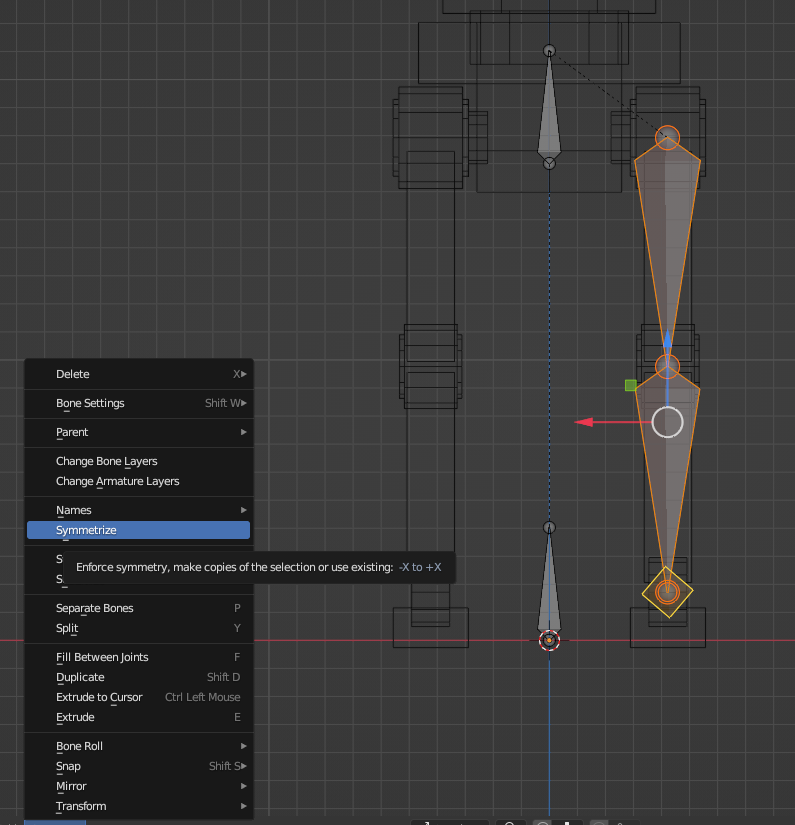
create the Pole Target for the IK Setup. You should now name all your bones as you want, those you wish to mirror have to be named with ".R" or ".L" at the end of their names depending on the side they are on. When this is done, you can symmetrize the skeleton by selecting "armature-> symmetrize" while selecting all bones you want to mirror.
1.3 Weightpainting
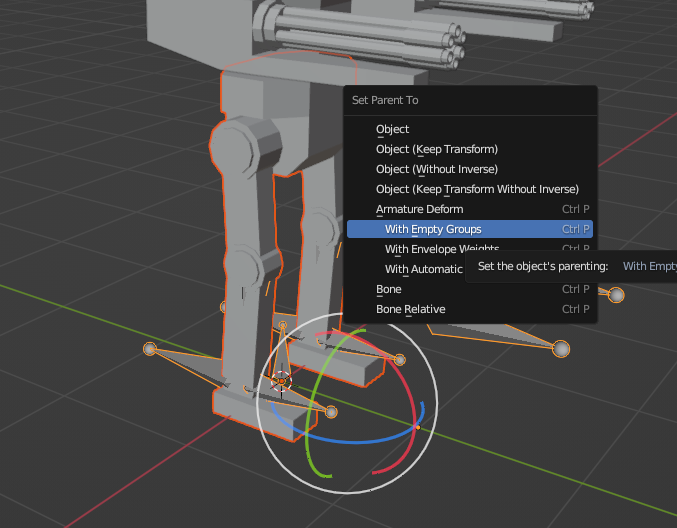 With the model and Skeleton now complete, we can add first select our model, then our armature and press ctrl+p to set the armature as the models parent with empty vertex groups
 (automatic weights can work aswell, but I don't reccomend it)
For those unaware, the weights determine how much a given Vertex is influenced by the movement of one or multiple Bones. For this Task Blender Provides the weights painting Mode, where you can "Paint" weights for Bones onto vertices.
This I'd reccomend only for very simple Models or bending parts, where weight gradients are necessary. For the bulk of your model (specifically Legs) i'd suggest using the objects "Vertex group" Tab
to assign the weights to a large number of vertices at once. You select your desired vertices in the Viewport, select the Vertex group corresponding to the correct bone Set the weight to one and Press assign weight.
Assuming everything was done correctly, moving the Bones should now move the mesh aswell. Weird behaviour in some vertices May be caused by either Not being assigned to a bone, or one or more incorrect ones.
This can be fixed by the methods discussed above.
Other Mesh Components, that are only influenced by one bone, i.e. the upper body by the hip bone, can be set as child of this bone by selecting the corresponding object, adding the armature to the selection,
going to pose mode and selecting only the specific bone you want as a parent.
1.3.1 Additional Armature Setup
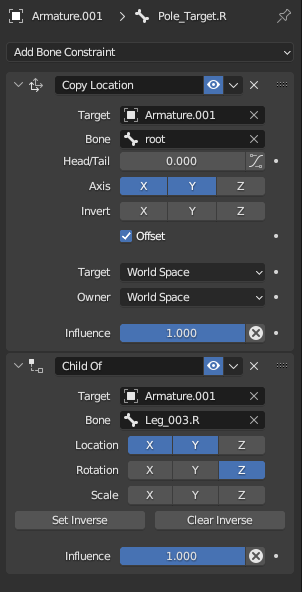
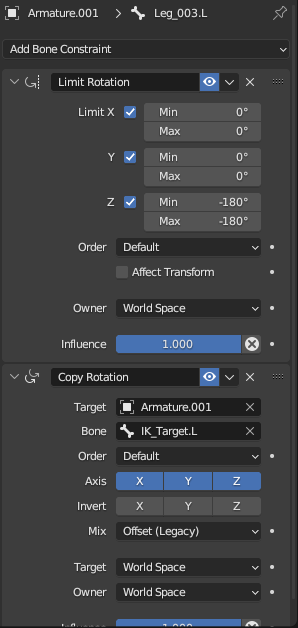
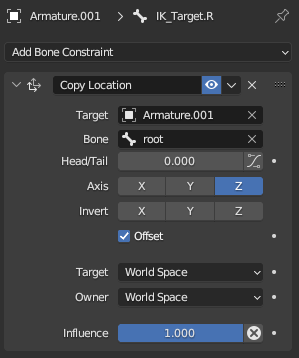
The IK Targets should inherit the roots z position with offset, the foot bone should inherit the rotation of the ik target with mix set to offset(legacy). Since this flips the bone by 180 degrees, you should also add
a limit rotation modifier active on all axes, constraining it to 0 0 for x and y and -180 -180 on the z axis. Lastly, the Pole Targets should have a "child-off" modifier inheriting x y location and z rotation
of the corresponding foot bone
1.4 Animating
or as intricate and beautiful as you wish. There's only two things absolutely necessary for a working animation:
- Any Movement of the Mech must be based on the root bone, be it linear movement, or just turning on the spot.
- All Animations to be used for normal bot used mechs need to be loopable, with all bone positions relative to the root bone, being identical at the beginning and end of the animation.
Movement animations to only be used by the player can also be non looping (i.e. starting animation, to transition to the walking loop smoother).
2. Unity
2.1 Importing
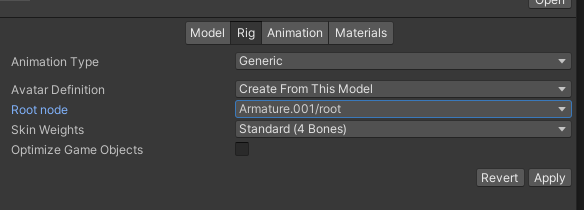 Before work on the actual vehicle begins, you have to import the model with some specific settings. Firstly, on the rig tab of the import settings set "avatar definition" to "create from this model" and "root node" to your root bone.
In the Animations tab you can set your animations as you would for any other mod
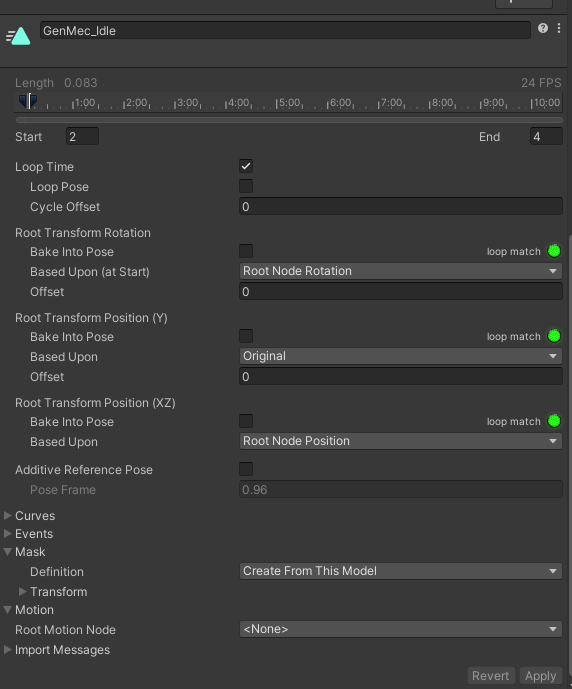 (if not sure, check out weapon modding tutorials, should be covered there).] If the animation is supposed to be looping, check the "loop time" box. What is important, is that the source take needs to be the armature action take, else your animation will not loop correctly, instead setting you back to the start position every time the animation is done.
Set the Mask to "Create from this model". Lastly, if you wish to use a soundbank (covered later) for step sounds and other movement related soundeffects, add events under the events tab with either "PlaySoundBank" or "PlayRandom".
In case of the former, the int value dictates the sound effect of the soundbank that is played.
2.2 Animation controller
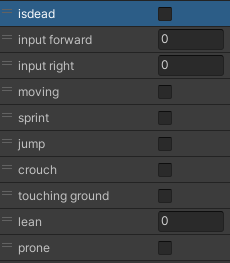 The basic animation controller for a mech only requires the float parameters "input right" and "input forward", although other input related parameters can also be used.
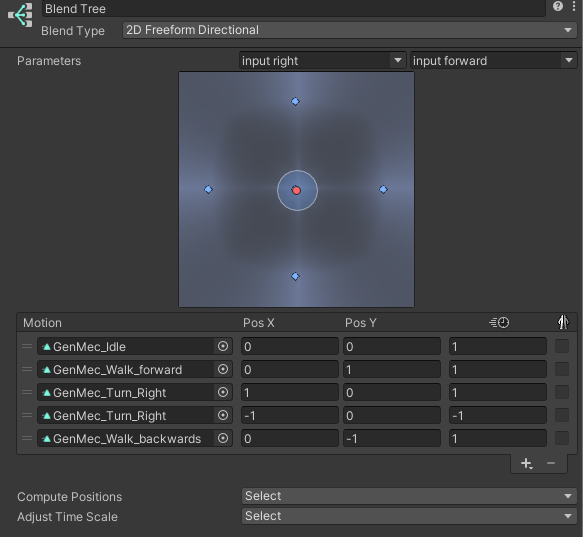
 For animation states, you only need to create a new blend tree.
Change the Blend Type to "2d Freeform Directional" and select "input right" and "input forward" for parameters, in that order. You can then input your animations and tie them to ratios of the two input directions.
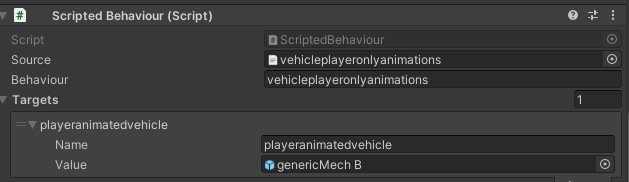
While the animator can also be made without a blend tree for custom/better animation transitions, bots only navigate correctly when you use a blend tree. Included in the example package is a script adding a player only
 parameter functionality, should you wish to seperate the two. You can just tie the transition to your player animations to the "player" Boolean parameter.
For this you need to add a "Scripted Behaviour" component to your vehicle, with a setup as such.
2.3 Vehicle Setup
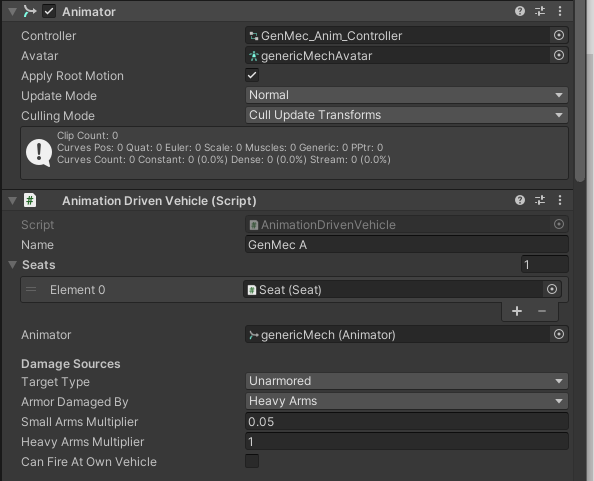 When dragging the fbx file into the unity scene some cleanup may be required on the upper body, to fix odd rotations and positions. This can be done directly on the mesh object and should not cause issues.
 Your prefab should already have an animator component on it, add the animation controller you created previously in the "Controller" slot. Also on the top prefab add an "animation driven vehicle" and "character controller" components.
As far as setup goes, the "animation driven vehicle" component doesn't differ too much from other vehicle scripts, two things need to be in place however. 1. In the Animator Tab near the top, input the the vehicle itself
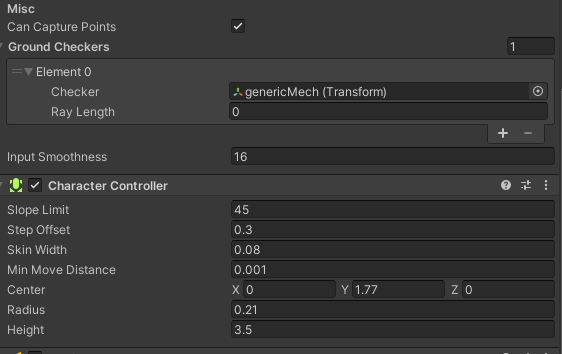 (the animator you have edited just previously) and 2. add a ground checker near the bottom of the script, which is again the vehicle itself. Other than that, everything can be set like with any other vehicle script.
 On the Charcter controller, edit the height and radius values to get the capsule collider it adds to fit between the legs, but the height of the whole mech. The other values of the component can be left unchanged for the most part,
in part because i can't quite tell what impact most of them have on the vehicles handling.
When you now just add a seat with a camera you can already test out your mech for the first time. I'd reccomend adding the colliders aswell, upper body colliders directly on the mesh components, and leg colliders on the bones.
For the latter I'd use box colliders adjusted by hand to fit the leg mesh first on one side and copied component by component to the bones on the other side.
When making mechs, there's two ways to go about how to handle weapons and vehicle turning, first being the "normal" method showcased on the default walker and the GenMec A, where there's specific animations for turning left and right,
tied to the A/D inputs. Weapons are completely seperate from the turning, though the camera can be turned with the weapons for orientation. The Second Version, originally used on the Seraphim Mech, then by Lordaloa and myself uses
the weapons input to directly turn the whole vehicle, which can be advantageous for less cumbersome mechs. In the following sections, the setup for each variant will be outlined and explained.
2.3.1 Setup A
Setup A is the simpler of the two setups, in that the number of interdependent components is kept to a minimum. Movement and Direction is handled soley by animations on the Armature, while the Upper body with all
its weapons can be treated essentially as a seperate object. It follows, that for the weapons setup nothing is necessarily different from your usual vehicle/weapon setup. However. since the form of mechs and their wide variety
of weapons, often mounted on different arms may still cause issues or confusion, I will describe some ways how I'd go about making certain weapon setups, although only one is provided as a reference.
2.3.1.1 Turret placed on upper body
Probably the simplest weapon to set up is just to make a turret as a child of the upper body. This Turret can be setup like normal.
2.3.1.2 Turret as part of the upper body
Another relatively easy setup is to use your upper body itself as the Bearing/Pitch of your weapon. In this case you can have your arms or wherever your barrels and muzzles are mounted static. You may have to create the appropriate setup
for the weapon movement in the hierarchy though, but as long as it is a child of the hip bone, everything is fine
2.3.1.3 Upper Body Bearing and seperate Pitch
You may decide to have the Turrets bearing be based on the upper body, with the pitch seperate. Itself not very complicated, unless you want to aplly this to two seperate arms with barrels on them.
Two ways to do this are to either make an empty pitch object, that the two arm pivot points are children off (assuming they are all on a straight line along the x axis) Or use an empty object with a far out target as pitch,
using lookatcamera scripts to facilitate the movement of the arms itself, this method also works on non-symmetrica arm arrangements. It should be noted however, that this causes the shots to converge in the distance of your
target object. The Ins and outs of the lookatcamera script will be elaborated on later
2.3.1.4 Bearing and Pitch in two seperate arms
There is two ways to make only the weapon arms move for weapon movement.
first method: Using the general setup of lookat targets and lookat cameras described in 2.3.1.3 we can also make bearing and pitch movement simultaneously, by just making the parent of the Target as the Bearing aswell.
This again causes convergence of the shots in the distance, although this may be seen as beneficial aswell. Another downside is the inablity to set different values for weapons, i.e. to prevent clipping
Second Method: We can also make this Weapon Style, by just making two seperate weapons, by just making two seperate weapon setups, one on each arm. As long, as they are both controlled by one seat, they will follow the same mouse inputs.
This method uses the Bearing and Pitch Values of each weapon seperately, however you as the player now necessarily have two weapons. Obviously good when you have different weapons on your arms, however if you have "twin" weapons shooting
simultaneously (just add weapon2 muzzle to weapon 1), this can be annoying as, you are either stuck with two weapons on the seat doing exactly the same, one of the weapons being the same but with only one barrel or having to include
a seperate firing mode using other ammo/firing rate/whatever. If this was planned from the beginning, good on you
When the weapons are set up, you might also want to figure out what to do about cameras in each of these setups. For 2.3.1.1 and 2.3.1.2 the camera can just be placed wherever you want as a child of the pitch you have chosen.
For 2.3.1.3 and 2.3.1.4 it makes a difference, if you wish to have your camera as a child of the weapon or in a head-like position. For the Former the previous advice still applies, for the latter the setup is a bit more complicated.
If your camera already is child of the bearing upper body you can use an inherit delta rotation script on the pitch of your weapons, to look where the gun looks. Same applies, if you have a seperate bearing or bearings,
inheritingthe bearings delta rotation aswell on a parent object with the same origin. The Axis multipliers can be left as 1 by default, since only one delta rotation can ever come from bearing or pitch respectively.
You will however have to set the correct axis multiplier to -1 should either movements be inverted. Should movement be translated on the wrong axis, you will have to make additional parent objects with rotation as compensation.
Since this is highly dependent on your specific mech, you will have to figure that part out, when you get to it.
Alternatively, if you use a lookat target at some point of your weapon setup, you can creat a parent to your camera with yet another lookatcamera setup, pointing at the target provided.
The Methods for head like cameras can also be used for actual head meshes (ideally with the camera in the head)
2.3.2 Setup B
though I prefer always prefer the look at camera approach (see 2.3). It is imperative, that the muzzle is rotated such that its local axis align with the axis indicator (z forward, x left, y up (assuming you are in front of the mech))
Additional Weapons besides the "main"/first one can be made as additional mounted turrets with the same bearing and either the same or a different pitch.
Alternatively, you can also make them as static mounted weapons, as long as their muzzles are children of look at camera objects. The exact position in terms of hierarchy does not make a difference,
as long as all muzzles are set up correctly
Since turning is handled by the camera, you can use the A/D inputs for Walking left or right. Should the muzzle setup be incorrect, bots will use this to walk weird circles, looking every which way, without considering their actual goal.
2.3.3 Look at cameras
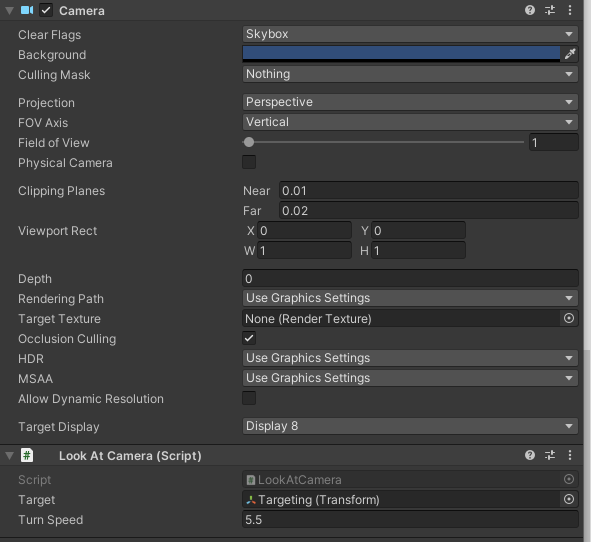 In unity, there's a script called "Look at camera" this allows you to have parts that are always reliably looking at some otherwise seperate object. For this, your pivot object needs both a camera object and a the script on it.
 unlike usual Ravenfield cameras, here the camera script needs to be enabled. The field of view can be set to 1 and the Target Display needs to be set to anything other than 1. When the camera turns to face the specified target of
the Look at camera script, so does every child object. Using the Turn Speed setting, you can adjust how long it takes for the camera to follow the target, which can be used for neat effects
2.3.4 General Remarks
It should be of note though, that the death of mechs may sometimes result in continuation of currently playing animation, leading to mechs walking in the air and similar situations. The easiest way to fix this is to disable all animated
mesh components on death and activating static ones in their stead. Adding a rigid body component and colliders to those makes sure, that they will not move with the rest of the vehicle after it is disabled. Last thing, for this
is to make sure the soldier in the bot leaves outside the collider, else you get rocket effects whether you like it or not.
3. Mistakes to avoid
- Do not make idle animations of zero frame length. this causes game crashes, when bots stop moving with the mech
- When first testing your mech, it might happen, that it A. does its walk animation once and then stays in place-> Check if you have looping enabled in the animation import settings. Or B. continually does the walkcycle always bugging back to the starting position -> make sure that apply root motion is enabled on the mechs Animator Component
- Use Blend tree in unity for atleast bot animations. using normal animation transitions in the animator can cause bots to wander in weird directions or
- Make sure, that the scaling ratio in unity is 1x1x1 (actual values can be set freely). May cause unwanted effects otherwise
Conclusion
Thanks for reading through all of this guide of mine, if it helped you getting your first mech out feel free to give positive feedback. On the contrary, if it did not help you, please tell me, what you found to be missing. Should you happen to run into very specifc issues i haven't detailed in here, please ask me, so a solution can be found and the guide amended.
Also, here's the Link to the example unitiypackage:
https://drive.google.com/file/d/17RSZ0q6d1_BN4fLe30ZOdKolBvyhYLR4/view?usp=sharing
- [Official] Creating custom maps for Ravenfield★ 5 (855)59k views1.4k ♥28 minUpdated May 17, 2022
- Ravenfield PvE Missions★ 5 (697)27k views1.4k ♥19 minUpdated Nov 18, 2022
- FPS BOOST [ALL MACHINES] (Remastered)★ 4 (184)14k views377 ♥13 minUpdated May 26, 2025
- Need Something To Do?★ 5 (275)13k views534 ♥5 minUpdated Jan 9, 2018
- RAVENFIELD — Руководство | Manual [RU].★ 5 (207)13k views289 ♥17 minRussianUpdated Oct 19, 2021
- Is Eagle the aggressor? (Fan theory)★ 5 (231)12k views193 ♥5 minUpdated Jan 31


- Upgrading to PremiumTeam Fortress 2★ 5 (20k)1441k views11k ♥6 minUpdated May 11, 2022
- No More Room in Hell Official ManualNo More Room in Hell★ 5 (2.8k)569k views2.1k ♥29 minUpdated Apr 22, 2019
- NMRiH Community Hosting GuidesNo More Room in Hell★ 5 (526)351k views653 ♥1 minUpdated Aug 10, 2022
- How to 'Git Gud' Soon™MORDHAU★ 5 (2k)318k views3k ♥68 minUpdated Nov 16, 2024
- Лучшие кооперативные игры SteamPAYDAY 2★ 5 (1.5k)315k views2.1k ♥56 minRussianUpdated Apr 27, 2025
- Desert Eagle Heat Treated | Blue GemCounter-Strike 2★ 5 (1.6k)292k views1.5k ♥2 minUpdated Jan 16





This guide was created by its original author on the Steam Community. Are you the author and want it removed? Request removal.