La Resistance [includes main Shadows w/o spoilers]
Definitive Defense Document
:P
- Fire > Agitated Hablerie
- Ice > Flattering Hablerie > F
- Elec > Forgotten Hablerie > F
- F/I/E/D > [white/red] Lying Hablerie; E > [zebra] LH
- E > Slipping Hablerie
All Cops Are Glass Jars
- D/F > Bribed Fuzz
- F > Chaos Fuzz
- E > Monomaniac Fuzz > F/I
- Persistent Fuzz > basically all elements
Birdemic
- E > Amenti Raven > W
- E > Black Raven
- F/L > Dark Eagle
- E > Jupiter Eagle
- E > Sonic Raven > W
- E/W/D > Spectral Raven
- I > Venus Eagle > Wind
- E > Vicious Raven > W
Build-A-Battler
- F > Dry Dexy
- W > Successful Juneacy > I/F
- Protective Lexy > F/I/E/W
- F > Raindrop Musha > I
- Rain End Musha > F/I/E/W/D
- Rain Leg Musha
Camptown Races
- F > Avenger Knight
- Champion Knight > Phys
- Hell Knight = all
- E > Intrepid Knight > D
- E > Jotun of Power > F
Decepticons
- I/W > Calm Machine > Ph
- Dominating Machine > D
- Steel Machine > Ph/F/I/E/W
Deoxyribonucleic Acid
- Fail Gene > Ph
- Ph > Happy Gene > I
- E > Miss Gene > F
Eden
- F > Avarice Bambino
- Blooming Bambino > I
- I > Blossom Nyogo
- F > Inviting Nyogo > W
- F/W > Praying Nyogo
- I > Secret Bambino
- I > Wheeling Bambino
Evacuate the Dancefloor
- F > Ardent Dancer
- D > Natural Dancer
- L > Royal Dancer > F/W
- Soul Dancer
Gi-Gas Giant
- I > Beastly Gigas
- L/D > Daring Gigas > Ph
- Furious Gigas > F/W
- Immortal Gigas > Ph
- D > Mythical Gigas
Give 'Em a Hand
- In general, use Almighty damage.
- I > Almighty Hand > Ph
- Dancing Hand > F/I/E/W
- E > Gauntlet Hand
- Glorious Hand > F/I
- Happiness Hand > F/I/E/W/Poi/Sil
- Ph > Killing Hand
- Luxury Hand > F/Sil
- I > Magic Hand > Ph/W
- Opulent Hand = Ph (can Counter)/En
- Supreme Hand > Pan/Sil
- Treasure Hand > Pan/Sil
- Wealth Hand > Sil
Gone Fishin'
- W > Calm Pesce > I
- Pursuing Pesce > I
- E > Revelation Pesce
- I > Truth Pesce > F/W
Herma-Mora
- Ph > Blue Sigil
- Green Sigil = Ph
- Ph > Maniacal Book
- L > Magical Magus > W/F
- E > Phantom Mage > Ph
- E > Phantom King > Ph
- L > Phantom Lord
- W/L > Phantom Master > D
- L > Prime Magus
- Purple Sigil > I/W
- I = Red Sigil
- I > Spurious Book
- Wondrous Magus
Idle Worship
- W/D > Apostate Tower
- E > Creation Relic > Ph/W
- D > Constancy Relic
- W > Corrupt Tower > E
- W > Dogmatic Tower > Ph
- I > Fanatic Tower
- F > Growth Relic
- Heat Balance > F/I/L
- E > Leading Idol
- F > Liberating Idol
- Sky Balance > Ph/E/W/L
- D > Tranquil Idol
- D > Vehement Idol > I
- L/D > World Balance
Ikea
- W > Angry Table
- I > Crying Table > Ph/F/E/W
- W > Laughing Table > E
- W > Reverent Table
- F > Sleeping Table > Ph
K/D Ratio
- E > Minotaur 1
- I > Mino 2 > Ph
- F > Mino 3 > E/L
- Mino 4
- F > Rainy Sister 1 > Ph
- E > RS 2 > F/I
- I > RS 3 > Ph
- I > RS 4 > Ph/F/E/W
- E > Rainy Brother 1 > F/I/W
- I > RB 2
- I > RB 4 > all else
Kingdom Strikes Back
- F > Contrarian King > W
- F > Egotistical King > E/L
- L > Great King
- Ph > Harmony Giant.
- E > Justice Sword
- F > King Castle > Ph
- E/L > Order Giant > D/F
- E/L > Phantom King
- L/D > Positive King
- W > Power Castle > E
- I > Rainy Castle > W
- W > Stasis Giant
Mothers I'd Like to Fight
- F > Elegant Mother
- Pistil Mother > F/I/E/W
- Regal Mother
Optometry
- I > Brilliant Cyclops
- F/D > Chaos Cyclops
- L > Death Seeker
- I > Fate Seeker > Ph
- Ph > Fierce Cyclops > W/I/E
- F > Mad Cyclops
- I > Mighty Cyclops > F
Pass the Basalt
- E > Anguish Basalt > W
- W > Autonomic Basalt
- L/D > Dependent Basalt
- F > Idle Basalt > Ph/I/E
- W > Insolent Basalt > F/I
- L/D > Large Basalt > Ph & has Counterstrike
- F/I/D > Selfish Basalt > All-Out Attack
- F > Source Basalt > W
PlAy WiTh Us...
- F > Killer Twins > E
- I > Rainbow Twins
- F > Trance Twins > E
Quit Bugging Me!
- Adamant Beetle > Ph/F/I/E/W
- I/D/L > Burning Beetle > Ph
- Fickle Papillon > F/I/E
- Finicky Papillon
- L > Grave Beetle
- D > Strength Beetle
- I > Whimsical Papillon
Sands of Time
- I > Flowing Sand > W
- W > Infinite Sand
- E > Perpetual Sand
Soft Kitty, Warm Kitty...
- I/D > Brave Wheel > W
- W > Enslaved Beast > E
- W > Mach Wheel > F
- I/L > Mighty Beast
- D > Nemean Beast
- Nizam Beast = standard
- E > Rain Wheel > Ph/I/W
Spin the Clay Class
- E > Cloudgirl Pot
- W > Cursed Women's Pot
- F > Rainy Pot
- L > Yearning Pot
Tanks for the Memories
- Arcane Turret = takes everything equally.
- I/W > Conceited Panzer > Ph
- Dismayed Panzer > E/W
- L/I > Hallowed Turret
- F > Killer Drive
- E > Rash Panzer
- Scarlet Turret > Phys
- E/W > Slaughter Drive
- E/L > Wicked Turret > D
- E > Wild Drive > Ph
Vegas, Baby!
- E > Bronze Dice > Phys
- L/D > Curse Dice
- Death Dice > Ph/I/W
- E > Iron Dice
- L/D > Mind Dice > Phys
- I > Platinum Dice
- Silver Dice > Phys
What is Love?
- W > Blind Cupid
- I > Devoted Cupid
- I > Monopolizing Cupid > W
Why Did It Have to Be...!
- I?/D? > Amorous Snake
- I > Carnal Snake
- F > Immoral Snake > W
- I > Lustful Snake
- F/D > Stoic Snake
E > Shallow Okina
W > Superstitious Okina
Bosses, Baby!
Main Shadows
E > "Frogger"W > "BDSM Slenderman" > Phys
I > "Phoenix" > F/Silence/Rage/D
"Mr. Universe" > E/Fe/Pan/Poi/R/Sil
The "Antenna Monster" has no specific weakness.
The "Cracked Friend" > I/D/Fear/Panic/R/Sil; it takes two turns to dunk on the party; recommend swapping Red out for Black if Orange is Healer build
[T]he Hero > L/D/Fe/Pan/Poi//Sil; it acts twice in one turn; recommend Null Fear & Null Exhaust.
"Top Gun" > F/D/Poi; recommend Red for Amrita & Green if has Counter/strike; recommend Makarakarn/Makara-corn for Ma-dyne set; Black Frost is particularly useful due to incidental heals; the Invigorate line compensates for Mute Ray.
"Halo" > L/D; after atmospheric changes, non-Alm magic is useless until an element is chosen; recommend Light-proof Personae for God's Judgement & Invigorate # for Spirit Drain; Blue is useful for versatility.
The "Lone Gunman" has no weaknesses; recommend Blue & Dark-proof Personae for Mudoon.
"Disco Death Star" > L/D; recommend Blue & Light-proof Personae for God's Judgement; it acts twice in one turn.
"Heterochromia" > Dizzy/Down/Ph (stop hitting at "Denial Shell")
"Phantom of the Elvis" (use the breakers that the dungeon liberally hands out)
"Breast Cancer Awareness" > D
"Skeletor" > E
Mini-bosses
F > Amorous Snake > Pan/SilF/Fear/Sil/Pan > Avenger Knight > L
Chaos Fuzz > L/D; Summons backup officers, the occasional I > Amorous Snake > W. Fickle Papillon > F/I/W, & F > Yearning Pot > Ph.
E > Charming Prince > W/D
Contrarian King > F/W/L/D/En/Fe/Pan/Po/R/Sil
Daring Gigas > L/D/En/Fe/R/Pan/Sil & has Counter.
Dominating Machine > D; recommend Green if has Counter/strike; Guard when it Stands By.
Escapist Soldier > Ph/D/Fe; recommend Dark-proof Personae for its Mudoon.
Envious Giant > everything but Ph, and it has High Counter, and Alm dmg doesn't do that much.
W > Extreme Vessel > L/D
Killing Hand > L/D/Down/En/Pan/Poi/Sil
E > Intolerant Officer > D/En/Exh/Pan/R/Sil; recommend Orange, Green, & Tea.
Lost Okina > Ph/I/D
I > Momentary Child > D; recommend bringing Black for regeneration & Dizzy resist.
Neo Minotaur
I > Nice Guy > F/W
Sleeping Table > D
The Reaper > Ex/En/Sil; recommend Green if Crit build [Black Spot, Rebellion, & Apt Pupil].
F > Tough Guy > I/W
World Balance > D
Bonus: Hidden Stat Gains, Guides I Use, Chat Controls, etc
Conversational Stat-Ups
- Introduction: "You callin' me a loser?" - Courage.
- Fall: "Are you guys okay?" - Understanding
- Returning to Junes: "I'm more worried about Chie." - Un
- Saved the Princess: "Let's call it a day" - Un
- Joining Music Club: "Let me help clean." - Un; Music!Sun 6->7: Stick up for her - Expression
- Strength 1->2: "Got it." -Un; 6->7: "You treated last time." - Ex
- Aiya: "I worry more for you" - Un
- Chie vs Yokiko: "Both" - Un, Neither - Cou
- Flashy Girls: "[any]/If you say so!" - Cou
- Pop Star Shrine: "Leave it to me." - Cou
- Nanako: "I'm here with you." - Un
- Post-Exams: "My pen was on fire." - Cou
- Tower 3->4: "It's not just you!" - Cou; 4->5: "I don't mind." - Un; 6->7: "What I like in girls is..." - Cou; 8->9: "Kindly reason with him."
- Festival: "Enter the pageant, dammit." - Ex
Shelving Stat-Ups
[only occurs when completed and actively shelved]- 3+ robots: +to all five personal stats (no bonus @ 6)
- Full shelf of scooters: "
Links:
Bike skills [www.rpgsite.net]Ultimate Persona by Arcana [gamefaqs.gamespot.com]
Controls:
Z = toggle auto-fast forward [as opposed to Tab for held fast-forward]X = shows chat history
Follow-Up Moves
- All can trigger an All-Out Attack if they Down the last standing enemy.
- Strike - Hits one enemy for critical damage.
- Galactic Punt - Dismisses one enemy from combat; unknown effects on loot.
- Fan Assault - Crits enemy into Dizziness.
- Calvary Attack [Most] - Crit one enemy.
- Calvary Attack [Black] - Crits two enemies.
Dates
- The last time you can advance the Justice S. Link appears to be 11/3
- The last day to go shopping/sell everything for NG+ is 3/20.
Skills
Dekaja can counter Heat Riser, but not Magic or Power Charge.A single-target elemental dmg skill is better than a multi-target skill of the same type and lower dmg class. The opposite is true for healing abilities, since enemies don't tend to focus fire. Either a target is by itself, or you can chain between similar enemies. Thankfully, a Null/Repel/Drain resistance mixed with a Weakness doesn't drain your turns as in Nocturne, but it's still a pain. This doesn't carry over to variants of Mudo & Hama, bc most enemies don't seem to be immune and it can theoretically clear a group to save the IT's collective sorry hides.
For the love of Izanagi, don't try to make a Jack-of-All-Stats as regards damage types. Only one ally pulls it off and the corresponding skill pool is notably shallow. Being a "Wild Card" means you can afford to swap between Crippling Overspecializations. I'm on NG+ rn, but look at what I did to poor Pale Rider before I learned better in comparison to Nebiros.
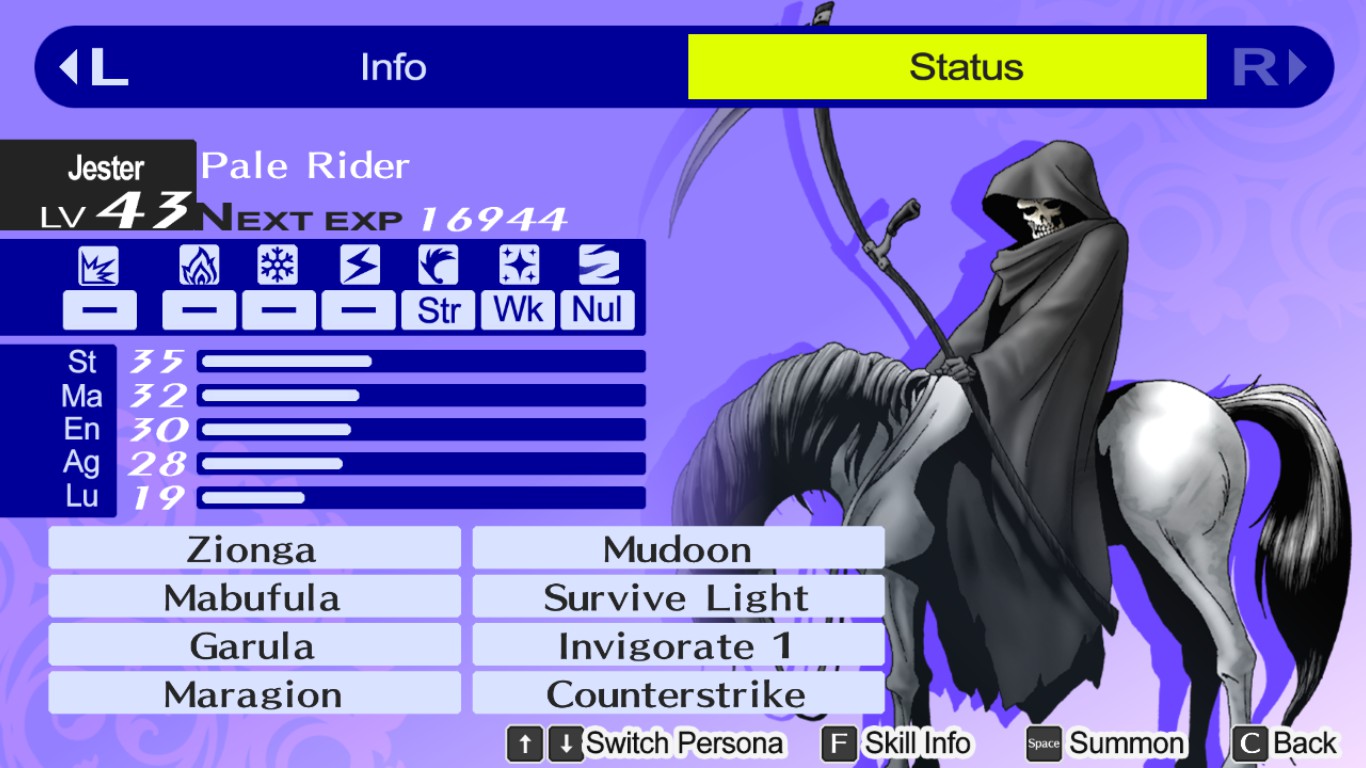
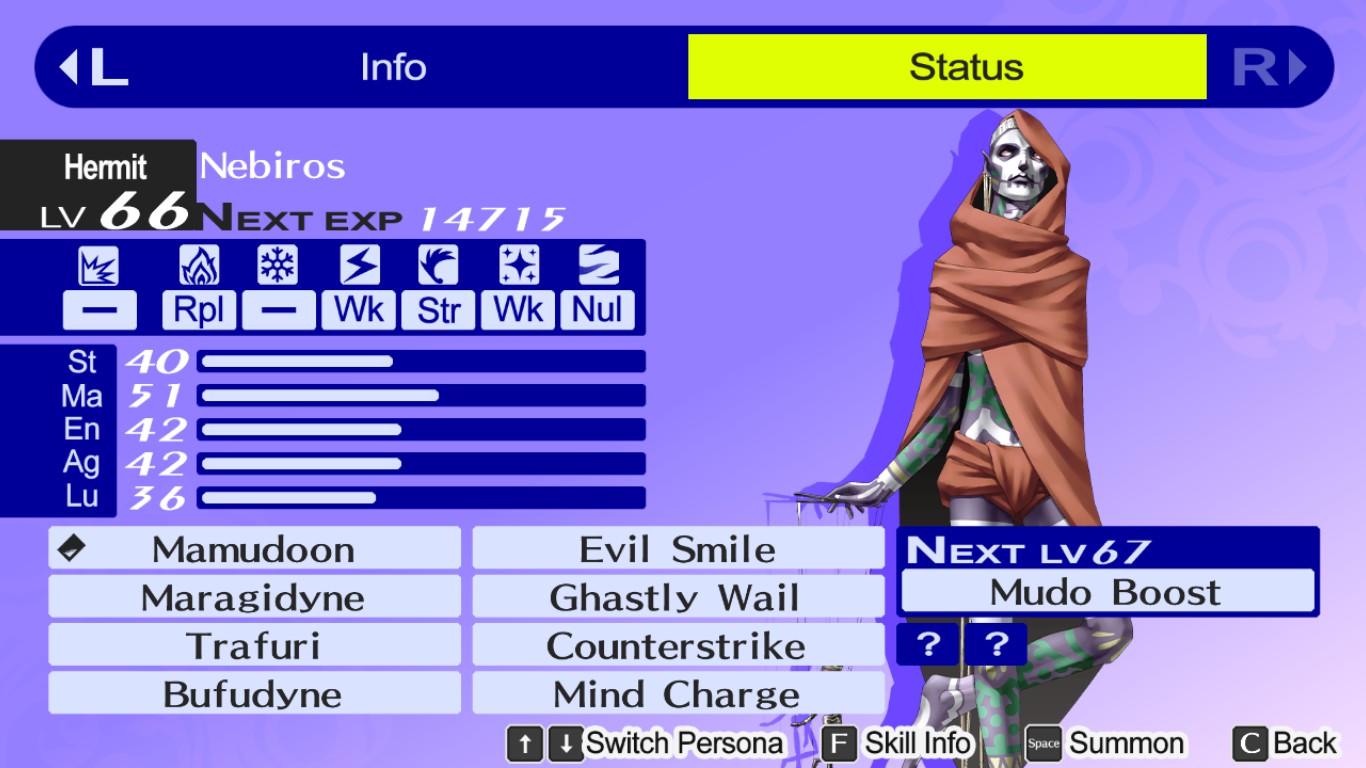 /cringe
I wasn't paying attn to Marge's message about "Don't overload the chars", so I tried to get several high dmg skills on one Persona. Not only is it ill-advised, but like, you can only pass on so many skills at once. Basically, pick a type of damage/kill and roll with it (ex: Ghastly Wail + Evil Smile + Fear/Ailment Boost) and then fill the other slots with passives.
Funny thing happened; an enemy Makarakarn'd itself, thereby reflecting one magic attack, and I hit it with an Electric attack that Lilith reflects as well. Apparently it doesn't ping back and forth but just treats the second Repel in the sequence like a Null.
Costume-Based Kill-cam Animations, PC-Exclusive
"Pushing your glasses back up your nose by their bridge, using one or two fingers, usually means that you're a Badass[ ]Bookworm Sometimes this is also combined with a covert way of Flipping[ ]The[ ]Bird." -- TV Tropes, pre indexing.- Smug glasses adjustment: Winter & Summer Yaso Outfits, Winter & Summer Clothes, Gag Winter & Summer Clothes, Cool Trunks, Cleaning Uniform, Bath Towel, Agent Suit, Butler Suit
- Delinquent hand in pocket with large staff on shoulder: Drag Costume, Cheer Squad Outfit
- Half twirl to show back to the camera before throwing out both arms: Yaso High Jersey, Festival Jinbei
- Hold weapon up, slide off-hand down it, then down-pump a fist in victory: Neo Featherman Suit
- Cape flair: Halloween Costume
- Summoning a coat to flop over one shoulder like Dojima: Hardboiled Look
Misc:
- Go into the difficulty settings and turn Exp up to "More" unless you like grinding.
- Avoiding the middle of the crosses prevents spinning.
- Talk to Dojima-san, Nanako-chan, & Sufoe-sensei & check your shoe locker after every test for cash, accessories, & random healing items respectively.
More Persona 4 Golden guides
- The Hardcore Risette Fan Experience™️★ 5 (489)32k views985 ♥48 minUpdated Aug 7, 2020
- Recommended level for every boss and their affinities. No spoilers★ 5 (730)32k views1.9k ♥7 minUpdated Jun 30, 2025
- Persona 4 Golden 100% Achievements Guide | 2020 (This is not a strict-Everyday-Guide)★ 5 (706)30k views1.7k ♥58 minUpdated Dec 25, 2020
- 100% Achievements Guide for Persona 4 Golden★ 5 (1.2k)29k views3.6k ♥87 minUpdated Feb 23, 2025
- 100% Day By Day Guide by Hurricanehaon★ 5 (1.3k)28k views4.2k ♥102 minUpdated Oct 4, 2023
- All Social Links Guide★ 5 (1.4k)26k views4.6k ♥95 minUpdated Nov 22, 2020






🔥 Popular guides
- Upgrading to PremiumTeam Fortress 2★ 5 (20k)1441k views11k ♥6 minUpdated May 11, 2022
- No More Room in Hell Official ManualNo More Room in Hell★ 5 (2.8k)569k views2.1k ♥29 minUpdated Apr 22, 2019
- NMRiH Community Hosting GuidesNo More Room in Hell★ 5 (526)351k views653 ♥1 minUpdated Aug 10, 2022
- Лучшие кооперативные игры SteamPAYDAY 2★ 5 (1.5k)315k views2.1k ♥56 minRussianUpdated Apr 27, 2025
- Desert Eagle Heat Treated | Blue GemCounter-Strike 2★ 5 (1.6k)292k views1.5k ♥2 minUpdated Jan 16
- Treasure Hunt Puzzle SolutionsTotal War: WARHAMMER II★ 5 (6.9k)281k views15k ♥3 minUpdated Aug 19, 2021






This guide was created by its original author on the Steam Community. Are you the author and want it removed? Request removal.