Make LotRO GORGEOUS Quick and EZ with Reshade
!! UPDATE !! Nov 2025
There has been some trouble with Reshade not working with a lot of games anymore post version 6.5.1.
The current version 6.6.2 is working ok for me SO FAR.
I am also using different plugins these days, so I am updating the guide to point to those instead. It's possible that the FXAA plugin I was using previously was clashing with some games.
The current version 6.6.2 is working ok for me SO FAR.
I am also using different plugins these days, so I am updating the guide to point to those instead. It's possible that the FXAA plugin I was using previously was clashing with some games.
What is Reshade? What is this guide?
It's an open-source developed app that applies shaders to programs to adjust or enhance the visual appearance of those programs. It works with most programs that use DirectX, OpenGL, and Vulkan to render their graphics.
All the further information is available on the website: https://reshade.me/
In this guide I intend to walk you through the bare minimum steps to apply some of reshade's features to your LotRO installation to make the game look better by sharpening the textures, brightening the colors, and enhancing the contrast of the in-game visuals.
It's important to note that Reshade allows you nearly limitless customization options if you are willing to dive into it further, and my steps are just to give you an easy baseline improvement to start from!
And just FYI, I'm not at all affiliated with the Reshade project except as an enthusiastic user.
All the further information is available on the website: https://reshade.me/
In this guide I intend to walk you through the bare minimum steps to apply some of reshade's features to your LotRO installation to make the game look better by sharpening the textures, brightening the colors, and enhancing the contrast of the in-game visuals.
It's important to note that Reshade allows you nearly limitless customization options if you are willing to dive into it further, and my steps are just to give you an easy baseline improvement to start from!
And just FYI, I'm not at all affiliated with the Reshade project except as an enthusiastic user.
1) Get Reshade
The official source of Reshade is: https://reshade.me/#download
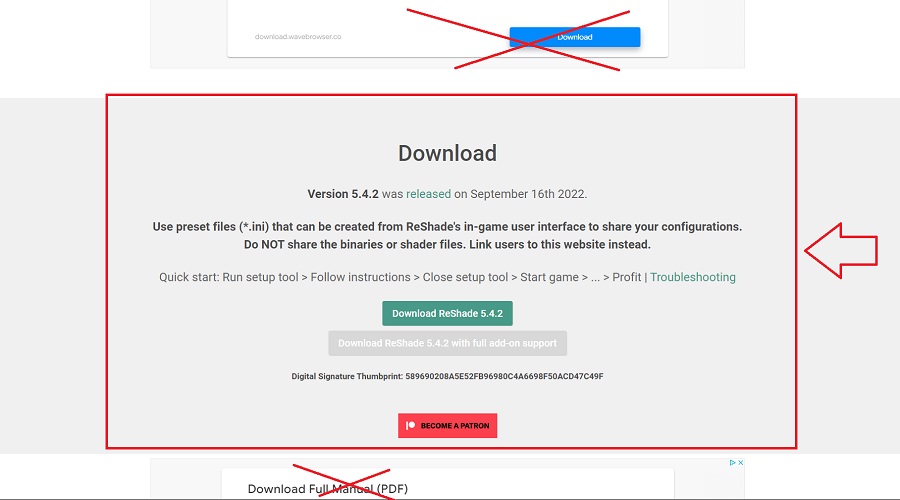
Save that file somewhere permanent. It's the app itself that you will need to run to apply at least once to each game you want to use it with.
(Be careful not to click on false, tricksey "Download" banner ads by mistake. Sorry!)
Save that file somewhere permanent. It's the app itself that you will need to run to apply at least once to each game you want to use it with.
(Be careful not to click on false, tricksey "Download" banner ads by mistake. Sorry!)
2) Installing Reshade in LotRO
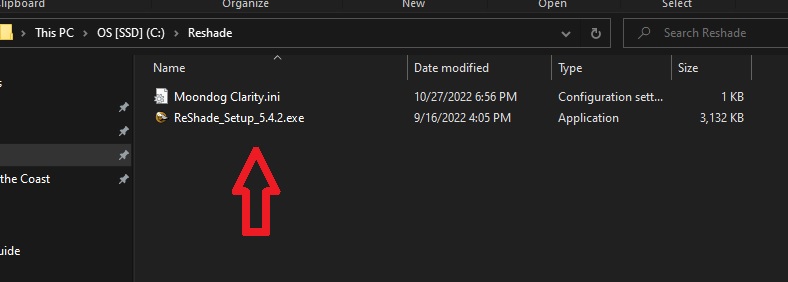
Run the current version Reshade Setup .exe from wherever you have saved it.
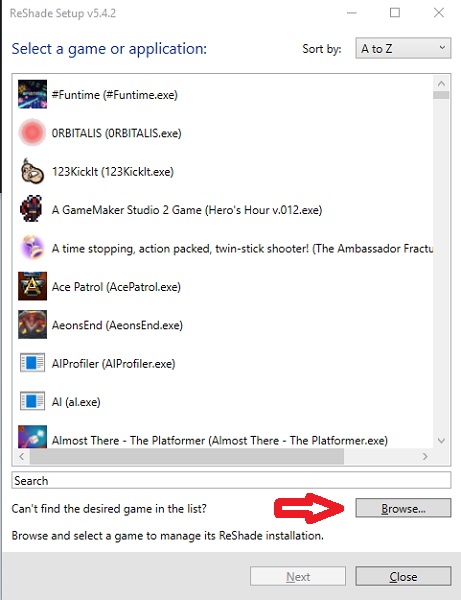
Reshade Setup will open and start to populate a list of games it finds on your computer. Ignore this! Just hit the BROWSE button.
o~*~\\Oo0oO//~*~o
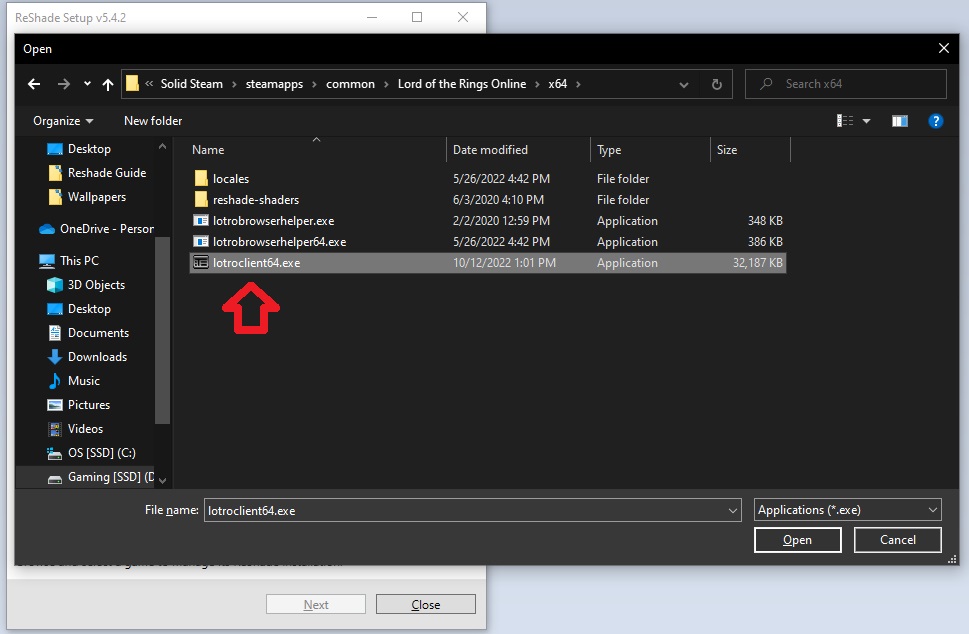
A window will open to select a game .exe to select to apply Reshade to.
This will default to wherever you had the Reshade app file, so you'll need to navigate in this window to your LotRO installation folder. You need to select the actual GAME CLIENT .exe, not the Launcher.
And, assuming you are using the 64-bit client (which you need to be anyway, unless your computer is too old to run any version of windows released in the last decade) then the file you're looking for is in the "x64" subfolder of your LotRO installation folder.
Select this file and hit "Open" (or just double click the file).
Then hit NEXT in Reshade Setup.
o~*~\\Oo0oO//~*~o
Then you will be asked which rendering API the game uses. LotRO uses DirectX10/11/12 unless you are for some reason forced to stick with DirectX9. (check your graphics settings in LotRO if you aren't sure which you are running).
Select whichever is correct (almost certainly DX10/11/12)
o~*~\\Oo0oO//~*~o
Next you will be asked to pick a "preset" to install. You can read the explanation of what that is, but for now just hit "skip" and it will create a default "Reshade.ini" preset file in the LotRO folder.
o~*~\\Oo0oO//~*~o
Next is the closest thing we have to a tricky part. Picking which effects packages to install. You should feel free to research and explore all your options in the future, but for now I will just tell you my precise recommendations for what to use!
Click the boxes next to "SweetFX", "Legacy effects", and "fubax-shaders" as many times as needed to ensure they have squares (not checkmarks). Make sure all the others are empty (except for "Standard" which you can't change).
Then hit NEXT
o~*~\\Oo0oO//~*~o
Now it will ask you to select individual effects you want to use. First, from each of the packages.
Make sure that only
- Vibrance
- Adaptive Sharpen
- Contrast Sharpening
Then hit NEXT
o~*~\\Oo0oO//~*~o
Install is complete! hit FINISHED
3) Reshade Settings In-Game
Now Launch LotRO!
Around the time you get to the game's splash screen, you should see some text from Reshade at the top of the screen.
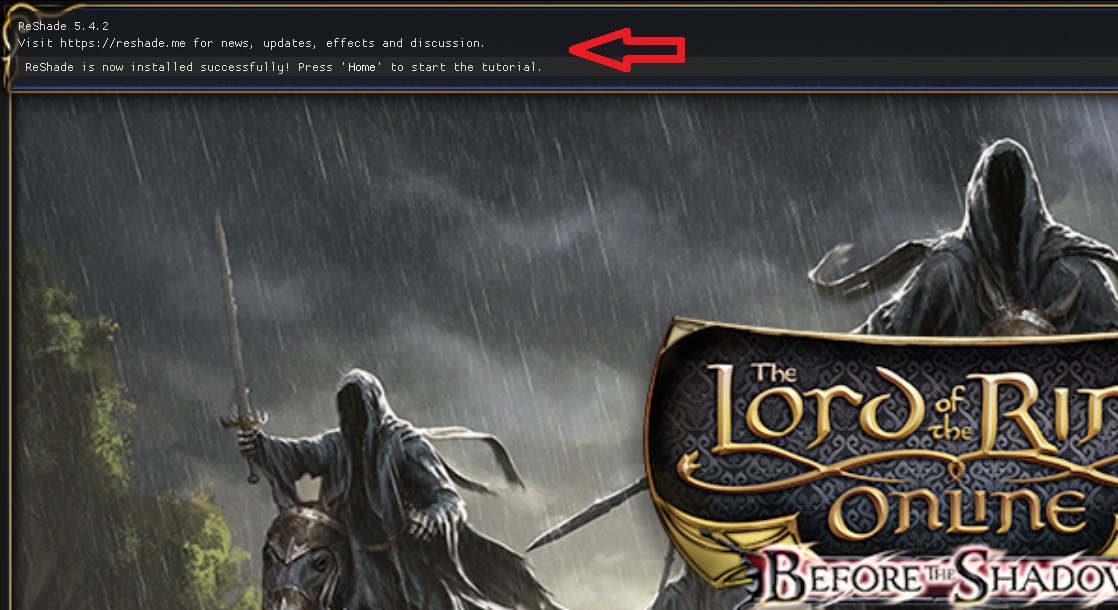
Do like its says and hit the HOME key.
It will open the reshade in-game interface panel. It has a tutorial you can go through for some more information. To can also just skip it for now and use my settings!
Once you complete or skip the tutorial, you should be looking at the "Home" tab which lists the installed effects available.
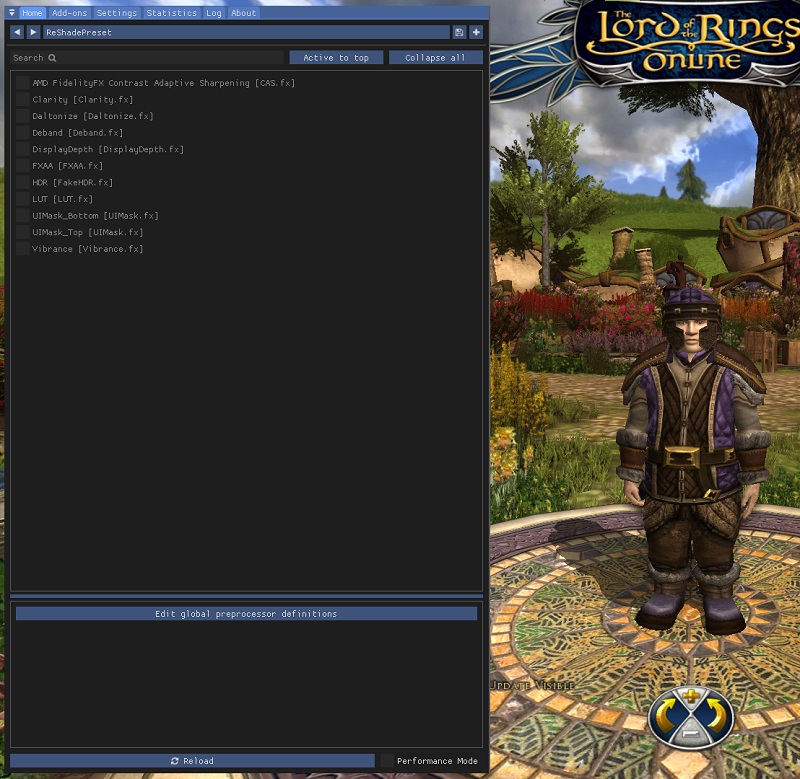
Hit the check boxes next to
As you activate each one, you should see the effect that they have on the game image! They will also populate the bottom frame of the panel with individual settings/options for each effect. You can grab the horizontal bar between the panels to resize the frames to get a better look. You can also hit the "Active to top" button to collect all the active effects to the top of the list.
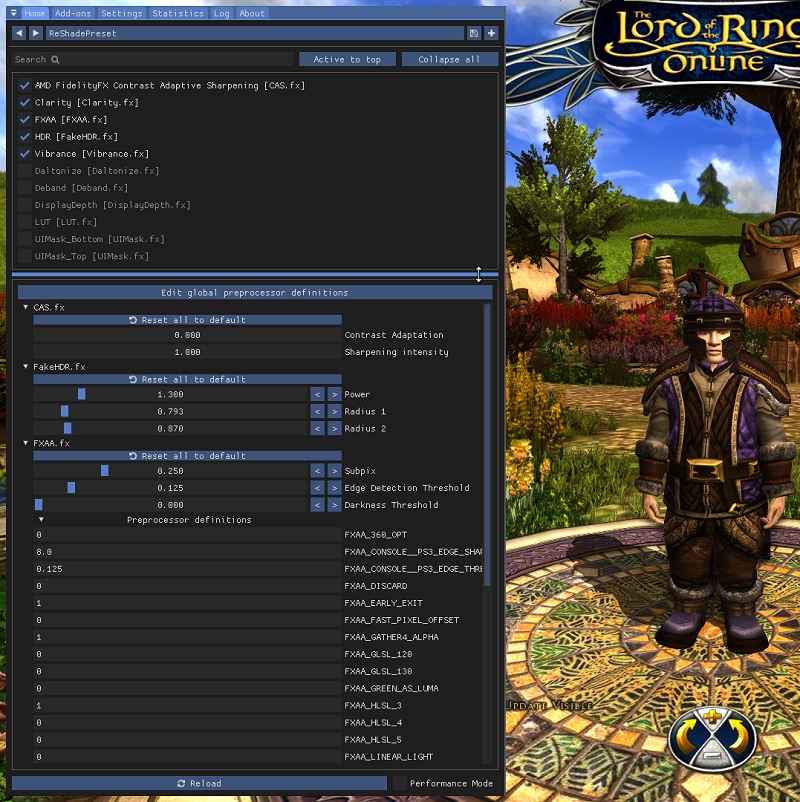
You can fiddle with these settings all you want to get things perfectly to your liking. You can also go discover and install different effects that may do better! But this bit even by default makes a huge improvement in my opinion, so you're ready to play if you like it!
Make sure to check the PERFORMANCE MODE box at the bottom of the reshade panel.
Then press the HOME key to make it go away.
Then enjoy a brighter, better, clearer, more vibrant Middle-earth!
It really helps to see all the amazing details the designers put into armor textures in particular, I think!
Around the time you get to the game's splash screen, you should see some text from Reshade at the top of the screen.
_______________________________________________________________________
Do like its says and hit the HOME key.
It will open the reshade in-game interface panel. It has a tutorial you can go through for some more information. To can also just skip it for now and use my settings!
Once you complete or skip the tutorial, you should be looking at the "Home" tab which lists the installed effects available.
_______________________________________________________________________
Hit the check boxes next to
- AMD FidelityFX Contrast Adaptive Sharpening
- Clarity
- FXAA
- HDR
- Vibrance
As you activate each one, you should see the effect that they have on the game image! They will also populate the bottom frame of the panel with individual settings/options for each effect. You can grab the horizontal bar between the panels to resize the frames to get a better look. You can also hit the "Active to top" button to collect all the active effects to the top of the list.
_______________________________________________________________________
You can fiddle with these settings all you want to get things perfectly to your liking. You can also go discover and install different effects that may do better! But this bit even by default makes a huge improvement in my opinion, so you're ready to play if you like it!
Make sure to check the PERFORMANCE MODE box at the bottom of the reshade panel.
Then press the HOME key to make it go away.
Then enjoy a brighter, better, clearer, more vibrant Middle-earth!
It really helps to see all the amazing details the designers put into armor textures in particular, I think!
My Settings
These are the contents of my personal .ini setting which Reshade references for each game.
I keep a single copy named "Moondog.ini" in my reshade folder and every time I add reshade to a game I point the installer to that file. By default it will create a "Reshade.ini" file in with the game files and other reshade files it installs. So you can use different settings for different games.
My settings use the Vibrance tools to tweak the green up a little and the red up a lot on all games because I'm Red/Green colorblind. So if you use my settings and those colors are too saturated for you, that's why! You can bring them back down.
Anyway, like I said, here are the contents of my personal .ini file. You can copy/paste these into your own.
I keep a single copy named "Moondog.ini" in my reshade folder and every time I add reshade to a game I point the installer to that file. By default it will create a "Reshade.ini" file in with the game files and other reshade files it installs. So you can use different settings for different games.
My settings use the Vibrance tools to tweak the green up a little and the red up a lot on all games because I'm Red/Green colorblind. So if you use my settings and those colors are too saturated for you, that's why! You can bring them back down.
Anyway, like I said, here are the contents of my personal .ini file. You can copy/paste these into your own.
[email protected]=46,0,0,0
PreprocessorDefinitions=CMAA2_STATIC_QUALITY_PRESET=2
[email protected],[email protected],[email protected],[email protected]
[email protected],[email protected],[email protected],[email protected]
[CAS.fx]
Contrast=1.000000
Sharpening=0.600000
[Clarity.fx]
ClarityBlendIfDark=50
ClarityBlendIfLight=200
ClarityBlendMode=0
ClarityDarkIntensity=0.250002
ClarityLightIntensity=0.125000
ClarityOffset=5.000000
ClarityRadius=4
ClarityStrength=0.750000
ClarityViewBlendIfMask=0
ClarityViewMask=0
[FakeHDR.fx]
HDRPower=0.999999
radius1=0.750000
radius2=0.750000
[FXAA.fx]
EdgeThreshold=0.025000
EdgeThresholdMin=0.025000
Subpix=0.600000
[RadiantGI.fx]
PP_Options=0
RadiantGI=0
[Vibrance.fx]
Vibrance=0.375000
VibranceRGBBalance=1.125000,1.250000,1.000000
More The Lord of the Rings Online™ guides
- LOTRO Points Farm Guide★ 5 (913)38k views1.6k ♥11 minUpdated Jan 19, 2021
- First Time Character Creation★ 5 (371)33k views390 ♥31 minUpdated Aug 18, 2020
- New to Lotro - Hint & Tips★ 5 (475)29k views785 ♥90 minUpdated Feb 18, 2022
- Hidden Deeds★ 5 (603)21k views869 ♥7 minUpdated Dec 11, 2013
- Efficient F2P for LotRO (LP Farming)★ 5 (226)20k views482 ♥24 minUpdated Aug 20, 2021
- руссификатор LOTRO. Самый актуальный способ!★ 4 (159)18k views250 ♥3 minRussianUpdated Mar 22, 2021



This guide was created by its original author on the Steam Community. Are you the author and want it removed? Request removal.