Map editor GUIDE
Introduction.
This manual is written entirely in English. If you are Russian, you can read its Russian version in Vkontakte: https://vk.com/@ametdesign-mapeditortutorial
How to start building — the process of unlocking the map editor.
At the Checkpoint the players initially have no access to the map editor. To unlock it, you need to do the following steps:
1. Go to settings (gear in the upper right corner).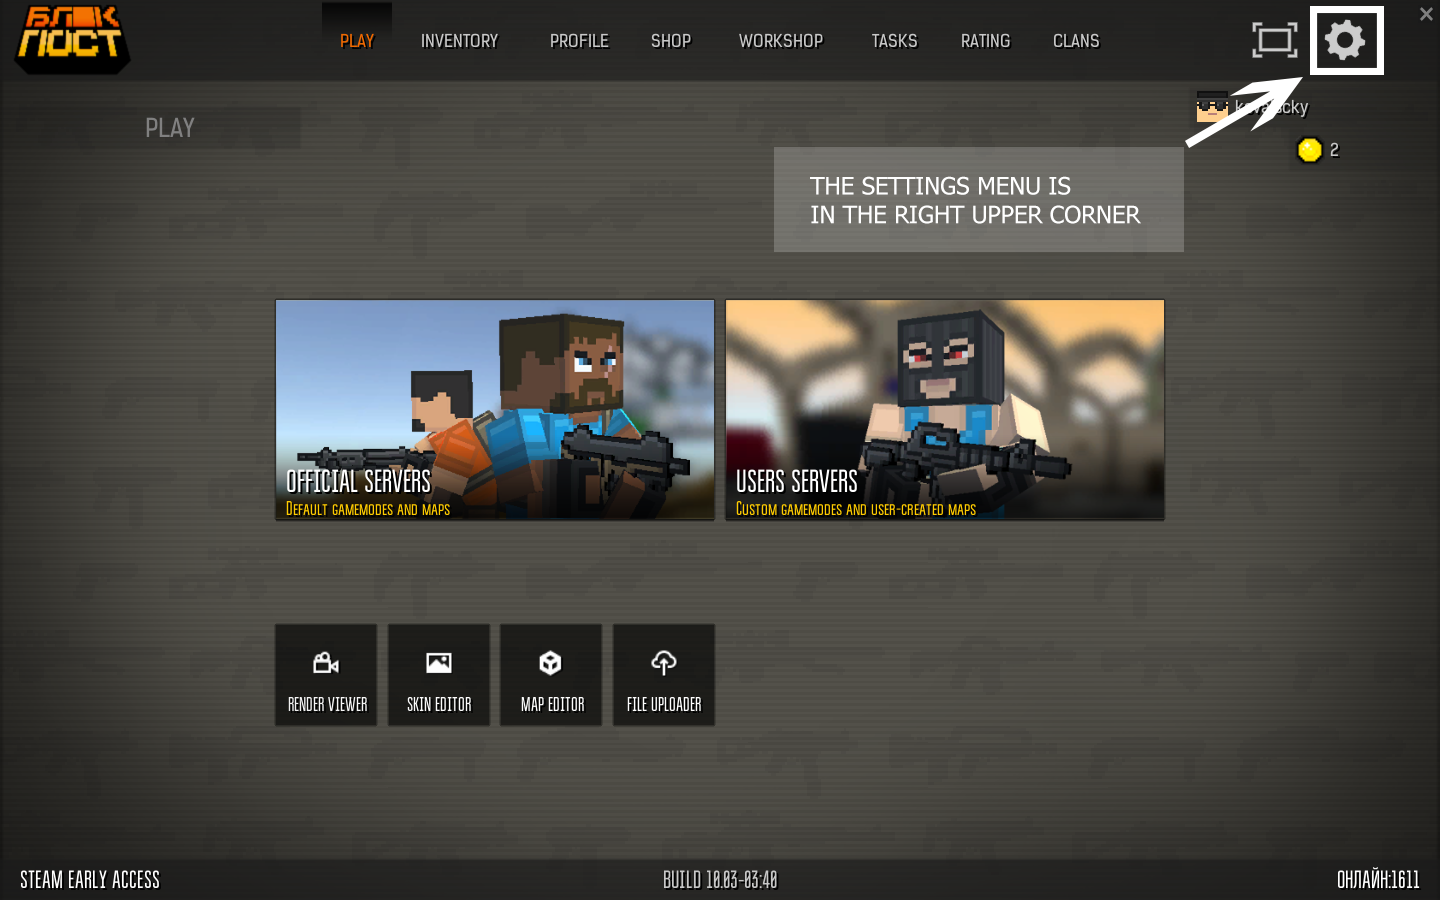 After the transition gear becomes orange
2. Click on the right arrow near the inscription "developer mode" to activate it, after saving the settings by pressing the red button "save".
After the transition gear becomes orange
2. Click on the right arrow near the inscription "developer mode" to activate it, after saving the settings by pressing the red button "save".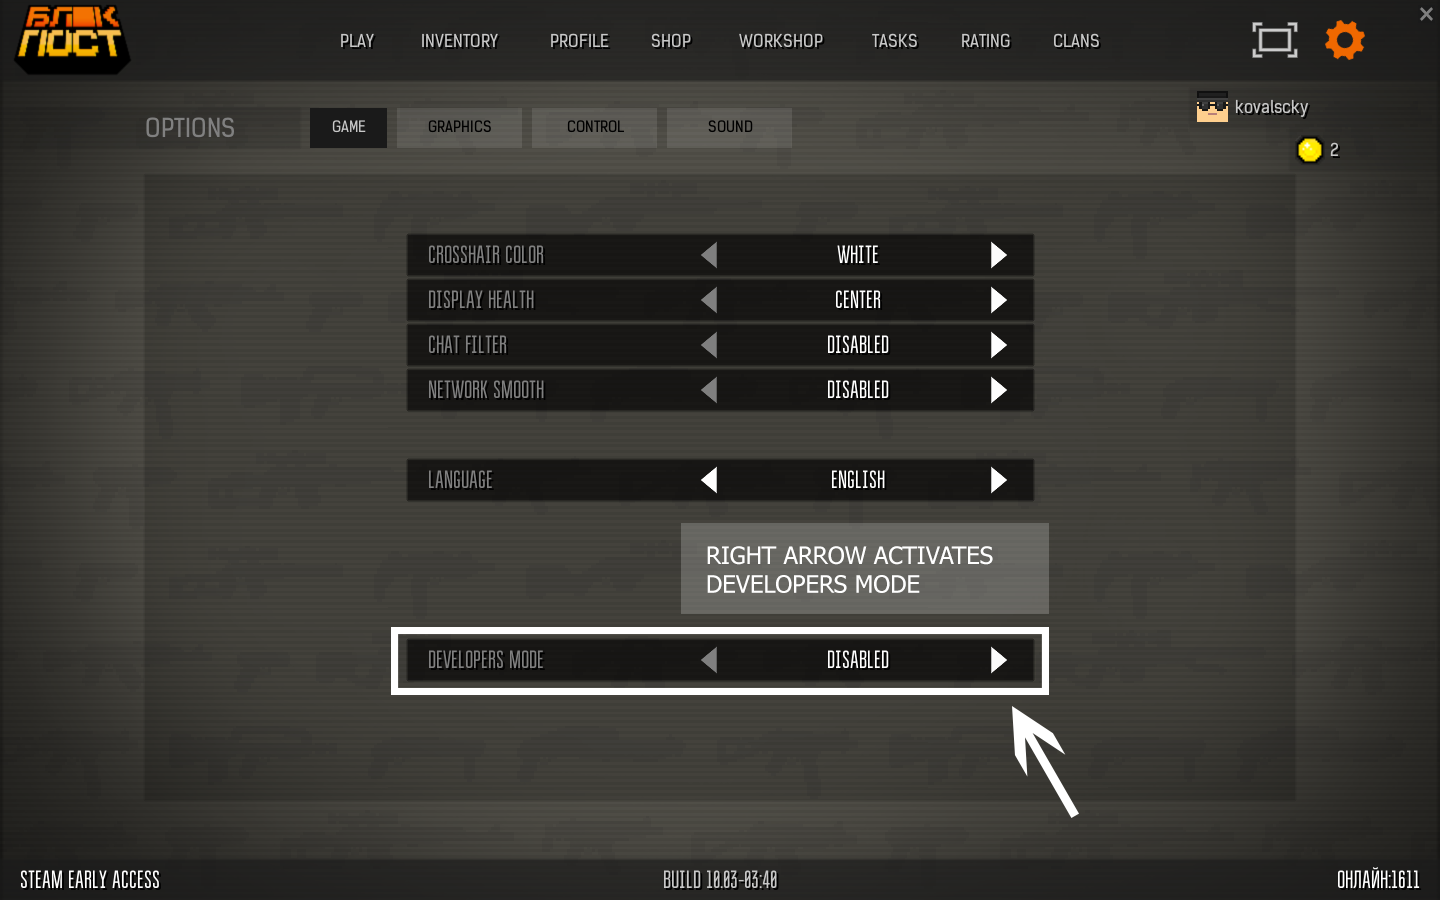
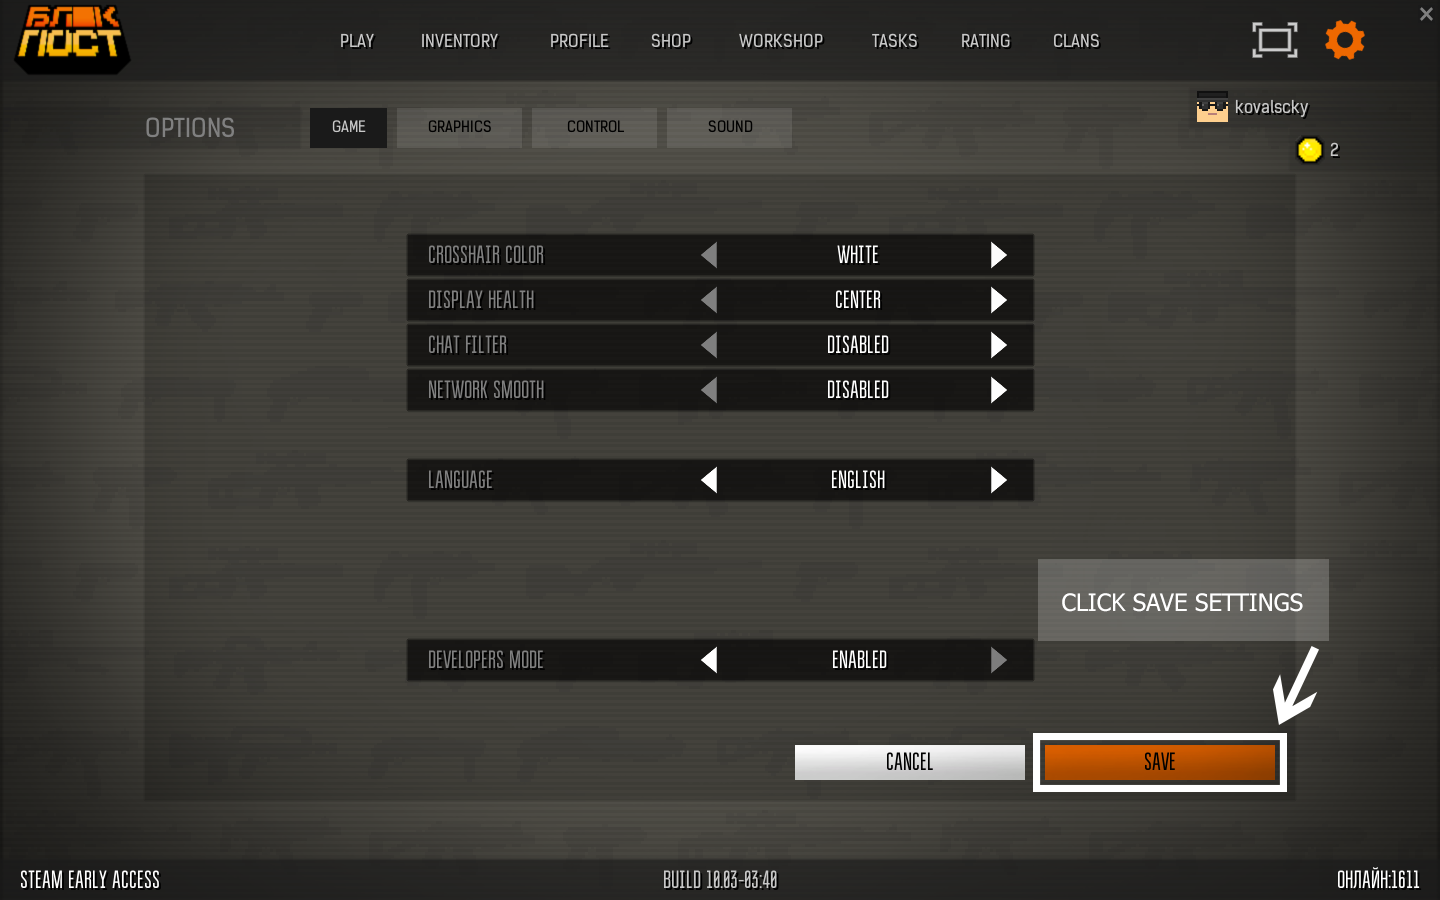 After showed the message "settings saved!"
3. The desired submenu with the map editor appears on the main menu of the game (to go to the tab "play").
After showed the message "settings saved!"
3. The desired submenu with the map editor appears on the main menu of the game (to go to the tab "play").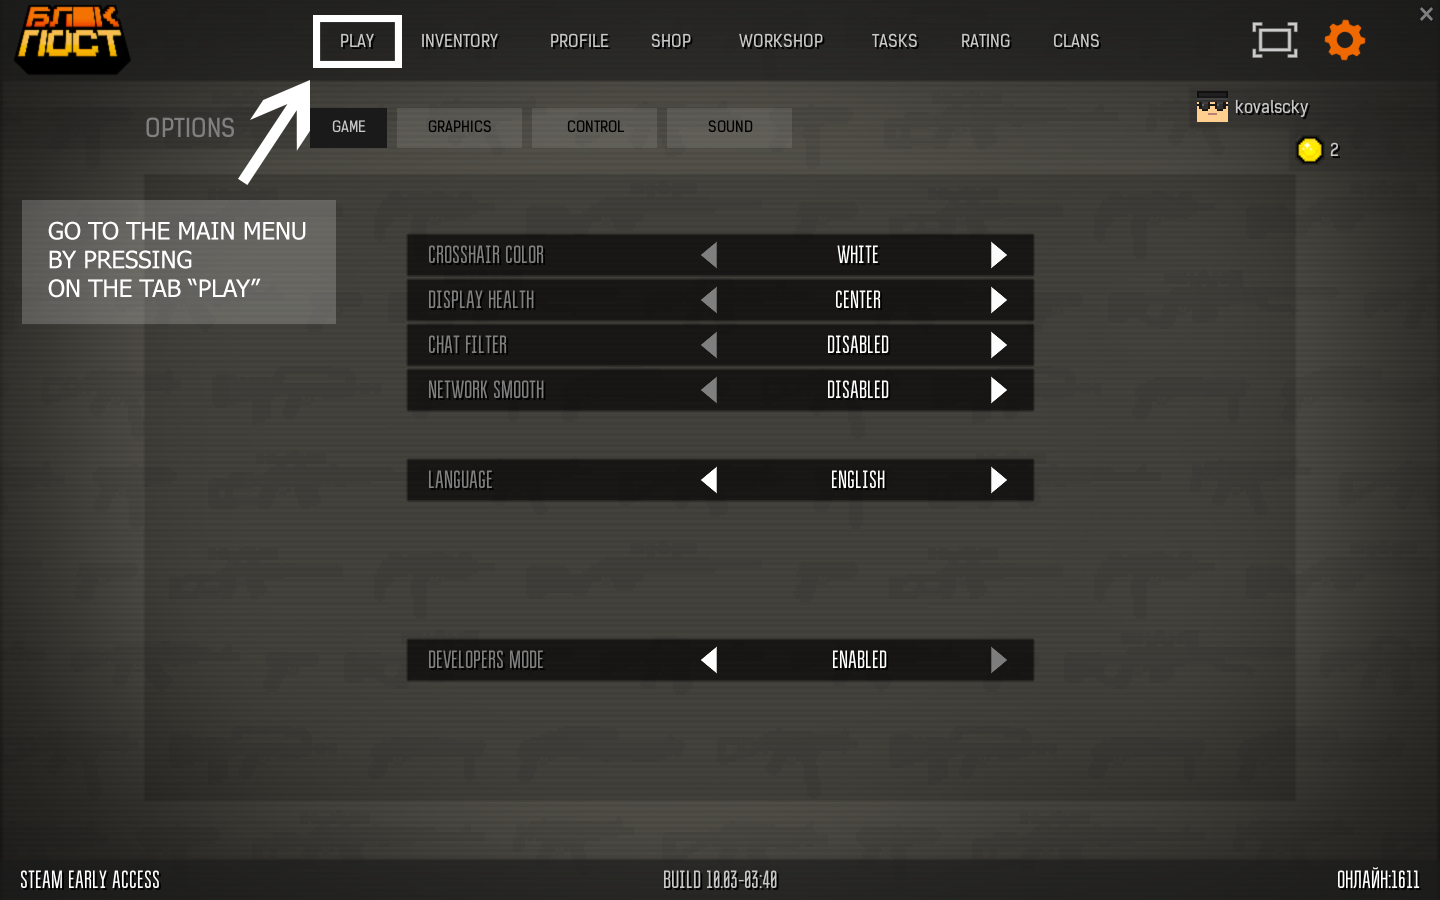
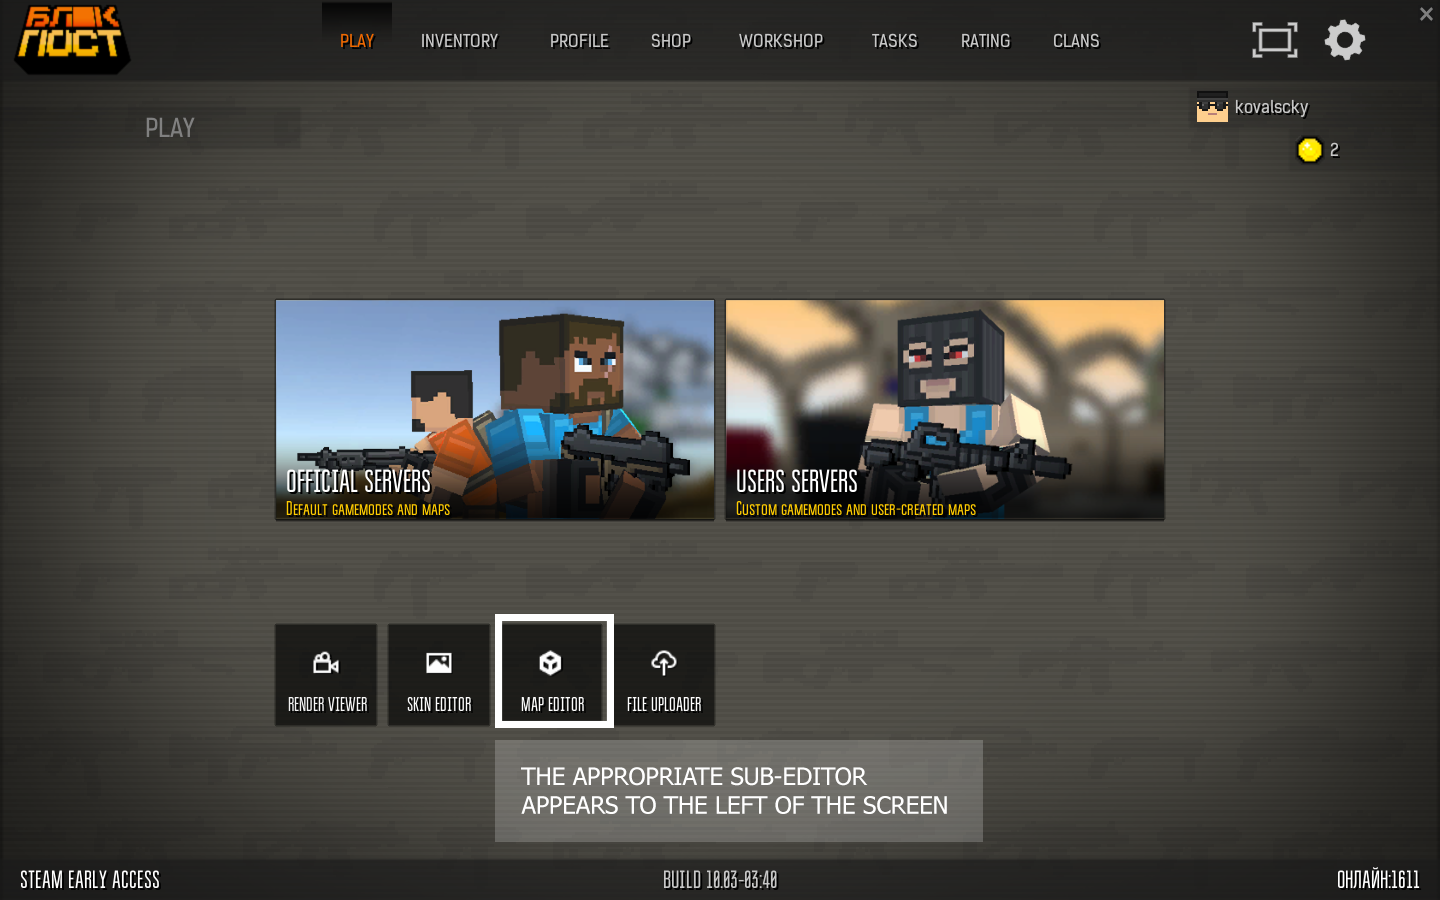 The unlock phase is over. On subsequent visits to the game you will not need to unlock the map editor yourself.
Analysis the menu — review the map settings before creating it.
"Map name" — here you can specify any name in English. However, any other characters (punctuation marks and not only) will not allow you to run your map on private servers. So try to leave the working version of the map without different signs and symbols.
"Size map" — select the map size by length. Specified in the number of blocks. The maps in the game are square, so the length is chosen for one side of the card.
"Height" — similar to the choice of map size in height. Specified in the number of blocks. For greater convenience, when flying and photographing the map, it is recommended to set the maximum height of the map.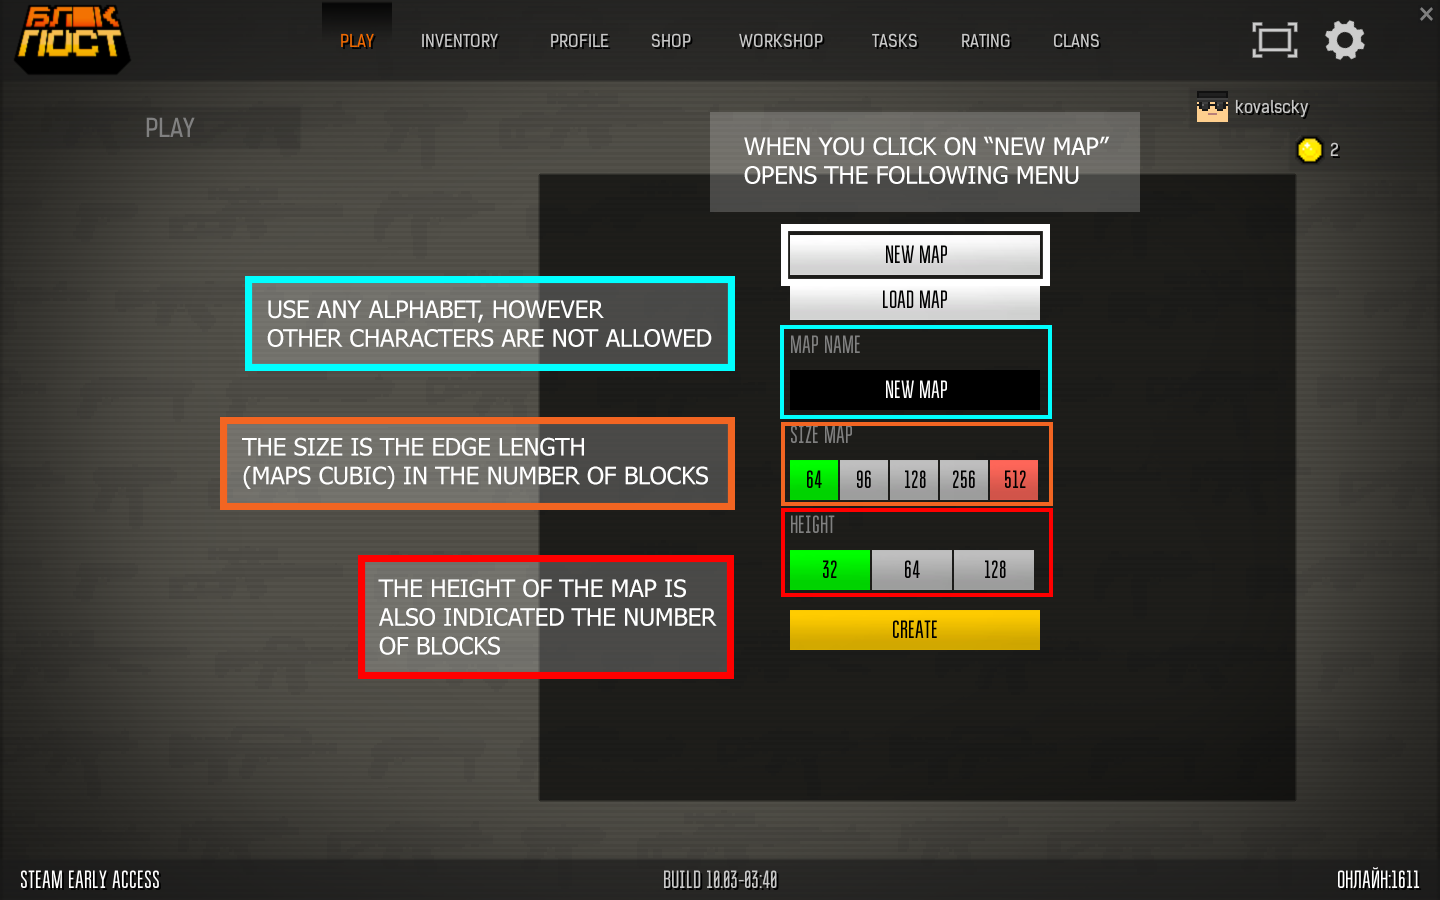
General tools — analysis of all possible modes for construction.
Since the tools of the editor and really rather big, the topic will have to be divided into several points. It should also be noted that after the creation of any card has a thickness of 1 block of vanilla green grass.
LMB — removing blocks / player spawns.
Mouse wheel — select the texture of the block / player spawns color.
W, A, S, D — moving the character in the editor.
Enter — enable / disable the flight mode. The corresponding astronaut icon appears in the right corner.
Shift (left) is the acceleration for moving the character two times during the flight.
Space — (space) rise of the character up during the flight.
CTRL (left) — character's descent down during the flight.
F — pipette tool. Is used for the sampling unit, which is aimed at your look (gray cross).
Q and E — select the color block through the palette on the right / rotating player spawns.
The upper toolbar buttons 1, 2, 3, 4 — switch modes of construction.
TAB — switching to setting players spawns mode.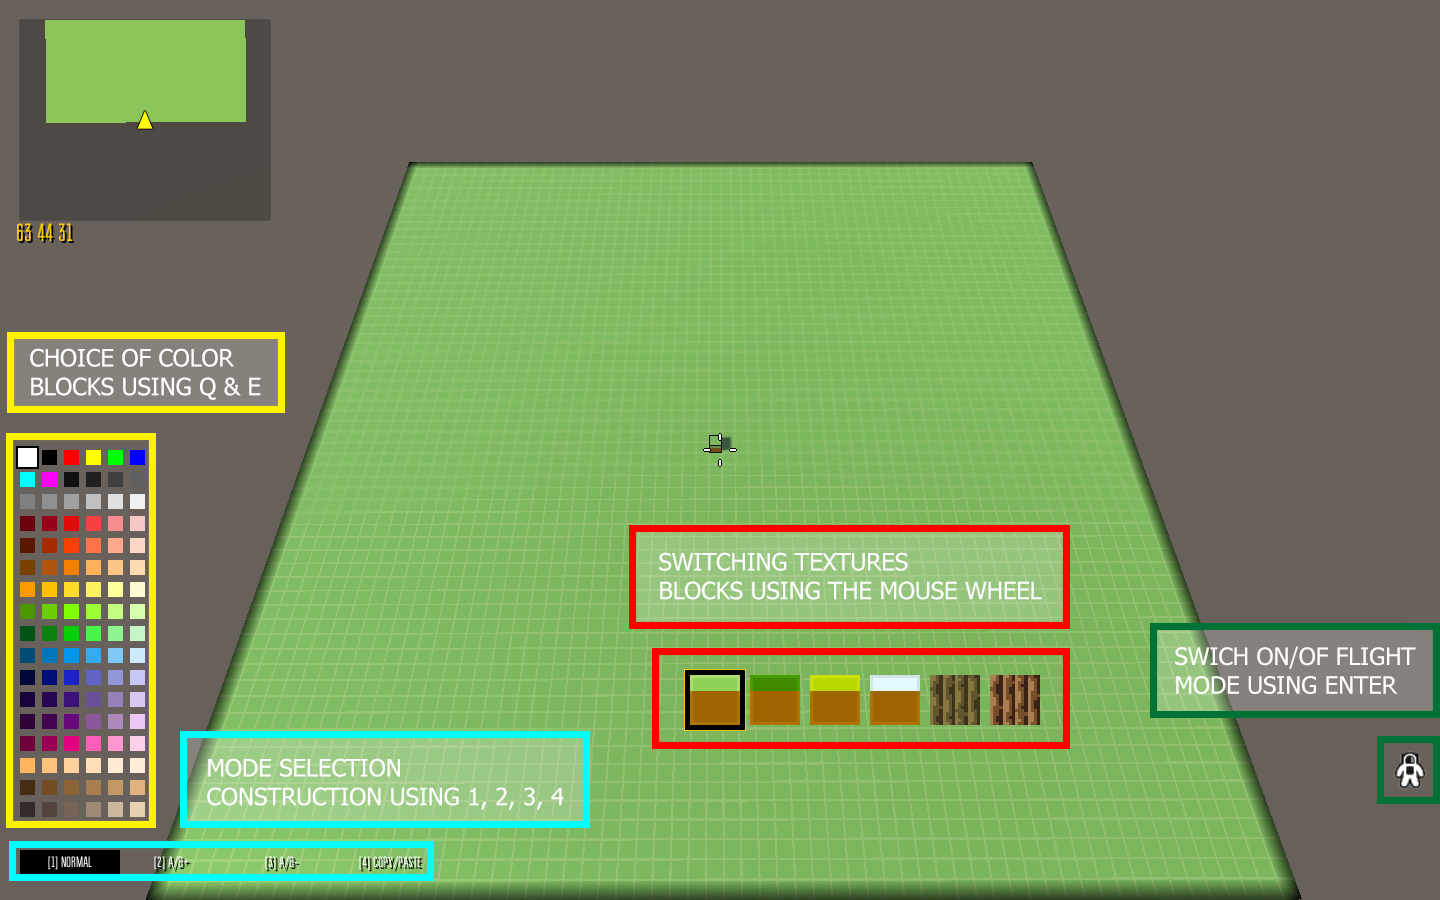
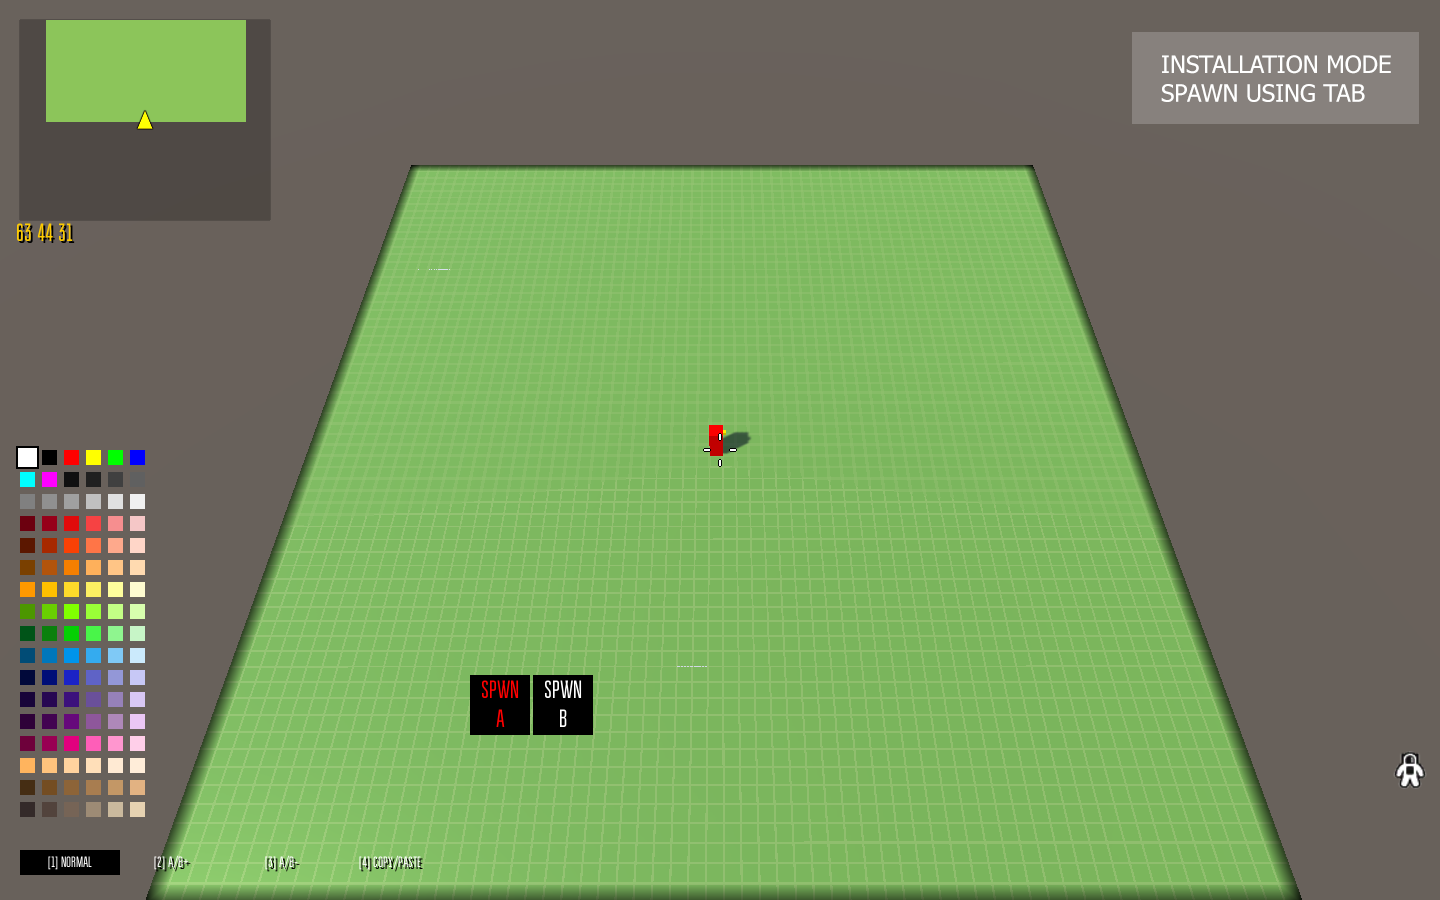
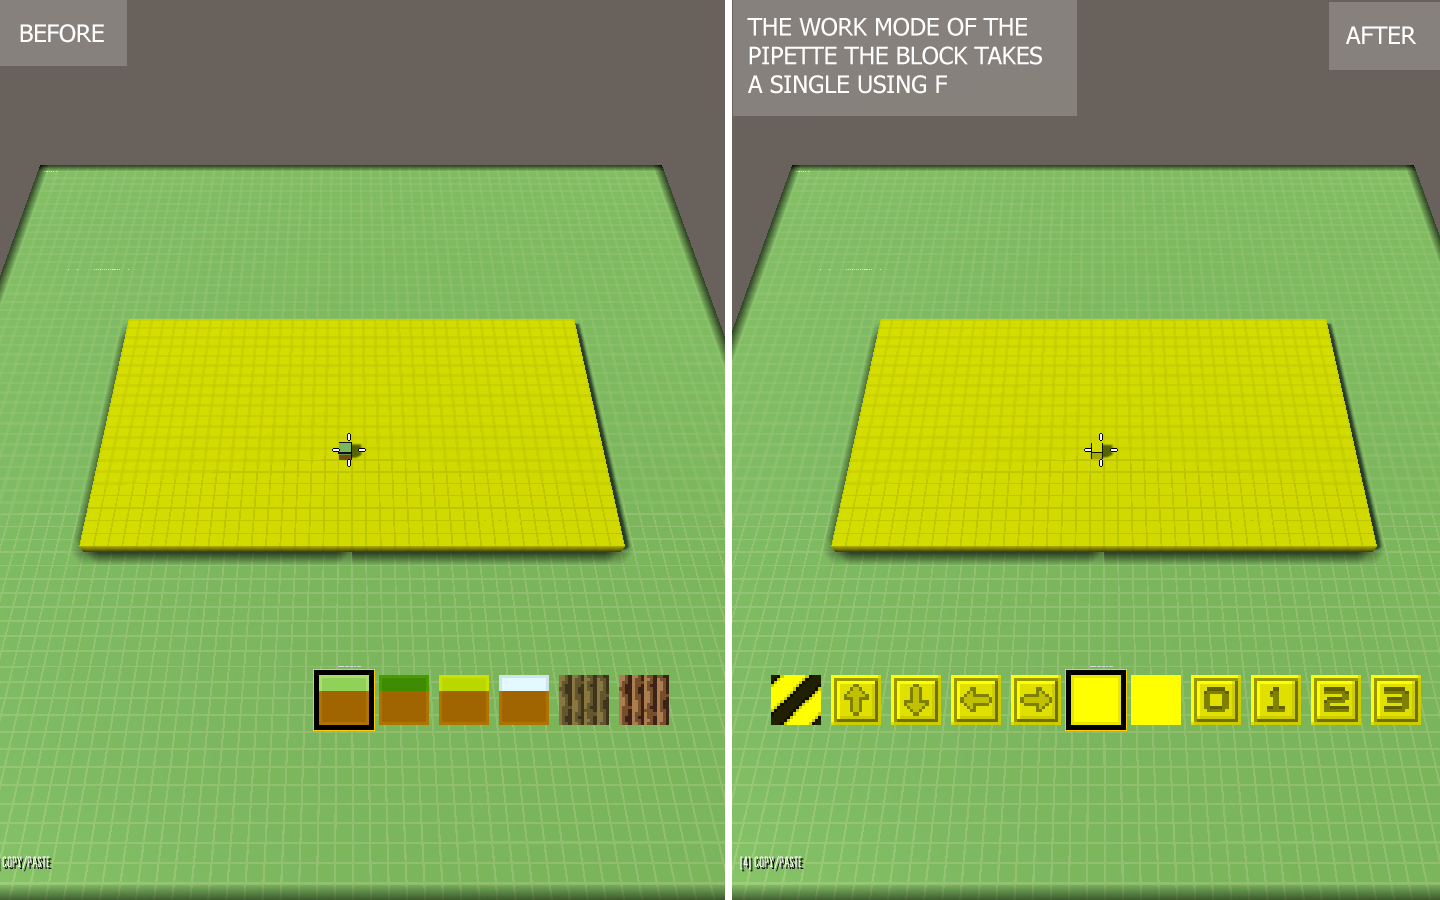 Illustrative example
[1] Normal — standard construction mode. A single installation of blocks by pressing the mouse button. LMB - installation of blocks, RMB-removal. When holding down the RMB the rate of removal of blocks increases up to ~6 block/sec.
[2] A/B+ — rectangular mode of blocks installation. The first click of the LMB selects the first point, the second-the second point and the automatic installation of blocks in the selected area (gray translucent parallelepiped). The installation area is not limited.
[3] A/B- — rectangular block removal mode. The first click of the LMB selects the first point, the second-the second point and the automatic removal of blocks in the selected area (red translucent parallelepiped). The removal area is not limited.
[4] Copy/Paste — rectangular block copy mode. The first click of the LMB selects the first point, the second-the second point and the automatic copying of blocks in the form of simplified textures of the blocks. Pasting copied objects on the map by pressing the RMB. Sometimes there is a bug and copied blocks are shifted. The copy area is highlighted in red, just put a limit on the number of copied blocks, the maximum: 2730.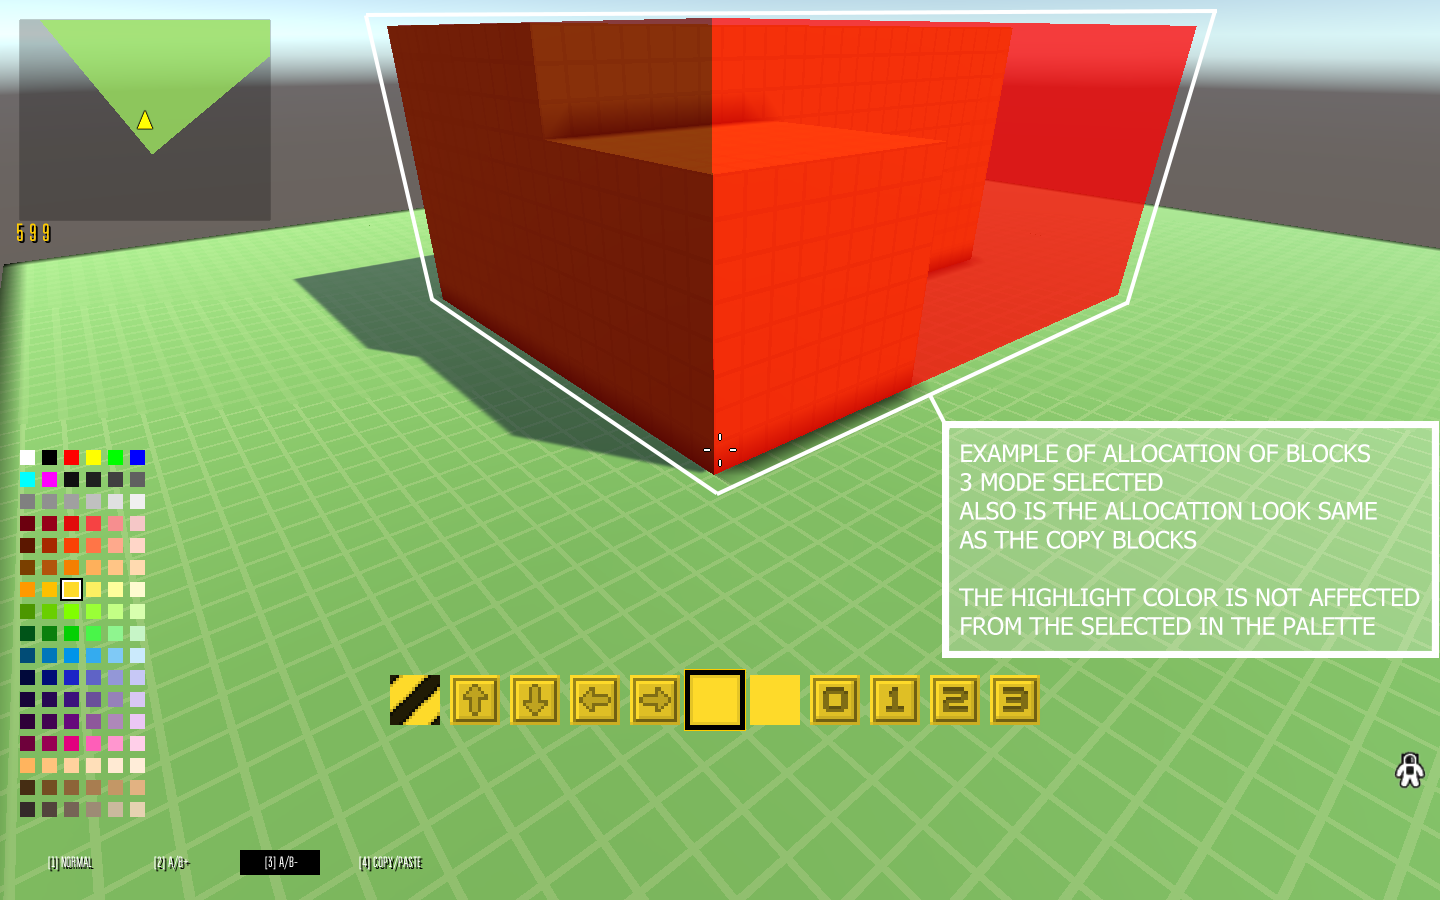
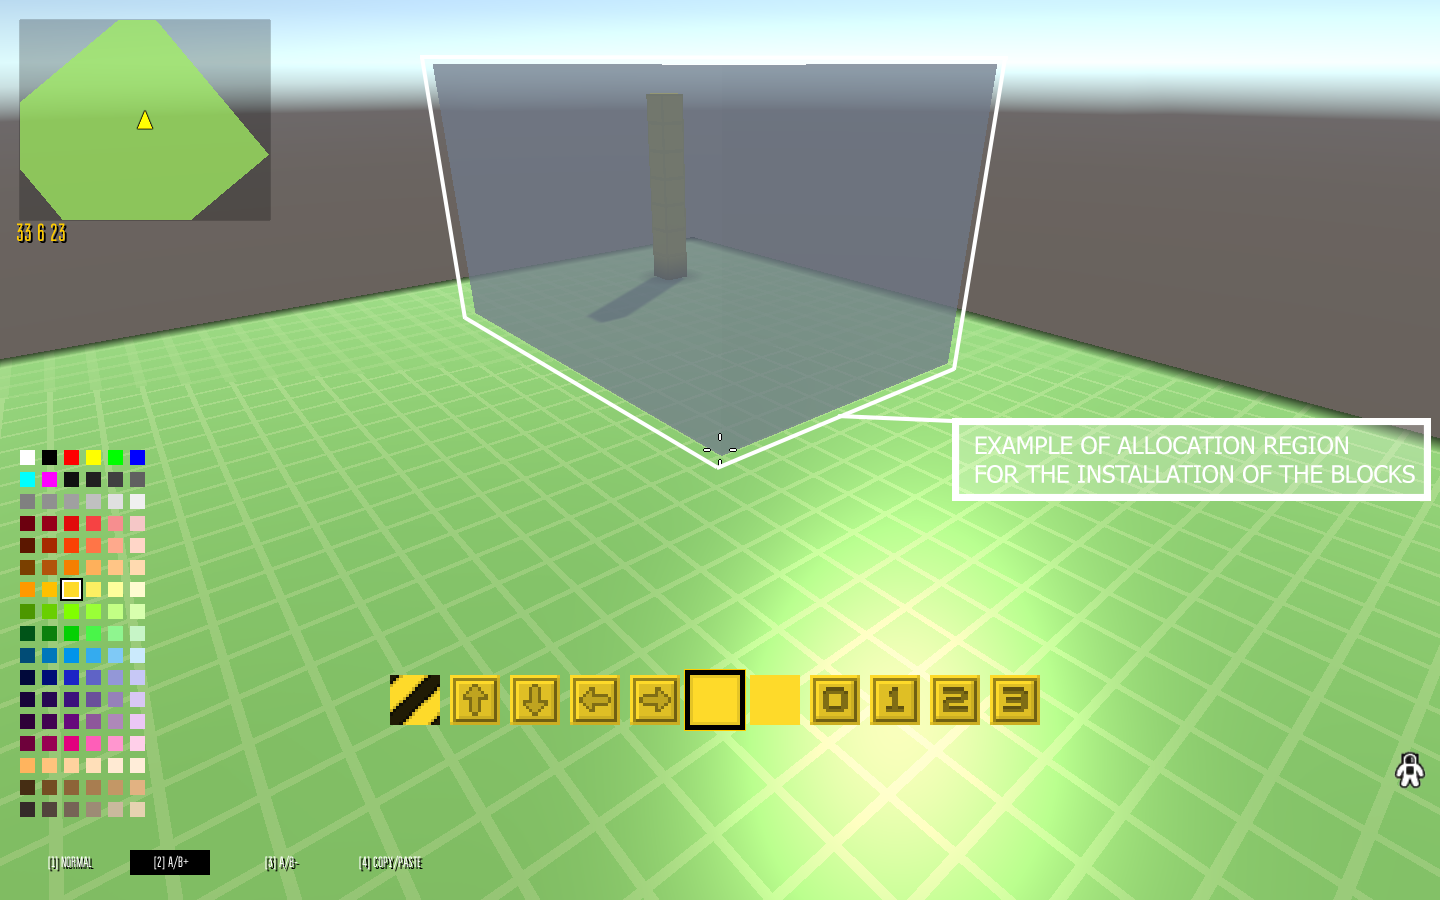 Illustrative example
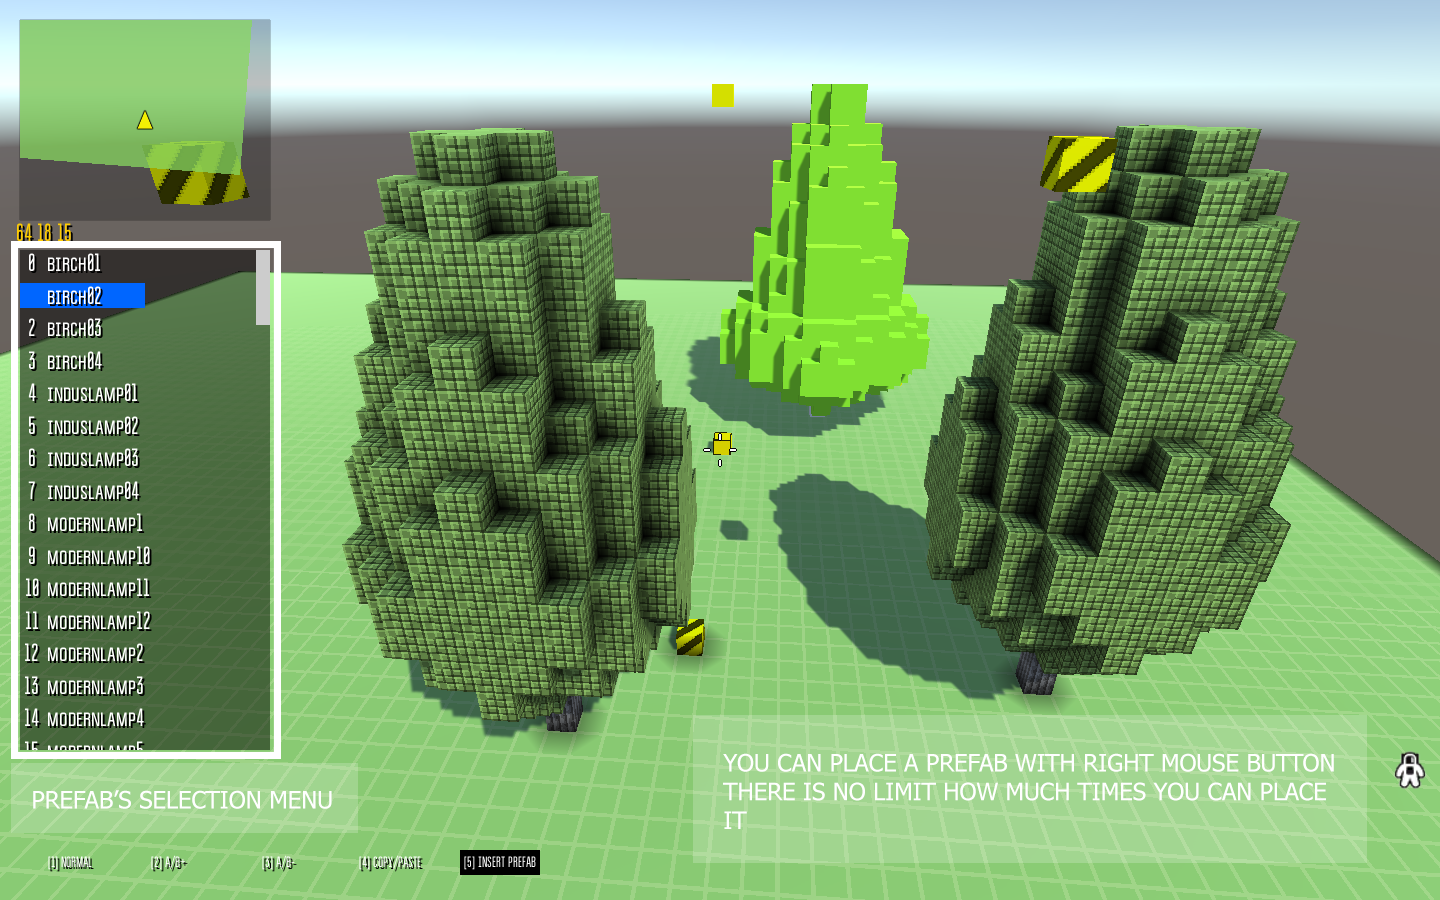
[5]Insert prefab — mode of installation of ready saved models from memory. Initially, you do not have any prefab. In order to save it, you need to select the object using the Copy/Paste[4] and in the pause menu click on the "save prefab" button: the object is saved in the Prefabs folder, where you can edit it by changing the file extension from .bpobj to .bpmap and conversely, or simply rename. To set the saved prefab, go to [5] mode, select the desired prefab with the mouse wheel and set it by pressing the PCM. Known bugs: the list of prefabs can't be scrolled up and down; when you save the prefab it is writing that "saved map", but actually is saved the prefab, not your map.
Illustrative example
[5]Insert prefab — mode of installation of ready saved models from memory. Initially, you do not have any prefab. In order to save it, you need to select the object using the Copy/Paste[4] and in the pause menu click on the "save prefab" button: the object is saved in the Prefabs folder, where you can edit it by changing the file extension from .bpobj to .bpmap and conversely, or simply rename. To set the saved prefab, go to [5] mode, select the desired prefab with the mouse wheel and set it by pressing the PCM. Known bugs: the list of prefabs can't be scrolled up and down; when you save the prefab it is writing that "saved map", but actually is saved the prefab, not your map.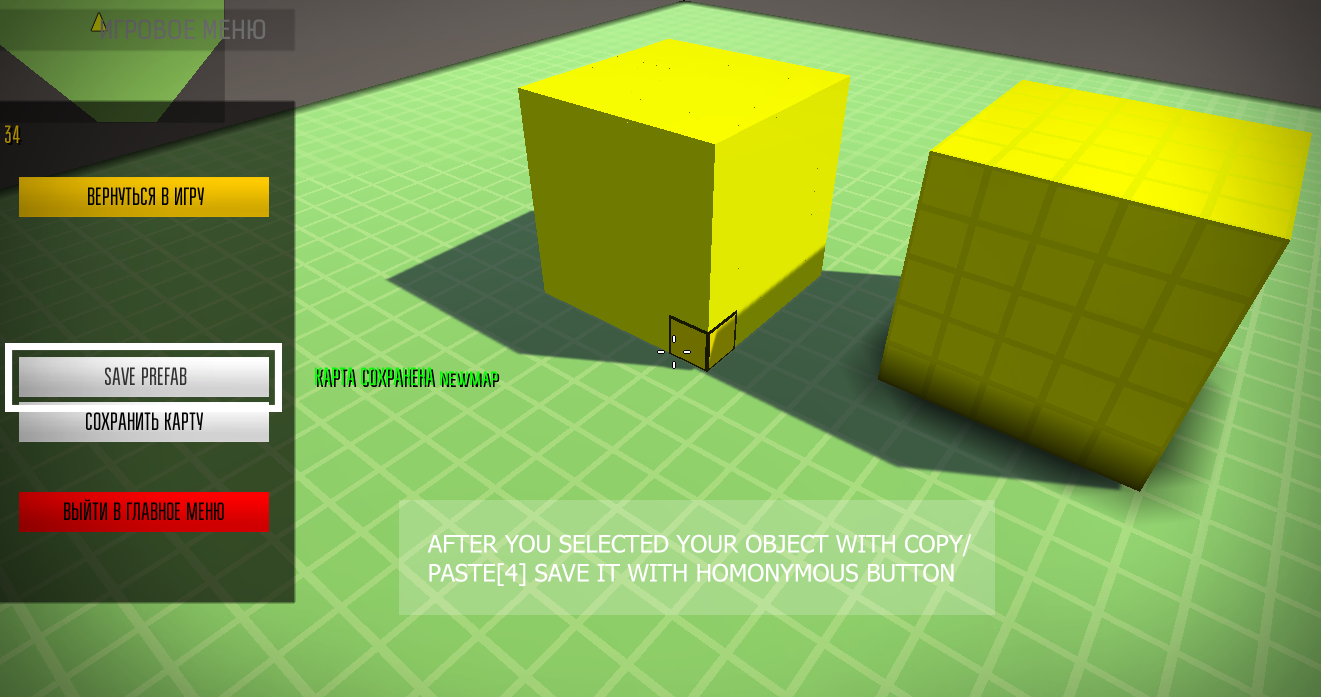
The color palette in the game consists of 102 colors. The color used is highlighted with a black rim in the palette. The first nine blocks do not change the color texture, when you select it, only the corresponding translucent layer is applied.
All blocks in the game have the same strength and explosion resistance and do not depend on the texture. In the game there are no transparent blocks, blocks-glass and blocks-light sources. The first color in the palette white does not impose a white layer on top, it is a model of natural texture blocks, including the first nine.
Commands and special features — console commands and additional tools when creating a map.
For more convenient use of the map editor, there are several commands in the game. The command console is opened / closed by pressing F10. Notice, that in the commands 0-off, 1-on.
clearent — responsible for removing spawns from the map. When typing it deletes all of the player's spawns from map. There is no other way to remove them.
hud 0/1 — command removes / enables the interface. Used for taking high-quality screenshots. It is worth noting that the first time you enter the map does not display the block at the gray crosshair, only after clicking LMB.r.
disablesun — the team completely removes the sun, creating light from its sunrise.
showfps 0/1 — enables display of frames per second and ping in the upper right corne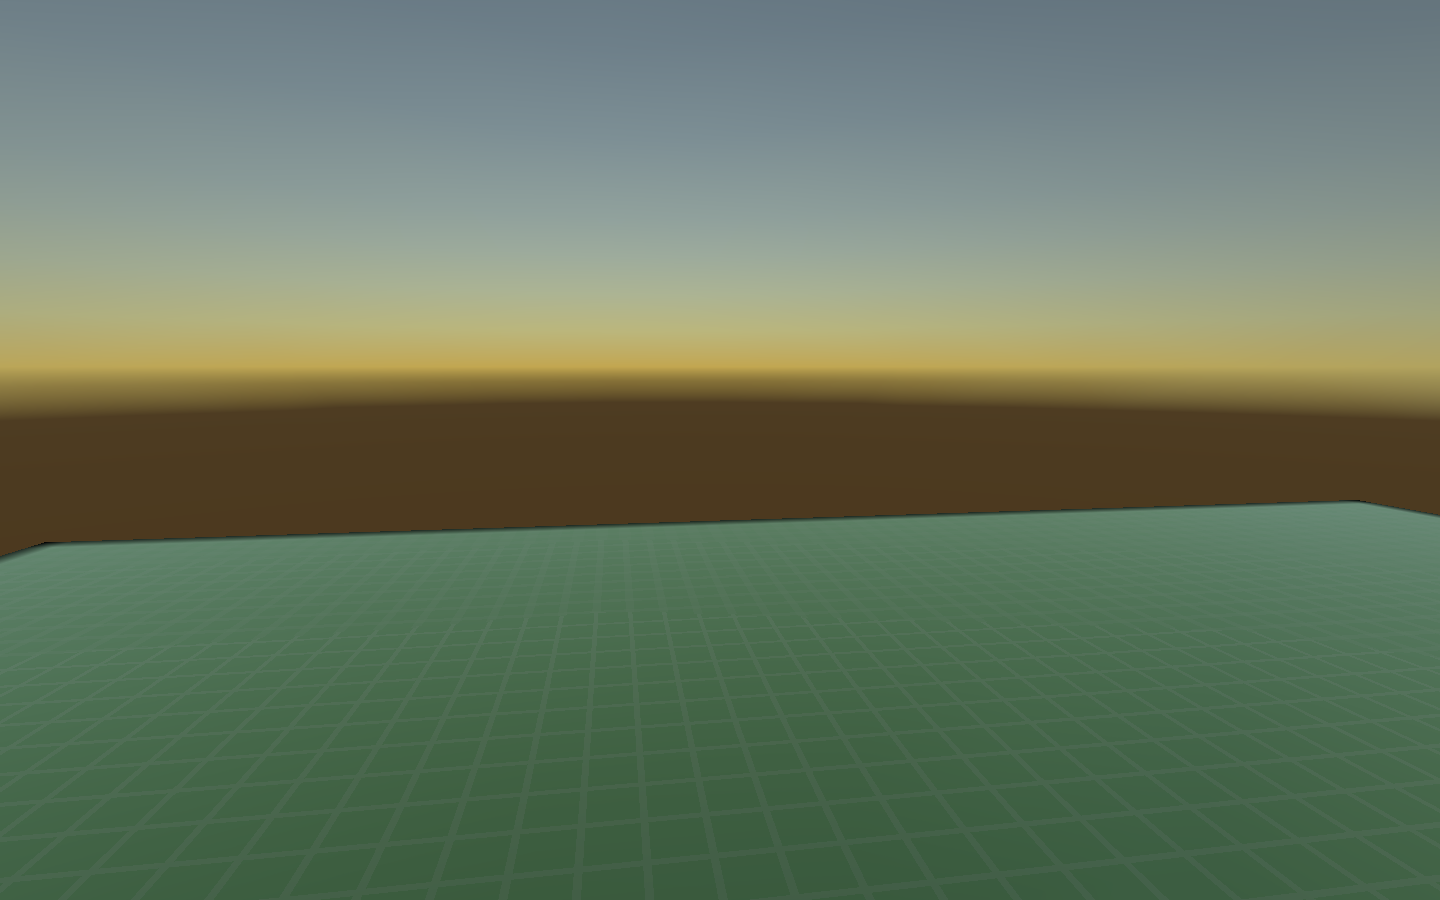 Disablesun and hud 0 commands enabled
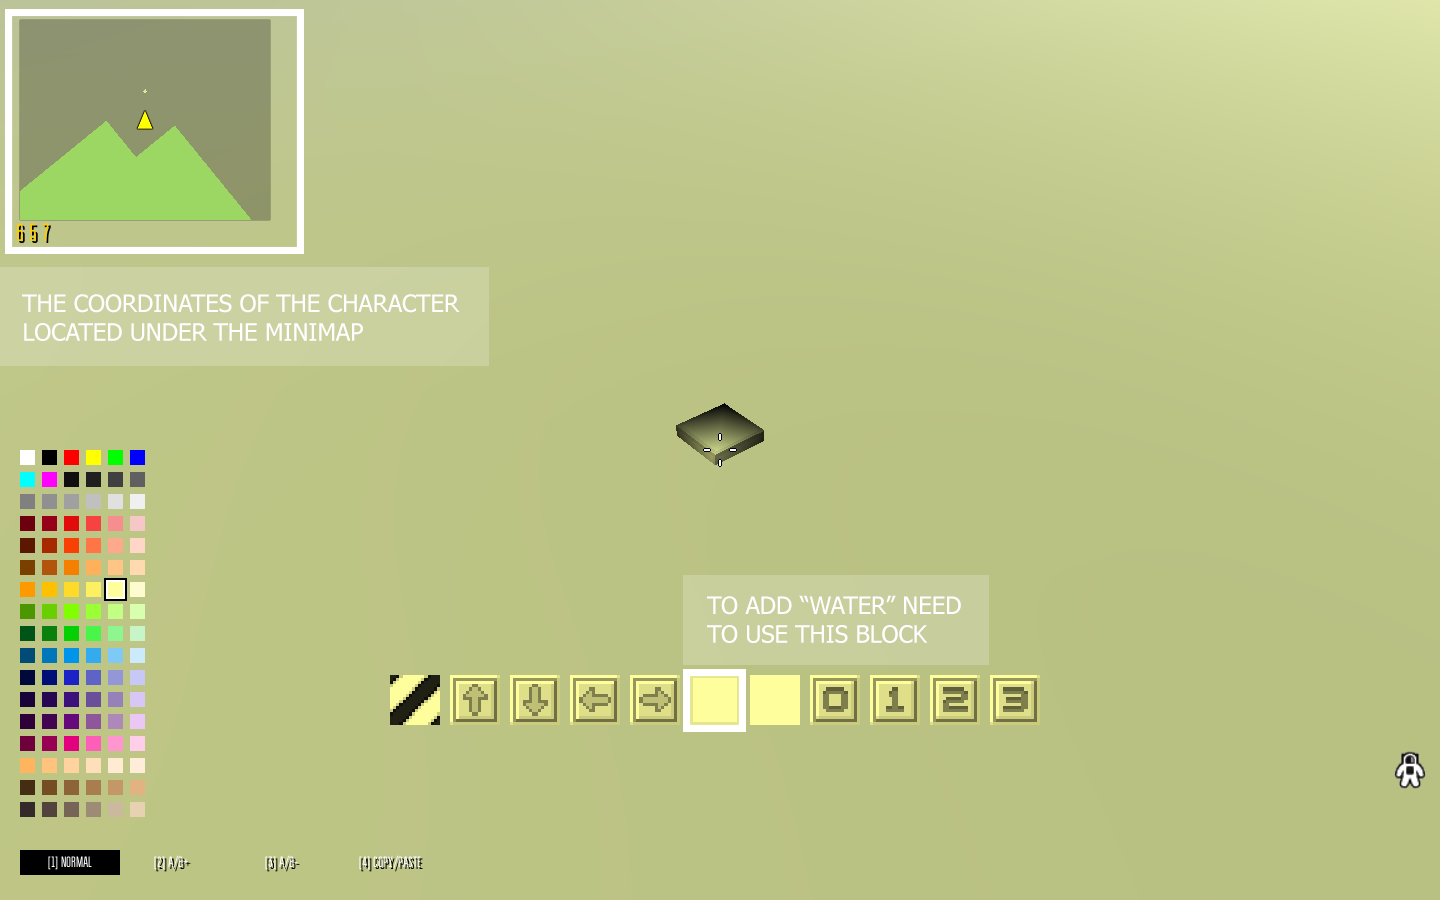 As you can see, "water" can be any color
Other — save maps and load on private servers.
If you play with the launcher (you can download it here www.playblockpost.com), the maps will be saved in the following way: all maps will be saved in the maps folder located at the root folder of the game/blockpost/maps. Since you download the archive launcher, the root folder for you is where you unzipped the game.
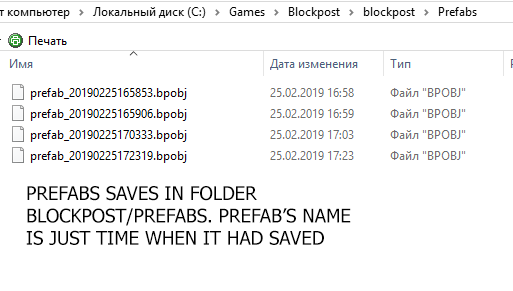
All prefabs are saved to the root folder of the game/blockpost/Prefabs. It is created when you create your first prefab. In the same folder you can rename and edit your prefab.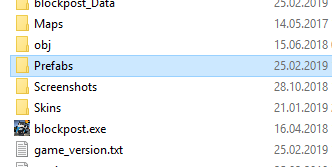
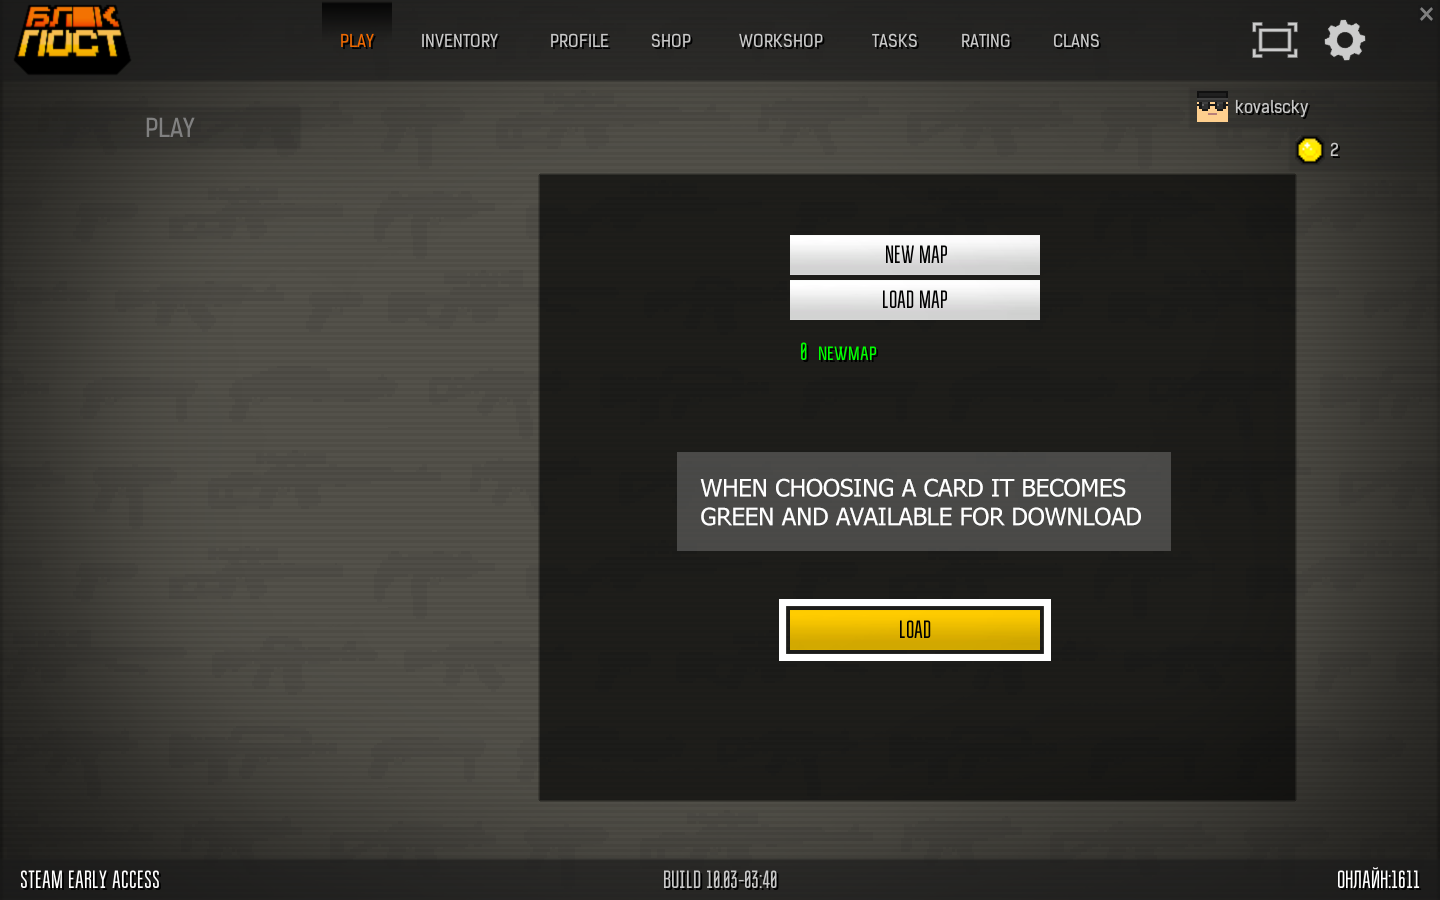
To do this, you need to go to the tab on the main screen of the game "custom server" and click on the button in the lower left corner "create server". After that, you will be redirected to your server. Initially, the map is empty, consisting of white blocks.
Opening the admin menu by pressing English key "K". Next you need to tab "download maps".
Modifiers are permissions to specific actions. "Allowed to break" - on / off. destructibility on the server. "Allowed to build" - on / off. ability to put blocks to players on the server.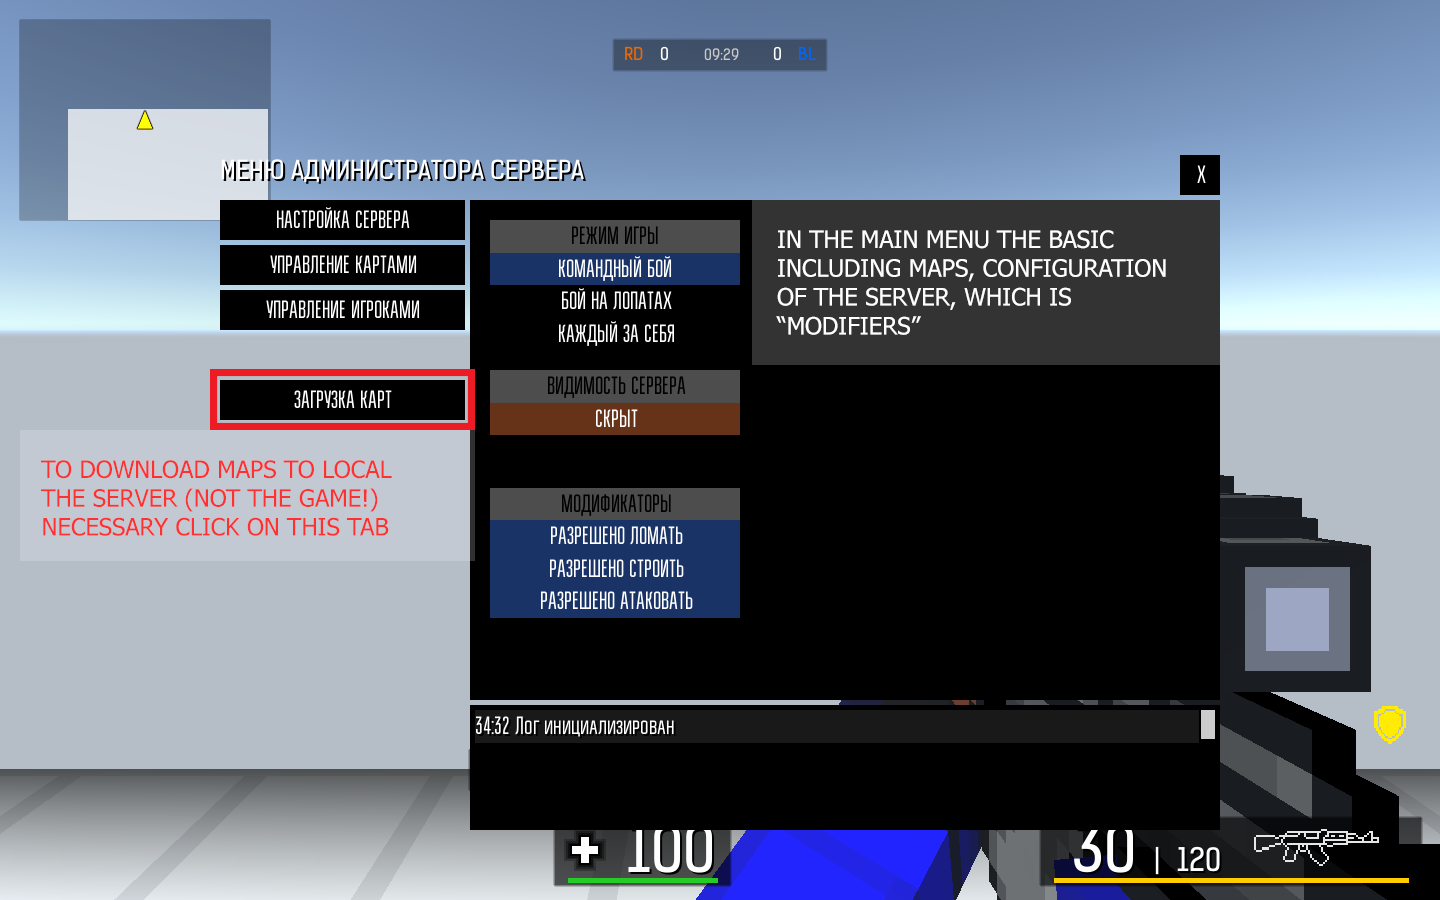
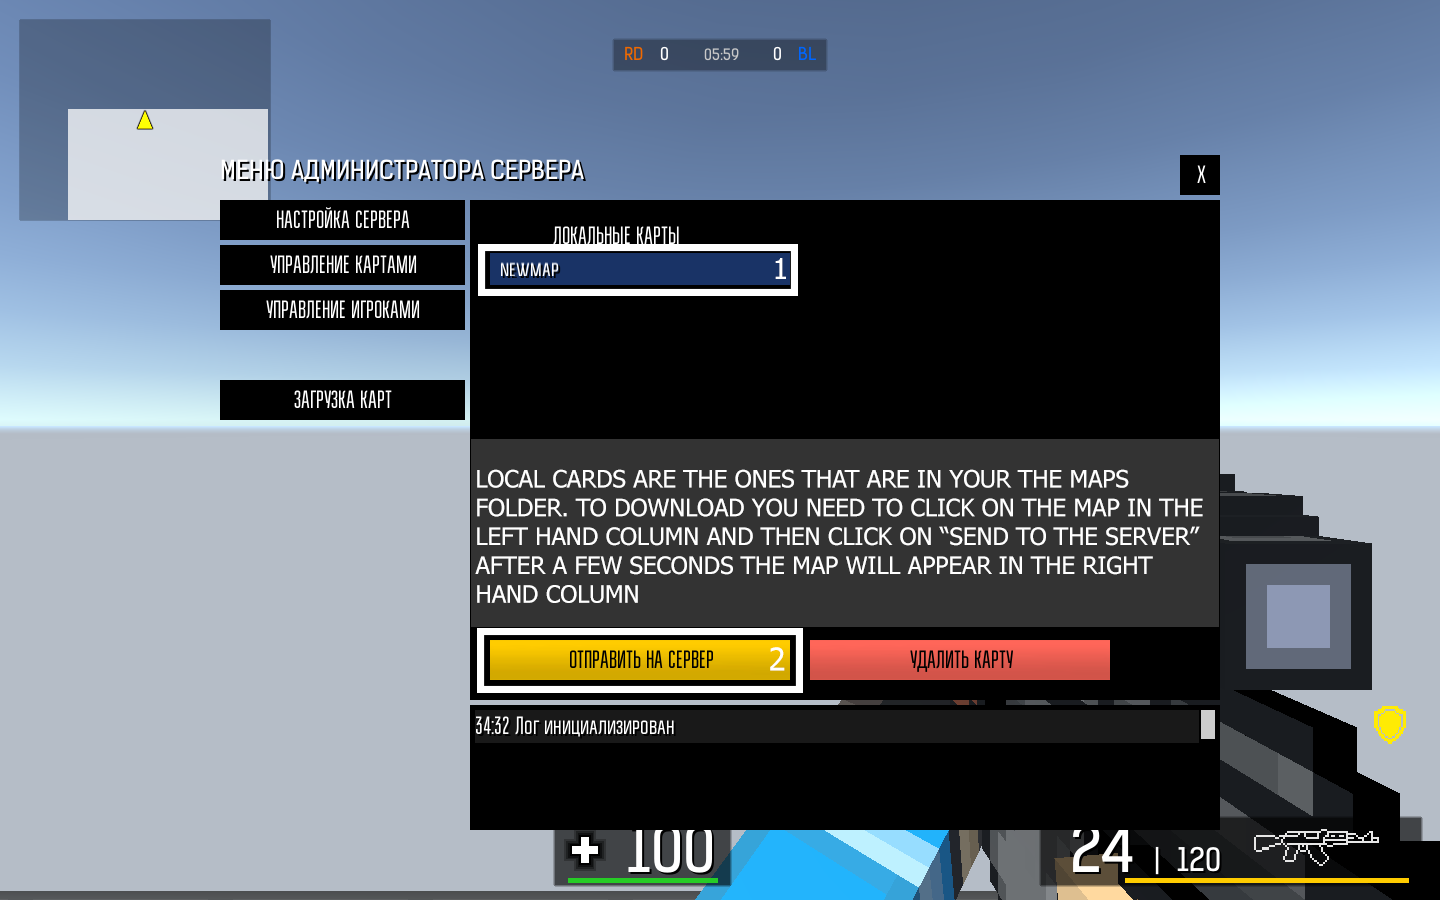
In the menu that appears, select any available map from the left column by clicking on it (the selected card becomes blue), then click "send to server". Card processing will take a few seconds and it will be on the right. Attention! In the name of the map there shouldn't be no other symbols except letters for the transaction.
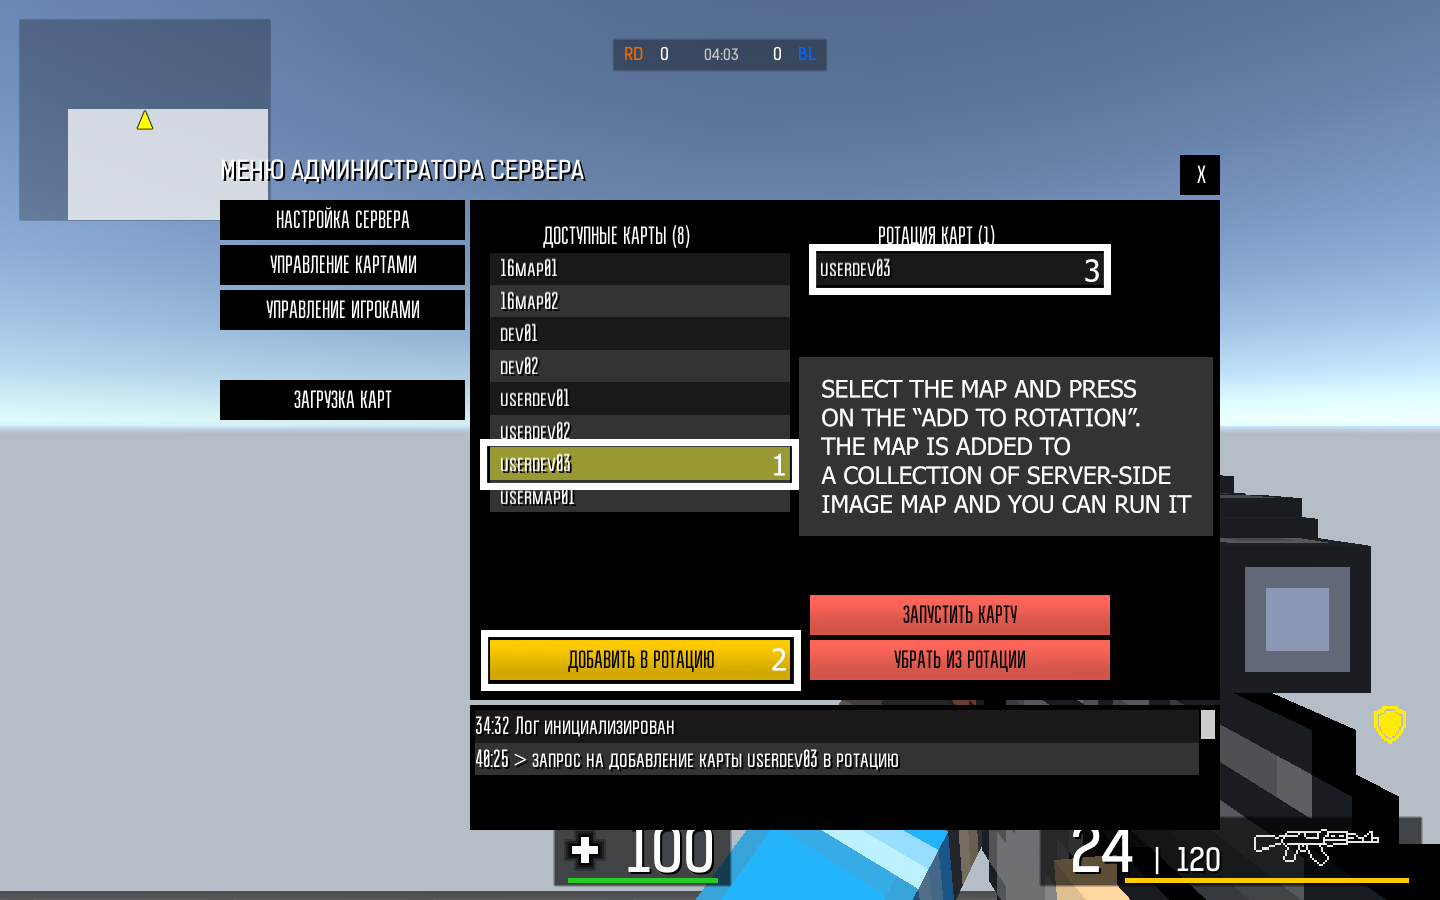
To finally run the map on the server, you need to go to the tab "manage maps", then select the desired/s maps and move using the button" add to rotation " in the map collection (the name of the map is highlighted in yellow). Next, you can wait for the end of the round (the cards are loaded sequentially from top to bottom), or by clicking on the map to launch it through the appropriate button.
- Заработок на игре!★ 4 (391)10k views24 ♥1 minRussian
- > Weapon Stats <★ 5 (284)8.5k views309 ♥25 minUpdated 12 Jan, 2025
- Фарм★ 4 (148)8k views54 ♥1 minRussian
- (Сиквел) Отличные пушки до 5 рублей.★ 4 (41)5.9k views47 ♥4 minRussianUpdated 1 May, 2020
- Список преступников BLOCKPOST★ 4 (60)4.9k views35 ♥1 minRussianUpdated 31 Jul, 2021
- ALL console commands | ВСЕ консольные команды★ 4 (99)4.6k views92 ♥3 min




- Upgrading to PremiumTeam Fortress 2★ 5 (20k)1441k views11k ♥6 minUpdated May 11, 2022
- No More Room in Hell Official ManualNo More Room in Hell★ 5 (2.8k)569k views2.1k ♥29 minUpdated Apr 22, 2019
- NMRiH Community Hosting GuidesNo More Room in Hell★ 5 (526)351k views653 ♥1 minUpdated Aug 10, 2022
- How to 'Git Gud' Soon™MORDHAU★ 5 (2k)318k views3k ♥68 minUpdated Nov 16, 2024
- Лучшие кооперативные игры SteamPAYDAY 2★ 5 (1.5k)315k views2.1k ♥56 minRussianUpdated Apr 27, 2025
- Desert Eagle Heat Treated | Blue GemCounter-Strike 2★ 5 (1.6k)293k views1.5k ♥2 minUpdated Jan 16





This guide was created by its original author on the Steam Community. Are you the author and want it removed? Request removal.