Operation ColdPeak Guide (Wave specific details and tactics)
Intro
Unrelated: I created a fairly extensive stats page that calculates time to kill, shots to kill, and more with variable distance, weapons, attachments, vests, and helmets.
https://docs.google.com/spreadsheets/d/1IznIOkCVcsjEiZ3u3T_CRMMWZRd5V_35uvwkYSea-T8/edit?usp=sharing
Basic information
Here are the basics of Cold Peak, keep in mind I have to talk very generally here because things are different in each mission. I will give more specific information in individual sections.
3 coins per checkpoint. Checkpoint at the start of Wave 1, and after every Wave.
2 Sniper, 1 Rifle, 2 Medic
Weapons
Assault: FY LMG, FY-103, T27, AC7 MG (but anything can work)
Sniper: Miller, BT50 crown, Karkom snr, AY 550 etc
Engineer: AC7, Exar-L, or CCR CQB.
Medic: Almost anything.
Pistol: AQUATIC ASSASSIN*** 4EVER, or whatever you like.
***NOTE: The water pistol can kill Helicopter for side-mission in 1 shot, does same damage against tank as RPG, and can shoot through shields. The Aquatic assassin can also kill the Apache Helicopter easily in Ambush.
Equipment
Pockets: 2-3 smokes (optional grenade)
Helmet: Warlord/Crown Helmet is best, but anything can work
Gloves: Anything.
Vest: Frontline, Crown, or maybe Atlant vest
Boots: Fast or Sliding
Because repairs are expensive, it makes sense to let the health of the Terminal get down to at least 30% in Spearhead or Zenith or 15-20% in Ambush. If you see a rocket coming try to take one for the team:
https://www.youtube.com/watch?v=JivytDWbLSg
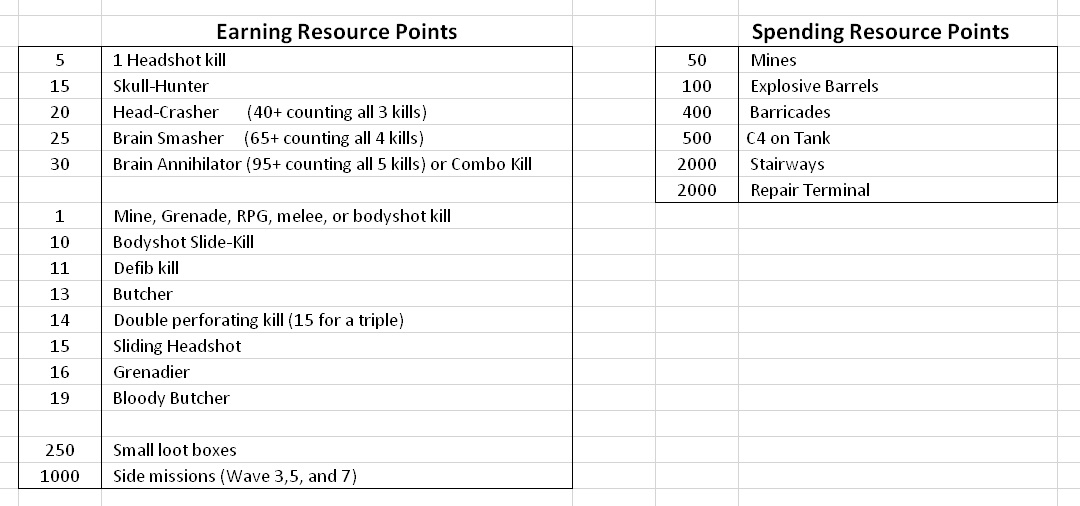
Rule of Thumb: It is better to slide kill if there is only one enemy, but if you can get a skull-hunter or better, headshots are worth it.
Stairways: Most staircases are useless and are generally considered a waste of resources.
Explosive barrels: Use sparingly and keep in mind they can kill teamates. Note: exploding them causes instant-kill burn damage to enemies nearby for a short time.
Barricades: Expensive, but very worth it in some scenarious. Their main uses are neutralizing turrets and redirecting enemy troops. They will last till the end of the round in which they were activated.
Box Hunting: Loot boxes are useful and respawn after each Wave. Often 1 medic will run around and find them, but in some parts of cold peak it is better to have both medics stay with you.
Side-missions: Most can be done by 1 medic, but sometimes they require a coop-climb to access. In most situations you can do the coop climb at the beginning of the mission so that two people aren't required to do the mission.
You will win winter edition weapon rentals and a random number of crowns for beating the individual missions. You will receive a badge if you do them without dying.
Marathon will give you winter weapon rentals, kredit gun rentals, crowns, and Winter skin.
Spearhead
Side missions are available round 3, 5, and 7.
Snipers might like a high rpm sniper rifle more than a slower, high damage one. This map is pretty easy for headshots because there aren't many long range targets that need to be eliminated immediately.
Stairways: The SE staircase is awesome. The others were useless because of a pipe you could run up. They have removed the pipe but I would still recommend not using the stairs. Save the SE one for a special occasion :)
https://www.youtube.com/watch?v=843vGPVKeo4
Explosive barrels: I like to use them on the SE turret sometimes but I don't often use barrels.
Barricades: If you have a good sniper you shouldn’t have many problems with turrets, so I wouldn’t use them due to their price except for North-West barricade in Wave 6 and also during Wave 8. During Wave 8 I would activate the barricades in front of the North-East and North-West turrets to give you one less area to cover and a time delay because Specops have to walk farther to get to you. Video demonstrating this is in the section for Wave 8.
Squad 1 (1 rifle, 1 sniper, 1 medic)
Squad 2 (1 rifle, 1 medic)
Always stay in your squad before Wave 2 and after Wave 8.
Box Hunting in Spearhead: The first 7 waves you can have 1 medic run around and get them. It is nice to have the medic return for Wave 8. You will have about 15 seconds between rounds and I recommend having each player pick a direction, and checking that area for boxes quickly after each wave. Make sure you get back in time.
*Note: If you have 2 snipers, it is easiest to have Rifle shoot West, semi-auto Sniper shoot East, and other sniper shoot North.
https://www.youtube.com/watch?v=aY5FseyGJbg
^Shooting through the holes of the turrets was recently patched in a recent update unfortunately.
There are 2 RPG boxes that spawn nearby. You get 20-25 seconds between Waves and you can pick them up quite easily. I recommend mainly using the RPG’s on turrets (especially the south one) if they are shooting the Terminal and you don't have time to shoot it normally. Use them for the helicopter if you get that side-mission, too. On Wave 8 since there aren’t any turrets you could use them on clusters of spec ops.
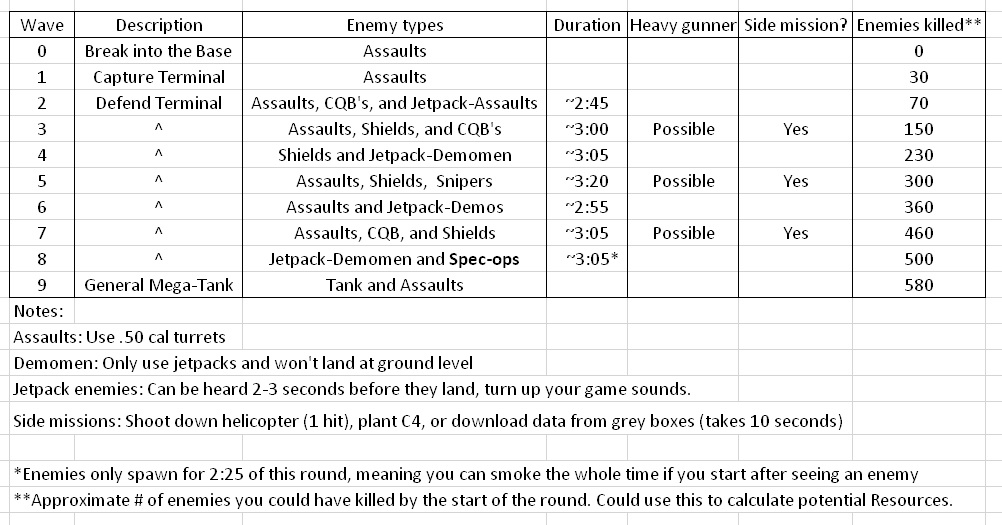
Note that many Waves will not have equal distribution of enemies between the East and West sides. In my experience it is usually the West side that gets more enemies.
Storming the Wall
Fight your way to the wall and have a medic push the truck while the others cover him. After climbing the wall, go down the stairs on the left. There is a door at the bottom that requires 200 resources to open. There is a box next to the door with 250 resources inside that will open up after everyone gets to it. When you blow up the door you will get a checkpoint. Here are 2 potential routes:
https://www.youtube.com/watch?v=LdfpNuHnvv0
Wave 1: Capture the Terminal
This Wave starts the second you walk through that door. There will be mines on other side guarding each path, shoot them to not die. Squads head to the terminal. There are scattered enemies but if aren't careful you can run into the 50 cal. To proceed to the next wave, activate the 5 second button on the Terminal. Clearing the enemies and activating the Terminal will give you a checkpoint and 500 Resources. Here are 2 potential routes:
https://www.youtube.com/watch?v=qkHvmZ_O5UI
Wave 3:
Shields introduced. They are not friendly like they are in Tower.
Wave 4:
Jetpack-demos are introduced this round. They are the most serious concern in Spearhead. Rifles should shoot them as they land and prioritize them over any other enemy. Here is their spawn pattern for jetpack-demos to the West: https://www.youtube.com/watch?v=LTKGoQgMpis
Wave 5:
Snipers do not spawn on the ground to my knowledge, they are on platforms. They usually spawn to the north and south west.
Wave 6:
This level is pretty much Whack-A-Mole with jetpack demos on the right side of the Terminal.. While you are shooting at one, another 1 or 2 will land. If there are too many sometimes it is useful for medics to shoot one or two of them. The Shooter on the left side of the terminal should stay there, but the sniper can help out on the right side. It is useful to buy the barricade on the rights side of the terminal in order to block the turret and make enemies go another way.
Wave 8:
This level is a lot of spec-ops. You will notice a fog that reduces visibility. I recommend smoking the whole time, starting when you see the first spec-ops. I recommend putting up the Northern barricades to constrain spec-ops' entry points. Repair the Terminal at end of round because even though the health bar won't be visible in Wave 9, some people have reported that it can still be destroyed. Below is gameplay of Wave 8, it compares using barricades to not using them:
https://www.youtube.com/watch?v=kOA42fW9t8g
Wave 9: GENERAL MEGA-TANK
This tank is OP. It will kill you faster than a spec-op enemy and will take ~50 RPG hits to kill. Assaults will keep spawning forever. Rockets seem to spawn in 2 different locations at a time so stick to cover and stay with a medic. You should note that you can place C4 on the tank. Below is a video showing how to do this.
https://www.youtube.com/watch?v=kRVQyZ7fKl0
You win after destroying the Tank and reaching the checkpoint. The entire mission can be done in ~26 minutes pretty easily.
Alternate Strategy:
https://www.youtube.com/watch?v=H-8U0aHZESY
Ambush
**DISCLAIMER** I'm writing this guide for the purpose of making people's Marathon runs smoother. I have only ever done Ambush in that setting. People do Zenith for fast XP and Marathon for a lot of XP per token. Either way, Ambush isn't done as an individual mission much at all so I don't feel bad having Marathon as my focus. While the concepts here are valid in "Ambush only" runs as well, but are not aimed towards them.
Ambush is a highly variable mission. Besides individual skill level, you need to be able to work well with your team, and a successful Spearhead mission with lots of extra Resources never hurts. I haven't had Ambush go exactly the same way twice yet, but the strategy I am going to share has been successful on every run I have done with clanmates.
-If the Container is being damaged from somewhere regularly start a smoke order to protect it.
-STAY AGAINST WALLS
https://www.youtube.com/watch?v=cleZjxwsK3o
https://www.youtube.com/watch?v=rurhe5sK2_8
More details in video:
https://www.youtube.com/watch?v=6gtyc4IurOU
WARNING: The mine respawns at MG1 a couple seconds into Wave .
Jetpacks are Assaults and Snipers
Side mission will be available.
The rest of the team will be on the platform. Basically 1 sniper will be responsible for jetpack spawns on Tower 2, 3, 4. The other will mostly watch spawns in Middle, and bots coming towards Platform. It is crucial that MG2 is killed very very quickly.
Side mission will be available.
Jetpacks consist of snipers demomen.
https://www.youtube.com/watch?v=CwlKEnwgjJg
Sniper 1 on platform shooting jetpacks + MG2.
Rifle1 by container or nearby with his/her medic. I would recommend staying against the container because it is easy to get knocked down if you are too close to the enemies. Don't forget to check Middle for spawns.
Jetpacks are mostly demos.
https://www.youtube.com/watch?v=OPUiZmmt0B8
Rifle1 and mows down shields and anything coming towards stairs
Easy to activate the barricades to MG1 so thast they are trapped to 1 staircase, but if you dont' want to you can just take opposite sides of the staircase with the medic. The medic should also check the opening to MG2 because there will be an occasional enemy. The medic is the Rifle's eyes and ears
Jetpack enemies will be mainly demos.
https://www.youtube.com/watch?v=rKmQR5oieMI
From now on:
Sniper1 shoots at Tower 3, Tower 4, and MG3 + MG2-roof spawns to the right of the turret.
Sniper2/Rifle2 shoots at Tower 1, Tower 2, MG2 + MG2-roof spawns to the left of the turret.
Medic 2 is responsible for keeping snipers alive but a lot of the time they won't need help.
MG3 is agro'ed by snipers upstairs and can be shot from an angle
If at any point the Container starts taking damage smoke it and take care of the threat. If you can't, or the enemy keeps coming back start a full-team smoke rotation.
Medic and Rifle1 are on the ground.
Rifle1 will basically be running around the container with his medic(s). It makes it a lot easier to put up all the barricades but it will cost you 2100 Resources per round to do this.
Notes:
Most ground enemies will be shields.
All MGs have the potential to be active.
Jetpacks will spawn on top of Tunnels and there will be spawns on the roof of MG2 that are not on Tower 3. Rifle1 and Sniper2/Rifle2 will be responsible for the spawns on top of Tunnels. Sniper2/Rifle2 and Sniper1 will share the "random" spawns on top of MG2.
Most Jetpacks will be Snipers and Demos.
Rifle1 will also do the same thing but this round there will be a tremendous number of spawns from Tunnels. There will also be Jetpacks on top of Tunnels again.
Notes:
Most ground enemies will be shields.
All MGs have the potential to be active.
Most Jetpacks will be Snipers and Demos.
All MGs have the potential to be active.
There will be a massive amount of Jetpack Specs and the normal amount of Demos.
Zenith
Rifle: FY LMG, T27, FY103, etc.
Sniper: Anything
2 Sniper 1 Rifle 2 Medic:
Sniper #1 : Anything
Sniper #2 : Karkom SNR, AY 550, CCR SPR. Bring good secondary just in case bots get too close.
Rifle: same thing
Sniper #1 Kills demos and snipers.
Sniper #2 Acts as a mid-range rifle or backup sniper. Stays by cannon in Wave 6.
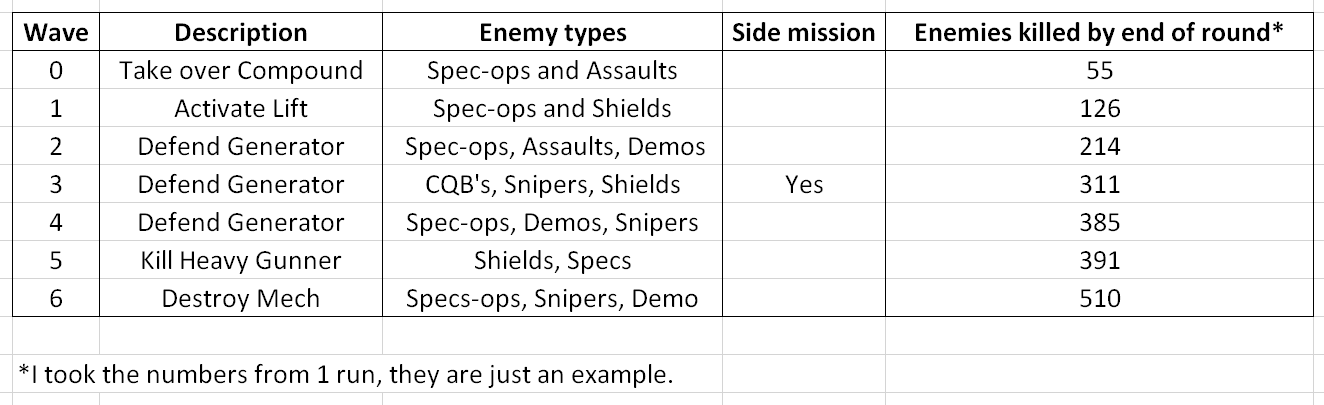
Wave 0:
Activate the box and then the three generators. You will have to kill all enemies to proceed. I recommend staying in 1 or 2 groups. I like these 2 routes:
https://www.youtube.com/watch?v=da-YvPveljk
Wave 1:
Stay in the big base in the middle of the map. Kill off enemies and then go activate the button by the lift to proceed to Wave 2. Do not spend resources this wave. You should have at least 4000 Resources by the end of this wave.
You need to protect the generator this wave. Sniper will take care of demos from now on. Sniper can do it from the generator or take this position:
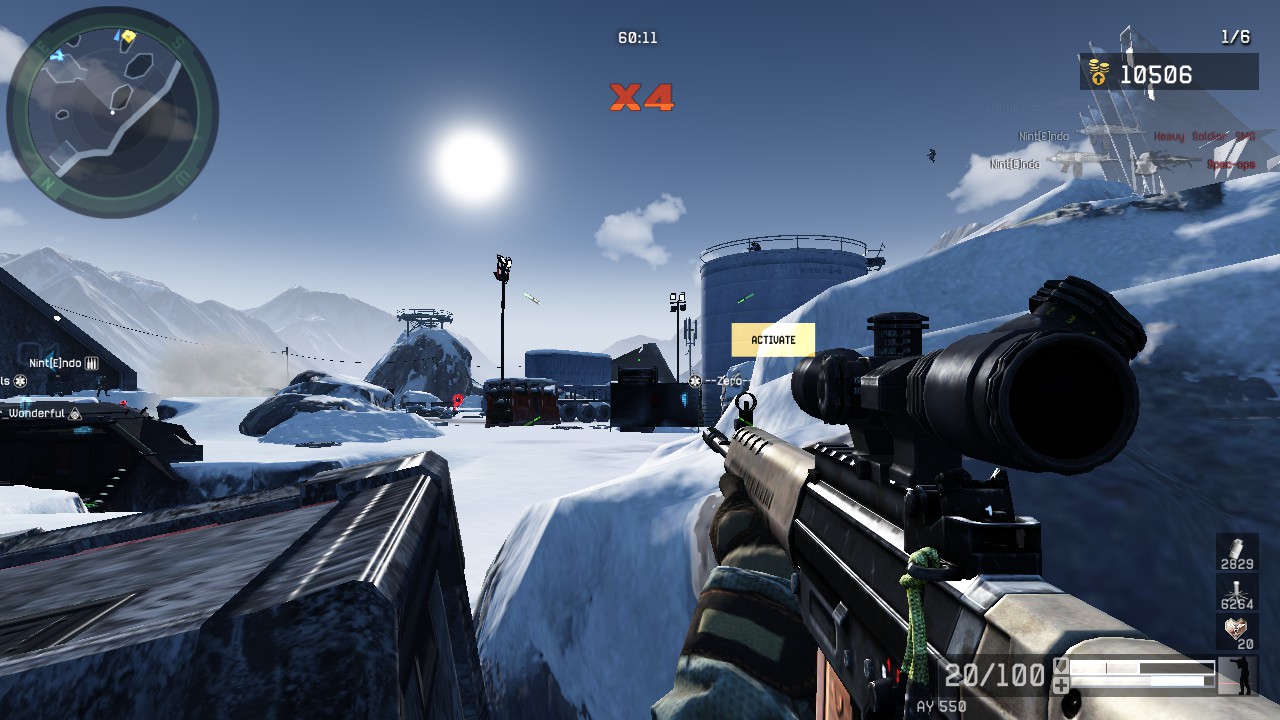 There is a turret on the NW side of the base that can hurt the generator, so keep the generator smoked. It is a good idea to buy the barricades on the North and South ends of the base this round. Your resource-hunting medic will start looking for resources this round and will continue to do so until the heavy gunner.
Here is a video showing what the rifles do and how to take care of the turrets:
https://www.youtube.com/watch?v=RDehdgFEFa0
Wave 3:
This wave is usually really easy if you activate the barricades on either side of the generator so that most of the enemies are funneled through the hallway. Both Rifles watch the hallway and I have noticed it is easiest if one of them is “bait”. The “bait” rifleman will stand against the wall and attract all of the shields while everyone else stays a little bit further back. This way no one gets knocked down. Both rifles will shoot down the hallway for the most part and the sniper will shoot shields and snipers that spawn from the south, east, and west (sounds like a lot of area to cover but they spawn slowly and a rifle can help if you get overwhelmed). It can be helpful to smoke this round, but it often isn’t needed. There should be a secondary objective available this round.
Here is a video showing what the bait does:
https://www.youtube.com/watch?v=FUJtGREswZQ
Note that if you are bait it is a good idea to shoot the shields a lot when they charge you so that they trip or stop for a second.
Wave 4:
This wave is like Floor 17 of Tower or Wave 8 of Spearhead, there are lots of Spec-ops to take care of. If the terminal is at below 30% health at the start of this round you are going to want to repair it quickly. You will want to buy the South-West barricade in this Wave and keep smoke covering the generator. There are demomen on a distant hill towards the North-East (I’m going to call this direction the front) that are constantly spawning and they are your sniper’s SOLE RESPONSIBILITY. The sniper will have an easier time if he/she is behind the demos (screenshot coming soon). All spec ops that can be seen when looking out the front opening are the duty of 1 rifleman. The other rifleman shoots out of the windows. The medic should be focused on healing everyone, but keep in mind that the “front” rifleman will take the most damage. You want 10-12 thousand resources by the end of this wave for a quick Wave 6
Here is a clip of me shooting out the front:
https://www.youtube.com/watch?v=HO1wF7qDZT0
Wave 5:
Before you push the button for the elevator you should gather resources. Hopefully you will have 10-12 thousand in total, because it will make the next part much faster. After you call the elevator you will have to kill the heavy gunner. There is a nice way to kill it demonstrated here:
https://www.youtube.com/watch?v=3zI11nbbpaw
You need 1 medic to be by the button (he is the distraction), and everyone else should be on the container. Throw smoke so that no bots (except HG) will shoot the distracting medic. Make sure to throw smoke at your feet so that the Heavy Gunner cannot see you. Then everyone shoots the HG until it is dead. The distraction medic will have to be seen by the HG for this to work.
After you kill the HG you will run onto the elevator. There is usually 5-8 bots to kill if you kill quickly..
Wave 6:
Now that you have experienced that thrilling elevator ride, you need to get to the cannon. Despite the fact that we are in the future and have to fight giant robots, we still have to push the cannon by hand.
Positions:
The sniper on your team could break away from the group and go hide behind the towers. He would shoot jetpacks in the air, and the bots won't notice him. It is ok to have everyone by the cannon though. Short clip of this:
https://www.youtube.com/watch?v=jh1-V6zQrqI
Everyone else should hang out by the cannon and throw smoke. The cannon will need to be pushed, fired, and reloaded. Keep in mind that shields spawn randomly around the map and will come after the people at the cannon.
Towers:
Each tower has 2 spawns and each spawn spawns the same type of enemy each time. Destroyed towers contain resource boxes and RPGs, so someone should go get those if you have under 12,000 resources at the start of the wave. When the cannon is aimed at a tower, there is a BIG RED TARGET that pops up so you know when to shoot. You get an achievement for destroying 100 towers, so fight with your friends over them. Team-kill if necessary.
The Cannon:
The cannon breaks stuff and it takes roughly 45 seconds to reload (I am guessing). You can use 2000 resources to make it reload in 2 seconds and this is advisable, but you should make sure that you have 2000 saved up for the mech. One person should reload and shoot so that no one shoots it on accident.You can skip tower, but it is good to shoot Demoman towers.
The Mech:
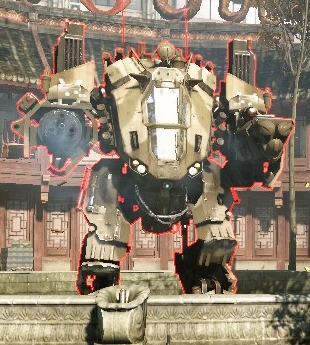
The Winter Mech is a bully and Spec-ops will come out of the gate with it. Shields will spawn randomly so be careful. You can damage the Mech by shooting the cockpit (like in regular missions) but you have to knock it down several times. If you hit the Mech with the cannon it only needs to be knocked down once. How to do it the quick way:
https://www.youtube.com/watch?v=TQd9lEZr-pE
If you are nervous about missing just push the cannon a little more before you shoot.
If that doesn’t work you can try to lure it back towards the cannon. Smoke will help you survive, but it can also make the Mech not follow you so be smart. If THAT doesn’t work you should retreat to the broken tower by the elevator. The Mech will glitch itself by the entry.
After you kill the Mech you can shoot more towers, shoot the snowman, or go push on the gate to finish the mission. It is is easily finished in 21-23 minutes, but 18 or under is possible.
Marathon
Now that you have read how to do each of these stand-alone missions, I will give you some hints for Marathon.
Major differences between Marathon and stand-alone missions:
-You will keep all the Resources you earn for the whole mission.
-You need to find loadouts that work well at close range in Spearhead, long range in Ambush, and everything inbetween. For this reason we use 2 snipers in our Marathon runs at the moment. Our rifleman uses FY LMG or T27. At least 1 of our snipers use CCR SPR/AY550/Karkom Sniper/RK14 EBR. We have found that these guns are very versatile and provided that your snipers are skilled there will be almost no drawback to this method.
Resource Management
We can all agree that Ambush is the mission people struggle with most. For this reason we should save Resources so that its a little bit easier. On all my runs with Exodus we have had 12,000 - 15,000+ Resources by the end of Spearhead. This makes it much easier to beat Ambush. We will waste many Resources in Ambush because Zenith is easily done without any extra Resources.
Spearhead
We repair 0-2 times in Spearhead, we compete all side-missions, and we kill tank with Aquatic Assassin + C4. We all camp by the Terminal except for the medic that finds boxes. The Rifle watches West side, 1 Sniper watches North, and 1 watches East.
Average results: 13-15,000 resources, Tank is dead by ~26:00
Ambush
In Ambush we will set up a LOOOTTTT of barricades Wave 6/7 and up. It helps because the enemies can only enter in a couple places. Keep in mind that many enemies will just shoot through barricades and damage the Container.
Done by 53:00-55:00 minutes. Resources depend on the run, but often over 10,000.
Zenith
We do Zenith roughly the same way as normal, but we waste a lot more resources.
One of the Snipers will have to take the "sniper" role and kill demos and snipers, the other one will act as a rifleman.
Last time we did Marathon it took us 72 minutes, and maybe 3 coins total. It is possible to do it faster and without coins though.
- WARFACE - The nearly "Ultimate Guide"★ 5 (287)20k views230 ♥6 minBulgarianUpdated 18 Jan
- Достижения с неизвестными условиями5.4k views38 ♥1 minRussianUpdated 10 Jan, 2022
- Mini-Achievements List★ 4 (72)3.8k views43 ♥3 minUpdated 27 Jan, 2018
- How to Destroy a Mech★ 4 (44)3.7k views19 ♥1 minUpdated 3 Aug, 2014
- Blackwood are the good guys.★ 4 (92)3.2k views56 ♥2 minUpdated 29 Jun, 2019
- Обозначения позиций на картах РМ★ 4 (44)2.9k views65 ♥3 minRussianUpdated 10 Sep, 2021





- Upgrading to PremiumTeam Fortress 2★ 5 (20k)1441k views11k ♥6 minUpdated May 11, 2022
- No More Room in Hell Official ManualNo More Room in Hell★ 5 (2.8k)569k views2.1k ♥29 minUpdated Apr 22, 2019
- NMRiH Community Hosting GuidesNo More Room in Hell★ 5 (526)351k views653 ♥1 minUpdated Aug 10, 2022
- ULTIMATE GUIDE FOR GAME DEV TYCOONGame Dev Tycoon★ 5 (5.8k)326k views10k ♥4 minUpdated 23 Jan, 2014
- How to 'Git Gud' Soon™MORDHAU★ 5 (2k)318k views3k ♥68 minUpdated Nov 16, 2024
- Лучшие кооперативные игры SteamPAYDAY 2★ 5 (1.5k)315k views2.1k ♥56 minRussianUpdated Apr 27, 2025






This guide was created by its original author on the Steam Community. Are you the author and want it removed? Request removal.