Optimized Rocket Interiors
1. Introduction
Well this is a little awkward. I haven't been playing ONI lately, in fact I left my last colony behinf in March of 2023. Right before I took that break I was working on this rocket guide, and in the back of my head I always thought I'd published it before I left.
Over the last couple weeks I've been watching Francis John's narcoleptic ONI playthrough and I got to episode 14 where he starts building his first rocket. Much to my surprise he commented "I went looking for tutorials on this... I was expecting things to have evolved a lot since I last played... but the only guides I could find were my own."
That remark got me thinking. I never get comments and questions on my rocket guide like I do on all my other guides. I started wondering how many views the guide had, or perhaps I'd forgotten to enable the comments section. You can probably already see where this is going; it turns out my rocket guide was never even published!
So I'm here now correcting that mistake, and while I can't promise this will be the end-all be-all guide to rocket design, I hope to at least give some examples of "evolved" rocket designs that I believe are a bit better than the staples of 12-24 months ago. According to Francis John there's a hole in the market for this kind of guide so hopefully I'll contribute a small amount towards filling it.
The one caveat is that all of this research and all of these designs were done in February and March of 2023, and there have been several game patches since then. Some of these concepts might no longer work exactly the way they used to. There were changes to telescopes, for example, to see up more symmetrically rather than be biased to the left. I'm not sure if that affects any of my placements or opens up options for more optimal placements. One very positive change was a reduction in which equipment counts as industrial machinery, so some of my rocket designs provide a point or two more of morale then they would have pre-patch.
In any case, all of my guides have the flavor of "teach you what to think about so you can improve on the designs yourself", but this one will really double down into that philosophy. I'm not doing any additional testing to see what still works and what broke, and I can't promise that if you find a problem I'll do the troubleshooting to fix it. Instead, consider this a crash course on rocket design with some practical examples that might or might not need a little fine tuning.
2. Objectives
Most of my guides use this section to spell out the requirements the design must meet, and the nice to have features that would make me consider one design better than another. In this case that's not as relevant, and all the criteria we're looking for from our rockets are covered in the background research section. Instead, I'll use this section to disclaim what is off-limits for the guide, specifically rocket mods and "building in space".
First, there are a lot of great mods available that introduce new types of spacefarer capsules, some significantly larger than the ones in the base game, and some that nicely fit in the size gap between the solo nosecone module and the standard spacefarer. I enjoy having options like those, but I'm not going to spend my time testing customized designs for something you can only build in a mod. So for the purposes of this guide we're using only the solo nosecone and the standard spacefarer.
Second, something that's become quite popular is to acquire melted steel and then continue to heat it (e.g. in a refinery) until it is able to melt the steel walls of the spacefarer module. Once you've broken out of the module in this way the entire area of "outer space" around it is buildable and counts as being inside the rocket. Again, this is a lot of fun, but the whole challenge of building a good rocket is the limited area inside the spacefarer module. I've seen nuclear reactors built "inside rockets" after breaking into space, so there's no point in me showing what I'd do with that kind of extra real estate.
So long story short, I'm only allowing spacefarer modules included in the base game, and no use of the wall-melting exploit.
3. Bottom Line Up Front - The Designs
After many hours of research, trial and error construction and playtesting, I've settled on a small number of rocket designs to highlight. The statistics section contains tables of metrics on nearly 30 different rocket designs that I thought were good enough to test and document, and that doesn't even count dozens of failed attempts that weren't up to snuff in one way or another.
At the end of the day I chose two of the best research rockets, one with a standard telescope and one with the large enclosed scope. I also chose the two best colonization rockets, one to carry three duplicants and one to carry four. It turned out the four-dupe design was almost as good as the best three-dupe design, so rather than go through construction of two completely different designs, I decided to show how to modify the four dupe design to carry three dupes with enhanced flexibility in other areas. The final three designs are shown below.
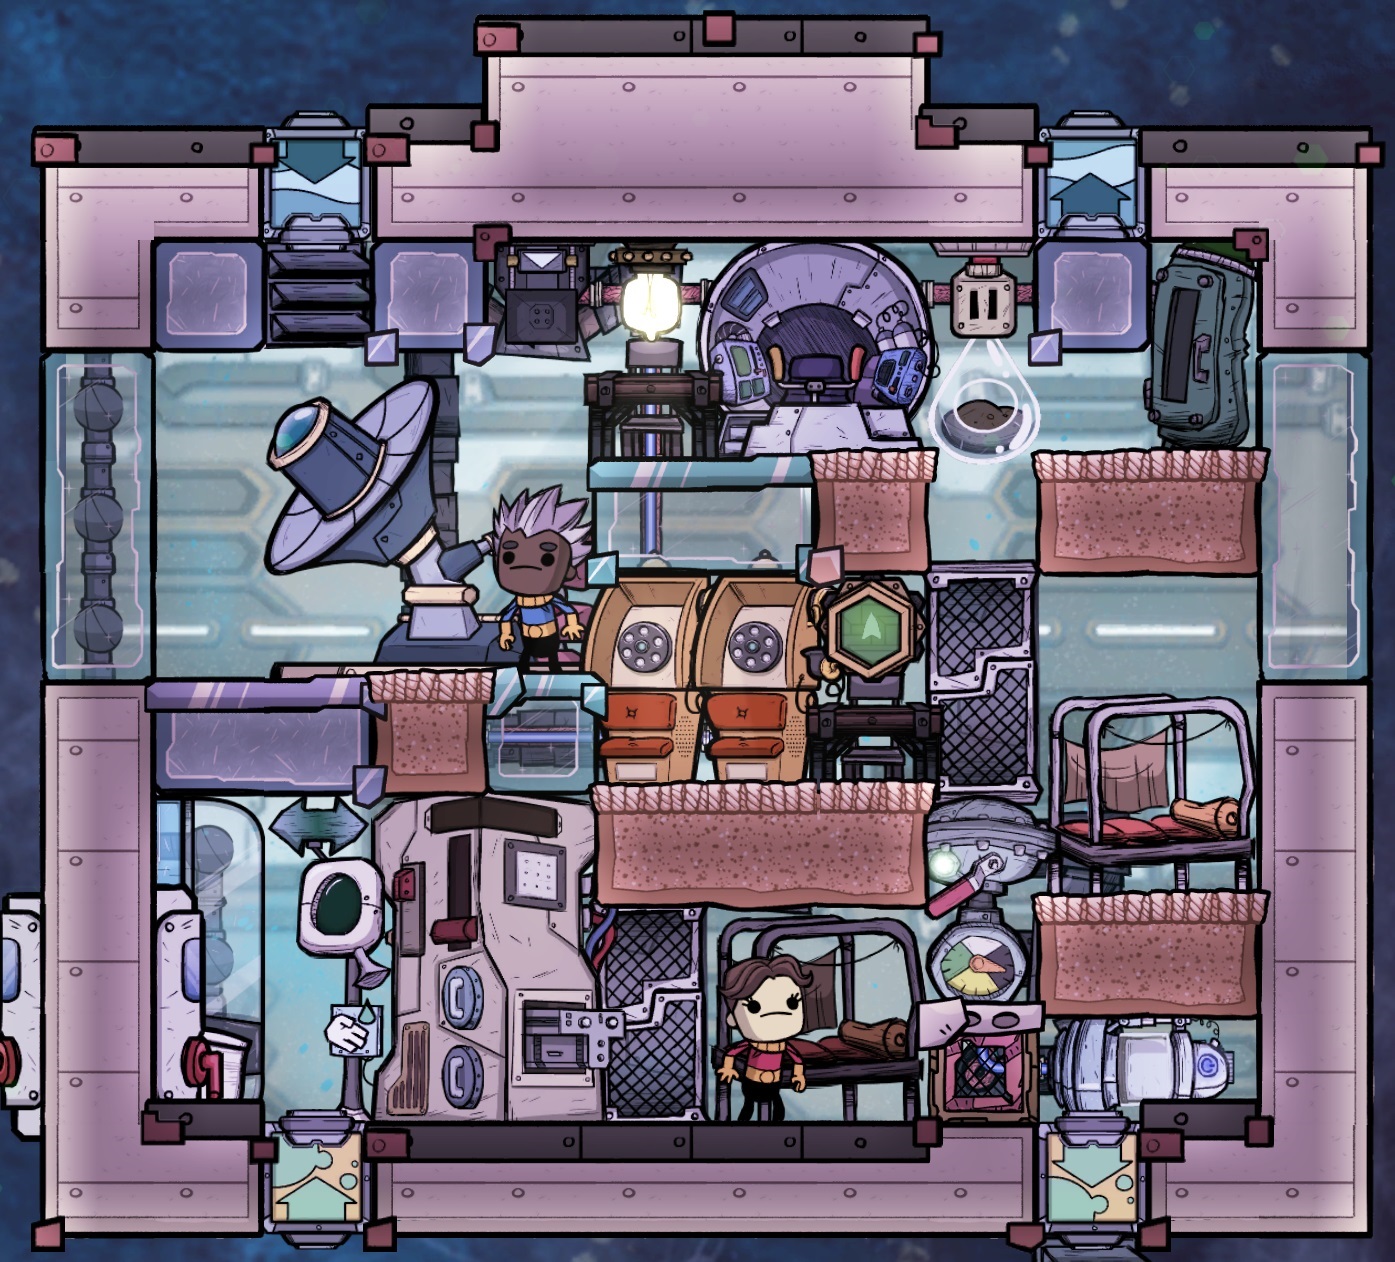
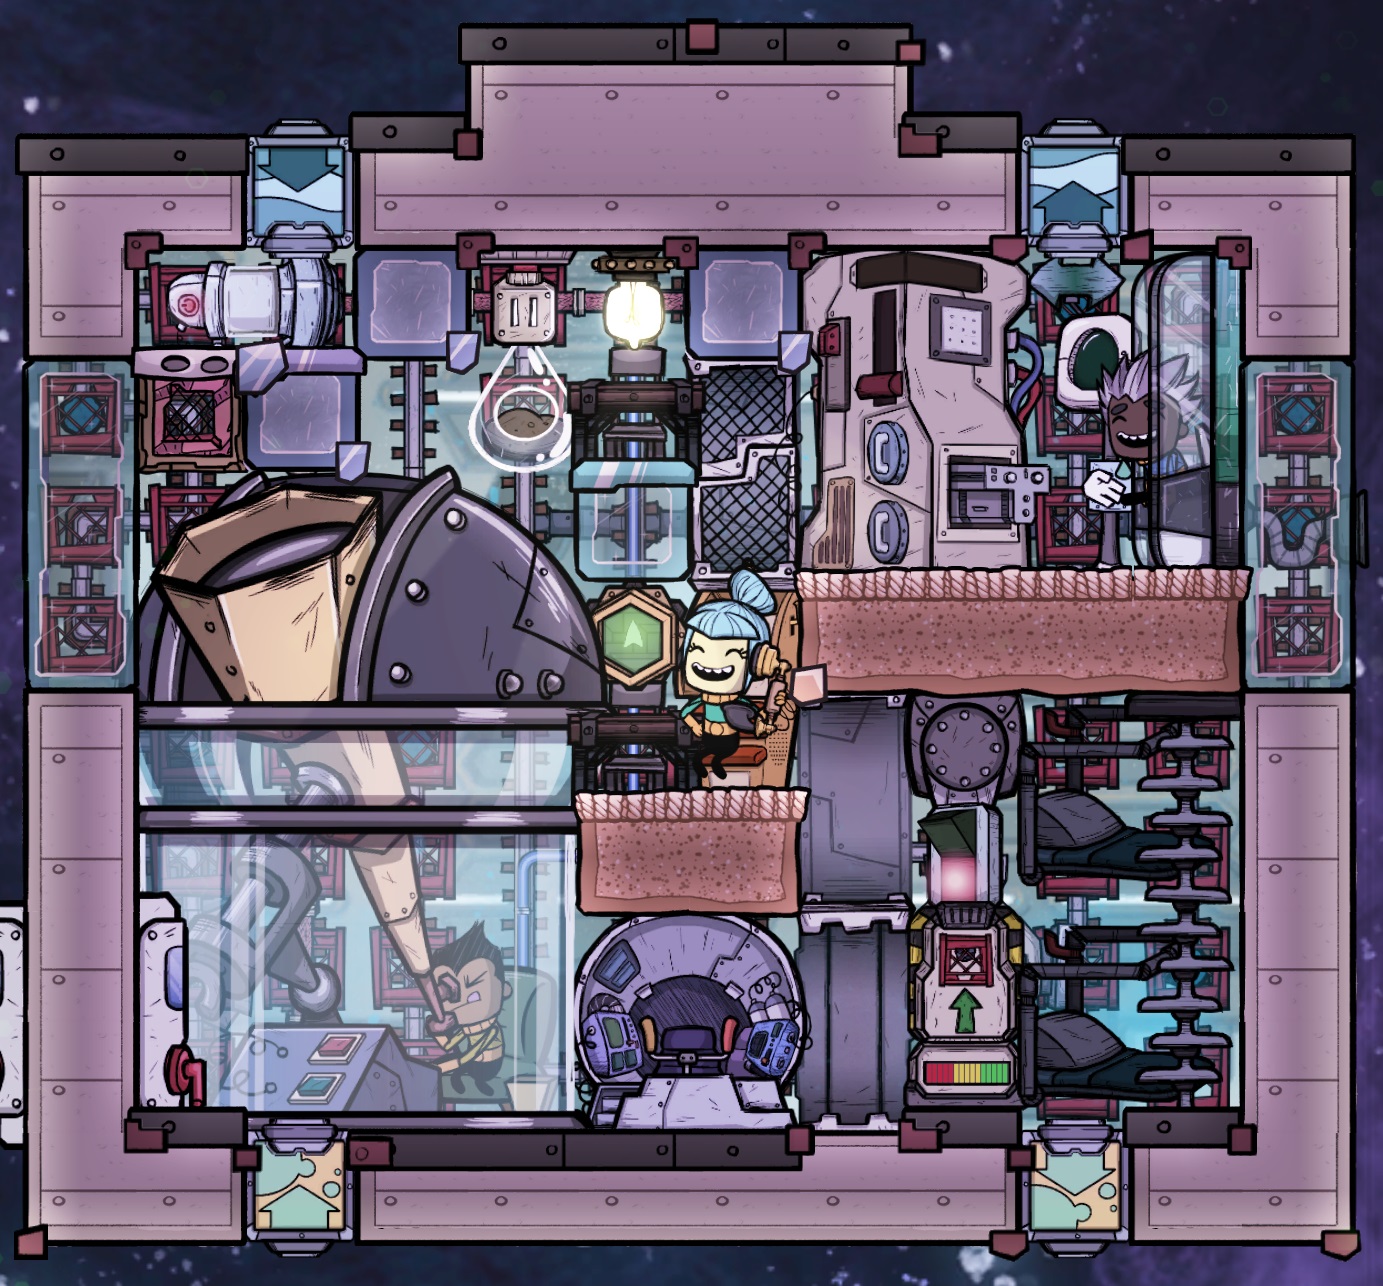
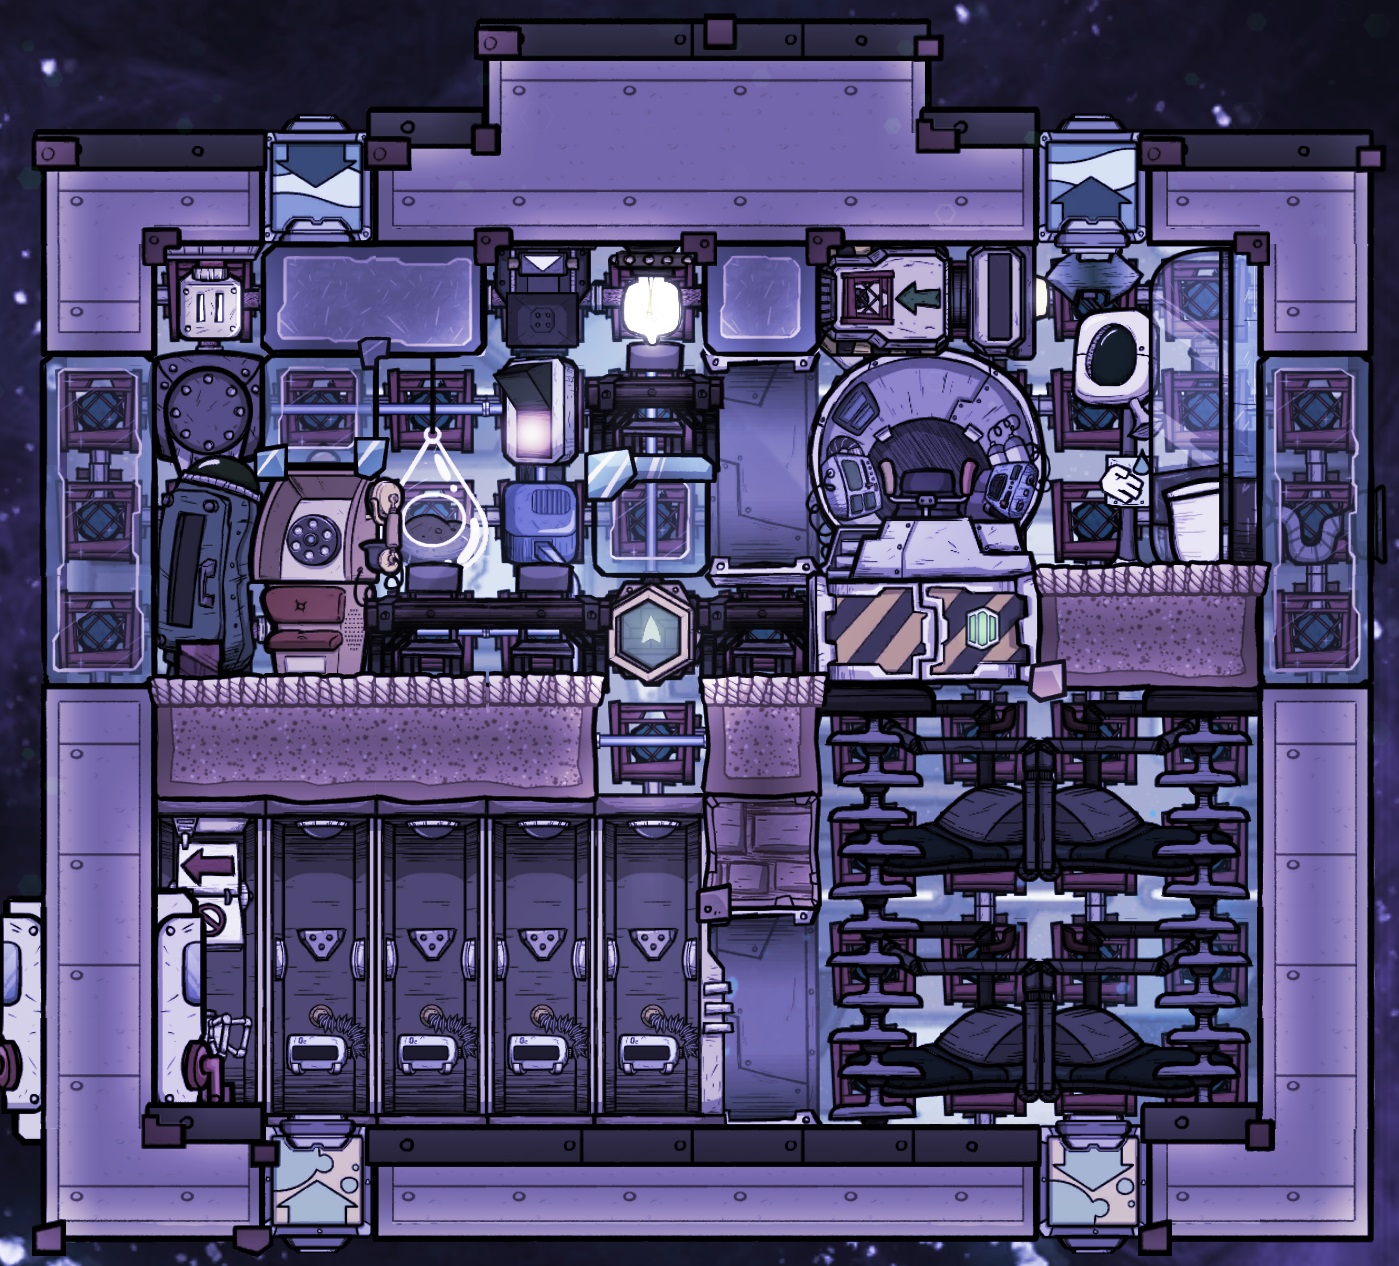
The four-dupe colonization rocket is the real pinnacle of this guide. With this option there's almost no reason to build a three-dupe variant, but I like that the area not used to cram in a fourth bed, suit dock, table, etc. gives a lot of flexibility in how to design the rest of the rocket. In the construction section I'll highlight these tradeoffs, giving you options on how to personalize the build.
Later in the guide I will highlight an honorable mention rocket that is somewhat in a category of its own. I would consider it an "Exploration" or "Mapping" rocket as it cannot perform research, but can support a single duplicant and an enclosed telescope for long periods of time in order to map out the universe.
4. Research and Optimization
4.1 - The Basics (Life Support)
There are three basic needs every rocket must fulfill. These are providing oxygen, removing carbon dioxide (CO2) and providing a toilet.
The first is obvious; without oxygen the rocket's occupant(s) won't last very long. You'll see in the oxygen subsection the timeline to suffocation is even shorter than you'd probably imagine. For this reason oxygen storage can be a tricky requirement to properly plan for.
CO2 is equally obvious, if somewhat less deadly. If you don't get rid of it it will eventually flood the cabin, preventing access to certain areas or stations. Your dupes won't die from it, they'll just be very inefficient leaving their workspace to gasp for air wherever the oxygen is. In my experience proper CO2 removal (without tossing your oxygen into space along with it) has been the most complex part of rocket construction.
Technically the toilet is not required. For a colony's first rocket you may want to launch a dupe in a mini nosecone with nothing but a data collection lab and the dirt on his or her face. A little polluted water on the floor never hurt anybody, and they won't be in space more than a couple days so there's no danger of drowning (I can't believe I just said that). Regardless, I'm here to describe how to optimize rockets for long term use, not how to wade through filth like this were Rimworld. So for the purposes of this guide we're considering the toilet a requirement.
4.1.1 - Oxygen
Each duplicant in your rocket will breathe 100g per second of oxygen, which amounts to 60kg per cycle. The diver's lungs and mouthbreather traits will alter those numbers, but I'll use the average dupe for the purposes of calculations.
Inside the standard spacefarer module there are 80 cells that could contain oxygen, though each one you fill with a tile doesn't count. You'll see later in the morale section that we're aiming for three "rooms" two of at least 12 tiles and one of at least 32. That's 56 open cells and with some pneumatic doors you can expect 60-65 cells worth of oxygen containing ~1.8kg each, assuming you filled the rocket with a standard vent.
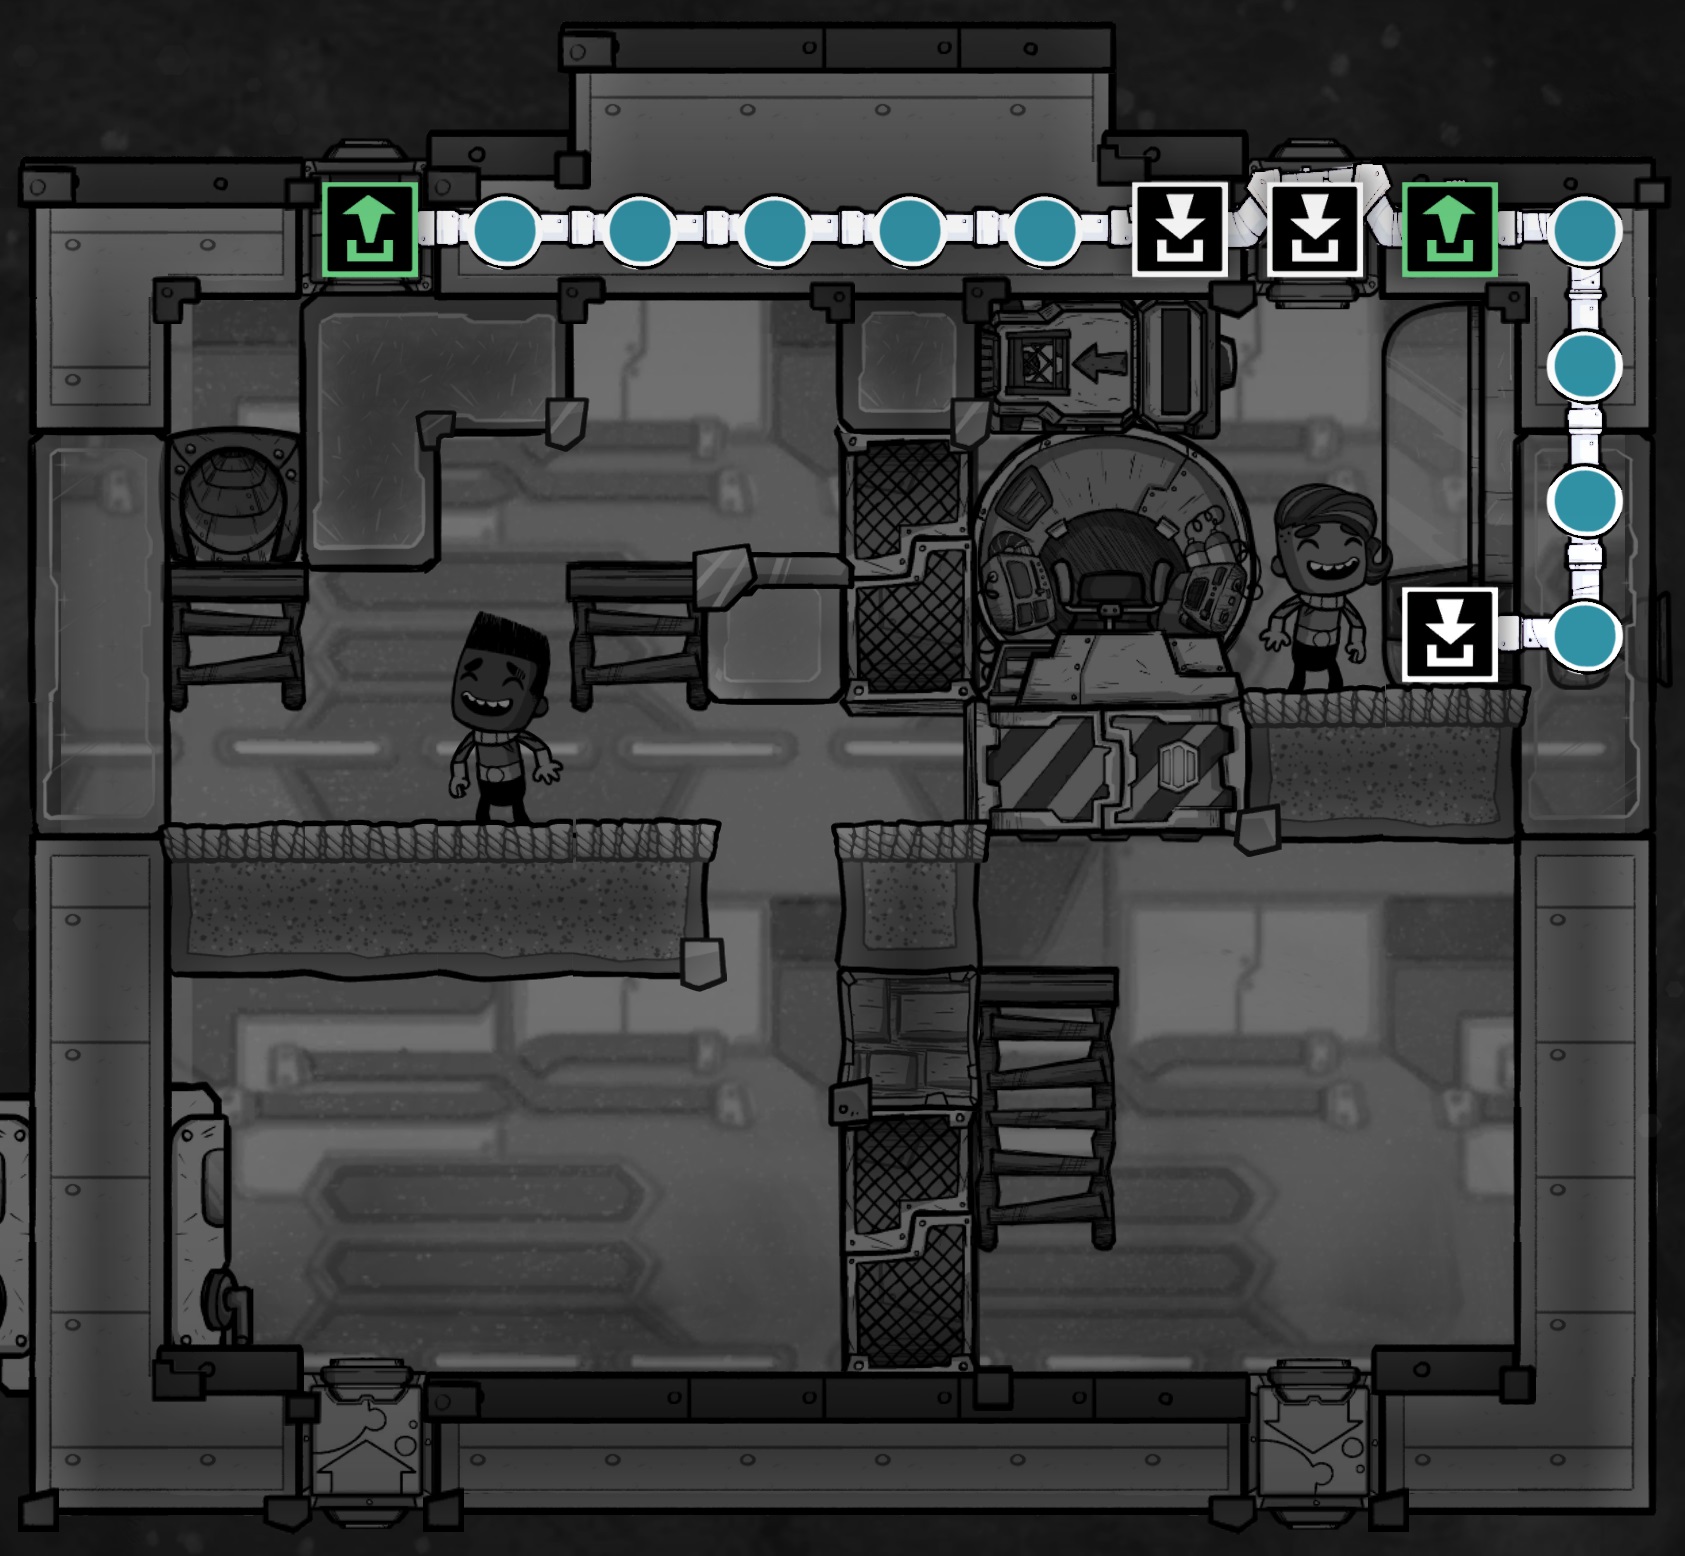
The above gives you between 108kg and 117kg of oxygen in the cabin, a bit less than the 120kg a single dupe would need to survive for two days. One thing I've seen in many old tutorials is to run a snake of gas piping through the entire cabin and fill that with oxygen to extend the supply. An example of this is shown below: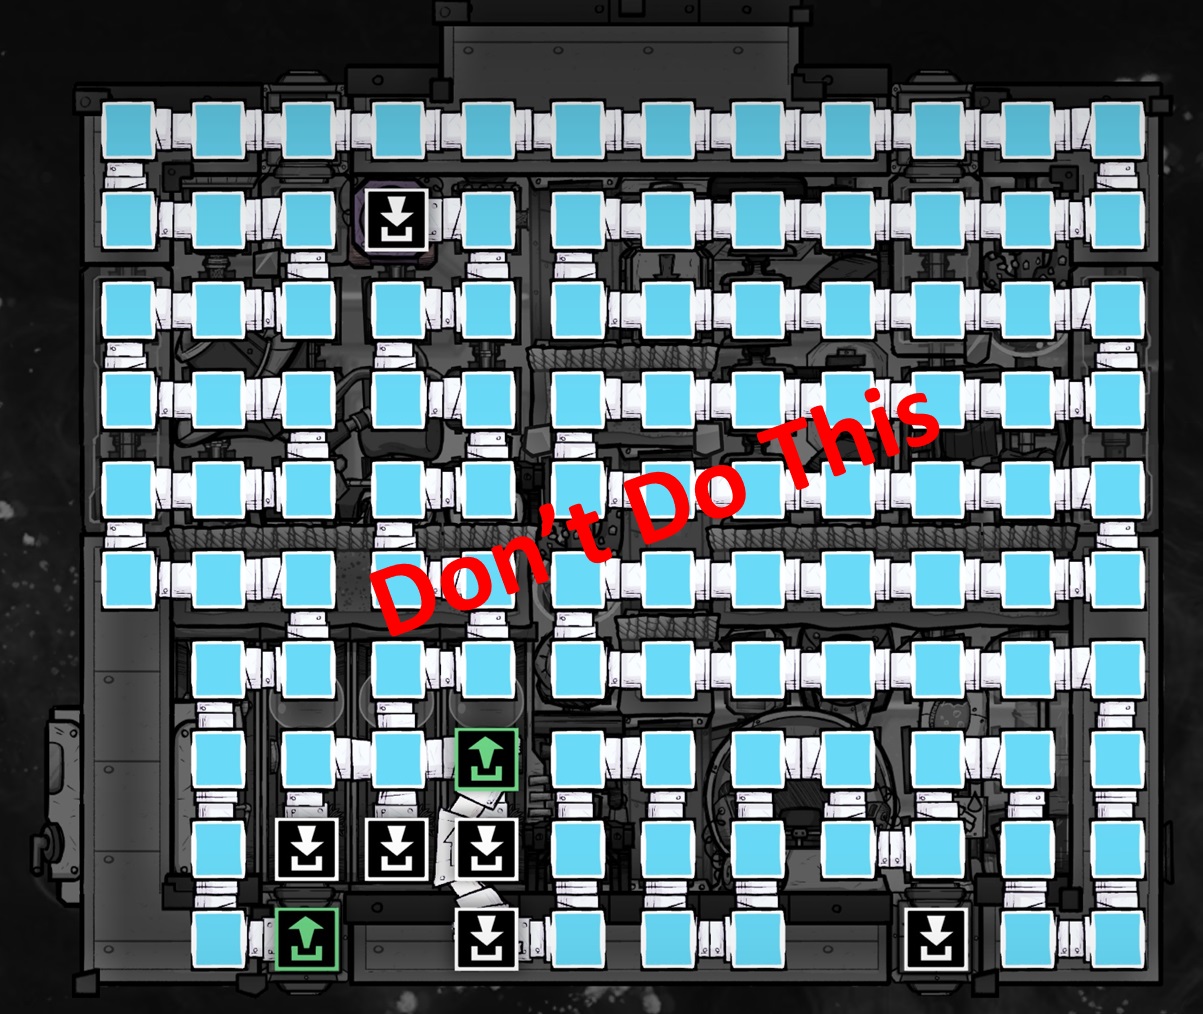
Unfortunately that doesn't scale well at all. You can fit about 100 tiles of gas pipe but each one can only hold 1kg of gas, so the total 100kg of extra oxygen only provides about a day and a half of extra oxygen for a single dupe. It's not that it's bad, there's no negative to it, it's just a lot of wasted material and construction time for very little gain. For me personally, I once tried to use this solution without thinking about it on a three person rocket and found them all suffocating in space barely a cycle and a half after launch. If you do the math it's obvious, but if you just look at pictures of designs online it's not so much.
In fact, I'll go so far as to say that for a first temporary research rocket the above approach might be perfectly fine. A single dupe can do plenty of research in 3 cycles, then you can land and replenish the oxygen through the launchpad. In my opinion, however, it's usually best to design for longer term use in the first place, and this kind of pipe snake does little to support that.
With that in mind, there are two main ways to bring oxygen into your cabin. These are using solid oxylite or a gas cargo canister.
Once you're ready to build a rocket there are three ways to make use of oxylite. The first is to simply toss it on the floor of the cabin. This can be done by first filling a storage bin and then deconstructing it, or I believe in the latest patch there is a command to move and drop specific resources in specific places. Regardless, oxylite on the floor works identically to oxylite stored in a bin, which is the second way to use it.
A storage bin can hold up to 20,000kg of oxylite, which converts to oxygen in a 1:1 ratio. This provides about 333 duple-cycles worth of oxygen, so 166 cycles for a two-person rocket, 111 for three dupes, and 82 for four. You won't have that much oxylite for your first rockets, but it's easy to calculate how much oxygen you need for the planned mission and load that amount of oxylite before launching.
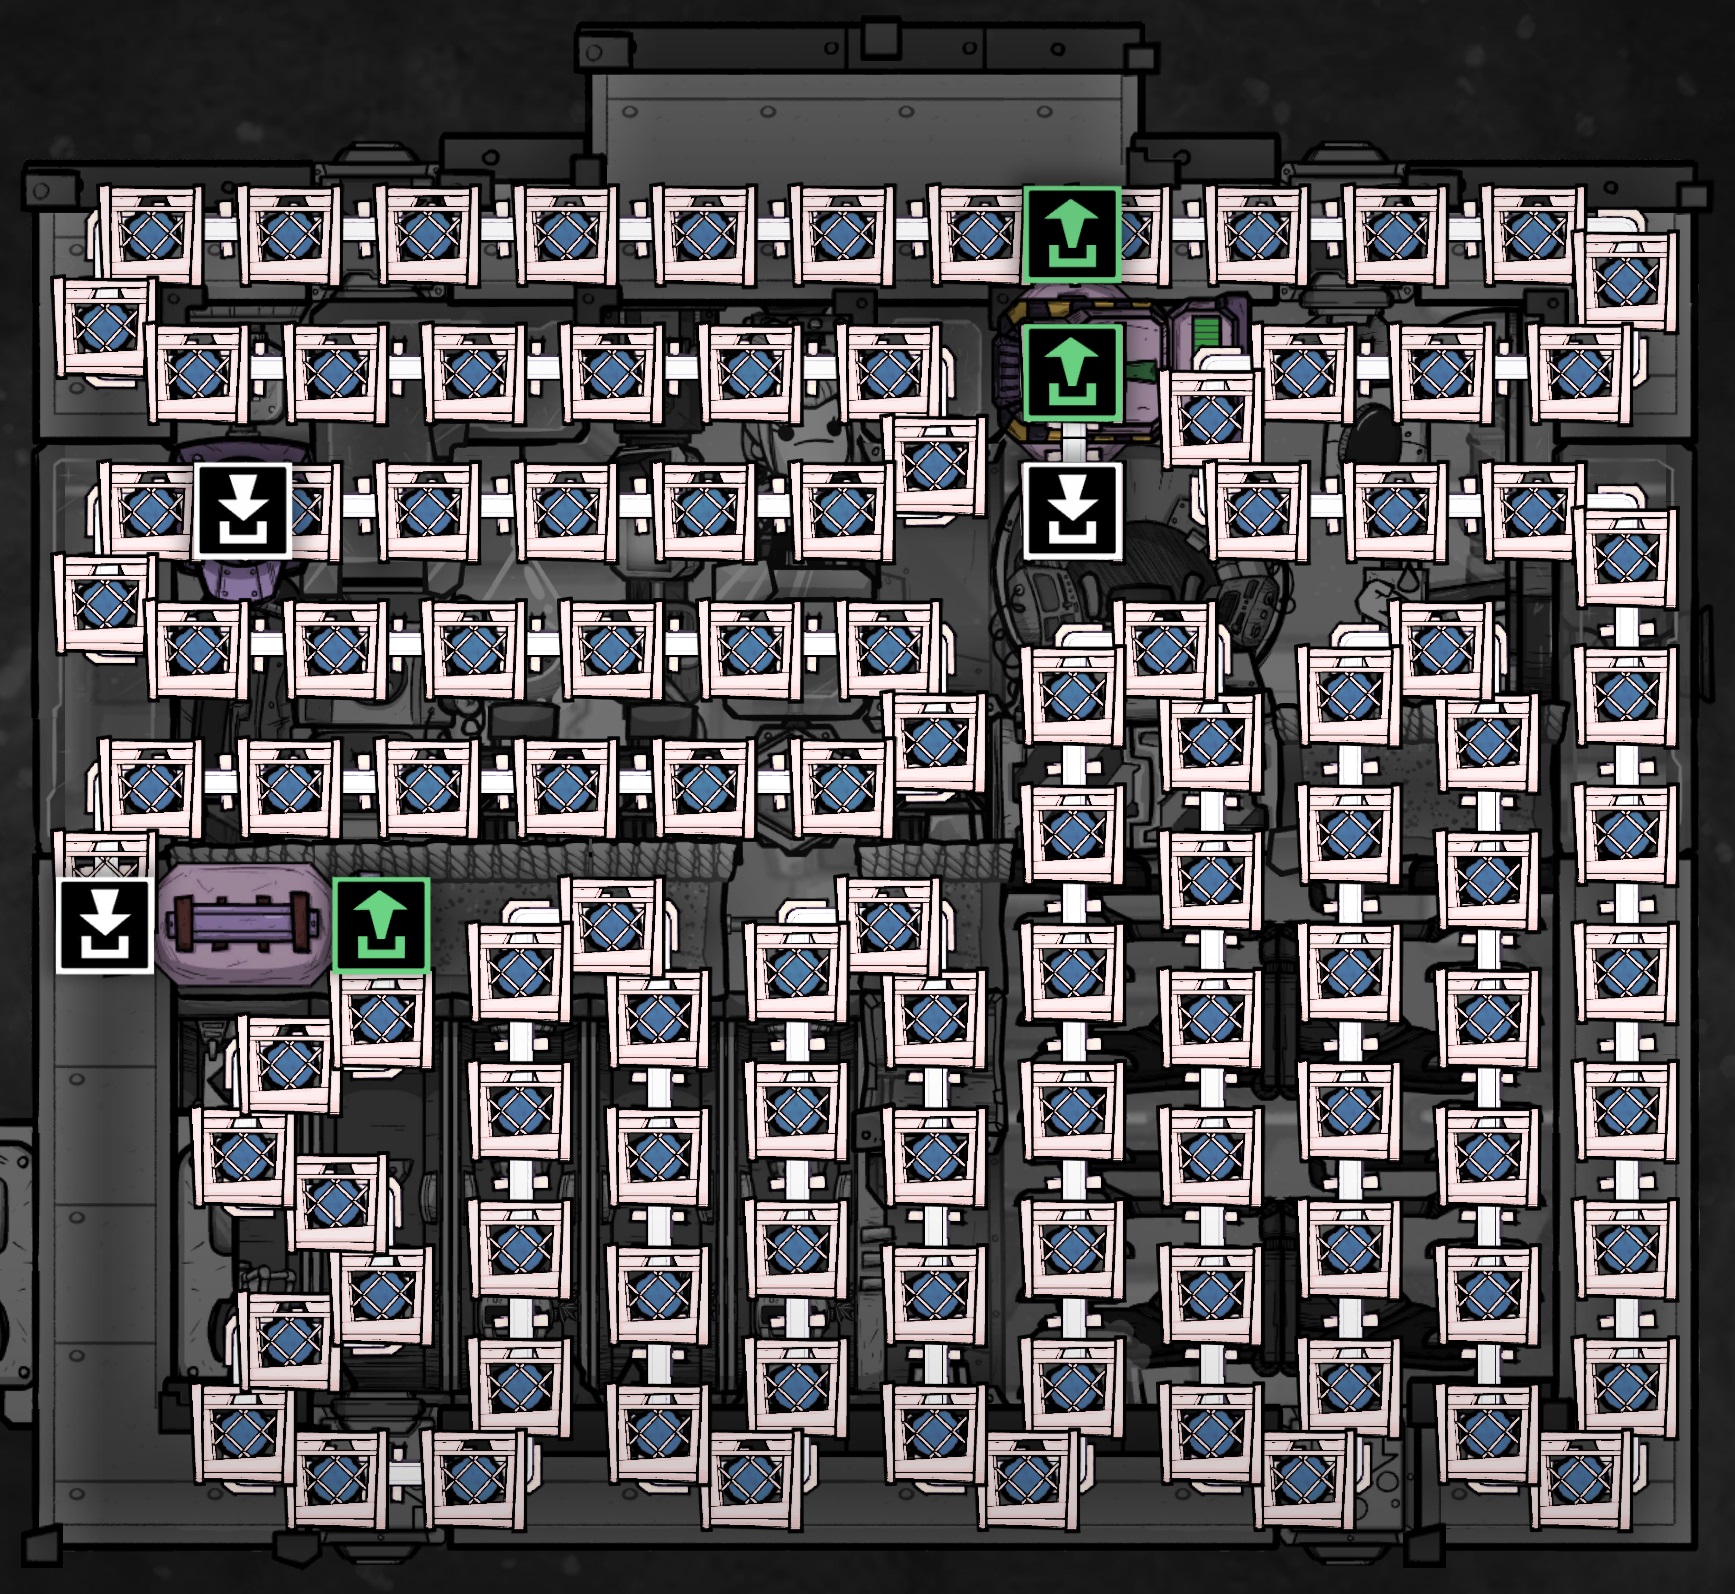
The third way to use oxylite is with a conveyor loader and rails snaked through the cabin. That might look something like this: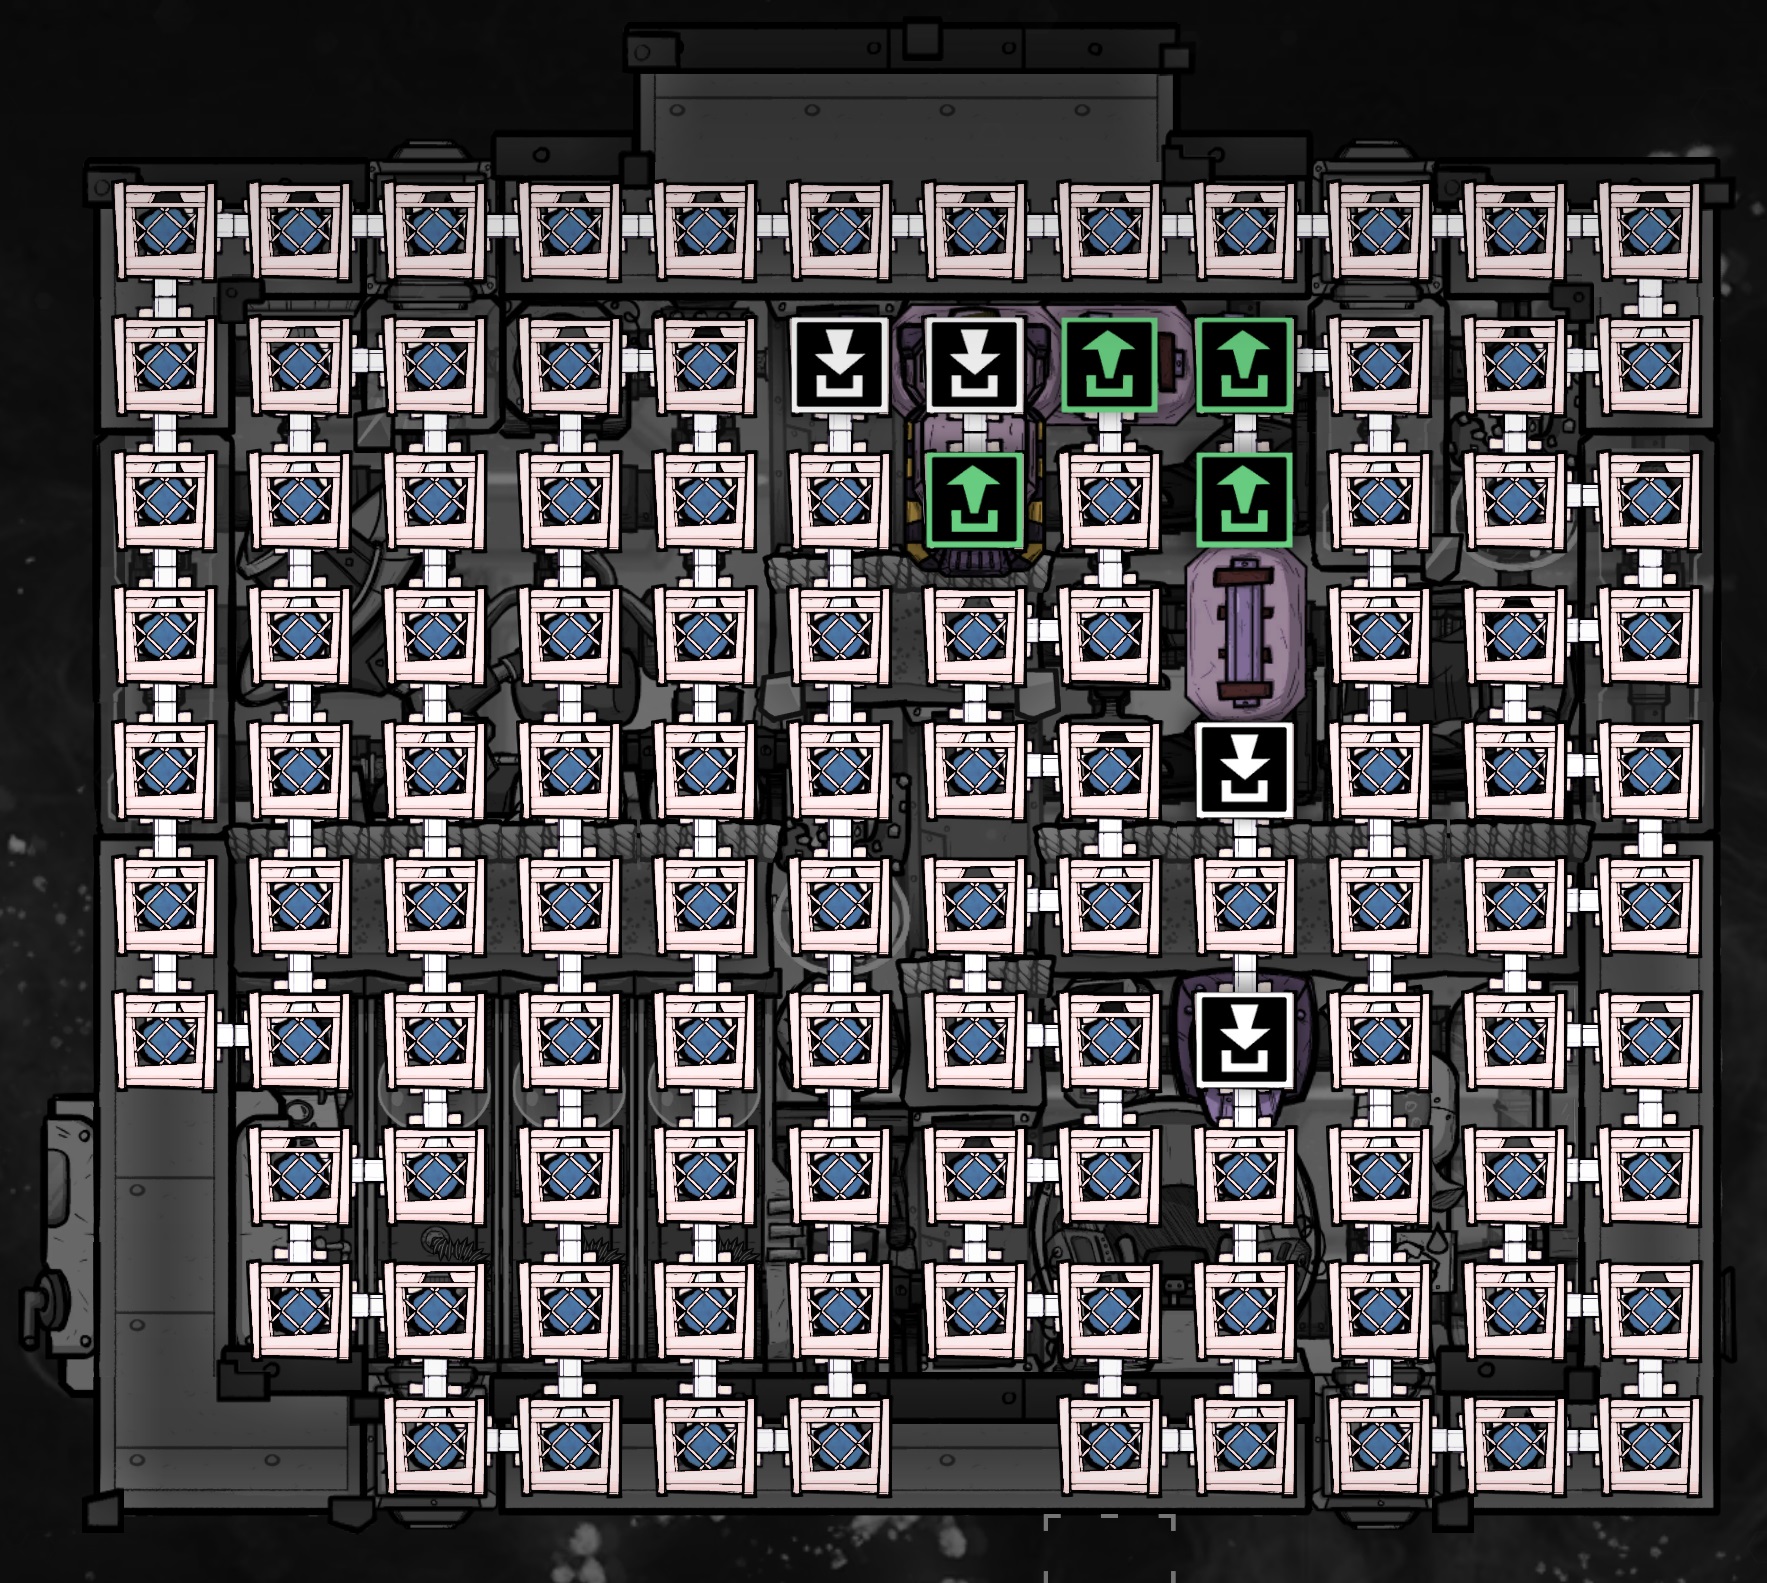
The loader can hold 1000kg of oxylite, plus 20kg each for the ~100 rails gives a total of about 3000kg. That's 30x the amount of oxygen vs. snaking it in gas form through pipes, enough for about 50 dupe-cycles, or 25 cycles for a two-dupe rocket. This is more than sufficient for many uses, and there are other advantages to this approach that will be covered in the CO2 section. The biggest downside is the mechatronics engineering requirement for the construction.
The basic gas canister can hold 3600kg of oxygen, while the large canister holds 11,000kg. This equates to 60 and 183 dupe-cycles, respectively. The basic canister is nice because it provides 20% more oxygen than the conveyor loader of oxylite approach and does not require mechatronics engineering to construct. The large canister has it's uses but feels overshadowed since a simple storage bin can store nearly double the oxygen in solid form.
With either canister you simply need a gas output fitting and a gas vent to bring oxygen into the cabin. These two consume one tile of space each, two total, the same as either a storage bin or conveyor loader for the oxylite solutions.
4.1.2 - Carbon Dioxide
A more recent development has been to make use of the "small packet deletion" behavior of the game engine. Essentially, whenever a liquid or gas is attempted to be produced, if there is no legal cell for it to spawn in but there happens to be a cell containing a very small amount of a different liquid or gas, the small amount will be deleted and replaced with the new product. Since CO2 is always exhaled in small amounts, any small packets that happen to collide with a source of oxygen (overpressurized vent, oxylite, etc.) will cause deletion to occur and replace the CO2 with produced oxygen. Some might consider this an exploit but I see it as no different than stacking liquid locks or other "obviously intended" behaviors of the game engine. In any case, I'll cover this approach in the second subsection.
4.1.2.1 - Pumping and Filtering
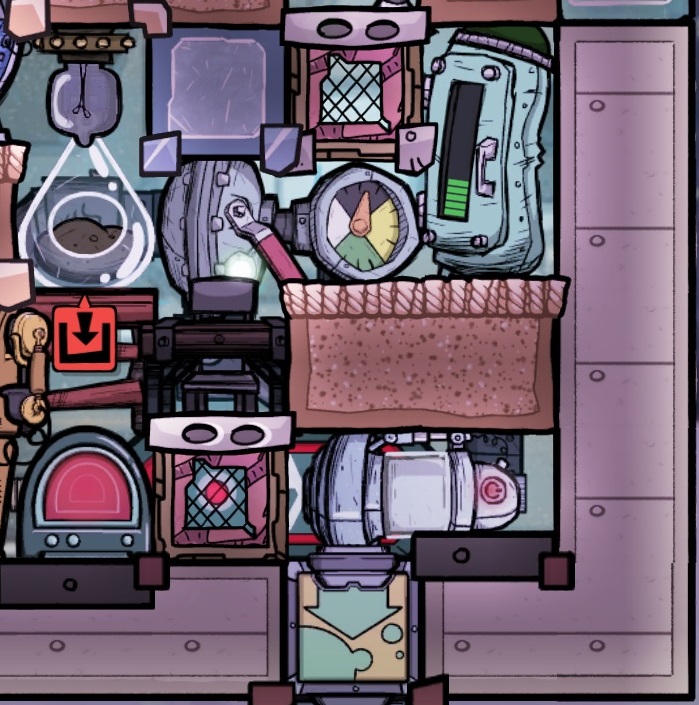
The problem with a mini pump is that it requires both plastic and radiation research, so you aren't likely to have it early game. Running a regular pump without automation costs a constant 240W which your early rockets won't be able to provide. If your dupe is running on a hamster wheel just to power the pump, they're not getting any research done! So to limit the pump we have to get into more sensors and automation, which requires more research, etc.
In the above picture the automation consists of a gas element sensor in the bottom left and a filter gate. There are other approaches but this one basically says if the gas sensor detects CO2 for an extended period of time, there must be a decently built-up layer on the floor, so turn on the pump until another gas hits the sensor.
Regardless, lets assume we have a pump, mini or large, and that it's automated to only run when the area around it is flooded in CO2. You'll then want to filter the gasses it pumps using a powerless mechanical filter rather than the standard filter provided in game. Any guide on building an electrolyzer or SPOM will explain mechanical gas filtering, but I recommend Kharnath's Amazing Compendium which has an entire subsection dedicated to the concept:
https://steamcommunity.com/sharedfiles/filedetails/?id=2154398396In the screenshot above, the gas valve providing the filtering is shown just to the left of the fridge. I don't show the piping overlay because this section isn't about construction, but rather about theory and mechanics.
OK so we have our pump automated, filtering is knocked out, now the real problems start. The first problem is that we have to make sure the O2 can always exit the pump and get back into the cabin. If the cabin is overpressurized the O2 can't get out a vent, the pump will back up and stop running, and the cabin floods with CO2. A high pressure O2 vent works alright to prevent this, but like a mini-pump it requires plastic. Additionally, if you're using oxylite as your oxygen source your cabin *will* eventually overpressurize even a high pressure vent if the oxylite is allowed to touch CO2.
The second problem is really the same, except for the CO2 output. When sitting on the pad CO2 can be pumped to the spacefarer module input port and then outside the rocket a pipe and vent can release it to space. But once the rocket launches there is nothing connected to the port and the CO2 will only build up in the pipes. You could carry a gas cargo module to fill with CO2, but that's a waste and not an option on small early game rockets.
The best recommendations I have to help prevent backup of both O2 and CO2 are:- Use a high pressure vent on your pump's oxygen output
- Store any oxylite high in the cabin, as far from CO2 as possible
- Run a long snake of piping off the pump output before the oxygen return vent, so that if the vent does overpressurize you have lots of extra gas storage in the pipes.
- Run a long snake of piping off the pump output before the CO2 output vent, so that while in space you have lots of extra gas storage in the pipes.
In terms of how long these pipe snakes should be, you can calculate a minimum size for the CO2 snake, then use any remaining space for the oxygen snake, just to be safe. Each dupe exhales 2g/s of CO2, so over a cycle that's 1.2kg. Each pipe segment can hold 1kg of gas, which is about 83% of a cycle for one dupe. Scaled up, a 10-pipe snake can hold 8 cycles worth of CO2 from one dupe, or 4 cycles from two. Allowing 10-20kg of CO2 to build up across the ten floor cells of the rocket is not a problem either, so you could account for that and reduce the snake length. So let's say you designed a rocket to contain 20 cycles worth of oxygen for two dupes. You'd want to make sure you could store 20*2*1.2kg = 48kg of CO2 from the two dupes over that time, which is 48 pipe segments. Accounting for allowing 10-20kg to build up on the floor you might reduce that to 28-38 pipe segments for storing CO2. Colonization rockets have more dupes, but spend less time travelling between planets, so the math generally comes out similar.
Most specifically what I like to do is create an oxygen pipe loop running through all oxygen consumers (vents, suits) that acts as a reasonably large storage. Producers like pumps and cargo canisters push oxygen onto the loop as it's depleted. Then the rest of the space in the rocket is available for snaking CO2 waste pipes.
One final note, either type of gas pump counts as industrial machinery (even post-patch) and will negate any room morale bonuses. It's not the end of the world to stuff the pump in a bedroom and lose 1 morale, but it's another mark in the column of "why even go through all this pumping trouble?". And that takes us to the clearly superior method of CO2 removal - deletion.
4.1.2.2 - Deleting CO2
Depending on your difficulty, the 20% stress debuff from popped eardrums is cancelled out perfectly by the 20% buff from high morale. So as long as you're otherwise maintaining decent morale and stress levels inside the rocket, there's no significant downside to an overpressurized cabin.
An important thing to note is that the behavior of oxylite in a bin vs. oxylite on a rail is massively different when deleting CO2 in this way. When oxylite is stored in a bin and that bin is contacted by a CO2 packet it will consume at least 1kg of oxylite each time. I've done some extended measurements in a 2-dupe rocket and it averaged about 200kg per cycle of oxylite loss. At that rate, the 20,000kg bin would only last about 100 cycles, rather than the much longer period calculated in the oxygen section. I believe that oxylite laying on the floor acts identically to oxylite stored in a bin in this regard, but I don't have thorough test data to prove it.
Conversely, when a CO2 packet comes into contact with oxylite on a conveyor rail, only 0.1kg (exactly) is consumed. In the same extended 2-dupe rocket testing I measured less than 10kg of oxylite consumption per day, a reduction of 95%!
The downside of using oxylite on a conveyor rail is that you need mechatronics engineering to build the loader and rails, but compared to the alternatives it is well worth it. Creating oxylite is very expensive in terms of refined metal, water and especially power, and in the early game the little you have access to is precious. By snaking it on a rail through your rockets you can extend its CO2-deleting lifetime by a factor of 20x, whether or not you're also using it as your primary source of oxygen.
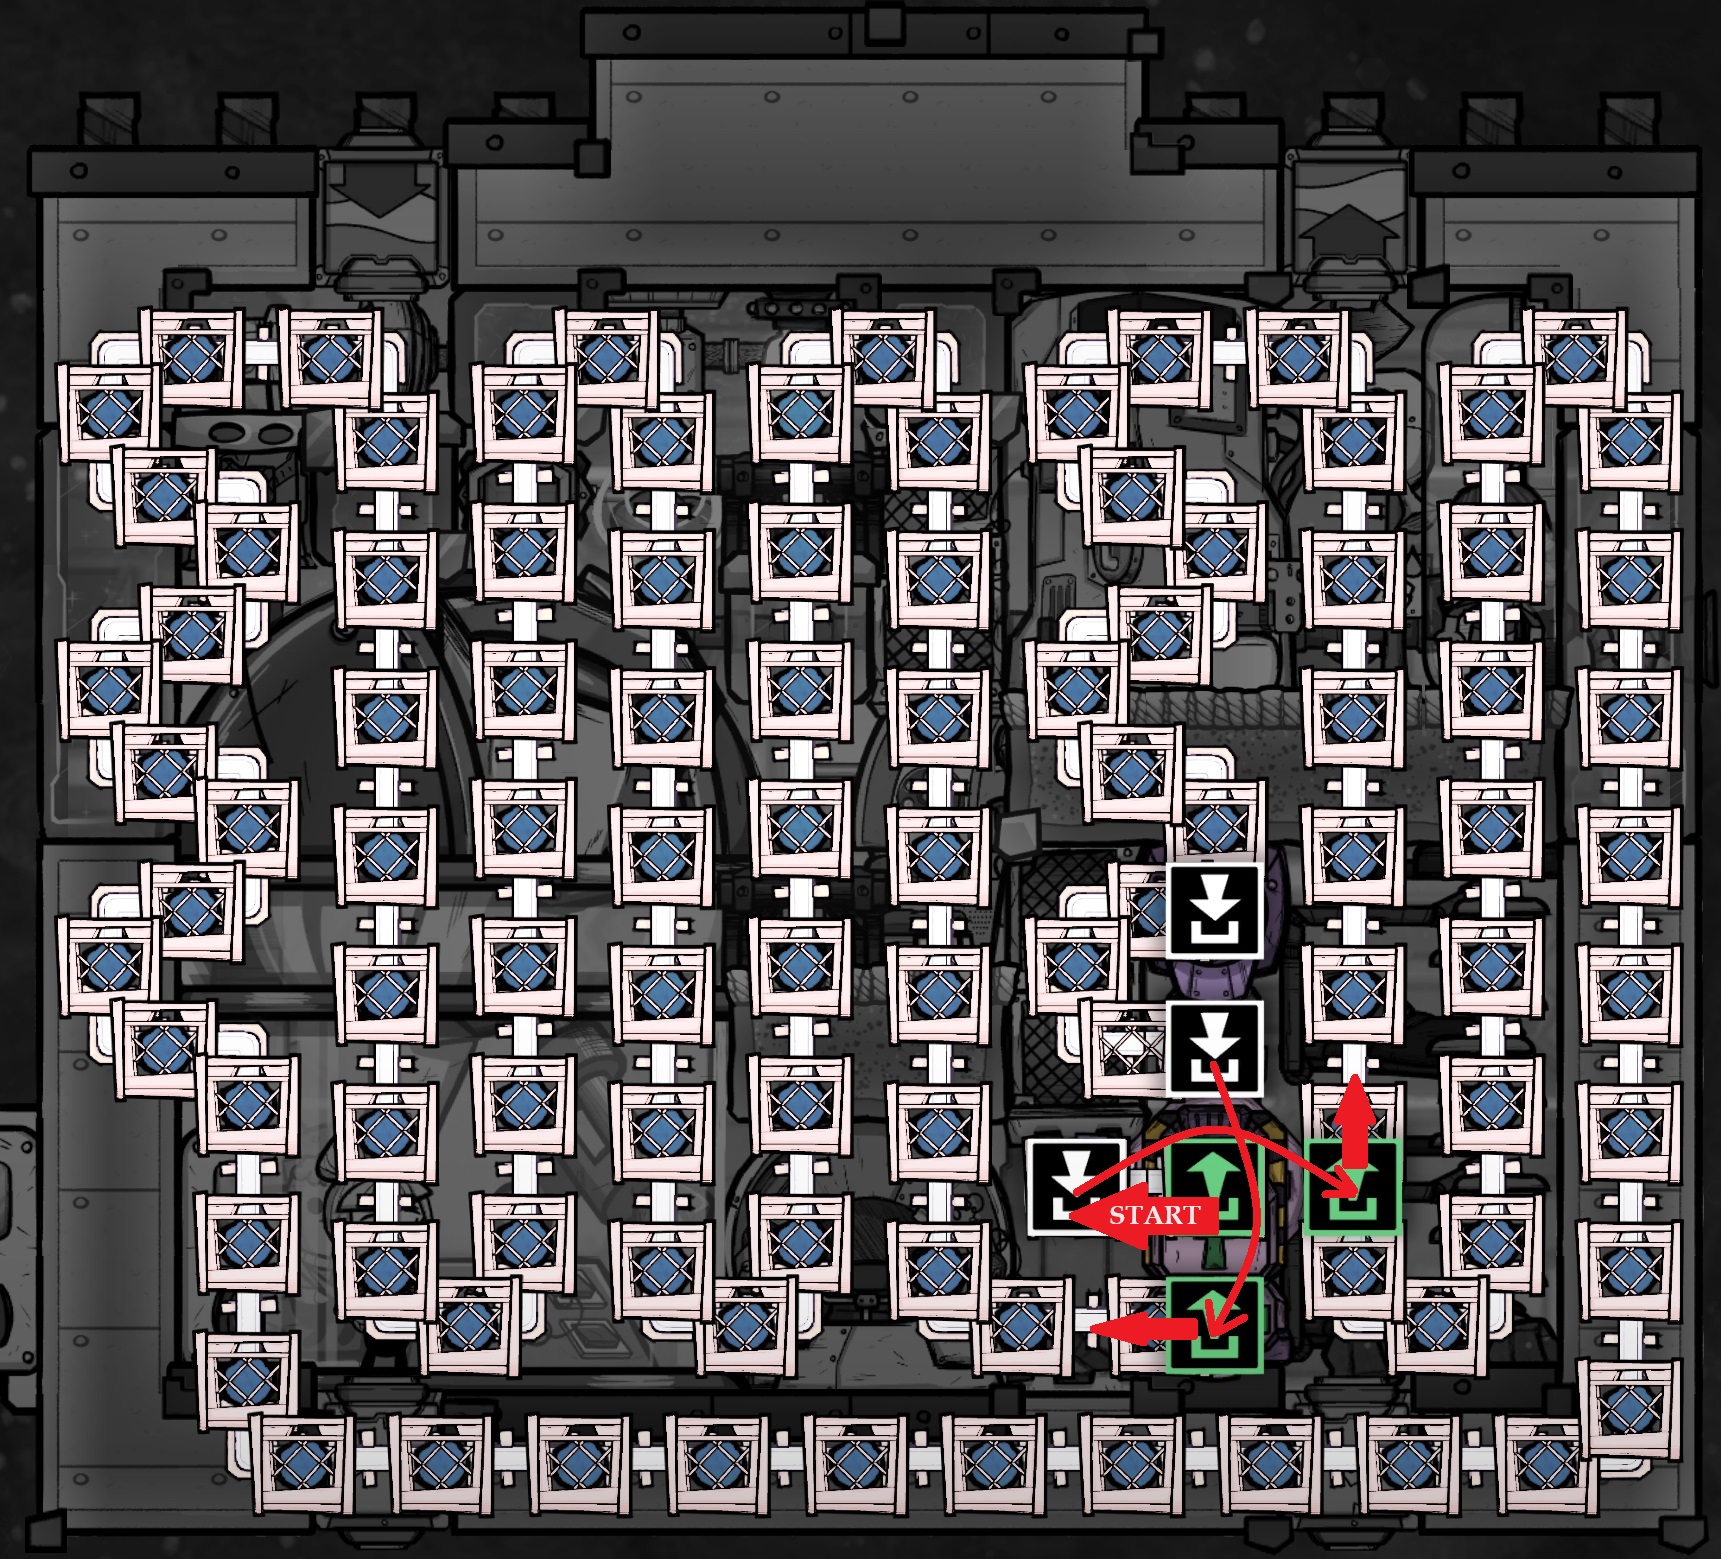
Finally, from the green port of the second bridge, continue snaking until you've completed the loop to the green port of the first bridge. There's a second example in the Oxygen section which uses three bridges. I used to have trouble getting the conveyors to flow correctly and in that image I was trying to use a double bypass approach similar to an aquatuner loop. There are plenty of ways to make it work, but ever since I've gone with the construction method described here I've found it a lot easier to consistently get continuous flow with only two bridges.
In addition to constructing the rail itself, I've found a tiny bit of automation to be very useful in maintaining the operation over time. A conveyor chute, toggle switch and NOT gate is all it takes, as shown below (ignore everything connected to the "InSp+1" sensor: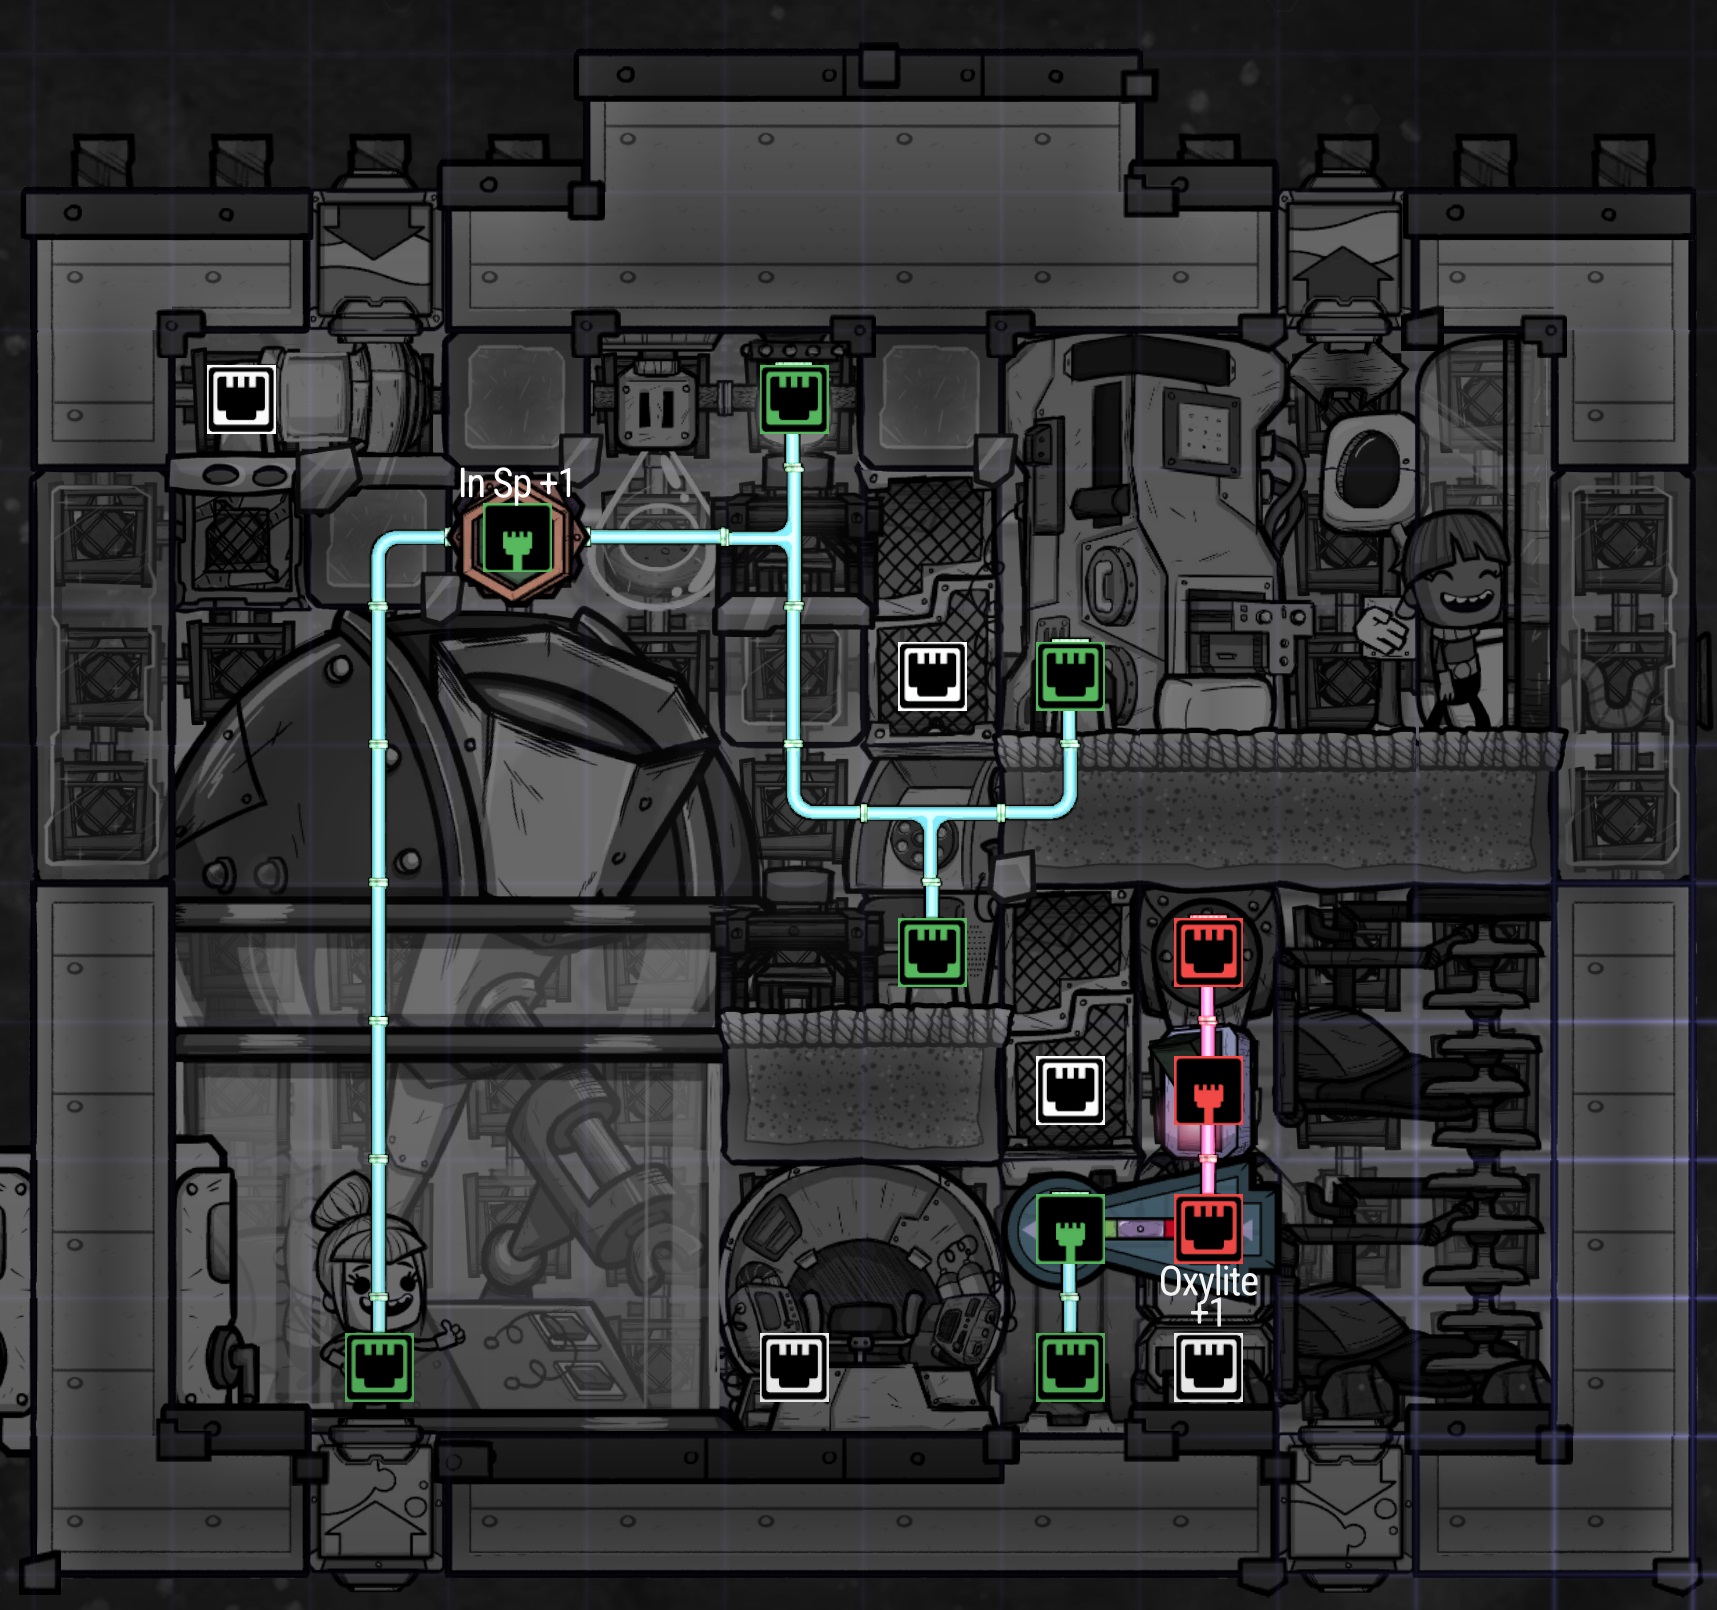
The purpose of this circuit is to allow you to easily re-stock the conveyor rail with a full load of oxylite. As you're flying through space the 20kg packets on the rail will gradually evaporate as they collide with CO2 and your dupes consume oxygen. Eventually you'll have lots of small packets clogging up the rail, limiting the duration of your next space voyage. By dumping everything on the rail through a chute it allows the dupes to refill the conveyor loader, which will reload the rail will full 20kg packets again.
My general strategy is after each mission lands back at home I flip the toggle switch, opening the chute and dumping all my oxylite on the floor. Just as importantly, the signal travels through a NOT gate to a nearby door locking the door and preventing the dupes from accessing the conveyor loader. Otherwise they'd keep trying to grab the dumped oxylite and put it back in the loader, creating a routing loop. So wherever you place the loader on your loop, you want to make sure it's behind a lockable door where the dupes can't access. Even if you had to lock two doors, you just have to keep them from refilling the loader temporarily. Once all the oxylite is on the ground I toggle the switch again, and the dupes come to refill the loader. If there's not enough oxylite they'll bring more from the base, and we're ready to set off again.
I will say that this whole toggle / chute / locked door approach was not my own creation, I actually found it long ago in someone else's guide to deleting CO2 with oxylite. I haven't been able to find that thread or guide to link it, so if anyone knows where it's at or who wrote it please leave a comment and I'll ensure the proper credit and thanks are added.
4.1.3 - Toilets
Toilets are the simplest of the three basic requirements, in fact it's really not about toilets at all, it's about water.
For your first basic rocket you might decide to use an outhouse and avoid the whole issue. You can bring a little dirt in a bin or on the floor to restock the outhouse, and the polluted oxygen it gives off is of no real concern. Even the dupe labor of emptying it is only every dozen cycles or so, which doesn't impact your research output much. Eventually though you're going to want to convert to a plumbed toilet, which means you need a source of water.
Of the two plumbed toilets the wall toilet is far superior. A regular toilet takes up twice as much space and requires a solution for disposing of polluted water. The wall toilet automatically dumps the polluted water into space (why can't CO2 pumps do that!). The only downside is that the wall toilet requires plastic, but I'd jump straight from an outhouse to a wall toilet once you find plastic, rather than deal with a regular toilet on a rocket.
The main calculation here is how much water do you need to store on-board to ensure you can continue flushing the toilet. A wall toilet uses 2.5kg per flush, and a single pipe segment can store 10kg or 4 flushes. So unlike the oxygen problem, snaking water pipes through the cabin is an excellent way to store water without cargo tanks or other complicated designs. With 4 flushes per pipe segment, 100 pipes gives 400 flushes, or 400 cycles at one flush per day. That's 200 cycles for a 2-dupe rocket, much more than you're likely to need.
One approach to sizing your pipe snake is to carry just enough water to last a little longer than the amount of oxygen you're carrying. For example let's say you planned for 20 cycles of oxygen in a 2-dupe rocket, using either a cargo tank or oxylite storage. 20 cycles is 40 flushes, 4 flushes per pipe means you need at least 10 pipe segments full of water. You could fill an 11-segment pipe and guarantee that your dupes would suffocate before they'd ever run out of water for flushing. This is only useful if you don't want to spend the time building the whole 100-segment pipe snake up front, but if you anticipate re-using the rocket long term I'd recommend committing to the whole pipe and calling it done. Here's an example of a full snake from the liquid input port (so you can refill the water on the launchpad) to a wall toilet.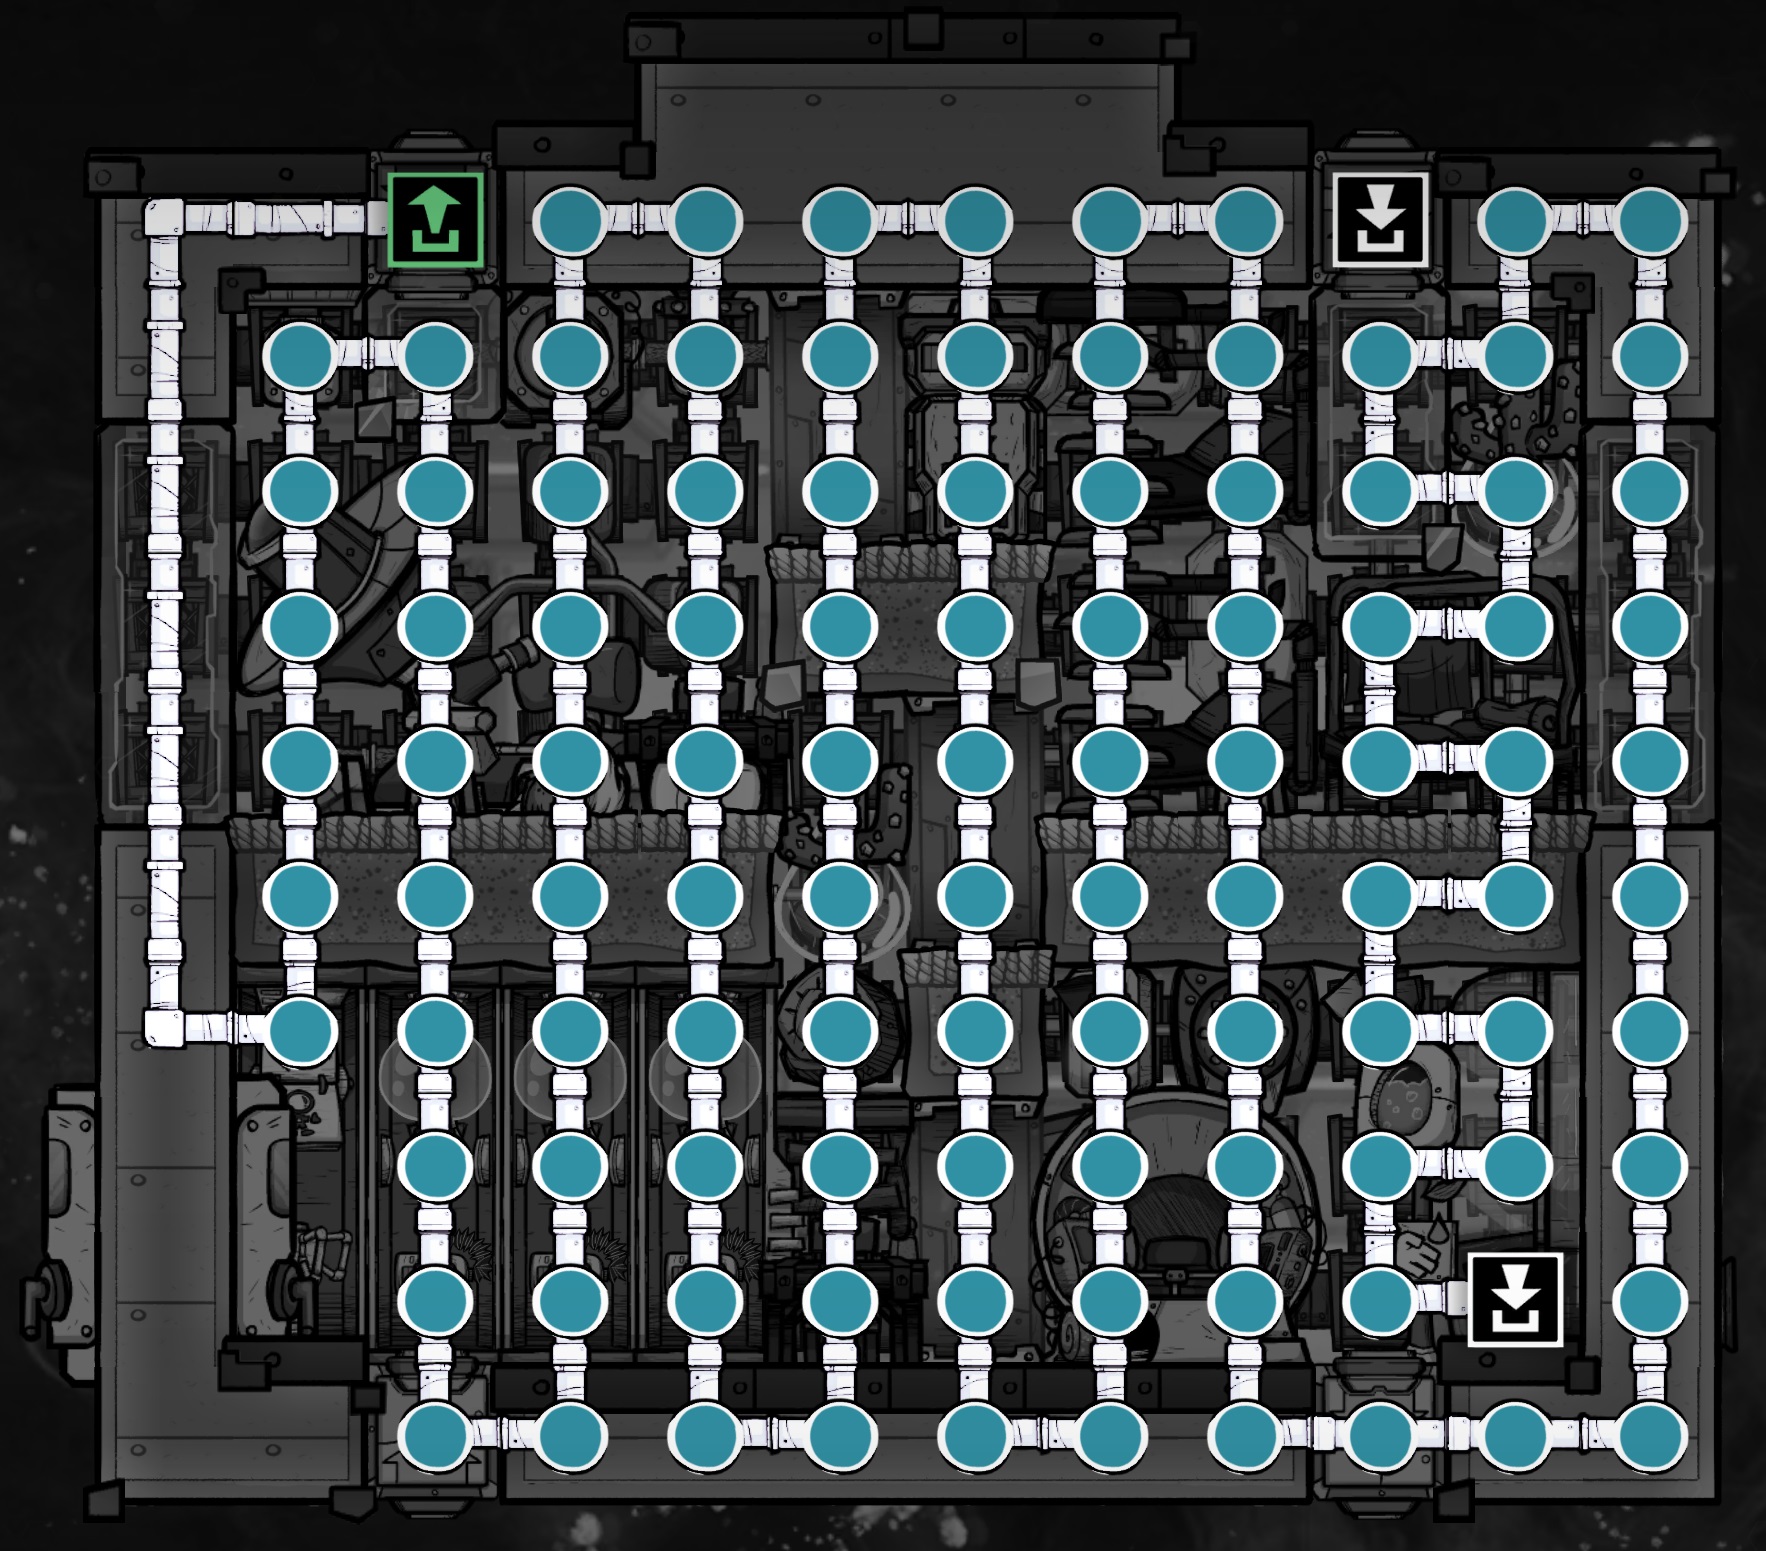
4.2 - Secondary Needs
Basically, just because these are in a section called "secondary" needs, they should not be undervalued in a good rocket design.
4.2.1 - Morale
If you've read my "Not Quite Beginner's Guide" I refer to stress and morale as the real killers in ONI. Once you get basic food and oxygen taken care of these are the things that can bring a colony to its knees. This is doubly true in space travel as you're unlikely to have nature reserves, great halls, and masterpiece artwork at every turn. In addition, you might be eating lower quality food that preserves better. Surf and turf is great when you have infinite frozen storage, but in a rocket you might be downgrading to berry sludge, grubfruit preserve or even pickled meal for the long-lasting freshness. These factors combine to make morale bonuses from rooms the most important part of a rocket design.
There are really only 4 rooms that give morale bonuses worth talking about in the context of a rocket:
Any beginner rocket design should be able to obtain the first three room bonuses for a total of +6. The best possible designs would upgrade the mess hall to a great hall for a +9. This is often difficult to do as it requires two 12-tile rooms and a 32-tile room. There are only 80 tiles in a spacefarer module to begin with so preserving 56 of them while installing walls and doors can be challenging.
Nearly all of my designs are optimized around preserving the full +9 morale bonus, and wherever that was not possible the barracks is sacrificed to maintain a +8.
For your first early game rockets you may not have the bleach stone required to build a hand sanitizer station, and I don't recommend using normal sinks for the same reason I don't recommend normal toilets (disposing of the polluted water). As such, until you have hand sanitizer I would sacrifice the Washroom bonus, ensure you have a Great Hall and Barracks, and settle for +7 morale.
4.2.2 - Radiation Protection
This subject isn't much of a concern unless you've increased the difficulty setting for radiation. I find that setting to be both a blessing and a curse in my playthroughs. Often on my casual runs I increase the radiation setting to make it easier to generate radbolts and produce radiation research, and I don't do a ton of space exploration anyway. But on a challenge run with higher difficulty settings, the increased radiation can become an absolute killer for space exploration.
The standard spacefarer module has two small windows on top that let through almost 75% of the radiation from space. At the highest difficulty level this exposes a dupe under the window to about 184 rads per cycle. Most of the rest of the cabin is protected by only a single tile of steel ceiling, which allows about 40% of the radiation through, exposing a dupe to about 100 rads per cycle. A dupe will remove 100 rads every time they use the restroom, but in this standard configuration that won't be enough to break even and their rad level will gradually increase. After accumulating 100 rads in their system the dupe will experience radiation sickness and acquire additional stress and debuffs that will likely cause a total collapse of your space mission.
Below is an example of a fairly standard research rocket design for two dupes with good morale. It checks all the other boxes in this guide, but didn't do anything particular to avoid radiation exposure. As shown, even near the bottom of the rocket the dupes would absorb over 70 rads/cycle sleeping in their beds. Towards the top of the rocket while eating or using the bathroom that increases to 95 rads/cycle. And walking through the green laser to use the phone or wash their hands... ouch.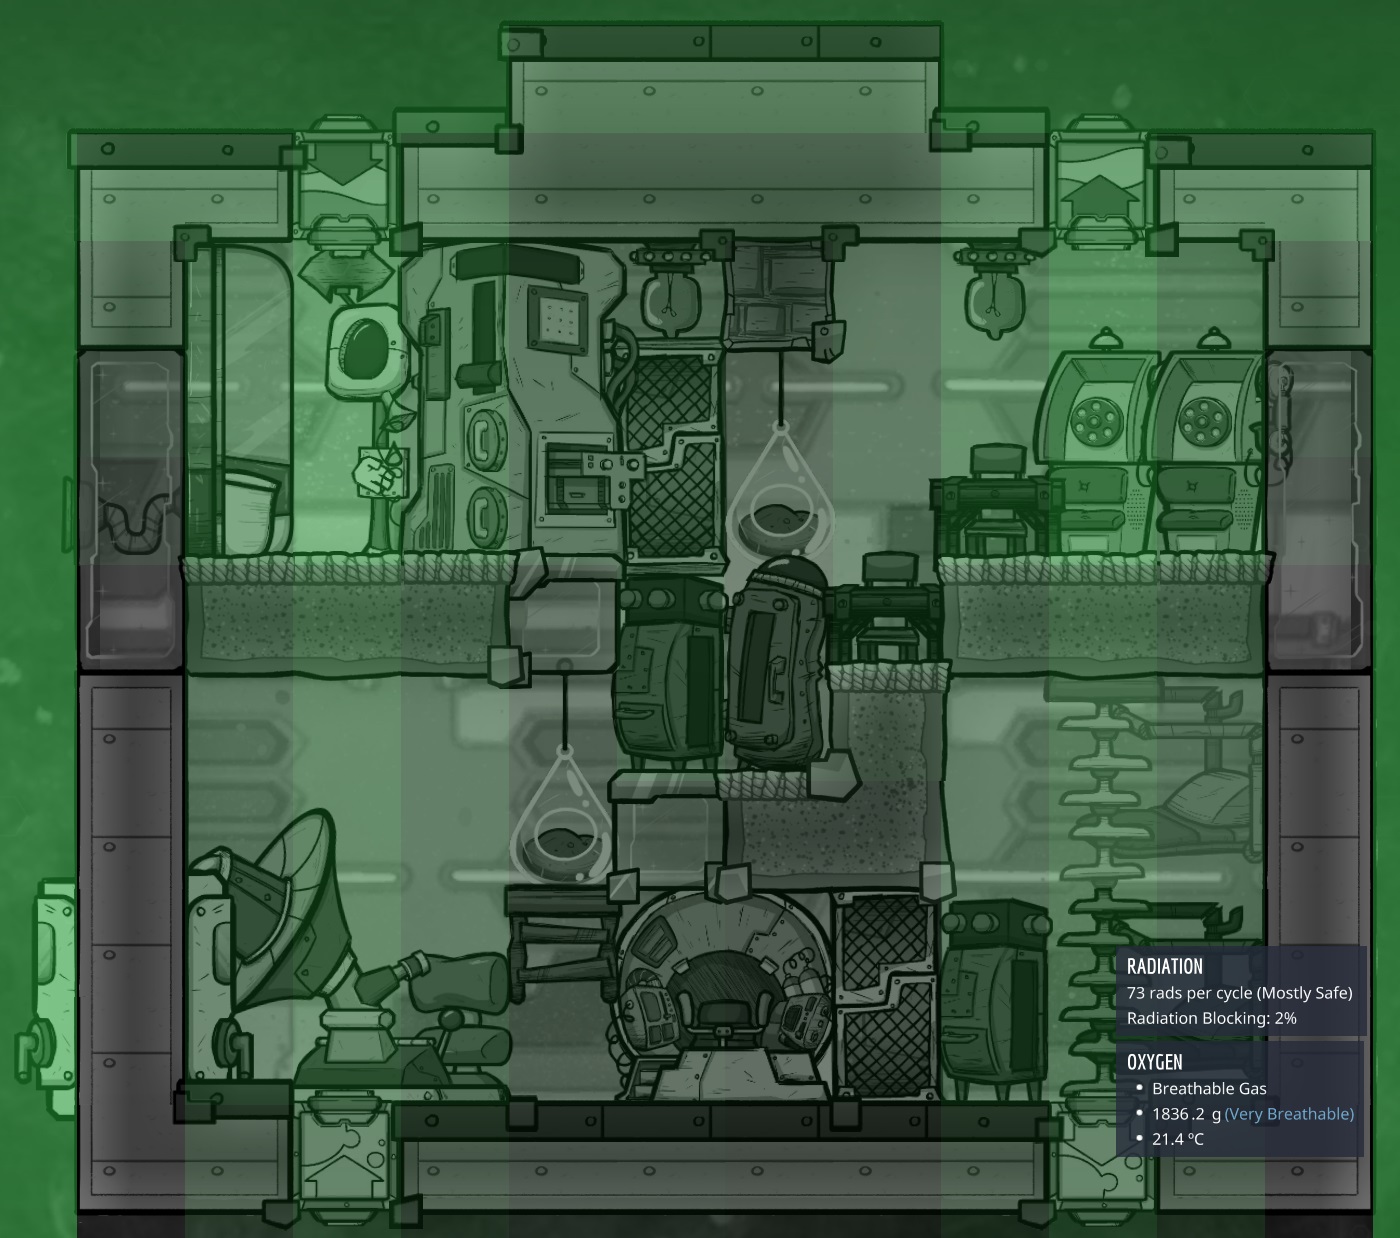
Typical ways to prevent radiation sickness in space include eating food that gives radiation resistance, such as cooked seafood, or bringing a supply of rad pills. You can additionally force a dupe to take two bathroom breaks per day to remove 200 rads per cycle, at a cost of doubling your water requirements. I prefer to design my cabin interiors to minimize radiation exposure in the first place, and then decide whether these additional measures are required. This effort of optimizing layouts to minimize radiation exposure, while still maximizing room morale is where most of the time spent on this guide went.
The first obvious answer is to fill in the tile directly below the windows with either plastic or lead. Those are the most effective radiation blockers and will drop the exposure by 68% to 59 rads/cycle. Similarly, the other four single-thick ceiling tiles can be doubled up with a layer of plastic or lead to bring exposure levels down to 32 rads/cycle.
The other consideration is where you locate your rooms within the rocket. Since there is likely to be an upper and lower floor within the rocket, the lower floor will have another layer of tiles above it cutting exposure by around half again. Locating areas dupes will spend the most time in on the lower level while putting things they rarely visit like bathrooms on the upper level will greatly reduce their radiation exposure.
With all of the above in mind, I came up with a formula to approximate the average daily radiation exposure for any rocket layout so that I could compare them effectively. This begins with the fact that there are 24 "time blocks" (hours?) within each cycle. By figuring out how much time the dupes spend doing different activities you can know where they'll be in the rocket and therefore how much radiation they'll be exposed to. This worked out as follows:
The above activities sum to 24 time blocks, accounting for the entire day's exposure. The one time block of maximum exposure is both to err on the conservative side and to account for the fact that dupes love to wander into the stupidest and most dangerous locations for no reason. So if you don't cover the window tiles you can all but guarantee your dupes will go stand in the green laser of radiation whenever they're not otherwise occupied.
The formula shown above is fairly straightforward for a research rocket, when almost the entire day is spent working at a data collection lab or telescope. On a colonization rocket flying between planets the dupes won't have this "work" to do, so instead they'll wander all over the rocket randomly. To account for this, the formula is modified for colonization rockets to take the average of the other 6 categories and apply 17.5 cycles of that average exposure.
For the rocket in the screenshot, the formula gives an average exposure value of 95.6 rads/cycle. That should be just barely survivable without pills or special food, but it's too close to the edge for my taste. Remember too that once your crew lands on another planet they'll be exposed to well over 100 rads/cycle outside the rocket, so their time inside the rocket should add significantly less than that to ensure they can eliminate enough rads at the restroom.
The designs I'll share later in this guide ranged from 17.8 to 51.5 rads/cycle per the above formula, and my personal threshold for what I considered a "great" design was to be under 30 rads/cycle.
4.2.3 - Well Lit Bonus
This topic certainly doesn't deserve its own section, but I include it to make sure it's not forgotten. By providing a light to the various workspaces and facilities within the rocket, duplicant performance can be increased by 15%. That's 15% less time eating or using the restroom that can instead be spent working, and 15% more output from the work performed.
Overall for just the installation of a ceiling light or two this can be a massive bonus, so my designs attempt to ensure every facility obtains the well lit bonus. Ideally you'd want to do this with a single light to reduce power consumption and heat generation, but in some cases a second light might be required.
The final thing to keep in mind when placing ceiling lights is to not allow them to shine into the bedrooms or you'll cause your dupes stress from waking up all night.
4.3 - Rocket Categories
For the purposes of this guide I define two general types of rockets, research and colonization.
My primary requirement for a successful research rocket design is to contain one research station (orbital data lab or telescope) per duplicant. There's no reason to bring a second duplicant if they aren't spending ~17 hours a day working at their own station, after all. Of note, the two research stations must be in separate rooms, because if they are both in the same room as a light it will become a laboratory and overwrite any morale bonus the room would have otherwise provided.
Once that requirement has been met there are generally three flavors of research rocket:- Mini
- Uses the solo spacefarer nosecone with a data collection lab to get the first bits of space research started before you can build your first "real" rocket.
- Regular
- Uses a standard spacefarer module with a data collection lab and standard telescope. Can sustain two dupes in space for long periods of research. In place of the standard telescope a second data collection lab can be installed to double the research output.
- Large Scope
- Same as the regular research rocket, except it uses the large (enclosed) telescope. Yes, it's possible :)
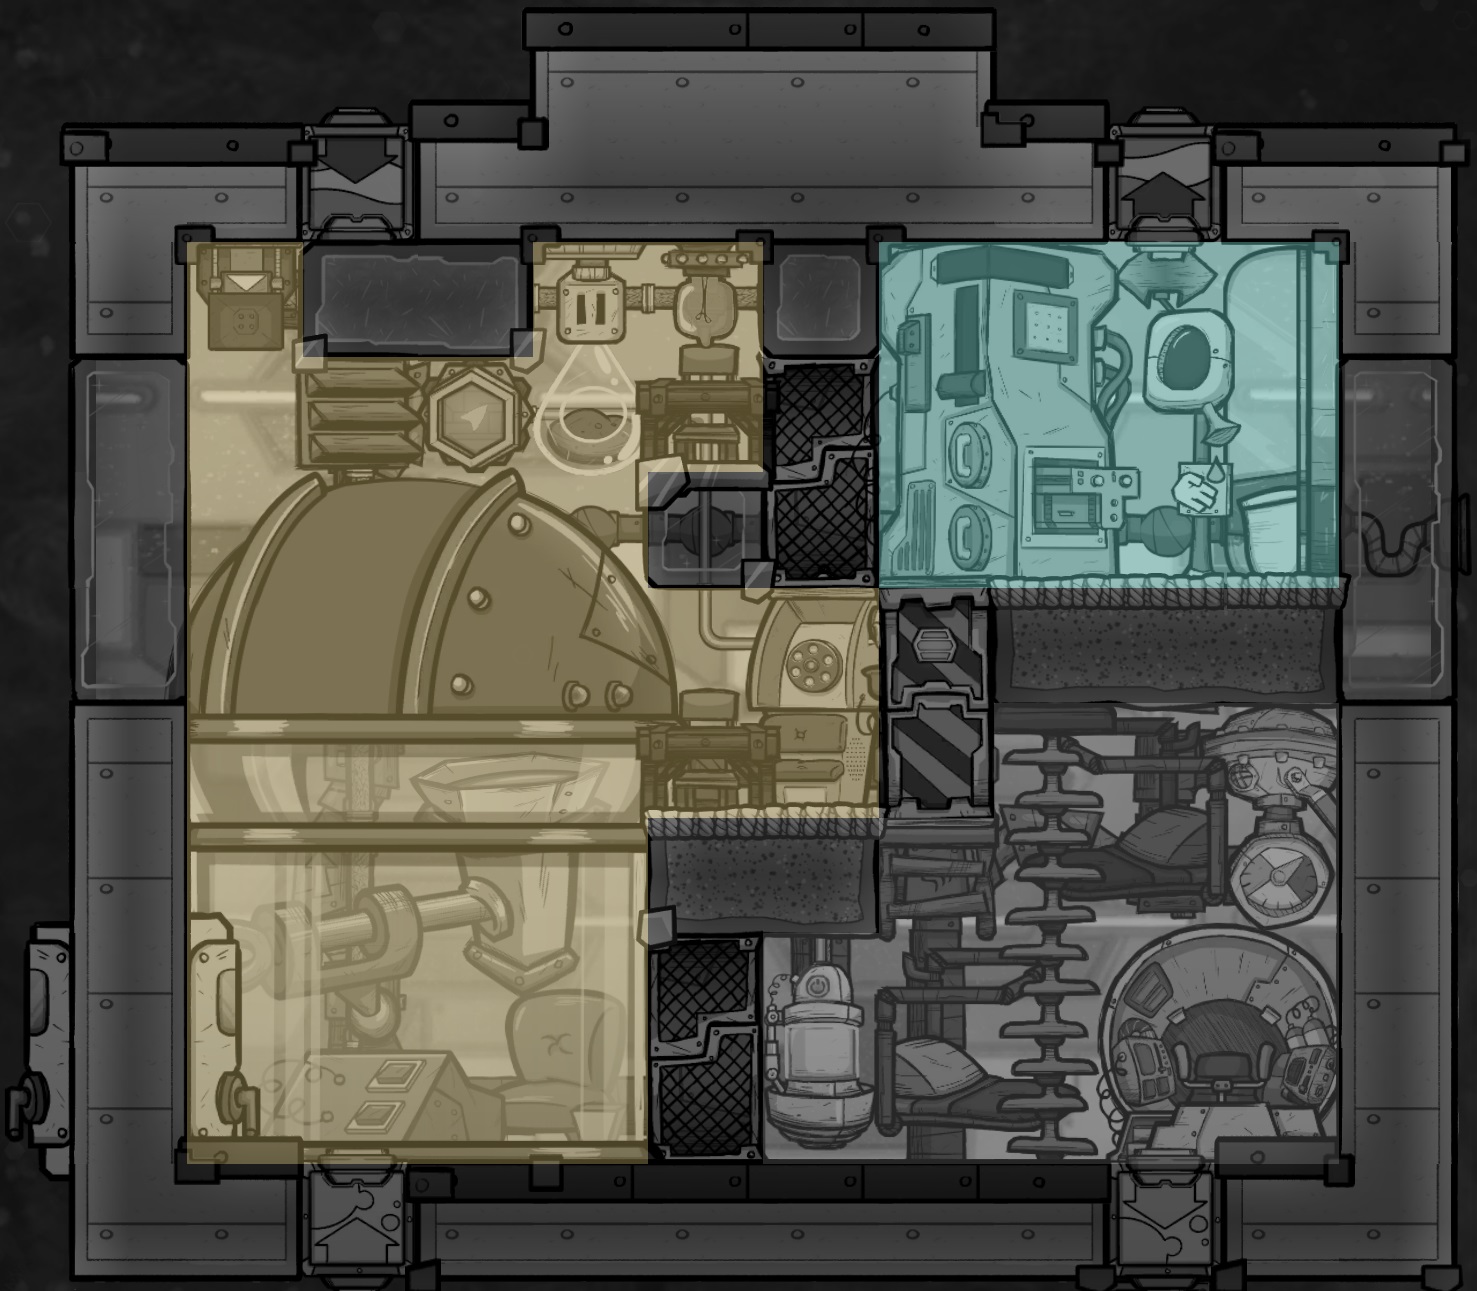
The one thing to note is that the telescope stores up to 10kg of oxygen which must be replenished via a pump or gas cargo canister. In this example you can see the pump just to the right of the telescope. So even if you're using oxylite to fill the rocket cabin, you'll need a small pump to push some gas into the telescope (and a filter as non-oxygen gasses will damage it). In my initial testing there seemed to be a bug where even though a dupe consumes 100kg/s and a mini pump only pumps 50kg/s, the oxygen level inside the telescope would not decrease while the dupe was working all day as long as the pump continued pumping. That seems to have been fixed and the telescope now loses oxygen as expected. Because this is a new behavior, I haven't done any testing to determine whether the dupe will run out of oxygen mid shift and have to wait for the scope to refill before continuing.
The primary requirement of a colonization rocket is an atmosuit checkpoint plus one suit dock per duplicant. This is to allow them to leave the rocket and establish a new colony on whatever new world they land on.
When I first started this guide I had never seen a rocket configured for 4 dupes that still met any of my other requirements. You could cram in four dupes, make them sleep or eat on the floor, have no decor, etc, but that doesn't work well on higher difficulties for extended space journeys. Retaining decent morale from room bonuses, decent protection from radiation, etc. all while fitting in four suit docks, four beds etc. is a very difficult task. A three-dupe colonization rocket where you have a bit more flexibility is perfectly adequate, but I enjoyed the challenge of working towards a viable four-dupe solution.
In the next section I'll provide statistics on nearly 30 rocket configurations for both research and colonization, supporting two to four duplicants. I'll then narrow down the best of each type and highlight those individually in the construction section.
5. Summary and Statistics
Combining everything above we can really start to see the competing requirements and game of Tetris that goes into building a good rocket.
We need to be able to provide oxygen and remove C02, provide water for toilets and protect dupes from radiation. We want to ensure there are three separate rooms to obtain a +9 morale bonus, but none of those rooms can contain industrial equipment like pumps. We want to provide light to as many stations as possible for the well lit bonus, but the light can't be in the same room as both research stations at the same time, nor can it shine into the bedrooms.
There are only 80 cells to use and we haven't even mentioned things like a fridge to store food or the mandatory pilot station to fly the rocket. Every tile you place as a floor and every ladder you place to climb between floors is consuming one of those 80 valuable cells.
In this section I'll summarize the statistics of all the rocket designs I came up with and give rationale for why I selected the ones I did to showcase in the construction section.
5.1 - Research Rockets
As discussed above, there are two main categories of research rocket. Those with standard telescopes and those with the large enclosed telescope. For the rockets with standard scopes, I loosely broke them down into three subcategories, based on how I installed the great hall.
If you install the great hall across the top of the rocket, with the barracks and washroom in the bottom left and bottom right corners, I call that a "Top" rocket. Conversely, if the great hall is on bottom with the other two rooms in the top left and right corners, I call that a "bottom" rocket. Finally, you can install the great hall diagonally through the rocket, for example from the airlock in the lower left up to the top right. The barracks and washroom would be installed in the top left and bottom right, and I would call that a "diagonal" rocket. None of these differences are meaningful in game, they simply helped categorize my designs as I was working on them. Any rocket with a large telescope was forced to place the scope on the left side (not necessarily true anymore post-patch) so I simply named those "large" rockets to indicate the enclosed scope. This shows that I didn't do as much research into what would be called "left" or "right" rockets per the above naming, so there could be room for improved designs in those areas. Particularly with the new more symmetrical telescope coverage.
With all that said, the following table summarizes the 16 designs I was moderately happy with, all compared to the bad example I showed in the radiation section.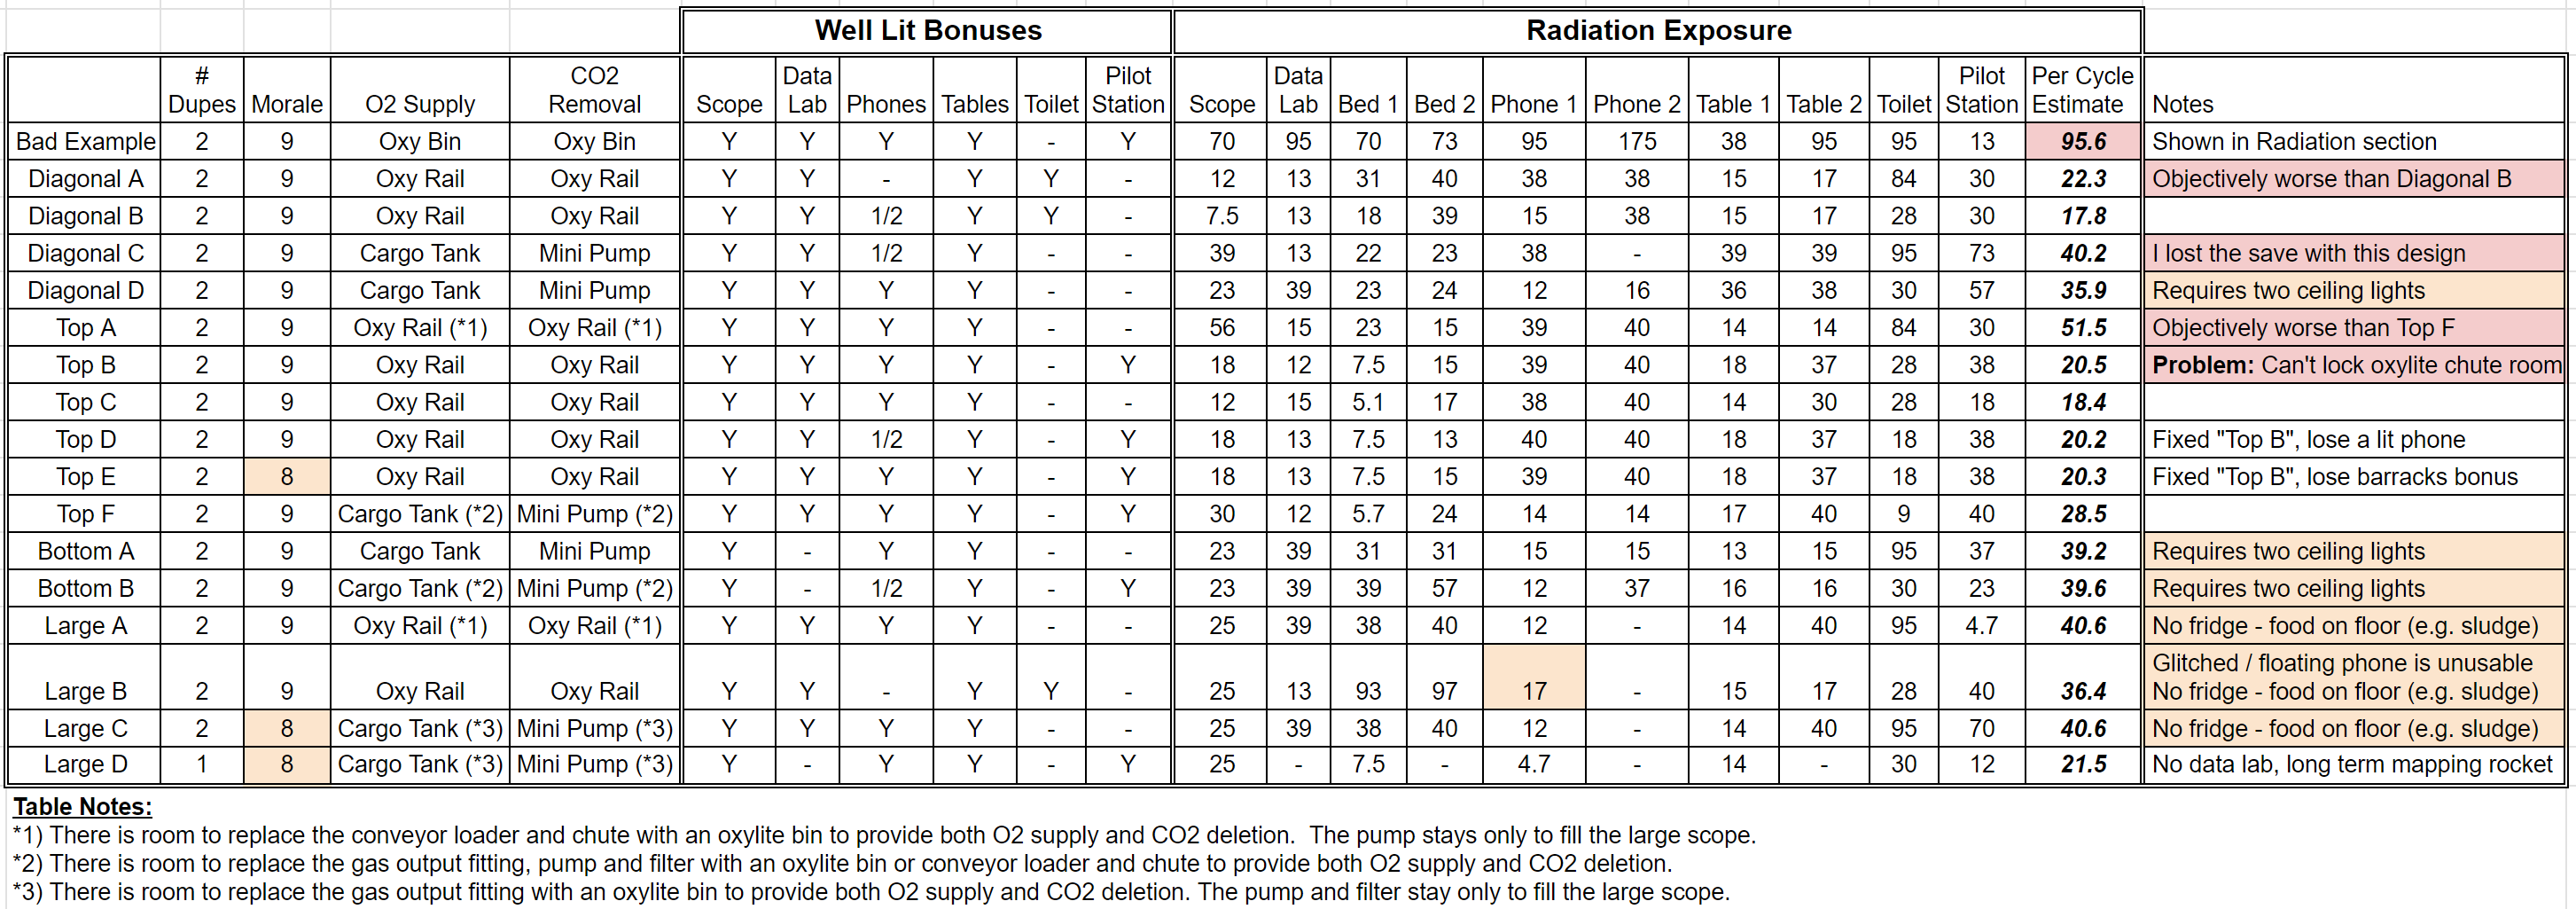
I intentionally tried to capture designs that used a mix of solutions for O2 supply and CO2 removal. I always rush mechatronics engineering for ranching and other reasons, so oxylite rails are my preferred solutions for rockets. But I didn't want to alienate folks who play differently and might prefer a cargo tank and pump, or a simple oxylite bin.
Even so, it's clear in the table above that some designs are objectively worse than others, and I certainly can't detail a dozen or more designs in this guide. So I removed the designs with major issues and narrowed down to just the best options:
I was now down to four rockets with standard scopes and three with large scopes. Large rocket "D" is actually more of an honorable mention as it does not contain a data lab and was not built for two dupes. I'll briefly revisit this rocket as an honorable mention in the bonus section, but it can't be the focus of this guide.
Looking at the final four standard research rockets, "Top F" really stands out. It's only real negative is that it has the worst radiation exposure levels, however it's still under 30 rads/cycle which is a fantastic result. If you look back at the original table it has the lowest radiation exposure of all builds with a cargo tank and pump, and it's the only one of those that doesn't require two ceiling lights as well. Compared to others in this reduced table it's the only design able to provide light to both phones and the pilot station, and the only area it doesn't light is the toilet, which very few of my designs managed. Most importantly, all three of the other designs can only be built with oxylite rails, while "Top F" can support any combination of cargo tank and pump, oxylite rails or oxylite bin. As such it's certainly the most flexible design so I decided to highlight it as the winner.
For the remaining two rockets with large scopes, they're essentially identical except for two things. "Large A" achieves the full +9 morale while "Large C" only gets +8. Additionally "Large A" is designed with an oxylite rail but can be adapted to use an oxylite bin instead, while "Large B" is designed with a cargo tank and pump but can be adapted to use an oxylite bin instead. It'd be nice to have an option which supported all three O2/CO2 options like "Top F", but given these choices I selected "Large A" as the winner. It's very usable early game with the oxylite bin and it upgrades to rails (my preferred solution) instead of having to always carry a gas cargo tank. The +1 morale is just icing on the cake. For what it's worth both designs support deleting the phone and replacing it with a refrigerator if you don't want to limit yourself to high-longevity food like berry sludge. This reduces the great hall to a mess hall at a cost of -3 morale, which is another reason the +1 from "Large A" is helpful.
5.2 - Colonization Rockets
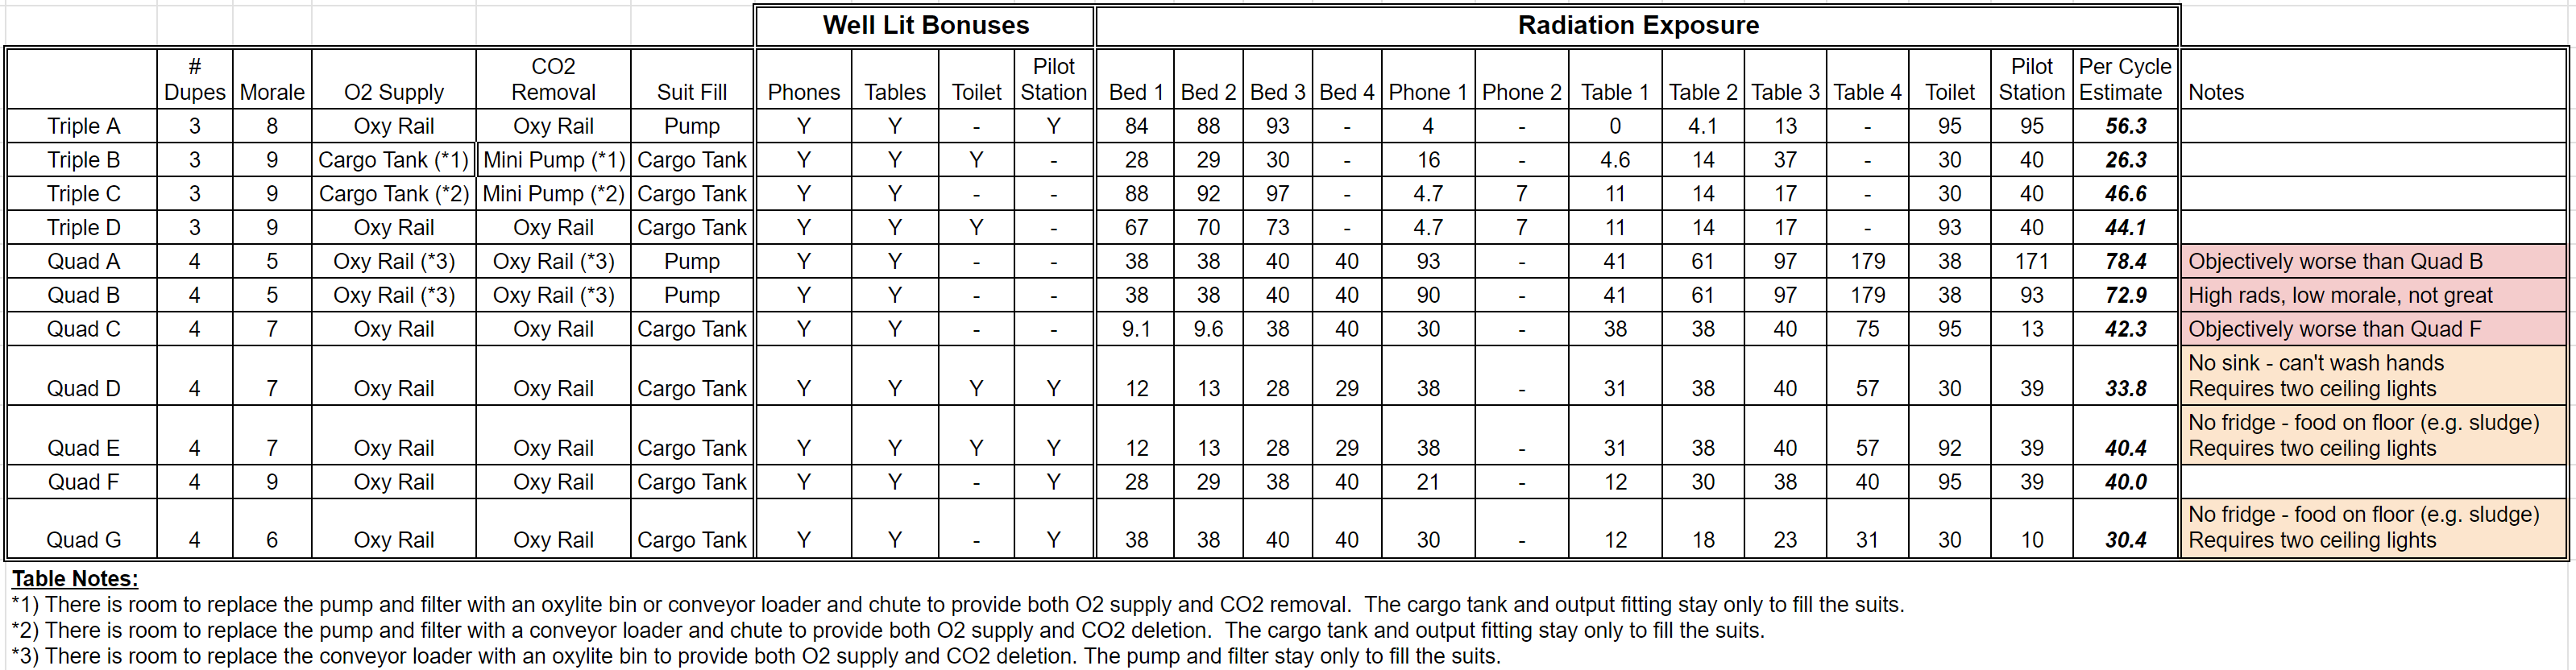
Choosing between the quad designs was remarkably easy. Quad F is clearly superior to any of the others as the only rocket to hit +9 morale, and one of only two designs without any significant flaws. There's nothing wrong with the Quad C design, the only other one without a specific flaw, but it gets edged out by Quad F in a couple areas.
For the three-dupe designs the selection was much more subjective. Triple A is the only design that can fill suits without a cargo tank (a big plus), but also the only one that can't hit +9 morale. Triples C and D are neck and neck, with D requiring an oxylite rail while C can support either a cargo tank and pump or an oxylite rail. Triple B is the most flexible, supporting any of the three O2/CO2 options, and also has the lowest radiation exposure.
What eventually settled it for me is that if you're going to build a colonizer rocket with an oxylite rail, Quad F is generally superior to most of the three-dupe designs. It's that good, you might as well just build it instead. Triple B though provides full flexibility in O2/CO2 solutions so you aren't forced into a conveyor rail. This potentially justifies having a separate three-dupe rocket design, so I chose it as the winner in that category.
After going through the above review process, I began to wonder how the Quad F design would compare to Triple B if I removed the support for the 4th dupe and treated it as a three-dupe rocket. With the extra space I was able to add a second phone and move one of the mess tables to a less radiated cell. I found that the rocket could also support both other O2/CO2 options in this configuration with only minor tweaks, a potential game changer. I played with the Triple B design to see what it would look like if I tried to add a second phone to be competitive, but the only way to do so was by moving a mess table to an un-lit cell with slightly higher radiation exposure. The table below summarizes this last stage of comparisons between the two:
All things considered the Quad F design makes a great foundation for either a three or four-dupe rocket, and in the end I couldn't justify writing up a whole separate construction guide for the Triple B design. The only real advantage is slightly lower radiation exposure, but we're already below the threshold where that would make a meaningful difference.
6. Construction
6.1 - Colonization Rocket
6.1.1 - Initial Construction
To start out, you'll want to build the basic interior of whichever version you're interested in:
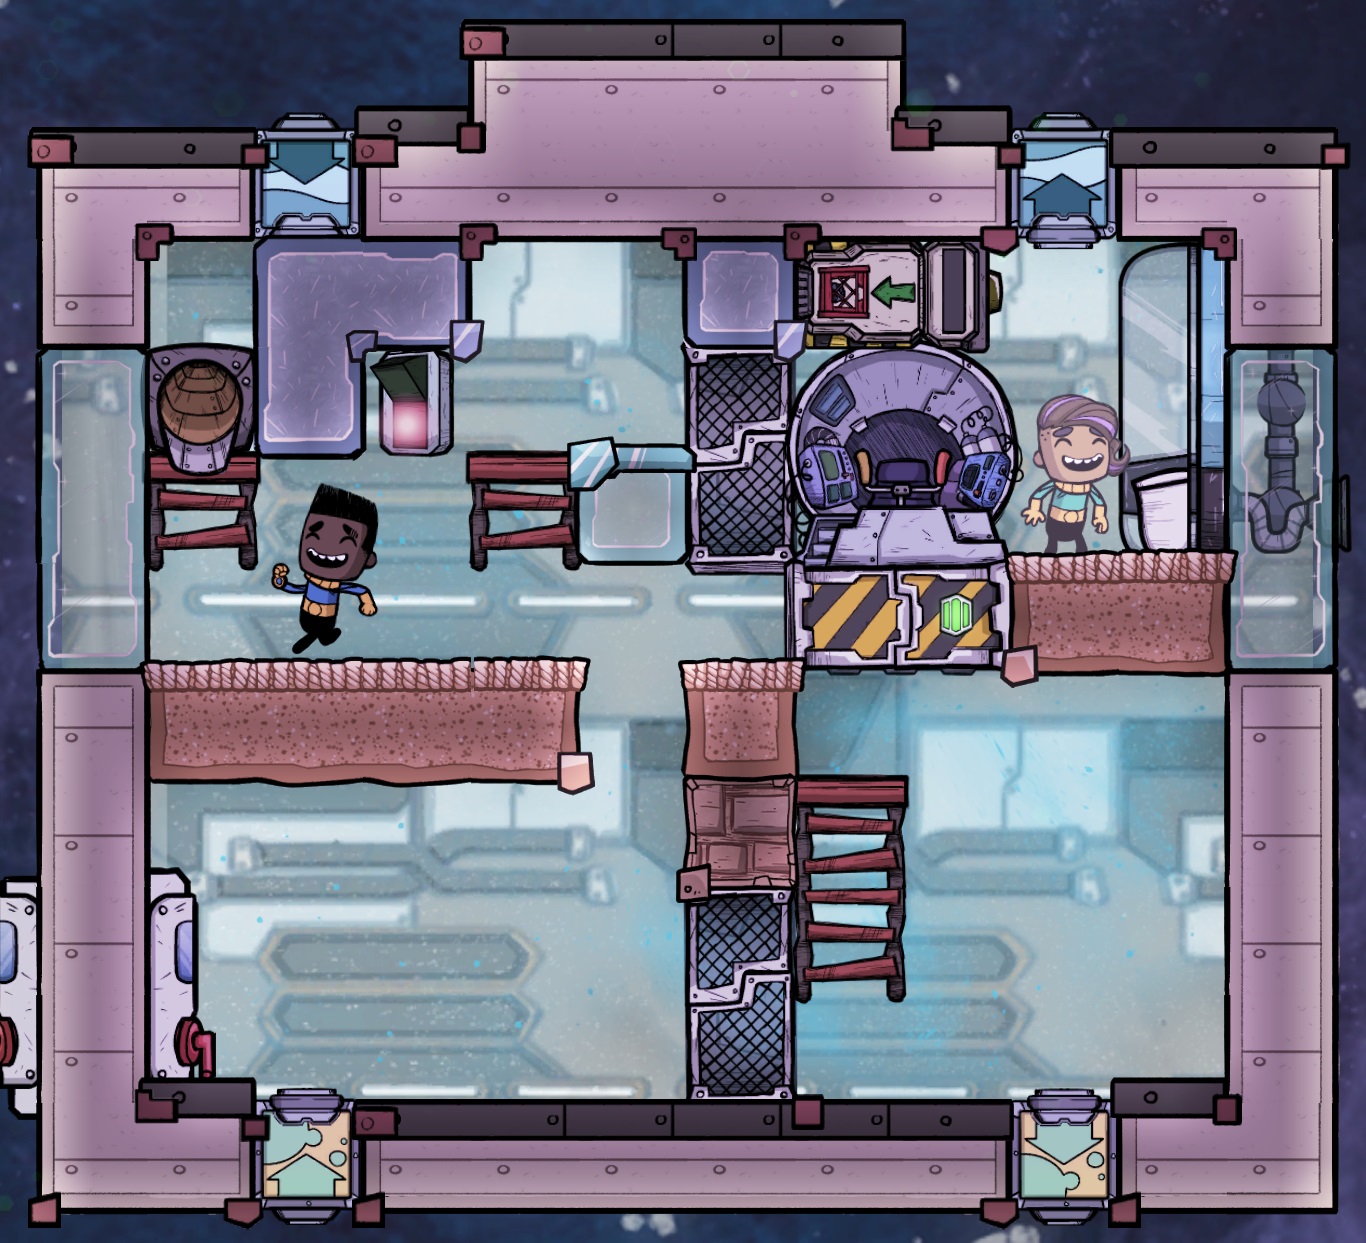
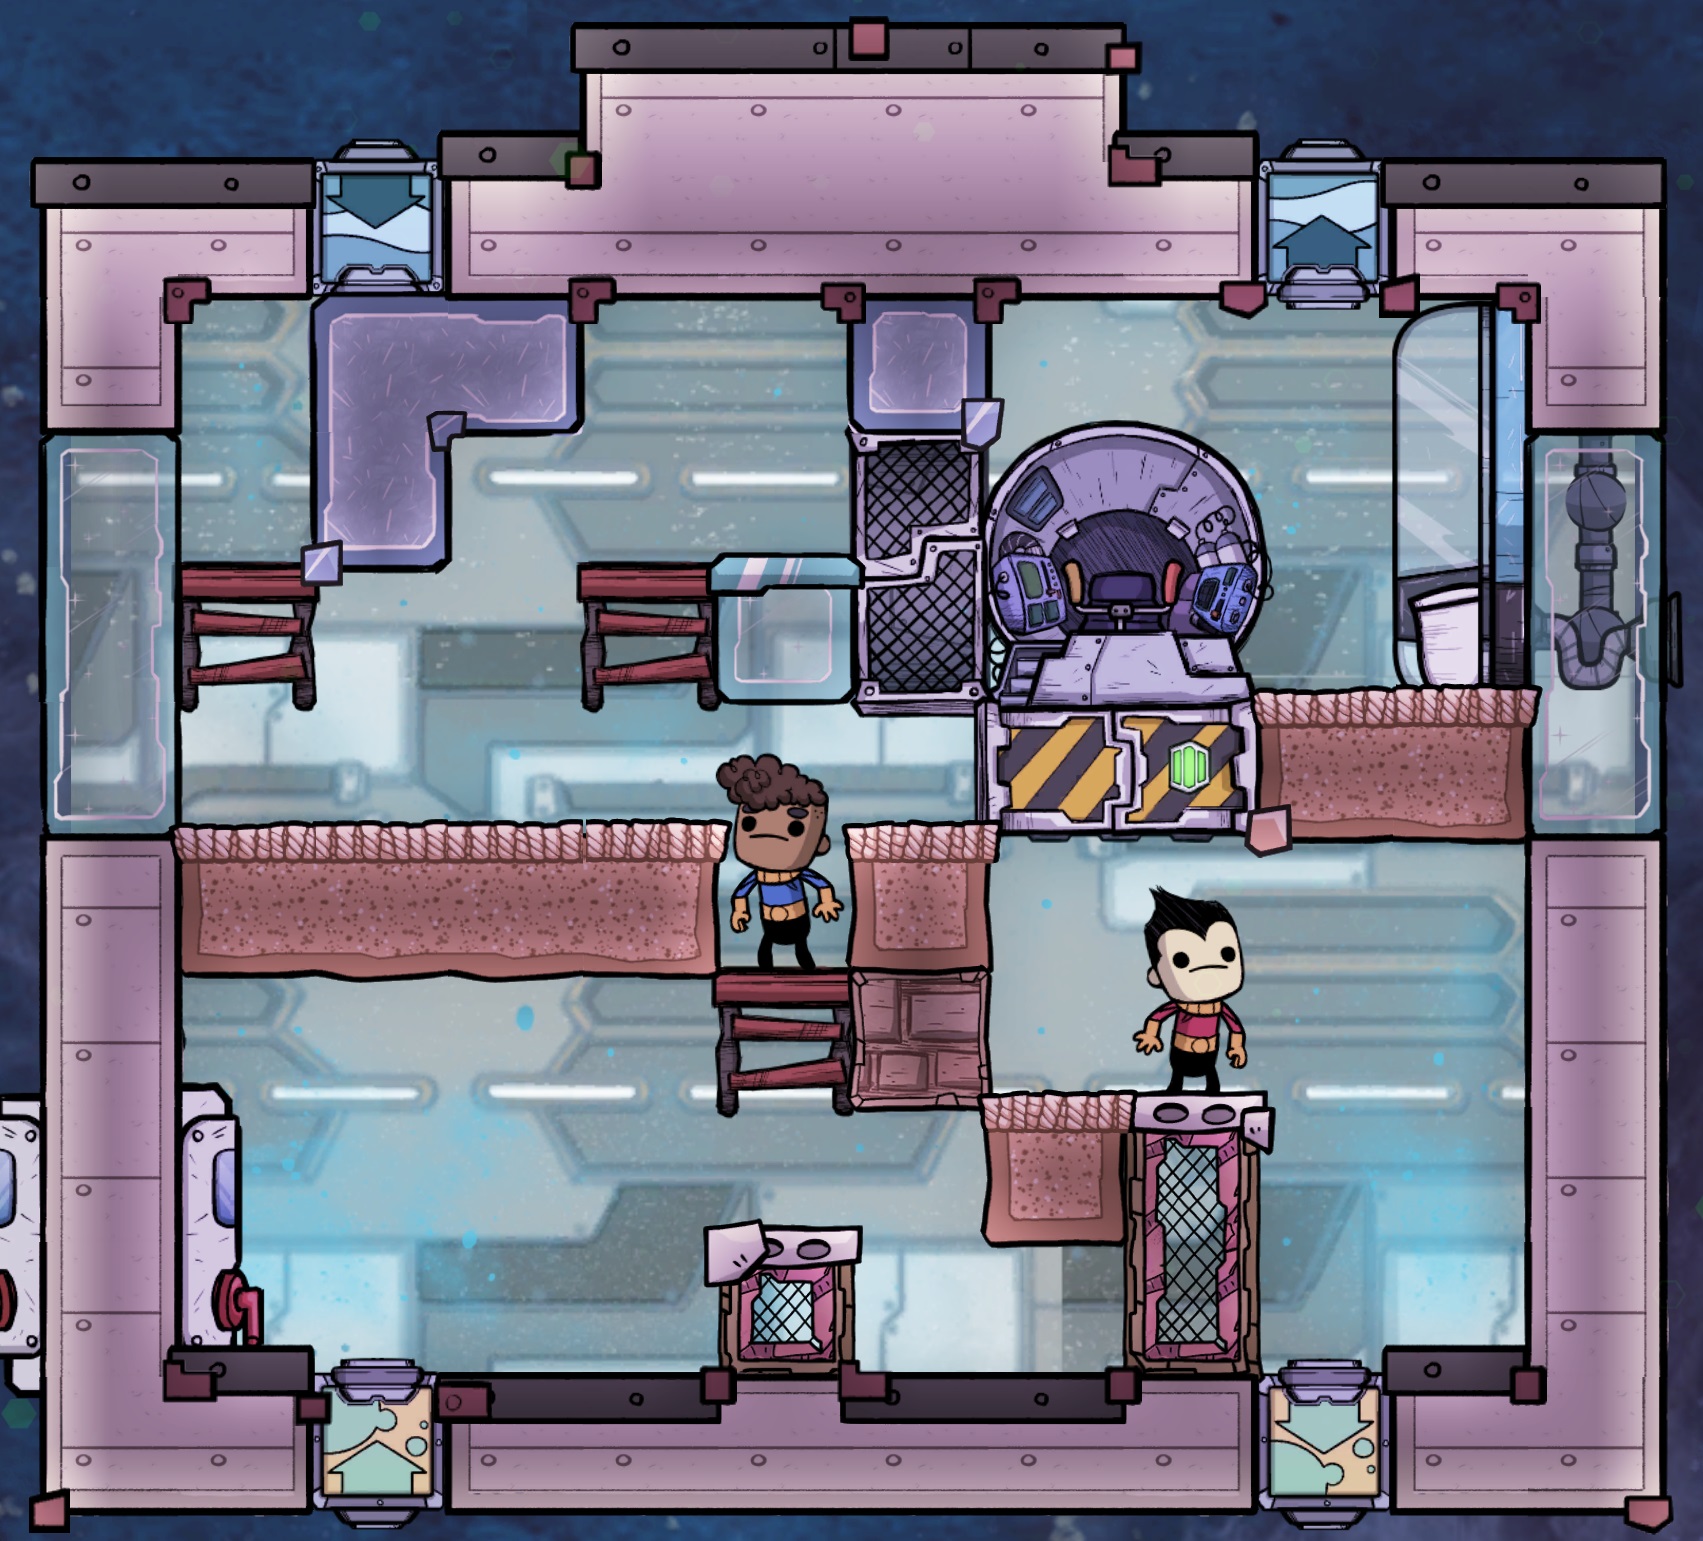
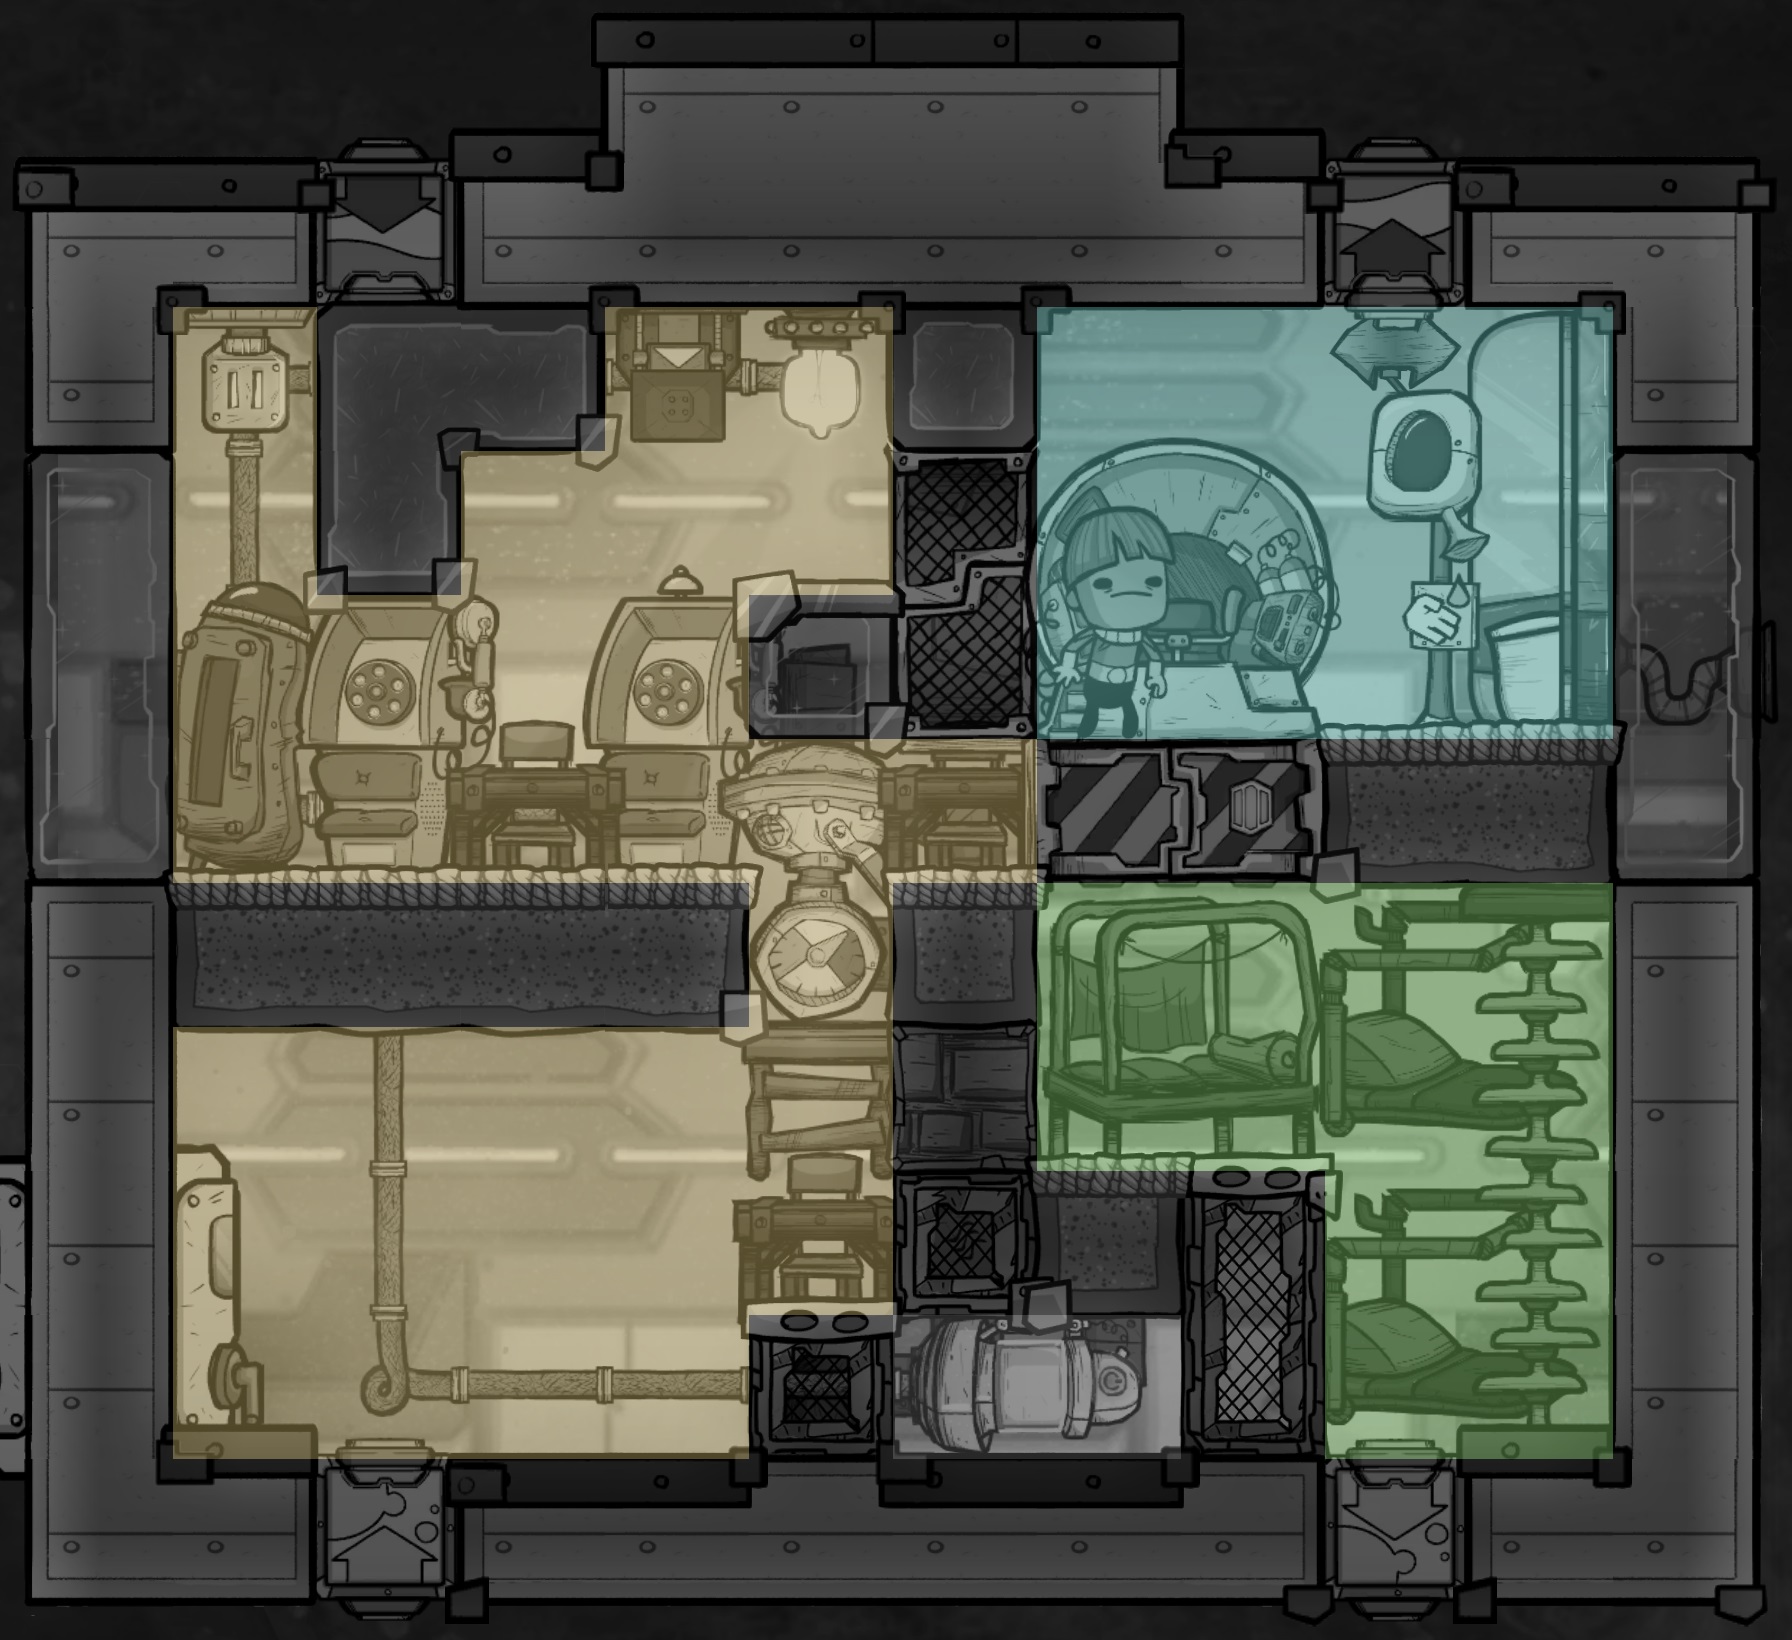
In this design the entire left side of the rocket will become a great hall, while the upper right and lower right will become a washroom and barracks, respectively.
There are 4-5 types of tiles used in my designs so I'll take a moment to explain each of their purpose.- The gray tiles near the ceiling can be either plastic tile made of plastic or a metal tile made of lead. Their purpose is to block radiation, and these two materials have the best shielding properties at 68%. Use whichever material your colony can spare.
- The light brownish speckled tiles are carpet tiles and I use them by default for any surface a dupe could stand on. These tiles are fantastic for decor and also give the dupes a "tickled tootsies" stress debuff when walked on. If you're limited on reed fiber then you want to at least try to have a carpet tile under beds, workstations and mess tables, where the dupes will spend long periods of time.
- The light blue semi-transparent tiles are window tiles. These can be made of either glass or diamond, and the purpose is to allow light through. I only use these where a carpet tile would block the well lit bonus on a station below.
- The darker brown tile that looks like a brick texture is just a standard tile. It only exists to save the special materials above when there would be no benefit from using another tile type. In other words if a dupe can't walk on it and I don't need to block radiation or allow light below it, then a standard tile works.
- Finally the wire mesh looking tiles are airflow tiles. I typically don't use these unless I'm installing a pump and need to block it off from another room to preserve the morale bonus, or along the floor to ensure CO2 won't get trapped on one side.

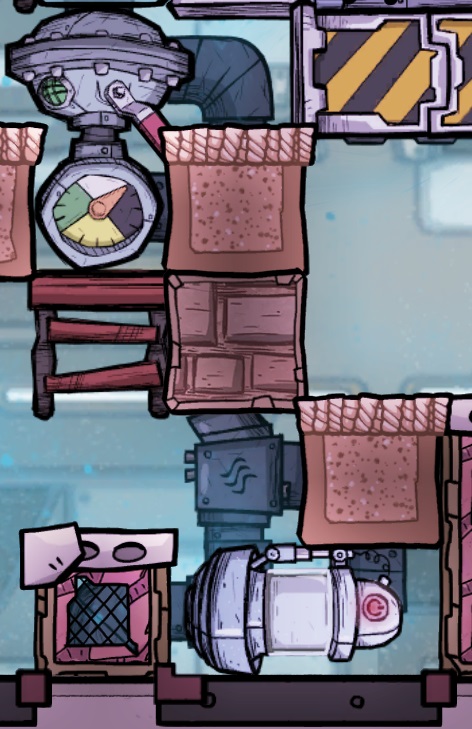
Then you'll want to construct some gas piping between them as shown:
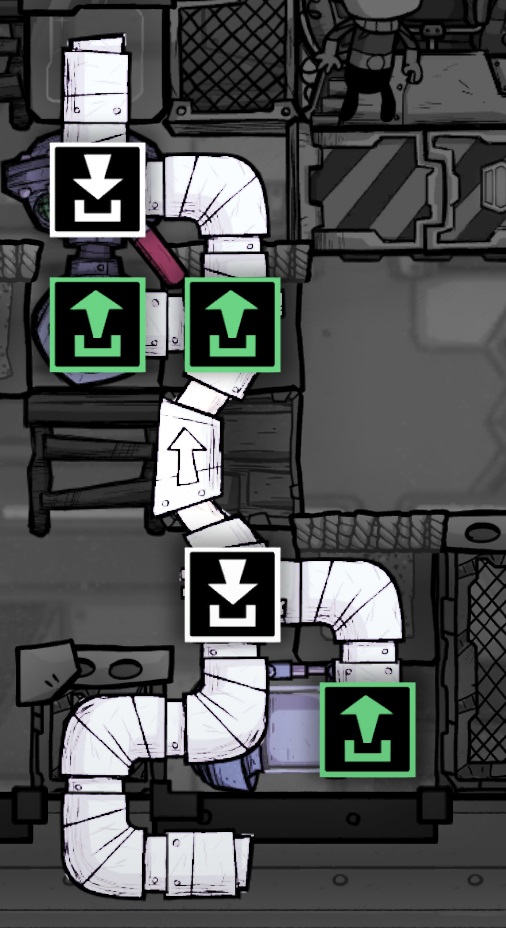
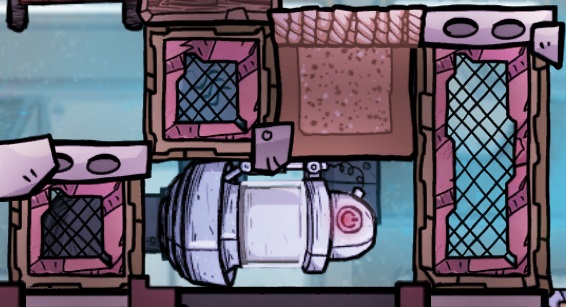
Make sure the filter is set to 1g/s and connect a power wire to the pump to push some oxygen into the pipe until the mechanical filter is primed. Otherwise you can feed in some oxygen from the launch pad. Just make sure no CO2 gets sucked up, if you've let some pile up on bottom you might want to build a temporary pump up top and run that one instead until the filter is primed. For more tips on this process check out other guides on what are known as mechanical filters.
Finally, once the filter is primed, you can turn off the pump and install an airflow tile so that the pump is considered in its own room, not affecting the morale bonus of your great hall:
6.1.2 - Washroom and Barracks
Both rockets only require the addition of a hand washing station to complete the washroom. The reason we didn't install this earlier with the wall toilet is because sometimes the bleach stone can give off chlorine gas and we wanted to make sure the oxygen filter was primed before dealing with other gasses in the module.
Once you've installed the hand washing station and set it to point left, you only have to install the beds to finish off this part of the design.
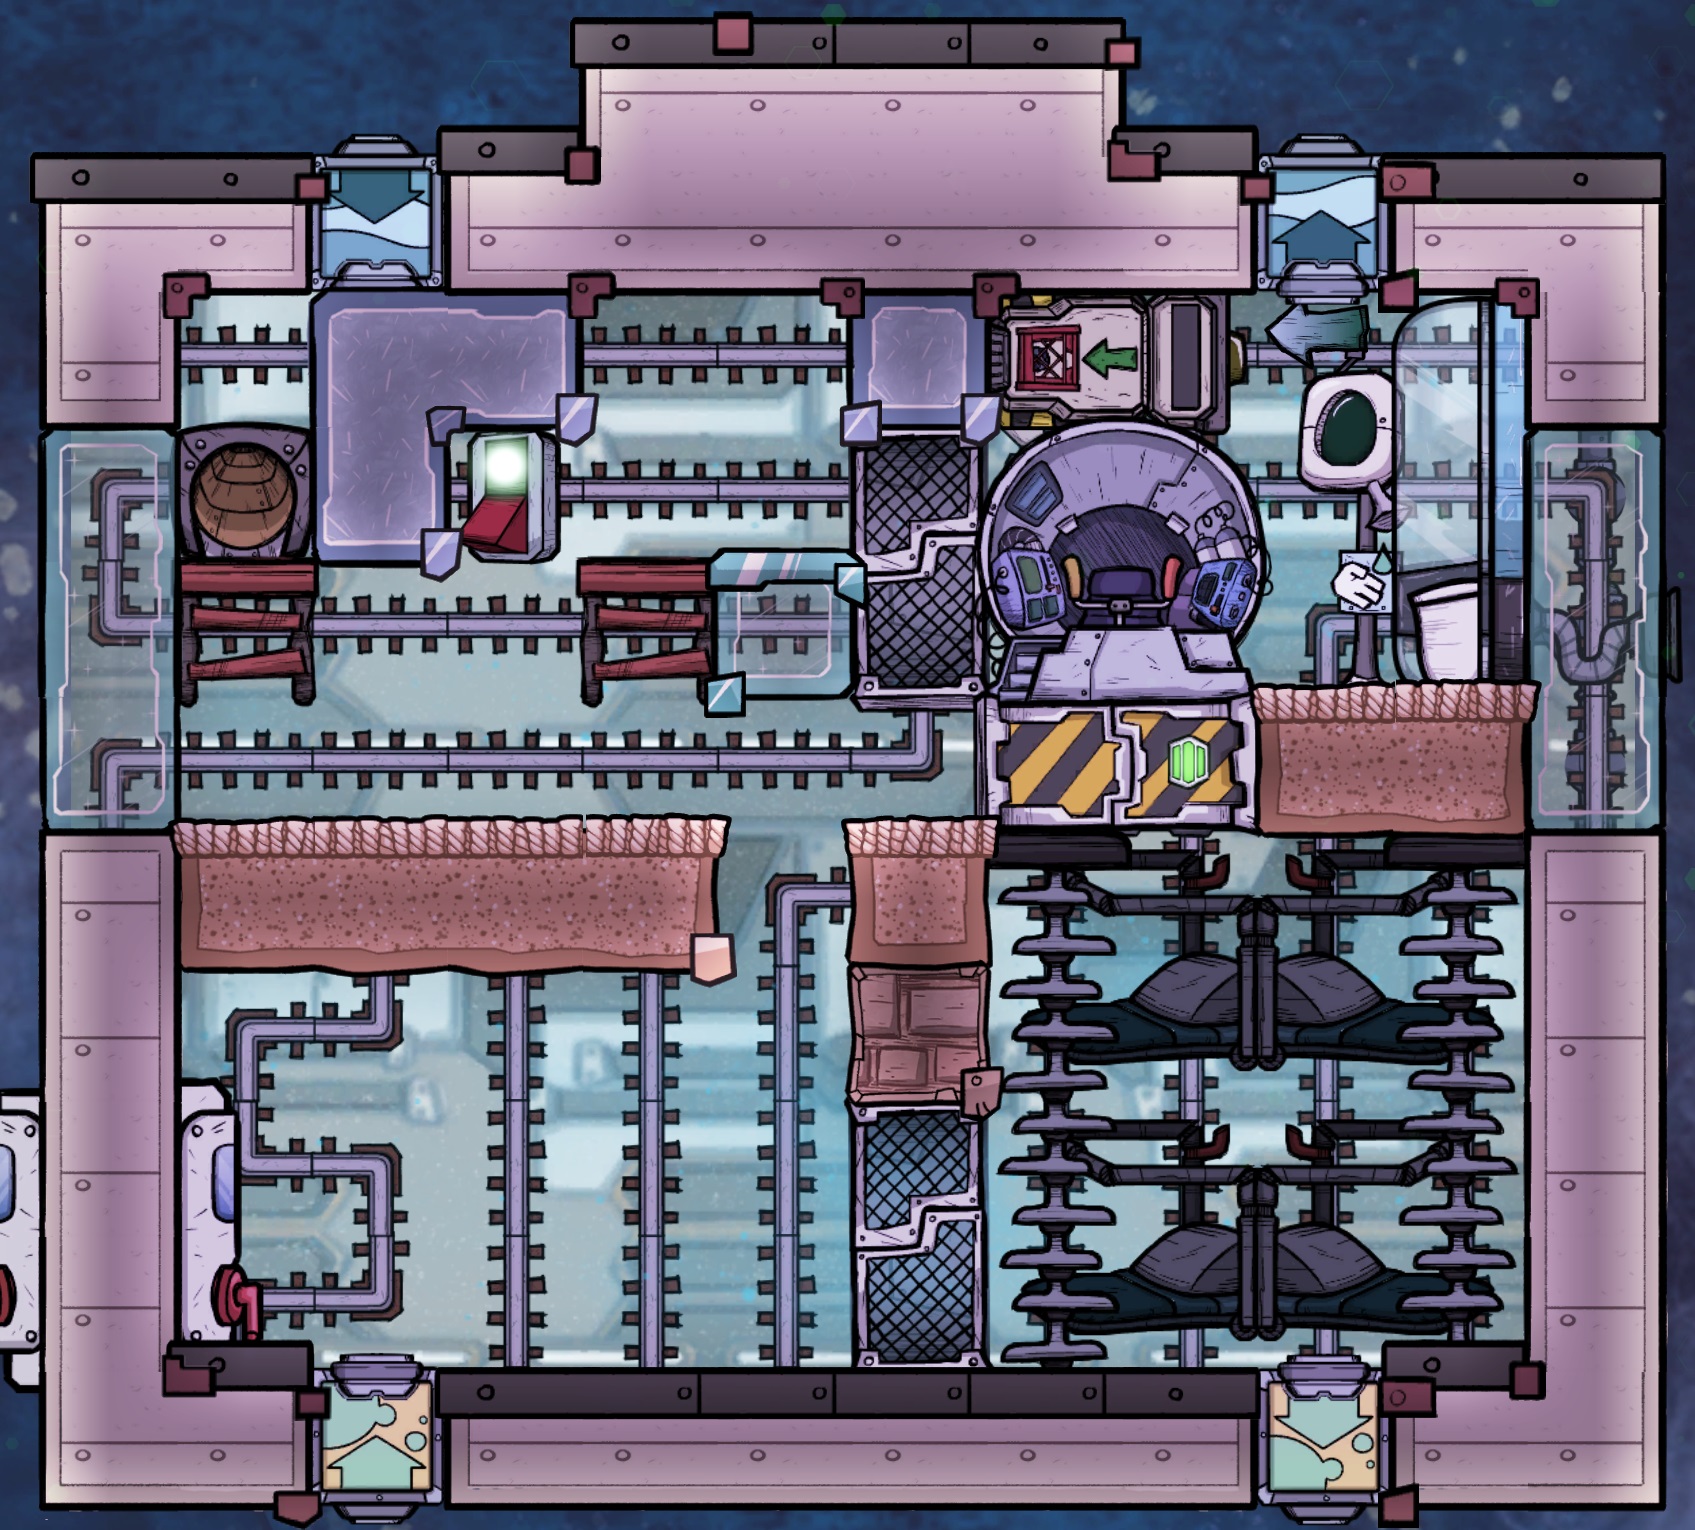
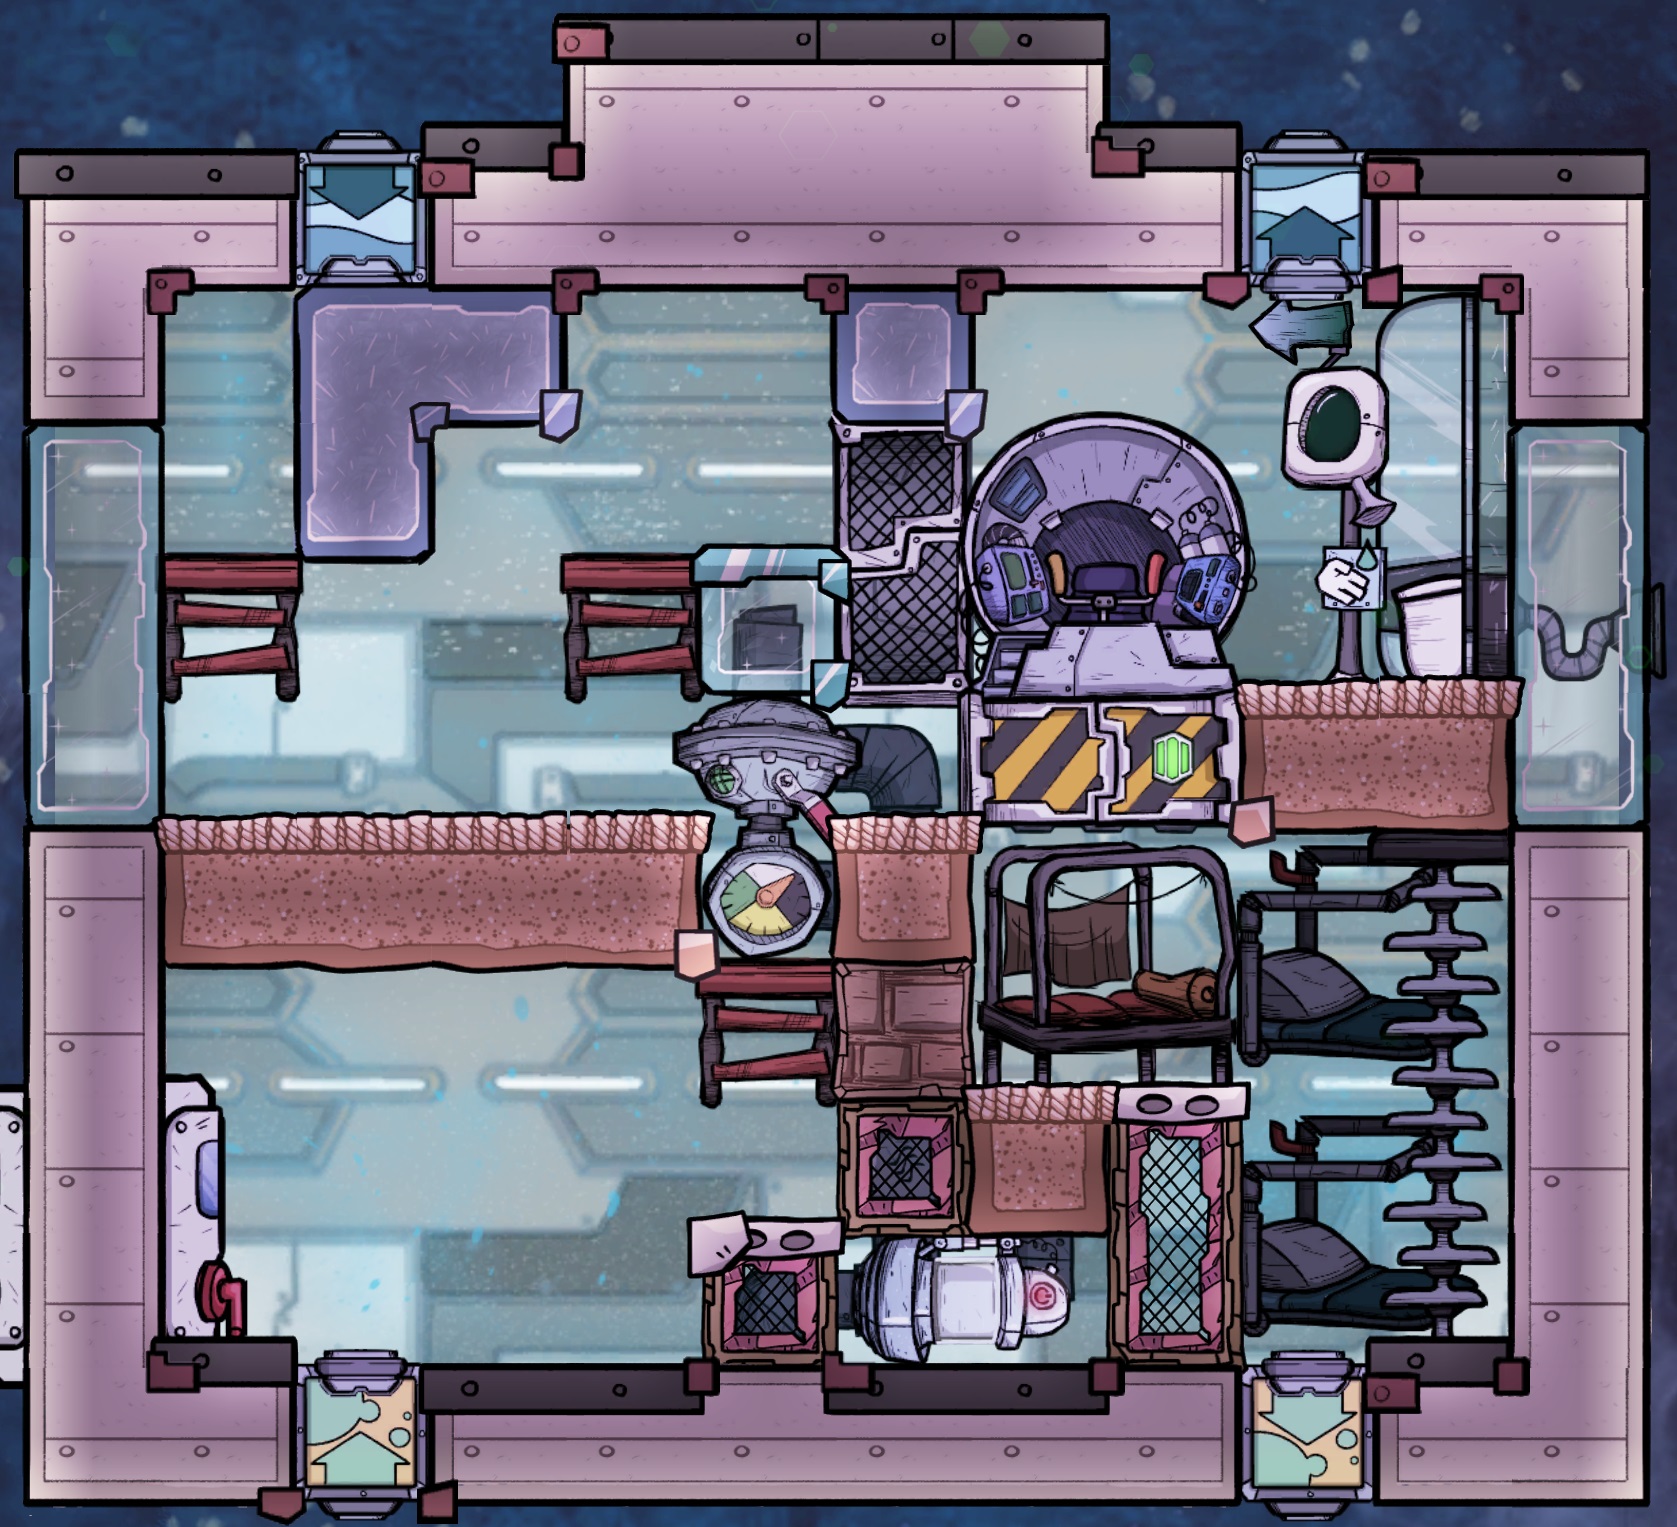
The orientation of the ladder beds is important to reduce radiation exposure. While sleeping, dupes are considered to be on the bottom tile of the ladder, as opposed to the tile that looks like a bed. For this reason we orient the beds on the left to keep the ladders under the double-thick ceiling, and the beds on the right are flipped to keep the ladders away from the window.
For the three dupe rocket we can use one regular cot instead of a third ladder bed. The dupe is considered to sleep in the bottom left tile, and since we don't have a ladder there's no risk of them being jostled awake by another dupe climbing into bed. Win-win!
6.1.3 - Great Hall
- 4 (3) Mess Tables
- 1 Aero Pot
- 1 (2) Party Line Phone
- Refrigerator
- Power Outlet
- Gas Output Fitting
- Ceiling Light
The numbers in parenthesis represent the three-dupe rocket, where the un-needed 4th mess table can be replaced with a second phone if desired. Alternatively that space can be used for a second fridge, decor item, etc. The phone is the smallest of the recreation item options required for a great hall. If you don't intend to use them they can be unplugged from power or disabled, but I find the stress buffs helpful for the minimal power costs.
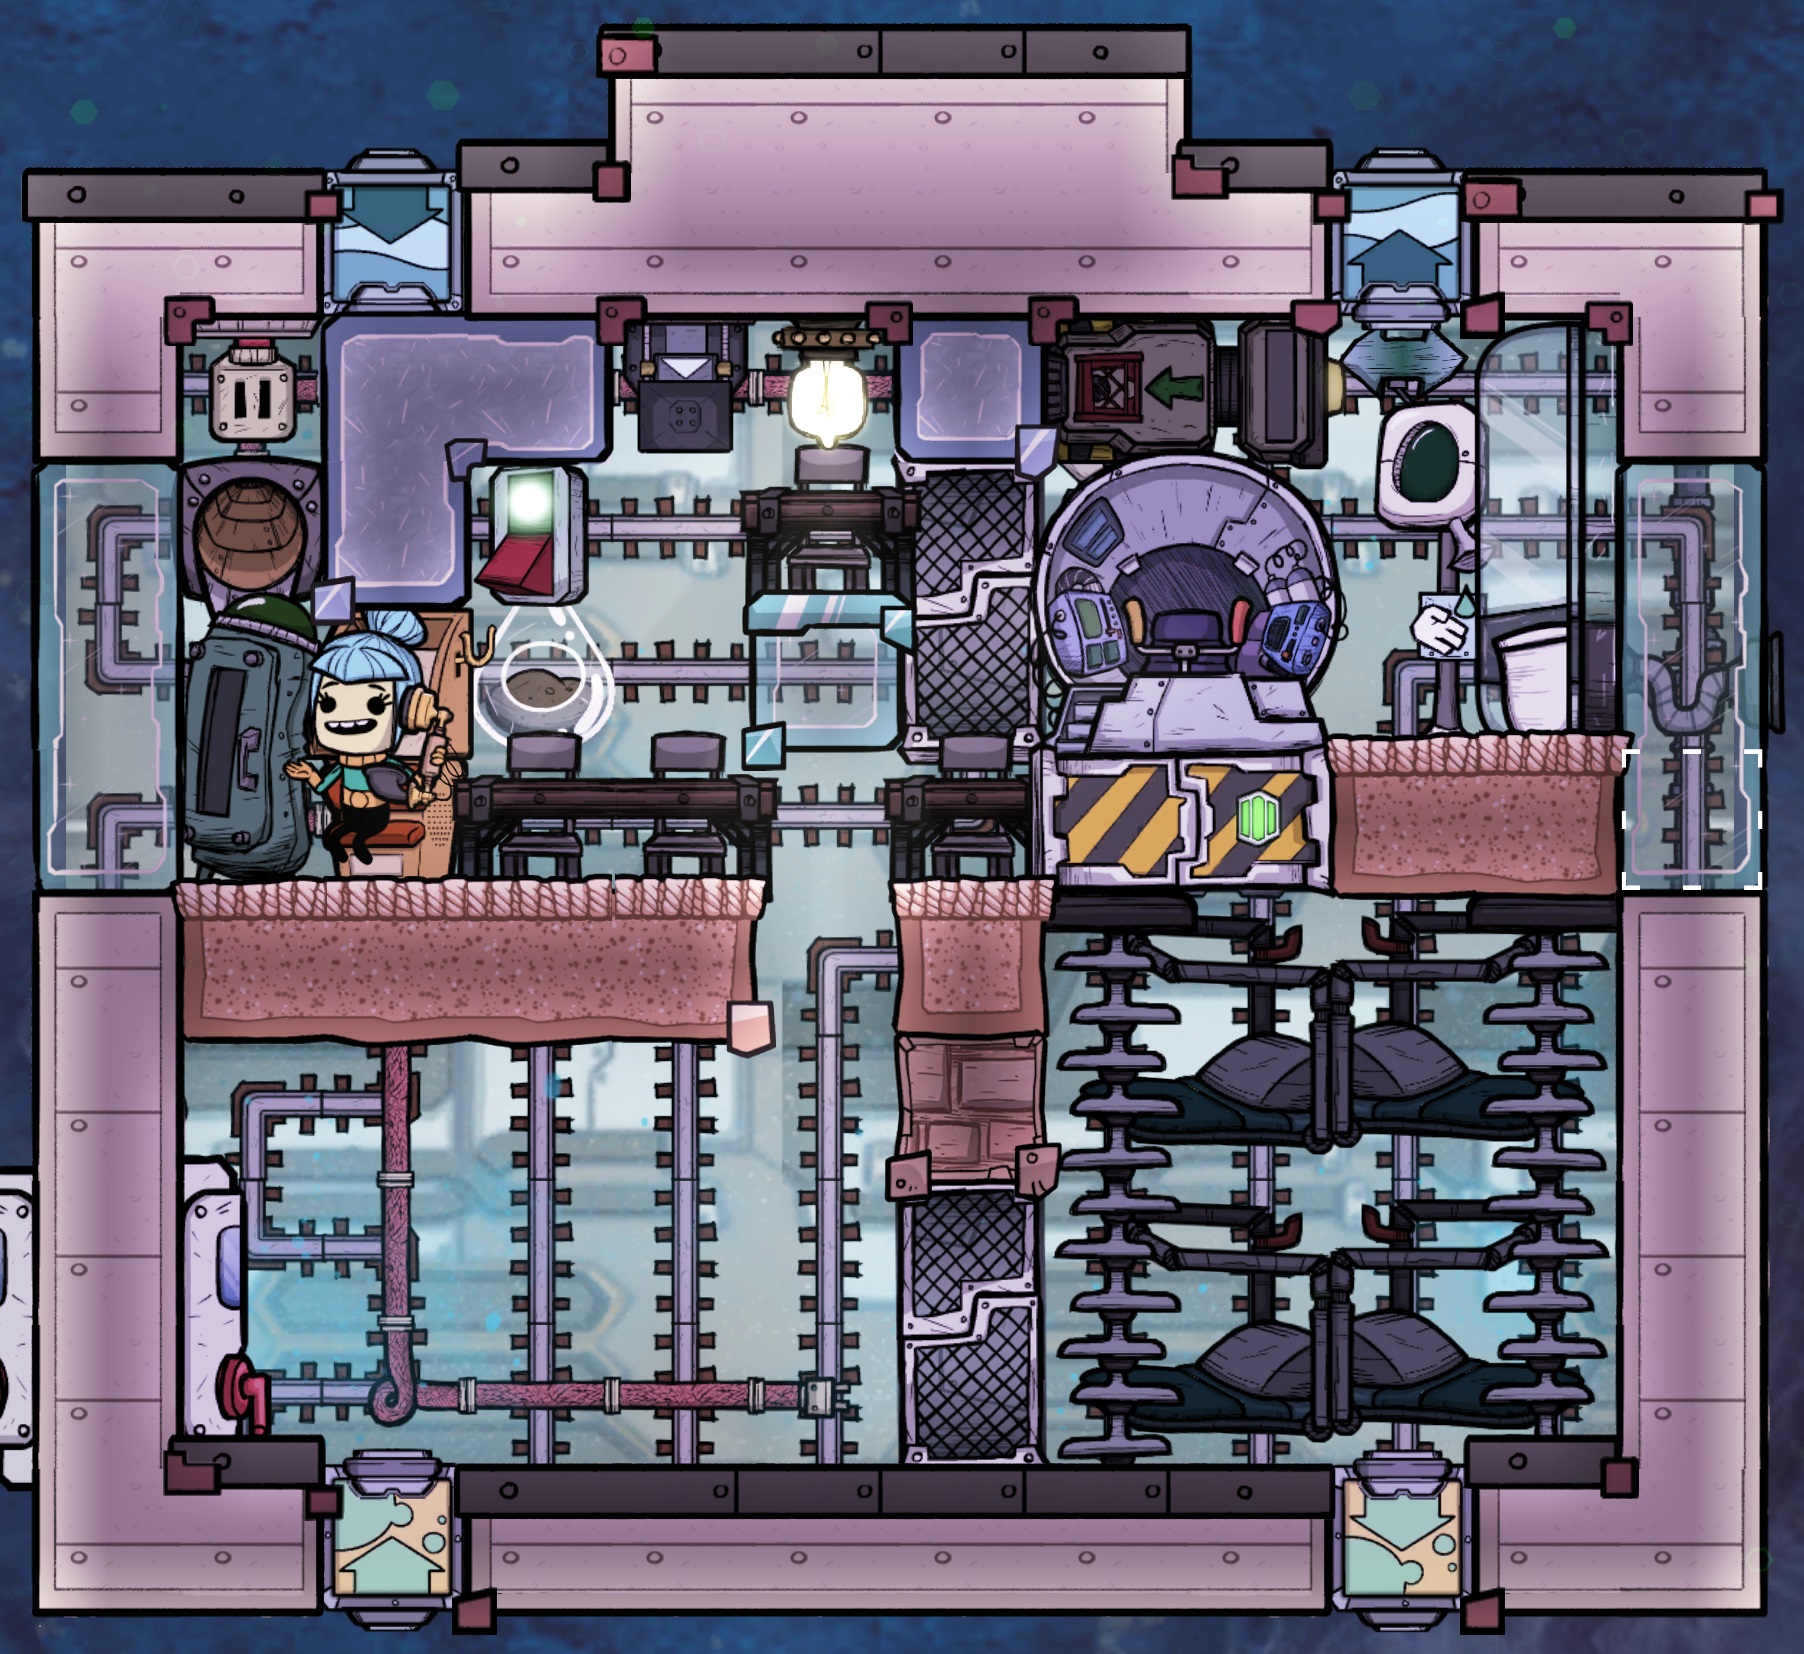
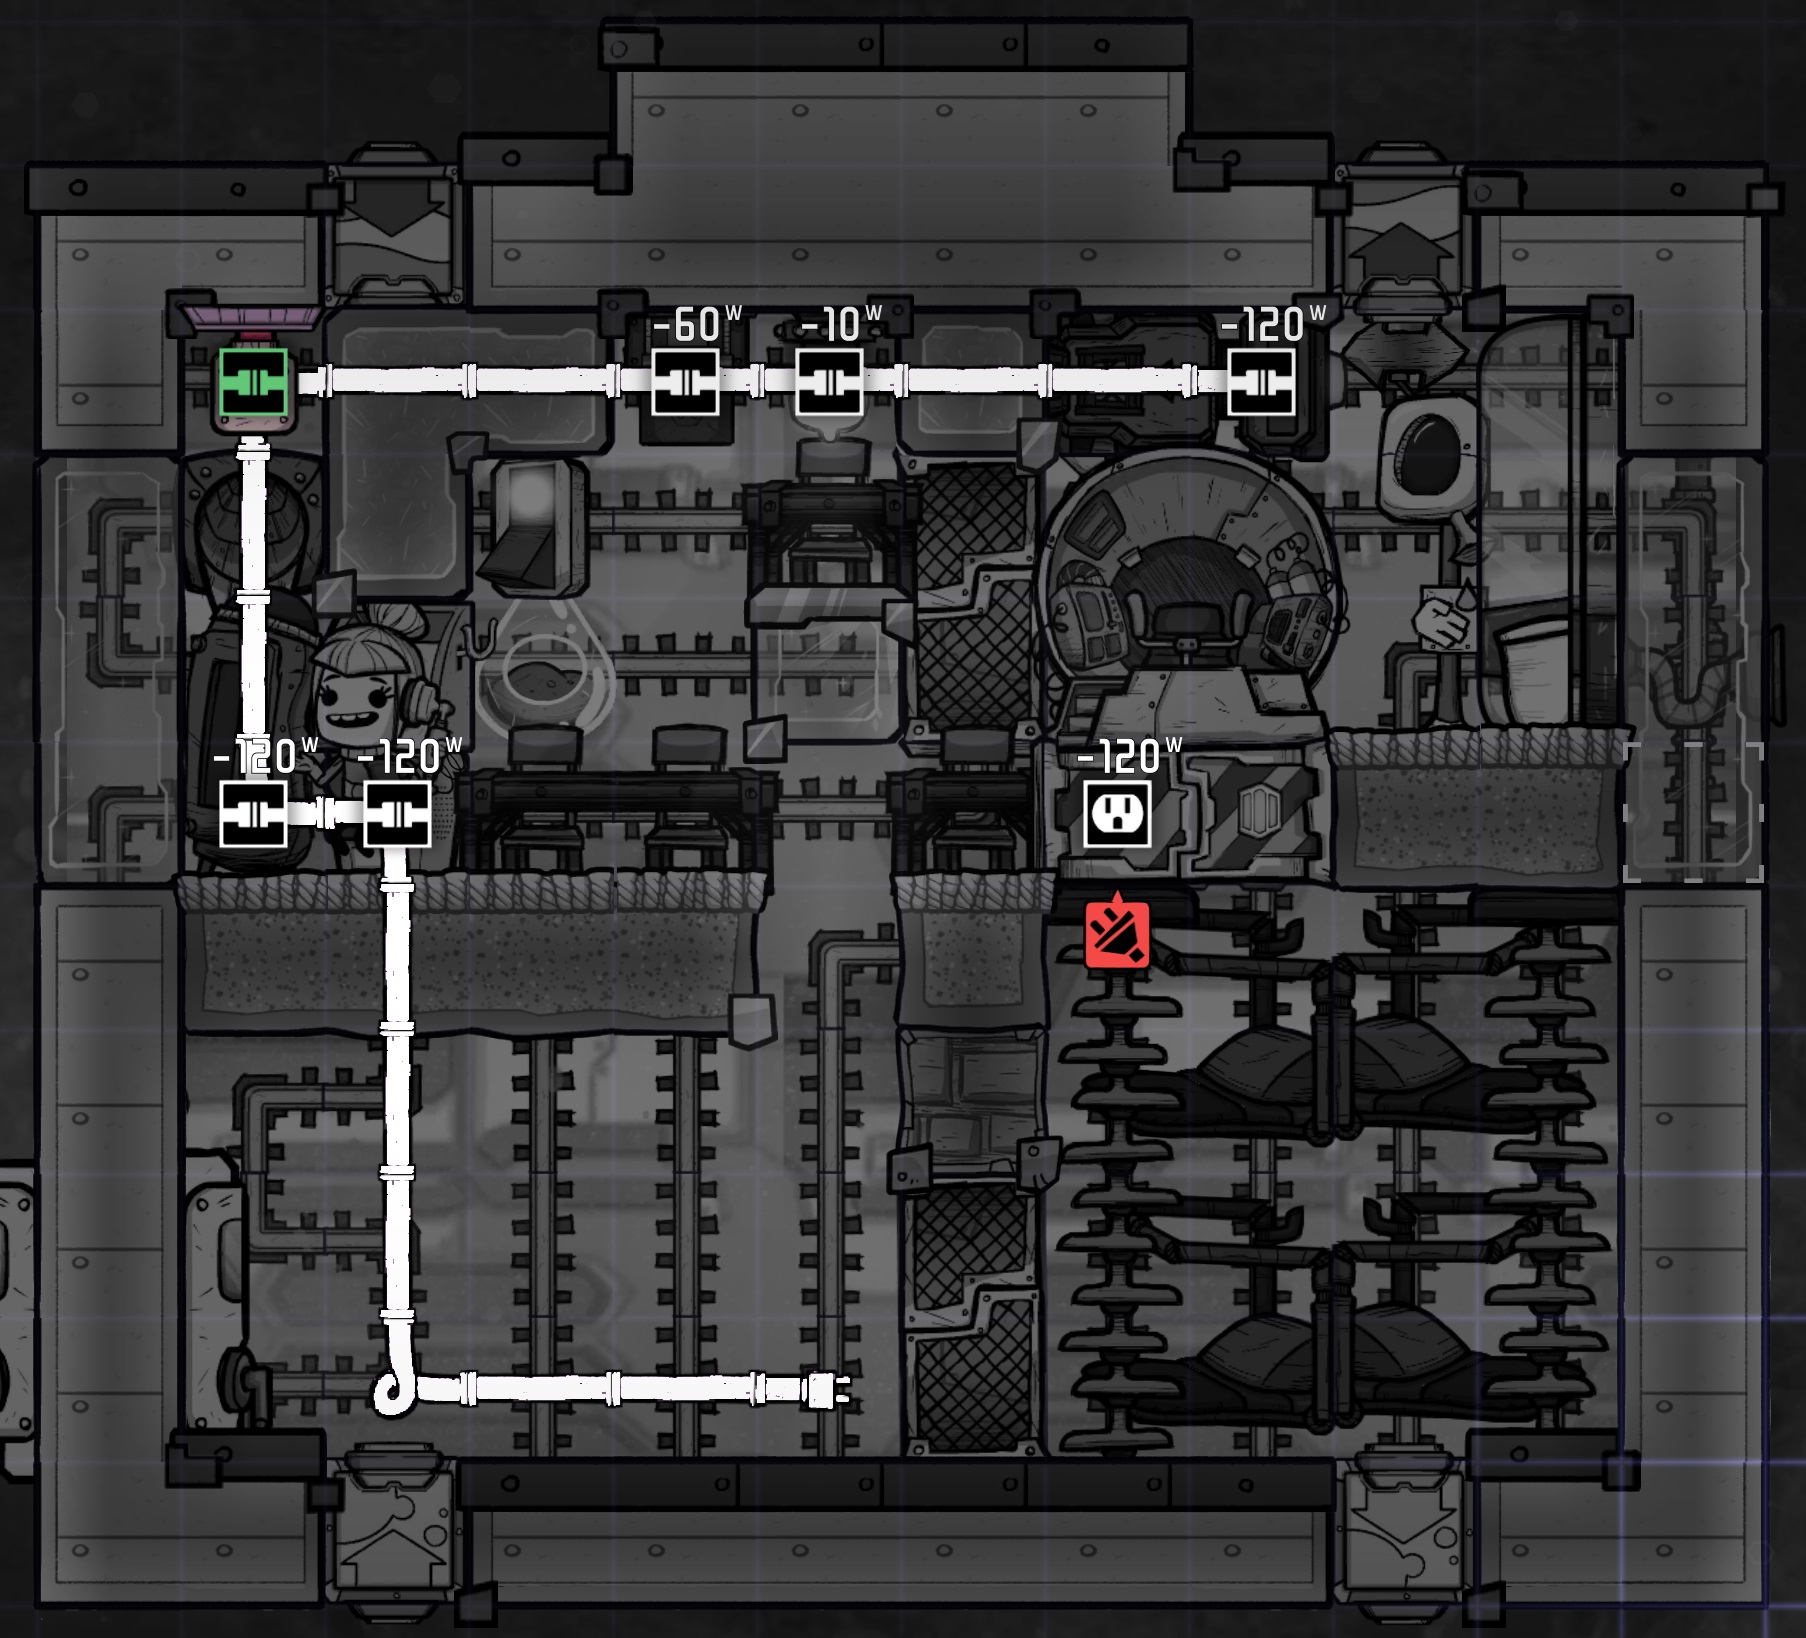
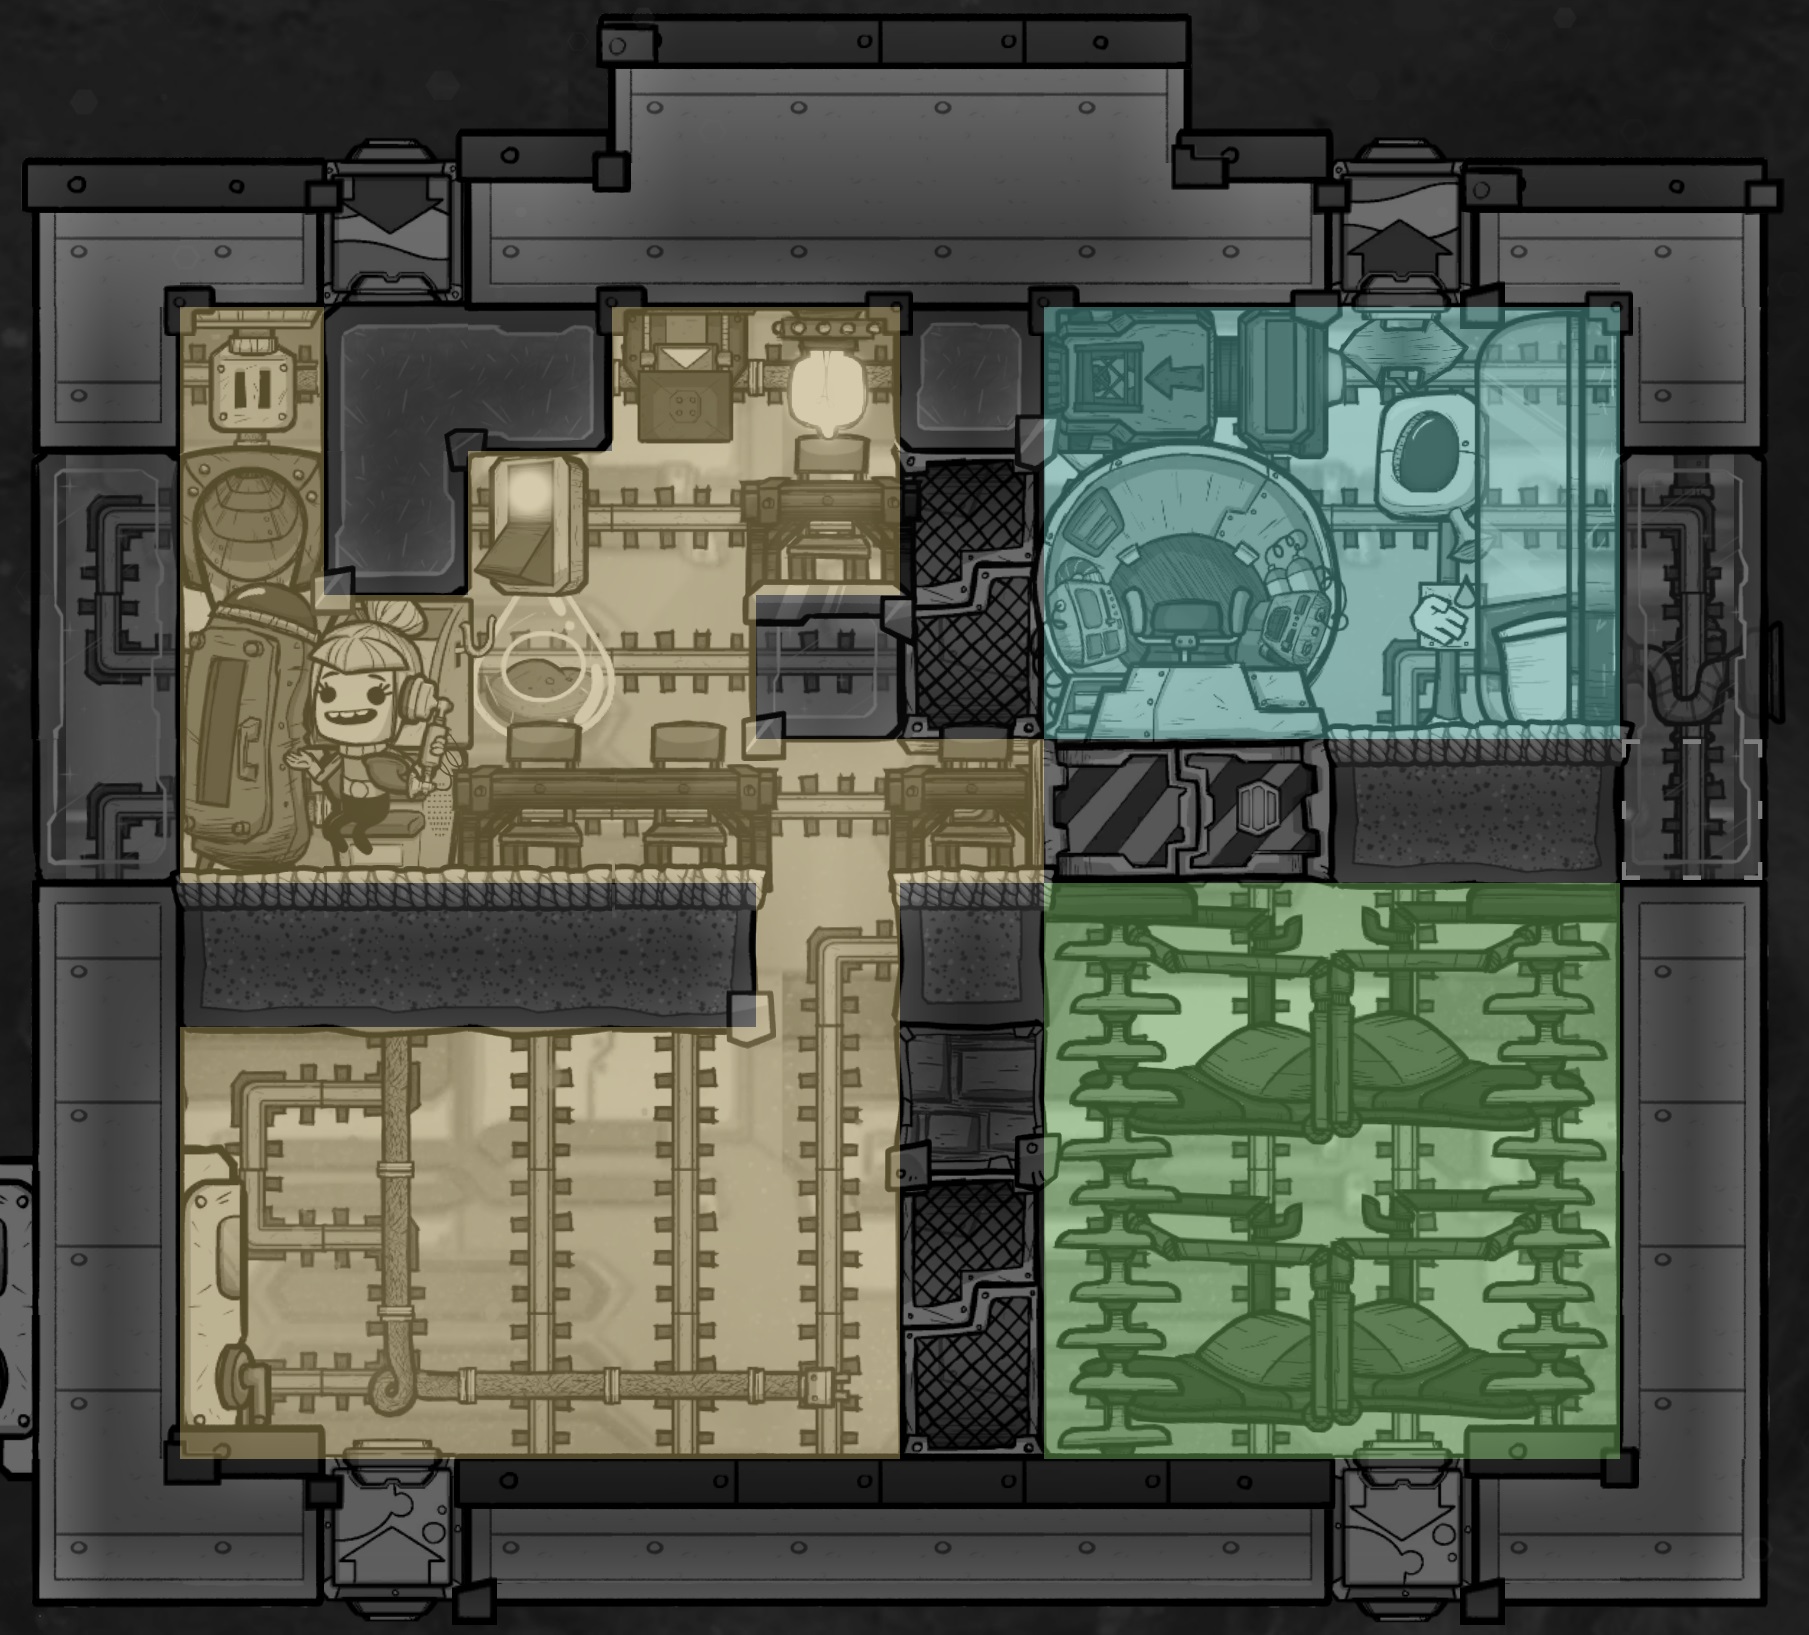
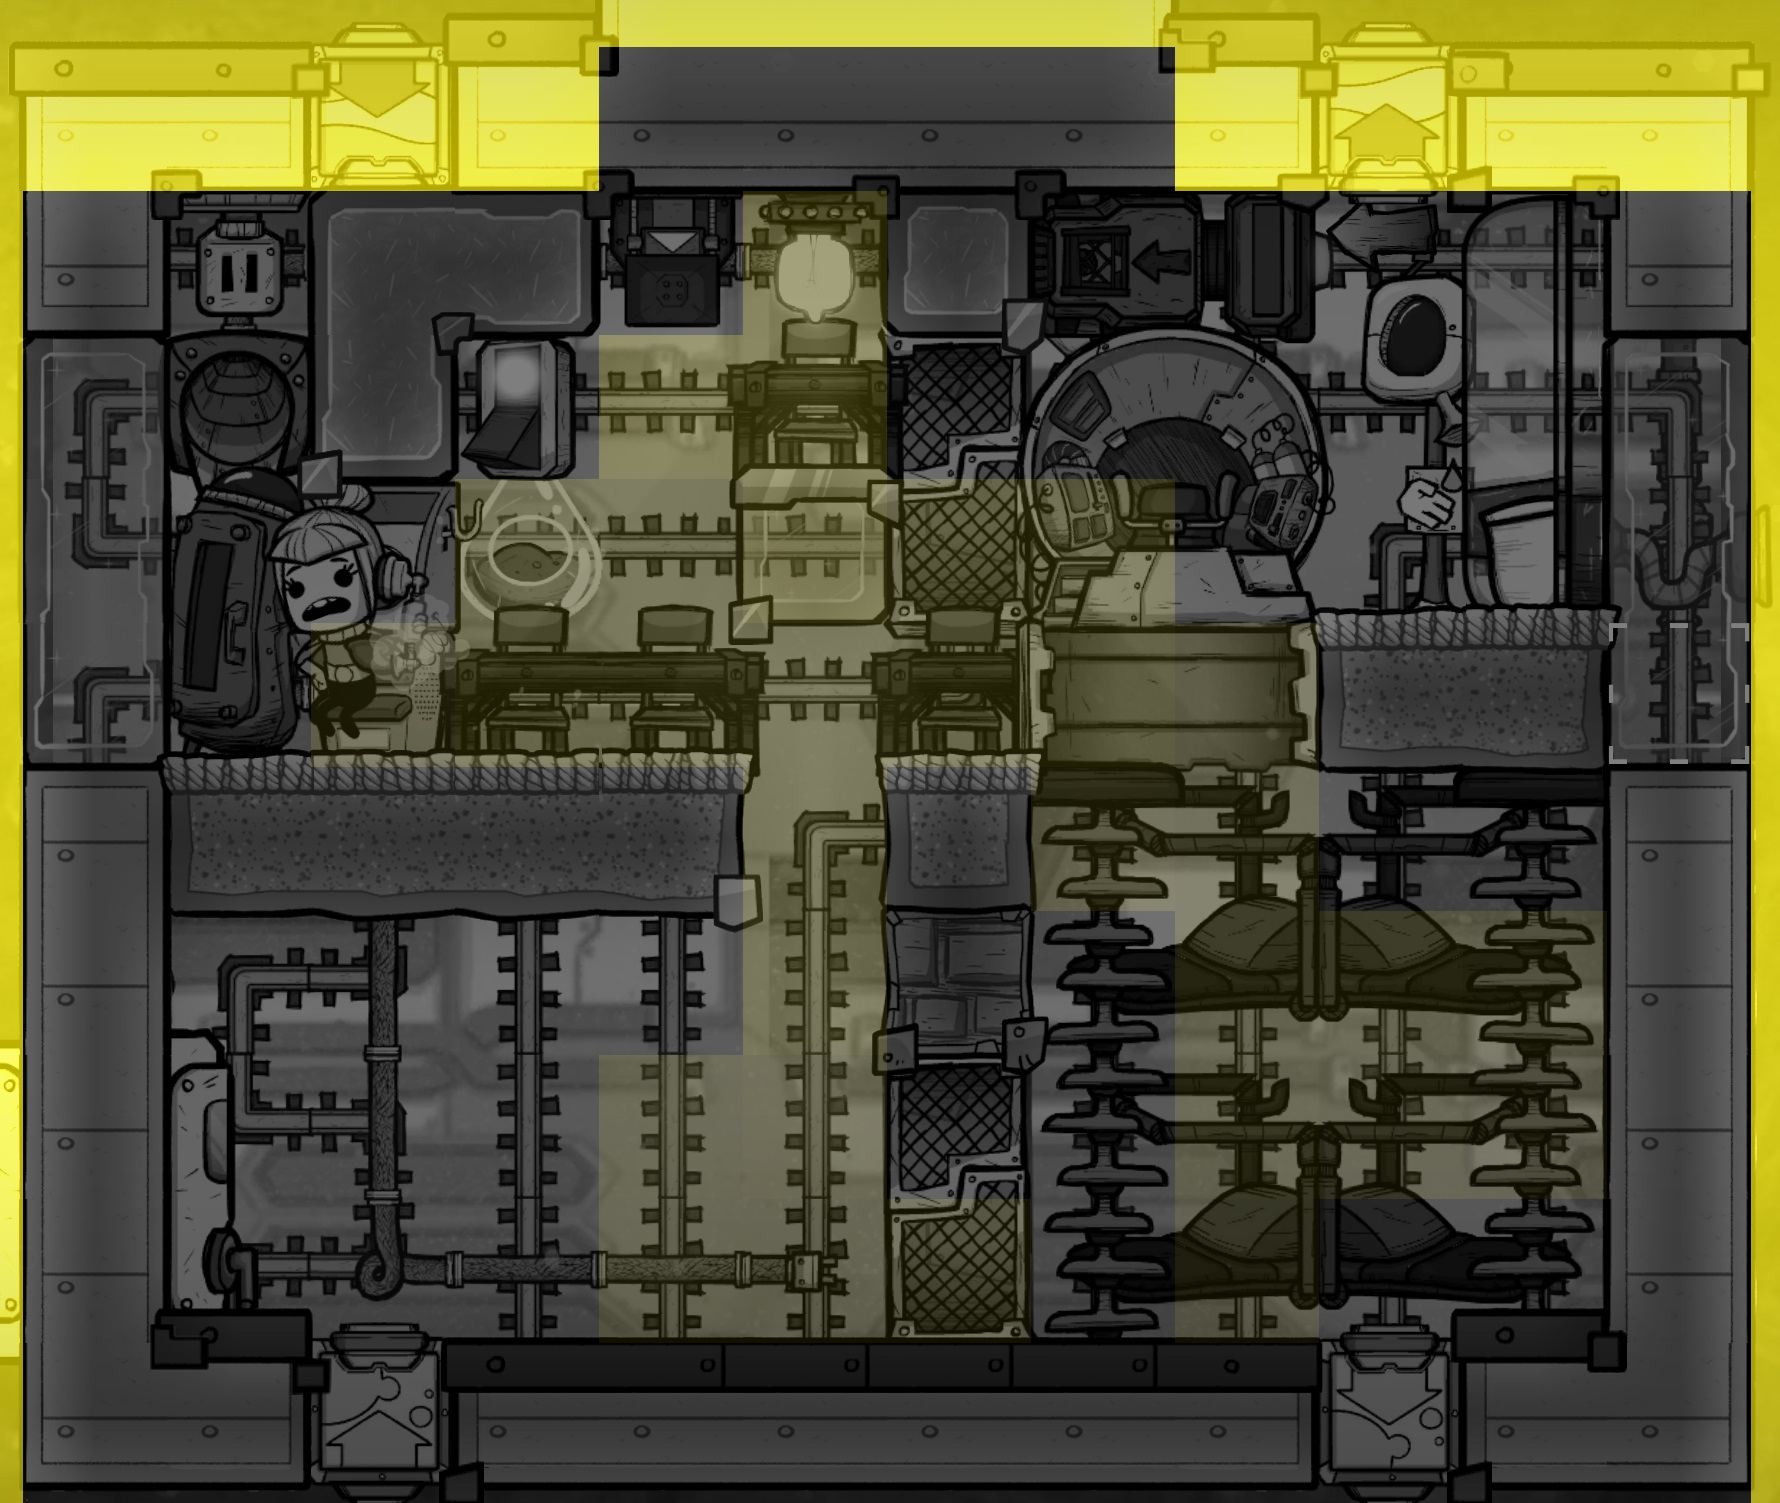
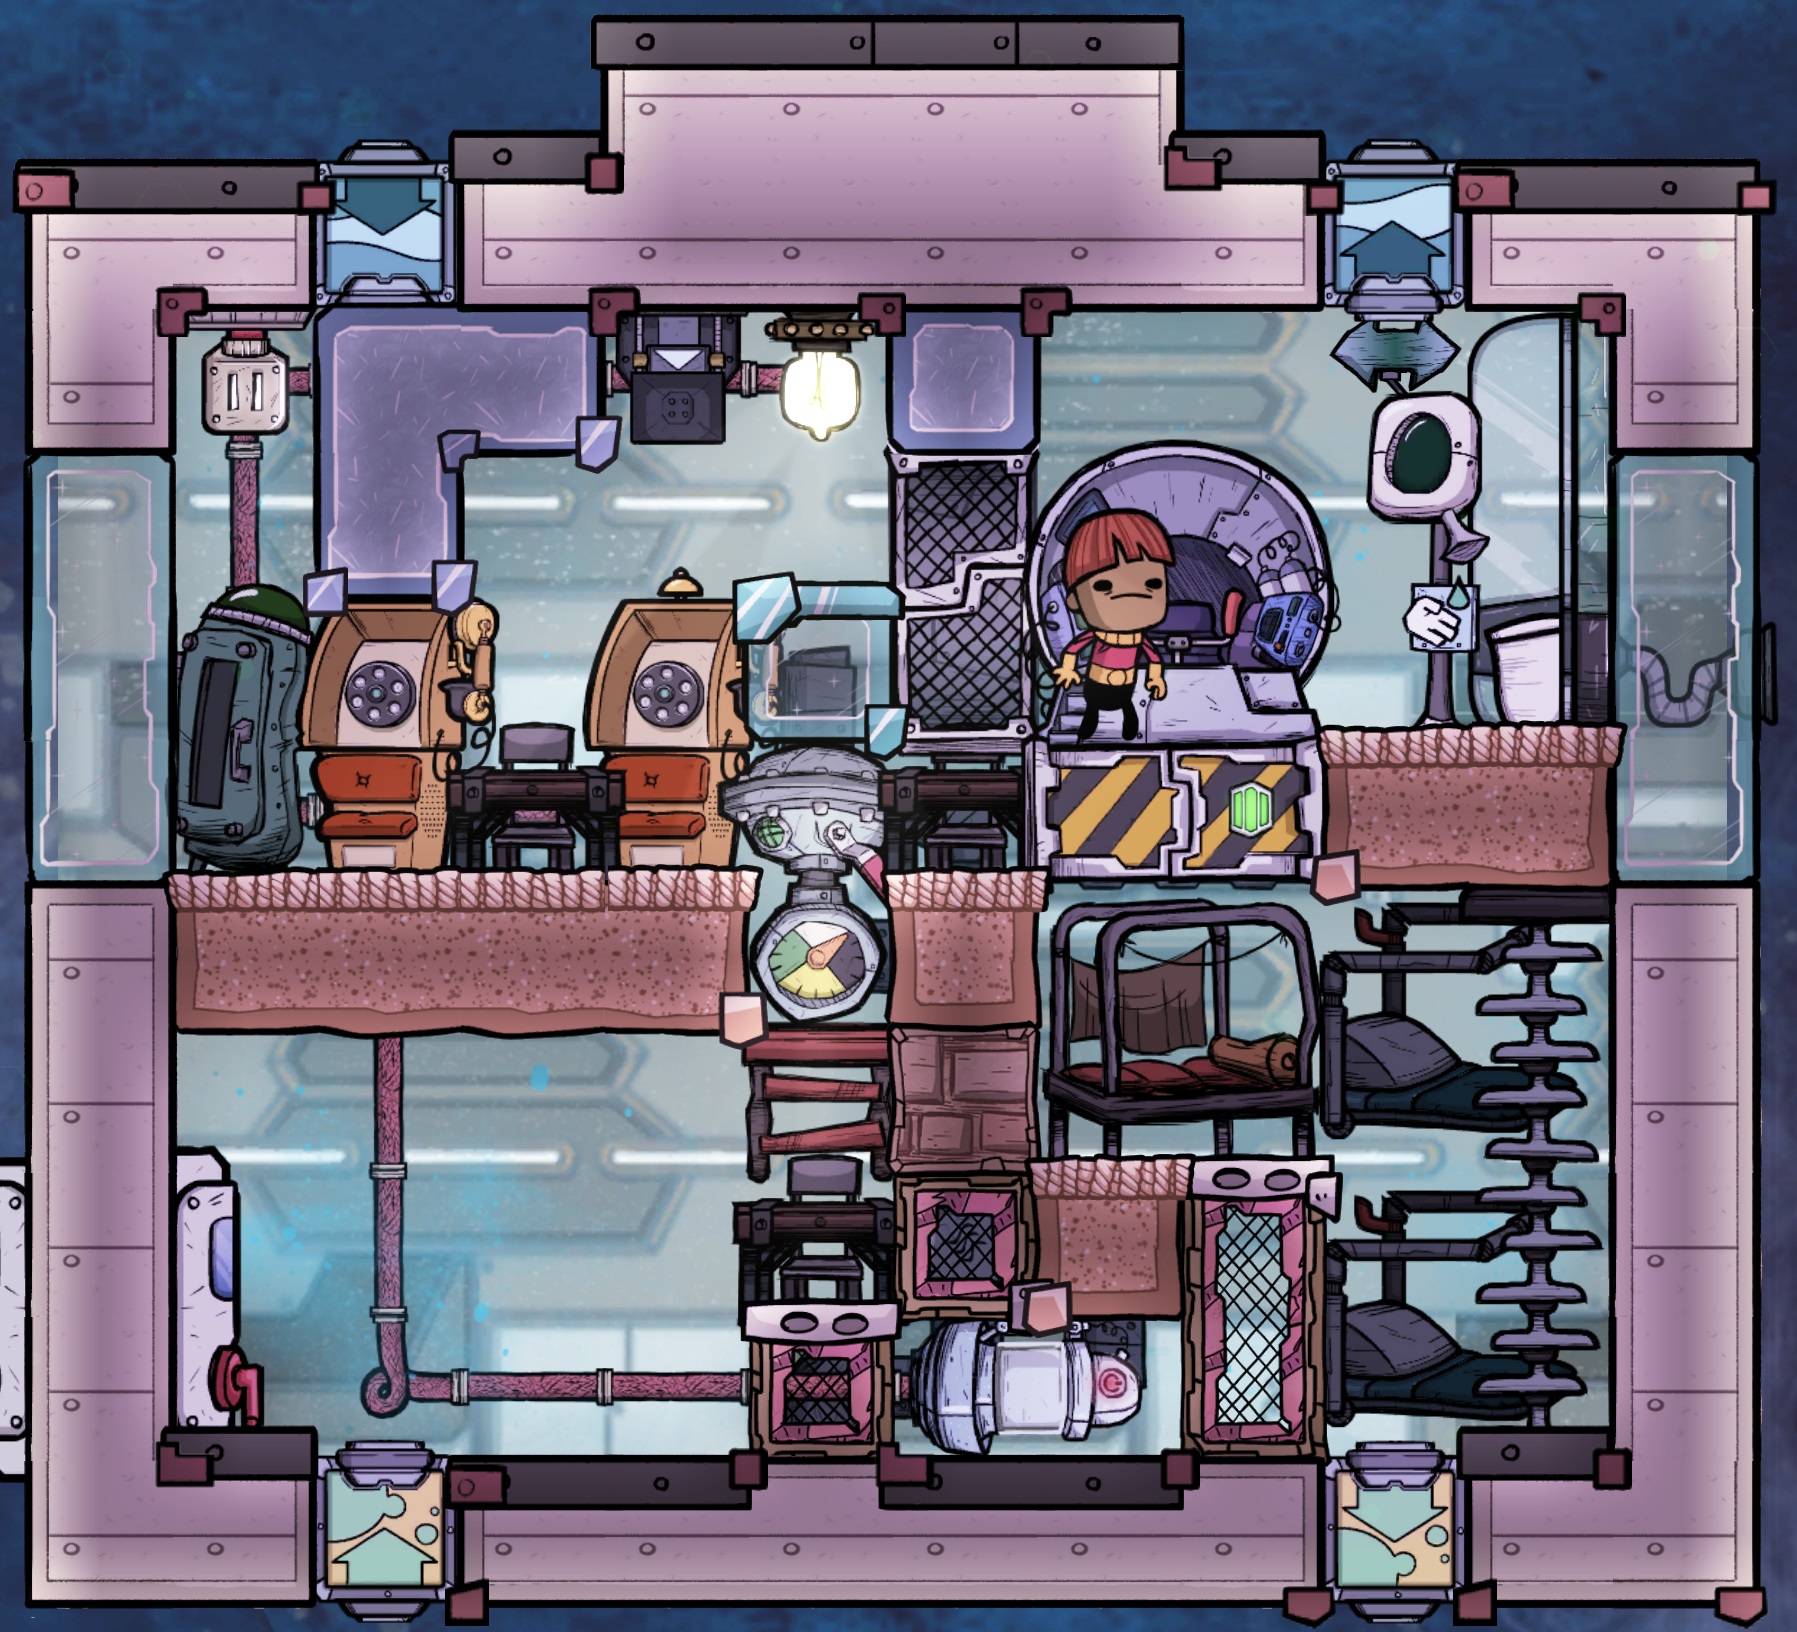
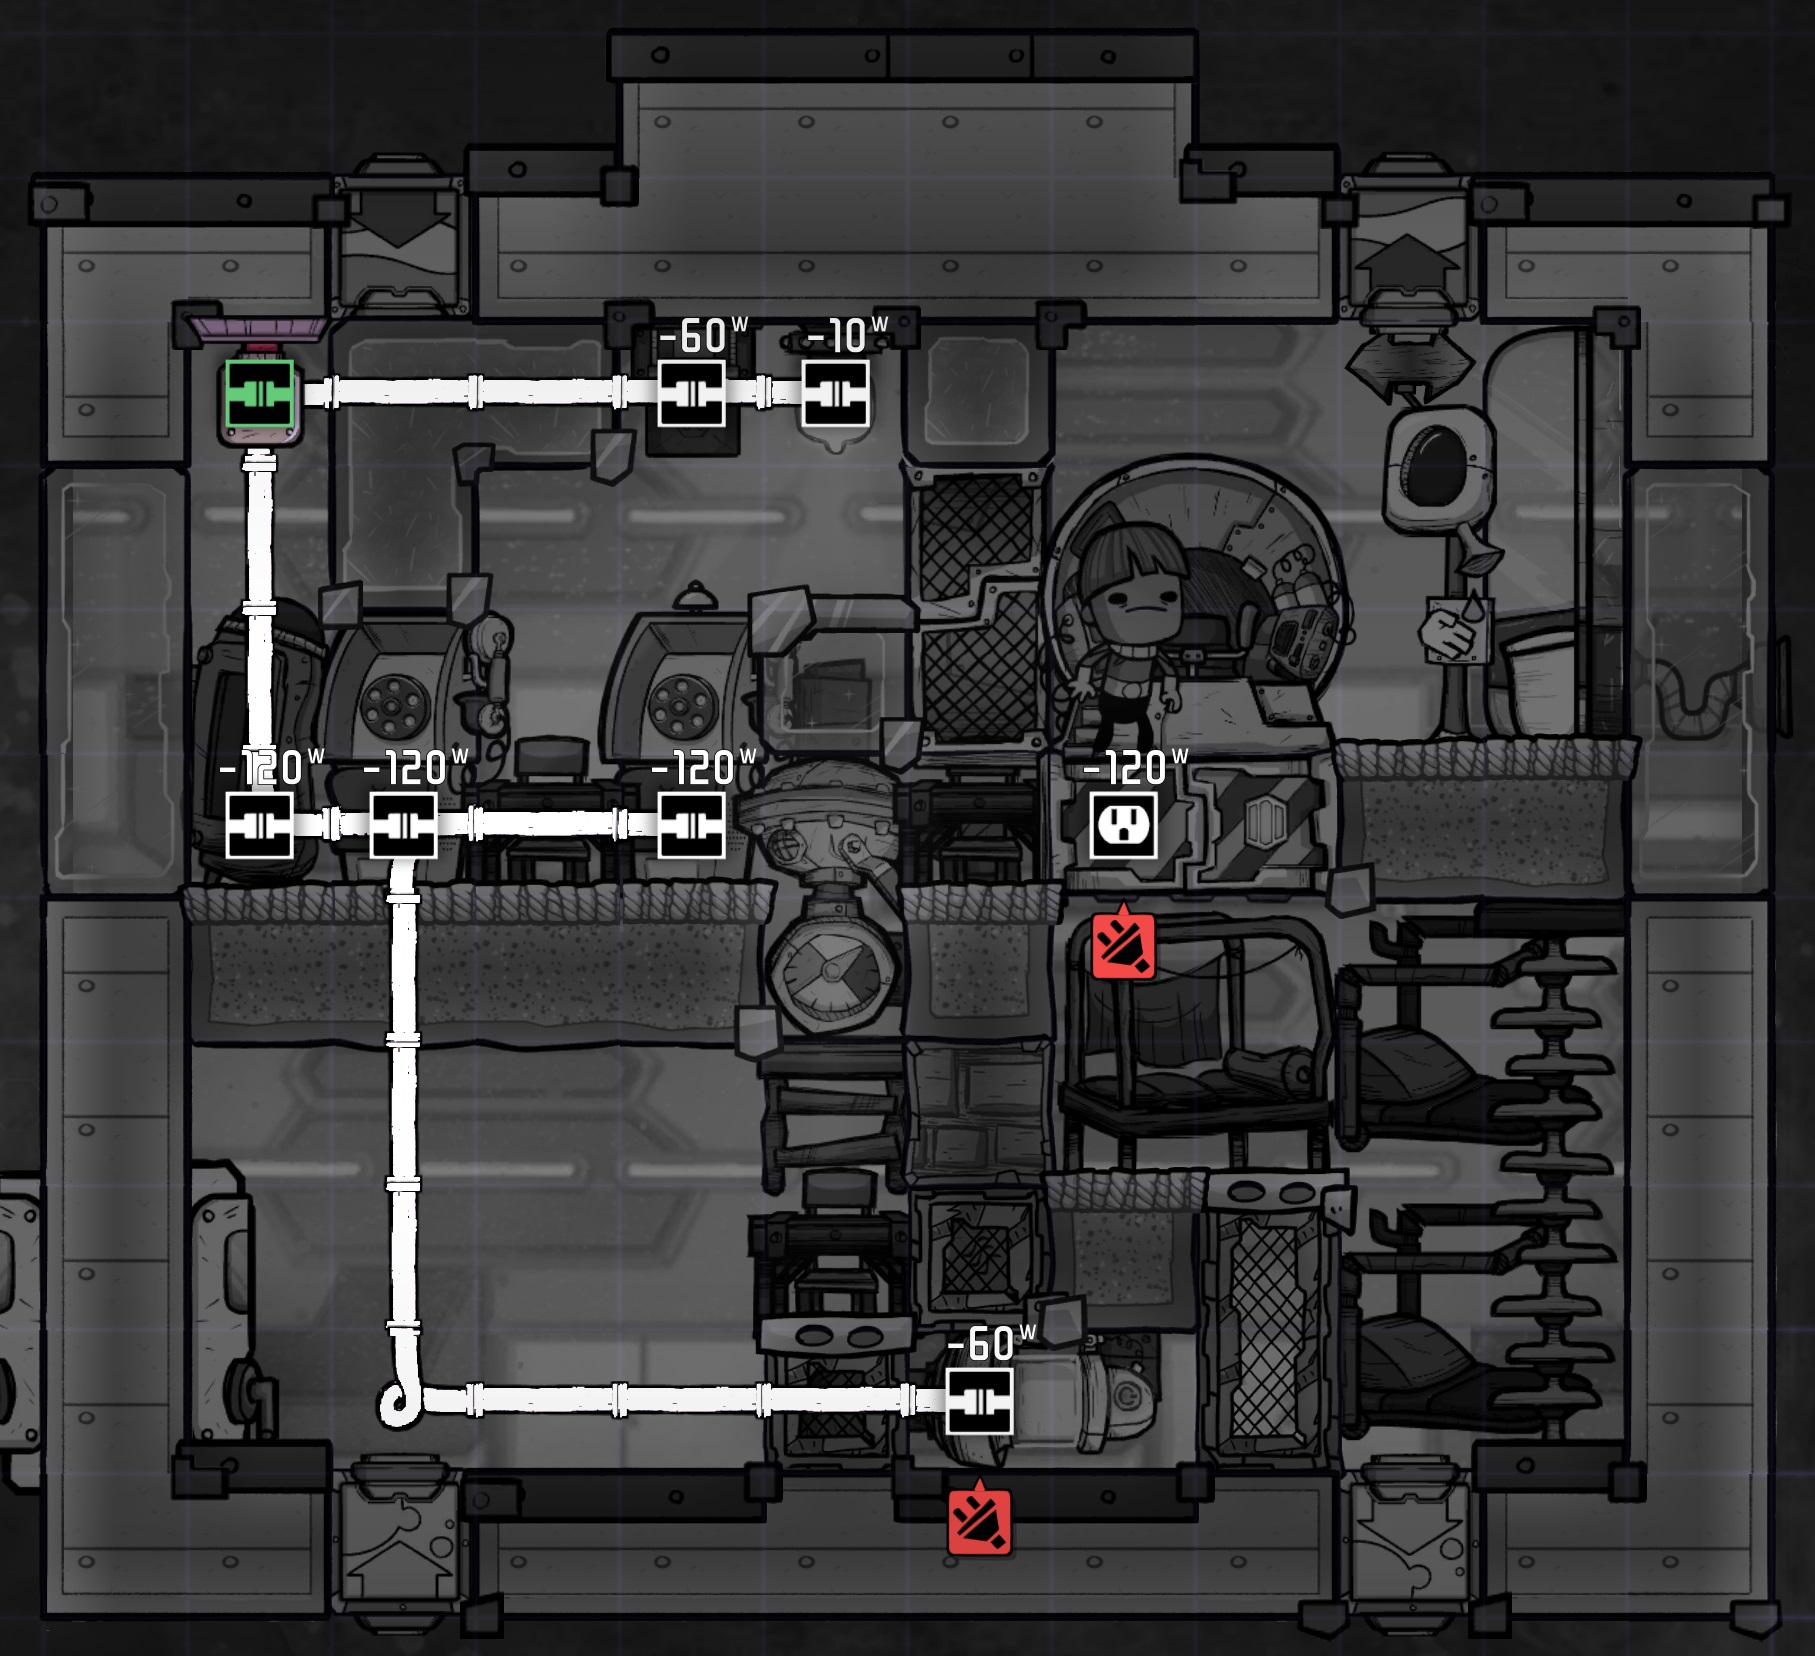
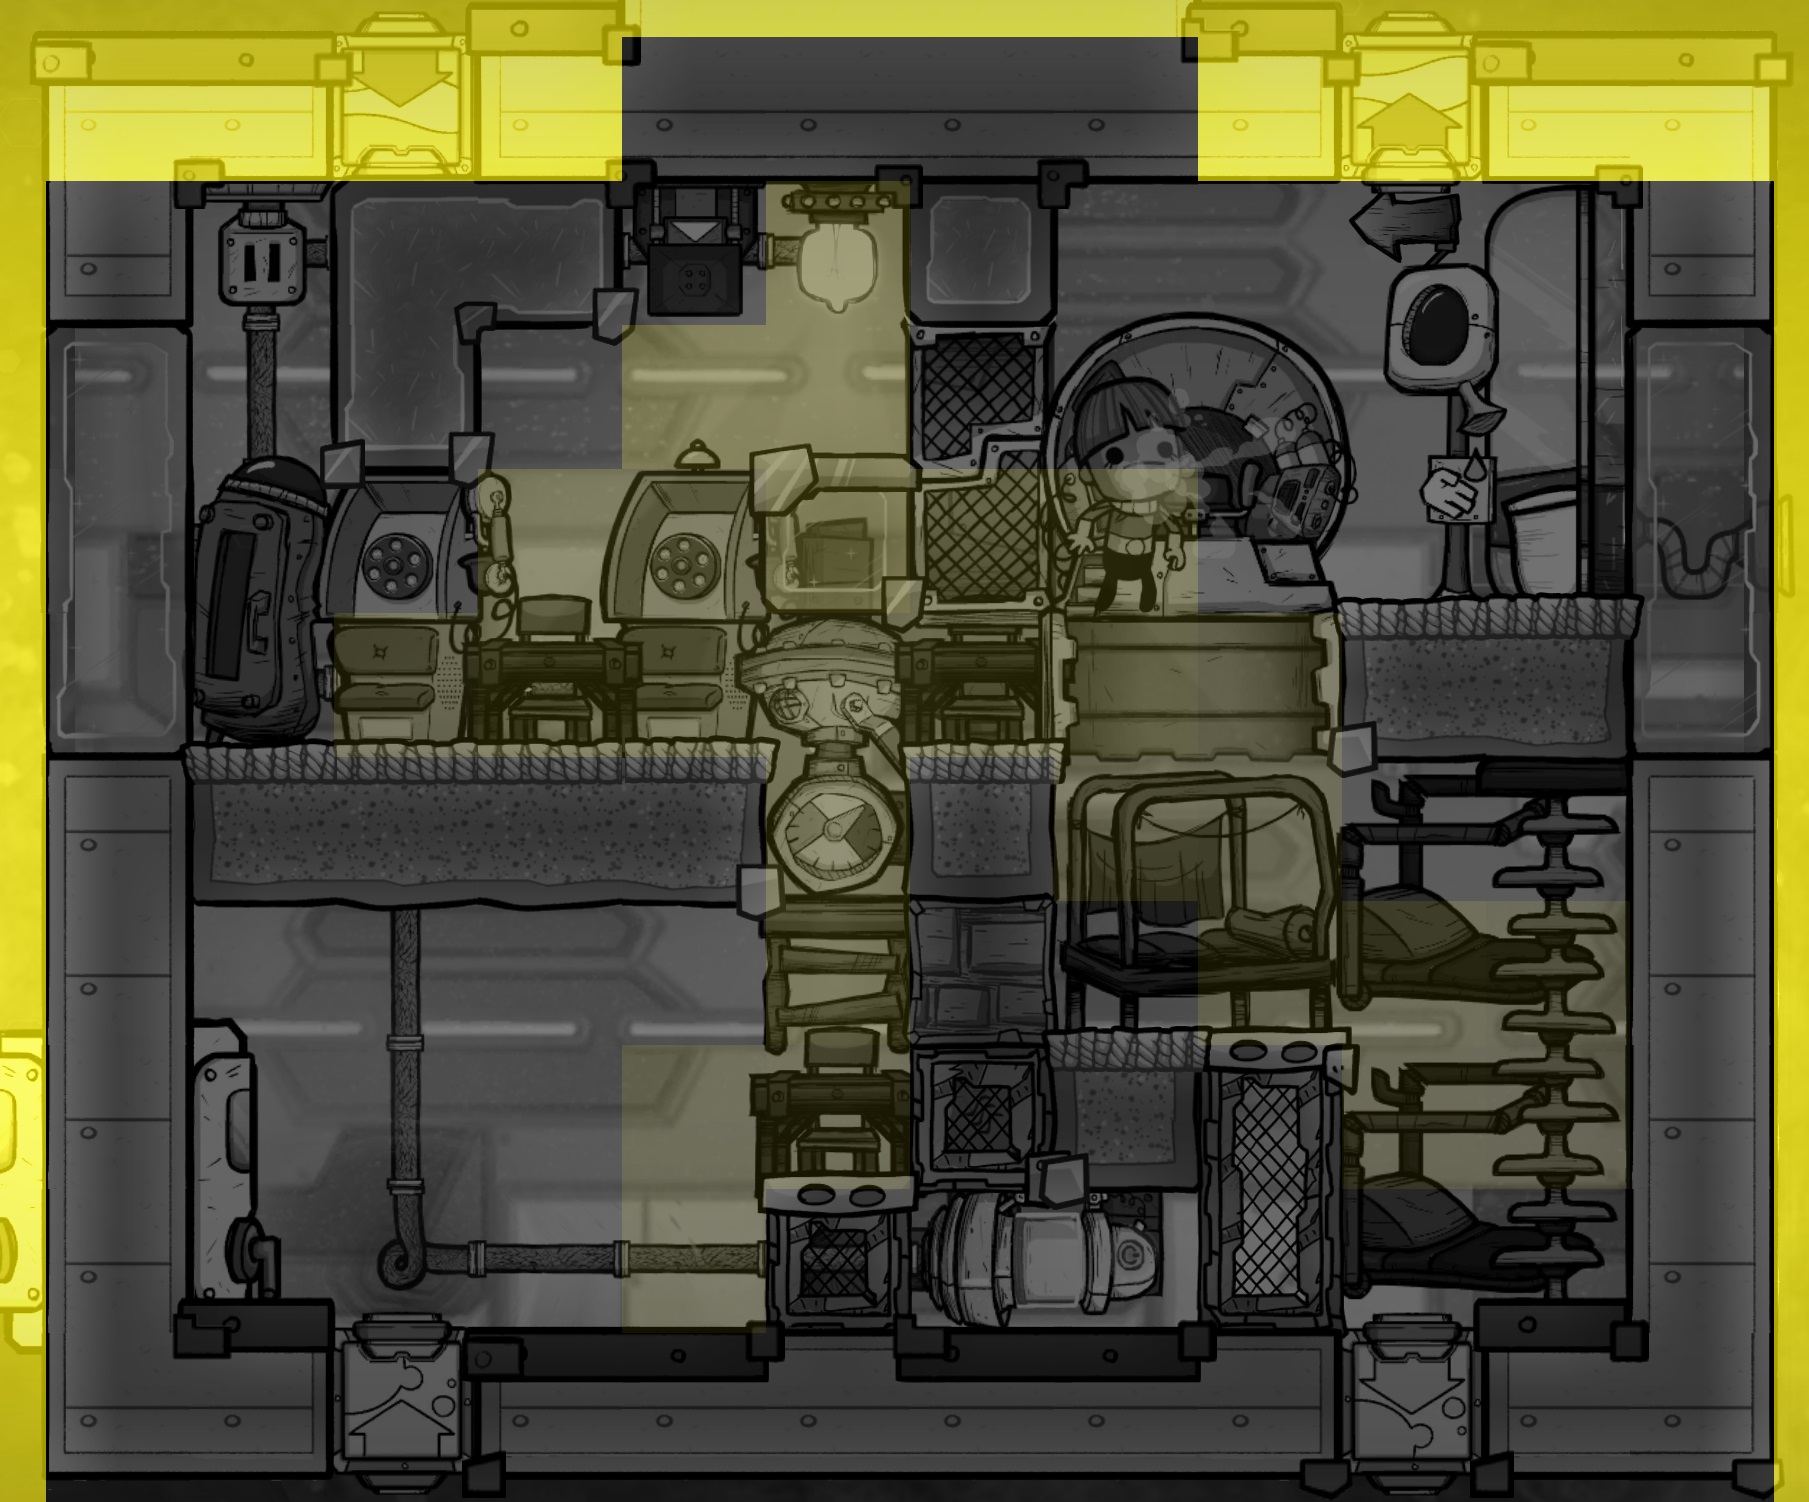
I wanted to briefly discuss the light overlays for both rockets. It is clear that all mess tables, phones and the pilot station are lit, which means they'll receive the 15% speed bonus. I opened the door to show that even though the light can get into the barracks it generally does not affect the tiles dupes are considered to be sleeping in. The only exception is the ladder bed in the top right of both designs which is exposed to light whenever the door above is opened.
That door will only ever open when a dupe is passing through it, so as long as all the dupes go to bed at the same time there should be no issue. If you tend to run separate schedules on your rocket you'll want to make sure the dupe assigned to the upper right bunk is awake and back to work before any other dupes come down to go to bed.
6.1.4 - Atmosuits and Oxygen
The next thing required in both designs is the atmosuit checkpoint and docks. These are installed on the bottom floor beside the exit, and then connected to the gas output vent to provide oxygen from a gas cargo tank.
If you're using the oxylite rail or bin to provide oxygen to your cabin, then the gas cargo tank will only be used to fill the suits. The piping in this case is extremely simple: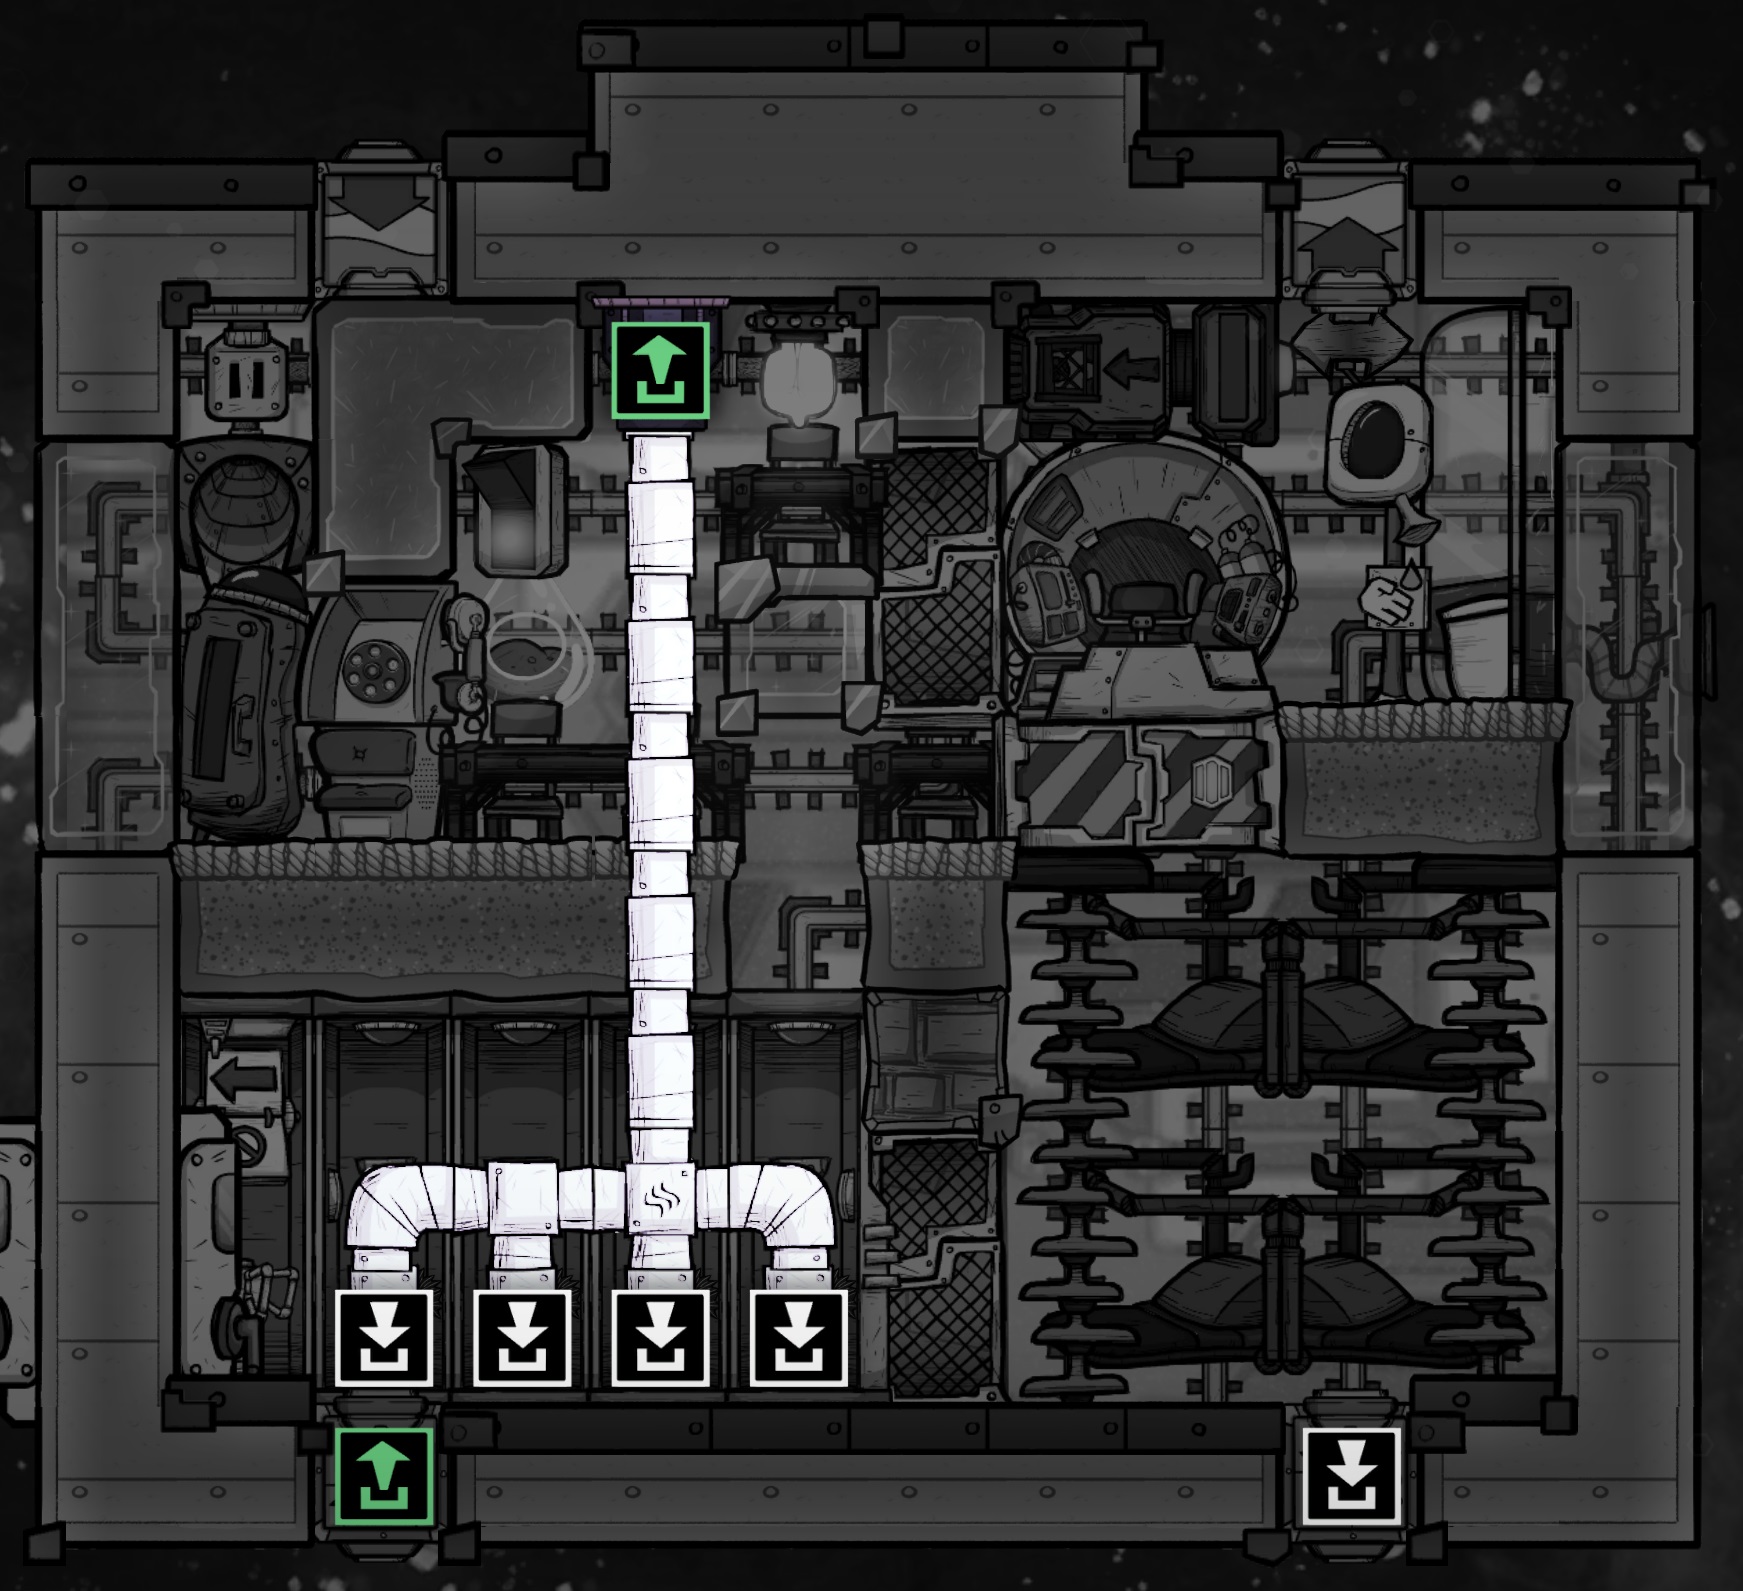
On the other hand, If you're using the mini pump and filter as your CO2-removal solution then you have no other source of oxygen. You could drop some oxylite on the ground on the upper floor of the rocket away from most of the CO2, or else use the cargo tank to fill both the suits and the cabin.
That latter case requires a much more complicated set of pipes, which I'll explain below. It also requires a gas vent in the cabin, which I recommend placing where the automation switch would have been for the oxylite rail solution. The next picture shows this vent and all of the pipes in place but without most of the bridges for clarity: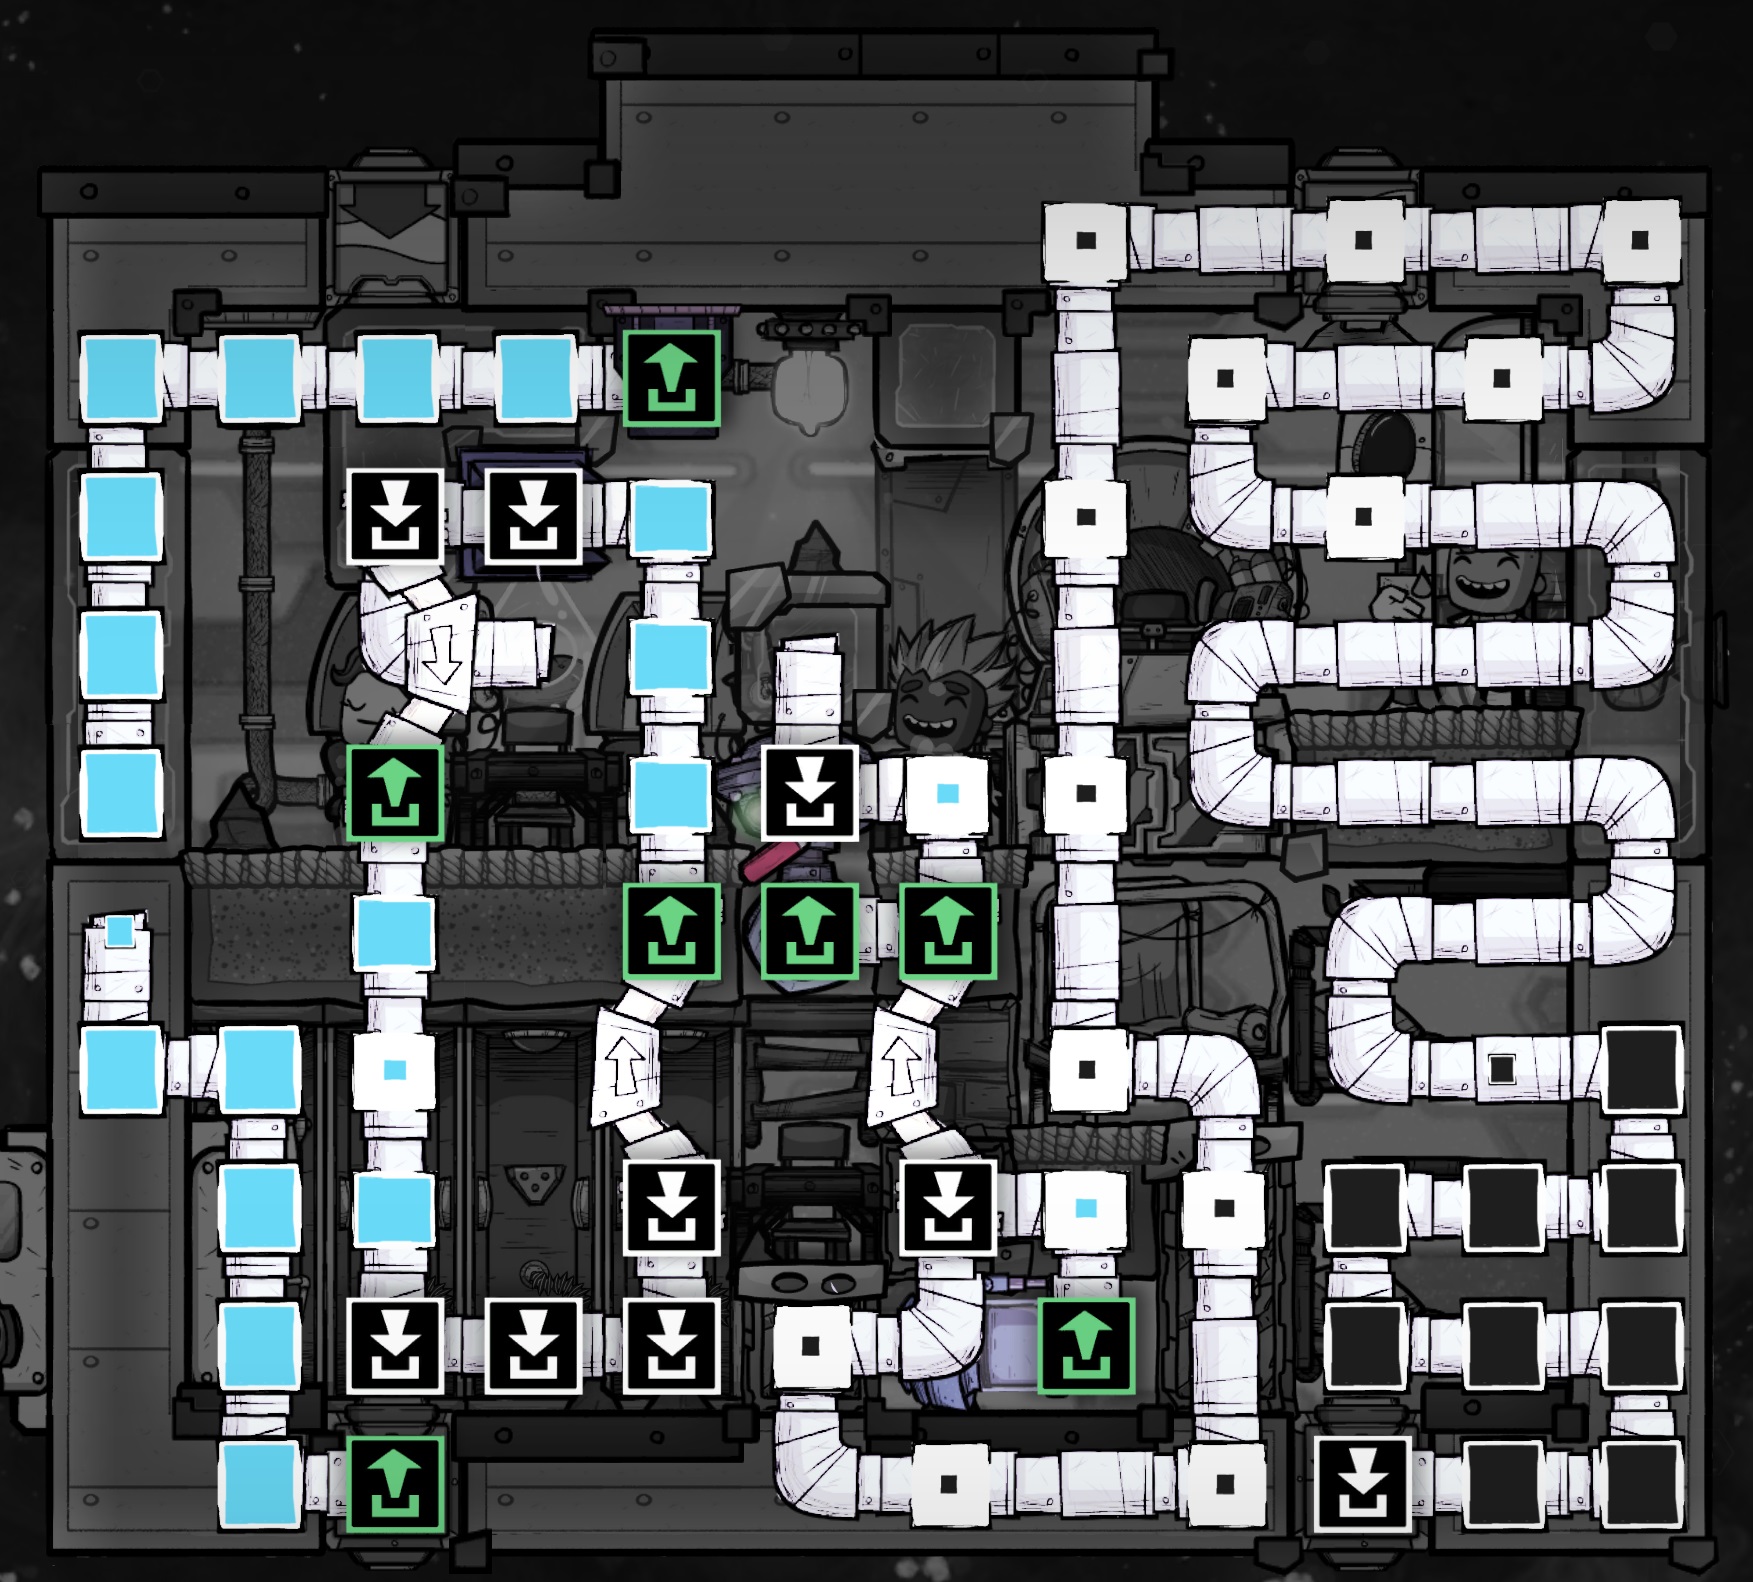
The right hand side is simply a snake to contain CO2 while you're in space. When you're on a launchpad you would connect the module's gas output port to a vent and empty this snake to space. To calculate how many cycles worth of CO2 you can store in a particular length of pipe see the life support section of this guide. I'm showing a 52-pipe snake which would hold over 14 cycles worth of CO2 from 3 dupes. Remembering that you'll vent this to space every time you land on a launchpad, that should be far more time than you need to travel between planets and set up a new pad.
On the left hand side you'll see a vertical loop that runs through the gas vent and the three suit docks. The two bridges ensure there is constant flow around the loop in the indicated direction. I like to use a loop like this so that oxygen can always be flowing around the loop and be consumed by either the suits or the cabin vent whenever necessary. The different sources of oxygen will simply add gas to this loop as its used, and what's important is controlling the priority among those sources.
The most important priority is the mini pump. We need it to always be pumping so it can remove CO2, so we don't want the oxygen output to back up. To accomplish this a small stub is attached to the loop just below the gas vent, and a bridge will be installed from the output of the mechanical filter to this pipe. Any gas in this pipe stub will merge with gas already on the loop. Since we've placed the connection point immediately after the gas vent, any time the vent releases O2 to the cabin, it will be immediately replenished from this stub.
The second priority is oxygen coming in from the launchpad. If we're sitting on a pad and have an oxygen pipe connected, we don't want to be draining gas from our cargo tank. For this reason the green port in the lower right travels up and to the left. A bridge will be installed from this pipe to the right, directly onto the loop. Bridge priority rules will ensure that gas can only flow across that bridge if the packet on the loop is not already full.
The last priority is the gas cargo canister, which is the green output port in the top center. Here a pipe runs to the left and down and will be connected using a bridge onto the pipe carrying O2 up from the launchpad. So in short, O2 from the cargo tank can only ever get into the "feeder" pipe if the pipe isn't already full of O2 from the launchpad. O2 in the feeder pipe can only get onto the loop if the loop isn't already full. O2 from the mini pump will always be waiting in the "stub" to merge into the loop whenever there is space, before the feeder pipe gets a chance to top it off.
With all that said, here's a picture of the final setup with all bridges installed: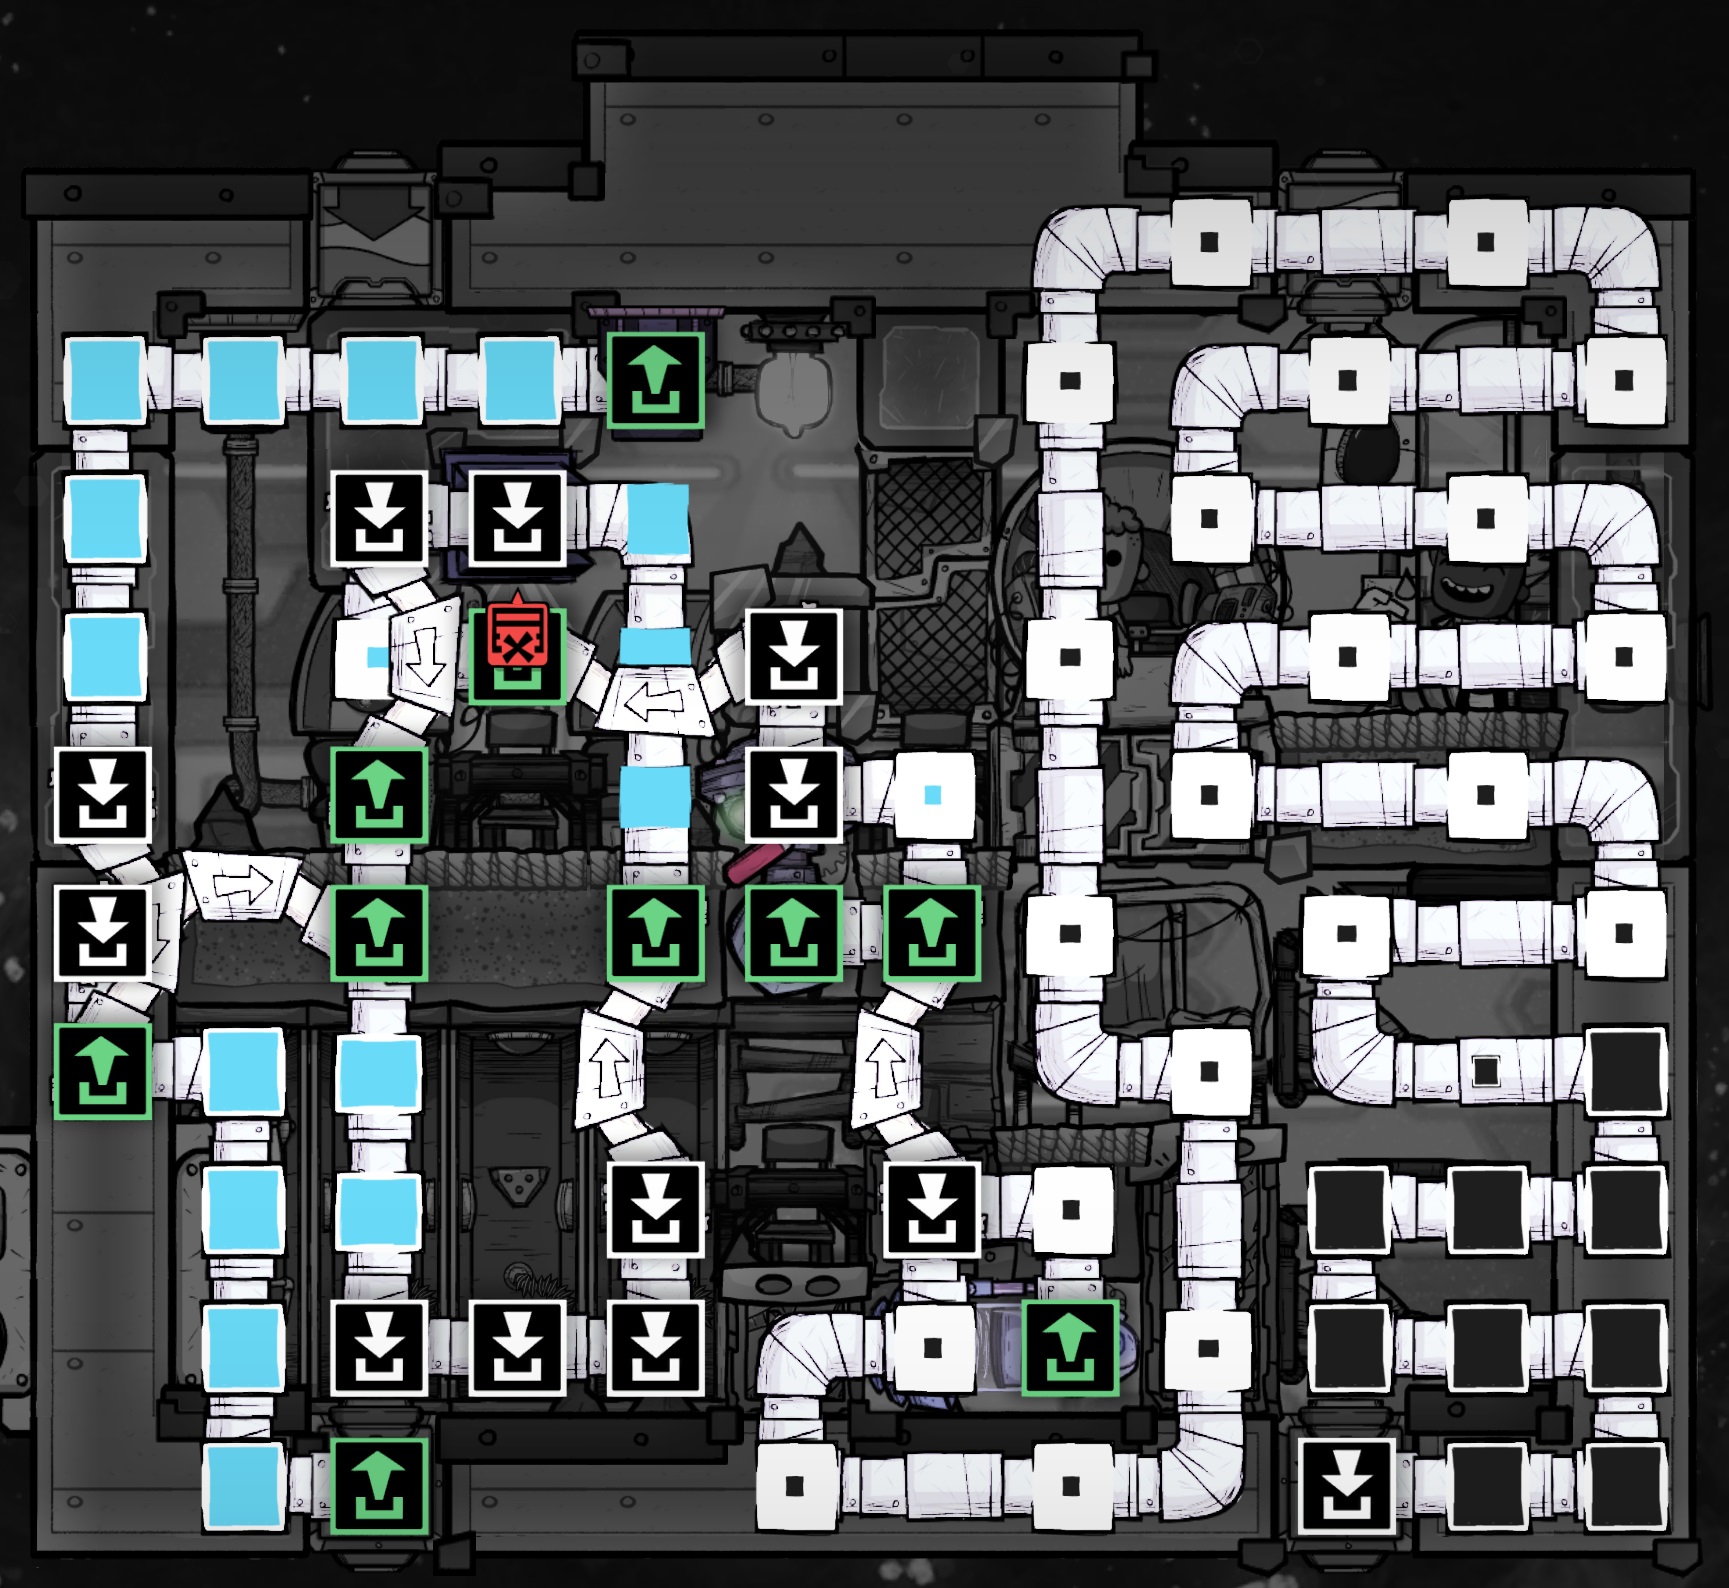
6.1.5 - Finishing Touches
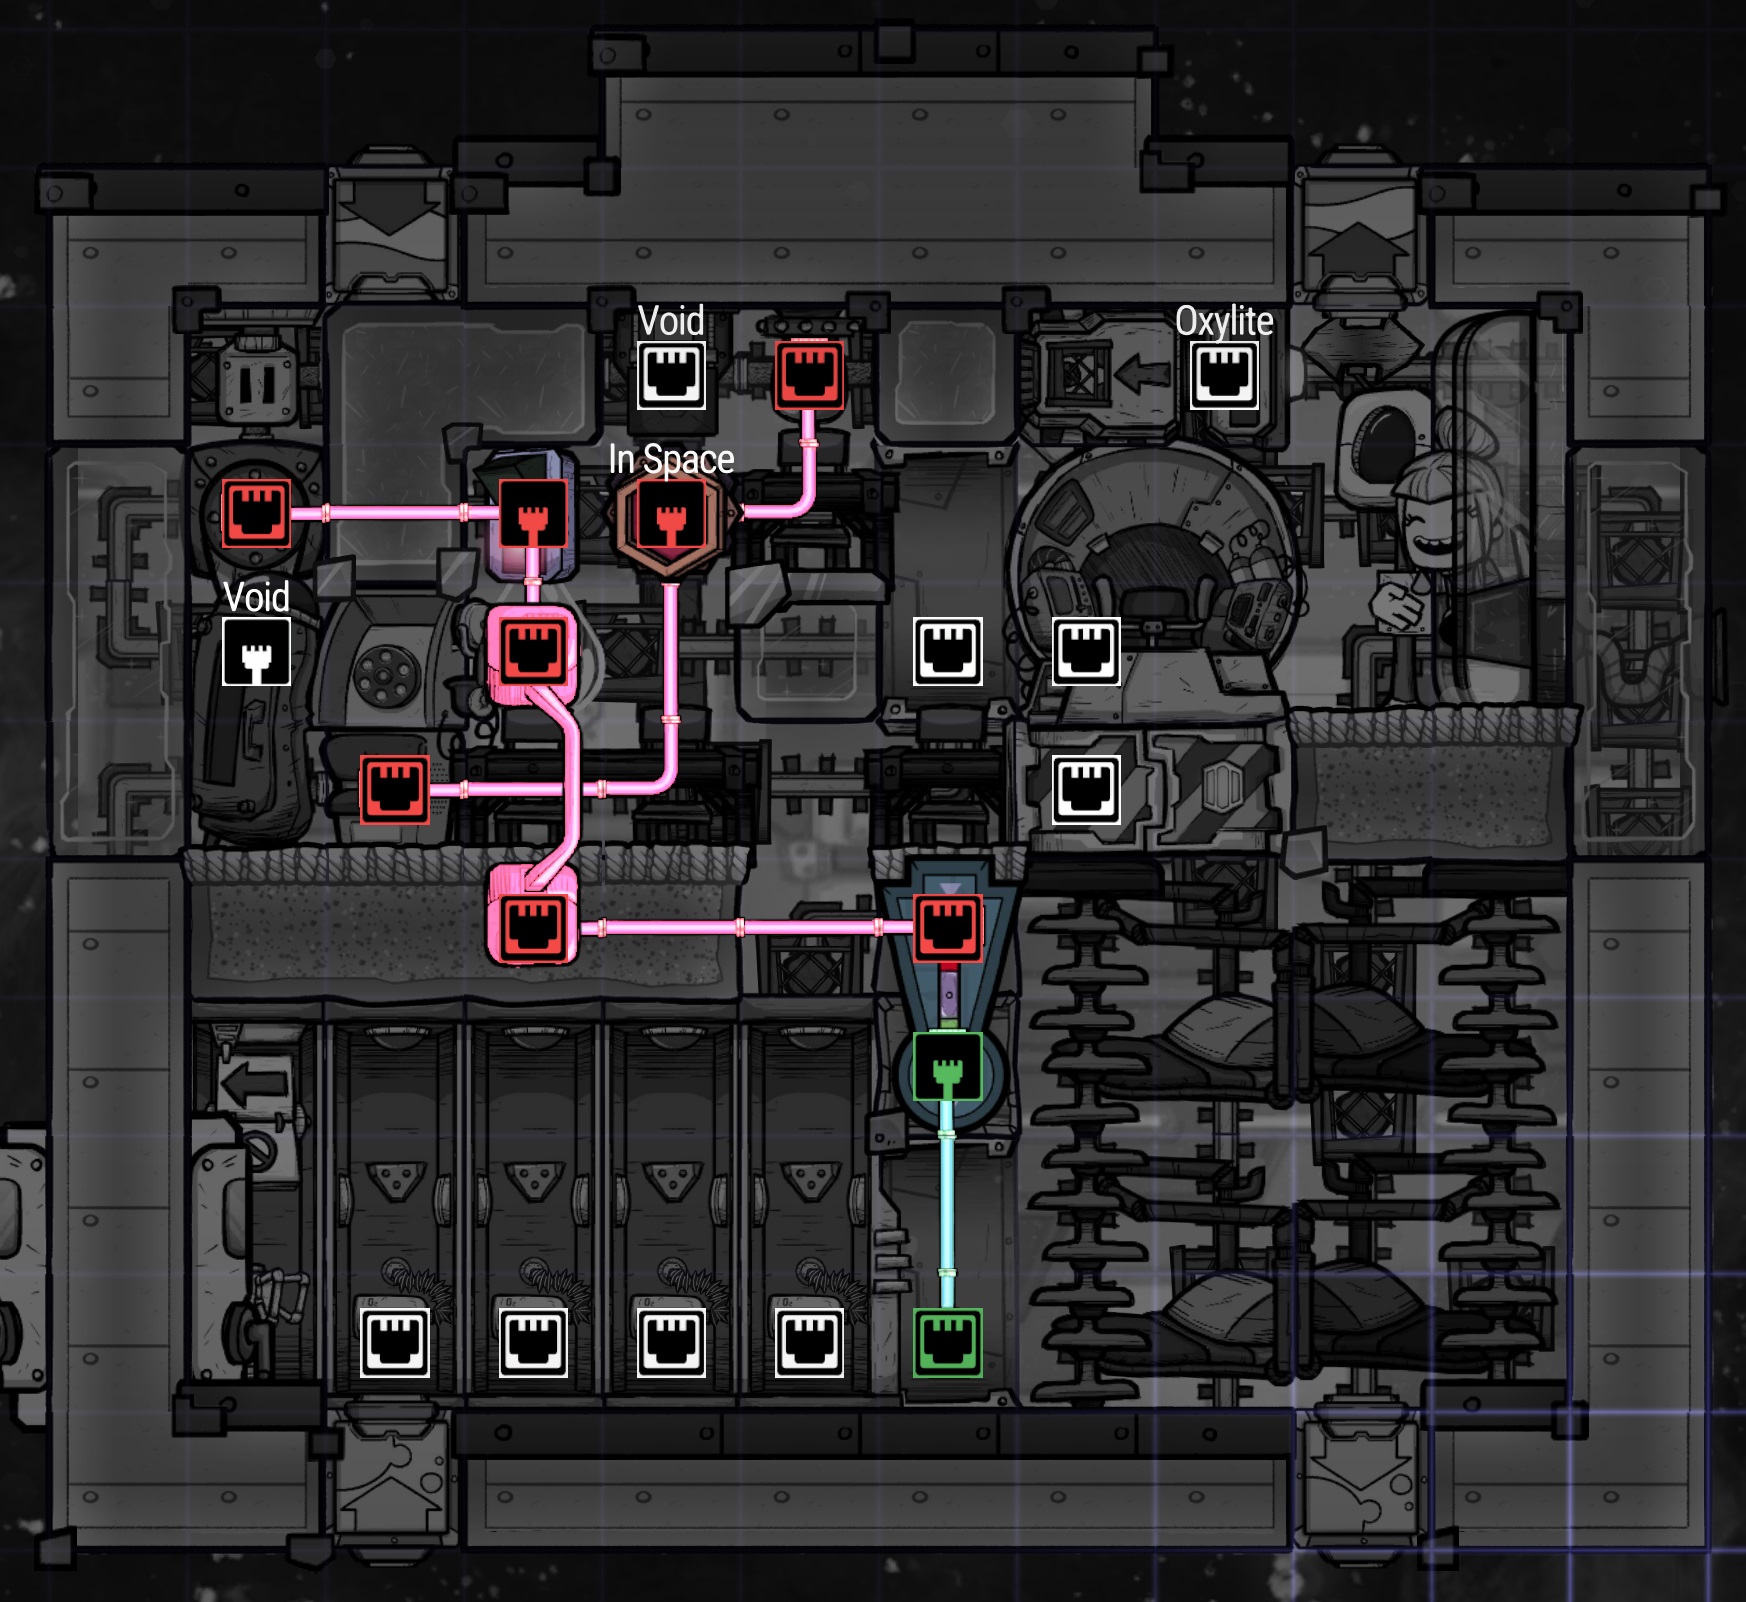
In the empty space above the telephone and below the gas output fitting I like to install a starmap location sensor. This allows the rocket to know whether it is in space or on a launchpad. I connect the sensor to the ceiling light and telephones, only enabling them when the rocket is in space. This reduces power consumption and heat generation inside the rocket when it's just sitting on the pad. The pilot station has a setting to disallow dupes from using the beds and toilets in the rocket when you're on the ground, so this basically completes the picture disabling the other fixtures and turning out the lights. You could even extend the wiring to the mini-pump to disable it since dupes won't be hanging out in the rocket breathing CO2, but I generally let it run continuously until the pipes back up.
6.2 - Standard Research Rocket
6.2.1 - Initial Construction
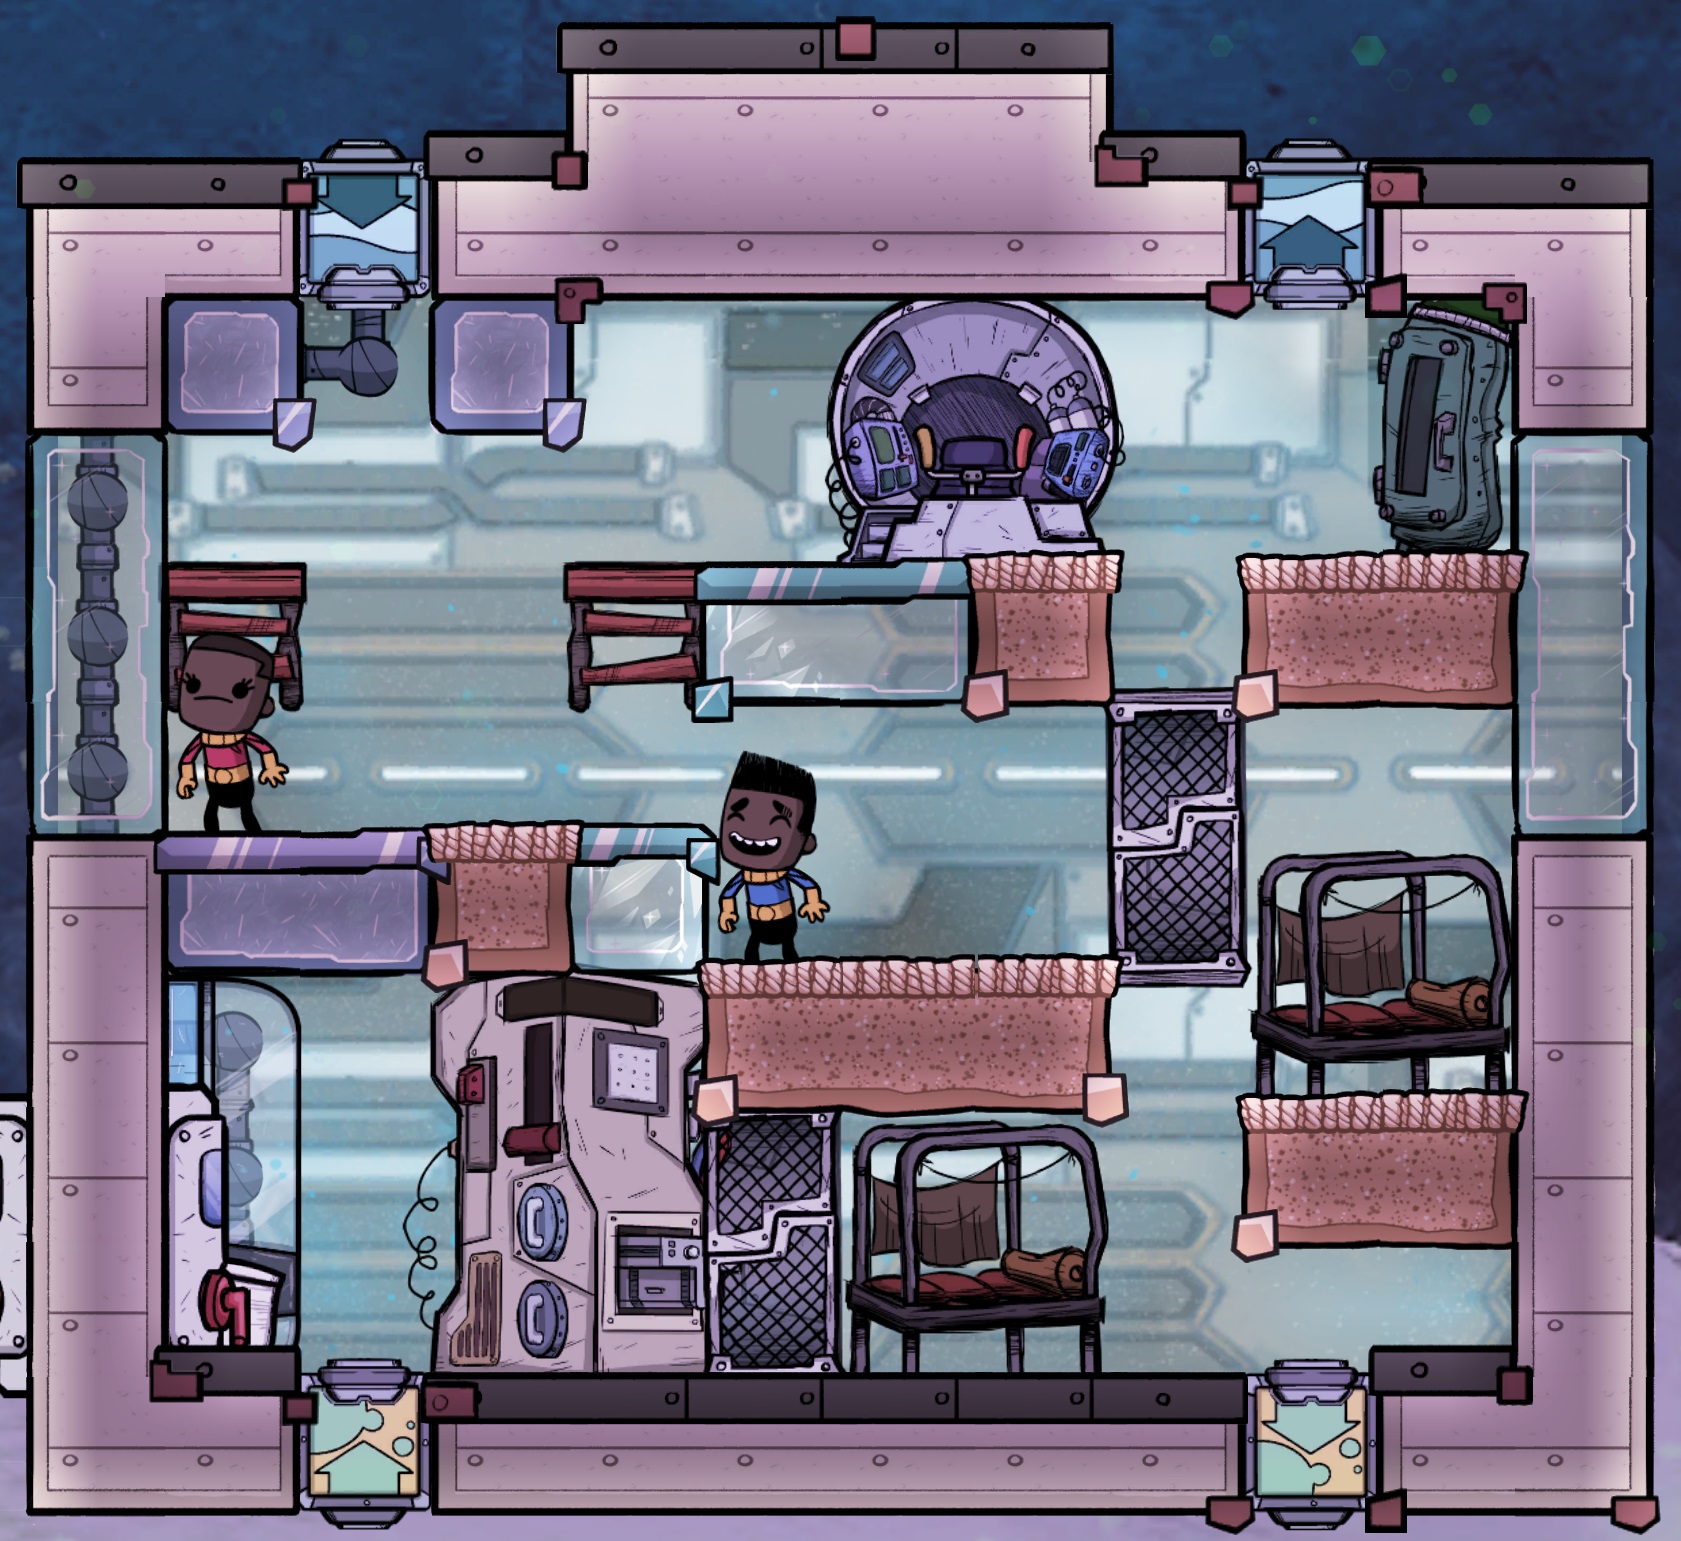
As before the ladders are temporary to allow dupes to construct pipes and wires in the ceiling tiles of the module. There are three tiles in the upper left corner that cannot be reached in this configuration, but if you need to reach them you can easily wait to build the plastic tile in that location and construct it after you've finished the rest of the rocket.
A water pipe must be run from the module output to the toilet. You can snake it around the module to get as much water storage as necessary. After that you'll need to choose your oxygen and CO2 solutions, as this configuration supports all three.
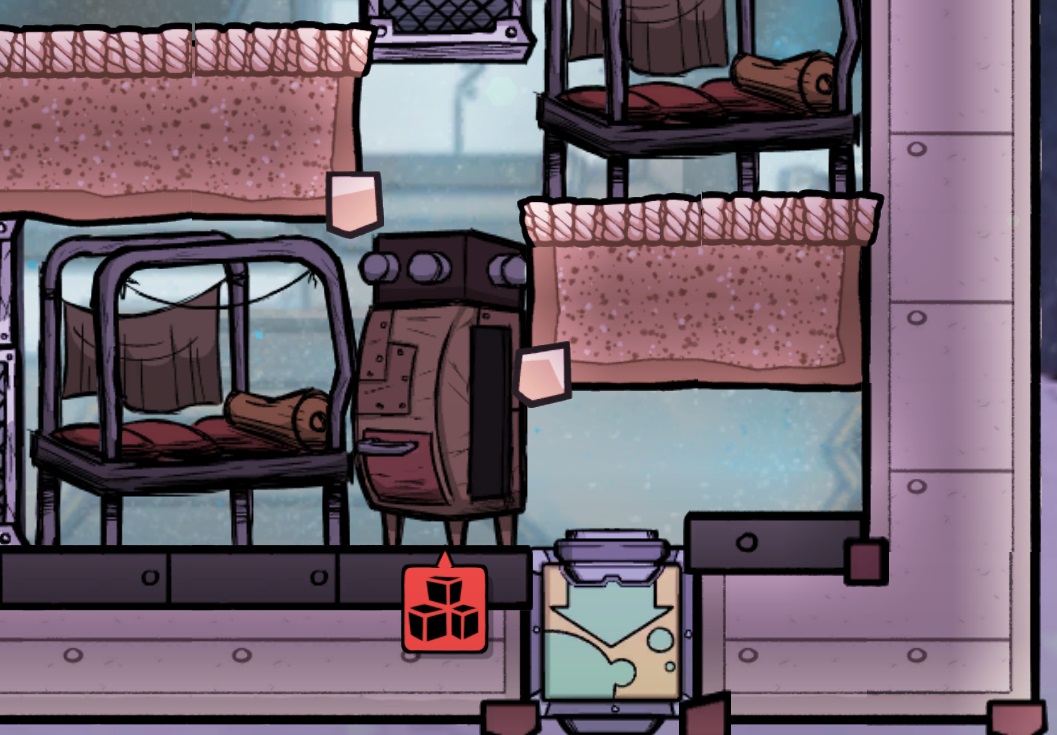
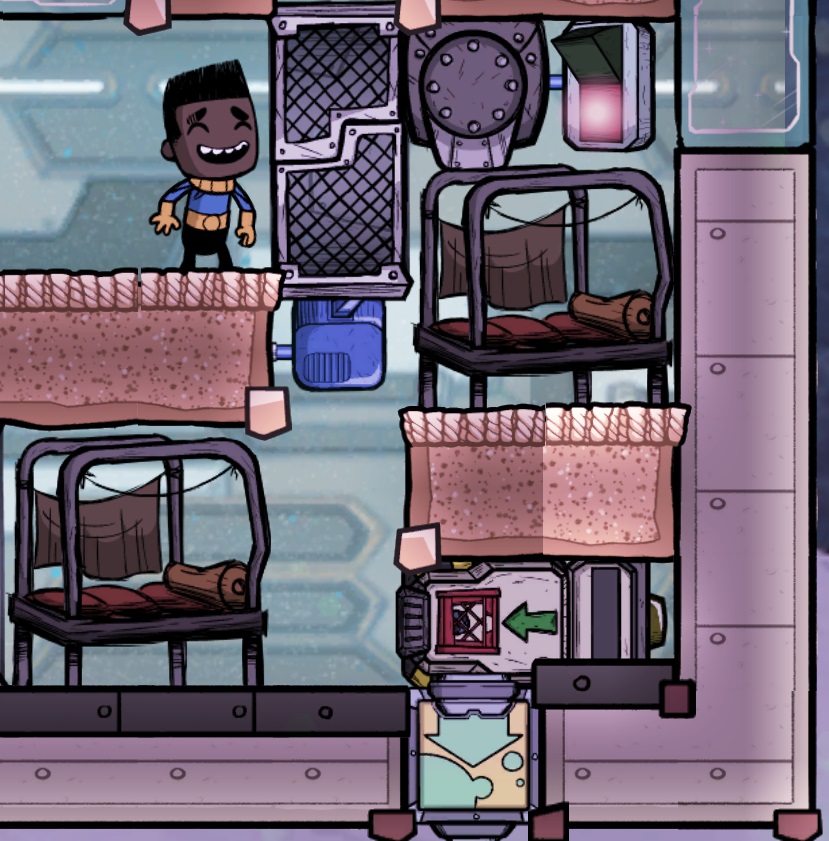
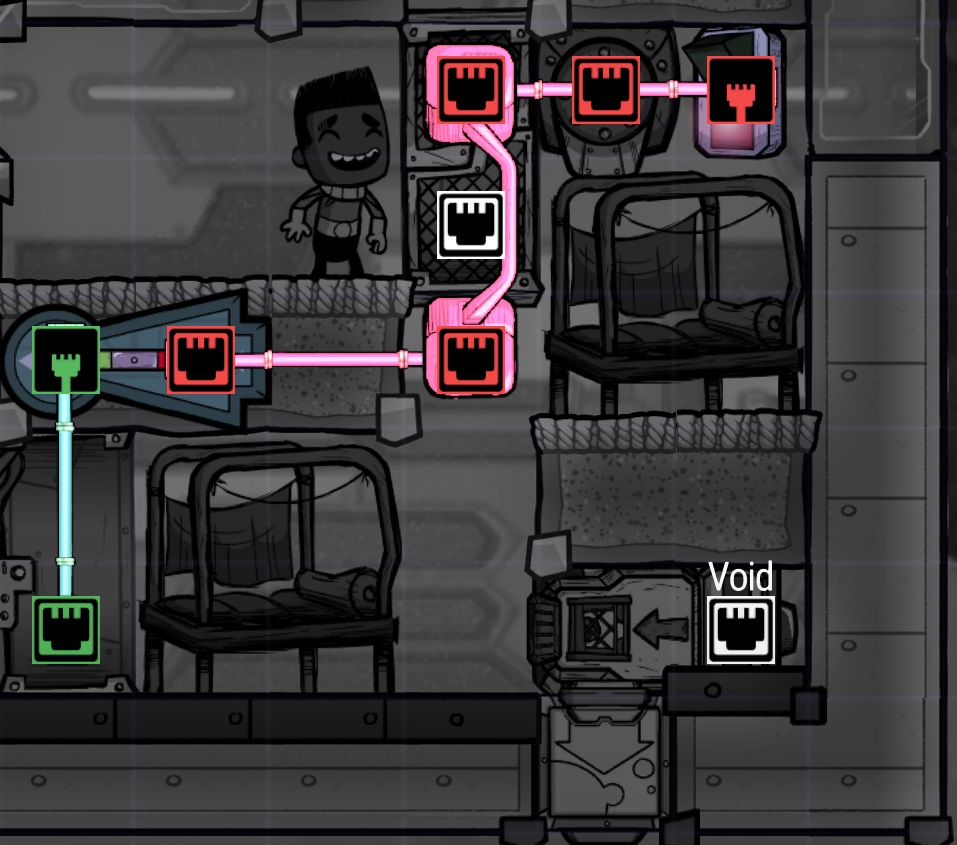
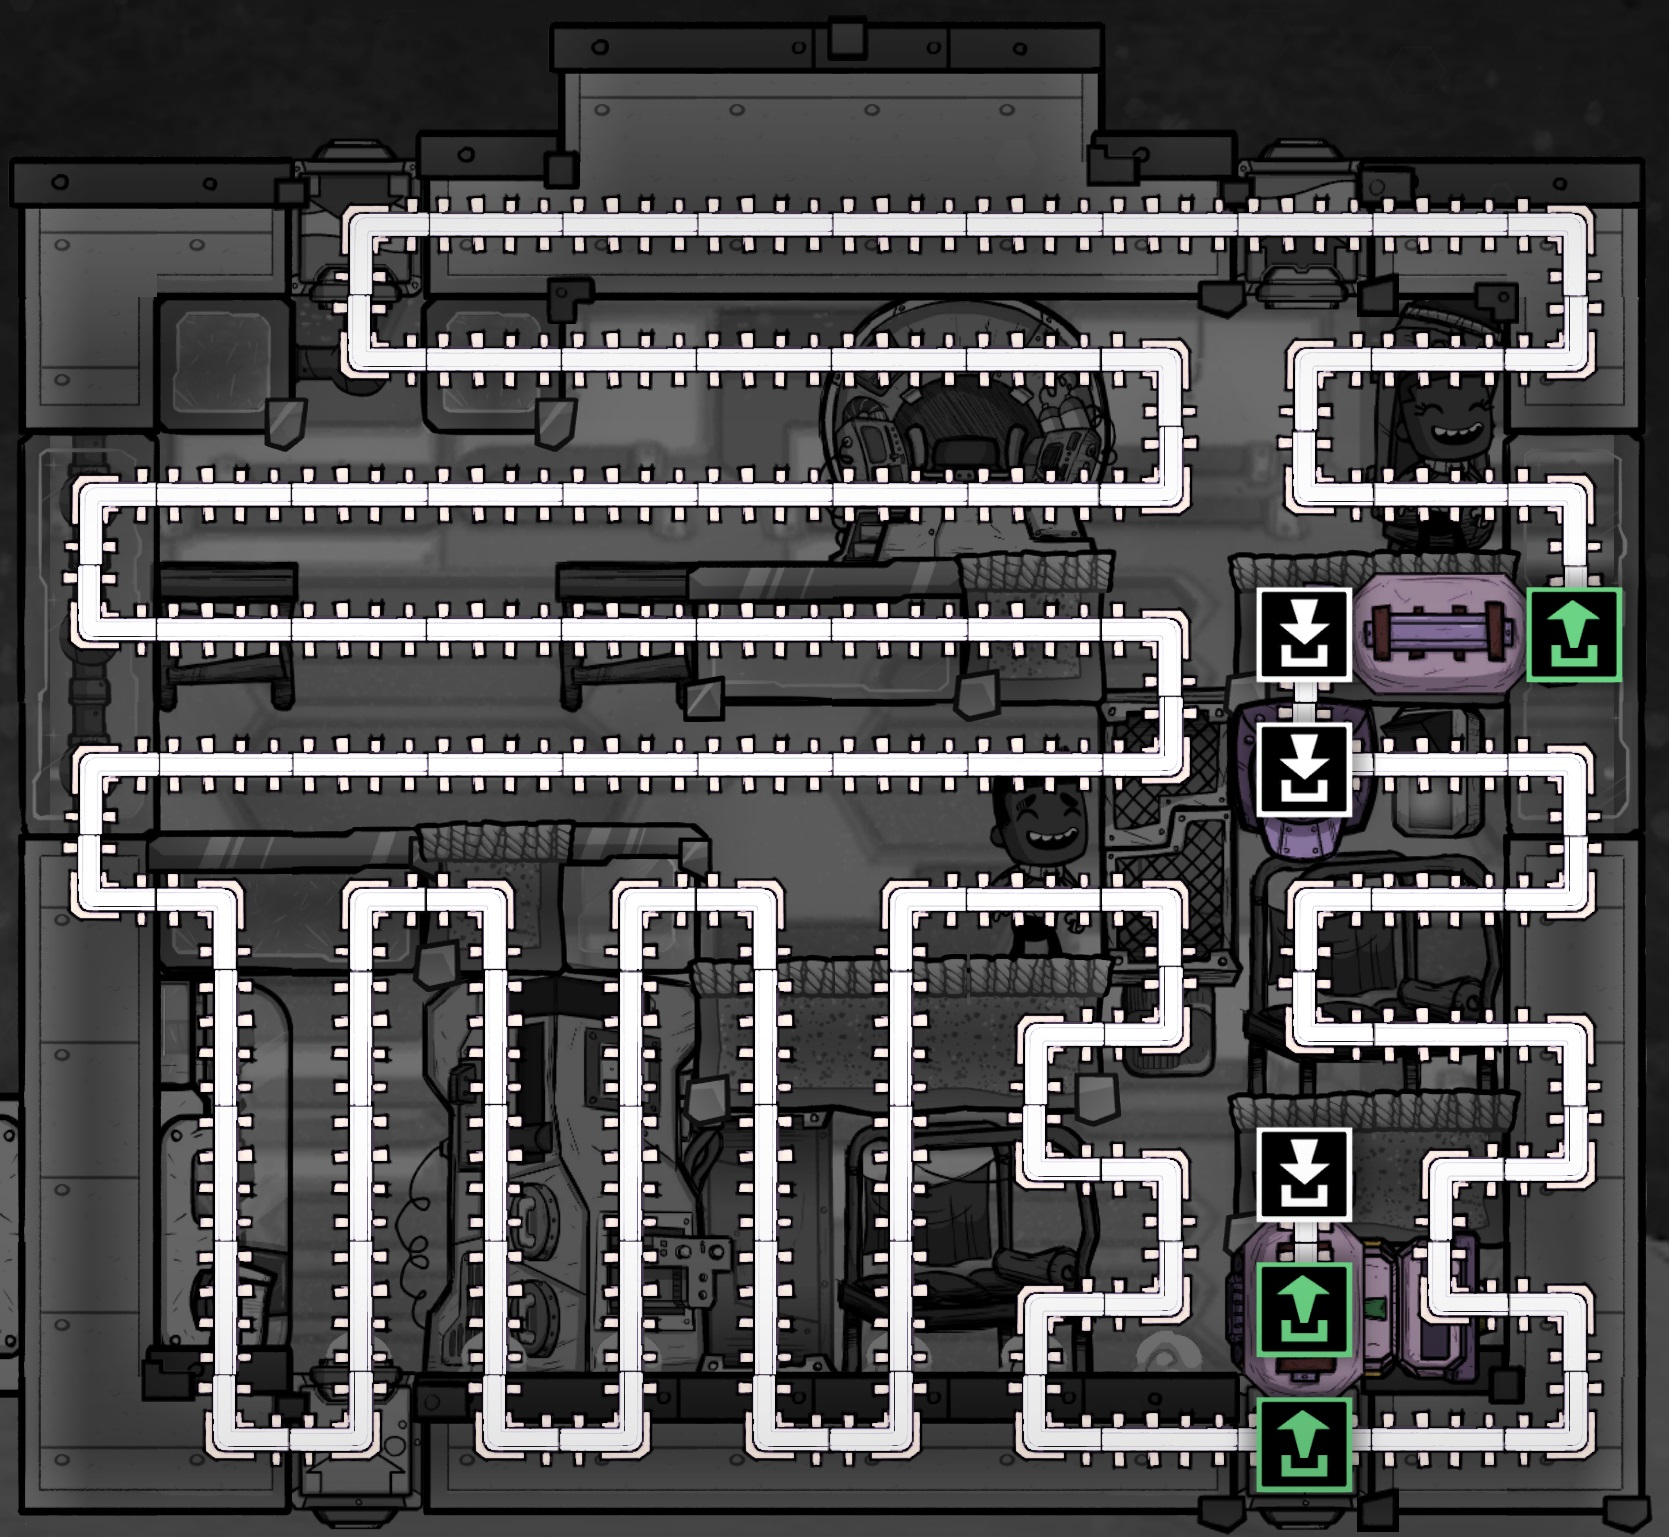
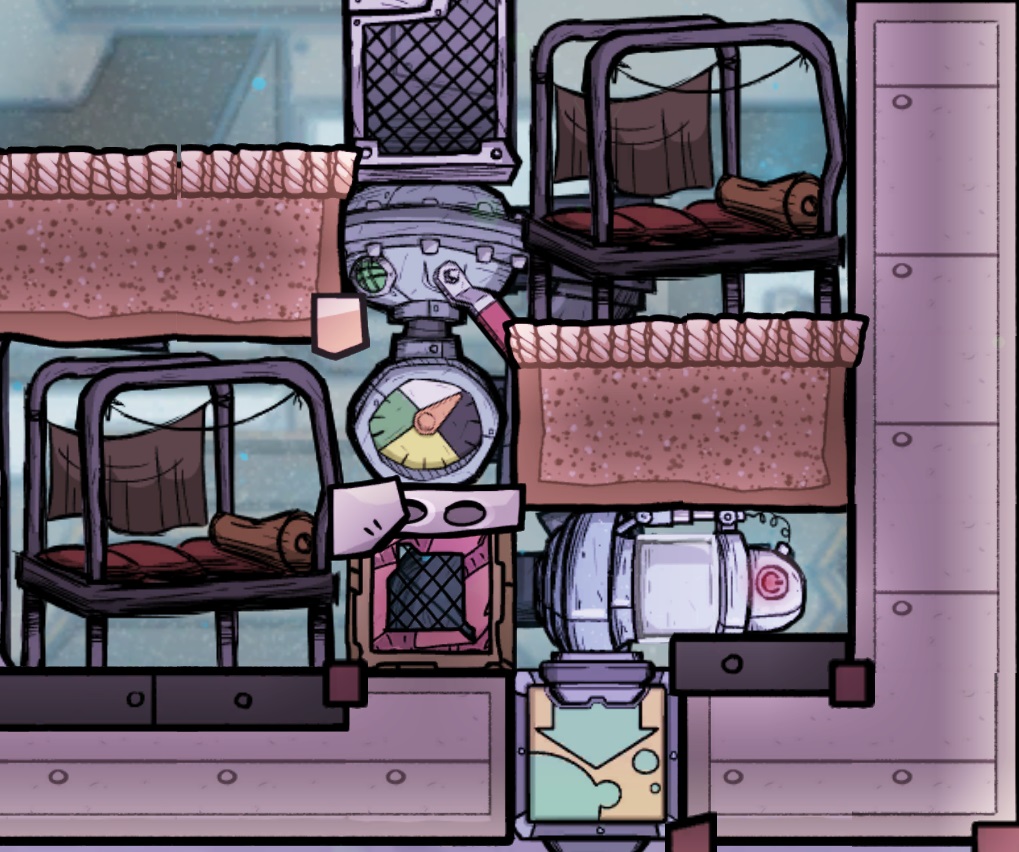
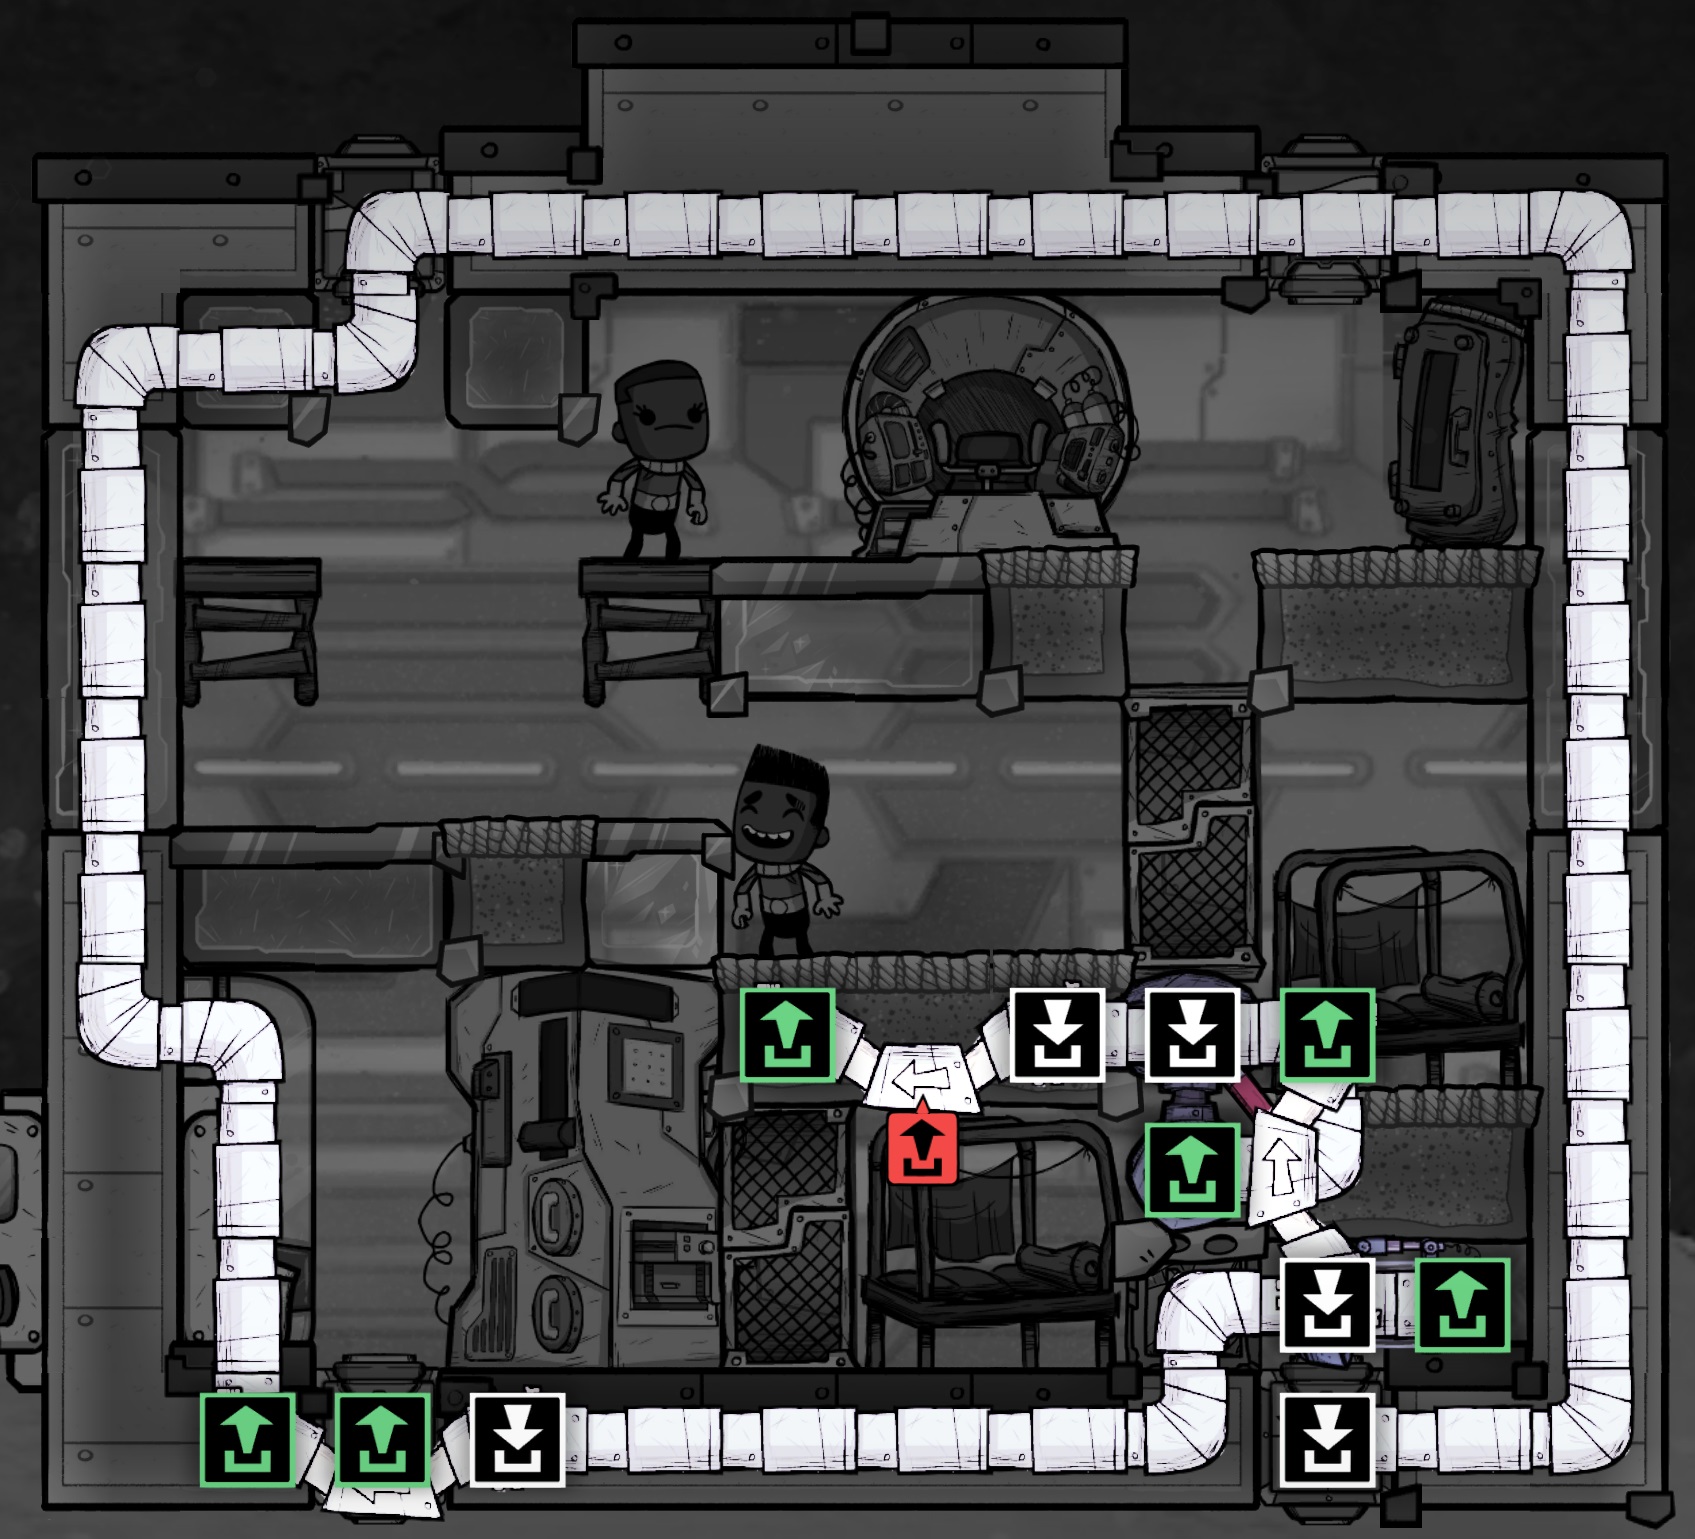
See the construction section for the colonization rocket for tips on priming the mechanical filter before you seal up the pump. Also, I'm showing a CO2 storage snake of 39 tiles around the outside which should be enough for over 16 cycles with only two dupes in the rocket. If you plan on longer research missions you can easily make this pipe snake longer. Every three pipe segments adds about a cycle for the two dupes.
6.2.2 - Great Hall & Washroom
- 1 telescope (or a second orbital data lab)
- 2 mess tables
- 2 party line phones
- 1 hand washing station
- 1 ceiling light
- 1 aero pot
- 1 plastic/lead tile left of the fridge (plus the upper left corner tile if you skipped building it)
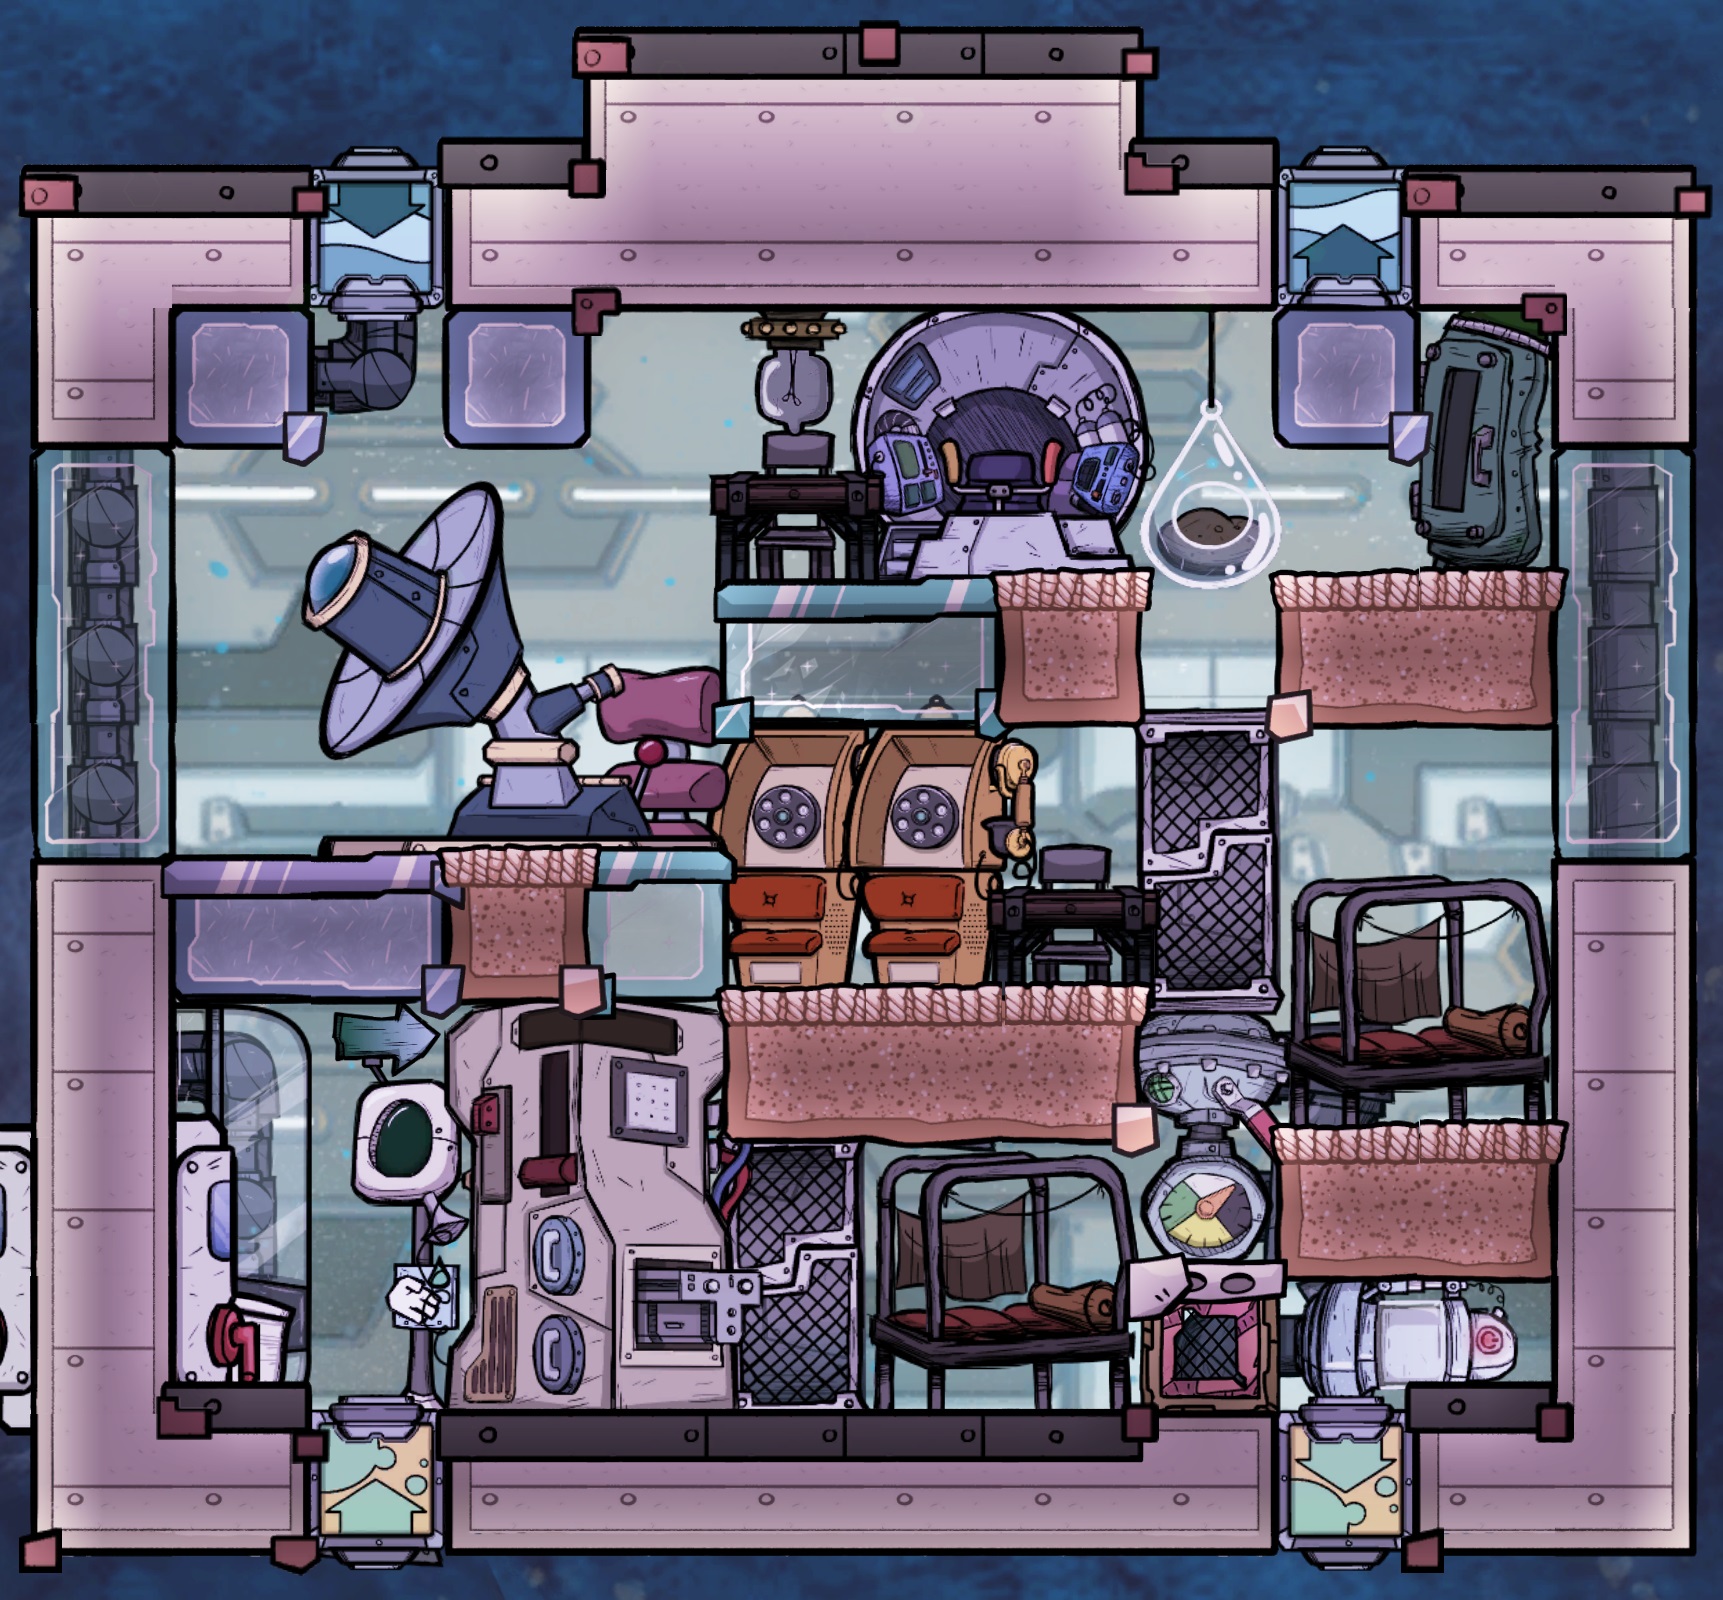
If you choose to install a second orbital data lab instead of the telescope, ensure that it is placed immediately above the first lab, with the left side over the carpeted tile. This tile is placed so that whether you install the telescope or lab it will trigger the stress relief debuff on a dupe working the station.
The placement of the ceiling light is important to ensure that both workstations, mess tables, phones and the pilot station all receive the well lit bonus. In addition, the light does not reach either bed to disturb sleeping dupes. In case you're wondering, even if we replaced the two lead tiles and carpet tile on the left side with all window tiles, the light still wouldn't quite reach the toilet.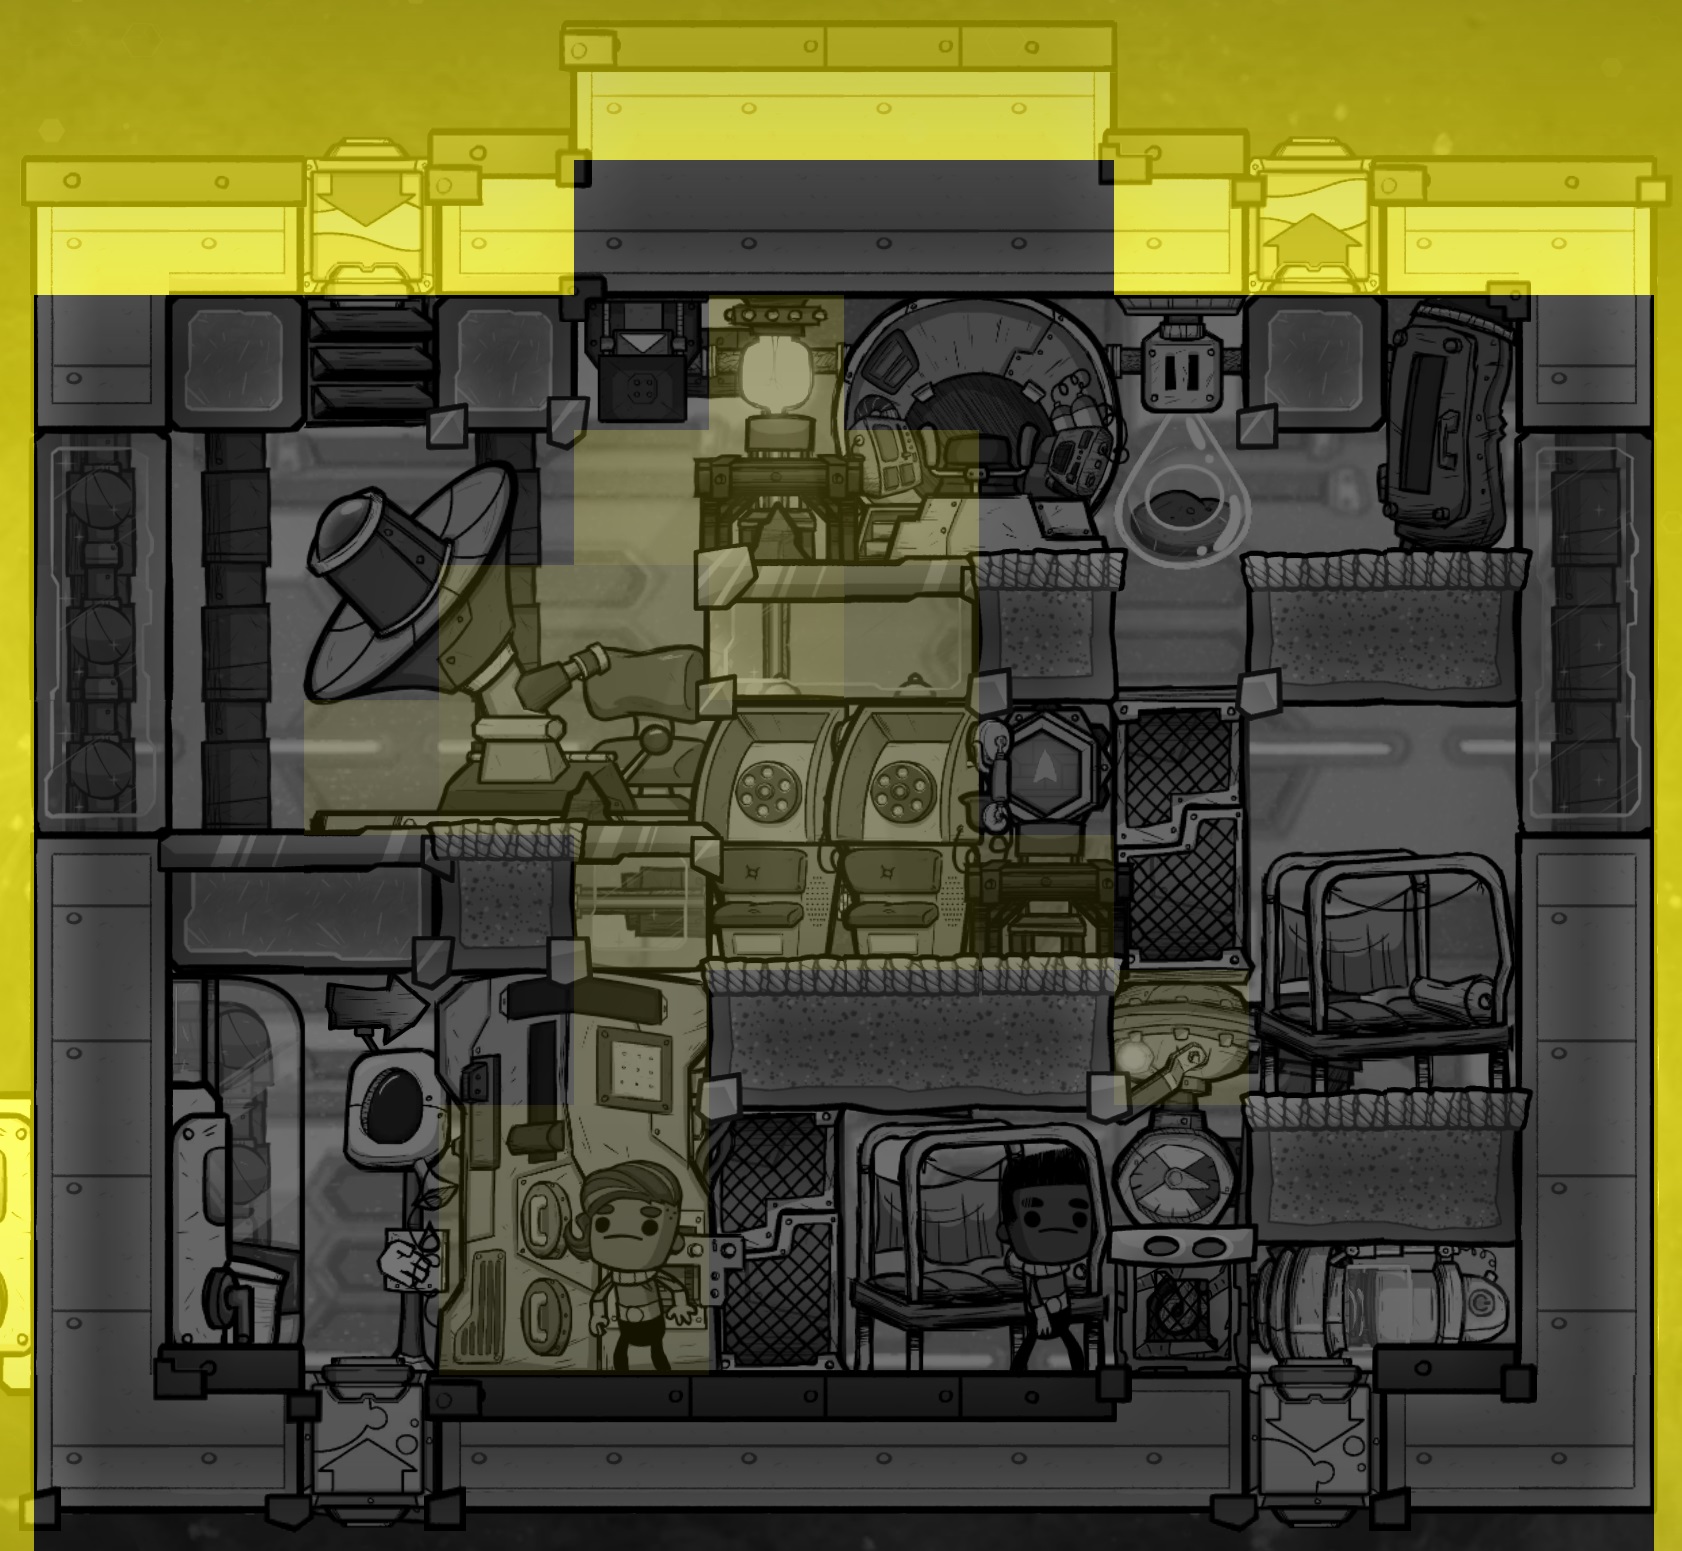 If you don't want to install two phones you can remove either one of them and move the top mess table to that location, which will reduce radiation exposure while maintaining the well lit bonus. Alternatively you could remove both phones and install a single 2x2 recreational building of your choice (such as a water cooler). Finally, you can disable the phone(s) or other recreational building if you don't want the dupes using them. You only require that a recreational building exists in the room to complete the great hall.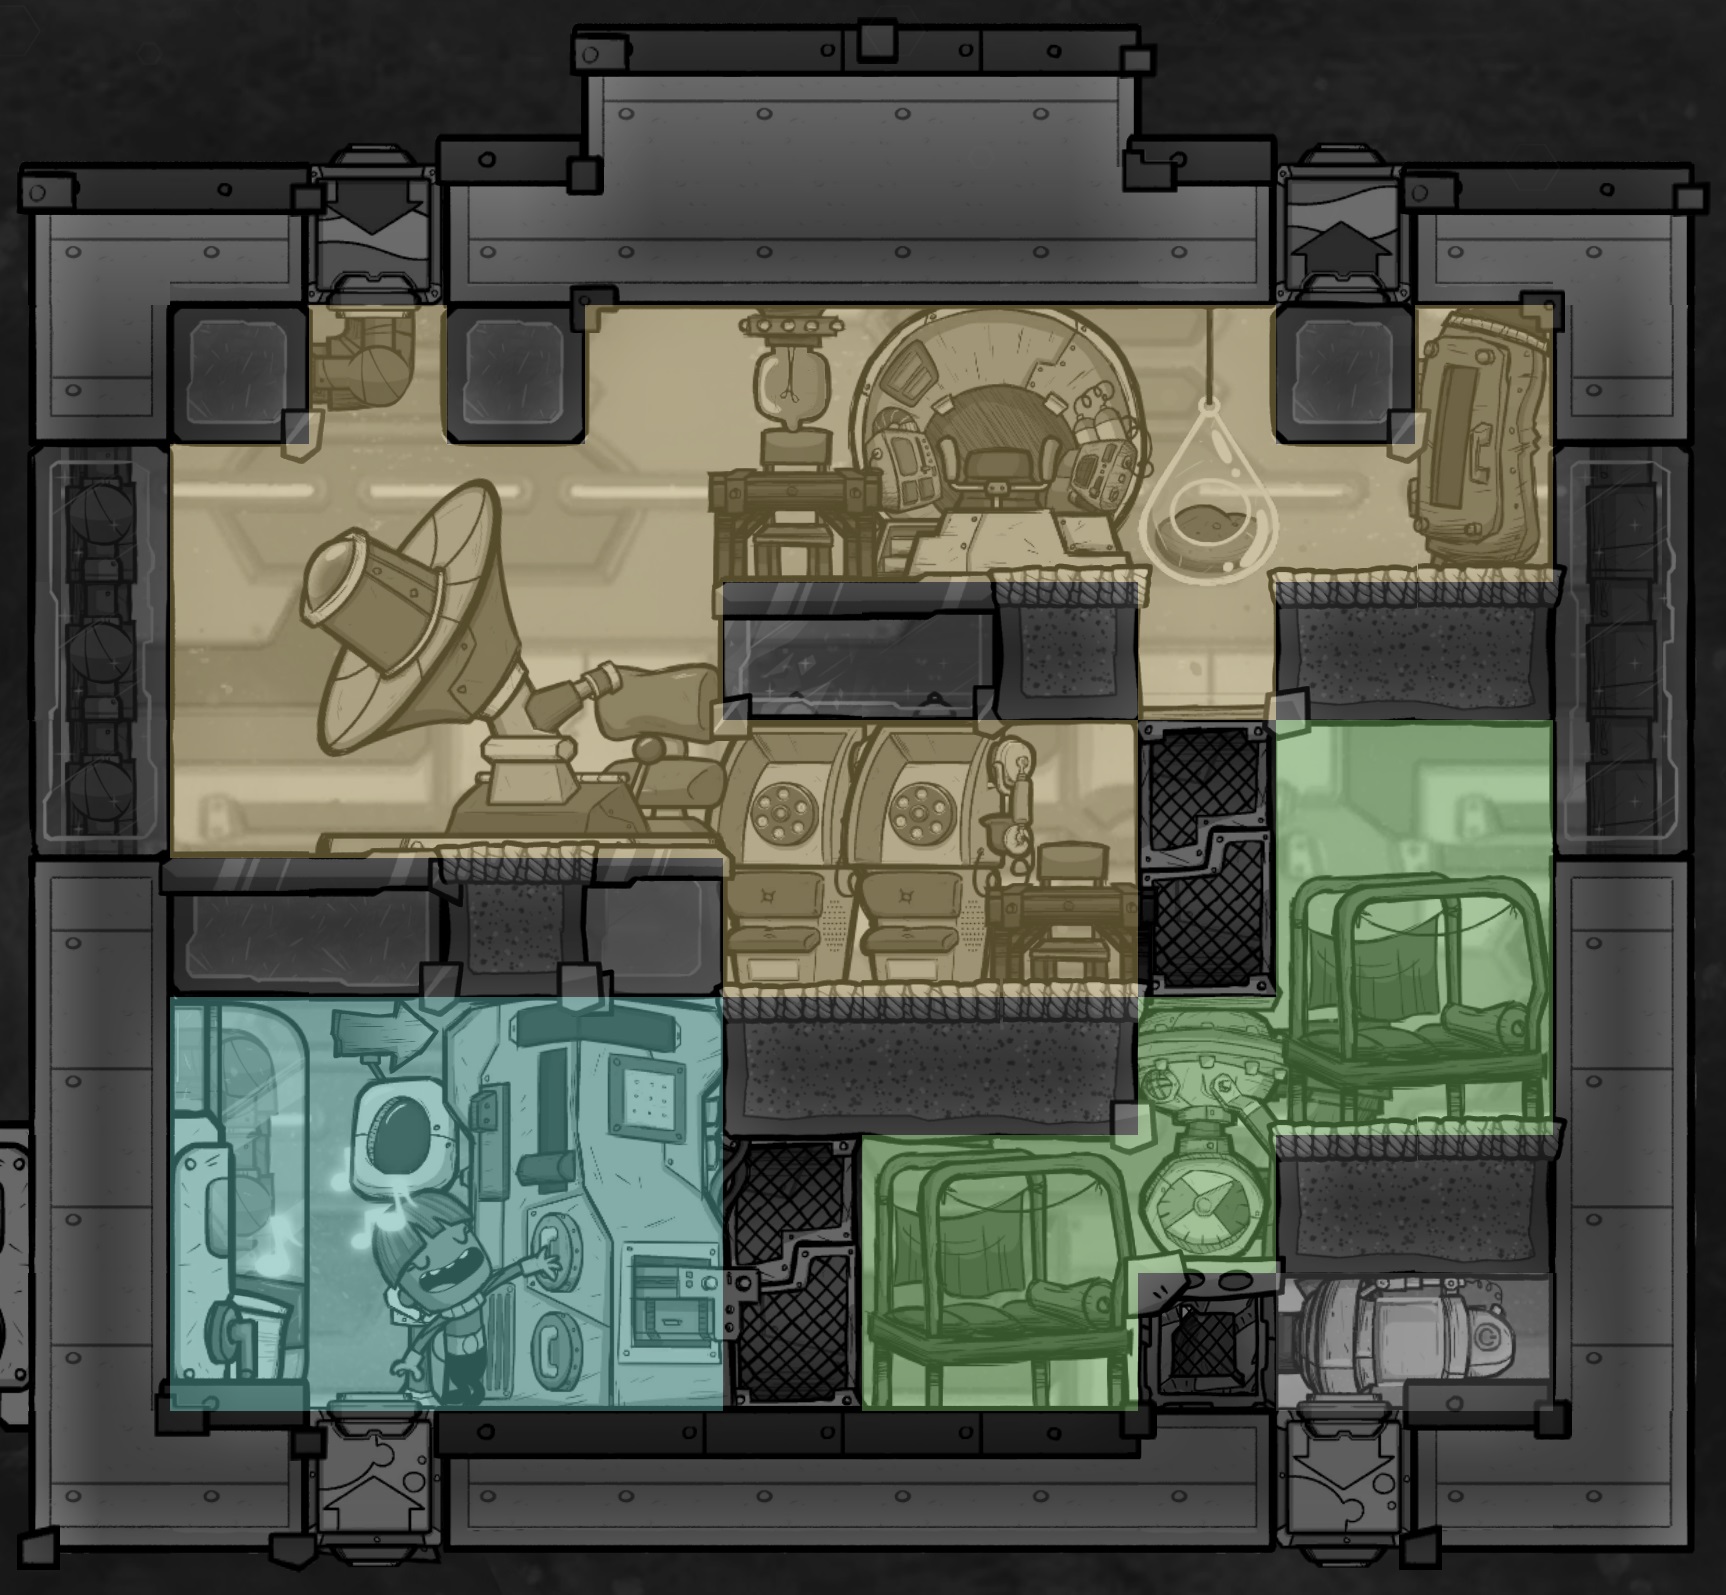
6.2.3 - Finishing Touches
- Add a power outlet and wire power inside the rocket
- Add a gas vent and gas output fitting (only if using the mini pump and gas cargo canister as your CO2/O2 solution)
- Optionally add a starmap location sensor
The following screenshot shows the completed design:
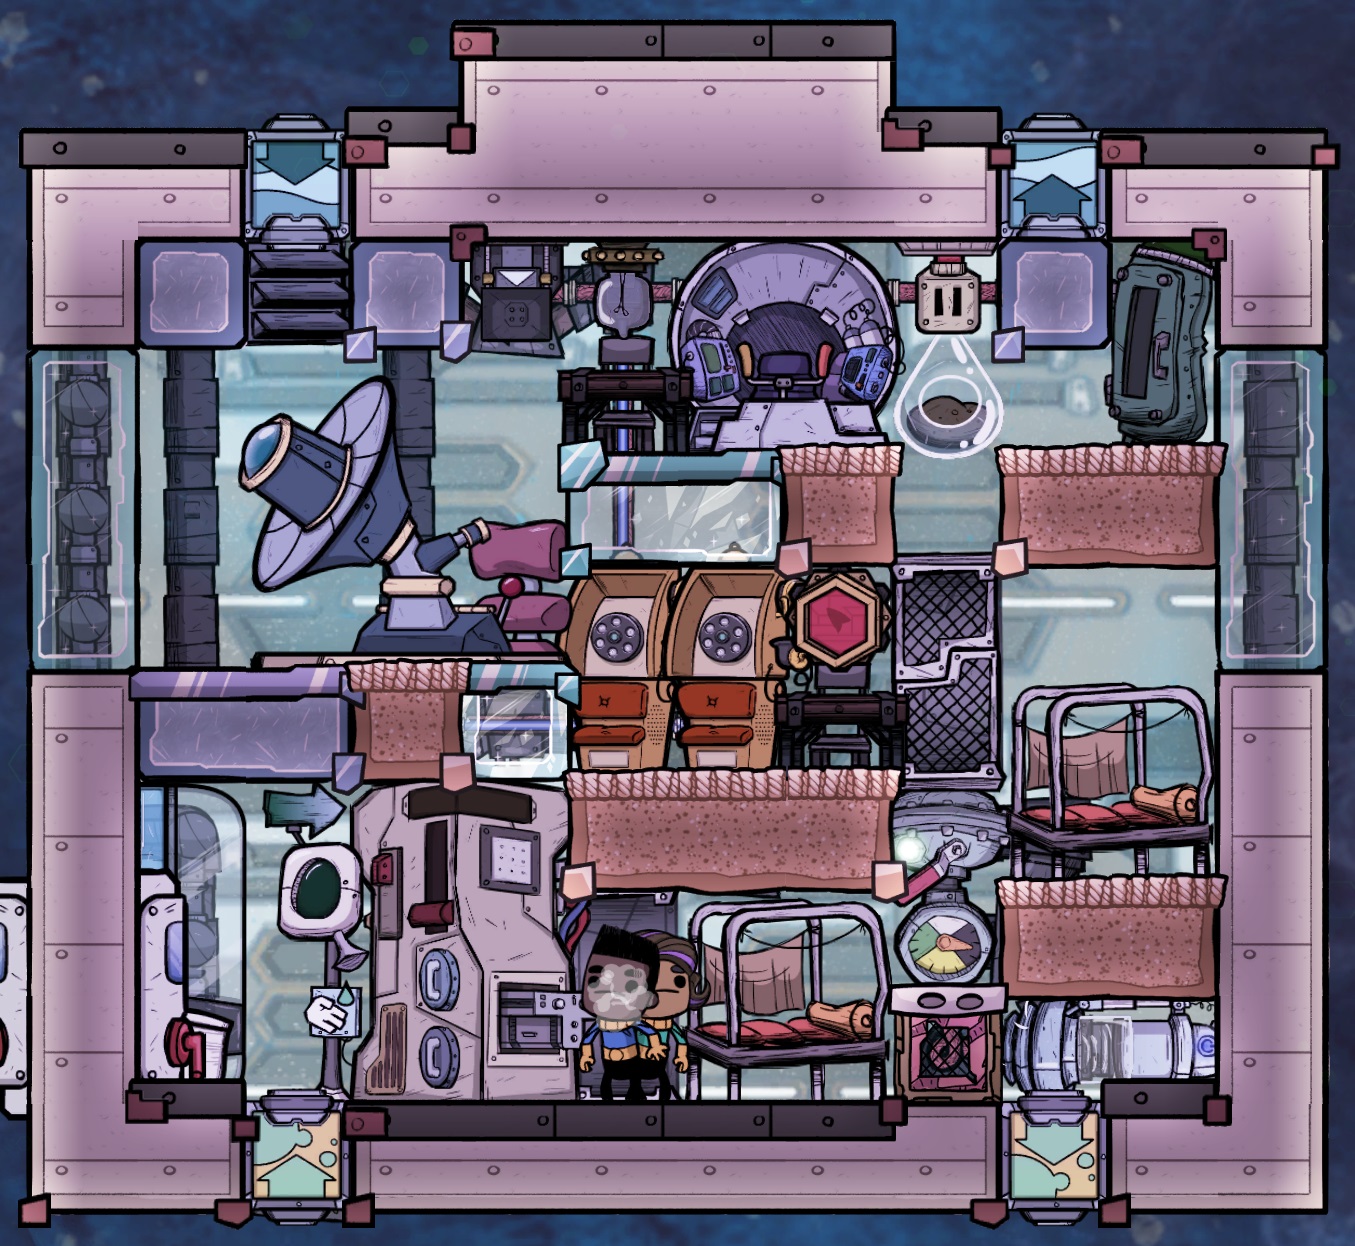
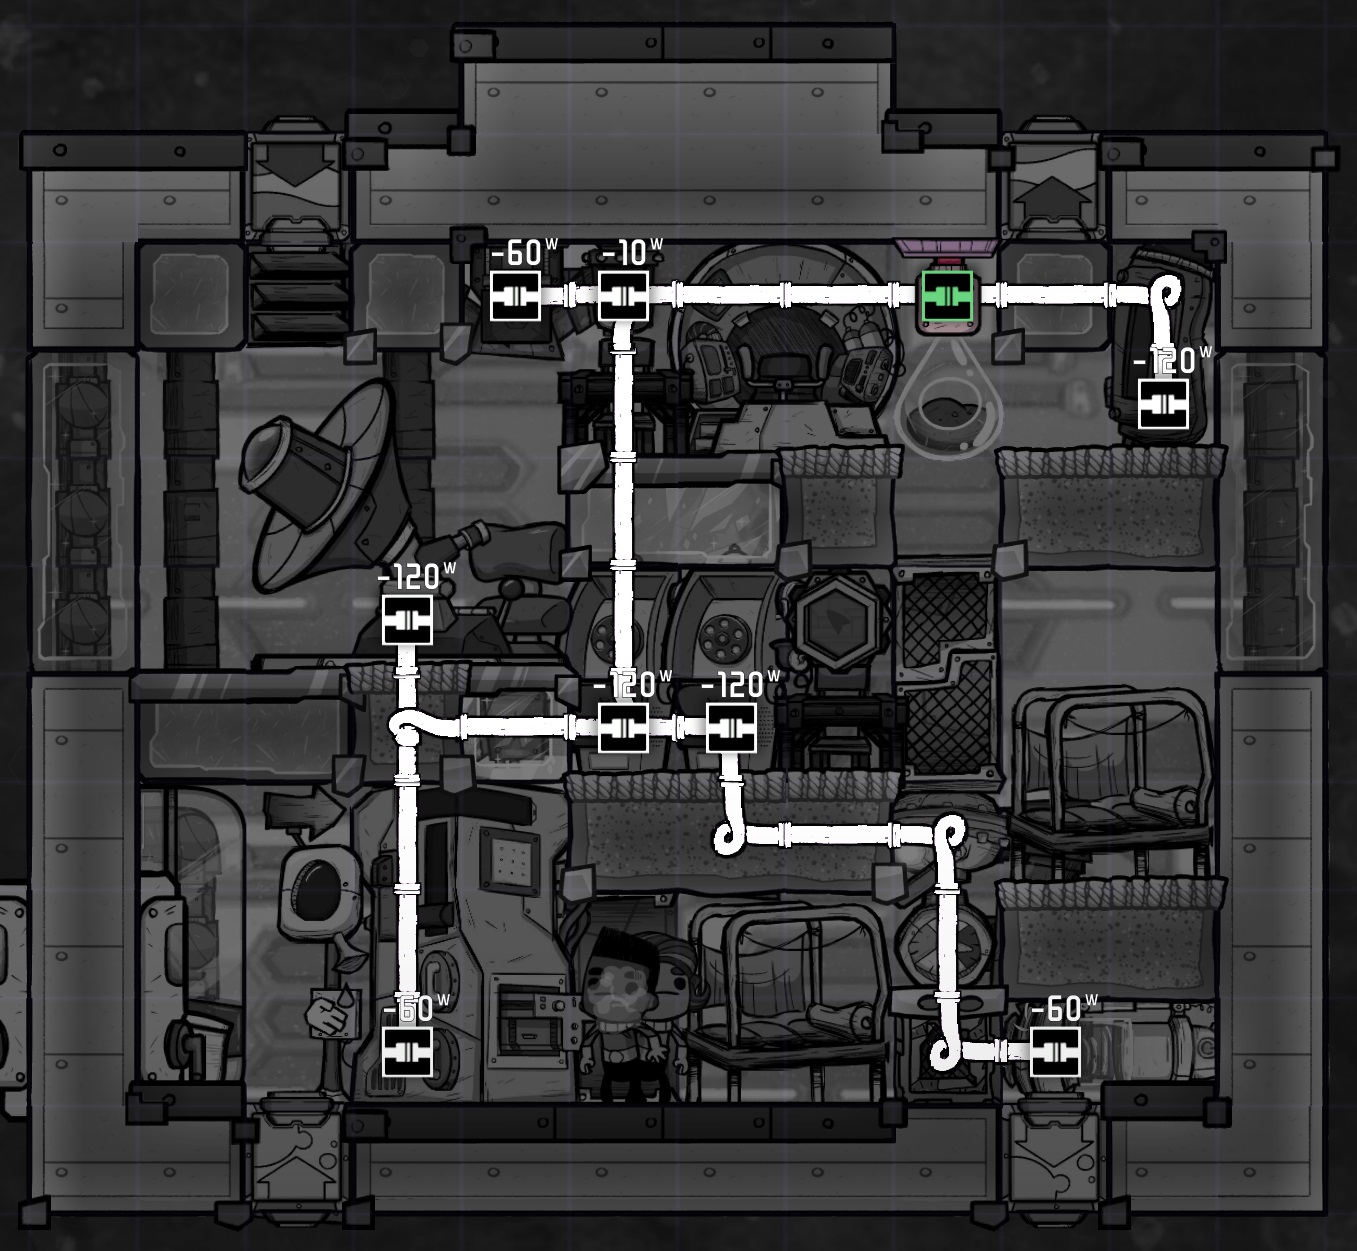
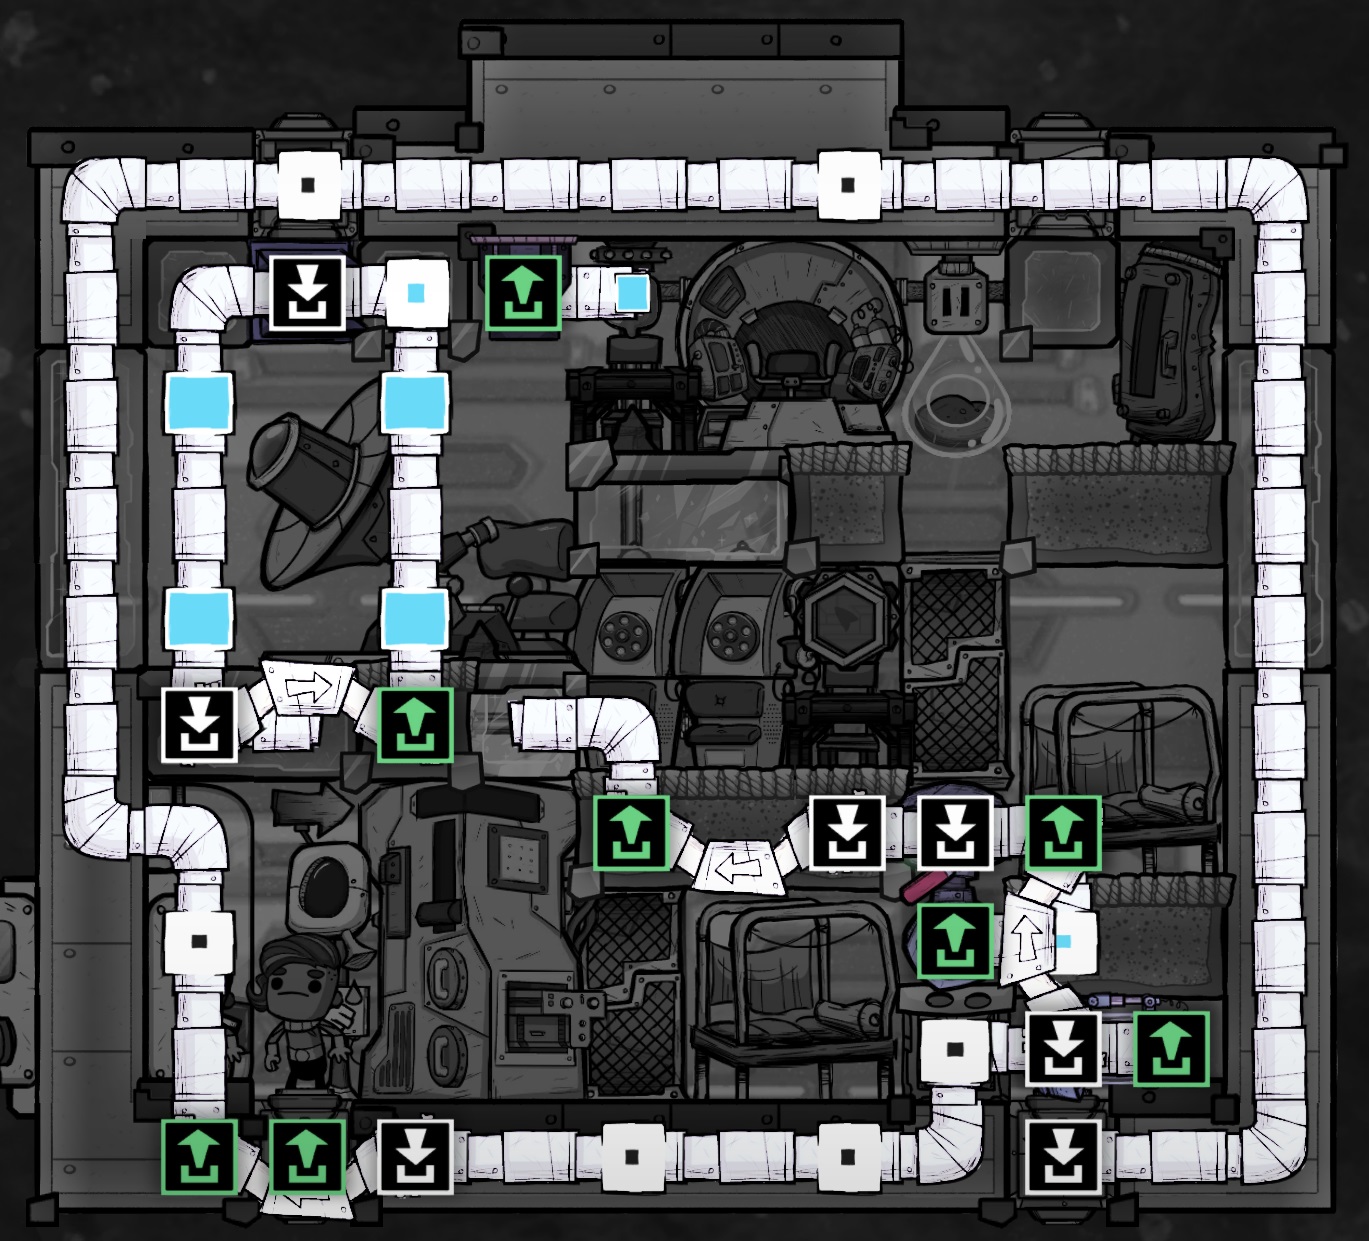
I like to create a small loop through the gas vent so that oxygen will always be in circulation and can be released through the vent whenever necessary. There is a small "stub" connected to the bottom left of the loop, and this is where the output of the mechanical filter on the right will be joined to the loop via a bridge pointing left. This ensures that oxygen output from the mini-pump will have first priority to merge onto the loop if it's not already full, replacing any oxygen that was released by the vent.
In the top right there is another small stub to the right of the gas output fitting. A bridge will be installed from this stub pointing left directly onto the loop. In this way gas from the cargo canister will only be allowed onto the loop if the loop is not already full. It will top off any smaller packets that were not fully topped off by the mini-pump.
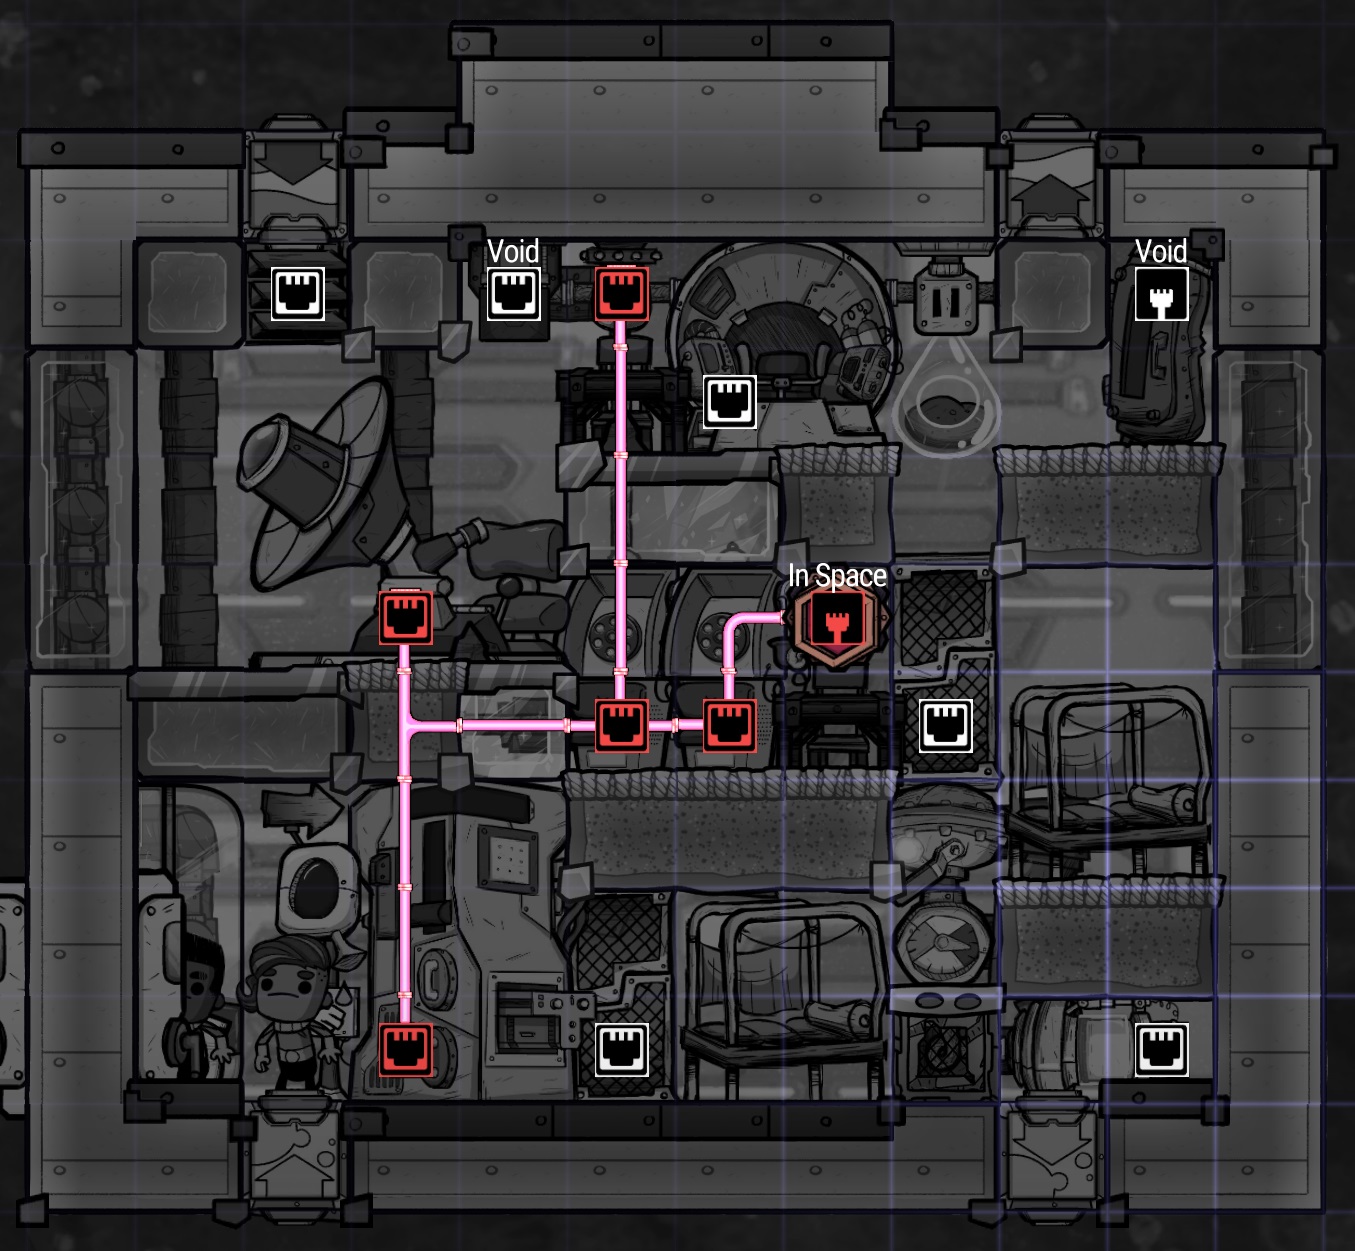
6.3 - Large Scope Research Rocket
6.3.1 - Initial Construction
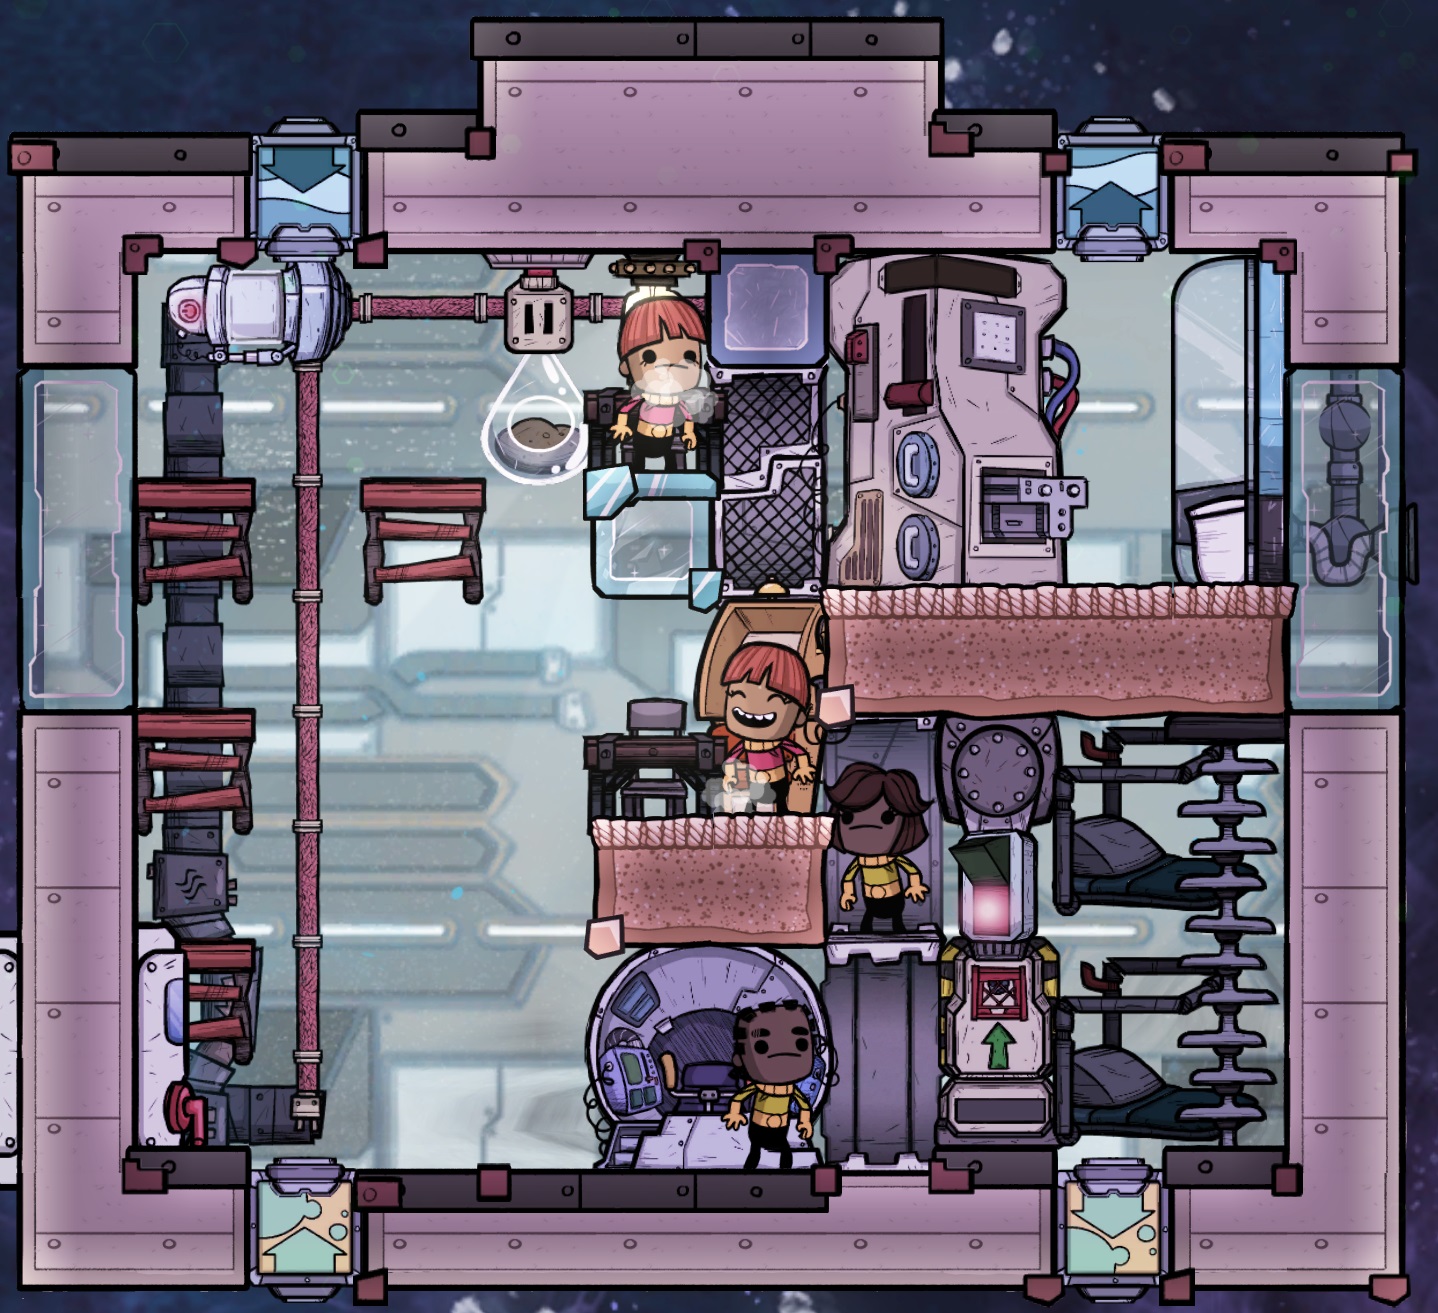
If you prefer to use an oxylite bin instead of the oxylite rail, you can remove the conveyor loader, chute and switch, plus all the automation wiring shown below, and place a bin on the floor where the loader is. You could install a mini pump and filter in this location as well, and rely on oxygen from a cargo canister, however you would lose the morale bonus from the barracks.
As usual the temporary ladders assist with constructing pipes and wires before we install the large telescope. The following overlays show the electrical, gas piping and automation installed: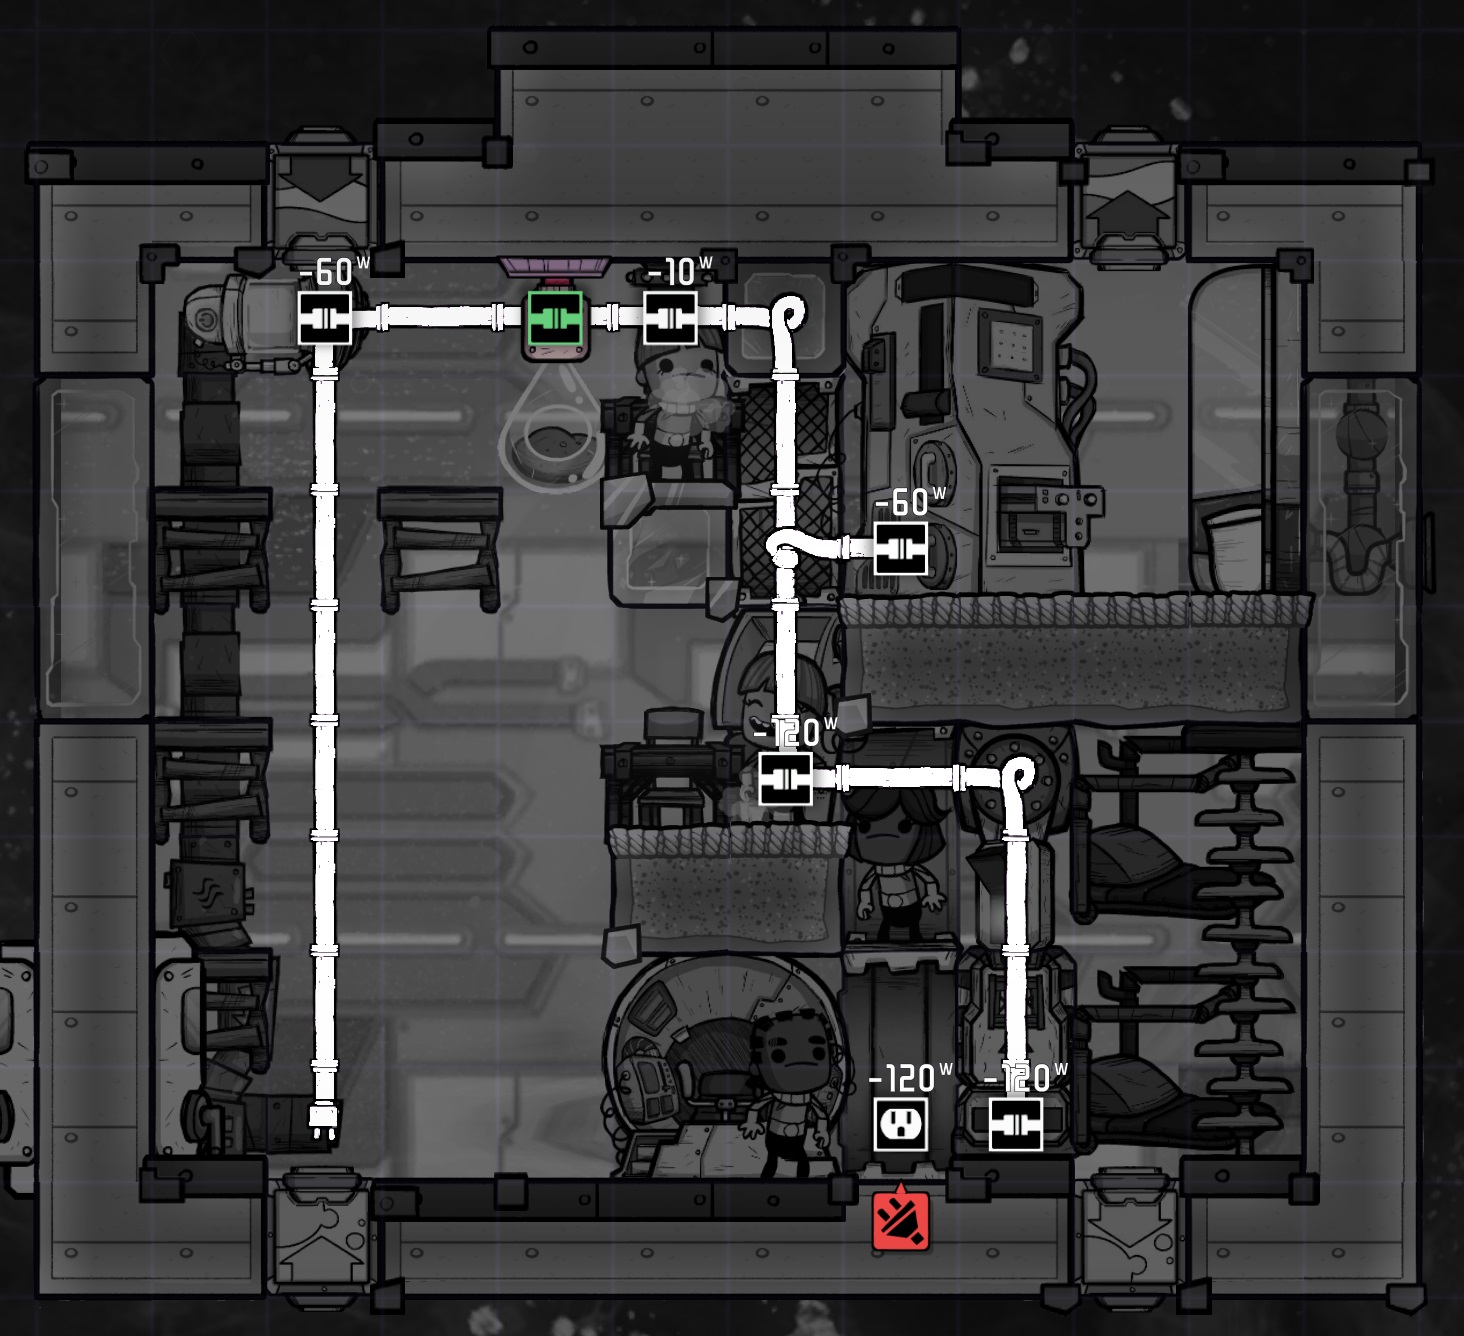
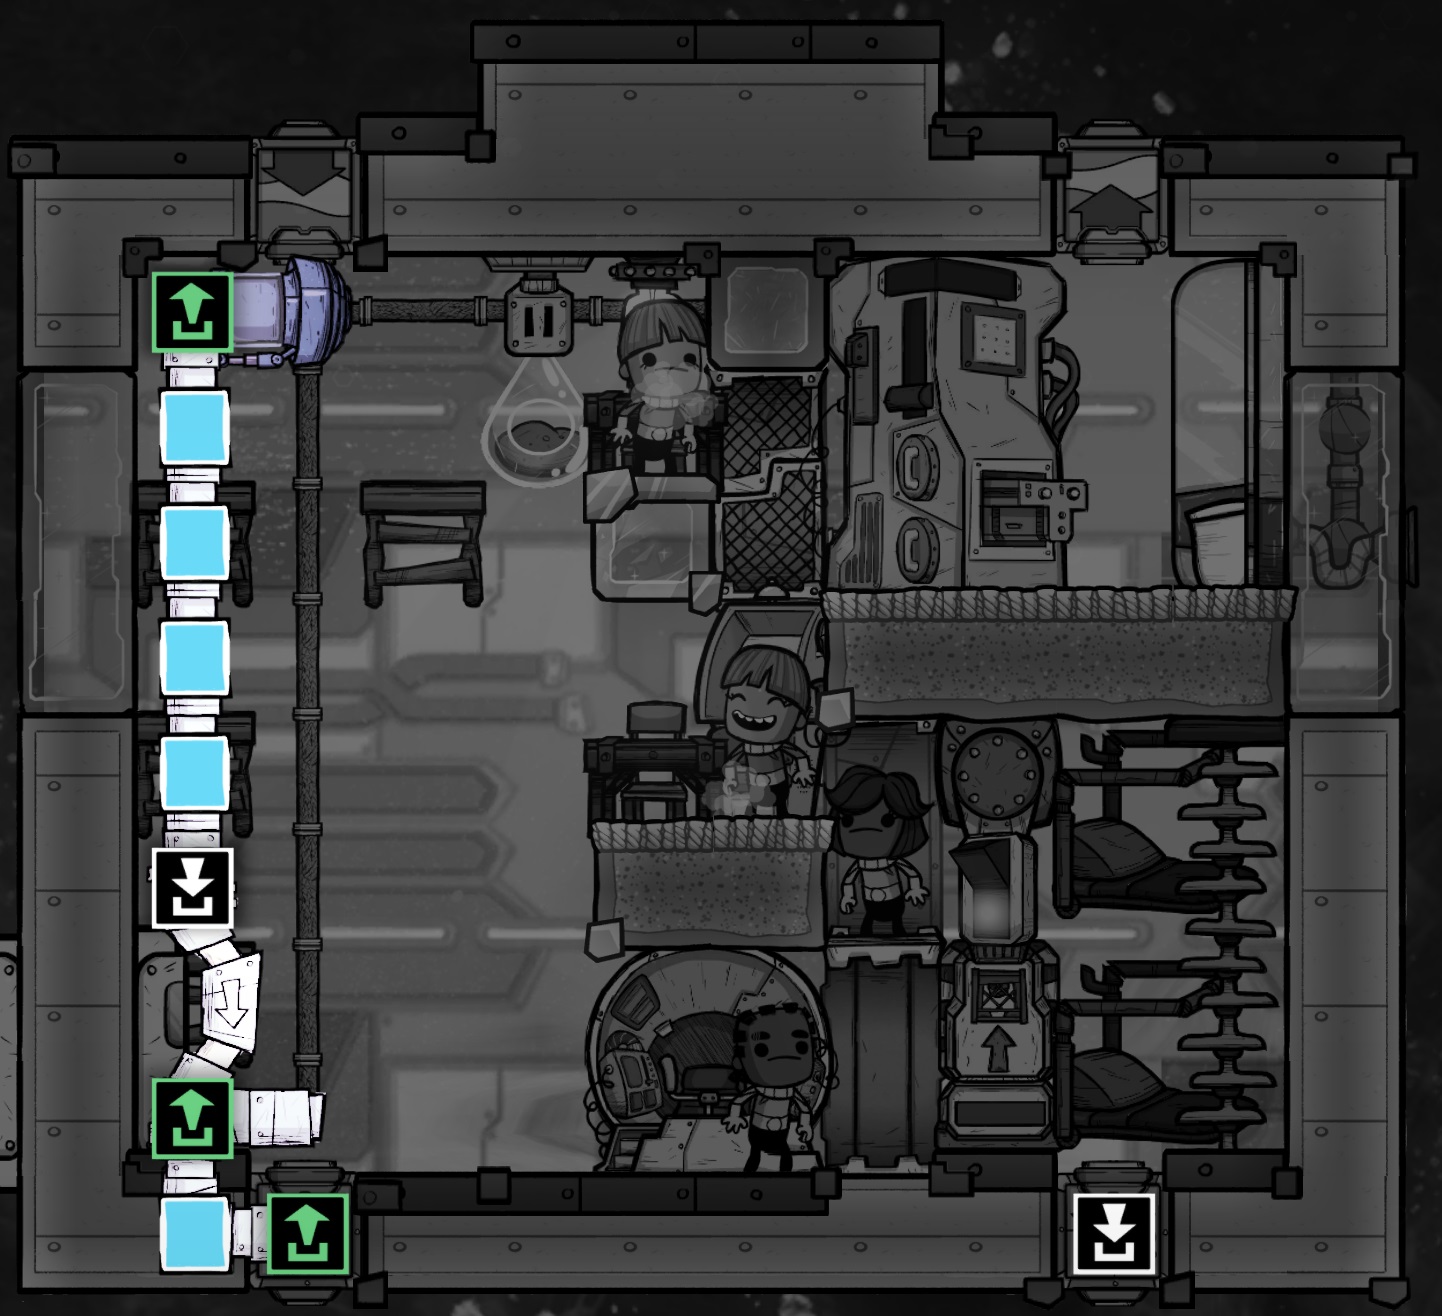
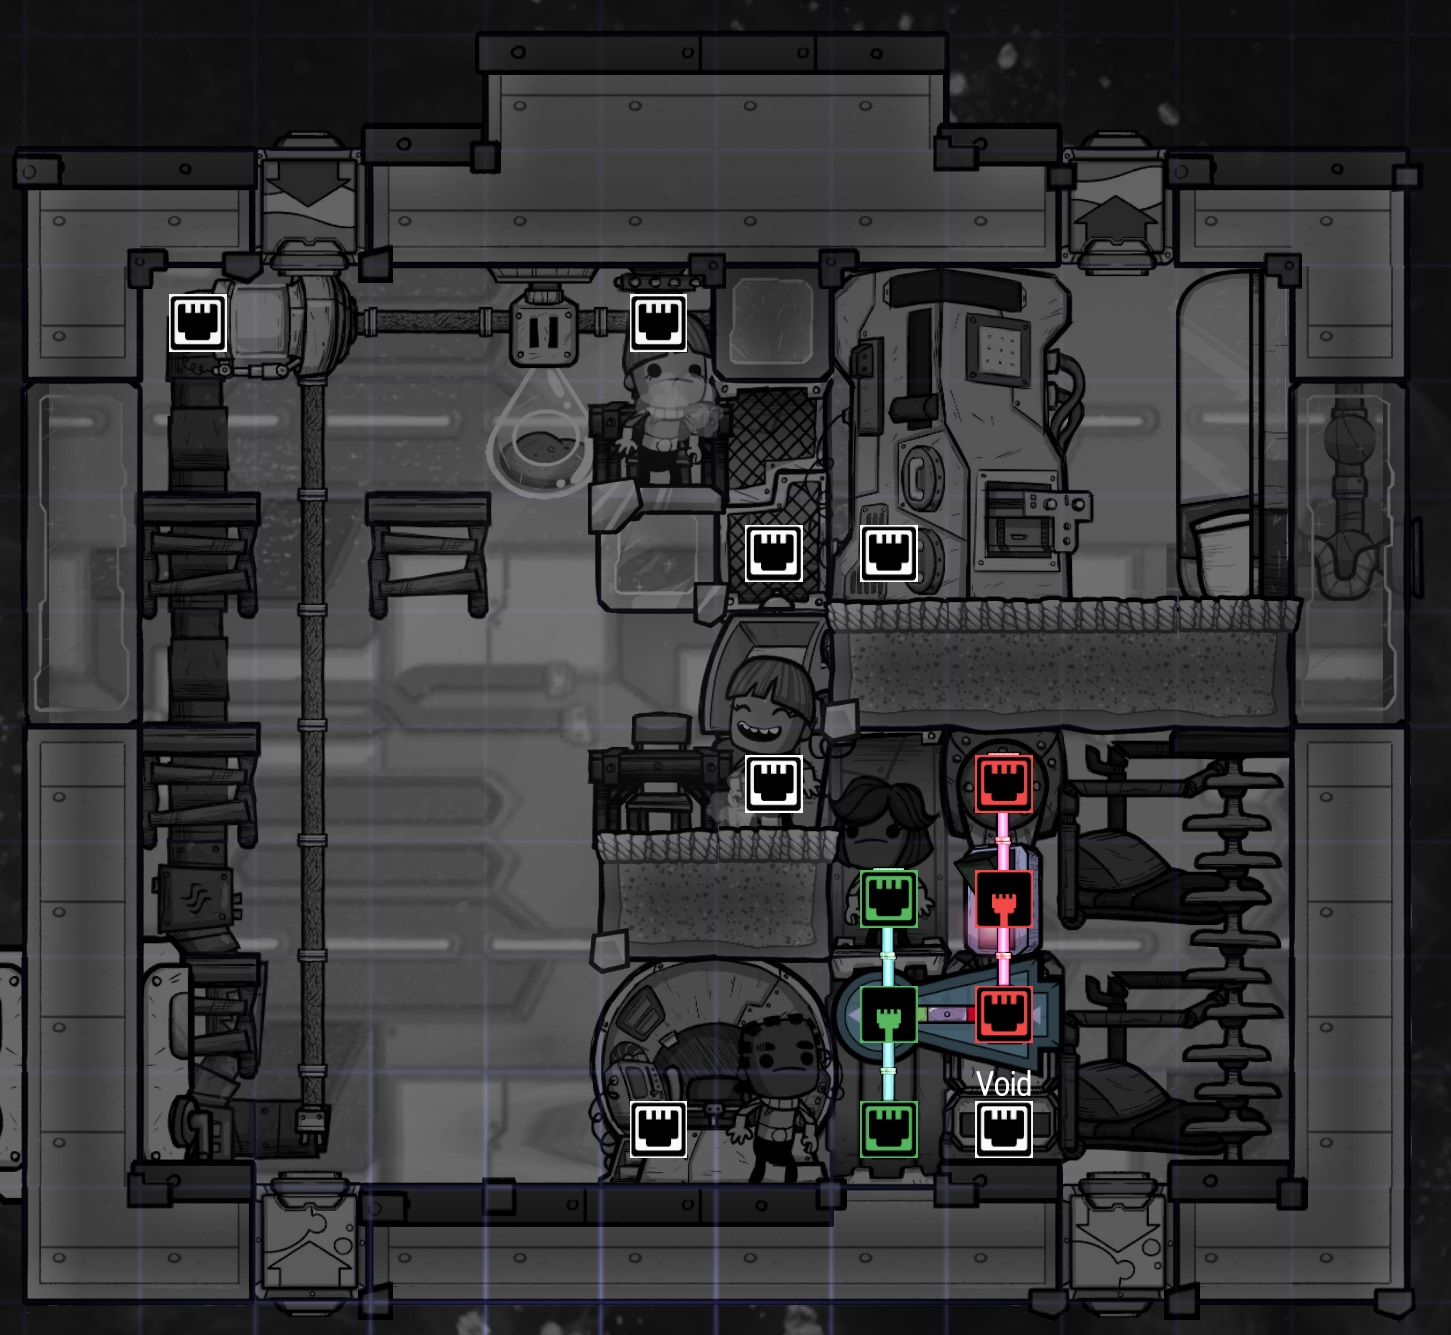
Note that the mini pump for filling the scope does not use a filter in this design. Once the temporary ladders are removed the dupes won't be able to get anywhere near the pump to exhale CO2, and what they do exhale on the other side of the rocket will always fall away from it. You should delay turning on the pump until construction is finished to avoid accidentally sucking in CO2 and damaging the telescope.
6.3.2 - Finishing Touches
- 2 plastic/lead shielding tiles + 1 airflow tile (to enclose the pump)
- 1 hand washing station
Once that is complete you can deconstruct the four temporary ladders and construct the enclosed telescope. The final result will look like the following:
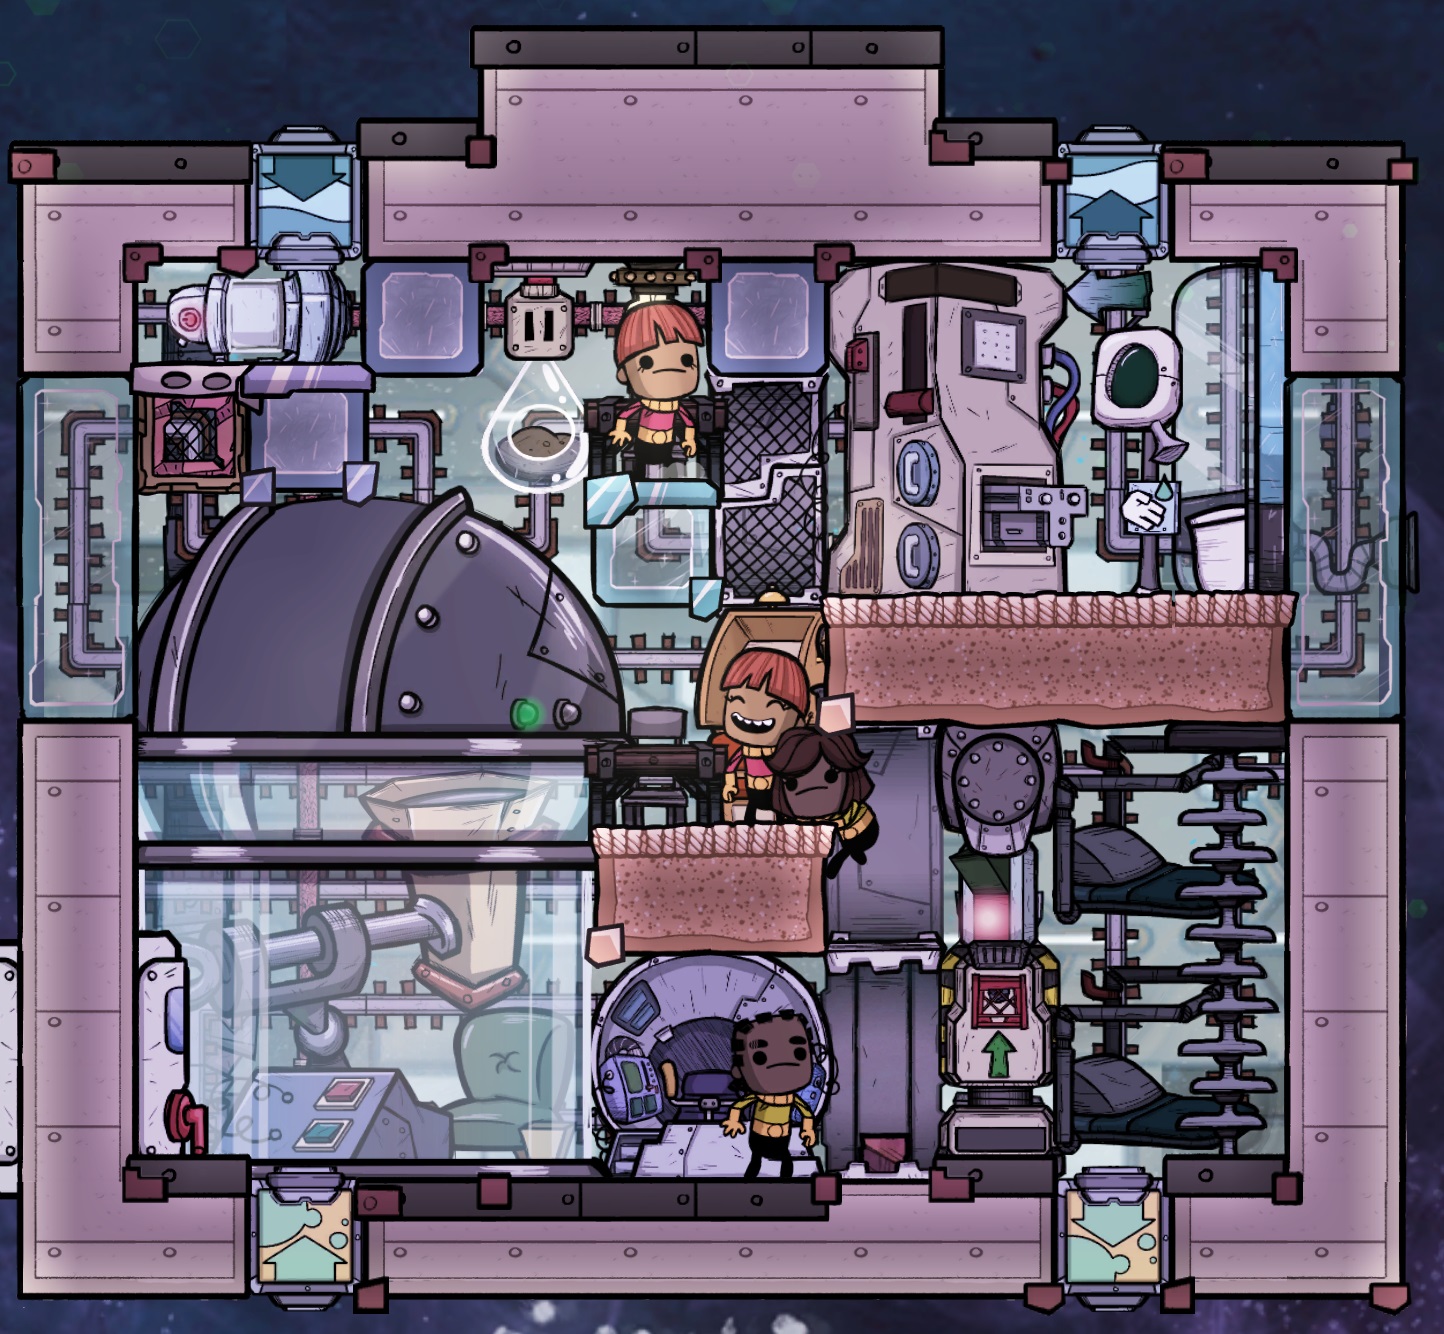
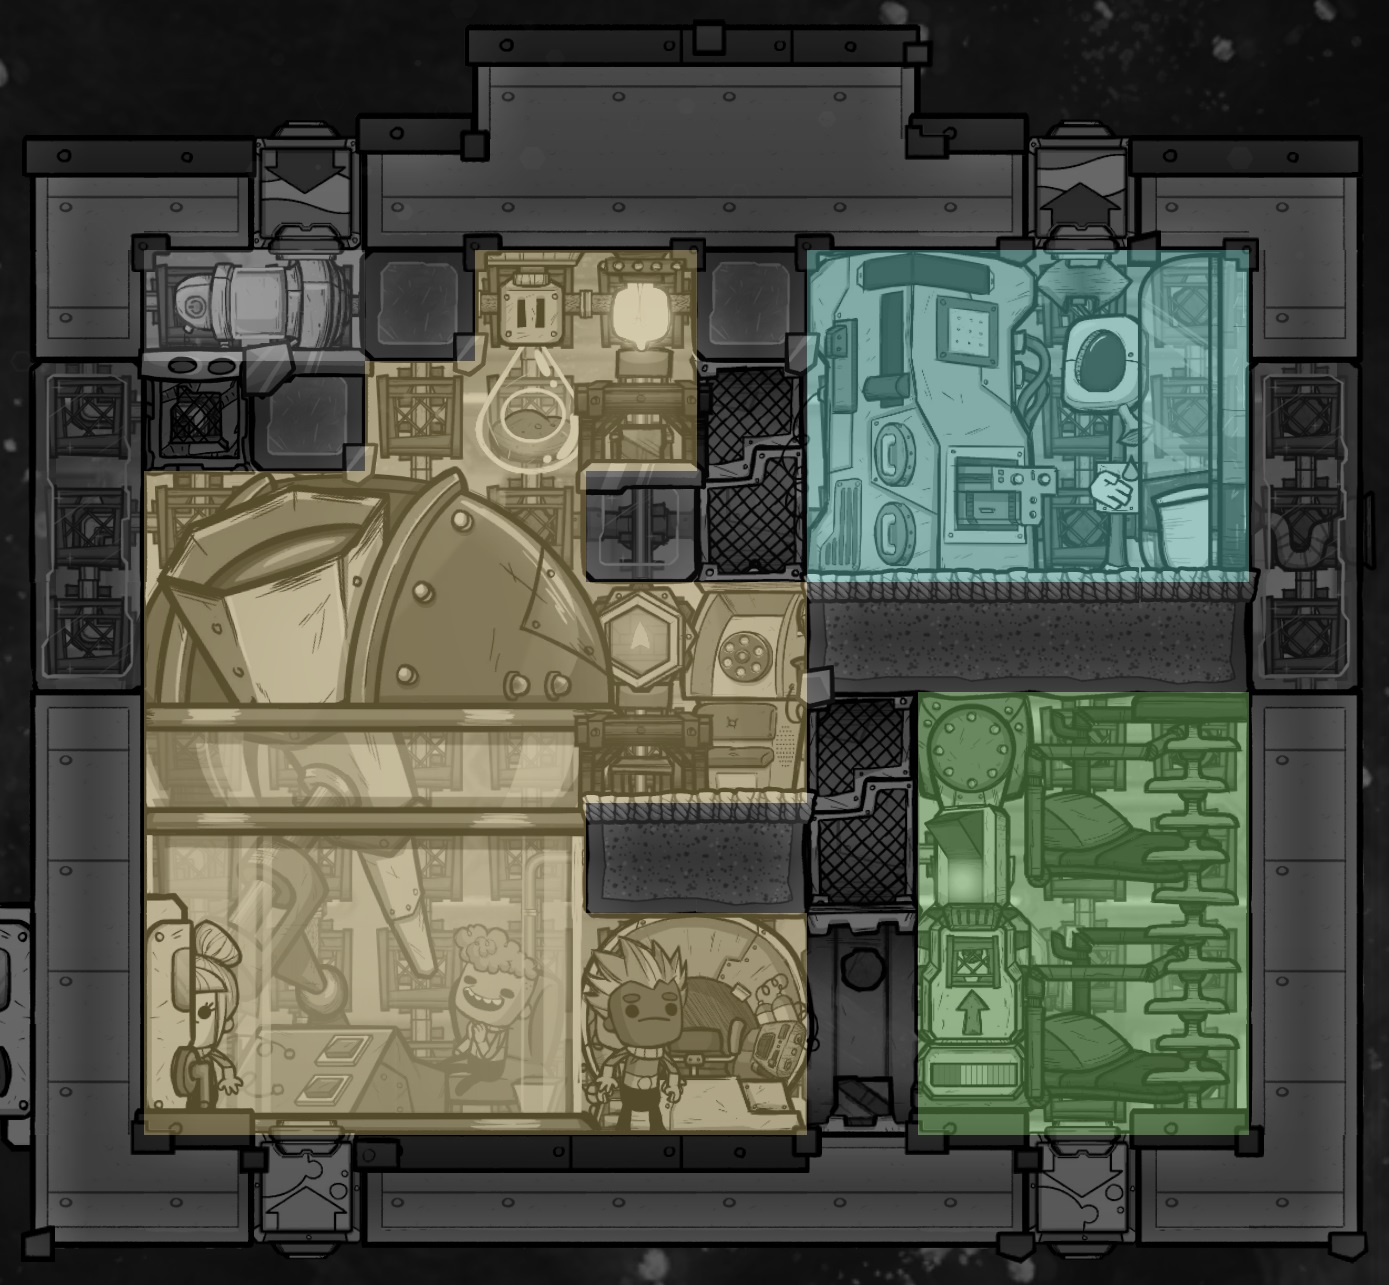
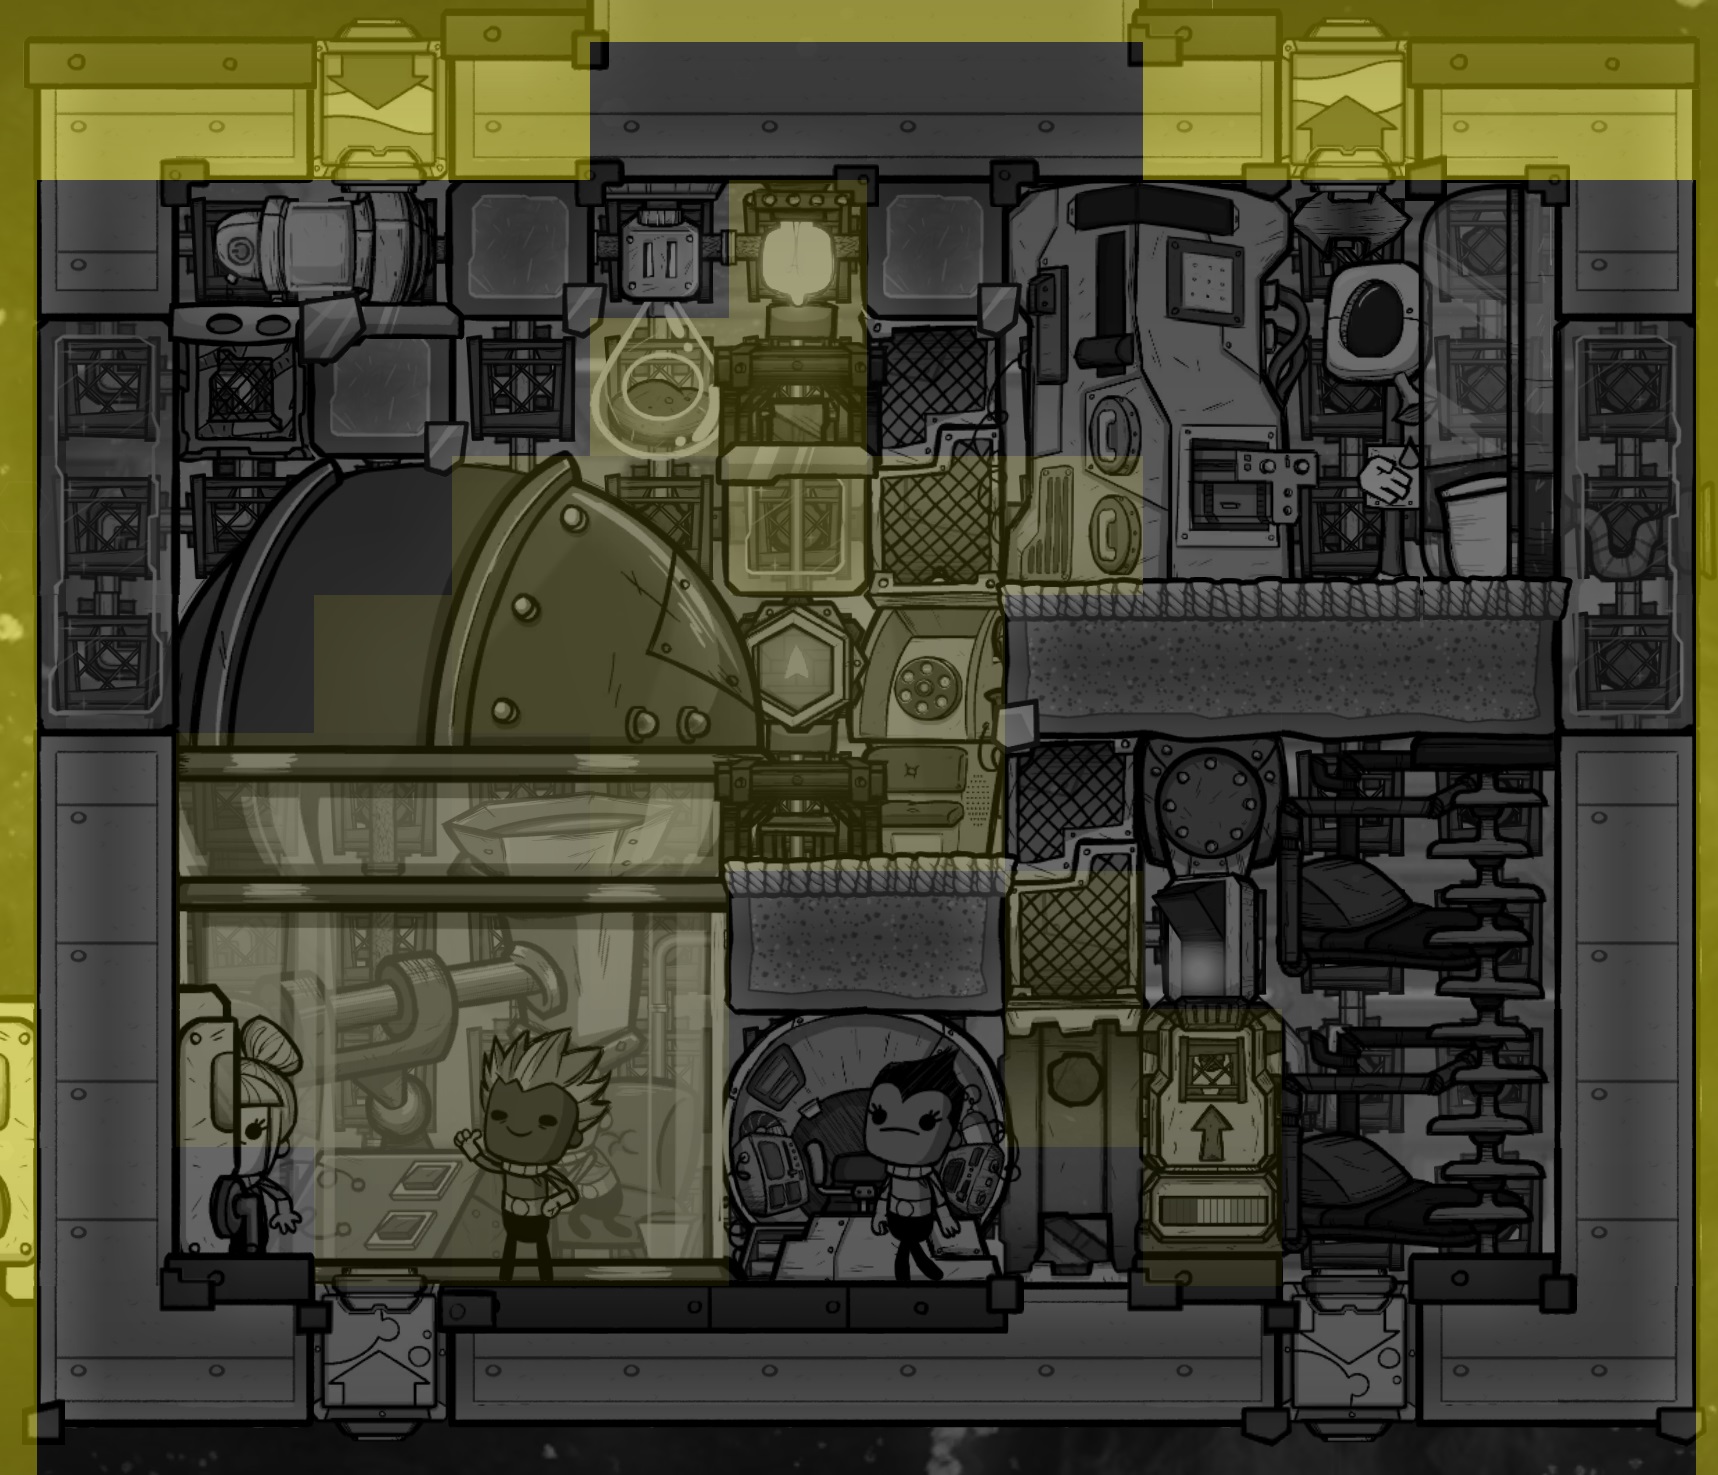 Fortunately there are a few options to customize the lighting to your preference.
- First of all, if you want to keep things how they are but add the well lit bonus to the pilot station, you can replace the left carpet tile above it with a window tile. The tradeoff is the dupe eating at the mess table will not receive the tickled tootsies stress debuff.
- If you would prefer that the telescope receive the well lit bonus *instead of* the orbital data lab, you can swap the positions of the power outlet and ceiling light. This has the added bonus of providing the well lit bonus to the pilot station without having to replace the carpet tile with a window.
- If you would like both the telescope *and* the orbital data lab to receive the well lit bonus (and the pilot station too) you can keep everything as shown and construct a second ceiling light to the left of the aeropot.
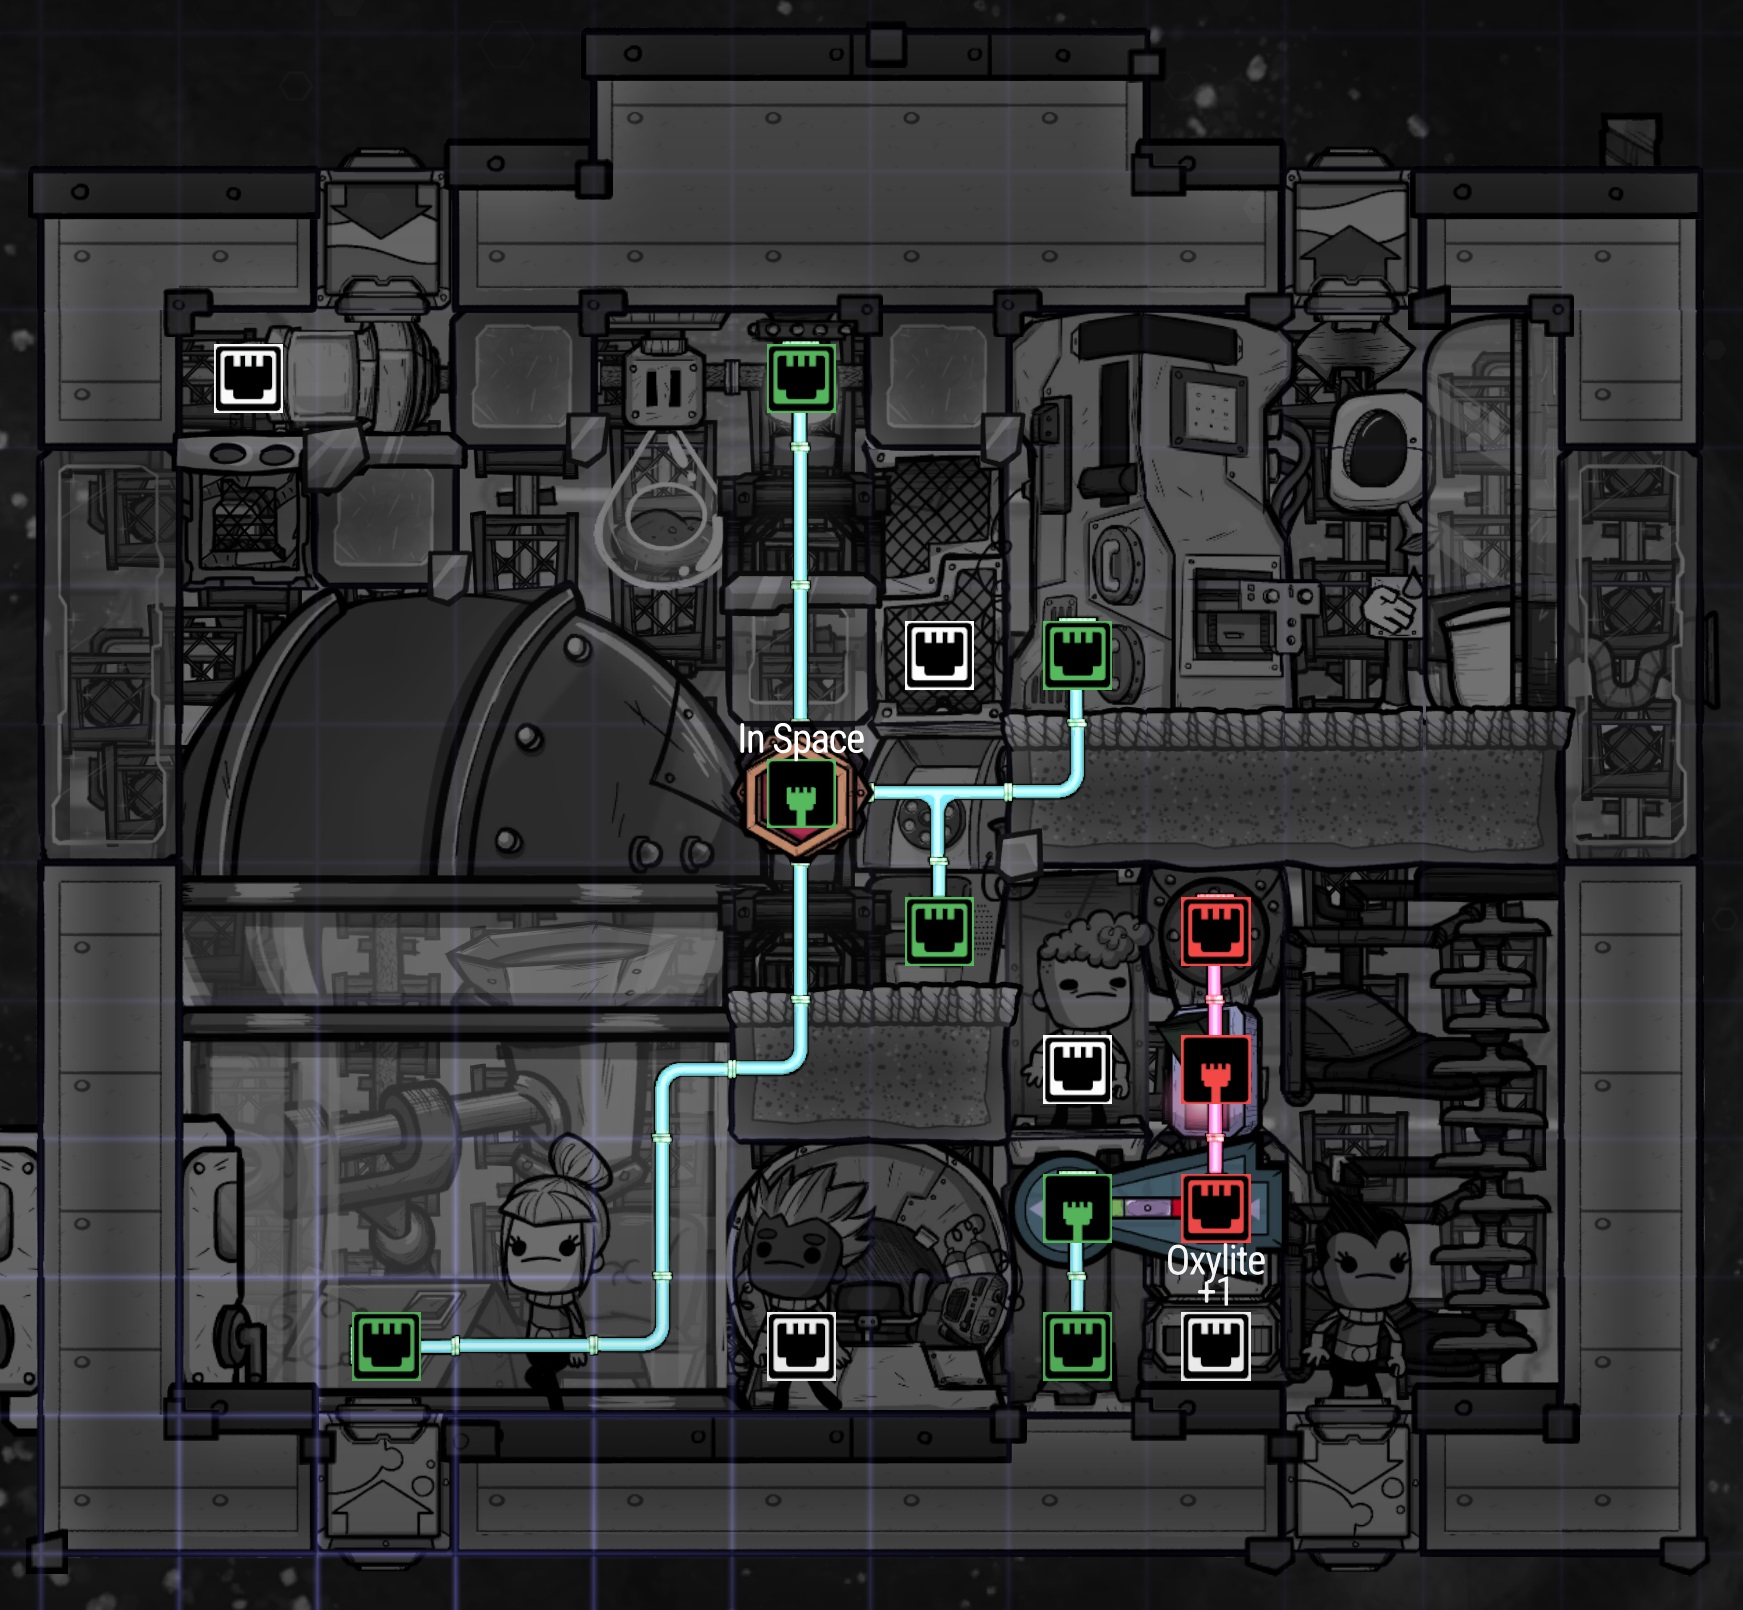
Pickled meal as an example gives a -1 morale from low food quality. This combines with the great hall's +6 for a total of +5 morale. Alternatively, the phone can be replaced with a refrigerator which downgrades the great hall to a mess hall with only +3 morale. Combining this +3 with any fresh food giving a +2 morale bonus or higher would be as good or better than the great hall with pickled meal. This opens up many options for foods like omelettes (+4) or barbecue (+8) that would otherwise spoil too fast if left on the floor. Long story short, while we *can* obtain a great hall in this rocket, unless you're cooking berry sludge it may not be the optimal solution to maximize morale.
7. Thank You!
Thank you for reading this guide and I hope you found something worthwhile to take away from it!
I also want to extend a second thank you to both Kharnath and Francis John.
Kharnath's Compendium of Amazing Designs has been a staple resource to the ONI community for years, and it continues to be updated with great information. I didn't make use of it in the creation of this particular guide, but I linked to it to help readers learn about mechanical filters. Several of my other guides also point to Kharnath's to assist readers in understanding peculiar game mechanics.
To Francis John I want to say thank you for the fantastic YouTube channel. Even after most of a year away from ONI I still couldn't resist watching your latest playthrough, which turned out to be both the clue and the inspiration I needed to finish and publish this 8 month old, half-written guide. Whether its Rimworld, Prison Architect or of course ONI, I've been a long-time subscriber and thoroughly enjoy watching my favorite games get completely broken :) If you aren't following this channel, you're really missing out!

Link: https://www.youtube.com/@FrancisJohnYT
BONUS - Mapping Rocket
This rocket was originally known as research rocket "Large D" in the statistics, but it never really fit the role of a research rocket. It did not contain an orbital data lab and was designed to support only a single duplicant rather than two.
My idea was to repurpose the module on a late game rocket with plenty of range that could fly to far corners of the universe and conduct extended mapping missions. Orbital research should be long finished by that point and by bringing only a single dupe the use of food, oxygen, water, etc. is halved, allowing for longer missions. There's also a lot more space for radiation shielding.
The design is shown below as an honorable mention: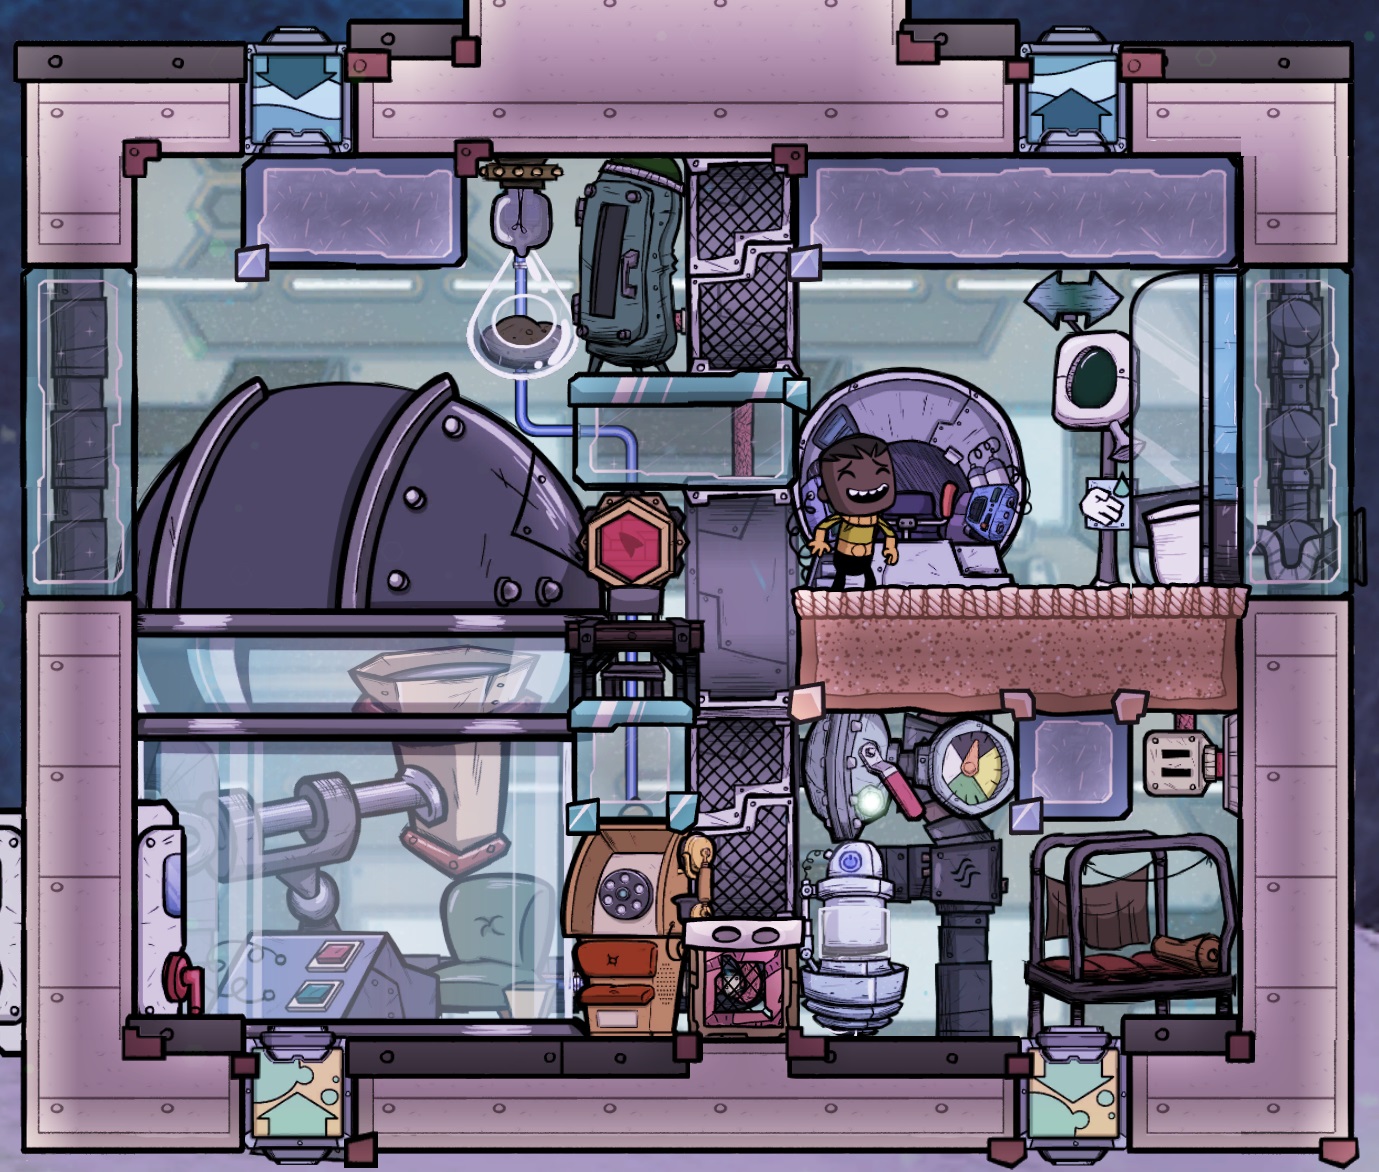
Construction of this design is very similar to the large research rocket above, using temporary ladders to build high before installing the scope. In fact I would recommend moving the mini pump to the upper left corner and deleting the filter as shown in the previous design. This would recover 1 point of morale from the barracks at the cost of needing a different solution to remove your CO2.
In the late game this rocket would probably be carrying multiple fuel and oxidizer tanks in order to achieve maximum range, and will most likely be using oxylite as the oxidizer. Relying on a gas cargo canister for oxygen may exceed the maximum rocket height and certainly doesn't leave much room to carry anything else. In addition, if you're already manufacturing oxylite as oxidizer, it makes sense to use more in the cabin to provide oxygen, either via bin or rail. There is room in the barracks and washroom to accommodate either of those solutions, either instead of or in addition to the mini pump already shown.
BONUS - Solo Nosecone
In the main guide I described why I don't recommend ever using solo nosecones for your rockets. Even so, I did a lot of testing to try and find a layout that could work.
Admittedly what I'm about to show doesn't make much sense in-game. If you have plastic and mechatronics engineering you don't need to worry about mini research rockets, you can obviously build a real spacefarer module. A more practical solo nosecone might contain a hamster wheel, an outhouse and an orbital data lab to eek out those first few bits of research.
In any case, it was a fun exercise to see how far I could push the limits of this enclosed space, and I wanted to share what I felt was the best of my designs: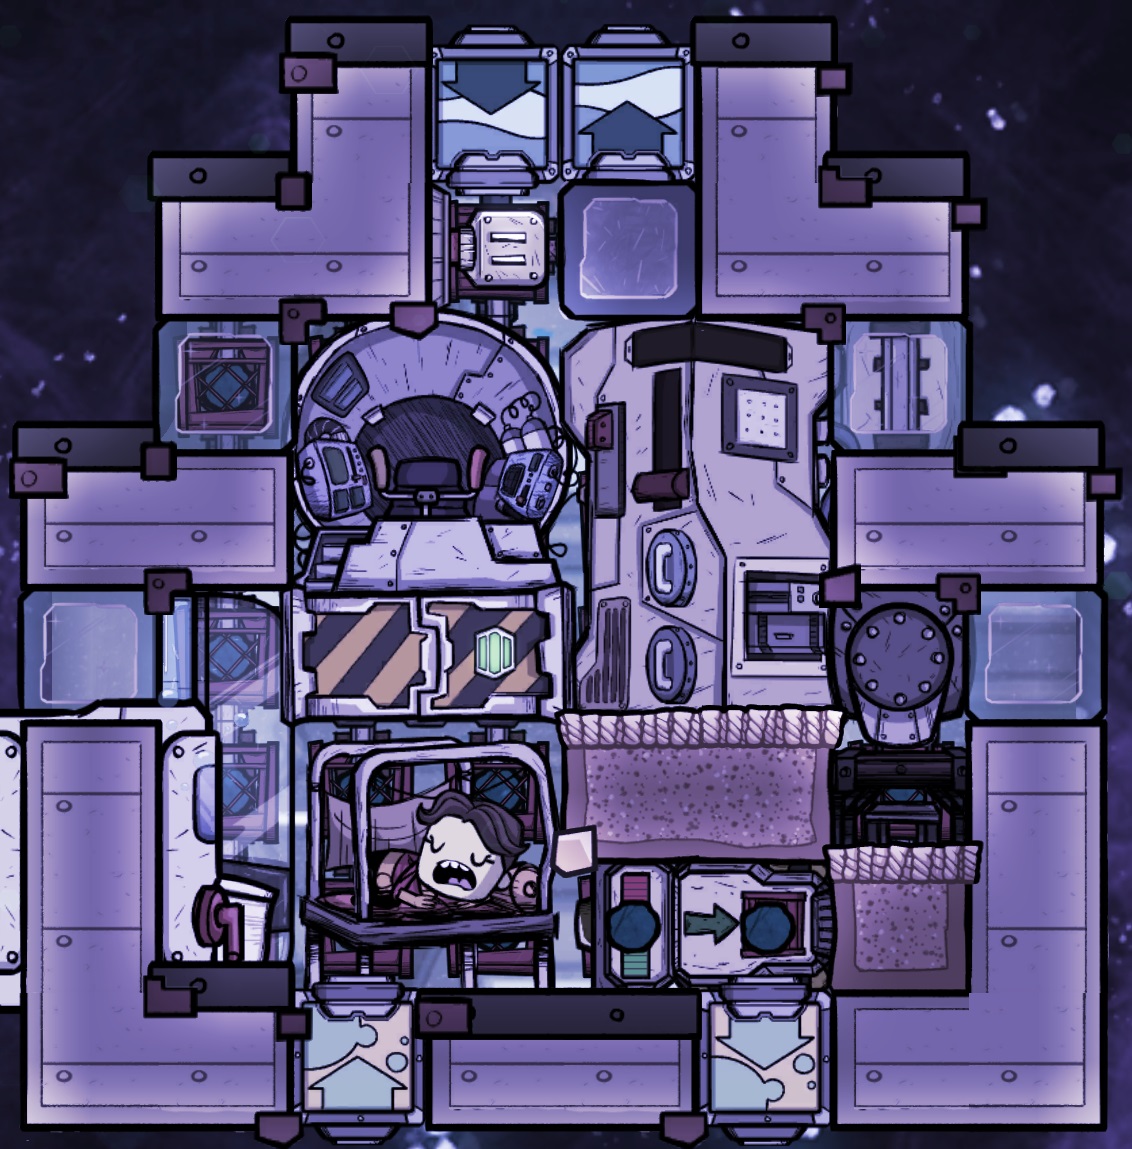
This design provides a mess hall for +3 morale, which I believe is the highest possible morale in a solo nosecone. It uses an oxylite rail for both O2 supply and CO2 deletion, with about 45 rail segments providing enough oxygen for about 31 cycles for the single duplicant. There's no room for the automation switch to replenish the rail, so instead you have to manually enable and disable the chute to refill the loader.
The estimated radiation exposure is 47.4 rads/cycle, which is extremely livable. There is no ceiling light, however one could be installed in place of the single tile of radiation shielding to provide the lit workspace bonus to all three of the orbital data lab, pilot station and mess table. This would increase the estimated rad exposure per cycle to 136.1 so on the highest difficulties you'd require some kind of radiation pills, radiation resistant food, or a second bathroom break.
Speaking of food, there's no room for a fridge so the expectation would be to store high shelf-life food on the floor, along with the plastic being used in the orbital research lab. I don't see anyone getting any use out of this design in-game, but it was fun and it seemed a waste not to share.
- ONI - Surviving the Early Game★ 5 (2.4k)83k views6.3k ♥54 minUpdated 6 Aug, 2019
- Useful Construction Patterns★ 5 (1.8k)74k views5.2k ♥66 minUpdated 29 Aug, 2020
- 10* things I wish I knew sooner...★ 5 (754)58k views1k ♥4 minUpdated 6 Oct, 2017
- ONI - Surviving the Mid-Game★ 5 (1.3k)44k views3.8k ♥150 minUpdated 6 Sep, 2019
- Not Quite Beginner's Guide★ 5 (361)32k views1.1k ♥91 minUpdated 26 Mar, 2023
- Руководство для начинающих. (ОСНОВЫ)★ 5 (629)32k views1.2k ♥21 minRussianUpdated 20 Apr, 2019





- Upgrading to PremiumTeam Fortress 2★ 5 (20k)1441k views11k ♥6 minUpdated May 11, 2022
- No More Room in Hell Official ManualNo More Room in Hell★ 5 (2.8k)569k views2.1k ♥29 minUpdated Apr 22, 2019
- NMRiH Community Hosting GuidesNo More Room in Hell★ 5 (526)351k views653 ♥1 minUpdated Aug 10, 2022
- How to 'Git Gud' Soon™MORDHAU★ 5 (2k)318k views3k ♥68 minUpdated Nov 16, 2024
- Лучшие кооперативные игры SteamPAYDAY 2★ 5 (1.5k)315k views2.1k ♥56 minRussianUpdated Apr 27, 2025
- Desert Eagle Heat Treated | Blue GemCounter-Strike 2★ 5 (1.6k)293k views1.5k ♥2 minUpdated Jan 16





This guide was created by its original author on the Steam Community. Are you the author and want it removed? Request removal.