Part 2: Vault Symbols, ECHOs, and Other Collectibles Location Guide
Research & Development: Vault Symbols

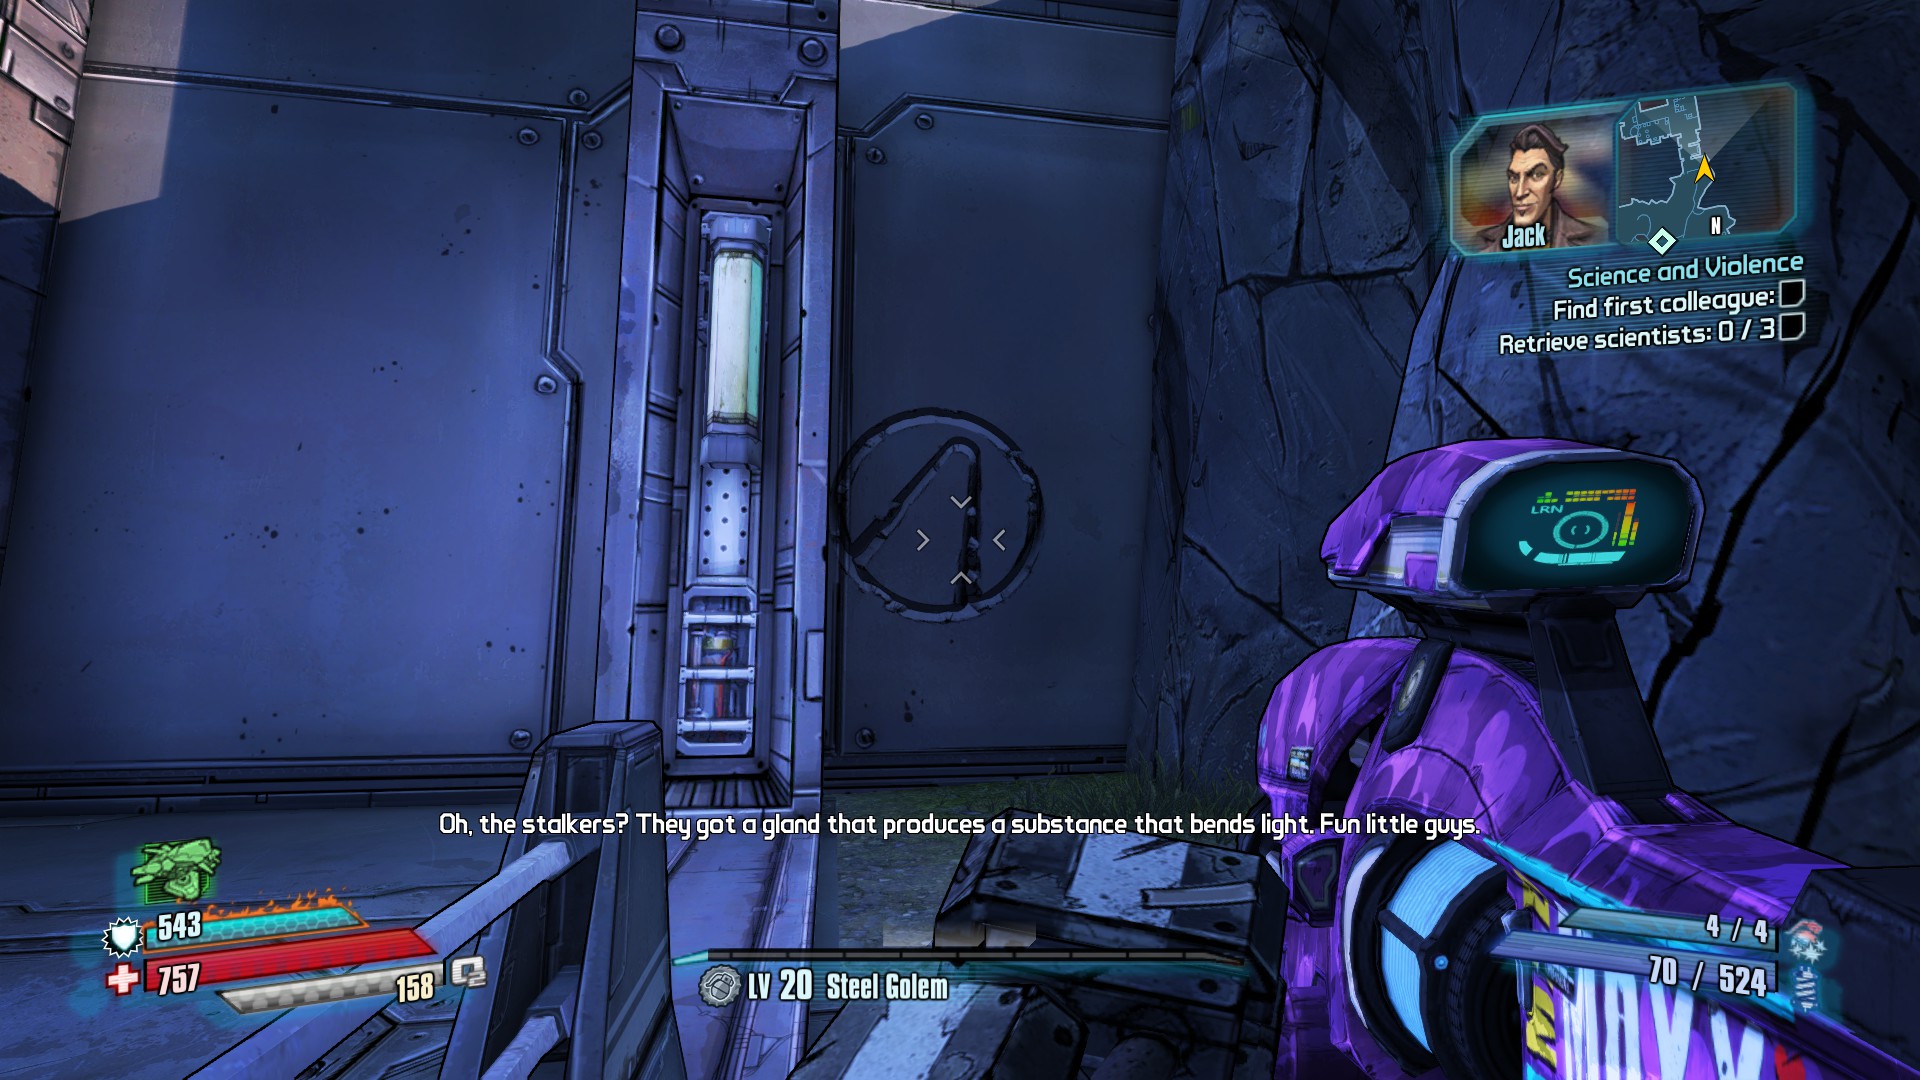 2. The second symbol is found shortly after entering the Aquarium. From Dr. Torres, enter the main aquarium and turn right to head south. You'll go down a small ramp and be attacked by torks. Turn around and look at the wall just west of the ramp.
 3. The last symbol is found at the end of the level when you fight the named stalker. Go to the northeast section of the room and check the east facing walls to find this one.

Research & Development: Slam Pads
***NOTE*** The fourth pad cannot be accessed until you have opened an area during the side mission "Lab 19".
Hitting all four of these in one run will open the cage for Benjamin Blue, the skag sleeping near the entrance. Pet him a few times to get him to barf up new toys.

 2. The second is just inside Robotics, hidden behind a map table.
 3. The third can be found in the treasure room in Optics, behind a bank of computers.
 4. This last in Lab 19, hidden behind the control panel.

Research & Development: Security Cameras 1-15
***NOTE*** There may be as many as 36 cameras on this level. I ran through this level at least a dozen times and had documented 31 distinct cameras when I got the challenge to complete. Any missing are purely my human error and wanton use of grenades when bored. Please feel free to let me know about any I have missed.
You must destroy all of the cameras on the level in one go. The camera that dropped the challenge complete message was one I had destroyed earlier in making this guide, but that I had re-spawned by restarting the level to test this.
If I'd realized it was going to be this much work for 5 challenge points, I might not have bothered to make a guide for them.
When you get close to a camera, you will hear a faint whir of servo motors followed by a quiet beeping. The camera will start to track you and the LED on the front will change from green to red. This makes them a little easier to find.

 2. The second camera is very near the first. Just slide around transport cage and look up at the wall past it. The camera is to the left of the enclosure with the giant mushrooms.
 3. The third camera is just north of the mushrooms, near a number of skags and stalkers in vats.
 4. The fourth camera is just west of the prior, on a beam illuminated by a blue light.
 5. The fifth is in Advanced Propulsion to the south, up to your left after entering.
 6. The sixth is to the north near where Gladstone is hiding. Look up to your right before entering the room to talk to him.
 7. The next will be just after you enter the Stalker Biome, up to your right.
 8. Continue around to the right and look up the ramp to find number eight.
 9. Look to the north from eight and your will see 9 on a lamp post.
 10. Over the cliff is a door, behind which is Dr. Langois. The camera is to the left of the door.
 11. This camera is on the lamp post just off to the northwest; hidden on the back side.
 12. As you head north, this one will be on a lamp post to your right as you come up the ramp.
 13. The next will be to the right of the waterfall.
 14. This one can be found before the door to the lab at the north end of the area. It is on a pillar out above the cliff face.
 15. Fifteen can be found in the Observation Room 11-B, where you get the photo. It is up to the right just after entering.

Research & Development: Security Cameras 16-32
Apparently there's a character limit for subsections and the camera guide hit that. Here's part 2, starting with the Aquarium:
16. Next up is as you enter the Aquarium area and get attacked by Torks. It's up to the left of the windows you can see Dr. Torres through.
 17. This camera is after the left of the door to the main Aquarium, on the right at the end of the gantry.
 18. From the last camera, slide back south and look across at the fish tank on the far wall. The camera is near the southwest corner of the tank. (About at the Custom Objective marked.)
 19. Walking south along the path, this camera will be facing you as the path wraps back north in a 'U' shape.
 20. If you look down off the ledge from #18, you will see water coming out of the wall. It is possible to carefully drop down into this spot, which will also complete the "Leap of Faith II" challenge. The camera is then ahead on the left.
 21. This one is right when you afirst encounter Lost Legion, on the upper terrace at the south end of the room.
 22. On the way from the previous one to the northeast corner of the map, look to the left wall of the hallway.
 23. This one is in the most northeast part of the actual complex. You will find it in the middle of the room on the side of a computer console area.
 24. In the gantry that leads from the northeast part of the complex to the northwest, you will find this one on a support pillar.
 25. This is found on a corner just before the room that lets you drain the Aquarium.
 26. This camera is right after you enter the Robotics area.
 27. After you deal with the stalkers in the first room, keep an eye to your left as you head up the first ramp.
 28. As per the last, keep an eye to your left as you head up the second ramp.
 29. In the room with Dr. Grayson, check the left wall of the hallway before you head south.
 30. On the left as you enter Synaptic Processing. There will be an audio message from Jack that starts when you enter.
 31. On the north end of the main room of where you fight the named stalker.
 32. On the east end of the main room where you fight the named stalker.

Research & Development: Data Consoles
Collecting all five of these consoles unlocks the challenge "Data Recovery". They may be available when you first get to the area, but might also require progressing the story. More on that when I can test it.
1. The first of these consoles is in the skag-tube area at the start, on the north side of the room looking back towards Propulsion Testing.
 2. The second is located at the south end of the Aquarium, near where you enter the area.
 3. The third is in Dr. Torres' room, after you complete the Aquarium.
 4. The fourth is in Robotics, in front of the two giant yellow Loaders.
 5. The last is in the boss area of Optics, just south of the treasure room.

Veins of Helios: Vault Symbols

 2. The second symbol is in the series of rooms connected by a long vertical shaft. You will have to access it by dropping from the top of the shaft. If you start from the room that has air, it is the first accesible room. Just slide north to exit where you want to be. The symbol will be facing you, just a bit up to the left.
 3. From the last symbol, drop down one level and exit to the vacuum. There will be a worker bot moving a large floor plate with two octagons cut out of it. Jump on the plate and ride to where it stops at the north. If you look north off the edge, you will see a treasure chest and a blue jump platform within easy jumping distance. Jump down there. From the treasure chest look east and the symbol be on the right.
 4. The fourth symbol is located on a platform just above Central Maintenance. The platform has two blue jumps that are used to access the Supply Platform and Remote Access Platform. The symbol can be found on the north side of the platform, on the north facing wall of a tank structure.
 5. The last symbol is found after you complete Central Maintenance. After the airlock, there is a green jump platform. Instead of using it, jump off to the northwest enough to get around the corner of the building in front of you. Once you're past the corner, turn and boost back in so you land on the lip that runs along the north face. The symbol is in the center of this wall facing north.

Veins of Helios: Lazlo ECHOs
***NOTE*** These are not available until you have started the side mission "Trouble with Space Hurps", which is available after the story mission "Eye to Eye" and side missions "Quarantine: Back on Schedule" and "In Perfect Hibernation". They must be picked up during the mission. They look like standard ECHO recorders, but will have a green interactable hue rather than a white item spike.
I believe it doesn't matter what order you grab these in and the sequence of messages will be the same.

 2. The second is in the same room, on the second floor of the west side. Look on the floor just south of the red machine.
 3. In the room just north of the airlock, head north enough to get past the sheet metal welded to the railing. Look east at the red duct work leading down to a machine. The ECHO is on top of the machine next to the duct.
 4. The fourth is in the brain bug room. Head west from the entrance along the upper level and then jump onto the fan on the west wall. The ECHO is on top of the fan motor.
 5. The last is in the brain bug room, underneath the ramp on the north side and on a pile of trash.

Veins of Helios: Worker Bots
***NOTE*** These are not available until you have finished the story mission "Eye to Eye" and side mission "Quarantine: Back on Schedule".
1. At the initial airlock, take a right and head north. It will be right in front of you.
 2. Head all the way west from the initial airlock to the first blue jump pad. That will toss you down to a small platform with the first worker bot panel.
 3. For the third bot, take the blue jump pad back to the main area. Head north and drop all the way to the bottom level and you'll find this bot.
 4. The fourth bot is on the Remote Access Platform. This can be reached by a green jump pad on the central platform, or by jumping off the platform with the first.
 5. The last bot can be found just west of the access to the quarintined zone.

Veins of Helios: Jump-Pads
Green 1. This is just after the airlock; it is the pad you can use to bounce back up to it after dropping off the pipe.


Blue 1 & 2. Head to the west end of the area without dropping off the building. The first pad will bounce you out to a remote platform. The second is right next to where you land on the platform and will bring you back.


Blue 3. Carefully drop off the roof northeast of Blue 2, aiming to land on the platform being moved about by the worker bot. When the platform is at the north position, the jump-pad is just north of you. Alternatively you can try to boost here from Green 5, but I find that tends to be just as tricky as catching the platform.


Green 2. At the very bottom of the area, this jump-pad will take you up to Green 3.


Green 3&4. This sequence of pads will boost you up to the central platform.


Green 5. On the north side of the central platform, this will boost you back near Green 1.


Blue 4. Located at the south end of the central platform, this will shoot you straight up to access the platform above.


Green 6. Look down from the central platform and you will see Green 6 in front of Central Maintenance. It sends you back to the central platform.


Blue 6-9. Jump west from the central platform and land on top of the western building. Ignore the southern jump (Blue 9) for now and take the northern (Blue 6) instead. This will boost you to the Supply Platform. Find 7 there to send you to the Remote Access Platform. Use 8 there to get back to the central platform. Now head back and take the southern Blue 6 jump. This will take you back to the Remote Access Platform. Use Blue 8 to return to the central platform.

Green 7. Head back over to the western building, but this time do a slow long jump off the north side. This will take you to the access for the Quarantine Zone. Green 7 returns you to the building west of Central Maintenance.


Blue 10-12. From the central platform, get on top of the building west of Central Maintenance. Head across the rooftops to the building east of Central Maintenance. Blue 10 is on the west end. It will take you to Blue 11. Head a bit west from where Blue 11 drops you to the Communication Array. Blue 12 takes you back to the eastern building.


Green 8. This pad is on the north side of Central Maintenance and will boost you across to the western plasma core.


Green 9. After taking Green 8, drop off the side to the lowest level. This pad will take you back up to Green 8.


Green 10. From Green 8, head east a bit. This pad will take you over to the eastern plasma core.


Lunar Launching Station: Vault Symbols

 2. From the entrance to Launch Control, head east and down the stairs. Follow the platform northeast and you will come to a room with a large pipeline suspended above it. Jump onto the pipeline and follow it to where it terminates in the north wall, where you will find the symbol.
 3. This last symbol is a bear to get. It took me three lives and eight attempts to get the timing right. From the entrance to Launch Control, head down the elevator to the Laser Amplification Nexus. Make sure to tag the savepoint next to the elevator. Fight your way north to Helios Targeting Centrum. Use the yellow supports to turn around and go south through the upper door. After a small room, there will be an opening overlooking the glowing core in the Nexus. There are a three metal walkways suspended between the pipes. A well timed double jump is needed to progress between them. The symbol is on the roof above the third. (Viewpoint from the right screenshot is near the save point, which is underneath and to the south.)

Vorago Solitude: Zarpedon ECHOs
All of the ECHOs are found in the vertical middle of the map.
1. The first ECHO is simple. Just look left of the Nurse Nina vendor at the entrance to see it sitting on a crate.
 2. The second ECHO is down the hill to the south, next to a container between two large buildings.
 3. Cross the central bridge towards the Legion base. There is a small building to the southwest with an air bubble. The ECHO is inside, on a crate to the left of the door.
 4. This ECHO can be found in the Legion base, just after the first gate. Look for a building with air to the southwest. The ECHO is on a table in the southeast corner.
 5. This ECHO is in the Lost Legion base at the south center of the map. Head west to the Eridian obelisk and then north up some steps into a building with air. The ECHO is on a table to your left.
 6. The last ECHO can be found at the bay windows overlooking the Vault, just before the elevator out. It is on the second floor in the southeast corner.

Vorago Solitude: Telescopes

 2. On the west side of the map, head towards the northern O2 generator. You'll find this on an overlook to the south of the generator, next to jump-pad.
 3. This telescope is in the southwest corner of the map, near a side mission marker, overlooking the Vault crater.
 4. This one can be found in the southeast section of the map. There's a medium sized building there with stairs leading up the outside. The scope is on the upper floor looking out over the cliffs.

Vorago Solitude: Vault Symbols

 2. The second symbol is at the southeast side of the map. There's a medium sized building there by the cliffs. The symbol is on the east facing wall.
 3. The last symbol is found in the Legion camp, just past the gate. There's a series of buildings on the south side of the camp. Swing around back and you'll find this on the south face of one between the building and the wall.
Vorago Solitude: Eridian Artifacts
All of the Eridian Artifacts are found on the west side of the map.
1. The first is found just after crossing the western bridge. Look to your southwest and you'll see two guys standing outside a tent building. These are the NPCs Sterwin and the Master Poacher; the artifact is on a crate next to Sterwin.
 2. From the first, look off to the southeast. There is a series of buildings on a hill outside the walls of the Legion base. The artifact is on a crate in the middle of the buildings.
 3. Head northwest of Sterwin to find the third artifact. You'll see a glass enclosure that looks like a car port. (It's an archaeology canopy to protect from storms.) Underneath it is a recessed room with an air bubble. Drop in and check the computer console in the southeast corner.
 4. In the northwest part of the map, there's a platform overlooking the northern O2 generator with a telescope and jump-pad. The artifact is on a crate just south of the overlook.
 5. Head to the extreme northwest of the map. There's a road that leads up and to the northeast before curving east. The artifact is on a crate where the road ends.

Tycho's Ribs: Vault Symbols


2. Ride the third rising platform, down by the southwest spur. It is identifiable by not having an orange forcefield at the top, for one. It will transport you to a new area worth seeing all for itself. The symbol is in the center room, at the top of the area, on a north facing wall.


Tycho's Ribs & Elseer: Corporal Best ECHOs
Though the challenge says these are in Tycho's Ribs and Elseer, only one is in Tycho's Ribs.
Tycho's Ribs:


Elseer:
For what it is worth, the order I found these as I played was 2,3,1,5,4, 6. This was mainly due to some areas being dead ends. However, after you progress through the level enough to raise the ramps to the inner ring upper level, you have easy access to them all. 1. South end, inner ring interior.

 2. After gaining access the core, head south on the floating platforms. The ECHO will be just inside an inner ring area, on a support pillar.
 3. North end, outer ring.
 4. West end, outer ring.
 5. South end, outer ring.
 6. South side, inner ring, upper area.

Tycho's Ribs: Crystal Skulls
There are 10 Crystal Skulls scattered around the level. Just shoot them to get the point towards the challenge.
1. From the entryway, look at the back right (southwest) corner of the vending machine room. There's a silver glowy thing that kinda looks like a head crab. That's your first Crystal Skull.
 2. In the second room, take a moment to look at the energy emitting pylon in the middle of the main shaft. There's little insets cut out of it. The top one has a skull nestled in the bottom.
 3. In the second room, as you start heading down the ramp towards the elevator platform, look northwest to find this one on the back of a crystal formation.

4.In the north-eastern spur of the area, this skull can be found in the second alcove on the right, on the upper floor.

 5. In the south-eastern spur, there are two ramps that lead up from the center to the walls. The skull is at the end of the one leading to the northwest.
 6. This skull is accessible by riding a lift platform or boosting over, but I found it easy to just use the southern jump pad and shoot it as I flew by.
 7. Take the jump-pad across to the north-western spur, where Z8N-TP is. On entering the room, look to your right (northeast) and see this one against a wall.
 8. This one can be found on the west side on the bottom of the shaft. From the save point, just drop off the edge next to the jump pad. Look south from there to see this one.
 9. Down the southwest passage, it takes a turn to the southeast. The skull is in the northwest corner of the room where it turns.
 10. After you take down the shield, head down the ramp. There's a closed door at the bottom that you have to go over. The skull is behind the energy field above the door..

Elseer: Vault Symbol


Holodome: Vault Symbols


2. The second one is put on the top of a arch, located in front of the arena entrance. Under the holo switch.


- SHiFT Codes★ 5 (4.8k)123k views9.2k ♥3 minUpdated Jul 28, 2017
- Grinder Recipes★ 5 (2.1k)77k views4.2k ♥8 minUpdated Apr 3, 2018
- 100% BL:TPS Achievement Guide - Descriptions, Details and Hints included.★ 5 (1.3k)30k views2.2k ♥15 minUpdated Dec 27, 2015
- "Goddess of the Storm" - An Athena Build★ 5 (482)29k views1.5k ♥18 minUpdated Dec 19, 2016
- R4MB0-TP!!! A Fragtrap Build★ 5 (582)28k views1.5k ♥21 minUpdated Jan 8, 2019
- Vault Symbols, ECHOs, and Other Collectibles Location Guide★ 5 (1.2k)23k views2.5k ♥21 minUpdated Feb 20, 2016




- Upgrading to PremiumTeam Fortress 2★ 5 (20k)1441k views11k ♥6 minUpdated May 11, 2022
- No More Room in Hell Official ManualNo More Room in Hell★ 5 (2.8k)569k views2.1k ♥29 minUpdated Apr 22, 2019
- NMRiH Community Hosting GuidesNo More Room in Hell★ 5 (526)351k views653 ♥1 minUpdated Aug 10, 2022
- ULTIMATE GUIDE FOR GAME DEV TYCOONGame Dev Tycoon★ 5 (5.8k)326k views10k ♥4 minUpdated 23 Jan, 2014
- How to 'Git Gud' Soon™MORDHAU★ 5 (2k)318k views3k ♥68 minUpdated Nov 16, 2024
- Лучшие кооперативные игры SteamPAYDAY 2★ 5 (1.5k)315k views2.1k ♥56 minRussianUpdated Apr 27, 2025






This guide was created by its original author on the Steam Community. Are you the author and want it removed? Request removal.