Play Crysis 64Bit DX10 @ Higher FPS
Use Crysis Warhead Binaries
If you have already done this by following the guide linked below you can skip this section of the guide.
Windows 10 64Bit Guide from Jack of Games
https://steamcommunity.com/id/Mr_AT
But I guess this guide will be a compilation of both his guide and a few other minor tweaks I have come up with during my play through of Crysis 1.
First, you will need to install both Crysis 1 and Crysis Warhead for this part to work.
Once installed you are going to copy the Bin64 folder from Crysis Warhead root directory to Crysis 1 root directory.
To do this right click Crysis Warhead in your steam library and click properties
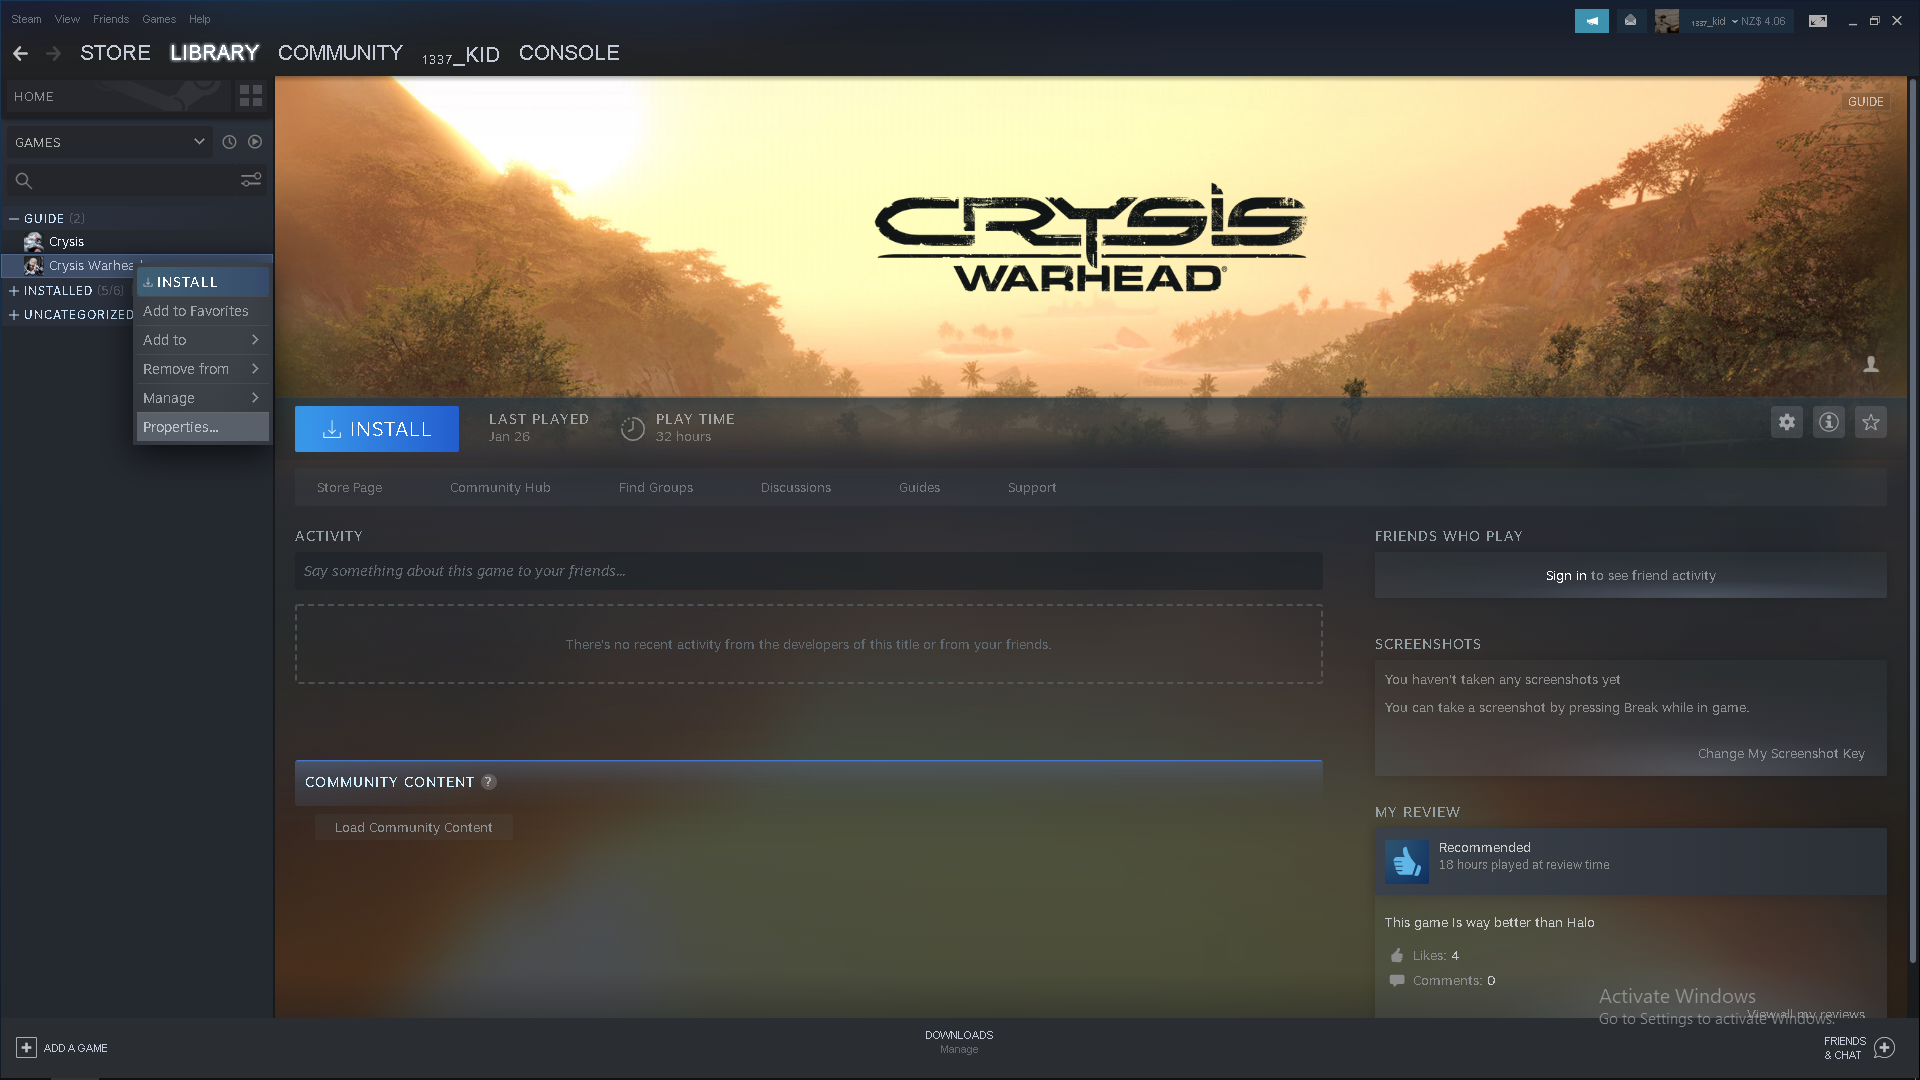
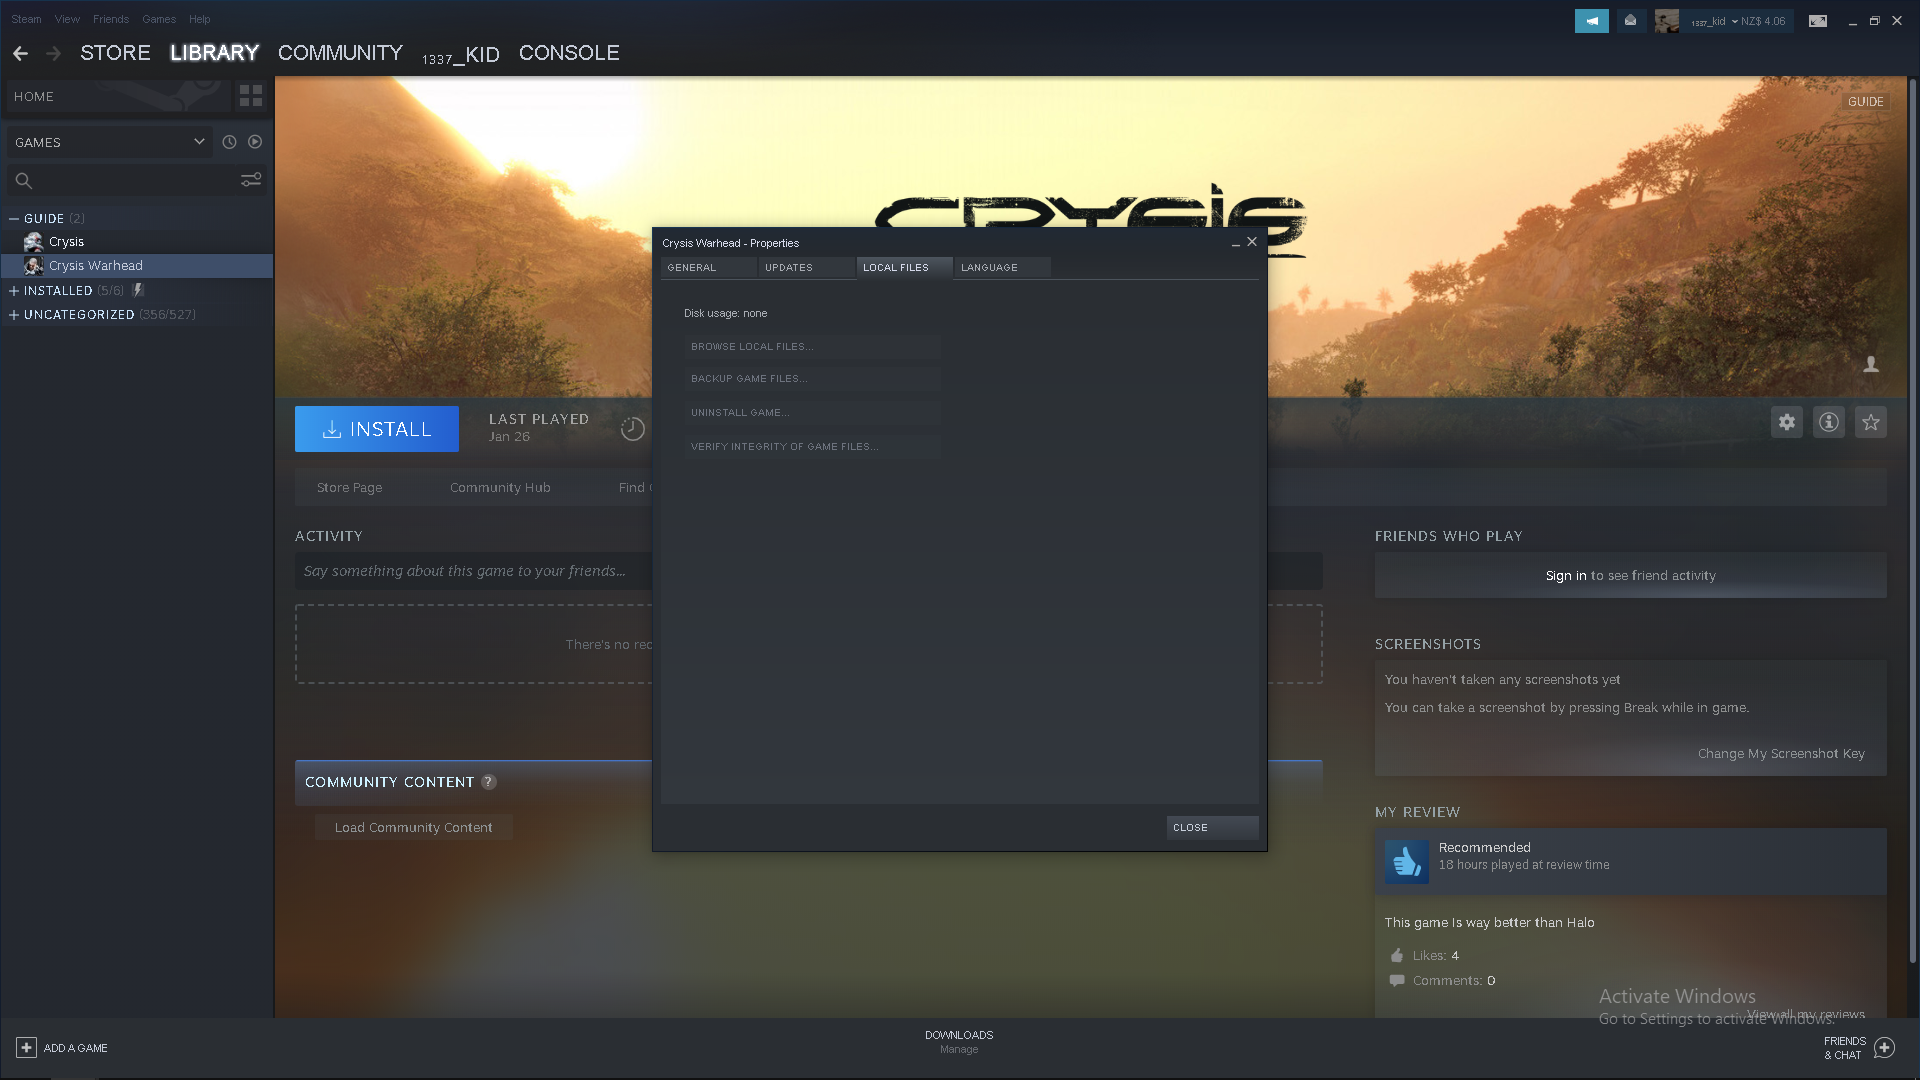
Then click on the "LOCAL FILES" tab and then click "BROWSE LOCAL FILES"
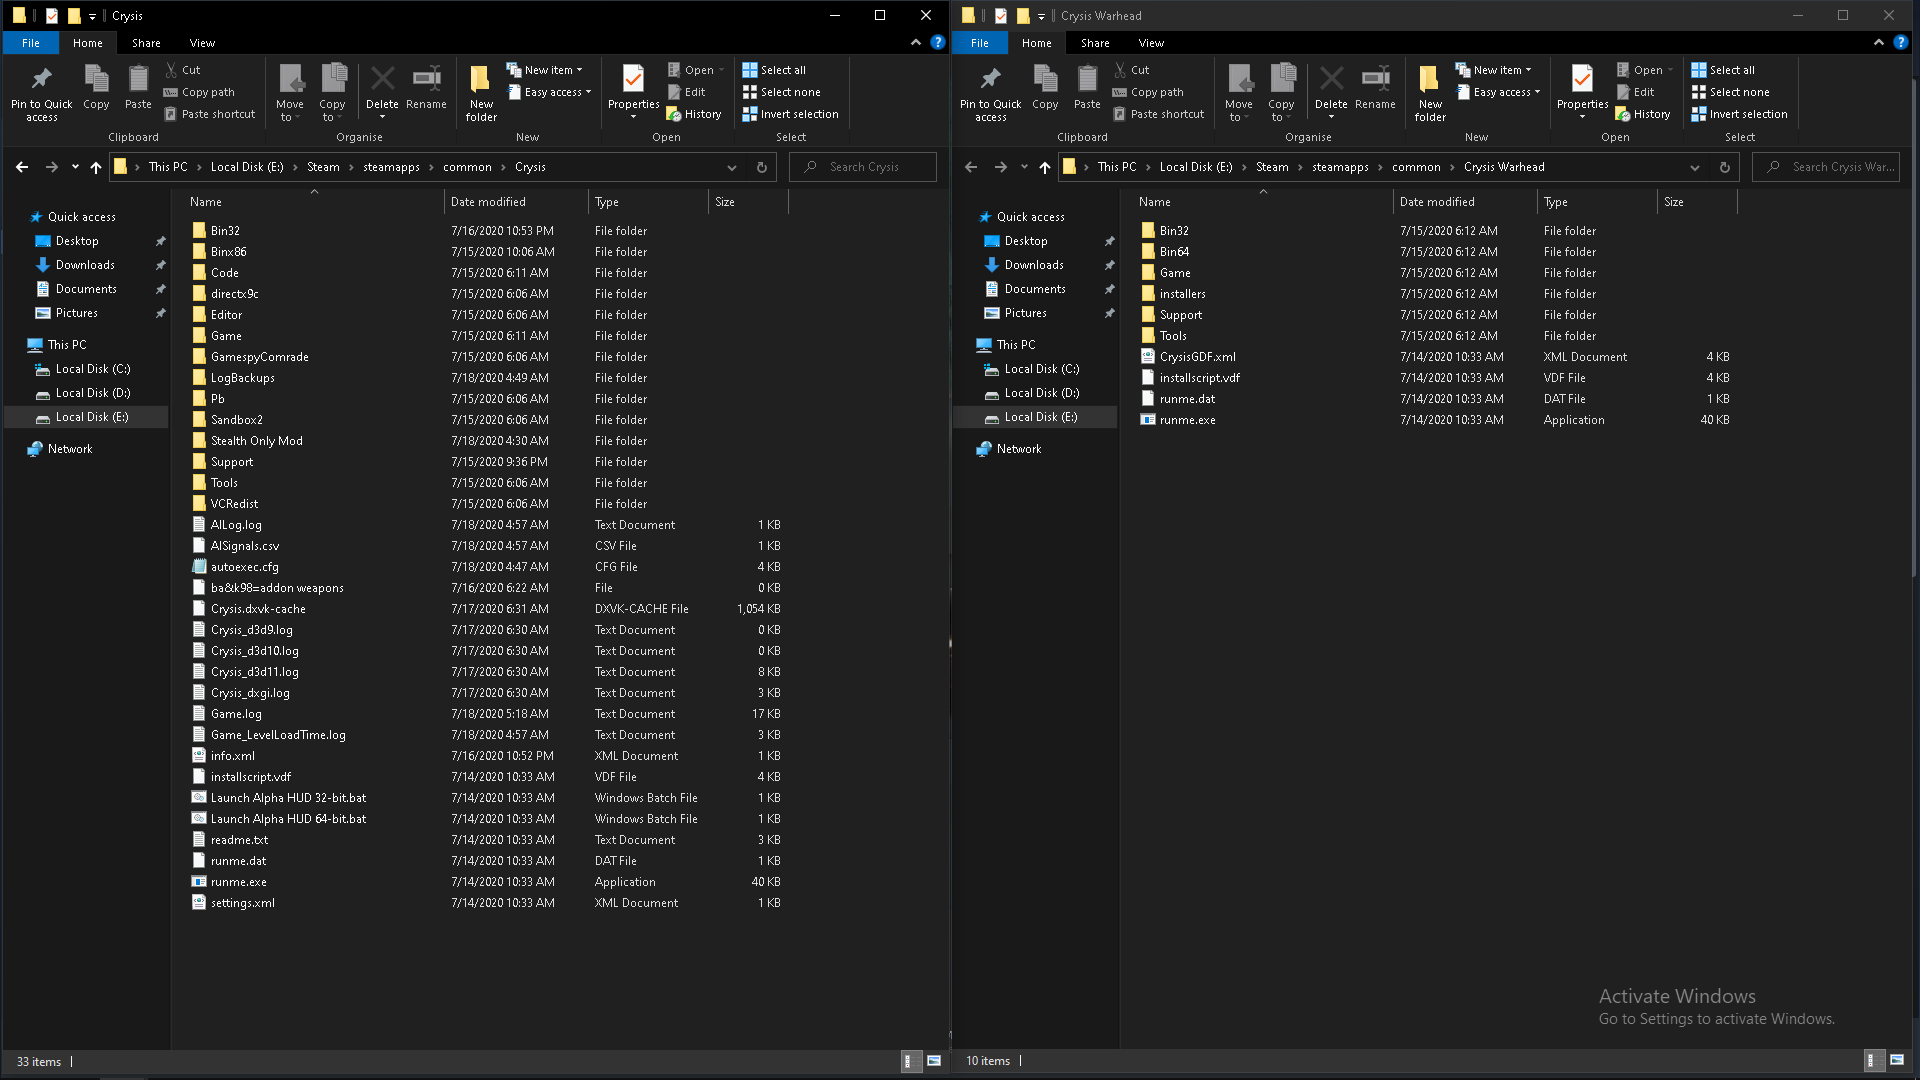
Then you are going to complete the same process with Crysis 1 so you will end up with two folders similar to this:
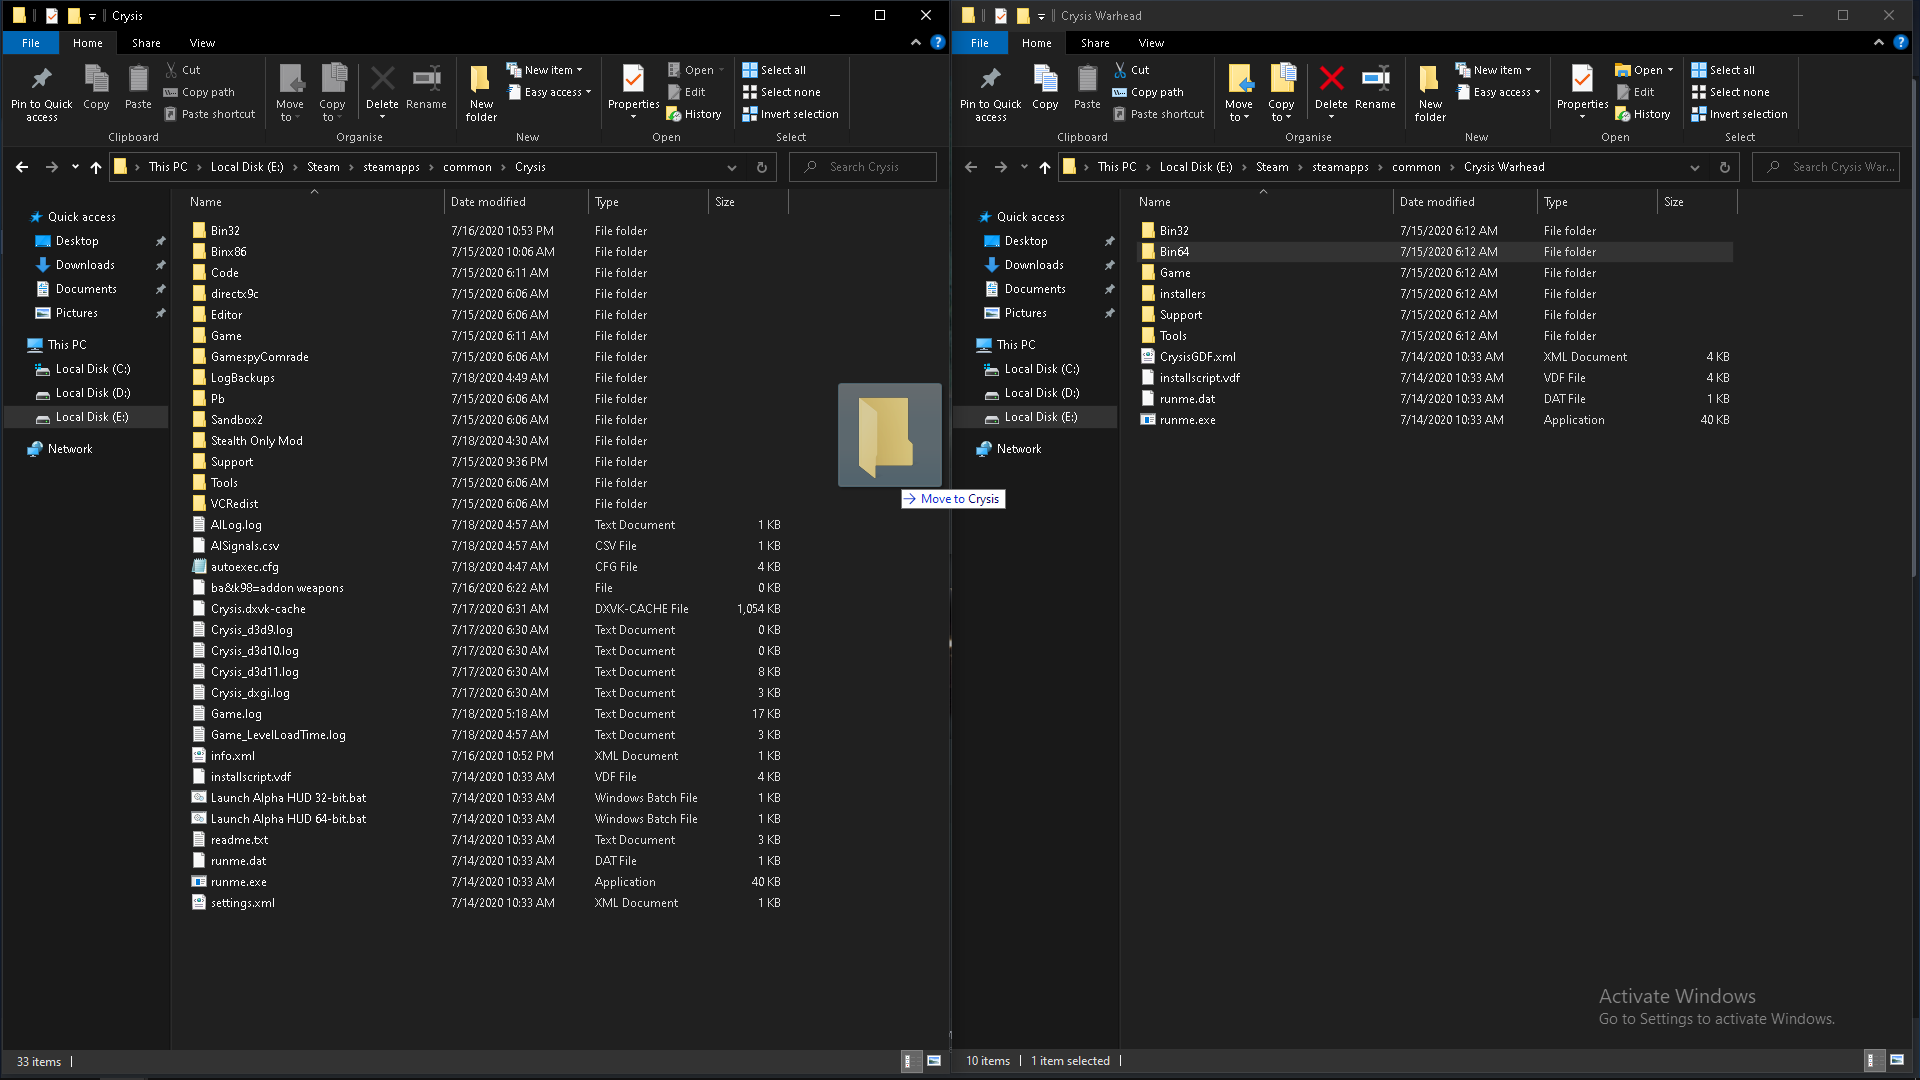
You are then going to want to move or copy the Bin64 from Crysis Warhead to Crysis 1:
Now in the Crysis 1 root directory you are going to want to rename the Bin32 folder to something like Bin32bak or Binx86 (You can rename it anything it doesn't matter)
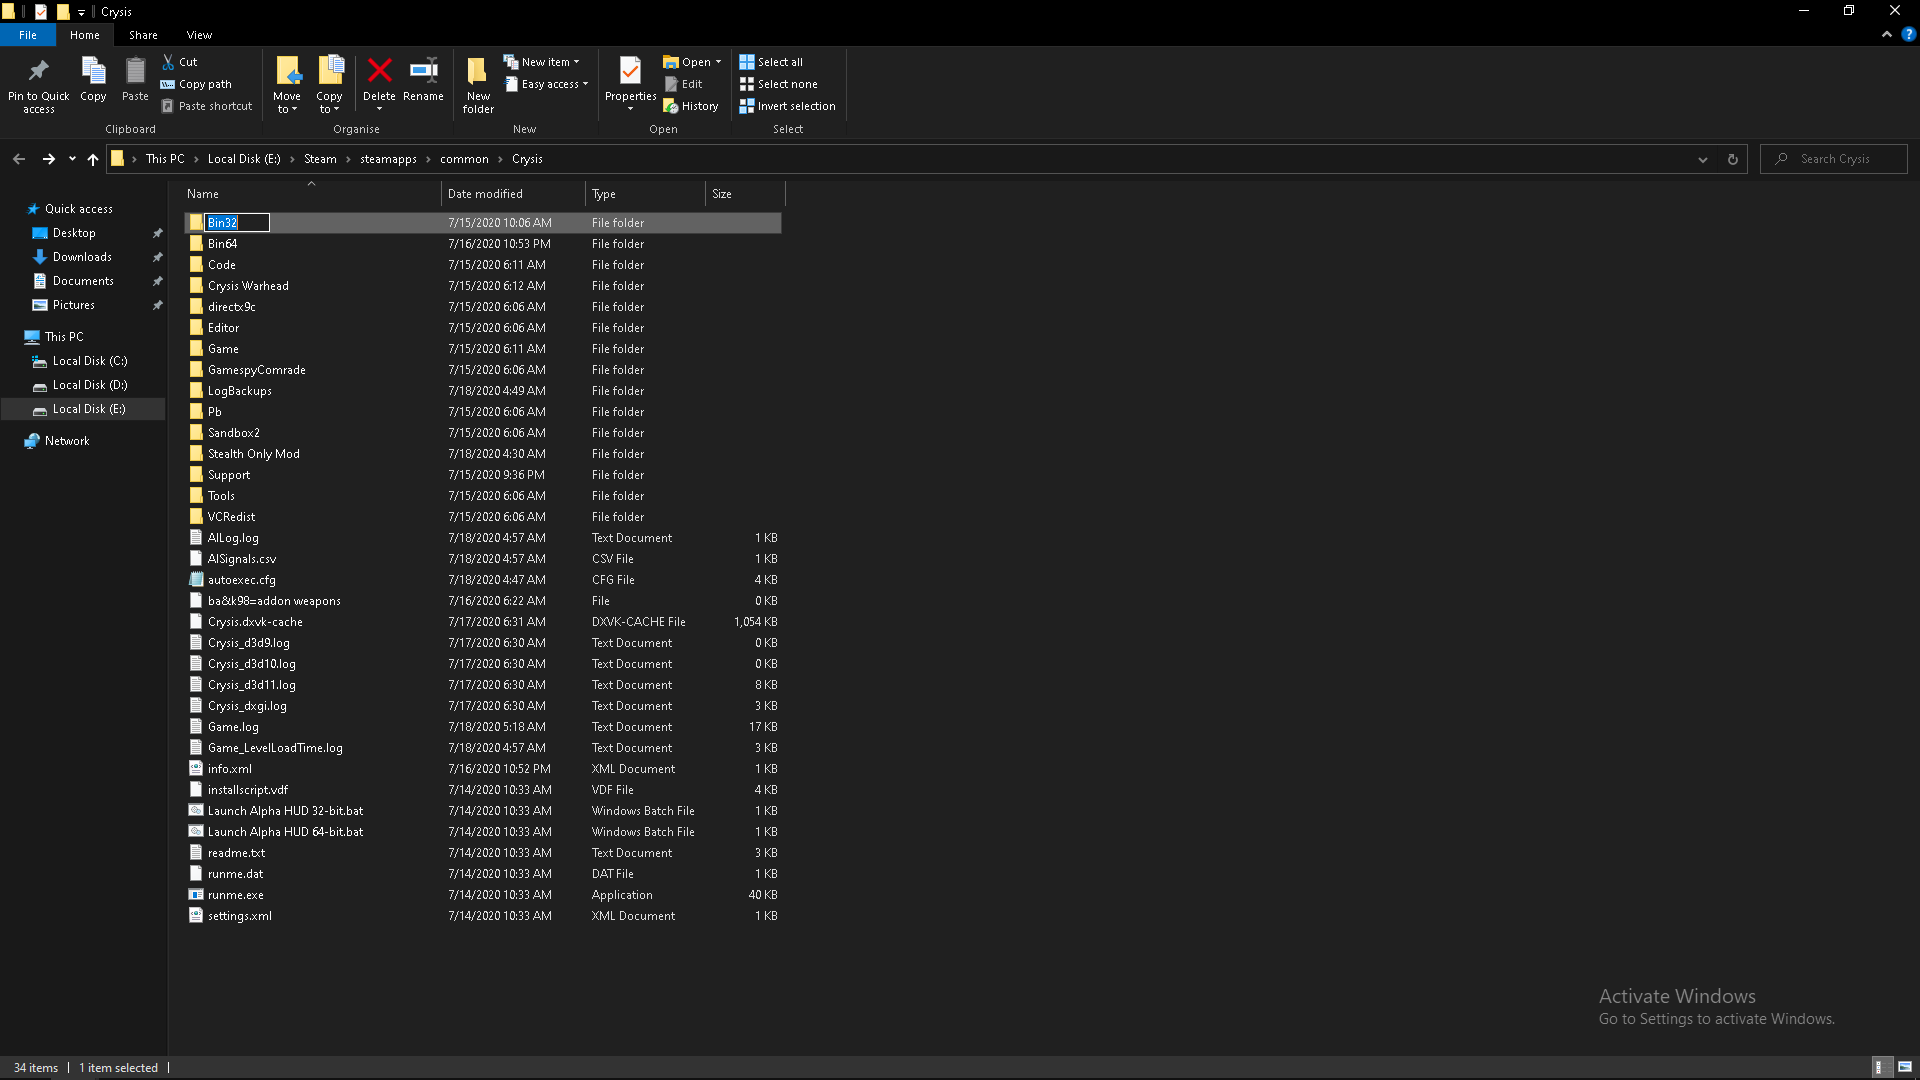
Secondly, in the Crysis 1 root directory rename the Bin64 folder you just copied over to Bin32
Go into the newly renamed Bin32 folder and rename Crysis.exe to Crysisbak.exe (Or anything)
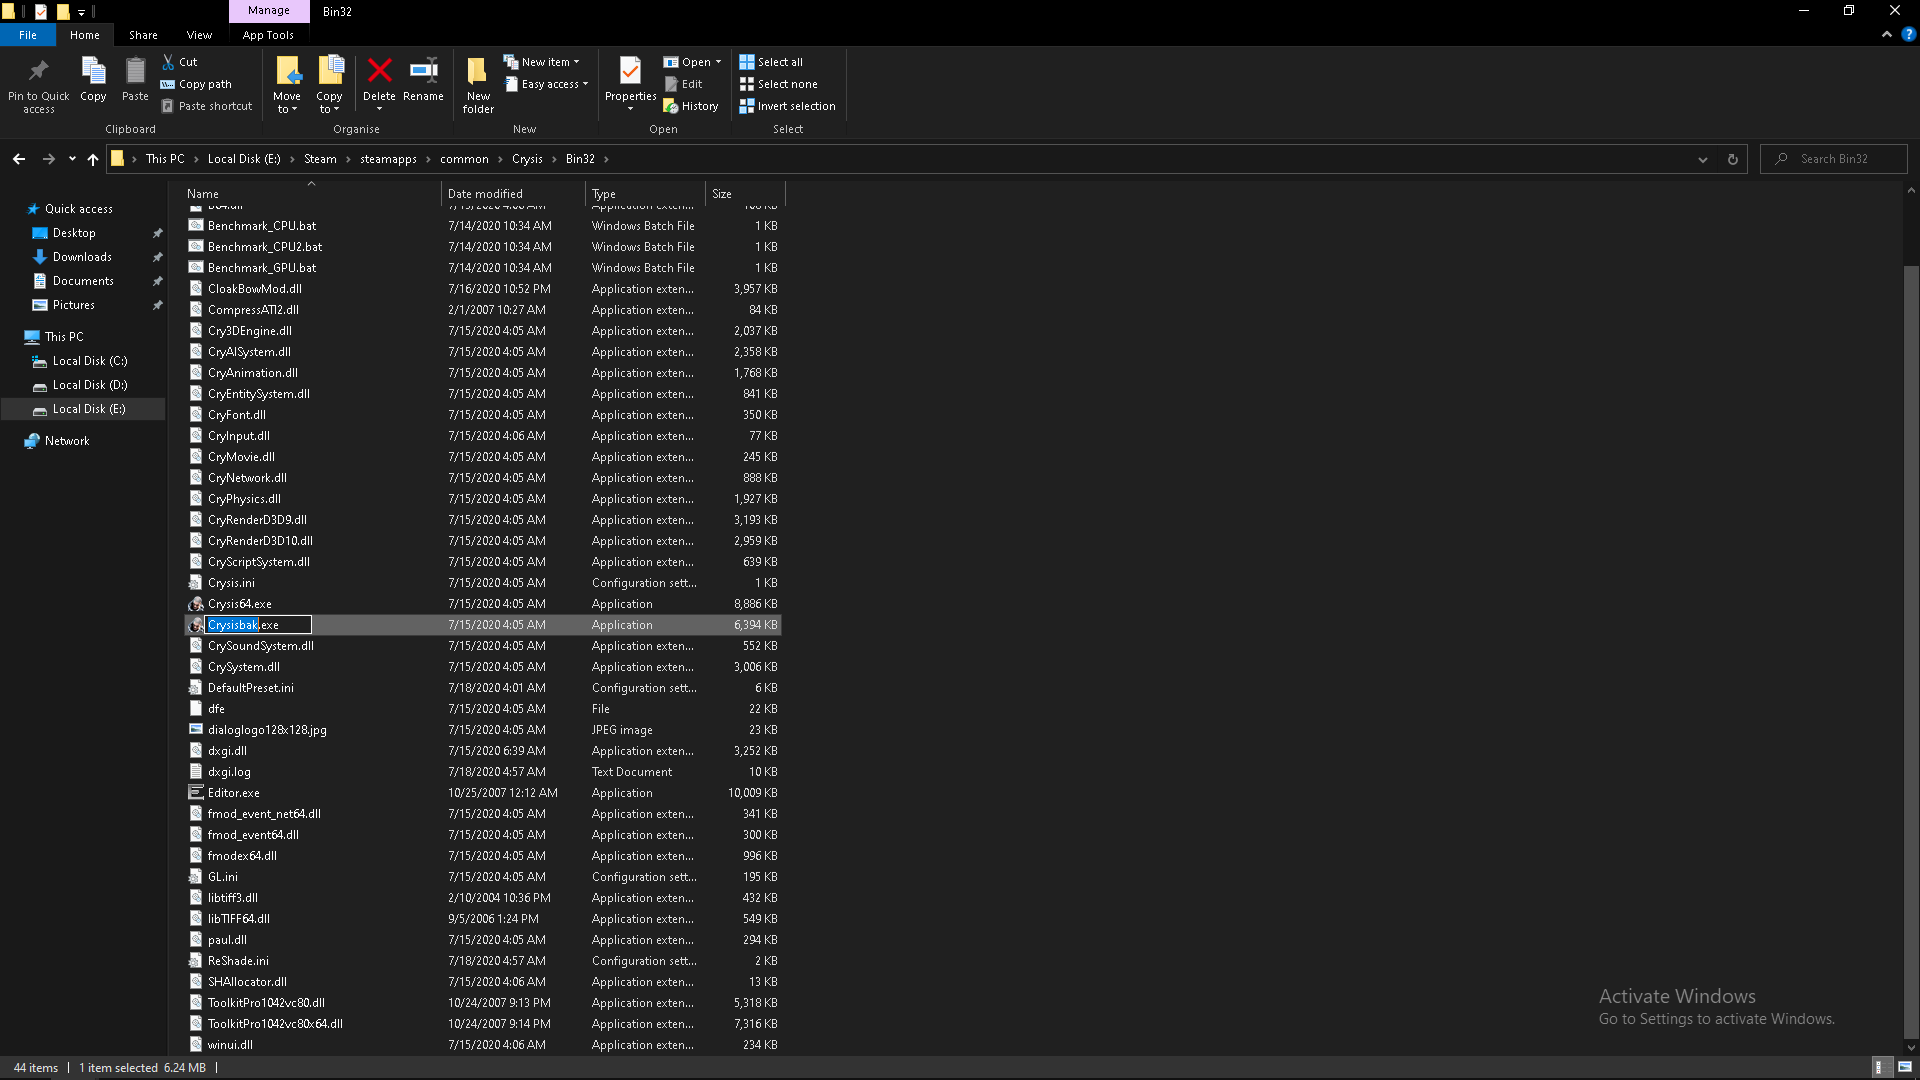
And rename Crysis64.exe to Crysis.exe
Test if the game launches hopefully it does! and If when trying to start a new game you end with a black screen press the tild "`" and type "map island" (without the quotes) and you will load into the first mission and you will be able to load saves like normal from there.
Windows 10 64Bit Guide from Jack of Games
https://steamcommunity.com/id/Mr_AT
But I guess this guide will be a compilation of both his guide and a few other minor tweaks I have come up with during my play through of Crysis 1.
First, you will need to install both Crysis 1 and Crysis Warhead for this part to work.
Once installed you are going to copy the Bin64 folder from Crysis Warhead root directory to Crysis 1 root directory.
To do this right click Crysis Warhead in your steam library and click properties
Then click on the "LOCAL FILES" tab and then click "BROWSE LOCAL FILES"
Then you are going to complete the same process with Crysis 1 so you will end up with two folders similar to this:
You are then going to want to move or copy the Bin64 from Crysis Warhead to Crysis 1:
Now in the Crysis 1 root directory you are going to want to rename the Bin32 folder to something like Bin32bak or Binx86 (You can rename it anything it doesn't matter)
Secondly, in the Crysis 1 root directory rename the Bin64 folder you just copied over to Bin32
Go into the newly renamed Bin32 folder and rename Crysis.exe to Crysisbak.exe (Or anything)
And rename Crysis64.exe to Crysis.exe
Test if the game launches hopefully it does! and If when trying to start a new game you end with a black screen press the tild "`" and type "map island" (without the quotes) and you will load into the first mission and you will be able to load saves like normal from there.
Crysis 1 Steam Tweaks
Crysis 1 has been debated over whether the game is just badly optimized or if it was generations ahead of it's time although with more modern hardware this game can be run just as smooth as any other modern triple A game.
But this section is more beneficial for people with older and dated hardware that want to squeeze a couple more fps out of this 13 year old game (As of the making of this guide)
In order to be able to tweak Crysis 1 properly we need to enter some command line arguments when launching the game.
Right click Crysis 1 in your steam library and click properties
And then click on the "set launch options"
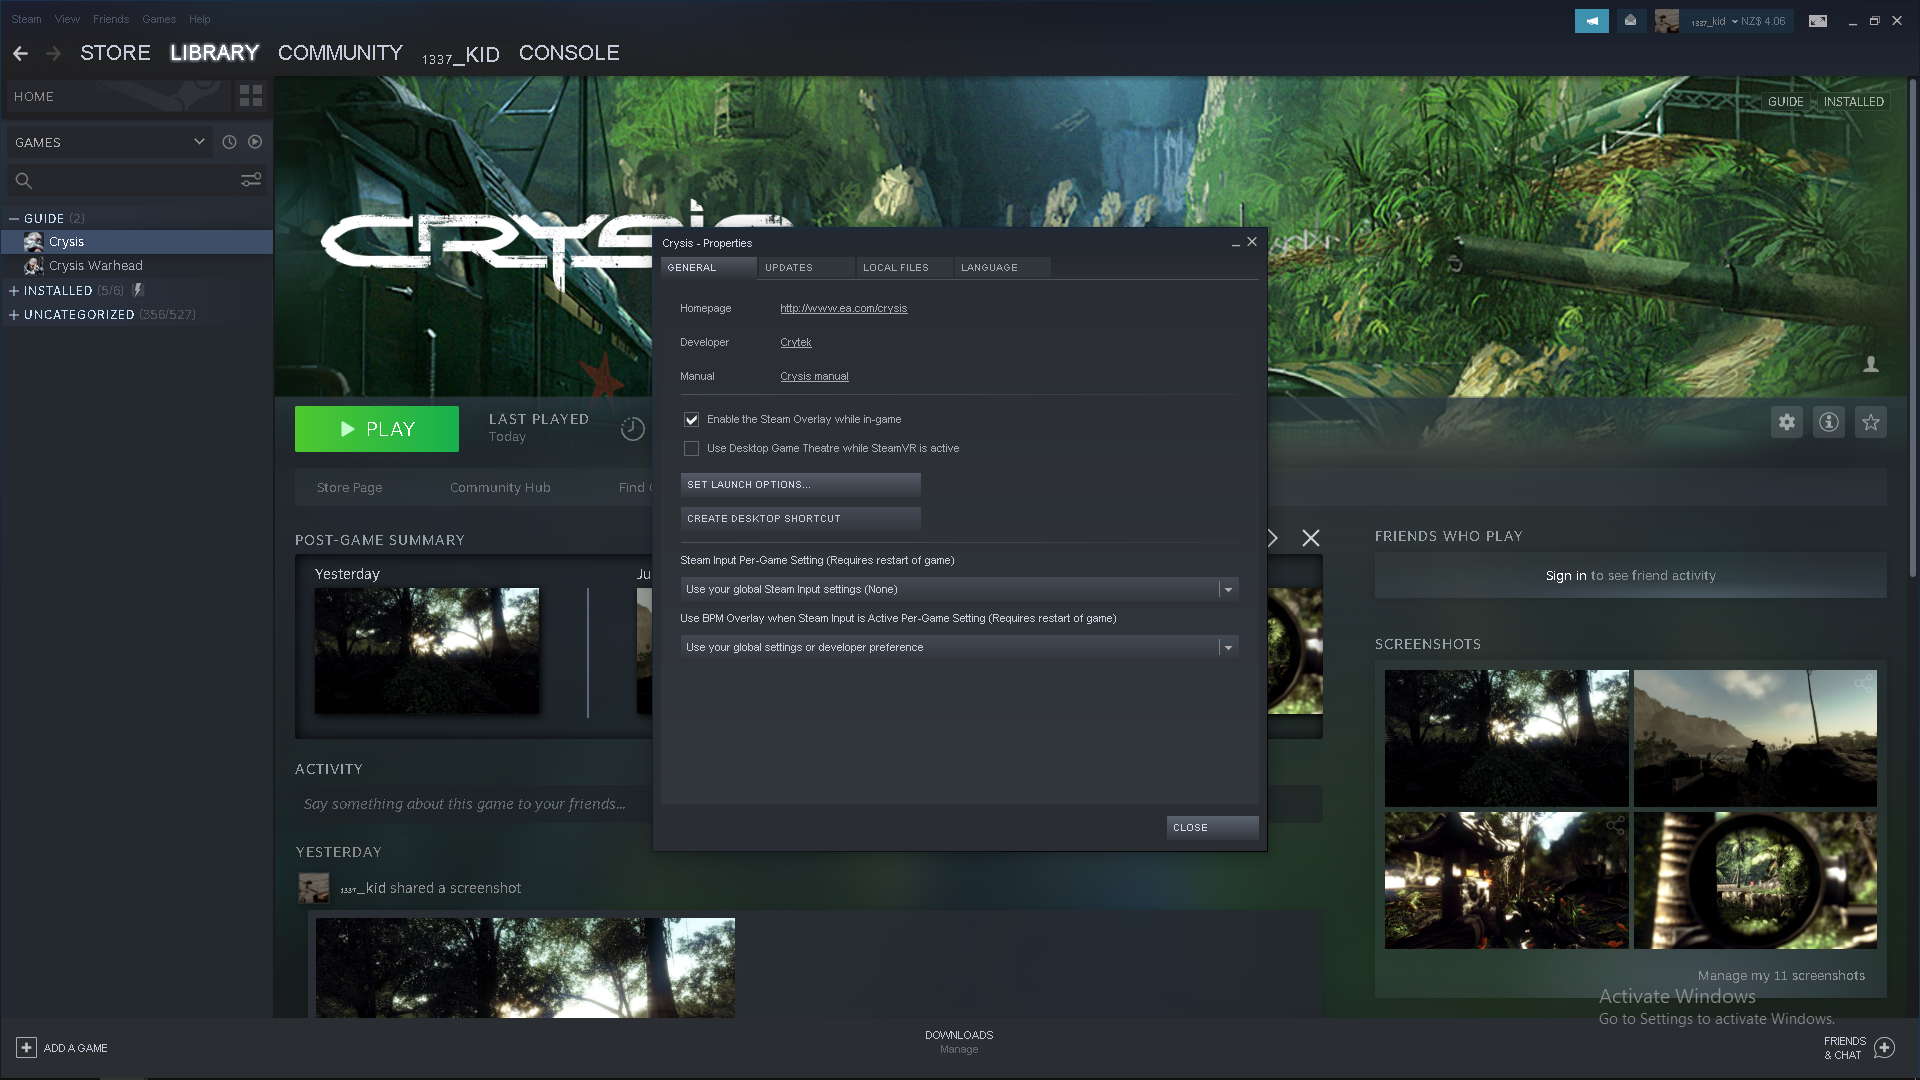
You can enter in various things here and depending on your setup different arguments may benefit your experience or make it worse.
The main arguments that everyone can use:
-devmode -console -high -USEALLAVAILABLECORES -nojoy -noforcemaccel
-devmode Is fairly self-explainatory and allows you to access the console when pressing "`"
-console Does the something, you can have both or just one, either or.
-high Automatically sets the Crysis.exe process priority to high instead of normal
-USEALLAVAILABLECORES Automatically setys the Crysis.exe affinity to the maximum amount of cores your cpu has
-nojoy Disables the xbox/gamepad input (This one probably won't do much fps wise but still worth putting in)
-noforcemaccel This disables the use of Windows 10 mouse acceleration in the application
Now the arguments that are specific for different peoples setups
-forcenovsync -refresh 144 -freq 144
-forcenovsync Forces v-sync off for the application
-refresh 144 -freq 144 Both of these force the application to run at a fullscreen refresh rate of 144hz (My native monitor refresh rate) you can use either -freq or -refresh (They both do the same thing) if for example you have a 60hz monitor you would put "-freq 60" or a 360hz monitor you would put "-refresh 360"
But this section is more beneficial for people with older and dated hardware that want to squeeze a couple more fps out of this 13 year old game (As of the making of this guide)
In order to be able to tweak Crysis 1 properly we need to enter some command line arguments when launching the game.
Right click Crysis 1 in your steam library and click properties
And then click on the "set launch options"
You can enter in various things here and depending on your setup different arguments may benefit your experience or make it worse.
The main arguments that everyone can use:
-devmode -console -high -USEALLAVAILABLECORES -nojoy -noforcemaccel
-devmode Is fairly self-explainatory and allows you to access the console when pressing "`"
-console Does the something, you can have both or just one, either or.
-high Automatically sets the Crysis.exe process priority to high instead of normal
-USEALLAVAILABLECORES Automatically setys the Crysis.exe affinity to the maximum amount of cores your cpu has
-nojoy Disables the xbox/gamepad input (This one probably won't do much fps wise but still worth putting in)
-noforcemaccel This disables the use of Windows 10 mouse acceleration in the application
Now the arguments that are specific for different peoples setups
-forcenovsync -refresh 144 -freq 144
-forcenovsync Forces v-sync off for the application
-refresh 144 -freq 144 Both of these force the application to run at a fullscreen refresh rate of 144hz (My native monitor refresh rate) you can use either -freq or -refresh (They both do the same thing) if for example you have a 60hz monitor you would put "-freq 60" or a 360hz monitor you would put "-refresh 360"
Crysis 1 exe tweaks
Right click Crysis in your steam library and click properties
go to the "LOCAL FILES" tab and click "BROWSE LOCAL FILES"
Navigate to the Bin32 folder, right click on Crysis.exe and click properties:
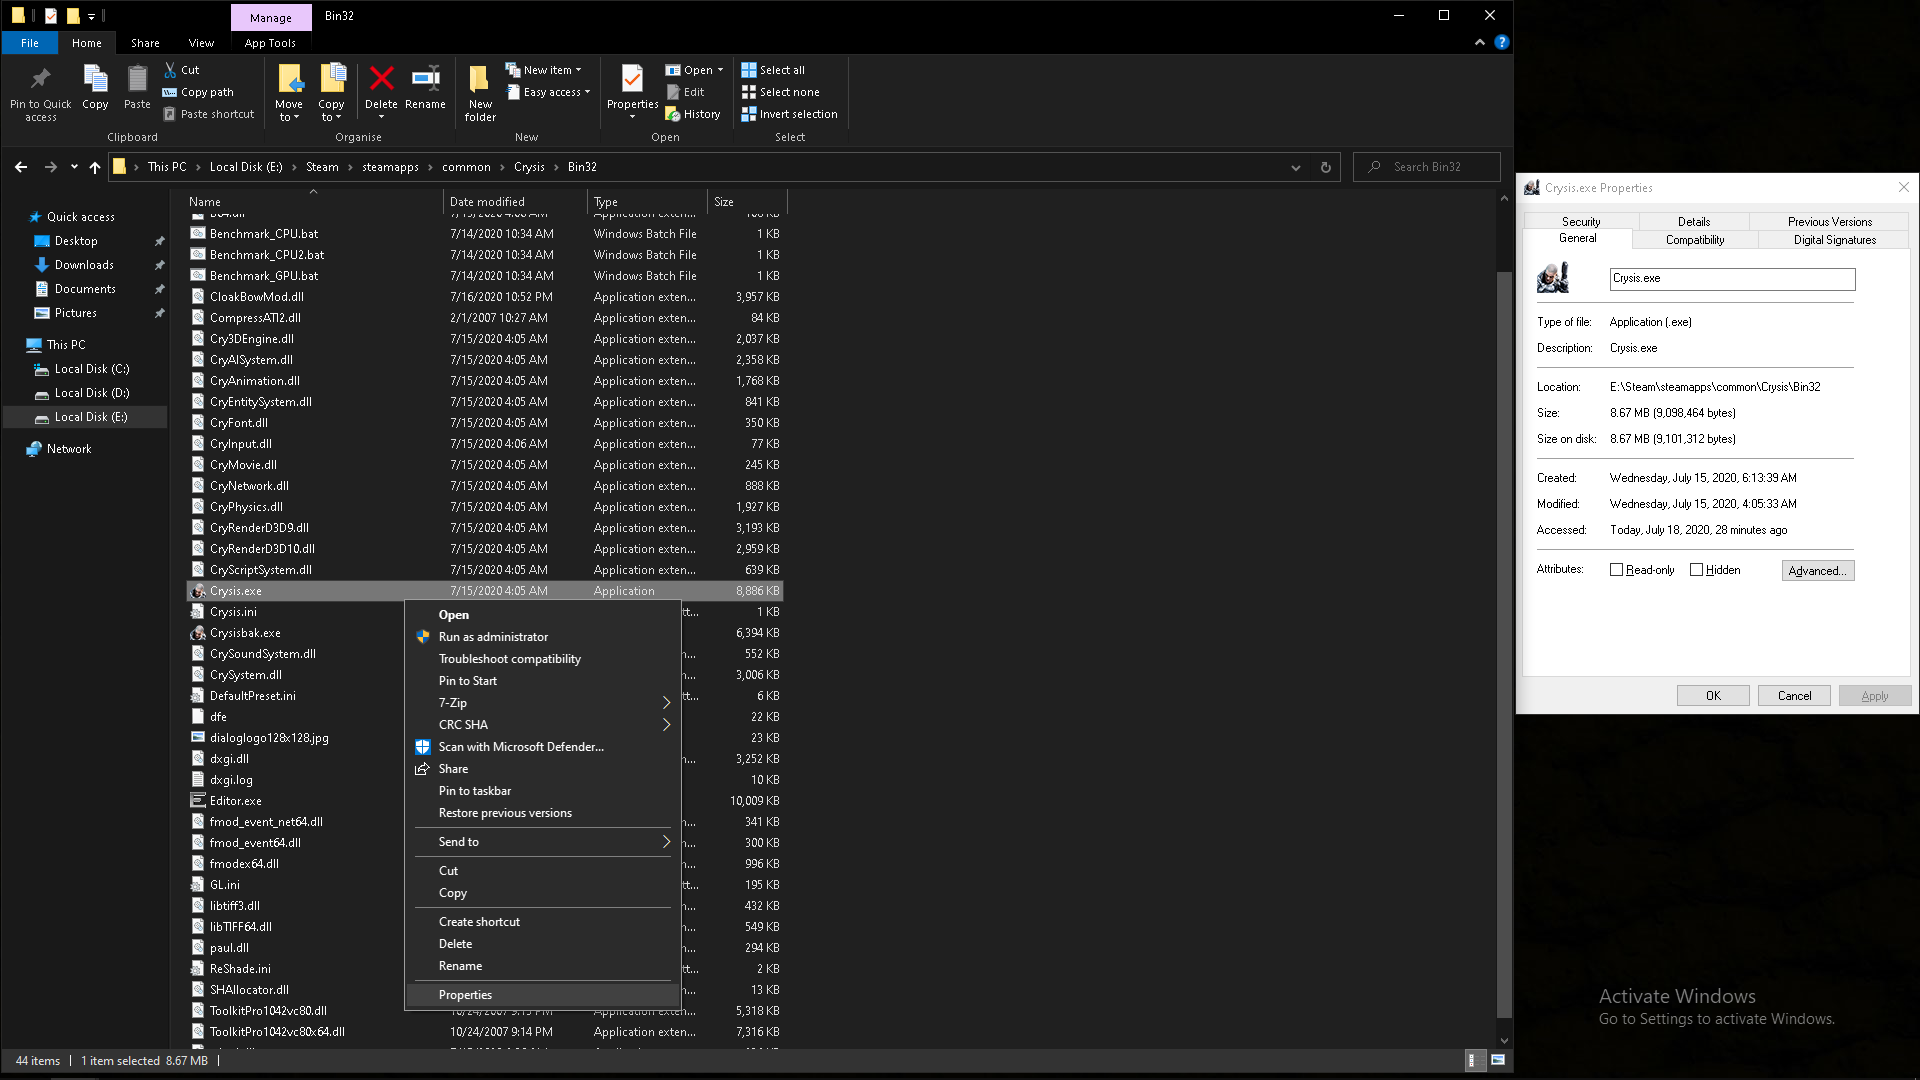
A little window should pop up, you want to go to the "Compatibility" tab and click "Change high DPI settings"
and make sure "Override high DPI scaling behaviour" is checked and is performed by Application
Then click OK
Click Apply and then OK again
Go up one folder; To the Crysis root directory and edit autoexec.cfg by right clicking it and clicking edit or open with... Notepad
If you don't have autoexec.cfg create it by right clicking anywhere in the folder, clicking "New" and selecting the Text Document option and delete the .txt in the name and rename it to autoexec.cfg
~~~~~~~~~~~~~~~~~~~~~~~~~~~~~~~~~
edit/open autoexec.cfg and put in this text:
con_restricted = 0
r_displayinfo = 0
d3d9_TripleBuffering=0
r_ColorGrading = 0
ai_interestsystem = 1
ai_interestdetectmovement = 1
ai_interestenablescan = 1
ai_usealternativereadability = 0
v_drivercontrolledmountedguns = 0
; Shadows
e_shadows = 1
r_ShadowsMaskResolution=0
e_shadows_on_alpha_blended=1
e_shadows_cast_view_dist_ratio = 0.6
r_ShadowBlur=3.0
e_shadows_max_texture_size=768
r_ShadowJittering=1.5
e_water_ocean_soft_particles= 1
e_particles_max_emitter_draw_screen = 16
e_particles_object_collisions=1
r_UseSoftParticles = 1
e_particles_thread=1
; Misc
e_max_entity_lights = 16
g_enableAutoSave = 0
g_battleDust_enable = 1
g_breakage_particles_limit = 250
g_ragdollDistance = 35
g_ragdollMinTime = 15
g_dofset_minScale = 20
g_dofset_maxScale = 40
g_dofset_limitScale = 40
g_suitCloakEnergyDrainAdjuster = 0.5
g_suitSpeedEnergyConsumption = 200
g_suitSpeedMult = 2
gpu_particle_physics = 1
e_terrain_ao=1
e_terrain_normal_map=1
; LODs
e_vegetation_sprites_distance_custom_ratio_min = 1
e_vegetation_sprites_distance_ratio = 1.5
e_cull_veg_activation = 60
e_view_dist_ratio_vegetation = 50
e_particles_lod = 0.6
es_MaxPhysDist = 60
es_MaxPhysDistInvisible = 25
e_terrain_lod_ratio = 0.8
e_view_dist_ratio_detail = 30
e_lod_ratio = 6
e_lod_min = 0
e_lods = 1
e_detail_materials_view_dist_xy = 4096
e_detail_materials_view_dist_z = 256
r_DetailDistance=12
r_TexturesStreaming=0
; END
~~~~~~~~~~~~~~~~~~~~~~~~~~~~~~~~~
Press Ctrl + S to save the document or click File in the menu and then "Save"
go to the "LOCAL FILES" tab and click "BROWSE LOCAL FILES"
Navigate to the Bin32 folder, right click on Crysis.exe and click properties:
A little window should pop up, you want to go to the "Compatibility" tab and click "Change high DPI settings"
and make sure "Override high DPI scaling behaviour" is checked and is performed by Application
Then click OK
Click Apply and then OK again
Go up one folder; To the Crysis root directory and edit autoexec.cfg by right clicking it and clicking edit or open with... Notepad
If you don't have autoexec.cfg create it by right clicking anywhere in the folder, clicking "New" and selecting the Text Document option and delete the .txt in the name and rename it to autoexec.cfg
~~~~~~~~~~~~~~~~~~~~~~~~~~~~~~~~~
edit/open autoexec.cfg and put in this text:
con_restricted = 0
r_displayinfo = 0
d3d9_TripleBuffering=0
r_ColorGrading = 0
ai_interestsystem = 1
ai_interestdetectmovement = 1
ai_interestenablescan = 1
ai_usealternativereadability = 0
v_drivercontrolledmountedguns = 0
; Shadows
e_shadows = 1
r_ShadowsMaskResolution=0
e_shadows_on_alpha_blended=1
e_shadows_cast_view_dist_ratio = 0.6
r_ShadowBlur=3.0
e_shadows_max_texture_size=768
r_ShadowJittering=1.5
e_water_ocean_soft_particles= 1
e_particles_max_emitter_draw_screen = 16
e_particles_object_collisions=1
r_UseSoftParticles = 1
e_particles_thread=1
; Misc
e_max_entity_lights = 16
g_enableAutoSave = 0
g_battleDust_enable = 1
g_breakage_particles_limit = 250
g_ragdollDistance = 35
g_ragdollMinTime = 15
g_dofset_minScale = 20
g_dofset_maxScale = 40
g_dofset_limitScale = 40
g_suitCloakEnergyDrainAdjuster = 0.5
g_suitSpeedEnergyConsumption = 200
g_suitSpeedMult = 2
gpu_particle_physics = 1
e_terrain_ao=1
e_terrain_normal_map=1
; LODs
e_vegetation_sprites_distance_custom_ratio_min = 1
e_vegetation_sprites_distance_ratio = 1.5
e_cull_veg_activation = 60
e_view_dist_ratio_vegetation = 50
e_particles_lod = 0.6
es_MaxPhysDist = 60
es_MaxPhysDistInvisible = 25
e_terrain_lod_ratio = 0.8
e_view_dist_ratio_detail = 30
e_lod_ratio = 6
e_lod_min = 0
e_lods = 1
e_detail_materials_view_dist_xy = 4096
e_detail_materials_view_dist_z = 256
r_DetailDistance=12
r_TexturesStreaming=0
; END
~~~~~~~~~~~~~~~~~~~~~~~~~~~~~~~~~
Press Ctrl + S to save the document or click File in the menu and then "Save"
Final (Honerable mentions)
For any other GPU related tweaks go into nvidia control panel > 3D program Settings and select Crysis.exe or Browse for it by default the path should be: C:\Steam\steamapps\common\Crysis\Bin32\Crysis.exe
You can tweak Anti-Aliasing options and set a max FPS, etc
AMD users will have similar process but i'm afraid I cannot explain it, I do not have an AMD graphics card.
If you need more optimization you can check out these links for further FPS:
https://www.moddb.com/mods/crysis-fps-booster
https://www.youtube.com/watch?v=cXrXZqxtMaY
-Hope this guide helped with optimizing your copy of Crysis!
You can tweak Anti-Aliasing options and set a max FPS, etc
AMD users will have similar process but i'm afraid I cannot explain it, I do not have an AMD graphics card.
If you need more optimization you can check out these links for further FPS:
https://www.moddb.com/mods/crysis-fps-booster
https://www.youtube.com/watch?v=cXrXZqxtMaY
-Hope this guide helped with optimizing your copy of Crysis!
More Crysis guides
- Fix for launching Crysis on Windows 7/8/10 (64-bit) [English guide/Русское руководство]★ 5 (756)35k views692 ♥5 minUpdated Feb 12, 2023
- Crysis Console Commands★ 5 (412)24k views691 ♥2 minUpdated Feb 6, 2013
- Не запускается Crysis, небольшой фикс и запуск на 64-битной системах...★ 5 (517)22k views476 ♥2 minRussianUpdated Dec 4, 2023
- Windows 10 64Bit - How to make this game work★ 5 (313)20k views424 ♥3 minUpdated Feb 12, 2023
- Crysis HUD off | Free Camera | HD Textures | Tiledshot★ 5 (523)13k views336 ♥3 minBulgarianUpdated Apr 29, 2016
- Чит консольные команды Crysis на Русском★ 5 (203)12k views267 ♥1 minUpdated Mar 3, 2013



This guide was created by its original author on the Steam Community. Are you the author and want it removed? Request removal.