Playing in the Sand - A Guide to Sandboxie
Introduction
If you are reading this guide, odds are you probably came from the Etherian Economics guide I have written and was directed here from the Multibox section.
https://steamcommunity.com/sharedfiles/filedetails/?id=1618164144
Although there was a guide written by a previous individual, the guide I felt was bit basic and I also never ran a 2nd account for this game. The author has also retired from DD2. As of two weeks ago from the creation of this guide, I managed to look into this program and found out it was not only easy to install but it was relatively simple to use.
With a secondary account or alt running parallel to your primary account or main, you get some definite advantages that can assist with your farming by providing a second set of:- Gold
- Medals
- Materials (Ampoules, Motes, Hammers and the item specific materials)
- Shards (although you cannot transfer these)
- Equipment drops
- Mod counter for the 10/10 guaranteed drop
As stated in the Multibox section of the aforementioned guide, there are 2 major methods: Hardware and Software. Hardware you simply have 2 computers (usually a PC and a laptop) each run Dungeon Defenders 2 and they both connect to the same server. Software, you will need to use Sandboxie to run 2 separate instances of Steam off 2 accounts on the same machine and both instances connect to the same server. This guide will be more oriented on how to do the latter more than the former, although there will be a section on how to optimise your 2 instances.
Any more and you risk getting banned by Chromatic Games if you are caught. The main reason being that it consumes extra server resources and it gives a player an extreme advantage when it comes to farming. As of writing this guide, there have been people who have recently banned for using this program to run 3-5 alternate accounts to do farming, streaming and selling items for real money.
If you are an active user on the Dungeon Defender's Discord, you are allowed to discuss the use of this program or link this guide on any sections of the Discord. I also have no personal or professional affiliation with Chromatic Games, their staff or official Discord. If you need assistance for how to run Sandboxie, either ask in the comments section here, the Help Chat on the Discord or do a Google/YT search for troubleshooting.
If you also do Software Multiboxing, your computer will be consuming extra resources (VRAM, CPU, GPU processing and RAM) to run 2 instances and lower end machines might run into difficulties.
Use this program responsibly and at your own risk!
Installation and Setup
While you are downloading and installing that, you will need to go to Steam's official website and create a secondary account. This will also require you to create a 2nd email address over at an email provider like Outlook, Gmail or Yahoo. Do not forget that this second account has to be activated through the email for it to work properly.
Finally, because you will be running two instances of Steam alongside Dungeon Defenders II, you will be consuming at least 3GB of RAM if you are running 1 instance of Dungeon Defenders II alongside Steam. Plus, your GFX card/chip will be processing 2 instances of the game in real time. If your hardware is not up to spec to handle Software Multiboxing, than you should consider Hardware Multiboxing to reduce the strain or you will be unable to Multibox.
Sandboxie - Setting Up
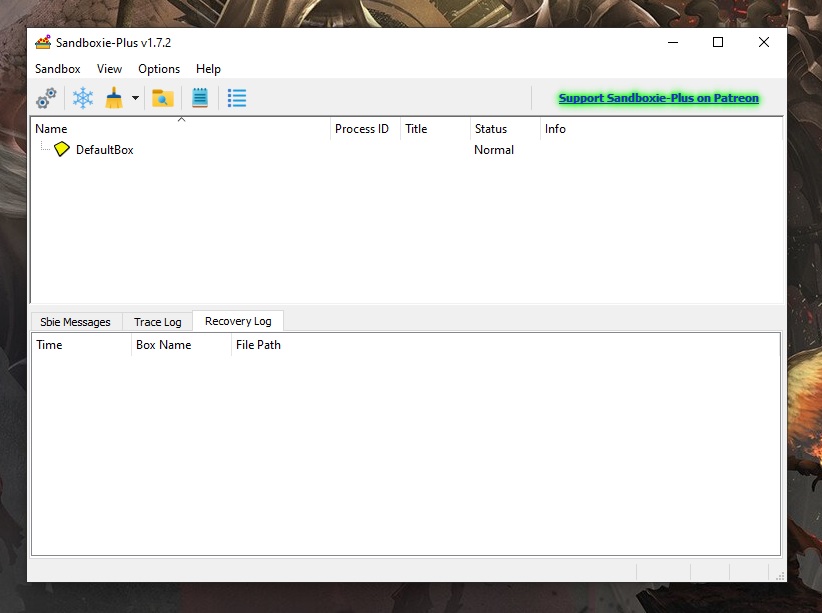
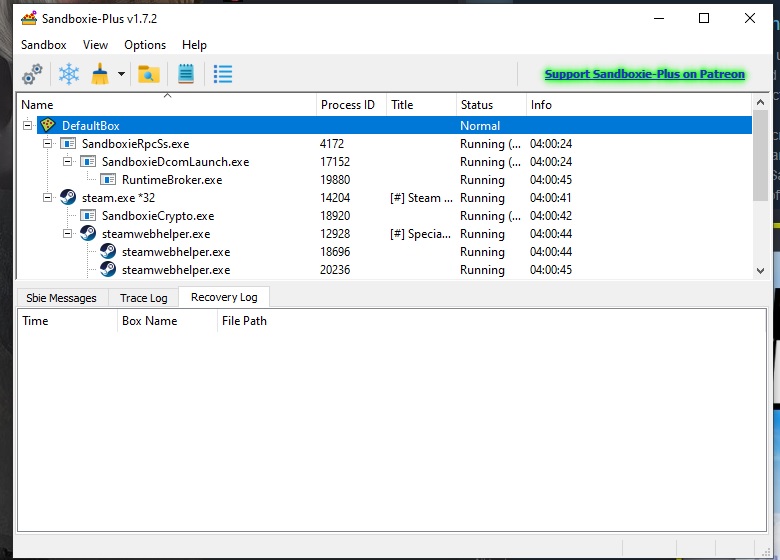
How this will work is your computer will now have 2 instances: Your main instance, which is what your PC generally runs and the "Default Box", which is your 2nd standalone instance. The plan is you will use these 2 instances to run Steam on each
- Click Sandbox and select Run Sandboxed
- Select Run Sandbox and select DefaultBox
OR
- Right click DefaultBox
- Hover over Run
- Select Run Program
You will then get this prompt:
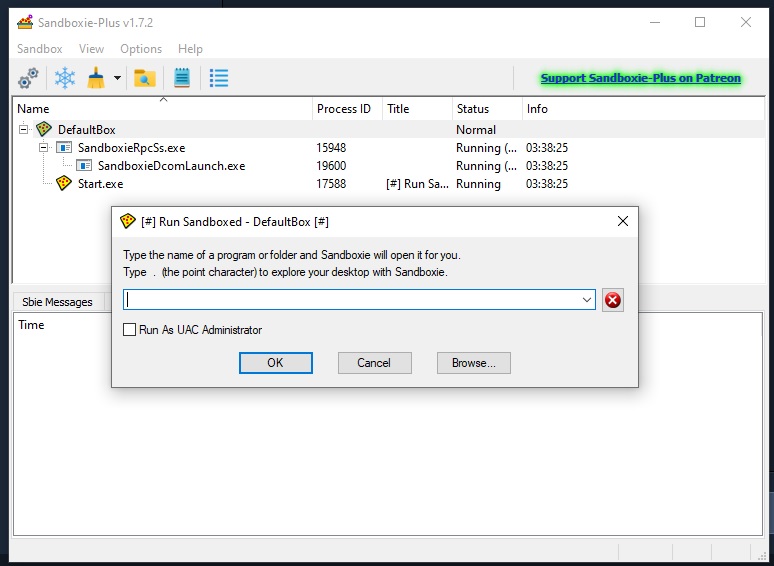
You will then click on Browse and you will navigate and locate the Steam executable (Steam.exe). For most installs, it is usually found on C:\Program Files (x86)\Steam.
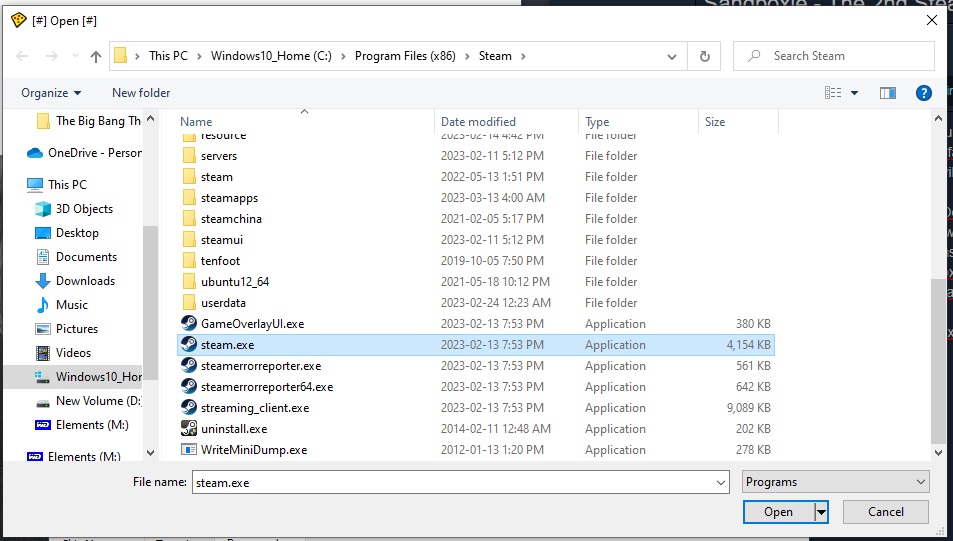 Note: In the event you didn't install it there and you cannot find where it is.
Once you find it, select it, Click Ok. If done correctly, the Run Sandboxed window will now have the location of the Steam executable in it's textbox. You will then Click Ok.
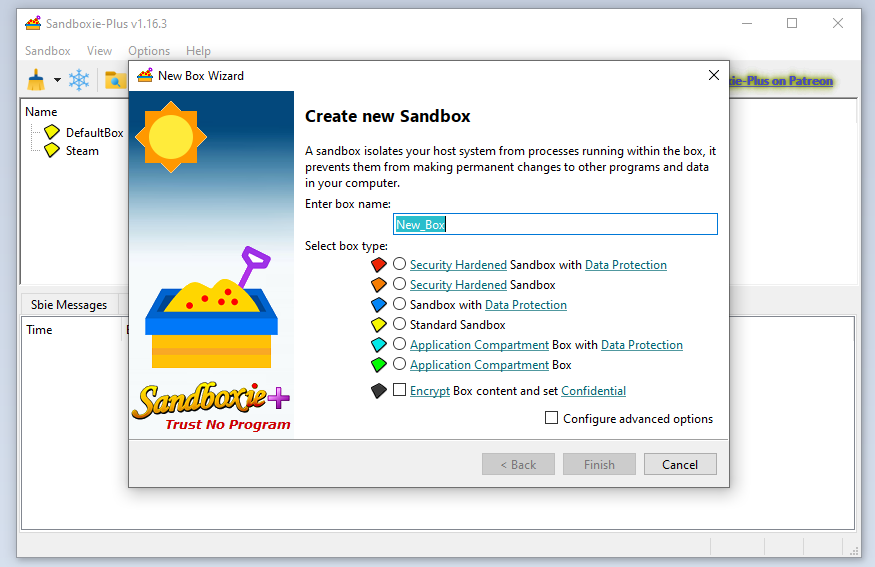
Simply type in the name of your new box, click the option for Standard Sandbox, then click Finish and your new box will be created.
Sandboxie - The 2nd Steam Instance
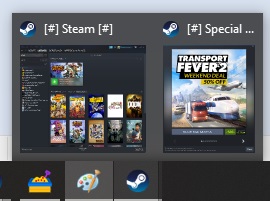
Note:All windows created under your Sandbox will have yellow borders when hovered over the title bar or move the window around. They will also the name of said window encased in a pair of boxed pound signs. This is a normal feature to Sandboxie as to show which programs are running of your main instance and which ones are running off Sandboxie's instance.
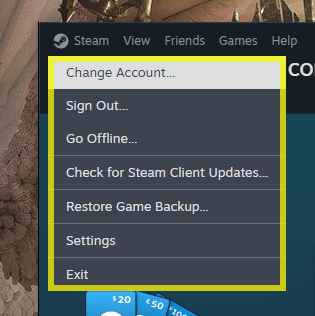
Upon clicking this option, it will load up a small window with your Main account's avatar and a plus sign next to it. Click on the Plus sign and a login prompt will appear. This is where you use your 2nd account's login information. After you have done this and it remembers the account, then your Alt's Steam will always login to this account.
WARNING: Make sure that your email account doesn't have Steam's support email address blocked or forwarded to Junk. Failure to do so will prevent your Alt's email from getting Security codes and it will be impossible to login.
Disclaimer: I am aware there is a Twitch streamer for DD2 named Harambe. My alt's name was not made in reference to him, but the very gorilla who died for our sins. He knows about the account now so please don't heckle him.
Note:You may get a pop up on your Sandboxie's Steam about the program needing maintenance and you have to install Steam Services. If you see this popup, click Cancel. This is not important and it may screw up your Steam program if you make any changes to it on your Sandboxie side.
Your Sandboxie's Steam will have no games connected to it, but it will default to whatever games are installed onto your computer by your main instance's primary account. If you run any game off your Sandboxie's Steam, then the game will function normally but it will have a different set of settings, save files or in this case: Login credentials. You will exploit this behaviour to run 2 instances of Dungeon Defenders II.
Once you have access to your Sandboxie Steam's user interface, you will acquire the Friend Code of your Alt or Main and use that to add the opposite account as a friend. It is recommended to do this before you run DD2. Another suggestion is to add your alt's account to your Favorites so it always appears on your Friends tab at the top. This helps immensely if you got a large friends list and you don't want to scroll through to find the account.
If you follow the suggestion, you should have this (I have blacked out my other friends for personal reasons):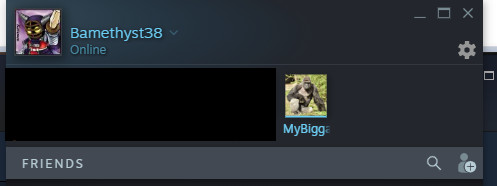
Note:It would be wise to first log into your Main's Steam to check for updates for Dungeon Defenders II. If there is a download, especially if its a big update, let the update download and install before you run Steam on Sandboxie. If you don't do this, you may cause problems with Steam and/or Sandboxie.
All you simply need to do is click the Play button on Dungeon Defenders II for both your Main and your Alt's instances. To tell the two apart, your Alt's instance of Dungeon Defenders II will be encased in pound sign boxes and the border will be yellow if it's running in Window Mode.
Before you log into both your Main and Alt's instance of Dungeon Defenders II, make sure you go into the options of your Alt and set the Server to make sure that it is the same as your Main's and set the necessary controls and options where ever possible.
Because your Alt is a fresh account, it will have to go through the Tutorial on Gates of Dragonfall solo. Luckily, the mission isn't too difficult as the Squire should be able to cut down all the Goblins and the boss will get downed by Cannonballs in tandem with your Squire or Apprentice. Once you complete the mission and get to town, head to the Private Tavern (either through the Private Tavern Door, located in the building between the Sky City Vault and Professor Proteus' ship or log out and select Private Tavern).
Sandboxie - Basic Troubleshooting
When you are running Sandboxie, you may get some occasional popups, notifying you of installing services or overwriting files. You must pay attention to when you get these so you don't accidentally click on something you shouldn't.
The two big annoying popups will overwrite files on your Steam directory and the Alt can do things that can screw up even the Main's Steam.
If you do see this popup, simply click Cancel, but do so when the Alt's Steam app appears (shown in the image above behind the popup). If you don't do this at the right time, it will lock up your Steam and you will need to rerun the Steam.exe a 2nd time. On the 2nd attempt, this won't happen.
Tip:You cannot alt-tab to this popup. If you see the popup as you wait for Sandboxie to boot your instance, drag it to a corner or another window until you see the Steam UI. Otherwise, you will have to close or minimize windows until you see the popup.

If the file in question is a Steam-related file, then this means there was an update to the Steam app itself. Simply click No, update your Steam through your Main and recreate your Sandbox.
If the file in question is something within Dungeon Defenders II directory (usually involving map files), then it is suggested to log off your Main's DD2 session and install any necessary updates on the Main's Steam. Once they are done, you can either keep clicking Yes for every file that needs to be migrated and check the box to remember the decision in the future, or delete and re-create the Sandbox after the Main's Steam completely installs the update.
Note: As of version 1.16.1, the Yes option will automatically be applied for every file that needs to be updated. All you will need to put up with during the patching is a window constantly telling you it's updating DD2 files.
You will need a macro program to do this. I am not versed enough in macros to assist people in this endeavor. If I do find information how you can do this yourself, I will share it when available.
The reason this happens is when you run Steam off your Sandbox for the first time, it will keep a "copy" of the version of Steam it ran off of that time. Since this version can never change, it will cause a version mismatch and try to update it. To fix this, simply delete the current Sandbox you are using (Right Click the Sandbox and select Remove Sandbox) and create a new one (Sandbox > Create Sandbox) or Right Click the current Sandbox and select Delete Content. You must do either of these options AFTER the Steam update is installed. If you have been using the DefaultBox as your Sandbox, you will need to use the Delete Content option.
You will also have to setup your logins and accounts again if you have to use this fix.
As of v1.16.1, this problem seems to have largely gone away. It will update the Steam within your Sandbox and if it does go through, you can continue onwards to Steam. If the update does fail in this version and onward, then simply do the fix mentioned in this section.
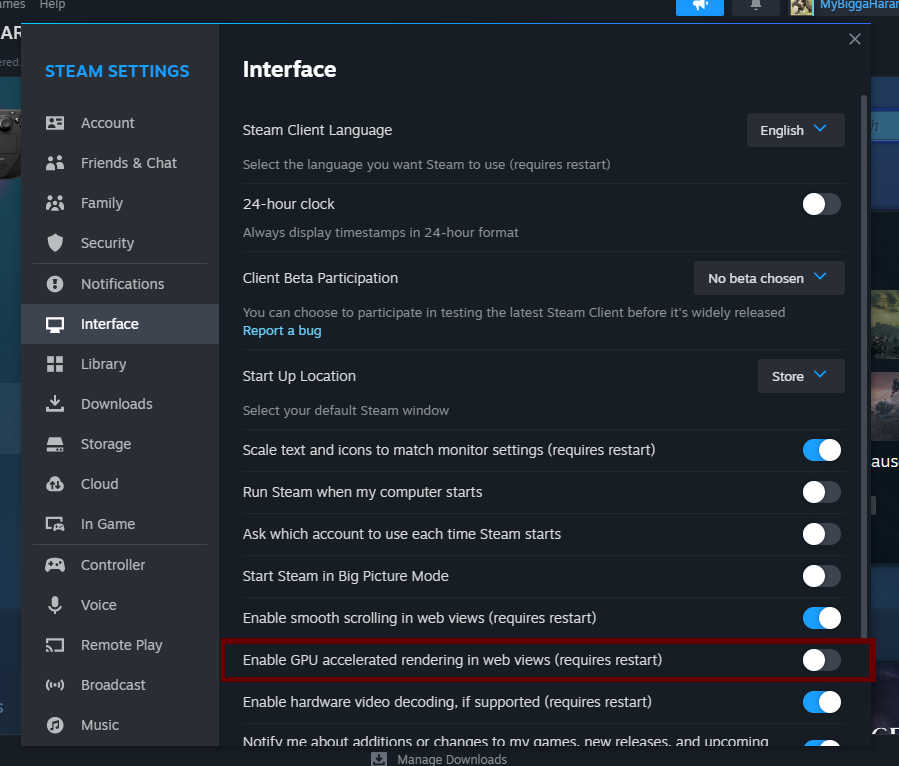
To counter this issue, run Dungeon Defenders II on your Main, then go to your Discord's User Settings > Game Overlay and an option will appear for the Discord Overlay on Dungeon Defenders II. Disable this option or the Overlay completely and this issue will be resolved.
Make sure that when you are 100% done with Sandboxie, you Terminate All Processes across your Sandboxes and then Exit the program properly.
Sandboxie - Ending the Program
When you are finished with the program and have no more use for it, make sure you close your Alt's Dungeon Defenders II and it closes properly.
You will then either right click on Default Box and select Terminate All Programs or select Sandbox and click Terminate All Processes.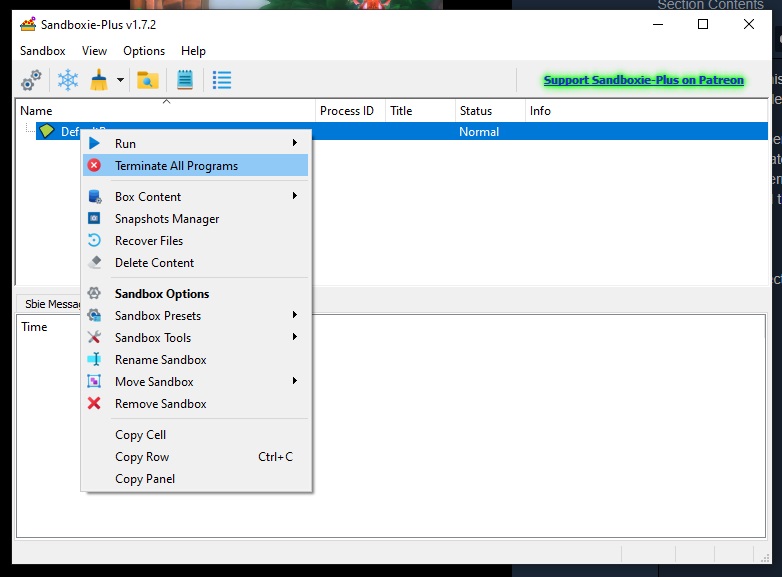
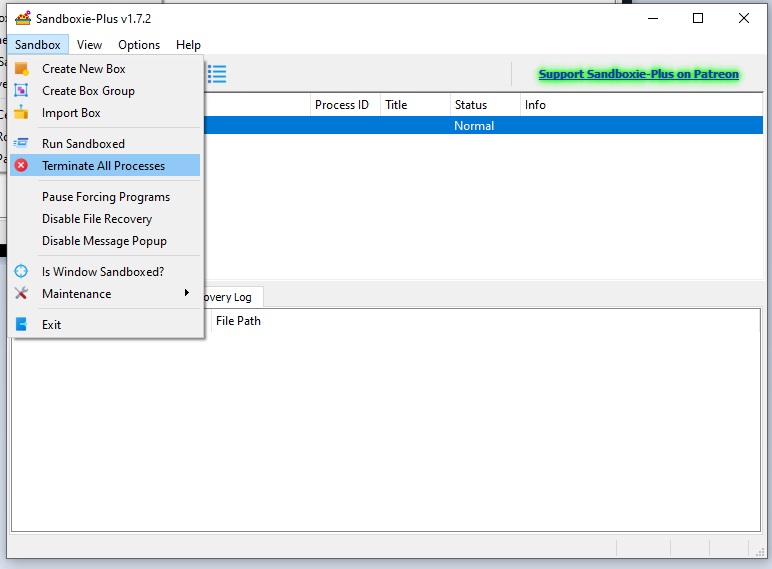
If you do either option, you may get a prompt asking for confirmation to terminate all programs/processes. In the event this happens, click OK. If done correctly, then all the programs that are displayed under the DefaultBox will be gone.
Then simply select Exit.
Dungeon Defenders II - Basic Uses
The main purpose that players do with alt accounts is party up with their main and let the main account do all the defense building and work while both accounts collect the rewards.
If you do the latter, an invite request will be sent to your Alt's Instance, all you have to do then Alt-Tab to your Alt's instance, Shift-Tab to open up the Steam Overlay, select Play Game from the Main's chat log and the account will join the main's Private Tavern.
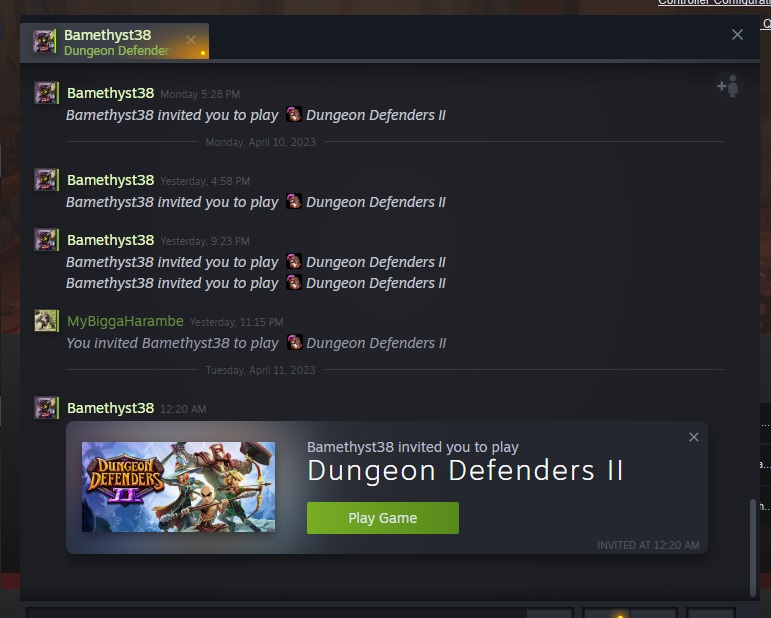
WARNING: Make sure both the Main and Alt's server locations match. Failure to do so will prevent your Main and Alt from joining the same instance and you will need to log out of 1 of the instances in order to change the Server location in the Main Menu's option window.
Once both accounts are in the same lobby, you simply have the Main send a Party Invite to the Alt, then alt-tab over to the Alt and accept the request within 15 in-game seconds. It is suggested to have the main be the leader of the party.
- Is able to clear at least Chaos 9 Expeditions solo, preferably with an effective brute force strategy and as AFK as possible.
- Clearing Masteries, Incursions and at least F240 on Onslaught recommended
- You have at least the Defense stats maxed on the Ancient Powers card (minimum requirement of AP25)
Once you are able to meet those requirements, you will need to do the following with your Alt:
- Clear the Campaign
- Clear all 12 Adventures while your current Questline is Clear Adventures
- Using a combination of Expeditions and Onslaught, get the Alt's Champion Score to Chaos 7, factoring in the current Questline objective as you go.
- Once you clear Chaos 7 and done the 10 Onslaught Floors required for the Questline, do the easiest 14 Masteries across the first 7 Chaos tiers that you are able to 5-star with little to no effort. This will give your account a free 2nd inventory bag, 240k Gold and another 1k medals.
- Get the account to Chaos 8 access and get the Alt's ascension to 250 via Wildest West (fastest and easiest Experience yield + access to Snakeskin armor for Main's use).
After this, the path splits and it will be based on your personal needs. You may do one of two strategies:
- Start doing AP resets on the Alt and using your Main's defenses to carry the account. You can get the Alt to AP50 with minimal risk and work. (See the Advanced Uses section for the quickest strategy to do this).
- Or you can get the AP0 to Chaos 9 and just begin farming at maximum rates as soon as possible and/or have 3400 minimum ascension for the Alt to work with.
- Additionally, you may do 10 Incursions, preferably on C9 Prime if you can handle the strength to farm for Rings and clear the final Questline mission for the Alt's free Vault Tab.
I would recommend you put at least 50 resets on the account for the increased Gold rates but also for the constant Ancient Power benefits, especially if you play Private sessions.
Try to also limit your Gold transfers as best as possible as the Etherian Tax still applies, taking 15% of the cut for a service charge. This can get costly when you are doing 100M transfers as you are effectively giving up 15M to the tax man. The best time to do Gold transfers is when there is an event where the Tax is 1% or only do it when its an emergency.
You must consider the Alt's items may have their stats altered to "sync with game progression". In order to combat this, you either need to get your alt's expedition progression to match your main or you will have to upgrade or evolve the item once. Check the Advanced Uses section on how you can exploit this to your benefit.
- Series EV2 for Nodes, specifically Proton and Reflect
- Initiate - Auras and Chi Spirit Tower are effective. Also has access to Talisman for defense buffing and Chi Aura for hero buffing/healing
- Mercenary - Nether Archers can be very effective with Resetting
- Lavamancer - Fissures of Embermount and Oil Geysers
- Dryad - The World Tree can be effective in some scenarios and her Nimbus is very effective
- Countess - Has one of the most effective buff spells in the game and Dragon Nests
If you must put money down for Gems, do so only to buy the Materials Tab and get 8 Inventory Bags, but do these actions when there is a sale for bags. You will be placing at least $35-40 USD down to get 7 bags and another $12-13 for the Materials Tab without the assistance of Sales.
If you are planning on wanting extra heroes, it is suggest do this via Medals before Gems.
Dungeon Defenders II - Advanced Uses (Part 1)
Although most players use the Alt as a means to collect a 2nd set of resources, there are some time saving tricks you can do with progression or even flat out use them for Passive and Quick Tab effects to turn the tides in harder challenges such as Survival, Onslaught, Mastery or Expeditions you can barely beat.
Simply have the Alt (or Main) build defenses for you on Onslaught and just blitz through the Floors until you start getting Chaos 7 drops. As your AP (Ancient Power aka # of resets completed) increases, your minimum floor will also increase, until eventually you can simply access Chaos 7 gear the moment you go back. Once Chaos 7 drops are unlocked, equip a set on your account you are progressing with to get access to Chaos 7 and then clear a Chaos 7 Expedition to lock your progress to Chaos 7.
Chaos 7 and onward
Once your progressing account has access to or has beaten Chaos 7 or has an Onslaught Floor Beaten of >=28, you will need to make sure your building account can get Level 10/10 items from the enemies. If you cannot, you will need to raise the Champion Score of your builder account until this happens.
- The Full Set of Hero Equipment that meets the above criteria
- 5 C8 Amps
- 1M Gold (optional)
After the transfer is complete, you will find on the progressing account that the items you transferred will be Level 10/10 but the stats will be downgraded to 0-1/10 level. The reason you needed to transfer the Chaos 8 Amps and 1M gold is because you will then simply Evolve the item to Chaos 8 (200k and 1 C8 Amp each) and you will not only bring the item to C8 0/10 but it will also correct the stat penalties. Once your progressing account does this, you will have a Champion Score required to enter C8 (which the game will notify you by giving you a cash reward for Champions to Expedition VIII). After you clear a C8 round, your minimum floor will go to 98 and you can simply reset right after.
Tip: Do each item one at a time and then check the Champion Score on the menu or hero UI. If you are able to get yourself to 7850 without having to completely upgrade all your items to C8 0/10, then you can save yourself amps and Gold for the next AP reset. This is especially effective for the AP32 step.
- The Full Set of Hero Equipment that meets the above criteria
- 5 C9 Amps
- 10M Gold (optional)
As you did before, Evolve the items you got to Chaos 9 0/10 (if necessary), clear a Chaos 9 Expedition to Floor Skip to 299, then reset again.
Dungeon Defenders II - Advanced Uses (Part 2)
- Passive: An effect that will always be operational at all times and requires no interaction other than the hero being on the field.
- Quick Tab: An effect you will have to Alt-Tab into your Alt's window to quickly activate or use and then switch back to your Main or needs active play to operate. If you are fast enough, swapping windows and using skills should only take about 3-5 seconds.
This section will break down these effects that you can do with your Alt, factoring in global powers (any hero can use them) and by a hero by hero basis.
Quick Tab: Works on Pet attack skills that deal damage
(Prime 4 Cleared or
250 Stars from Mastery)
(Chaos 10 Primes
Cleared)
barrier will have 750% of the damage dealt before resistances and armor reflected back to the attacker and all nearby enemies take 400% hero damage per second. Useful for instant killing high damage minibosses and weaker crowds.
(Pirate Maps Only)
(Drakenfrost Keep)
(Embermount)
Dungeon Defenders II - Advanced Uses (Part 3)
(Chaos 9+)
(Wild West)
(Wild West)
Passive: The hero also takes 20% less damage from attacks.
Passive: Adds a 5% chance to avoid any incoming damage from attacks, stacks with other sources of Dodge.
Dungeon Defenders II - Advanced Uses (Part 4)
- Fight Me Not (Chaos 3 Chest shard) causes any enemy that attacks the squire to take up to 25% increased damage
- Bulwark (Chaos 1 Chest shard) helps alongside the shield slot to give the Squire the highest Armor stat to reduce damage
- Heavy Armor (Chaos 9 Chest shard) at the cost of a movement speed penalty will further increase his armor, reducing incoming damage
- Putting up Shield when using the Fire Shield or United Defense pet powers can make a difference between getting killed by the attack and sacrificing the hero or a cheat death and surviving it, while still returning full damage. Block Power (Chaos 8 Shield Shard) will further improve the damage reduction blocking adds.
- Prickly Shield (Squire Exclusive Chip) and Unholy Fire (Chaos 6 Shield Shard) can stack onto these damage reflect effects by returning damage based on the Squire's armor. Armor Chips (Chaos 10 Armor Chips) are recommended for enhancing these effects.
- Blade or Betsy (Chaos 4 Weapon Shard) Beams can be used to quickly deal damage or gun down air
- Provoke can be used as a substitute to Annoyance to do controlled taunting of attackers
- Seismic Slam can stun enemies around the Squire with Enduring Slam (Chaos 7 Shield Shard) extending the duration further. Both this and previous skill trigger Controller effects.
- Ranged attack is useful for spreading Sundering Blow, Tandem Strikes and other attack proccing effects
- When you got no options for Oiling, Oil Flask can apply it for you
- Concussive Shots can be useful for a quick stun against your attacker, with the Concussive Shots (Chaos 0 Weapon Shard) extends the stun duration further
- Piercing Shot on an oiled enemy can instantly ignite it, useful for taking down Drakenlord barriers. You can skip this set by firing this with the Searing Flames Weapon chip equipped on the Huntress' Bow
- You will need to equip some form of Piercing in order to use Quick Tab skills effectively
- Ranged attack is useful for spreading Sundering Blow, Tandem Strikes and other attack proccing effects
- You can shoot the ground in front of Blockades to apply Betsy's Curse (Chaos 3 Weapon Shard) fields that reduce damage of enemies standing in it by 29%. Each section lasts 100 seconds and up to 3 can be placed
- Tornado can be used to launch enemies and keep them in the air, rendering them helpless. Enduring Tornado (Chaos 0 Gloves Shard) can extend this duration massively.
- If you have enough AP, you can deploy a Fire Shield or United Defense pet power and then fire off a Mana Bomb. The barriers will allow you to retaliate while you are charging the bomb
- You will need to equip some form of Piercing in order to use Quick Tab skills effectively
- Secondary attack can inflict Tandem Strikes but quick primary attacks can do both Sundering Blows and Tandem.
- Heroic Wave can be used to buff any nearby attacking heroes' damages. You can enhance the boosts with Heroic Power (Chaos 5 Chest Shard), add more healing with Heroic Boost (Chaos 7 Helmet Shard) or give up 30% of the straight damage boost for 58% increased Hero Damage and 20% Ability Power stats with Heroic Convergence (Survival Weapon Shard)
- Pole Smash and Chi Blast can be used to knock up or push back enemies quickly
- You will need to equip some form of Piercing in order to use some of the Quick Tab skills effectively
- Healing Fountain once deployed will heal any hero that stands within it's area of effect per second. You can enhance this effect bonus movespeed through Fountain of Speed (Chaos 0 Boots Shard) and cut down enemy damage with Withering Fountain (Chaos 1 Boots Shard)
- With high enough AP, you can use Direct Command on Skeletal Orcs, Archers or Ramsters to do a high powered special attack on enemies. You can use the Echoing and Mana Command chips (Abyss Lord and Onslaught exclusive respectively) to extend the duration of these enrages and even recover mana on kill.
- Skeletal Orc walls with the Berserk Master (Chaos 2 Relic Shard) equipped can have the berserk extended another 5 seconds on top of this
- Ramster Breath (Chaos 7 Gloves Shard) can further increase the damage of the Skeletal Ramster fire breath.
- Abyssal Stone and Knights of the Abyss can be used to deal quick damage. The former lingers for awhile and the latter can stun and knock around enemies.
- While you wait for Quick Tab usage, you can place her inside a Buff Beam with the Buffer Chip (Series EV2 Exclusive) to drain heat over time
- Ranged attack is useful for spreading Sundering Blow, Tandem Strikes and other attack proccing effects
- With enough AP and the correct buff shards, Proton Cannon can liquefy any enemy incredibly fast
- Death from Above can be used to quickly apply a distraction
- Anti-Gravity Bots with the Bots of Oil (Chaos 1 Chest) Shard can quickly apply Oil to start ignites, freeing up Burning Strikes on the weapon
- Staying submerged will allow you to emit Radiant effects without taking damage from enemies. Only Dark Assassins will force you out of the ground.
- You can also use the Earthen Power Chip (Lavamancer Onslaught Chip) to recover Molten Power for Eruptions and Toe-Roaster (Lavamancer Exclusive Chip) to damage enemies that walk over you.
- Submerging will allow you to get across larger maps to get into position far more quickly
- Eruption can be used to buff any nearby defenses in a pinch. You can use Twice as Bright (Chaos 7 Helmet Shard) to further increase this effect at the cost of 5 seconds of duration
- Enflaming yourself will give you increased damage reduction, which can be useful for surviving Fire Shield/United Defenses sacrificing
Dungeon Defenders II - Advanced Uses (Part 5)
- If you are able to maintain Max Appeasement, the Mystic's snake will deal AP based damage to anything around her
- She can inflict an IDT (Increased Damage Taken) effect with any attack at max Appeasement as well as Sundering Blow and Tandem Strikes
- Call to Madness can be used to cause Mass Confusion in an area, forcing enemies to attack each other. This effect bypasses all Stun and Slowproof checks. You can extend the duration of this with Madness' Embrace (Chaos 5 Weapon Shard), it's range with Thundering Call (Chaos 1 Weapon Shard) and apply another IDT through Debilitating Madness (Chaos 5 Glove Shard)
- High AP builds can toss Dark Torments and send Lash Outs to do quick damage. These can be buffed by various shards for both duration and damage
- If you cast Vroom Broom while stationary, you can heal yourself rapidly. Moving will lose the stationary effect unless you fly into a wall.
- Ranged attack is useful for spreading Sundering Blow, Tandem Strikes and other attack proccing effects
- She can use various AP skills to inflict quick damage and crowd control
- Book Drop can be used to shutdown advancing attackers and this effect bypasses all Stun and Slowproof checks. It cannot stop Minibosses, but the Read or Die (Chaos 5 Gloves) Shard can proc the same effect on them via Scatter Sweep or Broom Vault
- Dryad's Blessing with a maxed out Corruption's Blessing (Chaos 3 Chest)) and Fortification (Chaos 0 Chest) shards can apply effective damage reduction without consuming Celestial Power. This effect will drop if a Dark Assassin latches onto her.
- Going Corruption can enhance several defenses if you are using your Alt to build
- Throwing down Powder Toss on top of heroes can help accelerate healing for pure form or deal damage if corrupted. You can extend the duration with Shroom Bloom (Chaos 4 Gloves) Shard.
- With enough Stars and AP, you can spam Starfall in Corrupt form to do quick damage
- Having 2 weapons and a high Hero Health multiplier can allow him to stay on the field longer.
- If you are able to sustain Fury, Turtle Stance can last near indefinitely and removes him from Dark Assassin targeting. You can further cripple enemy offense with Shellshock (Chaos 6 Weapon) Turtle Power (Chaos 2 Chest) Shards
- If you are able to get to maximum Wrath quickly and have a high amount of AP, you can quickly cast Hawk Strike
- Staggering Shout can be used to apply Life Gain on Hit (Siphoning), Less Damage Dealt (Turtle Stance) or Increase Damage Taken (Lightning Stance) to enemies. Echoing Shout (Chaos 3 Helmet) can extend the duration of these debuffs.
- Leap can be helpful to get across the battlefield quickly. You can also get some damage reduction for 4 seconds using the Brace for Impact (Survival Boots) Shard.
- Ranged attack is useful for spreading Sundering Blow, Tandem Strikes and other attack proccing effects
- You can shoot the ground in front of Blockades to apply Betsy's Curse (Chaos 3 Weapon Shard) fields that reduce damage of enemies standing in it by 29%. Each section lasts 100 seconds and up to 3 can be placed
- Tornado can be used to launch enemies and keep them in the air, rendering them helpless. Enduring Tornado (Chaos 0 Gloves Shard) can extend this duration massively.
- Arcane Bubble can be quickly slapped down to stun enemies, incoming Dark Assassins, apply Increased Damage Taken effects via the Wither Bubble (Chaos 0 Chest) Shard or heal incredibly quickly via the Sanctuary (Chaos 2 Gloves) Shard.
- You will need to equip some form of Piercing in order to use Quick Tab skills effectively
- Secondary attacks can inflict Tandem Strikes and stun via the Concussive Chi (Chaos 0 Weapon) shard. Primary attacks can inflict both Tandem Strikes and Sundering Blow.
- Attacks can also proc another Chi wave that can inflict an Increased Damage Taken effect through the Crippling Strikes (Chaos 6 Weapon) Shard
- Talisman of Empowerment can be quickly placed and can massively increase the Defense Power and Critical Damage of any affected defenses. There are several shards that enhance these buff values and the Burning Talisman Chip (Initiate Onslaught Weapon) can cause the field to do damage over time if you have enough AP.
- Firing off a Crippling Chi Wave can apply an effective Increased Damage Taken effect to any enemy it cuts through. You can vastly increase this effect through the Chi Curse (Chaos 2 Chest) Shard and stack on a Polymorph and further Increased Damage Taken effect chance through the Goat Transmog (Chaos 7 Gloves) shard
- You can apply a Life per Second heal effect to nearby allies with Chi Aura. You can also use this aura to increase nearby Hero's Hero Damage via the Chi Boost (Chaos 9 Helmet) and improve their damage reduction via the Protective Chi (Chaos 2 Chest) Shard.
- You can also get enough AP and then quickly run through mobs with Chi Aura equipped and burn through enemies with the Chi Burn (Chaos 8 Boots) Shard
- Bulwark (Chaos 1 Chest shard) helps alongside the shield slot to give the Countess the highest Armor stat to reduce damage, which is further amplified by Call to Arms
- Heavy Armor (Chaos 9 Chest shard) at the cost of a movement speed penalty will further increase her armor, reducing incoming damage
- Because of the way Fury works, it carries any effects the primary attack inflicts. This will allow you inflict Sundering Blow, Tandem Strikes and other effects from a range. You may need Fury Speed (Chaos 1 Weapon Shard) for Fury to reach the targets sooner and you may need Piercer effects to bypass barriers.
- If you have enough Crit Chance, you can use Fury Restoration (Chaos 2 Helmet Shard) with your Fury bolts to recover mana quickly
- Call to Arms can increase the Damage and Armor of nearby Heroes and Defenses, allowing for an effective universal buff. Inspired Shout (Chaos 6 Gloves Shard) can further enhance these effects. You will need 100% Tenacity to maintain the effect should Dark Assassins latch onto the Countess
- Putting up Shield when using Call to Arms and the Fire Shield or United Defense pet powers can make a difference between getting killed by the attack and sacrificing the hero or a cheat death and surviving it, while still returning full damage. Block Power (Chaos 8 Shield Shard) will further improve the damage reduction blocking adds.
- Unholy Fire (Chaos 6 Shield Shard) can stack onto these damage reflect effects by returning damage based on the Countess' armor, especially under Call to Arms. Armor Chips (Chaos 10 Armor Chips) are recommended for enhancing these effects.
- Holy Fire can be an effective passive heal to survive Dark Assassin latching or to heal while tanking. You can enhance this heal with the Holy Restoration (Chaos 8 Helmet) Shard and even damage with the Holy Empowerment (Chaos 4 Gloves). You can hold 3 charges of this skill
Dungeon Defenders II - Advanced Uses (Part 6)
- The Escape Artist (Chaos 8 Boots) Shard when gilded and alongside his natural Tenacity effects will allow him to have 100% Tenacity without the need of Tenacity Chips.
- Having 2 weapons and a high Hero Health multiplier can allow him to stay on the field longer.
- You can use various AP or Hero Damage builds to quickly dispatch a threat
- Combat Preparation can increase your damage output for when you need it, especially on Pets.
- Leap can be helpful to get across the battlefield quickly. You can also get some damage reduction for 4 seconds using the Brace for Impact (Survival Boots) Shard.
- Every 5 seconds, the Engineer auto-repairs itself for about 25% of his maximum Life. This effect can stack with the Regeneration shard
- Ranged attack is useful for spreading Sundering Blow, Tandem Strikes and other attack proccing effects. You can also use the Steam Vent skill to give yourself a burst of attack speed alongside the Hasten (Chaos 9 Helmet) shard to apply these to more enemies faster
- Bunker Busters can be rigged to fire Incendiary Rockets (Chaos 9 Gloves Shard) to apply a quick Increased Damage Taken effect
- You can use the EMP Shells (Chaos 10 Chest) shard to allow the Orbital Channon to proc slow and stun effects
- The Engineer will need Piercer effects in order to use most of these Quick Tab skills effectively
- With a full set of Dodge Chips, a Ring of Wind and a gilded Hunter's Instinct (Chaos 5 Chest) shard, this character has the highest potential damage avoidance chance out of all the heroes at 69%
- Ranged attack is useful for spreading Sundering Blow, Tandem Strikes and other attack proccing effects
- The Wound (Chaos 10 Glove) and Bloody Strikes (Chaos 1 Weapon) shards can allow the Hunter to apply 2 Increased Damage Taken effects when necessary through Stakes and attacks respectively
- Dark Effigy can be used to create a sentry that fires at enemies in your stead
- Ambush when timed correctly can remove the Hunter from targeting and completely unnecessary damage, specifically from Dark Assassins
- Blood Siphon can deal damage and also heal the Hunter when needed
- The Hunter will need Piercer effects in order for almost all Quick Tab skills effectively
- While Water Orbs is active, you can position yourself to shred enemies with enough AP or just flat out spread freeze if you have a constant drench source like a Water Aura. These Orbs also add onto your chance to avoid damage. It is recommended to have the Quick Orbs (Chaos 1 Boot) shard to make these more effective
- Her secondary attack can pierce through walls and can easily apply the Tandem Strikes effect. You will need to use her melee attack to apply Sundering Blow
- Whirlpool can be used to constantly apply drench, pull enemies into an epicenter to setup skills for your Main or defenses to do heavy splash damage in a tighter space. You can increase the effectiveness of the pull with the Enhanced Current (Chaos 4 Helmet) shard
- Oceanic Rift can be used to temporarily launch enemies and roll a chance to apply an Increased Damage Taken effect through the Superheated Water (Chaos 8 Chest) Shard. With enough AP, you can do catastrophic, quick damage with the Rift Quake (Survival Helmet) shard
Dungeon Defenders II - Alt Hero Builds and Suggestions (Part 1)
- [Outdated!] Complete Beginners Guide to DD2 (Class Overview and Builds)★ 5 (1.1k)55k views1.7k ♥56 minUpdated Aug 29, 2022
- Dungeon Defenders II Ultimate FPS Guide★ 4 (161)26k views166 ♥3 minBulgarianUpdated Jun 1, 2017
- NM4 April 2016 Gear Guide for Primary Building Characters★ 5 (363)16k views672 ♥8 minUpdated Apr 25, 2016
- How to be a badass , ultimate noob friendly guide v1★ 4 (124)14k views271 ♥49 minUpdated Feb 15, 2020
- [Archived] SAS Soft Caps★ 5 (172)13k views285 ♥8 minUpdated Mar 9, 2017
- How to farm EXP | Level up fast★ 4 (77)13k views95 ♥4 minUpdated Oct 26, 2015




- Upgrading to PremiumTeam Fortress 2★ 5 (20k)1441k views11k ♥6 minUpdated May 11, 2022
- No More Room in Hell Official ManualNo More Room in Hell★ 5 (2.8k)569k views2.1k ♥29 minUpdated Apr 22, 2019
- NMRiH Community Hosting GuidesNo More Room in Hell★ 5 (526)351k views653 ♥1 minUpdated Aug 10, 2022
- ULTIMATE GUIDE FOR GAME DEV TYCOONGame Dev Tycoon★ 5 (5.8k)326k views10k ♥4 minUpdated 23 Jan, 2014
- How to 'Git Gud' Soon™MORDHAU★ 5 (2k)318k views3k ♥68 minUpdated Nov 16, 2024
- Лучшие кооперативные игры SteamPAYDAY 2★ 5 (1.5k)315k views2.1k ♥56 minRussianUpdated Apr 27, 2025






This guide was created by its original author on the Steam Community. Are you the author and want it removed? Request removal.