Porting to SFM (The Basics, and a little more.)
Introduction
Everything you are about to read here is typed from memory, from experience, and shaped by many members of the SFM community helping and teaching me.
This is intended to be an up-to-date (as of 2024) guide to port to SFM, Characters, Props, and materials. This covers many if not all of the important bits of porting.
If you are an experienced porter, and have things to add, or find mistakes in this guide, please message me freely as I am not an important person and have nothing to do.
The workflow described here goes back and forth between software, and other porters might have better workflows. However, it gets the job done.
The Character Porting section of this guide is geared towards normal models. Models that are Cel-shaded, Anime-styled, etc. will need other or advanced techniques.
Glossary
- SMD - A model format, used by StudioMDL to compile models.
- DMX - A newer model format, used by StudioMDL to compile models. It contains more features than SMD.
- StudioMDL - A Valve tool included with Source Development Kit that compiles models. You don't need to install this as it usually comes with SFM.
- QC File - A text file with the extension .qc that gives StudioMDL information about the model, how to compile it, what parts to include, and other info like eyes flexes and such.
- VTF File - A Valve Texture File. It's an image format, like a PNG or Jpeg, but for Source.
- VMT File - A Valve Material file. These are named the same name as materials in Blender, and describe the material shader and its parameters, such as textures, normalmaps, phong, etc.
- Bodygroup - https://developer.valvesoftware.com/wiki/$bodygroup
The tools you'll need
You'll need to download a couple of tools to help in your porting journey.
I've listed the ones you'll need below, with download links.
https://www.blender.org/
http://steamreview.org/BlenderSourceTools/
https://valvedev.info/tools/vtfedit/
https://valvedev.info/tools/crowbar/
or
https://github.com/ZeqMacaw/Crowbar/releases
The tools that'll come in handy
The following are tools that I don't use, and will not be covered in this guide, but might be useful if you need them.
Take a look at the descriptions to see if you need to download them.
https://developer.valvesoftware.com/wiki/VTF_Shell_Extensions#External_links
https://dima-369.github.io/VMT-Editor/
or
https://github.com/Dima-369/VMT-Editor
https://github.com/lasa01/Plumber/releases
Character Porting: Part 1 - Blender
If your source model is in a file format that Blender supports (File > Import), you can simply import the model into Blender as normal. However, if the source model is in another format, say, .ogf or a VRM file, you will need Blender addons to support importing those formats.
Optional:
If the model has too many bones (as is the case with many ripped game models), cleanup may be necessary. If the extra bones deform the model, use of the Cats plugin might be necessary to merge the extra bones to a parent bone while keeping their weights. Keep in mind however, that some deform bones will be useful and should be kept, such as ones for cloth, or flesh.
Face bones will also need to be removed, since you might want to use flex sliders instead. If not, you can keep the face bones. Just know that most animators loathe animating with face bones.Cats blender addonhttps://catsblenderplugin.xyz/
We need to keep one thing in mind, every mesh object needs to be less than ~60k vertices each. If a mesh object is more than 60k verts, you will have to split it into multiple objects.
It also might be a good idea to have separate mesh objects based on what they are, for example, Body, Hat, Boots, Jewelry, etc. This will also help set up bodygroups for models later.
The chunk of the work we'll have to do in blender involves renaming bones to work with SFM's built-in simple valve biped rig. The rig looks for specifically named bones in the base skeleton, i.e. fingers, hands, arms, neck, head, spines, pelvis, legs and feet. You only need to rename the basic skeleton, you do not need to rename extra bones.
The full list and heirarchy of bone names:https://kicodora.com/?p=valvebiped
Some models may have more or less spine bones than needed, or more neck bones. In that case, simply continue the naming scheme for the spine bones, and add numbers at the end of the neck bones like the spine bone names.
Select your armature, and scale your model up by 39.5x times.
39.5 Meters in Blender = 1 Meter in SFM.
Now, select everything and Apply the scale, by pressing [CTRL+A] and selecting Rotation & Scale.
Now that that's done, go into object mode, select the Armature (skeleton) and go into pose mode.
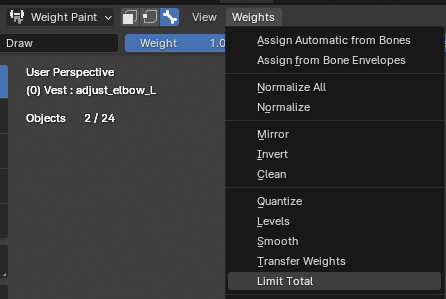
In pose mode, press [A] to select all bones, and press [I] to keyframe the position, rotation and scale of all the bones. There's one final thing you need to do. Select the armature, select a mesh, go into weight painting mode, and at the top bar (Weights > Limit Total > Set it to 3)
You'll need to do this for every mesh object. After the model and skeleton work is done, let's start work on preparing for materials.
(Remember to save your work!)
Here's what you need to do to set up the eyes (as of now):
Selecting the eyeballs.
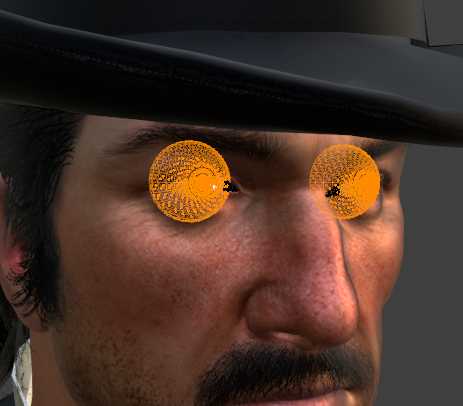
- Select the eyeballs in edit mode (as shown in the image above). (This can be made easier by going into edit mode, pressing [3] for face selection, hovering over a face and pressing [L] to select connected faces. This will make sure you only select the eyeballs and not the fleshy bit towards the nose.)
- Split them into their own mesh object (
> Separate). Name the object "eyeballs" or such.
- On the left eyeball (left eyeball only), assign a material called 'eyeball_l'
- On the right eyeball (right eyeball only), assign a material called 'eyeball_r'
You can assign materials to specific faces by selecting the relevant faces in edit mode, going to the materials tab, adding a new material slot, creating a new material and clicking the Assign button with the relevant mesh portion selected.
Now that that's done, keep track of all the material names for all the meshes. You do not have to spend time accurately creating the material shader inside Blender, as only info such as the names of materials will be ported over with the model.
(Save your work.)
If you have the BlenderSourceTools addon installed and enabled (if you haven't, go do that now), there should be some new boxes in the Scene Properties tab (image below)
Here is an example of what mine looks like.
The relevant boxes are: Source Engine Export and Source Engine Exportables.
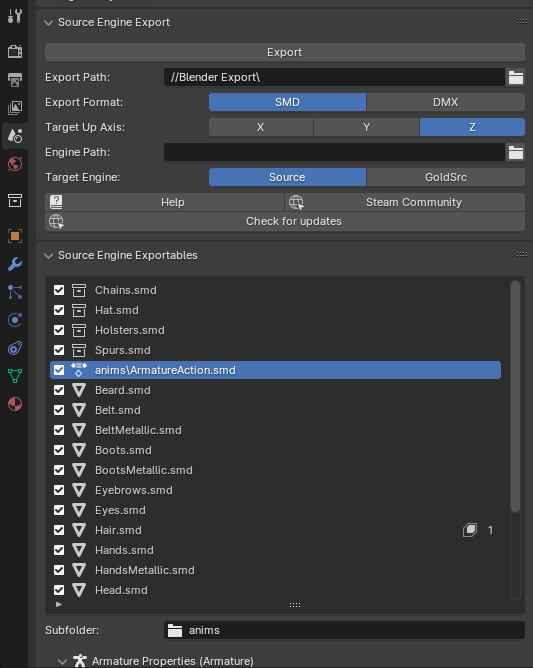
Let's take care of the first section first, Source Engine Export.
- Export Path: This is where Blender will export the .smd and .dmx files to. Do not set this to your SFM's Models folder, instead, set this to a work folder where you'll be performing the porting work.
- Export Format: Refer to the glossary section of the guide to see what the options mean.
- Target Up Axis: Leave this as Z.
- Engine Path: Only necessary if we're compiling through Blender, which we're not doing.
- Target Engine: Leave this option as-is.
Now, Source Engine Exportables.
Here you will see a list of objects that will be exported. There probably won't be this many for you, as in the screenshot I was porting a complex model with complex materials.
If you keyframed all the bones (remember when you did that hours ago?), there should be something called 'anims\ArmatureAction'. If so, great! Yippee! :steamhappy:
If it's not showing up after you did that, uh, we can take care of that later.
Alright, exporting.
Most objects can be exported as SMDs with no issue. But, models with flexes on them will need to be exported as DMXs, such as the head with face flexes on it.
If your model has no flexes, set the Export Format to SMD and hit Export > Scene Export.
If your model has flexes, set the Export Format to DMX and hit Export > Scene Export.
Our work in Blender is done. Somewhat. We will move onto the Compile Process now.
When I export SMDs, it feels like blocks of yummy cheese.
When I export DMXs, I think of 50 Cent.
Character Porting: Part 2 - Writing the QC File
Now we've gotta write the QC File. Goodness Gracious!
We'll be postponing the texture conversion process for later. Right now, let's focus on getting the model through to SFM.
To do that, Firstly we're gonna need a QC file.
Here's a Basic QC file to copy:
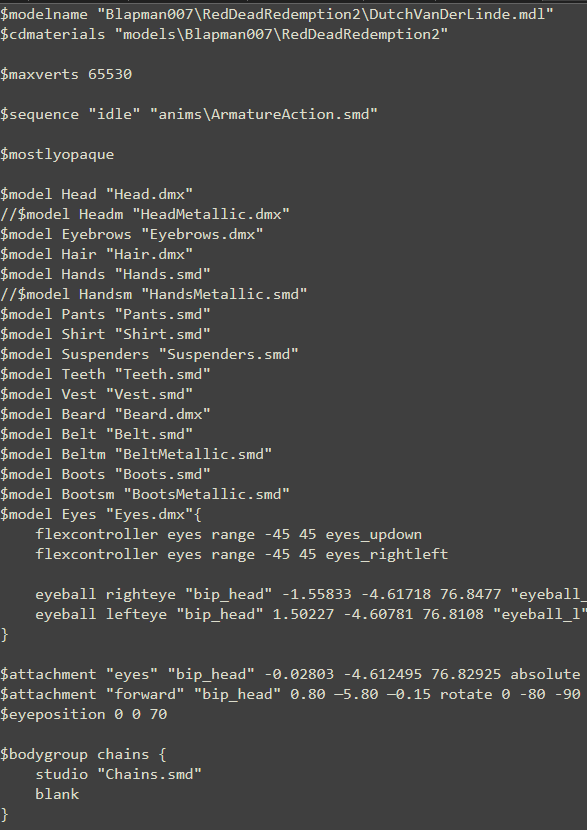
Here's an example of what the top half of a finished one looks like:
Copy the Basic QC into your text editor (Notepad++ if you have that, or Normal Notepad works too).
Save the file as a .qc file with the filename of your model. (Example: DutchVanDerLinde.qc or GordonFreeman.qc)
Let's go through this one line at a time.
It is a good practice for the first term of the path to be your username, as it is a unique identifier and doesn't risk conflicts with anyone else's ports.
The last term of the path is the model's name. This should end with a .mdl extension, and it is what will show up in SFMs model browser.
If you need to, you can add extra terms to the file path for organization.
The first term must always be "models\". This is because your model is in 'usermod/models' folder, and your textures will be in 'usermod/materials/models'.
The next terms will be your $modelname path without the model filename.
If you are confused, refer to the screenshot of my QC file above.
The first term will be what the object will be called. The second term is the name of the SMD or DMX.
Here's how this should be used:
For example, Here's a bodygroup command that lets my model have a hat, or nothing in it's place:
We're not done with the QC file yet, as we still have to set up the eyes. We'll come back to this later. Save your work, and continue. These are the basic QC commands you'll need to know. If you need something that isn't explained here, you can check the Valve Dev Wiki for the full list of QC commands.
Valve Developer Wikihttps://developer.valvesoftware.com/wiki/Category:QC_commands
Character Porting: Part 3 - Compiling
It is now time to compile our unfinished model.
First, if you haven't done so, we need to set up Crowbar.Open Crowbar.
In the Set Up Games tab, use the first drop down menu to change to Source Filmmaker.
Now, we need to set up the library path. At the bottom, in a section called Steam Library folders, click the browse button and point it to your Steam Library folder.
For example, my full path to SFM looks like this:
'E:\SteamLibrary\steamapps\common\SourceFilmmaker'
I will need to select the folder that is before 'steamapps', so I will choose 'E:\SteamLibrary' This is what my Crowbar setup looks like.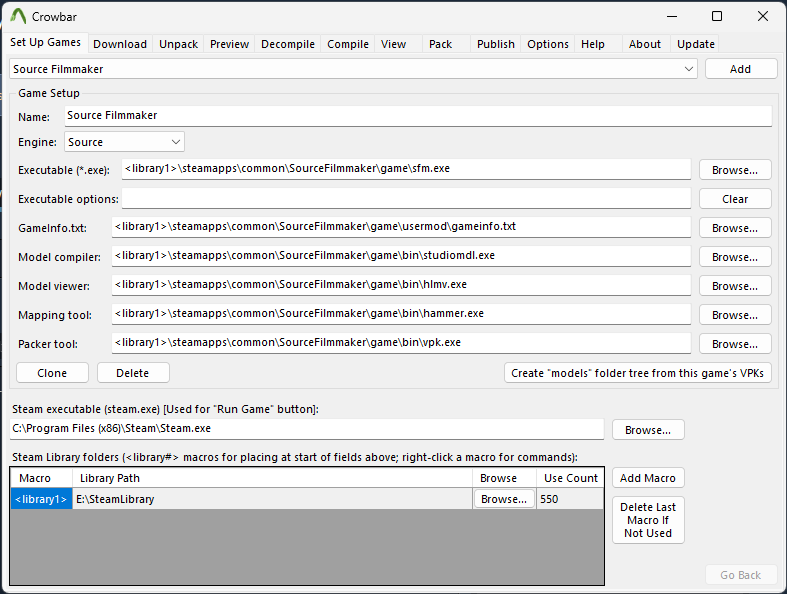
If your Steam.exe is in a different directory, you will also need to set that up in the Steam Executable box.
Now, move to the Compile Tab.
In the QC input box, set the dropdown to File, and browse to the QC file you wrote.
As for the Output path, set the dropdown to 'Game's "models" folder'. This will place the compiled model into your 'usermod/models' directory.
After the setup has been done, hit the Compile button.
You may or may not get some errors.
Head to the Troubleshooting section of the guide to see if the guide can help with your error.
If you've fixed your errors and the model has successfully compiled, hit the "Use In View" button at the bottom right. This will take you to the View tab. Hit the View button at the bottom left.
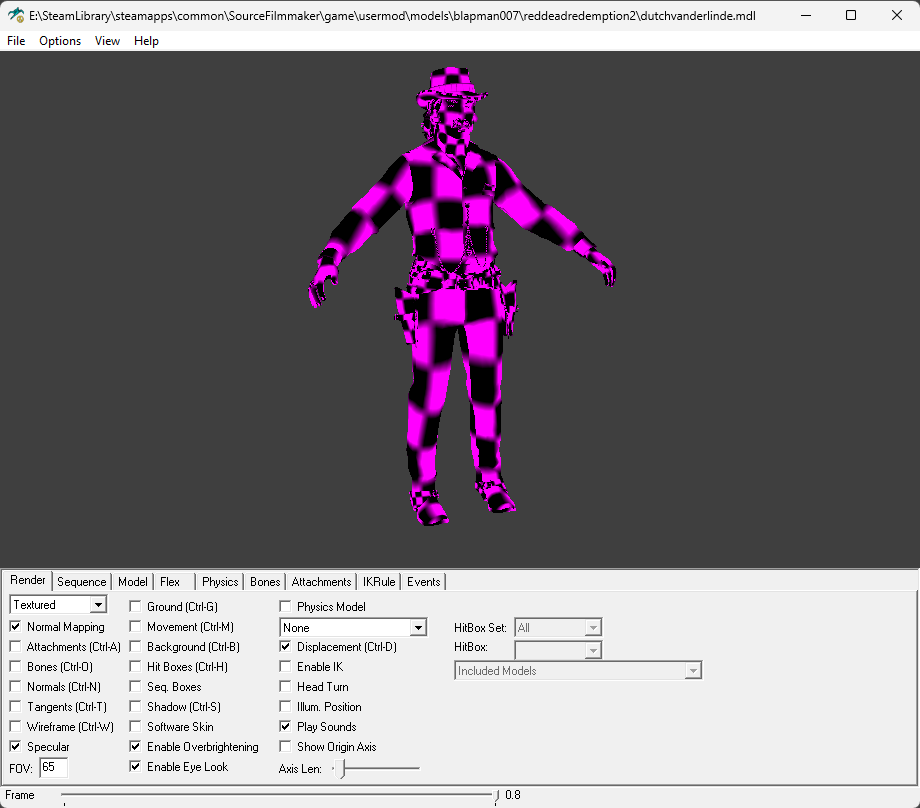
This will open up HLMV and you should see your model here, with a lot of pink and black missing textures. Do not worry, as this means your model has successfully compiled, and is only missing the materials, which we will move onto in the next step.
I have textures, John
What textures, what ♥♥♥♥♥♥♥ textures, Dutch?
Character Porting: Part 4 - Materials
Many models nowadays use advanced shading, such as PBR shaders, with features such as metalness, roughness, specular, etc. SFM doesn't have these, kind of.
There are a few ways to go about this.
The first, and easiest, is to just convert the base color texture (diffuse/albedo) and normalmap texture into VTFs. This is what we'll be covering here right now.
OPTIONAL!!
There are methods to 'fake' the PBR effect, for advanced materials in SFM. Notably:These are good for beautiful-looking materials if you've got the time and energy to do so. The example VMTs for these have been included in the [Common VMTs] section of the guide for those who are using these methods.Method 34, Metalness Roughness workflowhttps://youtu.be/tzej0FcOeUYMethod 36, Specular Gloss workflowhttps://youtu.be/IC4TvijtEJg
First, we'll need to convert the relevant textures into VTFs using VTFEdit.
You can import textures one by one by (File > Import), (Save As > name.vtf),
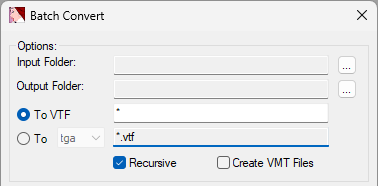
or you can batch convert an entire folder by (Tools > Convert Folder).
The names of the VTFs themselves don't matter, you can name them whatever you want.
Now that the textures have been converted into VTFs, we're gonna need VMTs.
You can do this in Notepad, or VTFEdit.
Head to the [Common VMTs] section of the guide and copy the "Basic VMT".
Remember the names of the materials in blender? We're going to have to make VMTs for each material with the same names. But, we will not make VMTs for the eyeball materials 'eyeball_l' and 'eyeball_r', at least not yet.
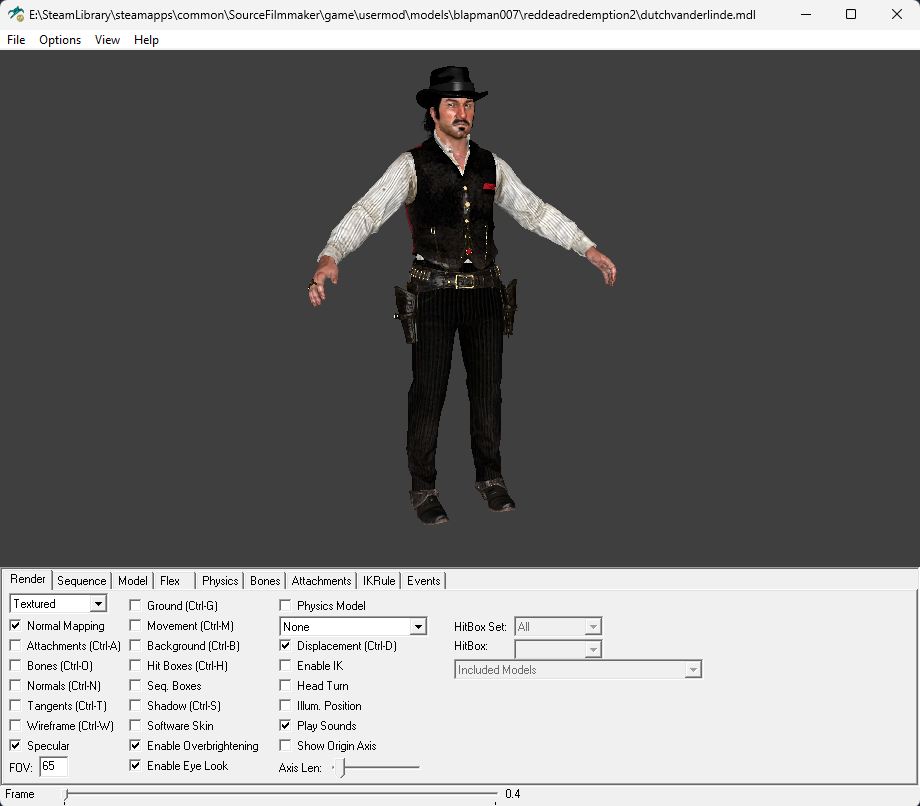
If the normalmap looks wrong inside SFM, or the lighting on the model looks strange on the model with normalmap, you probably need to invert the Green (y) channel of the normalmap texture, as some games or engines use different types of normalmaps, with some using Green for Up, and some using Green for Down.Save all your VMTs, and move your VMTs and VTFs into your cdmaterials folder (the one mentioned in your QC file.) After all that's done, head back to Crowbar, View tab, and hit view. If all went well, you should see your model with textures, like so:
This model uses advanced materials, and I've also done the eyes. The eyes on your model will still have error textures on them as we've not done it yet.
Now, all that's left are the eyes.
Character Porting: Part 5 - Eyes
Most porters use a tool called qc_eyes to set up the eyes, but personally I follow this video:
You don't need to separate the eye texture into iris and sclera. If you have the whole eye texture as shown in one of my screenshots below, it is okay to just plug that into the eyeball vmt.
To get the center of the eye, you can just select the ring of vertices closest to the center (if there are two 'middle rings', you can select both rings, like shown in the screenshot) and just look at the median coordinates (marked in screenshot).For models with non-spherical or angled eyes, you will have to experiment with the eye center positions and wall-eye values.
Here's an example of a finished eye setup, from one of my ported models:
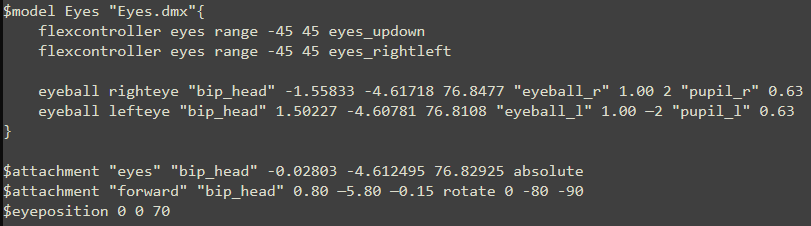
For the eye materials, if you haven't converted the eye texture to a VTF already, you'll need to do so.
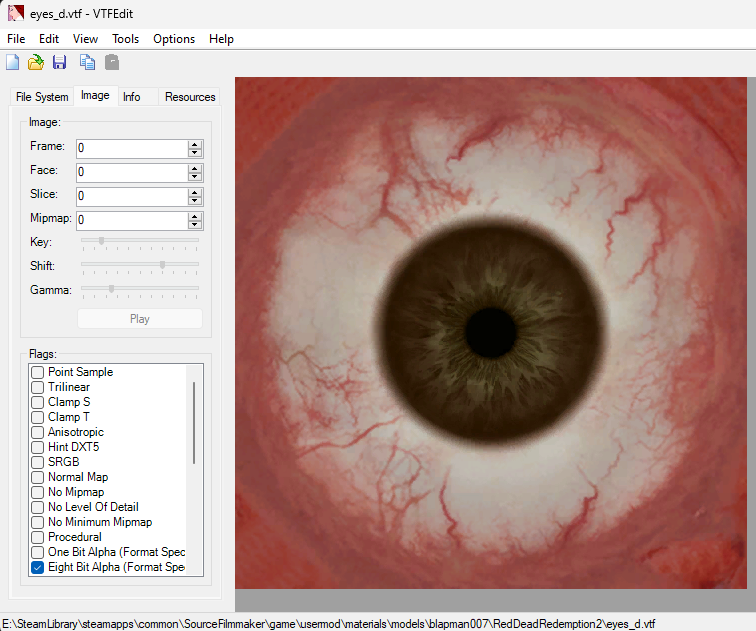
Here's the VMT for the eyeball materials (eyeball_l and eyeball_r):
Here's the eye_ao texture. It's just a vignette.

Now that that's done, it should be the end of it. Simply compile the model for the final time, (and fix any errors) and view the model in the View tab, and check the eyes.
When you spawn the model in SFM, there should be a point called viewtarget. If the eyes show up and look at the viewtarget, your work is done. The port is complete. Celebrate! :steamhappy:
Prop Porting
Prop porting is a relatively simple affair.
It is much less complex than character porting.
First, we'll be importing the model into blender.
We'll need to scale the model up first, since Blender and SFM sizes models differently.
Scale your model up by 39.5x times.
39.5 Meters in Blender = 1 Meter in SFM.
Now, select everything, hit [CTRL+A] to apply the Rotation, Location, and Scale.
Model parts (each object) needs to be under 60k verts. If any object is above 60k verts, split them into multiple objects.
If your model is rigged, select the armature, then a mesh object, go into weight paint mode, and at the top (Weights > Limit total > Set it to 3).
Select the armature in object mode, go into pose mode, select all the bones, and hit [I] to keyframe Rotation, Location, & Scale.
Keep track of the material names assigned to the meshes in Blender.
If you've set up the BlenderSourceTools addon, new boxes should appear in the Scene Properties tab.
In Scene Properties , we'll first set up the Source Engine Export box.
The export path should be set to a temporary work folder.
The export format should be SMD, UNLESS the model has flexes, in which case set it to DMX.
All your objects should show up in the Source Engine Exportables box.
Hit export and all your objects will be exported as SMDs or DMXs to the export path folder.
We'll need to write a QC file now. Here's a Basic QC file for you to copy.Open Crowbar.
Follow the section of the guide called 'Character Porting: Part 3 - Compiling' (im not writing all that again)
Now, we'll have to convert the materials.
Convert all the relevant texture files into VTFs with VTFEdit.
Move all the texture files into your cdmaterials folder (mentioned in your QC file). You're now gonna have to create VMT files for every material used by the model, with the same filenames as the materials in blender.
- Copy the Basic VMT from the 'Common VMTs' section of the guide.
- Use a text editor to paste the Basic VMT, and change the $basetexture and $bumpmap to point to your base color texture and normal map texture respectively (If your model does not have normalmaps, delete the $bumpmap line).
- Save the files with the appropriate name, and with the file extension '.vmt' into your cdmaterials folder path (mentioned in your QC file.)
Now that all your VTFs and VMTs are in your cdmaterials folder, open the compiled model in the View tab of Crowbar, or spawn it in SFM. The port is complete, your job is over!
Common VMTs (That I use)
This guide only follows the Basic VMT and not the advanced material VMTs.
However, the VMTs are here if anyone needs them.
Basic VMT"VertexLitGeneric" { $basetexture "models/(folders)/diffusetexture" $bumpmap "models/(folders)/normalmaptexture" }
Specular Gloss VMTsBase Mesh VMT:"VertexlitGeneric" { "$basetexture" "path to basetexture" "$bumpmap" "path to normalmap texture" "$phongdisablehalflambert" "1" "$phongexponenttexture" "path to exponent texture" "$phong" "1" "$phongboost" "23.076" "$phongfresnelranges" "[0 .225 1]" } // Material using pseudo pbr method 36 (Specular) // Engine branch: SFM // Hierarchy: Stack 1/3 // This vmt affects: BaseSpecular Stack VMT:"VertexlitGeneric" { "$basetexture" "path to specular texture" "$bumpmap" "path to normalmap texture" "$color2" "[0 0 0]" "$additive" "1" "$translucent" "1" "$phongexponenttexture" "path to exponent texture" "$phongalbedotint" "1" "$phong" "1" "$phongboost" "184.615" "$phongfresnelranges" "[.25 0.625 1]" "$ambientocclusion" "0.7" } // Material using pseudo pbr method 36 (Specular) // Engine branch: SFM // Hierarchy: Stack 2/3 // This vmt affects: Specular
Metallic Roughness VMTsBase Mesh VMT:"VertexLitGeneric" { $basetexture "path to base texture" $bumpmap "path to normal map texture" $phongexponenttexture "path to exponent texture" $color2 "[0 0 0]" $blendTintByBaseAlpha "1" $phong "1" $phongboost "9.9934895" $phongfresnelranges "[0.05 0.115 0.945]" $phongdisablehalflambert "1" // $envmap "path to fallout4cube_dithered_grey" // $normalmapalphaenvmapmask "1" // $envmapfresnel "1" // $envmaptint "[.2 .2 .2]" } // BASE MESHMetallic Stack VMT:"VertexLitGeneric" { $basetexture "path to base texture" $bumpmap "path to normal map texture" $phongexponenttexture "path to exponent texture" $PhongAlbedoTint "1" $color2 "[0.2 0.2 0.2]" $translucent "1" $phong "1" $phongboost "19.986979" $phongfresnelranges "[0.87 0.9 1]" $ambientocclusion "0.7" } //METALLIC MESH
Skin VMT"VertexlitGeneric" { "$basetexture" "path to basetexture" "$bumpmap" "path to normalmap texture" "$phongdisablehalflambert" "1" "$phongexponenttexture" "path to exponent texture" "$phong" "1" "$phongboost" "3" "$phongfresnelranges" "[0.25 0.47 1]" }
Advanced Eyeball VMT"eyerefract" { "$Iris" "path to eye diffuse texture" // Eyeball Texture "$AmbientOcclTexture" "path to eye_ao texture" // Ambient occlusion in RGB, A unused "$Envmap" "Engine/eye-reflection-cubemap-" //Reflection environment map "$CorneaTexture" "Engine/eye-cornea"// Special texture that has 2D cornea normal in RG and other data in BA "$Irisframe" "0" "$EyeballRadius" "0.5"// Default 0.5 "$AmbientOcclColor" "[0.3, 0.3, 0.3]" // Default 0.33, 0.33, 0.33 "$Dilation" "0.6" // Default 0.5 "$Glossiness" "0" // Glossiness of eye (1 is default, 0 is not glossy at all) "$ParallaxStrength" "0.25" // Default 0.25 "$CorneaBumpStrength" "0.30" // Default 1.0 }
Troubleshooting Errors
Troubleshooting Errors"Could not load file SMD/DMX"The filename of the SMD/DMX is probably not spelt right, or is in another location. Make sure the QC file is located in the same folder as the SMD and DMX files.
If this error relates to the ArmatureAction, and you're sure it's spelt right, simply replace the "anims/ArmatureAction" with one of your other SMD/DMXs."Exception Access Violation"This could be caused by a few things.
One probable cause is that one or some of the objects are too big/complex. Check if any object is over the 60k vert limit, and if so, split them into multiple objects.
The 60k vert limit applies per object, not to the whole model.
The other probable cause is something I do not fully understand, but I do know how to fix.
Try moving the problematic SMD/DMX to the top of the list of $models in your QC file.
If the problematic one is at the top already, try moving it somewhere else.Material errors for parts exported as DMXI have encountered the problem of material names being saved into DMXs as strange symbols and letters instead of the actual material names.
What fixed this for me is going to a previous Blender version and installing the appropriate version of BlenderSourceTools.
(In my case, I had to downgrade from Blender 4.2 to 4.1. After a while, the problem mysteriously reappeared, forcing me to downgrade from 4.1 to 4.0.)Eyes do not work rightI had a model where one of the eyes worked right, but the other just did not work right. either it was inverted, or was being projected from strange angles.
The solution to this that I found, was opening the model in the ModelViewer, turning off eyelook (makes the eyes look at the camera), going to the attachments tab, selecting the 'eye' attachment, and messing with the rotation value.
(In my case, a rotation of -90 0 0 fixed the eyes.)
- Changing Textures Using Material Overrides★ 5 (1.4k)41k views2.7k ♥5 minUpdated Jul 26, 2014
- Manually Updating TF2 Content★ 5 (1.3k)35k views1.9k ♥2 minUpdated Nov 26, 2025
- The Fundamentals of SFM: For Beginners★ 5 (1.3k)25k views3.3k ♥55 minUpdated Apr 29
- Ваш первый постер★ 5 (1.1k)22k views2k ♥5 minRussianUpdated Oct 22, 2024
- Getting Gmod Workshop stuff too SFM★ 5 (510)15k views1.3k ♥1 minBulgarianUpdated Aug 4, 2015
- Animation Guide★ 5 (704)14k views1.9k ♥6 minUpdated Apr 9, 2023




- Upgrading to PremiumTeam Fortress 2★ 5 (20k)1441k views11k ♥6 minUpdated May 11, 2022
- No More Room in Hell Official ManualNo More Room in Hell★ 5 (2.8k)569k views2.1k ♥29 minUpdated Apr 22, 2019
- NMRiH Community Hosting GuidesNo More Room in Hell★ 5 (526)351k views653 ♥1 minUpdated Aug 10, 2022
- How to 'Git Gud' Soon™MORDHAU★ 5 (2k)318k views3k ♥68 minUpdated Nov 16, 2024
- Лучшие кооперативные игры SteamPAYDAY 2★ 5 (1.5k)315k views2.1k ♥56 minRussianUpdated Apr 27, 2025
- Desert Eagle Heat Treated | Blue GemCounter-Strike 2★ 5 (1.6k)292k views1.5k ♥2 minUpdated Jan 16





This guide was created by its original author on the Steam Community. Are you the author and want it removed? Request removal.