Questionable Contraptions
Plant Mutations
For example:
Sleet Wheat & Gas Grass have a max radiation of 12200 Rads / cycle. So say the tile at the base of the plant has a radiation of 2600 rads/cycle, then the chance to mutate is:
2600 / 12200 * 0.80 = 0.17 * %100 = 17% (remember this can't exceed 80% because of game code)
Also important, is the agriculture skill of a duplicant. If a seed does not drop, then there is nothing to be mutated. There is a base chance of 10% for a seed to drop, increased by 3.3% for every level. So at lvl 20, there's a 76% to drop a seed, and at lvl 27 (acheivable with Bionic dupes) there is a 99% chance.
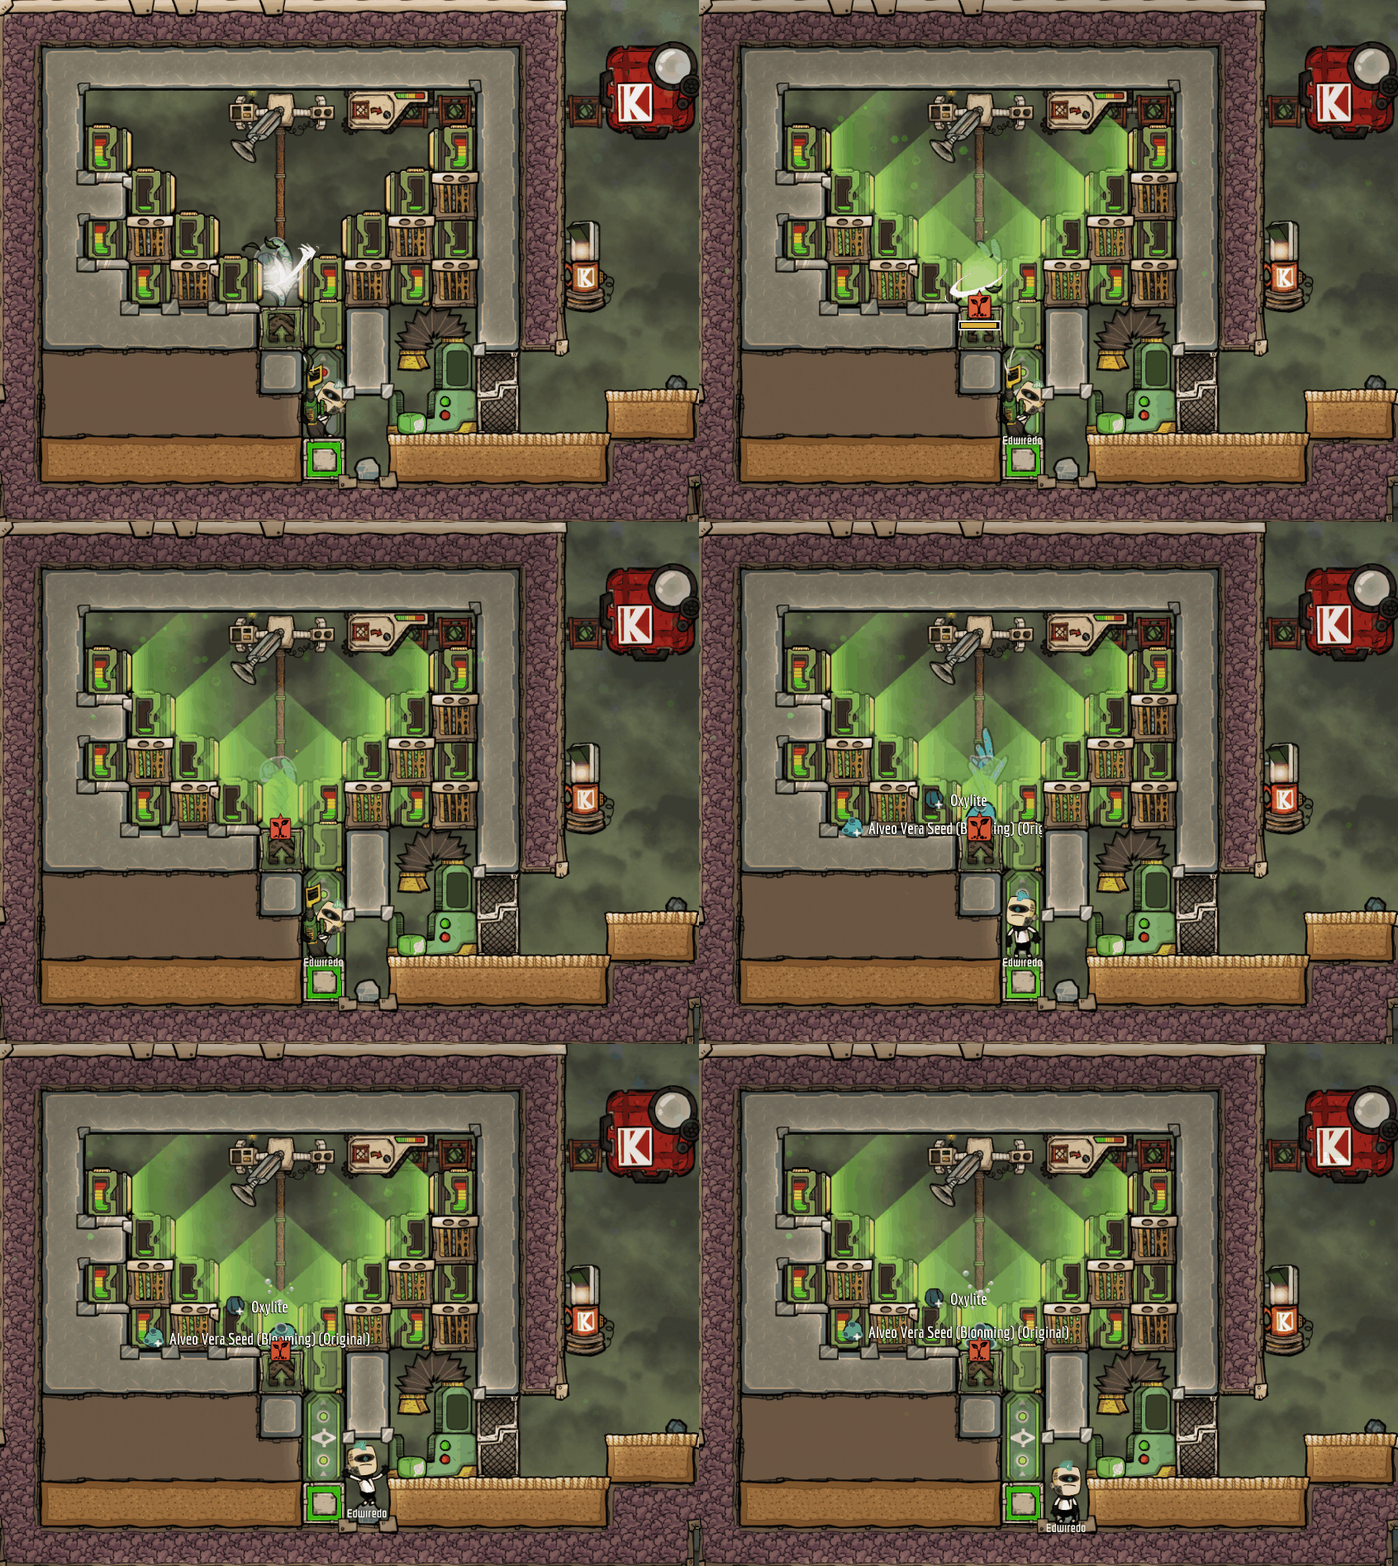
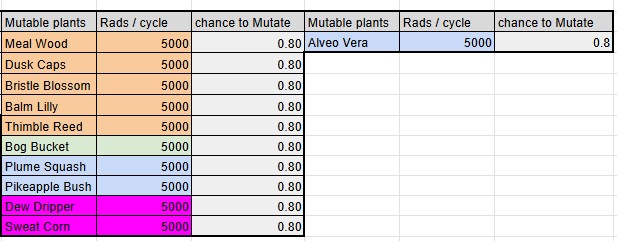
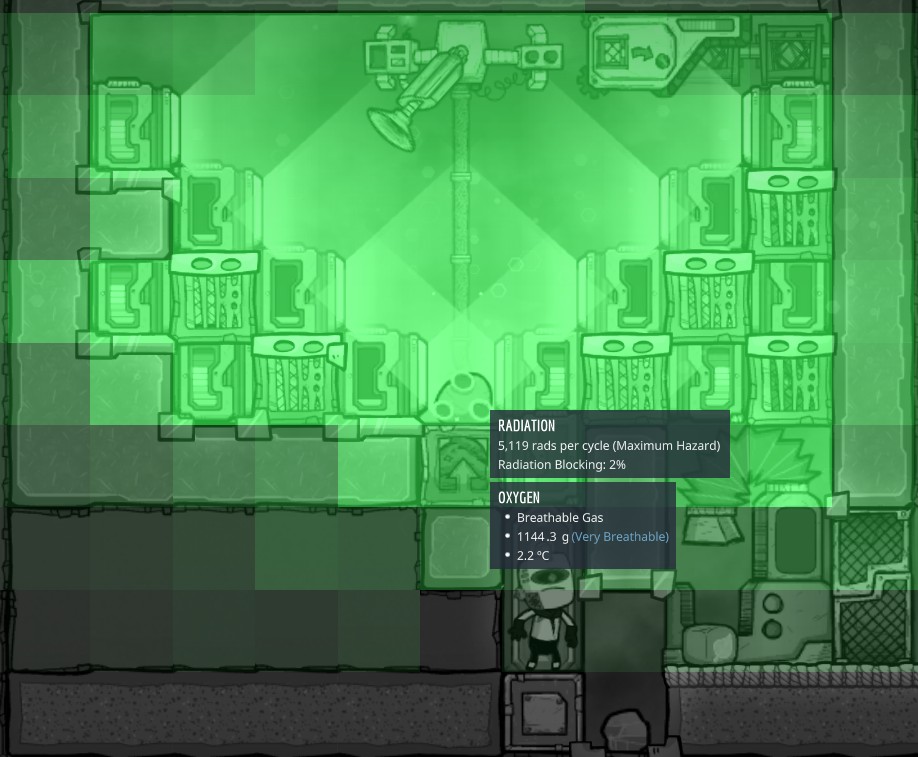 And here the chance for each mutable plant to mutate in this setup. (Orange = Base game, Green = SO, Blue = FPP, Purple = PPP)
100 Radbolts (RB) is the max amount a RB chamber can shoot out from storage. But we can combine any number of RB into one by shooting them into the same RB reflector pointing at itself.
When the reflector is sent a red signal, it will stop reflecting and allow the now mega RB to pass and collide with another RB preciously when we want it to.
So I made this:Gif of it running: https://www.reddit.com/r/Oxygennotincluded/comments/1lwsidh/guarantee_mutated_plants_with_the_rad_bolt/
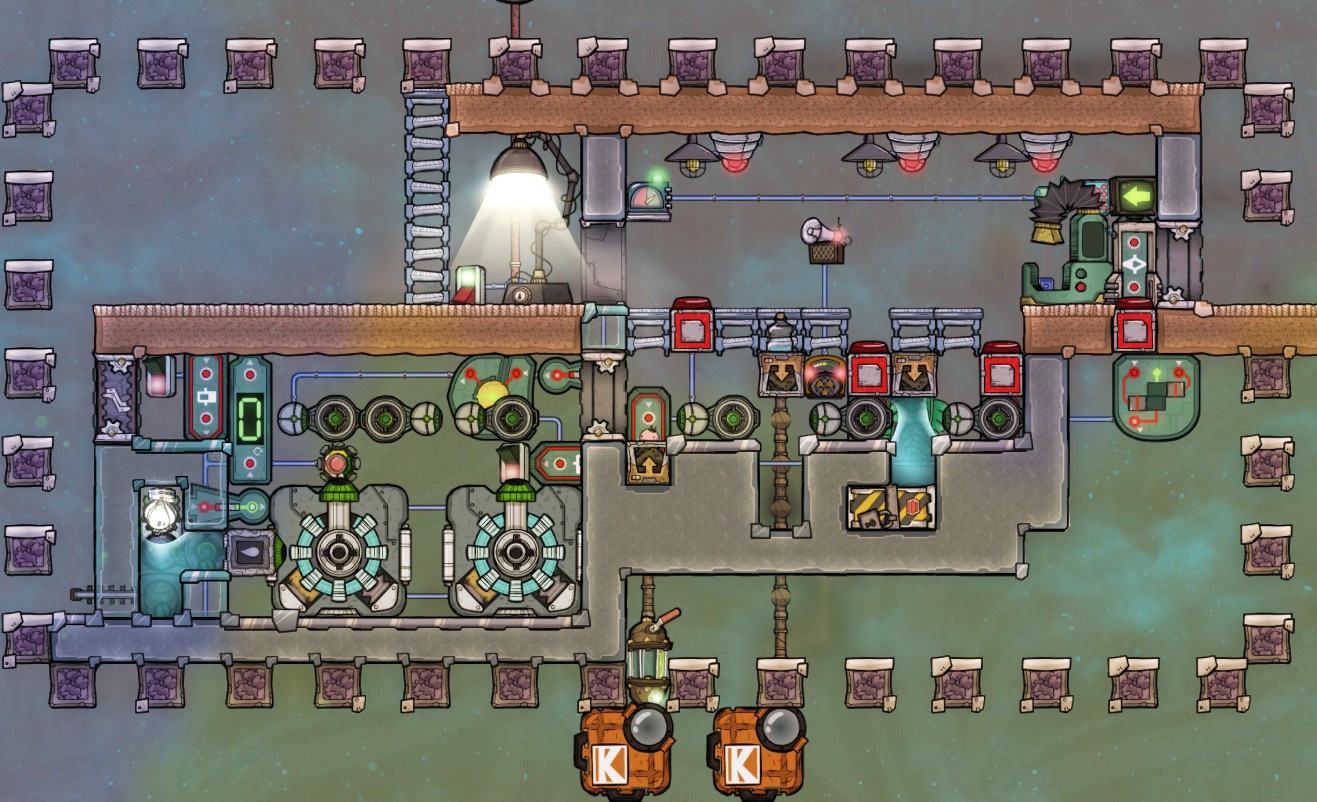 It does exactly what is described above, but includes timers for growth speed and harvest timing, logic to count the number of radbolts, and also a way to mutate seakomb by removing the water that would absorb radiation. The last feature was just because I could, not because you'd want to.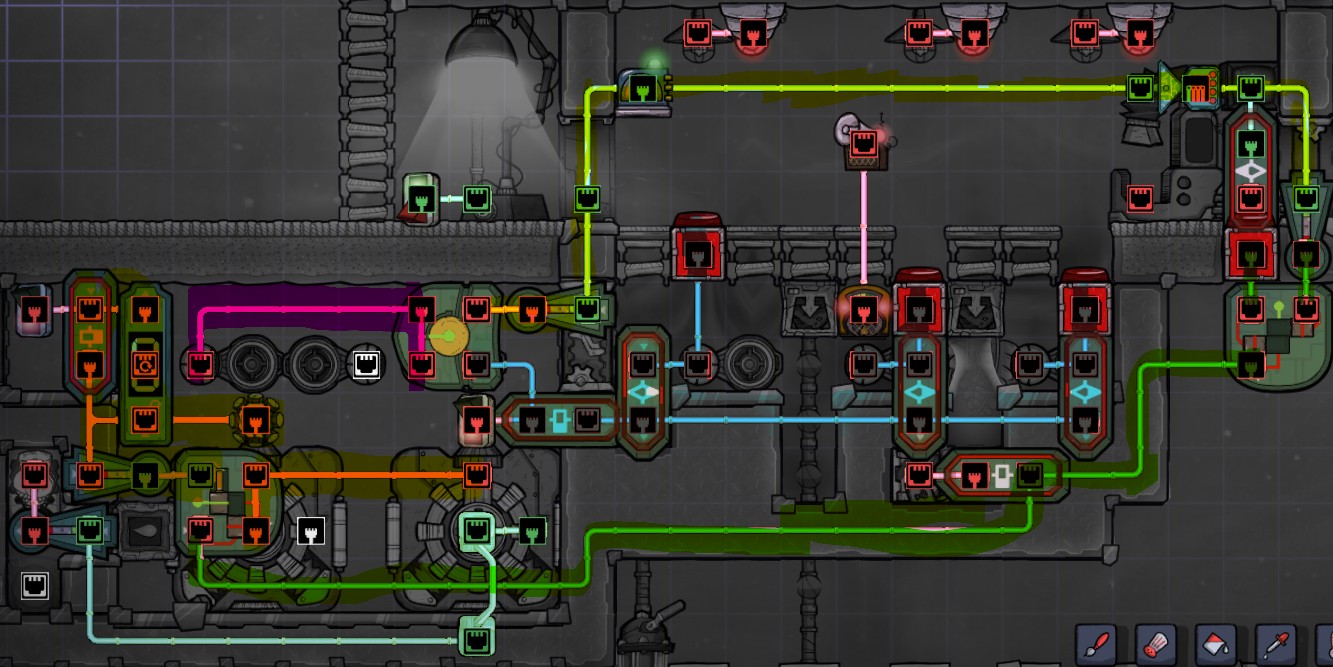
Manual switches to release RB if it malfunctions.
Disabling the Greenhouse so its not used, but plants inside can still be Farmer's Touched.
Sun Lamp For Gas Grass.
Door To remove water for Sea Komb.
Circuit to stop RB production from Shine Bugs when RB Chambers are full.
12200 Rads/Cycle / 33 / 18 cycles to grow = 20.5 Rads / Cycle
Using similar math we can find value of the 3 RB we are shooting (set inside the RB Chamber)
12200 / 2 (two RB Chambers) / 33 / 3 = 61
Note:
Only 1 dupe can do the harvesting and all timings are based on how fast they harvest (because that determines when the RB collide via the Blue circuit). So I'd recommend saving right before a harvest and then reloading if the timing wasn't correct. I'd also recommend Bionic Dupes because they won't lvl up and alter the timing.
I only show the different setups to grow different types of plants for the explanation, if this is only used for 1 planter box it becomes much more automatic because you don't need to change the timing between harvests. I also don't show any of the cooling loops you'd need to implement.
I use Shinebugs for the radiation source but you can use any other source like Wheeze Worts.
Digital Logic
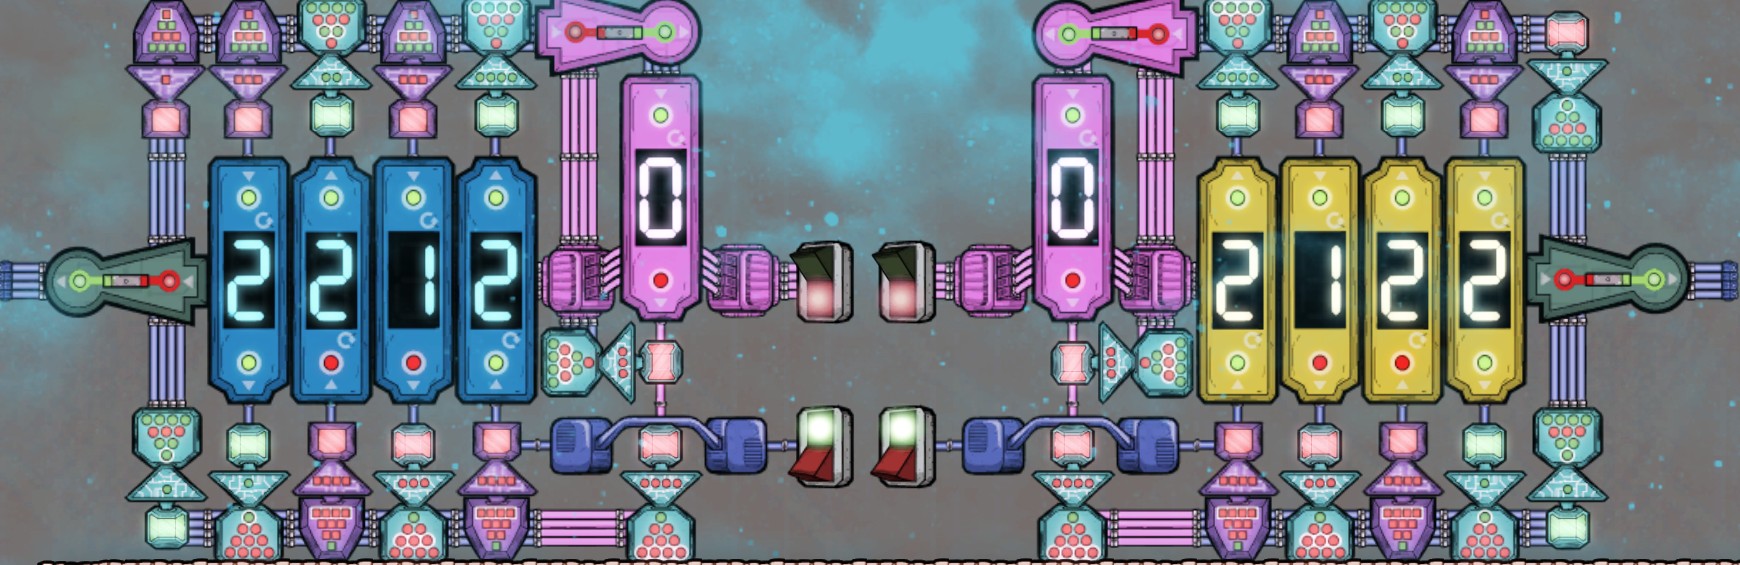
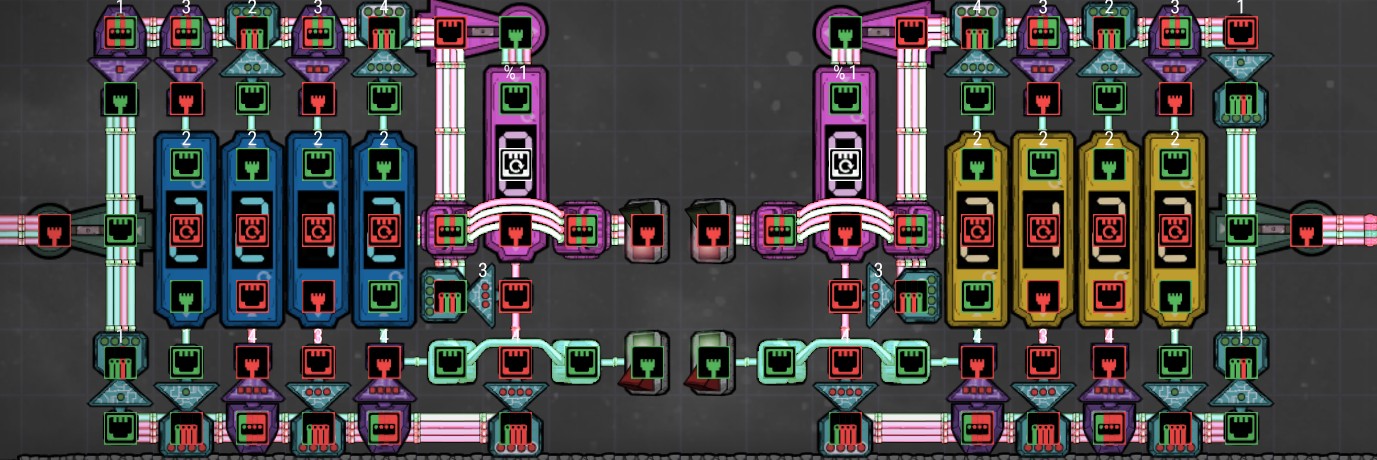
1100 - 1111 = 1011 (or) 15 - 12 = 11 (11 = -3 in unsigned binary)
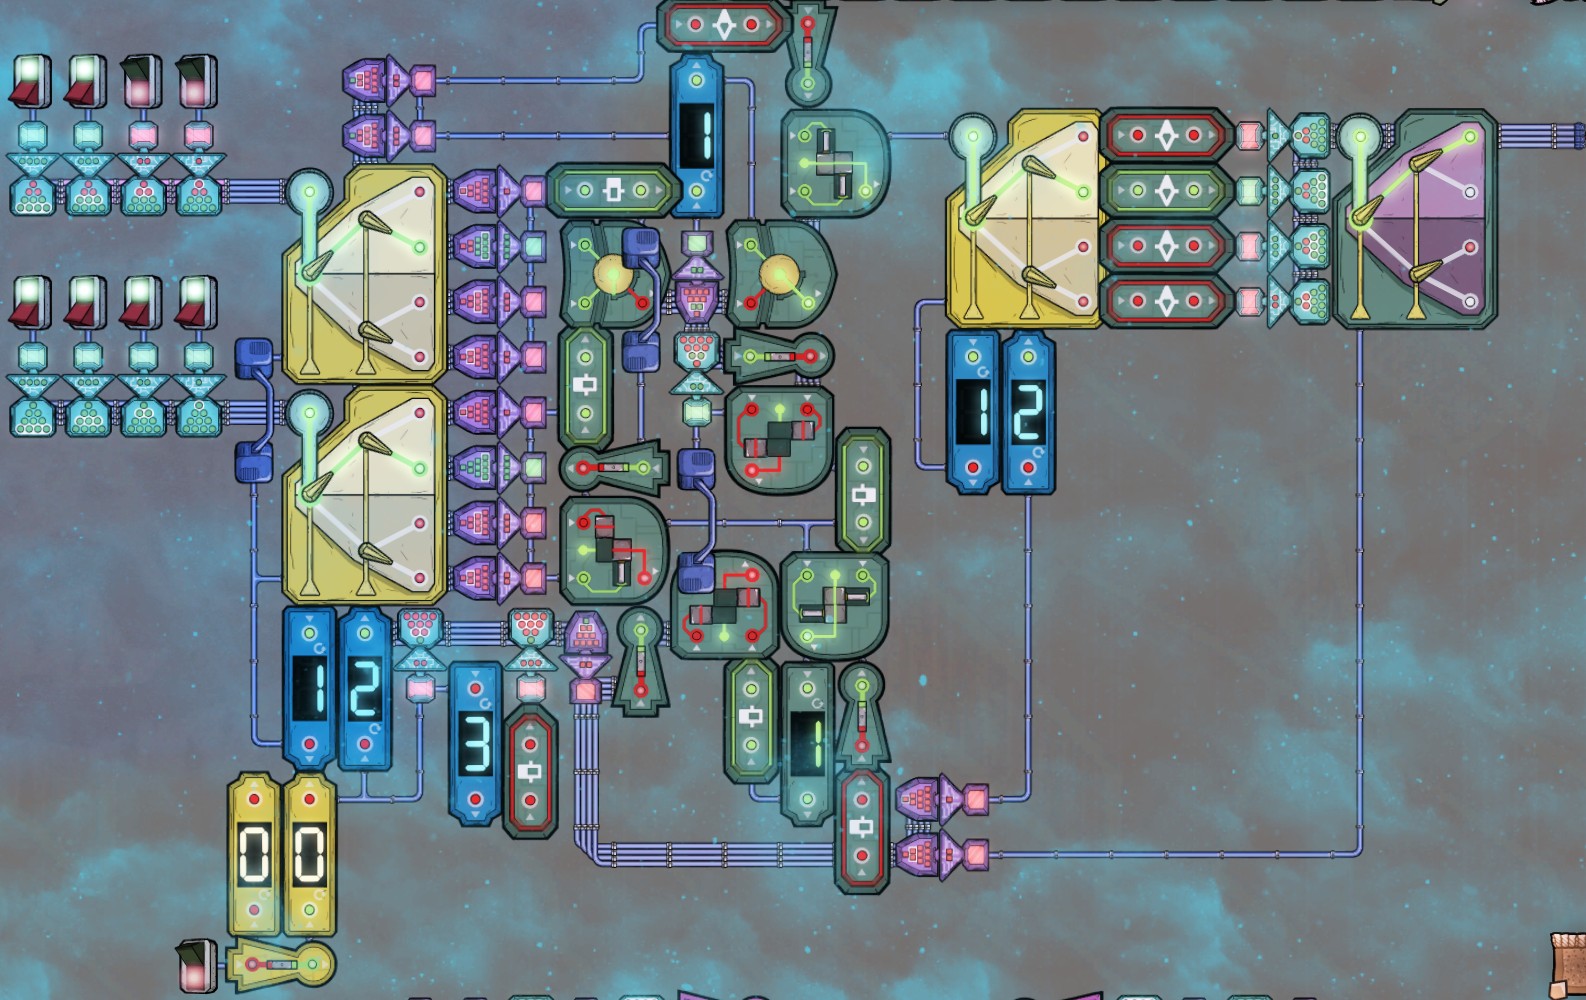
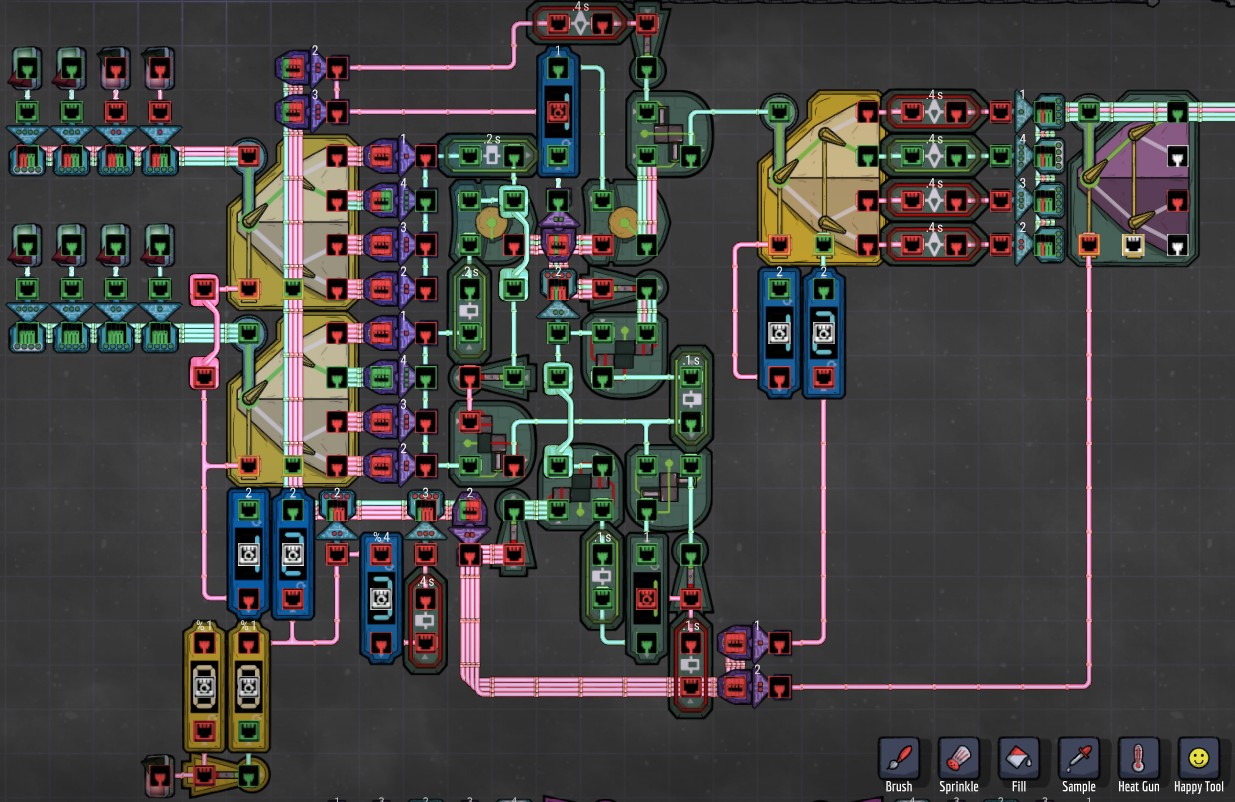 Its not a traditional series of subtractors for each bit, but instead holds the borrow bit in memory as each bit is cycled through. I'll explain useful parts of this circuit later but as a whole its useless in ONI so I wont go through it.
Using a signal counter set to 1, and in advance mode. we can get a rising edge detector.
For a falling edge detector we can simply negate the rising edge version.
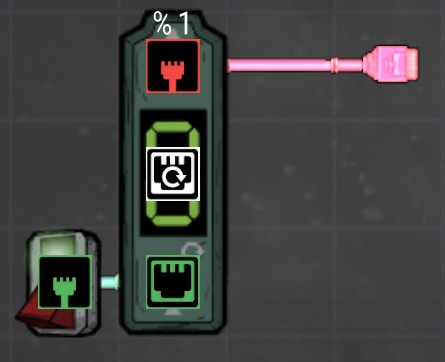
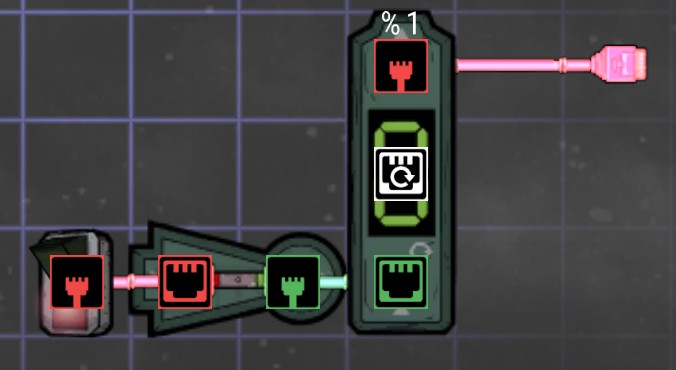
We can also combine the two to create a dual edge detector. This is what I use in my subtractor to cycle through the bits by clicking the switch only once and not twice for each bit. And can be used in the 4bit counters for the same reason.
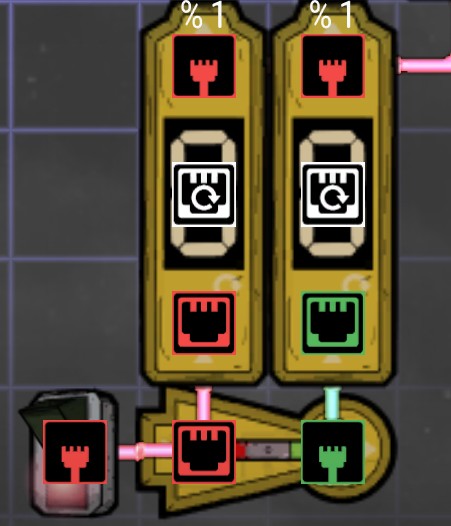
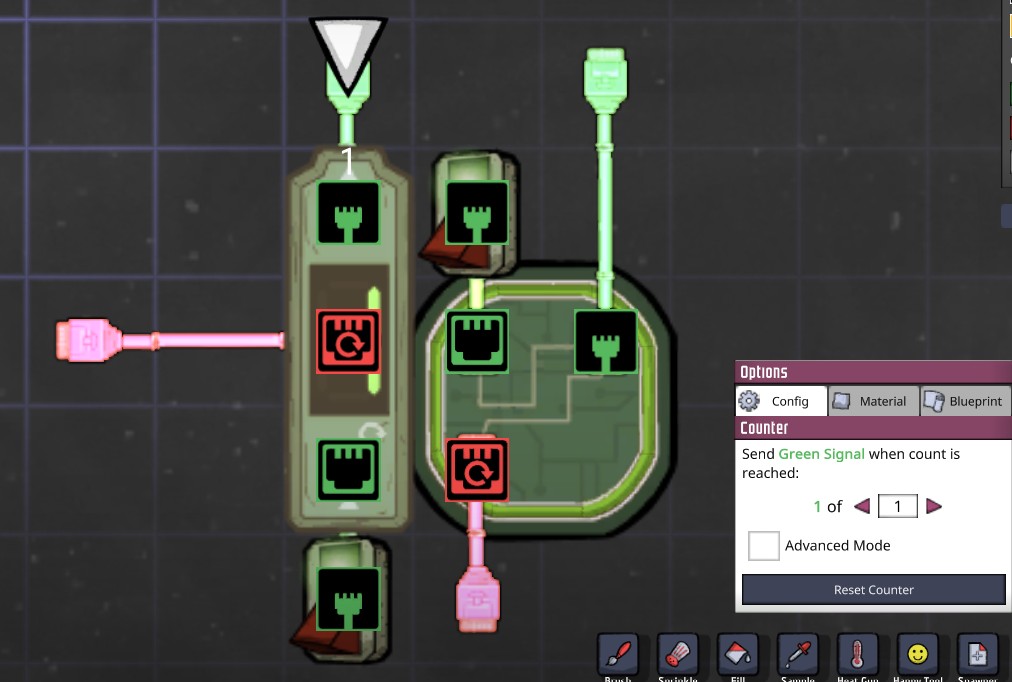
So instead we can use a multiplexor or an AND gate.
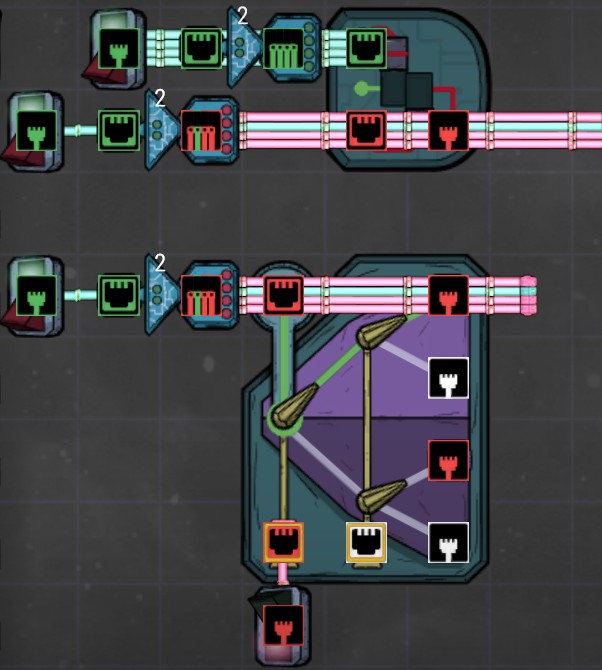 Both function the exact same. The only difference could be a small delay in the AND gate memory because the turns red 1 bit at a time because of how I setup the reset (a ribbon writer that continually writes to the next bit). The Multiplexor memory is from KBN on the ONI Forums.
Super Ranching

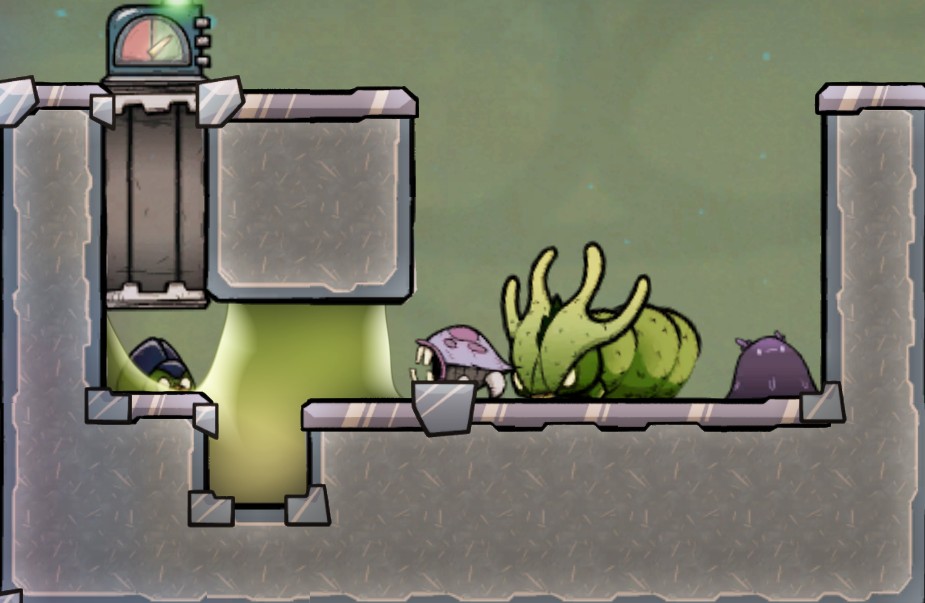
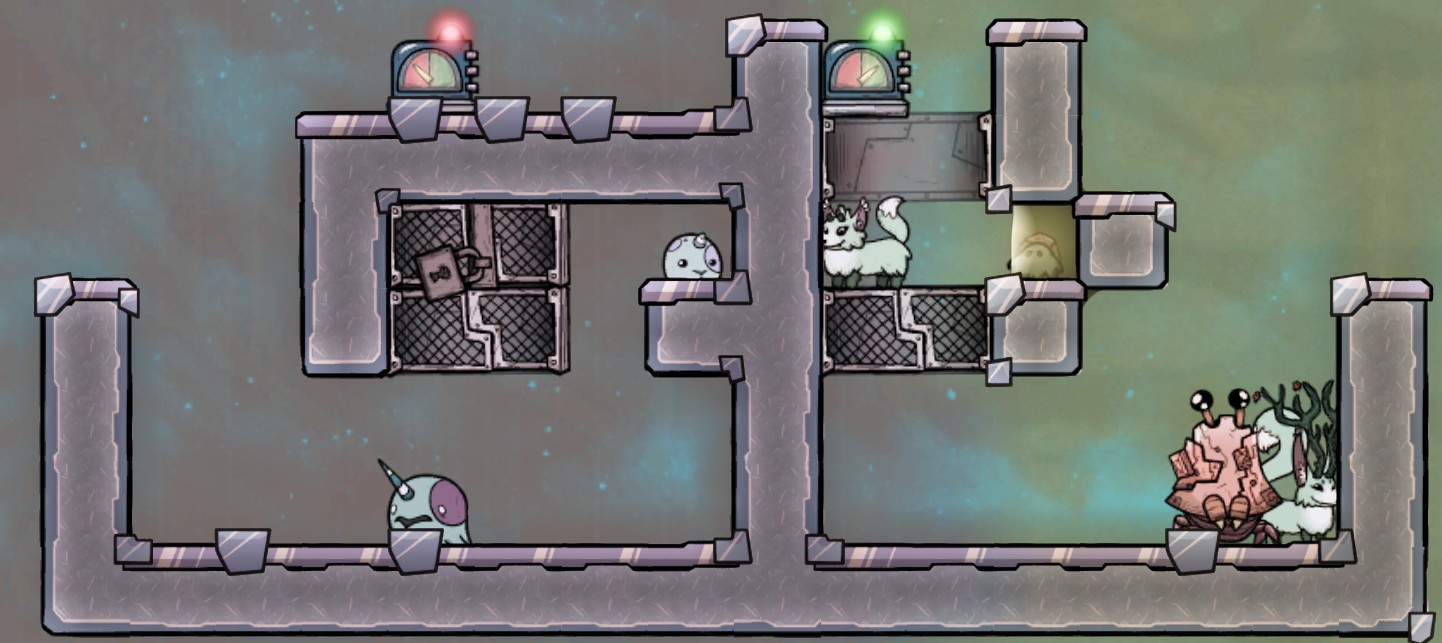
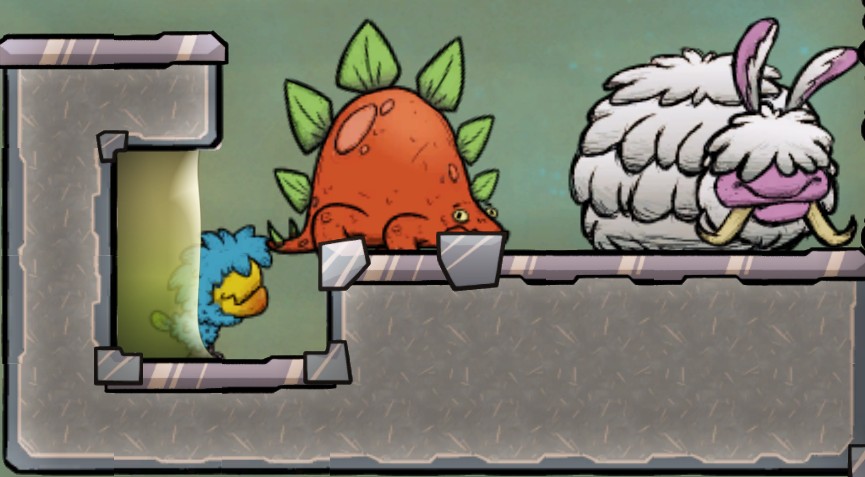
The tenth egg a pacu lays is one that will be an adult when the first pacu dies. So We count 10 eggs and put it in a pile. When it hatches, it enters one of the fish traps where it stays until it matures. Once it does, it'll actually make the trap think there are no critters in it for a moment and we use that to drop it and open a door below so it falls down, and then flops to the water. Its not perfect, a more regular pacu sorting could be better, but this is not called the normal contraptions guide.
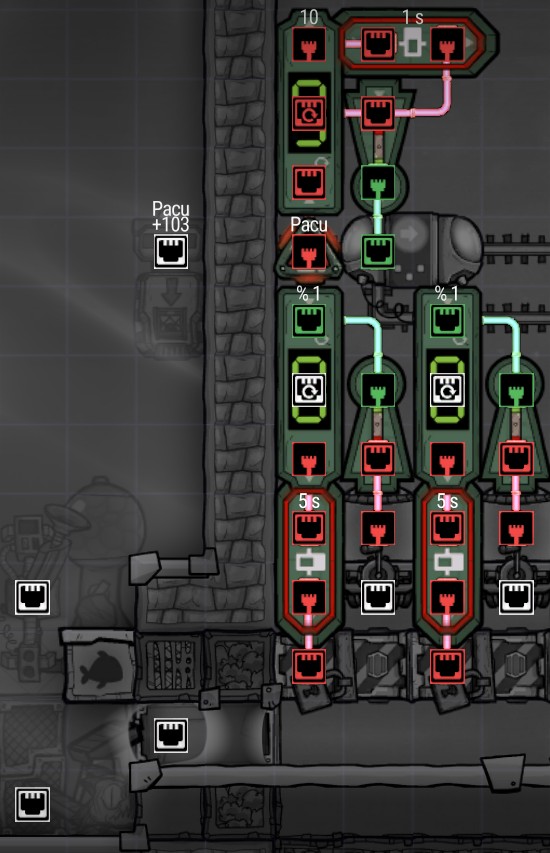
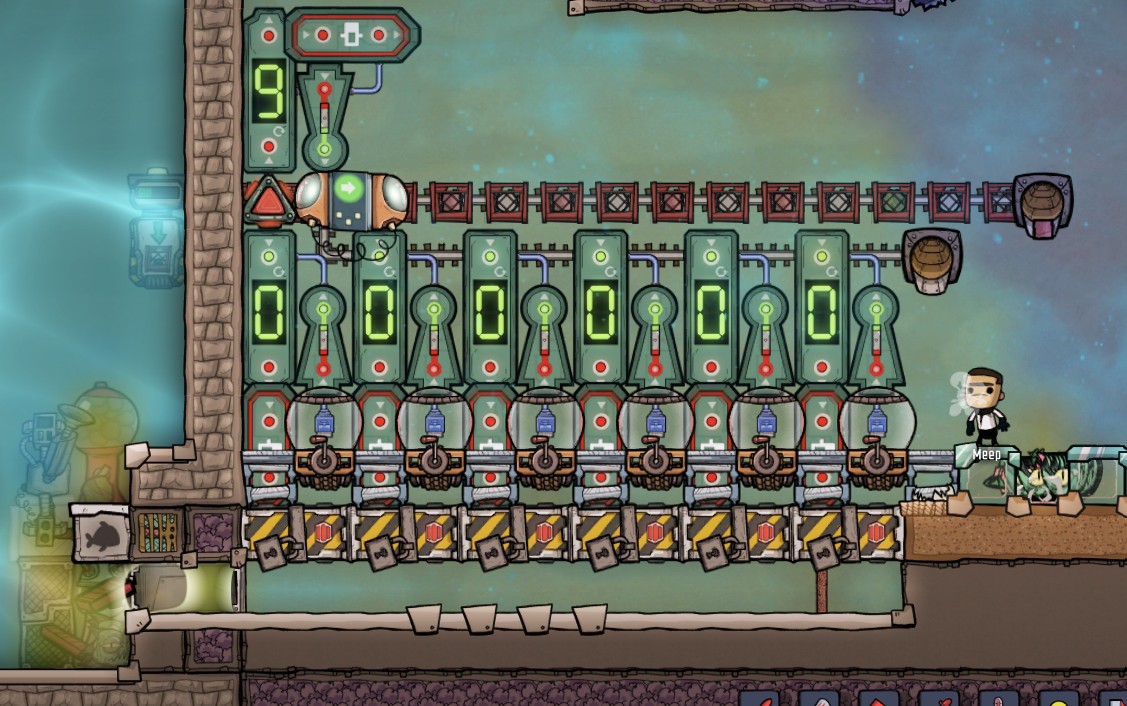
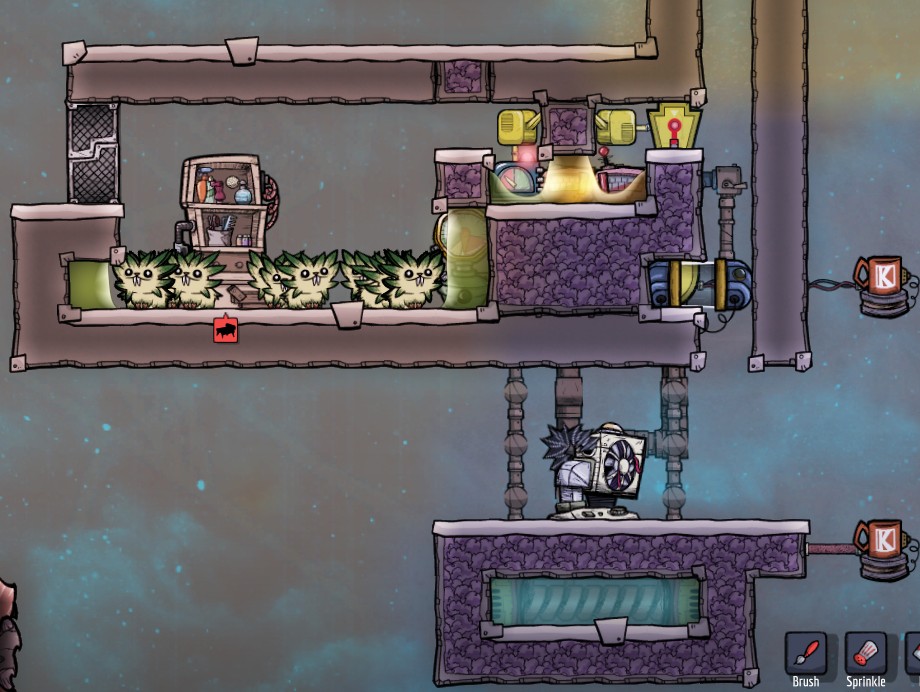 In this setup we have 2 tiles of 30kg of resin, and 1 tile of 0.1kg phyto oil (because it has a very low SHC). As the cycle sensor goes between green and red signal, the resin will either melt (due to warm water) or freeze (due to cold hydrogen). I have the sources for both detached to show that you could easily stack this design - using the same hot and cold source. Also, we do not care how cold the H2 gets so we don't need automation, as well as little to no cooling because of how infrequently it runs (a little bit every cycle). Same goes for the liquid tepidizer.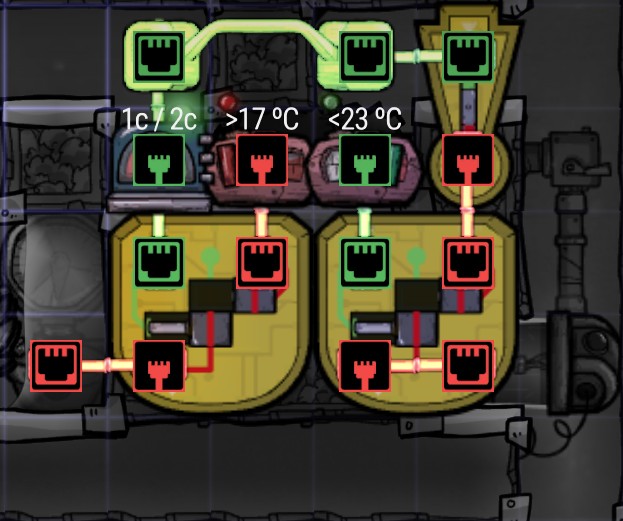
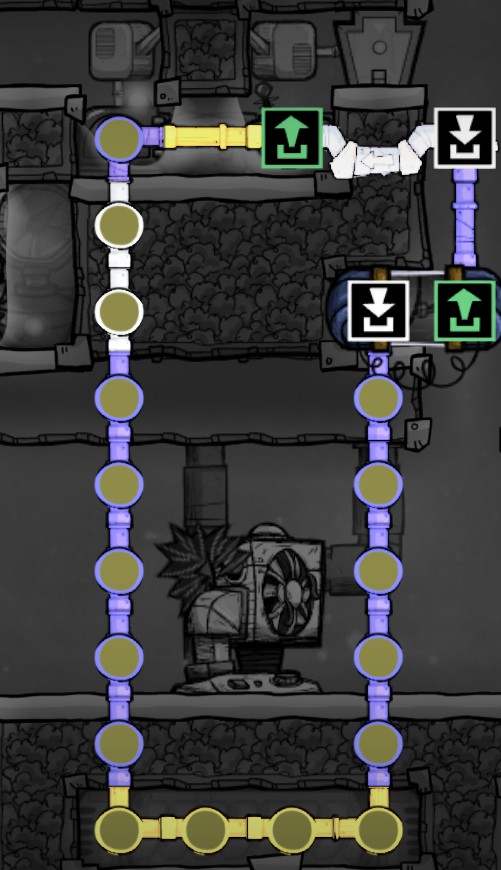
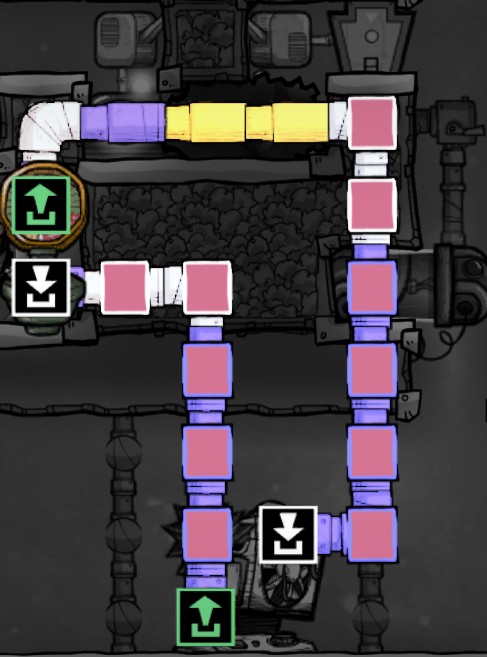
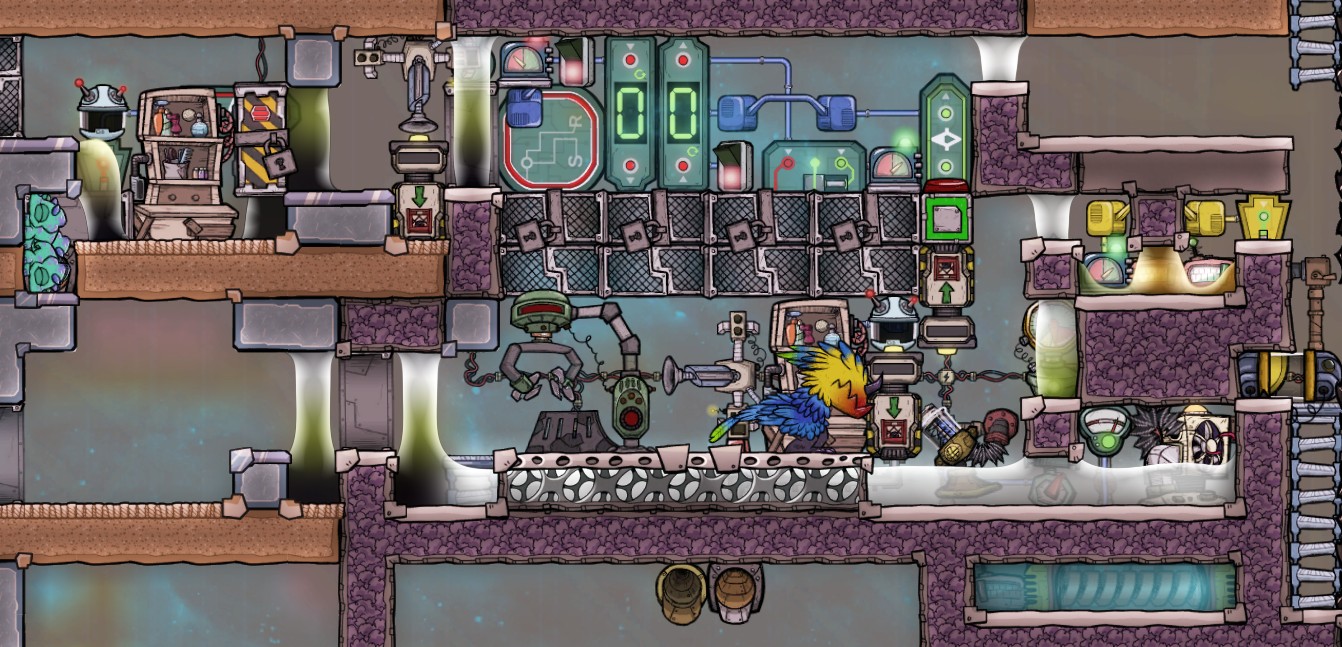
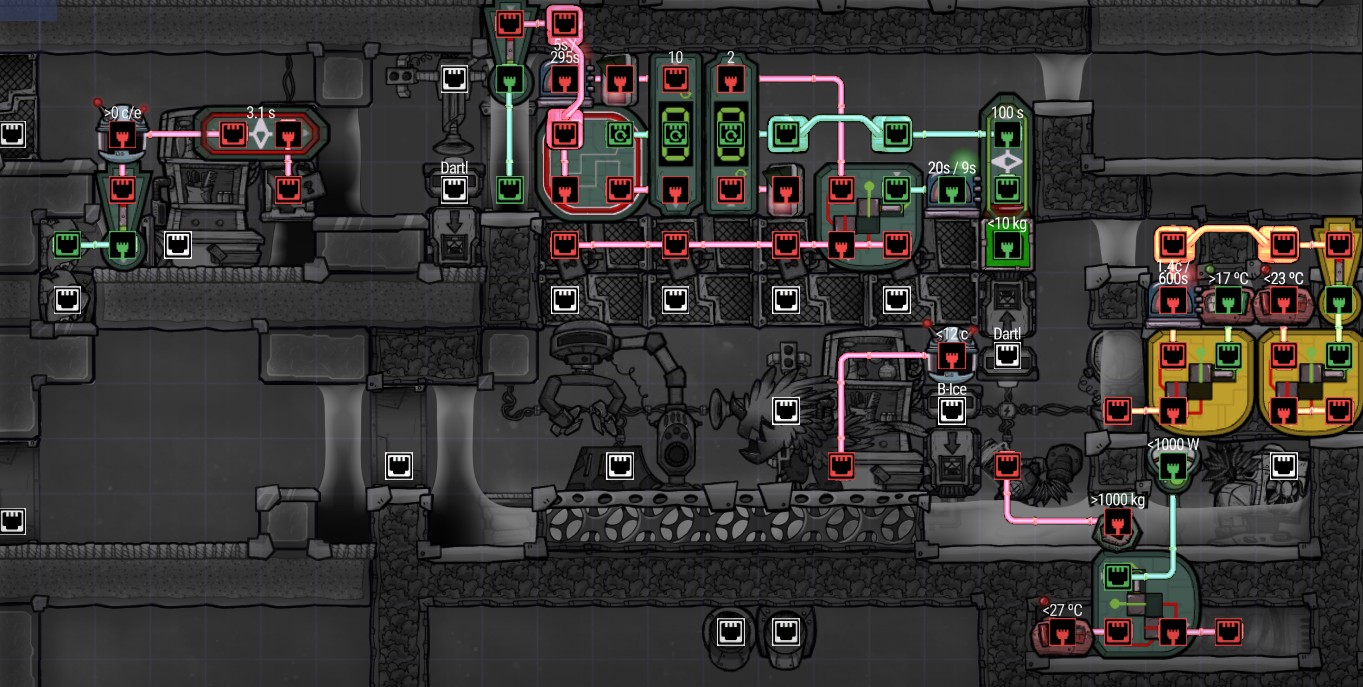 For a gif of it working you can check out my eariler reddit post.https://www.reddit.com/r/Oxygennotincluded/comments/1mnkcra/infinite_dartlerhex_ranch/
The automation, from left to right is as follows:
- The baby critter storage automation ensure that ungroomed adults don't escape with the groomed critters.
- The main automation consist of a timer that counts to 5 cycles twice (the left signal counter). After the first 5 cycles the door to the chamber is closed via the memory gate. This prevents dartles from entering and getting eaten before they lay an egg. After the next 5 cycles the door crusher starts and does not stop until a dartle has not stepped on the weight plate for 100s. The timer starts again when the first dartle of the next batch steps on the weight plate.
- In the Rhex pit, the critter sensor is meant to stop the grooming of dartles if it coincides with a rhex grooming time. And of course we have pump for melted brine and the resin melter shown previously.
- The wattage sensor so everything can run on the same wire without overloading. It makes the tepidizer wait until enough space is available on the wire.
Glossy Dreckos
I've seen Glossy drecko farms done three ways.
- You make a box and the time they spend in hydrogen is determined by their time on the roof for the most part if you bother putting H2 in at all.
- You optimize the ranch so dreckos spend as much time as possible in H2.
- You use automation to guide the dreckos to their food, sometimes using 2 rooms.
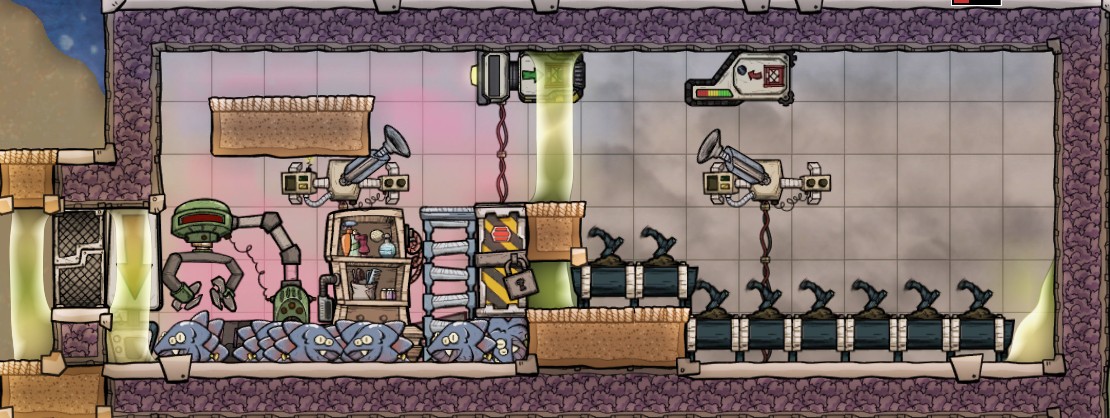 .Its very simple, they can only path-find to the right when the door is open, but always can path-find to the left to leave. The door opens once a cycle, and because the dreckos are hungry by then, they go straight for the food so we open it for only 5% a cycle - they can leave regardless of the doors state and will never re-enter till the door closes.
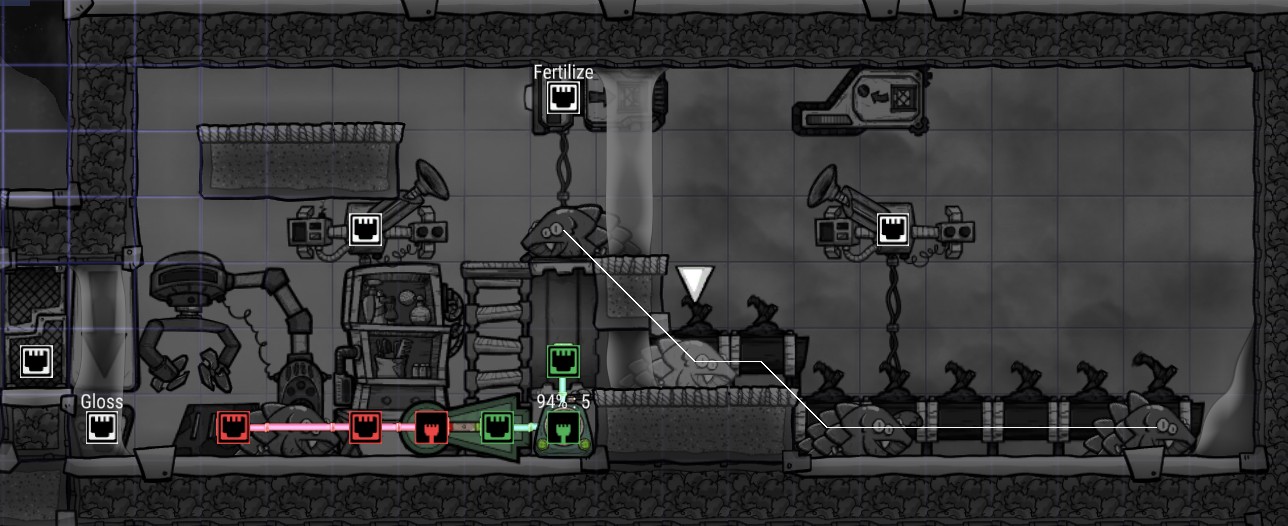 I use a NOT-gate to disable the shearing and groom station while the door is open to make sure ranchers don't distract the dreckos while they eat.
Ez Lura Beeta Farm
Seeing other people's Lura farm design with Beetas made me think the temps were harder to manage than I thought. But you don't actually need to manage temperature much at all.
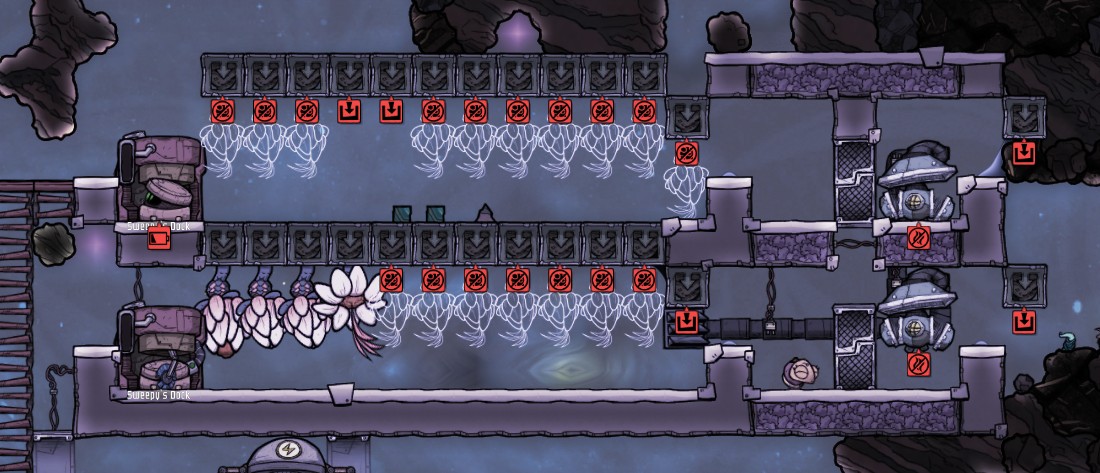
This design is like a lot of others, but we really only care about keeping the beetas in vacuum. Only if the environment is exactly 10 degrees would both the Luras and Bees be live. So here, we are just betting on the Bees hitting a Lura before they die.
But, if we keep the ends open - because we don't manage the Lura temperature - then the Bees will naturally pathfind out to sting nearby critters and dupes. And as long as you have 12 Luras to eat 1 bee per cycle, then they will never actually escape. (okay they can escape on faster speeds in this setup)
Flydo and Sweepy Pump Magma
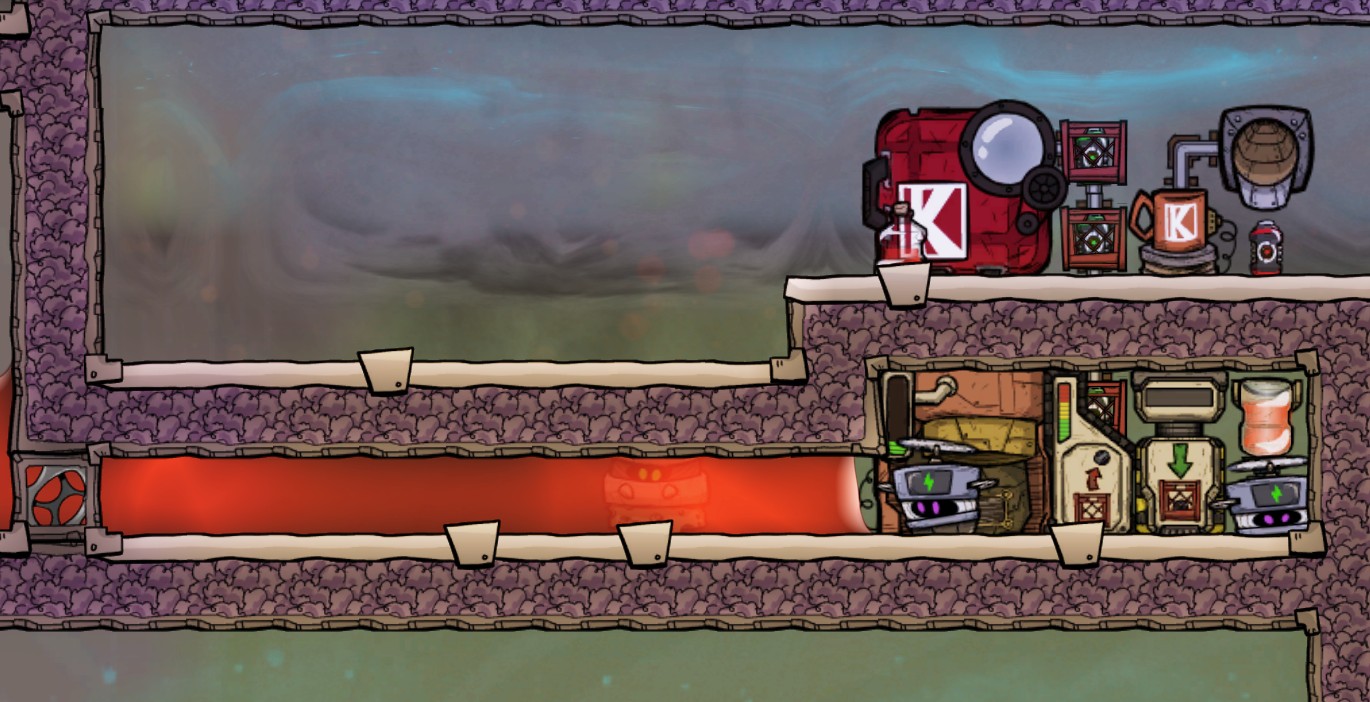 Flydos can't use a pitch pump directly, but we can use a Sweepy to mop up liquids for us that they can deliever. (and an auto sweeper can't). Two Flydo's mean that they can replace each other's batteries, and a vacuum means they can be made out of regular plastic.
** s = J / W
An Eco battery uses takes 144,000 J to charge (480 W / 300 s) and gives 120,000 J in return.
A Flydo uses 50 W .
So a Flydo will last 4 cycles on 1 Eco Battery. Giving a total energy used per cycle of 144kJ / 4 cycles = 36,000 J.
A Liquid pump use's 240 W, over a whole cycle [240 * 600] is 144000 J.
Given that that pipes only carry 10kg of mass / s, even though the Flydo has more throughput, the pipes limit us to the same mass flow rate. The Flydo mass flow rate is a little as a result because of its travel time.
A Sweepy mopping uses 27.14 W. If we ignore it charging when it doesn't need to at night and assume it always working, then it uses ~ 16,284 J / cycle.
Now, if we ignore the travel time and that pumps will pick up smaller than 10kg packets of liquid, then in our setup with a Sweepy and 2 Flydos and a Seepy dock, a pump would have to be limited to 3678.5 kg/cycle of liquid pumped to be as efficient as the 2 Flydos and Sweepy. [ 2*36000 + 16284J / (x) = 144000 J / (6000 kg per cycle)].
Actually testing it, the Flydos and sweepy only pumped 57% of the mass compared to the pump. Factoring that in and we get x = 6452 kg / cycle which is not possible, meaning that pumps will always be more efficient than our robots. But by how much?
Flydos: 25 J / kg [2*36000 + 16284 / 6000(.57)]
Pump: 24 J / kg [144000 / 6000]
We are still assuming full 10kg packets from the pump and that the sweepy is always drawing max power (the robot not the dock).
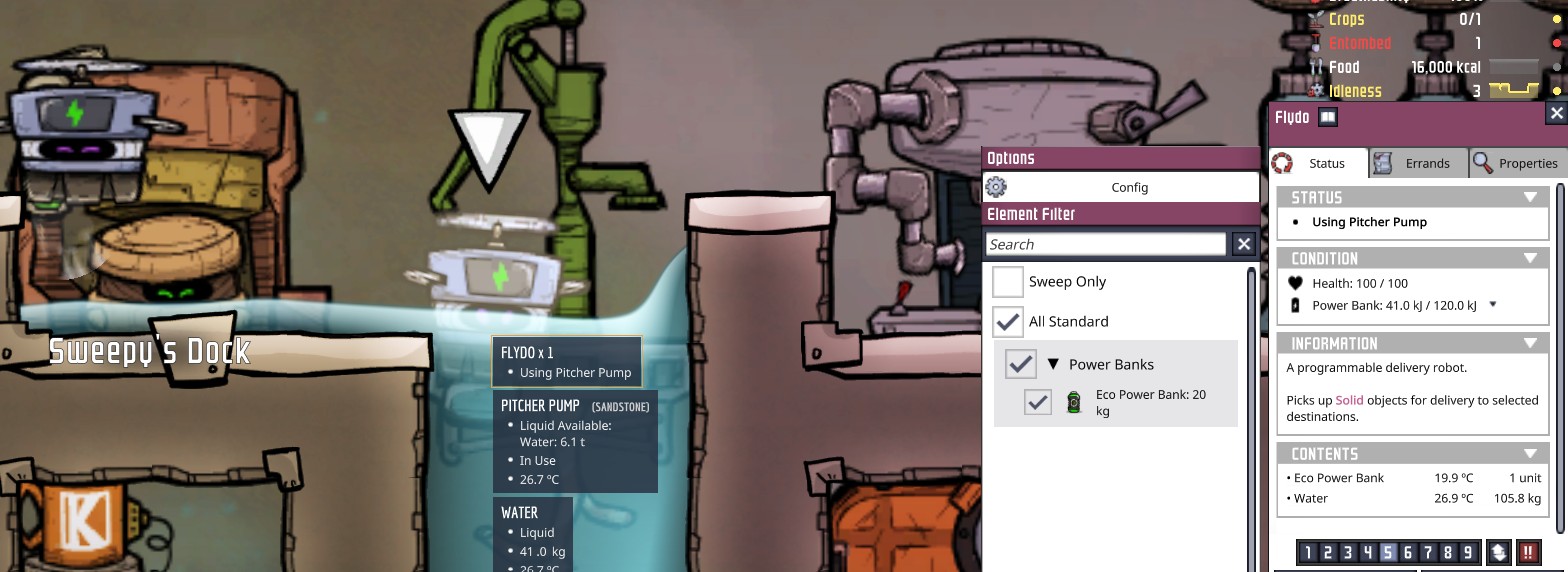 But with this improvement to their throughput, their efficiency would only improve, probably past liquid pumps.
Flydos for Off-gassing Polluted Water
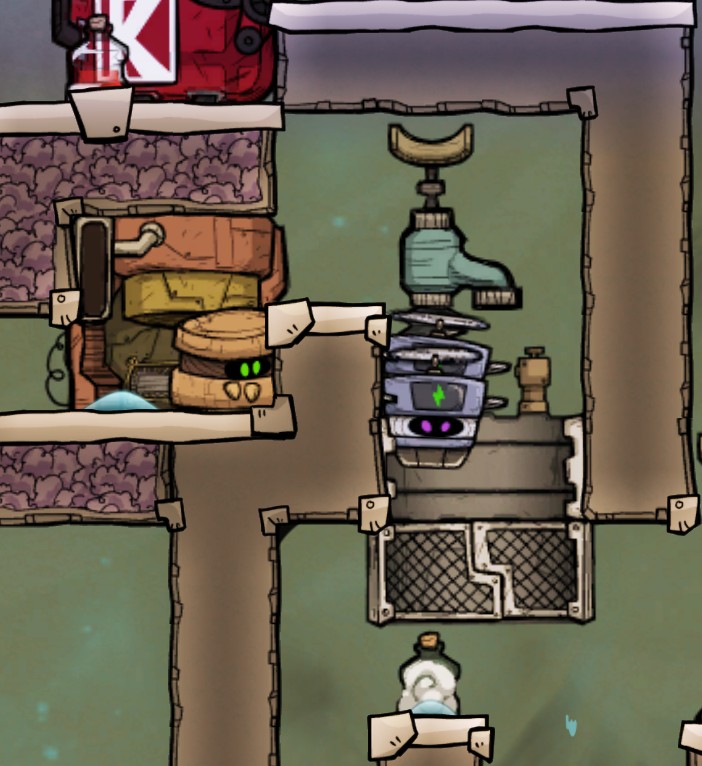
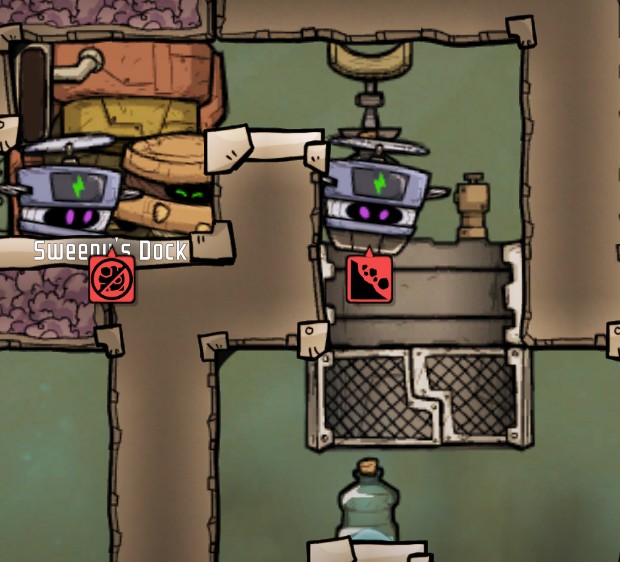
Bottle emptiers seem to just work. For bottle drainers, the tile above it must be covered by a block.
This worked for me regardless of what side of the door they sit on top of.
Also important is having the pneumatic door set to not allow Flydos to go through, and that the sides of the mechanized door have tiles so they don't leave diagonally (bypassing the pneumatic door permissions)
- ONI - Surviving the Early Game★ 5 (2.4k)83k views6.3k ♥54 minUpdated 6 Aug, 2019
- Useful Construction Patterns★ 5 (1.8k)74k views5.2k ♥66 minUpdated 29 Aug, 2020
- 10* things I wish I knew sooner...★ 5 (754)58k views1k ♥4 minUpdated 6 Oct, 2017
- ONI - Surviving the Mid-Game★ 5 (1.3k)44k views3.8k ♥150 minUpdated 6 Sep, 2019
- Not Quite Beginner's Guide★ 5 (361)32k views1.1k ♥91 minUpdated Mar 26, 2023
- Руководство для начинающих. (ОСНОВЫ)★ 5 (629)32k views1.2k ♥21 minRussianUpdated 20 Apr, 2019




- Upgrading to PremiumTeam Fortress 2★ 5 (20k)1441k views11k ♥6 minUpdated May 11, 2022
- No More Room in Hell Official ManualNo More Room in Hell★ 5 (2.8k)569k views2.1k ♥29 minUpdated Apr 22, 2019
- NMRiH Community Hosting GuidesNo More Room in Hell★ 5 (526)351k views653 ♥1 minUpdated Aug 10, 2022
- ULTIMATE GUIDE FOR GAME DEV TYCOONGame Dev Tycoon★ 5 (5.8k)326k views10k ♥4 minUpdated 23 Jan, 2014
- How to 'Git Gud' Soon™MORDHAU★ 5 (2k)318k views3k ♥68 minUpdated Nov 16, 2024
- Лучшие кооперативные игры SteamPAYDAY 2★ 5 (1.5k)315k views2.1k ♥56 minRussianUpdated Apr 27, 2025






This guide was created by its original author on the Steam Community. Are you the author and want it removed? Request removal.