The One-Shot Build
Introduction
The One Shot Build is my most powerful build that will destroy one or multiple Process(es) in one Turn(). This build relies heavily on Turn() so try to avoid any Process when Turn() is on cooldown.
This build works wonders with every Limiter except for Resilience and Responsiblity as Shielded Cells is troublesome to break since you can't use abilities on Turn() cooldown. I will add an alternative to this build which you can also try out that is based on the One Shot build but built for fights with 10 Limiters, which I have used to obtain the achievement.
I will be explaining in-depth on my reasons of using each Function so I hope you enjoy reading it! :)
The One-Shot Build
The One-Shot Build uses Damage Stacking abilities and a powerful Damage ability to utilise the stacks to deal INSANE damage. However this build can be very expensive in mems so watch out.
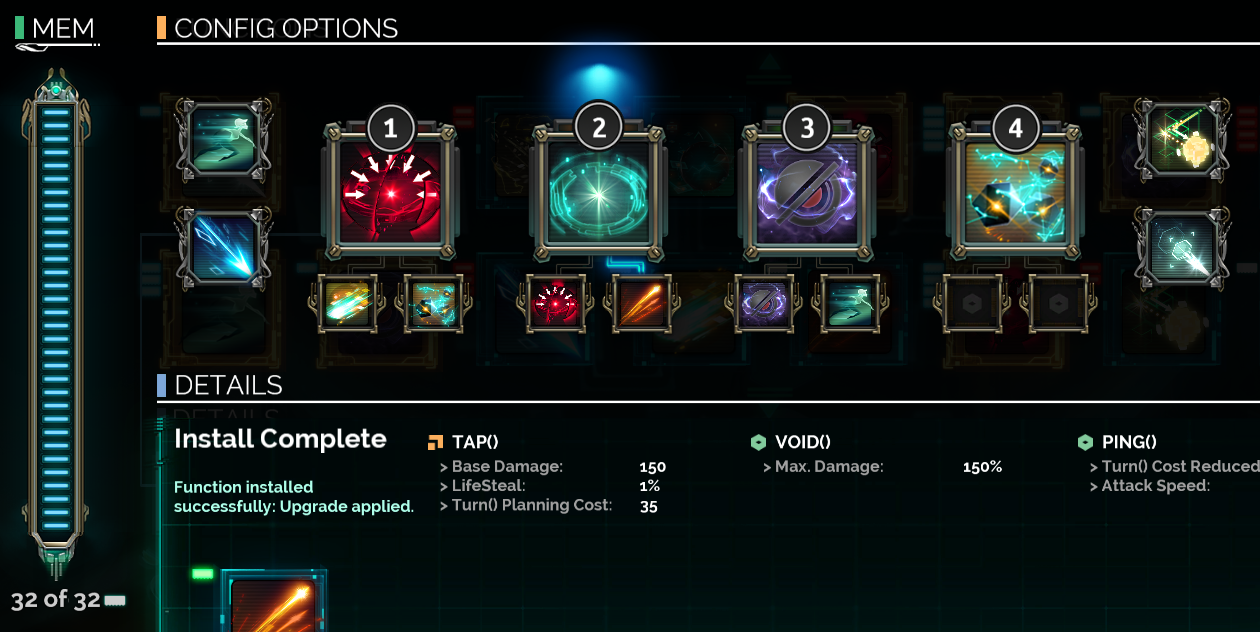 Example of my full build
Damage Stacking Functions:
- Void()
- Crash()
- Mask()
Damage Dealing Function:
- Tap()
Core Functions in this build (must have's):
- Void()
- Crash() (as Void() upgrade)
- Tap()
- Mask()
- Jaunt() (as Passive)
- Breach() (as Passive)
Jaunt() + Breach()
These two passives are the most important because since this build relies so heavily on Turn(), you need to be able to get as much Functions as you can in a Turn() and make sure Turn() comes up as fast as possible in fights.
Get()
Doesn't do anything for the damage of the Build but it's a core Function in every aspect. Collecting Cells from further away is a must-have because walking up to it is slow and you're going to get hit going there. Not to mention YoungLady spews Cells everywhere and makes it impossible to collect all the Cells without Get(). Get() can only be replaced when fighting the non-Process enemies since they do not drop Cells.
The Fourth Passive
Anything goes into here so go wild!
My favourite for this slot is usually Bounce() because of its deflecting shield that negates damage every few seconds. Bounce() will probably be in your Passive slot for 10 Limiters fights because it will save you countless of times but feel free to use any other Functions.
Ping() or Crash() is also good here because it allows you to use Turn() to walk and doesn't make it feel like a waste or help you tank up from the Efficiency Limiter respectively.
Void() + Crash()
As simple as it gets, Void() and Crash() both stack damage multipliers for your attack so putting them together creates the best wingman of all time. Remember that Void() stacks up to 3 times so don't ever use more than 3 Void()s (not that you need to anyway). Lower health enemies only need 1-2 Void()(s) so you don't have to expend your whole Turn() and can allow it to recharge faster.
- Upgrade 2: Anything
when using Void(), the chosen Function will depend on how you control Red. One recommended Function() that I use here is Spark() because it allows Void() to stack twice with one hit, making any low health enemy to be destroyed using only one Void(). Tap()
Tap() is used because it has the highest base damage (with Cull()), hits in an AOE so there's no random misses and it has Lifesteal. This Function will destroy a Process without effort and at the same time heal you, so it easily wins the BEST ABILITY award. Its range will never present a problem because a lot of enemies will approach you to attack or you can easily walk into its range normally or with Turn(). Do note that Tap() does not backstab so you do not need to waste time walking behind Processes.
- Upgrade 1: Ping()
- Upgrade 2: Anything
Second upgrade is the same as above which is whatever you want. I.E. extending its range with Load() or Spark(), increasing its damage even more with a second Void(). Mask()
Simple here as well. Use it before an attack and watch your damage skyrocket even further. It is also an evasive function so you can use to reorganise if you are being overwhelmed.
- Upgrade 1: Anything
- Upgrade 2: Anything
The Fourth Function
Whatever goes here will probably not be in use. If you have Max mems (32), you probably have spare mems left so just place any function you would like to use here. I usually just toss in a damage Function here as fodder so if I happen to die, it can overload this Function or I can use this Function as backup if Tap() gets overloaded.
10 Limiters considerations
Jaunt() is also a must-have function upgrade for any damage functions so that you can use it outside of a Turn() to break the shields of the Cells, which is not in our original build.
No worries though, a variation of this build that still relies on Void() will work.
One recommendation is to do the Risk() Achievement when you recurse. This allows you to gain more levels and get the second Functions to use, which the variation build utilises.
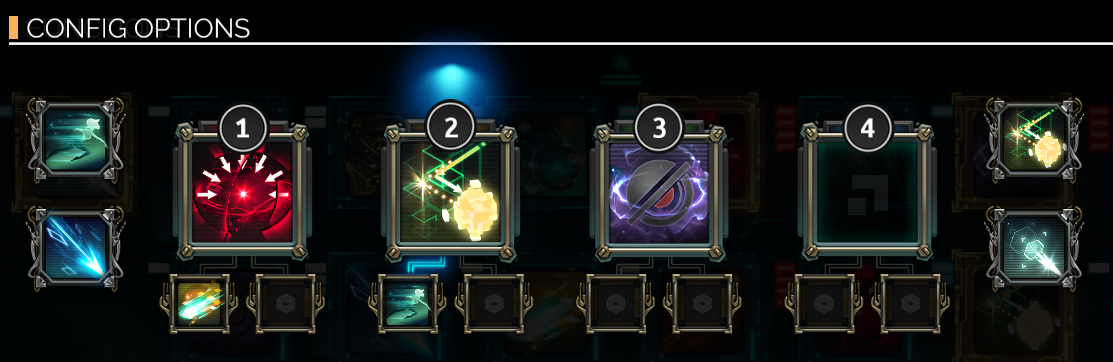 Example of my 10 Limiter build using all available mems
Damage Stacking Abilities
- Void() + Crash() upgrade
- Mask()
Damage Abilities
- Bounce() + Jaunt() upgrade
or Anything with good AOE
Passive Abilities
- Jaunt()
- Breach()
- Bounce() 2
- Get()
This variation build uses Bounce() to inflict as much damage as possible in an area and to take out as many shields as possible from Shielded Cells. Void() is still mainly used to ensure maximum damage to destroy an enemy. Breach() Passive can be swapped out to include a Ping() upgrade for Bounce() and include another 2 mem upgrade of choice. Bounce() has Backstab damage so do try to get behind larger health enemies if possible.
Use Bounce() during Turn() recovery to break the shields off Shielded Cells and the Cell should be able to get pulled in by Get() passive. If Bounce() has a slow attack speed for comfort, then it is best to swap out Breach() passive for a Ping() upgrade to speed up the attack as mentioned above.
Conclusion
I hope this build will help you out in your journey through Cloudbank and big thanks for reading my guide!
- Transistor 100% Achievement Guide★ 5 (1.7k)42k views2k ♥13 minUpdated 22 May, 2022
- How To Avoid Running Around in Abject Terror Like a Person Who Is Completely Covered in Spiders★ 5 (482)25k views224 ♥3 minUpdated 7 Jun, 2015
- The Plot of Transistor★ 5 (1.7k)25k views1.2k ♥17 minUpdated 19 Nov, 2014
- Nerava's Combat Tips★ 5 (344)17k views585 ♥9 minUpdated 24 May, 2014
- How to win the entire game regardless of difficulty or limiters.[Spoilers]★ 4 (196)16k views283 ♥5 minUpdated 22 May, 2014
- Super Lifesteal Void★ 5 (305)13k views397 ♥19 minUpdated 21 Apr, 2015


- Upgrading to PremiumTeam Fortress 2★ 5 (20k)1441k views11k ♥6 minUpdated May 11, 2022
- No More Room in Hell Official ManualNo More Room in Hell★ 5 (2.8k)569k views2.1k ♥29 minUpdated Apr 22, 2019
- NMRiH Community Hosting GuidesNo More Room in Hell★ 5 (526)351k views653 ♥1 minUpdated Aug 10, 2022
- ULTIMATE GUIDE FOR GAME DEV TYCOONGame Dev Tycoon★ 5 (5.8k)326k views10k ♥4 minUpdated 23 Jan, 2014
- How to 'Git Gud' Soon™MORDHAU★ 5 (2k)318k views3k ♥68 minUpdated Nov 16, 2024
- Лучшие кооперативные игры SteamPAYDAY 2★ 5 (1.5k)315k views2.1k ♥56 minRussianUpdated Apr 27, 2025






This guide was created by its original author on the Steam Community. Are you the author and want it removed? Request removal.