The Source guide for Blender
Introduction
This guide includes many things:
Source Engine
Importing:
- Importing Maps
- Importing Models
- Importing Textures
- Importing Materials
- Exporting Models
- Exporting Materials/Textures
- .VPK files
- .GMA files
Source 2
Importing:
- Importing Maps
- Importing Models
- Importing Textures
- Importing Materials
- Exporting Maps
- Exporting Models
- Exporting Materials/Textures
Goldsrc
- Importing Maps
- Importing Models
[Where importing is from the engine > Blender, and exporting from Blender > Engine]
I hope this will help!
Blender Addons
- Source IO[github.com] - Extremely versatile addon - covering almost all your Source needs!
- Plumber[github.com] - While Source IO can import Source maps, it needs this addon to help with importing - a vital part in importing these maps.
- Blender Source Tools[steamreview.org] - This can import things such as de-compiled models and textures.
Software
Needed software:
- Java[www.java.com] - Needed for BSPsrc (Java based versions only)
- BSPsrc[github.com] - De-compiles .bsp files back into their Hammer format - .vmf | No longer requires Java
- Source 2 Resource Viewer[valveresourceformat.github.io] - Source 2 file viewer
- Crowbar - Needed to compile our models into a source engine format
- VTFedit[nemstools.github.io] - Needed to create .VMT and .VMF files
Source Engine

For importing Source models, you require:
Software
- Source 2 Resource Viewer
- Source IO
Then, do the following:
- Click 'Open'
- Locate the dir.vpk of your game, and select it
- Go to the model you wish to import to Blender [.mdl], or its folder
- Click 'Export as is'
- Select the folder you want to export it to, this can be anywhere
Edit > Preferences > Addons > [Add the ZIP file]
Go to File > Import > Source Engine Assets > Source Model (.mdl) and select it.
Navigate to its location on where you exported it from the .VPK in Source 2 File Viewer, and select it.
Now you have a Source Model in blender.
I recommend extracting the entire VPK, or at least the materials and models sections into a folder.
For importing Source maps, you require:
Software
- Java
- BSPSrc
- Plumber
- Blender Source Tools
- Navigate to the 'Files' tab [Should open onto this tab]
- Select the 'Add' button
- Go to the location of the BSP file we found, and select it
- Click decompile, and let it work it's magic
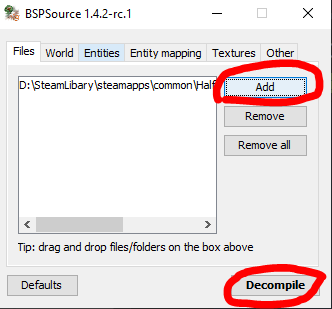 Now we should have ended up with a VMF file. A VMF file is a version of the map that is decompiled. These are useable in the Hammer editor, whereas BSP files are not.
Next, we import the map using the addon. Make sure the addon is installed, just go to
Edit > Preferences > Addons > [Add the ZIP file]
Then, click the triangle icon next to the addon's name, this will open the details and preferences for the addon. Here we set up the folders and cache folders for the addon.
- Create a cache folder somewhere on your computer [name it something like 'Cache'], and add it to 'Cache Directory'.
- Create a game definition at 'Valve game definitions', name it whatever your want. [Half-life 2 for example, these are presets that include the location of game files]
- For 'Game directories', add the game folder from the one in your 'common' folder [In your Steamapps/Steamlibrary folder] that is for the game you need, such as 'Half-Life 2]
- For Game VPK archives, add the '.vpk' file with '_dir' [Like 'pak01_dir.vpk'] on the end. it should be in [For Garry's Mod, there is a specific area for the HL2 files, see Garry's Mod Section]. For some games, you need the [game]_textures_dir.vpk and [game]_misc_dir.vpk. Make sure to add VPKs of custom content.
- Ignore Game wildcard directories
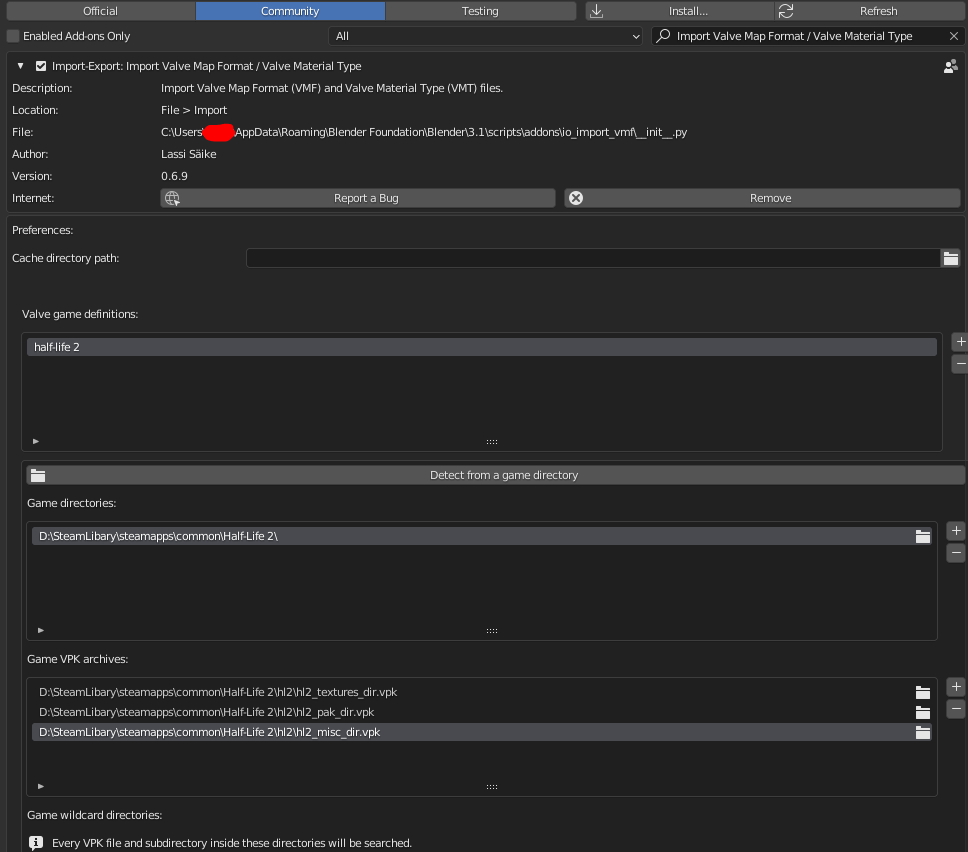 Now, we need to import it into blender. Go to:
Leave everything checked unless you want to only add certain things, and click import.
IF you are going to add it into a Software like Unity, make sure to check 'Simple Materials' in the materials section.
There you go. You now have a Source Map within Blender. Please note that switching to the Material Preview may take some time until it applies all materials. All textures will be in the cache folder that was set, but shouldn't be needed as they are applied automatically.
[This is my recommended way, as importing a BSP with SourceIO will only give the map geometry and some textures, no models or entities]
For importing Source textures, you require:
Software
- Source 2 File Viewer
- Source IO
Then, do the following:
- Click 'Open'
- Locate the dir.vpk of your game, and select it
- Go to the texture you wish to import to Blender [.vtf], or its folder
- Click 'Export as is'
- Select the folder you want to export it to, this can be anywhere
Edit > Preferences > Addons > [Add the ZIP file]
Go to File > Import > Source Engine Assets > Source Texture (.vtf) and select it.
Navigate to its location on where you exported it from the .VPK in Source 2 File Viewer, and select it.
Now you have a Source Texture in blender.
Another way is to put the .vtf through VTFEdit, which will give you the raw texture that was used in the .vtf, and then allows you to save it to any file type you want.
For importing Source Materials, you require:
Software
- Source 2 File Viewer
- Source IO
Then, do the following:
- Click 'Open'
- Locate the dir.vpk of your game, and select it
- Go to the material you wish to import to Blender [.vmf], or its folder
- Click 'Export as is'
- Select the folder you want to export it to, this can be anywhere
Edit > Preferences > Addons > [Add the ZIP file]
Go to File > Import > Source Engine Assets > Source Material (.vmf) and select it.
Navigate to its location on where you exported it from the .VPK in Source 2 File Viewer, and select it.
Now you have a Source Material in blender.
Software
- Crowbar
- Blender Source Tools
Once you have made your model, and Blender Source Tools is enabled, export it as a .SMD file.
Make sure to export it into a folder for your model, as we can't have it unorganised.
Next, in your folder, make a text document, and put in the following:
Set each "yourmodel" to the name and path of the .smd, and save the file as a .qc file.
After that, open up crowbar and head to the Compile tab.
Make sure you have set up Crowbar with stuff like your game directory, if not follow this guide on how to set up Crowbar.
Crowbar (Modding Tool) Guide by ZeqMacaw
Now, set the output folder to wherever you desire, and the QC file to the one we just made.
Now click the compile button, and in the folder you chose should be a .mdl file.
Source Engine - Part 2
Software
- VTFedit
Firstly, a Source Engine material consists of two files, the VTF and VMT.
The VTF contains the texture itself, while the VMT contains the material data.
- To make a VTF file, open up VTFedit, go to File > Import and select your image.
- A pop up will appear, you can search online if you want to look into what each option does, but it is fine as it is.
- Once imported, go to File > Save as and save it in a folder for your material.
Repeat this for any other textures, like normal maps, etc.
Creating the VMT files:
- In VTFedit, go to Tools > Create VMF File
- A pop up will appear. You will probably only need the Normal map and Base Texture 1
- You can also go to the options, and change the shader if its water, a decal, etc.
- Now, click create, and you'll have your VMT.
Once done, put your materials into the game files, or a VPK, your choice.
Compiling VPK files:
- Locate vpk.exe in the /bin of your source game
- Drag the folder you wish to turn into the VPK onto vpk.exe in file explorer
- A new .vpk should have been created in the folders parent directory.
Decompiling VPK files:
- Locate vpk.exe in the /bin of your source game
- Drag the .vpk you wish to decompile onto vpk.exe in file explorer
- A new folder should have been created in the .vpk's parent directory
If either of these ways fail/don't work, you can use the program with command prompt.
Source 2

For importing Source 2 models, you require:
Software
- Source 2 File Viewer
- Source IO
Then, do the following:
- Click 'Open'
- Locate the dir.vpk of your game, and select it
- Go to the model you wish to import to Blender [.vmdl_c], or its folder
- Click 'Export as is', or 'Decompile and export'
- Select the folder you want to export it to, this can be anywhere
Otherwise, go into Blender and make sure SourceIO is enabled. This is done by:
Edit > Preferences > Addons > [Add the ZIP file]
Go to File > Import > Source Engine Assets > Source 2 Model (.vmdl_c) and select it.
Navigate to its location on where you exported it from the .VPK in Source 2 File Viewer, and select it.
Now you have a Source 2 Model in blender.
I recommend extracting the entire VPK, or at least the materials and models sections into a folder.
There are two ways to import a Source 2 map to Blender. If you have a good amount of time, use Source 2 File Viewer, otherwise, use SourceIO.
The difference between the two:
SourceIO
- Imports geometry, textures, some models, straight into Blender.
- Doesn't import some models/entities.
- Decompiles the map into a single .GLTF (Each entity in the map can be selected individually)
- Decompiles every texture as a .tga for all used models and stuff into the selected folder.
- Takes a good amount of time, does import absolutely everything (can have some issues rarely)
Either use SourceIO:
Export the .vmap or find the .vpk for the map,
Go into Blender, go to file > import > source engine assets > Source 2 Map/Source 2 packed map
Then click either one for whatever choice you made.
Once imported, you'll only see map textures and geometry, no models. Instead you'll see empty objects, these are entity placeholders. To switch them out for their respective models, you should:
- When selecting one or multiple placeholders, a tool panel will appear on the right tool shelf named SourceIO
- It will list options about the selected entities, nothing to be interested in for static props and most other things.
- Select every placeholder, or the ones you want.
- Head to the Entity Loading section, then you have 2 options, BLVG and Instances.
- BLVG use custom shader nodes to mimic the Source engine visual style, but only work with Evee and aren't too optimised.
- Instances is optimised for Blender, and is what I recommend to use.
- Once an option is selected, select Load Entity.
Or use Source 2 File Viewer:
Go into Source 2 File Viewer and locate the .vworld. It will be in the files, or a .vpk of the map. Then you can right click it, decompile and export, and create a folder for this map and select it as the location to export to. Once done, the map will be exported as a .gltf and every texture (Normals, Height, everything) will also be exported into the folder as a .tga, but please note that this process will take some time, this guide covers it in more detail:
https://steamcommunity.com/sharedfiles/filedetails/?id=2815879008
For importing Source 2 textures, you require:
Software
- Source 2 File Viewer
- Source IO
Then, do the following:
- Click 'Open'
- Locate the dir.vpk of your game, and select it
- Go to the texture you wish to import to Blender [.vtex_c], or its folder
- Click 'Export as is', or 'Decompile and export'
- Select the folder you want to export it to, this can be anywhere
Otherwise, go into Blender and make sure SourceIO is enabled. This is done by:
Edit > Preferences > Addons > [Add the ZIP file]
Go to File > Import > Source Engine Assets > Source 2 Texture (.vtex_c) and select it.
Navigate to its location on where you exported it from the .VPK in Source 2 File Viewer, and select it.
Now you have a Source 2 Texture in blender.
For importing Source 2 materials, you require:
Software
- Source 2 File Viewer
- Source IO
Then, do the following:
- Click 'Open'
- Locate the dir.vpk of your game, and select it
- Go to the texture you wish to import to Blender [.vmat_C], or its folder
- Click 'Export as is'
- Select the folder you want to export it to, this can be anywhere
Edit > Preferences > Addons > [Add the ZIP file]
Go to File > Import > Source Engine Assets > Source 2 Material (.vmat_c) and select it.
Navigate to its location on where you exported it from the .VPK in Source 2 File Viewer, and select it.
Now you have a Source 2 Material in blender.
It is possible to import something from Blender into the hammer editor on Source 2.
This will only import geometry, no textures or lights can be exported from Blender.
To do this is quite simple, here is the list of steps required to export your map from Blender to Source 2:
- Once you have completed your map in Blender, go to File > Export and select either .obj or .fbx [I recommend .fbx[
- Now, open up the Hammer editor. For this I am using CS2, but any Source 2 Hammer Editor will support this.
- Now once you have loaded up your map, go to File > Import file...
- This will bring up your file explorer/viewer, using this you can locate your .obj or .fbx file to select it and import it.
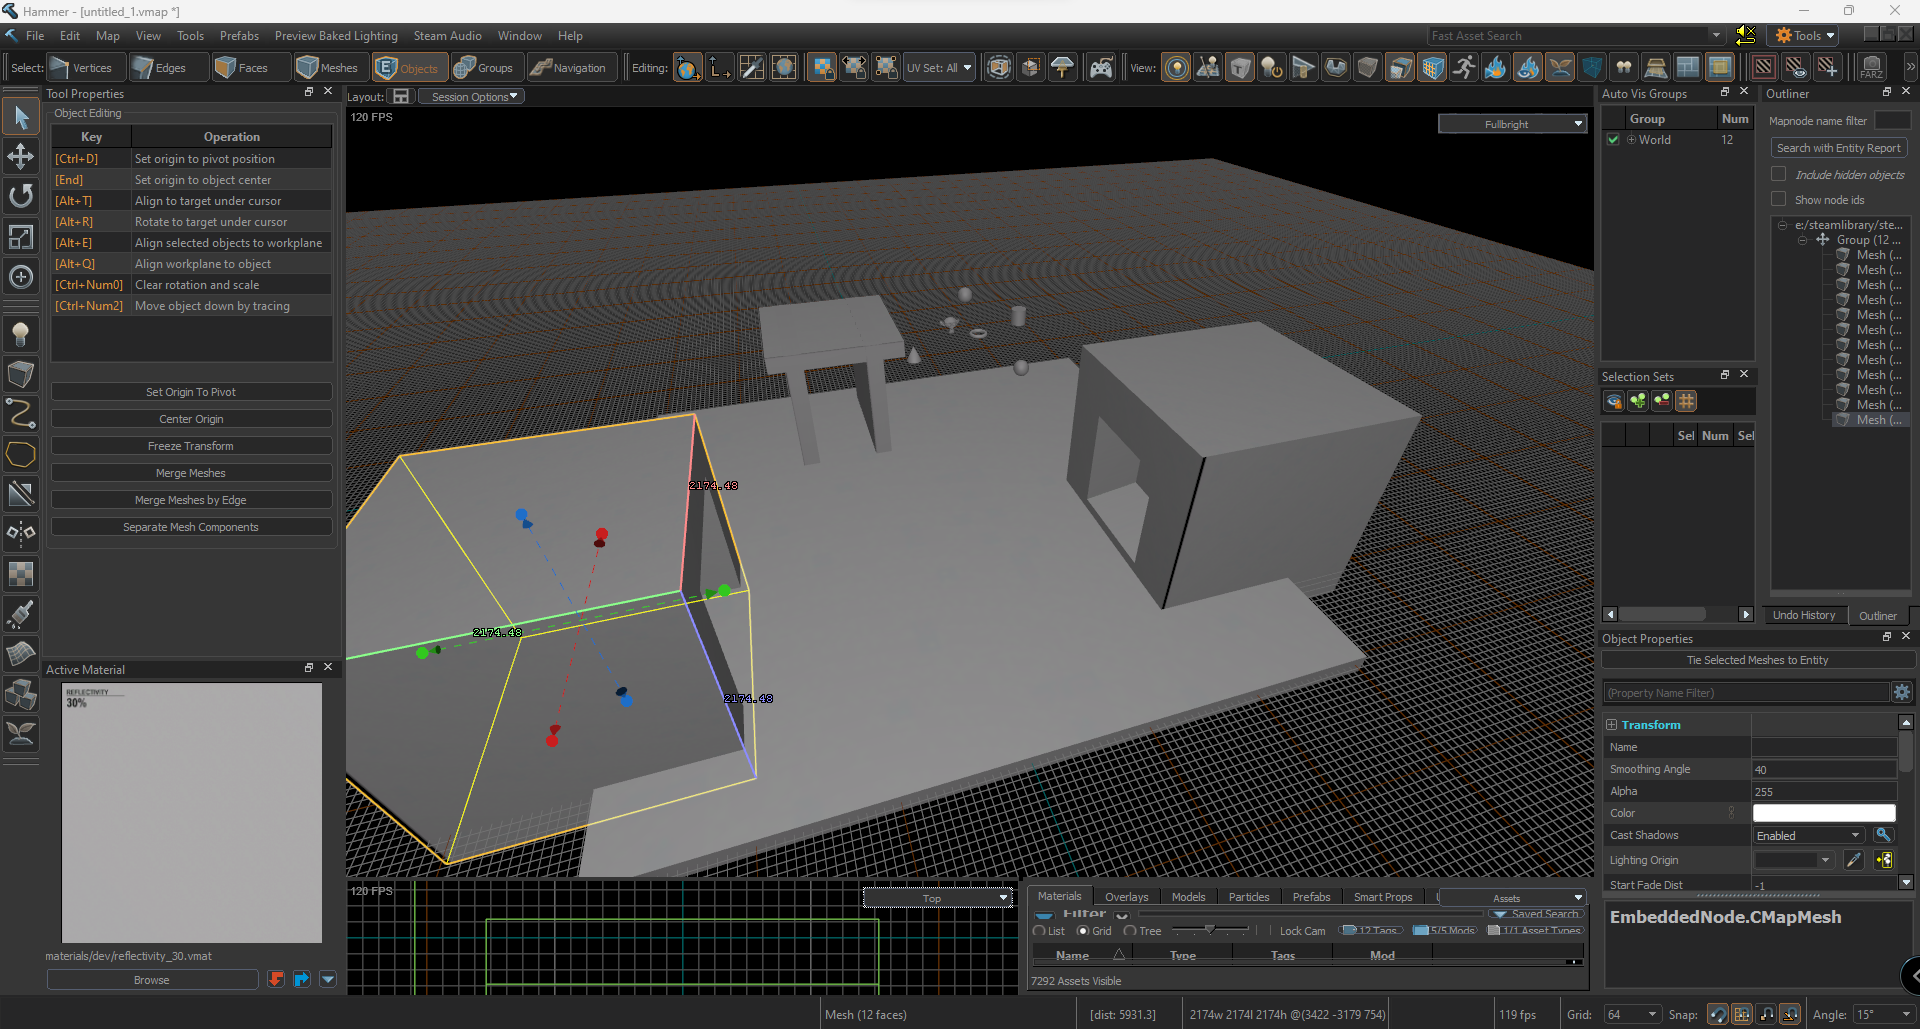
This does not work with lights or materials.
I still recommend making your map in the Hammer Editor rather than making it in Blender then importing into Hammer. I don't recommend doing this to add props or models to your map, as they will not be treated as a prop or model, but rather as meshes.
To export your model from Blender into Source 2 as a model, you will need to use the ModelDoc Editor. Here is a list of steps showing how you can export models into Source 2.
- Firstly, export your model as a .fbx or .obj from Blender.
- Next, open up the ModelDoc editor from the asset browser after launching your workshop tools.
- On the lower half of the newly opened window, it will say create new. Double click the word "Model" underneath file type.
- In the favourites list, there'll be a button labelled Add Mesh, select it, go to your model, and import it.
- After, select the "Needs Compiling" button, and select where you want to save the compiled model.
Source 2 - Part 2
- Click the Add button (Large, has a blue + symbol)
- In the popup, search material, and select DefaultMaterialGroup
- Now all materials you added in Blender will appear on the side (Like their slots, but with the name of the original material).
- Go to the top left, select tools, and open the Material Editor.
- Select new, then save and name your material.
Now a blank white sphere should appear, which means you have made a new material.
In this section, you can add your material maps, like normal, roughness, etc.
To add your material to the model, head back to the ModelDoc Editor, go to the material slot you just made a material for, select the magnifying glass shaped button under your material.
Now a new pop up will have appeared. Search for the name of your new material, and select it.
Now compile it, and your model will have the added material.
With these models, you can do stuff such as animations, bodygroups, material groups, etc. I will not cover them due to how much there is, but this video will help:
Harry101UK - Source 2 Filmmaker Tips and Tricks - Importing Custom Models
Goldsrc
This section is shorter due to it being simpler and the limited options on what to import
Required Blender Addons:
- SourceIO
Edit > Preferences > Addons > SourceIO [Add the ZIP if it is not there]
Go to:
Files > Import > Source Engine Assets > GoldSrc Model (.mdl)
Go to the game's folder in your common folder [Which should be in your Steam > Steamapps or Steam Library folder]
Go to the models folder
Select the model and import it [.mdl]
Now you have a GoldSrc Model in Blender
Required Blender Addons:
- SourceIO
Edit > Preferences > Addons > SourceIO [Add the ZIP if it is not there]
Go to:
Files > Import > Source Engine Assets > GoldSrc Map (.bsp)
Go to the game's folder in your common folder [Which should be in your Steam > Steamapps or Steam Library folder]
Go to the maps folder
Select the model and import it [.bsp]
Now you have a GoldSrc Map in Blender
Garry's Mod
 Garry's Mod Addons
Garry's Mod Addons are stored in:
- gmad.exe - in the bin folder of Garry's Mod.
- Gm Publisher - a Gmod publishing app that publishes, updates, downloads and extracts workshop addons
- Google some - there's a lot
To use gmad.exe to decompile a .gma, you can simply drag and drop the file onto it in file explorer. If you face any issues with this, use it in command prompt/cmd.exe (Make sure to set it to the /bin directory of gmod with the cd command)
Once done, you will have access to the files. Use the Source section to understand how to use them with Blender.
Importing map with custom assets
If you're importing maps with custom assets, you'll need to create a VPK containing all of the custom assets. Once you've decompiled the .gma, compile the folder you received into a .vpk (See Source Engine - Part 2) and then simply add it into the Plumber config like you did for other .vpks.
In Garry's Mod, the Half-life 2 and Counter-Strike: Source content [All the props, textures, etc that aren't Gmod specific] will be in:
Use the Source Engine section to understand how to use them with Blender!
Other
- For any other games, use each section from which engine the game is.
- If something does not work and you are struggling, make a comment, or just google it.
- If you cannot find or do not have the assets, try asking others for help, or search online for the models.
- If a software is no longer downloadable, try to google another download of it, and/or comment about it so I can update the guide
- If there is a better way to do something not stated in this guide, comment it, it'll be useful to us all
Conclusion
I hope this guide helped, and if it didn't, leave a comment or ask another person for help.
Feel free to leave a like or favourite the guide, I'll appreciate it!
If there's something you feel should be changed, included or removed from the guide, comment and let me know.
I really hope this helped! Feel free to message me if you have any issues.
Click this for more guides!
- Гайд для новичков (Модель)★ 5 (441)19k views1.1k ♥6 minRussianUpdated 22 Aug, 2022
- Game Asset Ripping★ 5 (450)18k views1.3k ♥2 minUpdated 21 Jun, 2021
- easier than you think blender tutorials for beginners★ 5 (774)17k views2.2k ♥4 minUpdated 26 Aug, 2022
- Как Делать круто и красиво ничего не умея в Blender.★ 4 (760)14k views131 ♥1 minRussian
- Нужные приколюхи для лохов как я★ 5 (717)14k views1.5k ♥2 minRussianUpdated 15 Jan, 2021
- Сборник видео руководств по Blender★ 5 (776)12k views2.1k ♥46 minRussianUpdated 17 Feb, 2022





- Upgrading to PremiumTeam Fortress 2★ 5 (20k)1441k views11k ♥6 minUpdated May 11, 2022
- No More Room in Hell Official ManualNo More Room in Hell★ 5 (2.8k)569k views2.1k ♥29 minUpdated Apr 22, 2019
- NMRiH Community Hosting GuidesNo More Room in Hell★ 5 (526)351k views653 ♥1 minUpdated Aug 10, 2022
- ULTIMATE GUIDE FOR GAME DEV TYCOONGame Dev Tycoon★ 5 (5.8k)326k views10k ♥4 minUpdated 23 Jan, 2014
- How to 'Git Gud' Soon™MORDHAU★ 5 (2k)318k views3k ♥68 minUpdated Nov 16, 2024
- Лучшие кооперативные игры SteamPAYDAY 2★ 5 (1.5k)315k views2.1k ♥56 minRussianUpdated Apr 27, 2025






This guide was created by its original author on the Steam Community. Are you the author and want it removed? Request removal.