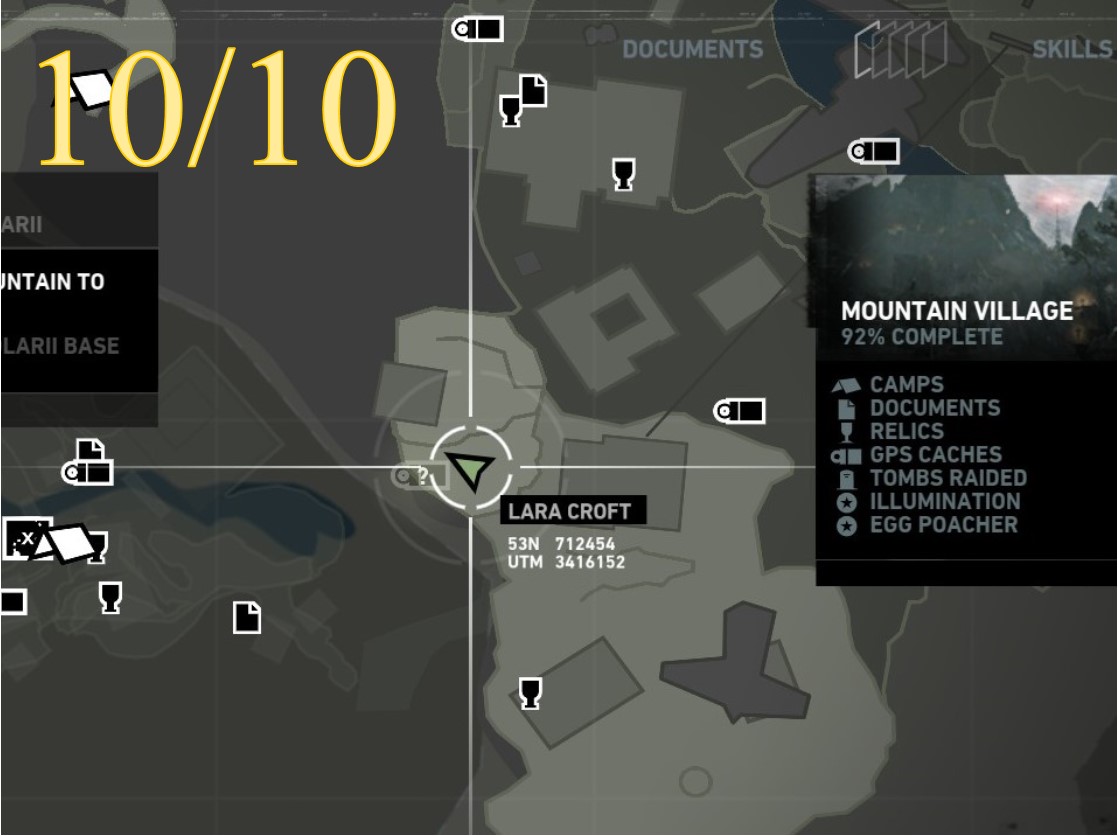
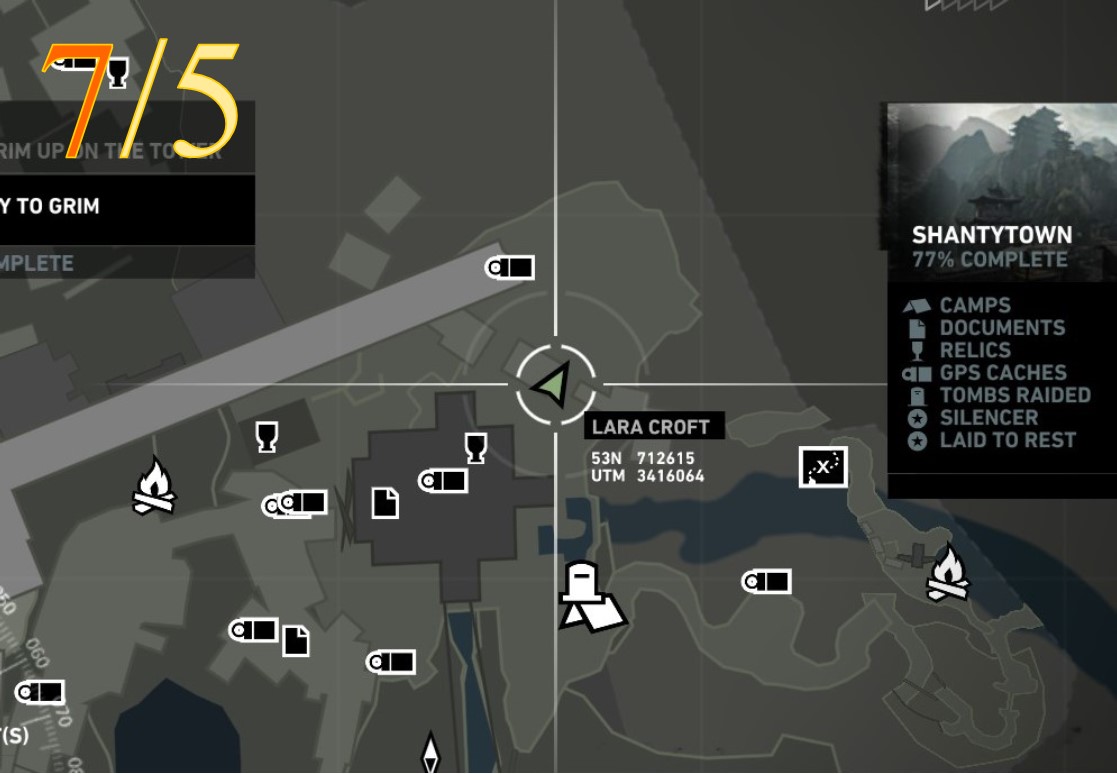
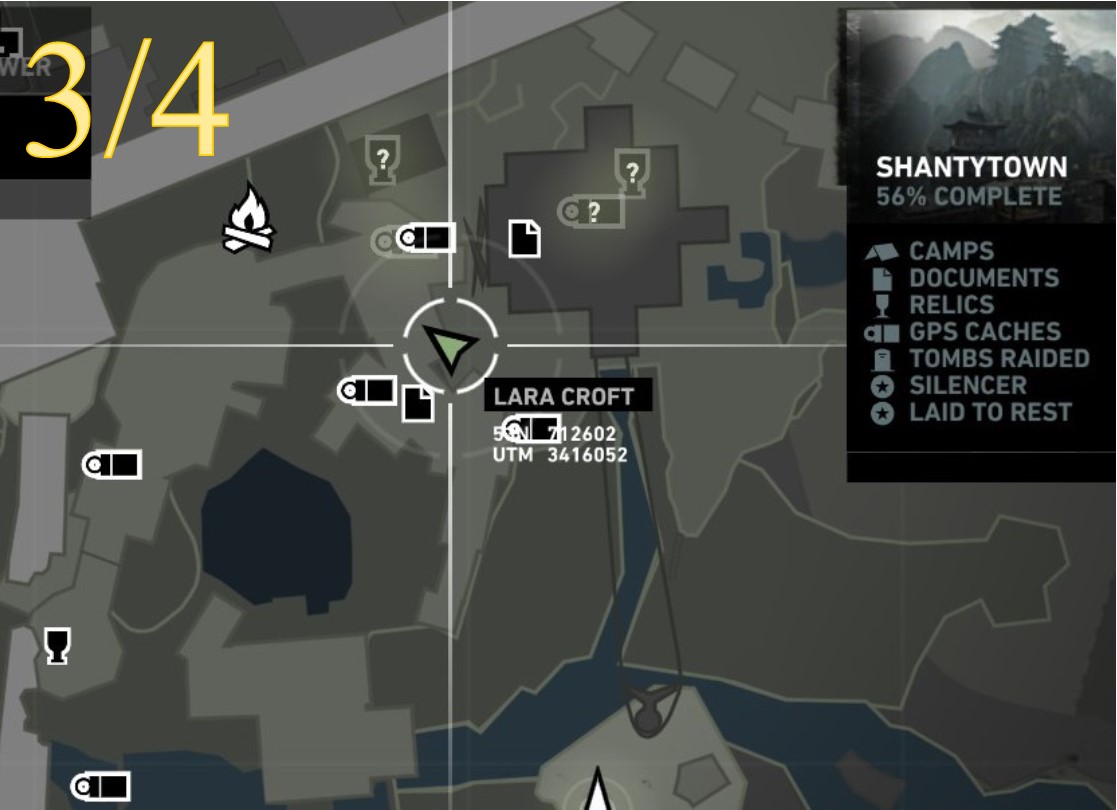
Tomb Raider: Complete All Challenges
List of Challenges
Challenge 1 - Ghost Hunter (10)
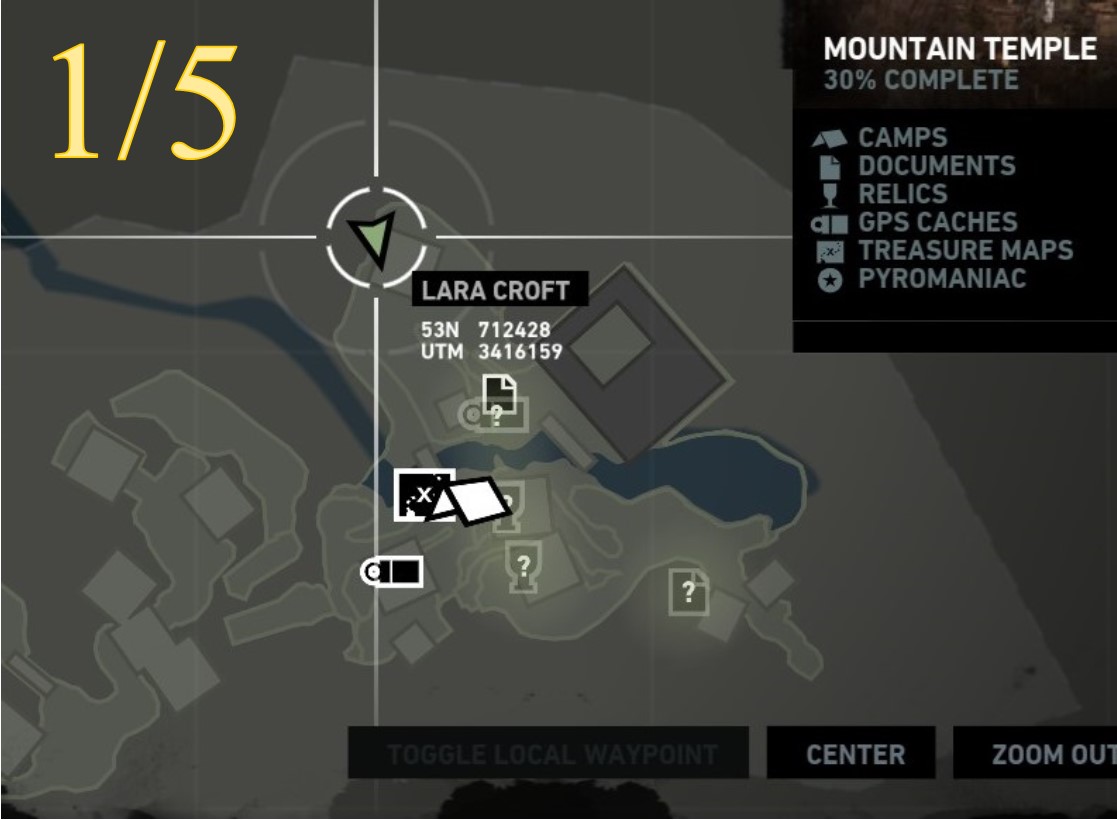
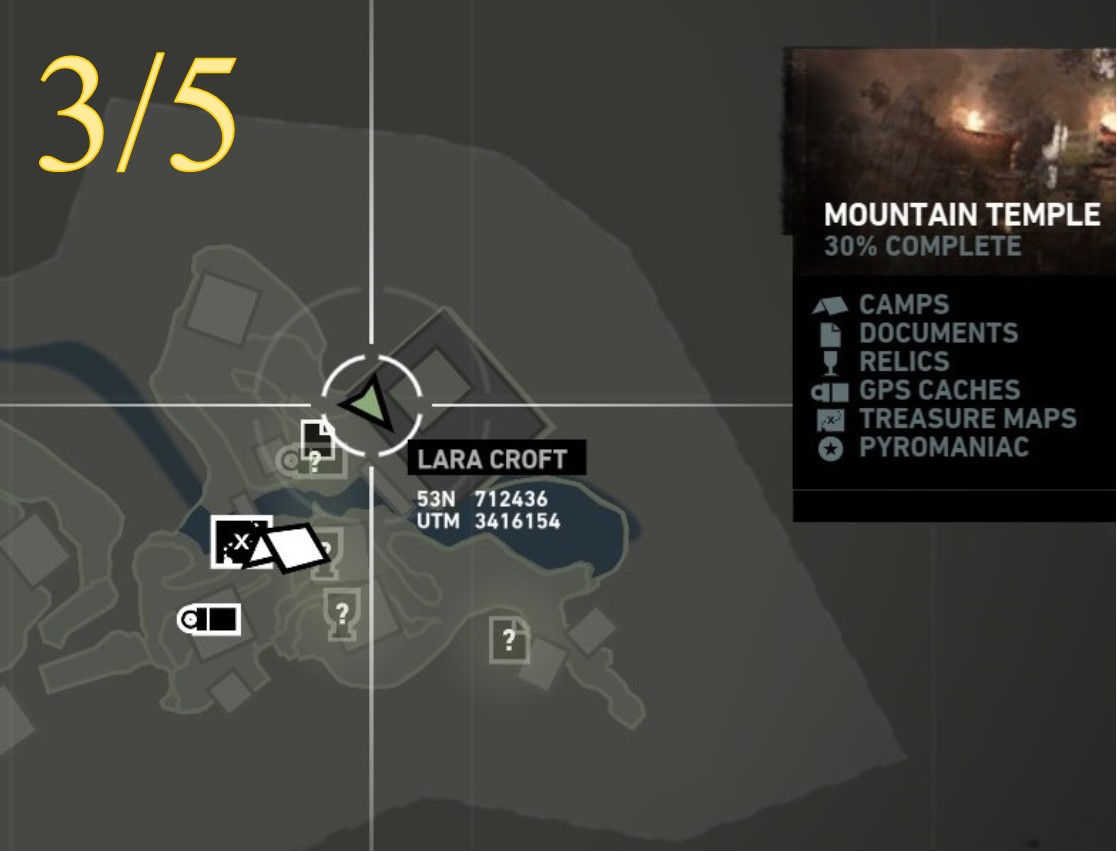
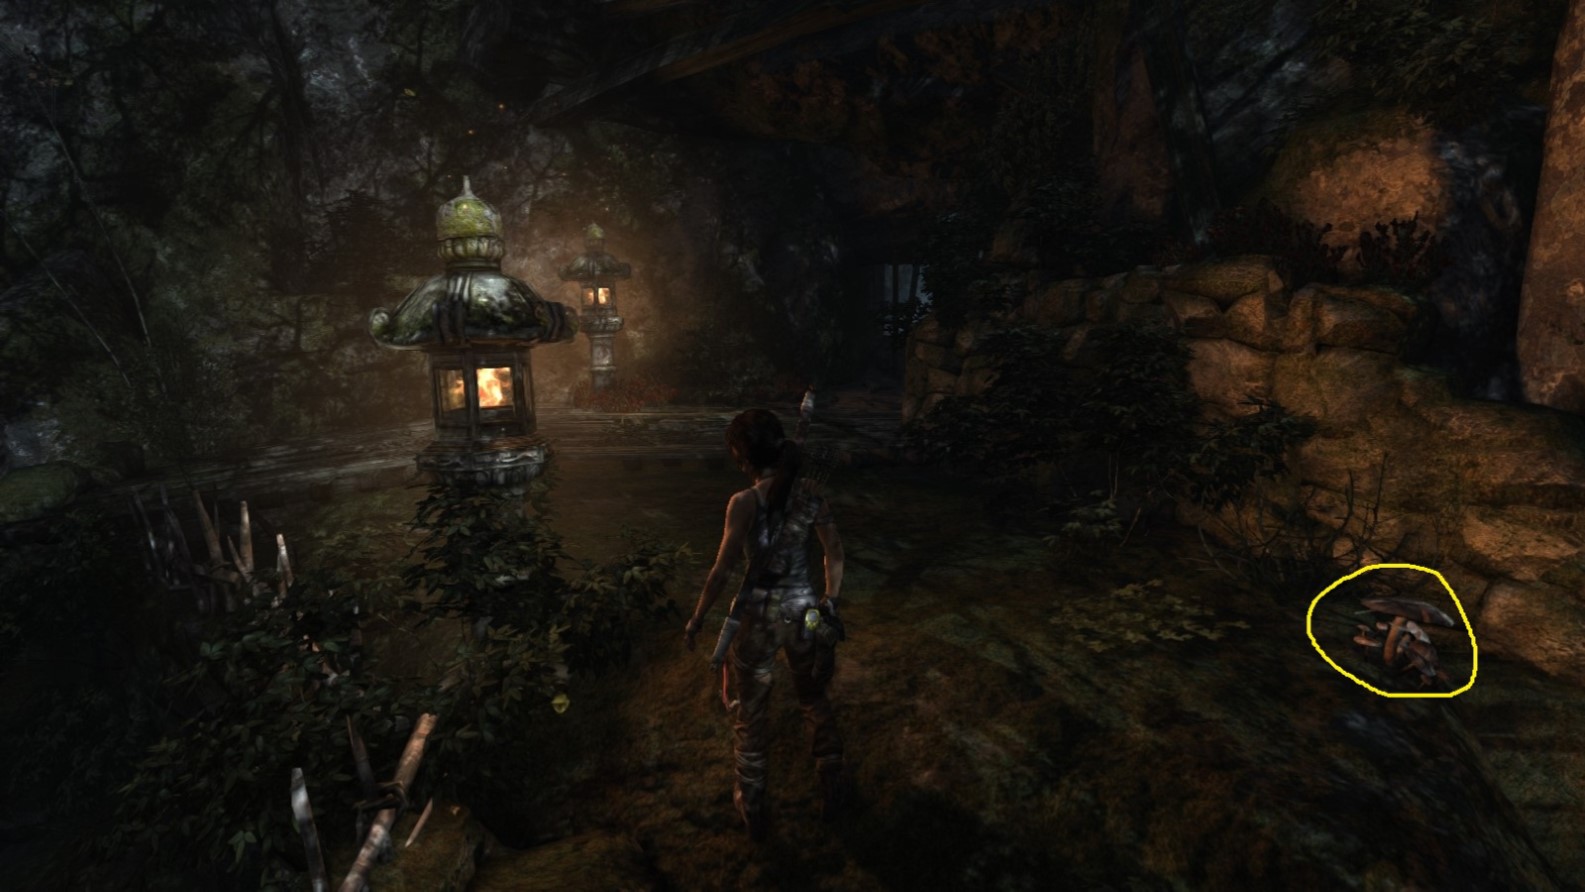
Challenge 2 - Pyromaniac (5)
Challenge 3 - Illumination (10)
Challenge 4 - Egg Poacher (5)
Challenge 5 - Non-Believer (5)
Challenge 6 - Laid To Rest (5+4)
Challenge 7 - Silencer (4+1)
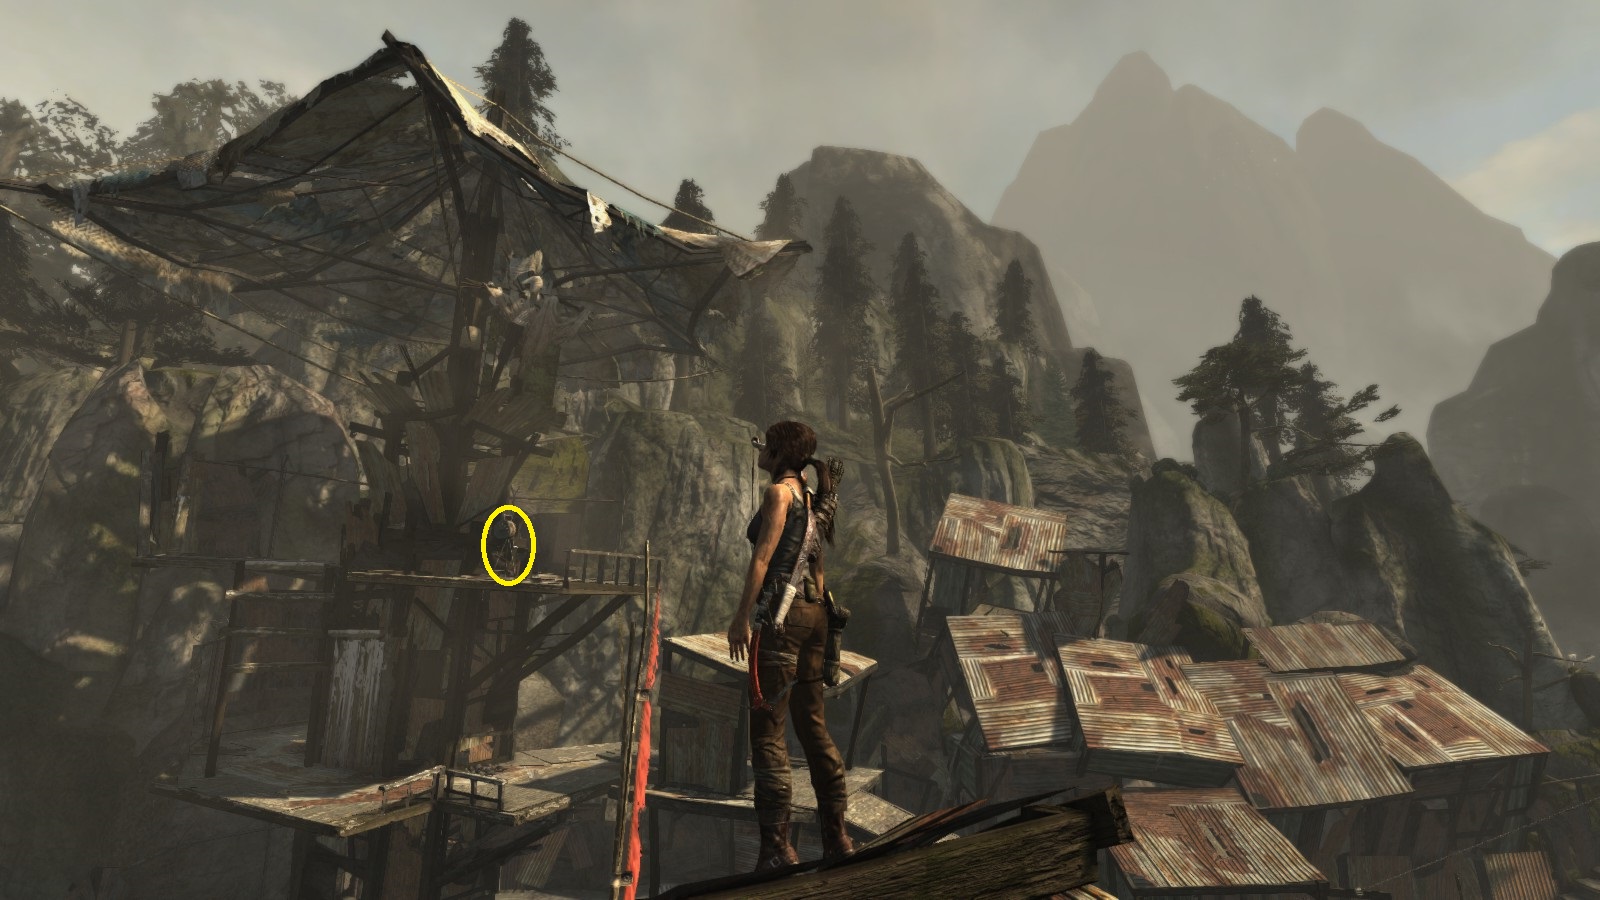
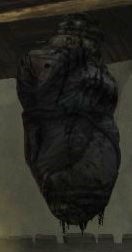
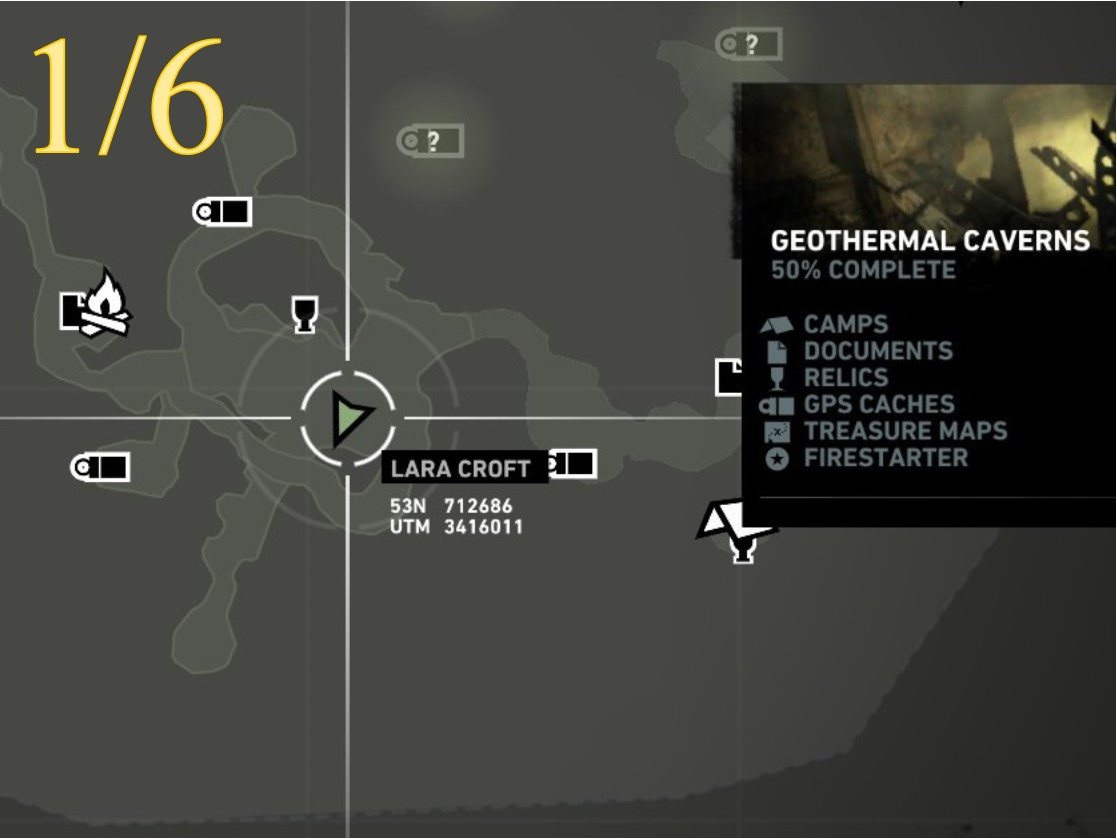
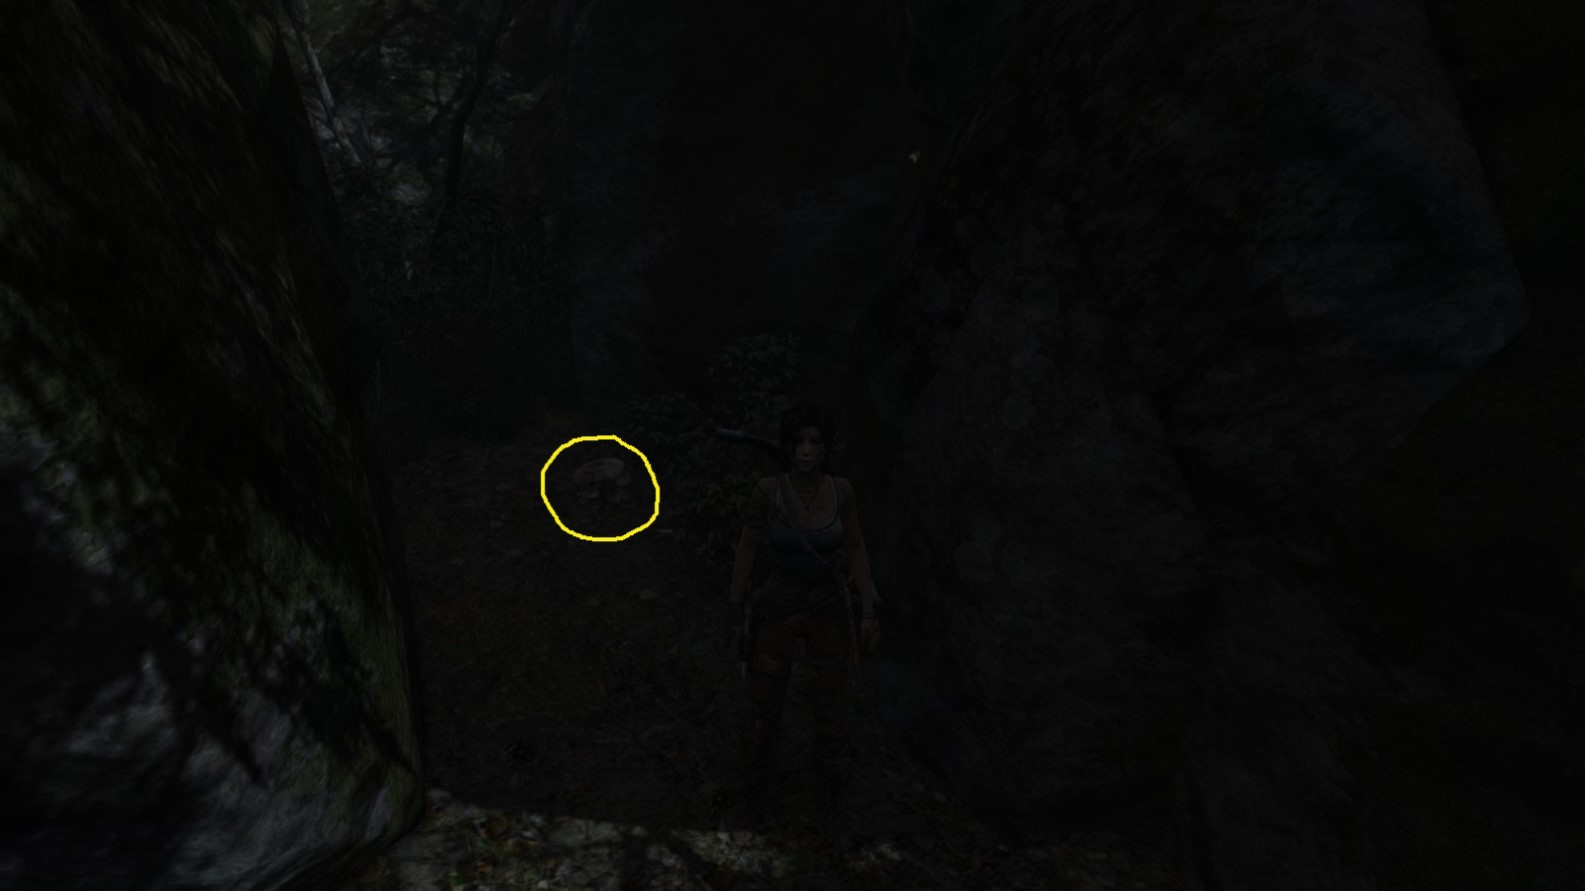
Challenge 8 - Firestarter (6)
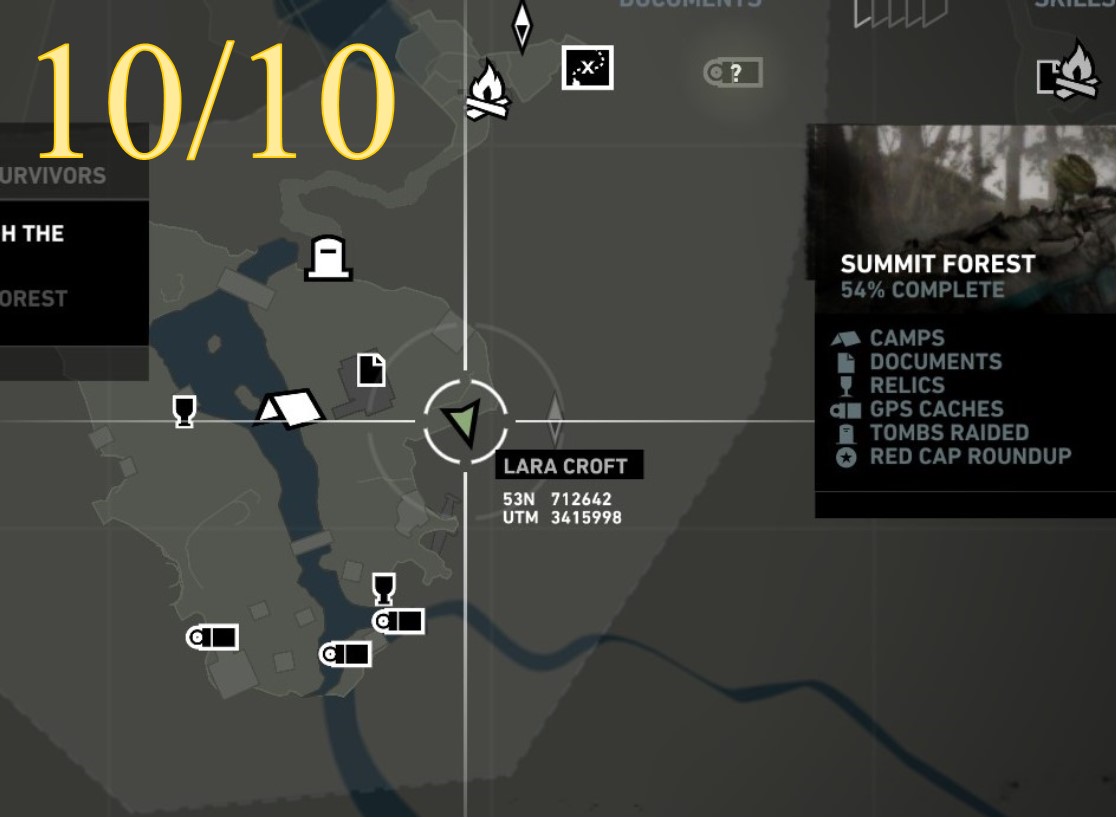
Challenge 9 - Red Cap Roundup (10)
Challenge 10 - Cairn Raider (5)
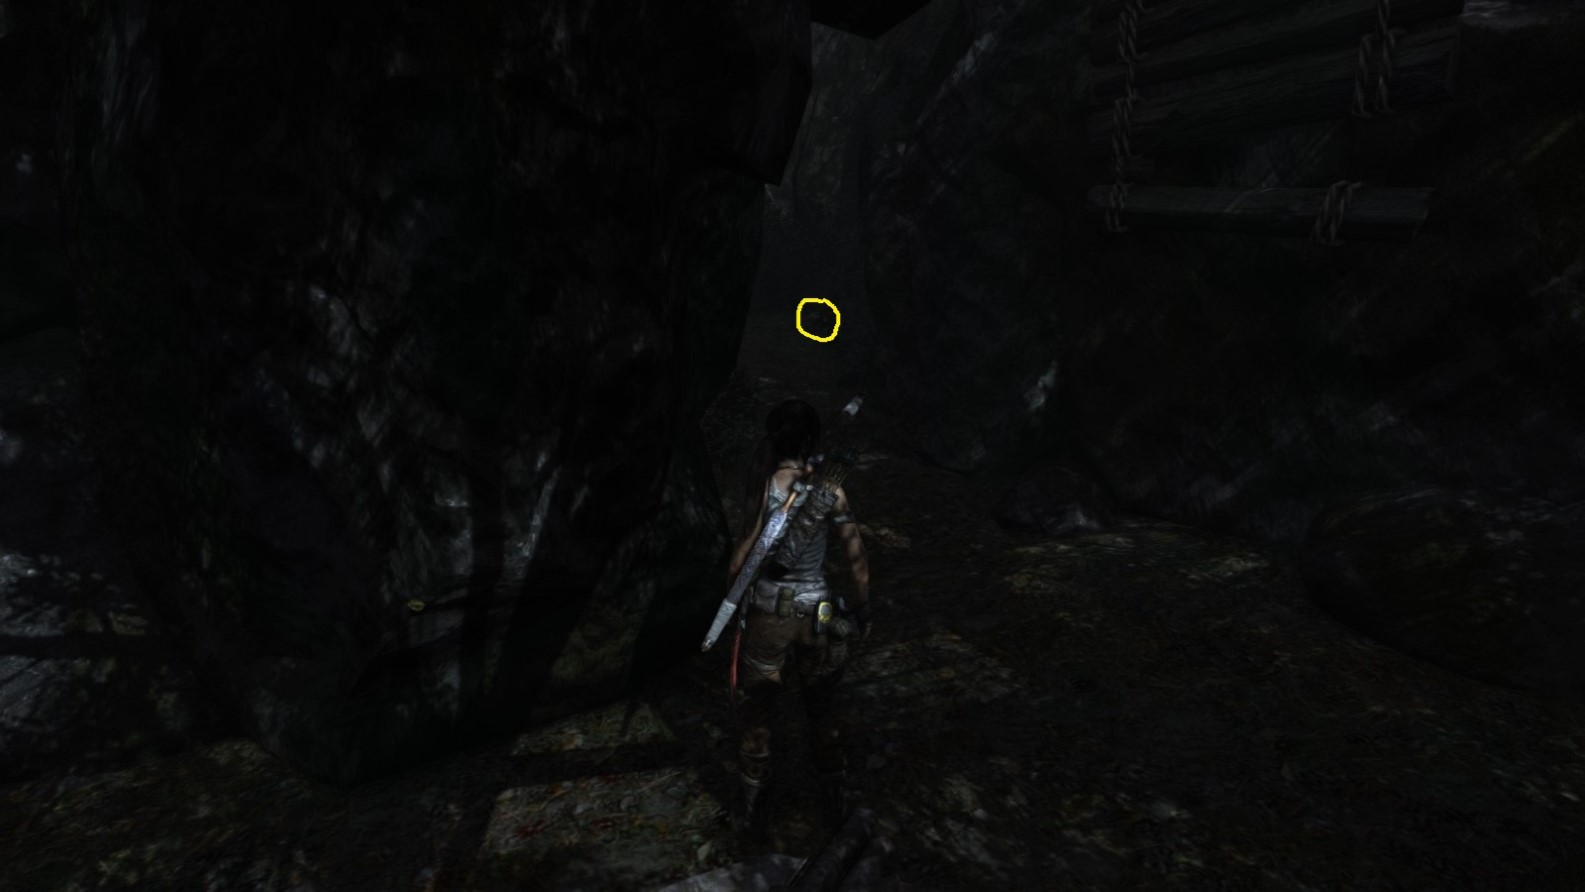
Challenge 11 - Mine Sweeper (10)
Challenge 12 - Previous Inhabitants (4)
Challenge 13 - Sun Killer (5)
Challenge 2 - Pyromaniac (5)
Challenge 3 - Illumination (10)
Challenge 4 - Egg Poacher (5)
Challenge 5 - Non-Believer (5)
Challenge 6 - Laid To Rest (5+4)
Challenge 7 - Silencer (4+1)
Challenge 8 - Firestarter (6)
Challenge 9 - Red Cap Roundup (10)
Challenge 10 - Cairn Raider (5)
Challenge 11 - Mine Sweeper (10)
Challenge 12 - Previous Inhabitants (4)
Challenge 13 - Sun Killer (5)
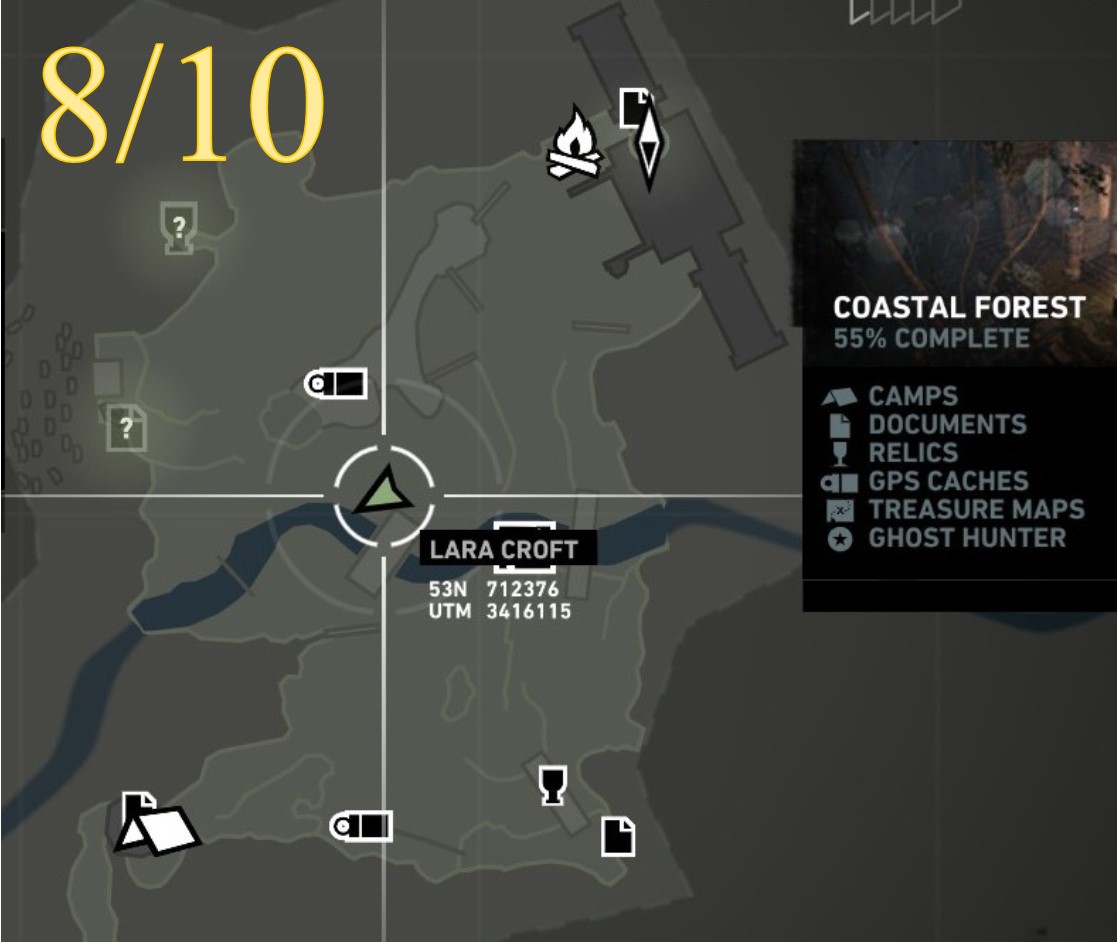
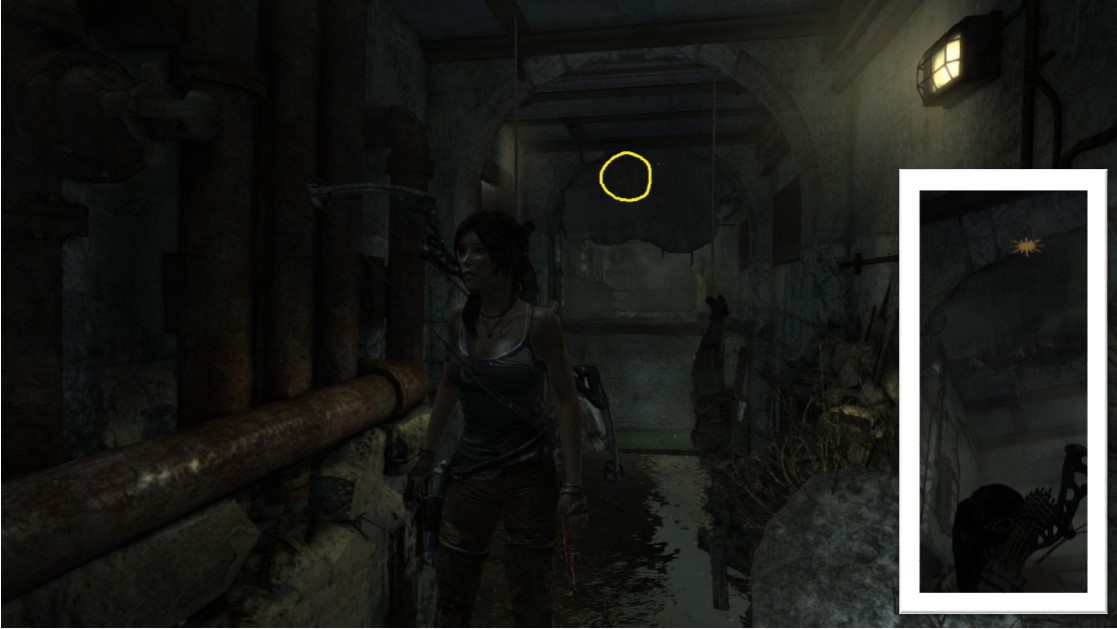
Challenge 1: GHOST HUNTER
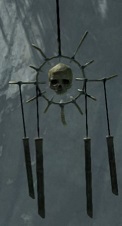
Ghost Hunter - Object 1
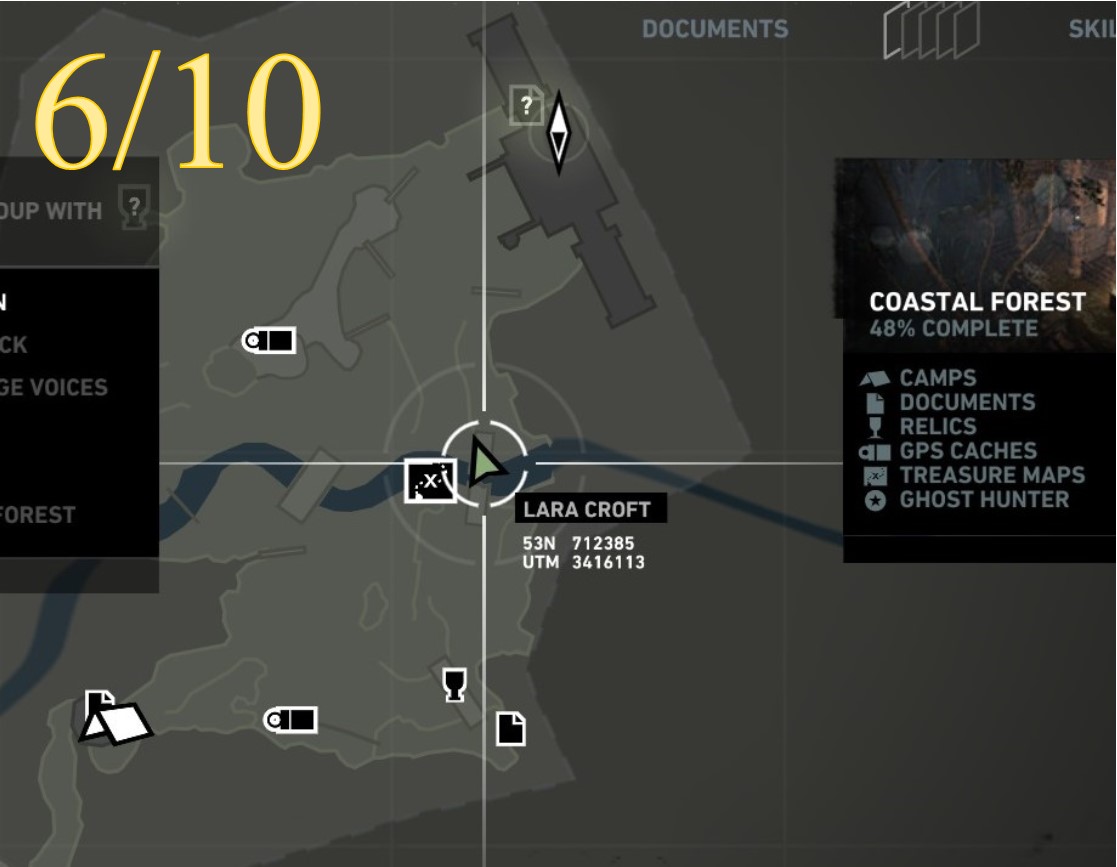
Area: Coastal Forest (Part 1)
Closest Base Camp: Sheltered Ridge
Find and destroy (shoot)
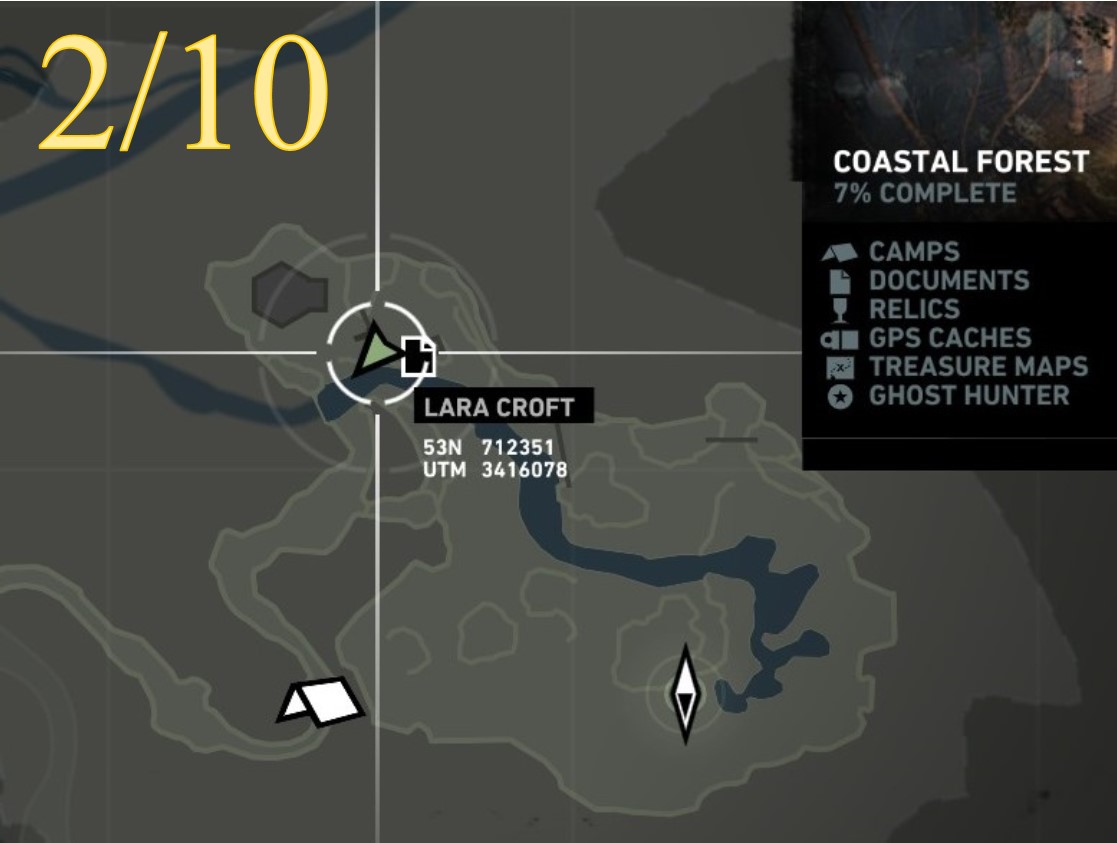
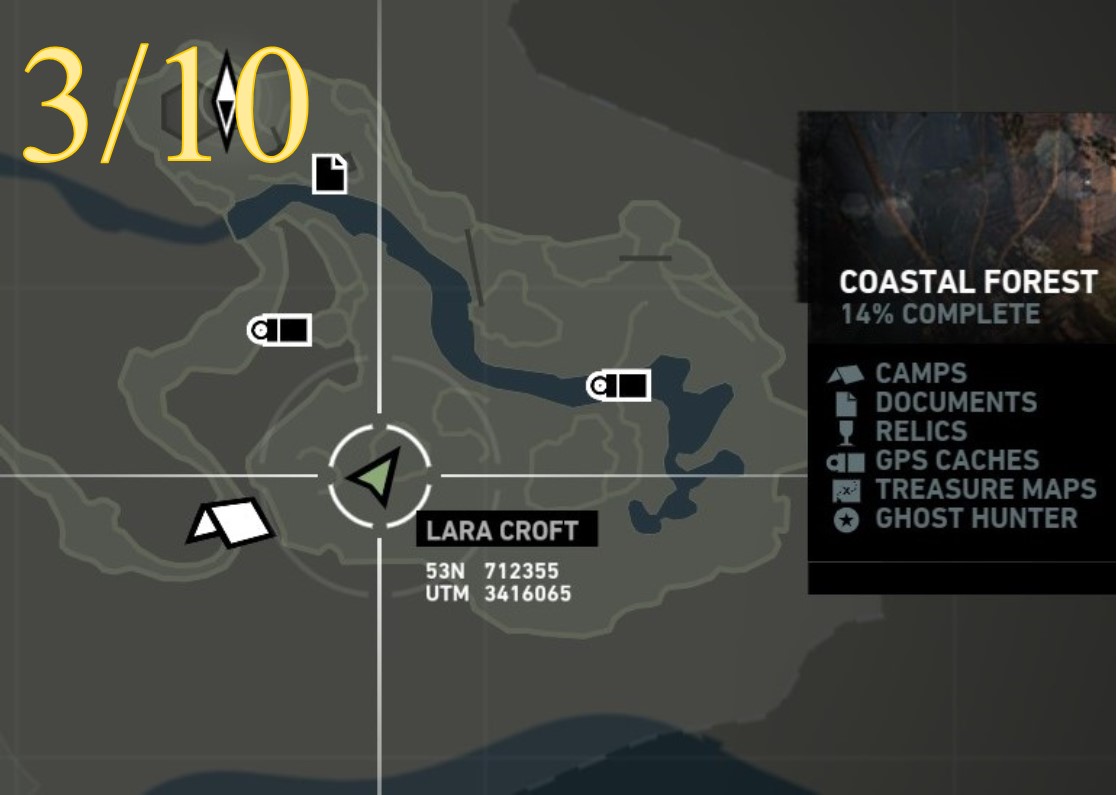
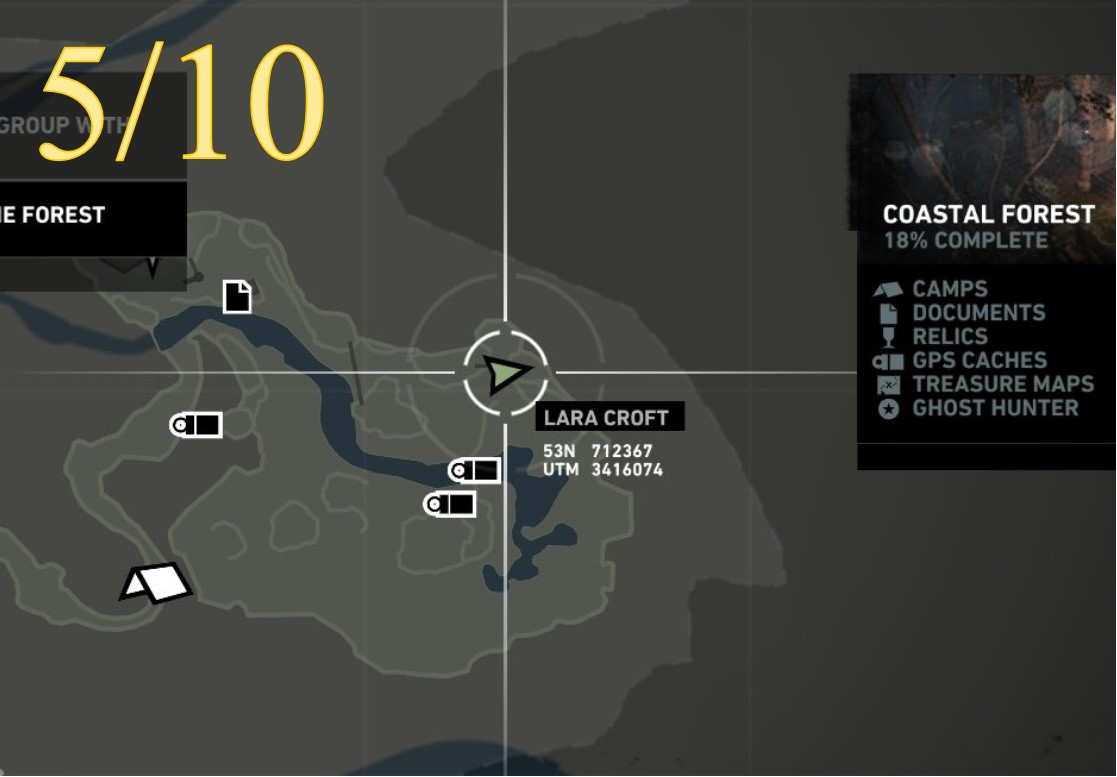
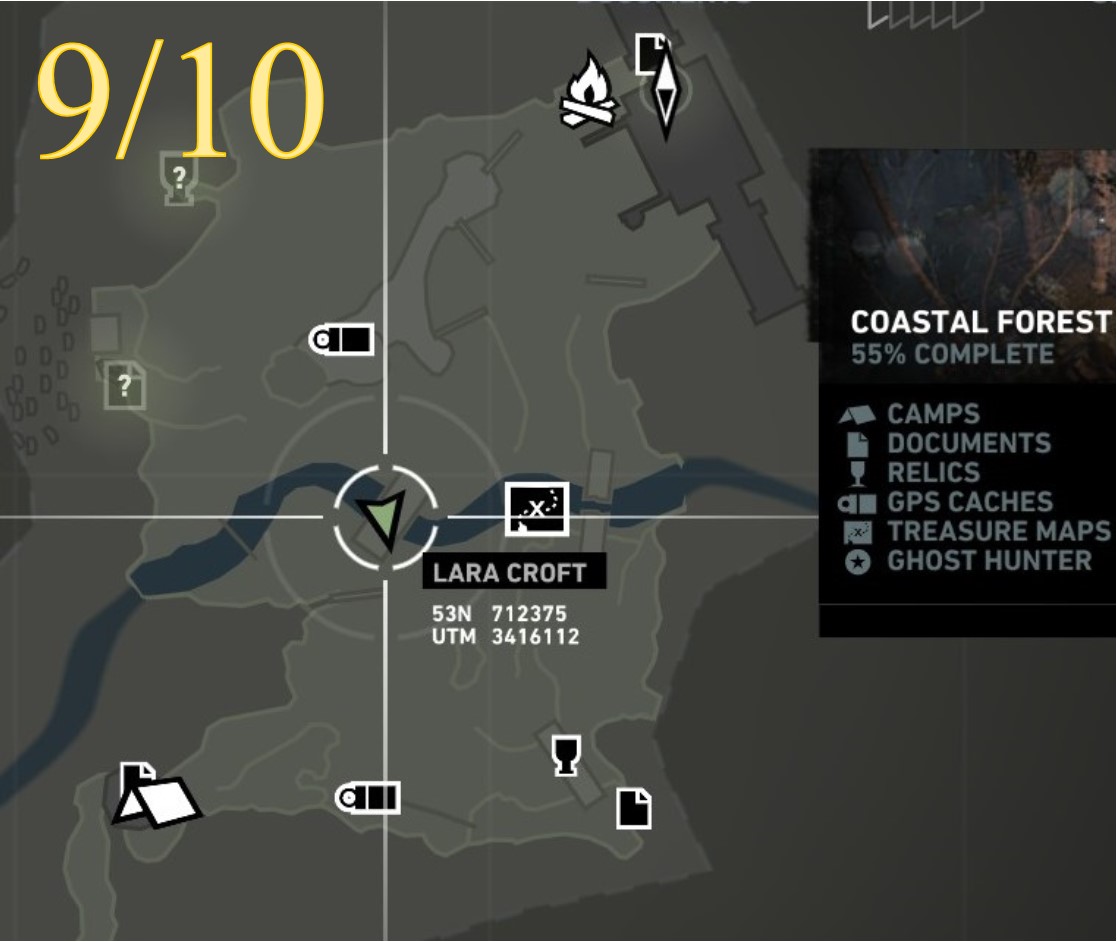
Location on the Map
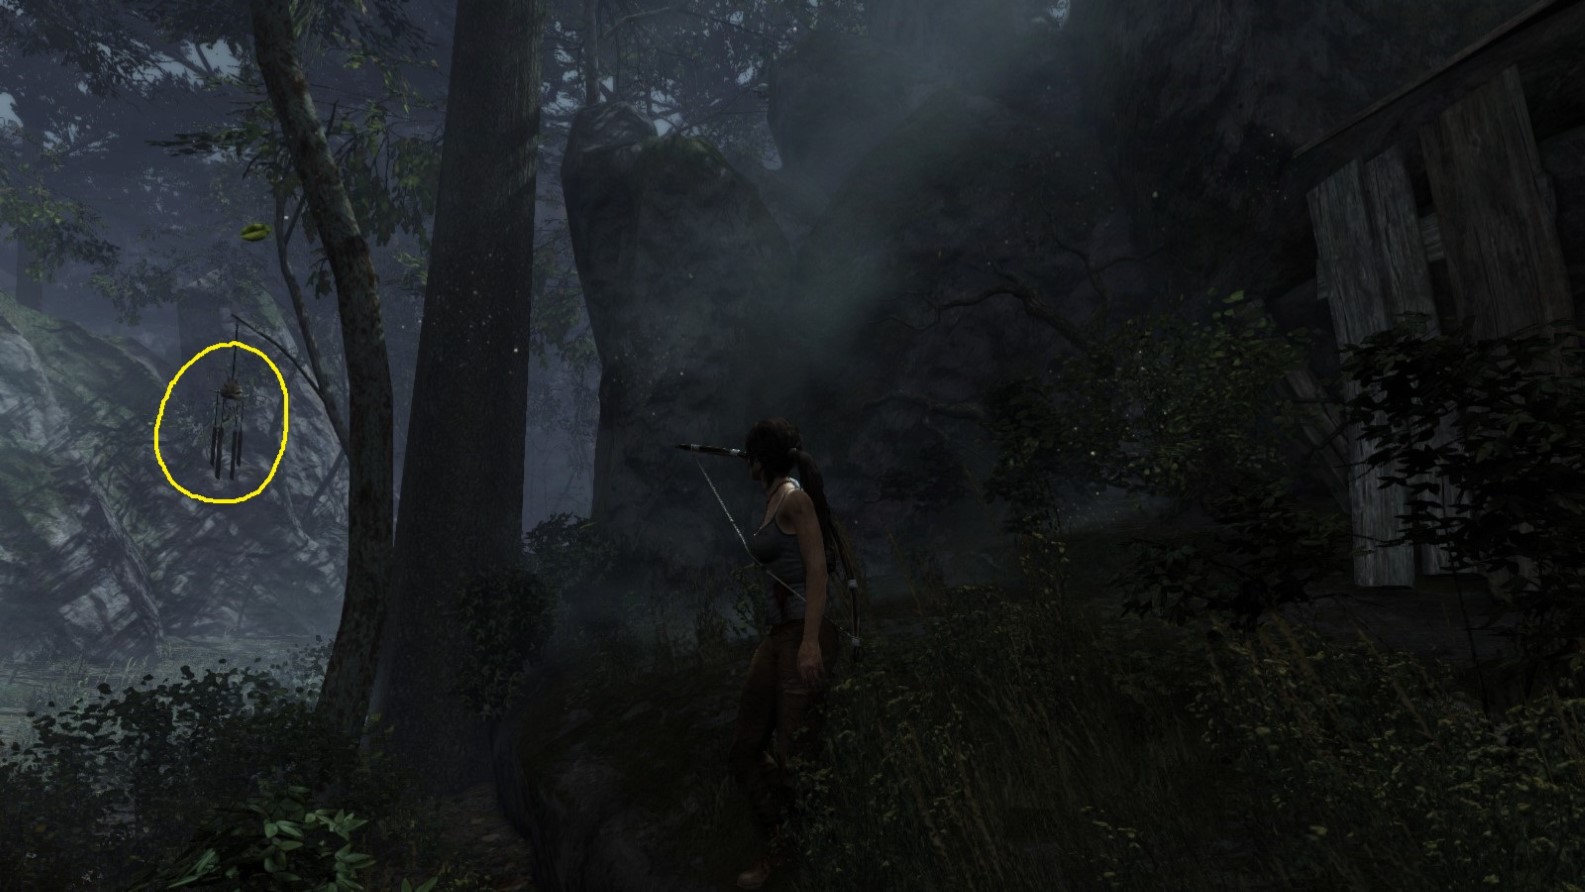
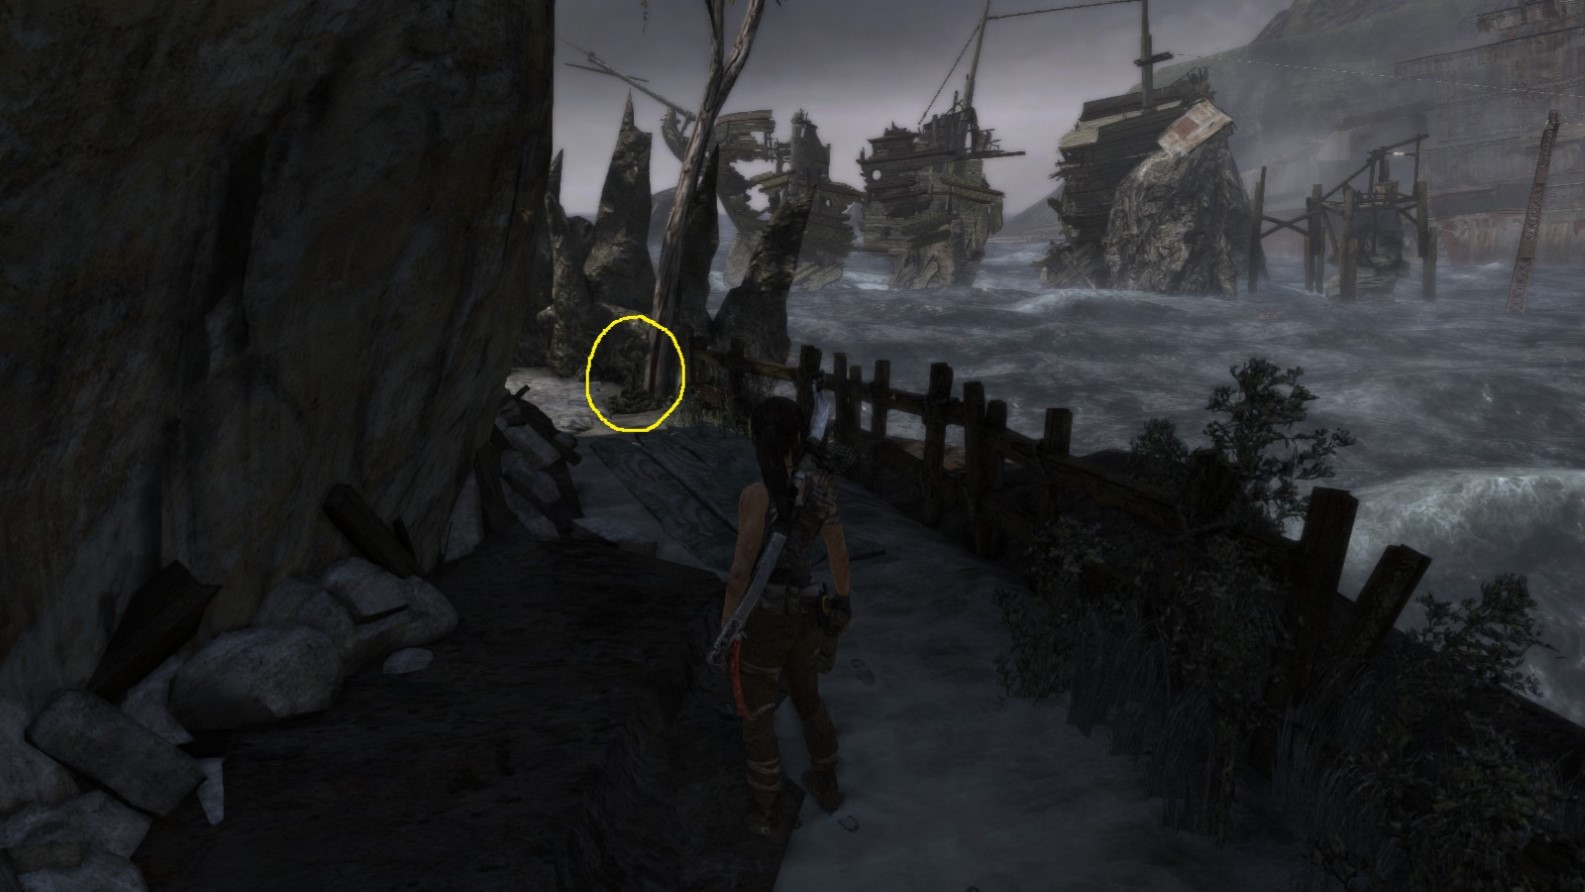
Screenshot A - Ghost Hunter 1/10
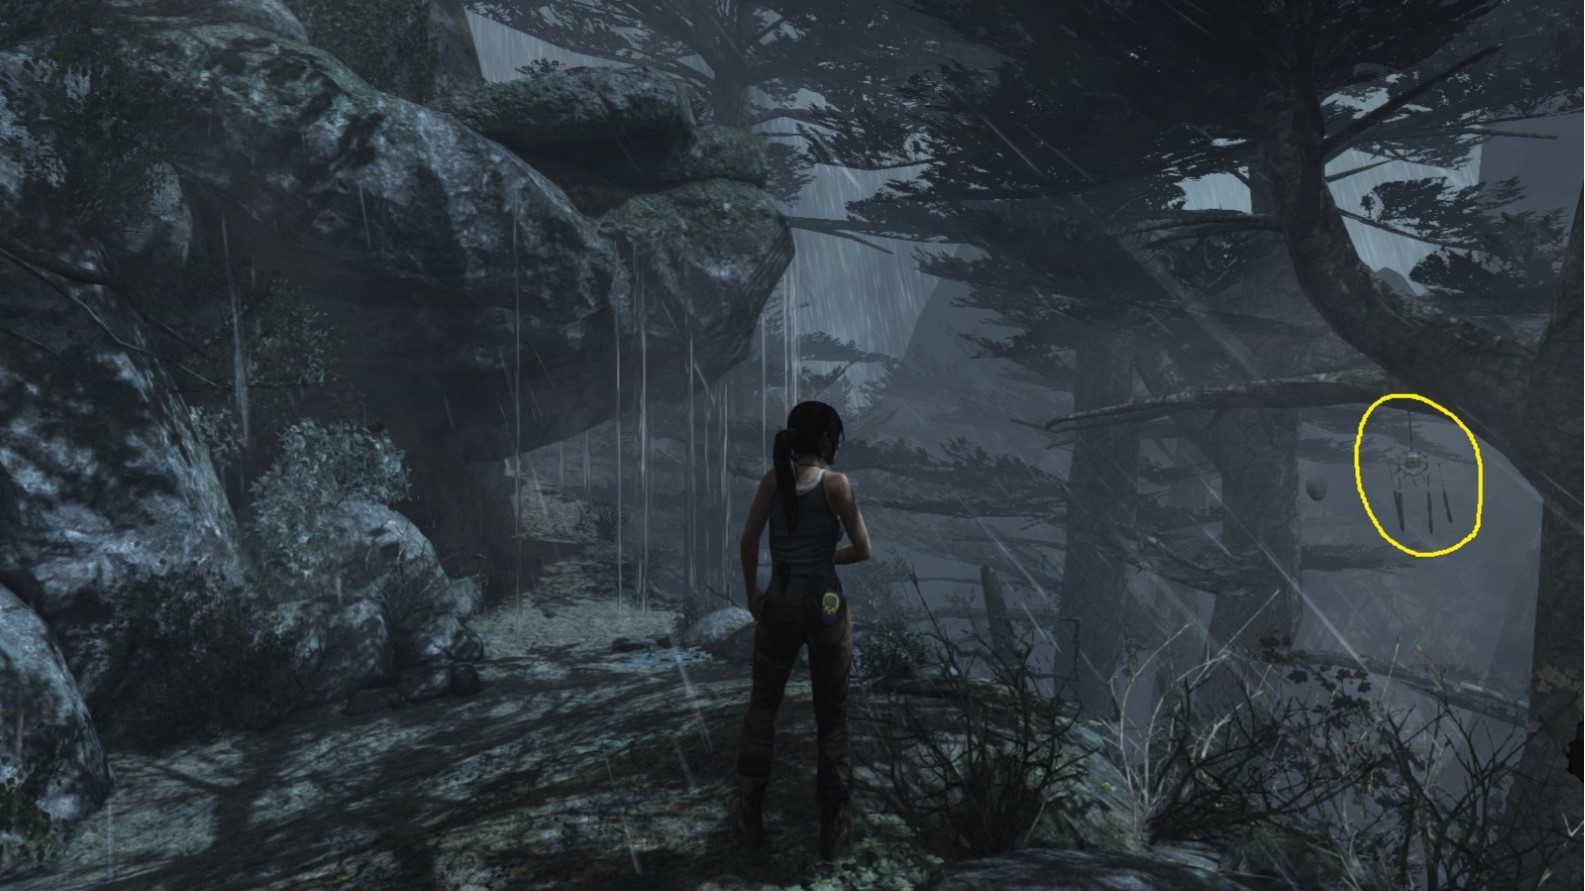
This is before the wounded Lara finds the very first base camp. Having no weapons, she can’t destroy it yet.
Screenshot B - Ghost Hunter 1/10
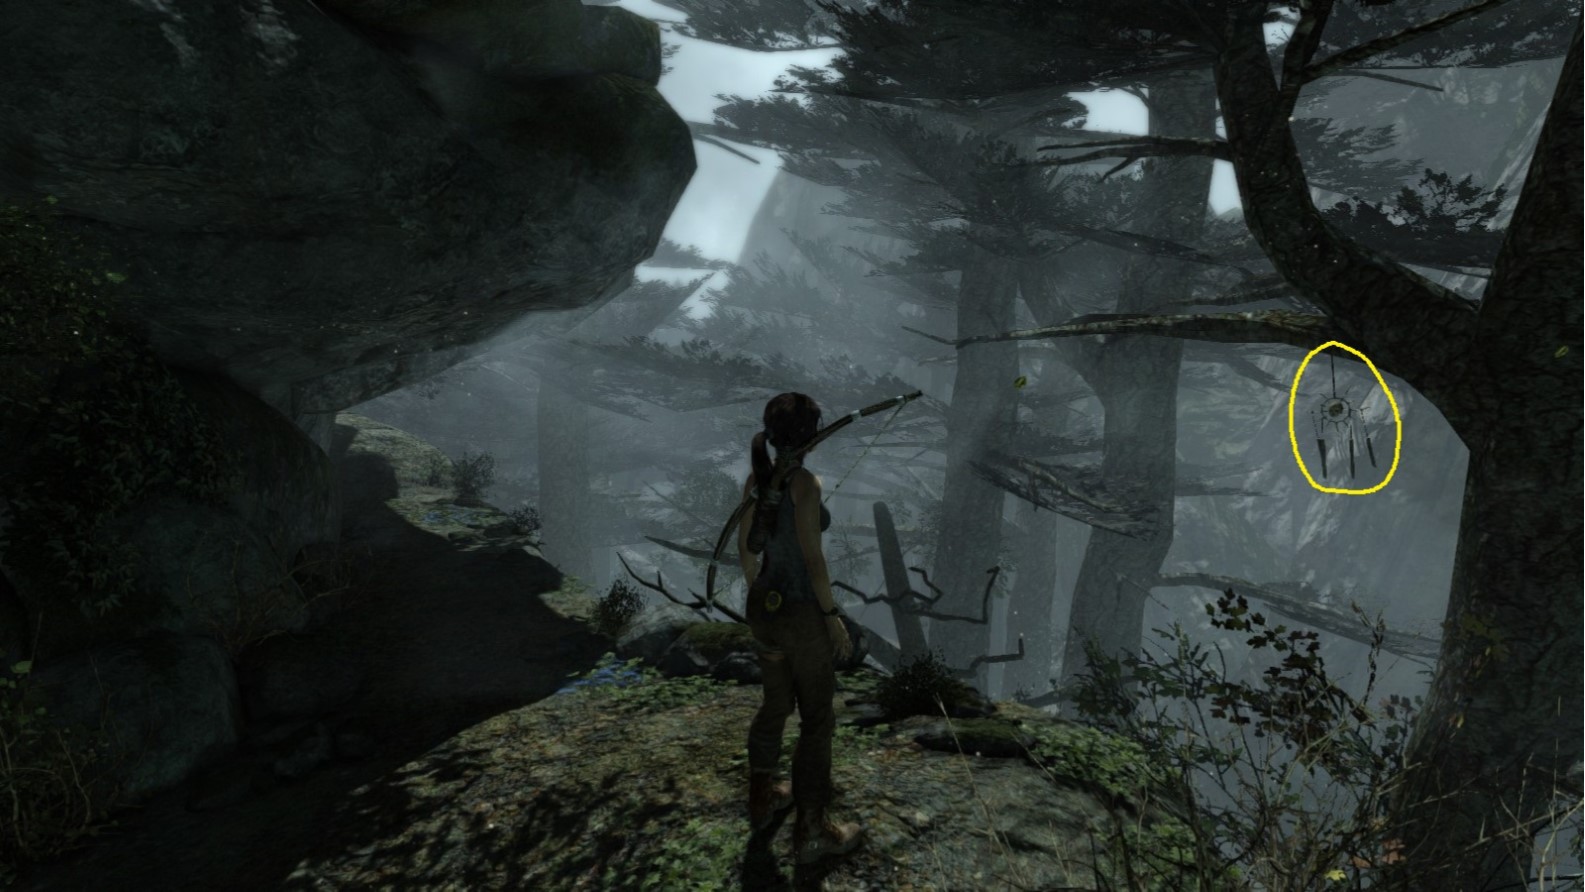
The same location but after Lara has found the bow and returned. Use the bow to shoot it.
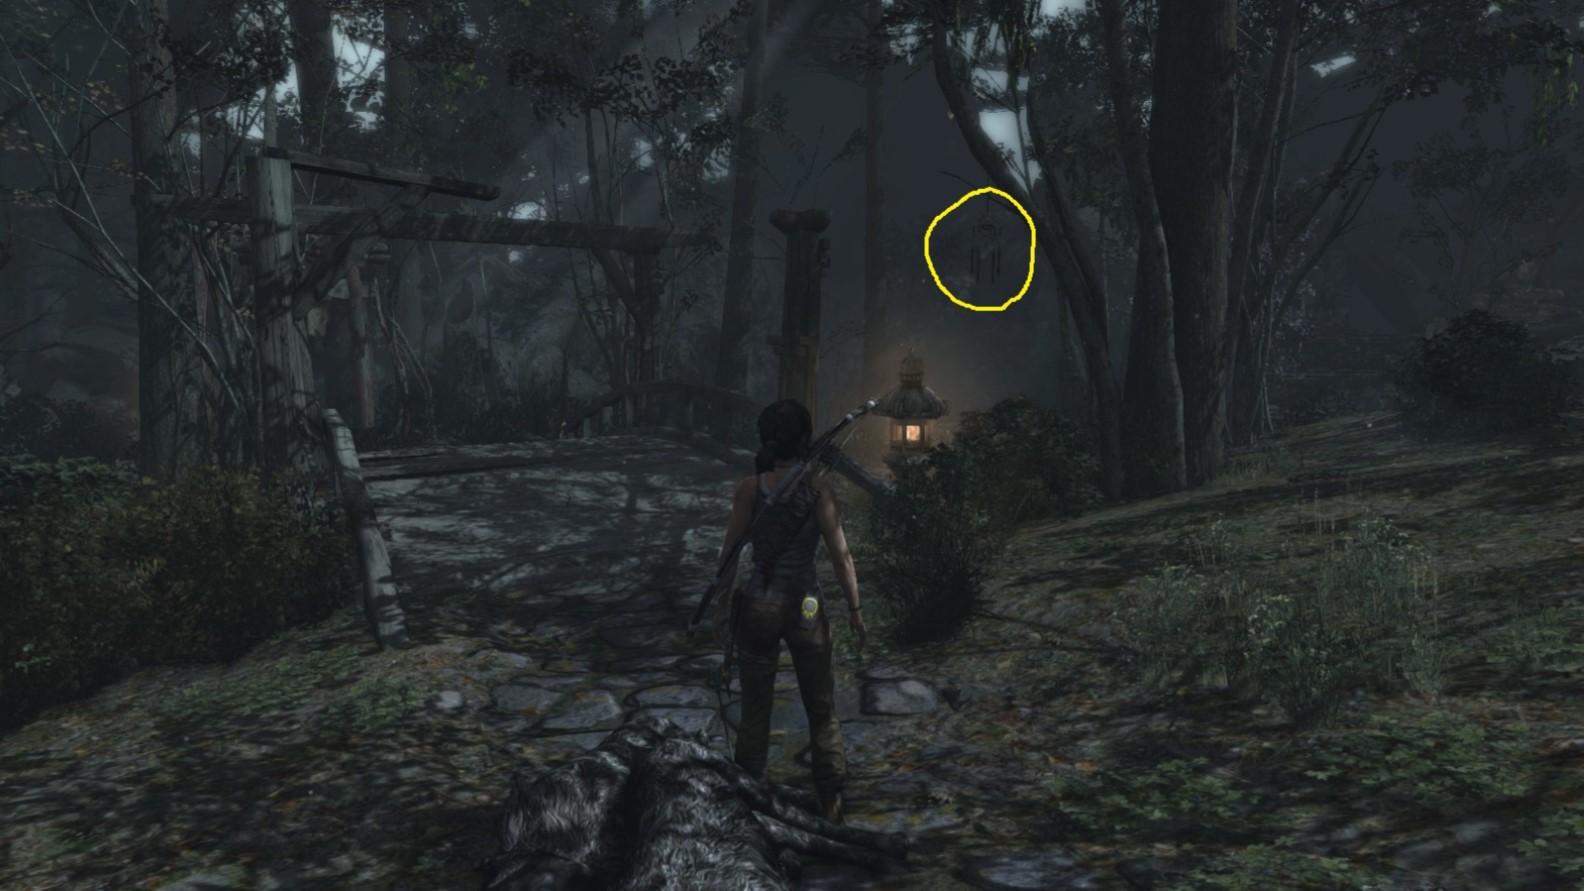
Ghost Hunter - Object 2
Area: Coastal Forest (Part 1)
Closest Base Camp: Sheltered Ridge
Find and destroy (shoot)
Location on the Map
Screenshot A - Ghost Hunter 2/10
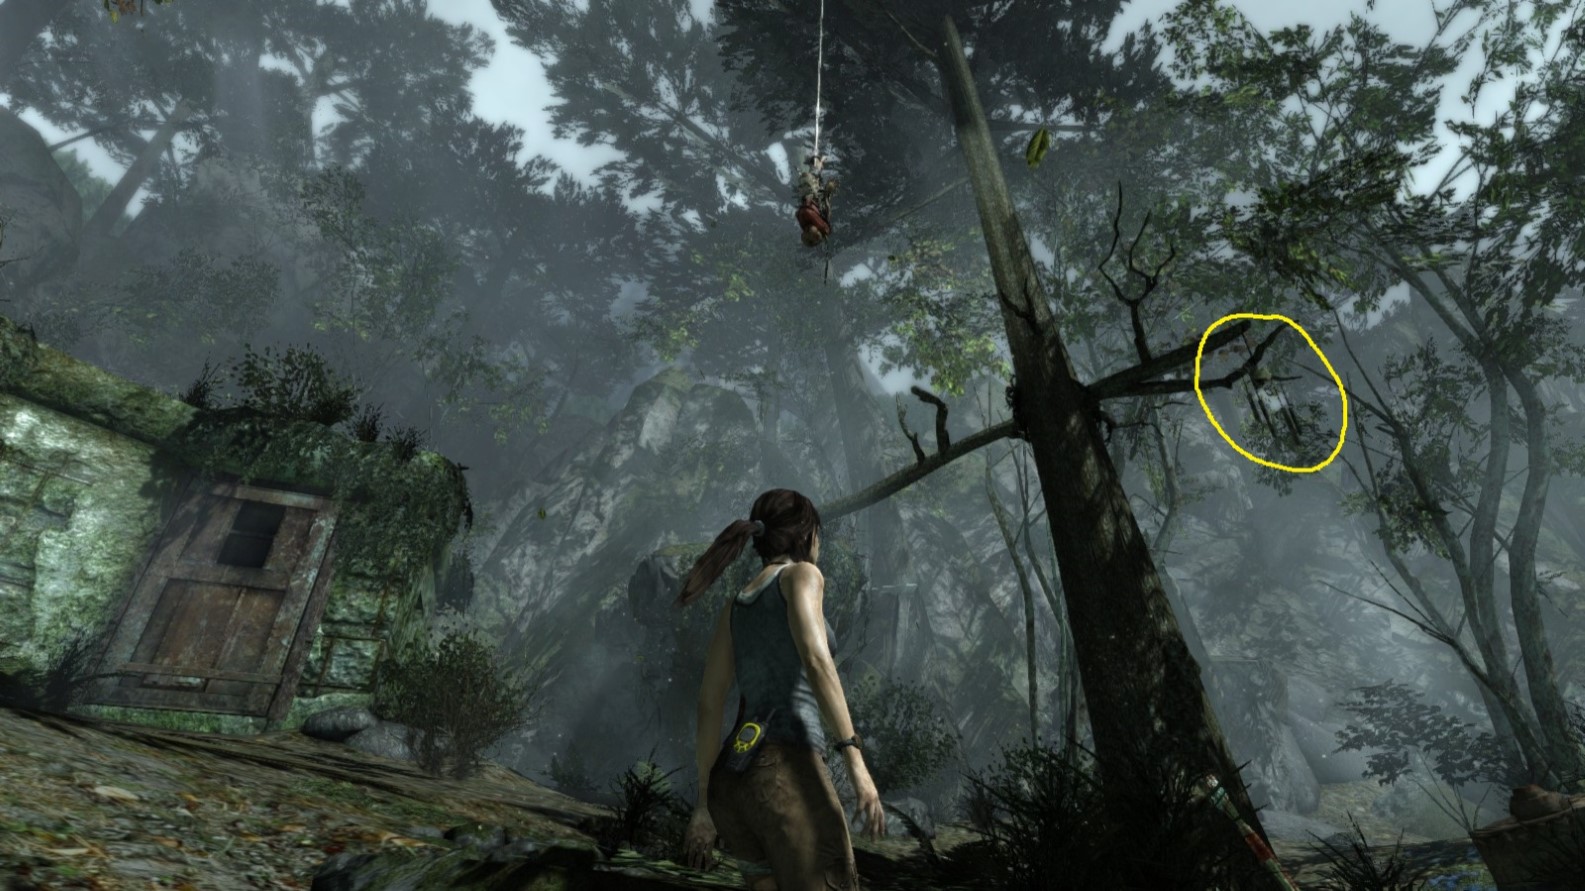
Looking at the tree that also has the bow attached to the skeleton in it.
Screenshot B - Ghost Hunter 2/10
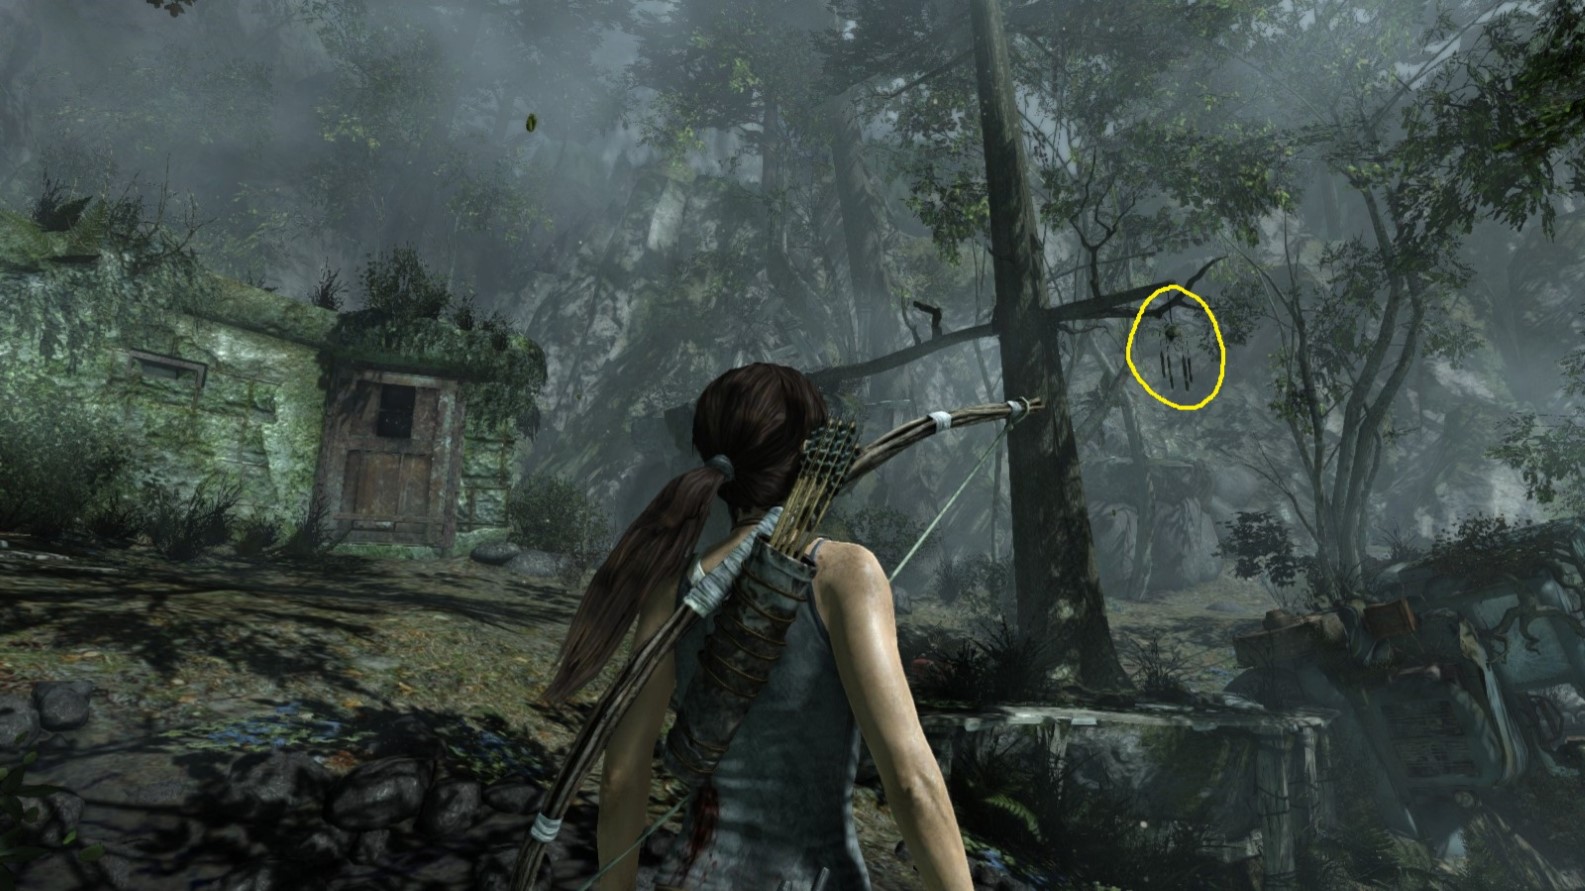
Now Lara has the bow and is ready to destroy the object.
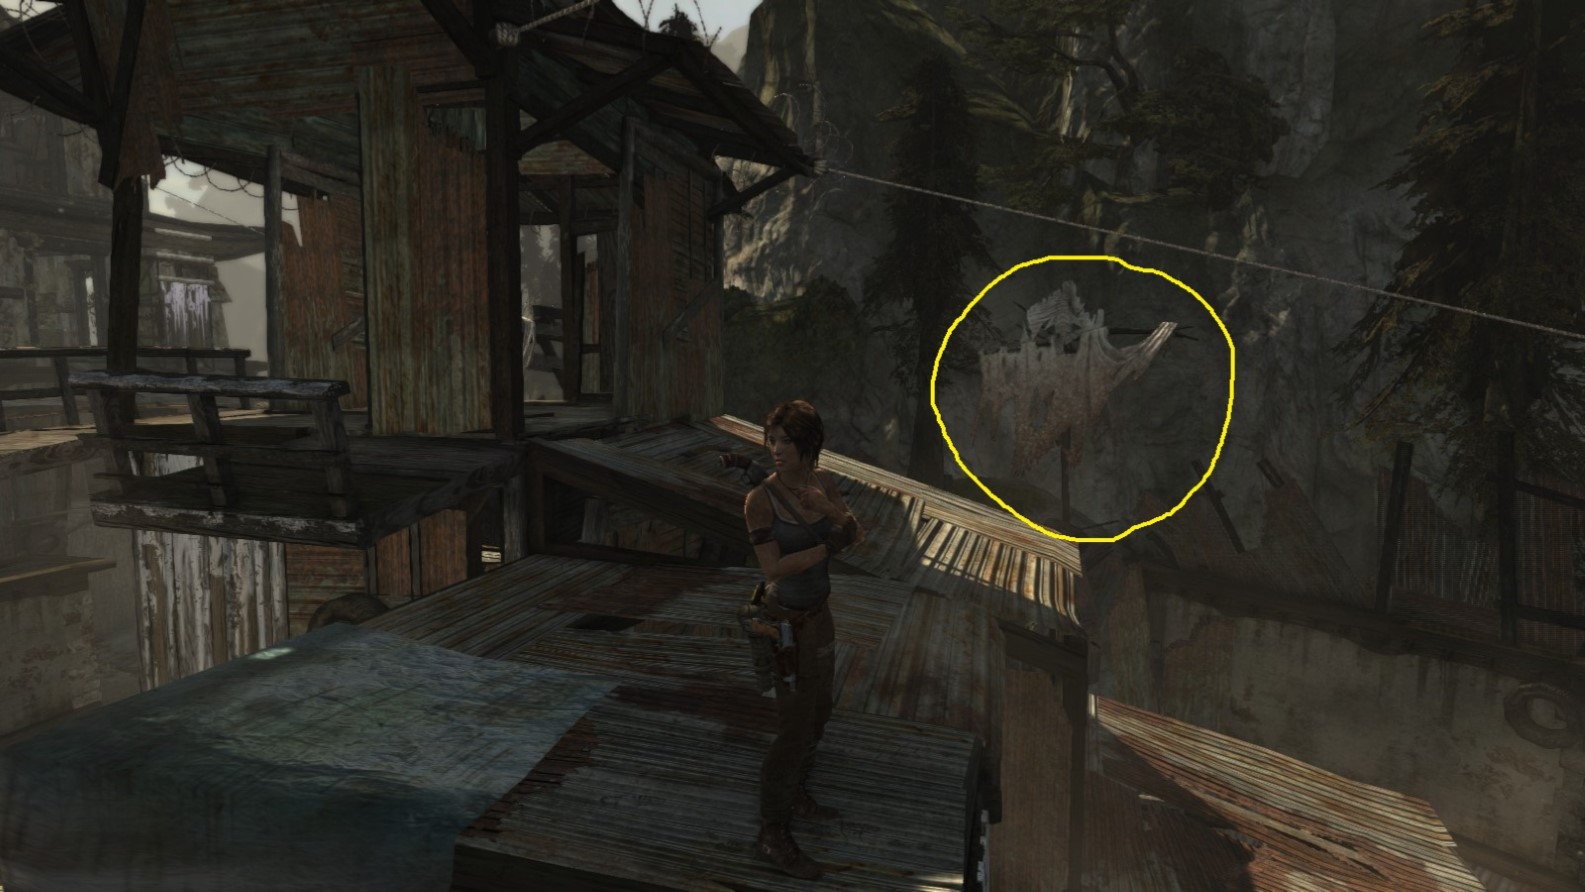
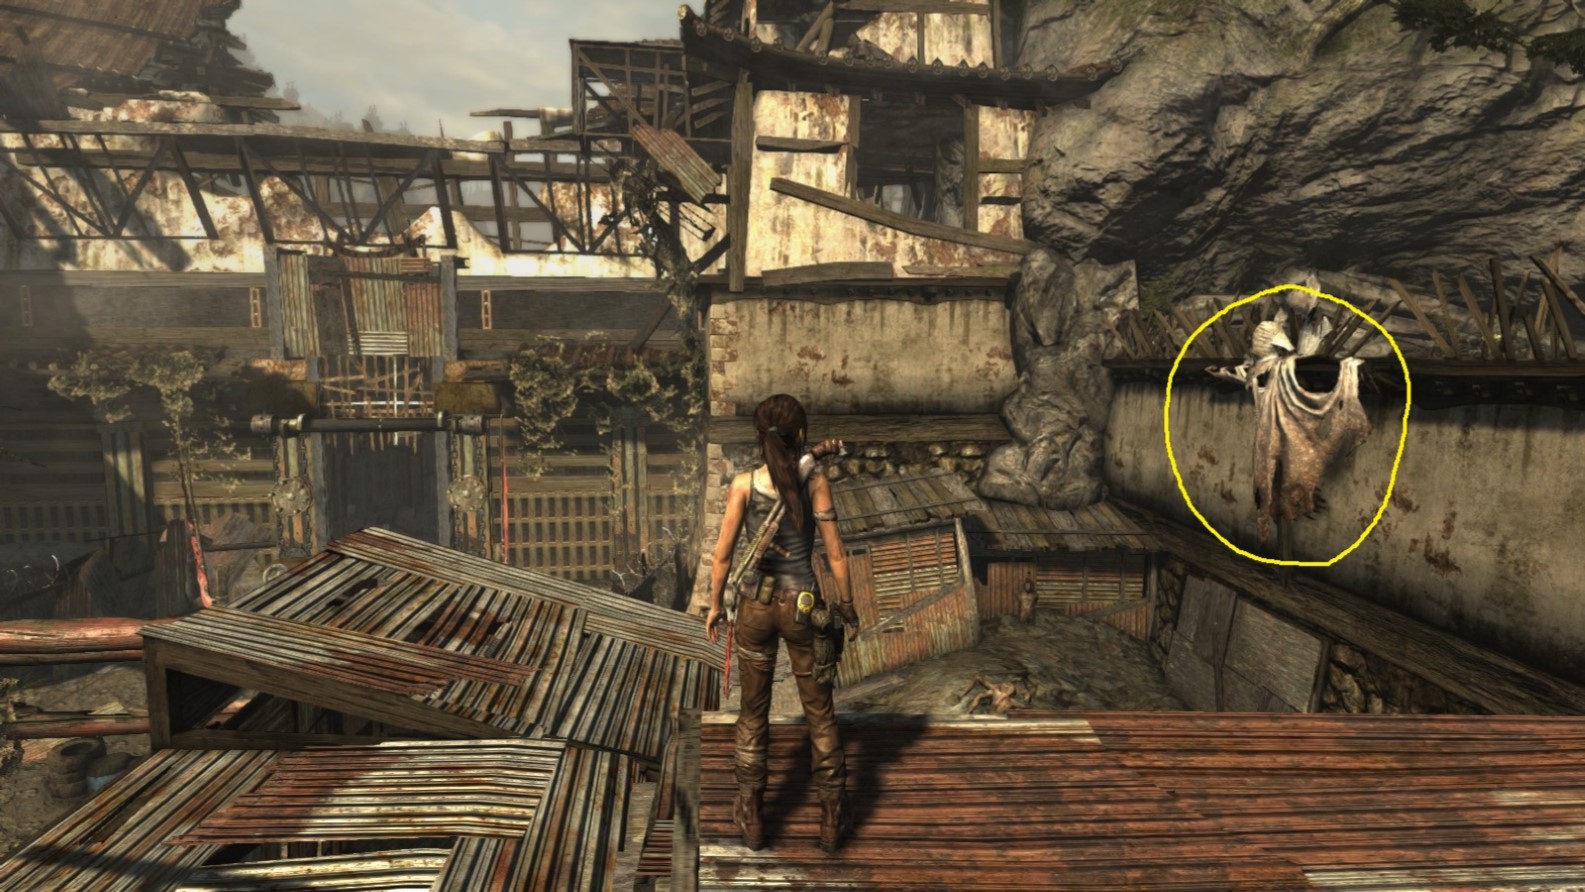
Ghost Hunter - Object 3
Area: Coastal Forest (Part 1)
Closest Base Camp: Sheltered Ridge
Find and destroy (shoot)
Location on the Map
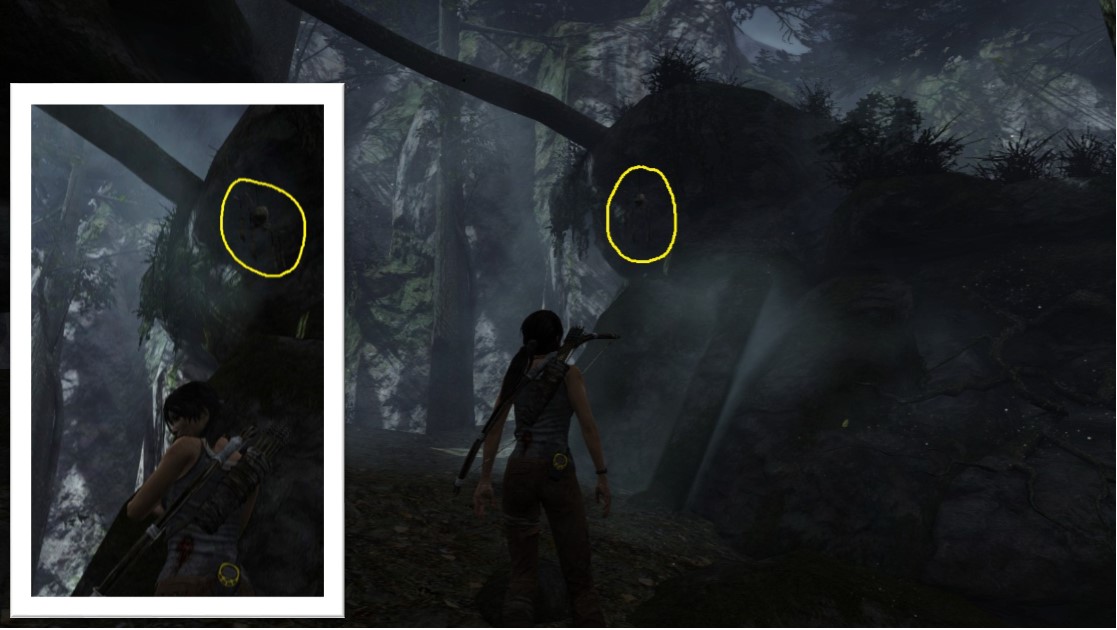
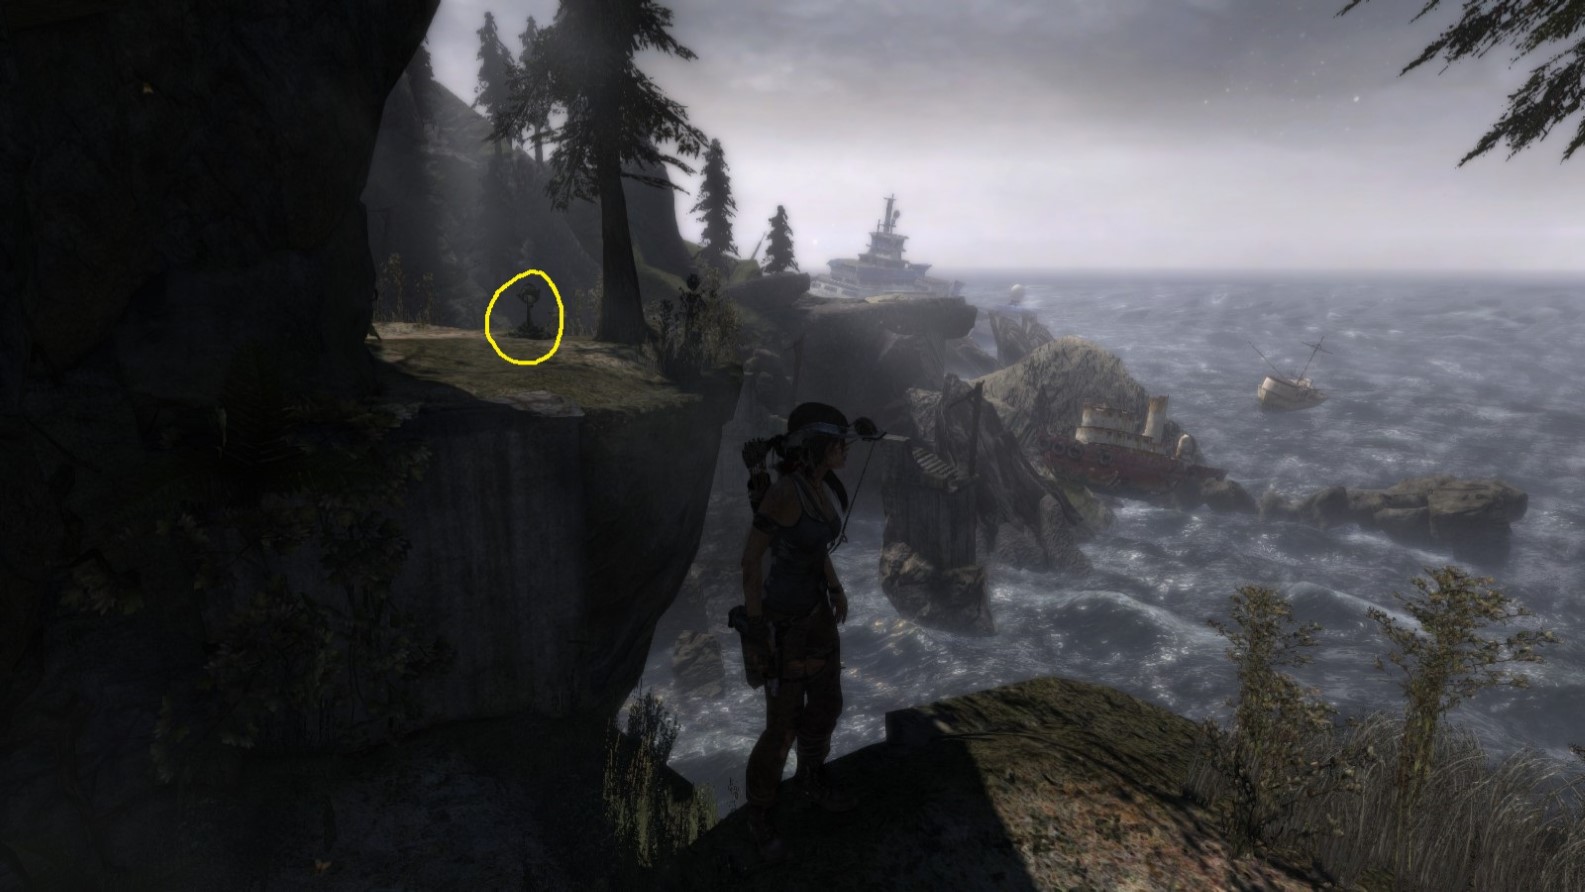
Screenshot A - Ghost Hunter 3/10
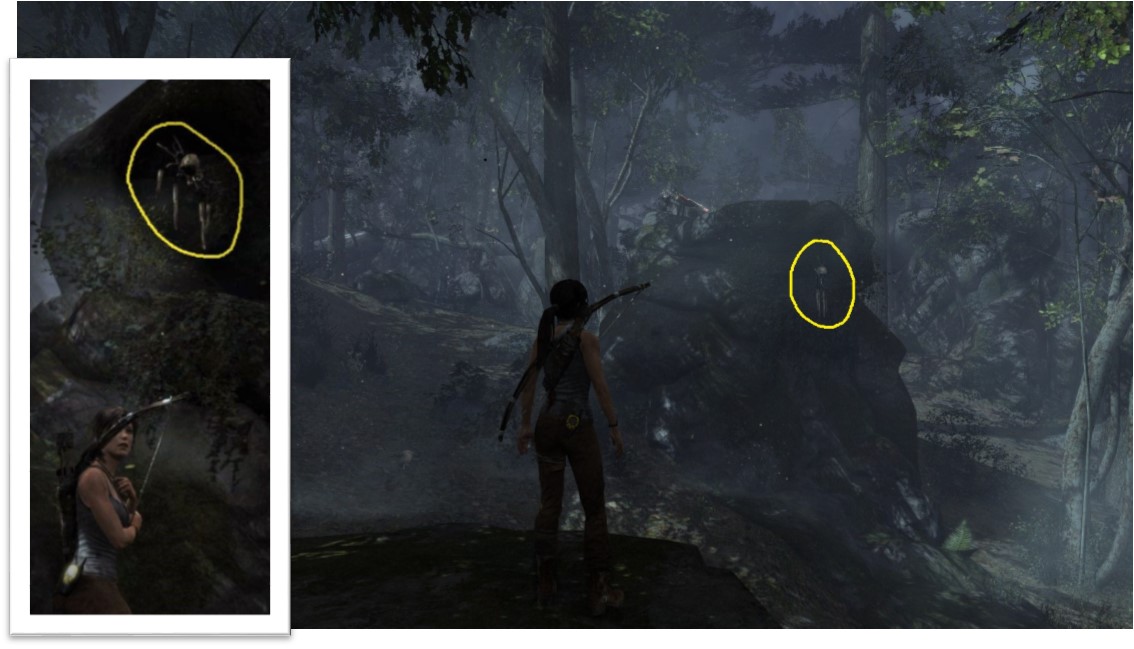
Hanging from a rock formation.
Screenshot B - Ghost Hunter 3/10
Shown from the opposite side.
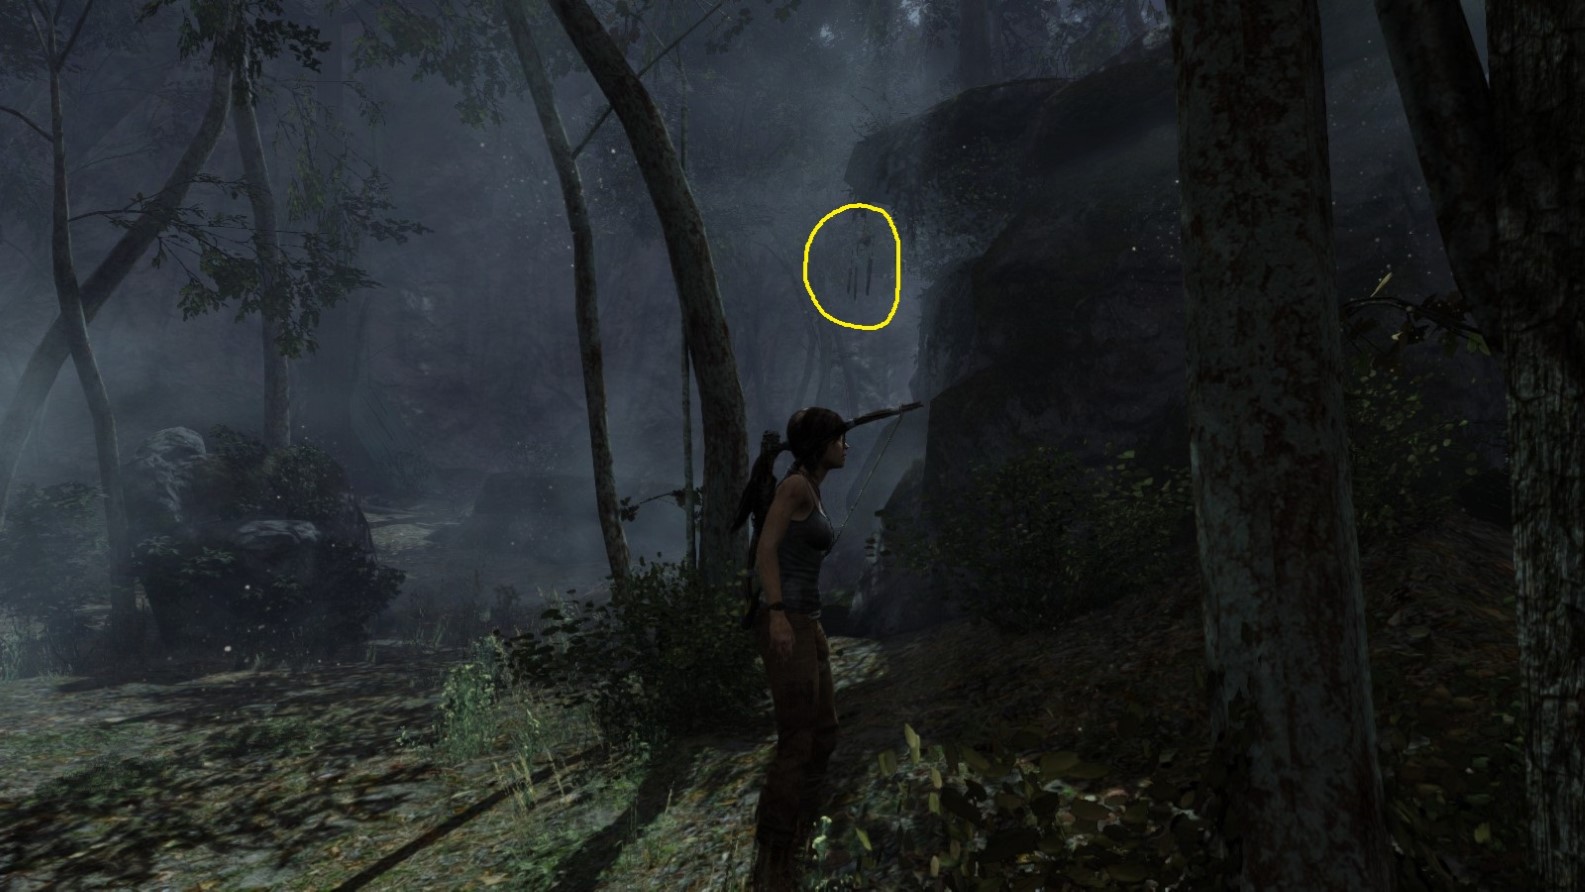
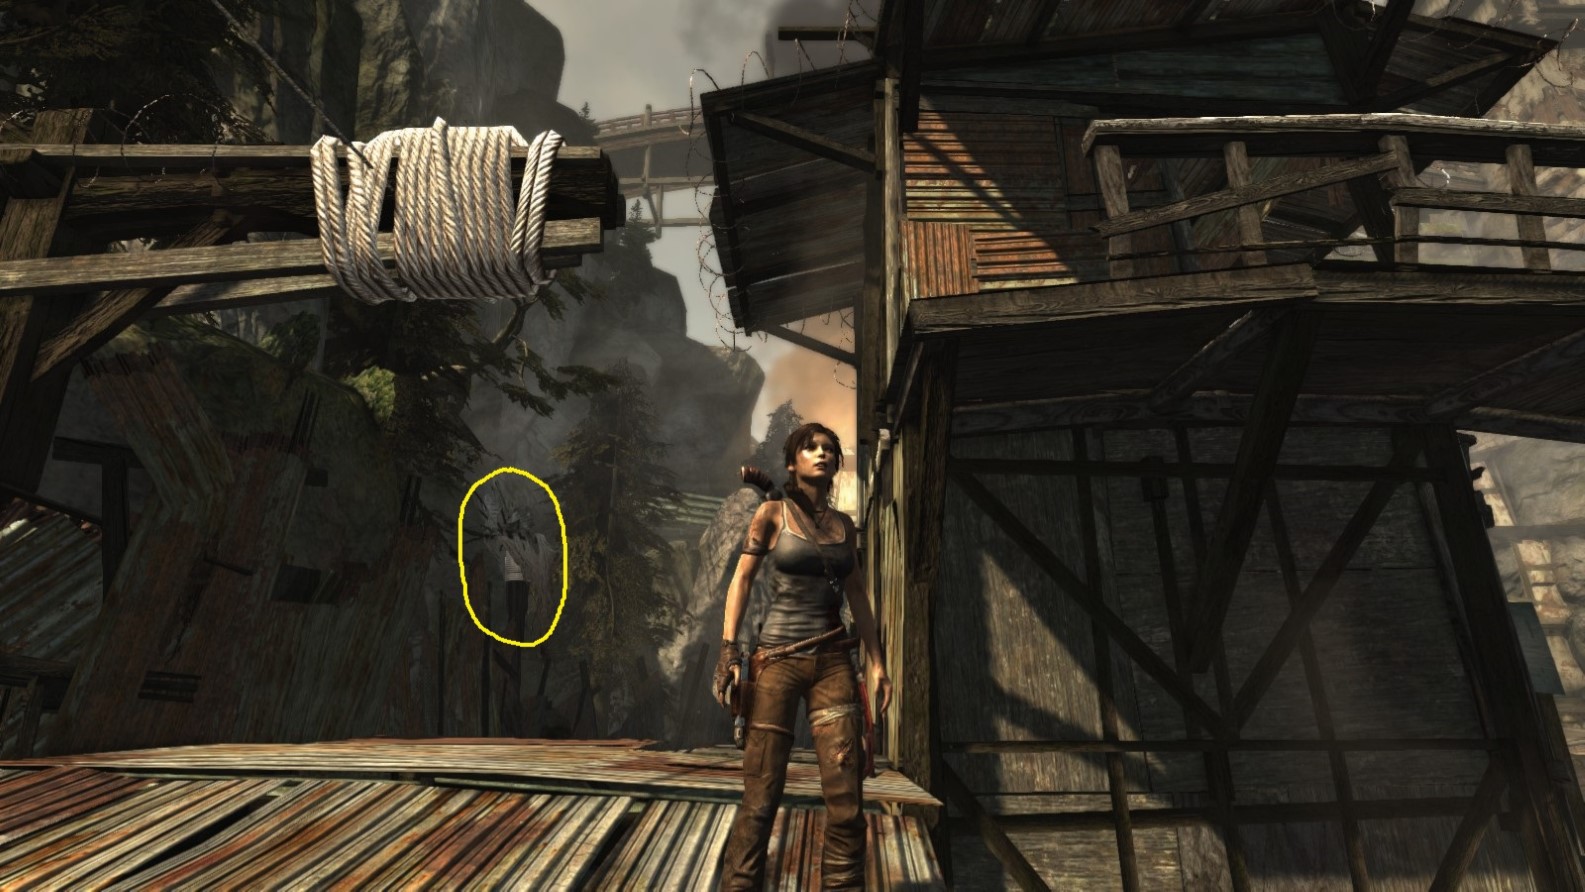
Ghost Hunter - Object 4
Area: Coastal Forest (Part 1)
Closest Base Camp: Sheltered Ridge
Find and destroy (shoot)
Location on the Map
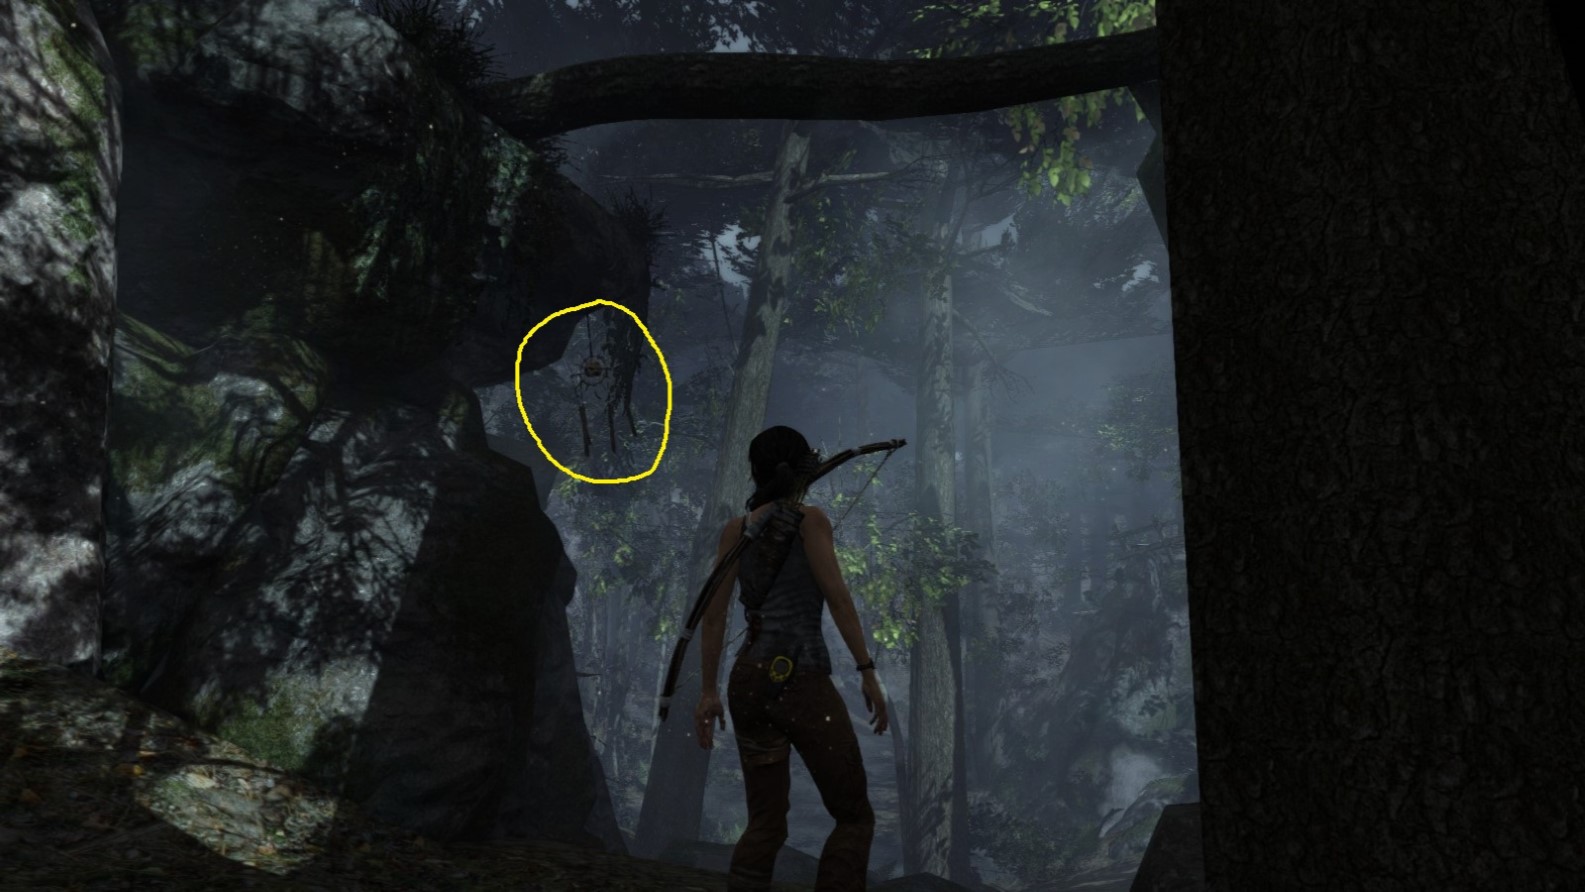
Screenshot A - Ghost Hunter 4/10
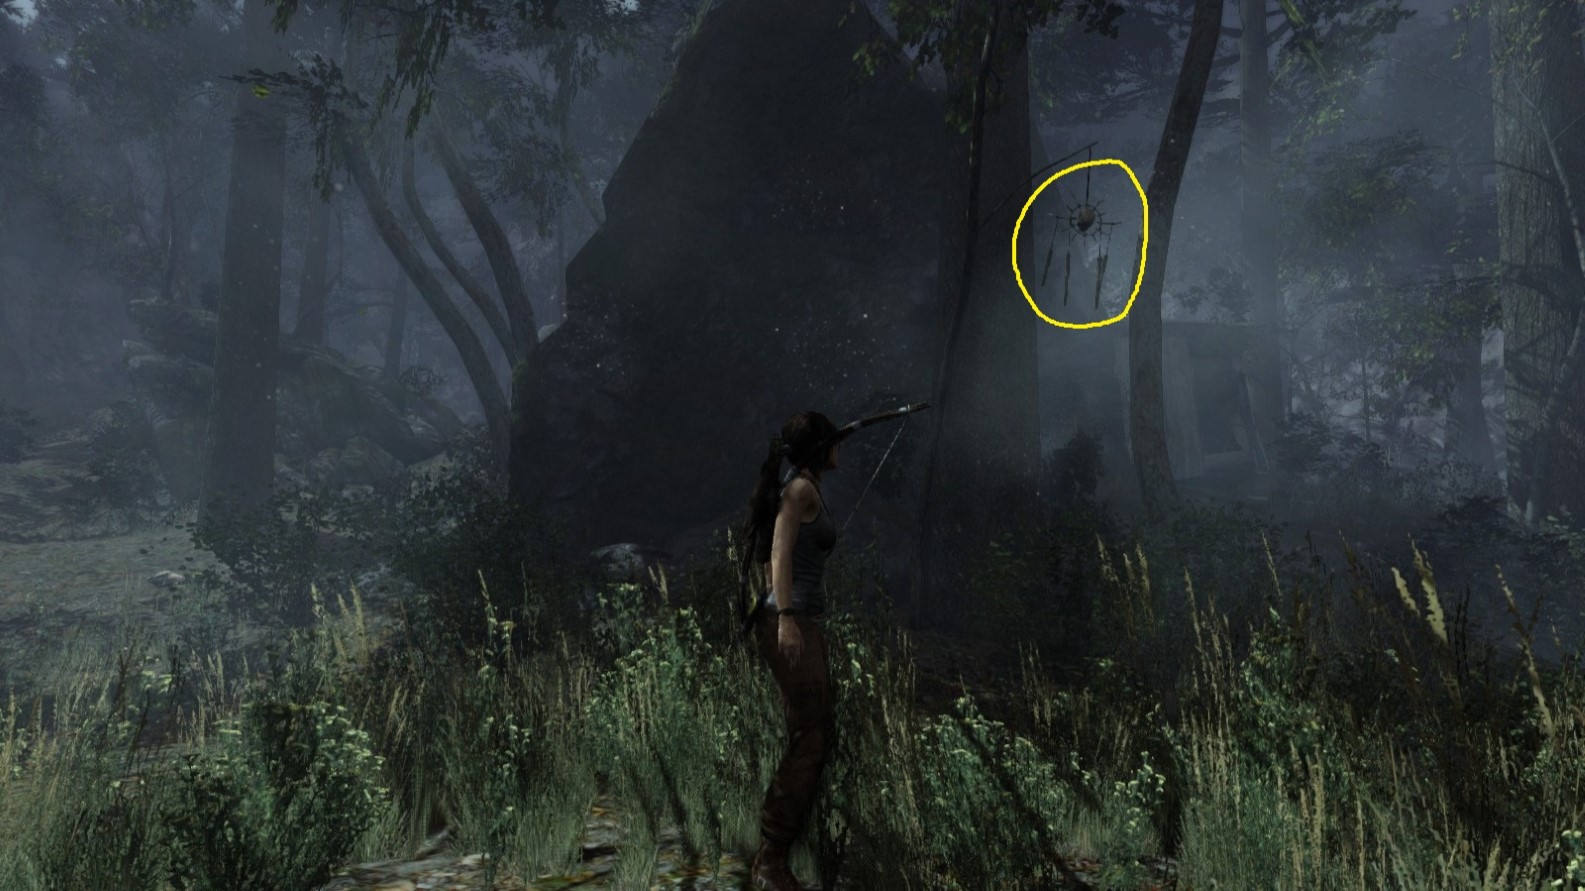
Hanging from a thin tree.
Screenshot B - Ghost Hunter 4/10
Shown from the opposite direction.
Ghost Hunter - Object 5
Area: Coastal Forest (Part 1)
Closest Base Camp: Sheltered Ridge
Find and destroy (shoot)
Location on the Map
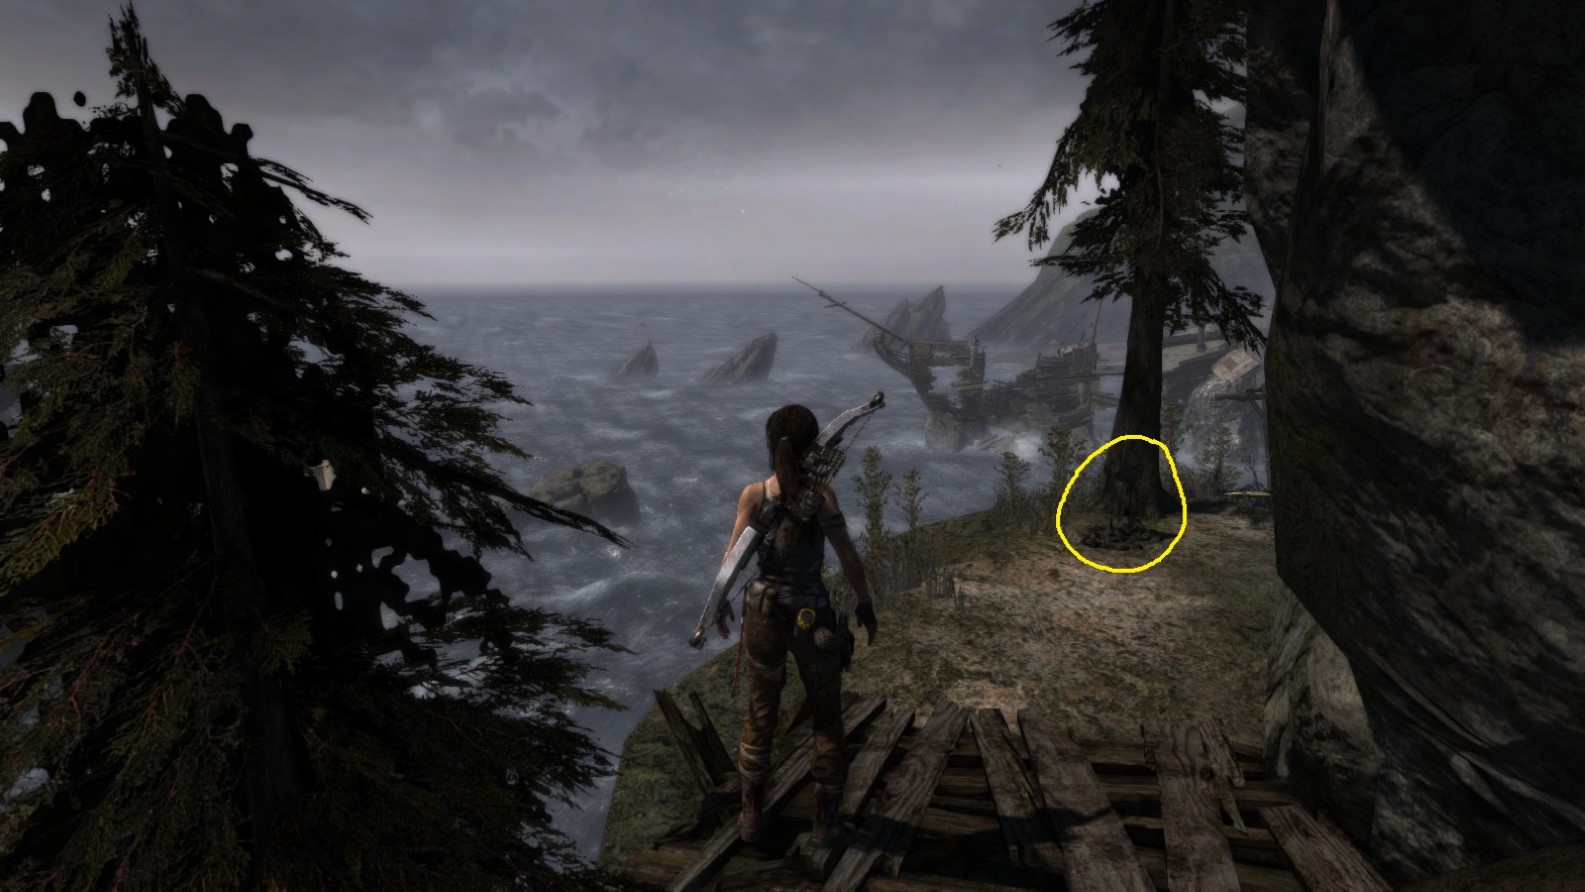
Screenshot A - Ghost Hunter 5/10
Screenshot B - Ghost Hunter 5/10
Shown from the opposite side.
Ghost Hunter - Object 6
Area: Coastal Forest (Part 2)
Closest Base Camp: Forest Ruins
Find and destroy (shoot)
Location on the Map
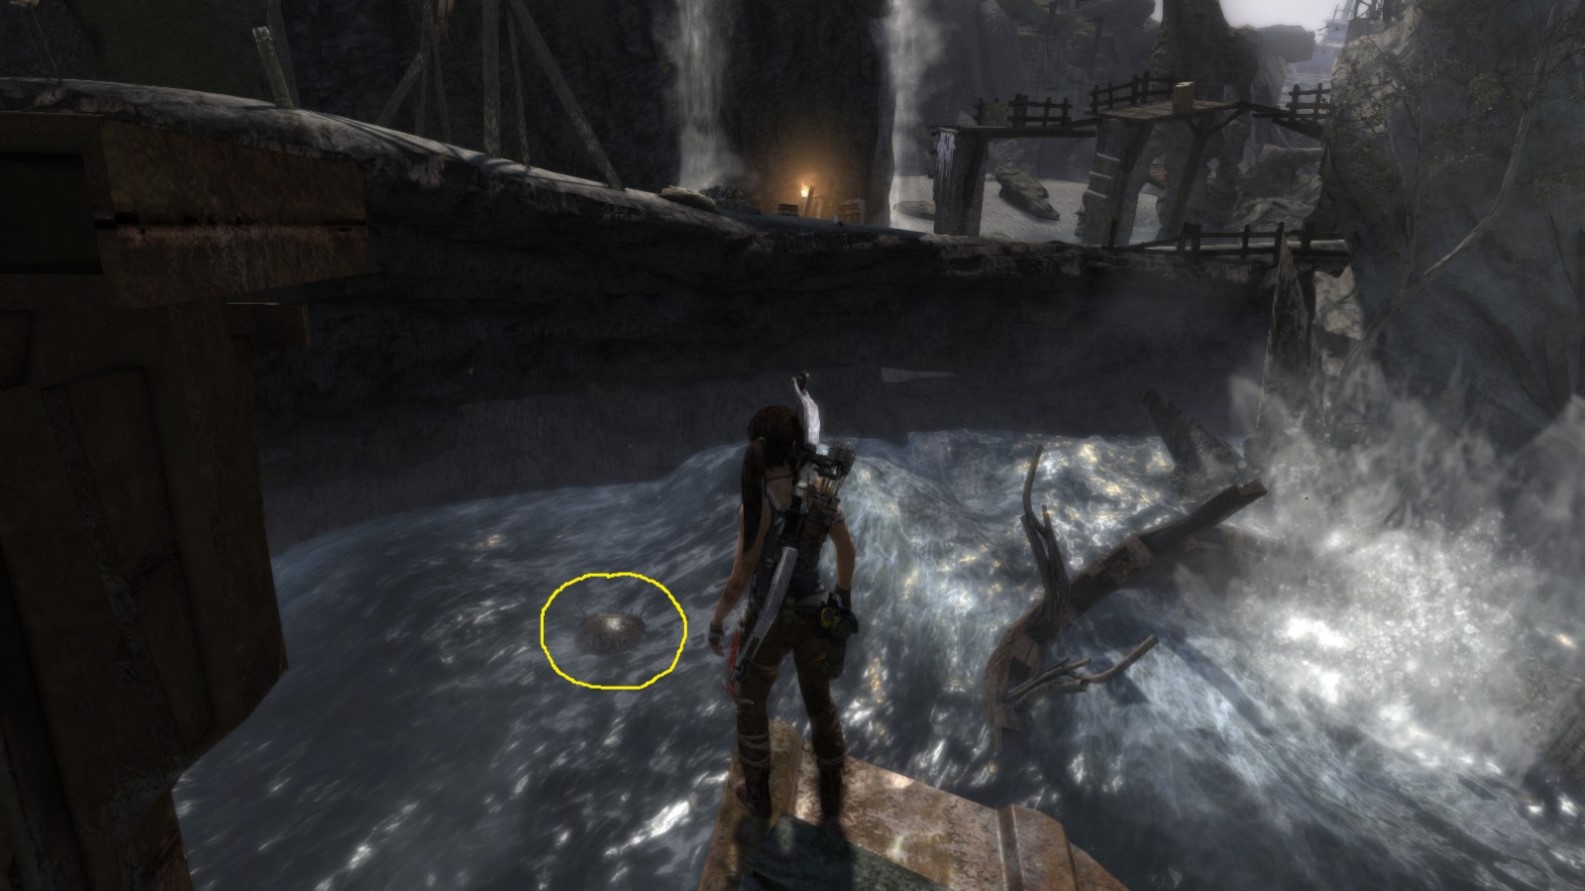
Screenshot A - Ghost Hunter 6/10
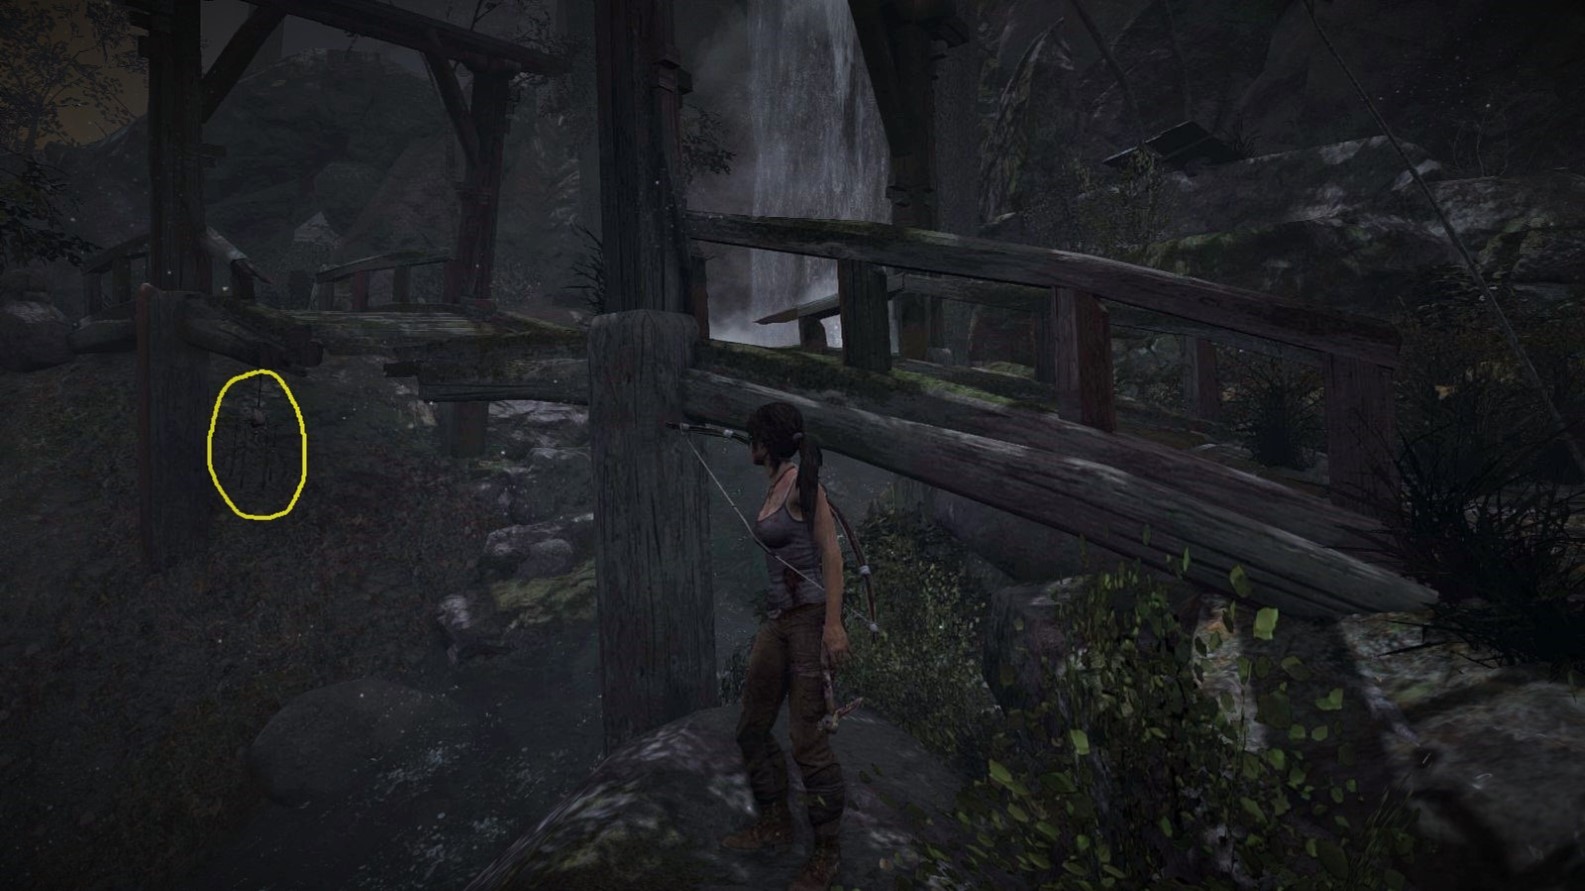
At the broken wooden bridge (near the waterfall) where Lara gets attacked by wolves.
Screenshot B - Ghost Hunter 6/10
View from the stream underneath the broken bridge (the waterfall now behind the “photographer’s” back).
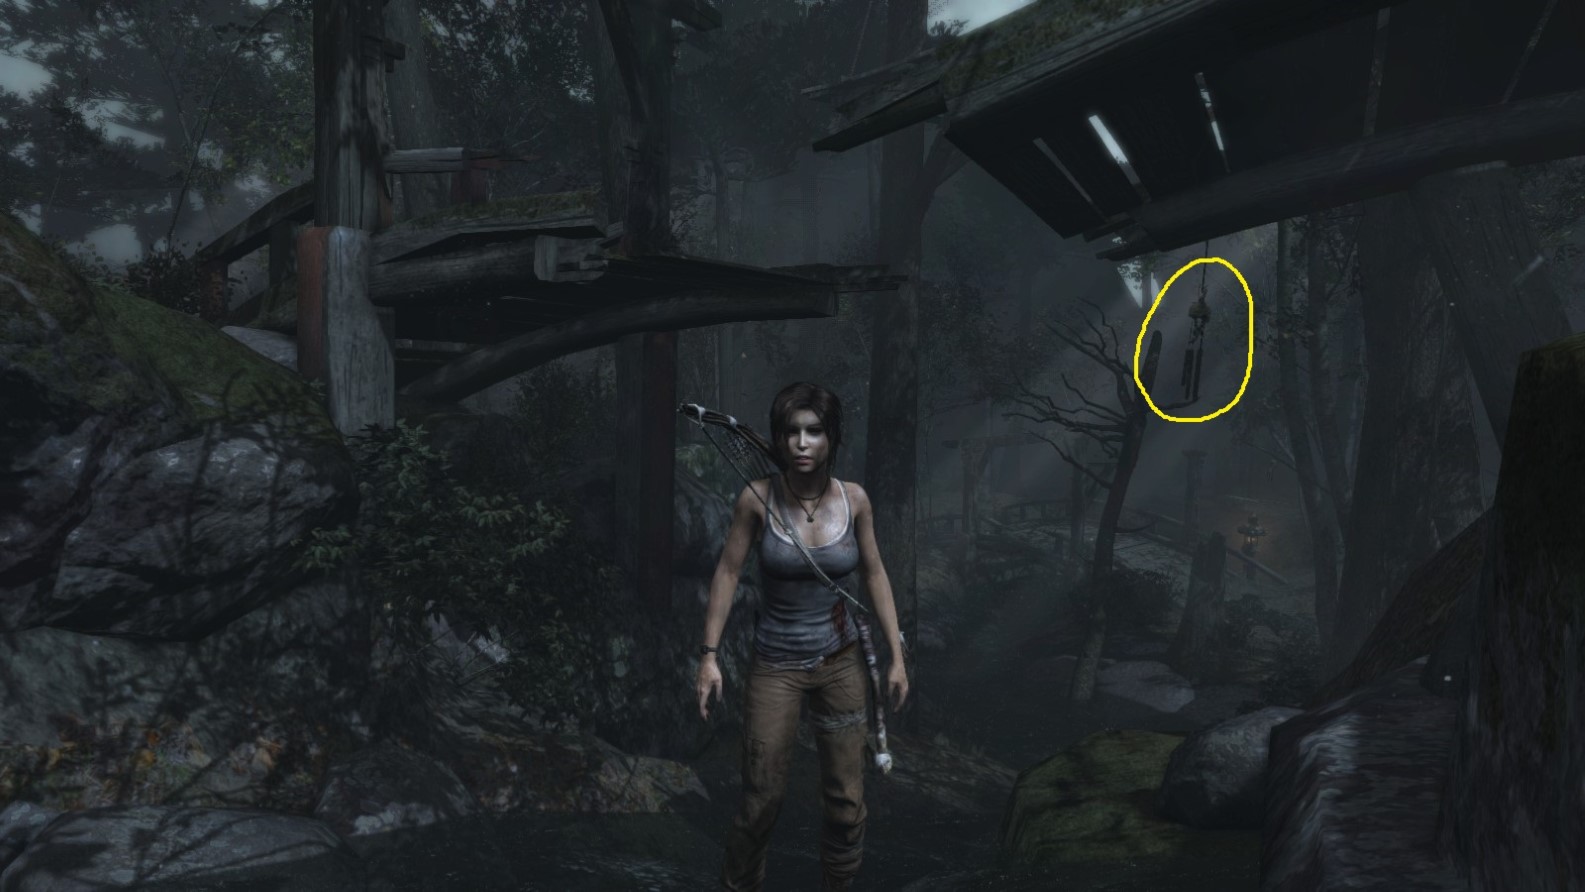
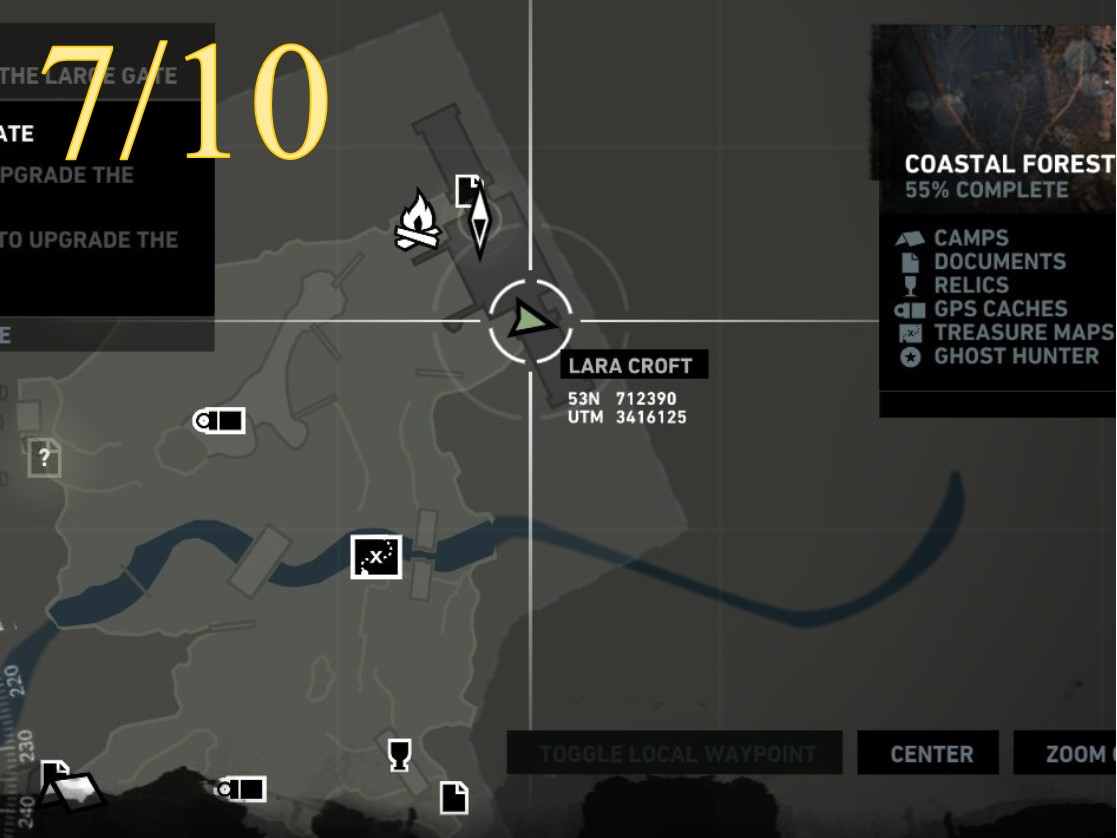
Ghost Hunter - Object 7
Area: Coastal Forest (Part 2)
Closest Base Camp: Forest Ruins
Find and destroy (shoot)
Location on the Map
Screenshot A - Ghost Hunter 7/10
At the large closed gate where Lara finds Dr. Whitman.
Screenshot B - Ghost Hunter 7/10
A closer view: at the right-hand side of the closed gate, hanging from the roof’s edge.
Ghost Hunter - Object 8
Area: Coastal Forest (Part 2)
Closest Base Camp: Forest Ruins
Find and destroy (shoot)
Location on the Map
Screenshot A - Ghost Hunter 8/10
Hanging from a tree next to the bridge.
Screenshot B - Ghost Hunter 8/10
View from the opposite direction.
Ghost Hunter - Object 9
Area: Coastal Forest (Part 2)
Closest Base Camp: Forest Ruins
Find and destroy (shoot)
Location on the Map
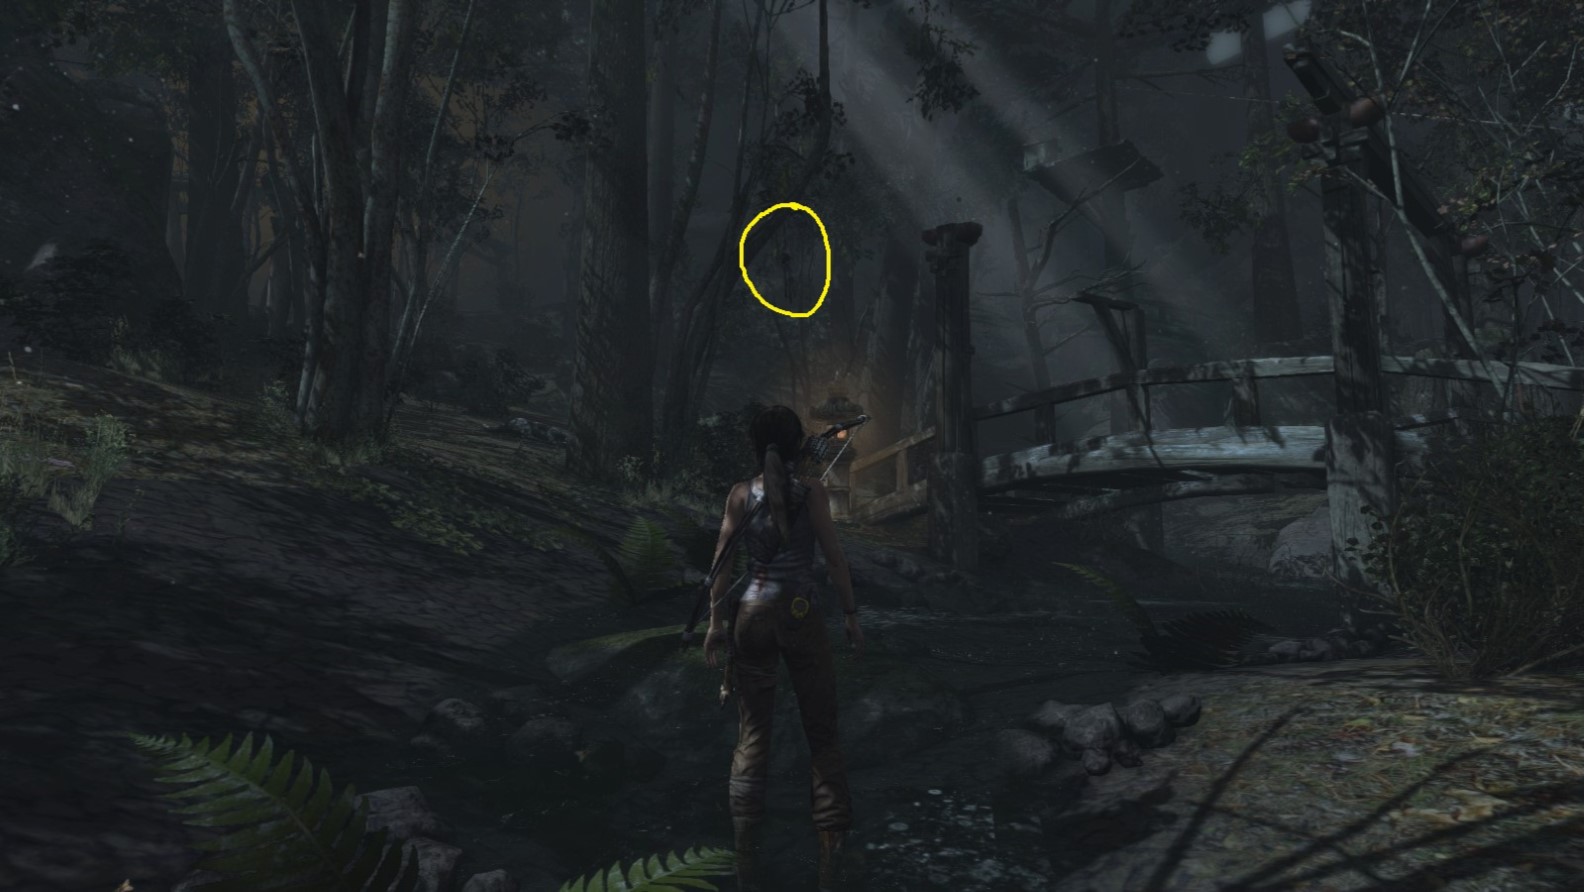
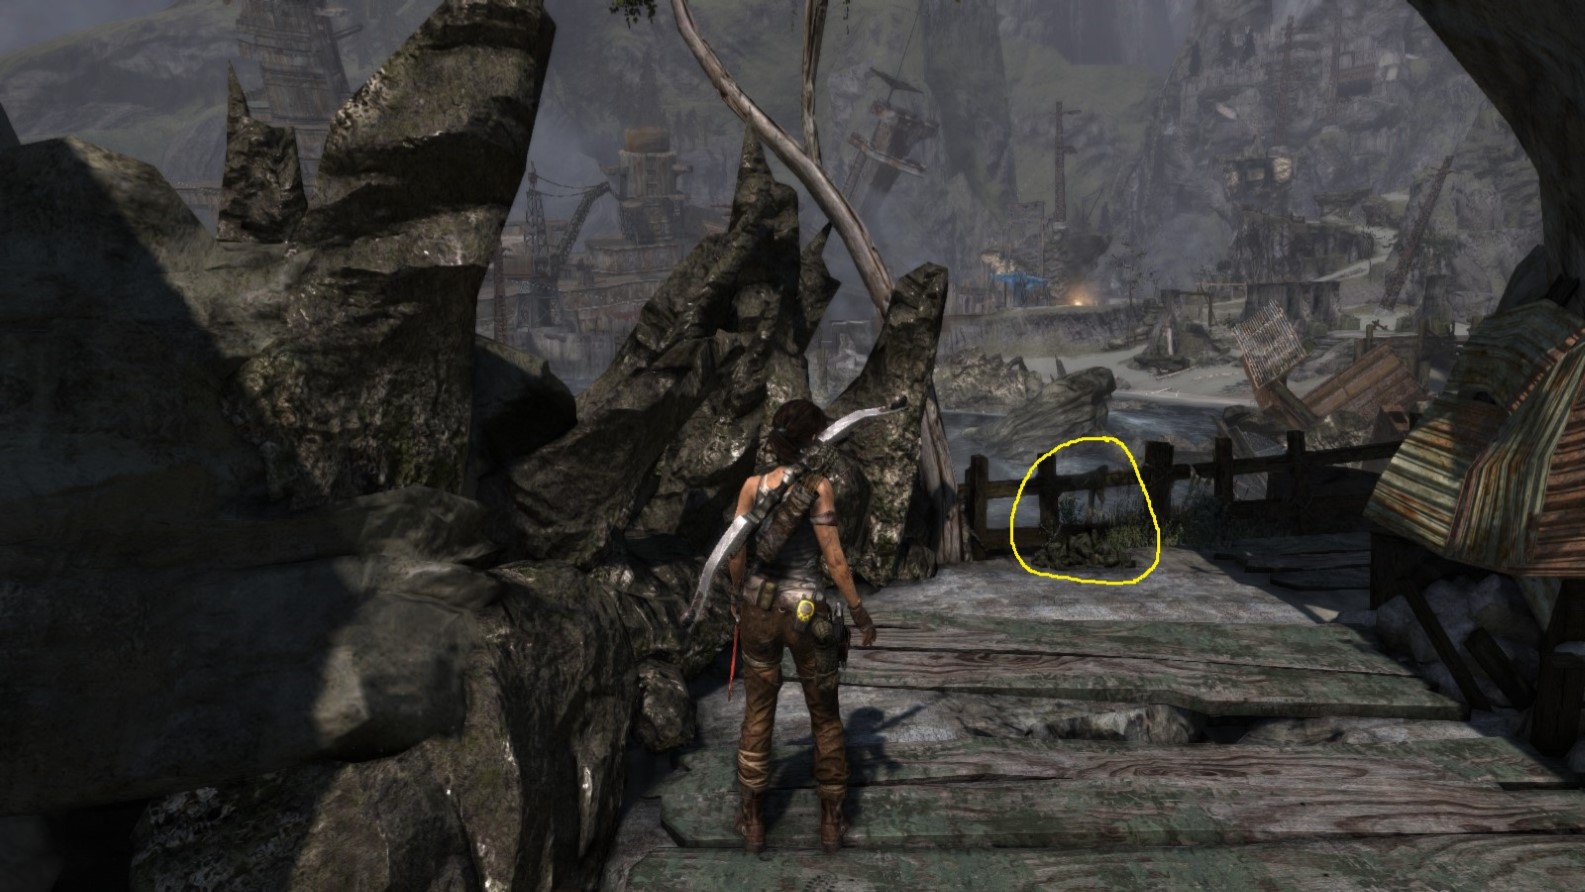
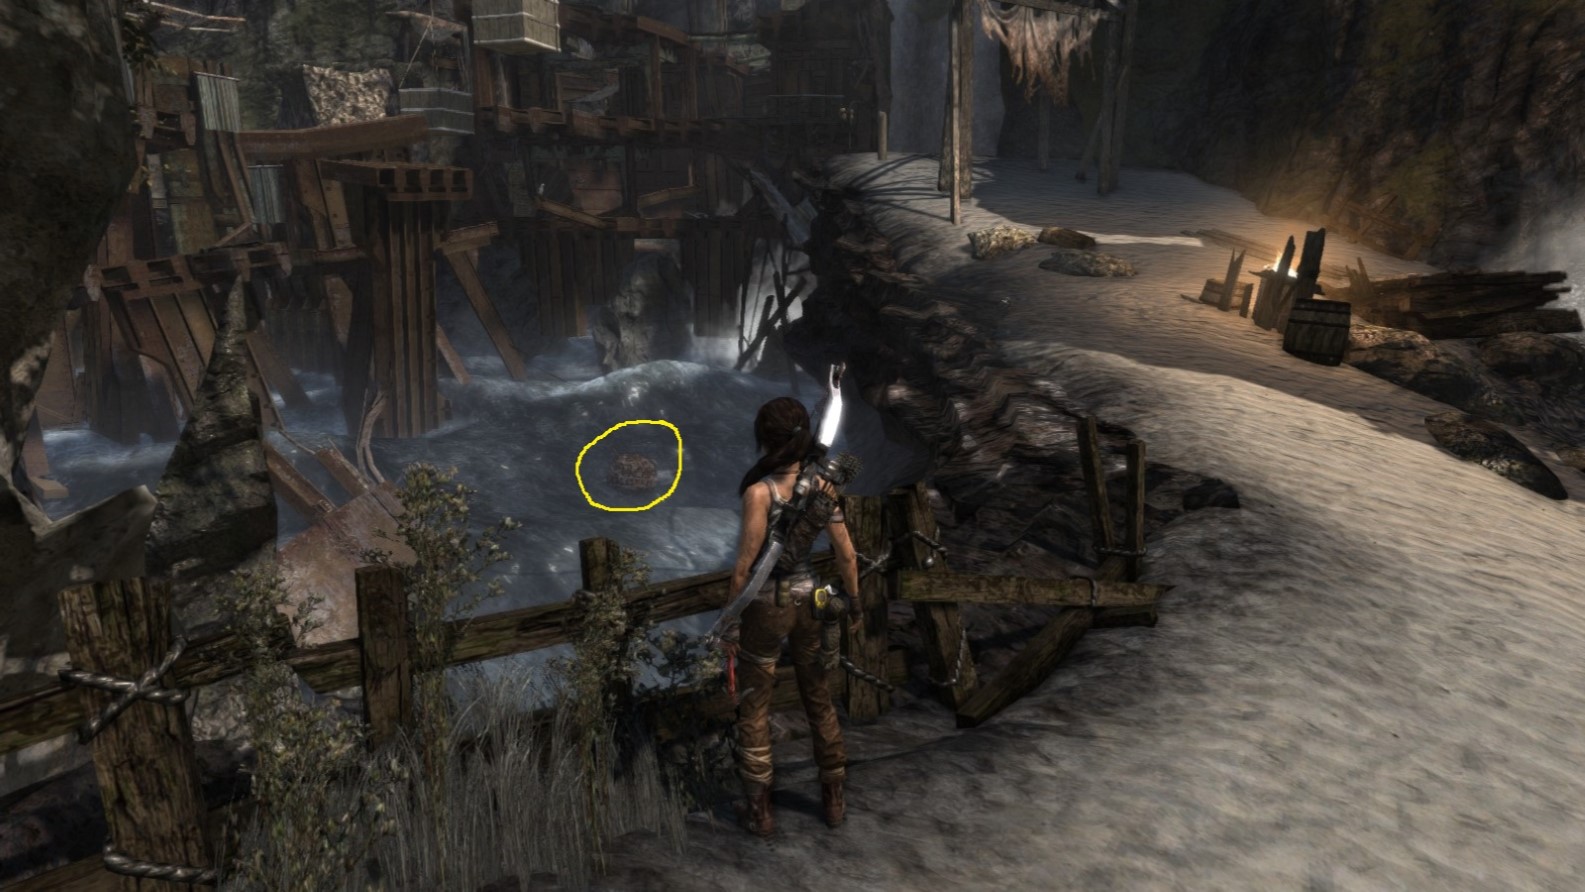
Screenshot A - Ghost Hunter 9/10
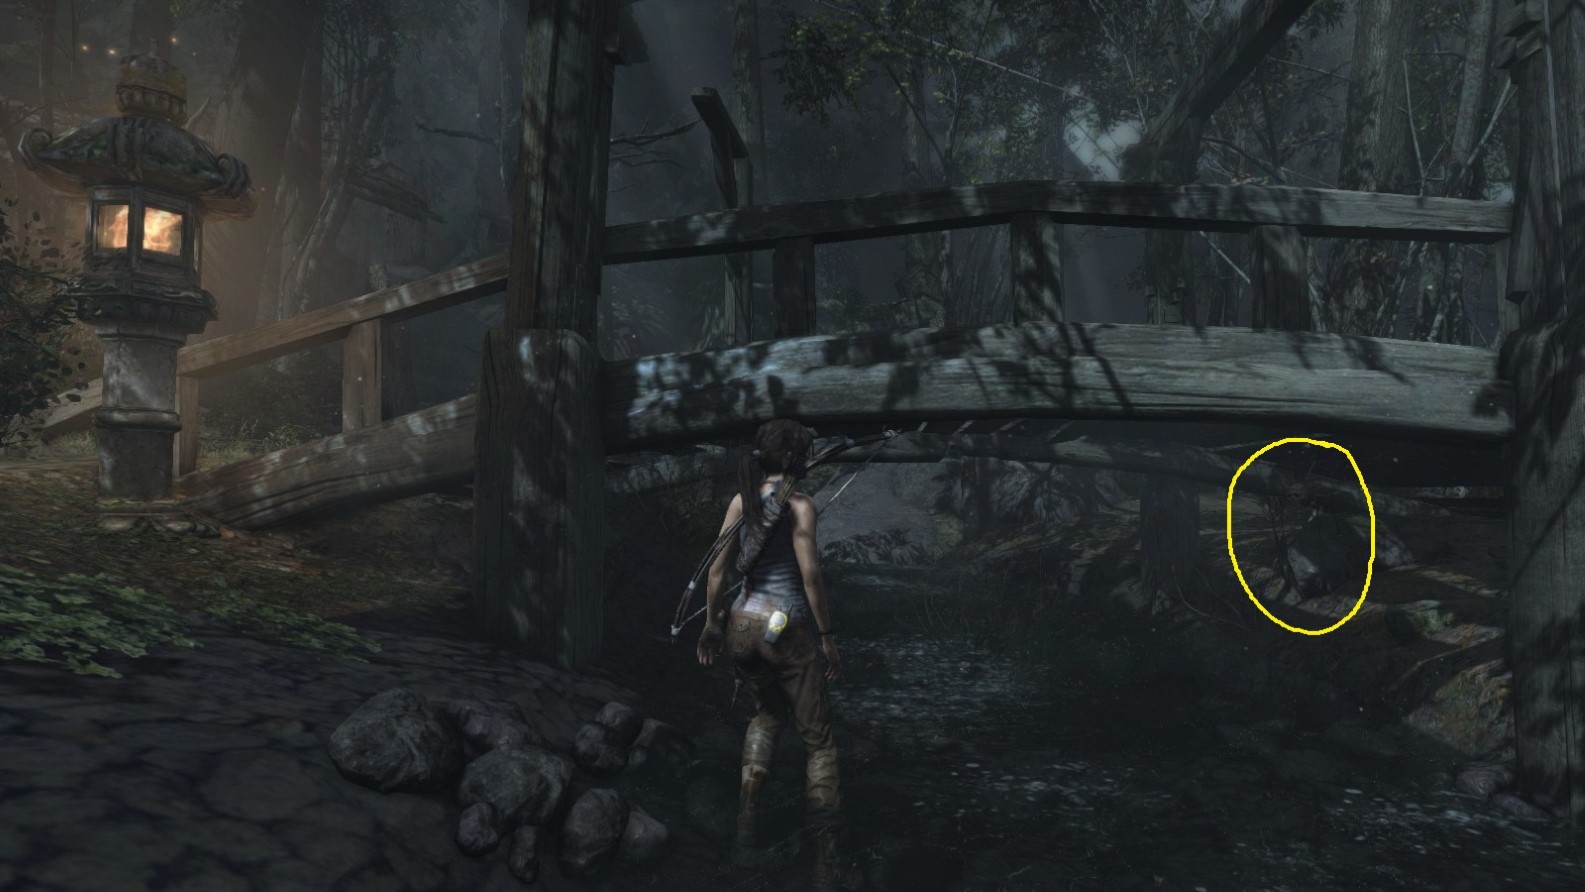
Hanging from underneath the same bridge that is next to the spot where 8/10 was located.
Screenshot B - Ghost Hunter 9/10
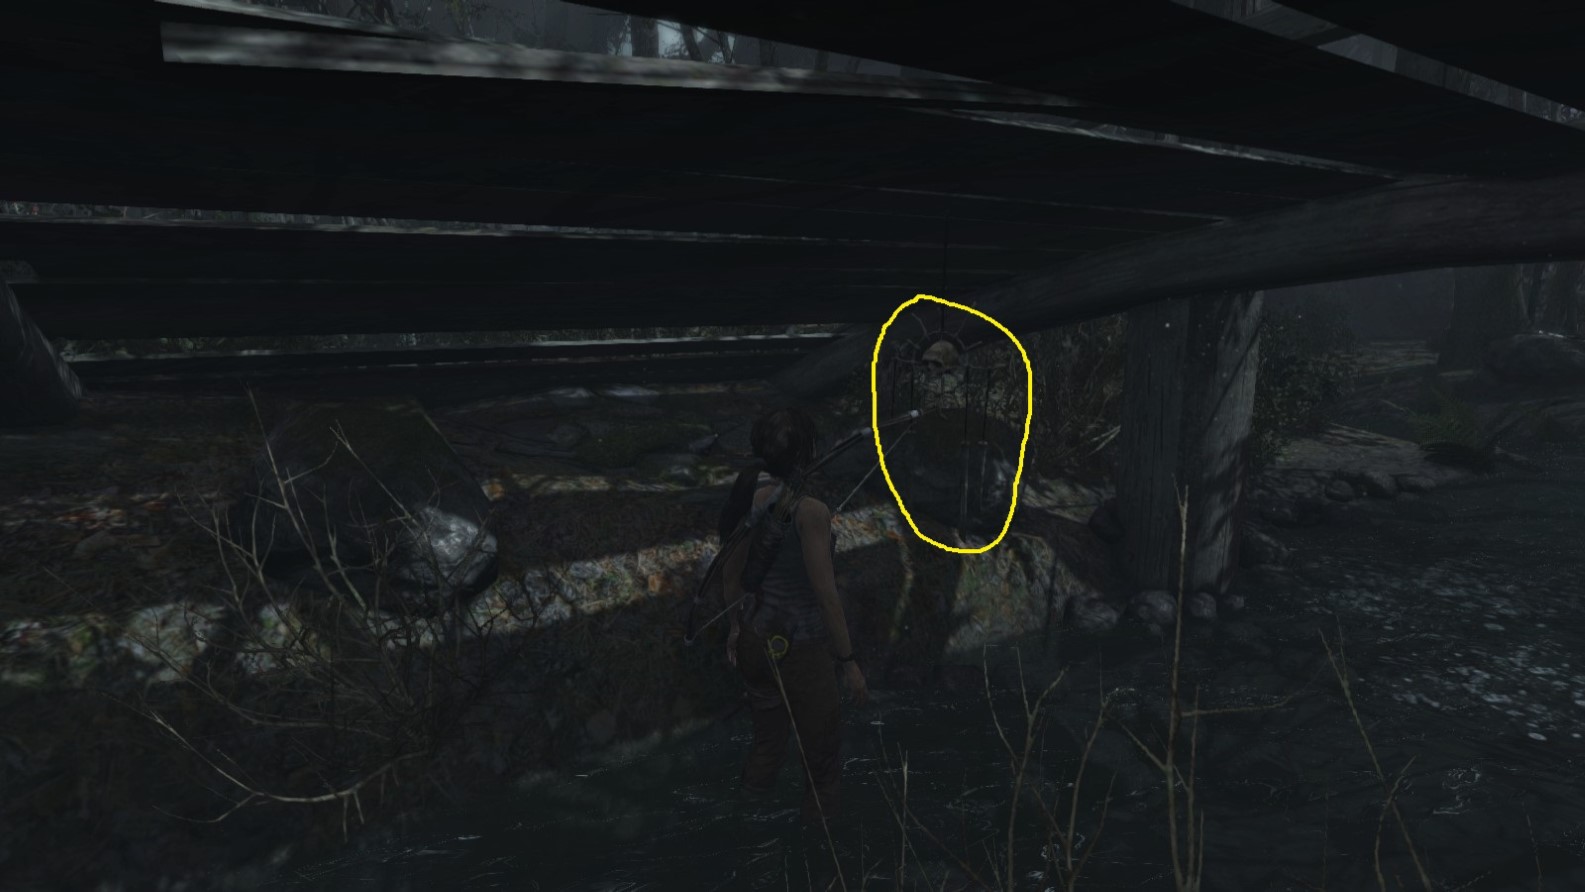
View under the bridge.
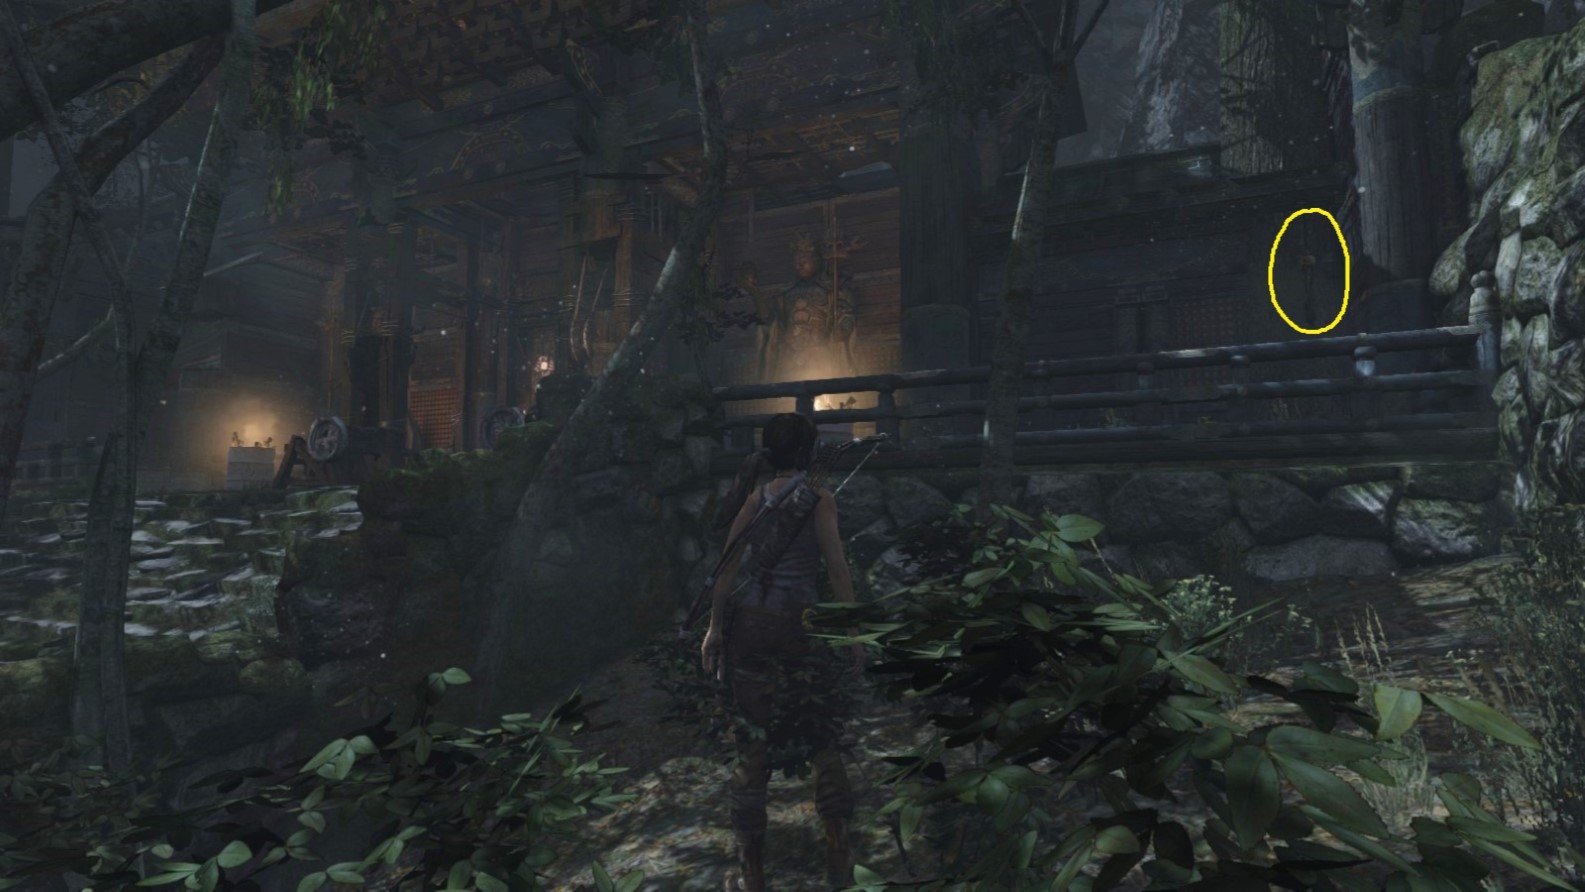
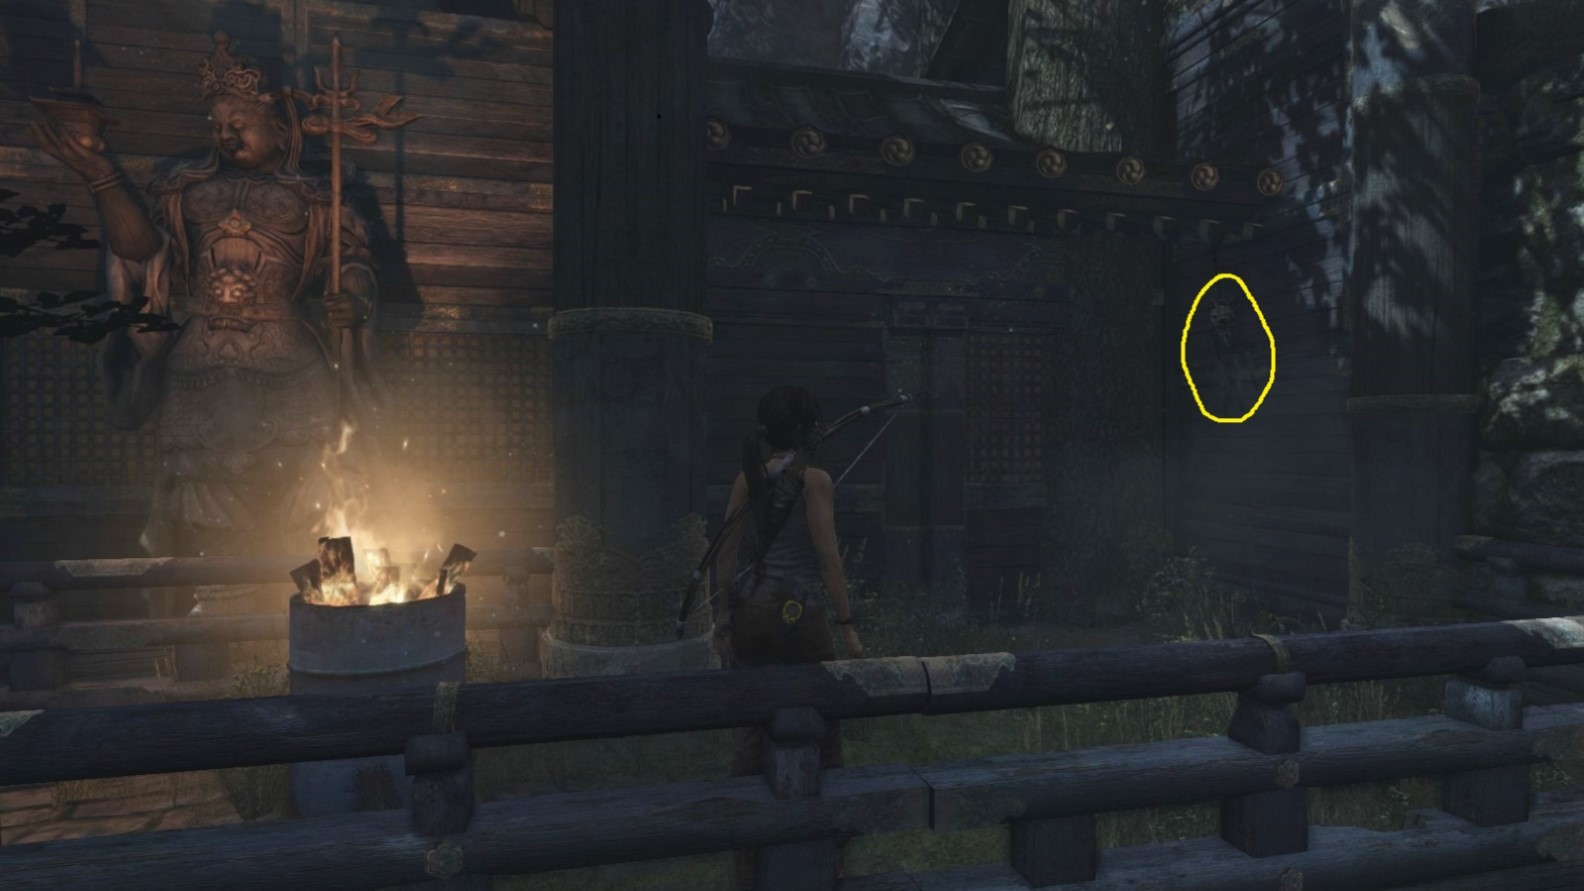
Ghost Hunter - Object 10
Area: Coastal Forest (Part 2)
Closest Base Camp: Forest Ruins
Find and destroy (shoot)
Location on the Map

Screenshot A - Ghost Hunter 10/10
Hanging from the wooden structure above the headless statue.
Screenshot B - Ghost Hunter 10/10
A different angle.
*** End of GHOST HUNTER ***
Challenge 2: PYROMANIAC
Pyromaniac - Object 1
Area: Mountain Temple
Closest Base Camp: Mountain Temple
Find and destroy (shoot)
Location on the Map
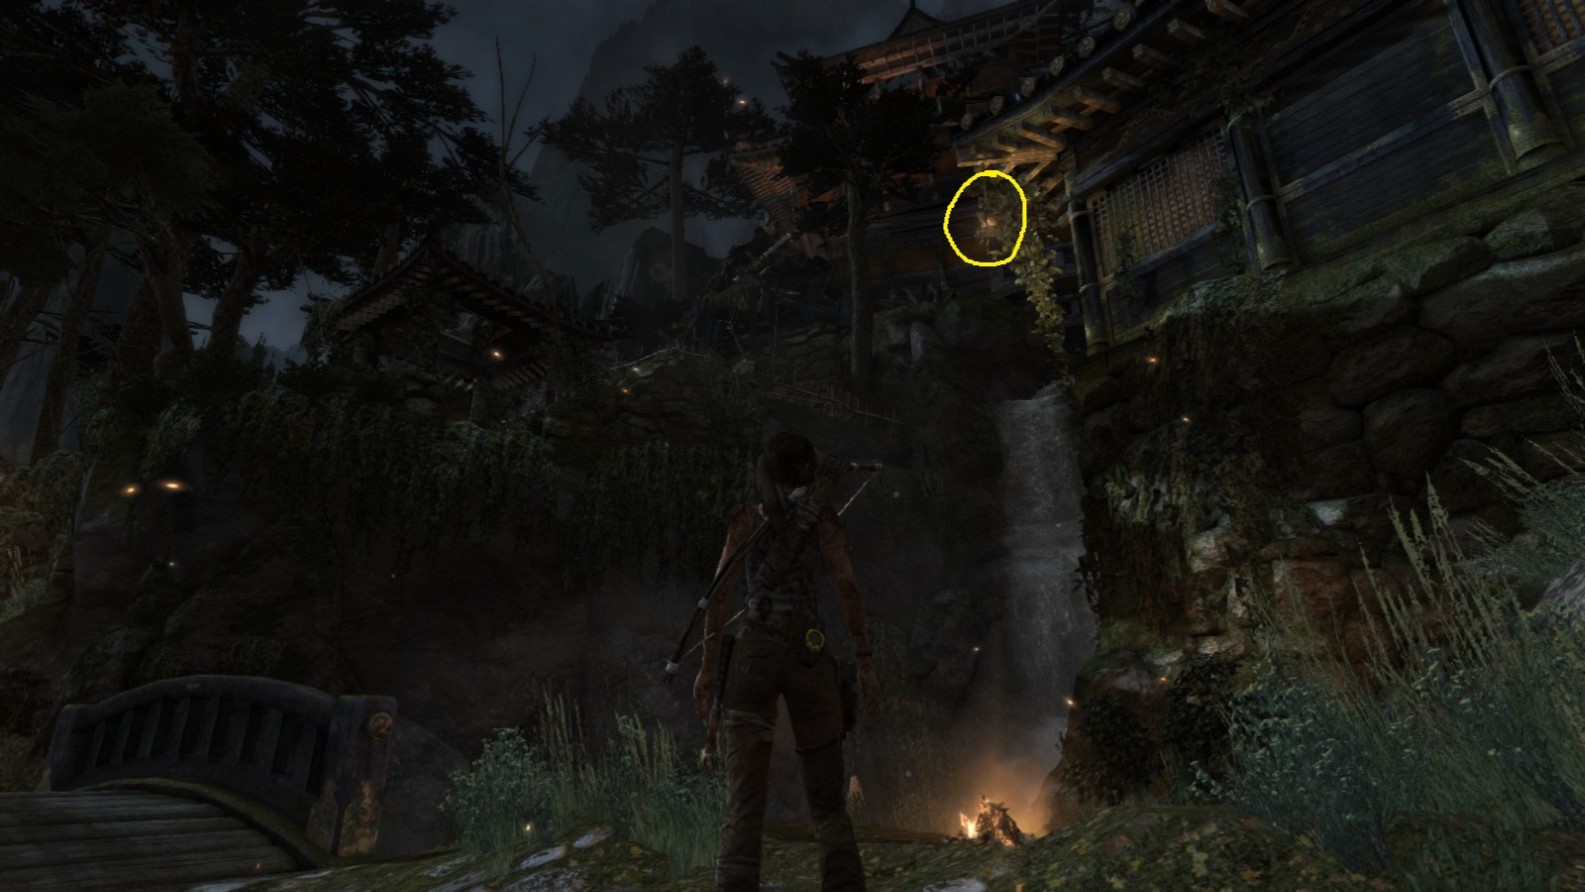
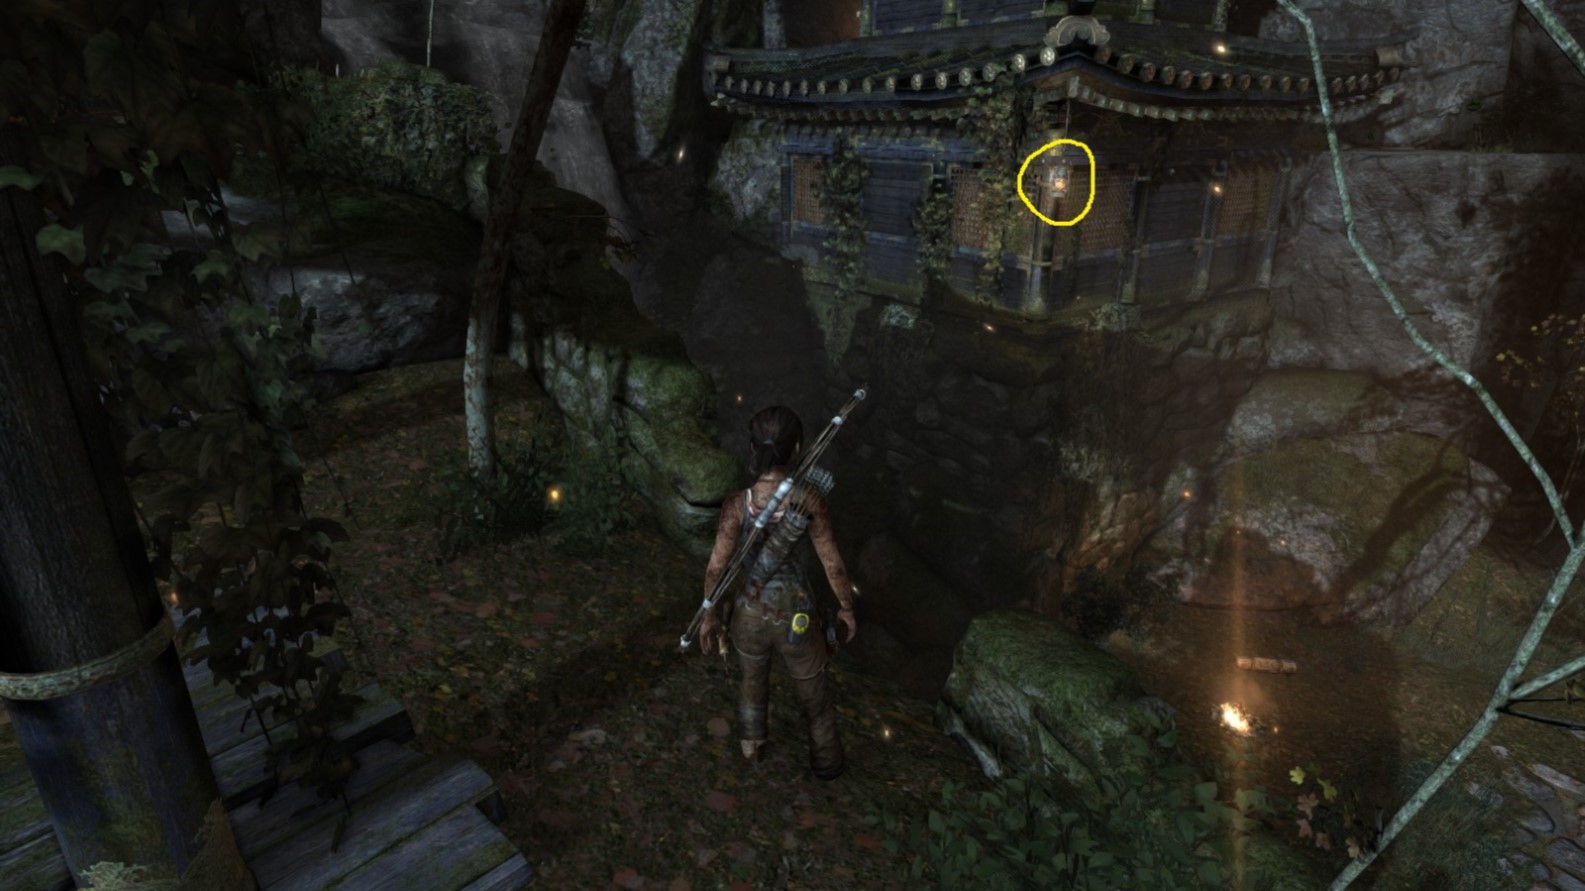
Screenshot A - Pyromaniac 1/5
From the base camp, cross the bridge and continue upwards to the far side of the building. It’s hanging from the roof’s corner. (On your first visit you'll encounter enemies here.)
Screenshot B - Pyromaniac 1/5
A different angle of the building.
Pyromaniac - Object 2
Area: Mountain Temple
Closest Base Camp: Mountain Temple
Find and destroy (shoot)
Location on the Map
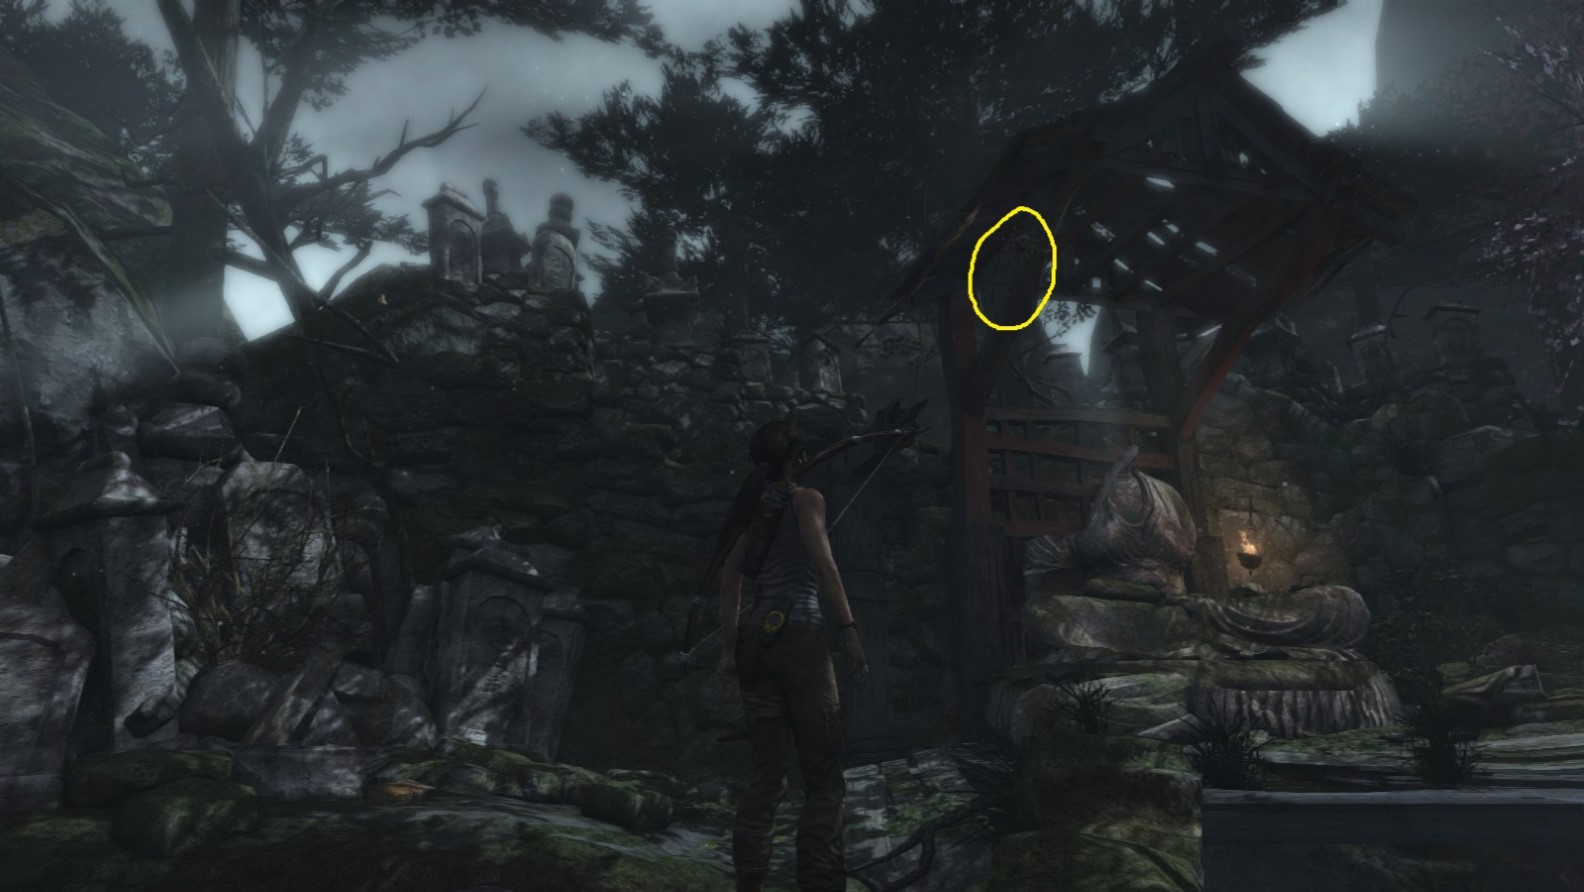
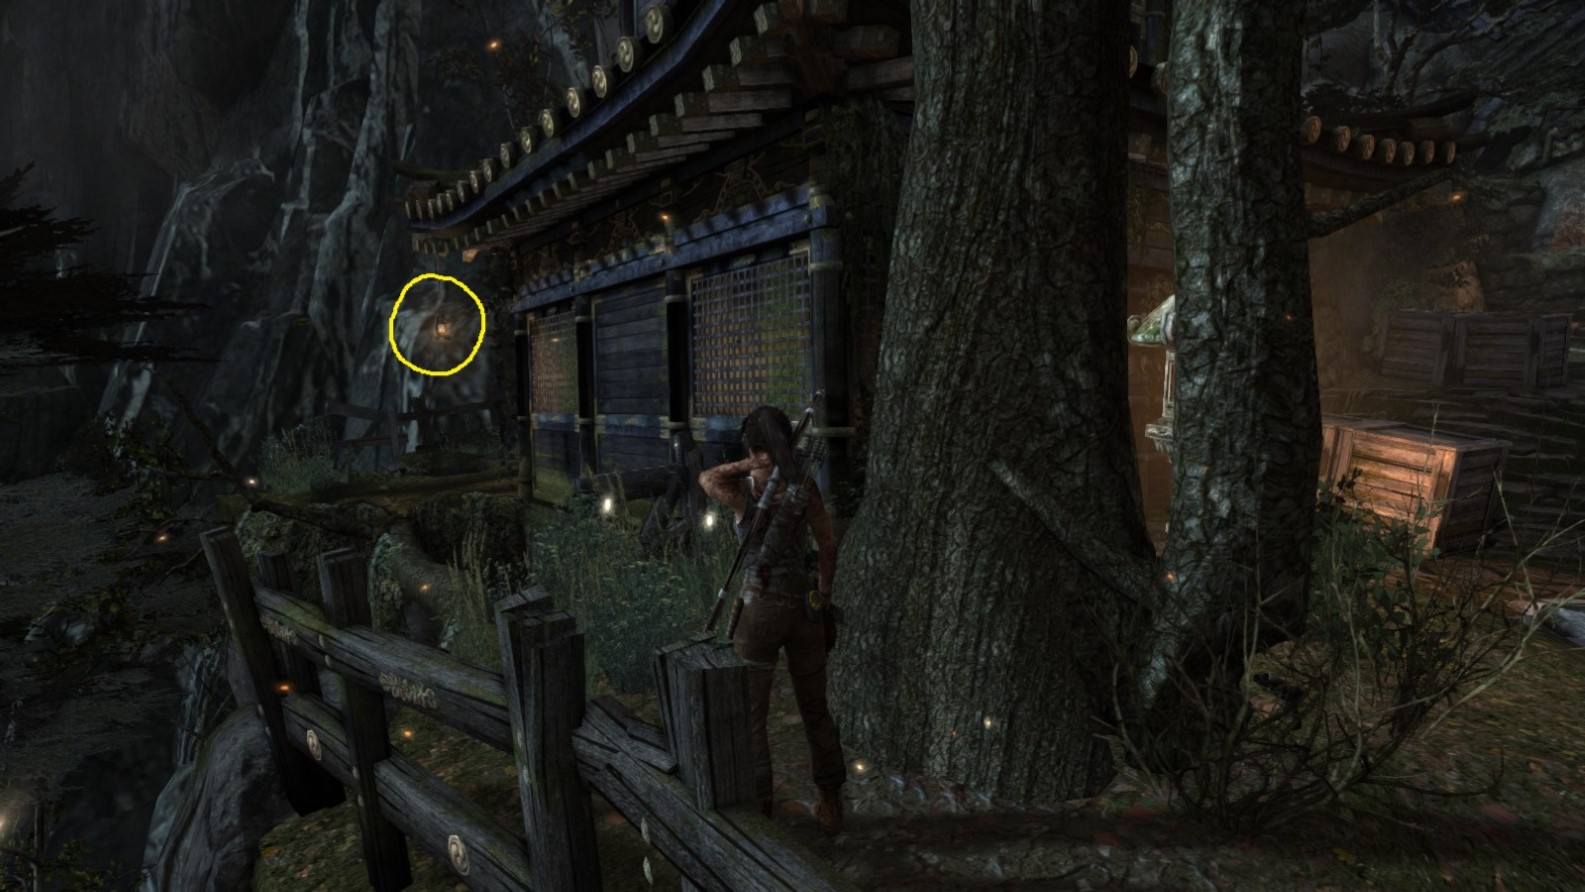
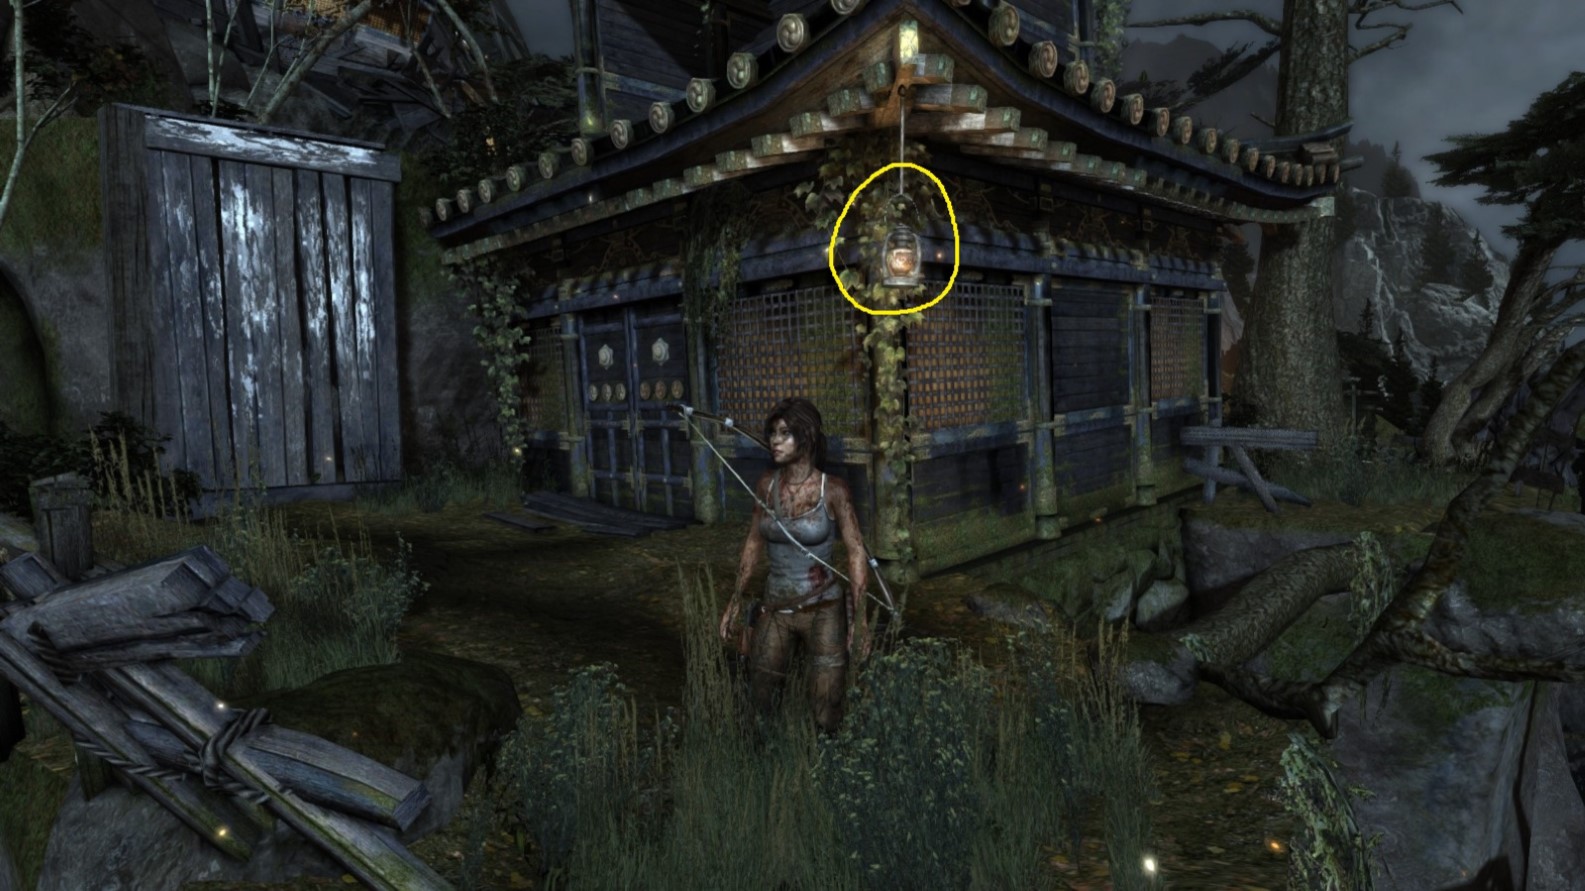
Screenshot A - Pyromaniac 2/5
This one is virtually on top of the base camp, hanging right above it from the corner of a roof.
Screenshot B - Pyromaniac 2/5
A different angle of the spot. The base camp burns underneath.
Pyromaniac - Object 3
Area: Mountain Temple
Closest Base Camp: Mountain Temple
Find and destroy (shoot)
Location on the Map
This location is inside a building.
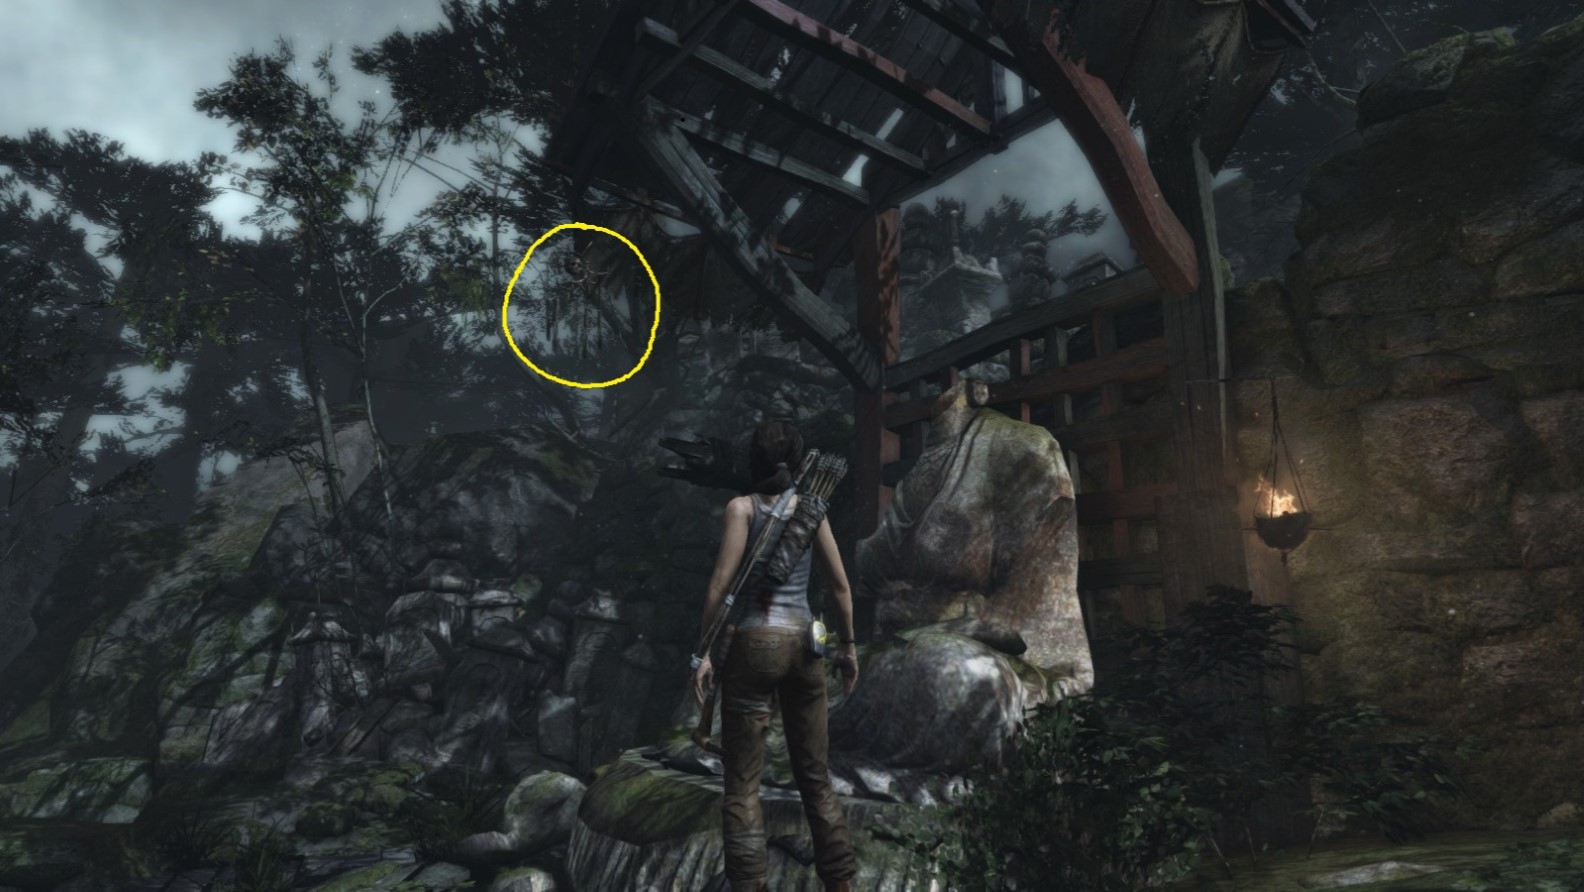
Screenshot A - Pyromaniac 3/5
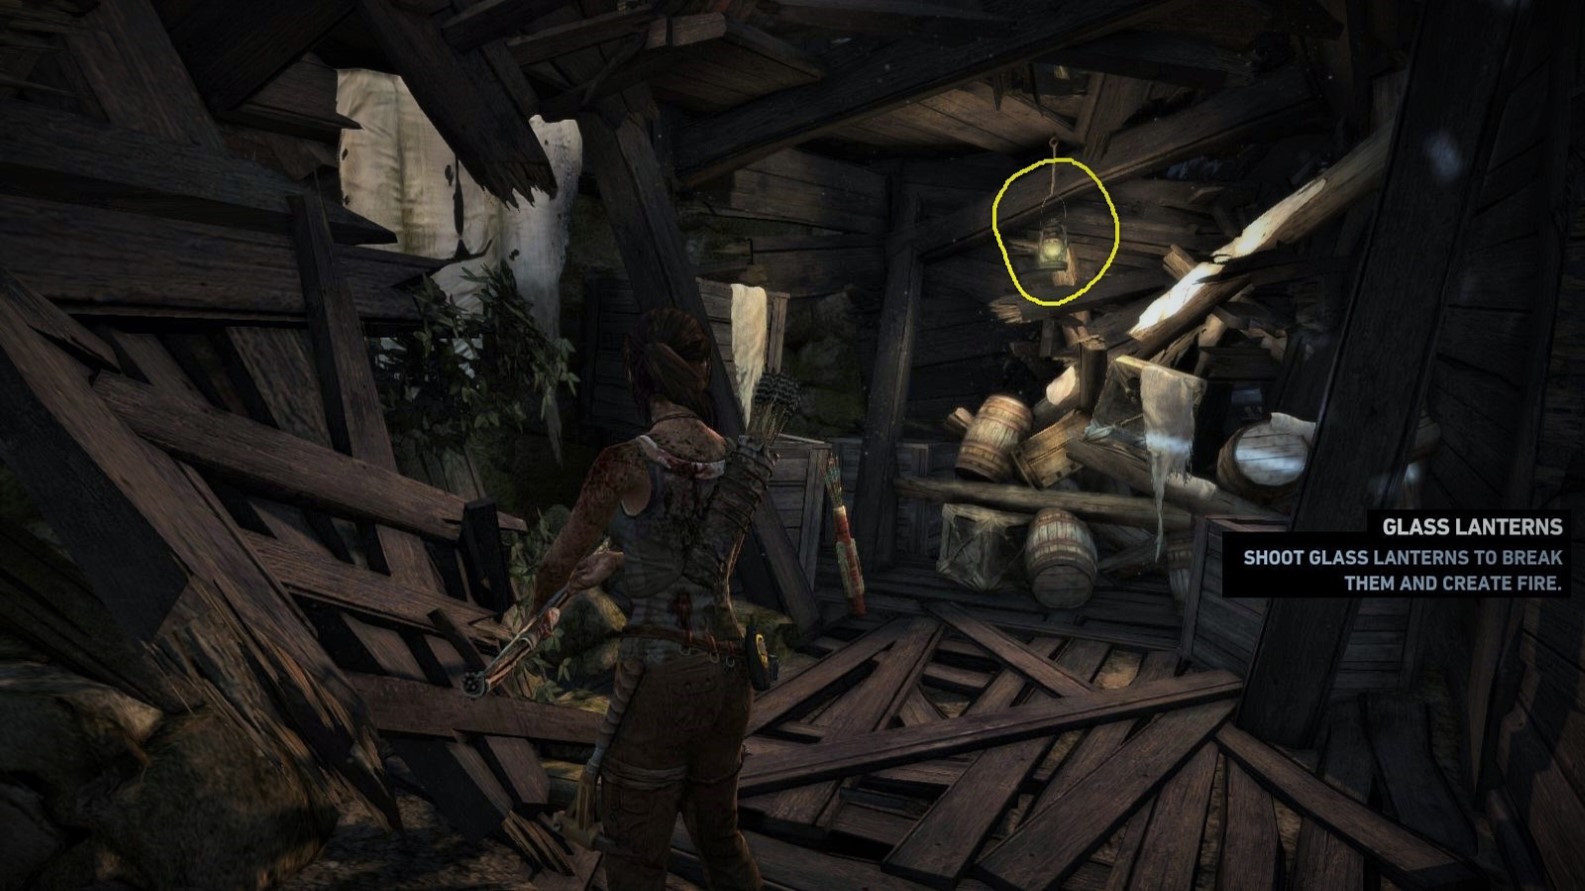
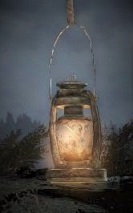
This one’s located in a building Lara climbs into. She has to destroy this lantern to start a fire otherwise she won’t be able to continue.
Screenshot B - Pyromaniac 3/5
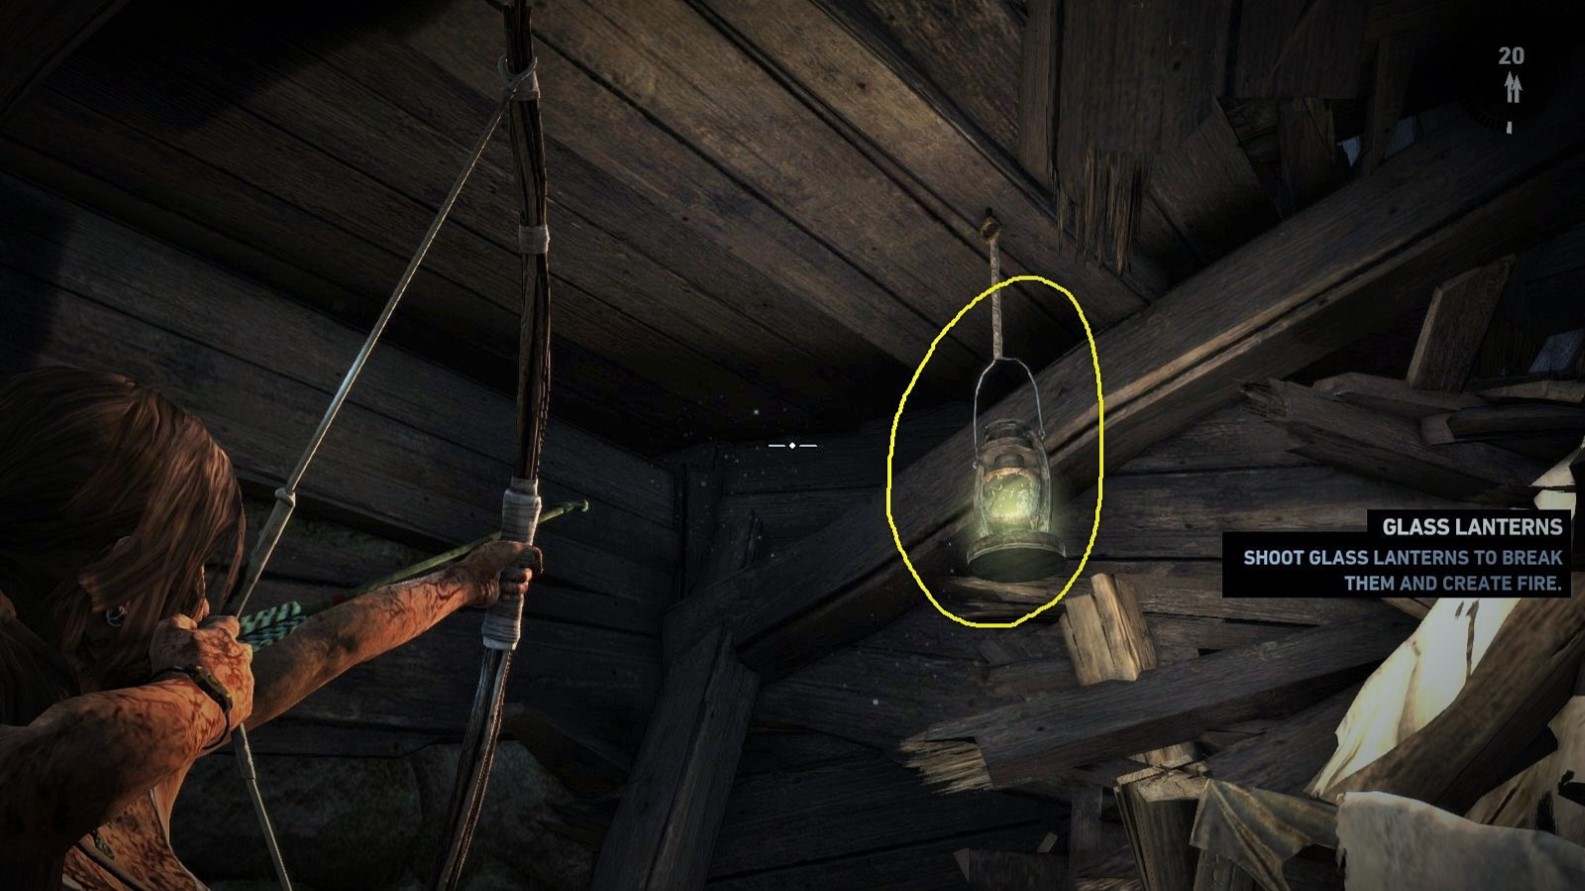
A close-up view. (If another latern should appear in the same spot after Lara has destroyed it, shoot that one too, just to make sure.)
Pyromaniac - Object 4
Area: Mountain Temple
Closest Base Camp: Mountain Temple
Find and destroy (shoot)
Location on the Map

Screenshot A - Pyromaniac 4/5

Another lantern hanging from the corner of a roof. The building houses a relic.
Screenshot B - Pyromaniac 4/5
A view from a different angle.
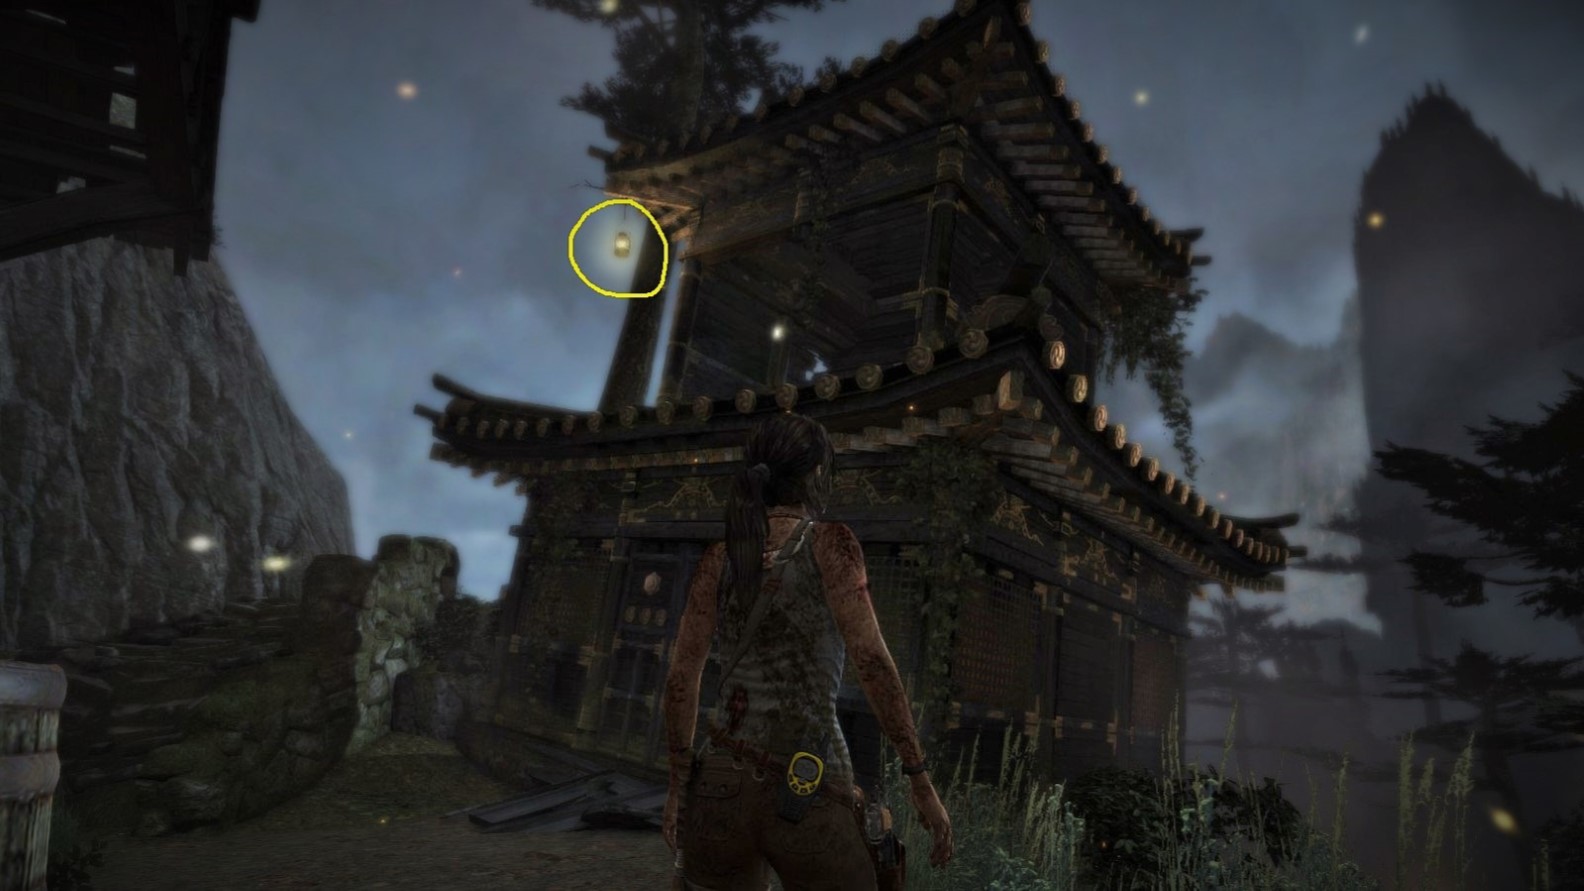
Pyromaniac - Object 5
Area: Mountain Temple
Closest Base Camp: Mountain Temple
Find and destroy (shoot)
Location on the Map
Screenshot A - Pyromaniac 5/5
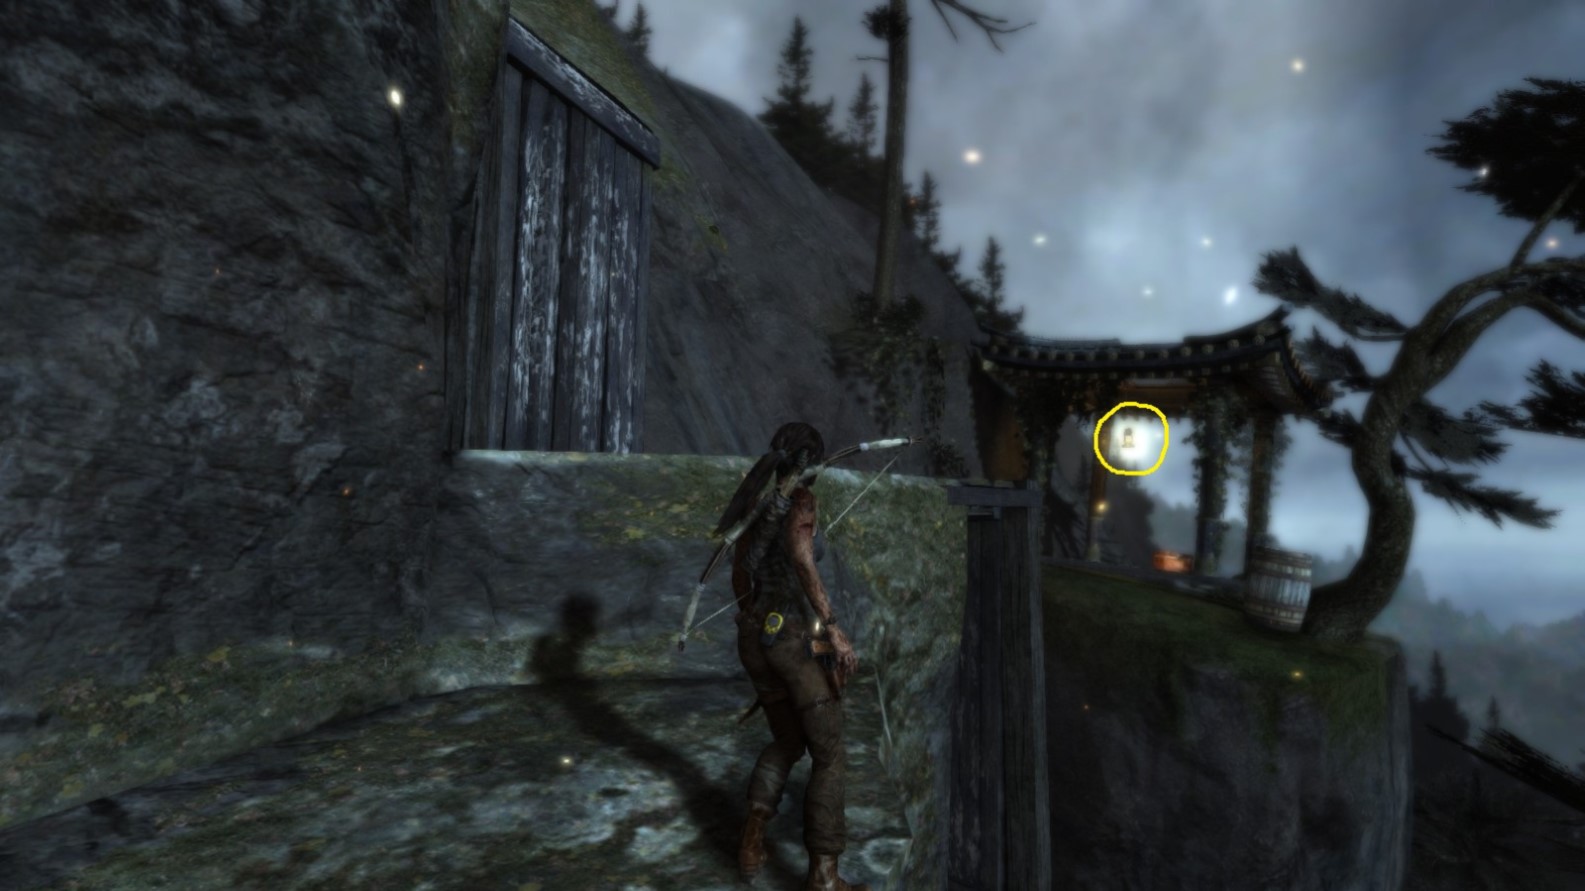
A bit isolated from the the other structures, this one houses the last lantern. Run and jump to get there.
Screenshot B - Pyromaniac 5/5
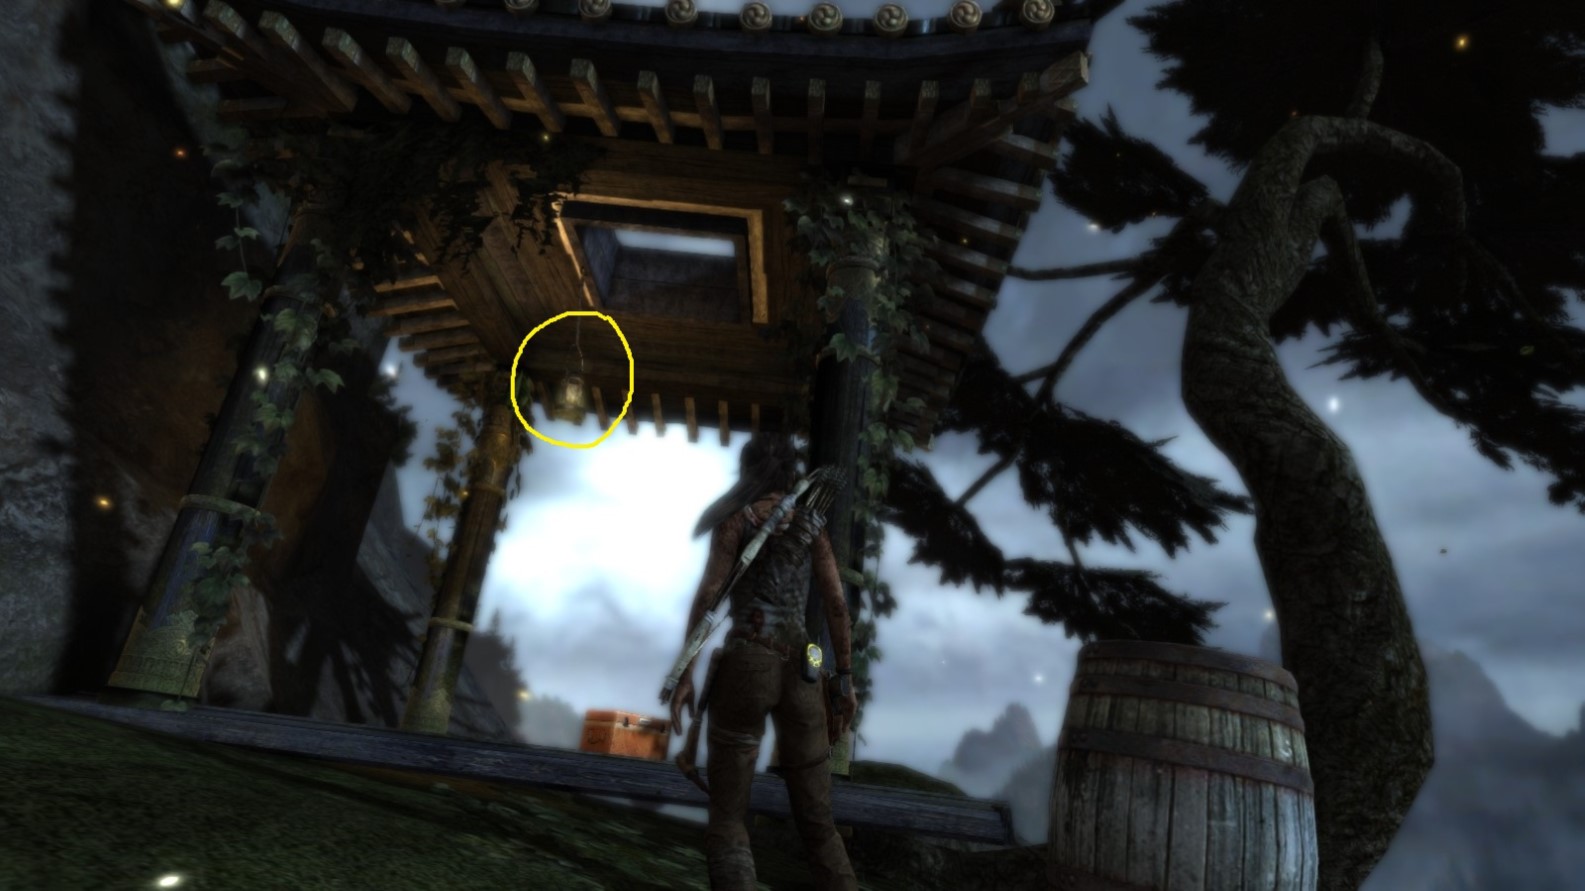
A view from close up.
*** End of PYROMANIAC ***
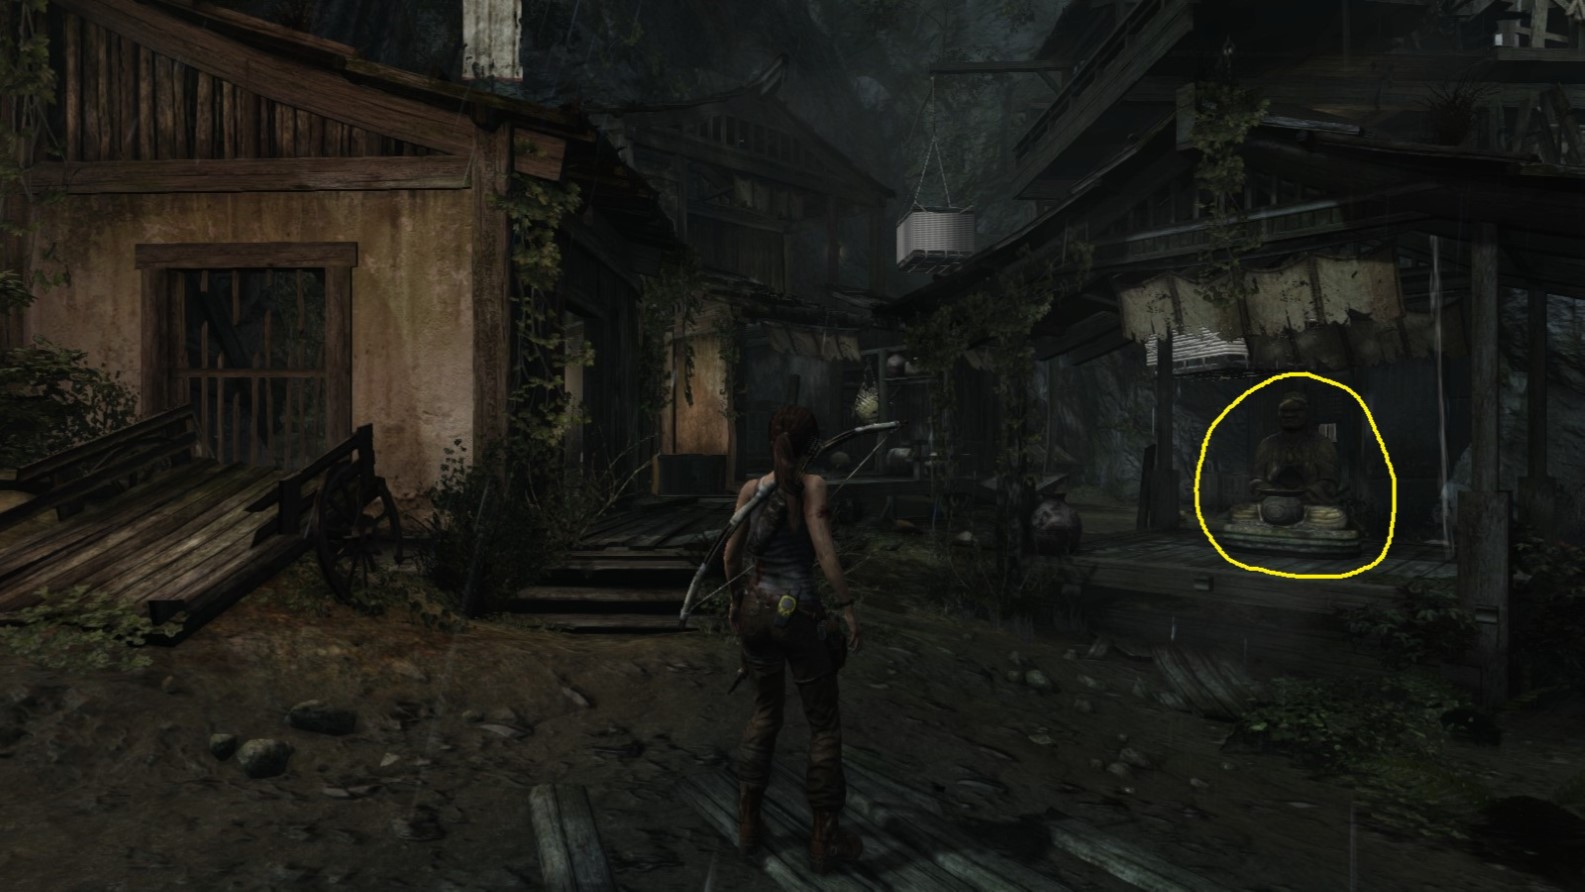
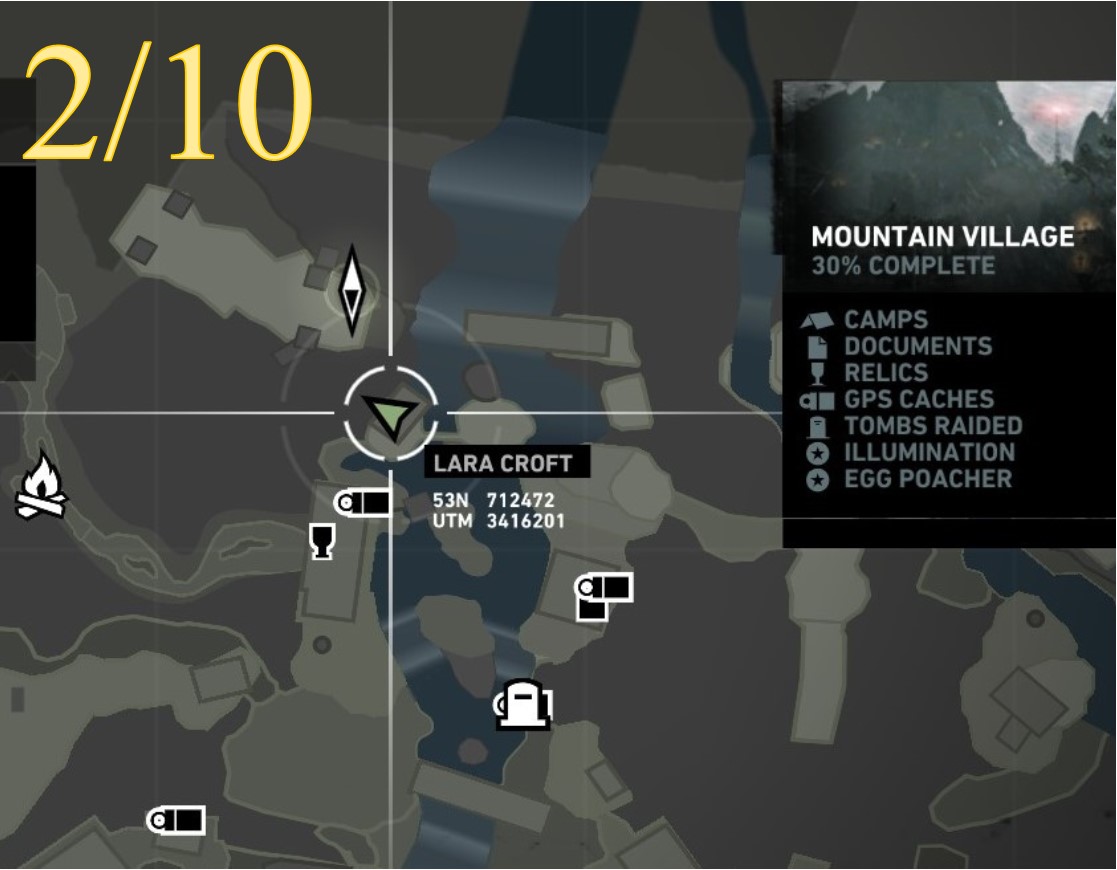
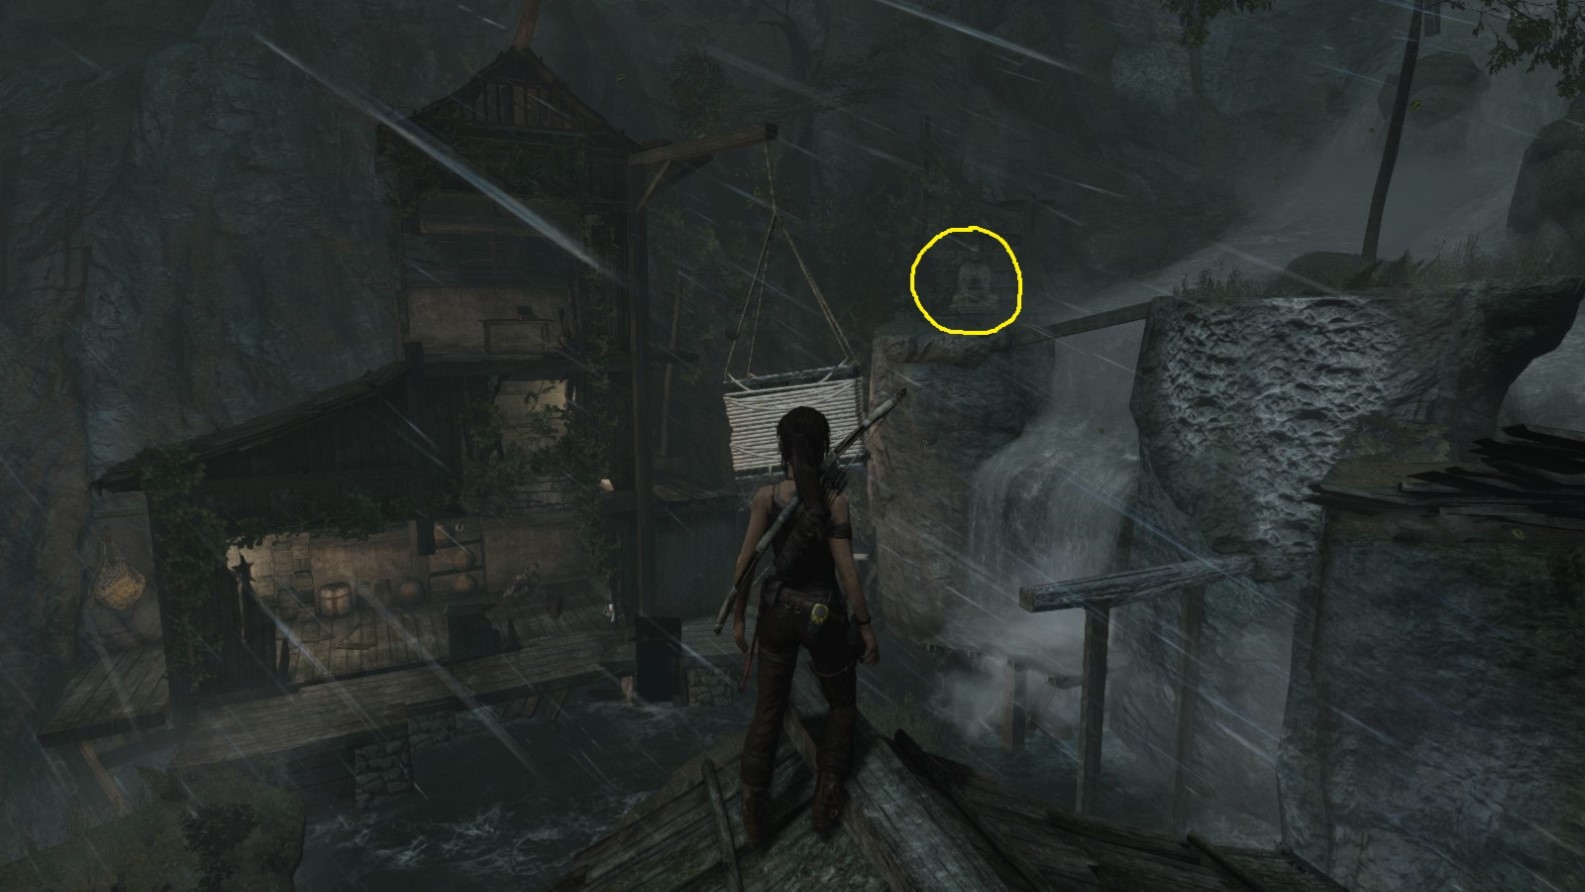
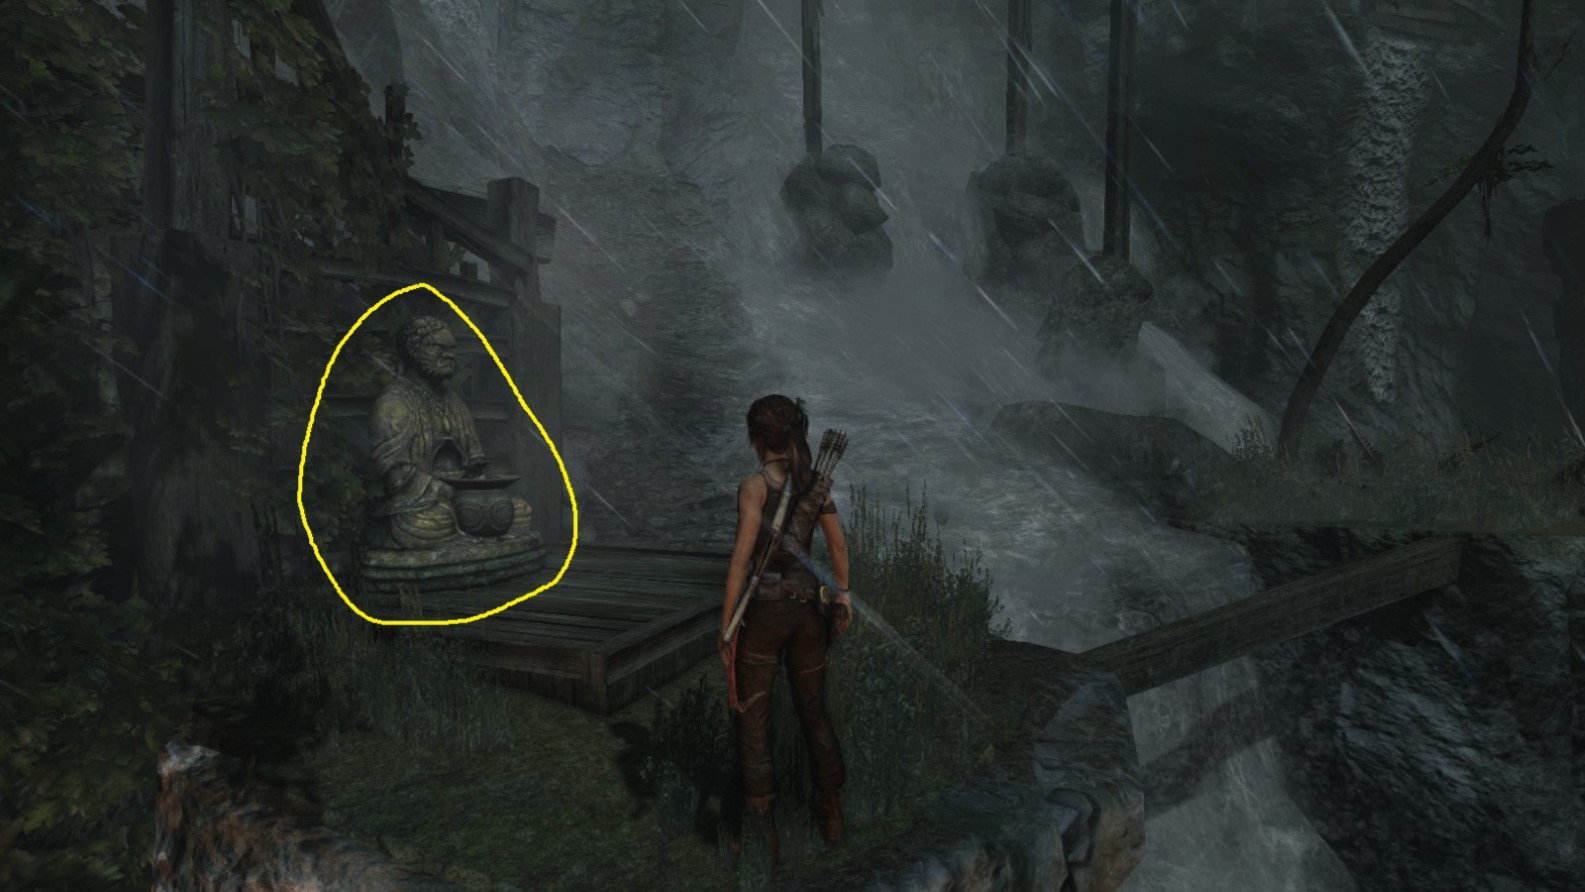
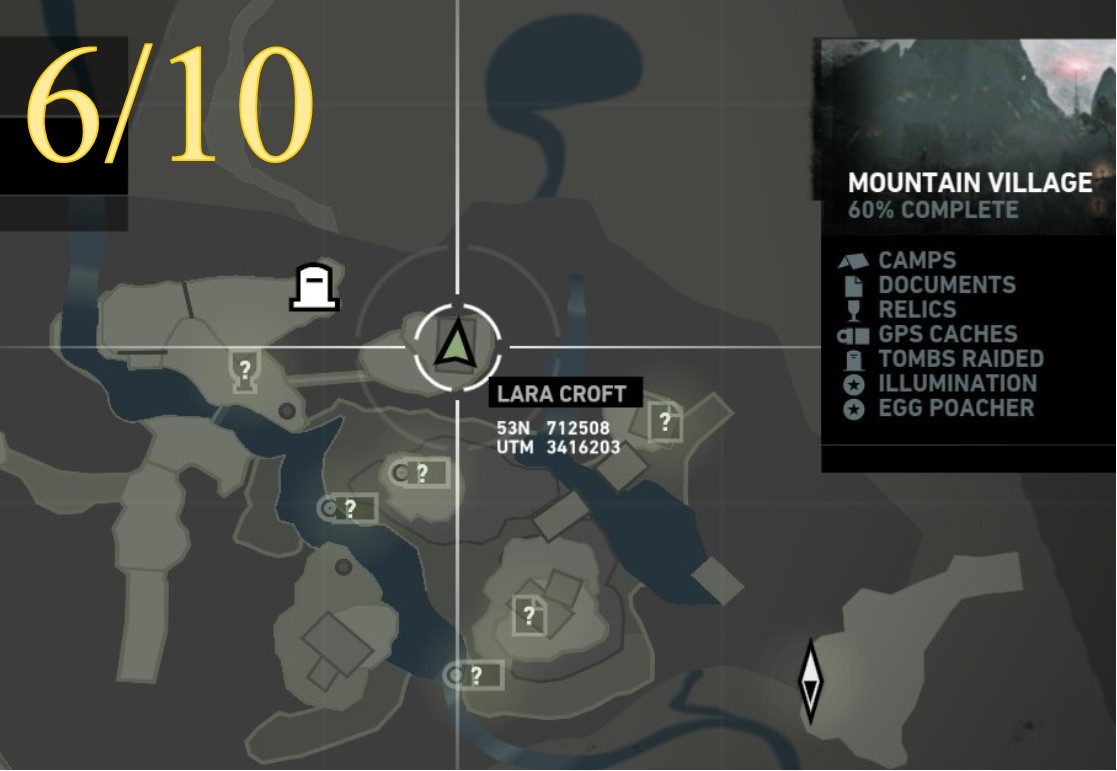
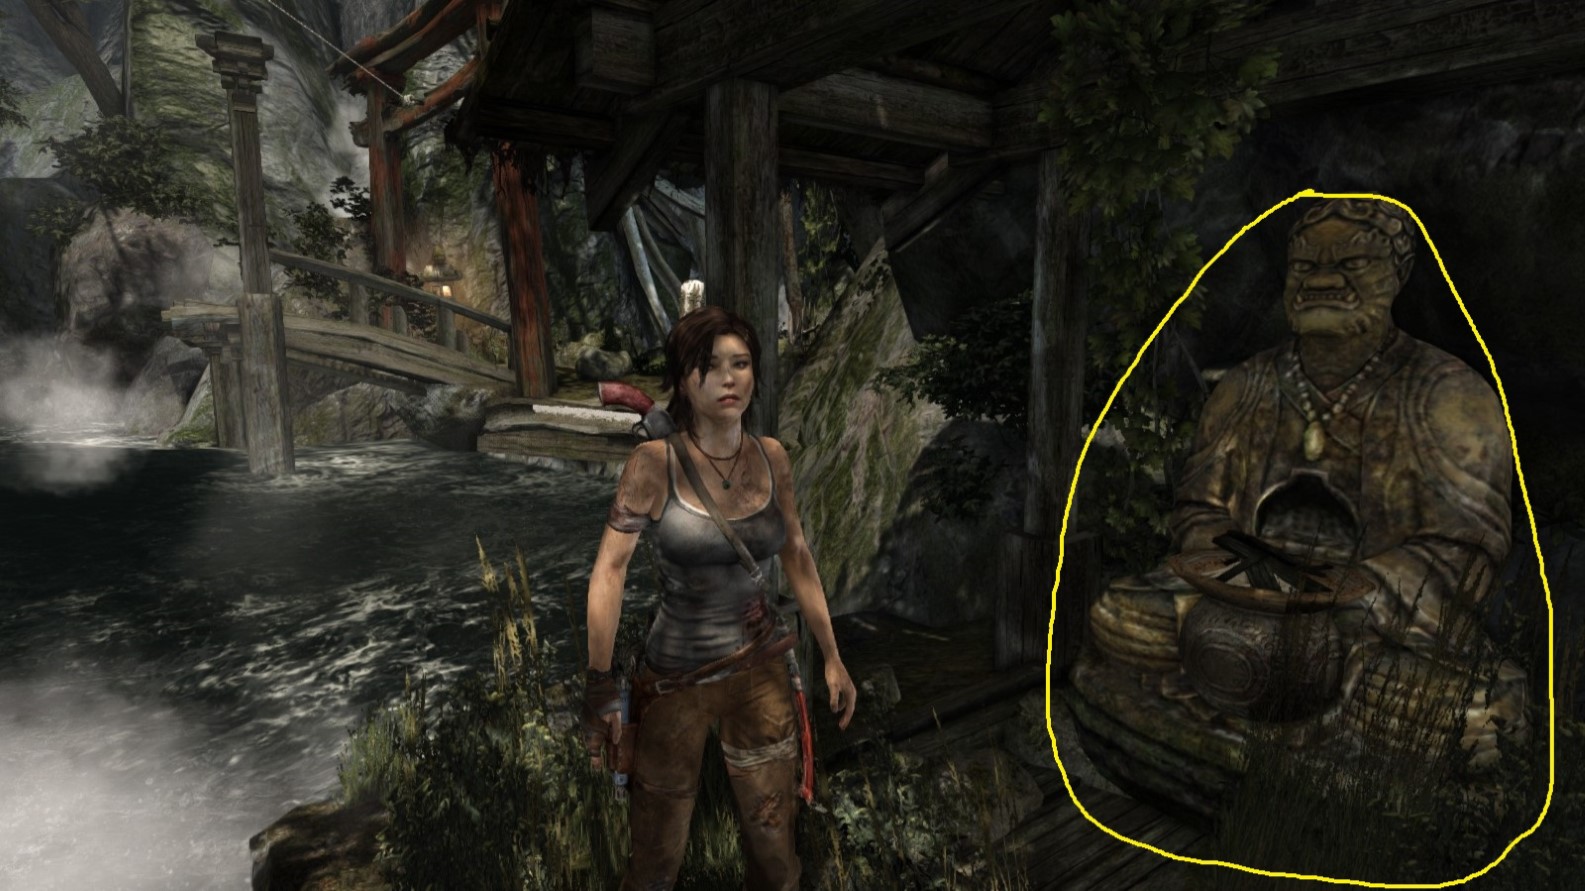
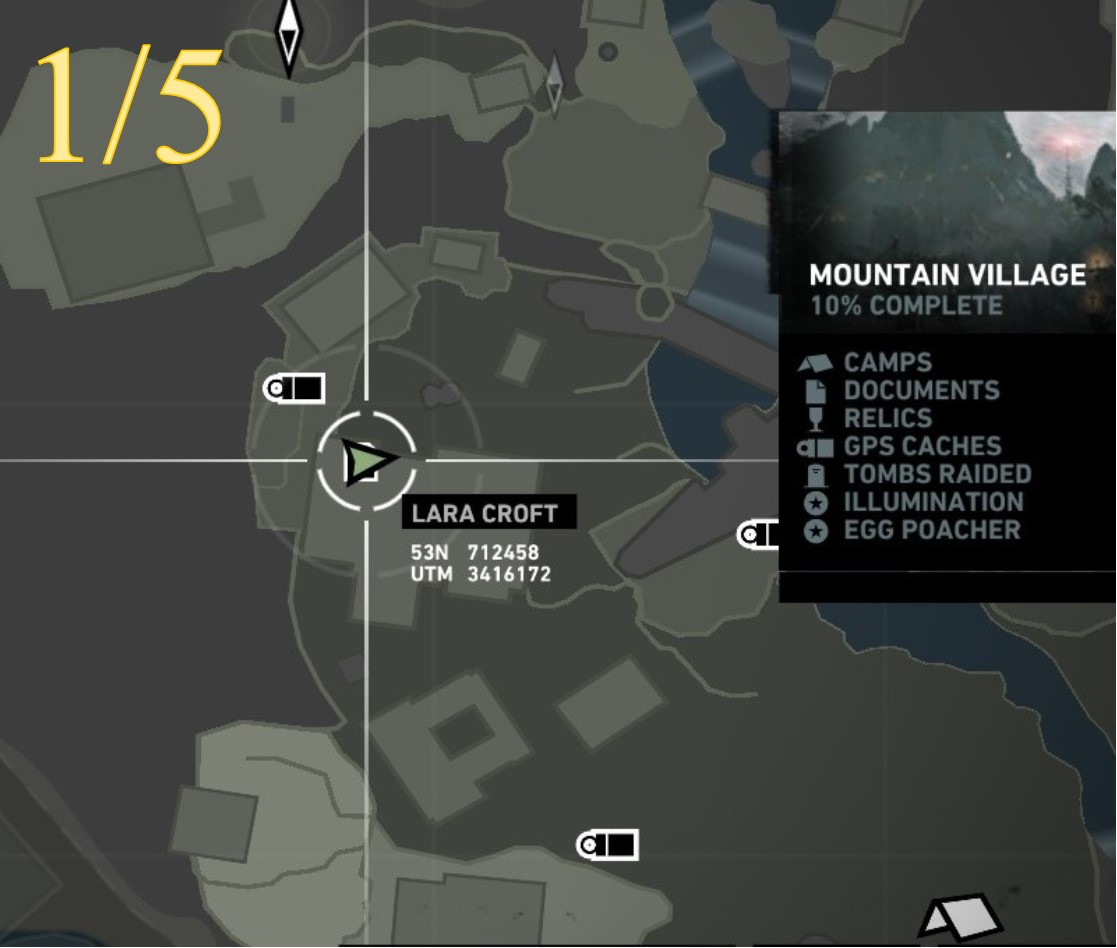
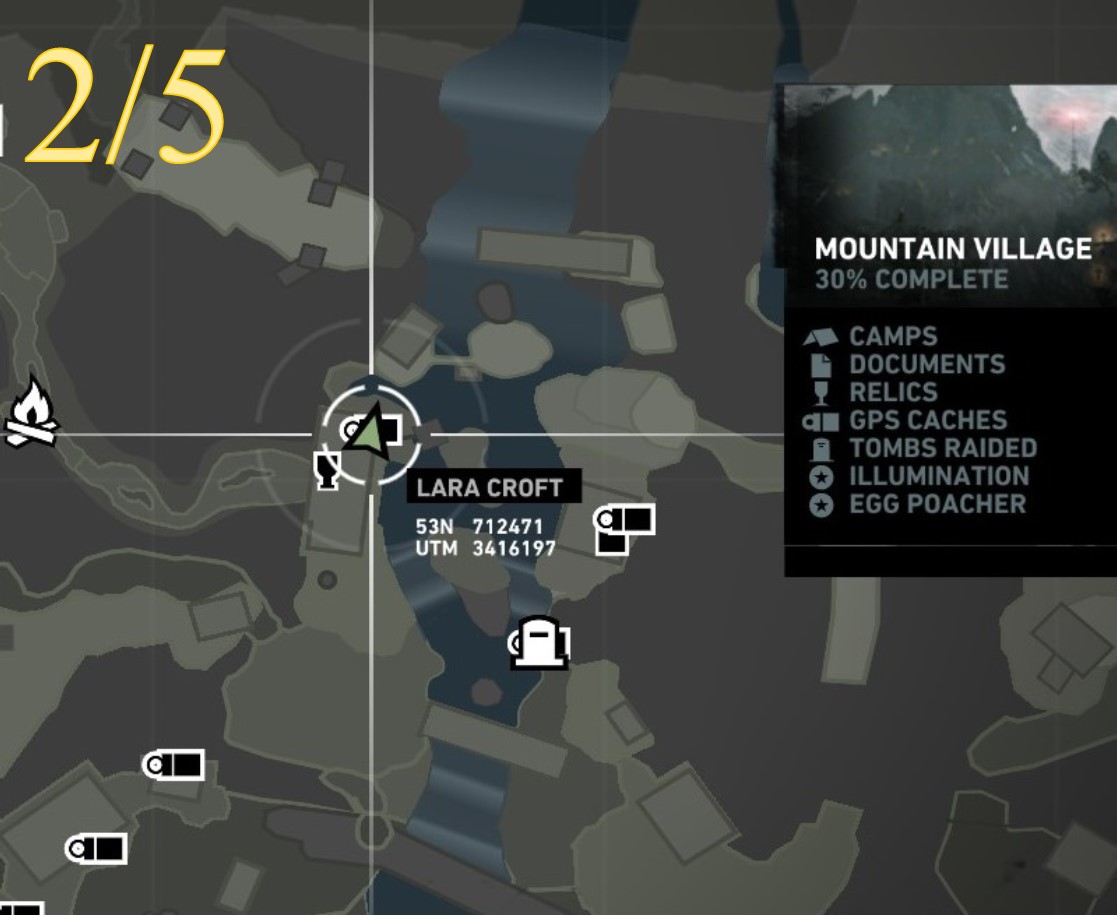
Challenge 3: ILLUMINATION 1-7
Illumination - Object 1
Area: Mountain Village
Closest Base Camp: Village Plateau
Find and light the bowl
Location on the Map
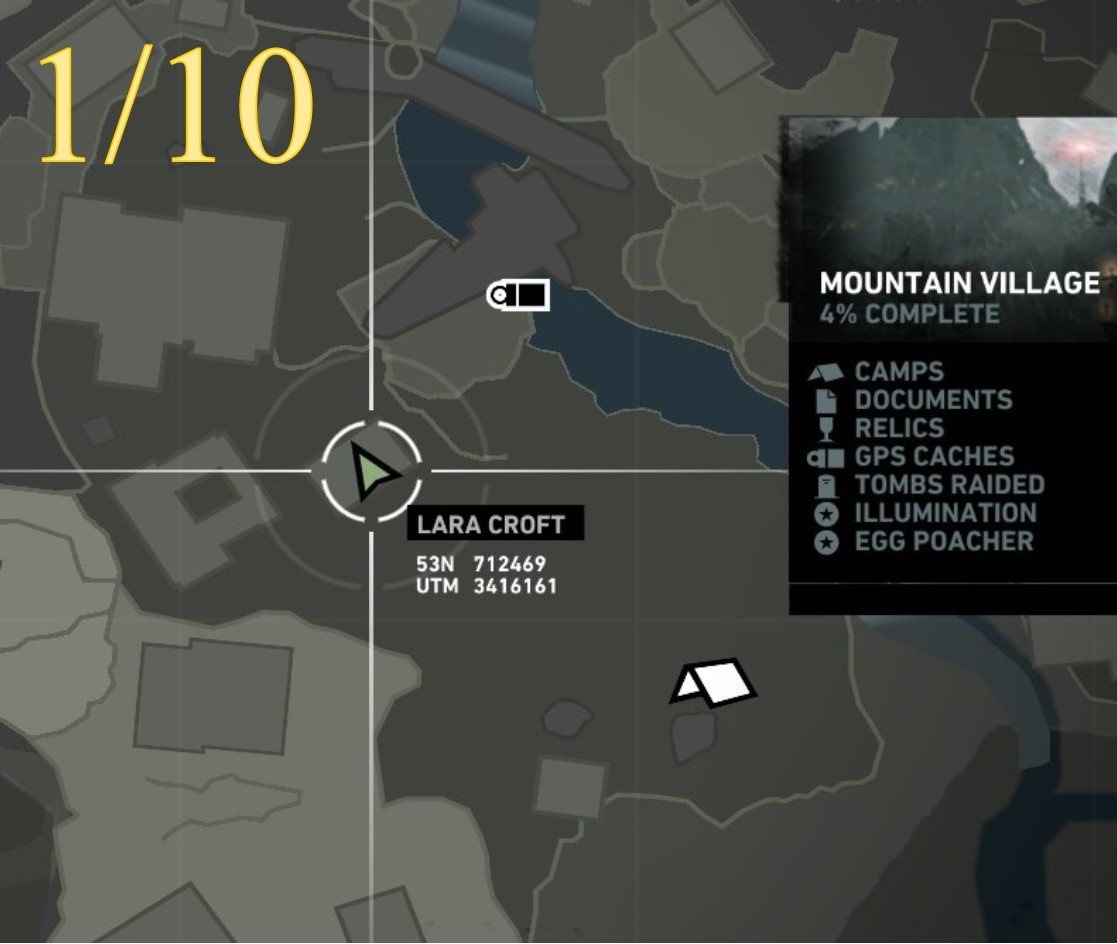
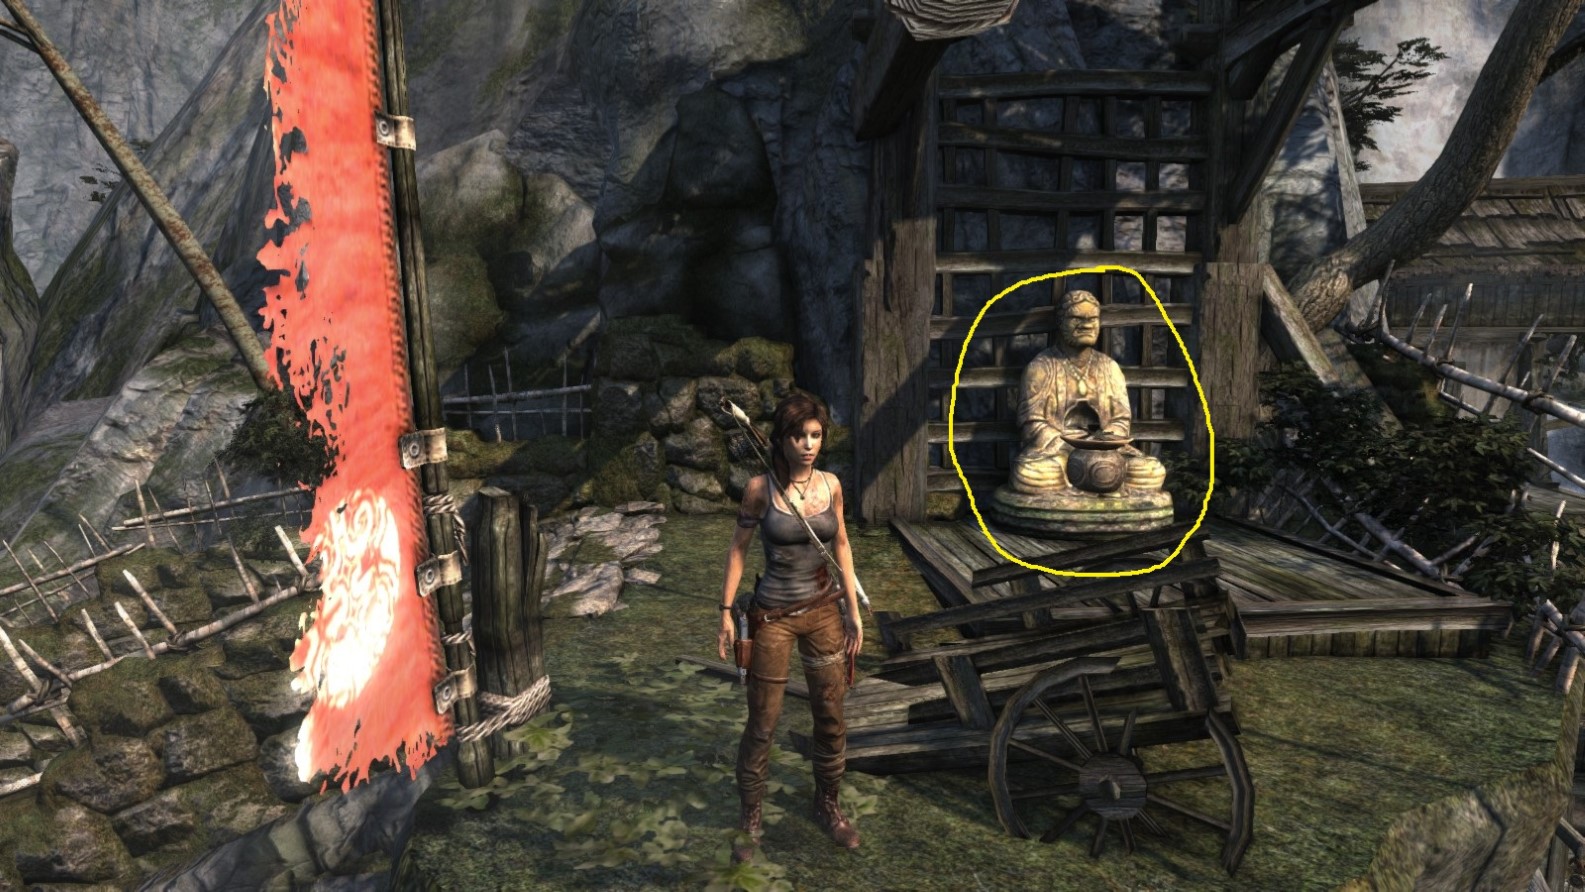
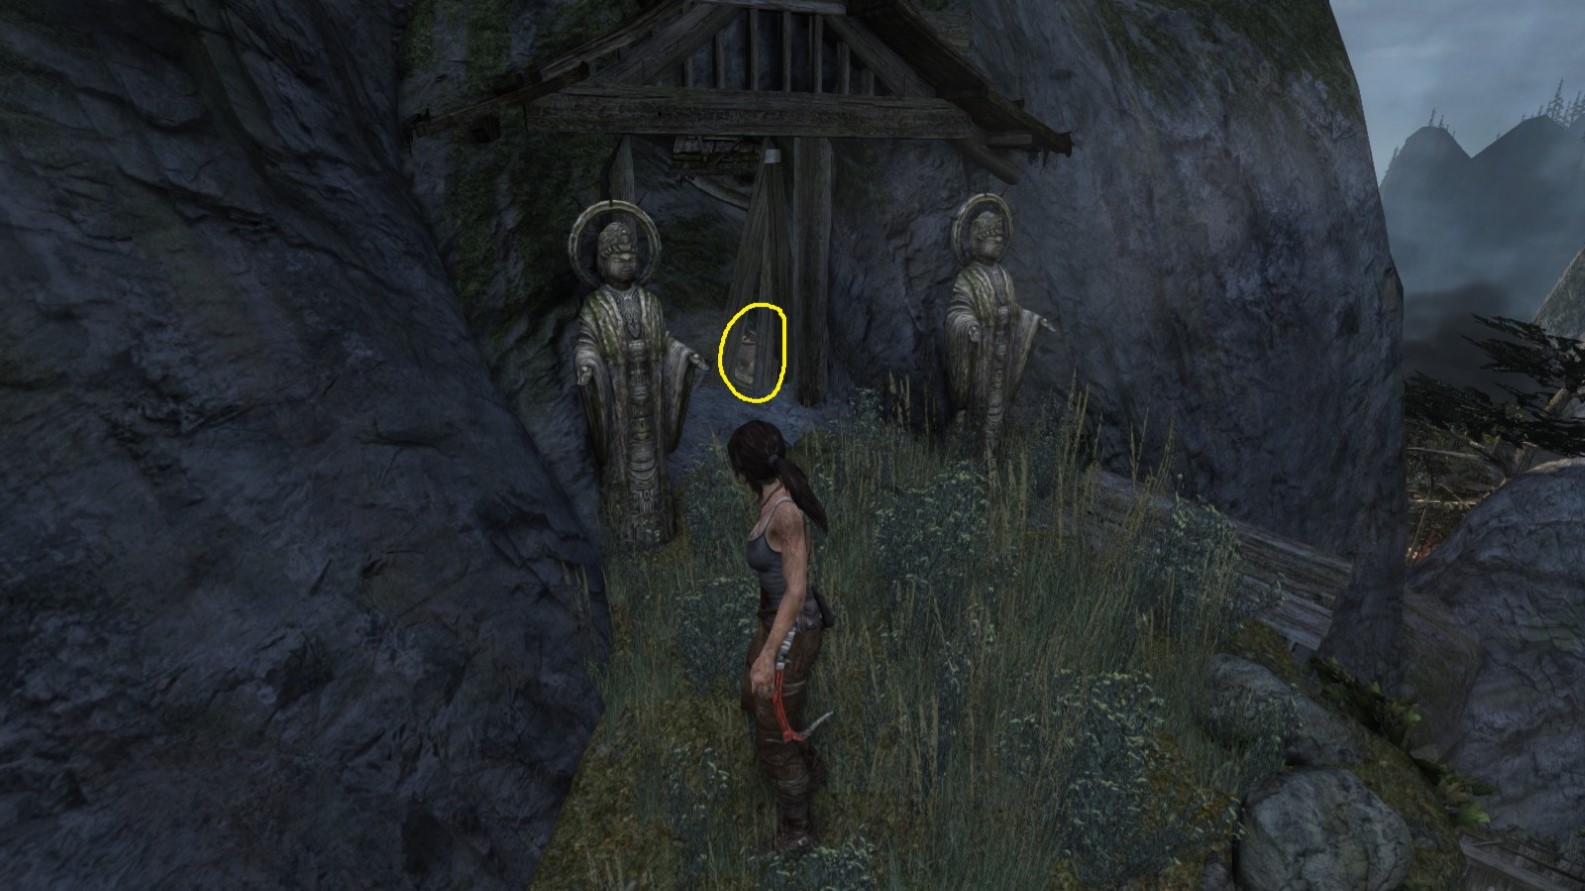
Screenshot A - Illumination 1/10
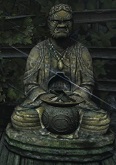
Light the bowl in the statue’s lap to start the challenge.
Screenshot B - Illumination 1/10
Viewed from another direction.
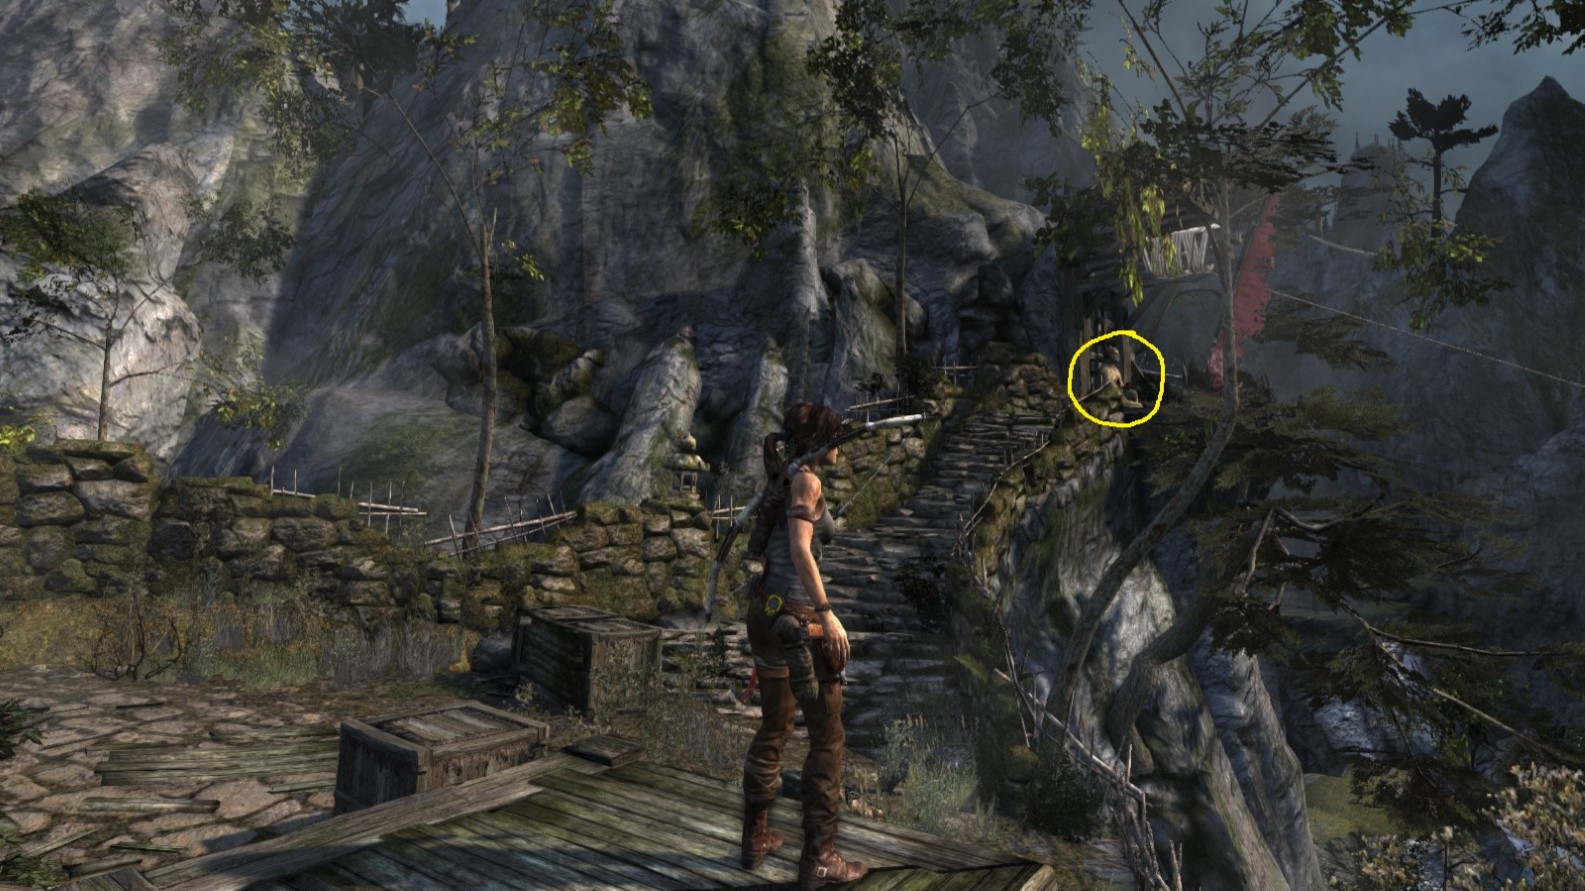
Illumination - Object 2
Area: Mountain Village
Closest Base Camp: Village Plateau
Find and light the bowl
Location on the Map
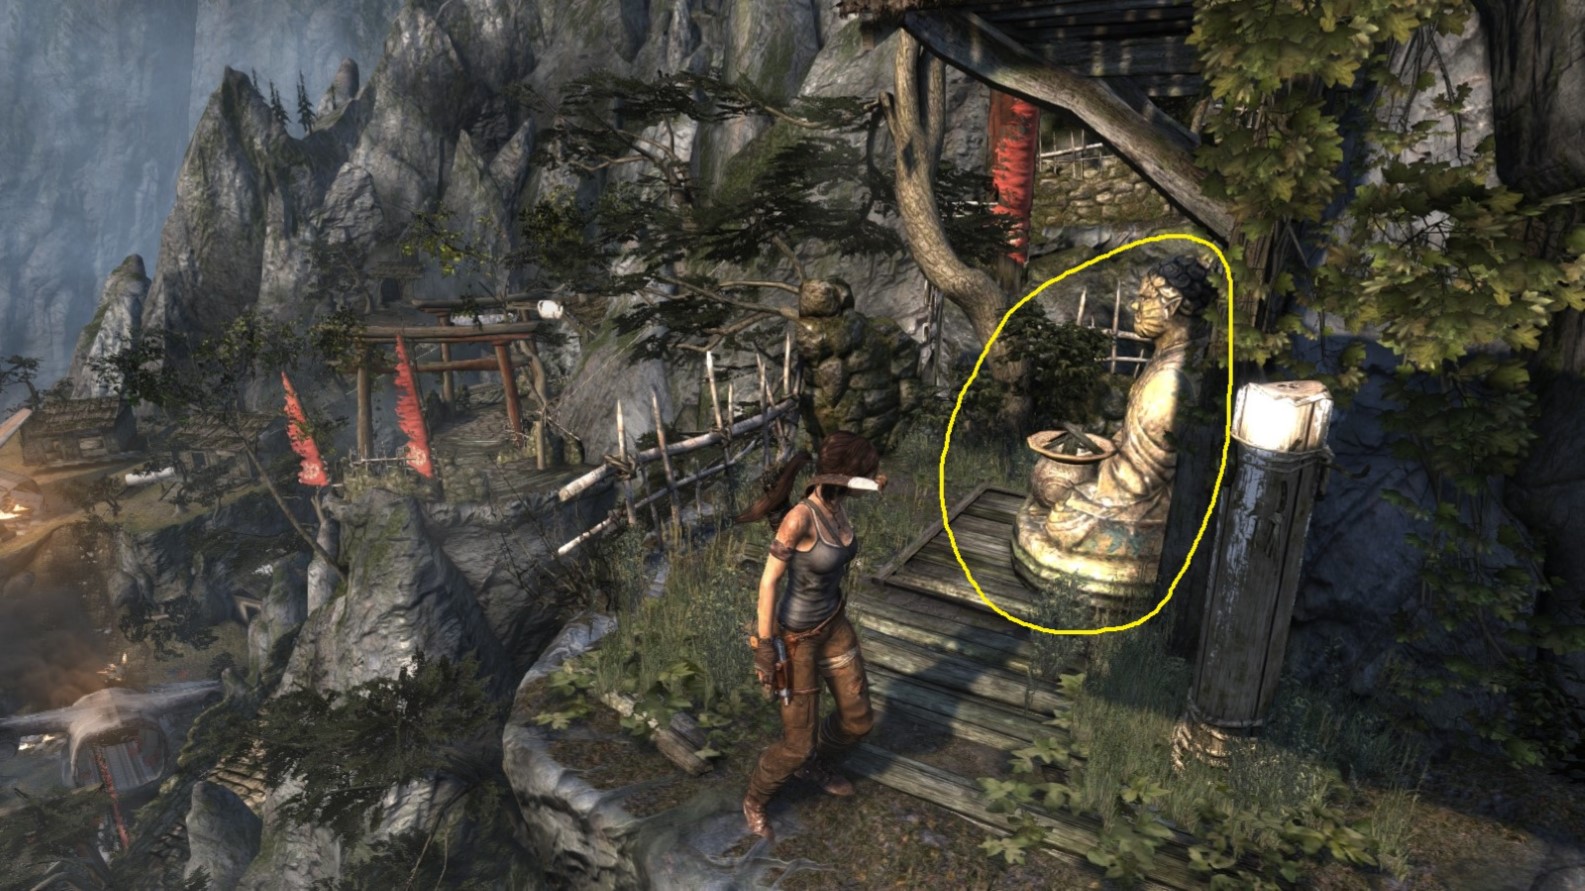
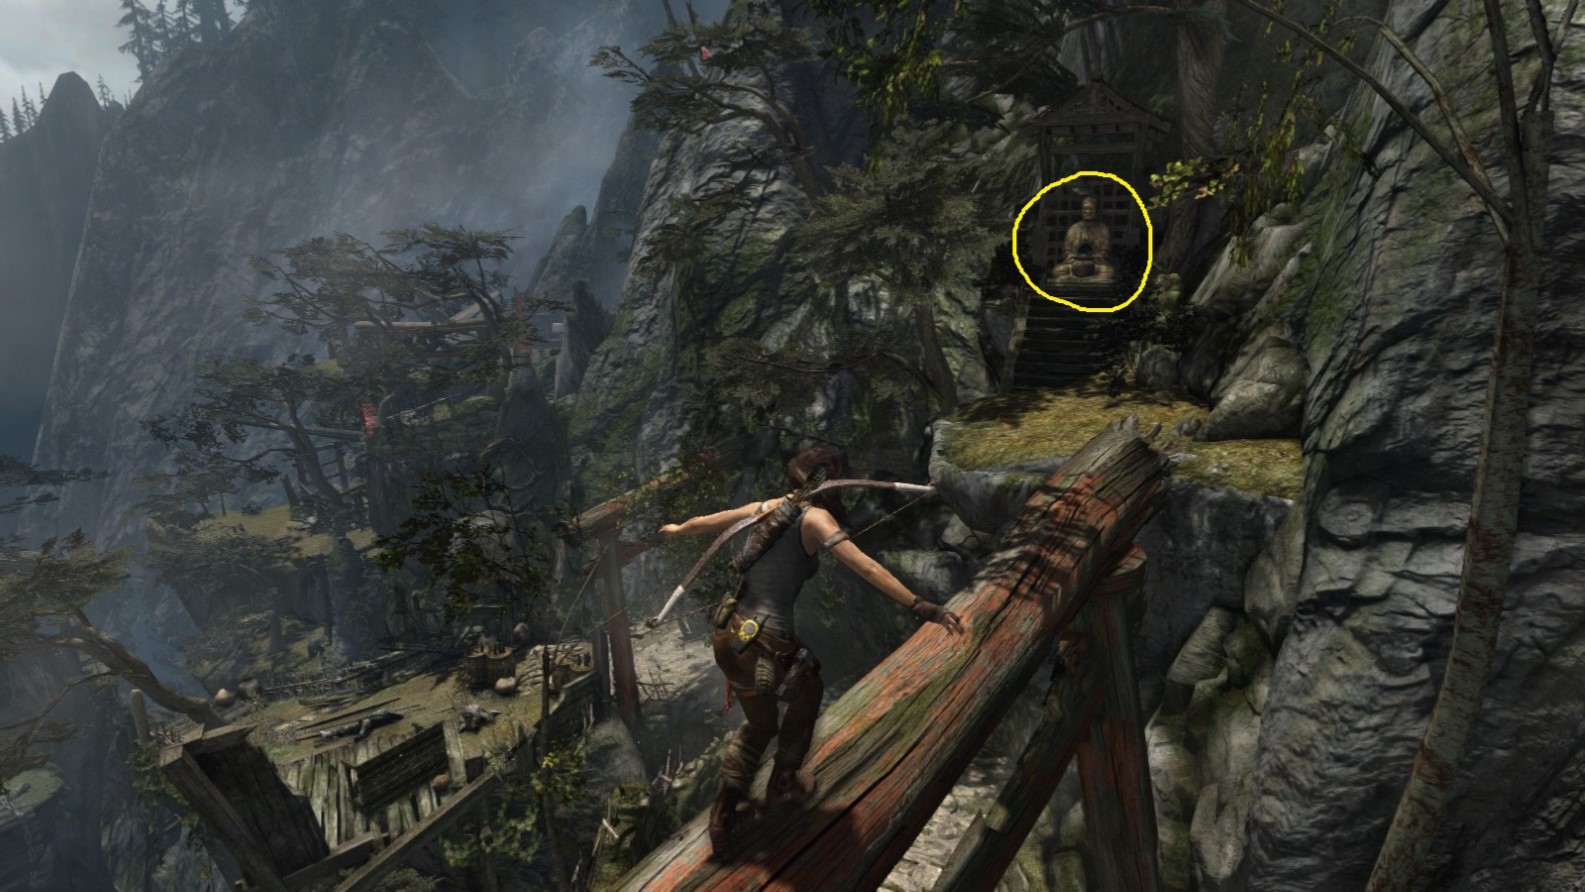
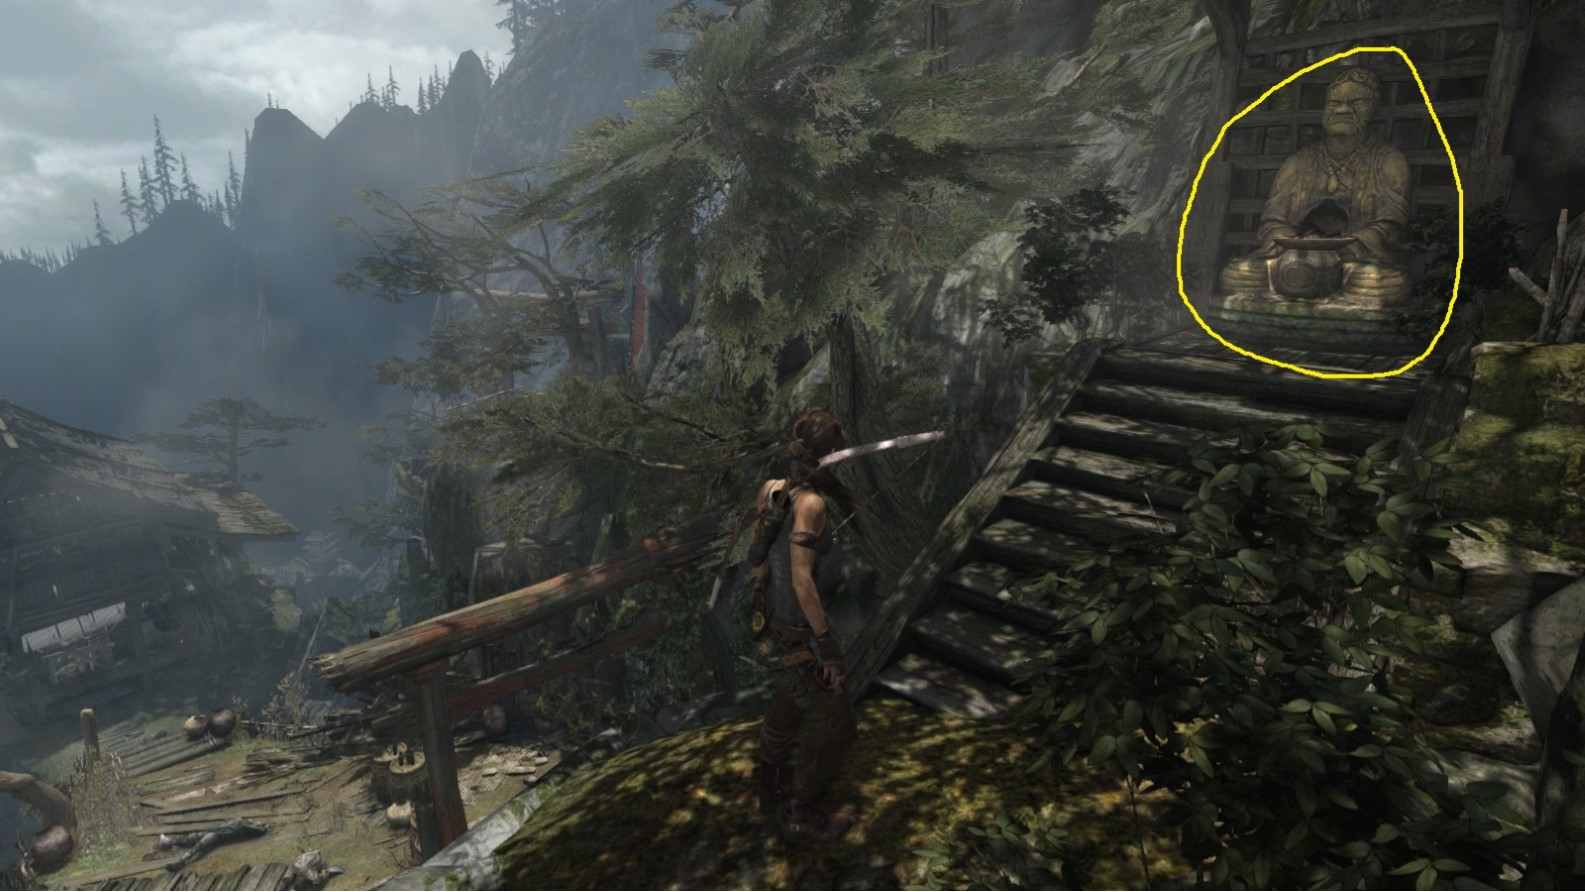
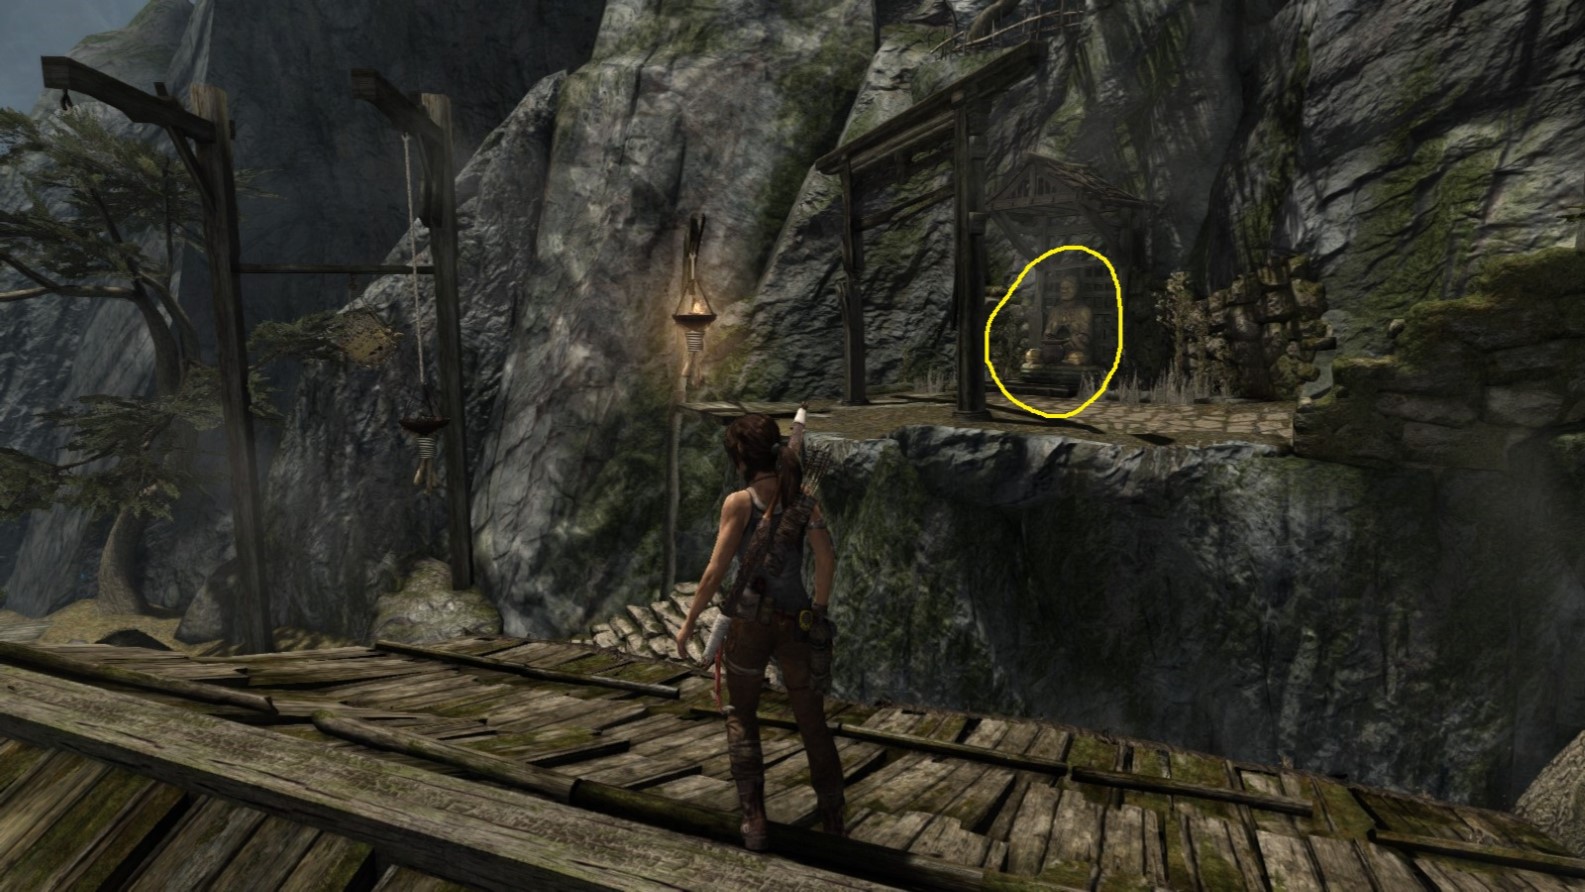
Screenshot A - Illumination 2/10
This one is much higher up. Located next to the larger building, on a cliff next to the waterfall.
Screenshot B - Illumination 2/10
Close-up view.
Illumination - Object 3
Area: Mountain Village
Closest Base Camp: Village Overlook
Find and light the bowl
Note: Accessible after Lara’s been to the radio tower
Location on the Map

If you’re trying to travel to this one using base camps, go to Village Overlook (left-hand bottom corner of the map) and work your way from there.
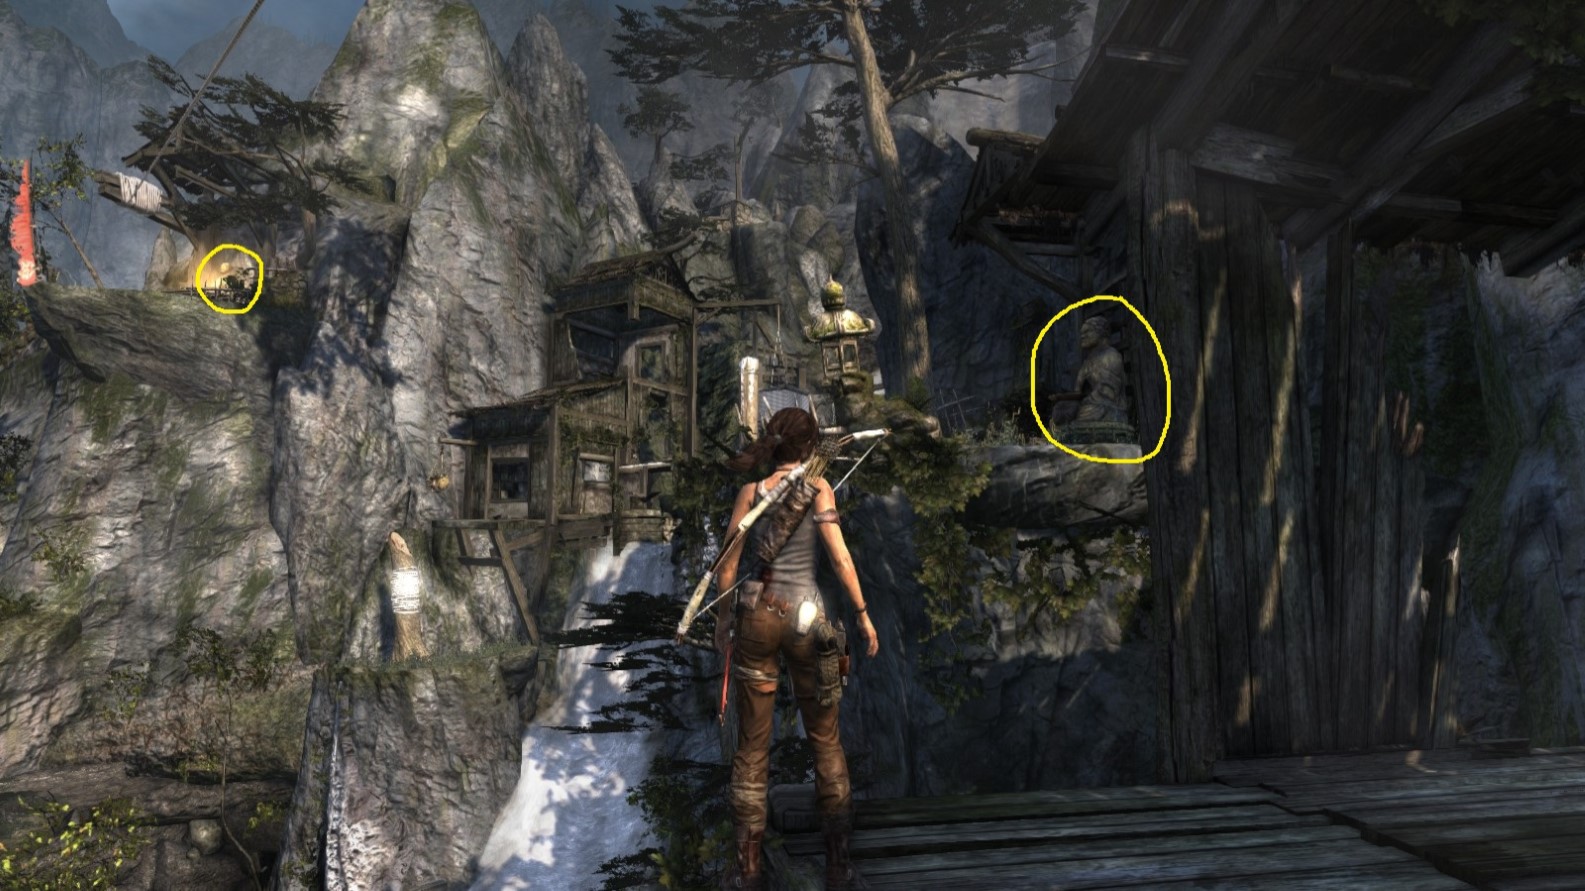
Screenshot A - Illumination 3/10
Go down the zipline (killing enemies after you touch ground if it’s your first visit here), then go up the stairs (as shown) to the statue.
Screenshot B - Illumination 3/10
Close-up view.
Illumination - Object 4
Area: Mountain Village
Closest Base Camp: Village Overlook
Find and light the bowl
Note: Accessible after Lara’s been to the radio tower
Location on the Map

As a pointer, the spot where the previous statue (3/10) is located is circled in orange on the map.
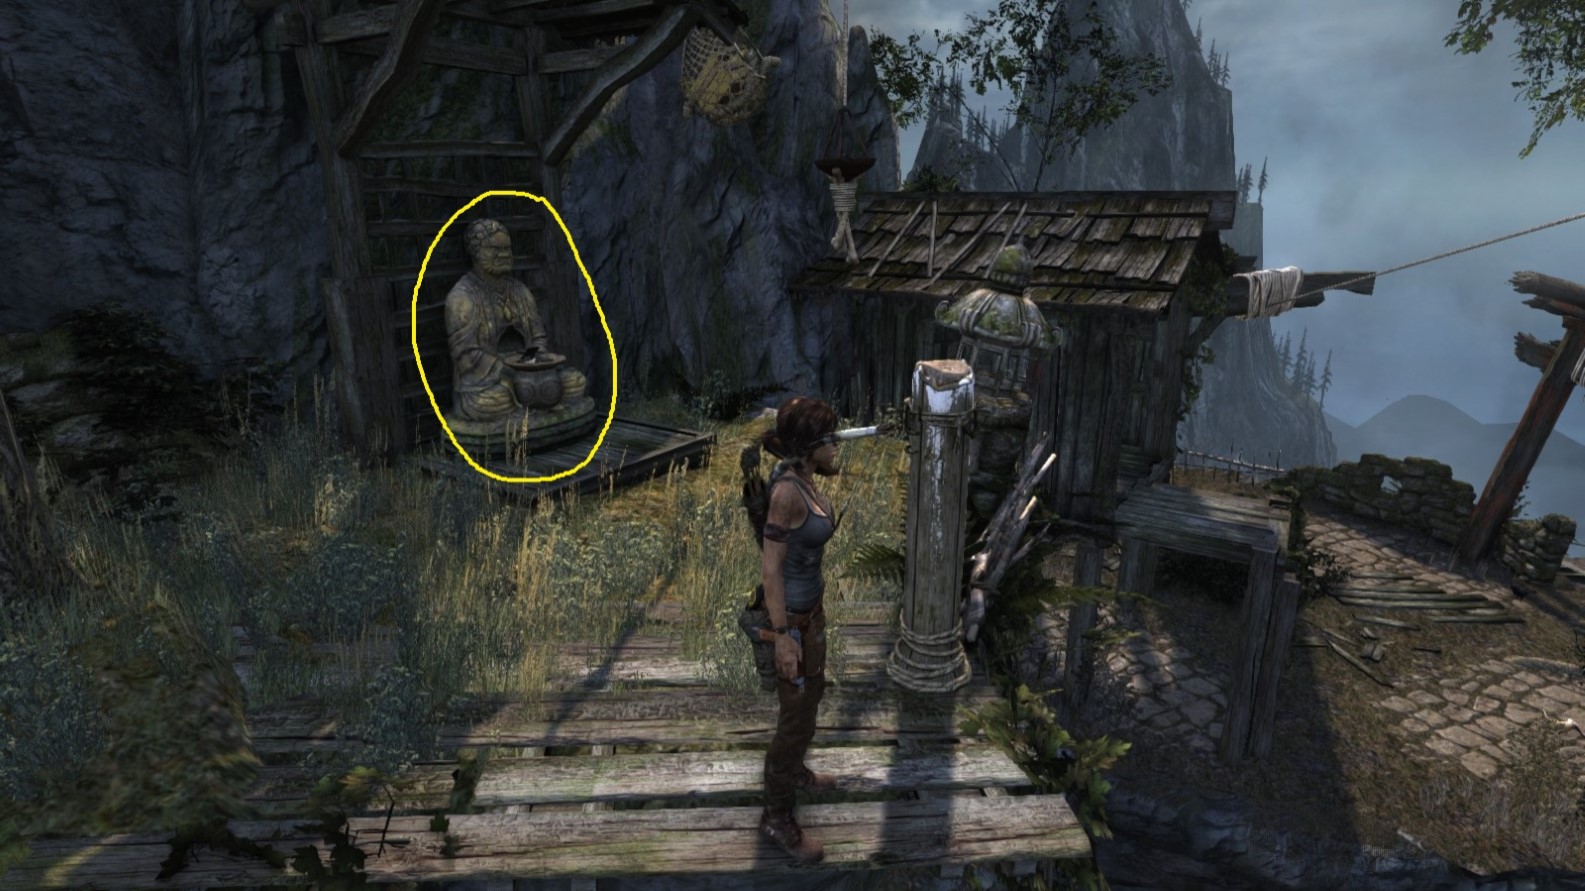
Screenshot A - Illumination 4/10
Take the zipline down from the 3rd statue (small yellow circle). You land at a small wooden building next to the cliff with the 4th statue (larger yellow circle.)
Screenshot B - Illumination 4/10
Close-up view showing the small building at the bottom of the zipline.
Illumination - Object 5
Area: Mountain Village
Closest Base Camp: Village Overlook
Find and light the bowl
Note: Accessible after Lara’s been to the radio tower
Location on the Map
Screenshot A - Illumination 5/10
This entrance to the statue (5/10) is “guarded” by two identical statues of the sun queen. A short corridor connects this entrance to an exit on the opposite side of the cliff face, as seen in the next screenshot.
Screenshot B - Illumination 5/10
Viewed from the opposite entrance/exit. On Lara’s first visit here she’s confronted by two enemies.
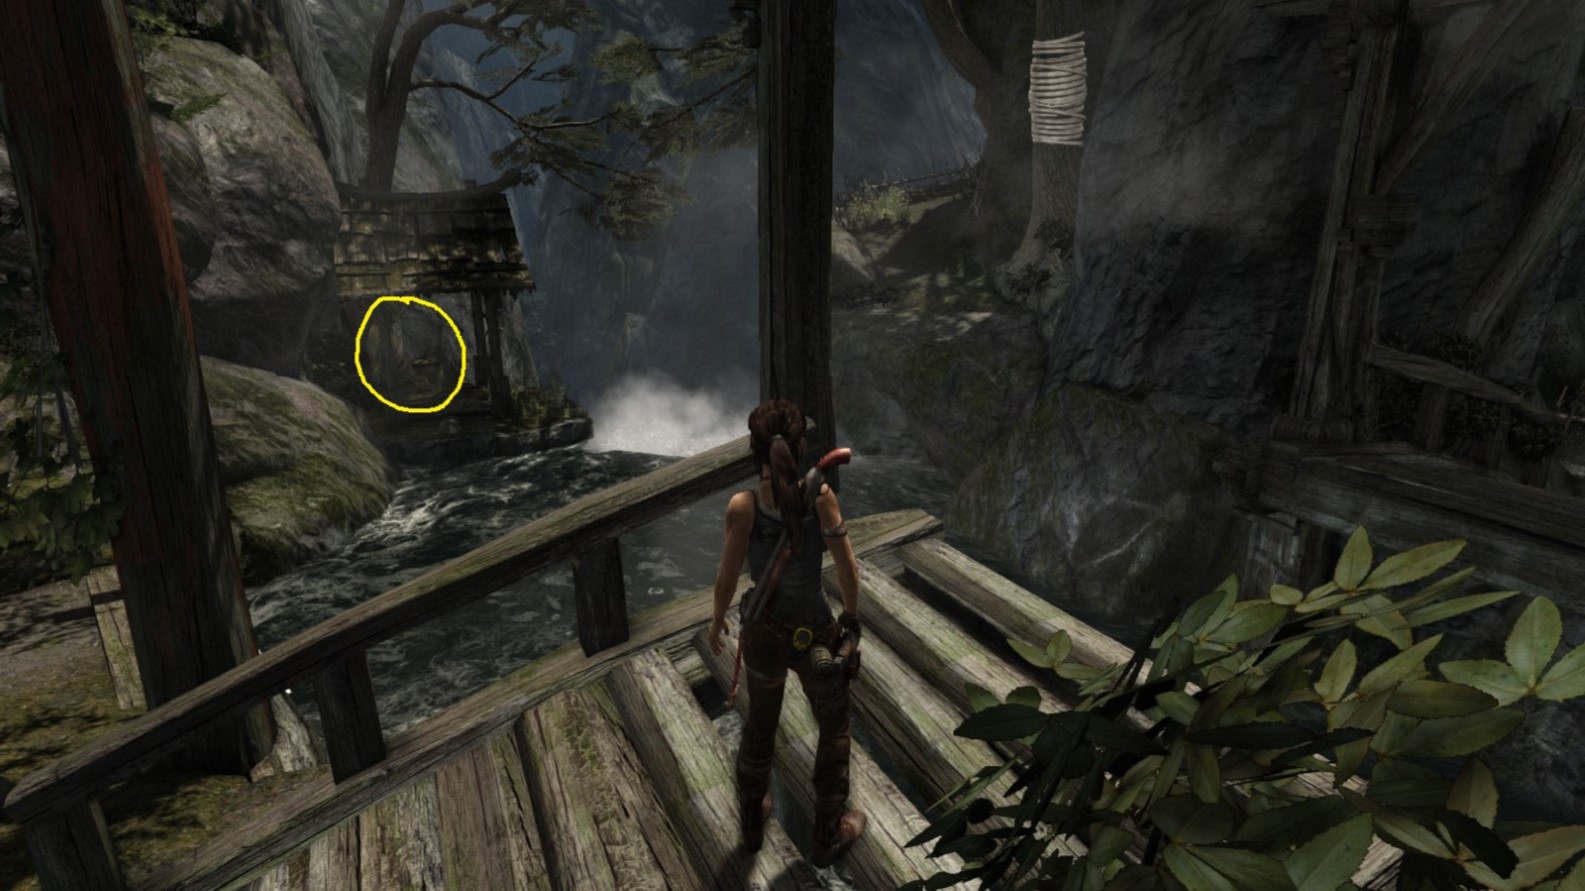
Illumination - Object 6
Area: Mountain Village
Closest Base Camp: Village Overlook
Find and light the bowl
Note: Accessible after Lara’s been to the radio tower
Location on the Map
Screenshot A - Illumination 6/10
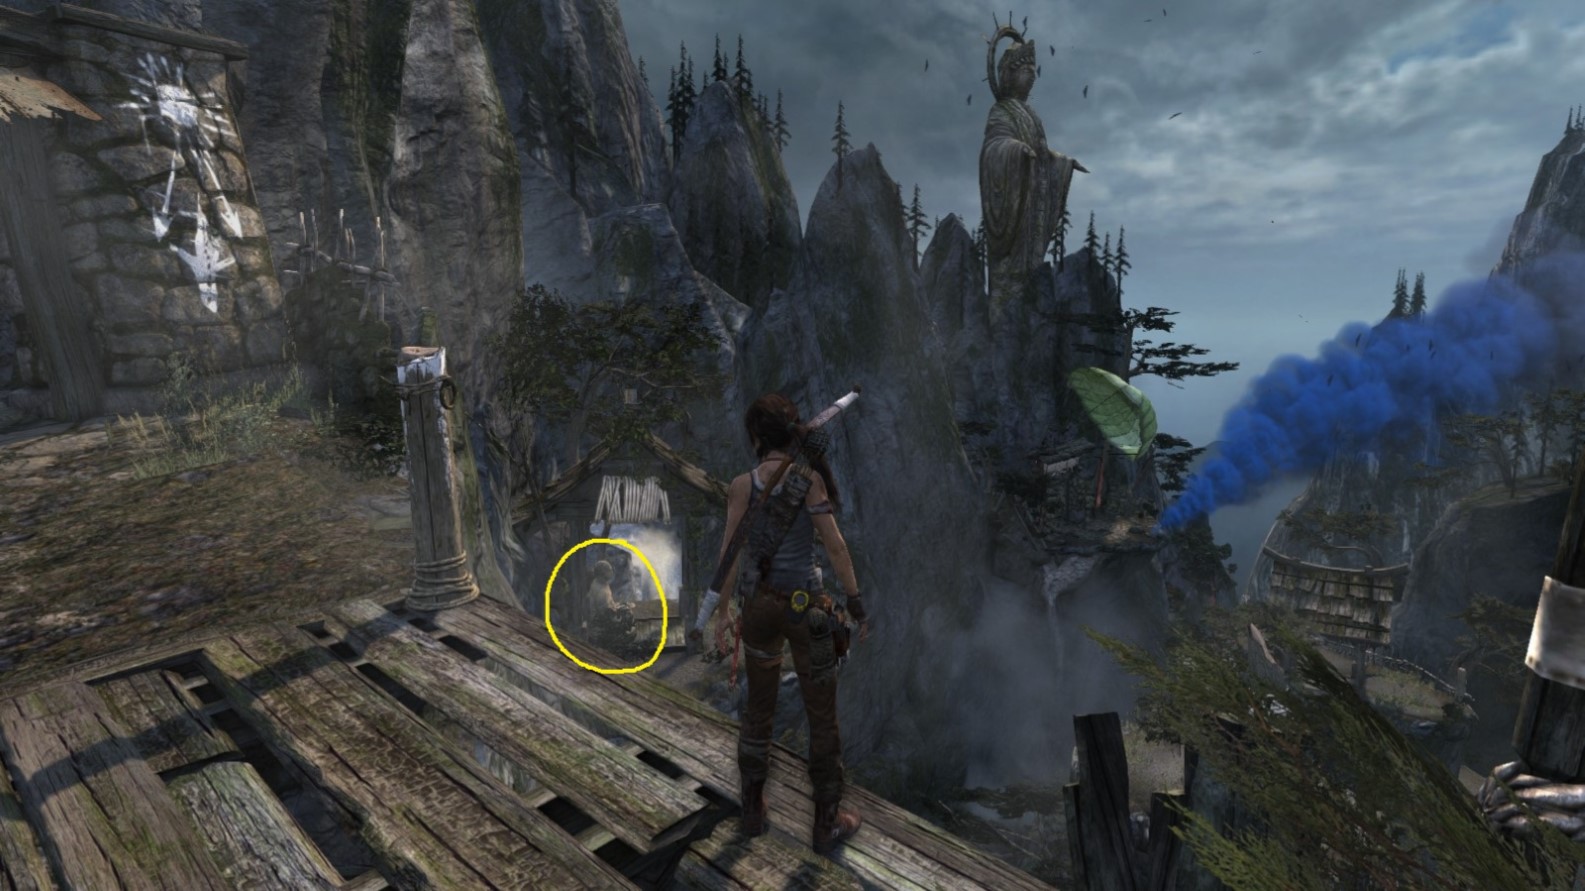
With the entrance to a secret tomb to her left and the co-pilot’s blue smoke on the right, statue 6/10 is visible just left of Lara. She has to take a ropeline down to the spot.
Screenshot B - Illumination 6/10
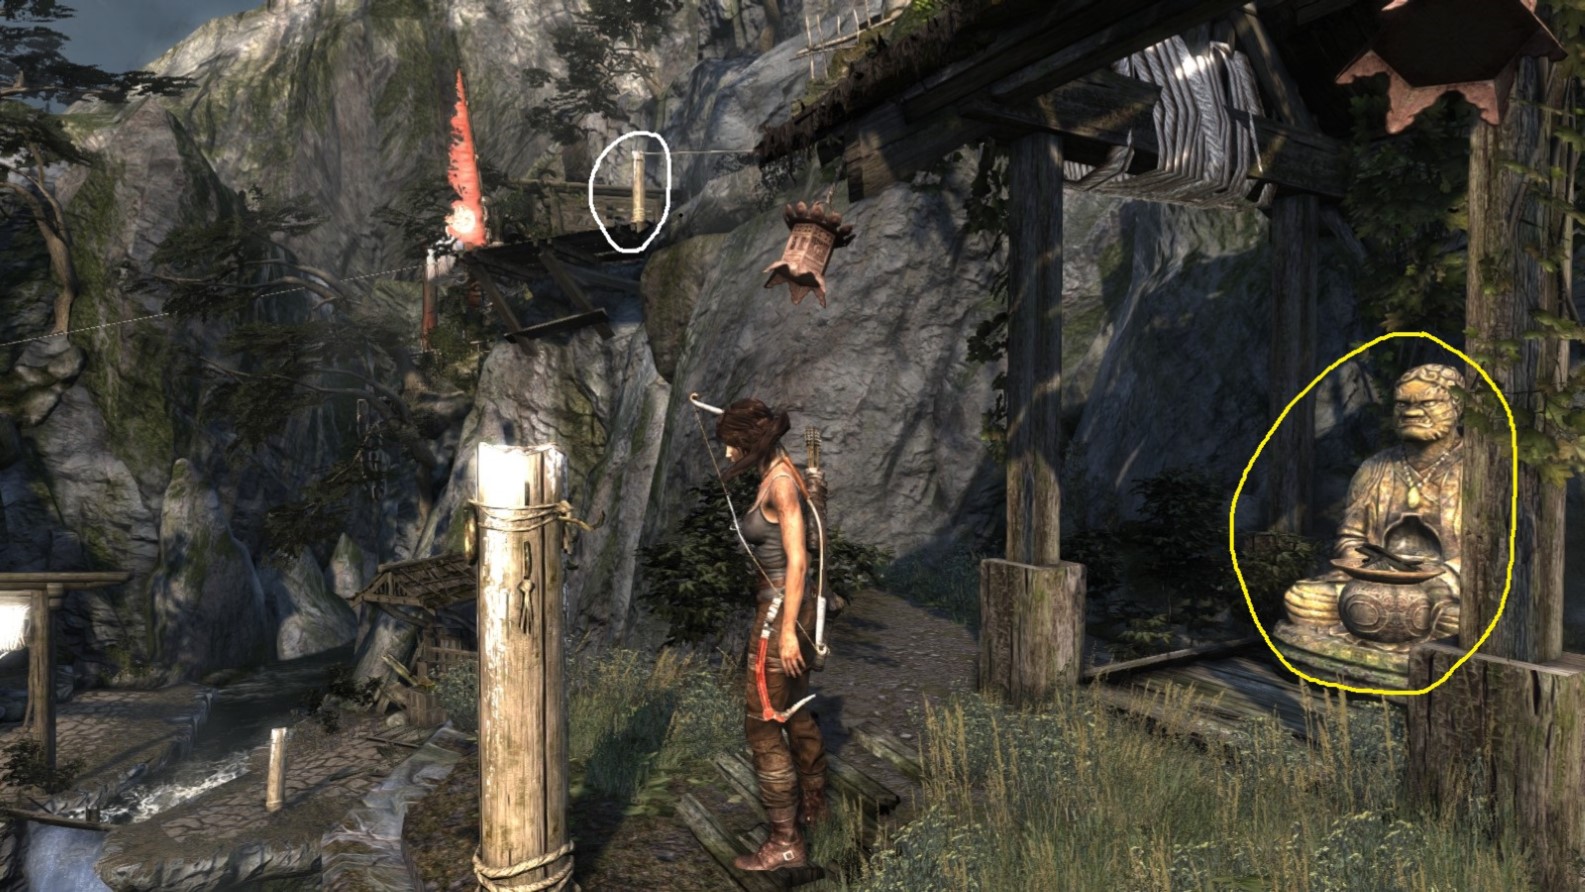
Viewed from statue 6/10. The pole Lara was standing at in the previous screenshot is shown circled in white.
Illumination - Object 7
Area: Mountain Village
Closest Base Camp: Village Overlook
Find and light the bowl
Note: Accessible after Lara’s been to the radio tower
Location on the Map
Screenshot A - Illumination 7/10
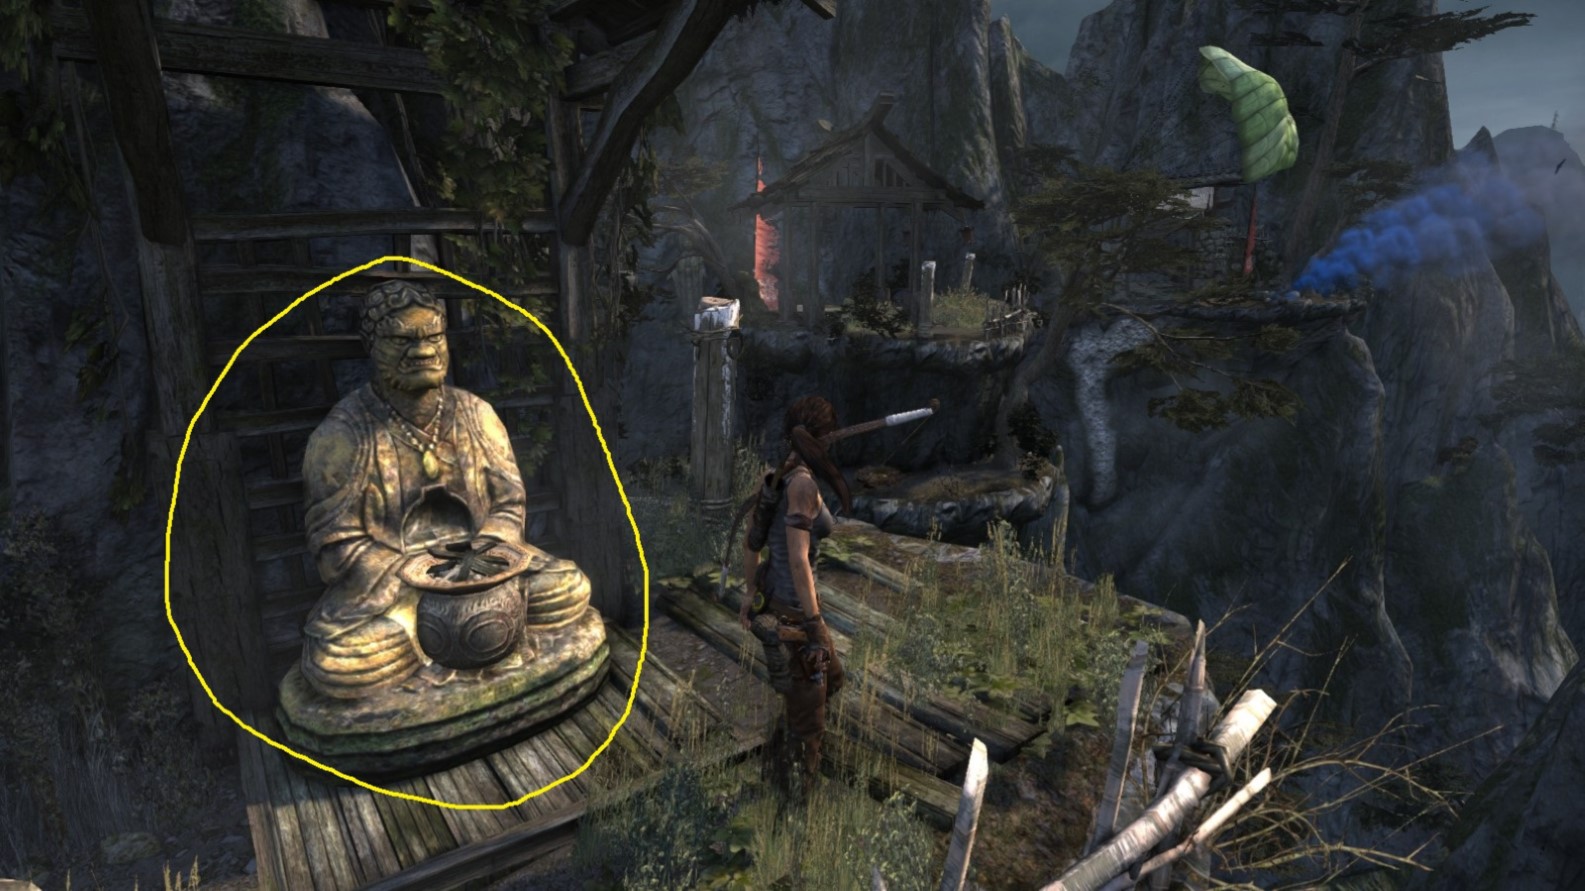
Lara has reached the statue and looks in the direction of the blue smoke. Next stop: the wooden structure in the top (centre) of the picture, where a fierce wind blows.
Screenshot B - Illumination 7/10
Another angle of statue 7/10.
Challenge 3: ILLUMINATION 8-10
Illumination - Object 8
Area: Mountain Village
Closest Base Camps:
a) Village Overlook (see important note below map)
b) Village Plateau (see important note below map)
Find and light the bowl
Note: Accessible after Lara’s been to the radio tower
Location on the Map
Important Note:
In case you need to go back to statues 8 or 9 after Lara’s initial visit to that part of the level, you’re going to have to travel a long way to get there again. You won’t be able to backtrack the route from the Village Plateau base camp through the isolated wooden structure just northeast of that, since Lara cannot jump or rope-arrow back to the slightly more elevated spot where statue 9 is located. Instead, you need to proceed from either the Village Plateau or Village Overlook base camps back to statue 7 and then keep on moving downwards from there (using jumps and ropes) until you end up back at the Mountain Descent day camp close to statue 8, and then onwards to statue 9.
Screenshot A - Illumination 8/10
Lara gets to a broken bridge. The statue is in die wooden structure to the left.
Screenshot B - Illumination 8/10
Lara wades through the water to get to the statue.
Illumination - Object 9
Area: Mountain Village
Closest Base Camps:
a) Village Overlook (see important note below map)
b) Village Plateau (see important note below map)
Find and light the bowl
Note: Accessible after Lara’s been to the radio tower
Location on the Map
Important Note:
In case you need to go back to statues 8 or 9 after Lara’s initial visit to that part of the level, you’re going to have to travel a long way to get there again. You won’t be able to backtrack the route from the Village Plateau base camp through the isolated wooden structure just northeast of that, since Lara cannot jump or rope-arrow back to the slightly more elevated spot where statue 9 is located. Instead, you need to proceed from either the Village Plateau or Village Overlook base camps back to statue 7 and then keep on moving downwards from there (using jumps and ropes) until you end up back at the Mountain Descent day camp close to statue 8, and then onwards to statue 9.
Screenshot A - Illumination 9/10
Since this statue is on higher ground than the river, don’t jump the broken bridge, but look to the left for the roped pole on the other side of the river (it is on the opposite bank of the stream from statue 8). Use an arrow-ropeline to get across the river and proceed up the ledge to the top. From there, jump onto the wooden beam in the picture, then jump towards the statue.
Screenshot B - Illumination 9/10
After lighting the bowl, get Lara down from the higher area and proceed to the left of the picture, eventually arriving back at the Village Plateau base camp.
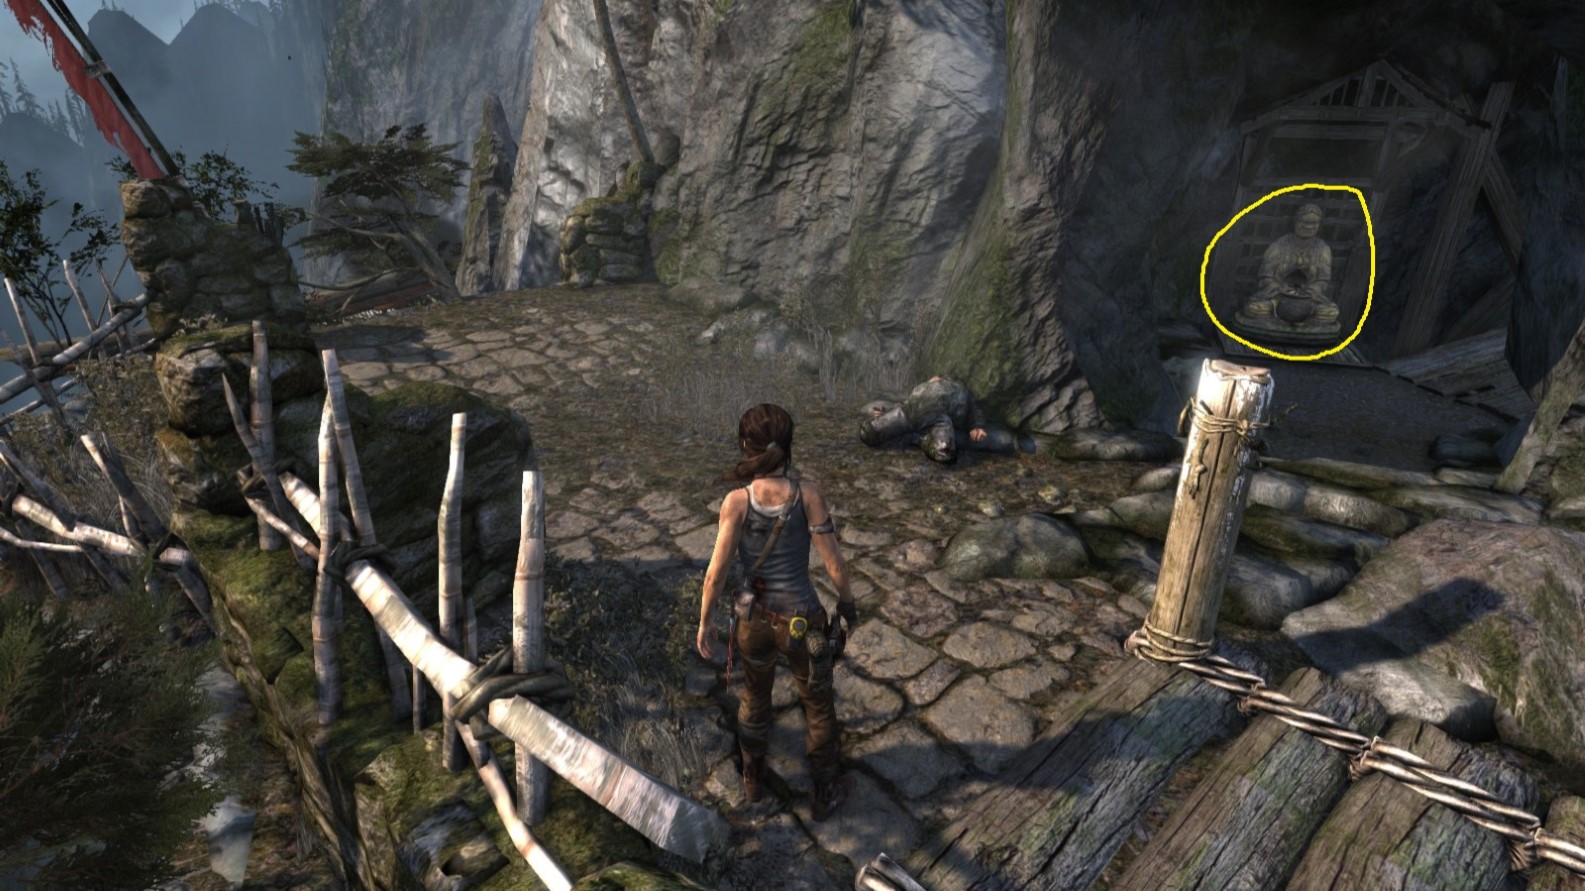
Illumination - Object 10
Area: Mountain Village
Closest Base Camp: Village Overlook / Village Plateau
Note: Initially accessible from the Village Overlook base camp, but after Lara finds the co-pilot, is captured and then escapes back to this area, it is more easily accessible from the Village Plateau base camp.
Find and light the bowl
Location on the Map
Screenshot A - Illumination 10/10
Lara is standing on the roof where Egg Poacher 5 is located. This higher-lying part of the level is not accessible at the start of the level, but a plane crash changes that later.
Screenshot B - Illumination 10/10

*** End of ILLUMINATION ***
Challenge 4: EGG POACHER

Egg Poacher - Object 1
Area: Mountain Village
Closest Base Camp: Village Plateau
Find and collect
Location on the Map
Screenshot A - Egg Poacher 1/5
Lara needs to get on top of the roof.
Screenshot B - Egg Poacher 1/5
View from the roof.
Egg Poacher - Object 2
Area: Mountain Village
Closest Base Camp: Village Plateau
Find and collect
Location on the Map
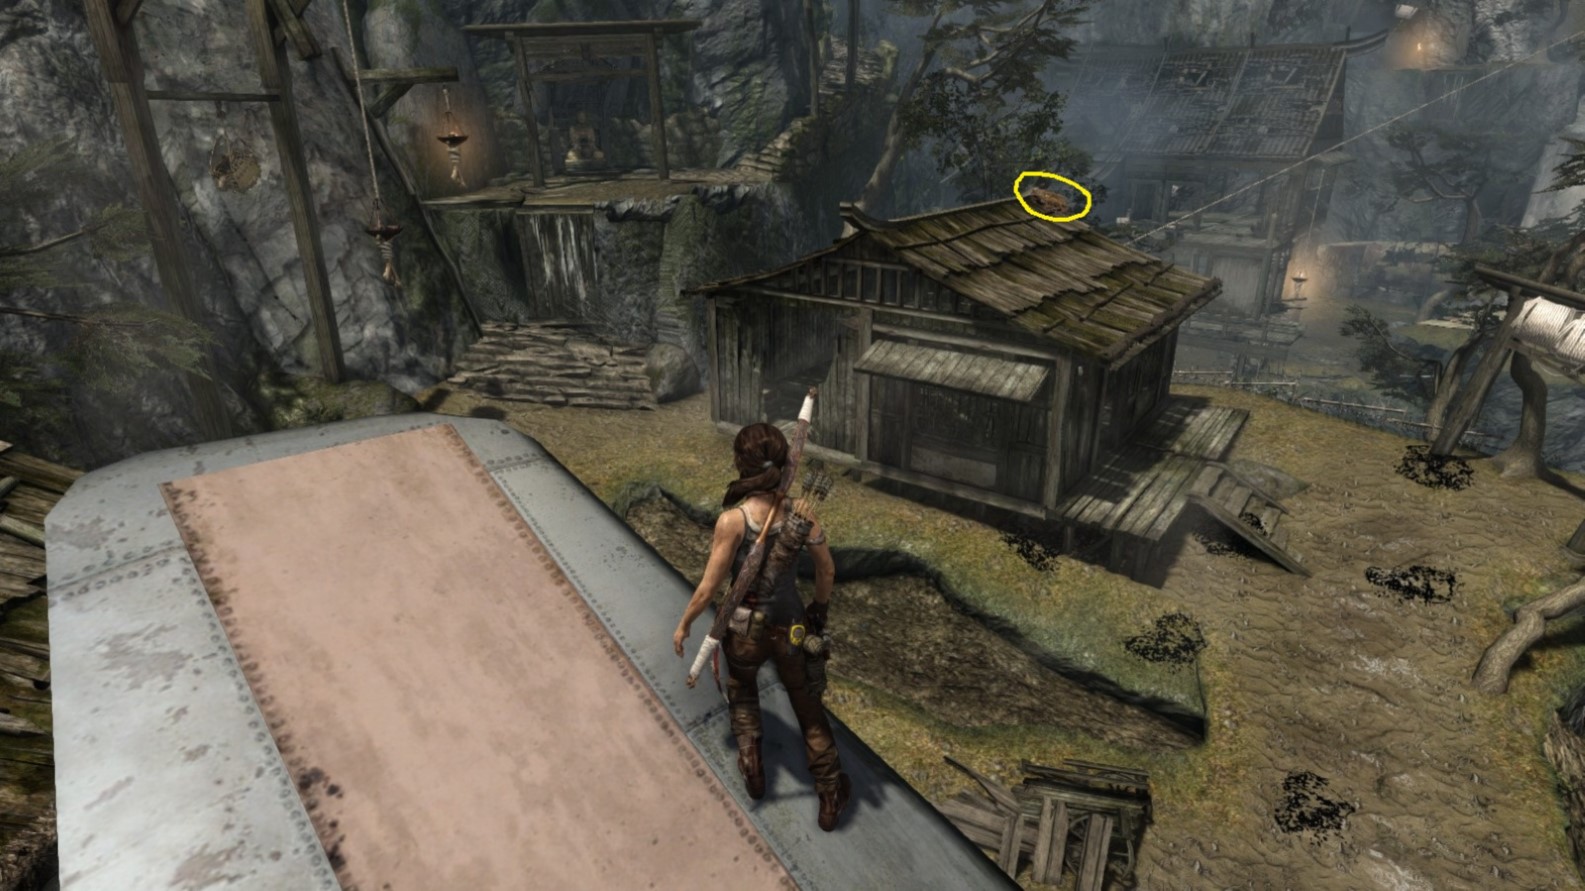
Screenshot A - Egg Poacher 2/5

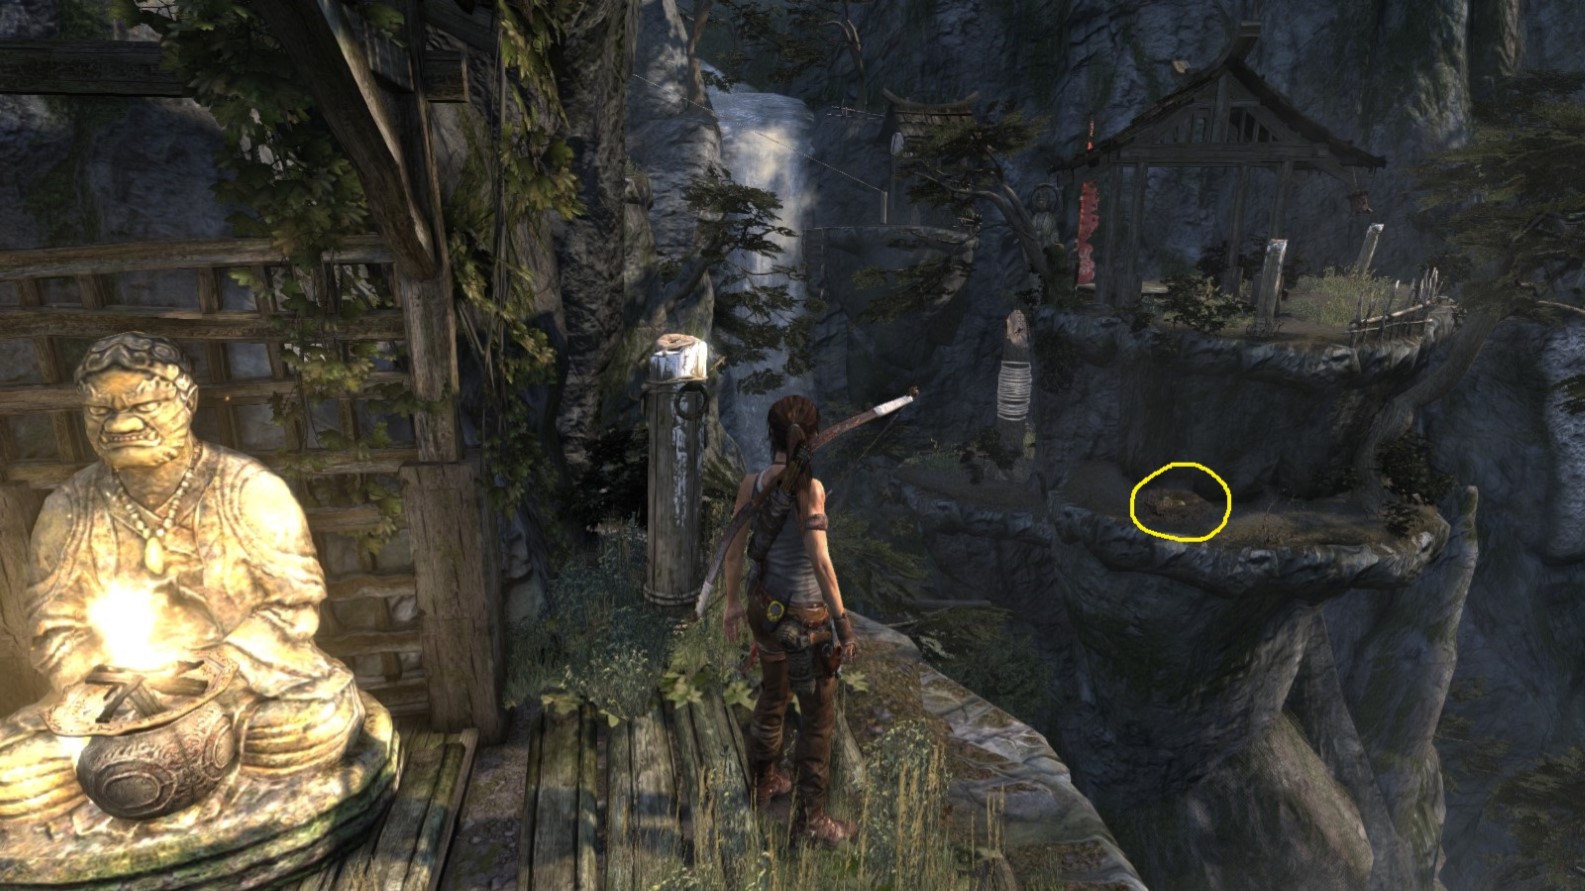
Also located on a roof. The statue from Illumination 2/10 can be seen to Lara’s right.
Screenshot B - Egg Poacher 2/5
View from the roof, taken when lightning struck.
Egg Poacher - Object 3
Area: Mountain Village
Closest Base Camp: Village Overlook
Find and collect
Note: Accessible after Lara's been to the radio tower
Location on the Map

Screenshot A - Egg Poacher 3/5
Nest 3/5 is located on a ledge underneath the building with statue 6/10, next to a waterfall.
Screenshot B - Egg Poacher 3/5
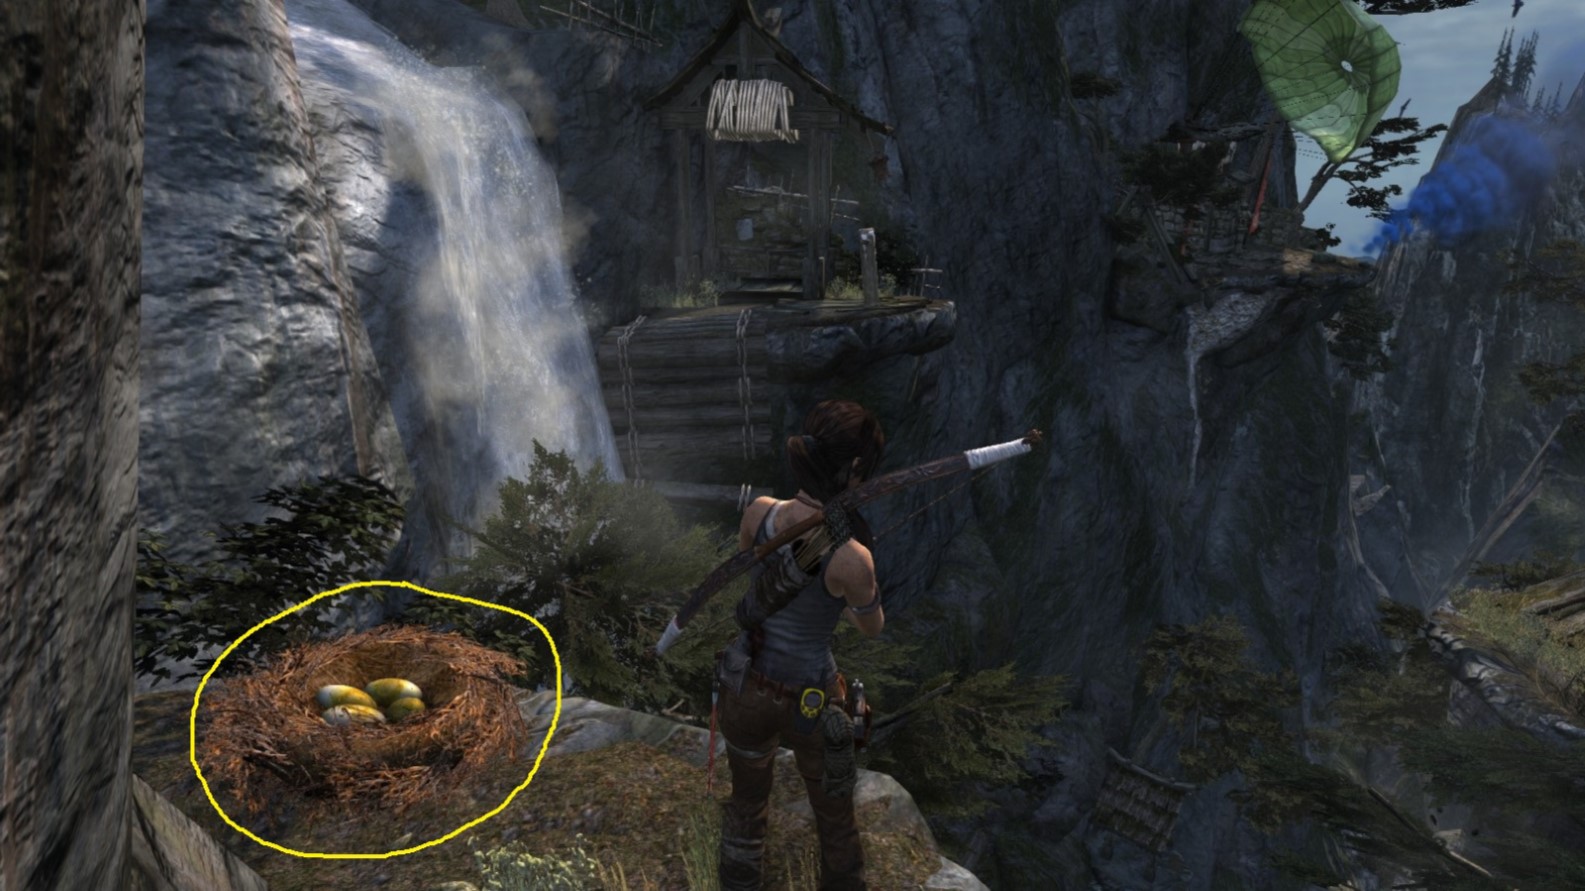
From the nest Lara looks towards the co-pilot’s blue smoke (top right-hand corner).
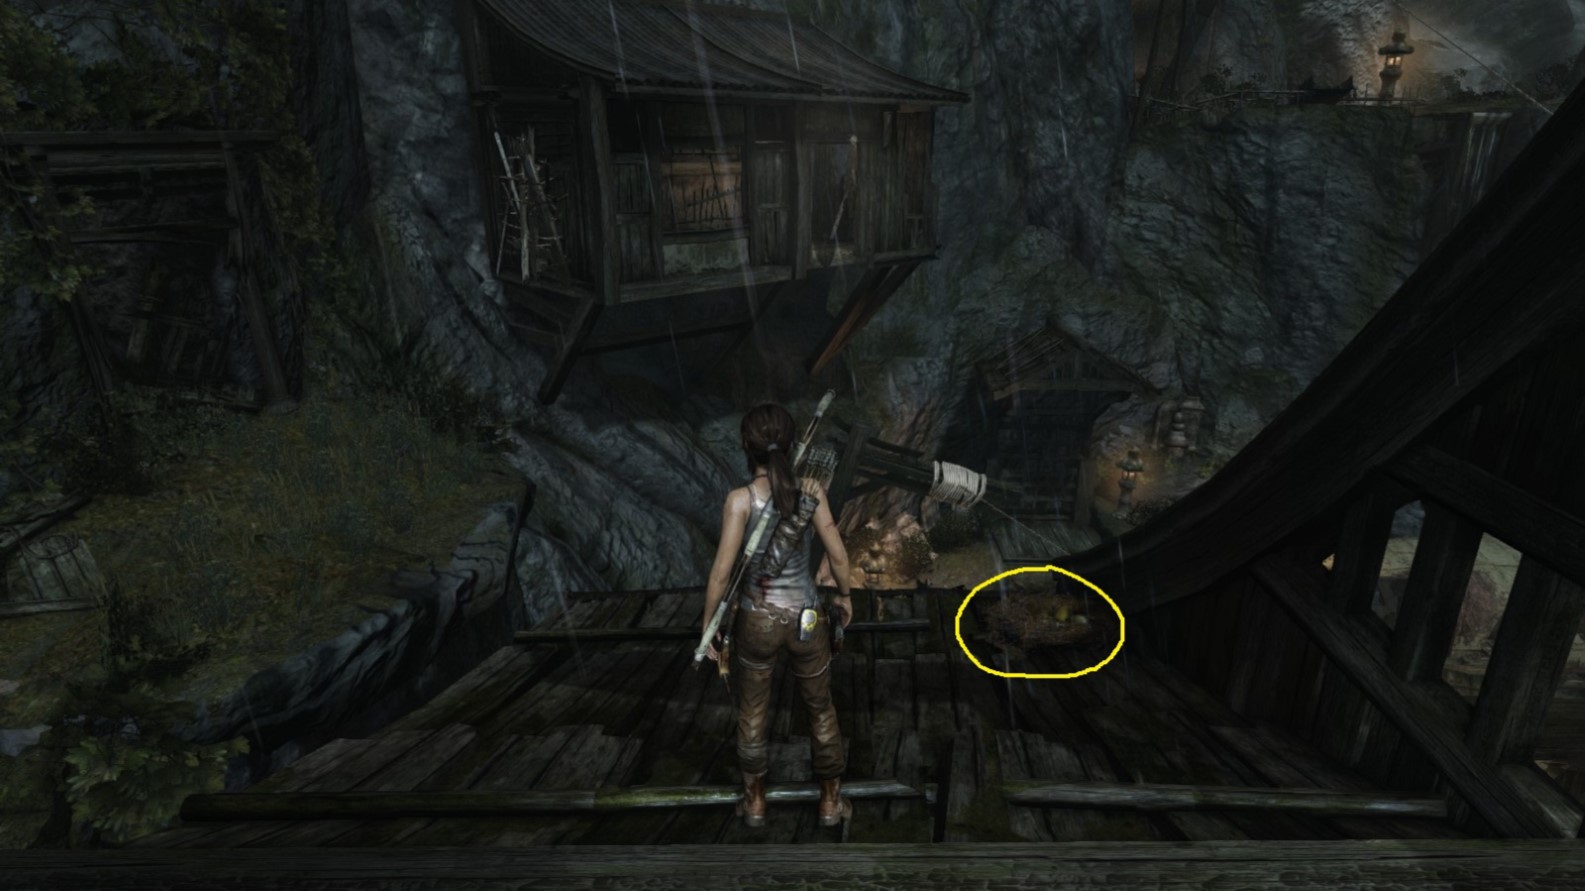
Egg Poacher - Object 4
Area: Mountain Village
Closest Base Camp: Village Overlook
Find and collect
Note: Accessible after Lara's been to the radio tower
Location on the Map
Screenshot A - Egg Poacher 4/5
Standing next to statue 7/10, the nest is visible (circled with yellow).
Screenshot B - Egg Poacher 4/5
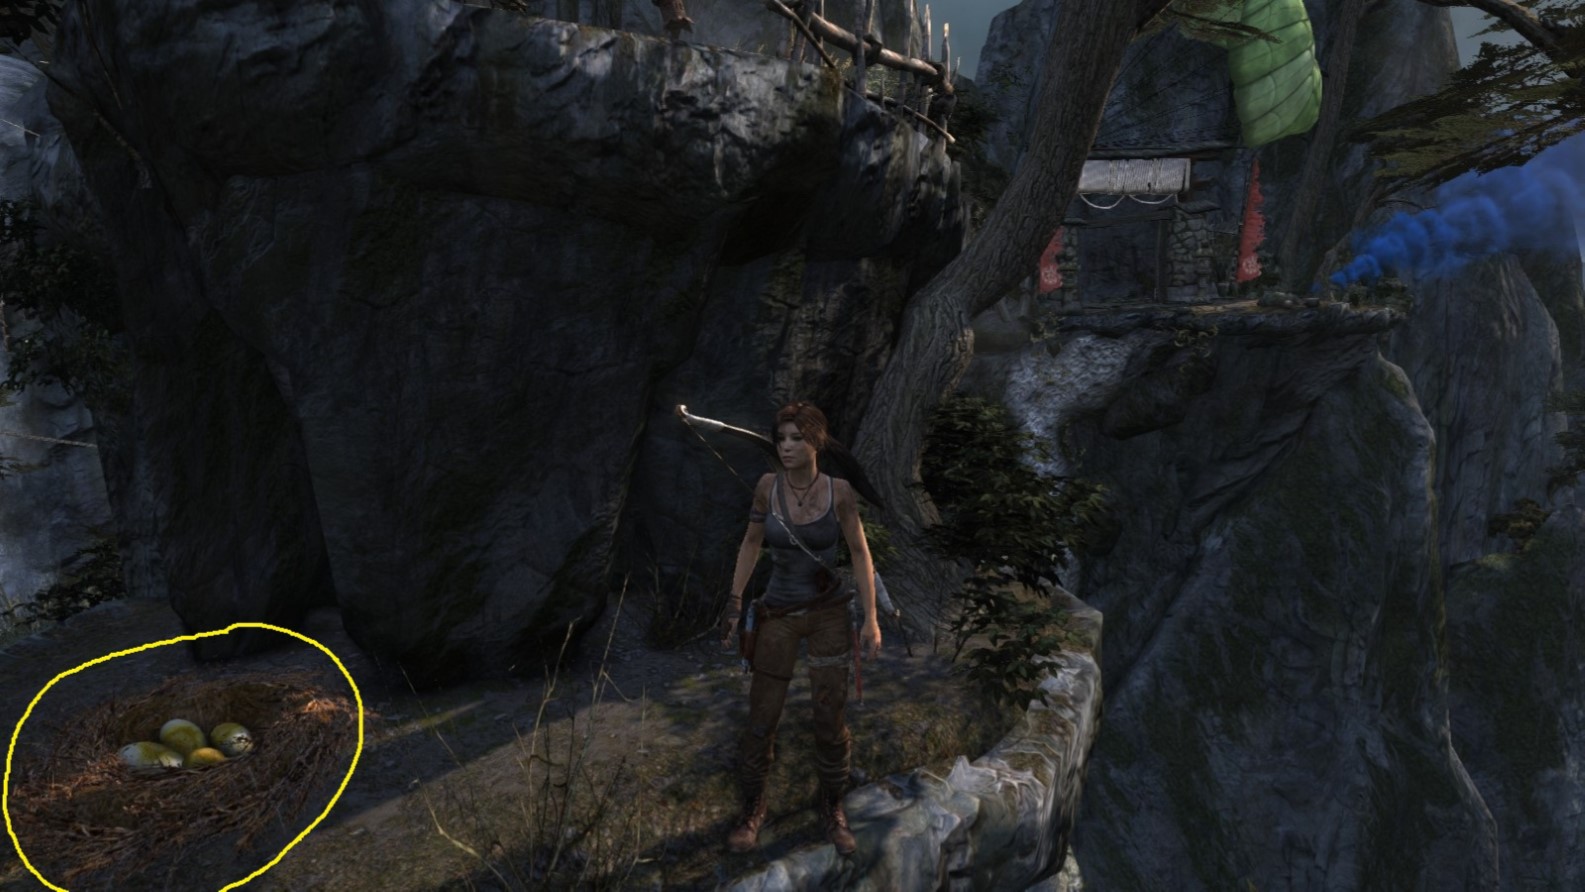
A view of the nest with the co-pilot’s blue smoke visible at the right.
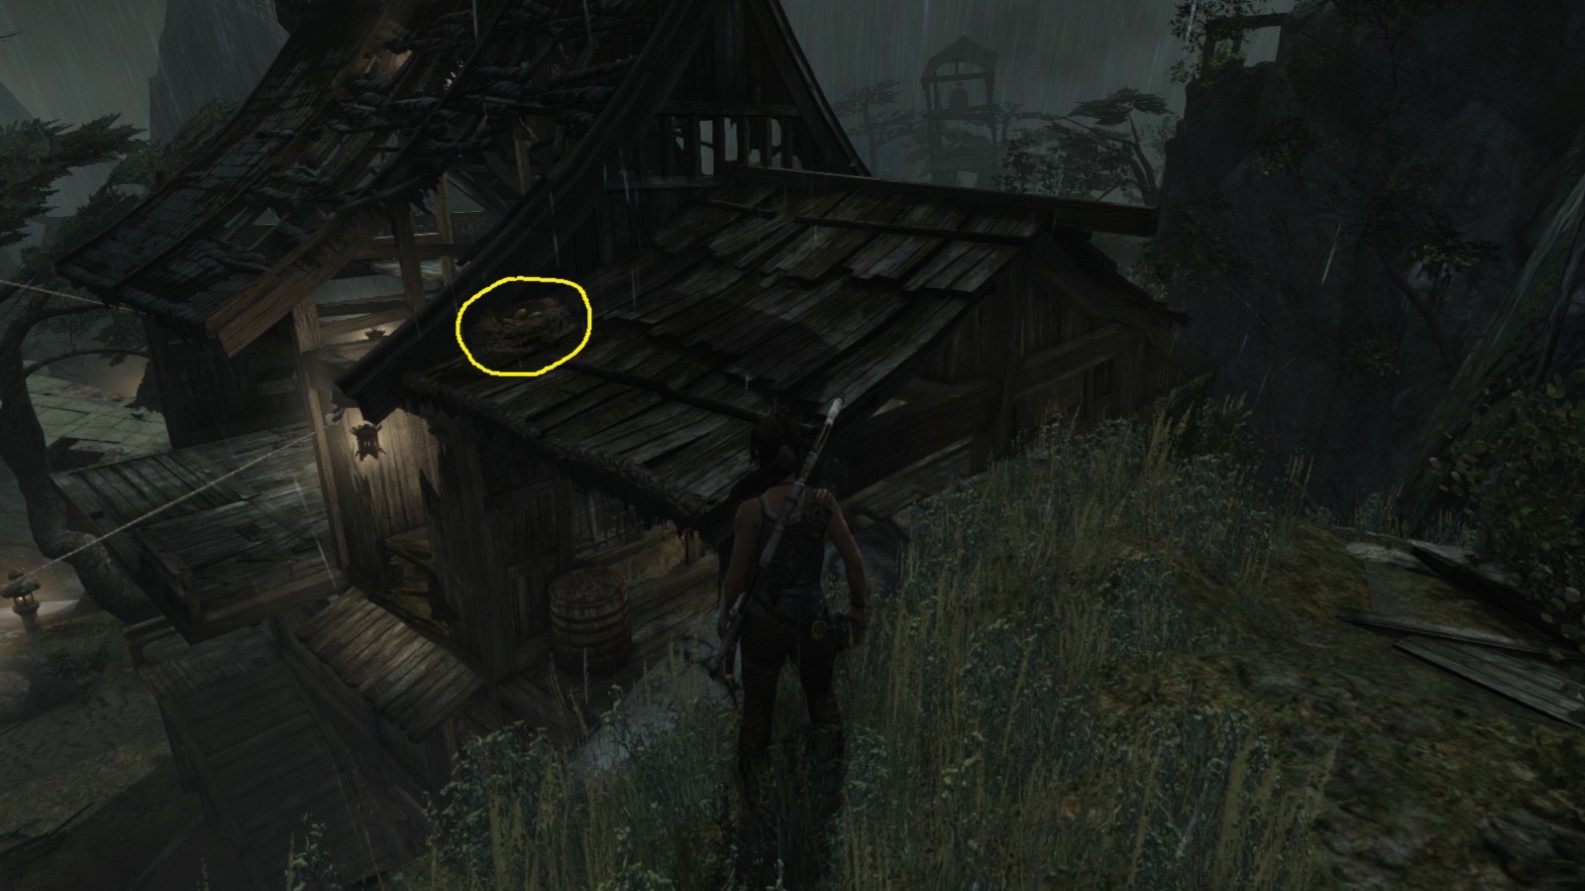
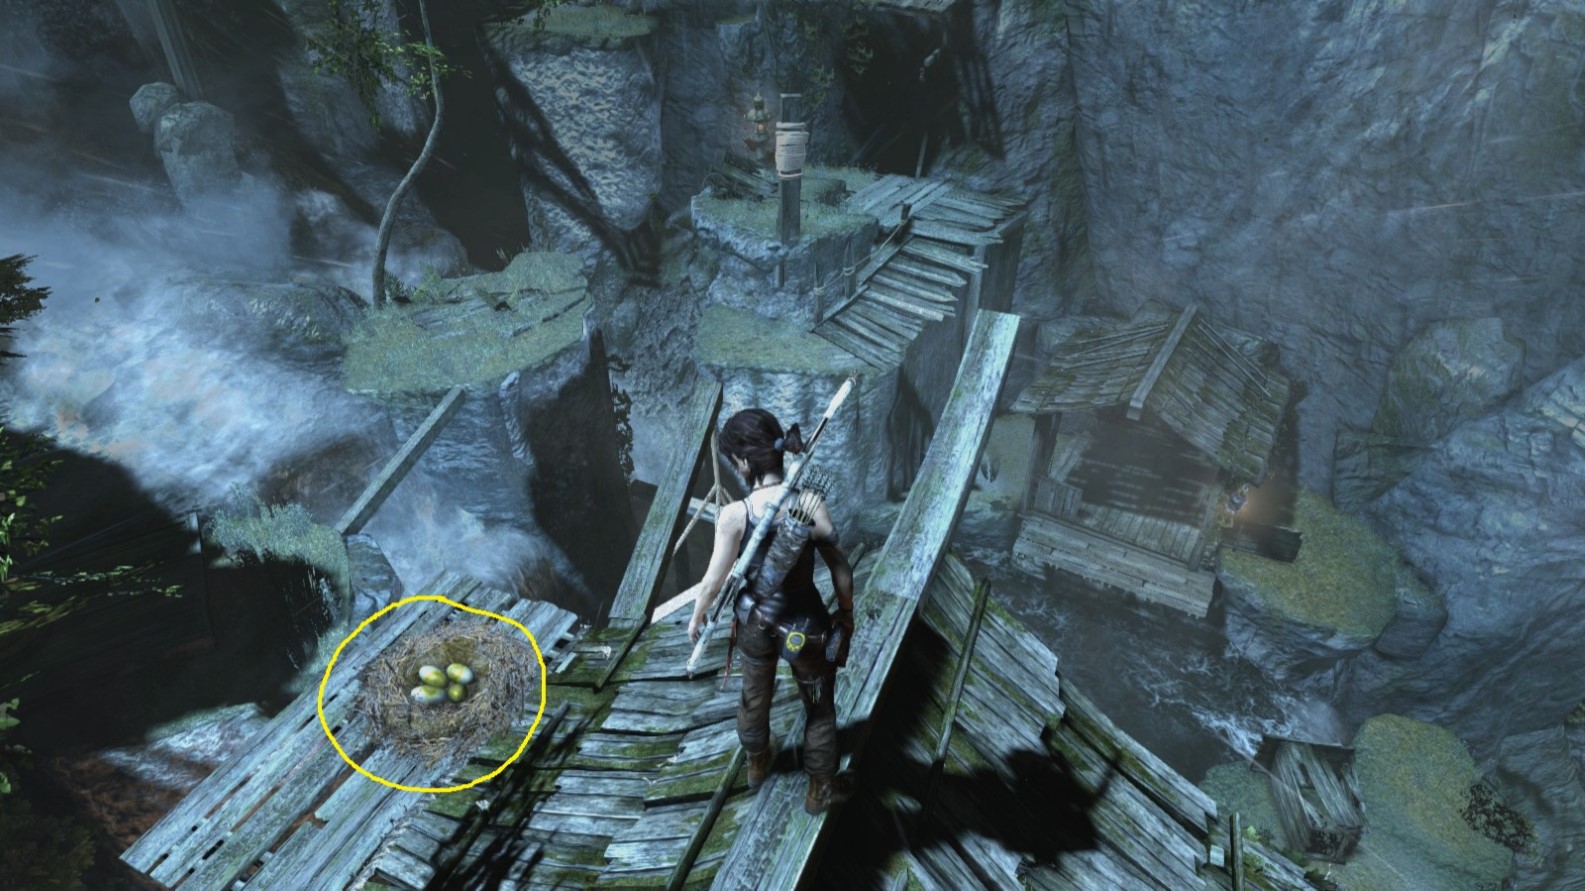
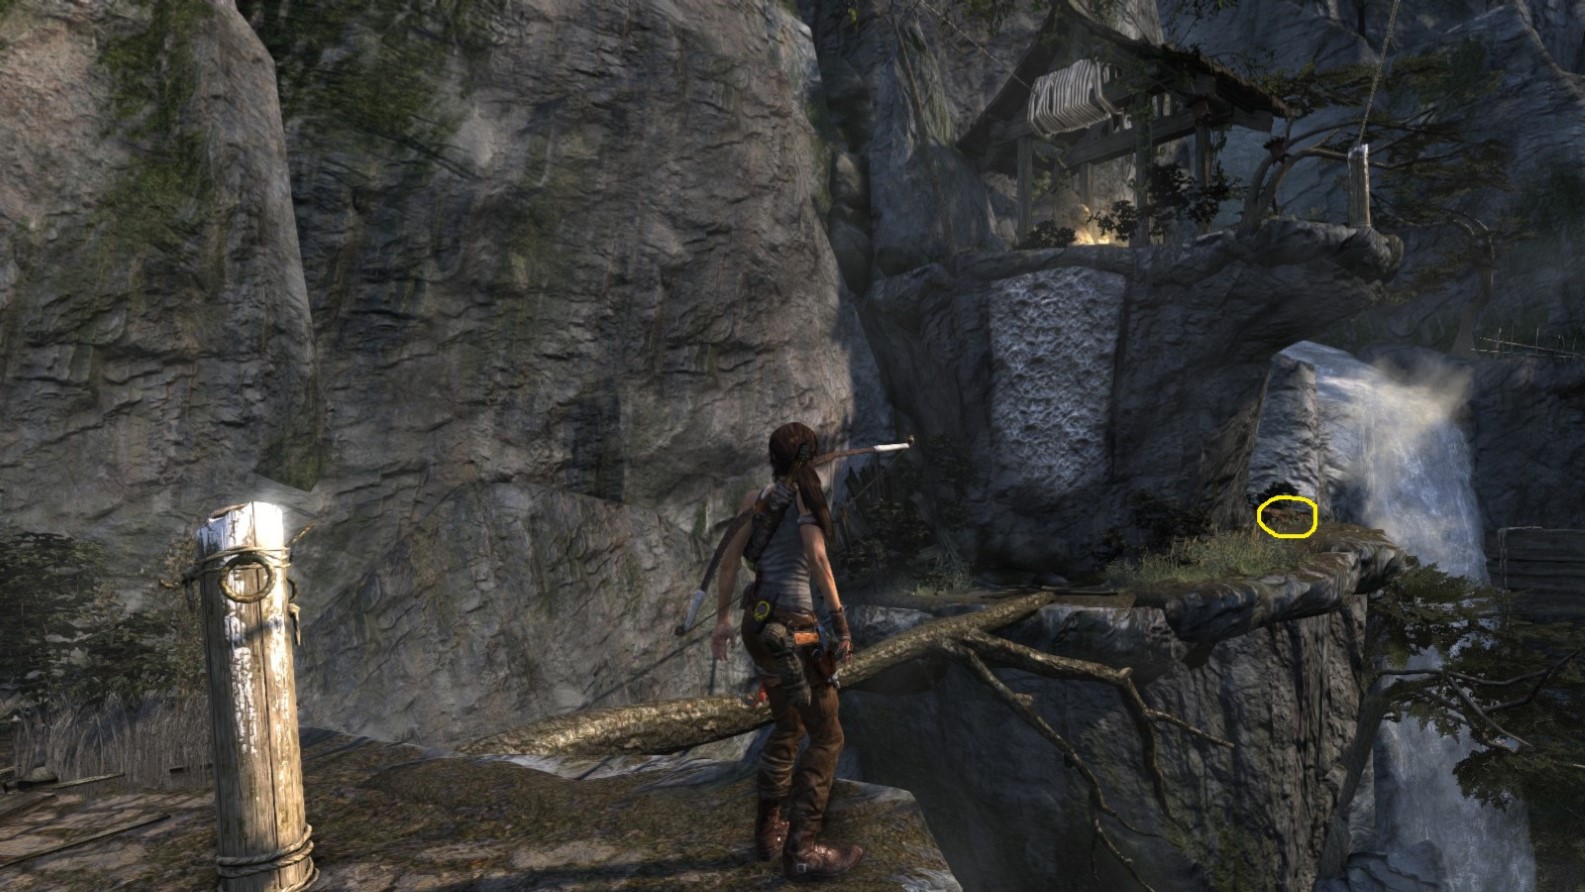
Egg Poacher - Object 5
Area: Mountain Village
Closest Base Camp: Village Overlook / Village Plateau
Note: Initially accessible from the Village Overlook base camp, but after Lara finds the co-pilot, is captured and then escapes back to this area, it is more easily accessible from the Village Plateau base camp.
Location on the Map

Screenshot A - Egg Poacher 5/5
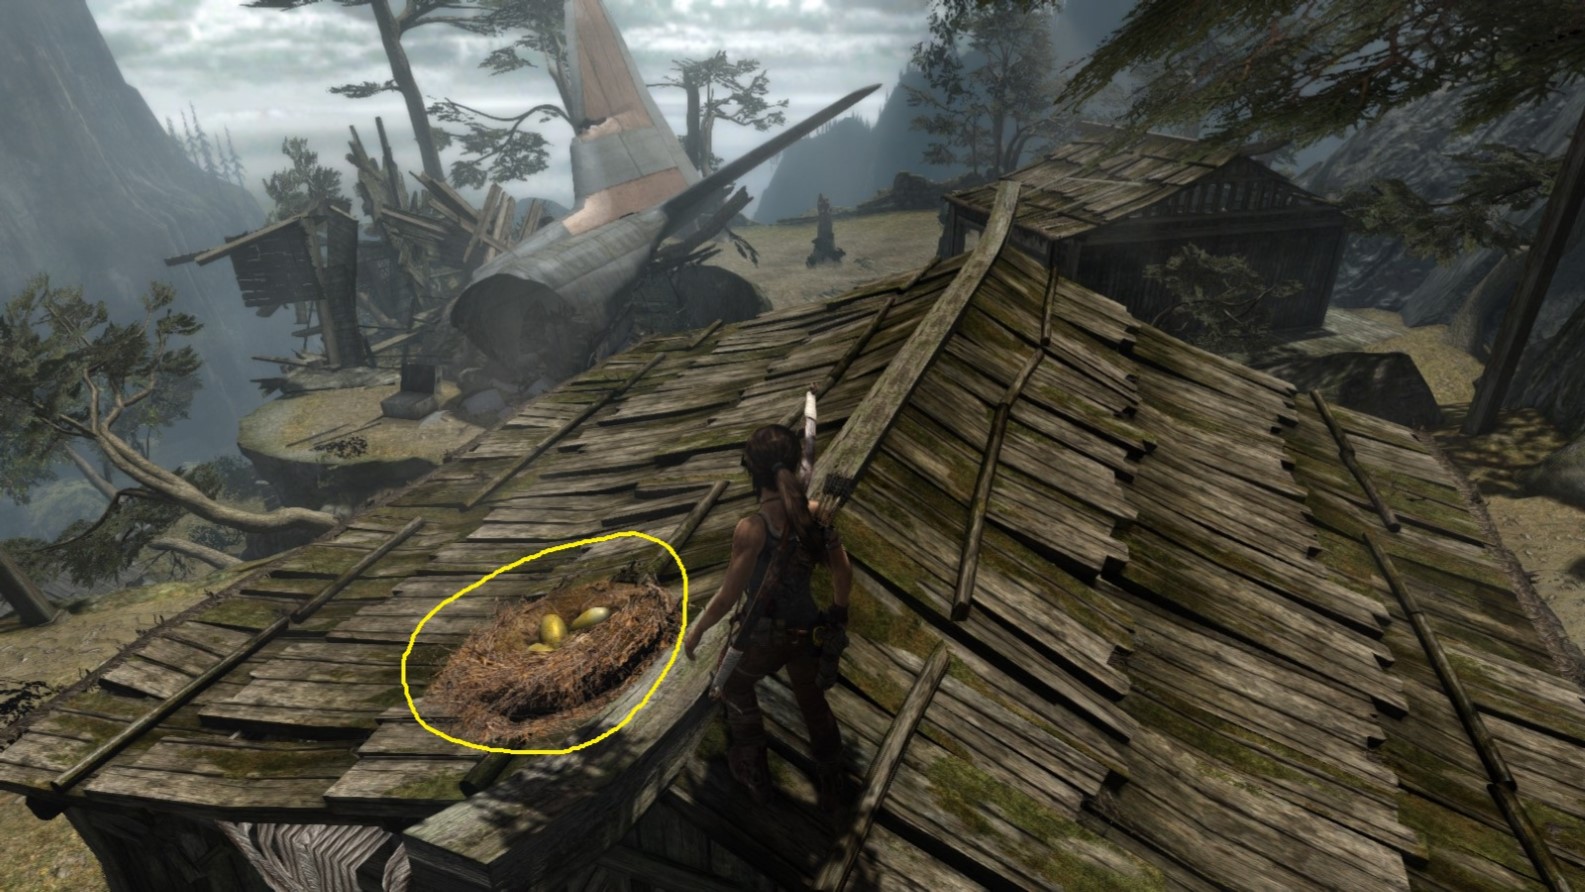
Located on the roof. This corner of Mountain Village was previously inaccessible, but then made accessible by the downing of another aircraft (tailpiece on the ground beyond the building).
Screenshot B - Egg Poacher 5/5
Lara stands on the tail of the destroyed aircraft.
*** End of EGG POACHER ***
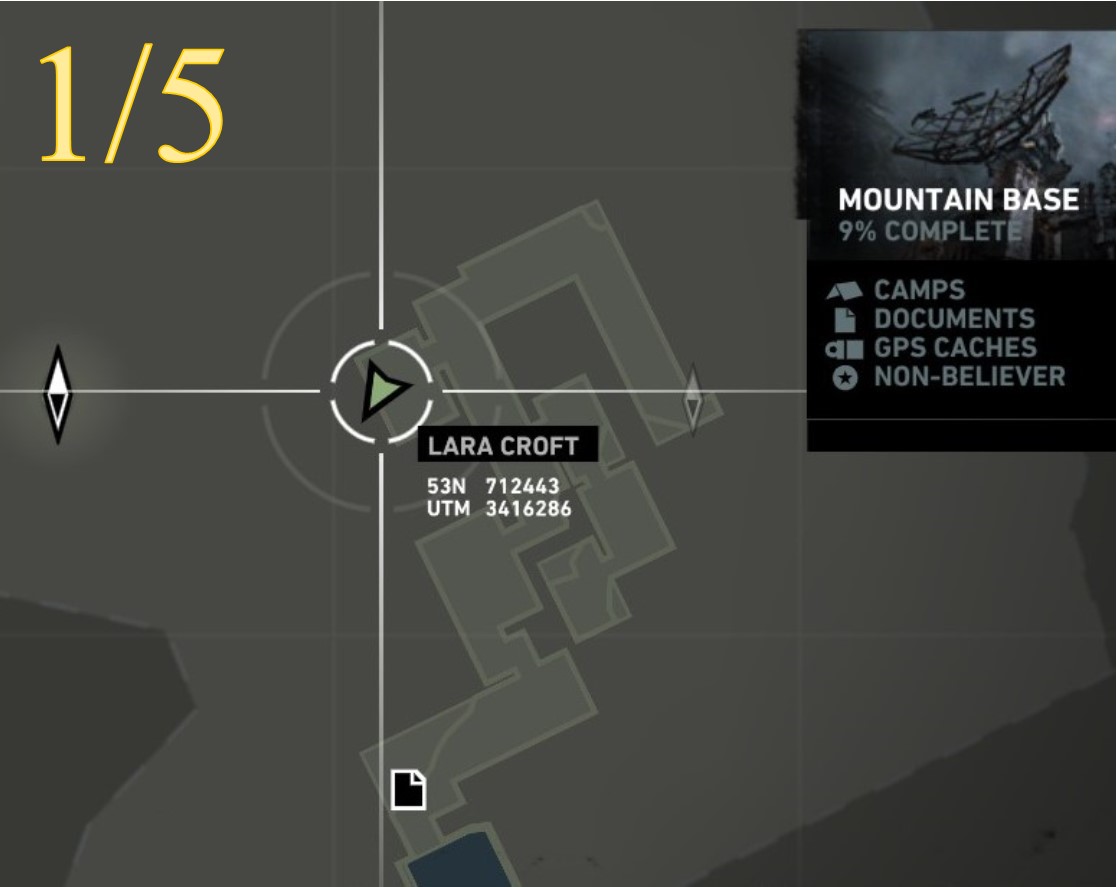
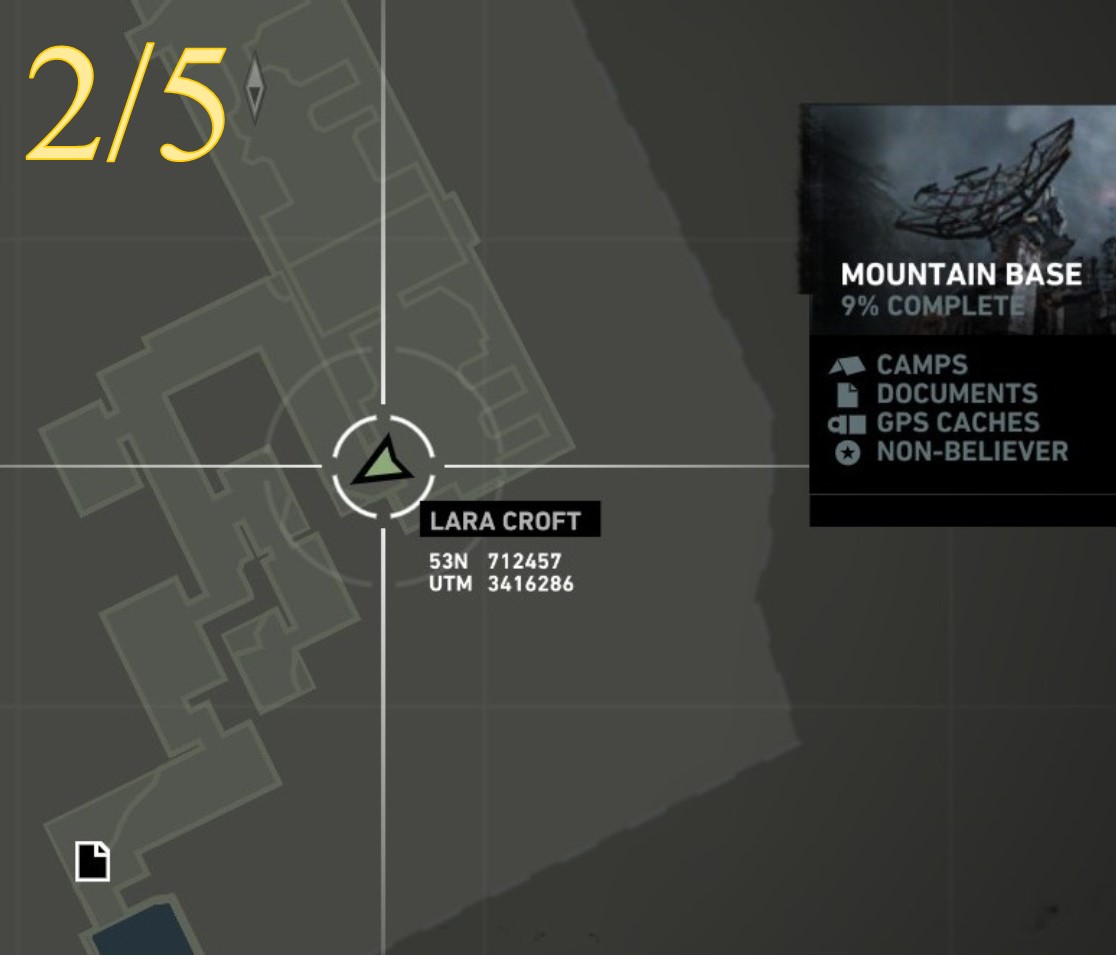
Challenge 5: NON-BELIEVER
Non-Believer - Object 1
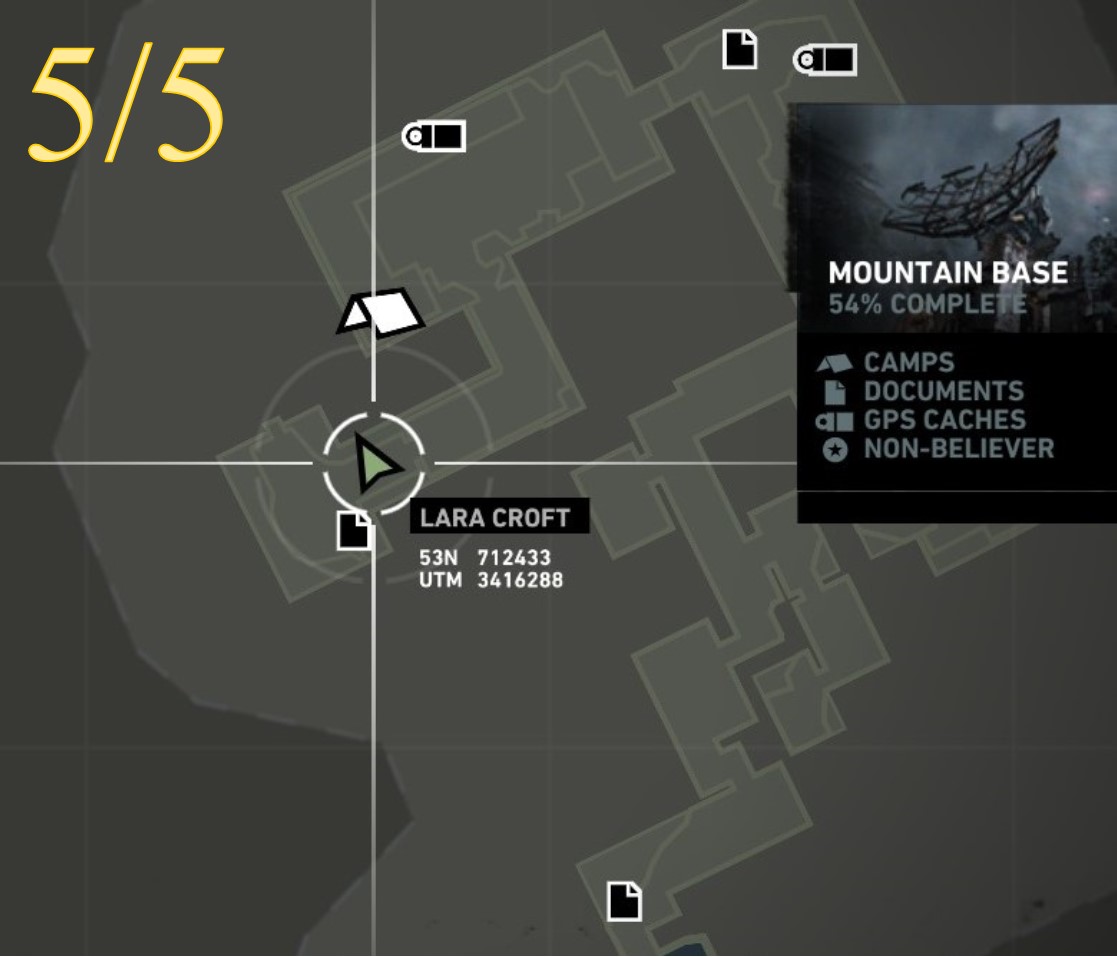
Area: Mountain Base
Closest Base Camp: Map Room
Find and destroy (burn)
Location on the Map
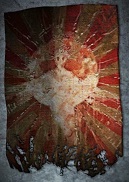
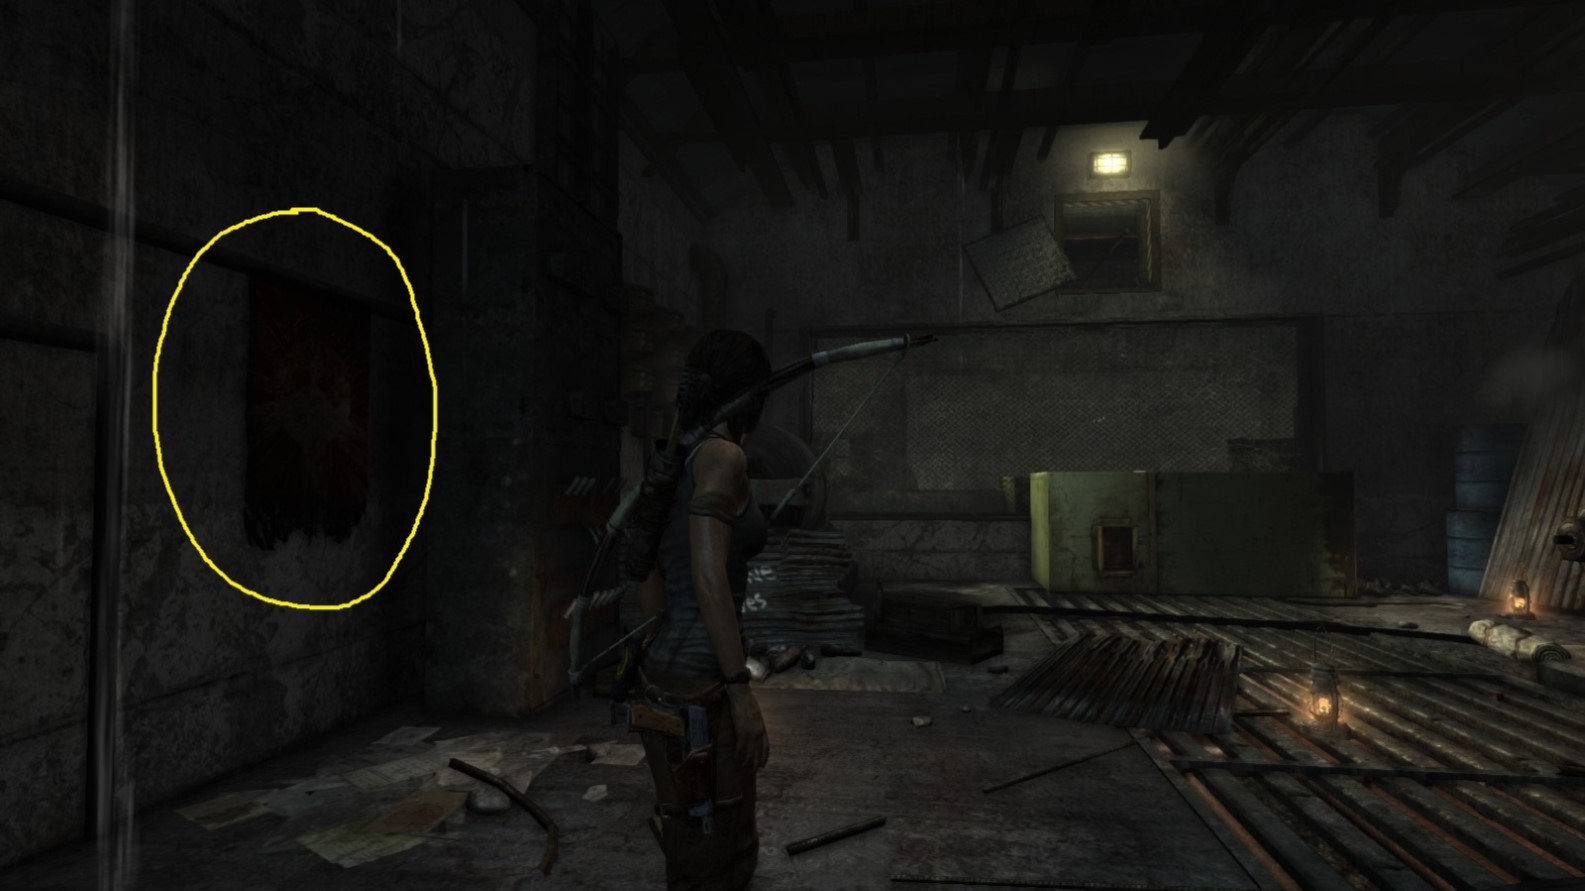
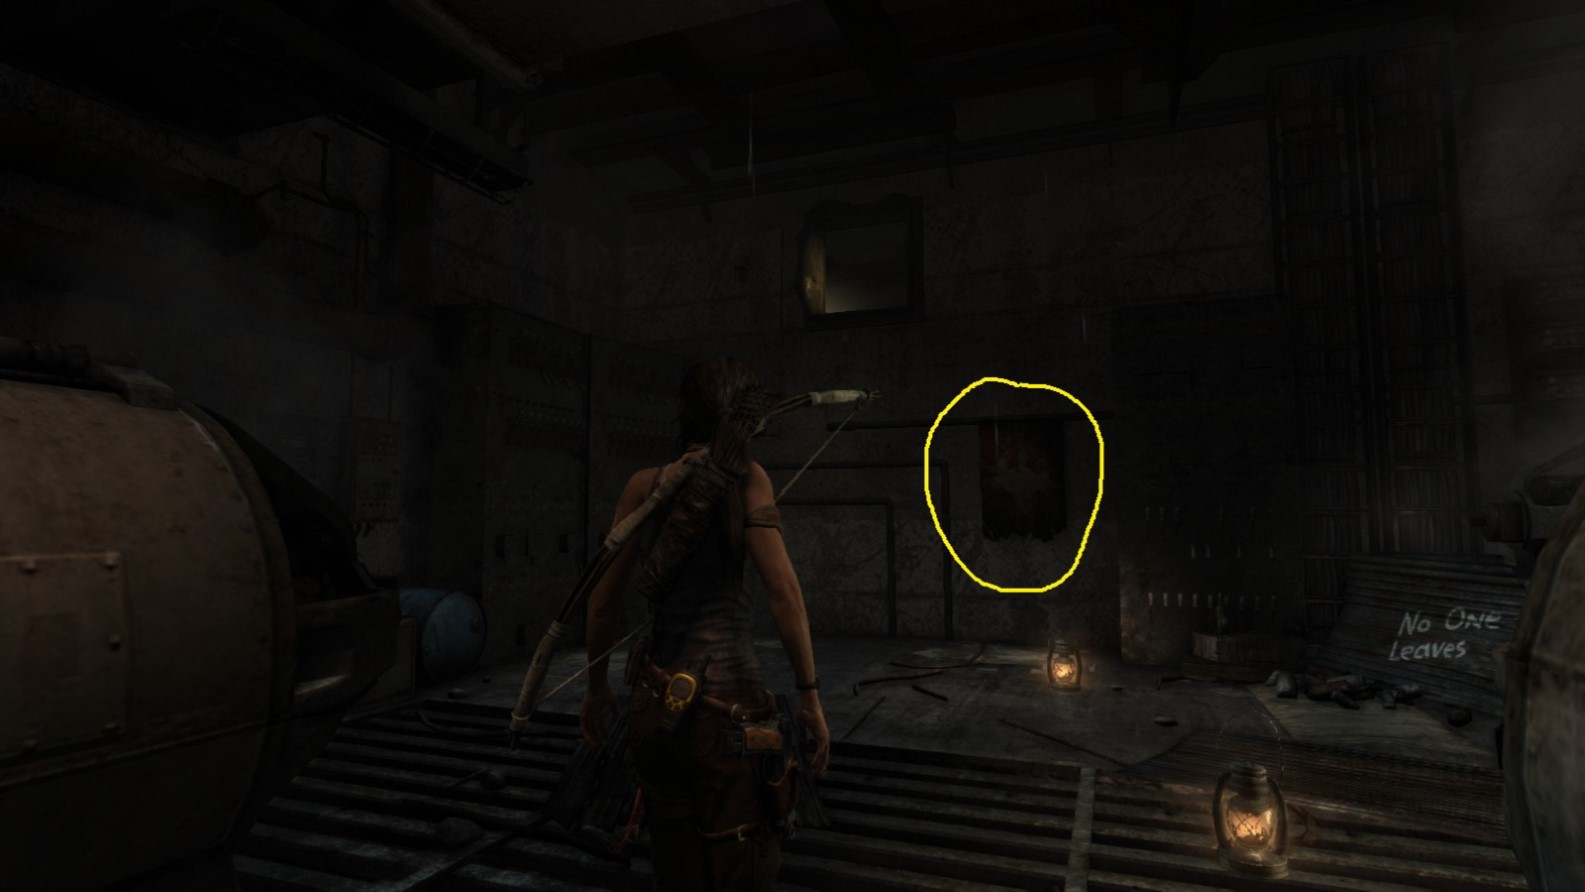
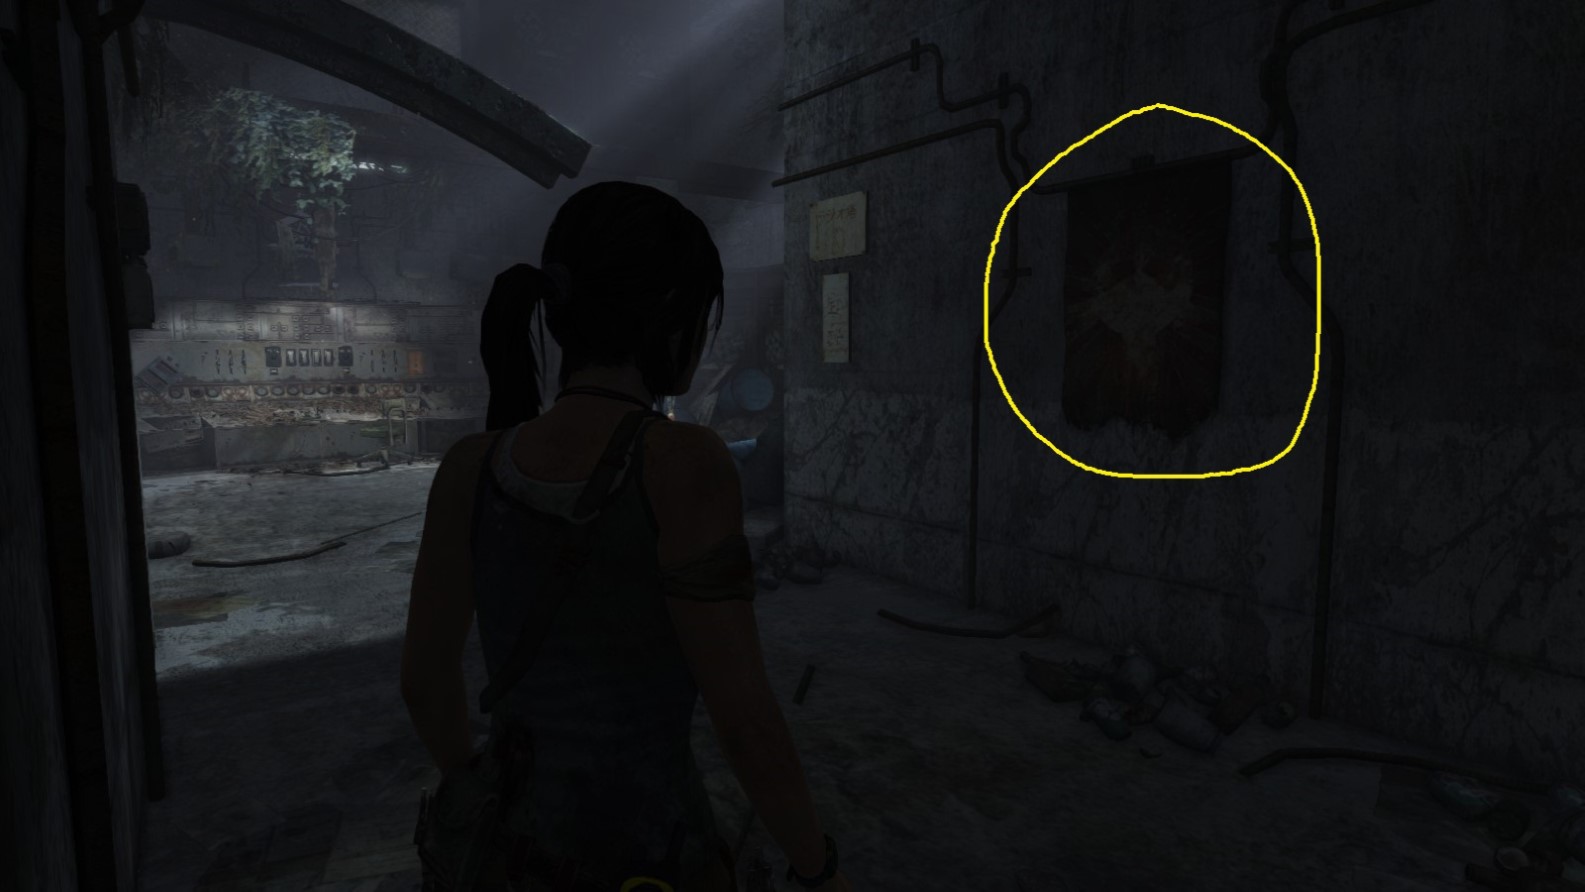
Screenshot A - Non-Believer 1/5
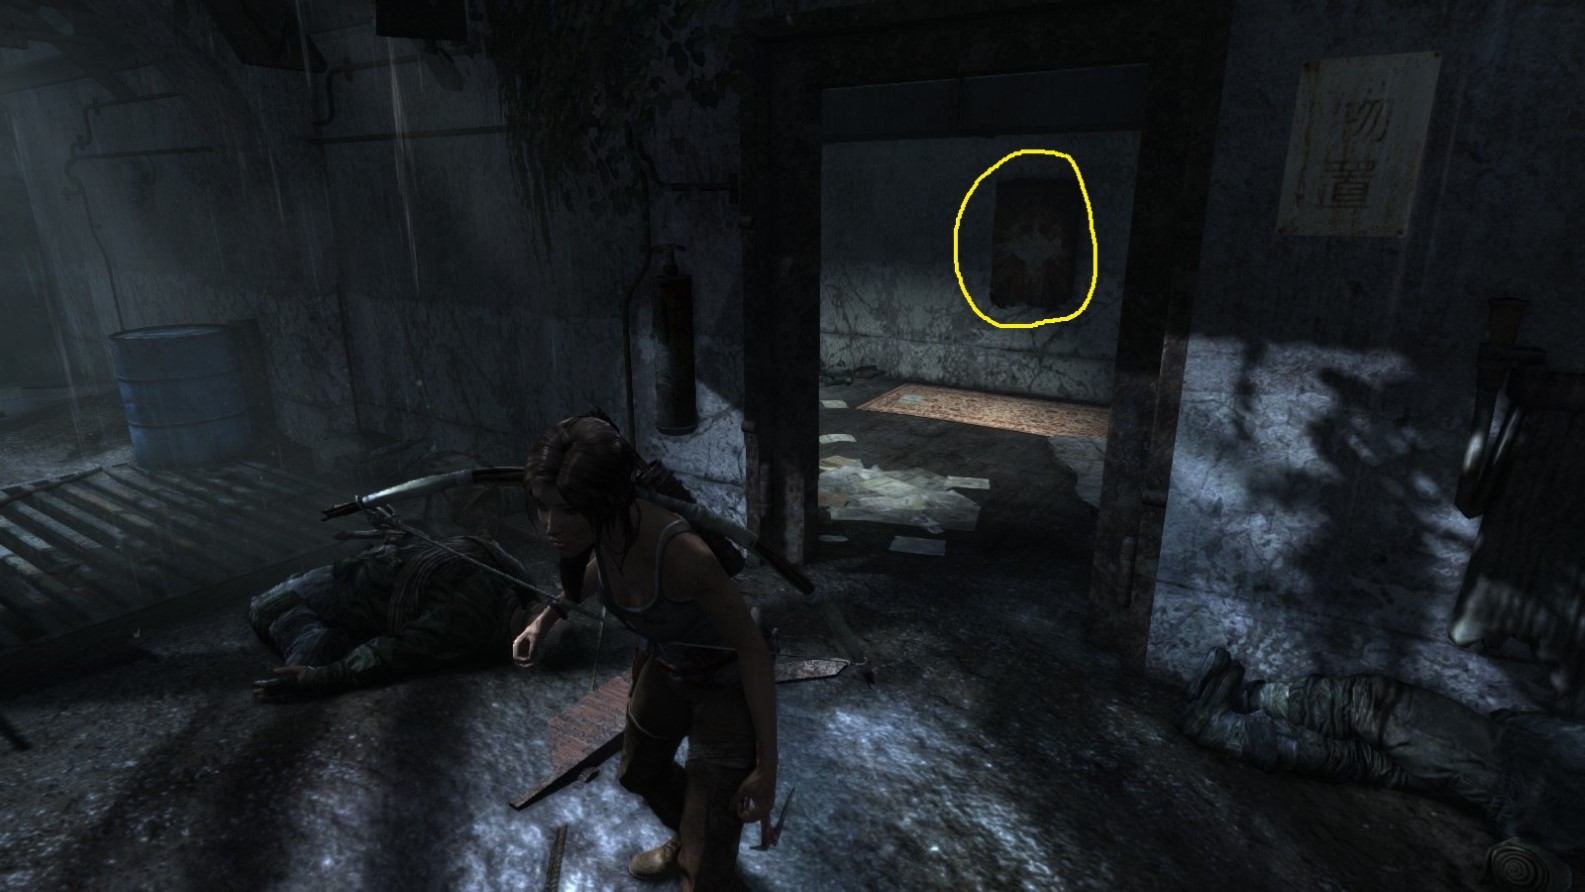
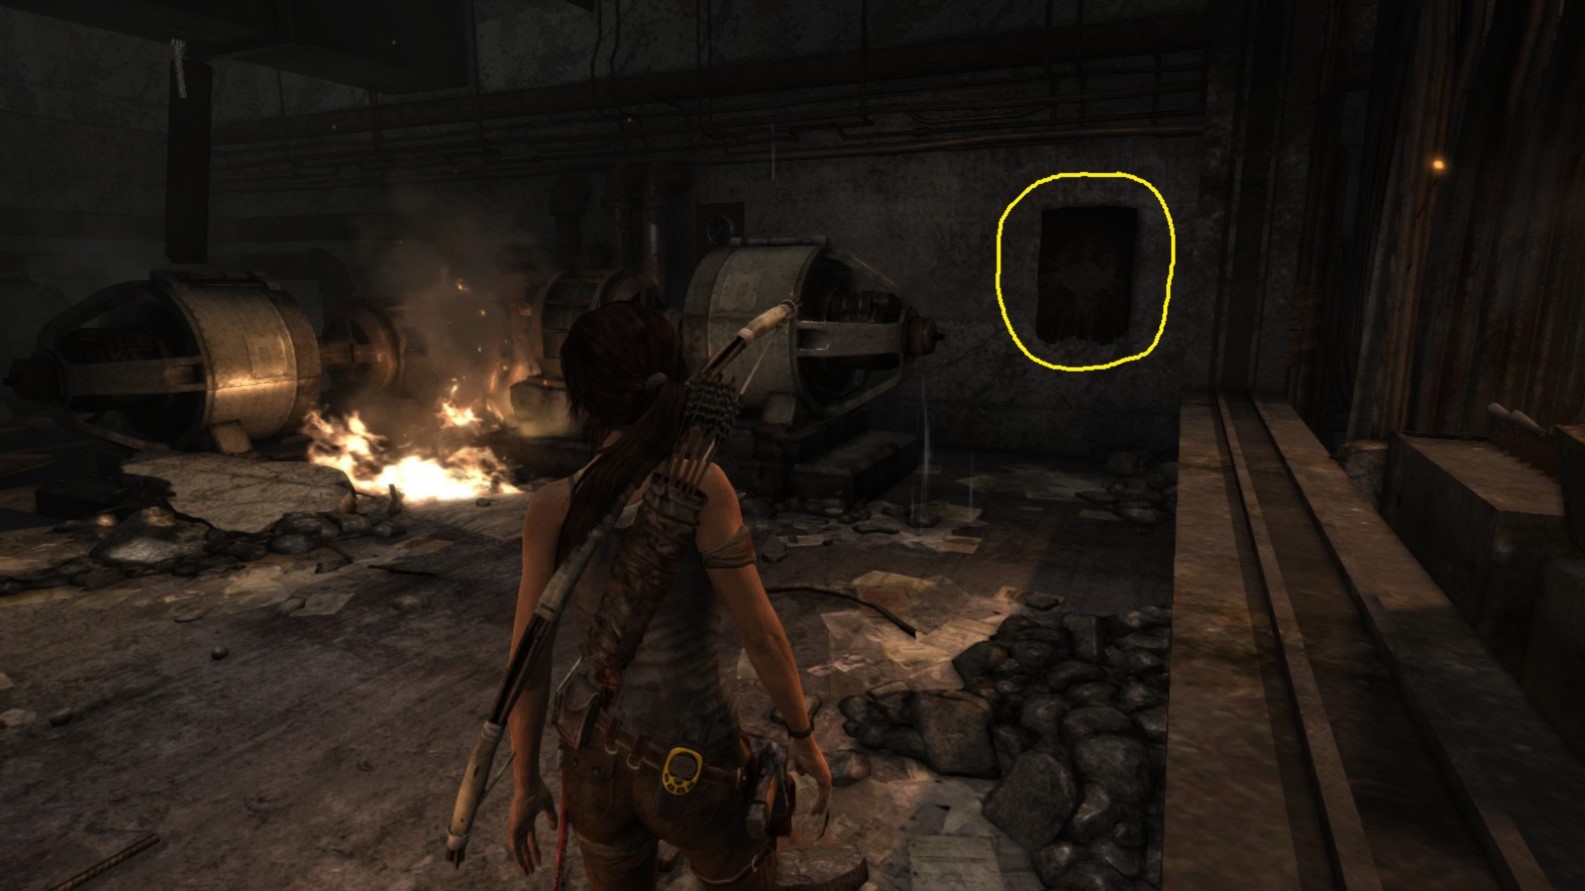
Located on the wall of a small room just before Lara climbs some stairs.
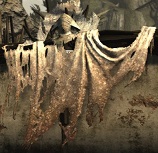
Screenshot B - Non-Believer 1/5
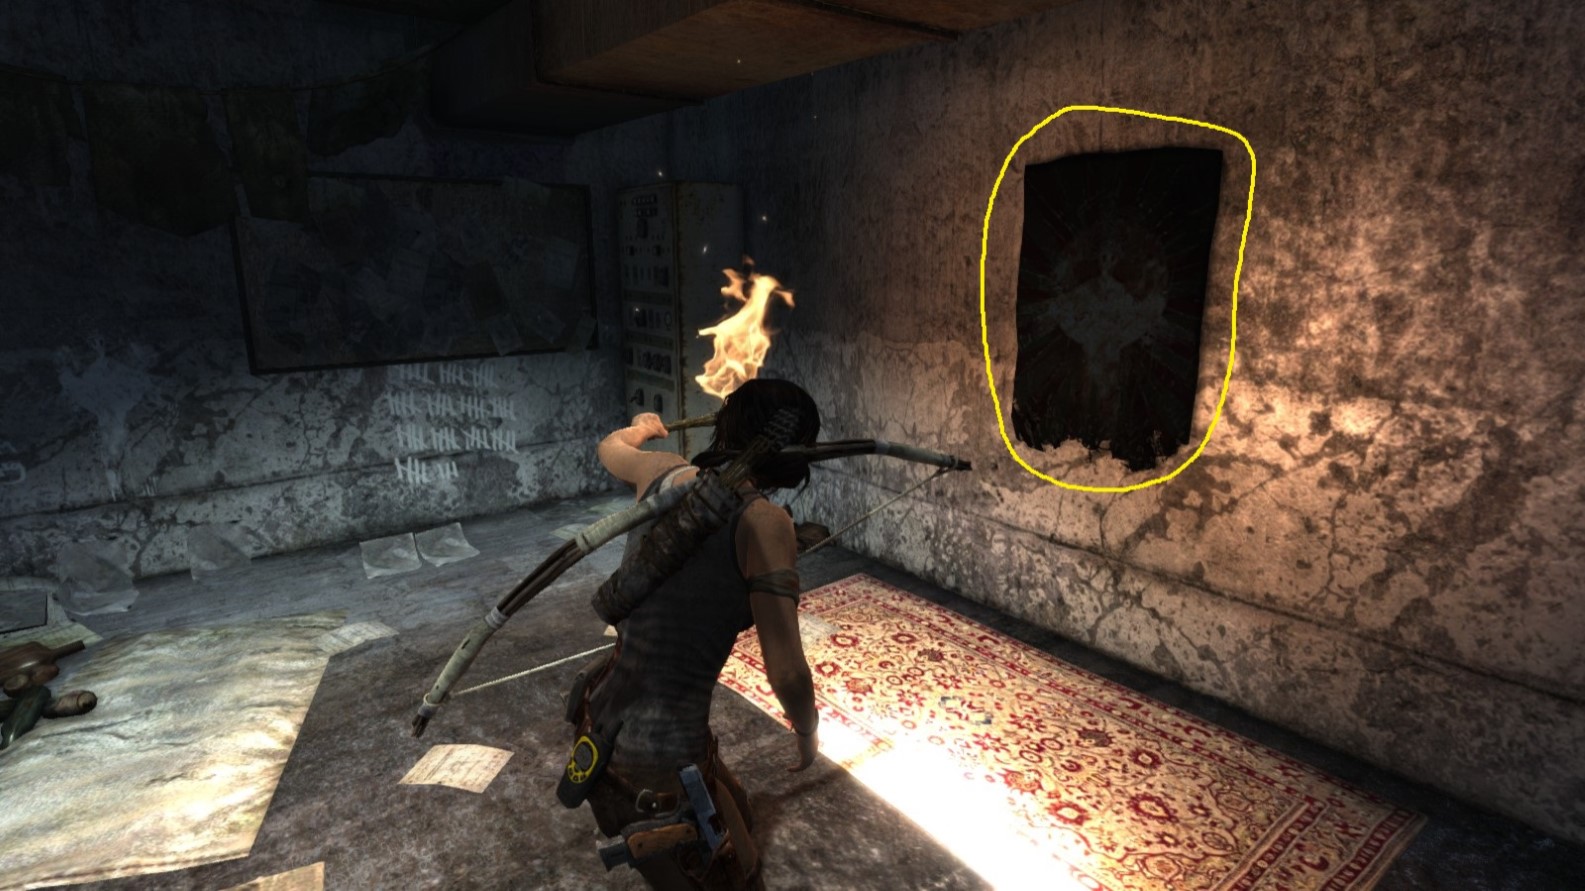
A close-up view of the banner.
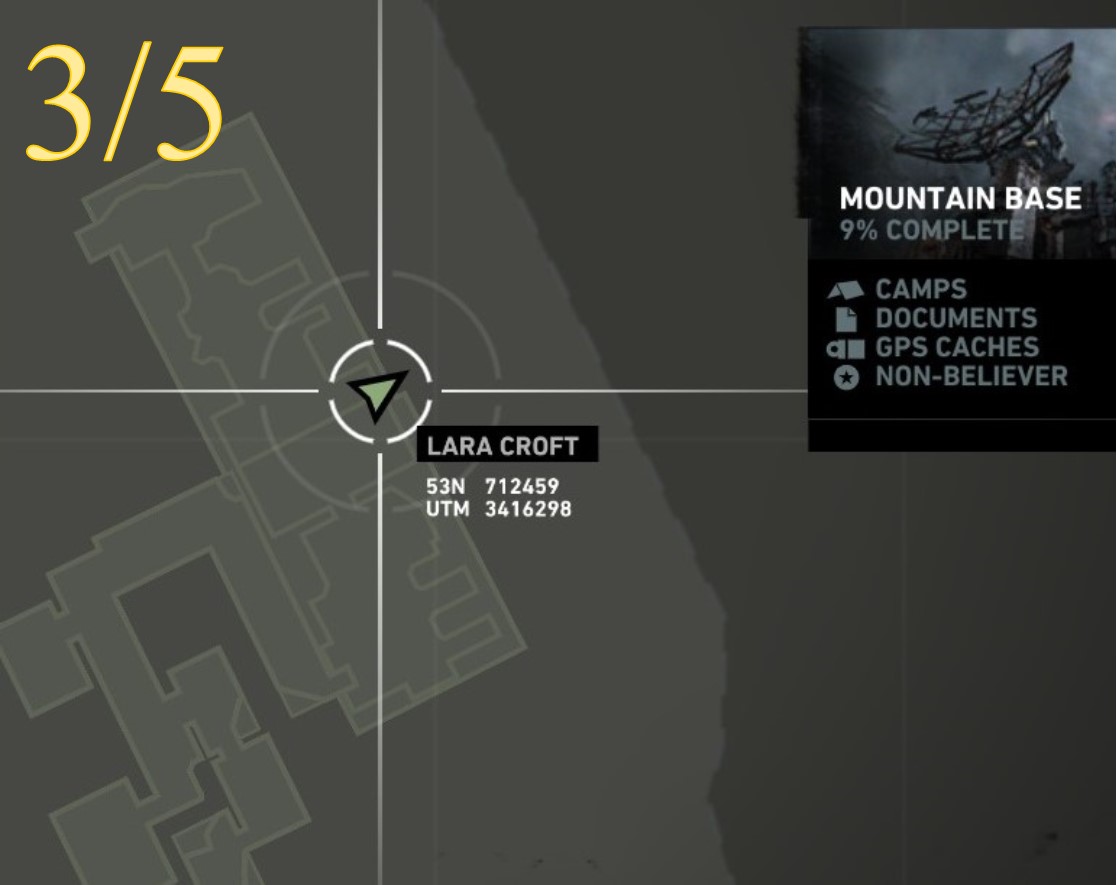
Non-Believer - Object 2
Area: Mountain Base
Closest Base Camp: Map Room
Find and destroy (burn)
Location on the Map
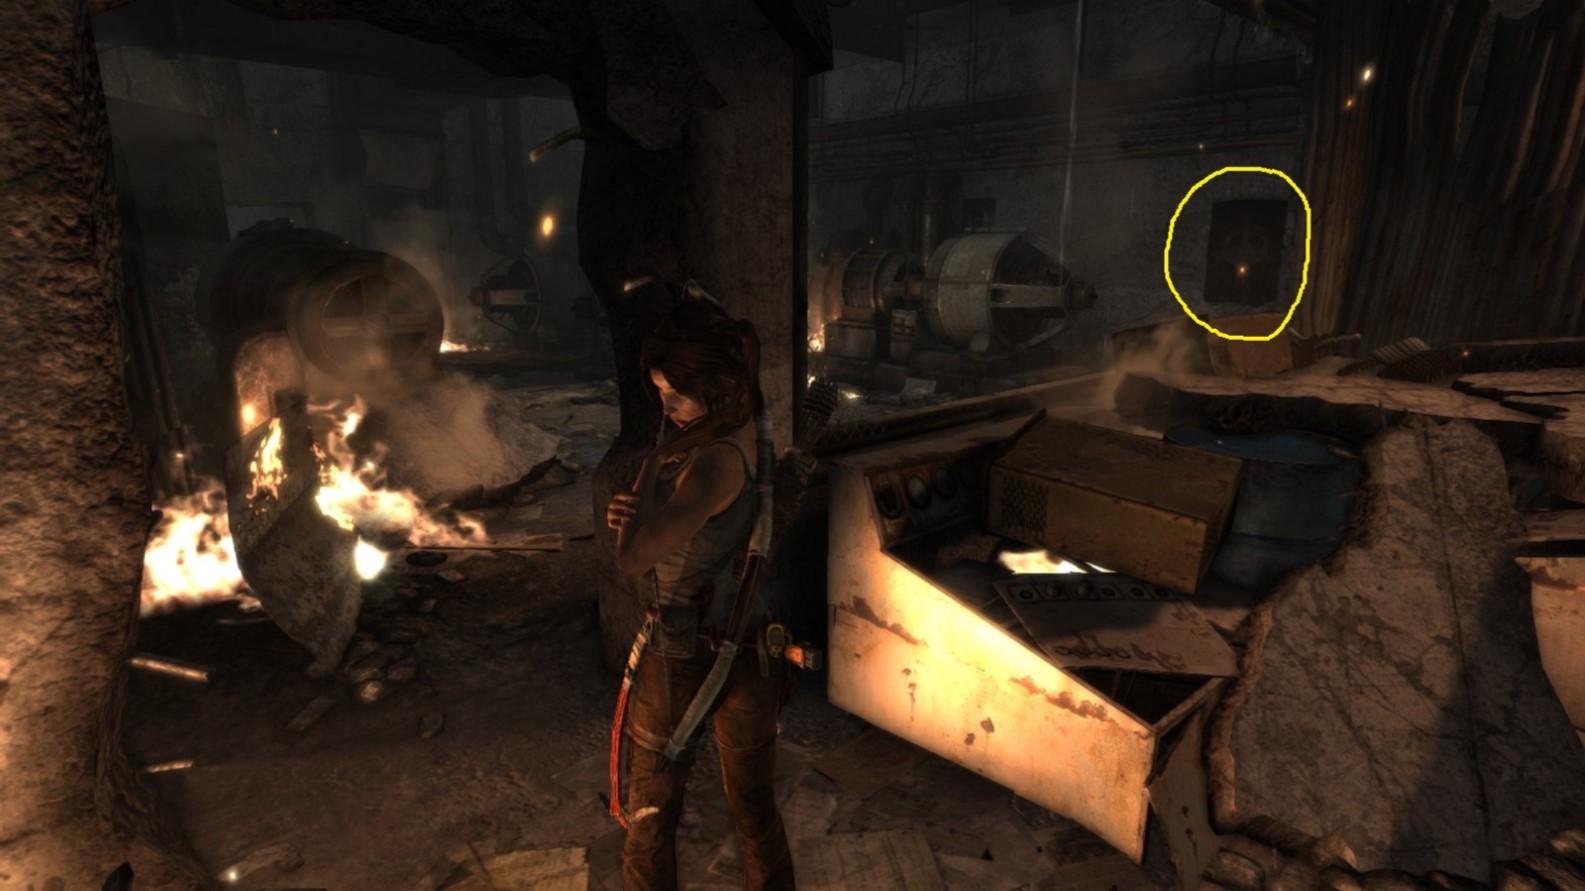
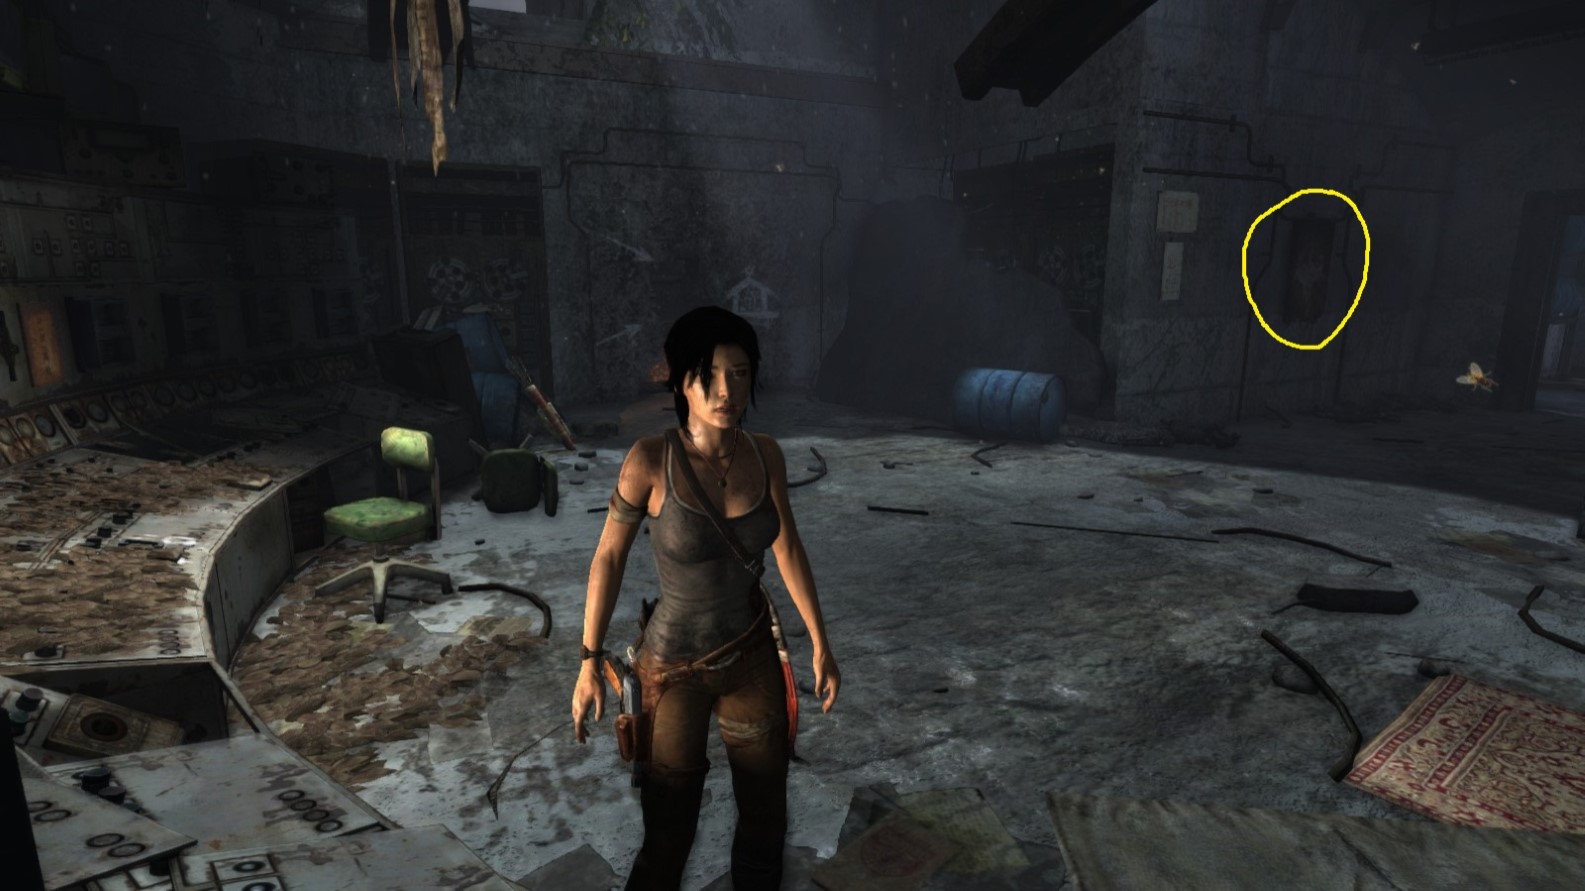
Screenshot A - Non-Believer 2/5
Located in the room from where Lara has to throw a lantern into another, gas-filled, room.
Screenshot B - Non-Believer 2/5
Another angle. Lara entered this room through the opening above. You can throw a lantern at this banner to burn it.
Non-Believer - Object 3
Area: Mountain Base
Closest Base Camp: Map Room
Find and destroy (burn)
Location on the Map
Screenshot A - Non-Believer 3/5
After the explosion, Lara goes through two more rooms to find this object.
Screenshot B - Non-Believer 3/5
This angle shows the object’s location in the room after the one where the explosion took place.
Non-Believer - Object 4
Area: Mountain Base
Closest Base Camp: Map Room
Find and destroy (burn)
Location on the Map

Screenshot A - Non-Believer 4/5
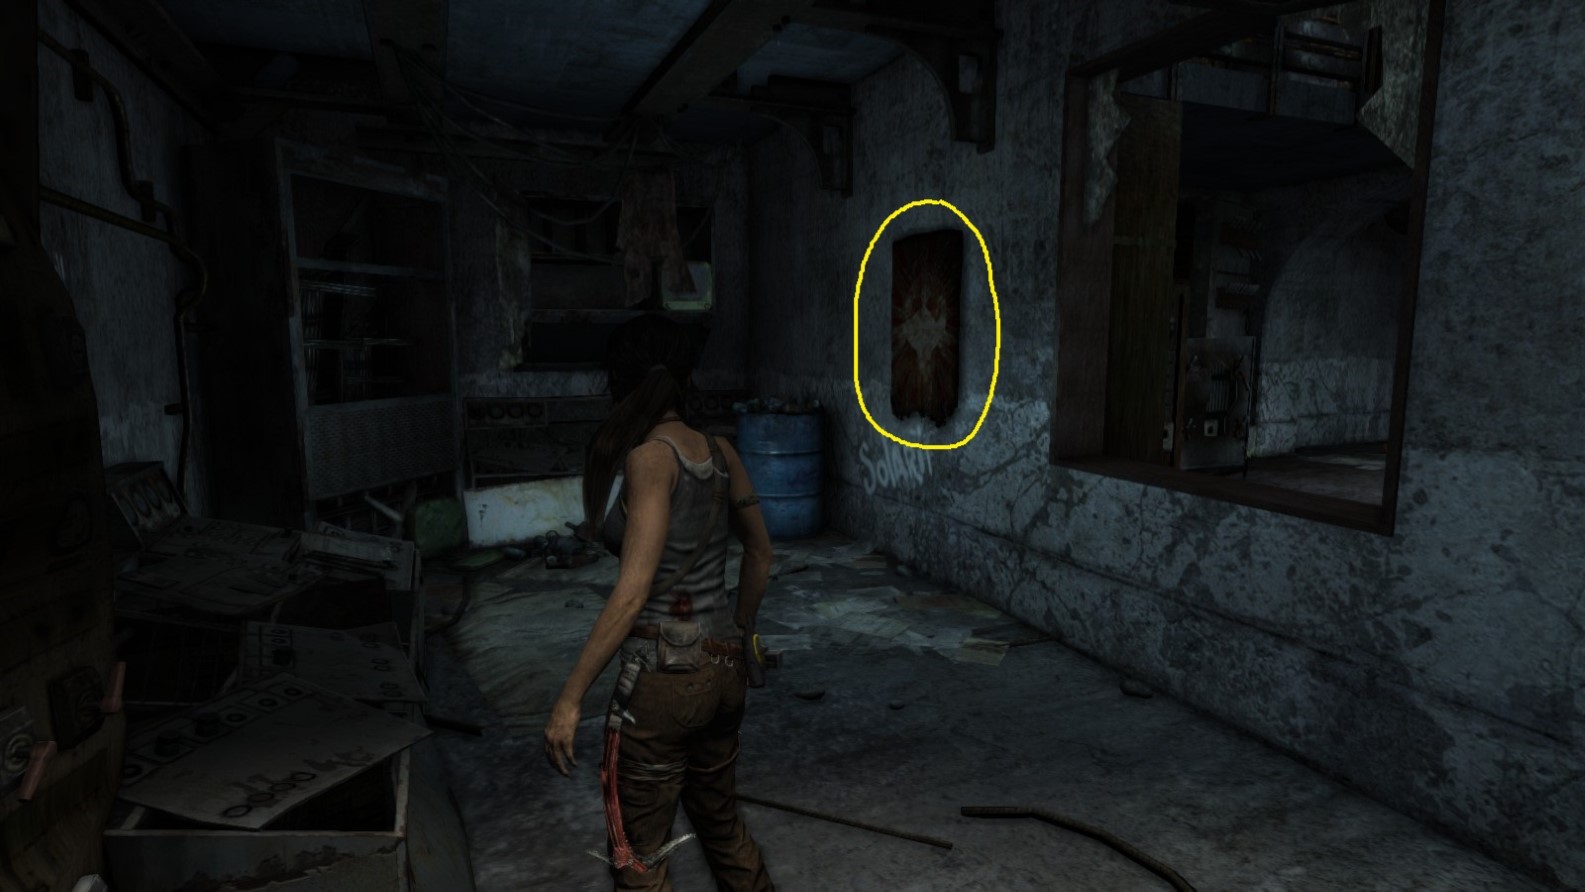
At at the end of the room where Lara is ambushed, this small room contains another object.
Screenshot B - Non-Believer 4/5
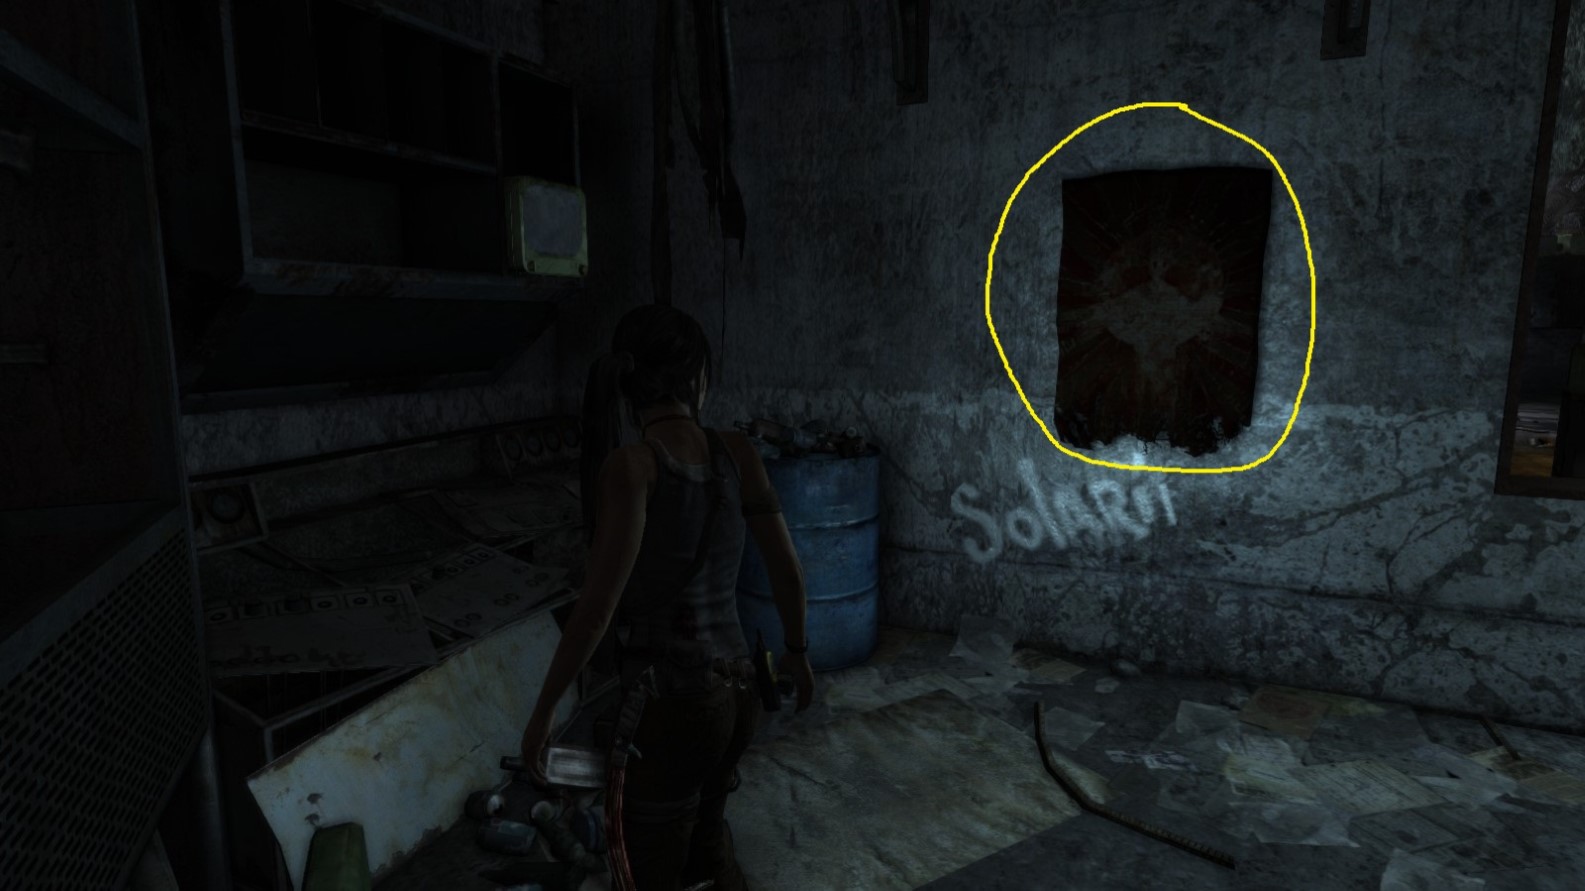
The word “Solarii” is clearly written underneath this object.
Non-Believer - Object 5
Area: Mountain Base
Closest Base Camp: Map Room
Find and destroy (burn)
Location on the Map
Screenshot A - Non-Believer 5/5
Lara enters the control room with the worthless equipment.
Screenshot B - Non-Believer 5/5
Shown from another angle.
*** End of NON-BELIEVER ***
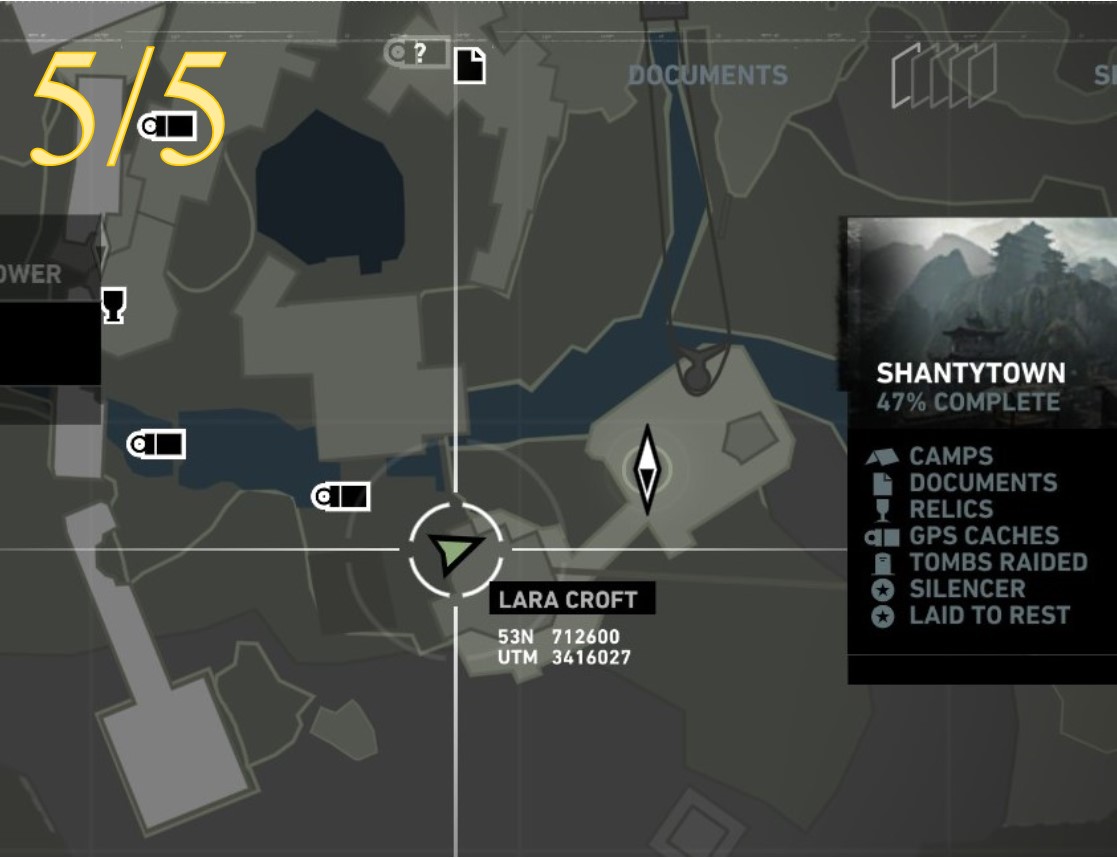
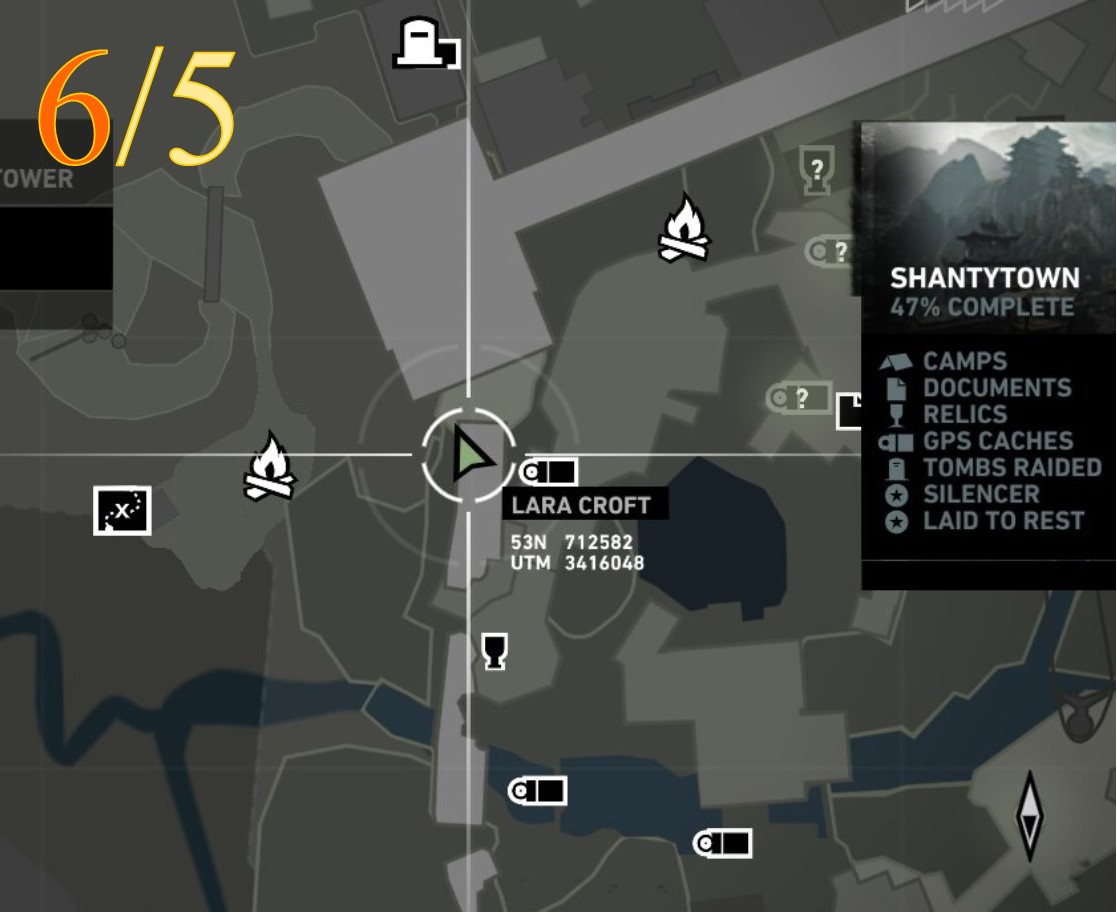
Challenge 6: LAID TO REST
Important Note:
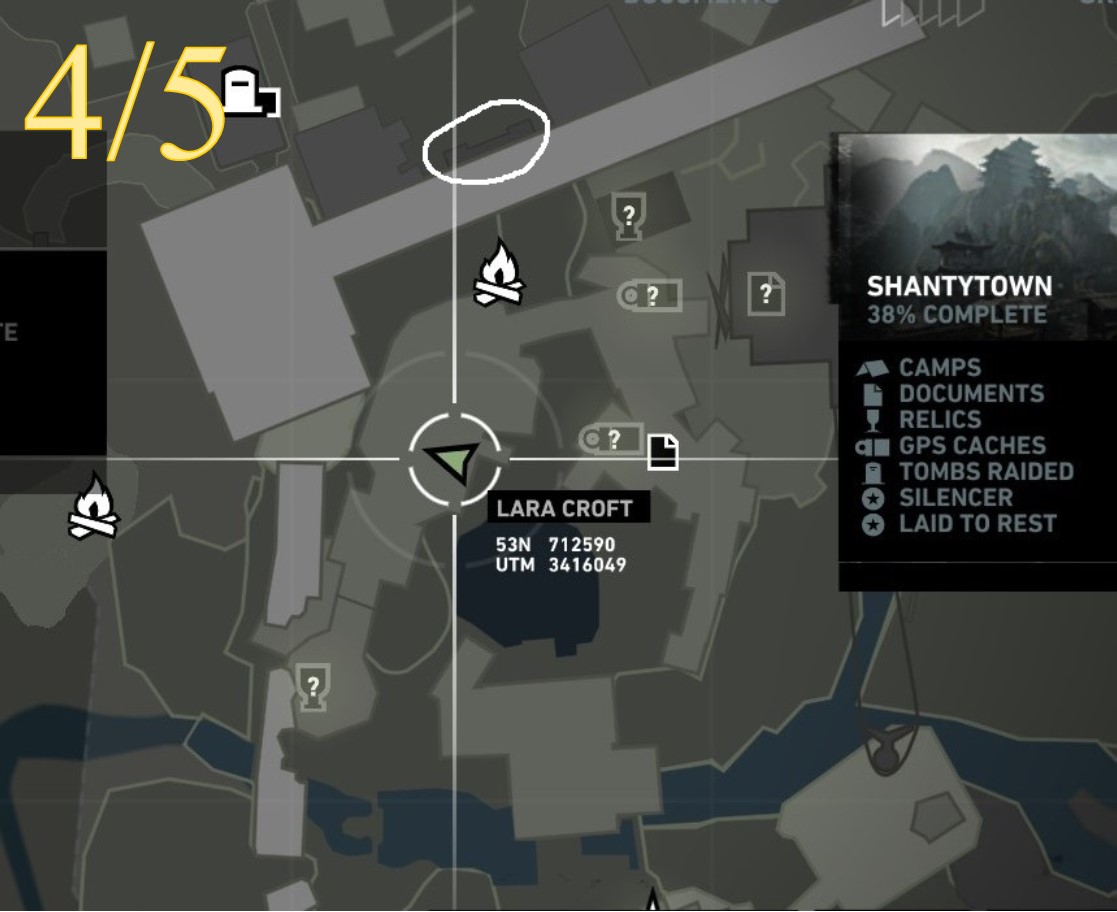
Although one needs to find 5 objects to complete this challenge, a total of 9 can be found scattered throughout Shantytown. This guide reveals the locations of all 9 effigies.
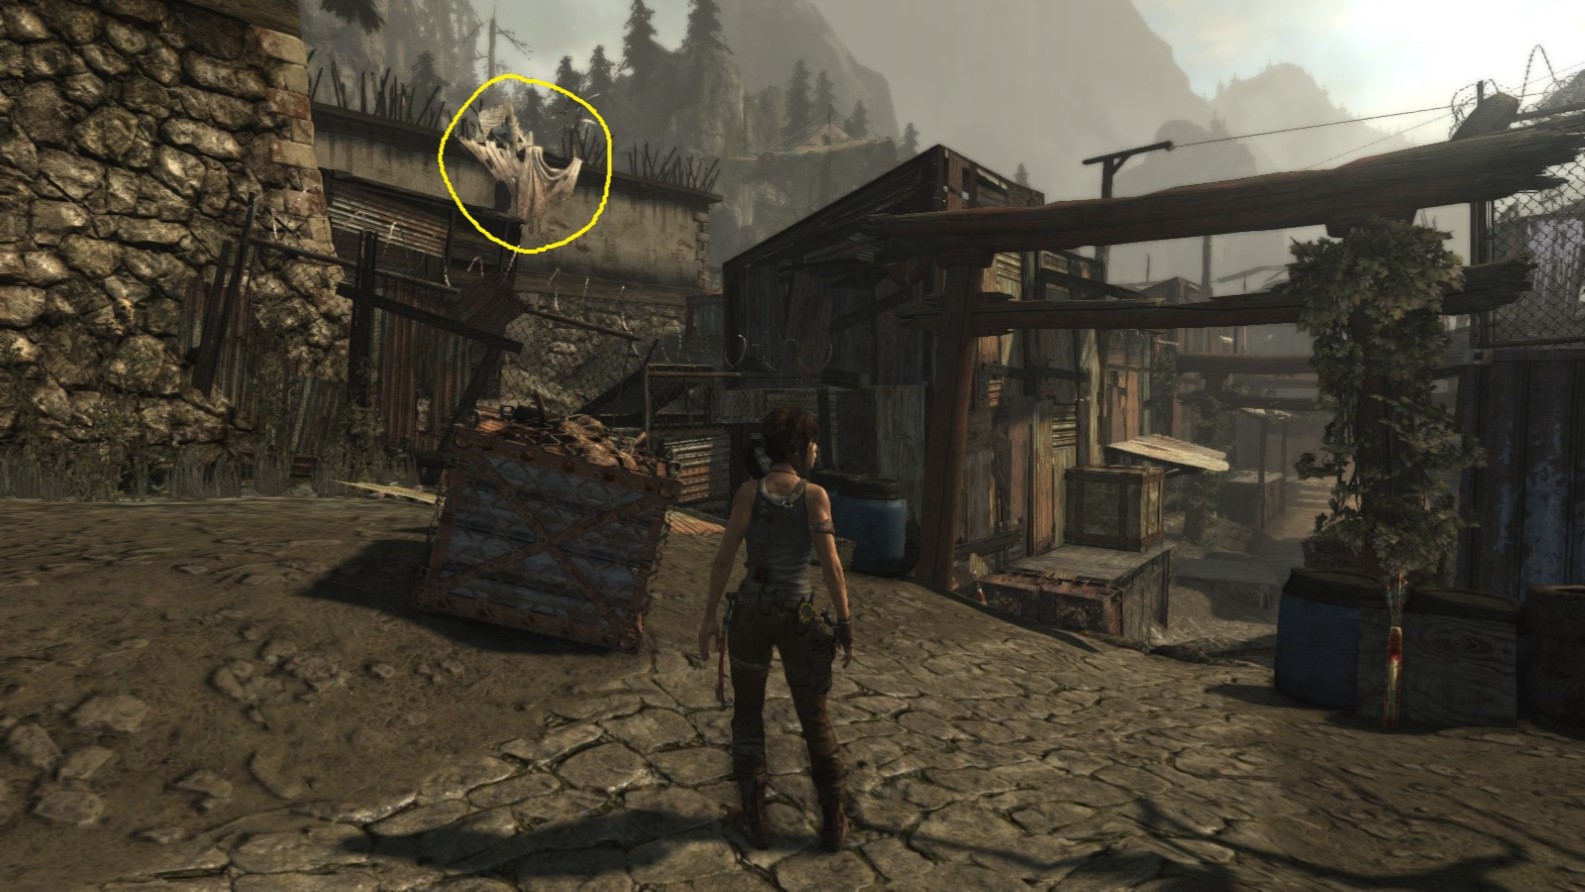
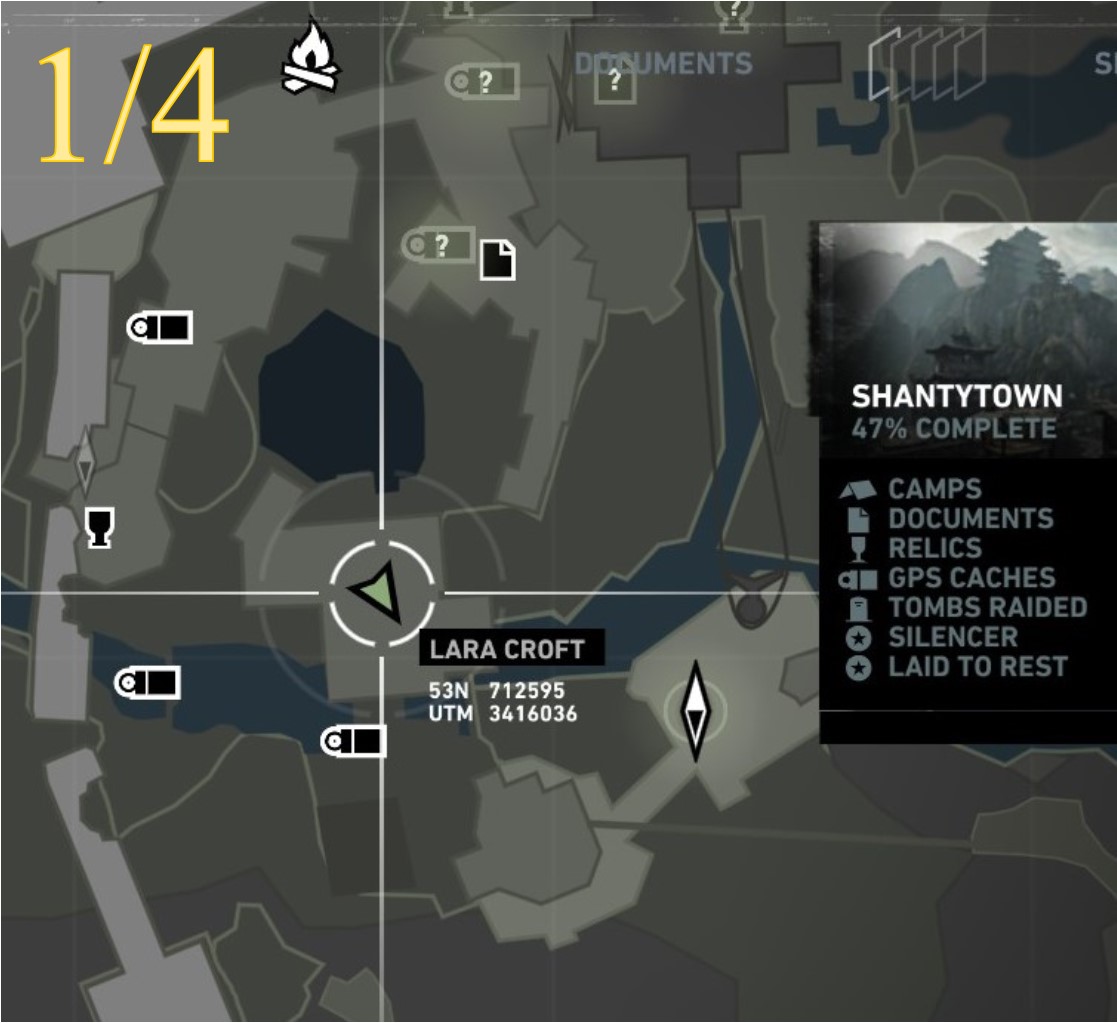
Area: Shantytown (part 1)
Closest Base Camp: Helicopter Hill
Find and destroy (burn and pull down - fire arrow, then rope arrow)
Location on the Map
Screenshot A - Laid To Rest 1/5
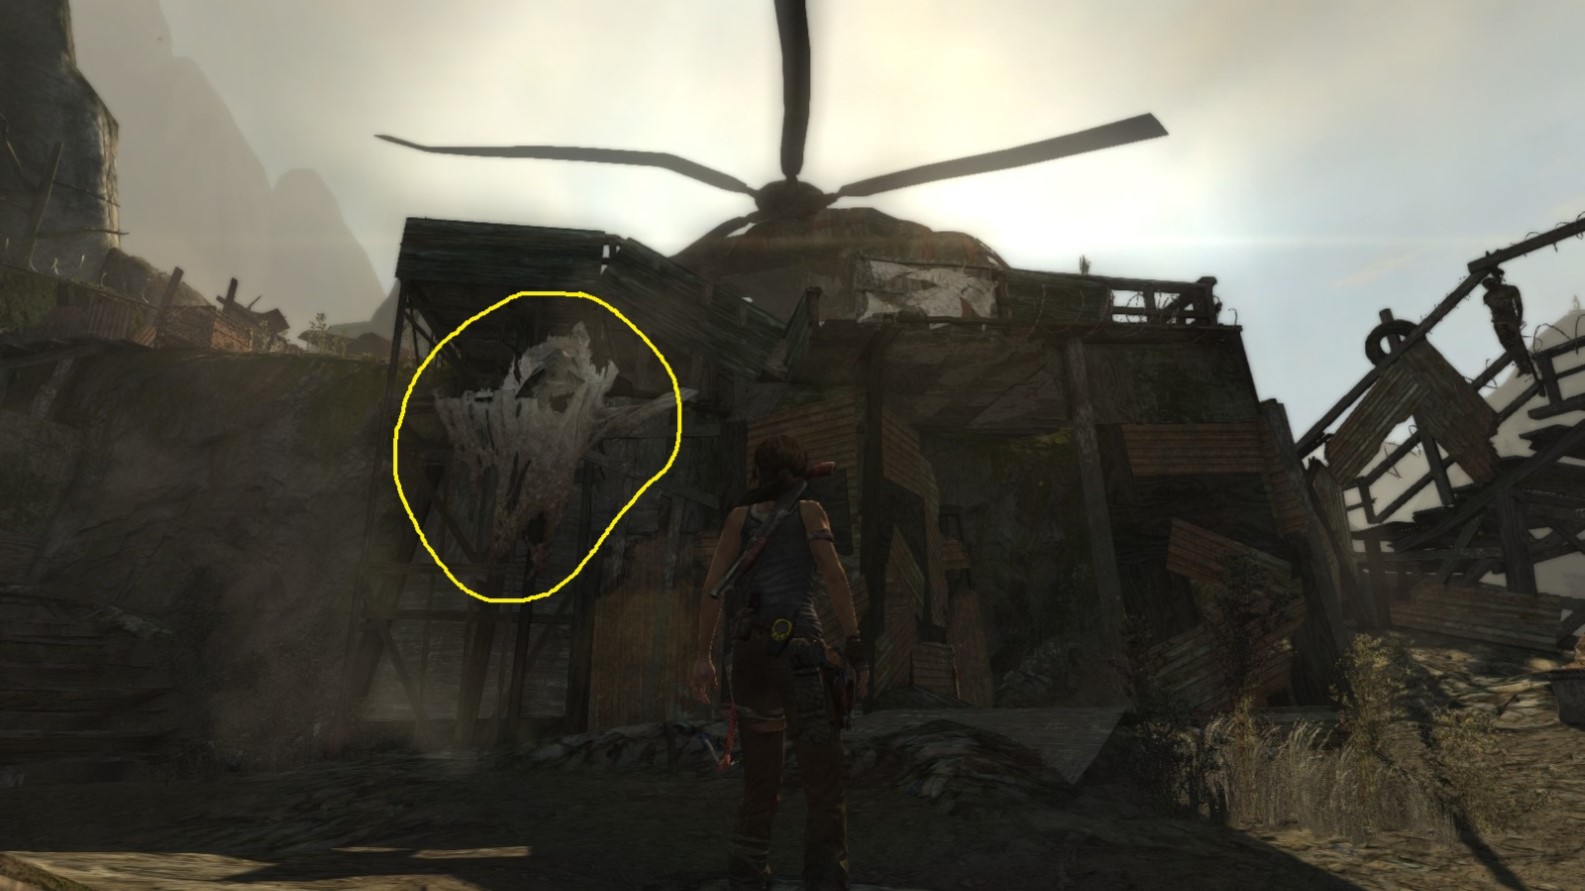
Lara looks in the direction of the wrecked helicopter.
Screenshot B - Laid To Rest 1/5
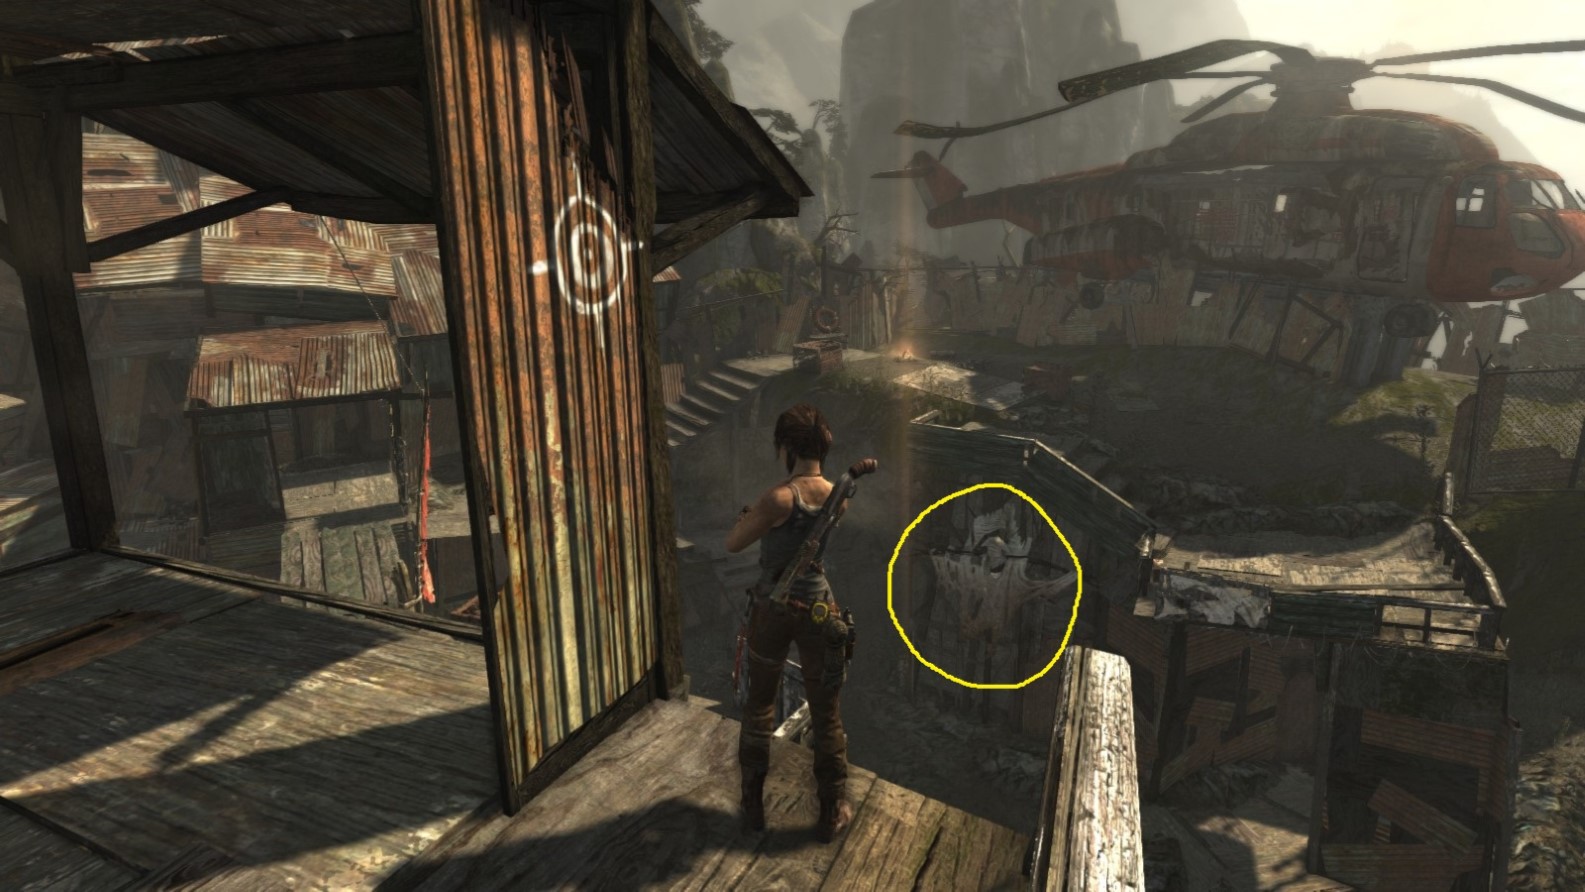
Shown from another angle.
Area: Shantytown (part 1)
Closest Base Camp: Helicopter Hill
Find and destroy (burn and pull down - fire arrow, then rope arrow)
Location on the Map
The Helicopter Hill base camp lies in the top left-hand corner of the map.
Screenshot A - Laid To Rest 2/5
The effigy is above ground level and on the very edge of the Shantytown perimeter.
Screenshot B - Laid To Rest 2/5
Shown from another angle.
Area: Shantytown (part 1)
Closest Base Camp: Helicopter Hill
Find and destroy (burn and pull down - fire arrow, then rope arrow)
Location on the Map
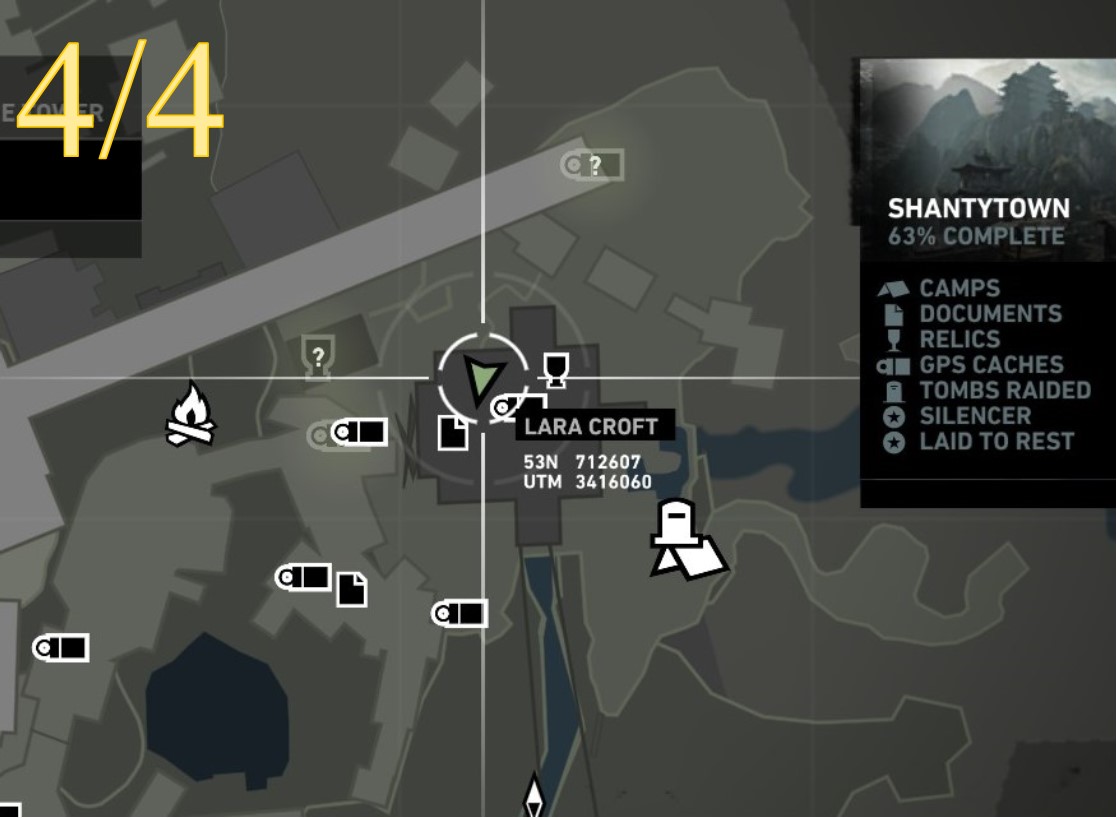
Located in the 1st part of the Shantytown level, close to the gate under the bridge. Helicopter Hill base camp lies to the northwest. After Lara opens the gate, the 2nd part of this level can be explored.
Screenshot A - Laid To Rest 3/5
The object is on Lara’s right as she’s facing the gate under the bridge.
Screenshot B - Laid To Rest 3/5
Shown with the gate at Lara’s back.
Area: Shantytown (part 2: after the gate)
Closest Base Camps:
a) Helicopter Hill (first visit via part 1)
b) Windmill (after exploring part 2)
Find and destroy (burn and pull down - fire arrow, then rope arrow)
Location on the Map
Located in the area behind (south of) the gate under the bridge. On the map the gate is circled in white.
Screenshot A - Laid To Rest 4/5
This effigy is on Lara’s right as she proceeds down to the muddy pool where corpses hang from a tree.
Screenshot B - Laid To Rest 4/5
A view from the muddy pool, looking back up the slippery slope to the gate.
Area: Shantytown (part 2: after the gate)
Closest Base Camps:
a) Helicopter Hill (first visit via part 1)
b) Windmill (after exploring part 2)
Find and destroy (burn and pull down - fire arrow, then rope arrow)
Location on the Map
Screenshot A - Laid To Rest 5/5
The object hangs from the towering structure from where Grim calls to Lara.
Screenshot B - Laid To Rest 5/5
A view from further away.
Area: Shantytown (part 2: after the gate)
Closest Base Camps:
a) Helicopter Hill (first visit via part 1)
b) Windmill (after exploring part 2)
Find and destroy (burn and pull down - fire arrow, then rope arrow)
Location on the Map
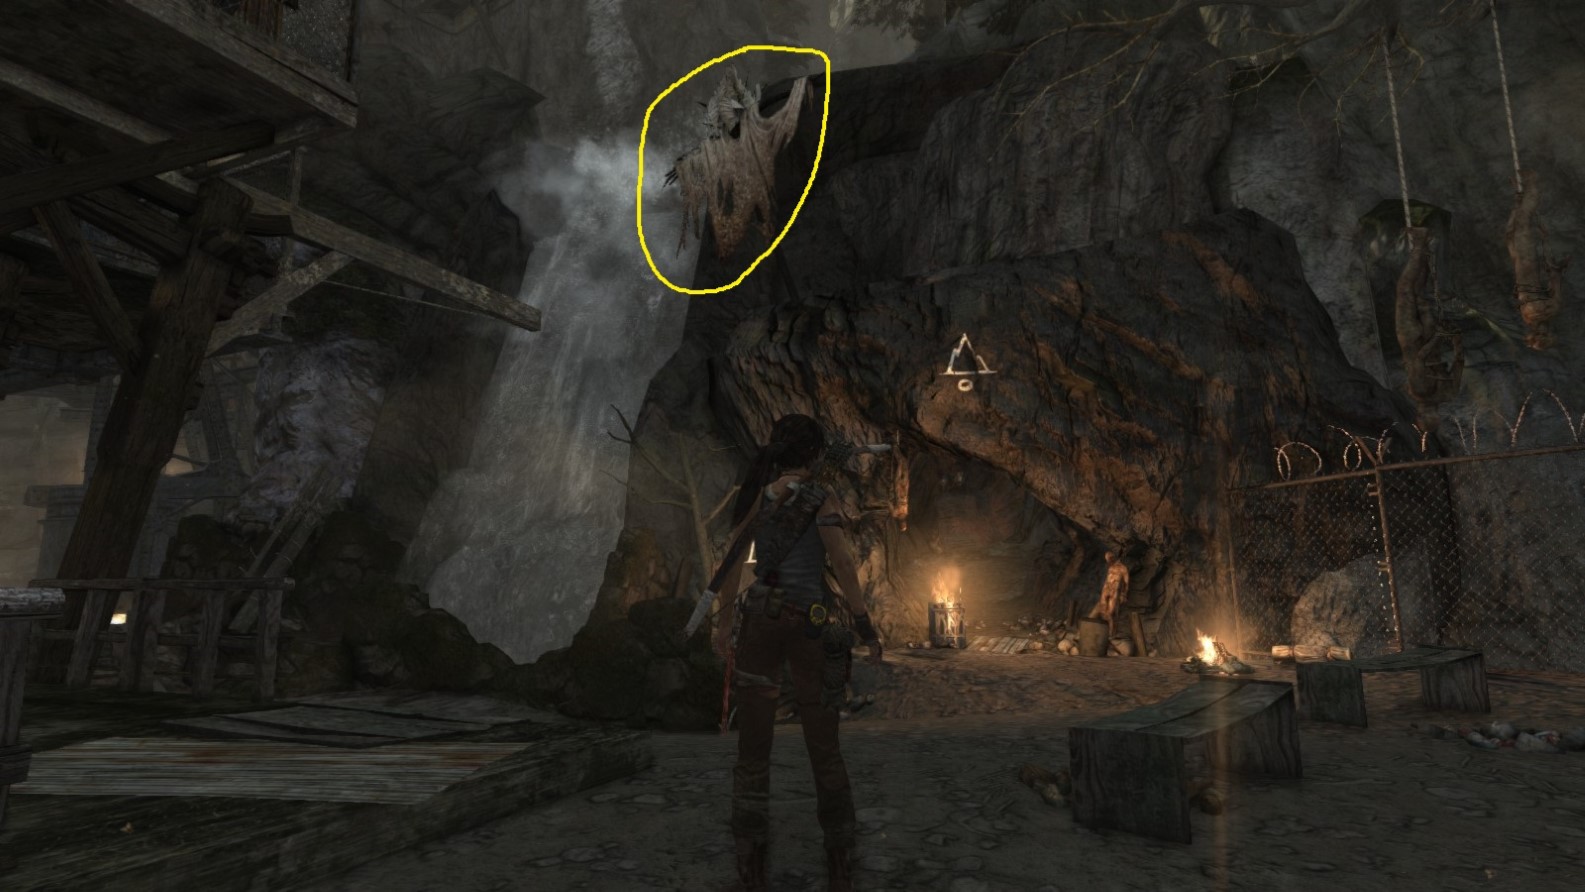
Screenshot A - Laid To Rest 6/5
The object hangs from the cliff face, high up.
Screenshot B - Laid To Rest 6/5
Another angle.
Area: Shantytown (part 2: after the gate)
Closest Base Camps:
a) Helicopter Hill (first visit via part 1)
b) Windmill (after exploring part 2)
Find and destroy (burn and pull down - fire arrow, then rope arrow)
Location on the Map
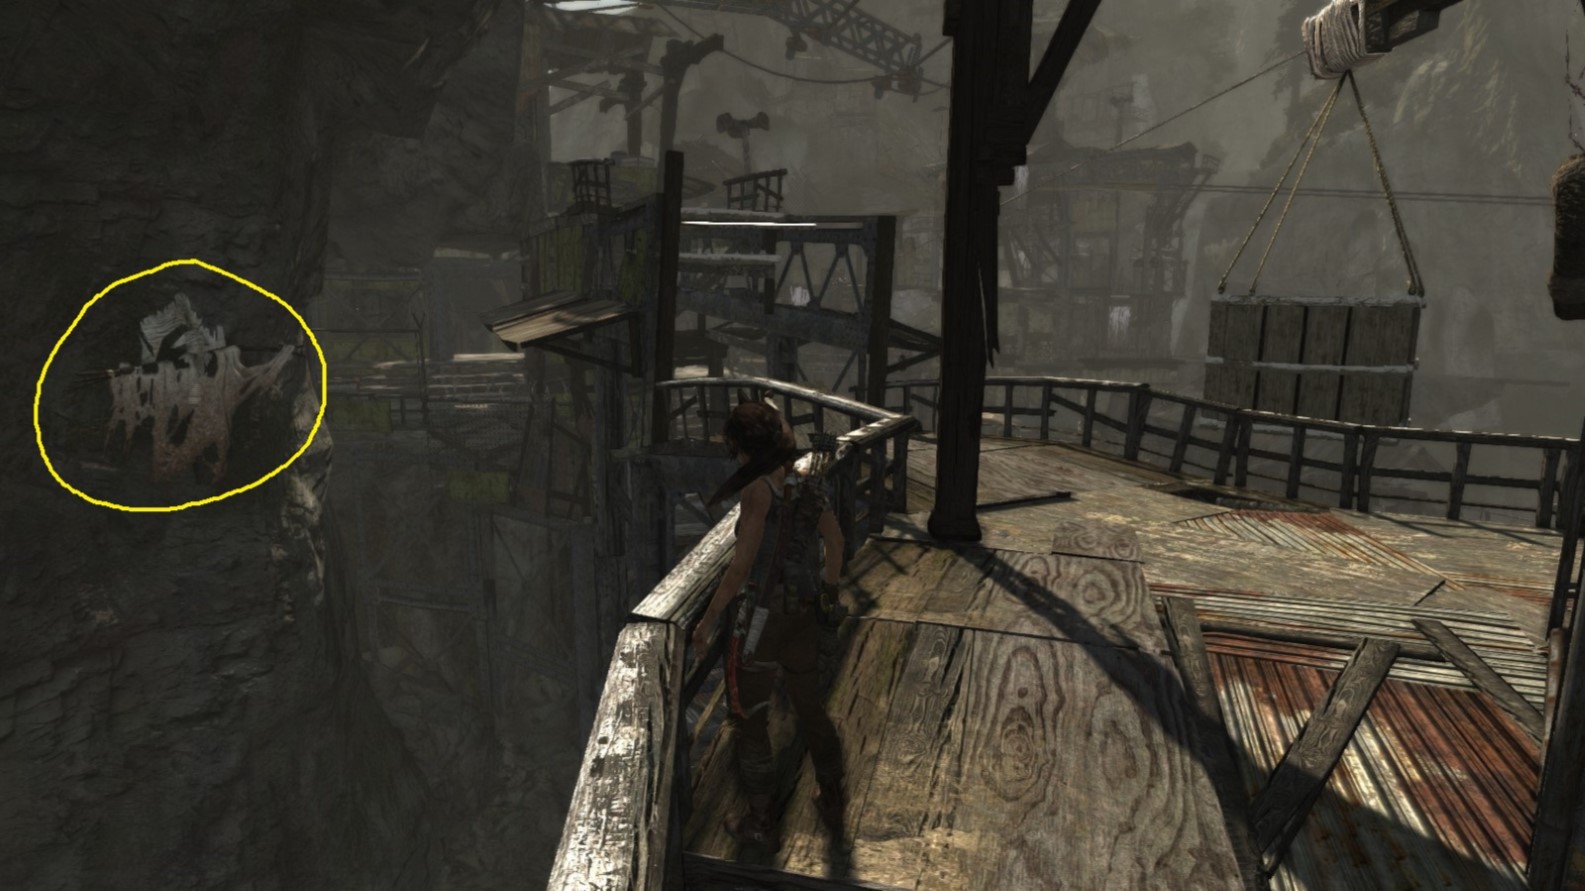
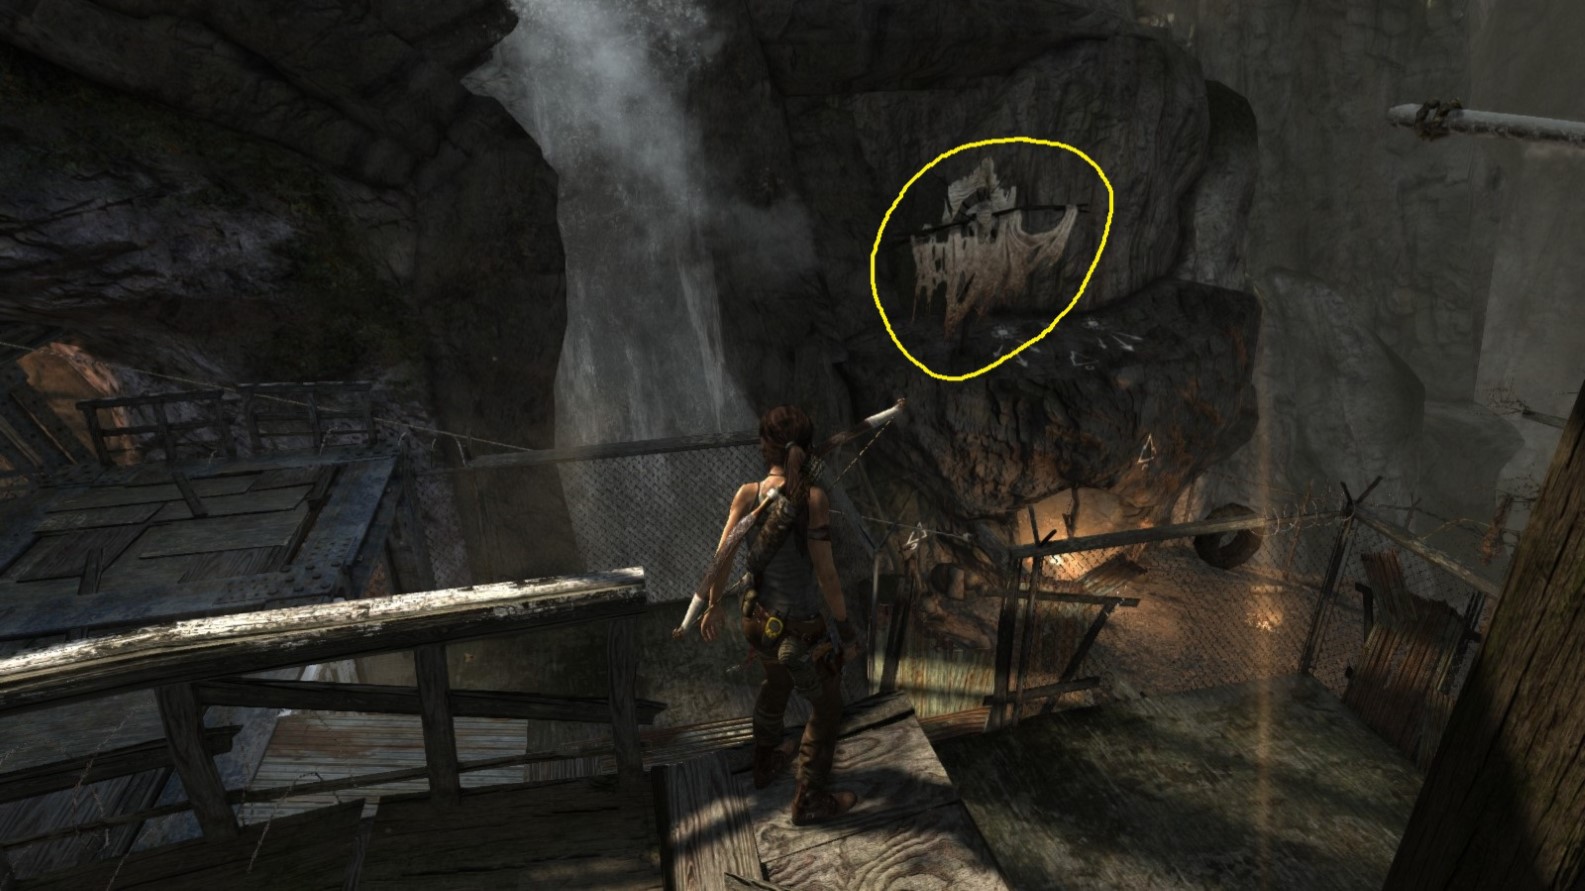
Screenshot A - Laid To Rest 7/5
This object also hangs from the cliff face, high up.
Screenshot B - Laid To Rest 7/5
The view from another direction.
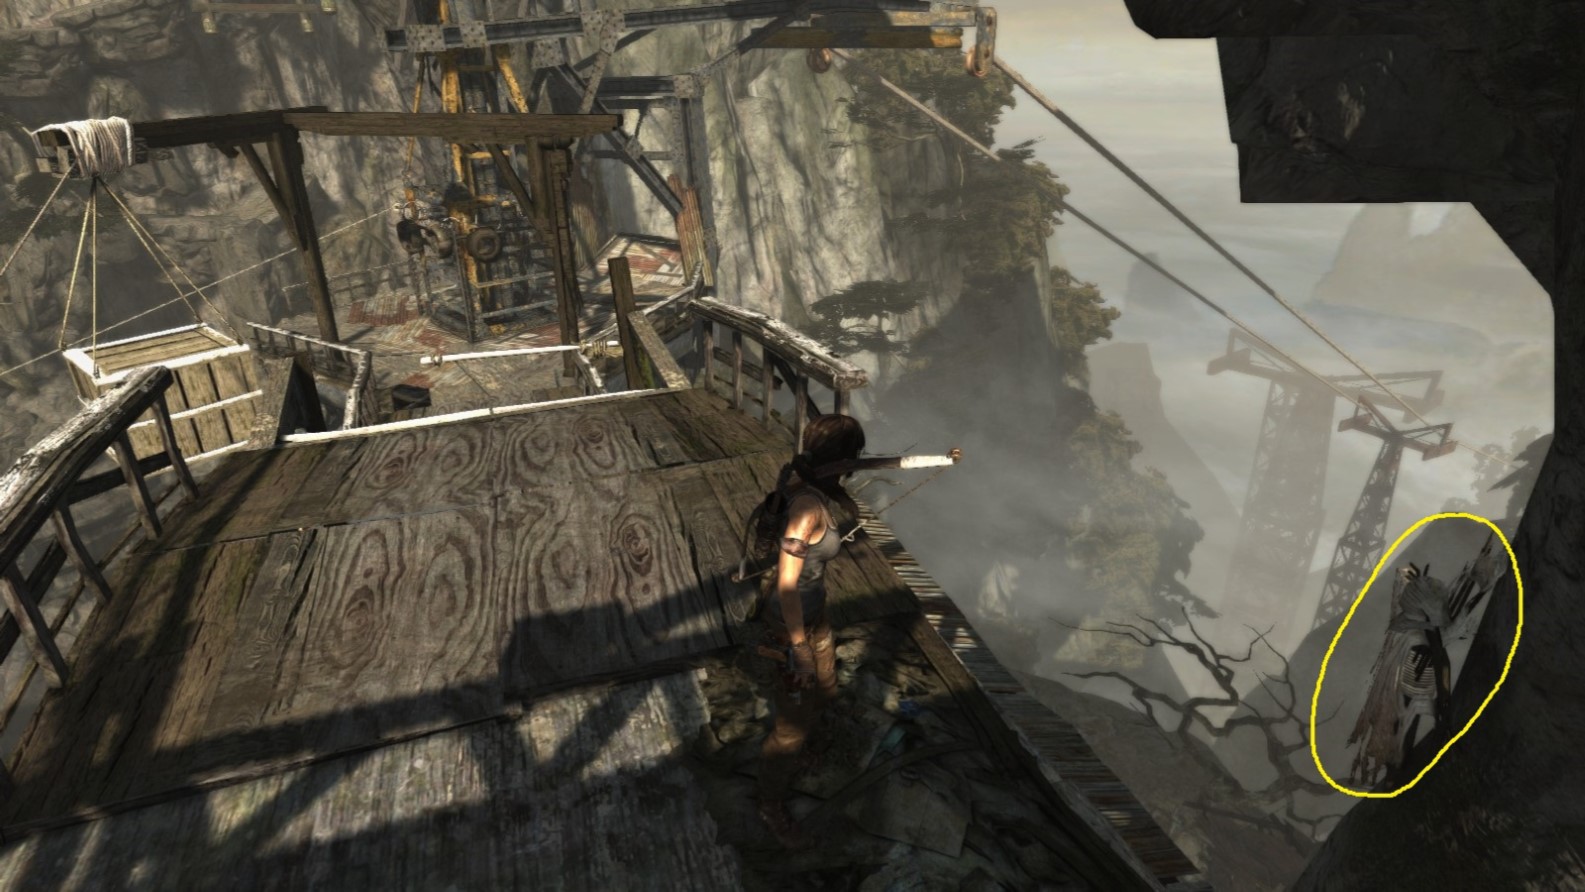
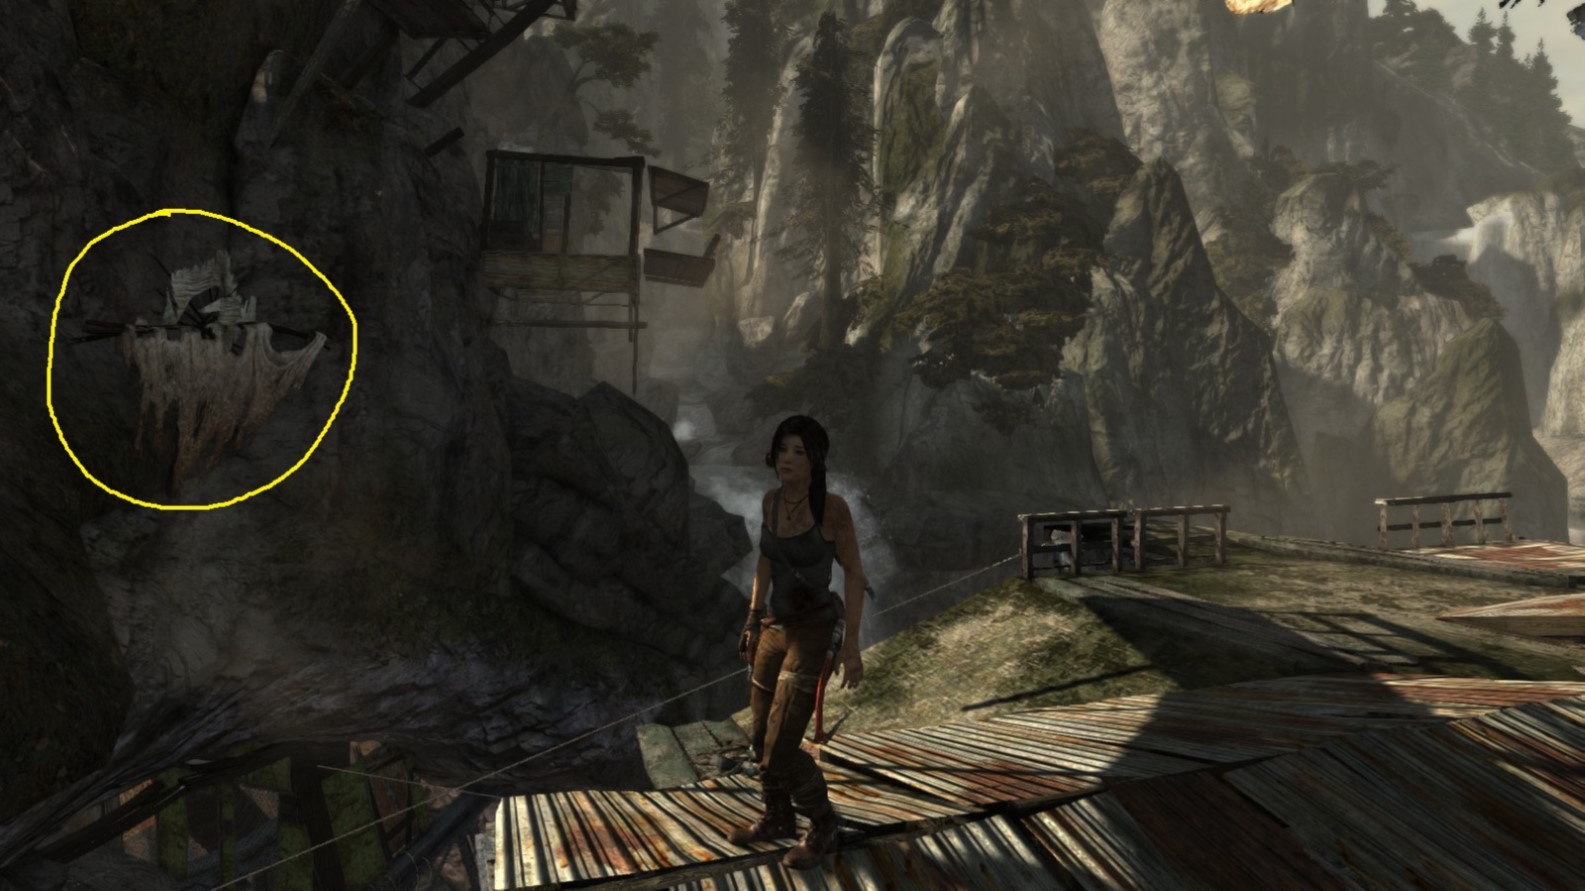
Area: Shantytown (part 2: after the gate)
Closest Base Camps:
a) Helicopter Hill (first visit via part 1)
b) Windmill (after exploring part 2)
Find and destroy (burn and pull down - fire arrow, then rope arrow)
Location on the Map
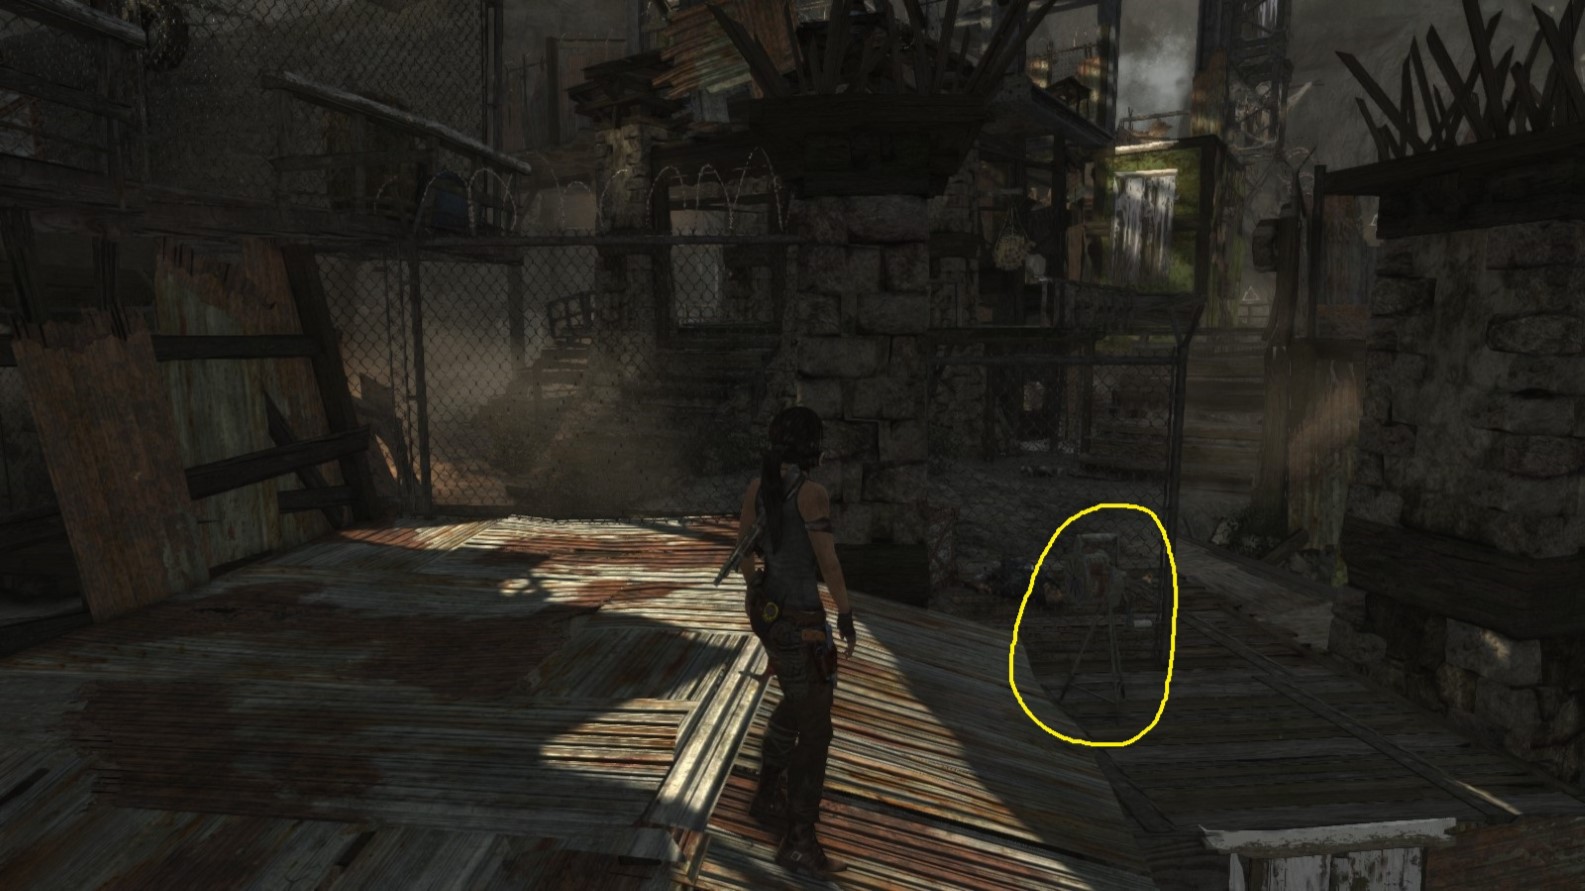
Screenshot A - Laid To Rest 8/5
The effigy is to the right of a waterfall, close to the Windmill base camp (glowing on the right).
Screenshot B - Laid To Rest 8/5
The object is located above the entrance to the secret tomb. At Lara’s right is the Windmill base camp.
ADDED LATER
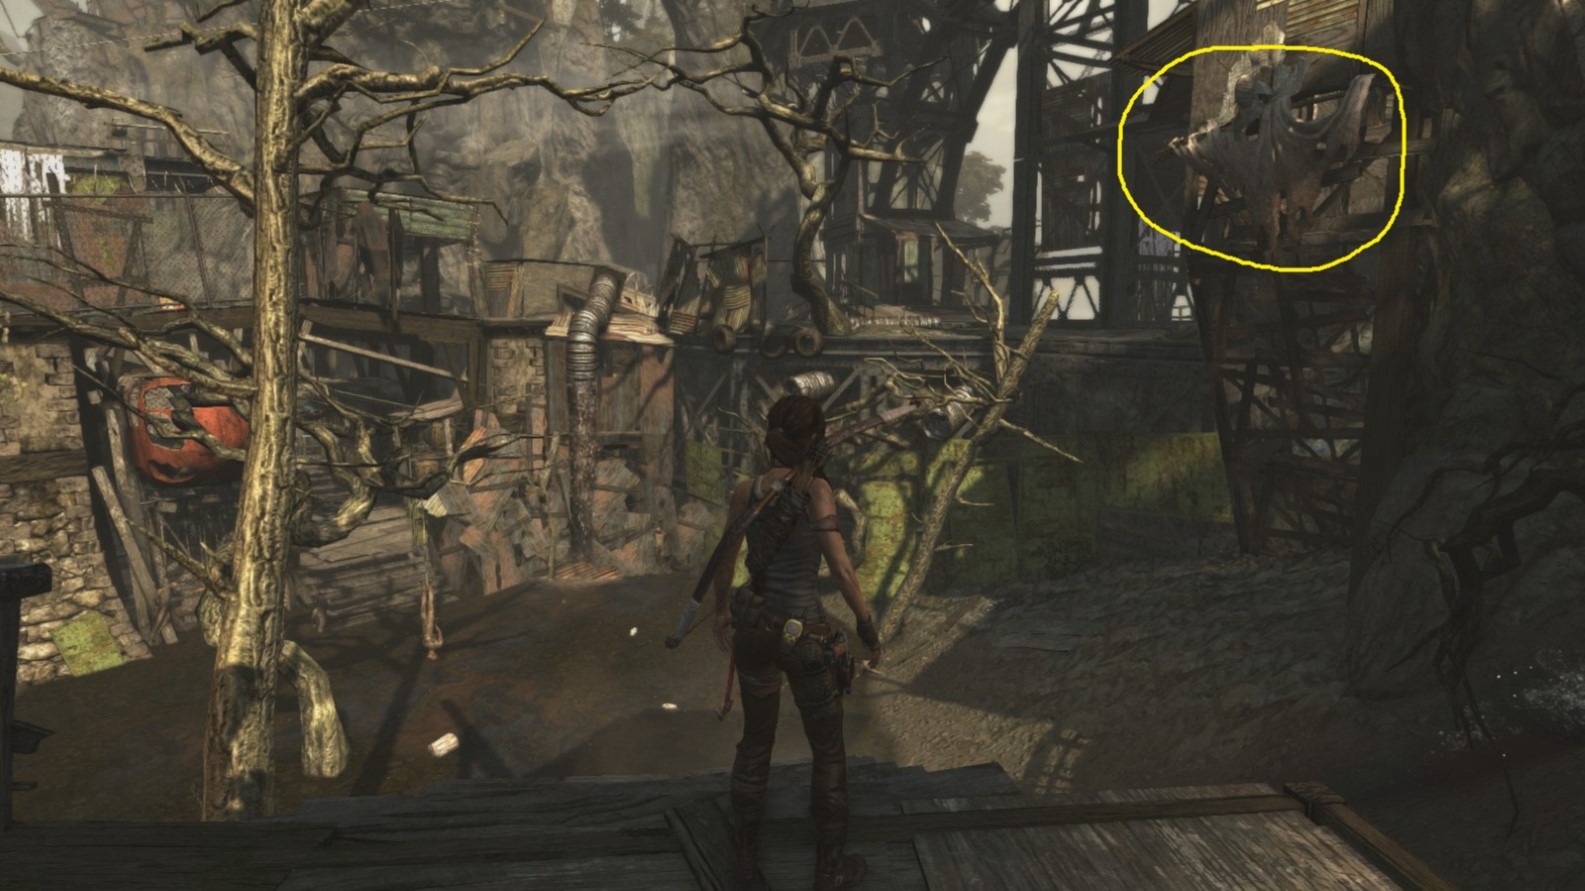
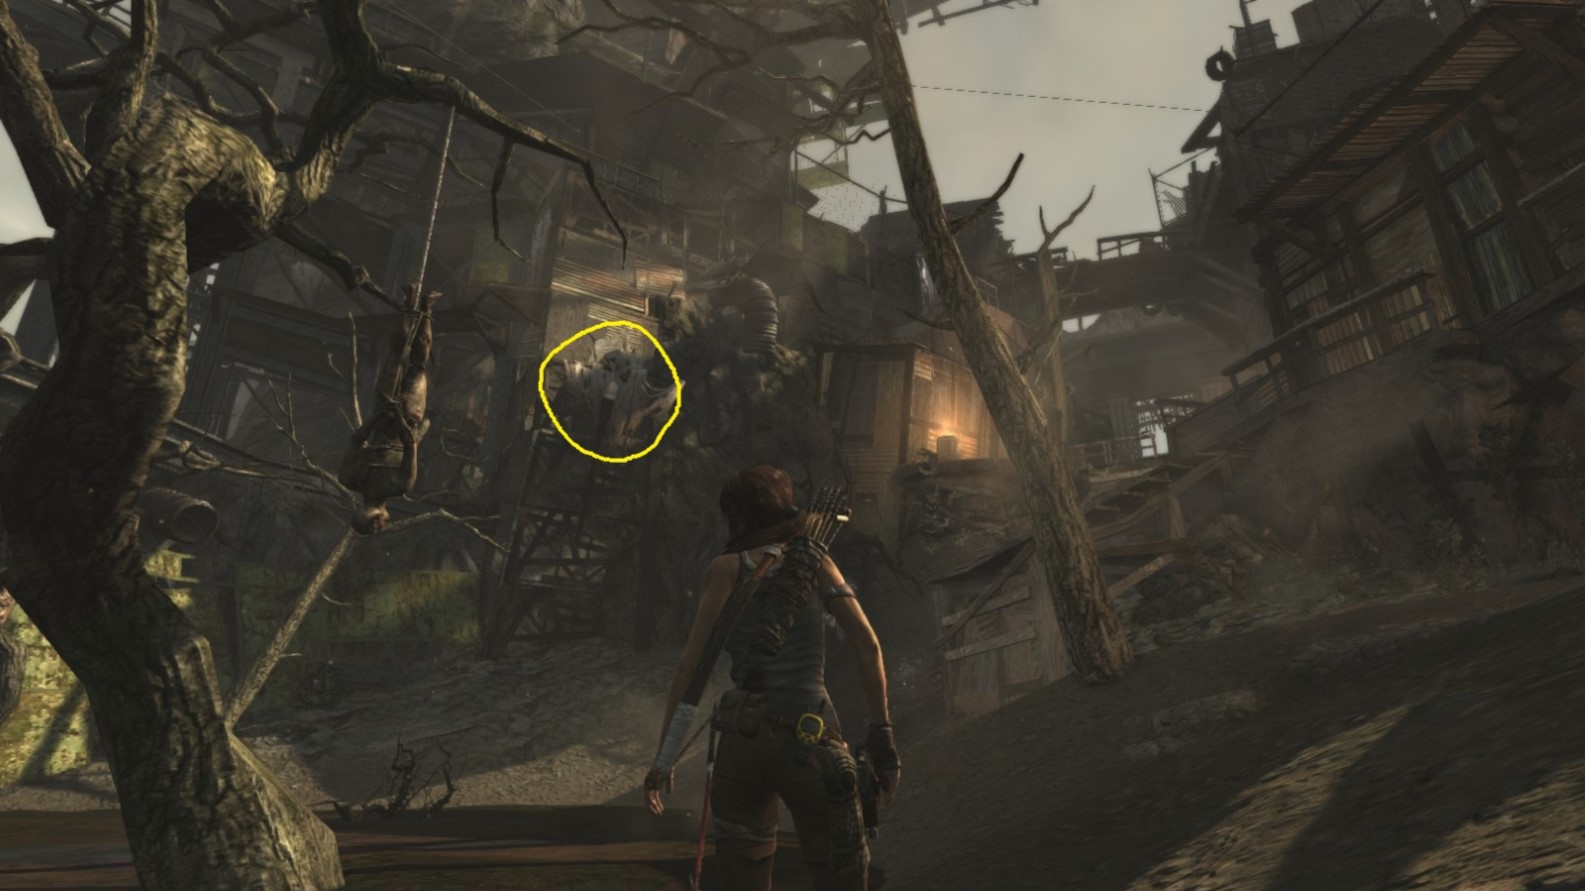
Area: Shantytown (part 1)
Closest Base Camp:
Helicopter Hill
Find and destroy (burn and pull down - fire arrow, then rope arrow)
Location on the Map
Screenshot A - Laid To Rest 9/5
The effigy is high up on a man-made structure.
Screenshot B - Laid To Rest 9/5
Looking towards the bridge and gate that separates the two parts of Shantytown.
*** End of LAID TO REST ***
Although one needs to find 5 objects to complete this challenge, a total of 9 can be found scattered throughout Shantytown. This guide reveals the locations of all 9 effigies.
Laid To Rest - Object 1
Area: Shantytown (part 1)
Closest Base Camp: Helicopter Hill
Find and destroy (burn and pull down - fire arrow, then rope arrow)
Location on the Map
Screenshot A - Laid To Rest 1/5
Lara looks in the direction of the wrecked helicopter.
Screenshot B - Laid To Rest 1/5
Shown from another angle.
Laid To Rest - Object 2
Area: Shantytown (part 1)
Closest Base Camp: Helicopter Hill
Find and destroy (burn and pull down - fire arrow, then rope arrow)
Location on the Map
The Helicopter Hill base camp lies in the top left-hand corner of the map.
Screenshot A - Laid To Rest 2/5
The effigy is above ground level and on the very edge of the Shantytown perimeter.
Screenshot B - Laid To Rest 2/5
Shown from another angle.
Laid To Rest - Object 3
Area: Shantytown (part 1)
Closest Base Camp: Helicopter Hill
Find and destroy (burn and pull down - fire arrow, then rope arrow)
Location on the Map
Located in the 1st part of the Shantytown level, close to the gate under the bridge. Helicopter Hill base camp lies to the northwest. After Lara opens the gate, the 2nd part of this level can be explored.
Screenshot A - Laid To Rest 3/5
The object is on Lara’s right as she’s facing the gate under the bridge.
Screenshot B - Laid To Rest 3/5
Shown with the gate at Lara’s back.
Laid To Rest - Object 4
Area: Shantytown (part 2: after the gate)
Closest Base Camps:
a) Helicopter Hill (first visit via part 1)
b) Windmill (after exploring part 2)
Find and destroy (burn and pull down - fire arrow, then rope arrow)
Location on the Map
Located in the area behind (south of) the gate under the bridge. On the map the gate is circled in white.
Screenshot A - Laid To Rest 4/5
This effigy is on Lara’s right as she proceeds down to the muddy pool where corpses hang from a tree.
Screenshot B - Laid To Rest 4/5
A view from the muddy pool, looking back up the slippery slope to the gate.
Laid To Rest - Object 5
Area: Shantytown (part 2: after the gate)
Closest Base Camps:
a) Helicopter Hill (first visit via part 1)
b) Windmill (after exploring part 2)
Find and destroy (burn and pull down - fire arrow, then rope arrow)
Location on the Map
Screenshot A - Laid To Rest 5/5
The object hangs from the towering structure from where Grim calls to Lara.
Screenshot B - Laid To Rest 5/5
A view from further away.
Laid To Rest - Object 6
Area: Shantytown (part 2: after the gate)
Closest Base Camps:
a) Helicopter Hill (first visit via part 1)
b) Windmill (after exploring part 2)
Find and destroy (burn and pull down - fire arrow, then rope arrow)
Location on the Map
Screenshot A - Laid To Rest 6/5
The object hangs from the cliff face, high up.
Screenshot B - Laid To Rest 6/5
Another angle.
Laid To Rest - Object 7
Area: Shantytown (part 2: after the gate)
Closest Base Camps:
a) Helicopter Hill (first visit via part 1)
b) Windmill (after exploring part 2)
Find and destroy (burn and pull down - fire arrow, then rope arrow)
Location on the Map
Screenshot A - Laid To Rest 7/5
This object also hangs from the cliff face, high up.
Screenshot B - Laid To Rest 7/5
The view from another direction.
Laid To Rest - Object 8
Area: Shantytown (part 2: after the gate)
Closest Base Camps:
a) Helicopter Hill (first visit via part 1)
b) Windmill (after exploring part 2)
Find and destroy (burn and pull down - fire arrow, then rope arrow)
Location on the Map
Screenshot A - Laid To Rest 8/5
The effigy is to the right of a waterfall, close to the Windmill base camp (glowing on the right).
Screenshot B - Laid To Rest 8/5
The object is located above the entrance to the secret tomb. At Lara’s right is the Windmill base camp.
ADDED LATER
Laid To Rest - Object 9
Area: Shantytown (part 1)
Closest Base Camp:
Helicopter Hill
Find and destroy (burn and pull down - fire arrow, then rope arrow)
Location on the Map
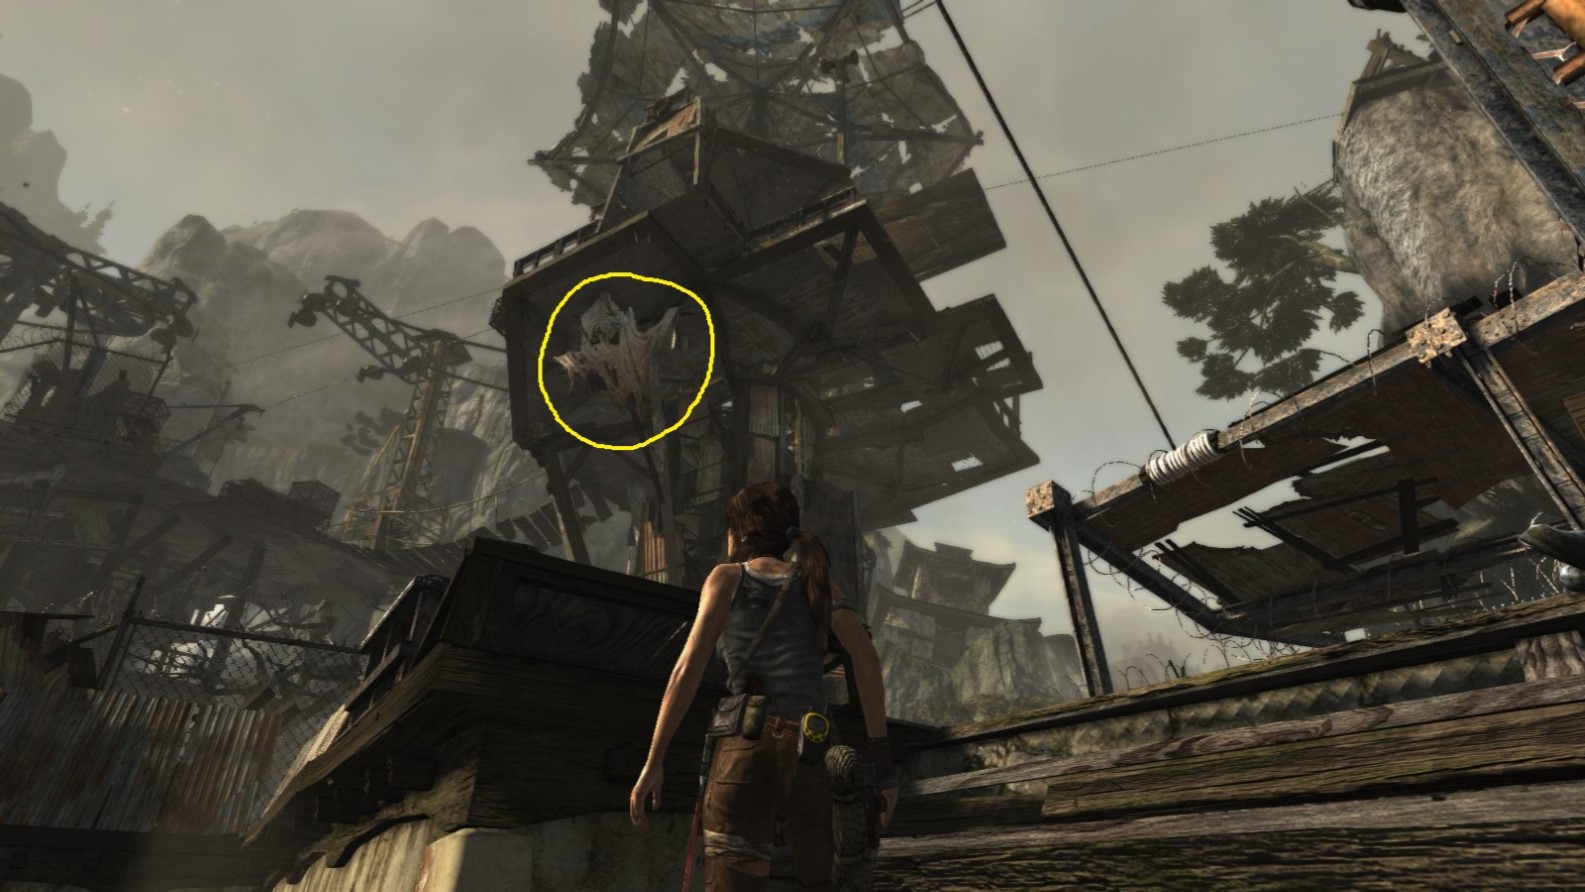
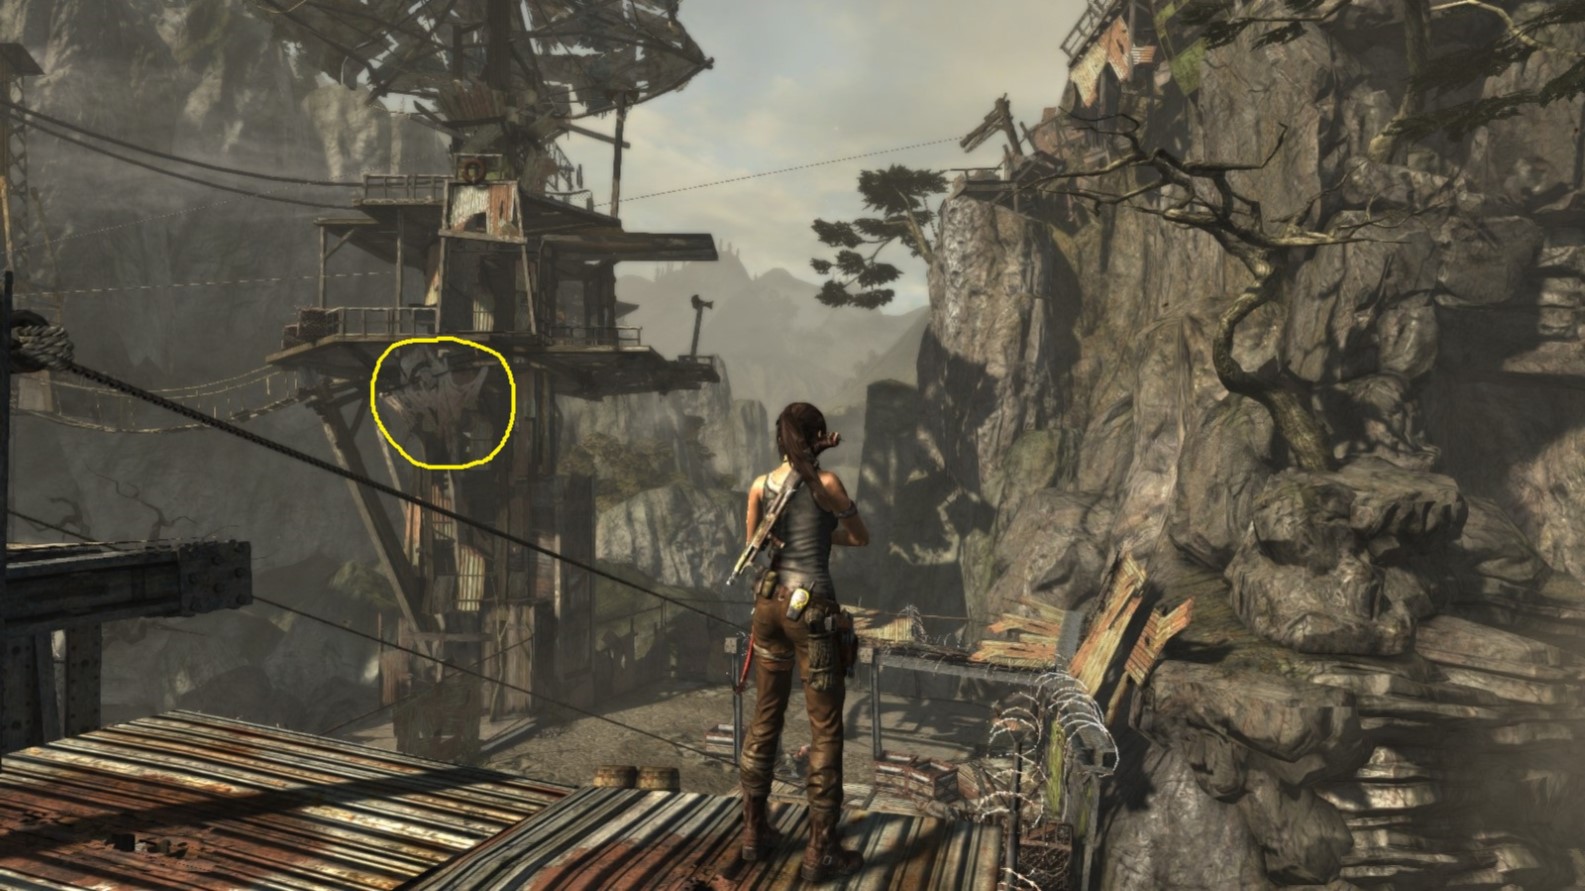
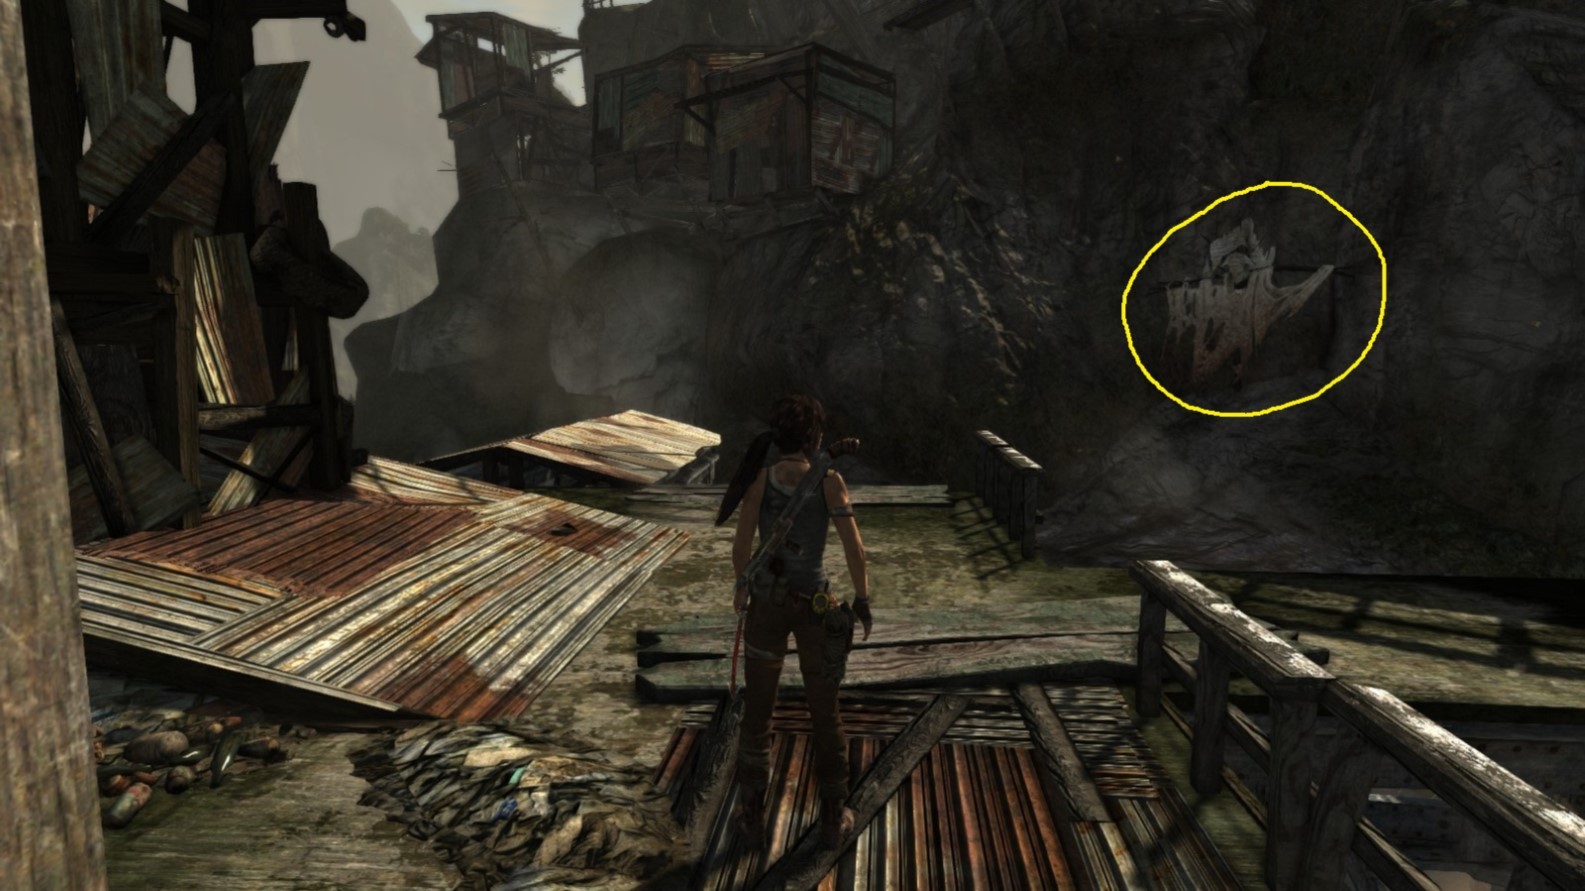
Screenshot A - Laid To Rest 9/5
The effigy is high up on a man-made structure.
Screenshot B - Laid To Rest 9/5
Looking towards the bridge and gate that separates the two parts of Shantytown.
*** End of LAID TO REST ***
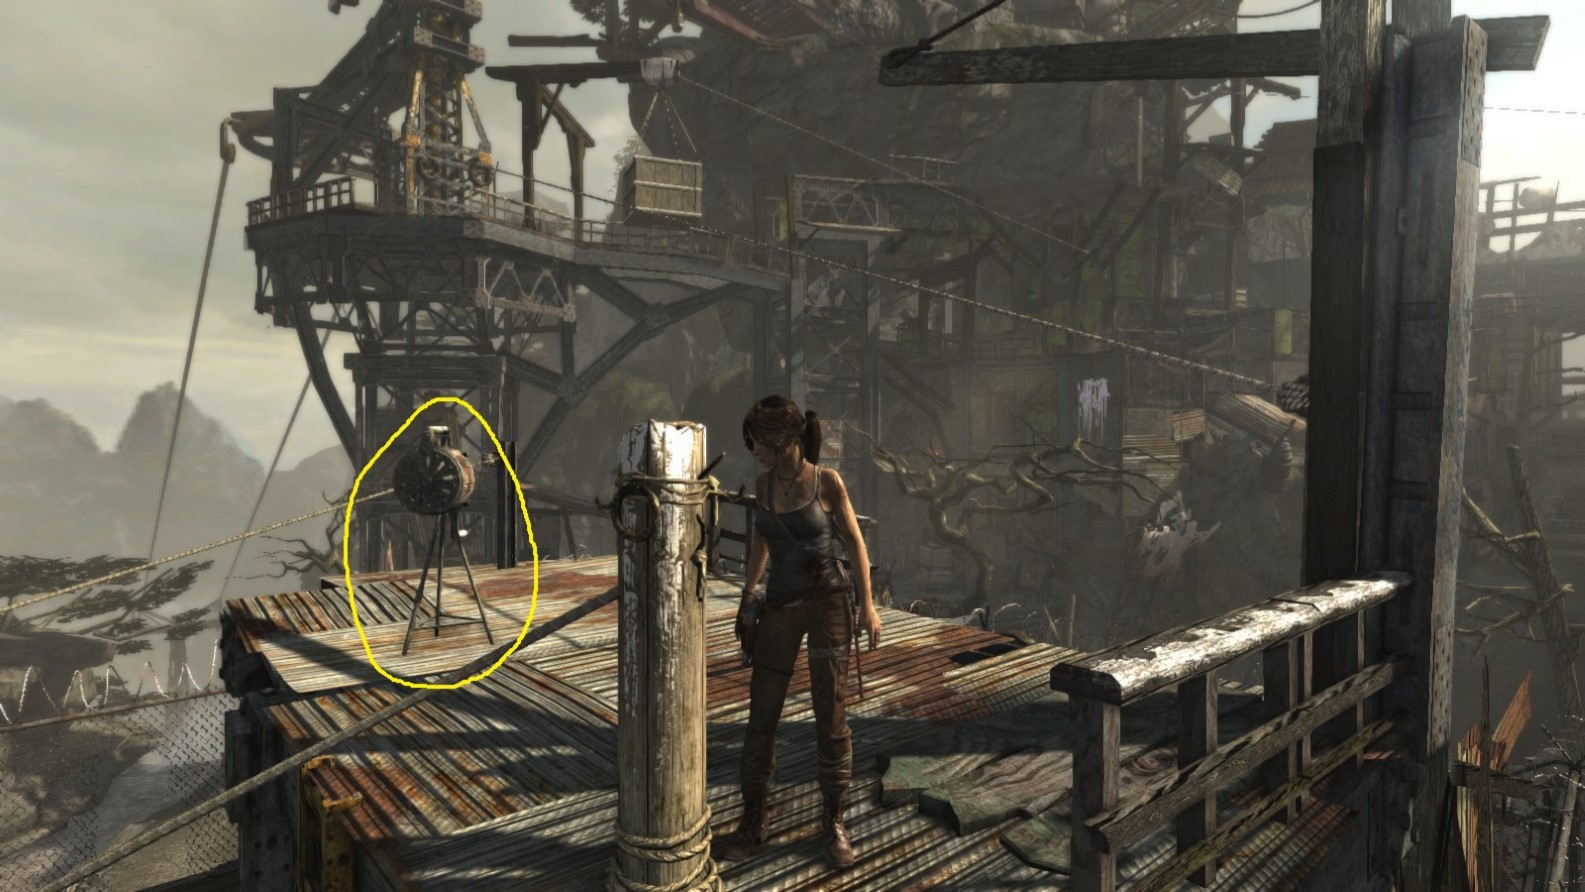
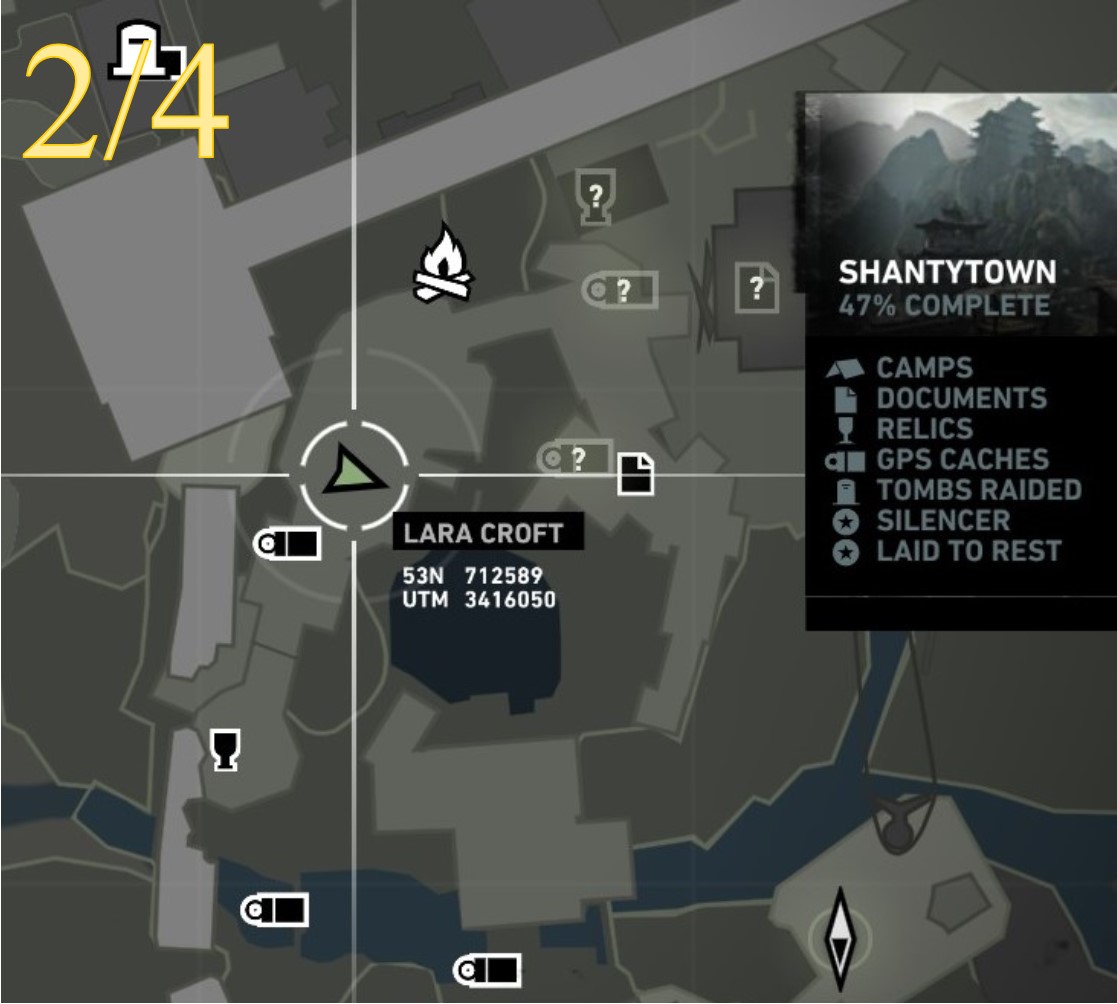
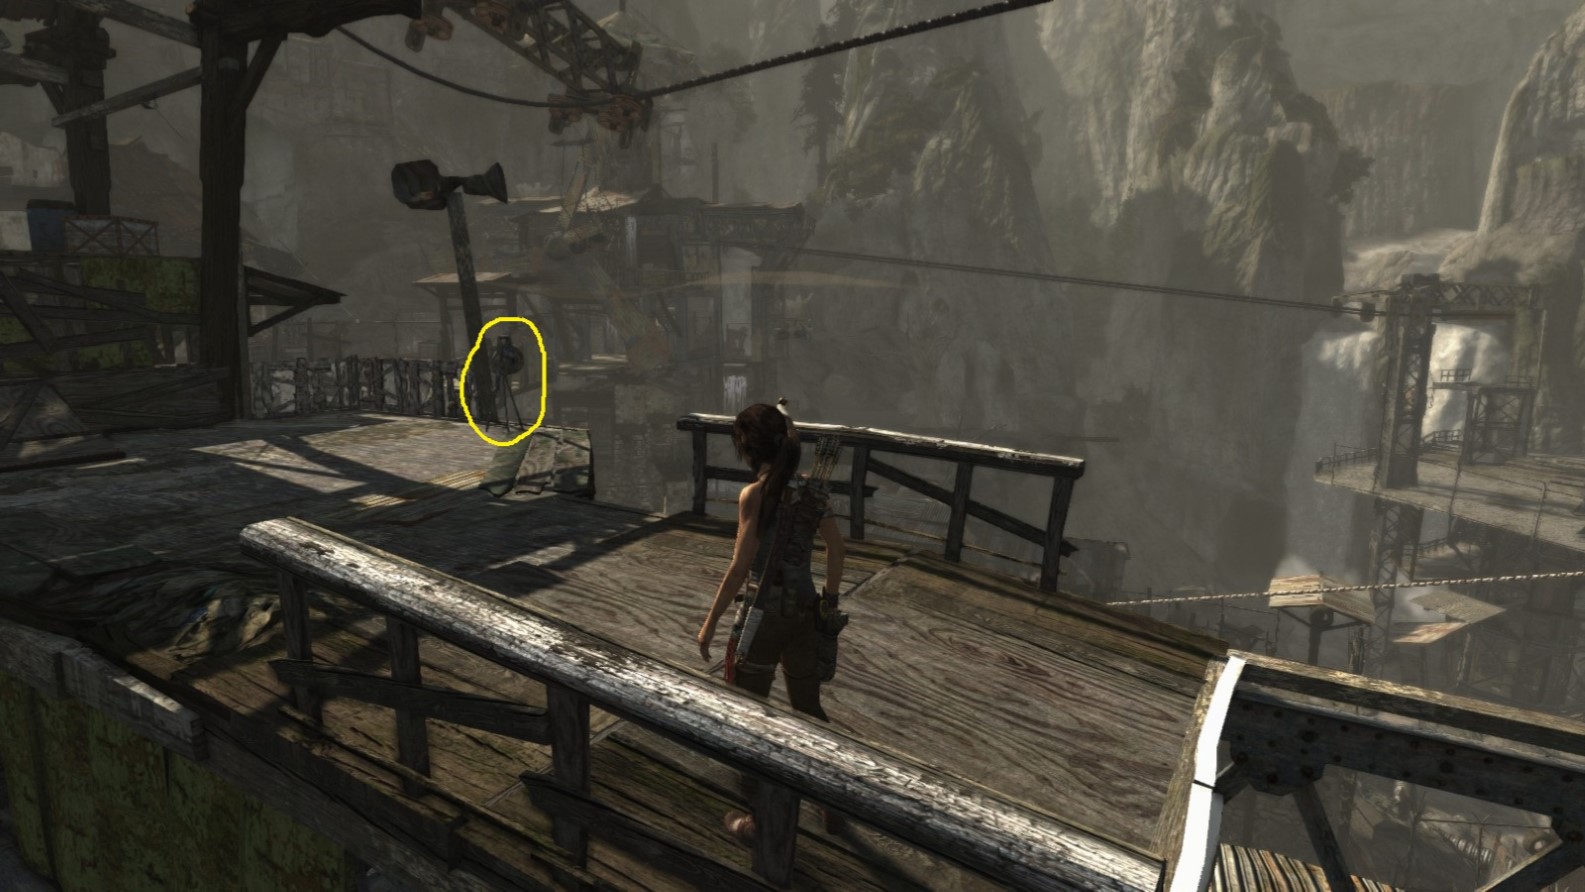
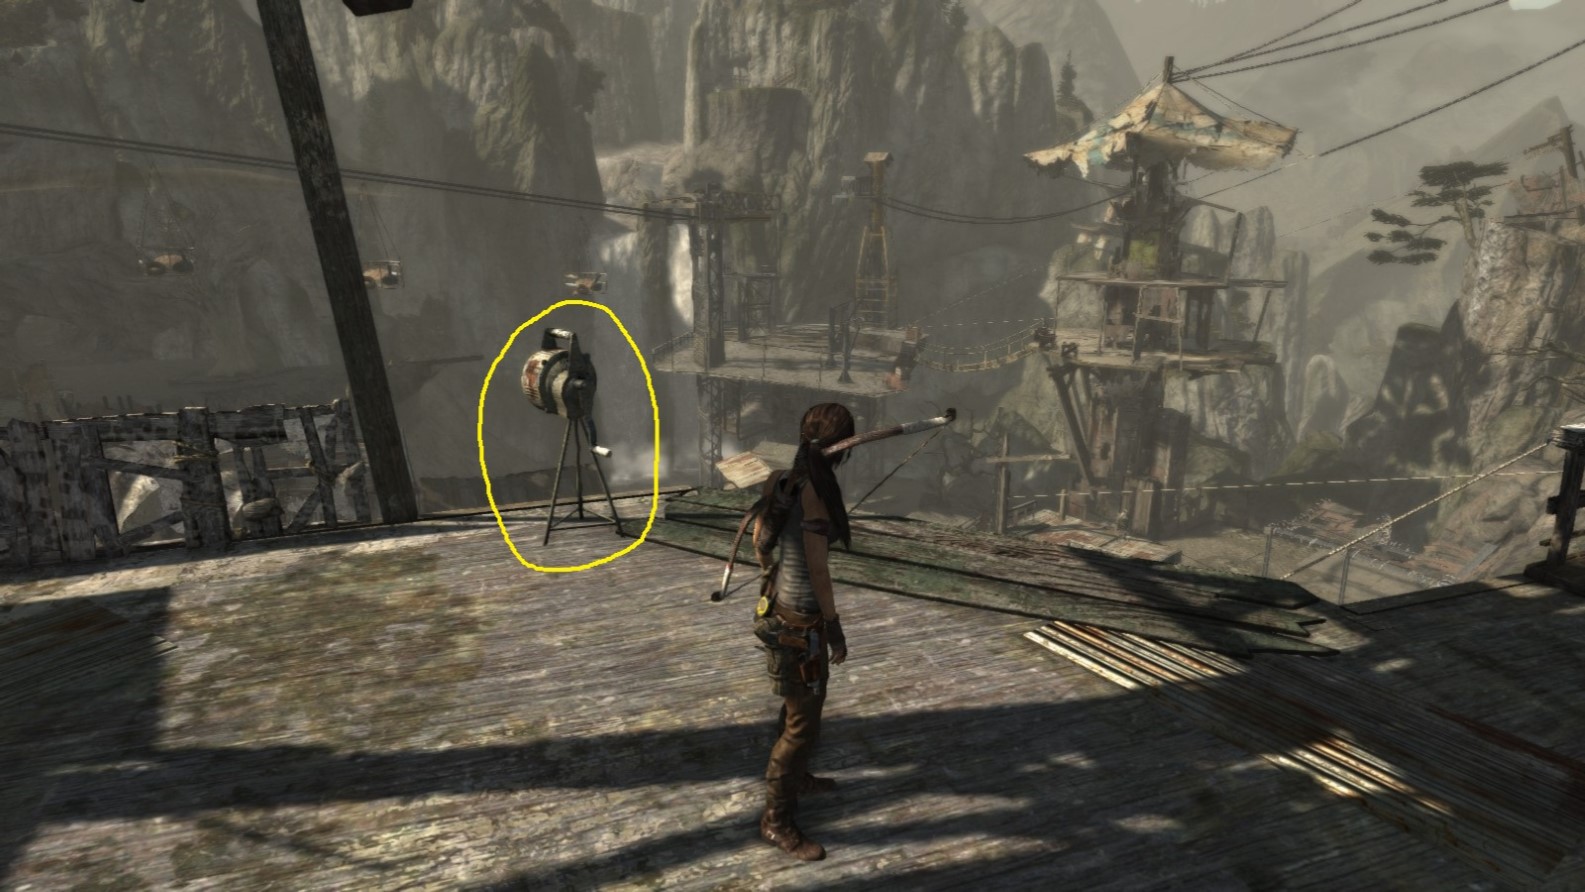
Challenge 7: SILENCER
Important Note:
Although one needs to find 4 objects to complete this challenge, a total of 5 can be found scattered throughout Shantytown. This guide reveals the locations of all 5 alarms.
Area: Shantytown (part 2: after the gate)
Closest Base Camps:
a) Helicopter Hill (first visit via part 1)
b) Windmill (after exploring part 2)
Find and destroy (using axe)
Location on the Map
Screenshot A - Silencer 1/4
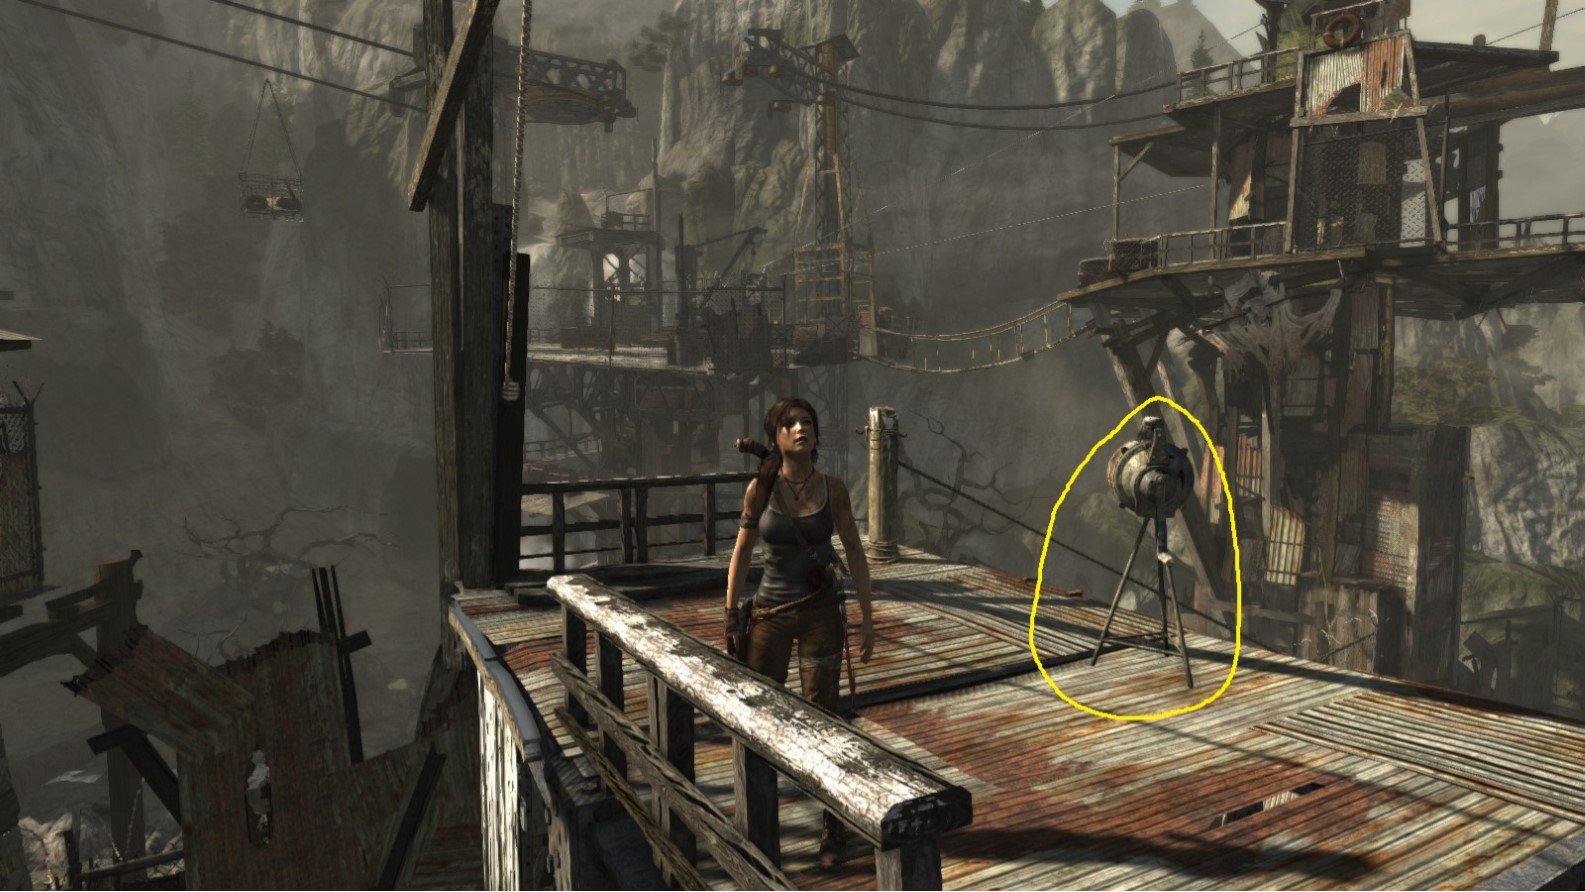
Located on the roof of a building with a view of the overhead cargo-hauling system.
Screenshot B - Silencer 1/4
The view from the opposite direction. This alarm is used by the Solarii when they spot Lara talking to Grim and then attack.
Area: Shantytown (part 2: after the gate)
Closest Base Camps:
a) Helicopter Hill (first visit via part 1)
b) Windmill (after exploring part 2)
Find and destroy (using axe)
Location on the Map
Screenshot A - Silencer 2/4
Located high up on the man-made structures.
Screenshot B - Silencer 2/4
Looking towards the cargo-hauling lift system and the tower from where Grim called down to Lara.
Area: Shantytown (part 2: after the gate)
Closest Base Camps:
a) Helicopter Hill (first visit via part 1)
b) Windmill (after exploring part 2)
Find and destroy (using axe)
Location on the Map
Screenshot A - Silencer 3/4
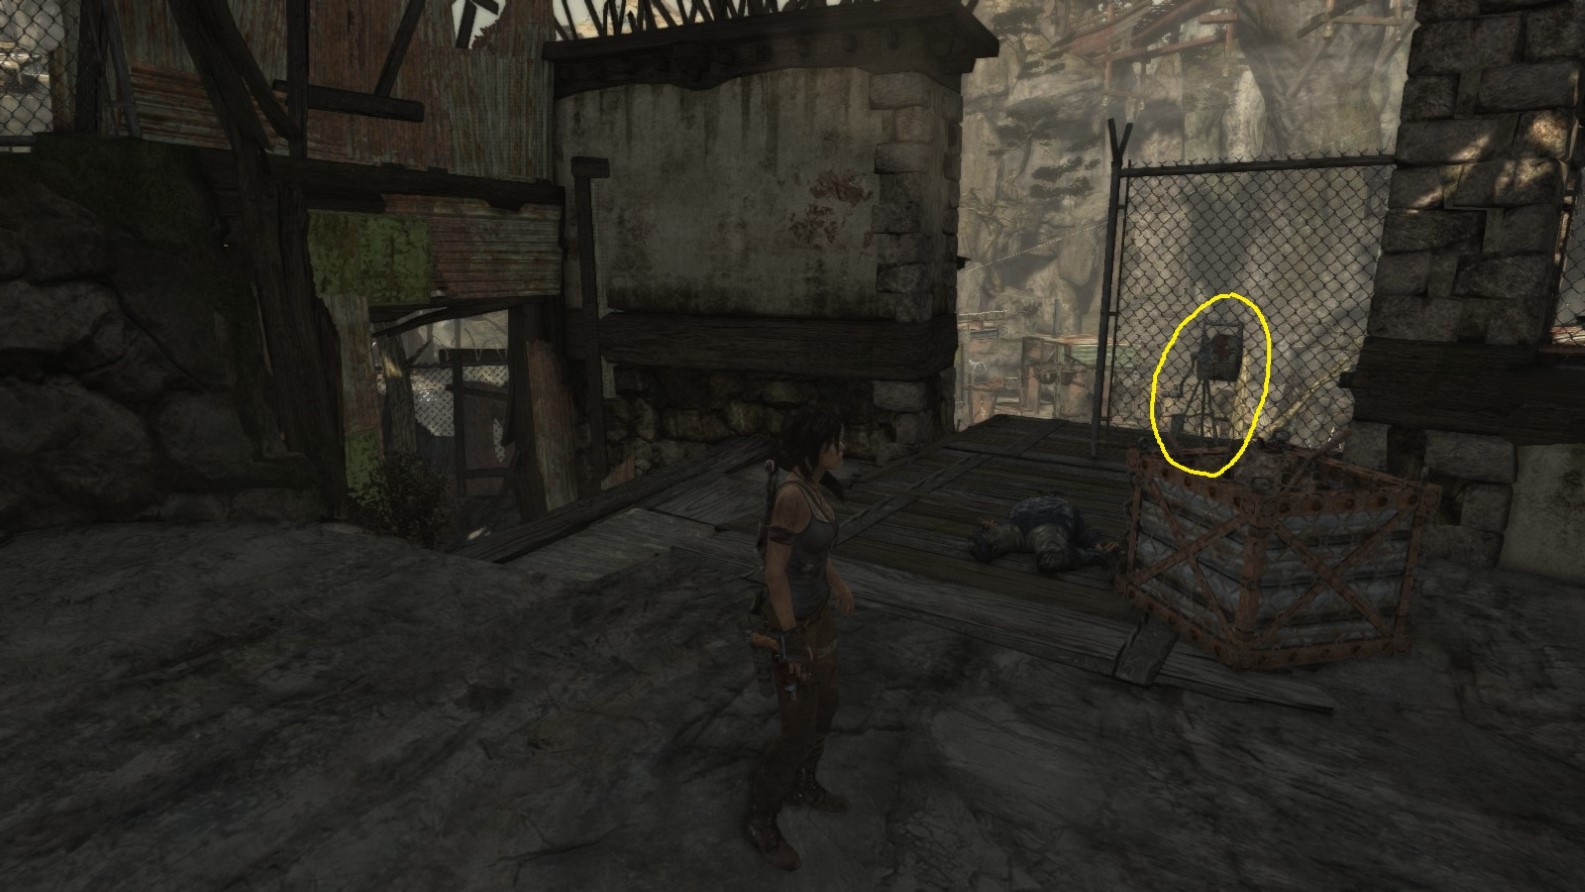
Located near a wire fence.
Screenshot B - Silencer 3/4
Seen from the opposite direction.
Area: Shantytown (part 2: after the gate)
Closest Base Camps:
a) Helicopter Hill (first visit via part 1)
b) Windmill (after exploring part 2)
Find and destroy (using axe)
Location on the Map
Screenshot A - Silencer 4/4
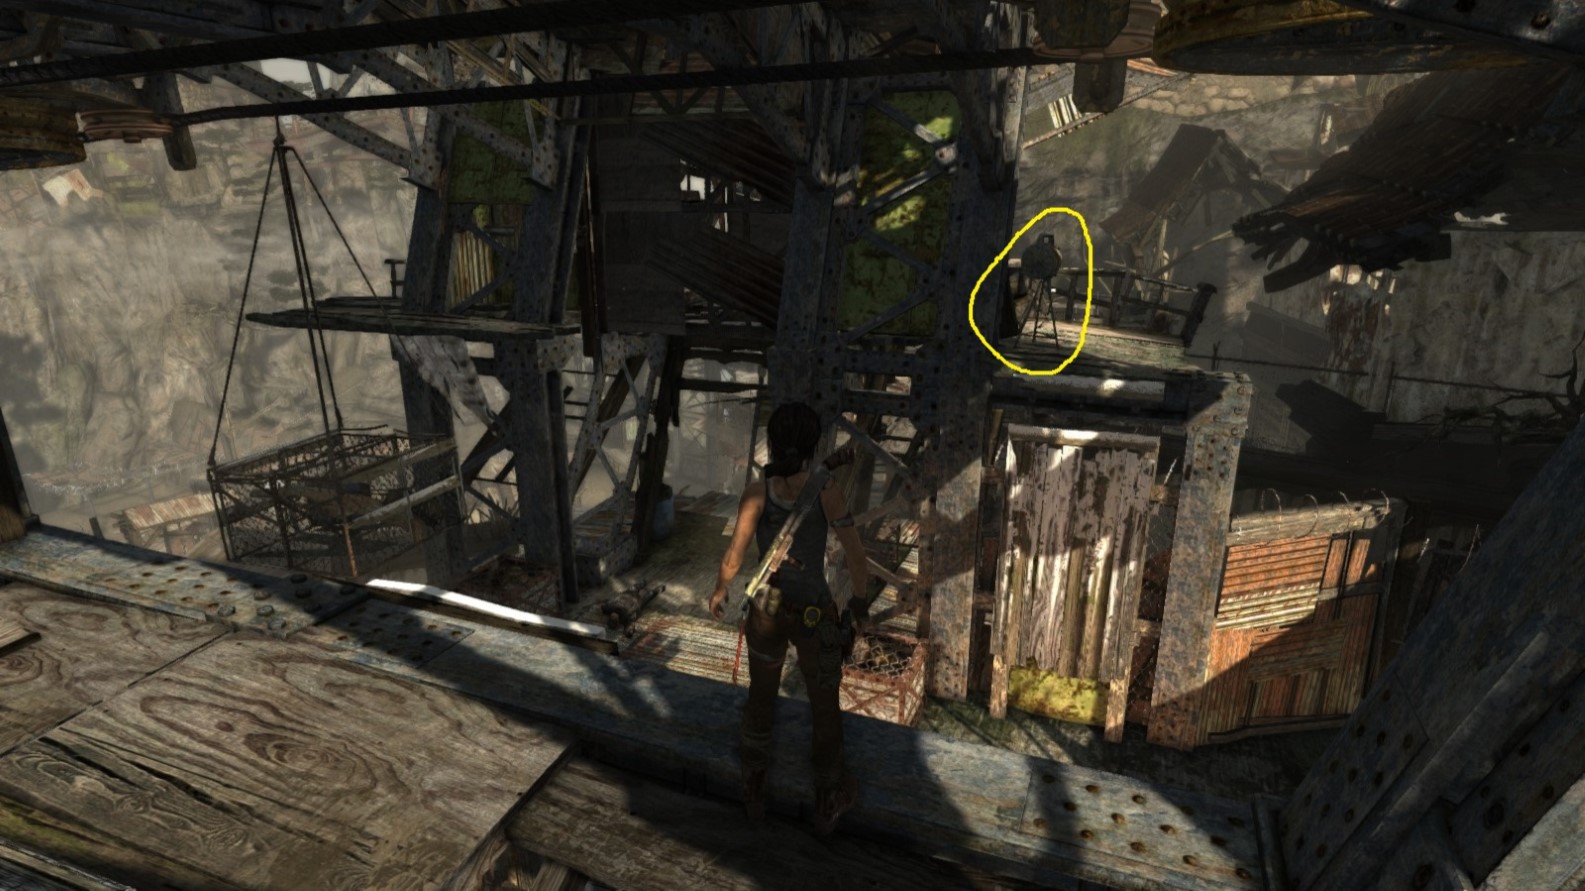
Close to where Lara gets onto the cargo-hauling lift system.
Screenshot B - Silencer 4/4

Looking from the opposite side. The lifts move along a cable between these buildings.
ADDED LATER
Area: Shantytown (part 1)
Closest Base Camp:
Helicopter Hill
Find and destroy (using axe)
Location on the Map
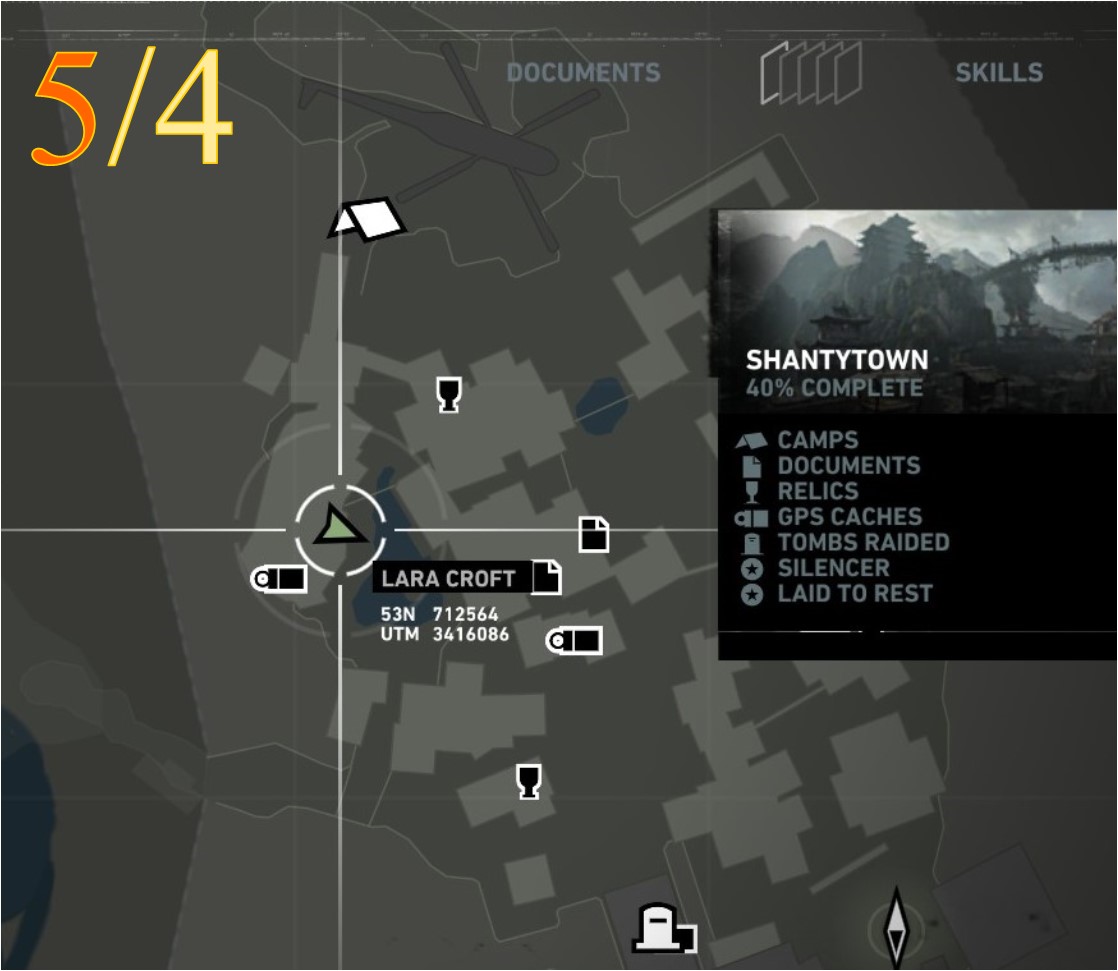
Screenshot A - Silencer 5/4
High up on a man-made structure.
Screenshot B - Silencer 5/4

Looking back towards the Helicopter Hill base camp.
*** End of SILENCER ***
Although one needs to find 4 objects to complete this challenge, a total of 5 can be found scattered throughout Shantytown. This guide reveals the locations of all 5 alarms.
Silencer - Object 1
Area: Shantytown (part 2: after the gate)
Closest Base Camps:
a) Helicopter Hill (first visit via part 1)
b) Windmill (after exploring part 2)
Find and destroy (using axe)
Location on the Map
Screenshot A - Silencer 1/4
Located on the roof of a building with a view of the overhead cargo-hauling system.
Screenshot B - Silencer 1/4
The view from the opposite direction. This alarm is used by the Solarii when they spot Lara talking to Grim and then attack.
Silencer - Object 2
Area: Shantytown (part 2: after the gate)
Closest Base Camps:
a) Helicopter Hill (first visit via part 1)
b) Windmill (after exploring part 2)
Find and destroy (using axe)
Location on the Map
Screenshot A - Silencer 2/4
Located high up on the man-made structures.
Screenshot B - Silencer 2/4
Looking towards the cargo-hauling lift system and the tower from where Grim called down to Lara.
Silencer - Object 3
Area: Shantytown (part 2: after the gate)
Closest Base Camps:
a) Helicopter Hill (first visit via part 1)
b) Windmill (after exploring part 2)
Find and destroy (using axe)
Location on the Map
Screenshot A - Silencer 3/4
Located near a wire fence.
Screenshot B - Silencer 3/4
Seen from the opposite direction.
Silencer - Object 4
Area: Shantytown (part 2: after the gate)
Closest Base Camps:
a) Helicopter Hill (first visit via part 1)
b) Windmill (after exploring part 2)
Find and destroy (using axe)
Location on the Map
Screenshot A - Silencer 4/4
Close to where Lara gets onto the cargo-hauling lift system.
Screenshot B - Silencer 4/4
Looking from the opposite side. The lifts move along a cable between these buildings.
ADDED LATER
Silencer - Object 5
Area: Shantytown (part 1)
Closest Base Camp:
Helicopter Hill
Find and destroy (using axe)
Location on the Map
Screenshot A - Silencer 5/4
High up on a man-made structure.
Screenshot B - Silencer 5/4
Looking back towards the Helicopter Hill base camp.
*** End of SILENCER ***
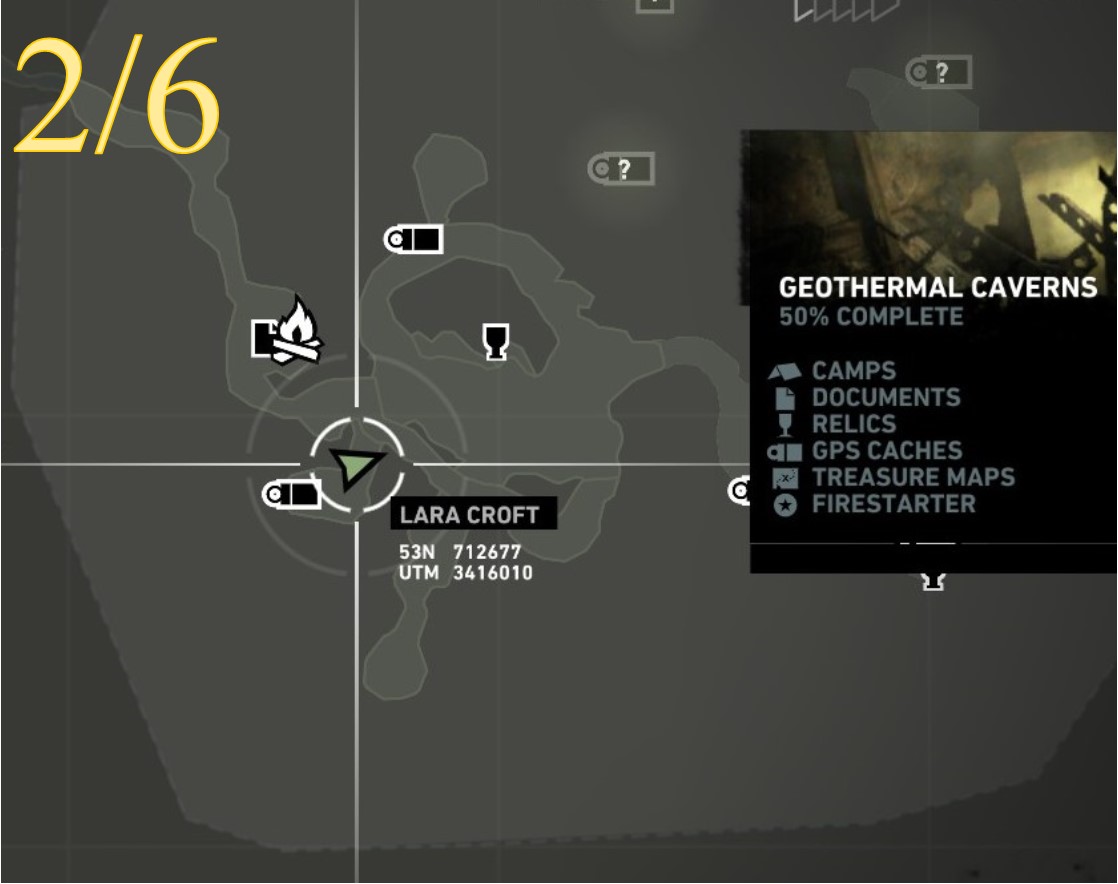
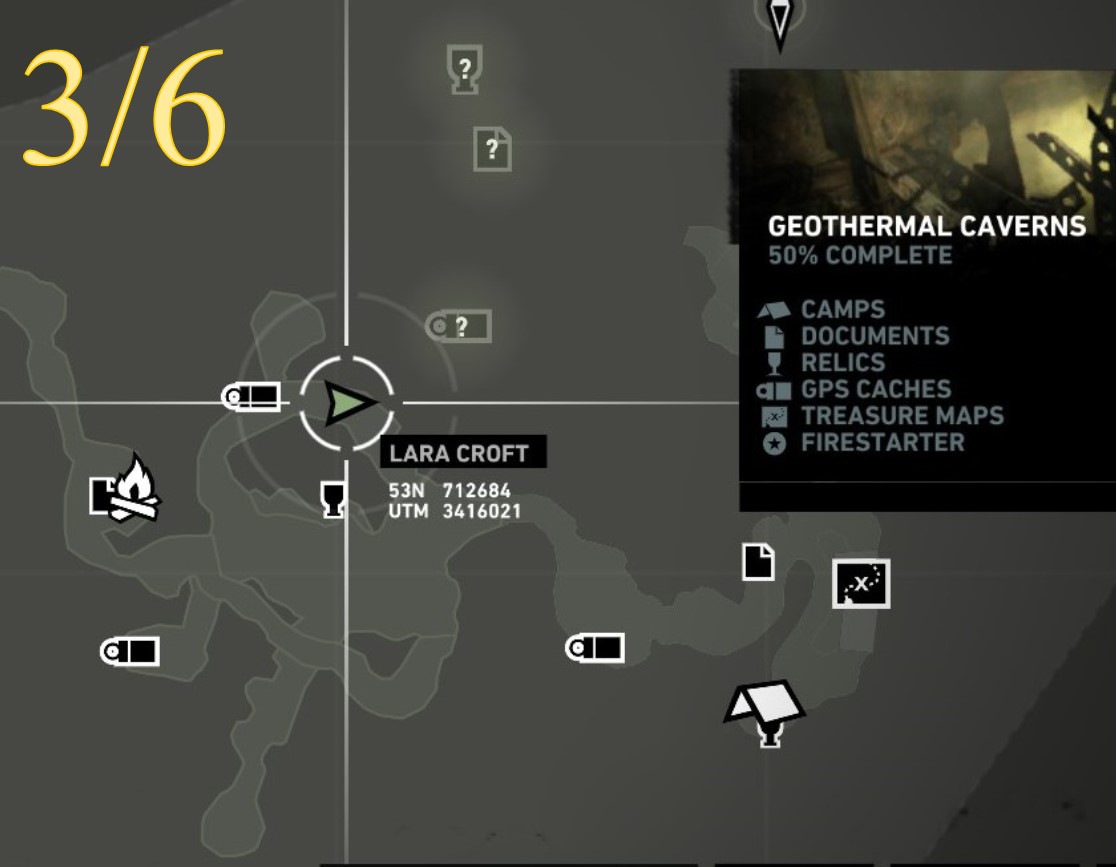
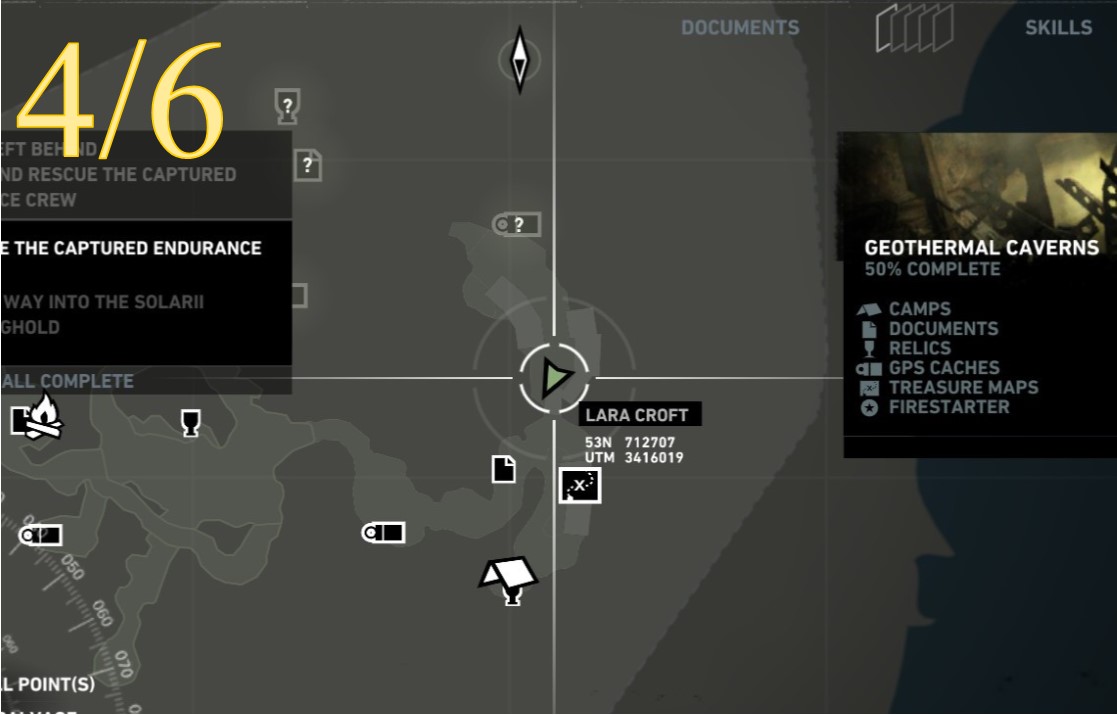
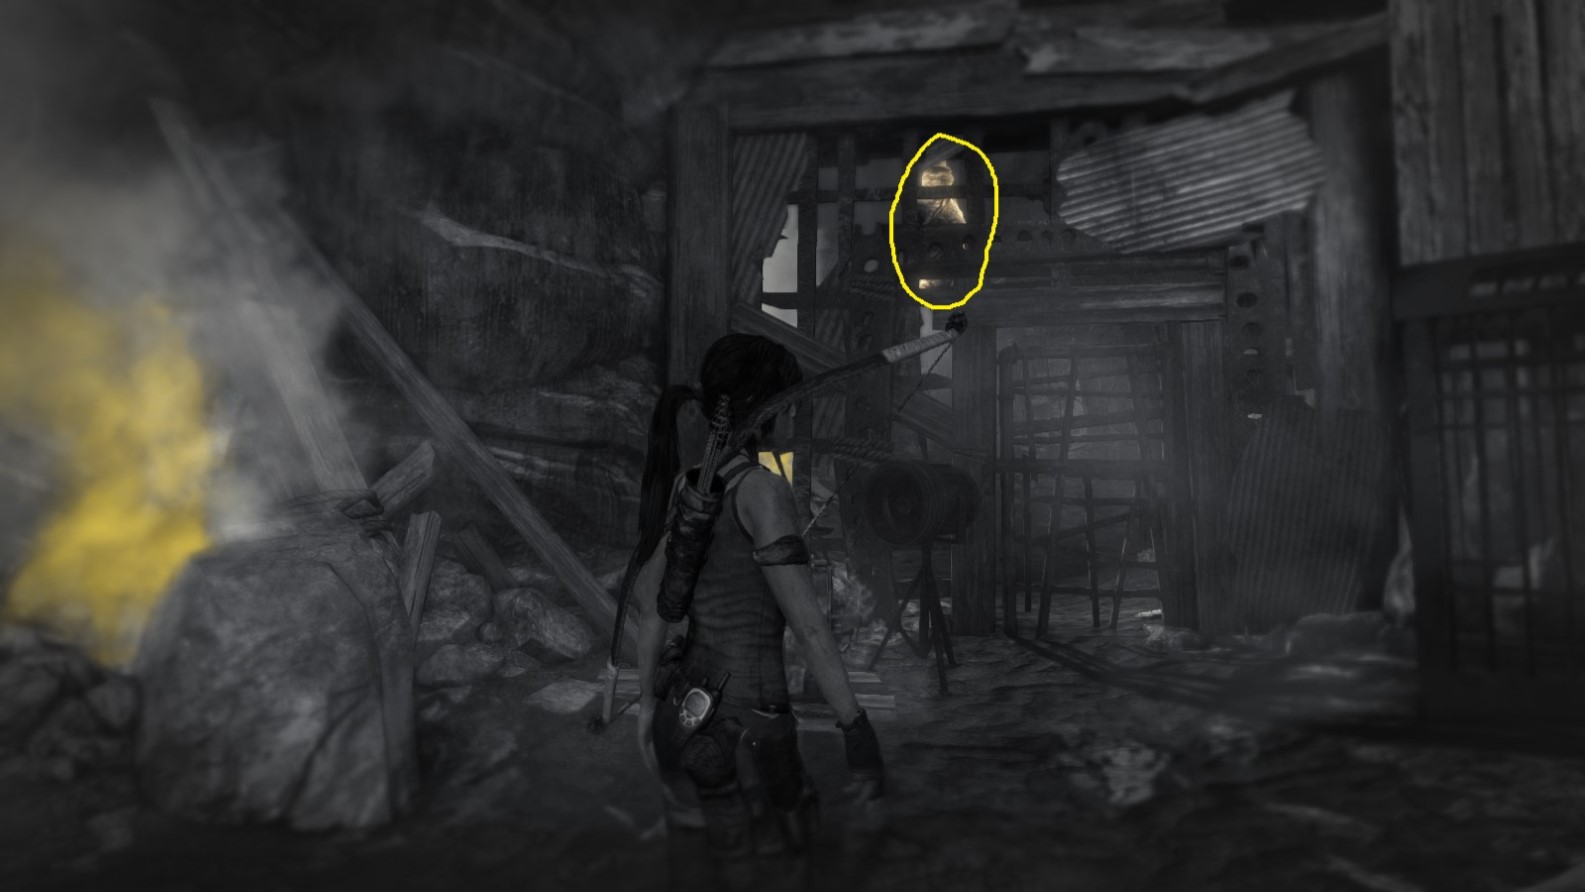
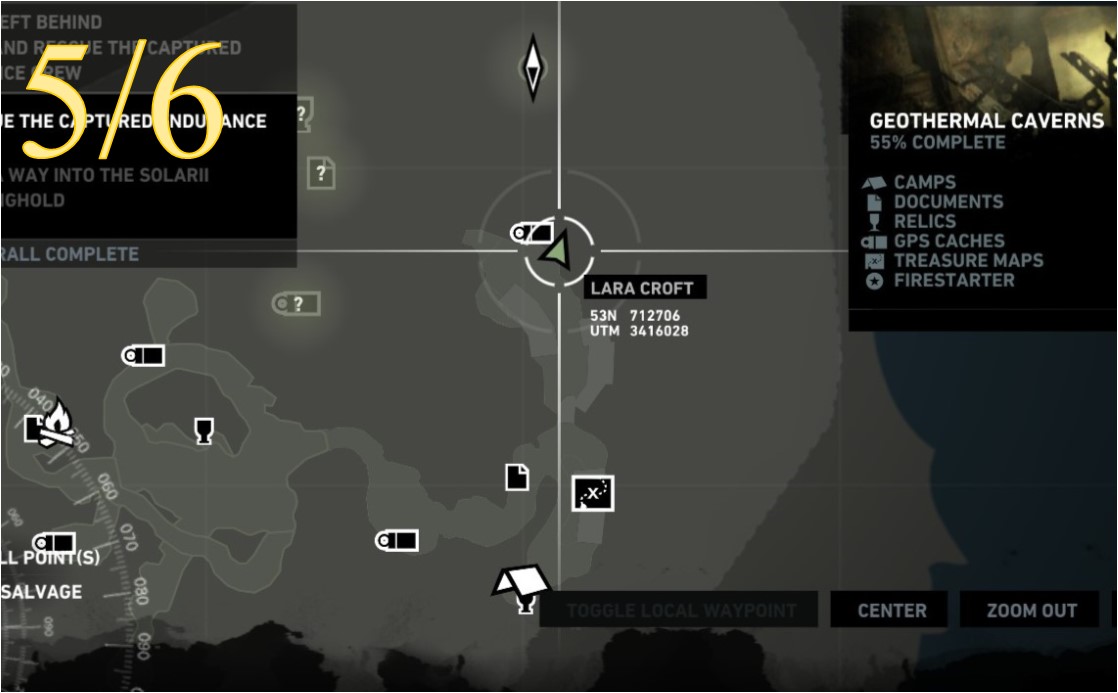
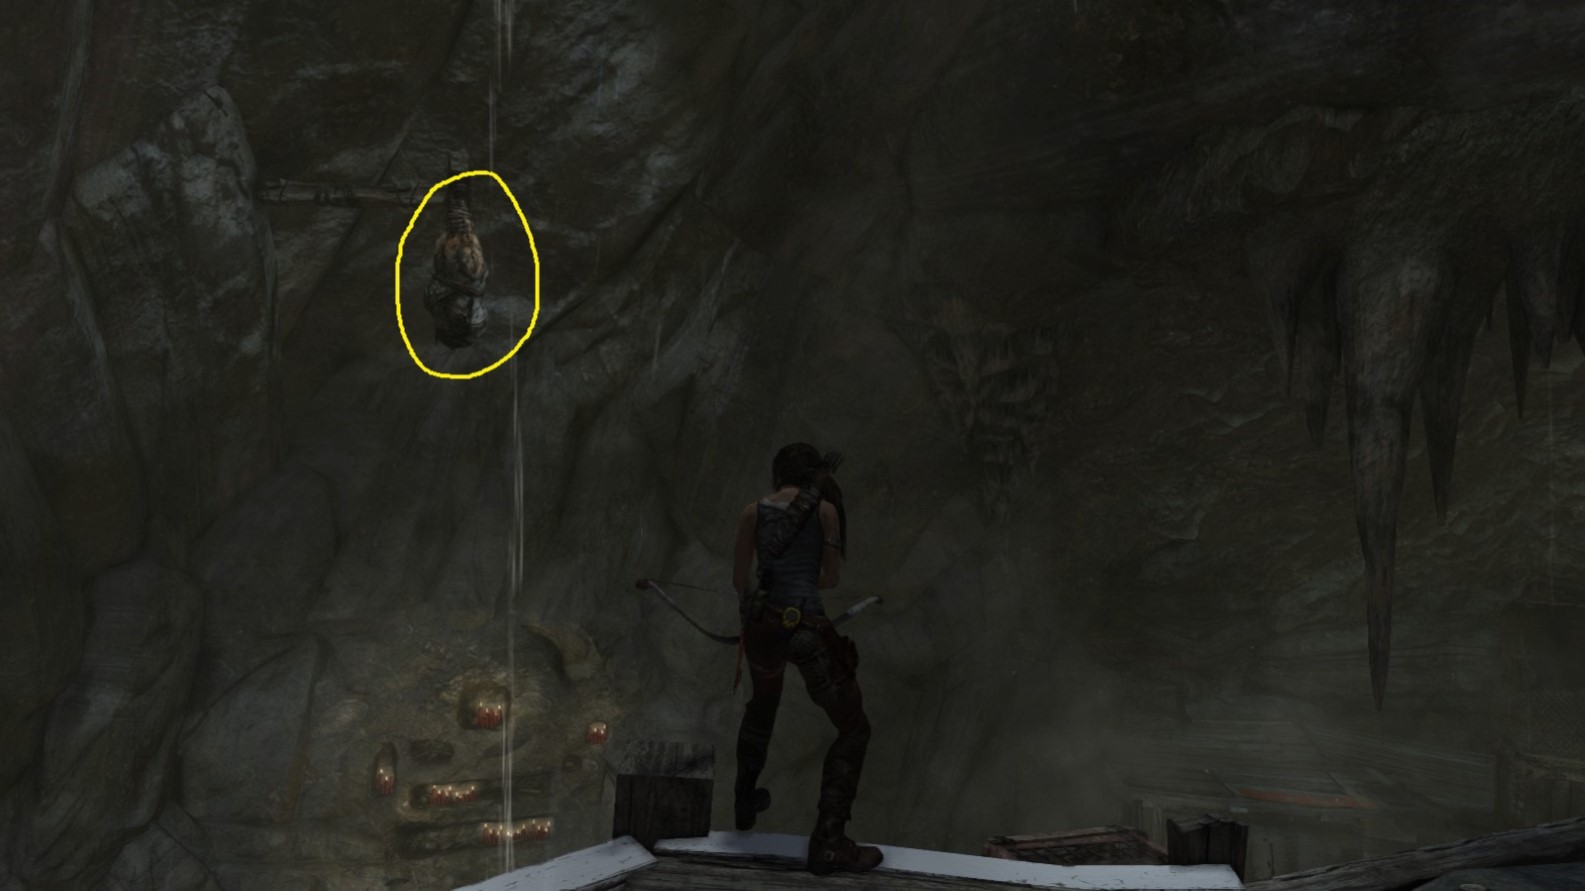
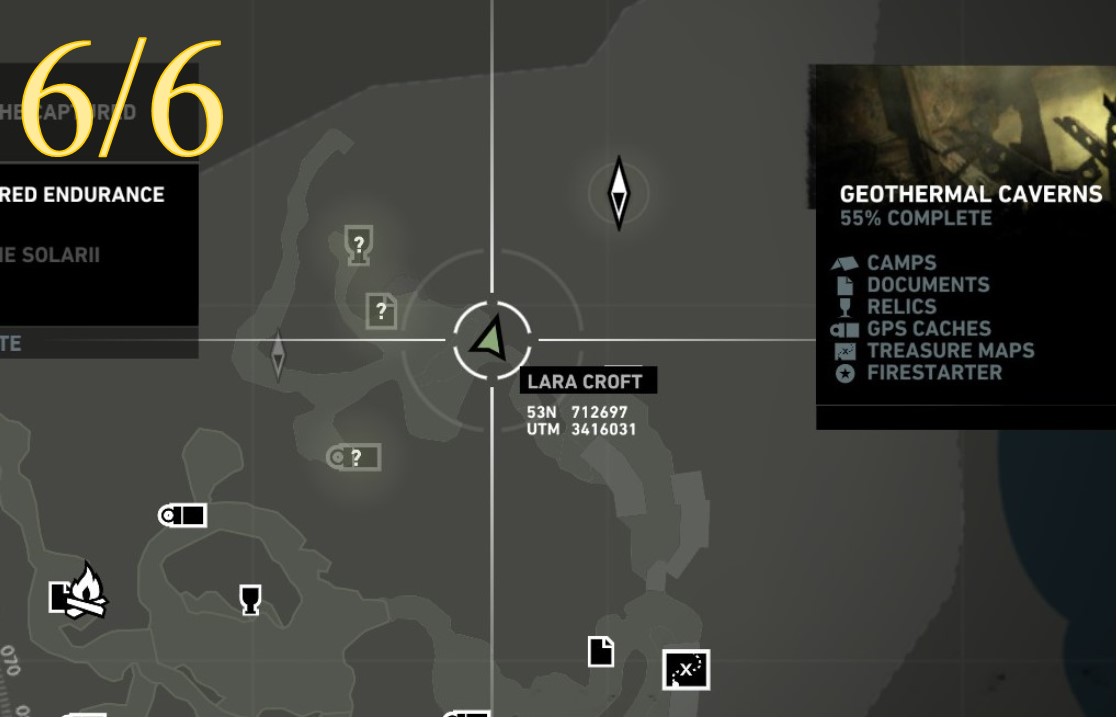
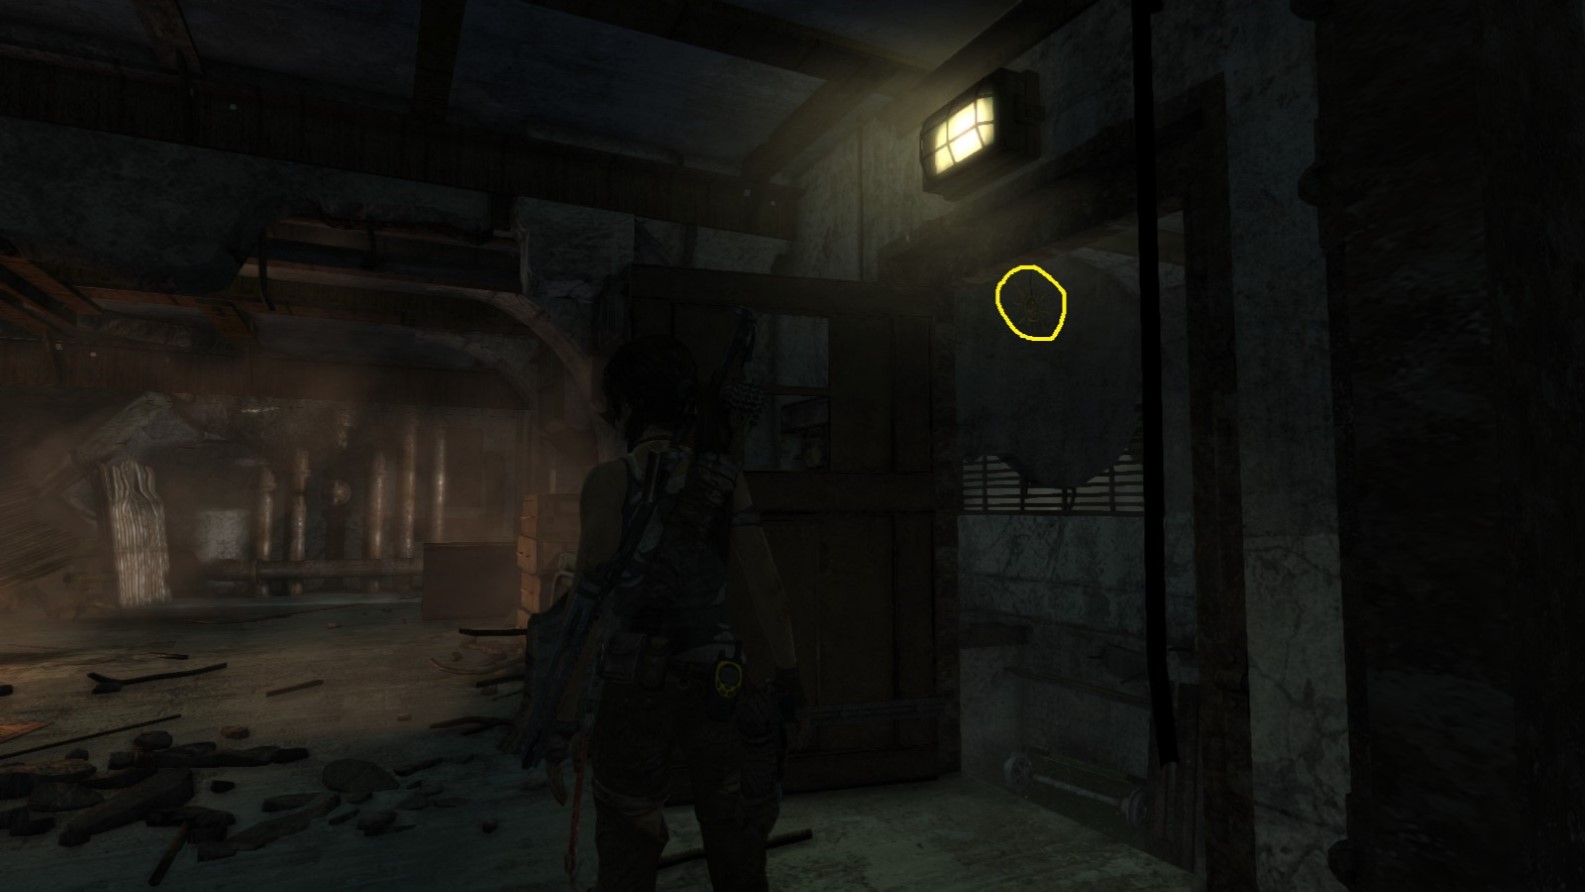
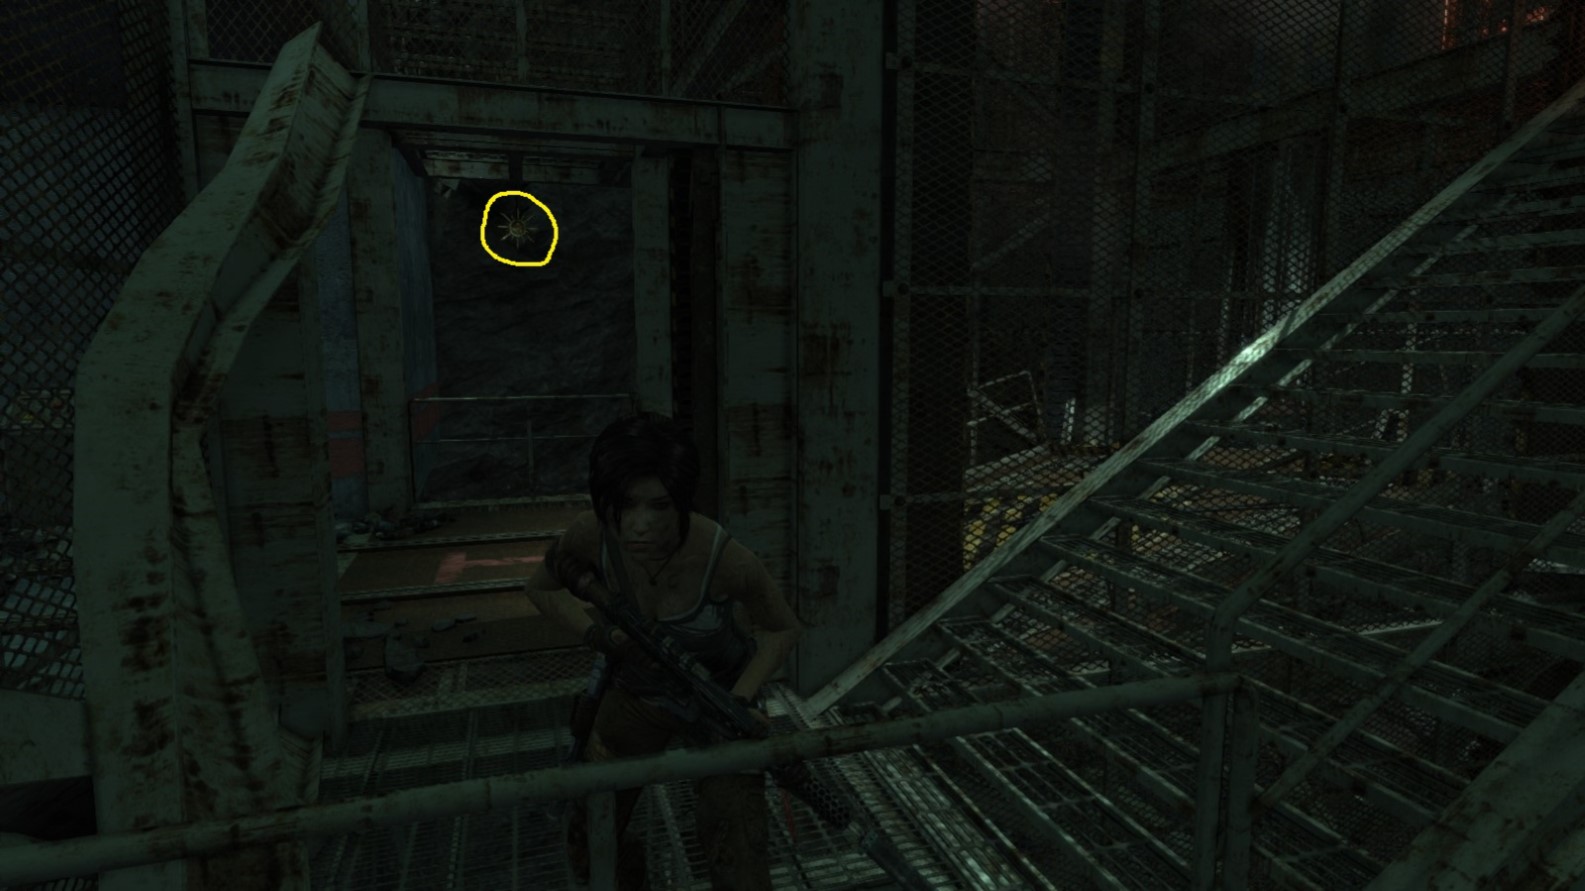
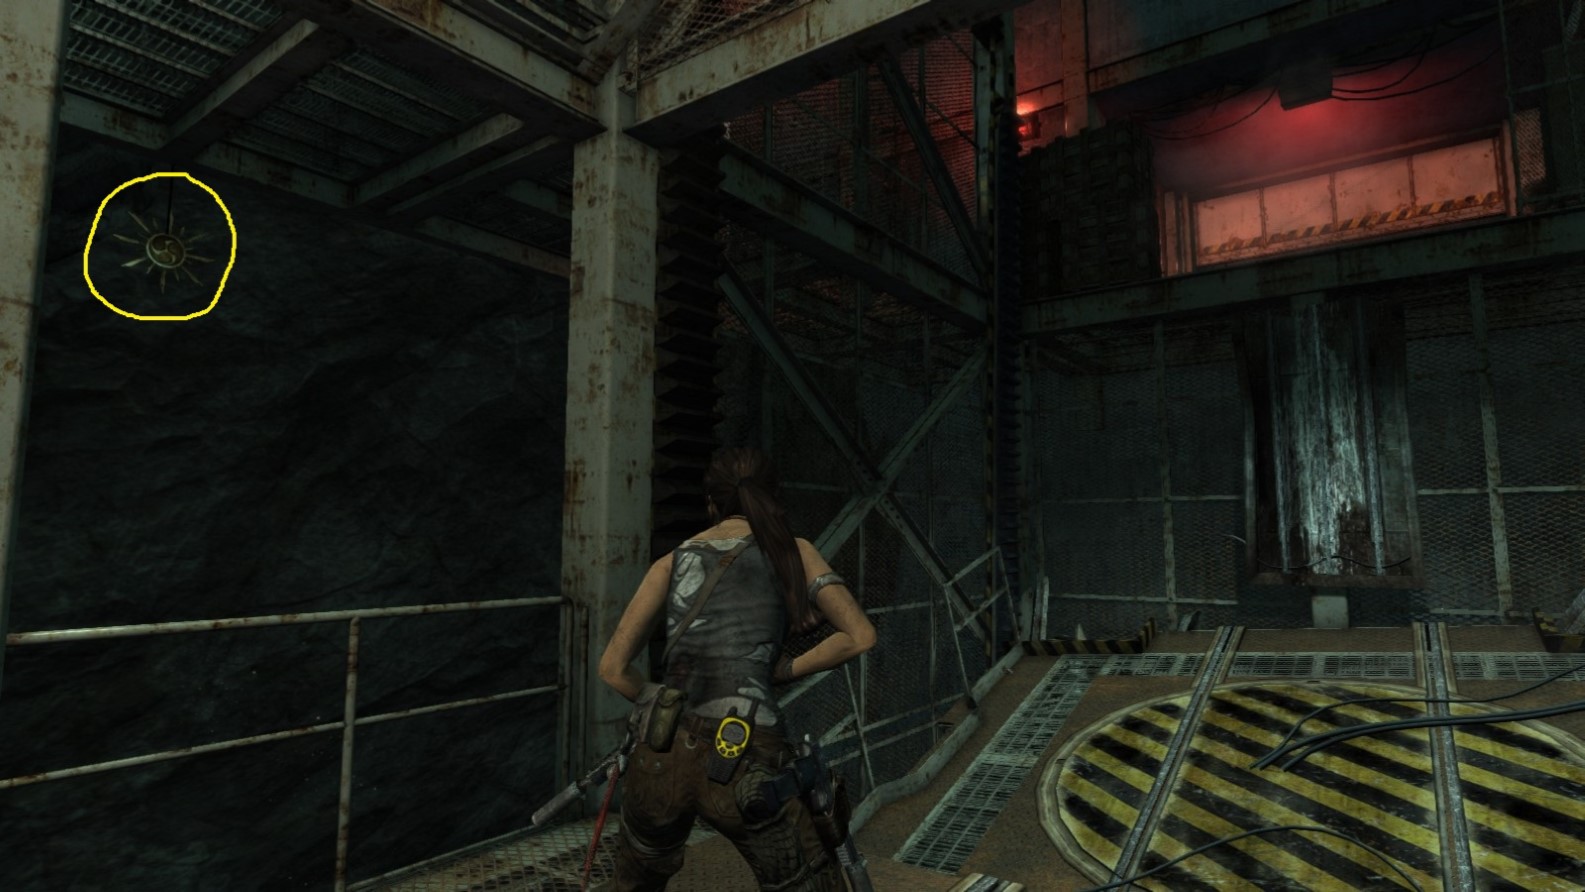
Challenge 8: FIRESTARTER
Firestarter - Object 1
Area: Geothermal Caverns
Closest Base Camp: Catacombs
Find and destroy (using fire arrows)
Location on the Map
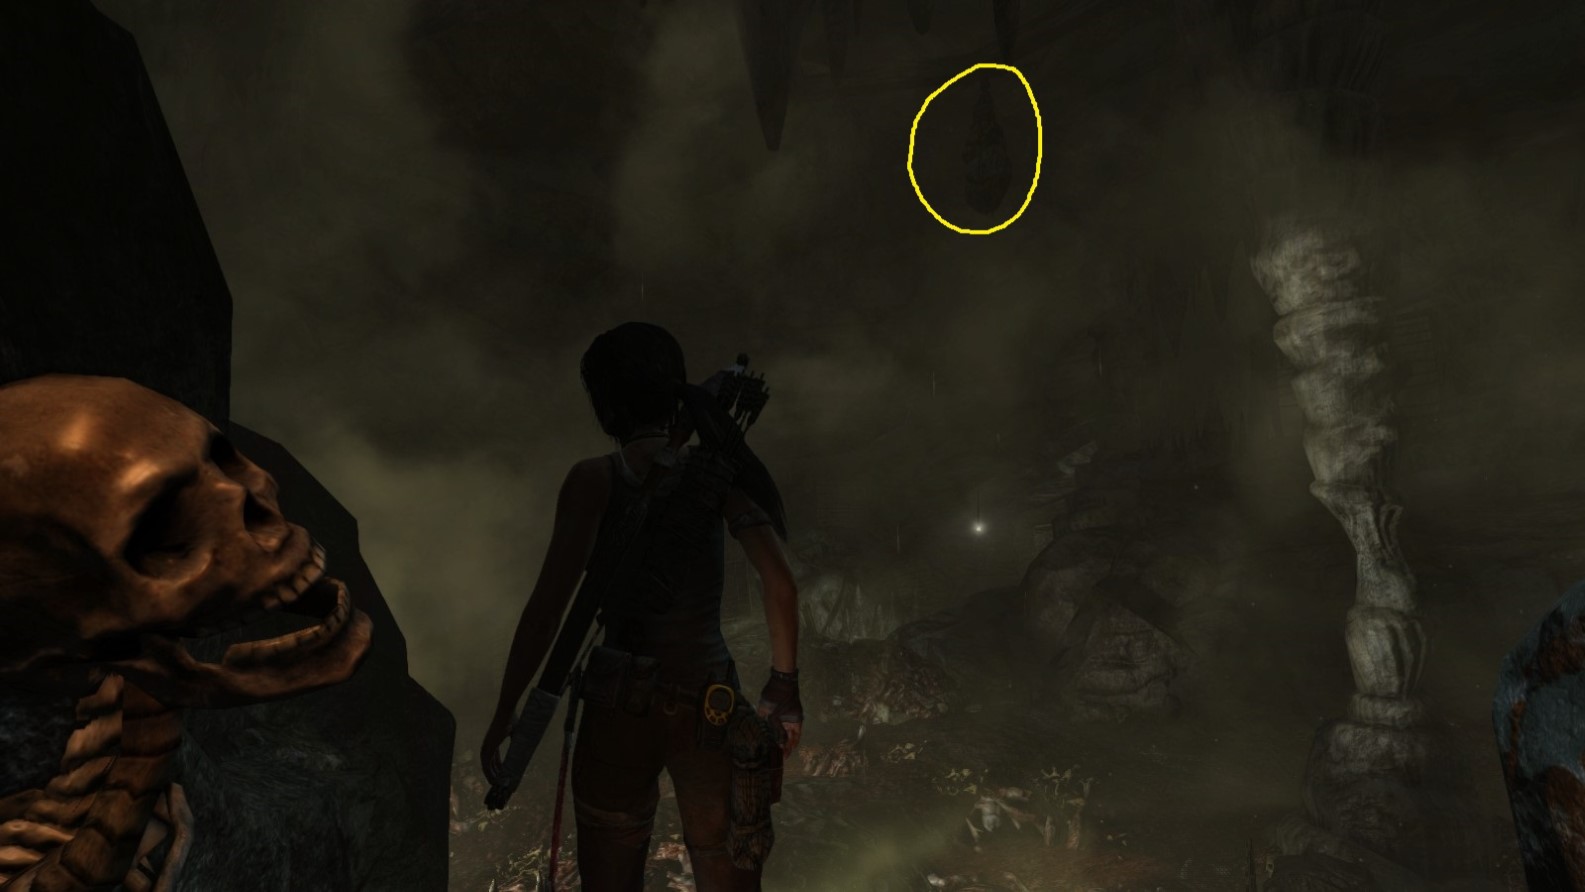
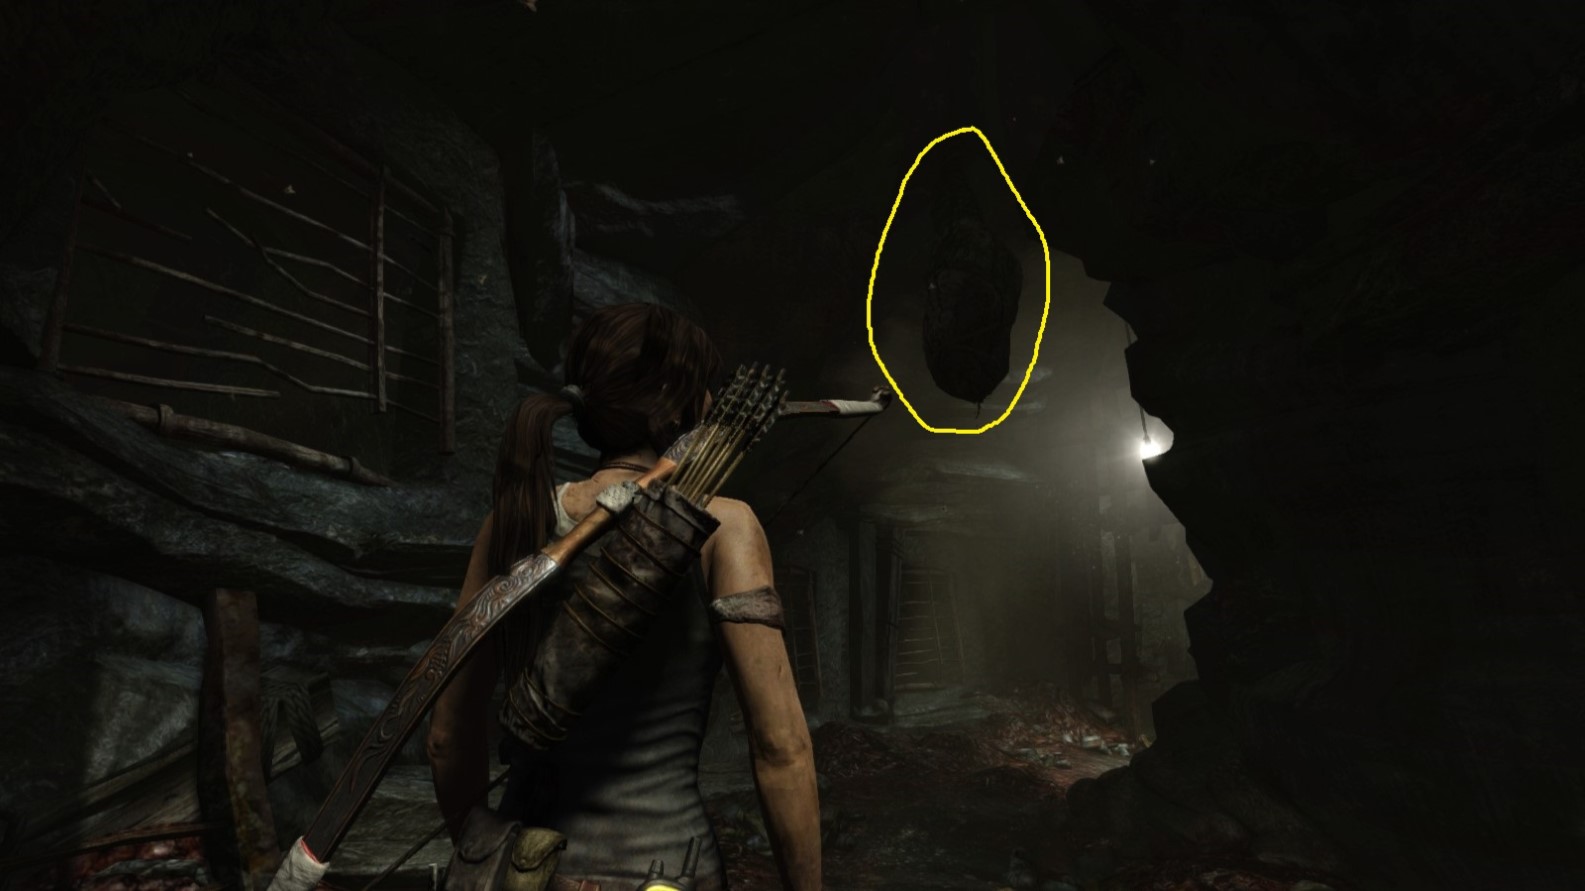
Screenshot A - Firestarter 1/6
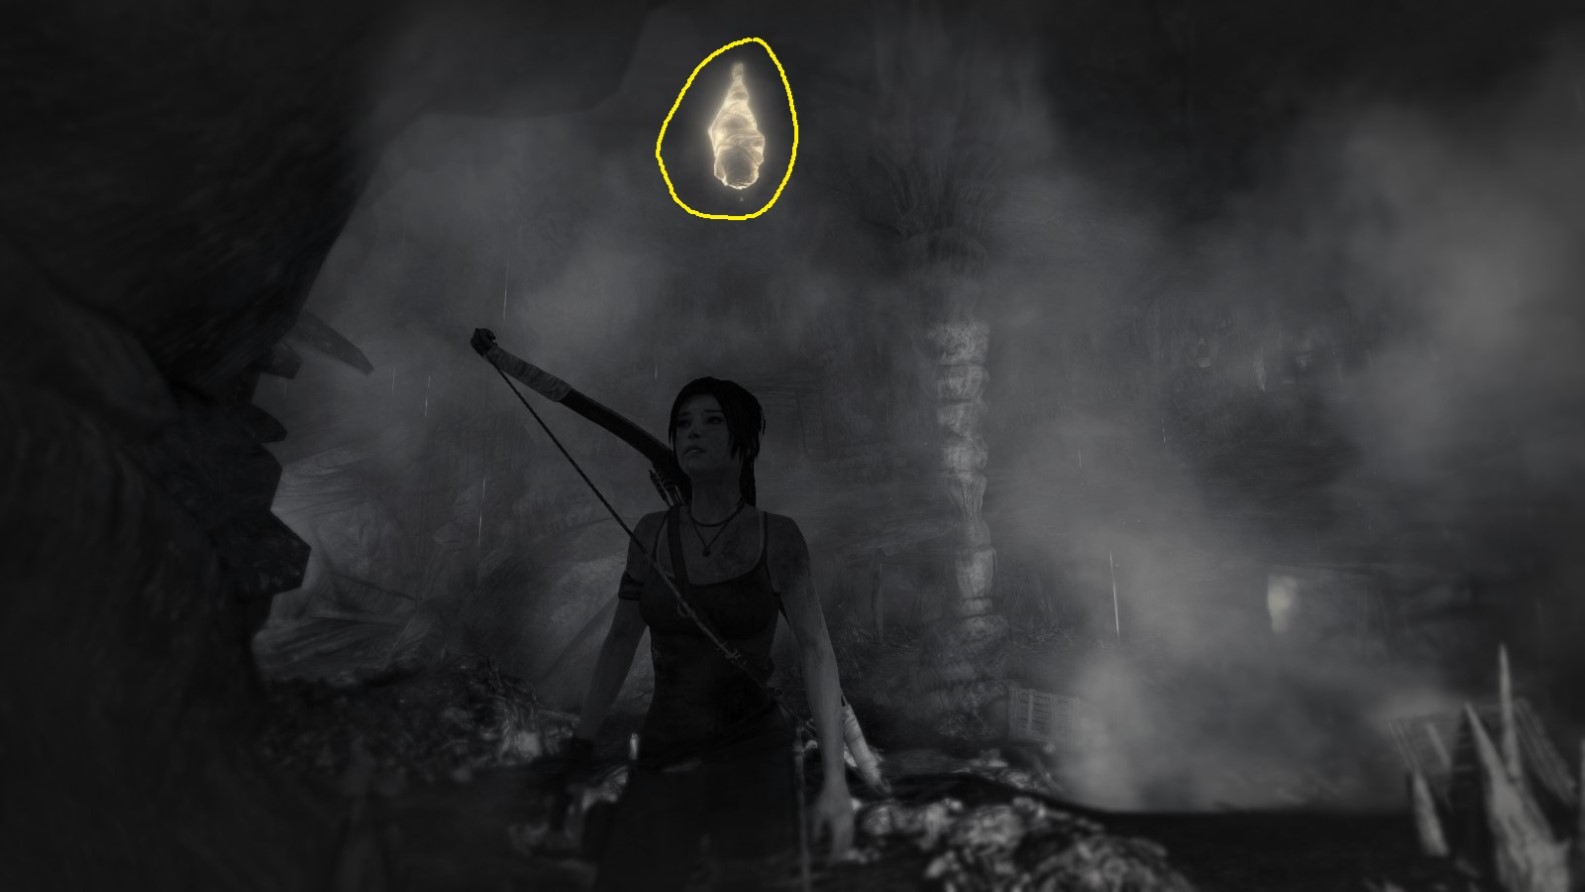
Hanging high up from the ceiling of the cavern. Use Survival Instinct mode (Q) to better see the object.
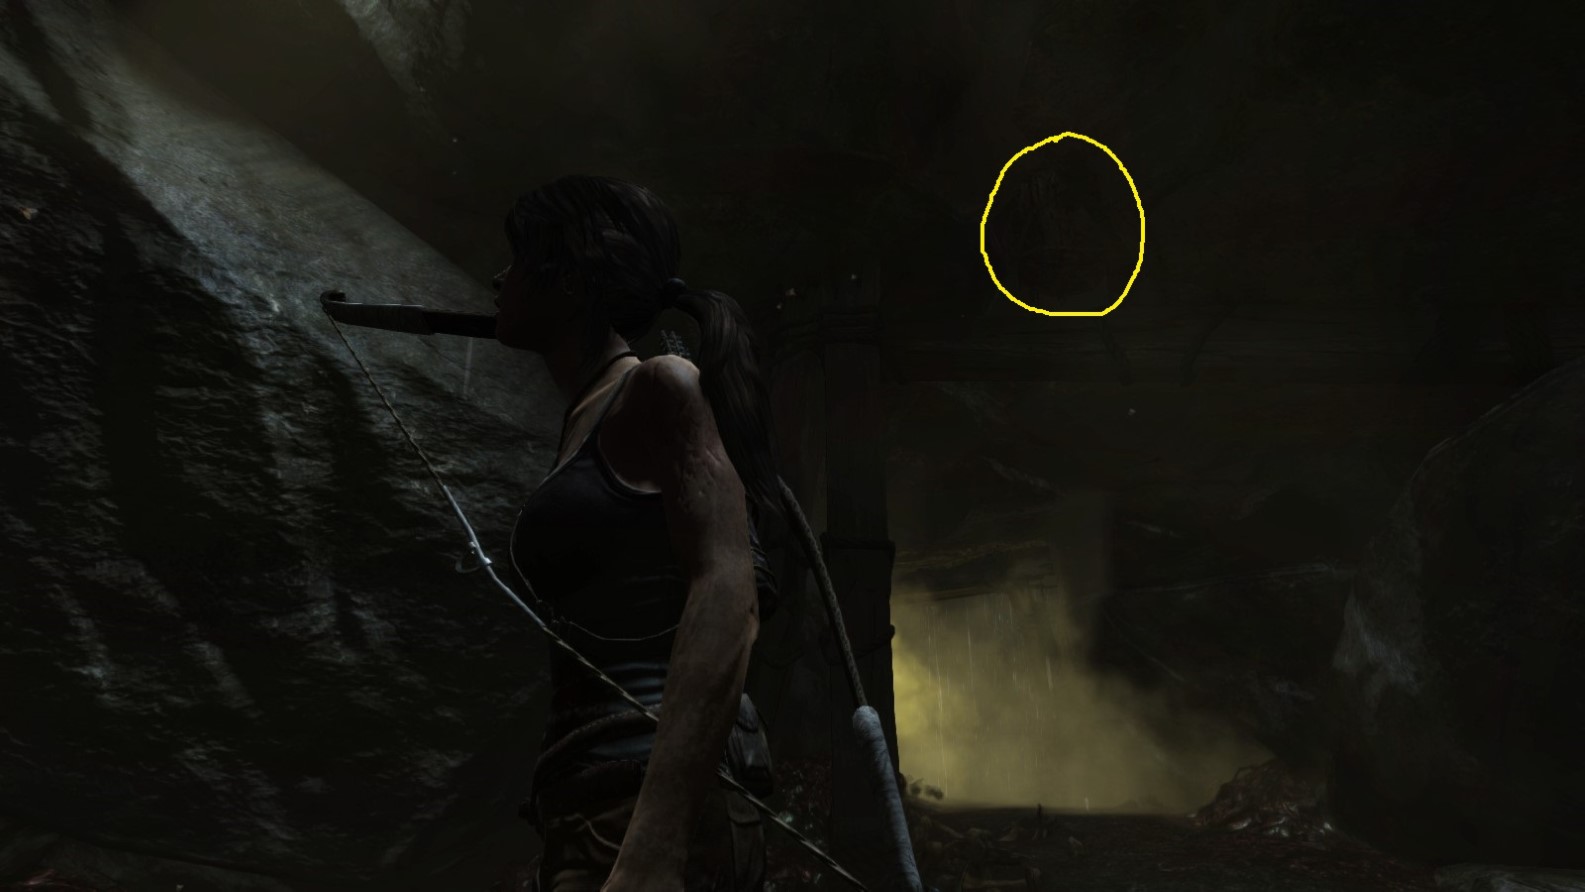
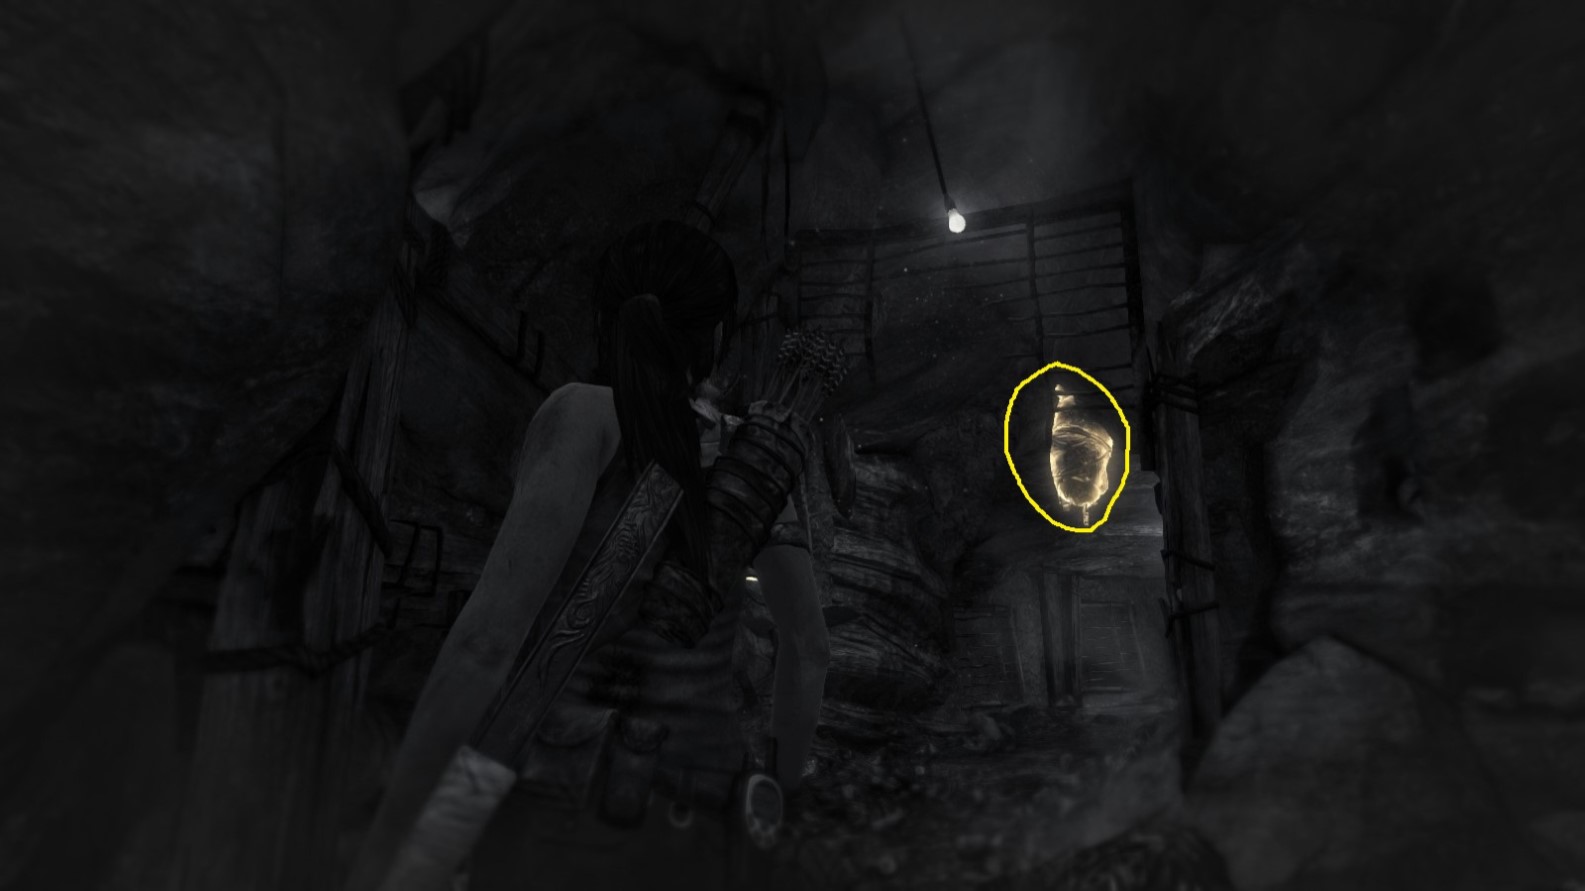
Screenshot B - Firestarter 1/6
Taken from the opposite side of the cavern at the entrance to the curved corridor with cages.
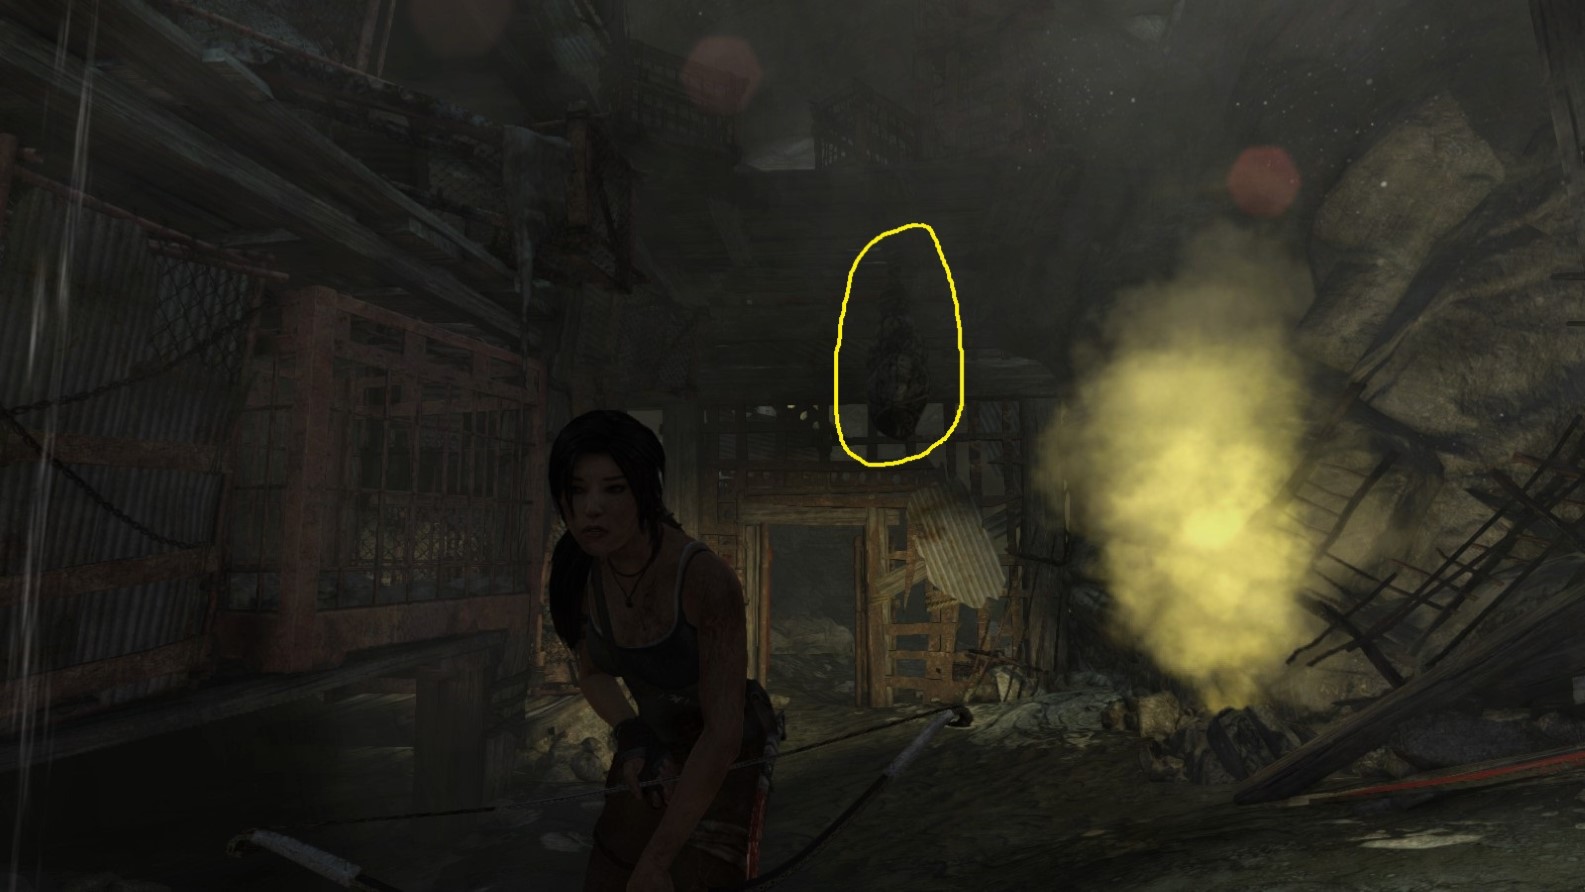
Firestarter - Object 2
Area: Geothermal Caverns
Closest Base Camp: Catacombs
Find and destroy (using fire arrows)
Location on the Map
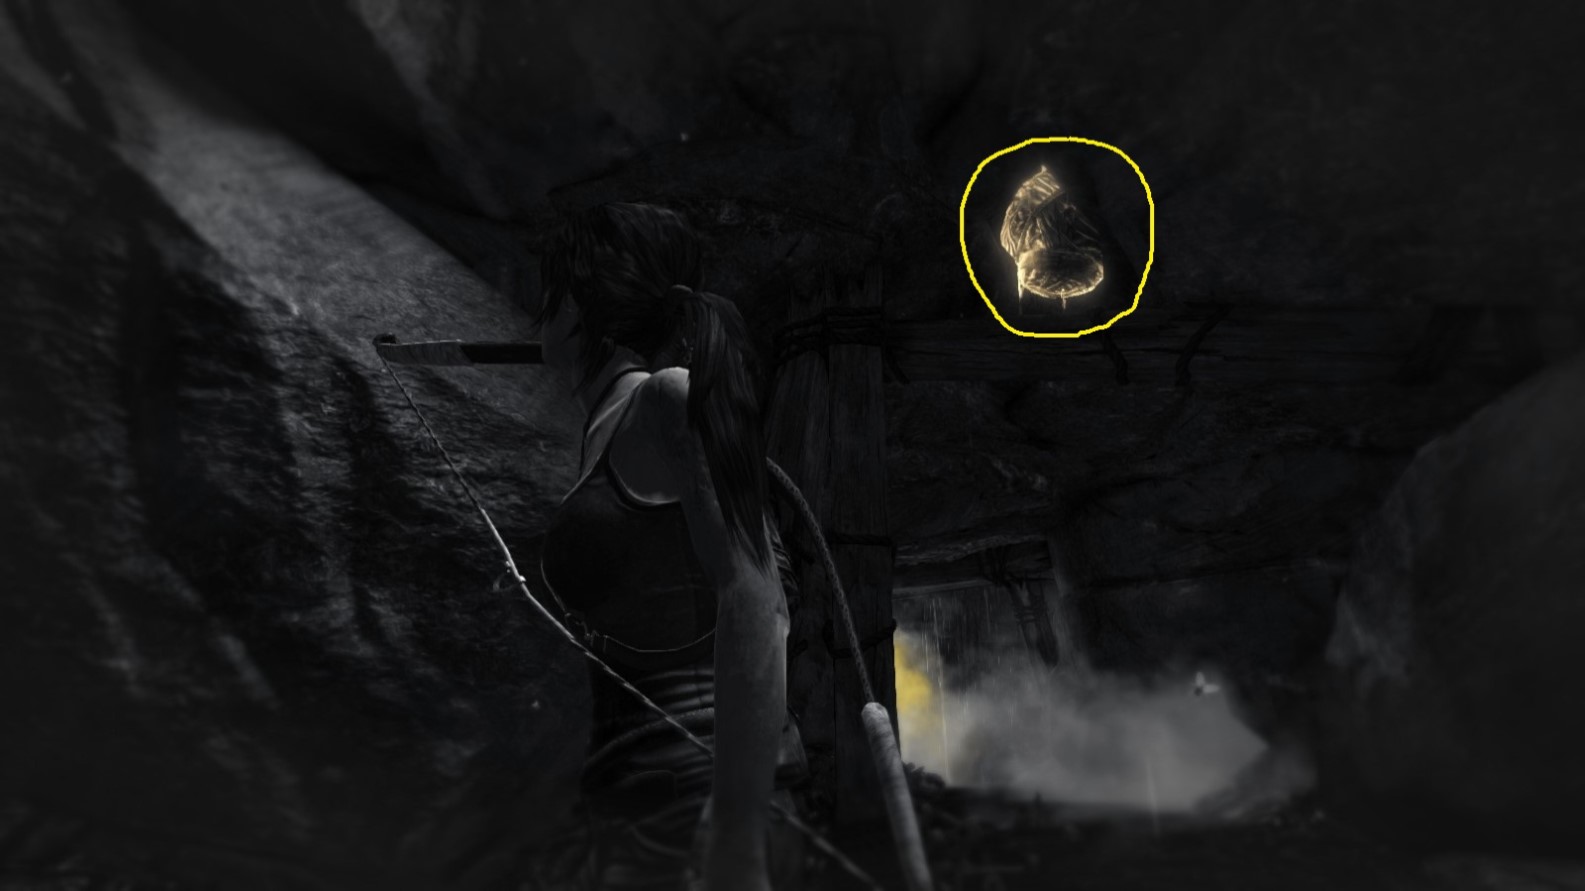
Screenshot A - Firestarter 2/6
Hanging from the ceiling of the cavern. Use Survival Instinct mode (Q) to better see the object.
Screenshot B - Firestarter 2/6
Taken in Survival Instinct mode (Q). The leaking gas at the entrance to this little chamber is seen in the background.
Firestarter - Object 3
Area: Geothermal Caverns
Closest Base Camp: Catacombs
Find and destroy (using fire arrows)
Location on the Map
Screenshot A - Firestarter 3/6
Hanging from the ceiling in the curved corridor that leads back to the large open part of the cavern. There are several caged men in here.
Screenshot B - Firestarter 3/6
Taken in Survival Instinct mode (Q).
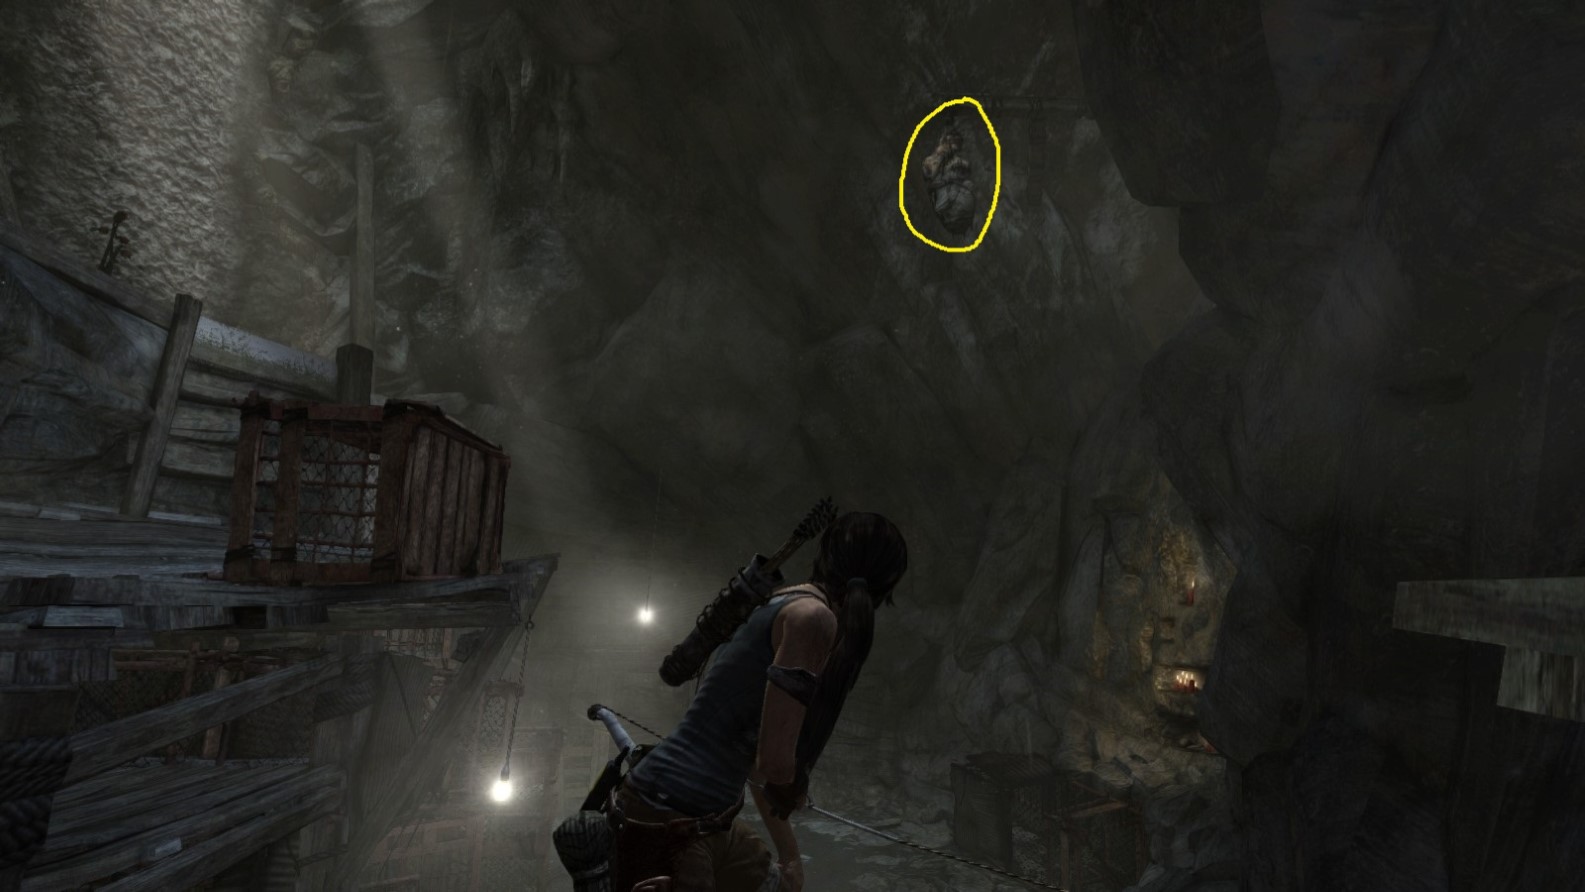
Firestarter - Object 4
Area: Geothermal Caverns
Closest Base Camp: Catacombs
Find and destroy (using fire arrows)
Location on the Map
Screenshot A - Firestarter 4/6
Hanging behind the closed door, seen in Survival Instinct mode.
Screenshot B - Firestarter 4/6
Seen from the opposite side of the doorway (now open).
Firestarter - Object 5
Area: Geothermal Caverns
Closest Base Camp: Catacombs
Find and destroy (using fire arrows)
Location on the Map
Screenshot A - Firestarter 5/6
Hanging from the ceiling above.
Screenshot B - Firestarter 5/6
Seen from higher up.
Firestarter - Object 6
Area: Geothermal Caverns
Closest Base Camp: Catacombs
Find and destroy (using fire arrows)
Location on the Map
Screenshot A - Firestarter 6/6
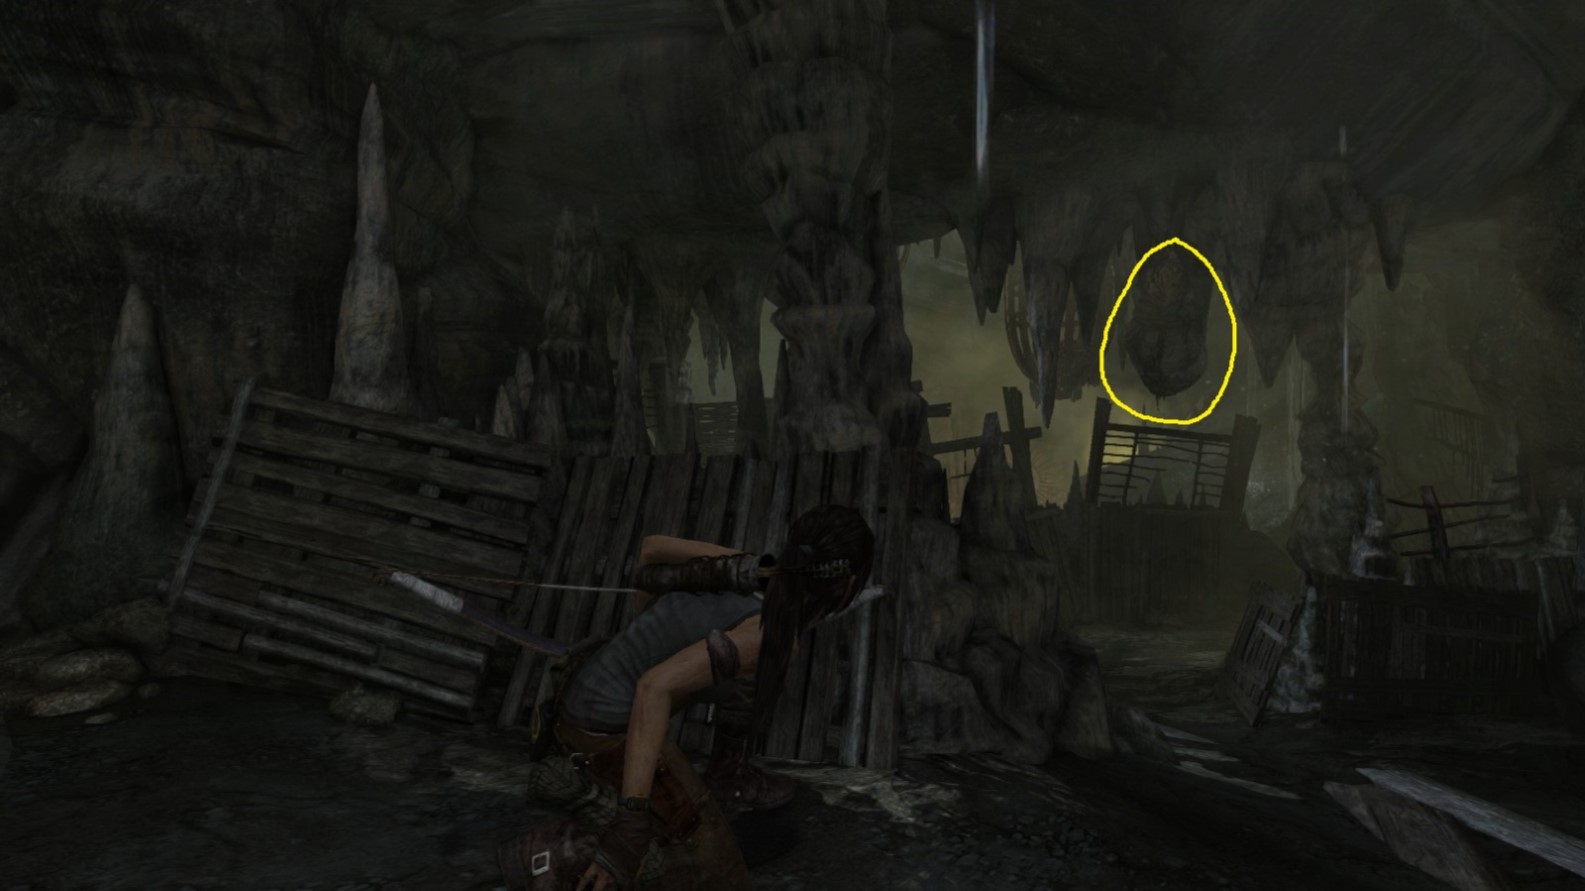
Hanging from the ceiling at the entrance to a chamber where a ritual is taking place.
Screenshot B - Firestarter 6/6
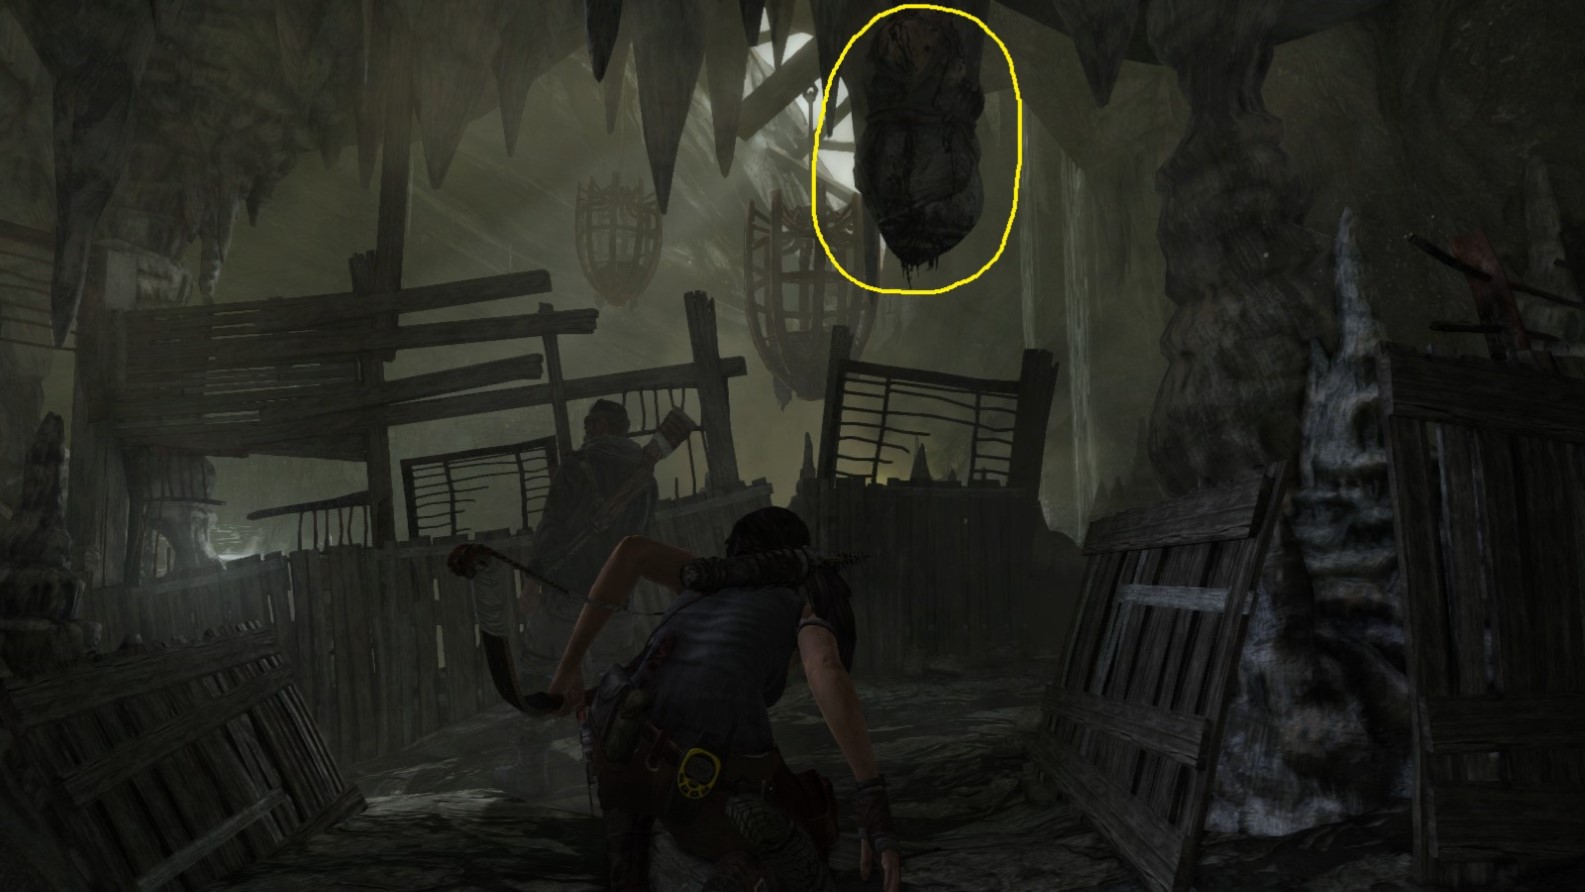
The object hangs close to a guard watching the ritual.
Note:
After Lara interrupts the ritual, the entrance to the ‘ritual chamber’ leading back to the Catacombs base camp is blocked by fallen debris - at that stage Lara cannot go back to the base camp and the first five objects. However, upon fast-traveling back to the Catacombs base camp thereafter, the rubble is gone and access to all objects (in case you haven’t destroyed them yet) is restored.
*** End of FIRESTARTER ***
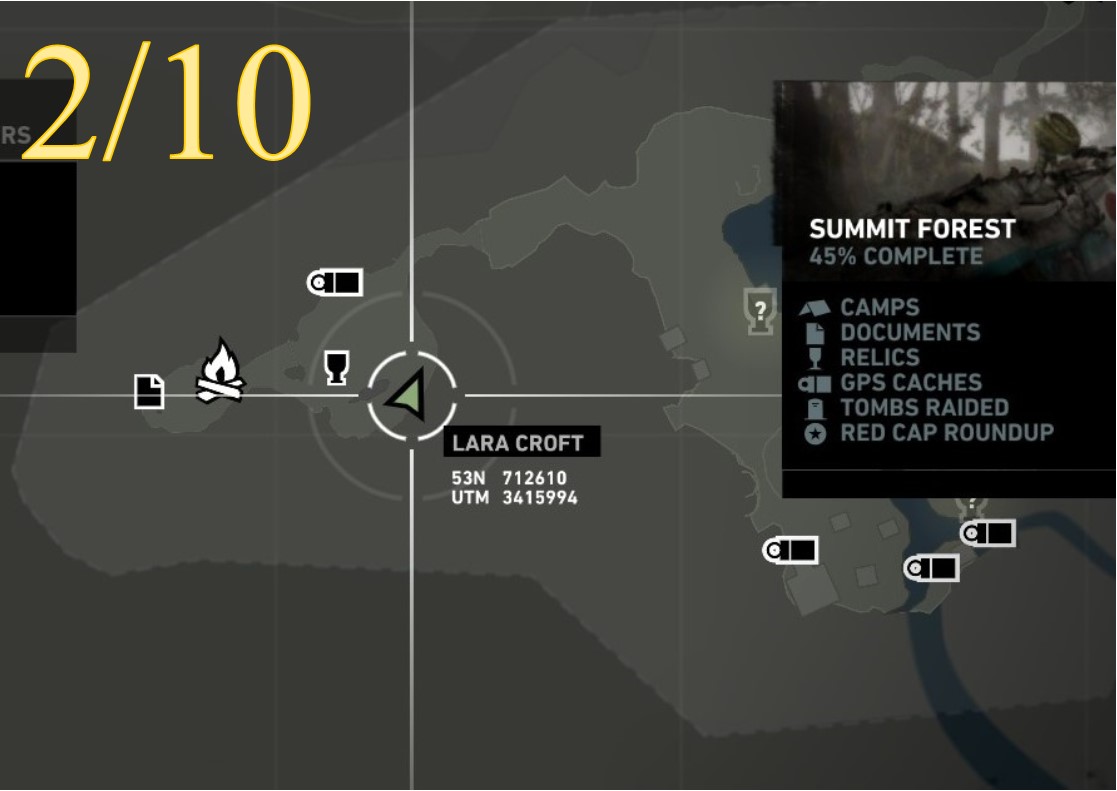
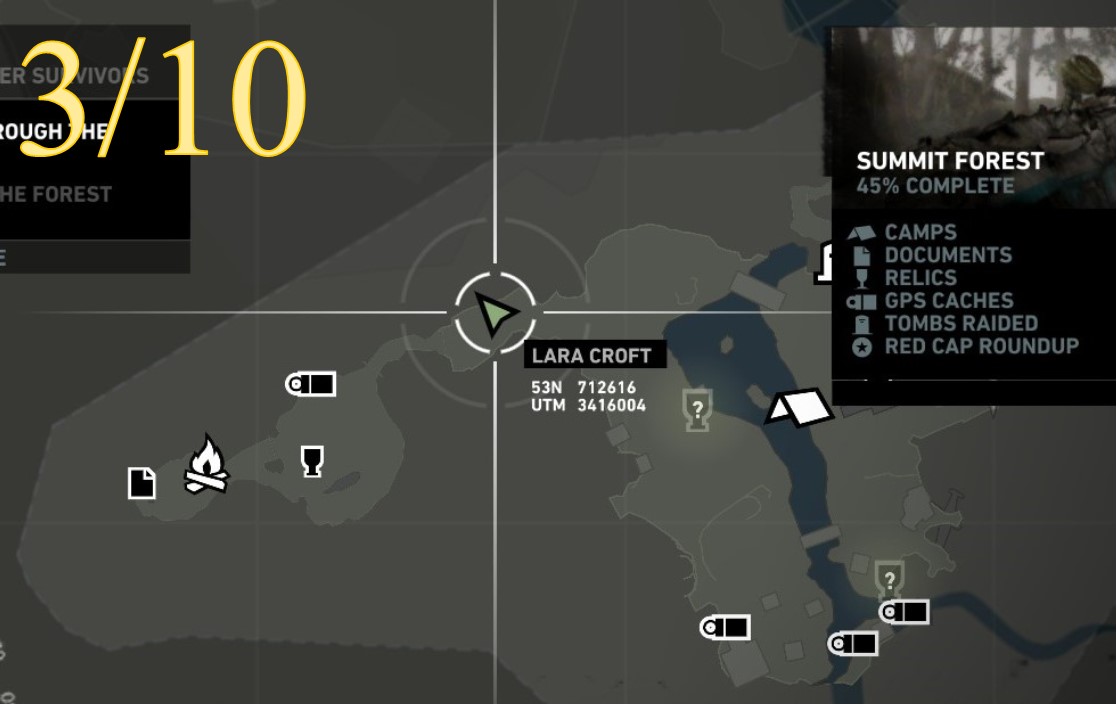
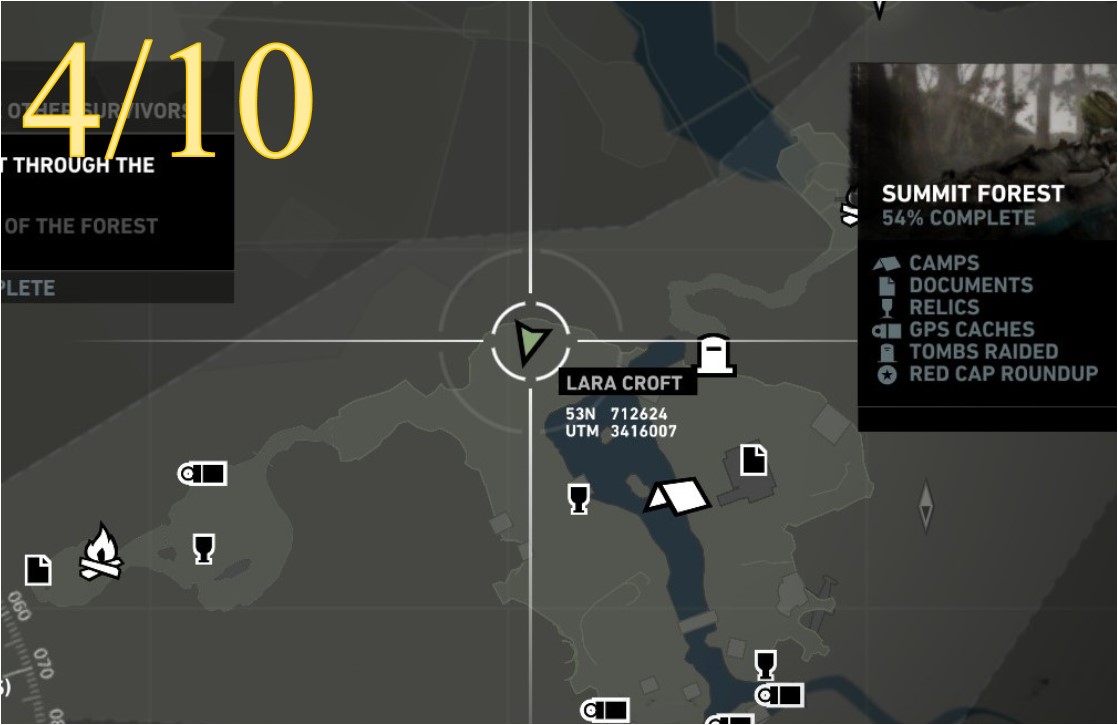
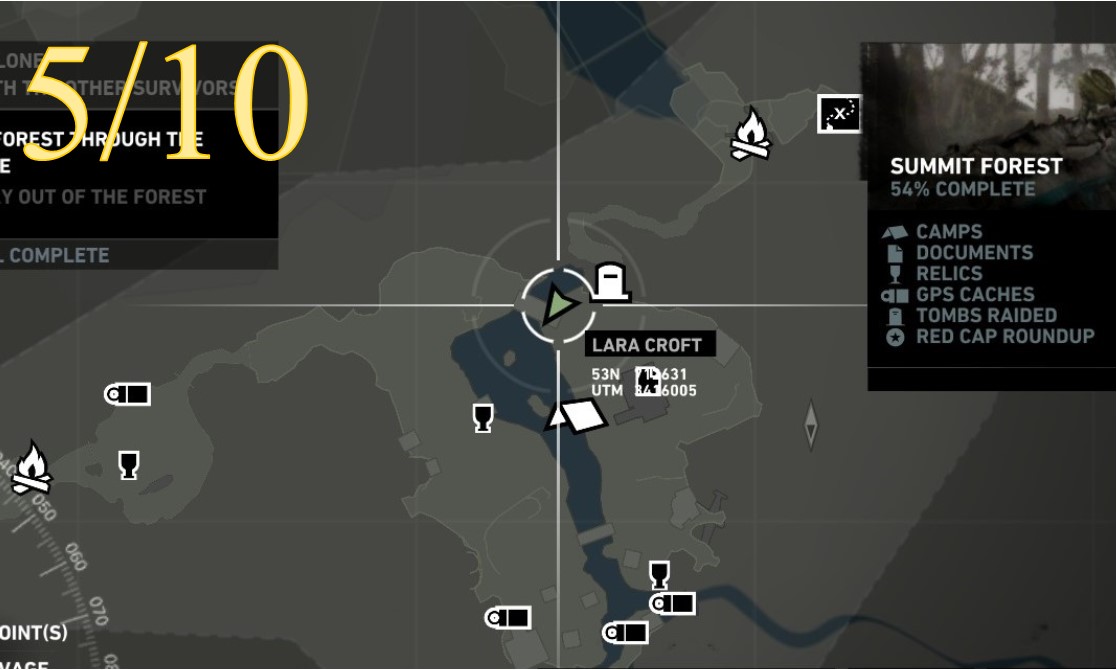
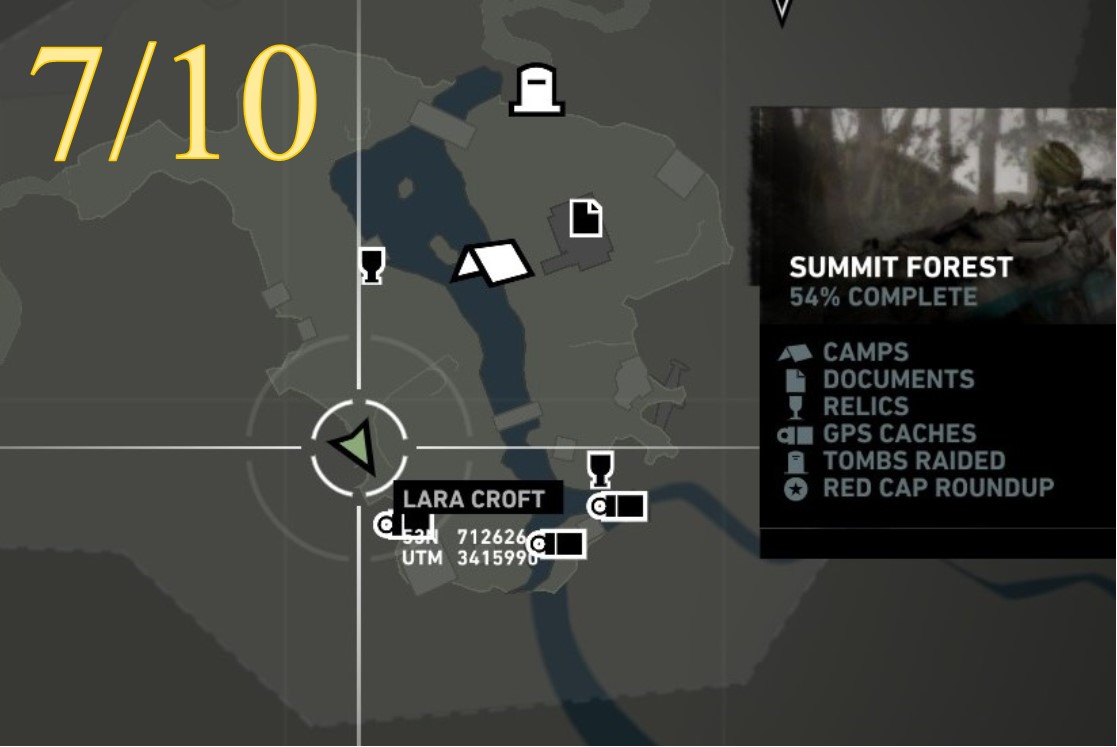
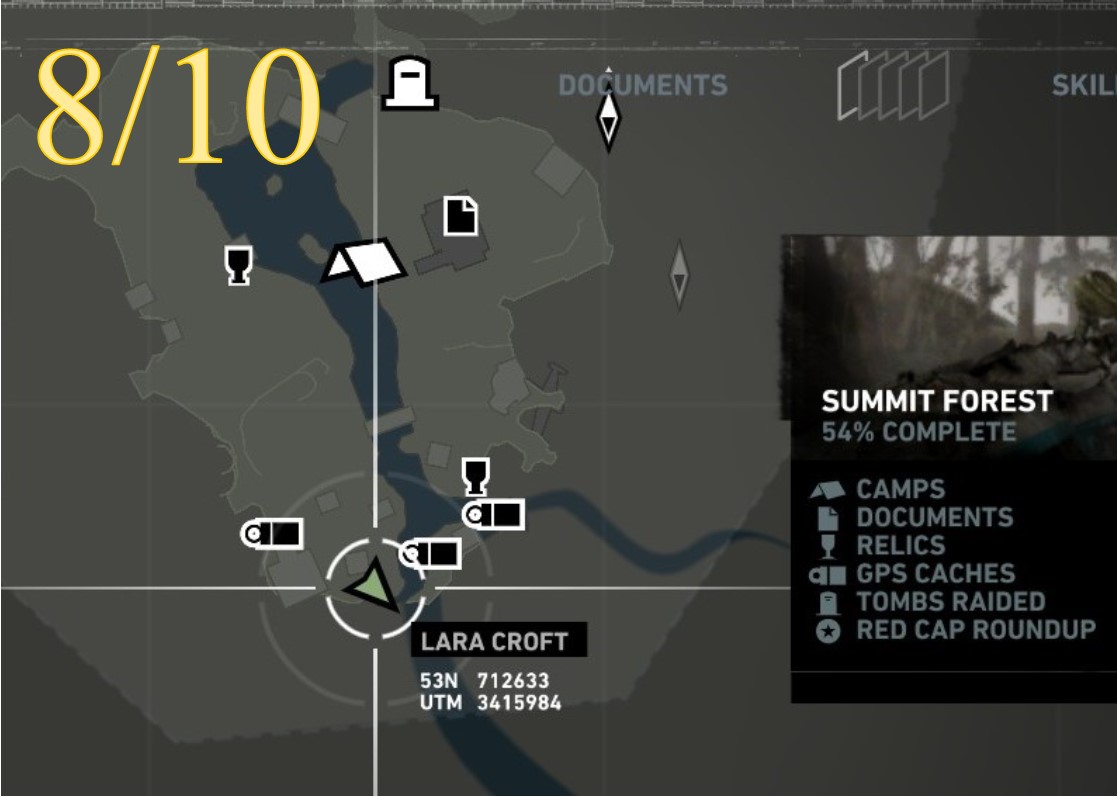
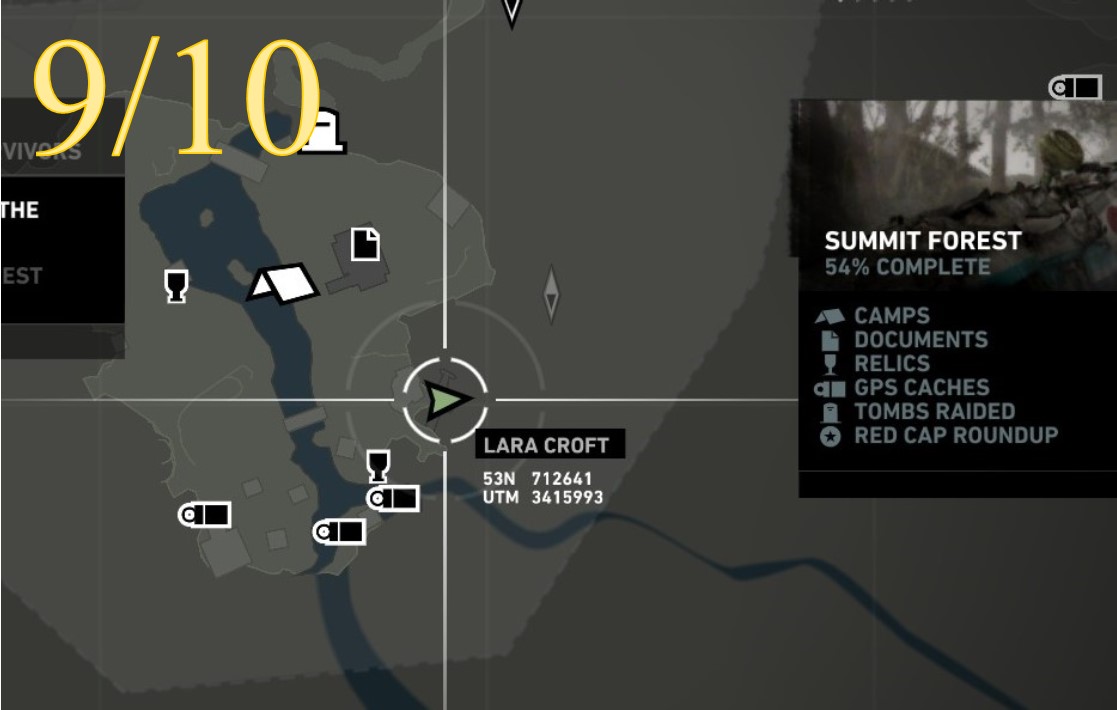
Challenge 9: RED CAP ROUNDUP
Red Cap Roundup - Object 1
Area: Summit Forest
Closest Base Camp: Hunting Lodge
Find and pick
Location on the Map
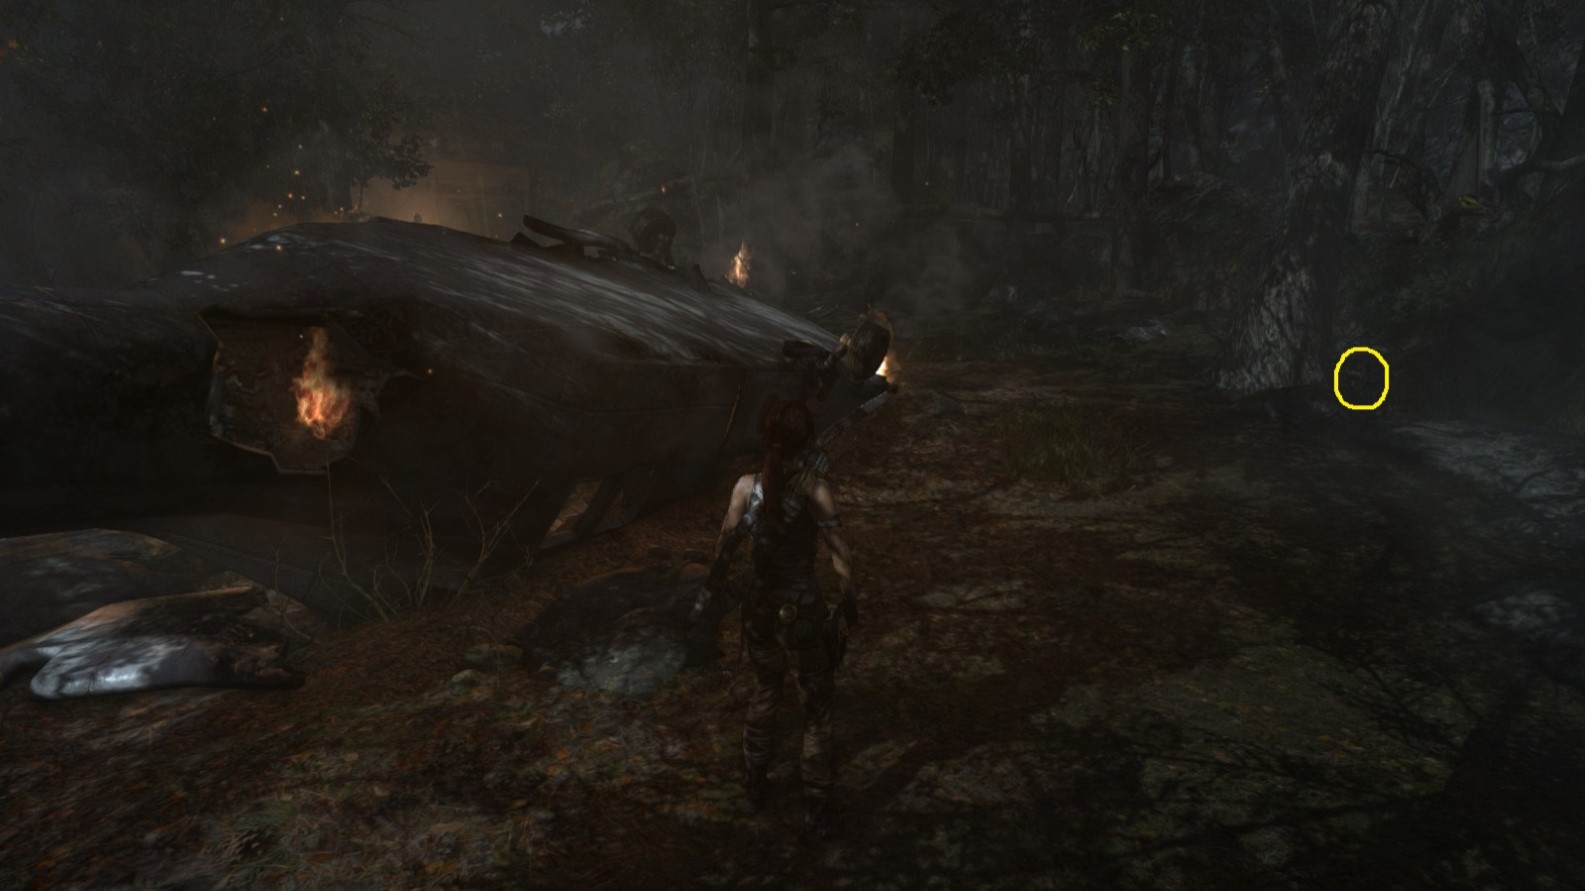
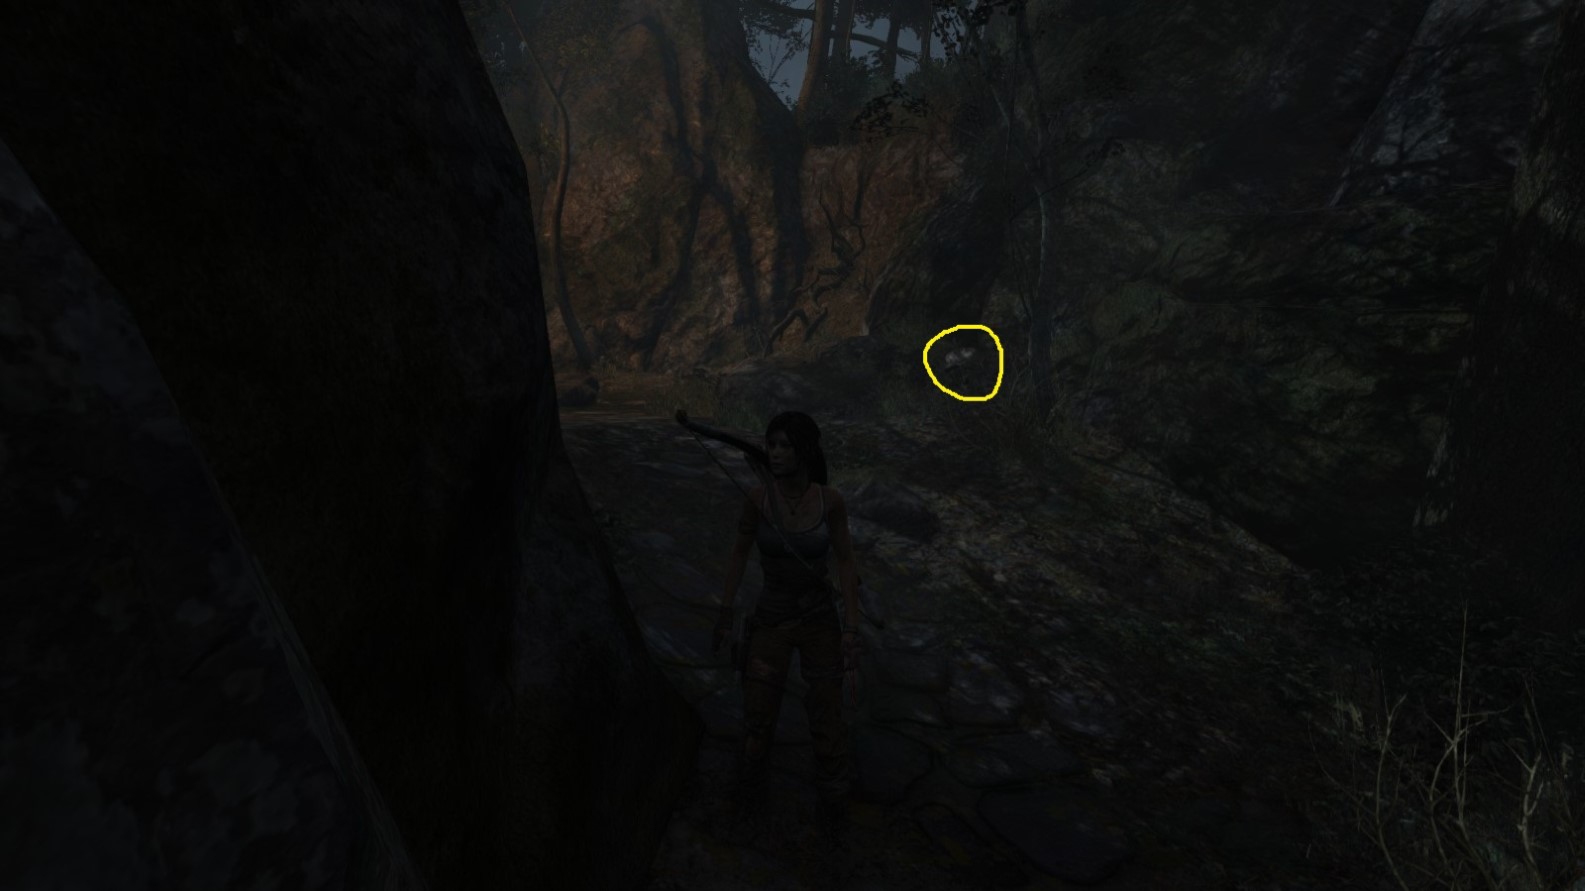
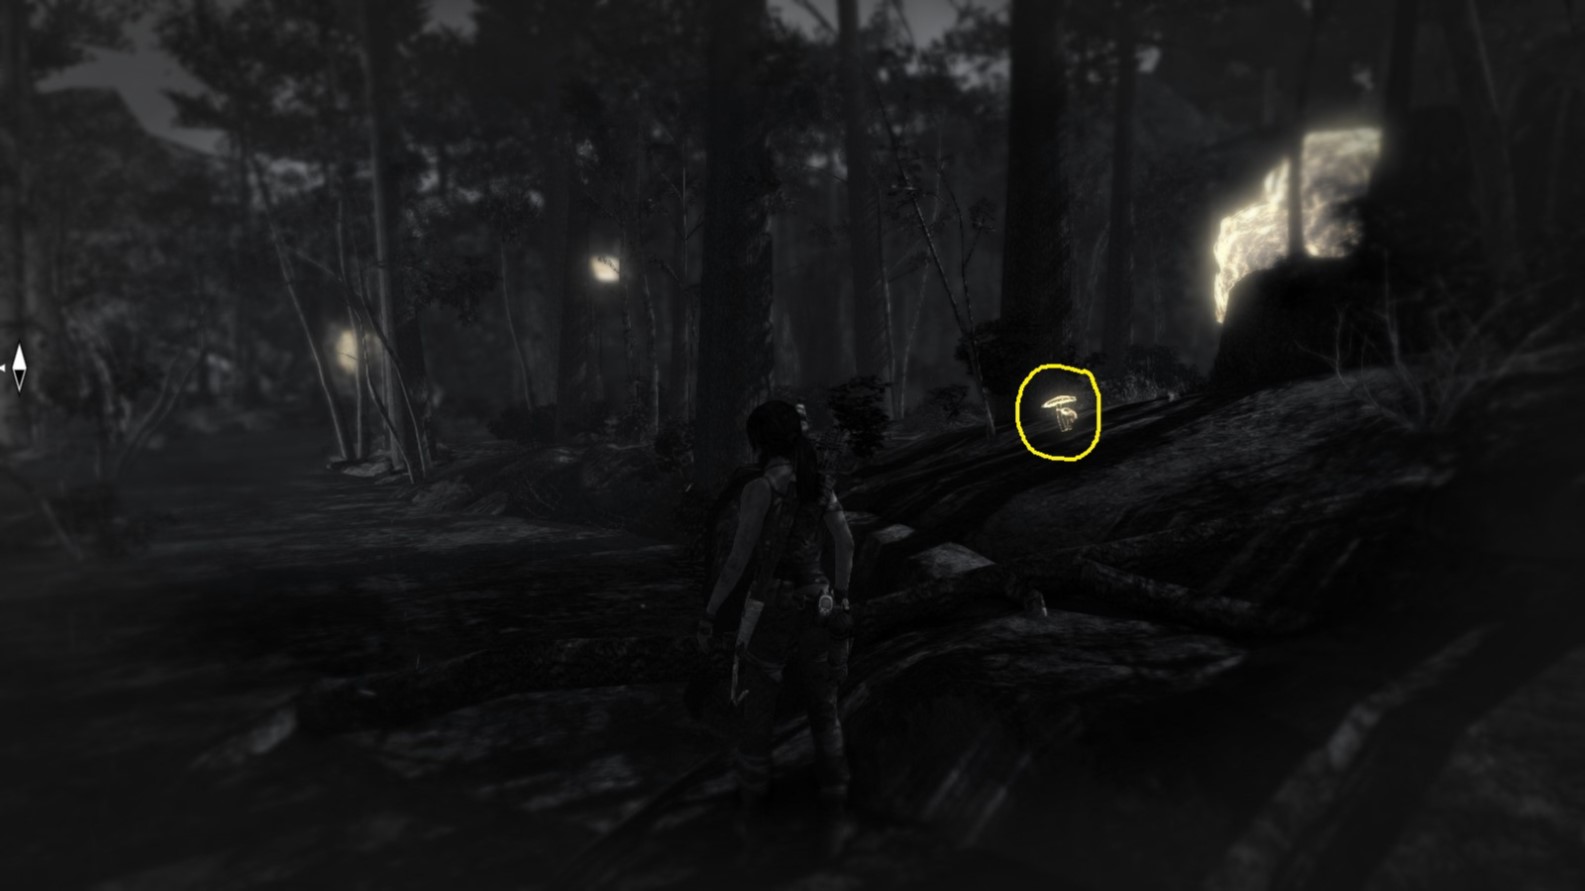
Screenshot A - Red Cap Roundup 1/10
Located between the trees on Lara’s right as she descends the stairs from the Summit Marsh day camp.
Screenshot B - Red Cap Roundup 1/10
As seen from the helicopter wreck nearby.
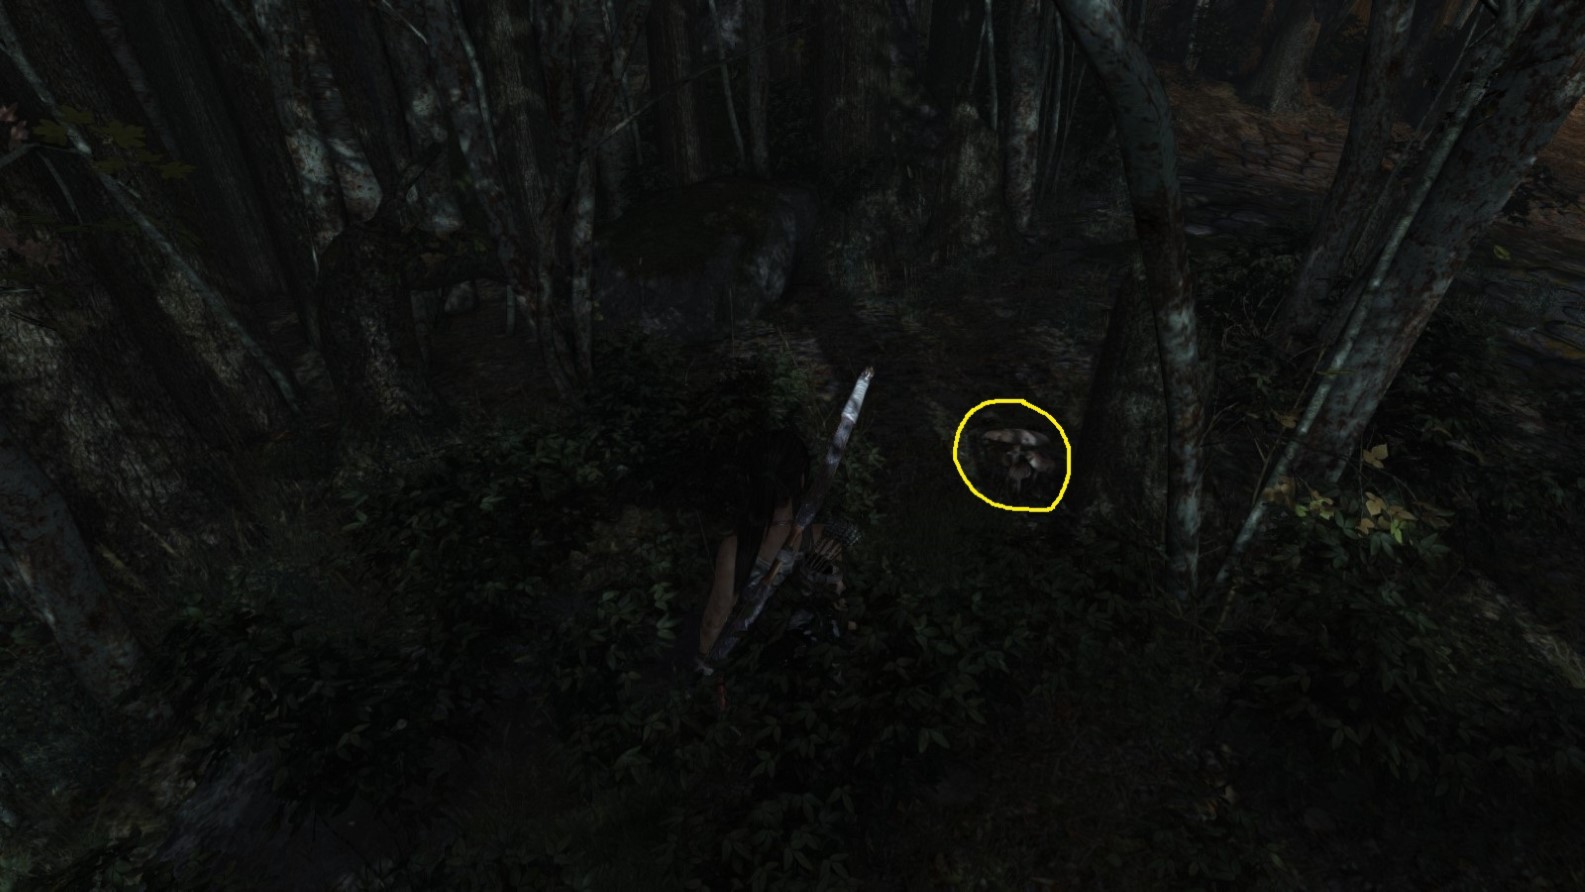
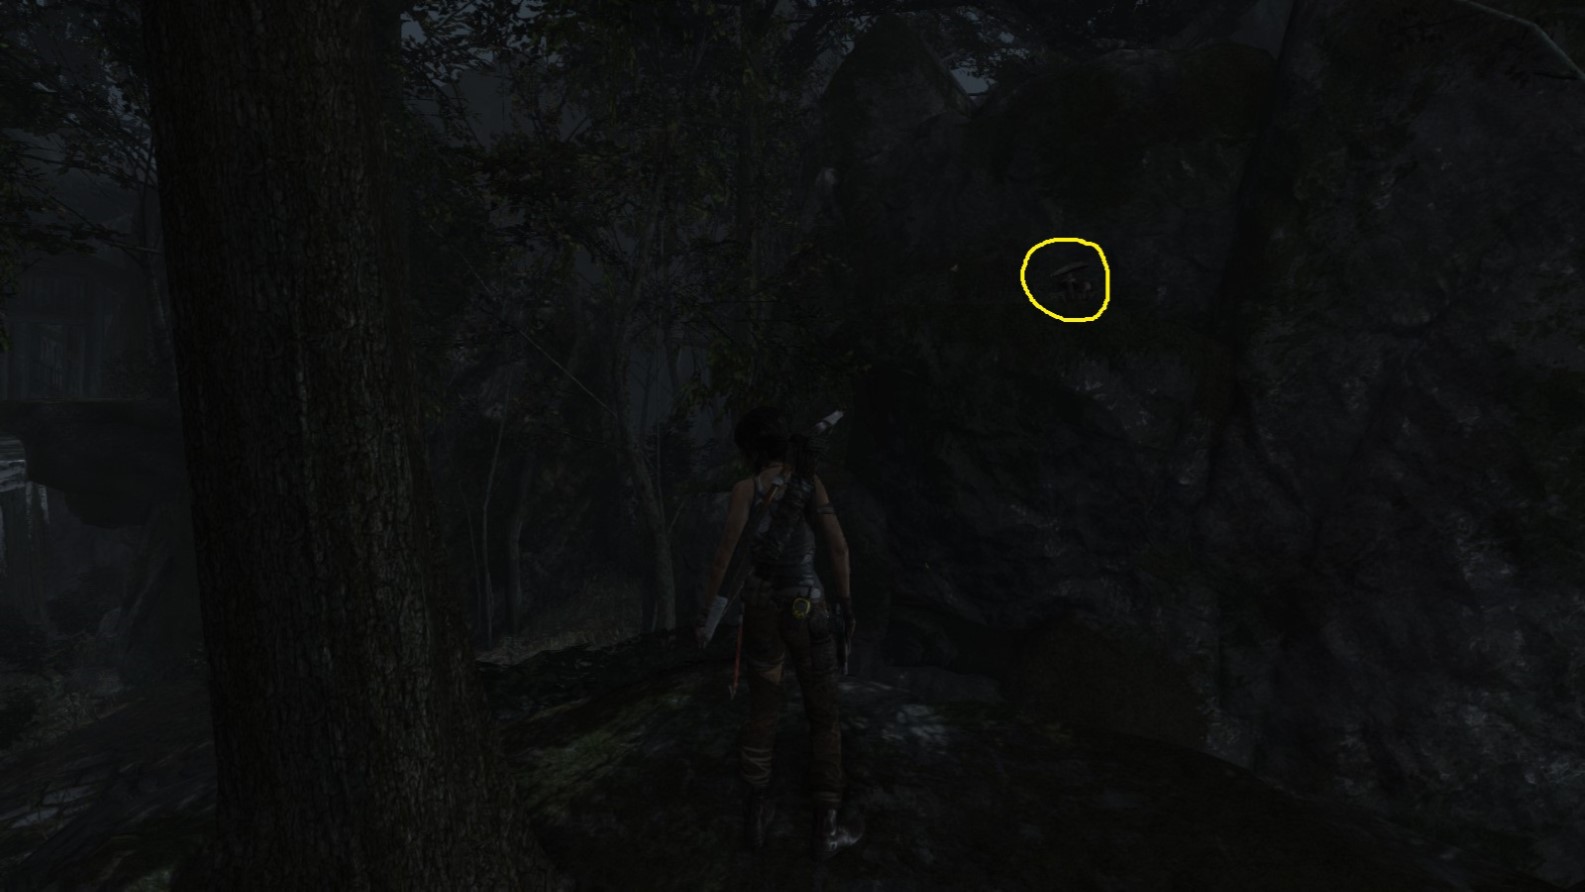
Red Cap Roundup - Object 2
Area: Summit Forest
Closest Base Camp: Hunting Lodge
Find and pick
Location on the Map
Screenshot A - Red Cap Roundup 2/10
Also located near the helicopter wreck, hiding behind a tree.
Screenshot B - Red Cap Roundup 2/10
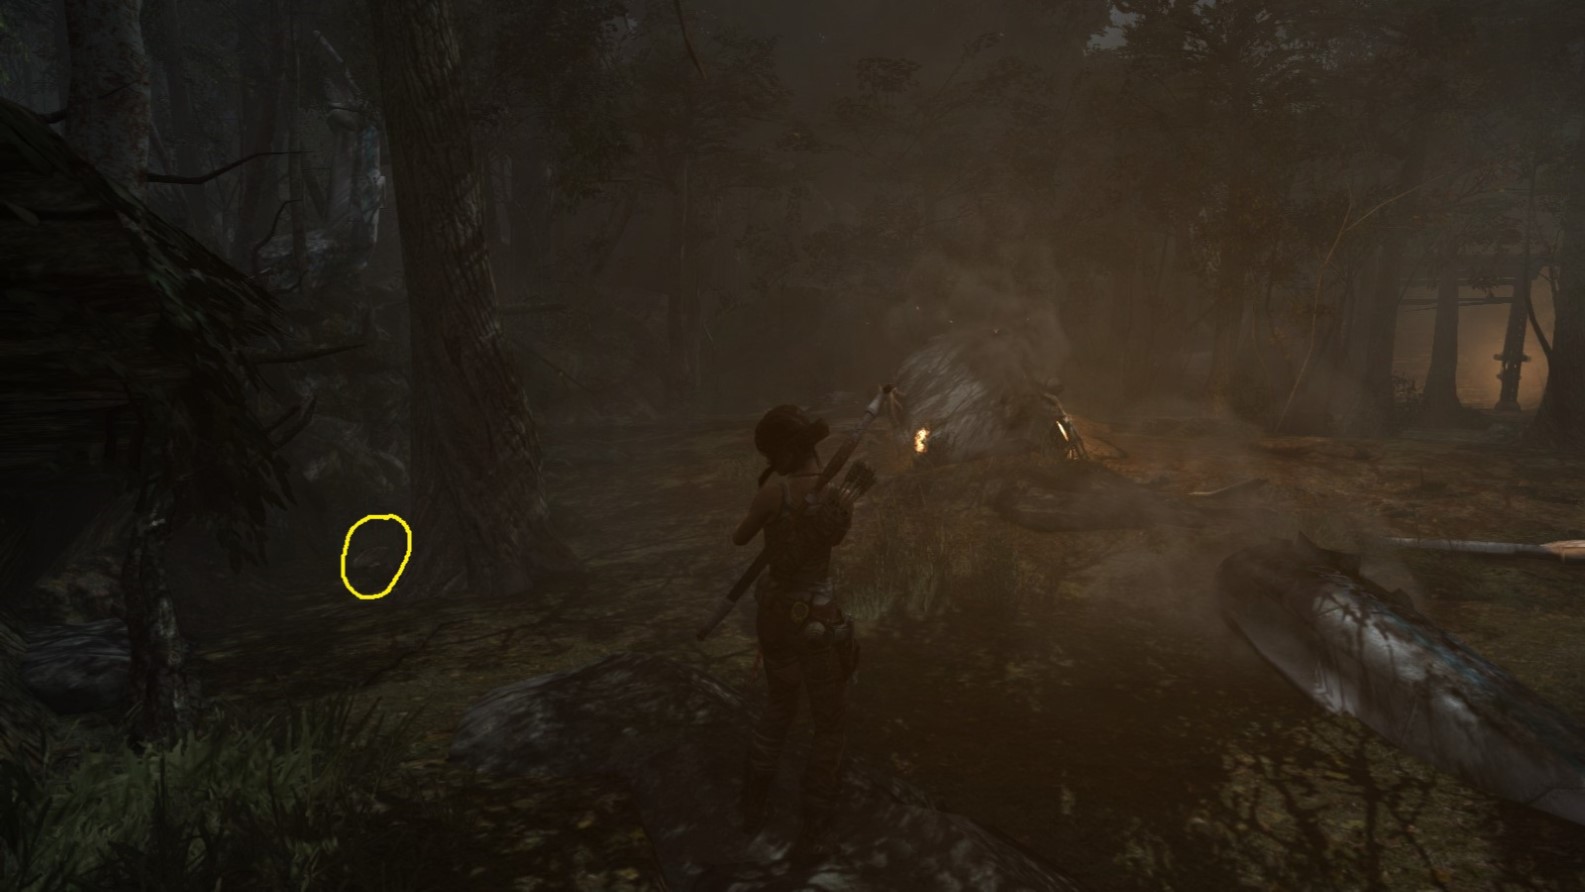
As seen from the opposite direction.
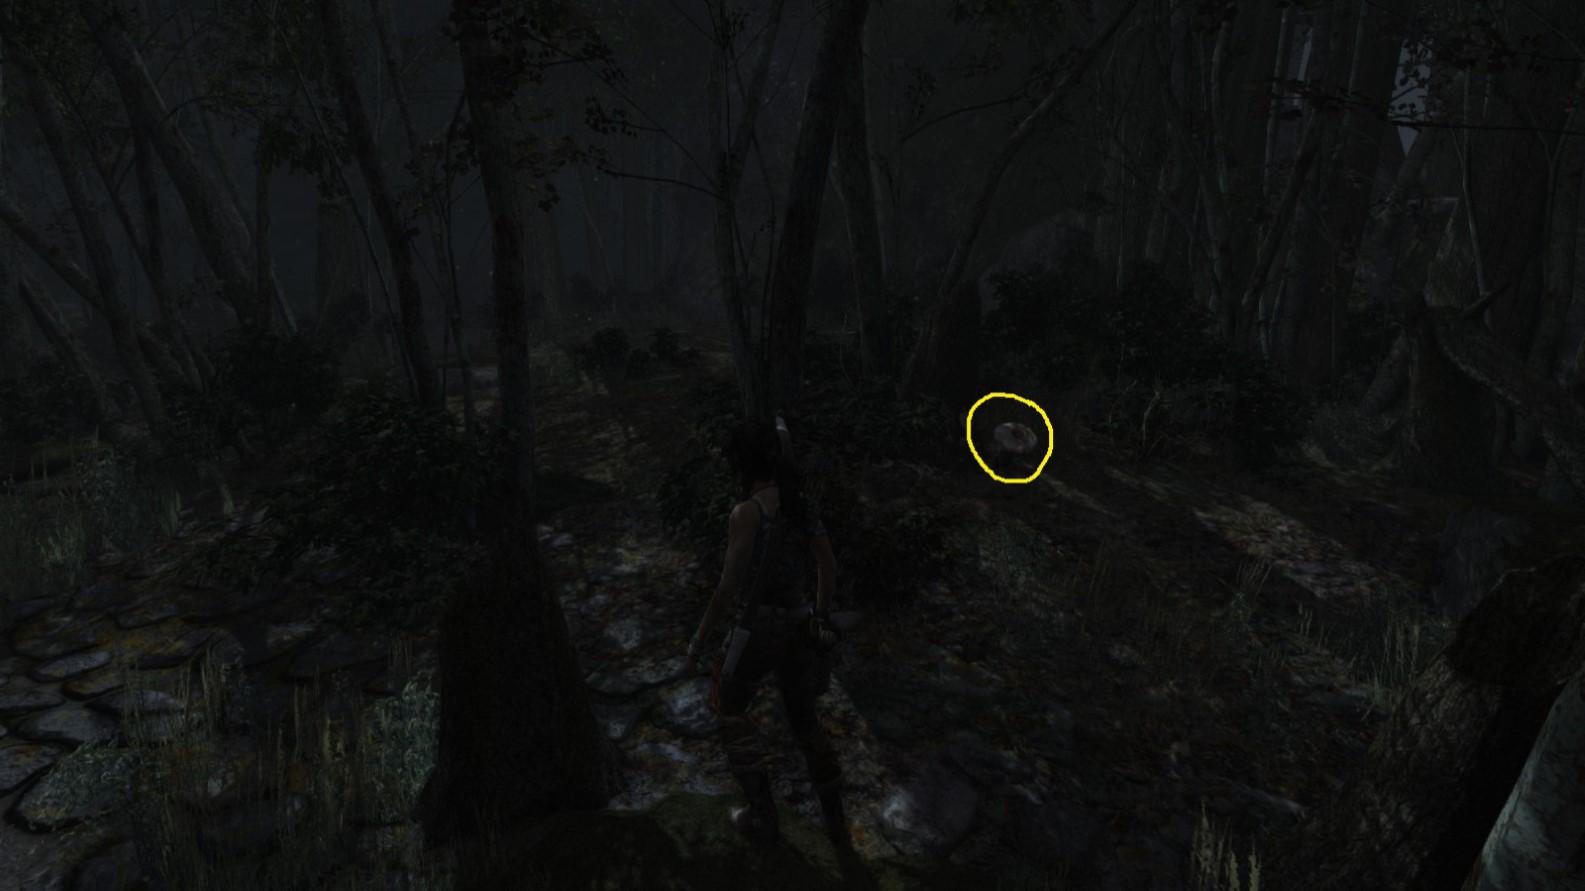
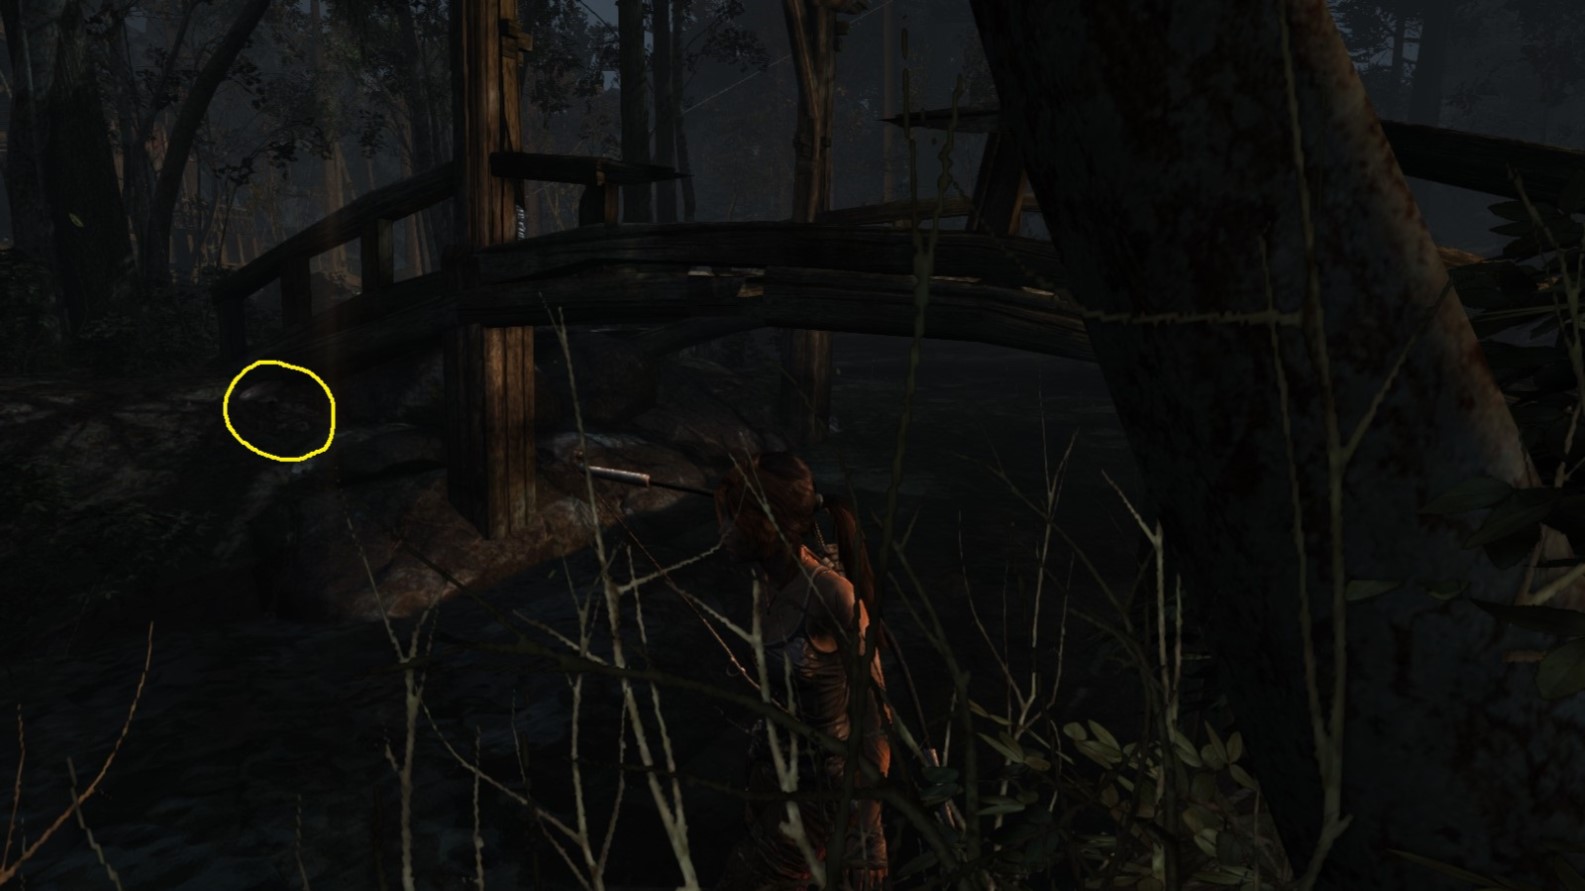
Red Cap Roundup - Object 3
Area: Summit Forest
Closest Base Camp: Hunting Lodge
Find and pick
Location on the Map
Screenshot A - Red Cap Roundup 3/10

In the narrow passage leading to the larger open forest part.
Screenshot B - Red Cap Roundup 3/10
Seen from the opposite direction.
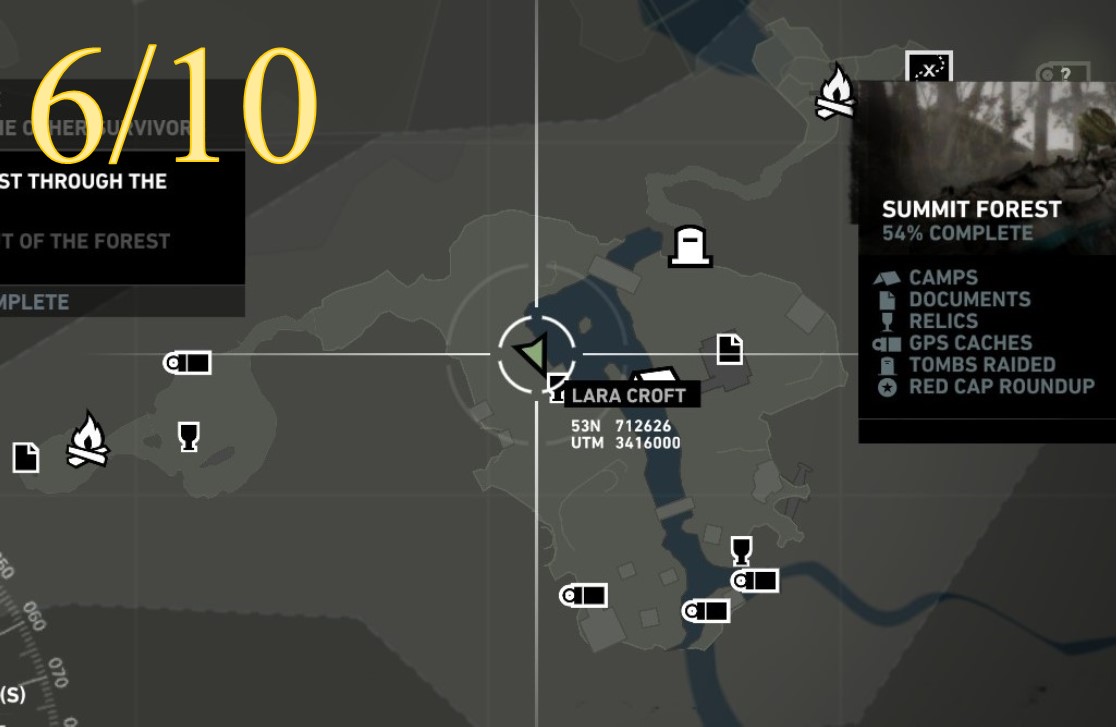
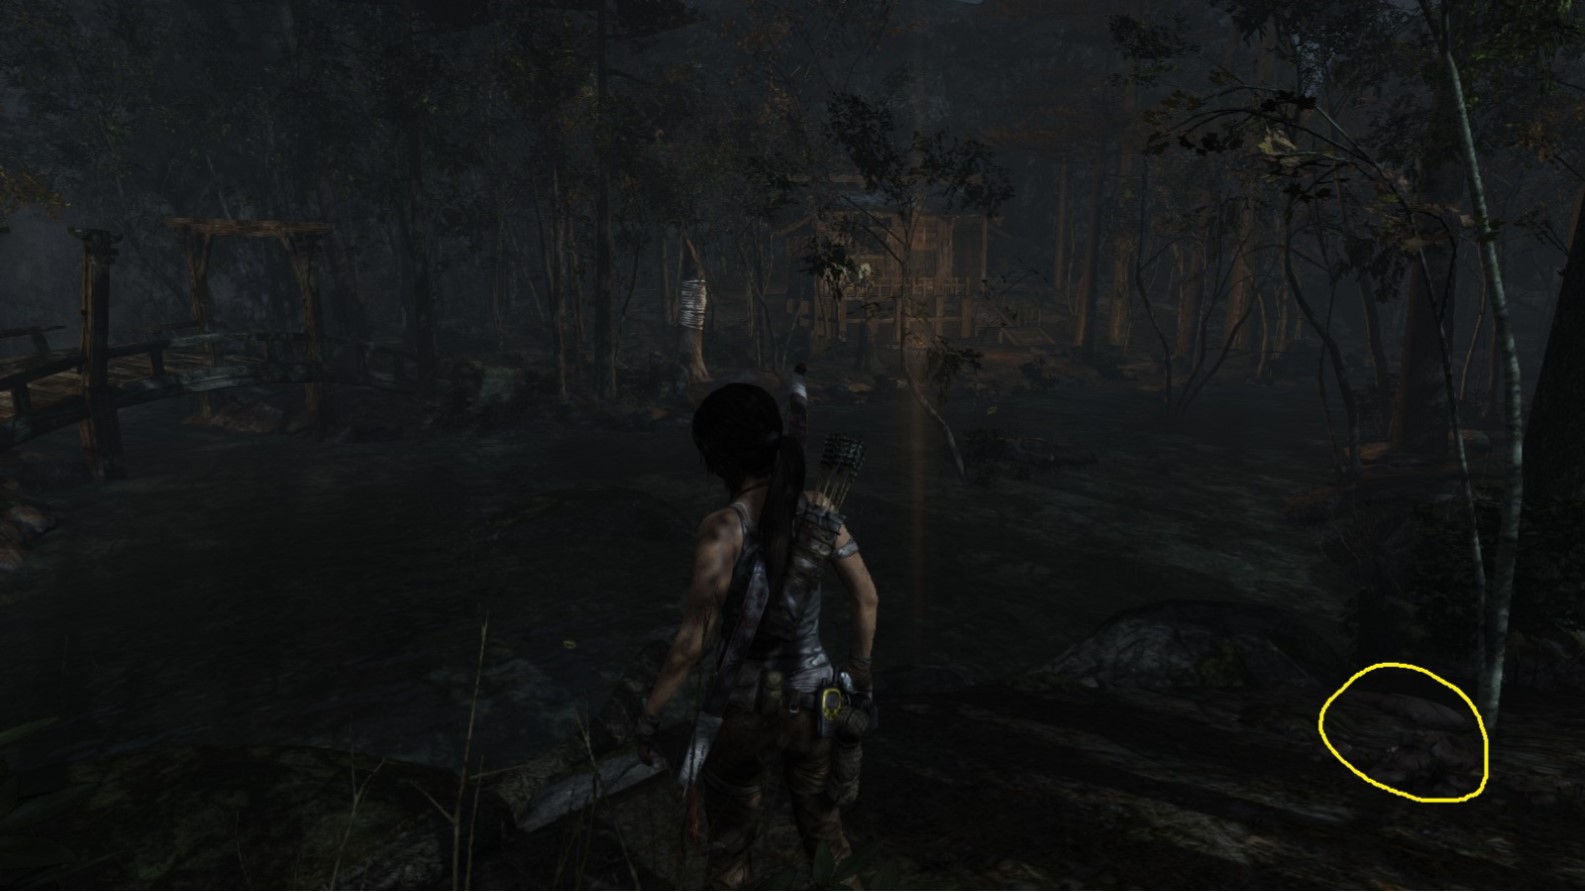
Red Cap Roundup - Object 4
Area: Summit Forest
Closest Base Camp: Hunting Lodge
Find and pick
Location on the Map
Screenshot A - Red Cap Roundup 4/10
Amongst the trees, close to the area’s perimeter.
Screenshot B - Red Cap Roundup 4/10
Seen from another angle.
Red Cap Roundup - Object 5
Area: Summit Forest
Closest Base Camp: Hunting Lodge
Find and pick
Location on the Map
Screenshot A - Red Cap Roundup 5/10
Located right next to the bridge.
Screenshot B - Red Cap Roundup 5/10

Seen from the other side of the stream.
Red Cap Roundup - Object 6
Area: Summit Forest
Closest Base Camp: Hunting Lodge
Find and pick
Location on the Map
Screenshot A - Red Cap Roundup 6/10
Located across the stream from the hunting lodge.
Screenshot B - Red Cap Roundup 6/10
From another direction, seen in Survival Instinct (Q) mode.
Red Cap Roundup - Object 7
Area: Summit Forest
Closest Base Camp: Hunting Lodge
Find and pick
Location on the Map
Screenshot A - Red Cap Roundup 7/10
Located on a ledge on the perimeter of the area.
Screenshot B - Red Cap Roundup 7/10
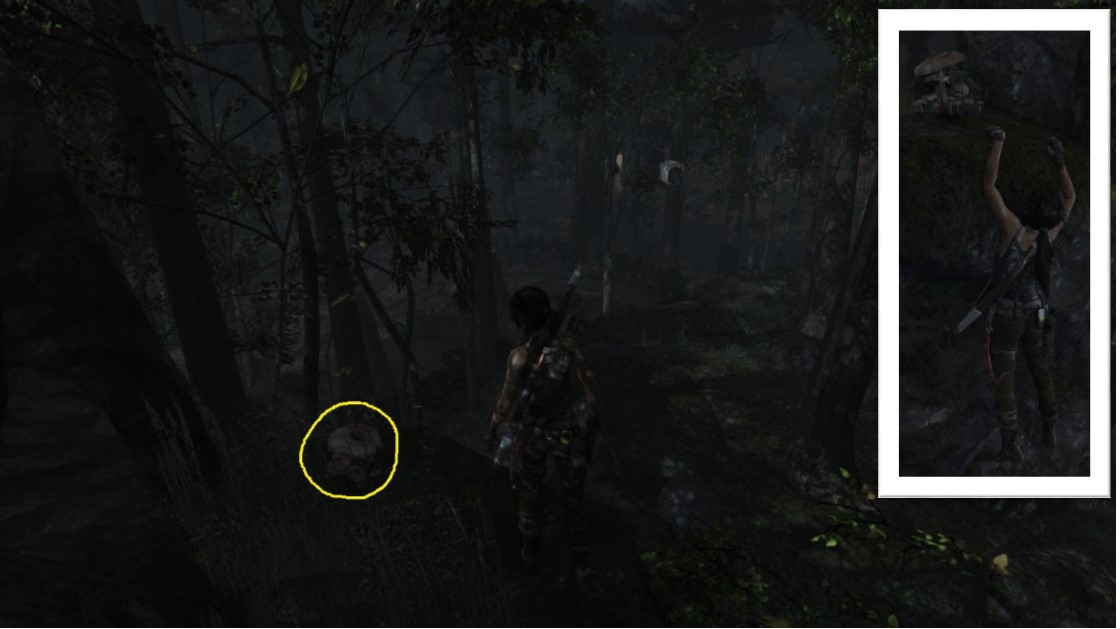
As seen from the ledge. Inlay: Lara has to jump and climb onto the ledge.
Red Cap Roundup - Object 8
Area: Summit Forest
Closest Base Camp: Hunting Lodge
Find and pick
Location on the Map
Screenshot A - Red Cap Roundup 8/10
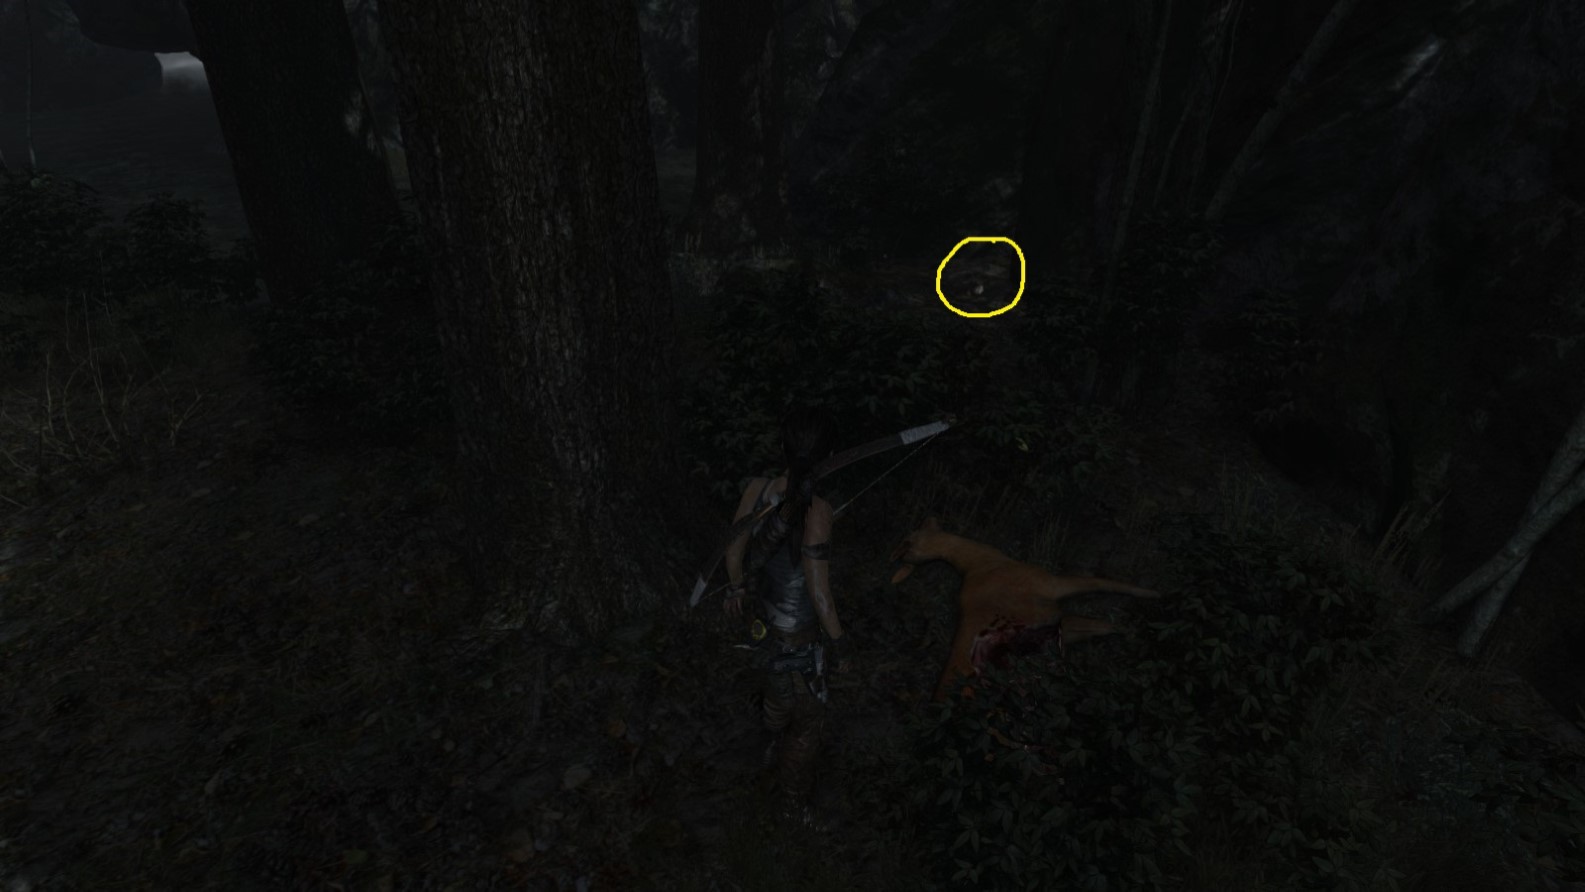
Close to a dead deer.
Screenshot B - Red Cap Roundup 8/10
Seen from another angle: located close to the stream.
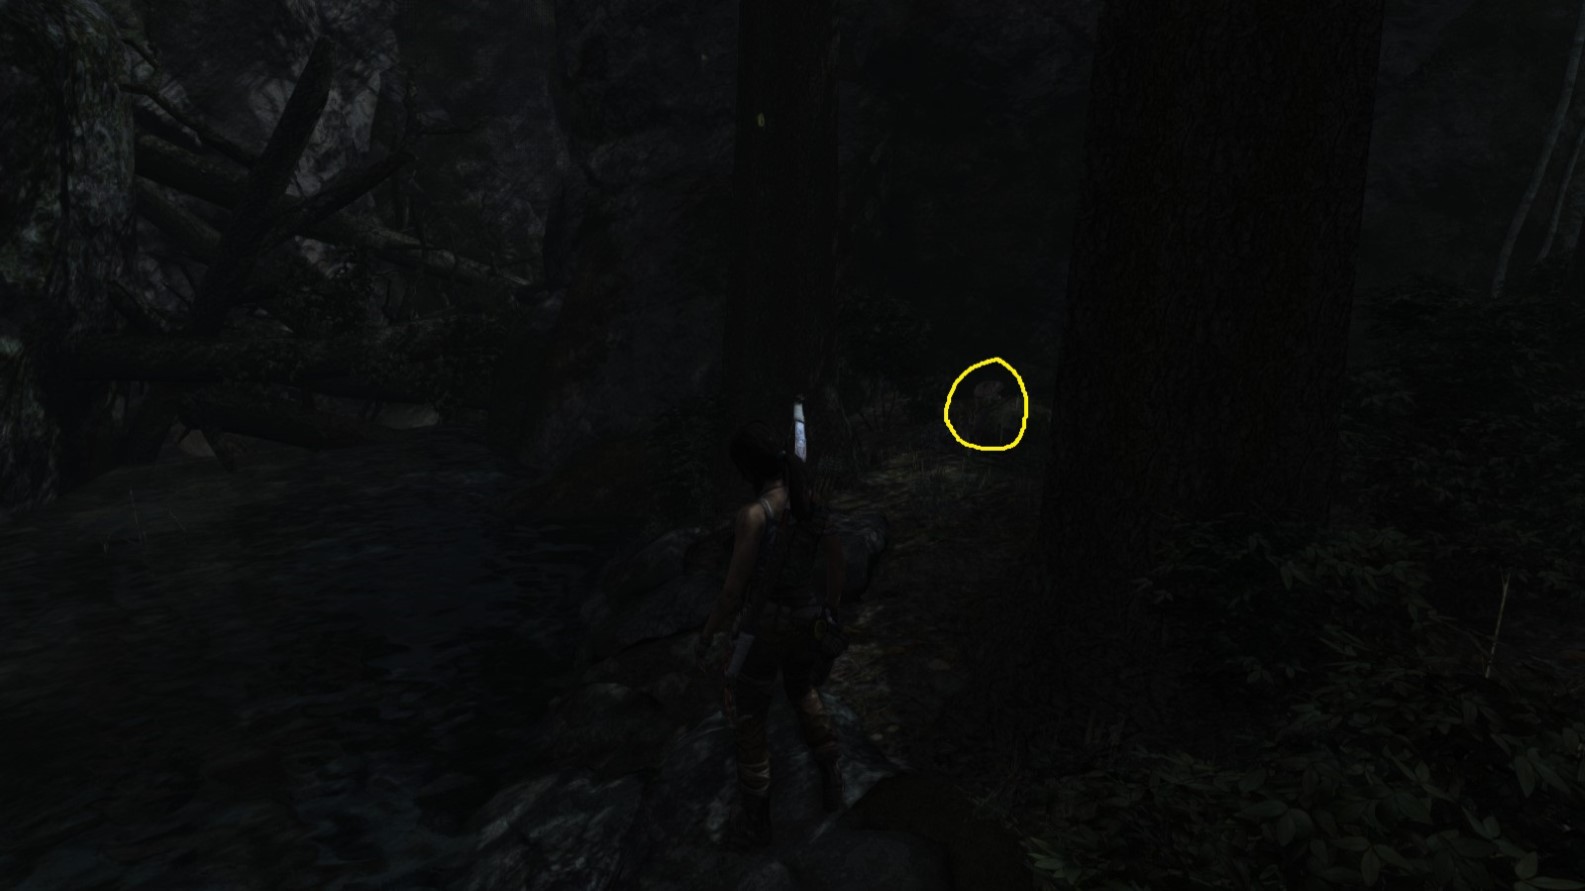
Red Cap Roundup - Object 9
Area: Summit Forest
Closest Base Camp: Hunting Lodge
Find and pick
Location on the Map
Screenshot A - Red Cap Roundup 9/10
Located beyond a broken ladder bridge at the end of a short passage between the cliffs.
Screenshot B - Red Cap Roundup 9/10
A closer view of the short dead-end passage with the object located on ground level.
Red Cap Roundup - Object 10
Area: Summit Forest
Closest Base Camp: Hunting Lodge
Find and pick
Location on the Map
Screenshot A - Red Cap Roundup 10/10
Located at the top of the stairs leading to the exit from the area.
Screenshot B - Red Cap Roundup 10/10
Showing the exit from a different angle.
*** End of RED CAP ROUNDUP ***
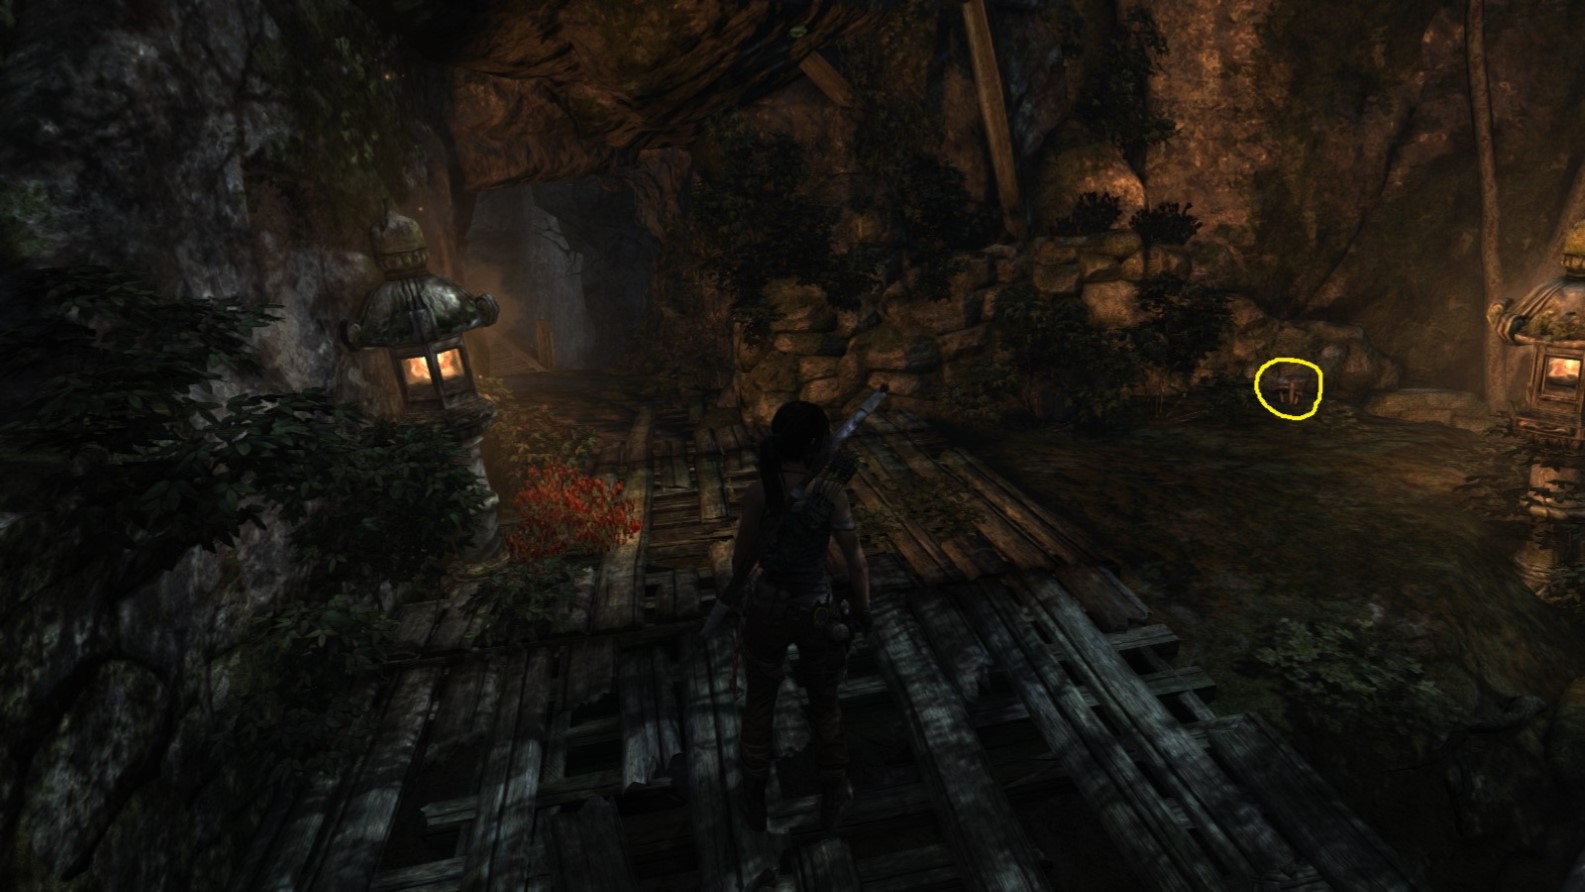
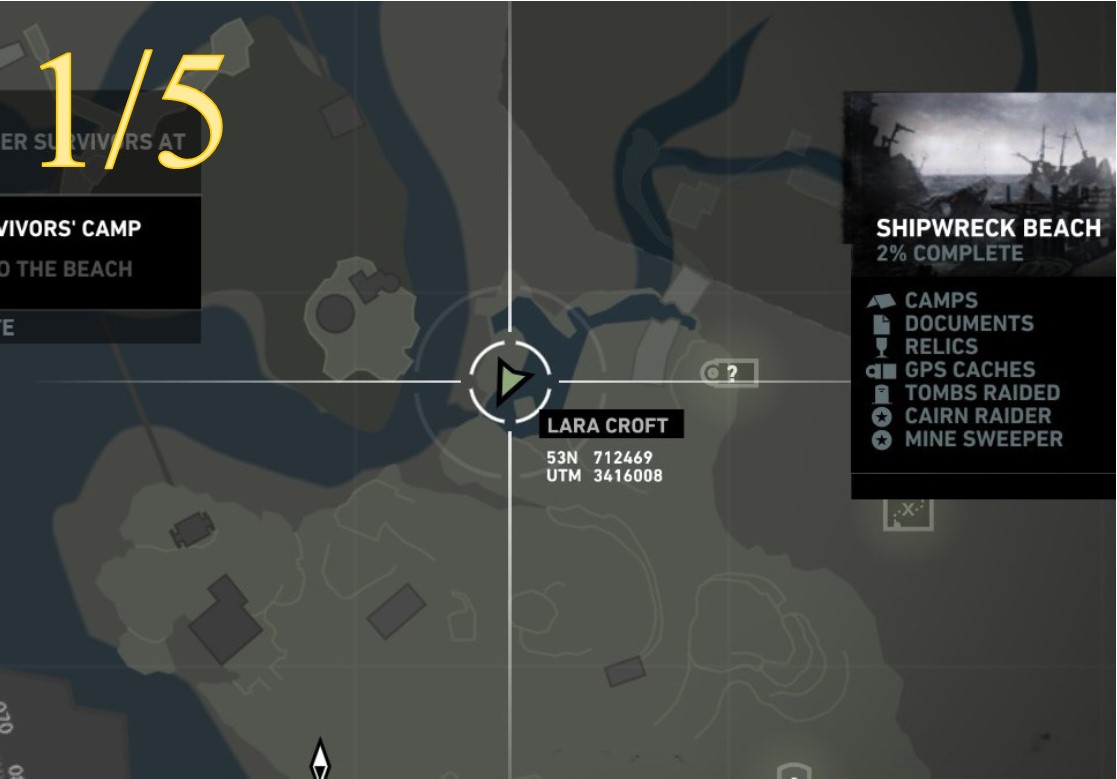
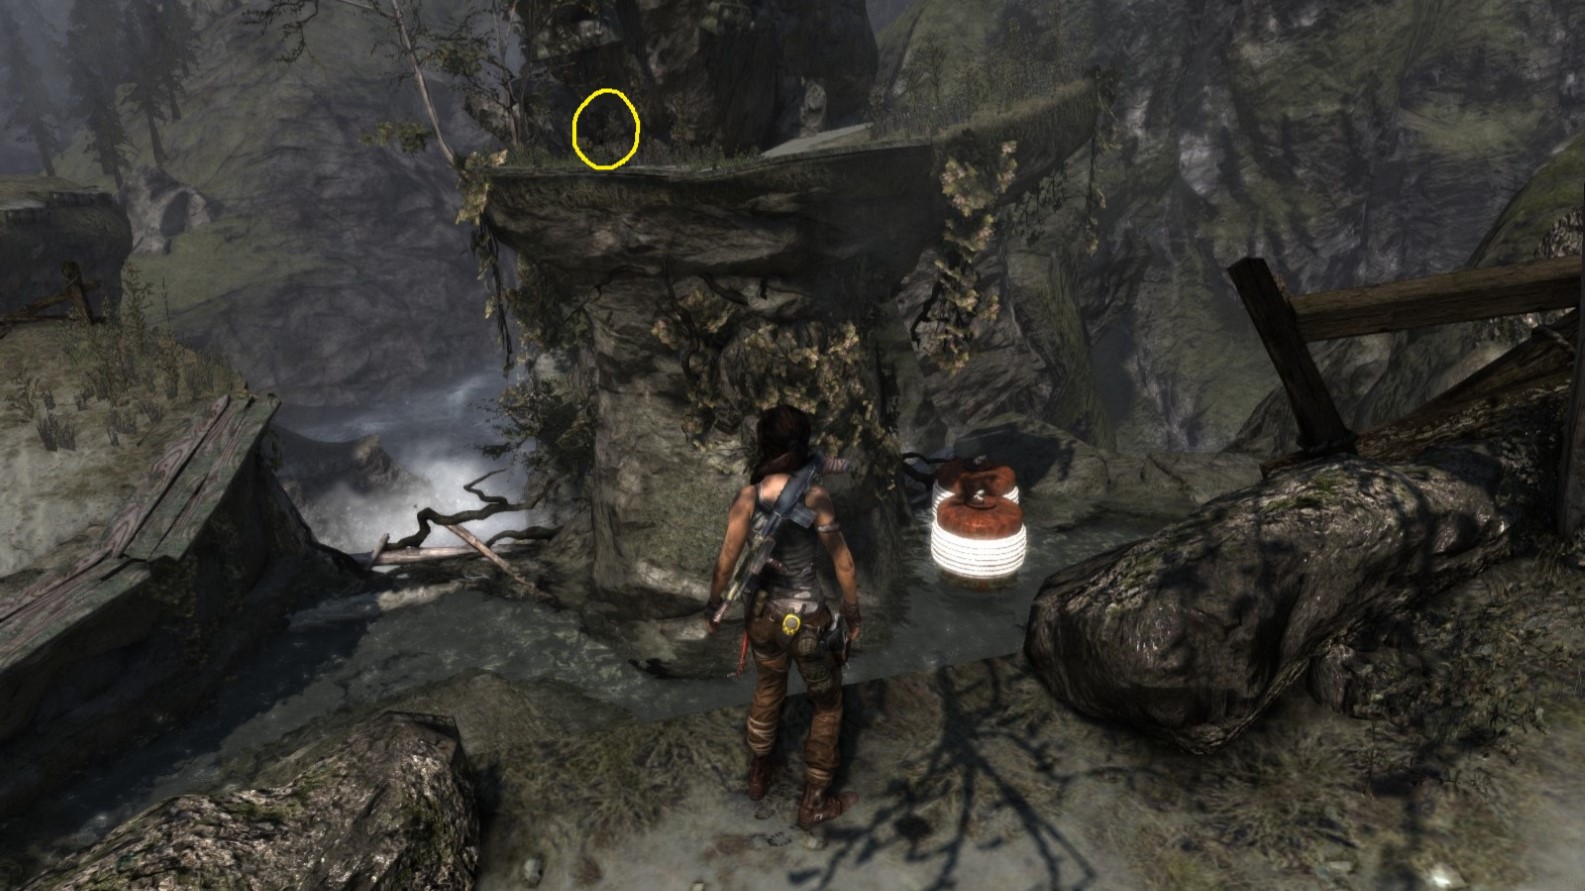
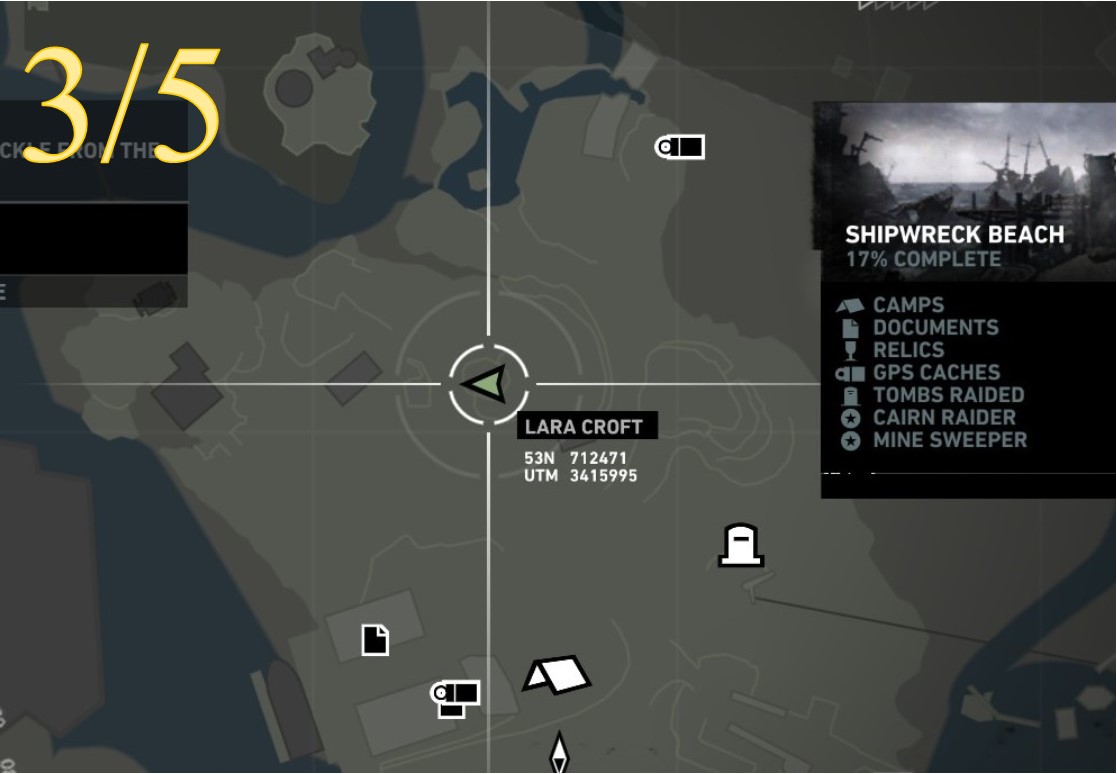
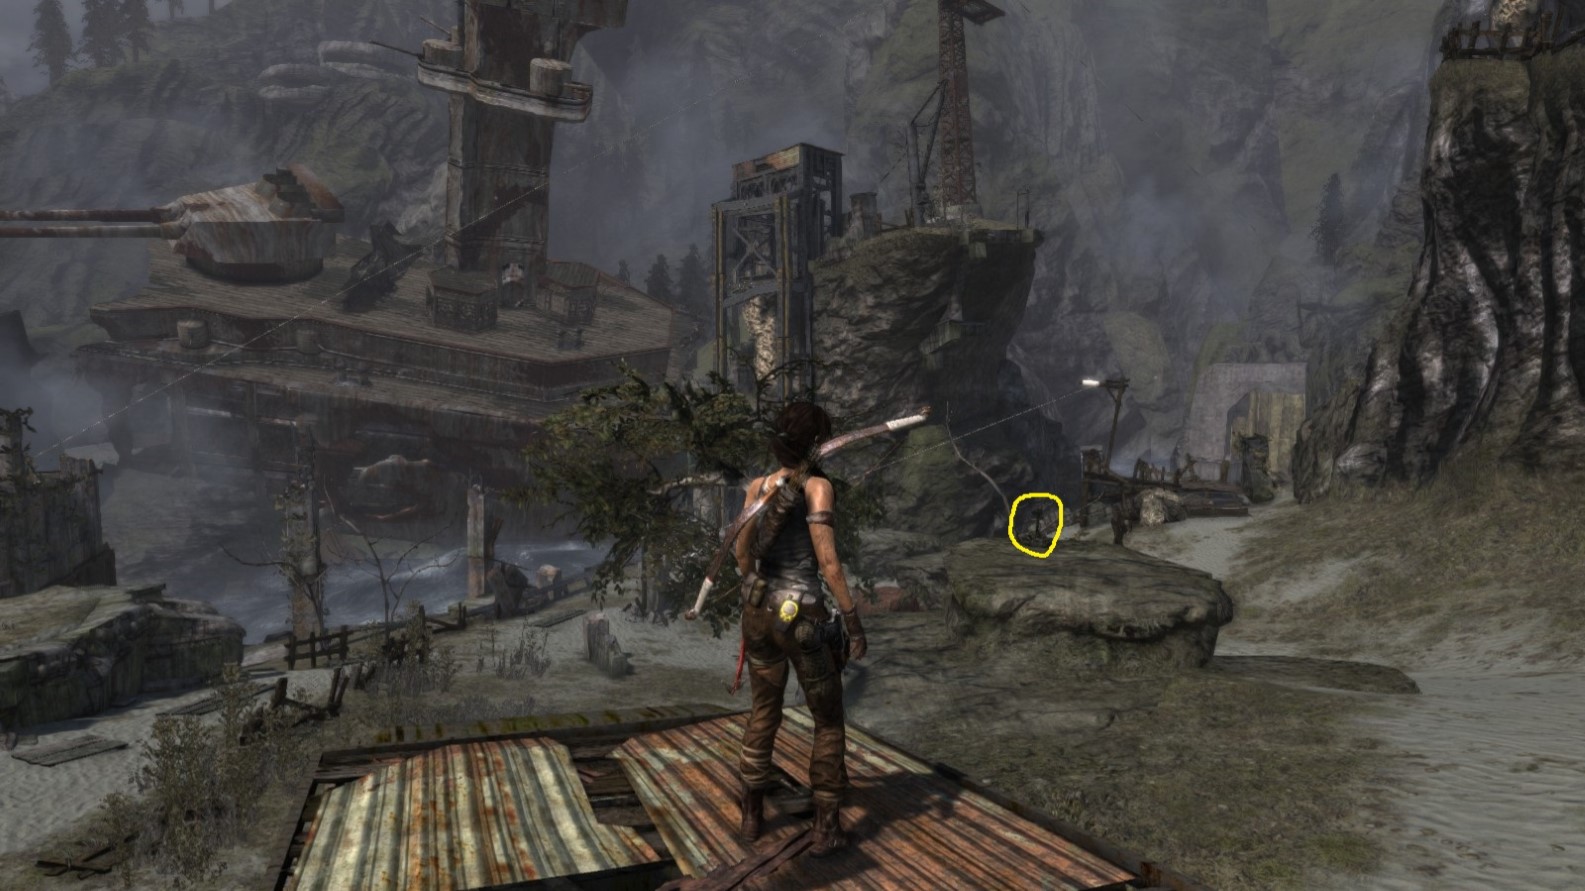
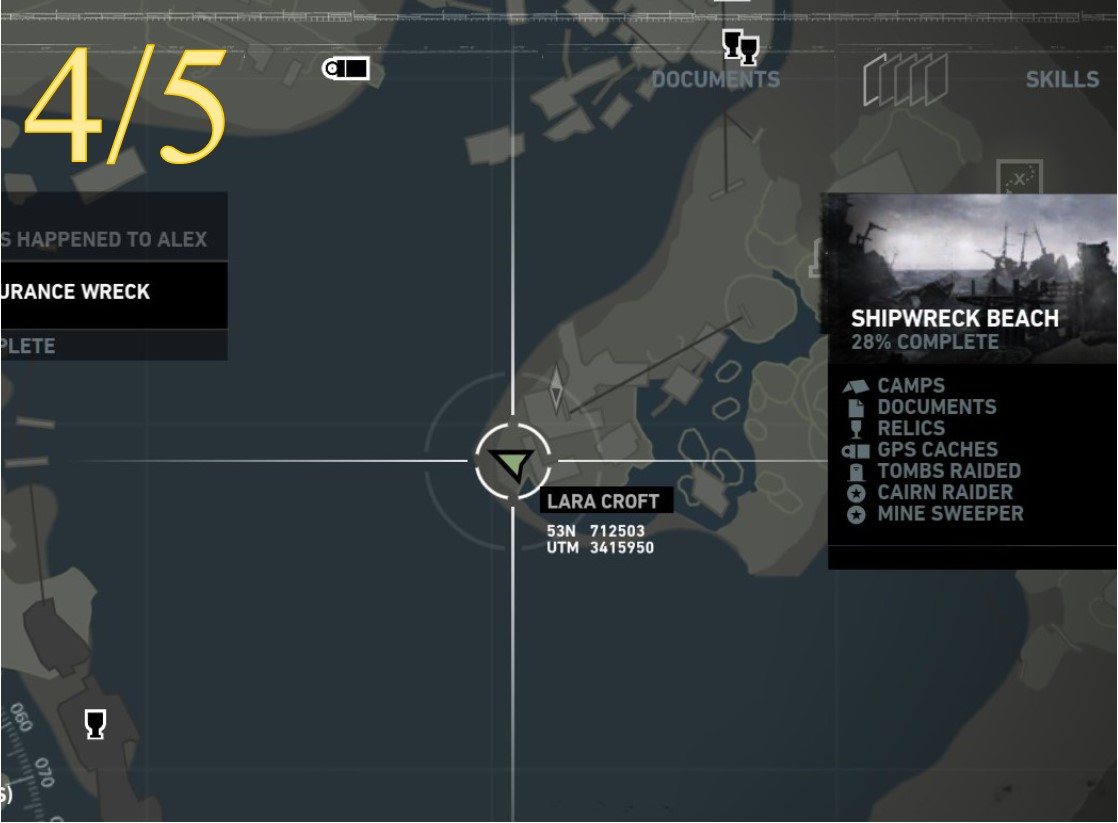
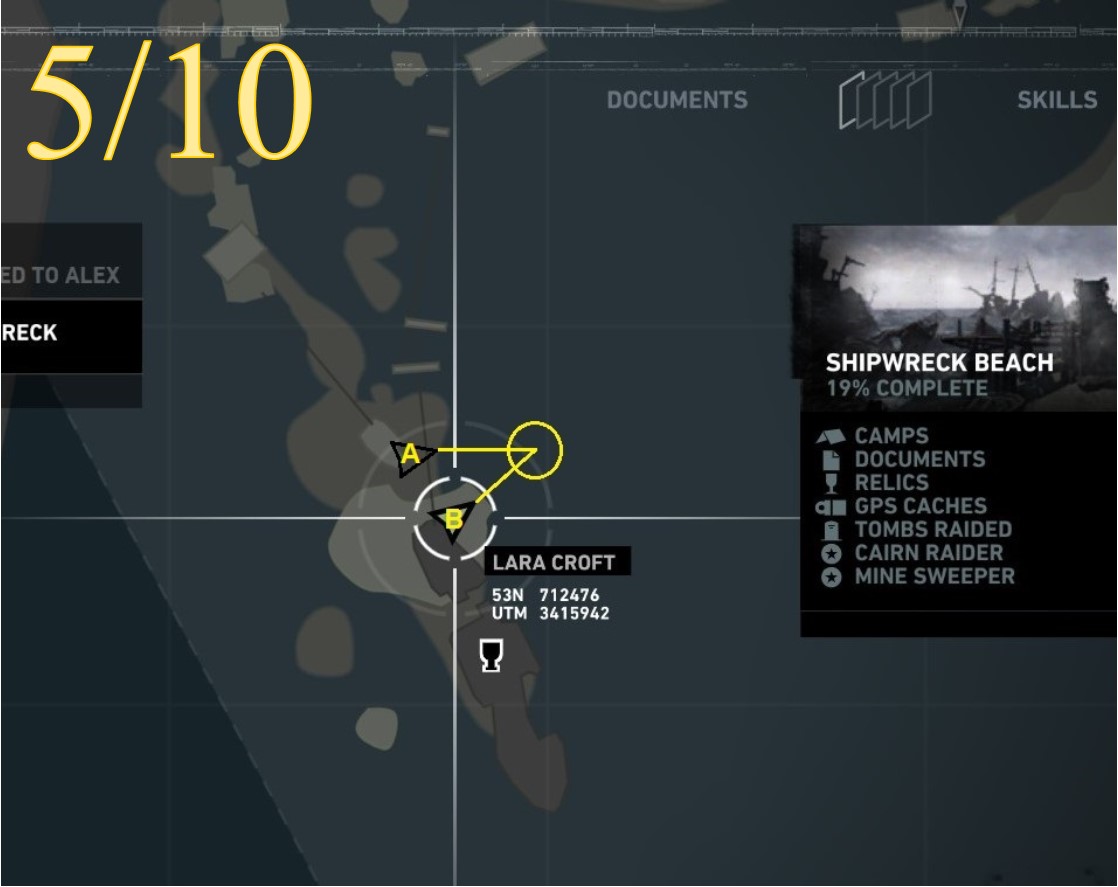
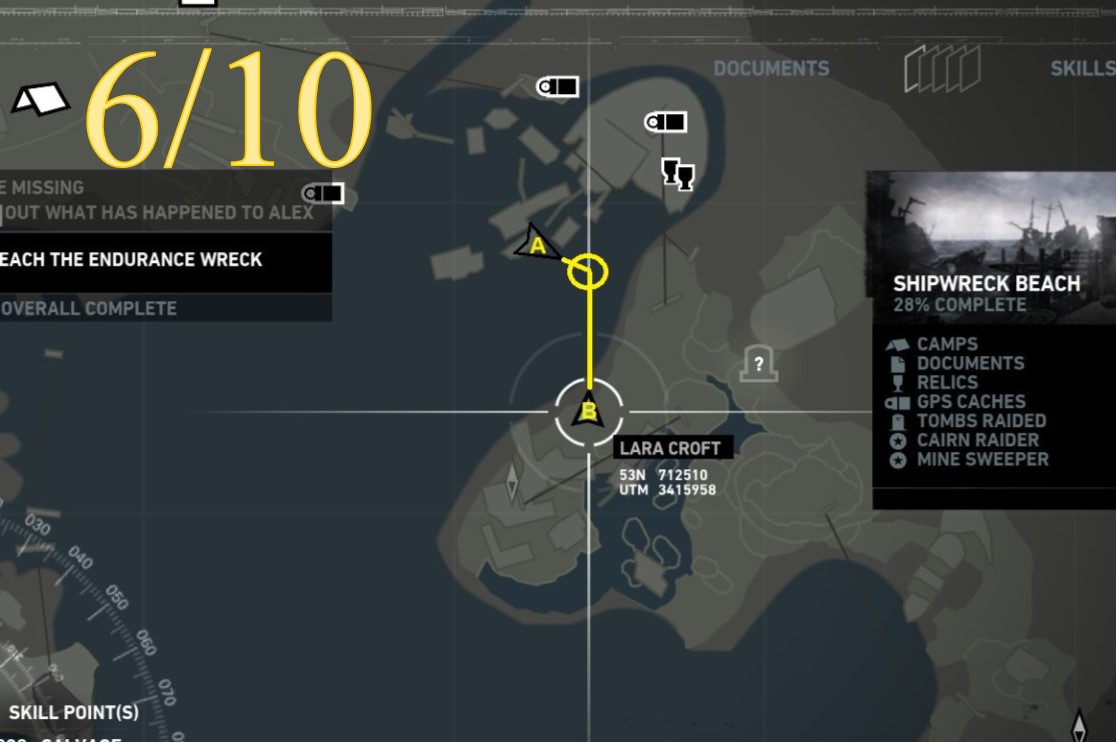
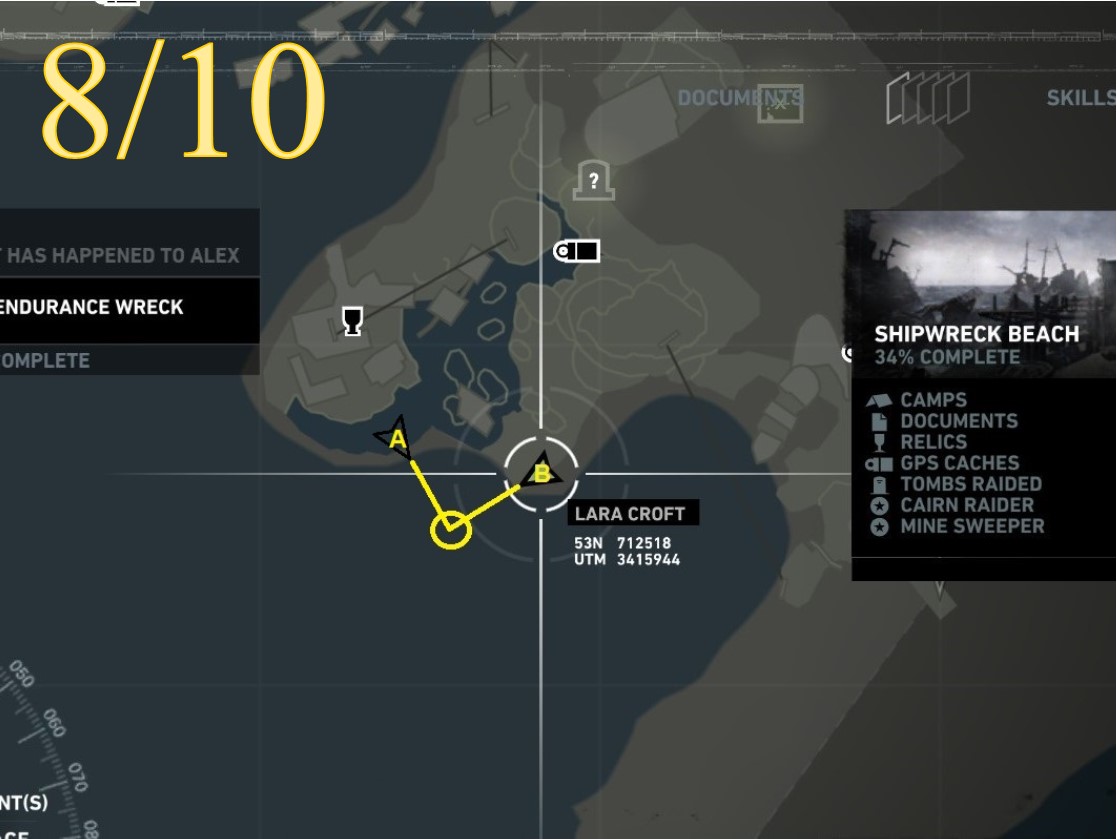
Challenge 10: CAIRN RAIDER
Cairn Raider - Object 1
Area: Shipwreck Beach
Closest Base Camp: Survivors’ Camp
Find and examine
Location on the Map
Screenshot A - Cairn Raider 1/5
Located at the top of a cliff. Shove the buoys to the spot where they are in the picture so Lara can jump to the climbable rockface and then climb to the top.
Screenshot B - Cairn Raider 1/5
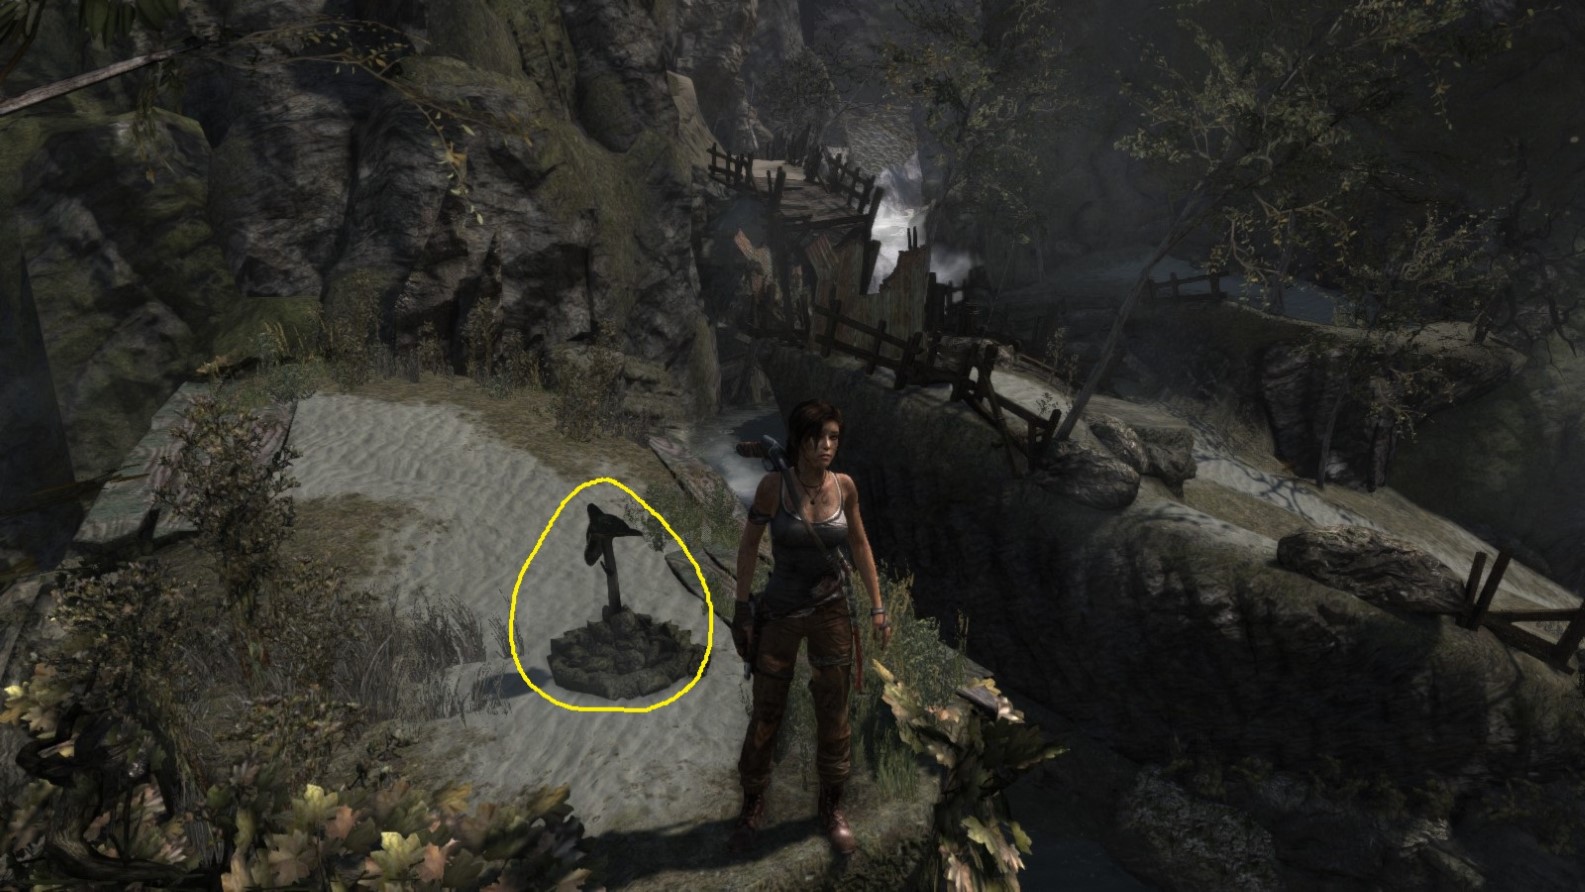
Here Lara has climbed to the top of the cliff and stands close to the cairn. Behind Lara in the background is the area where she first entered this level.
Cairn Raider - Object 2
Area: Shipwreck Beach
Closest Base Camp: Survivors’ Camp
Find and examine
Location on the Map
Screenshot A - Cairn Raider 2/5
Located most of the way up on another lone-standing cliff.
Screenshot B - Cairn Raider 2/5
Lara has climbed up to the cairn.
Cairn Raider - Object 3
Area: Shipwreck Beach
Closest Base Camp: Survivors’ Camp
Find and examine
Location on the Map
Screenshot A - Cairn Raider 3/5
This one is easily accessible; sitting on top of a flat-surfaced rock.
Screenshot B - Cairn Raider 3/5
Seen from another angle.
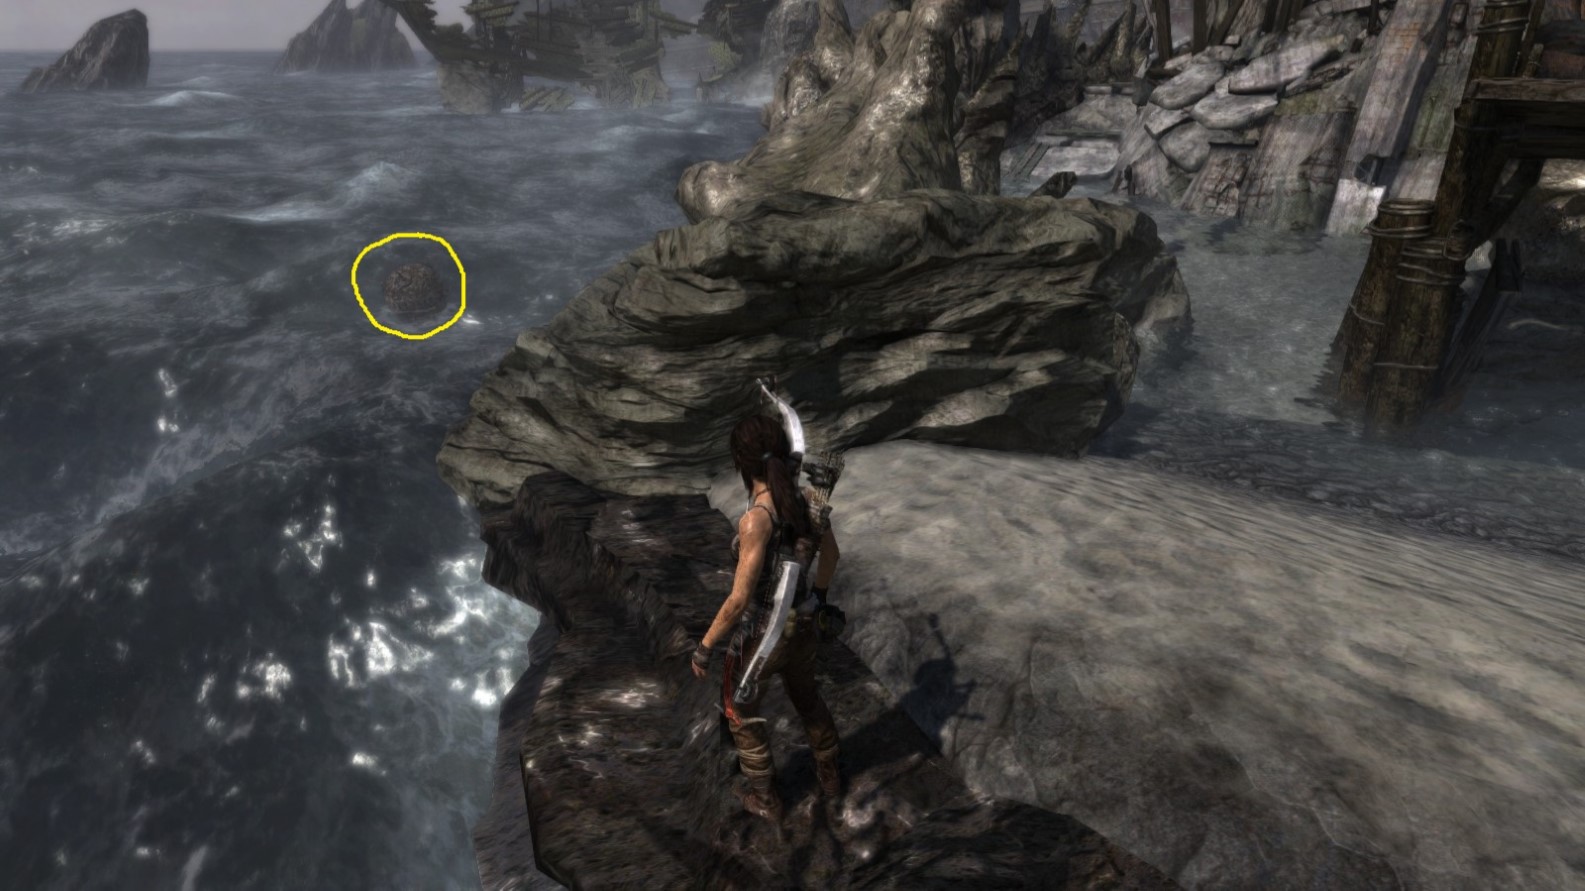
Cairn Raider - Object 4
Area: Shipwreck Beach
Closest Base Camp: Survivors’ Camp
Find and examine
Location on the Map
Lara passes through this area on her way to the Endurance, looking for Alex.
Screenshot A - Cairn Raider 4/5
Located on a path that leads around the towering rock formation where Lara encounters two Solarii lookouts.
Screenshot B - Cairn Raider 4/5
The glow from the Survivors’ Camp base camp can be seen in the background right above the cairn.
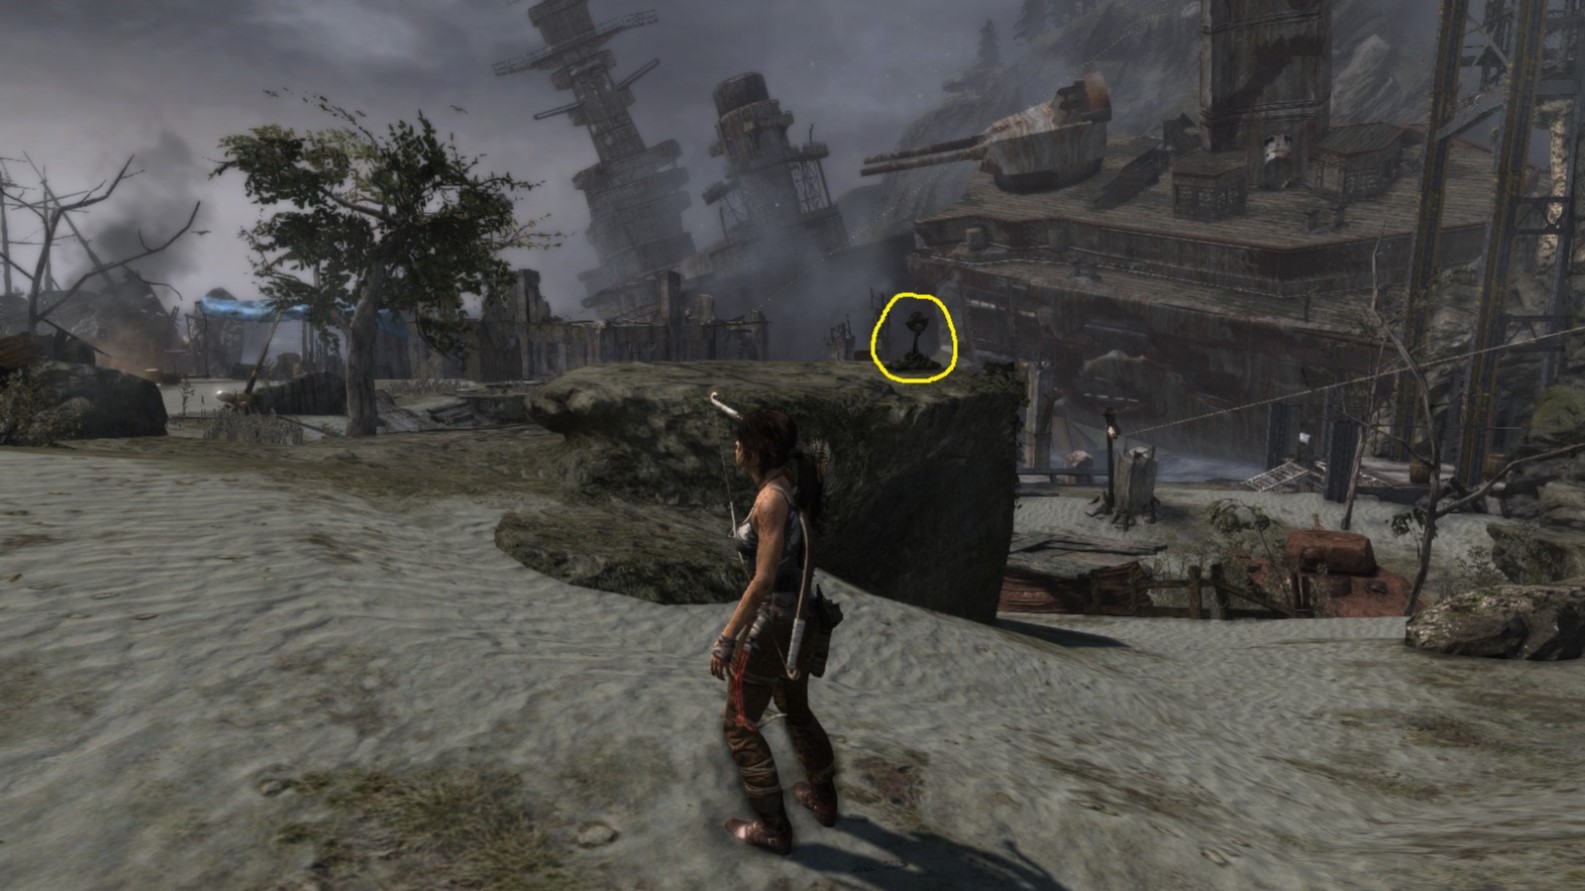
Cairn Raider - Object 5
Area: Shipwreck Beach
Closest Base Camp: Survivors’ Camp
Find and examine
Location on the Map

Screenshot A - Cairn Raider 5/5
Located near a tree on a ledge overlooking the sea.
Screenshot B - Cairn Raider 5/5
Seen from the opposite side.
*** End of CAIRN RAIDER ***
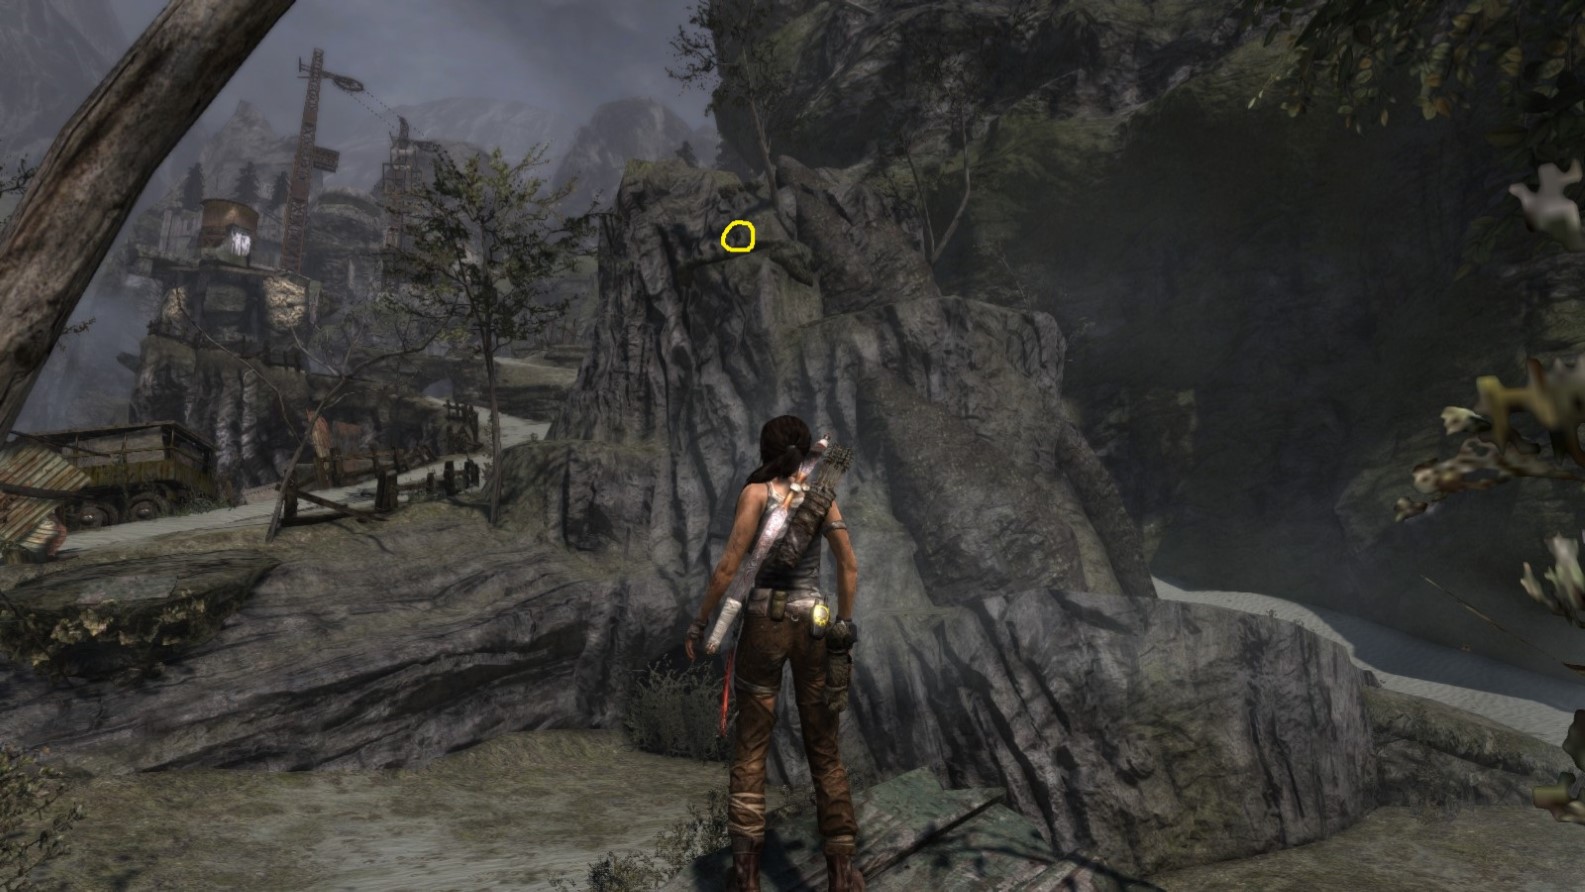
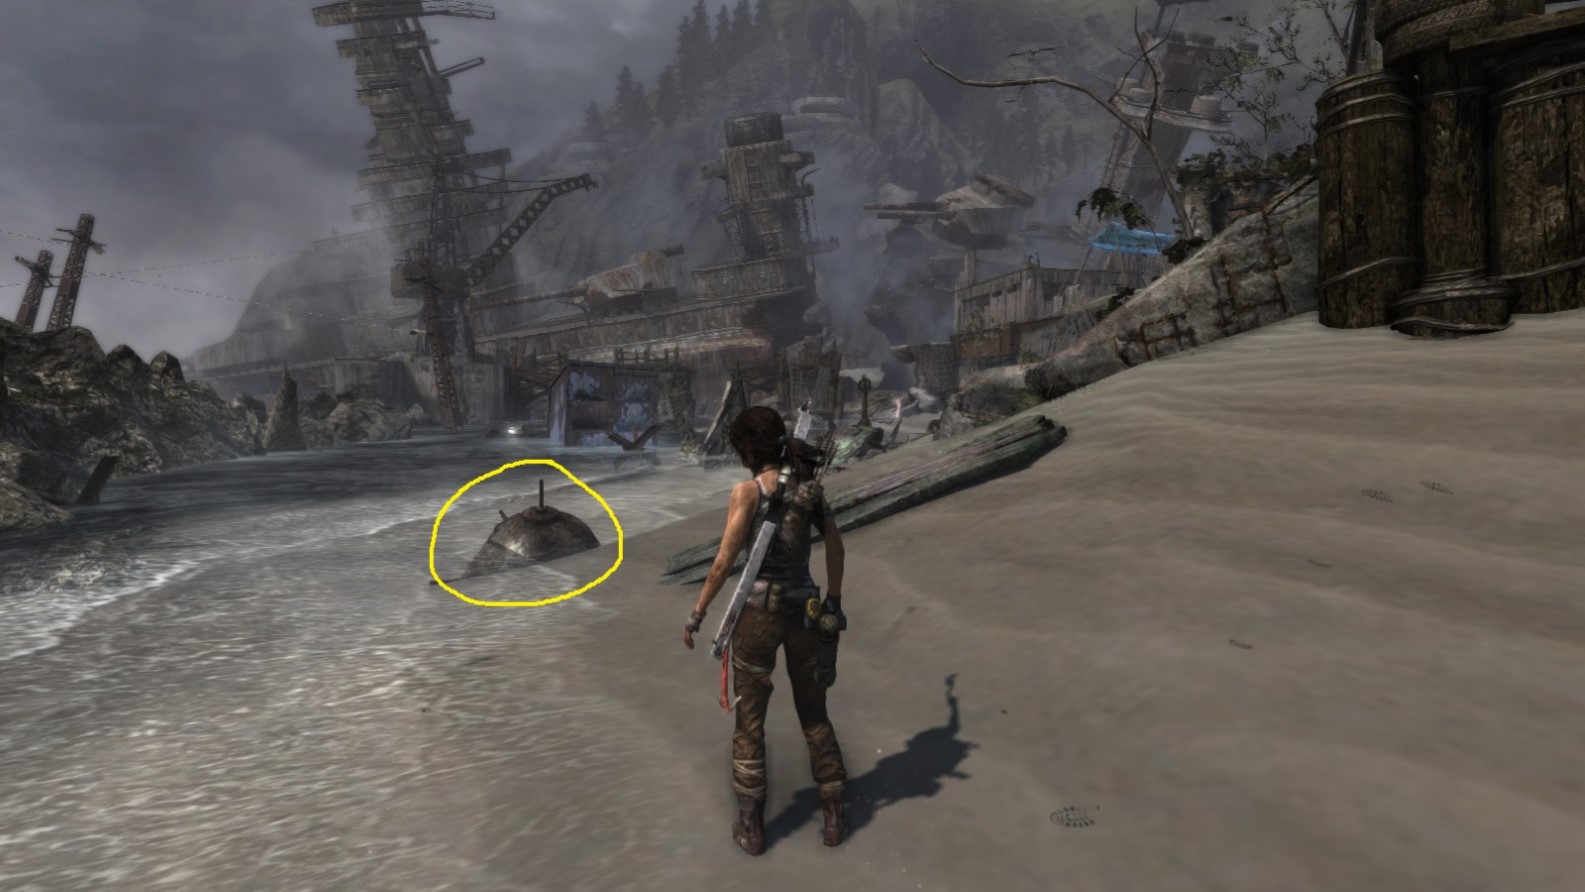
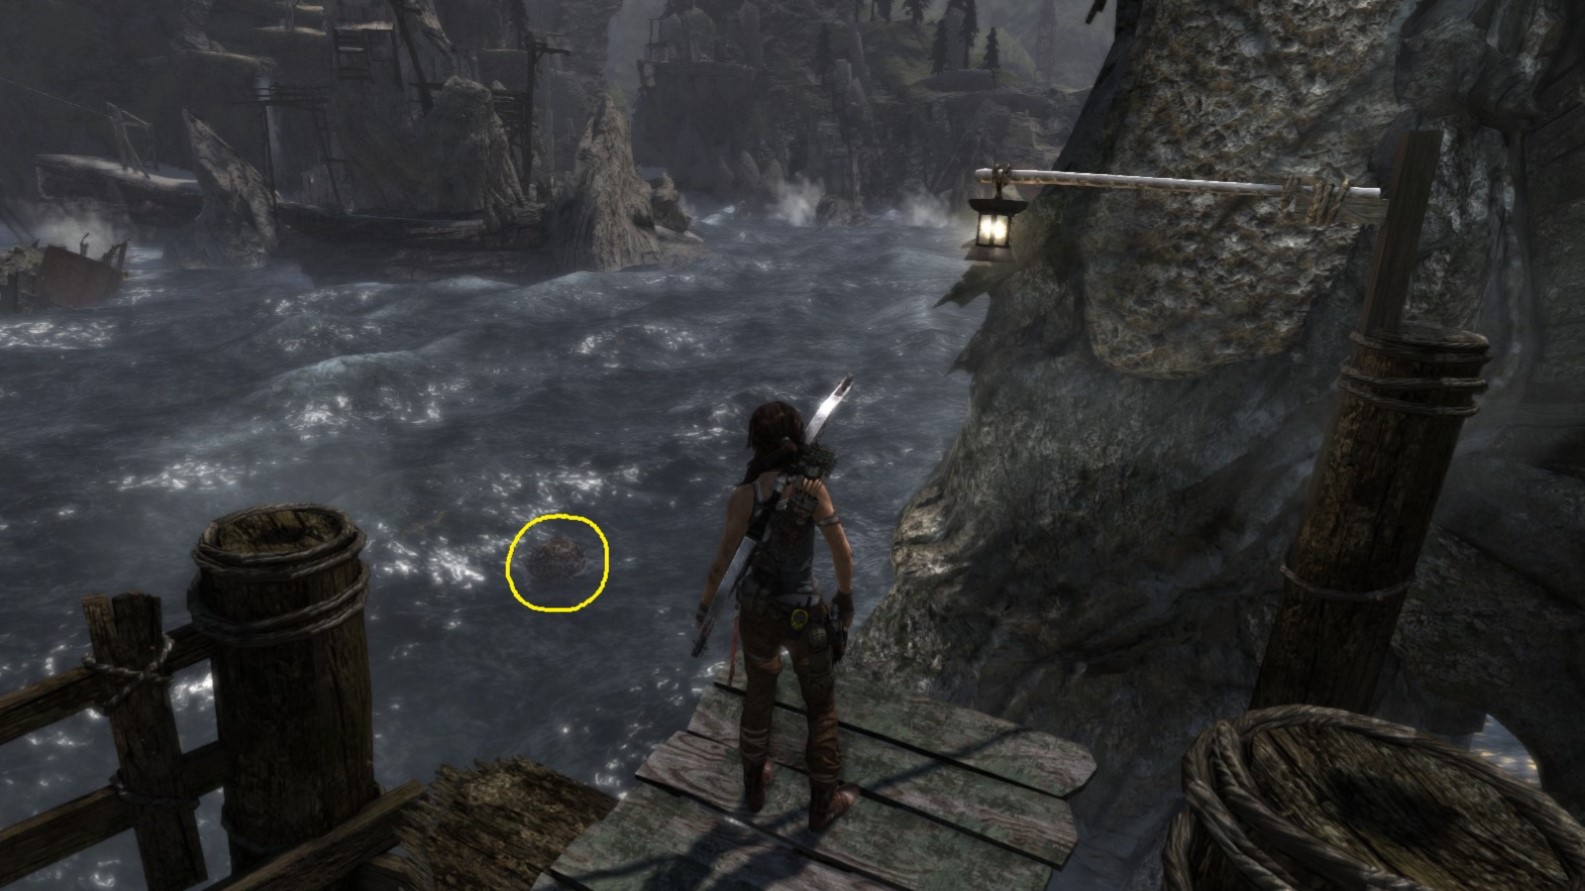
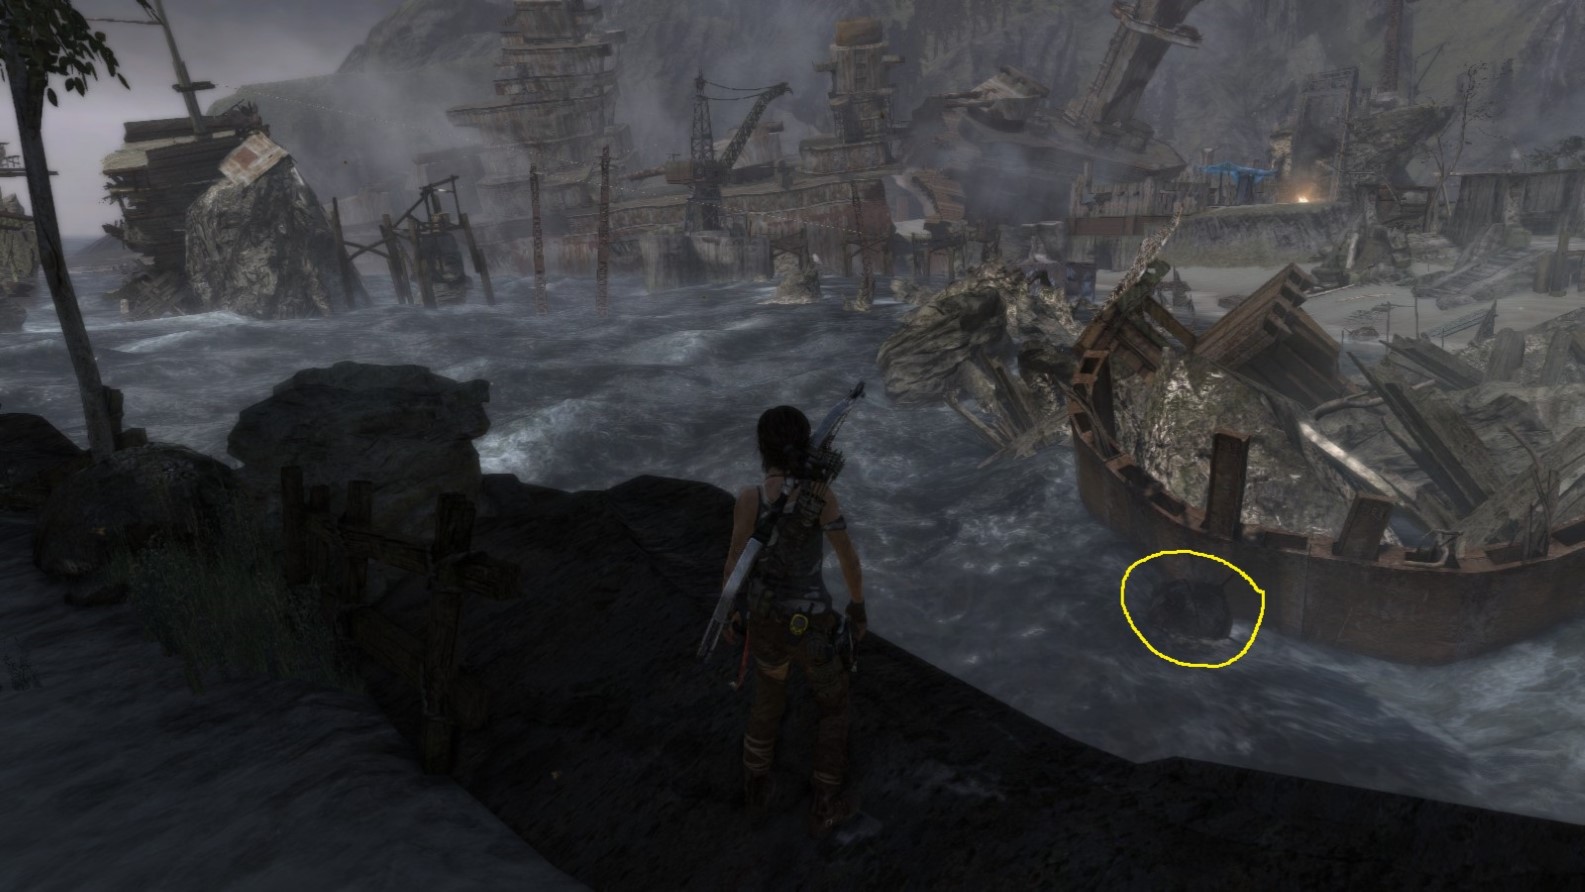
Challenge 11: MINE SWEEPER
Mine Sweeper - Object 1
Area: Shipwreck Beach
Closest Base Camp: Survivors’ Camp
Find and destroy (shoot)
Location on the Map
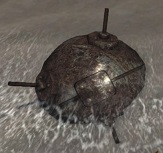
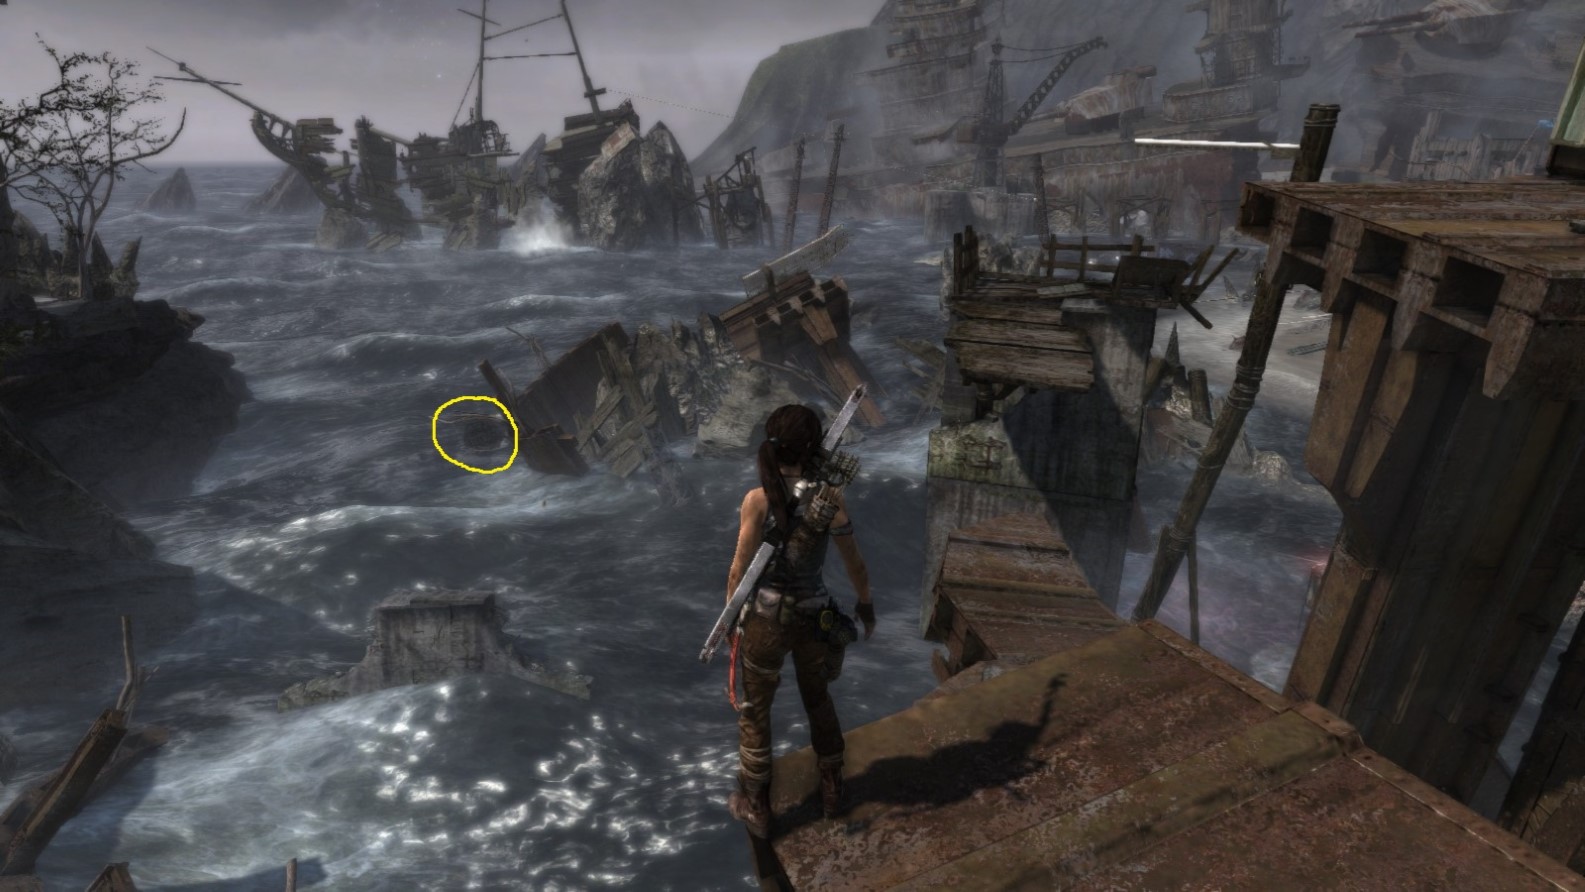
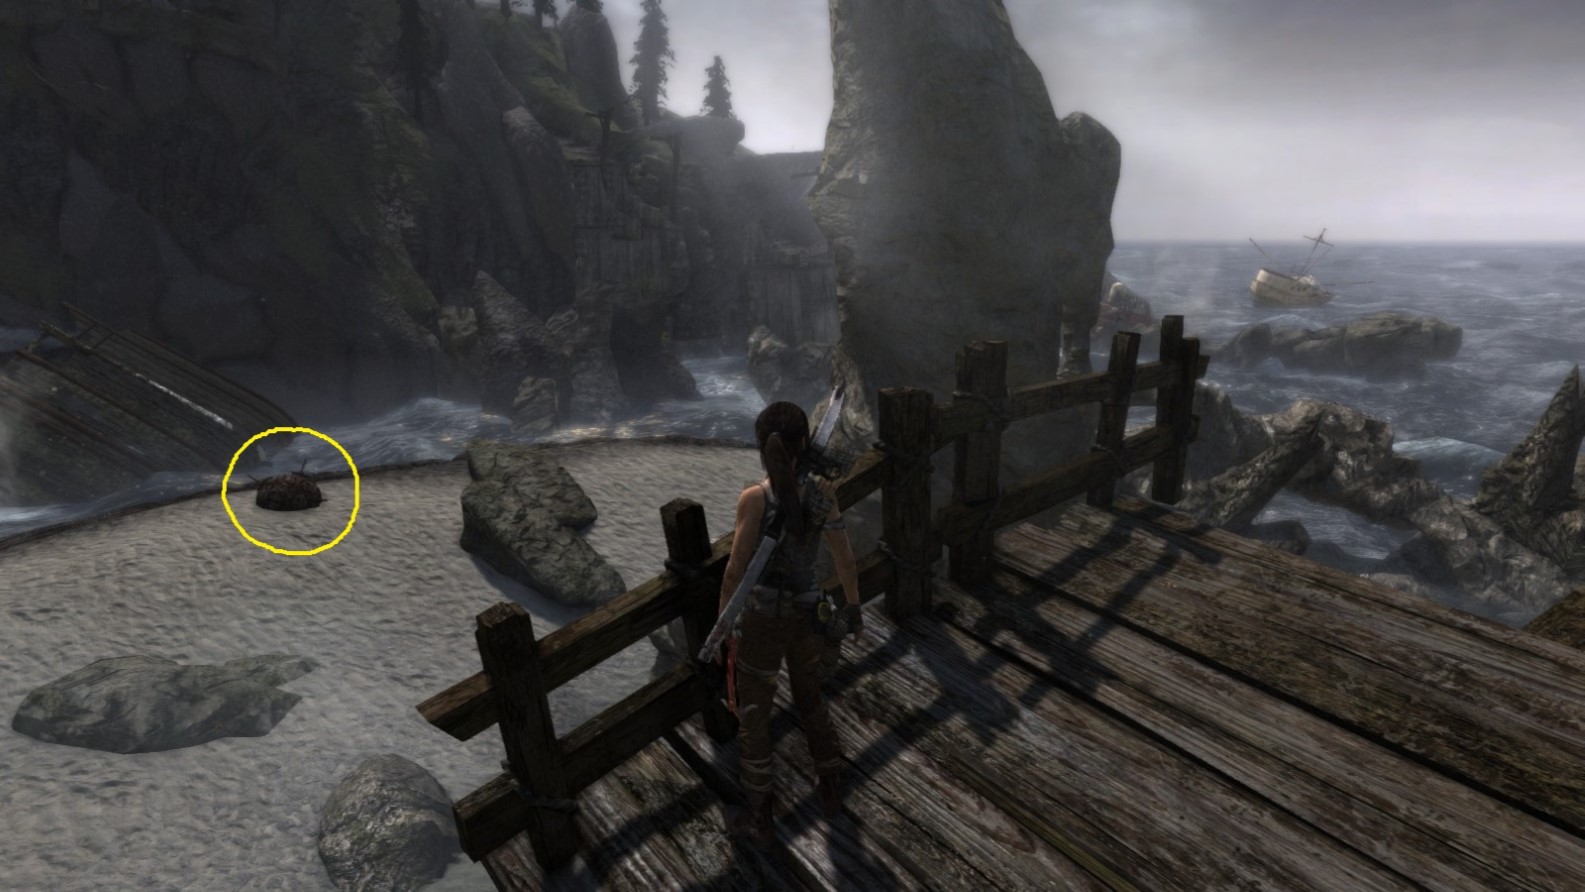
Screenshot A - Mine Sweeper 1/10
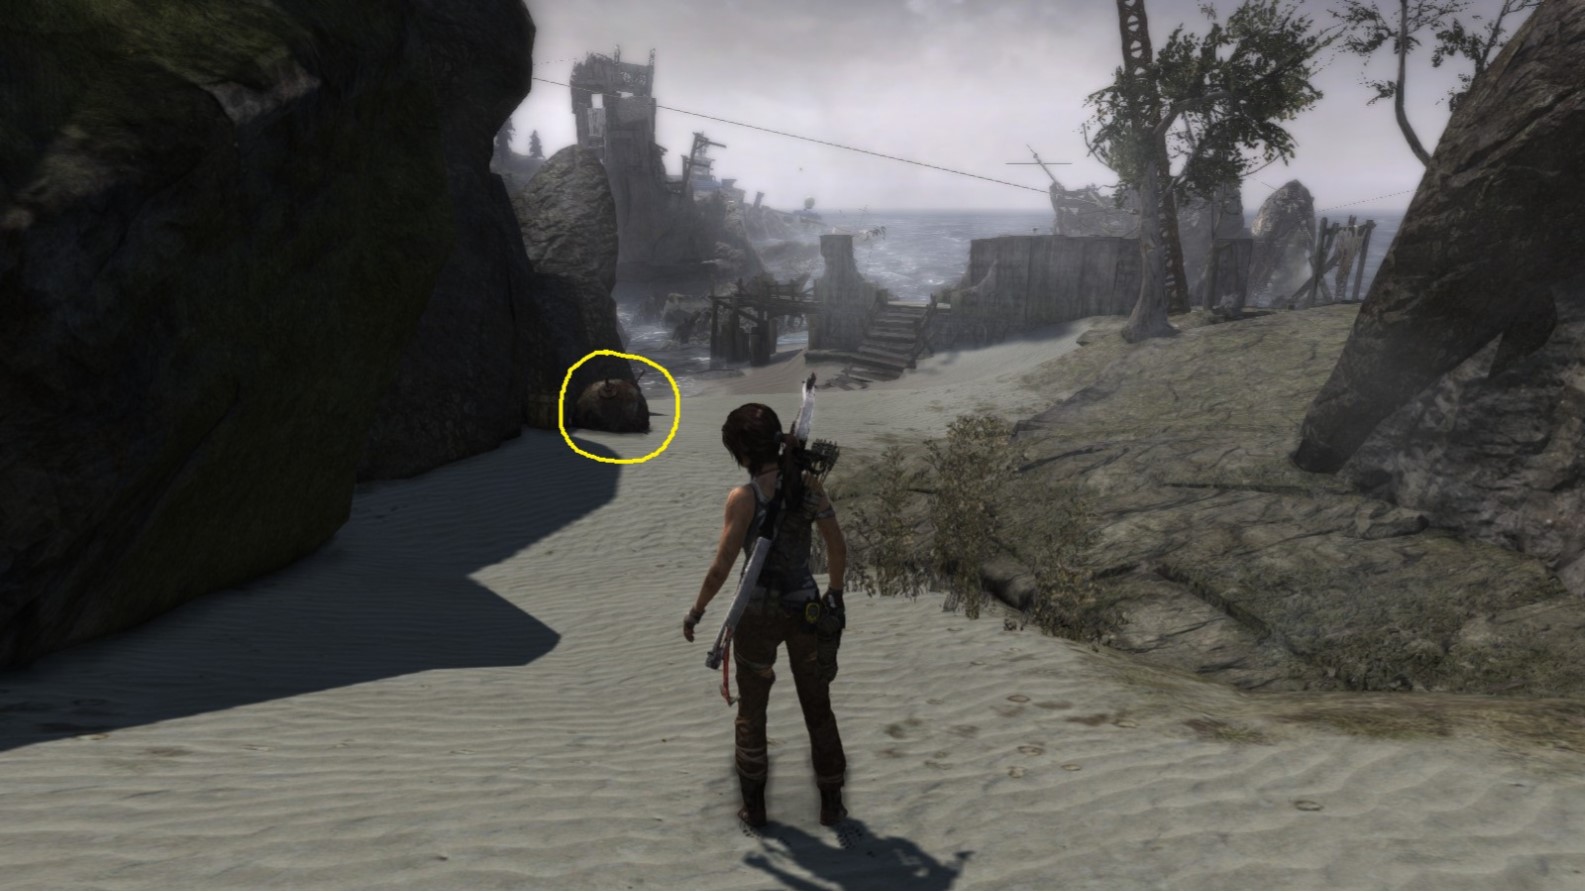
Nestled in the sand next to the cliff.
Screenshot B - Mine Sweeper 1/10
Viewed from a different angle.
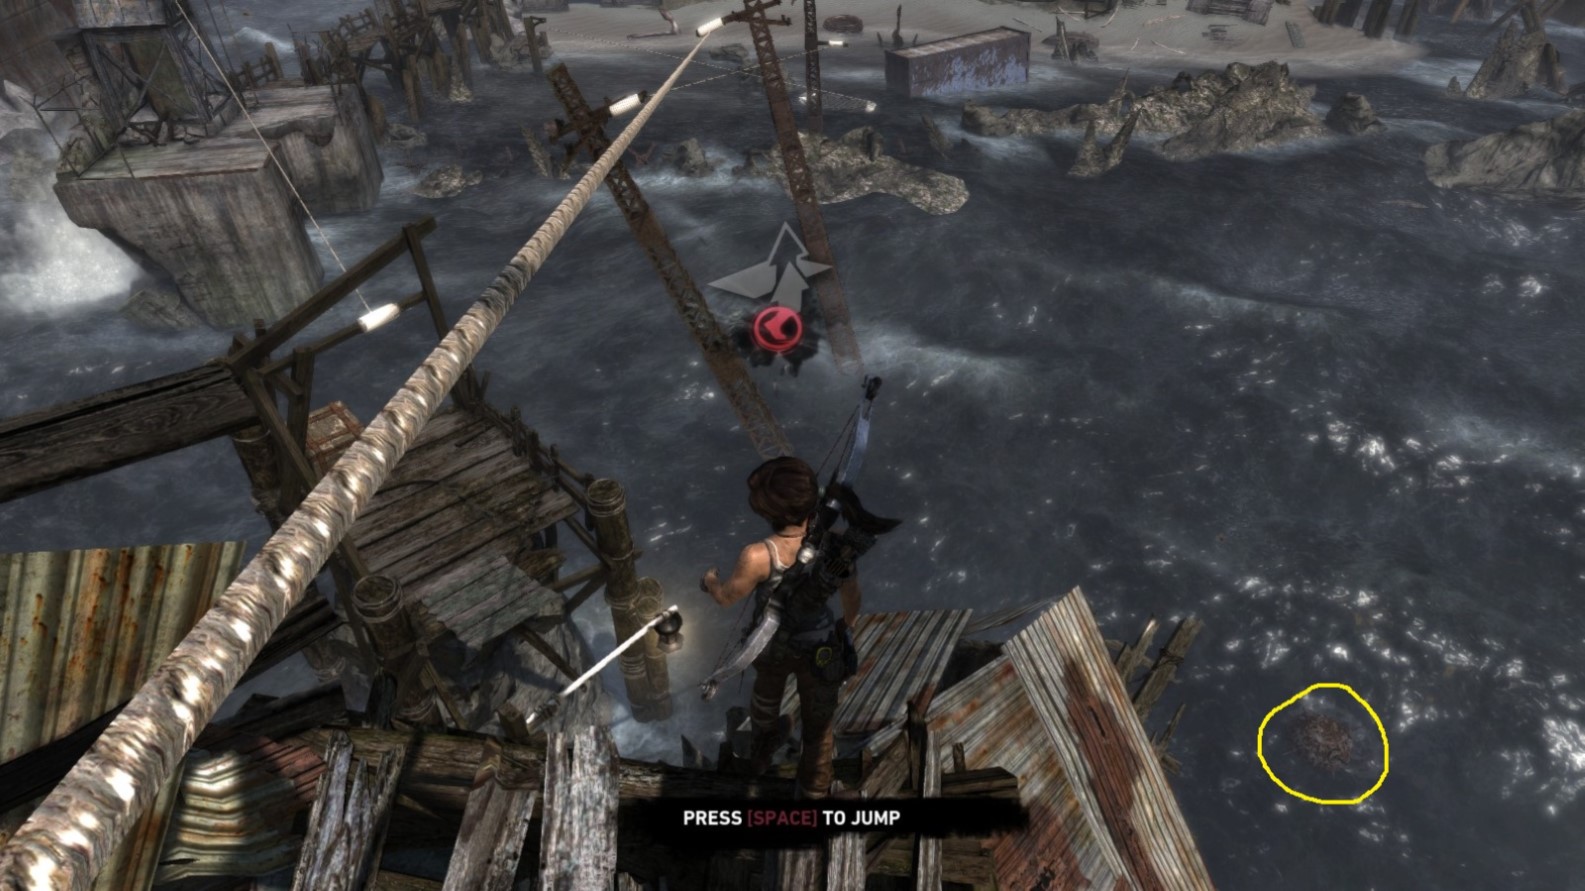
Mine Sweeper - Object 2
Area: Shipwreck Beach
Closest Base Camp: Survivors’ Camp
Find and destroy (shoot)
Location on the Map

Screenshot A - Mine Sweeper 2/10
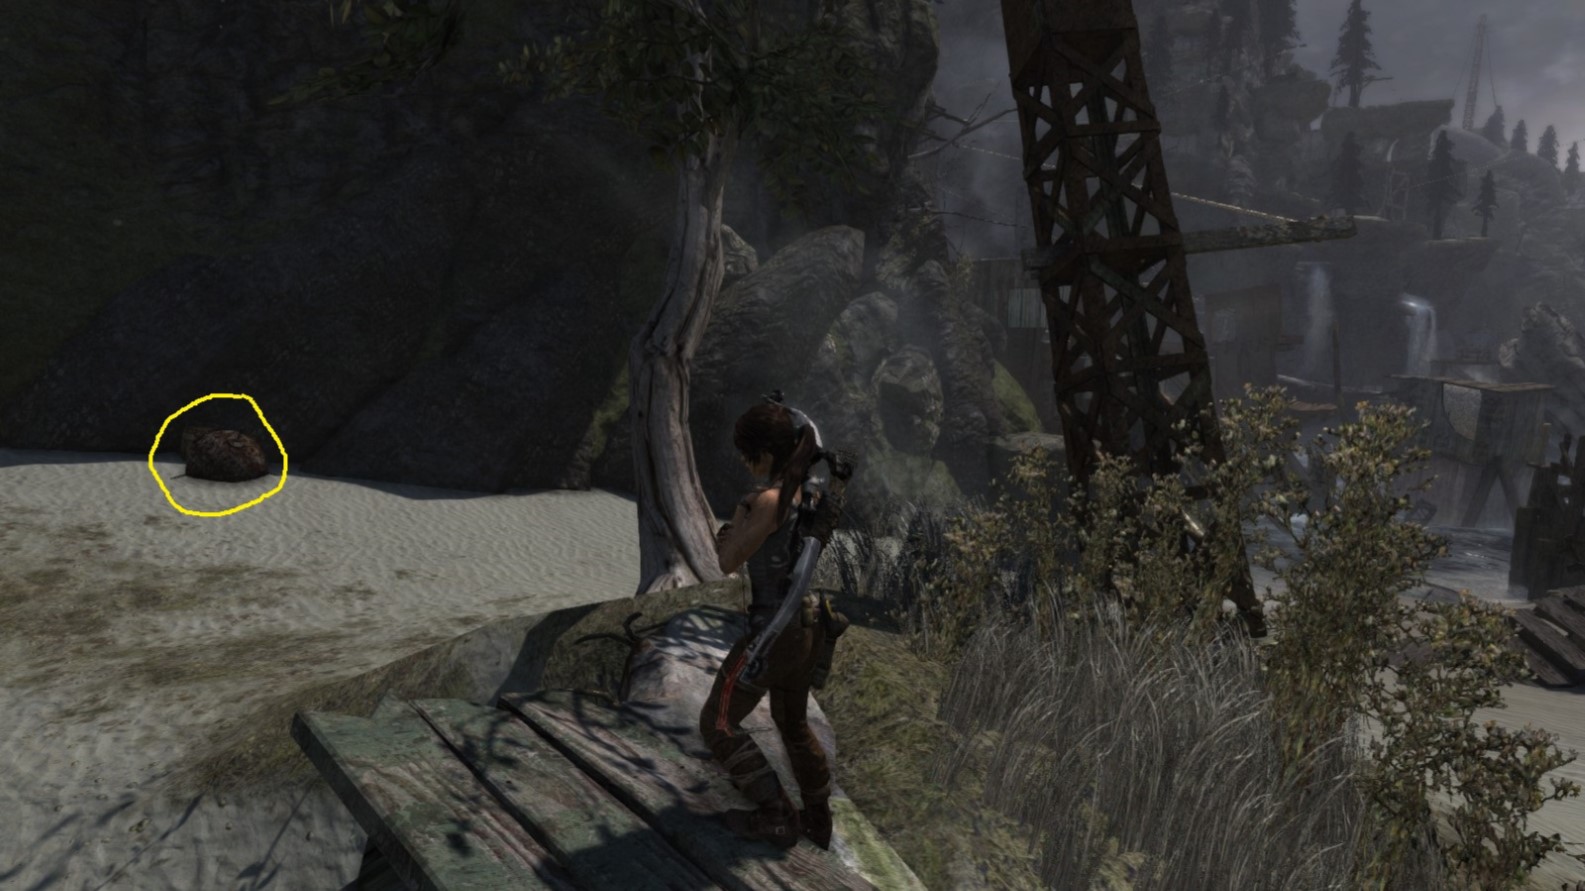
Located on the shoreline.
Screenshot B - Mine Sweeper 2/10
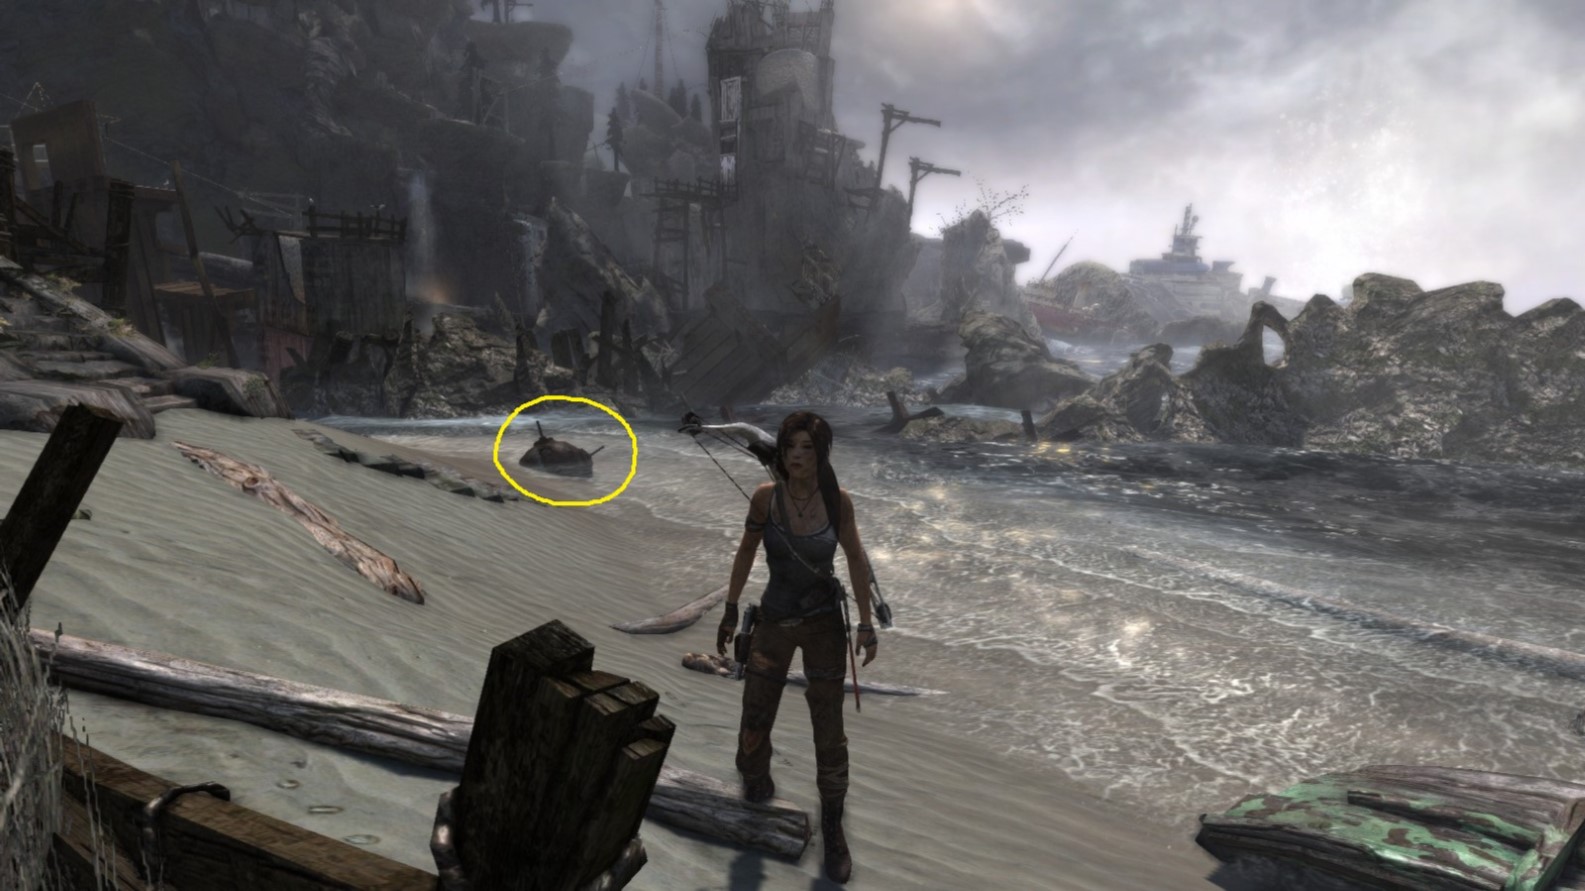
Viewed from the opposite direction.
Mine Sweeper - Object 3
Area: Shipwreck Beach
Closest Base Camp: Survivors’ Camp
Find and destroy (shoot)
Location on the Map
Screenshot A - Mine Sweeper 3/10
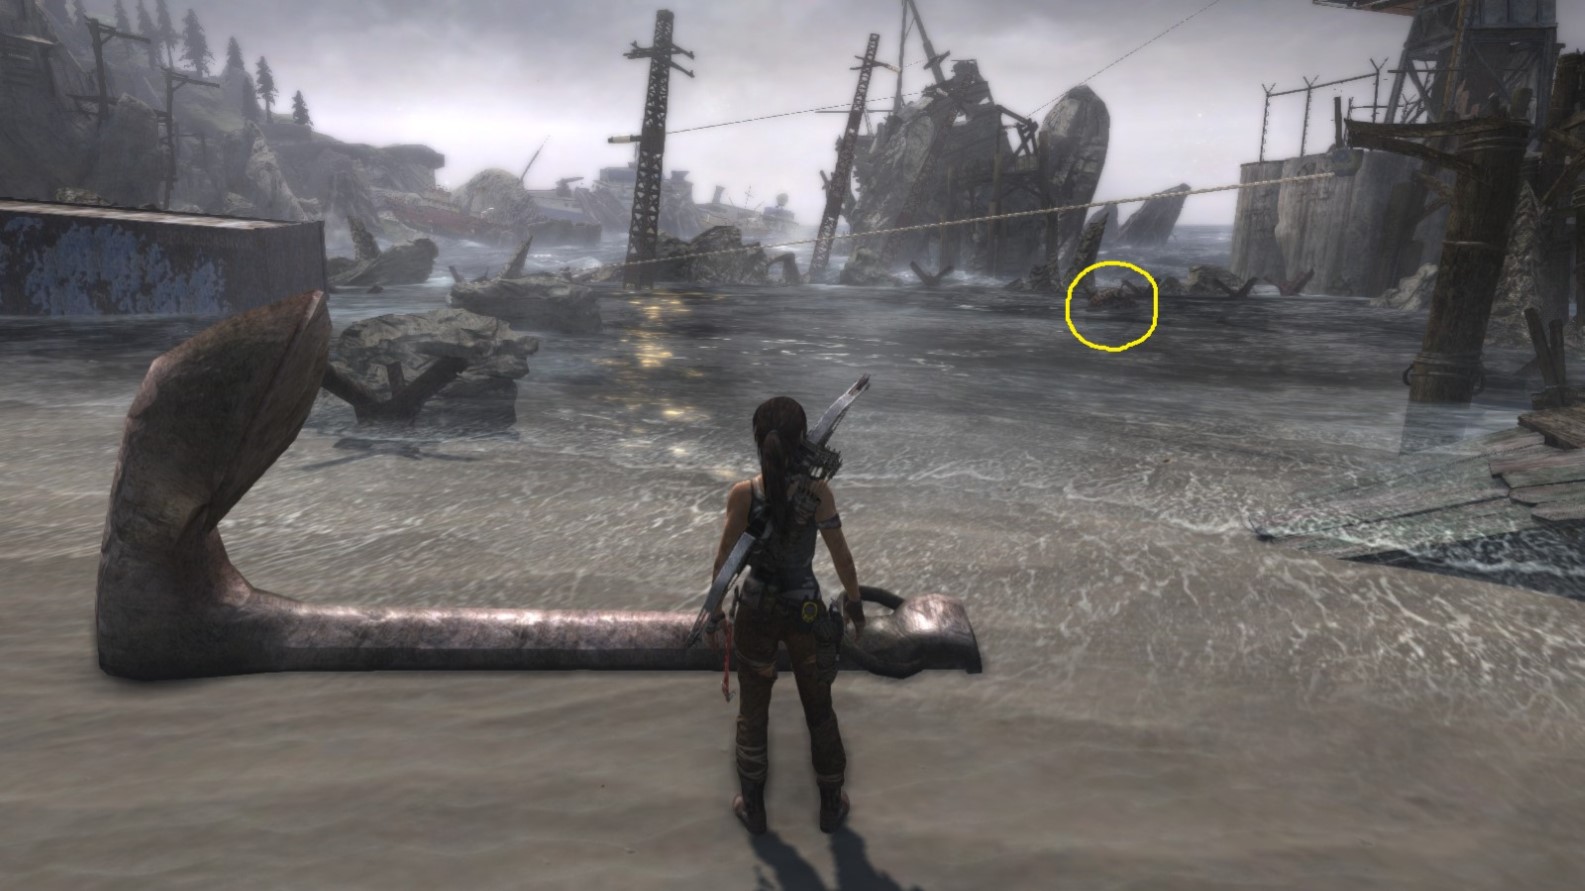
Located in the water. Lara can wade right up to it, but be sure to shoot it from a distance.
Screenshot B - Mine Sweeper 3/10
Seen from a higher point of view.
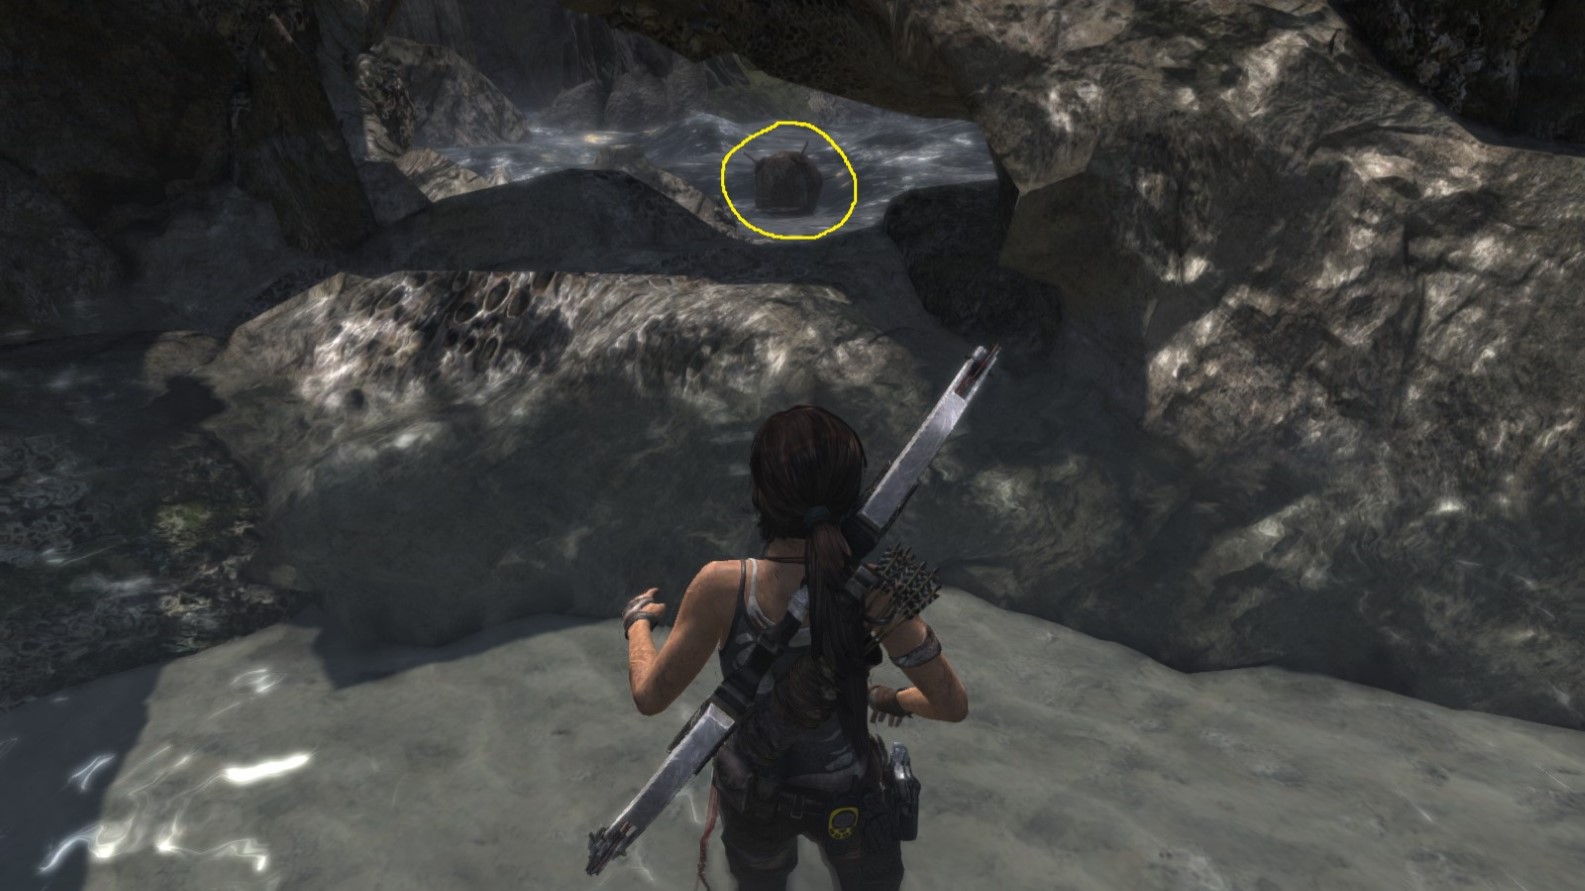
Mine Sweeper - Object 4
Area: Shipwreck Beach
Closest Base Camp: Survivors’ Camp
Find and destroy (shoot)
Location on the Map
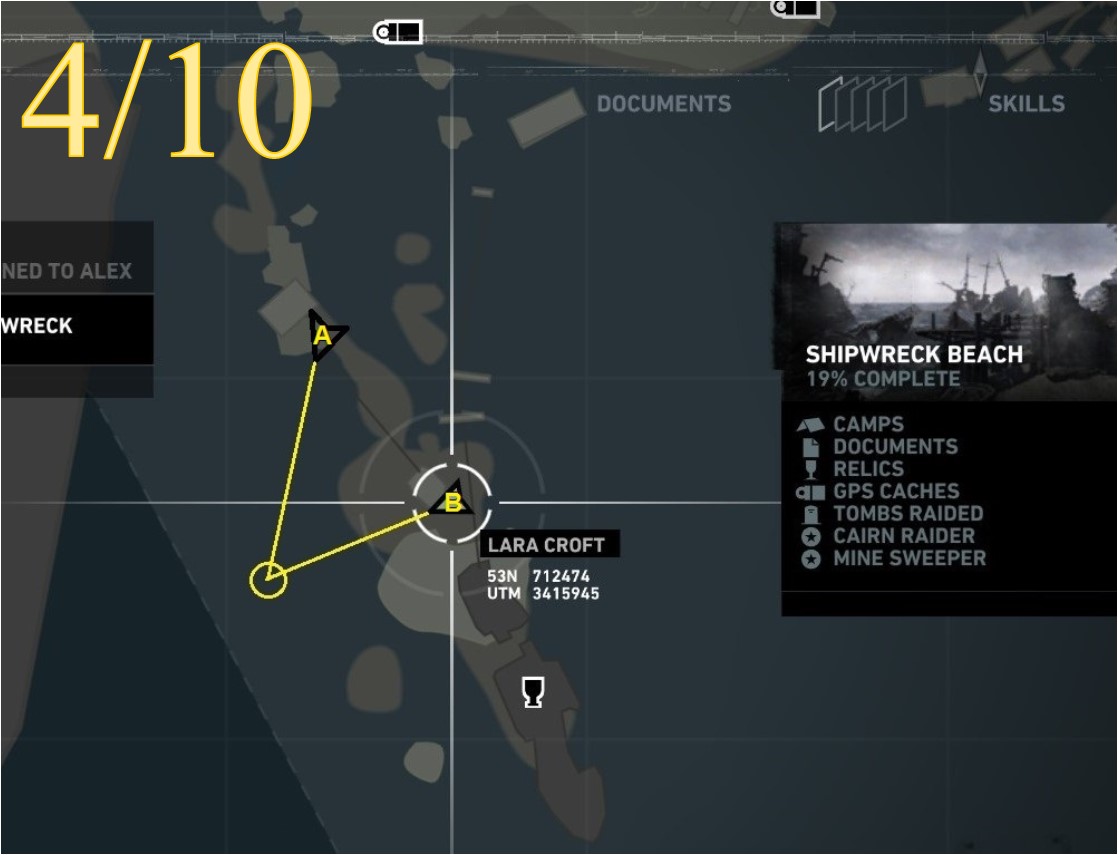
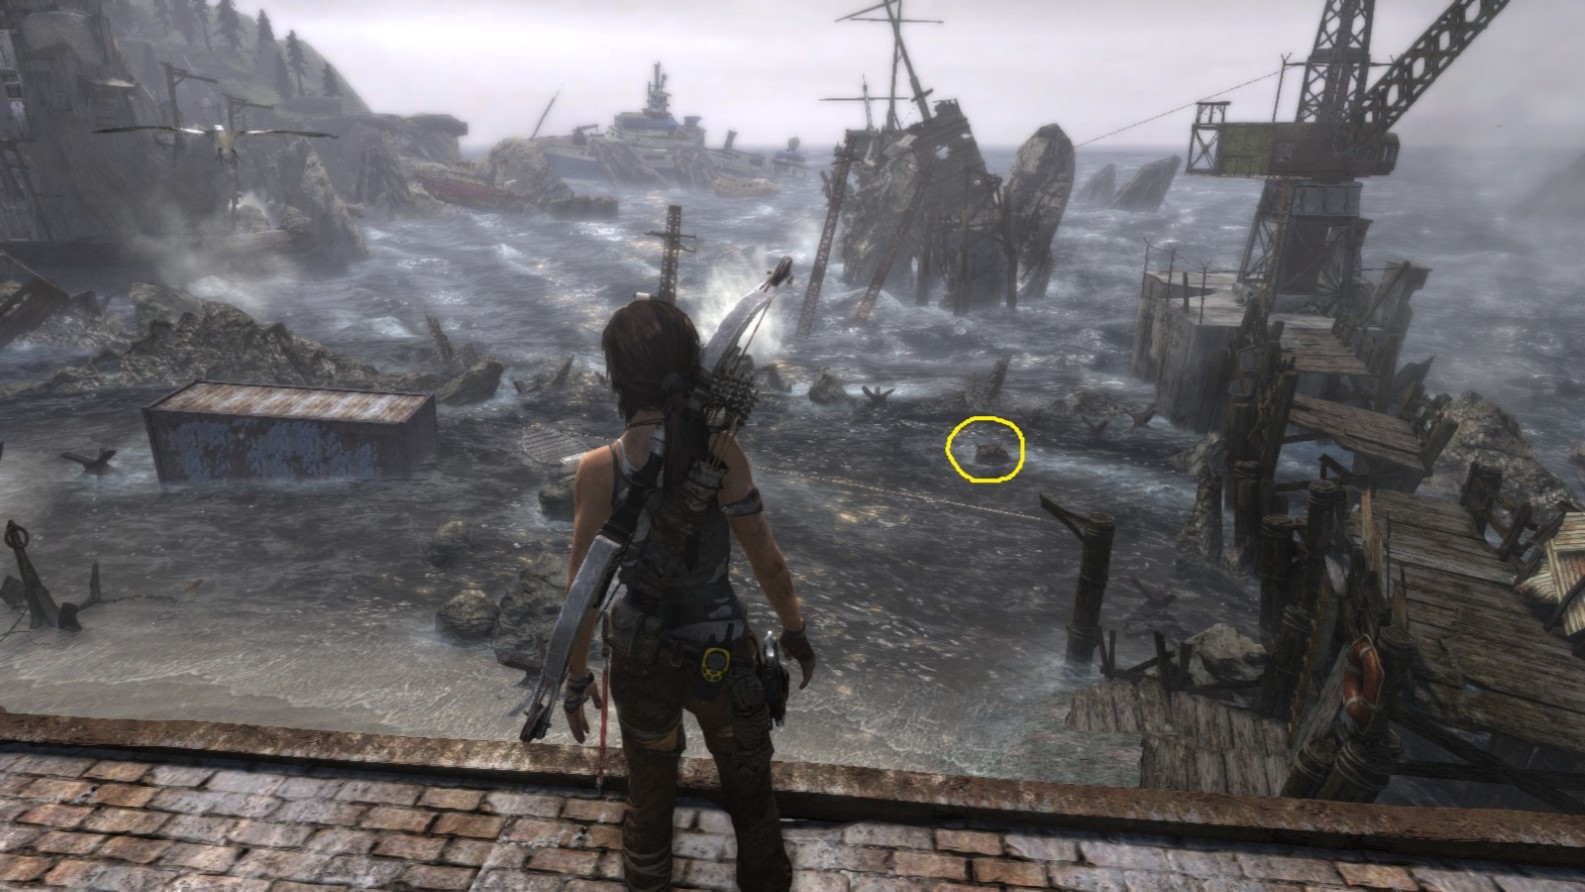
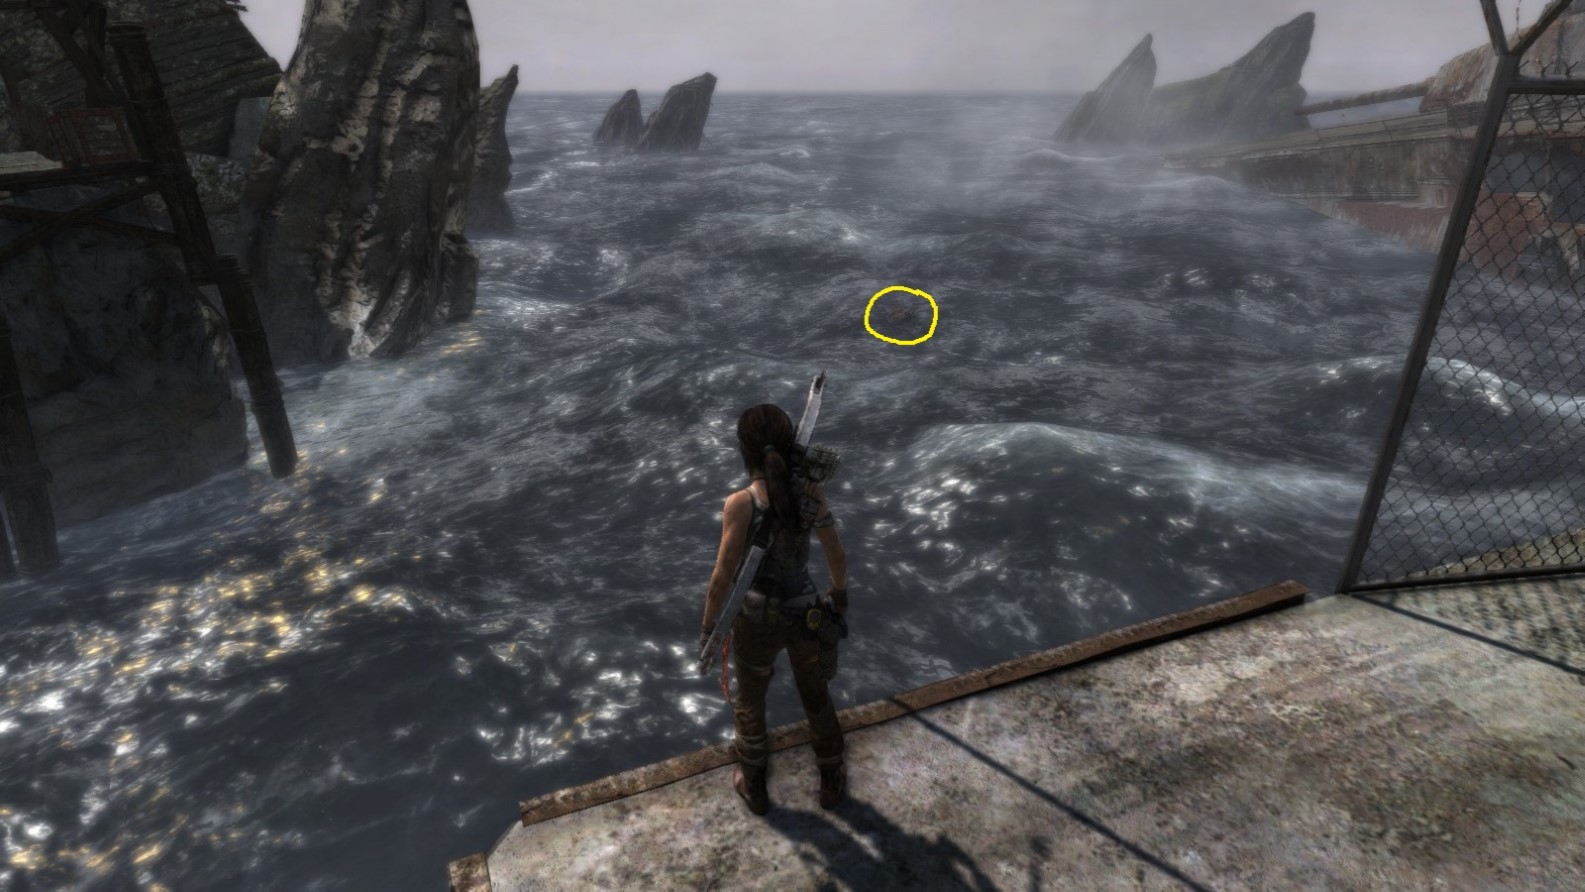
The position of the mine is represented by the yellow circle. Arrows A and B represent Lara’s position in screenshots A and B.
Screenshot A - Mine Sweeper 4/10
Lara’s view from point A on the map. Use Survival Instinct mode (Q) to see the target better.
Screenshot B - Mine Sweeper 4/10
Lara’s view from point B on the map. Use Survival Instinct mode (Q) to see the target better.
Mine Sweeper - Object 5
Area: Shipwreck Beach
Closest Base Camp: Survivors’ Camp
Find and destroy (shoot)
Location on the Map
The position of the mine is represented by the yellow circle. Arrows A and B represent Lara’s position in screenshots A and B.
Screenshot A - Mine Sweeper 5/10
Lara’s view from point A on the map. Use Survival Instinct mode (Q) to see the target better.
Screenshot B - Mine Sweeper 5/10
Lara’s view from point B on the map. Use Survival Instinct mode (Q) to see the target better.
Mine Sweeper - Object 6
Area: Shipwreck Beach
Closest Base Camp: Survivors’ Camp
Find and destroy (shoot)
Location on the Map
The position of the mine is represented by the yellow circle. Arrows A and B represent Lara’s position in screenshots A and B.
Screenshot A - Mine Sweeper 6/10
Lara’s view from point A on the map. Use Survival Instinct mode (Q) to see the target better.
Screenshot B - Mine Sweeper 6/10
Lara’s view from point B on the map. Use Survival Instinct mode (Q) to see the target better.
Mine Sweeper - Object 7
Area: Shipwreck Beach
Closest Base Camp: Survivors’ Camp
Find and destroy (shoot)
Location on the Map
The position of the mine is represented by the yellow circle. Arrows A and B represent Lara’s position in screenshots A and B.
Screenshot A - Mine Sweeper 7/10
Lara’s view from point A on the map. Use Survival Instinct mode (Q) to see the target better.
Screenshot B - Mine Sweeper 7/10
Lara’s view from point B on the map. Use Survival Instinct mode (Q) to see the target better.
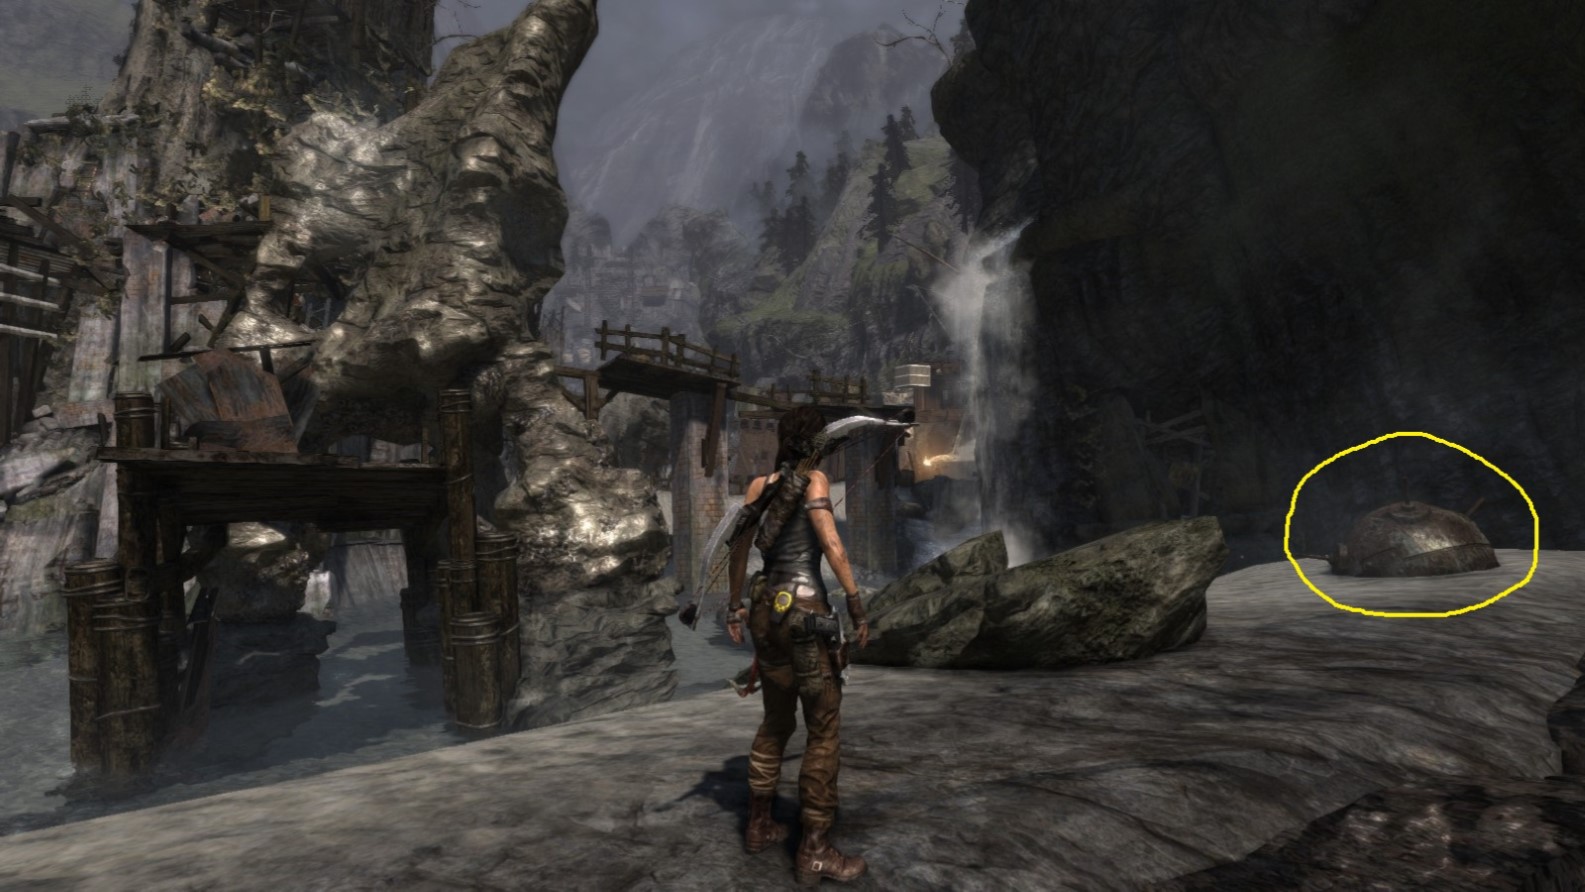
Mine Sweeper - Object 8
Area: Shipwreck Beach
Closest Base Camp: Survivors’ Camp
Find and destroy (shoot)
Location on the Map
The position of the mine is represented by the yellow circle. Arrows A and B represent Lara’s position in screenshots A and B.
Screenshot A - Mine Sweeper 8/10
Lara’s view from point A on the map, looking through an opening in the rock at sea level. Use Survival Instinct mode (Q) to see the target better. (Shoot from position B.)
Screenshot B - Mine Sweeper 8/10
Lara’s view from point B on the map. Use Survival Instinct mode (Q) to see the target better. Note: You may find it difficult to aim at this mine. While aiming your weapon, press the key for 'switching shoulders' (default is 'C'). She will now have a clear view of the mine.
Mine Sweeper - Object 9
Area: Shipwreck Beach
Closest Base Camp: Survivors’ Camp
Find and destroy (shoot)
Location on the Map
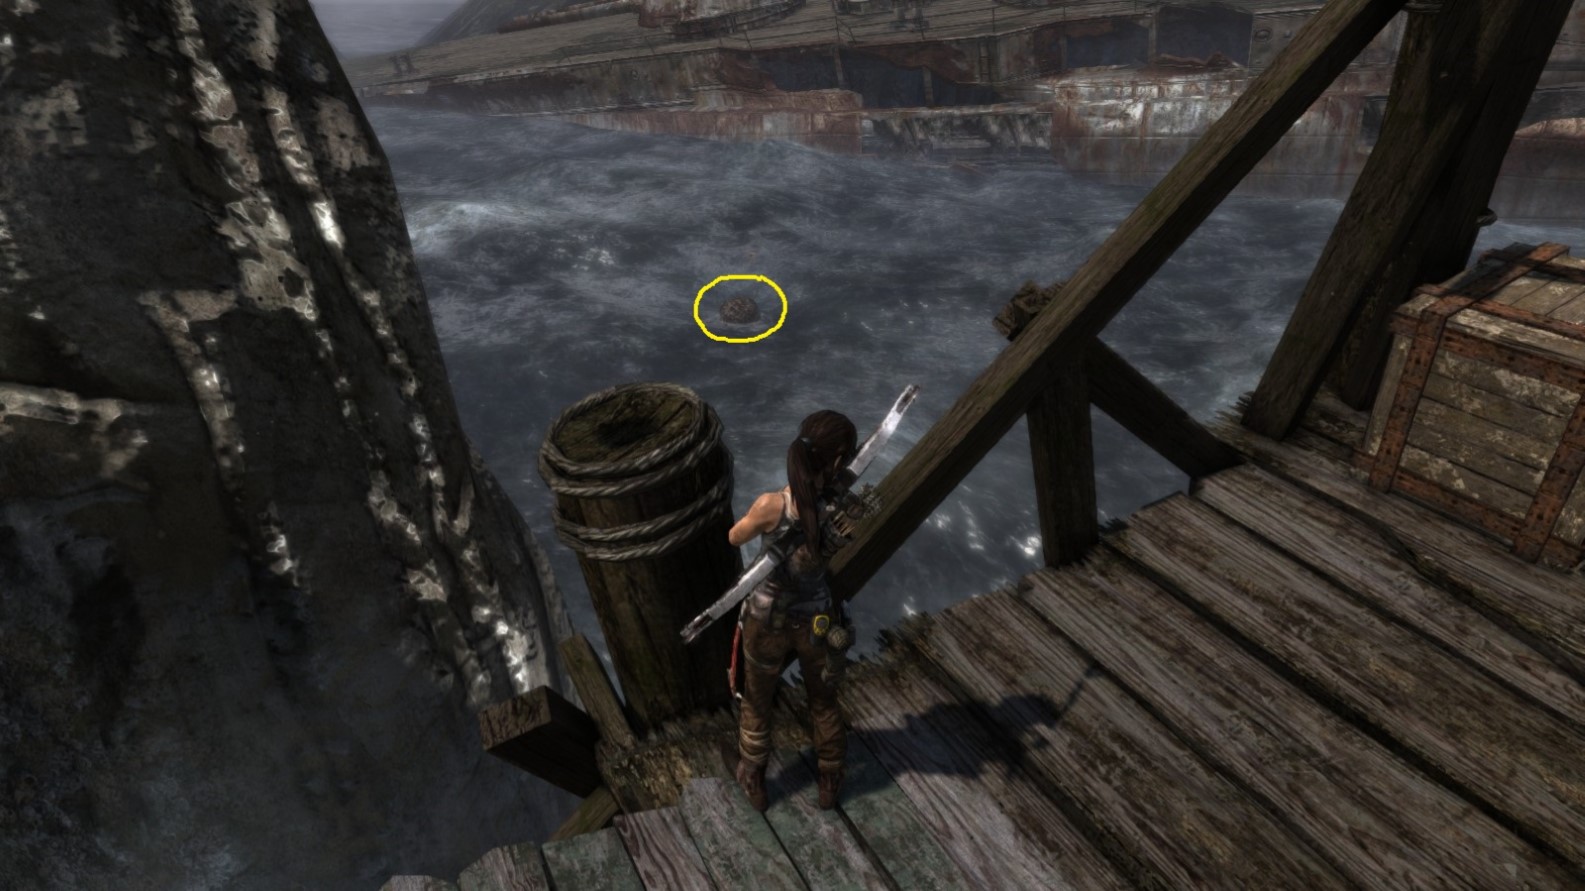
Screenshot A - Mine Sweeper 9/10
Lara looks down from part of a broken bridge.
Screenshot B - Mine Sweeper 9/10
The mine lies in the sand.
Mine Sweeper - Object 10
Area: Shipwreck Beach
Closest Base Camp: Survivors’ Camp
Find and destroy (shoot)
Location on the Map
Screenshot A - Mine Sweeper 10/10
Lara finds the mine in the sand.
Screenshot B - Mine Sweeper 10/10
From closer.
*** End of MINE SWEEPER ***
Challenge 12: PREVIOUS INHABITANTS
Important Note:
This area has no base (fast-travel) camps, only day camps. Therefore, to return here from distant areas, Lara needs to fast-travel to the adjacent area’s base camp: the Survivors’ Camp in Shipwreck Beach. From there she can make her way back to Cliffside Bunker, moving east.
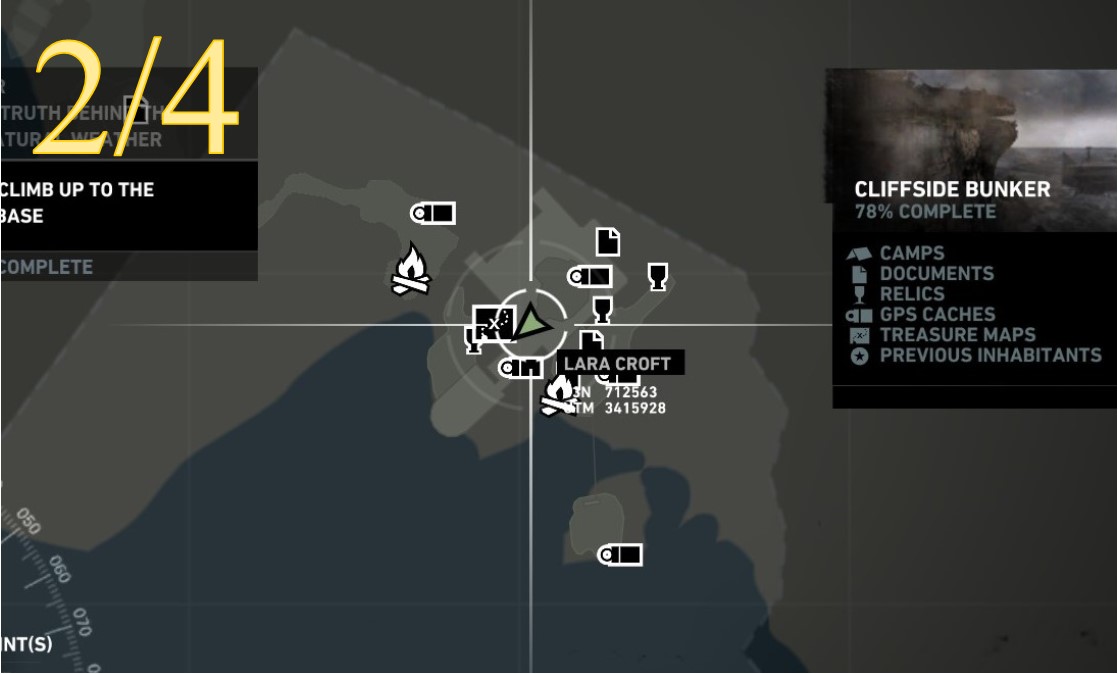
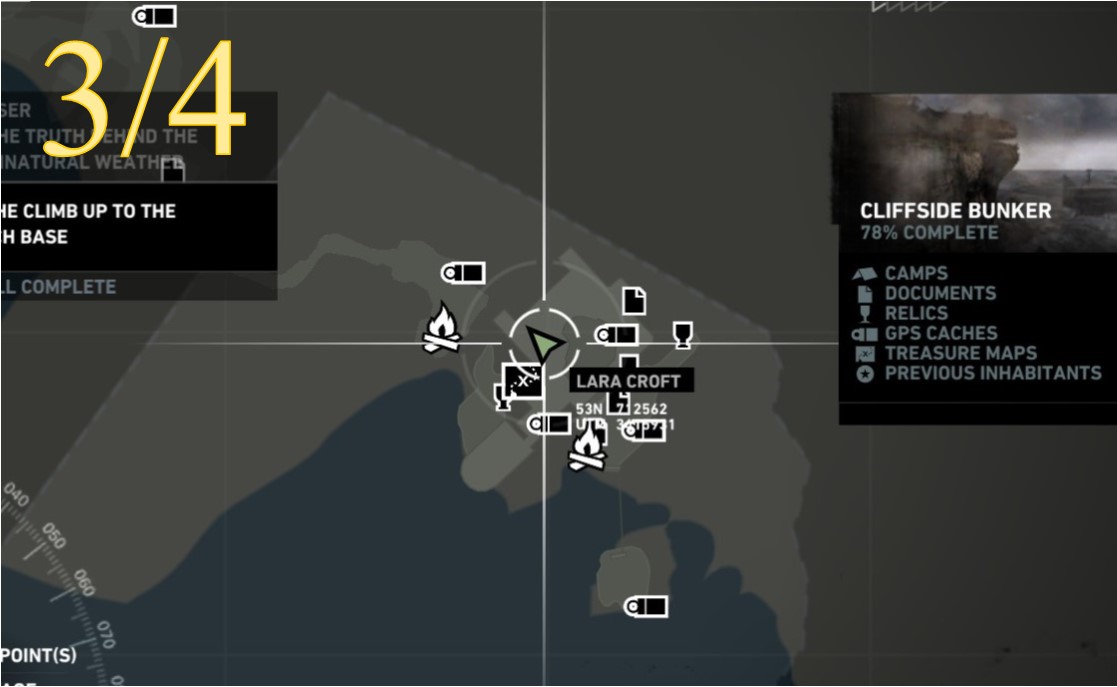
Area: Cliffside Bunker
Closest Base Camp:
Survivors’ Camp (area: Shipwreck Beach)
Find and destroy (burn)
Location on the Map
Screenshot A - Previous Inhabitants 1/4
Lara climbs her way into a fortified artillery nest, destroyed long ago.
Screenshot B - Previous Inhabitants 1/4

The first flag is located on a wall at the back of the cannon.
Area: Cliffside Bunker
Closest Base Camp:
Survivors’ Camp (area: Shipwreck Beach)
Find and destroy (burn)
Location on the Map
Screenshot A - Previous Inhabitants 2/4
The object is hidden high up on a shadowed wall amongst some vegetation. Not that easy to spot at first. Shoot with fire arrow.
Screenshot B - Previous Inhabitants 2/4

A different view of the object as Lara hangs from a lift.
Area: Cliffside Bunker
Closest Base Camp:
Survivors’ Camp (area: Shipwreck Beach)
Find and destroy (burn)
Location on the Map
Screenshot A - Previous Inhabitants 3/4
Located on a wall on the roofless top level of the building.
Screenshot B - Previous Inhabitants 3/4
Seen from another angle.
Area: Cliffside Bunker
Closest Base Camp:
Survivors’ Camp (area: Shipwreck Beach)
Find and destroy (burn)
Location on the Map
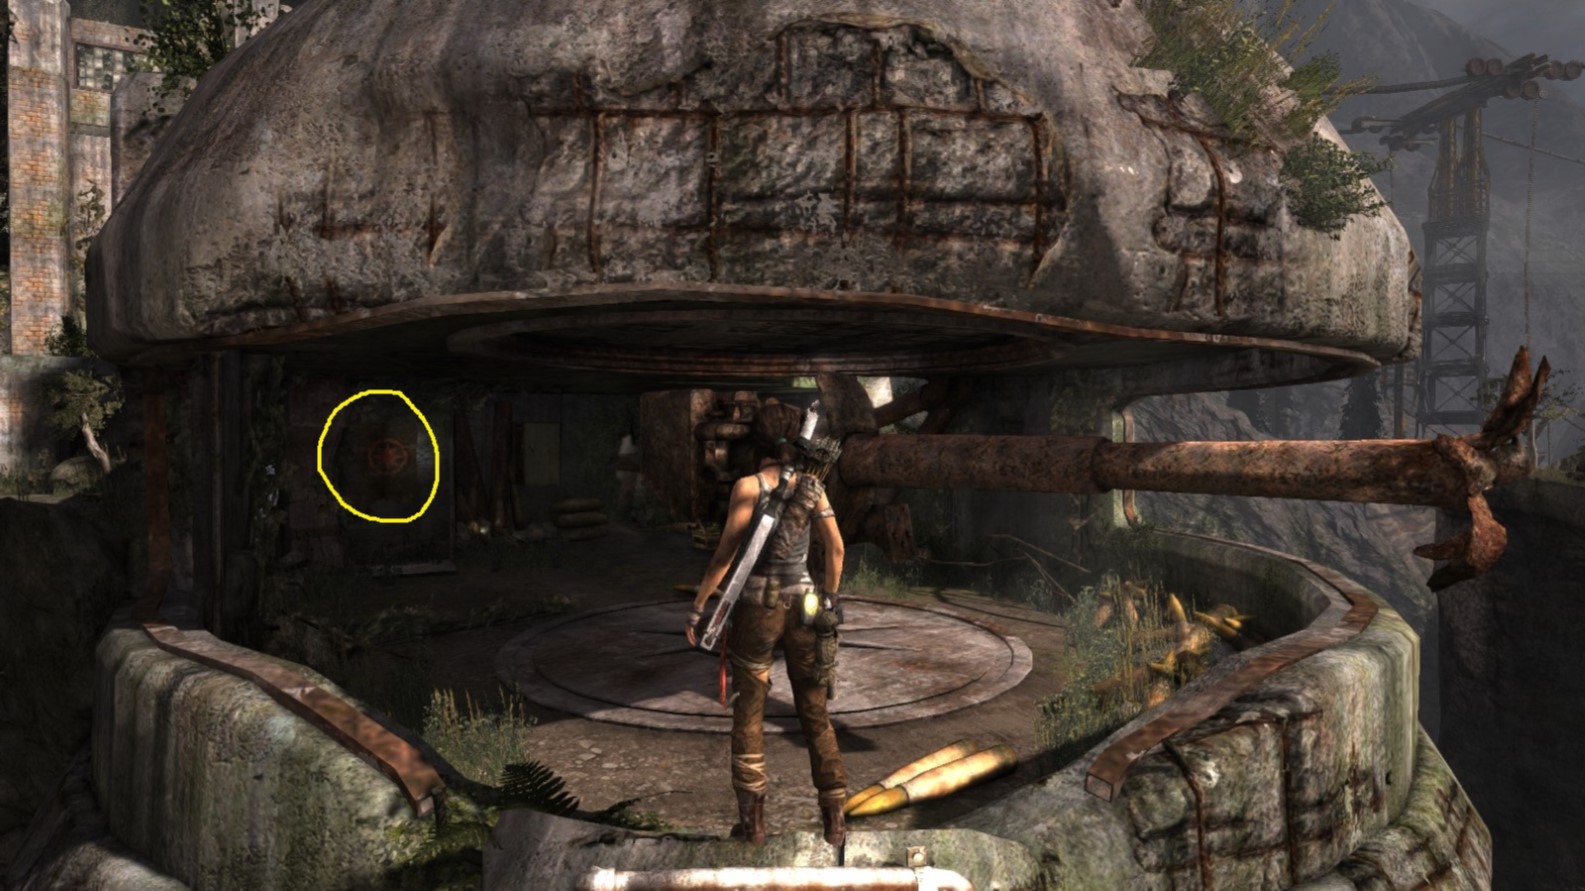
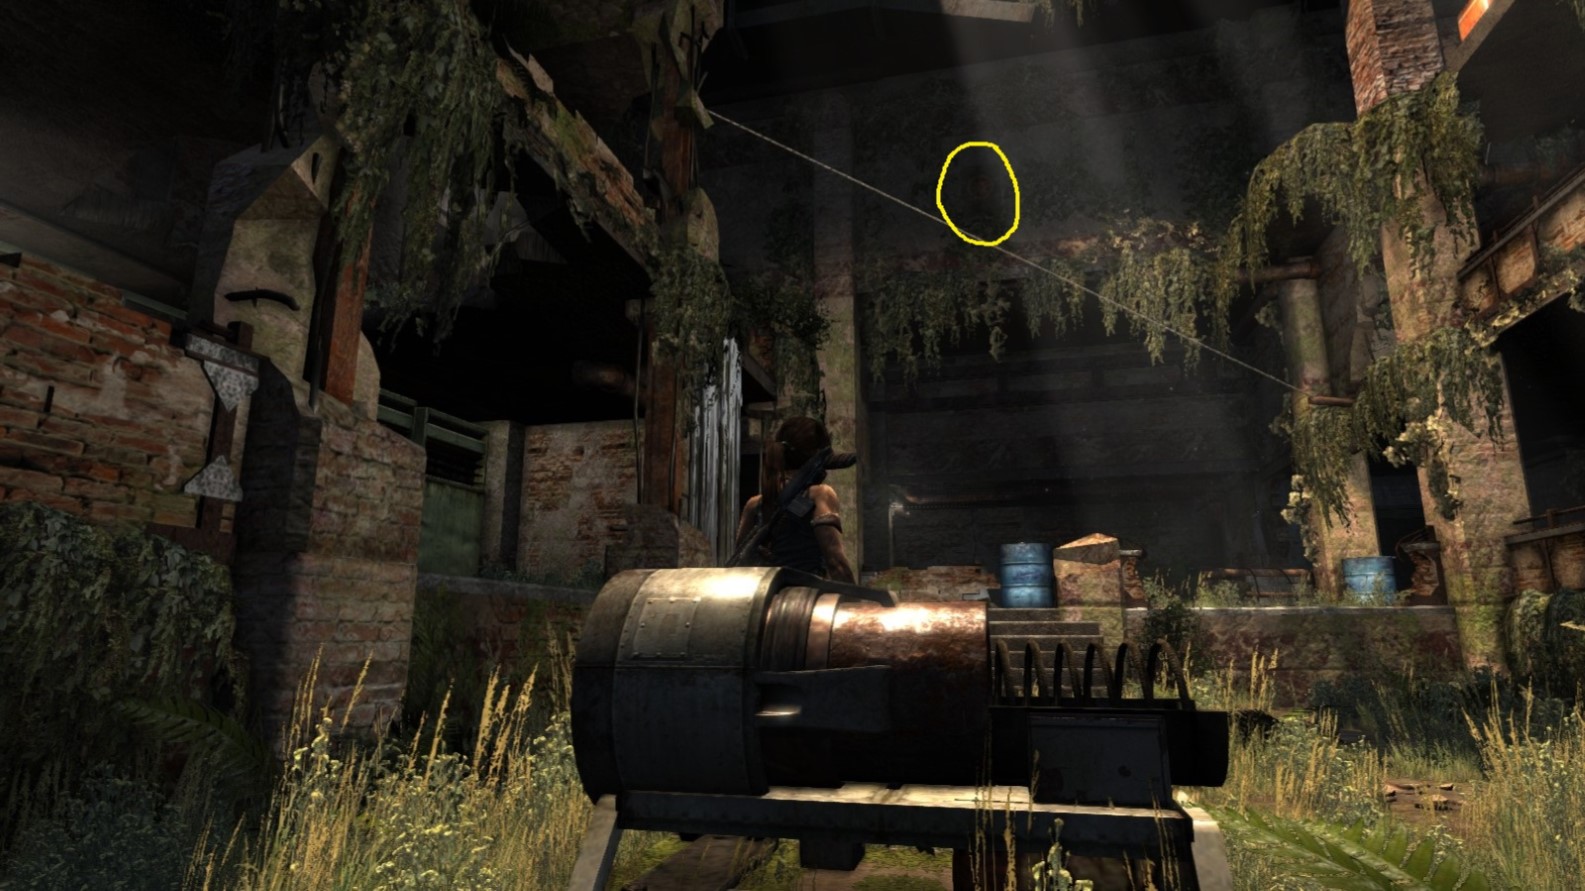
The position of the object is represented by the yellow circle. Arrows A and B represent Lara’s position in screenshots A and B.
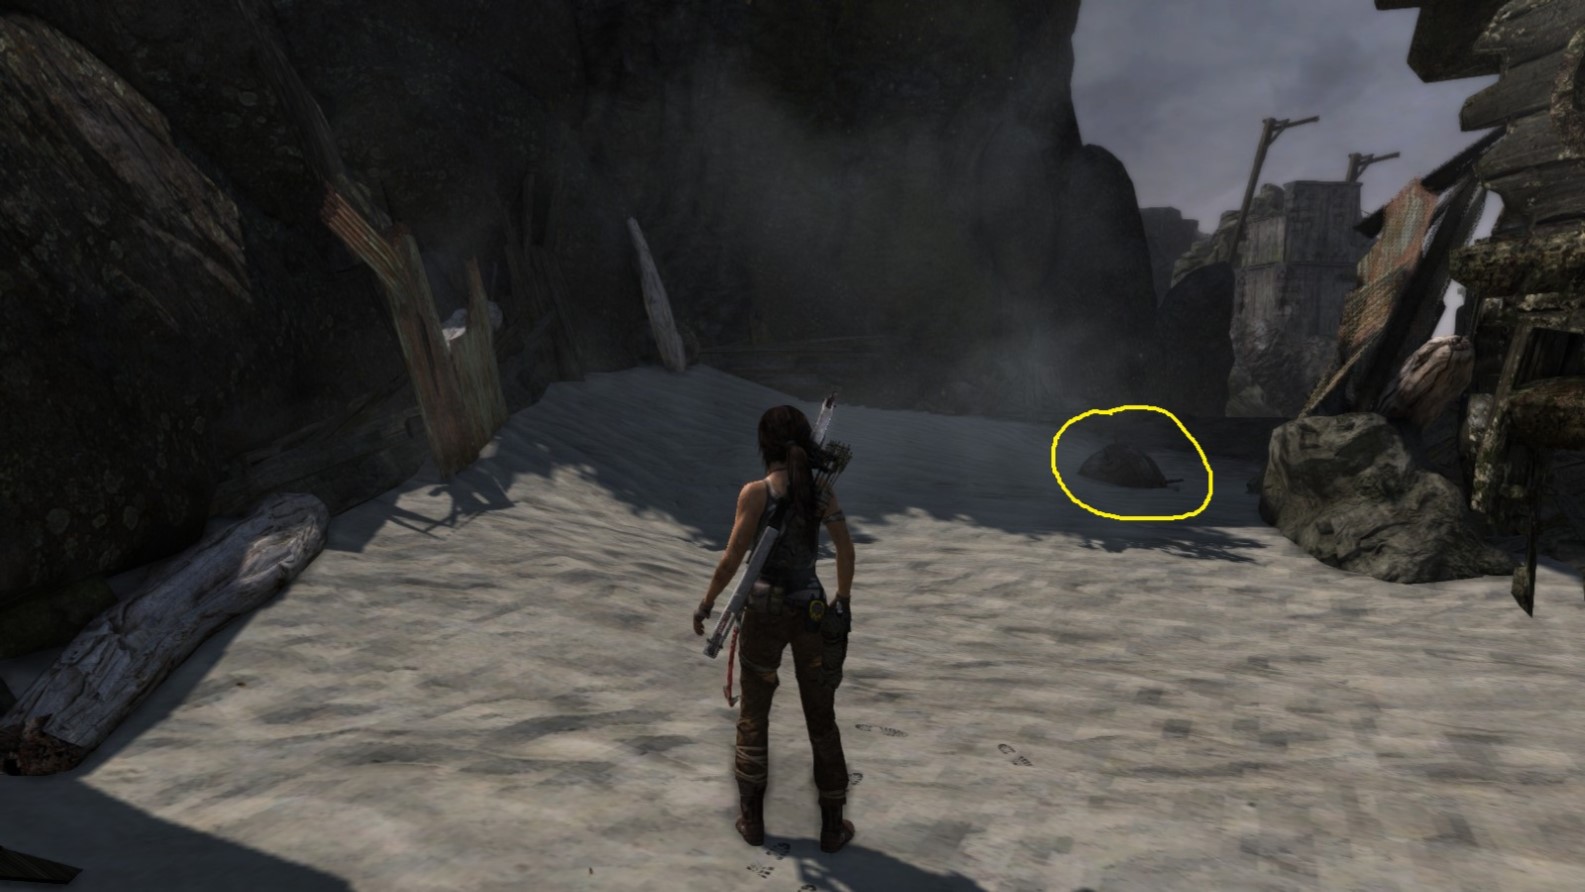
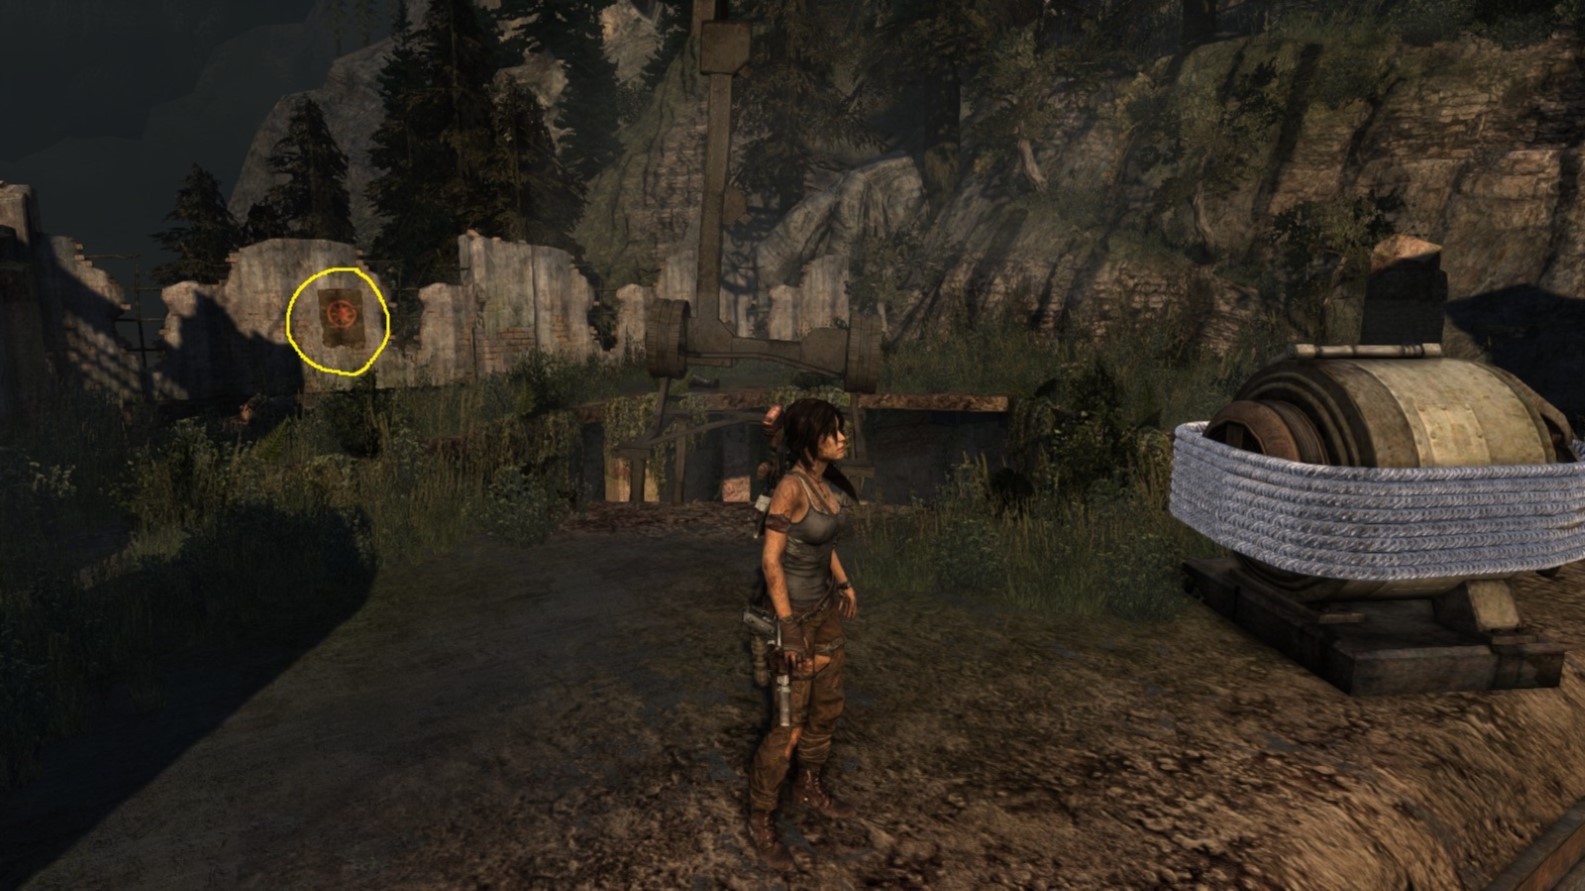
Screenshot A - Previous Inhabitants 4/4
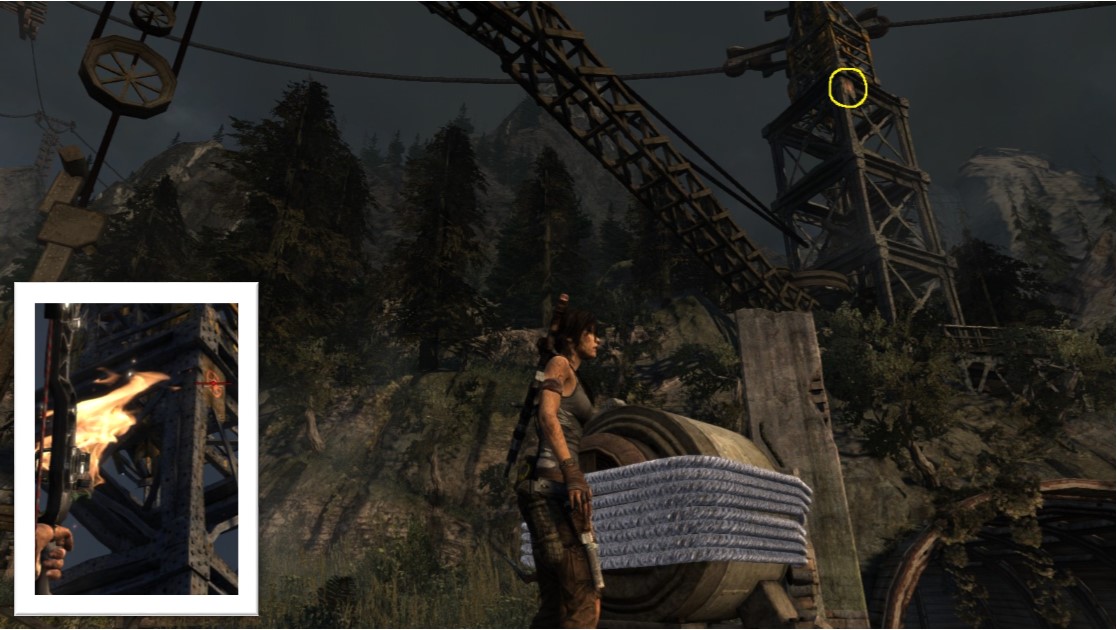
One of the game’s most difficult objects to find. Located very high up on a rusty metal structure. Barely visible. Shoot with fire arrow to destroy (inlay) using zoom (Z).
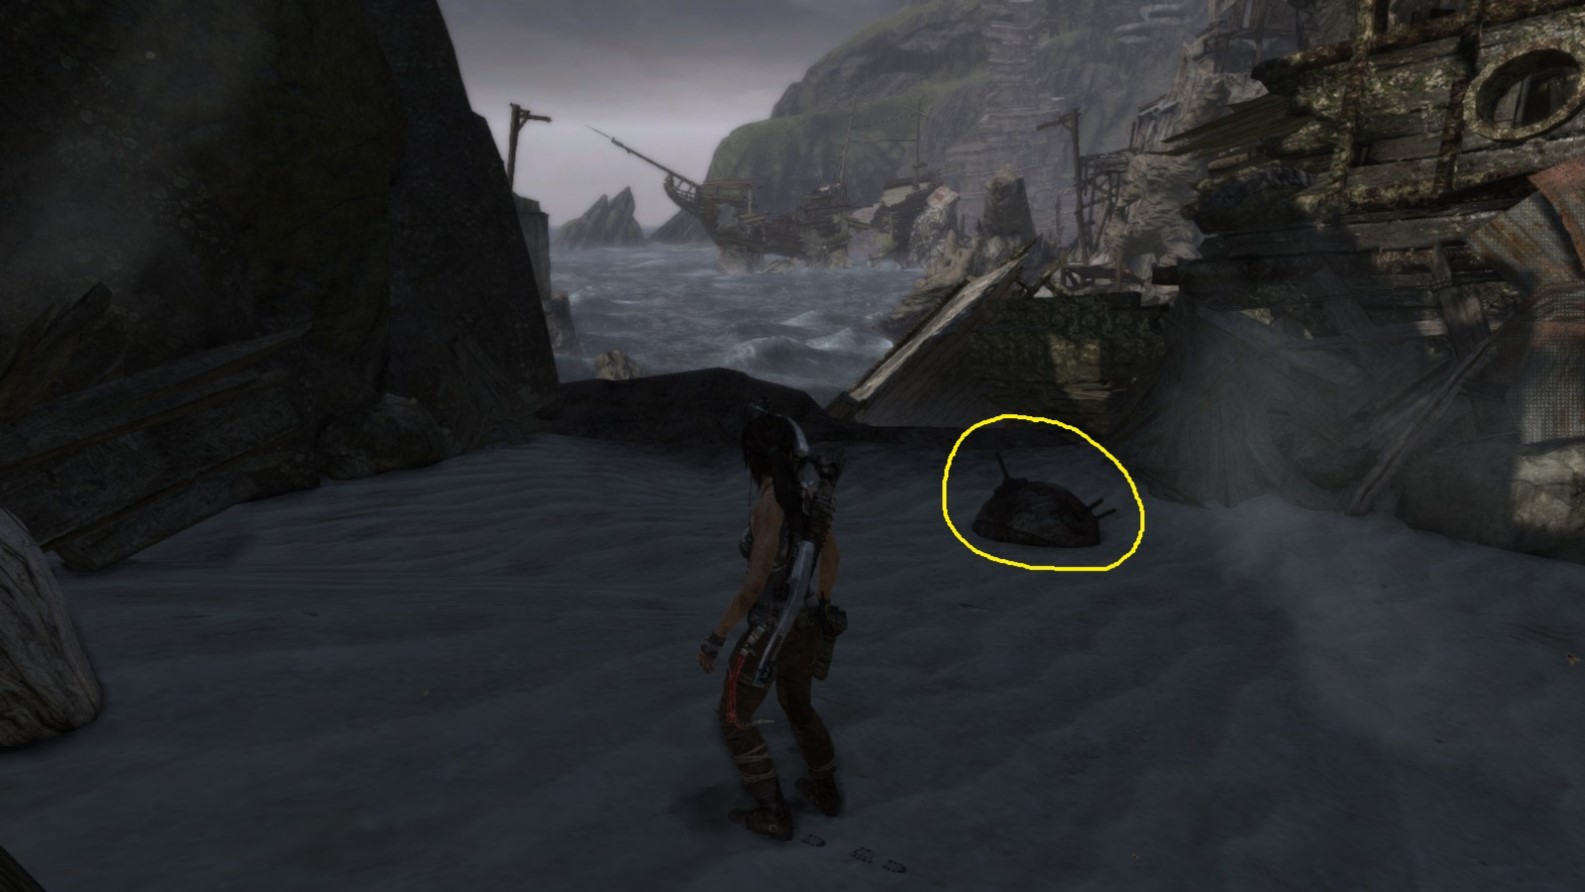
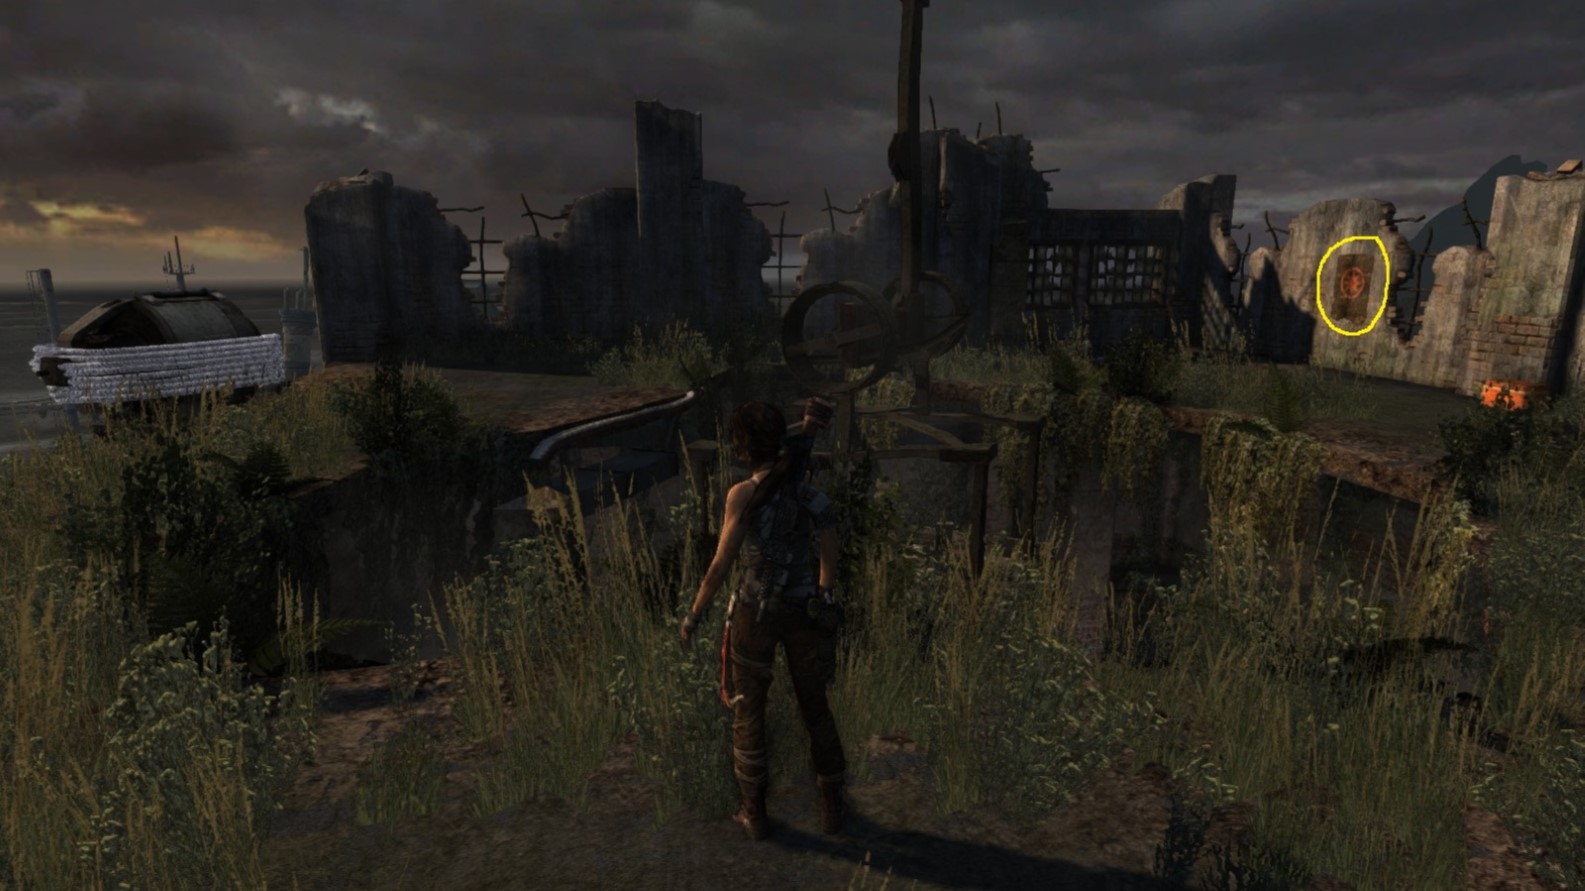
Screenshot B - Previous Inhabitants 4/4
Seen from further away and a bit lower, close to the day camp from where Lara proceeds to the wreck of the Endurance.
*** End of PREVIOUS INHABITANTS ***
This area has no base (fast-travel) camps, only day camps. Therefore, to return here from distant areas, Lara needs to fast-travel to the adjacent area’s base camp: the Survivors’ Camp in Shipwreck Beach. From there she can make her way back to Cliffside Bunker, moving east.
Previous Inhabitants - Object 1
Area: Cliffside Bunker
Closest Base Camp:
Survivors’ Camp (area: Shipwreck Beach)
Find and destroy (burn)
Location on the Map
Screenshot A - Previous Inhabitants 1/4
Lara climbs her way into a fortified artillery nest, destroyed long ago.
Screenshot B - Previous Inhabitants 1/4
The first flag is located on a wall at the back of the cannon.
Previous Inhabitants - Object 2
Area: Cliffside Bunker
Closest Base Camp:
Survivors’ Camp (area: Shipwreck Beach)
Find and destroy (burn)
Location on the Map
Screenshot A - Previous Inhabitants 2/4
The object is hidden high up on a shadowed wall amongst some vegetation. Not that easy to spot at first. Shoot with fire arrow.
Screenshot B - Previous Inhabitants 2/4
A different view of the object as Lara hangs from a lift.
Previous Inhabitants - Object 3
Area: Cliffside Bunker
Closest Base Camp:
Survivors’ Camp (area: Shipwreck Beach)
Find and destroy (burn)
Location on the Map
Screenshot A - Previous Inhabitants 3/4
Located on a wall on the roofless top level of the building.
Screenshot B - Previous Inhabitants 3/4
Seen from another angle.
Previous Inhabitants - Object 4
Area: Cliffside Bunker
Closest Base Camp:
Survivors’ Camp (area: Shipwreck Beach)
Find and destroy (burn)
Location on the Map
The position of the object is represented by the yellow circle. Arrows A and B represent Lara’s position in screenshots A and B.
Screenshot A - Previous Inhabitants 4/4
One of the game’s most difficult objects to find. Located very high up on a rusty metal structure. Barely visible. Shoot with fire arrow to destroy (inlay) using zoom (Z).
Screenshot B - Previous Inhabitants 4/4
Seen from further away and a bit lower, close to the day camp from where Lara proceeds to the wreck of the Endurance.
*** End of PREVIOUS INHABITANTS ***
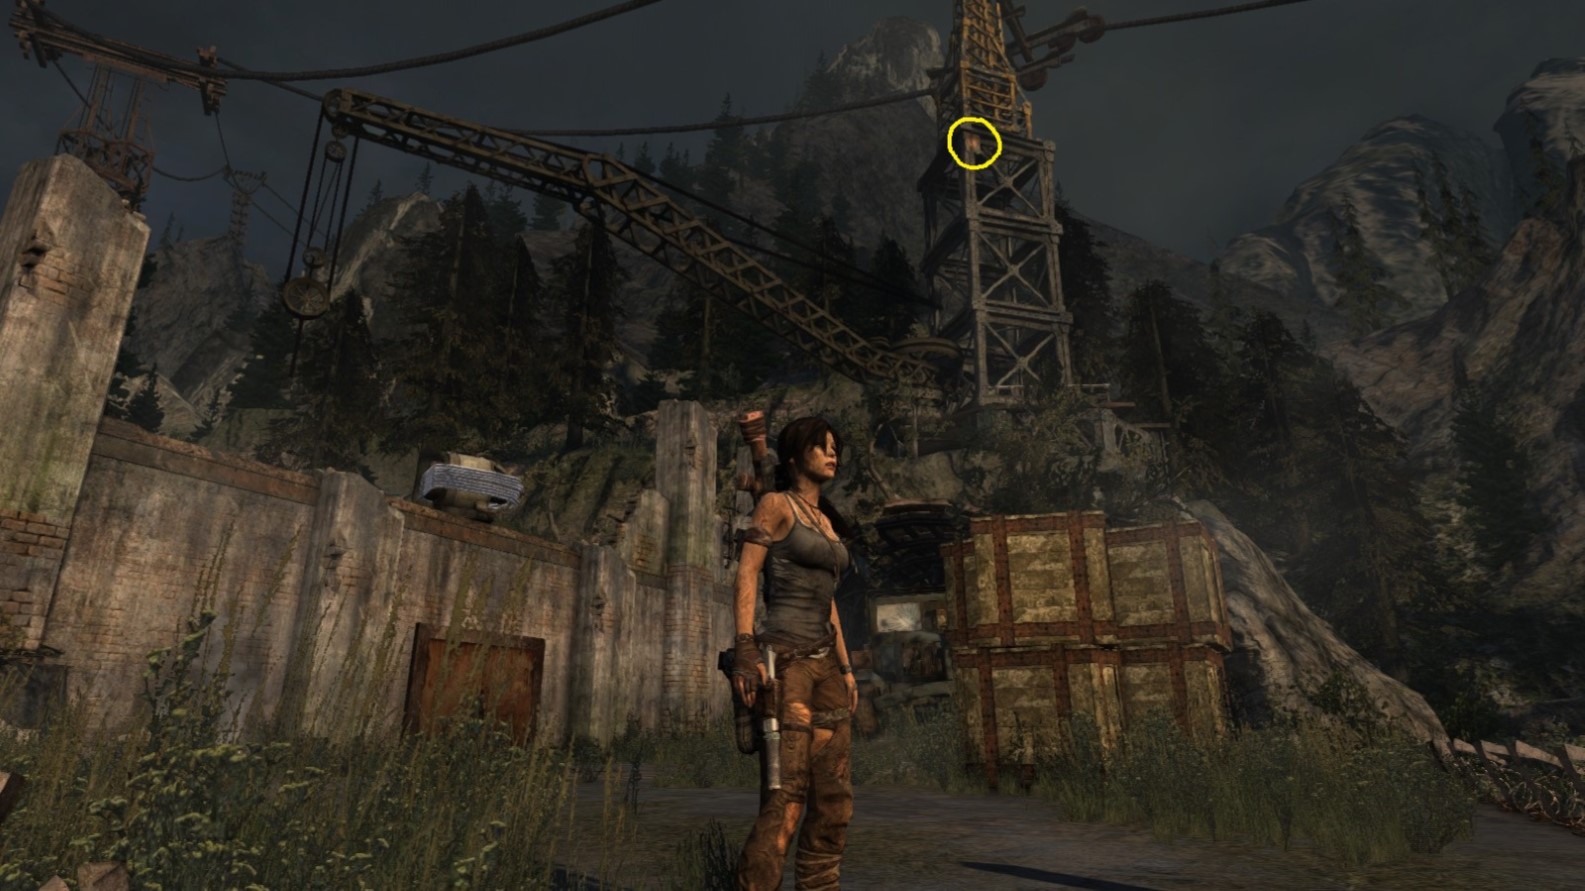
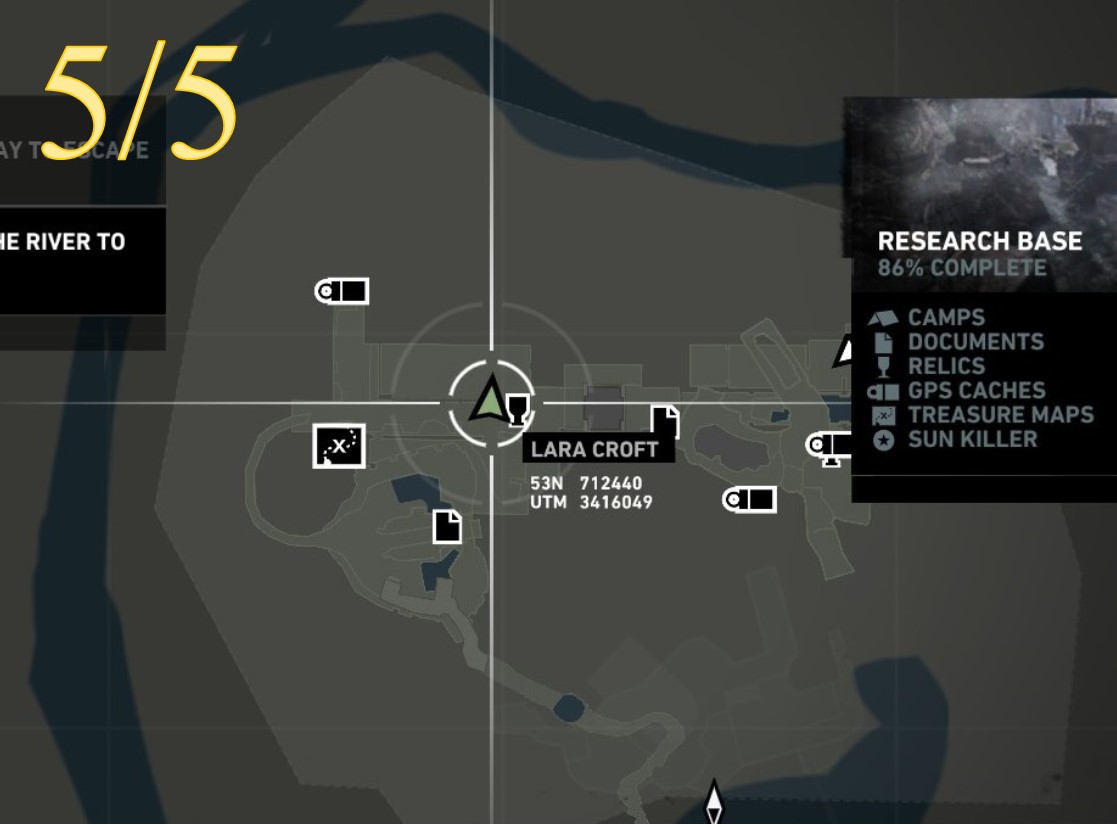
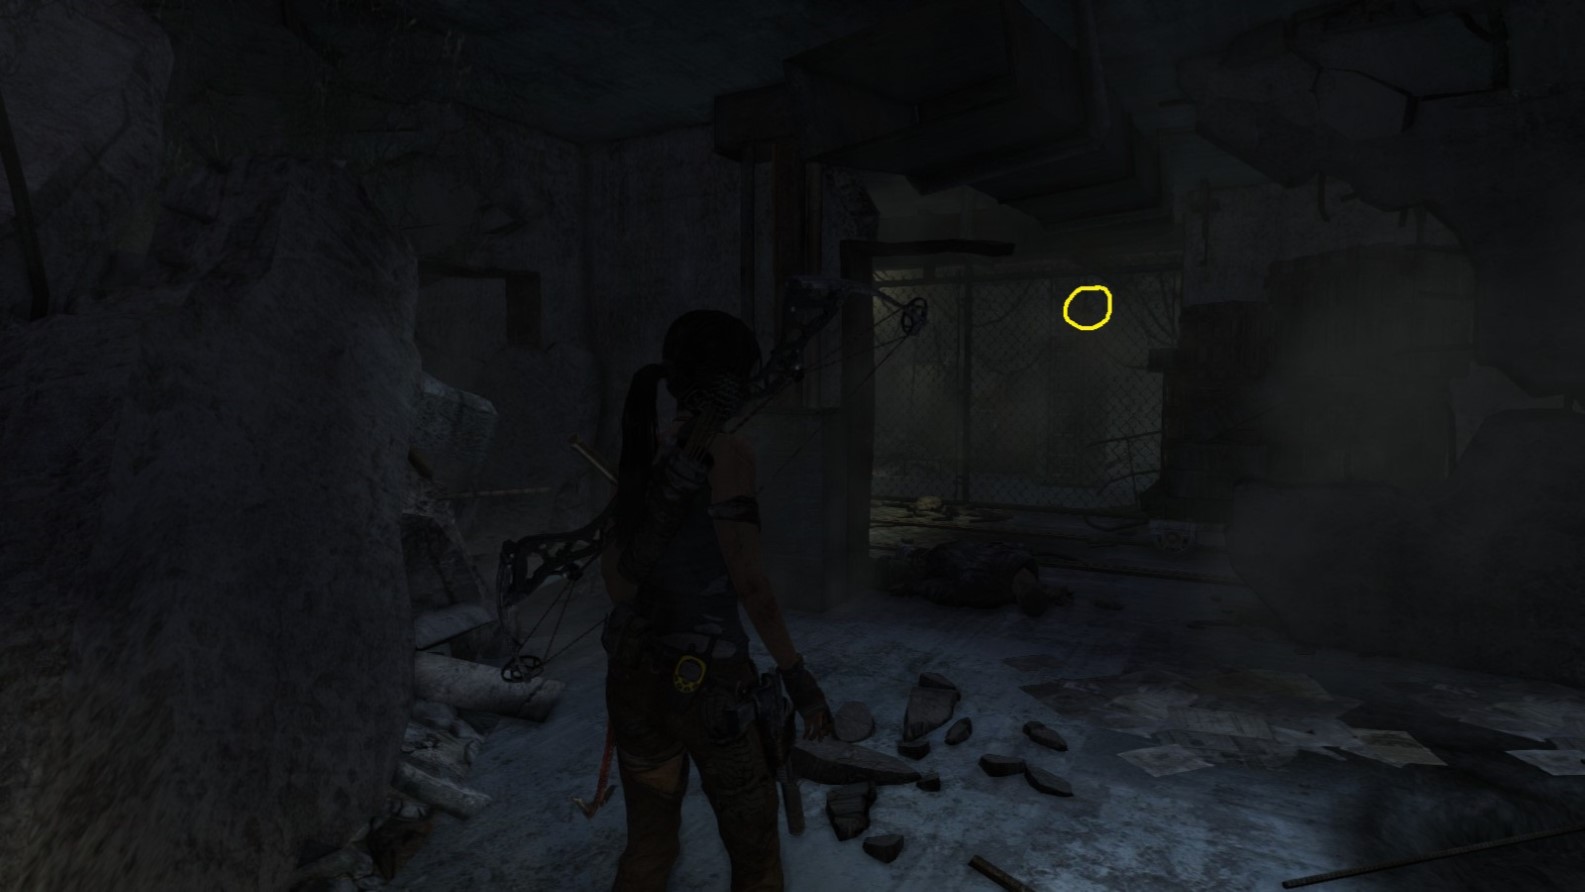
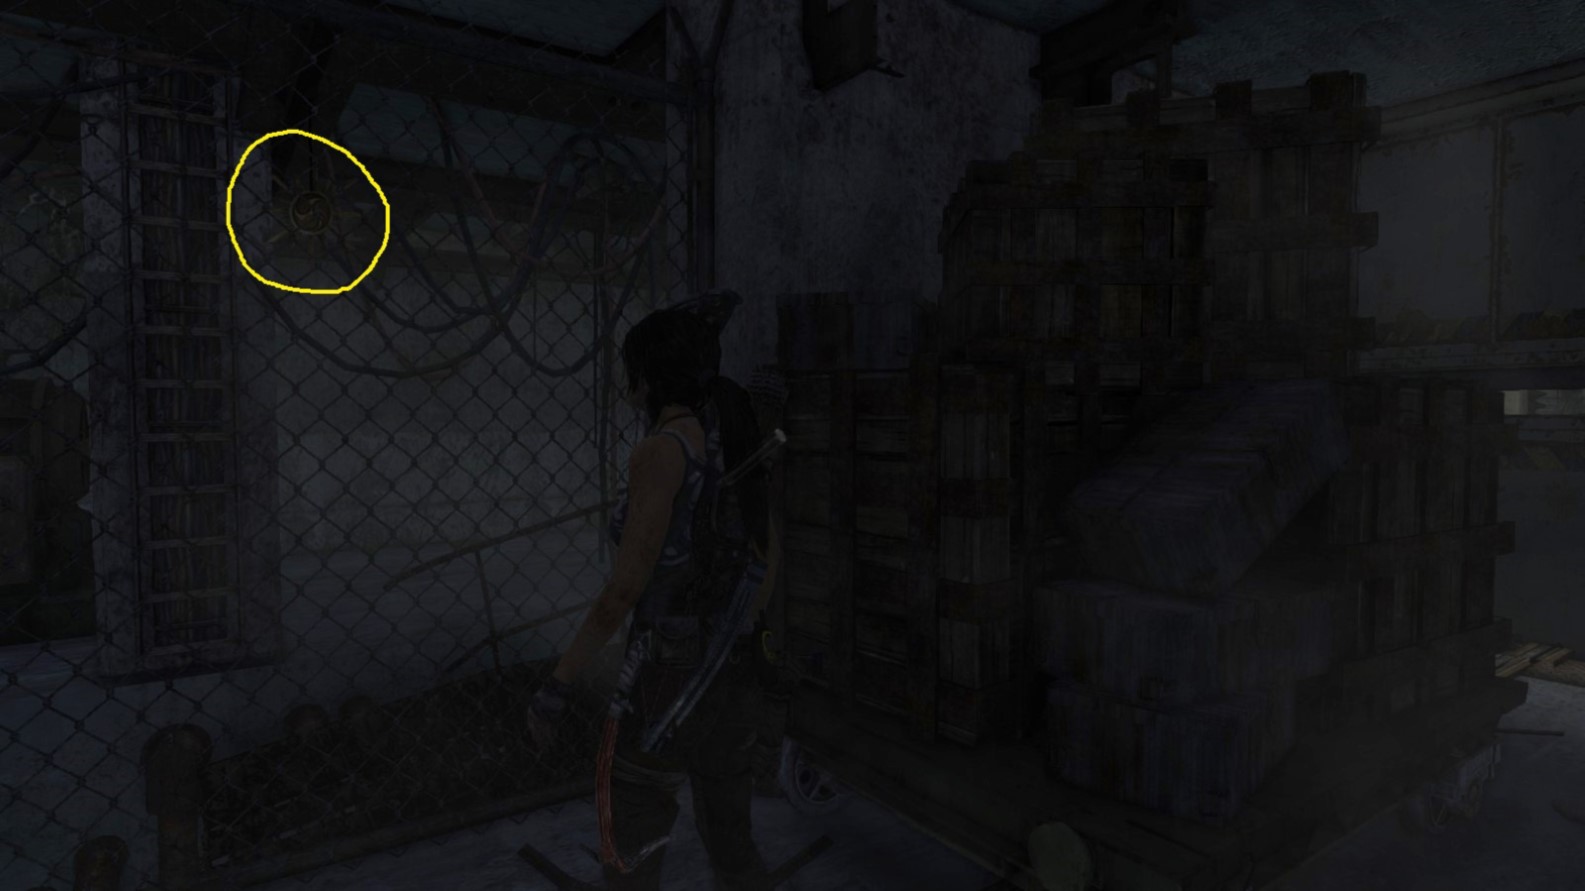
Challenge 13: SUN KILLER
Sun Killer - Object 1
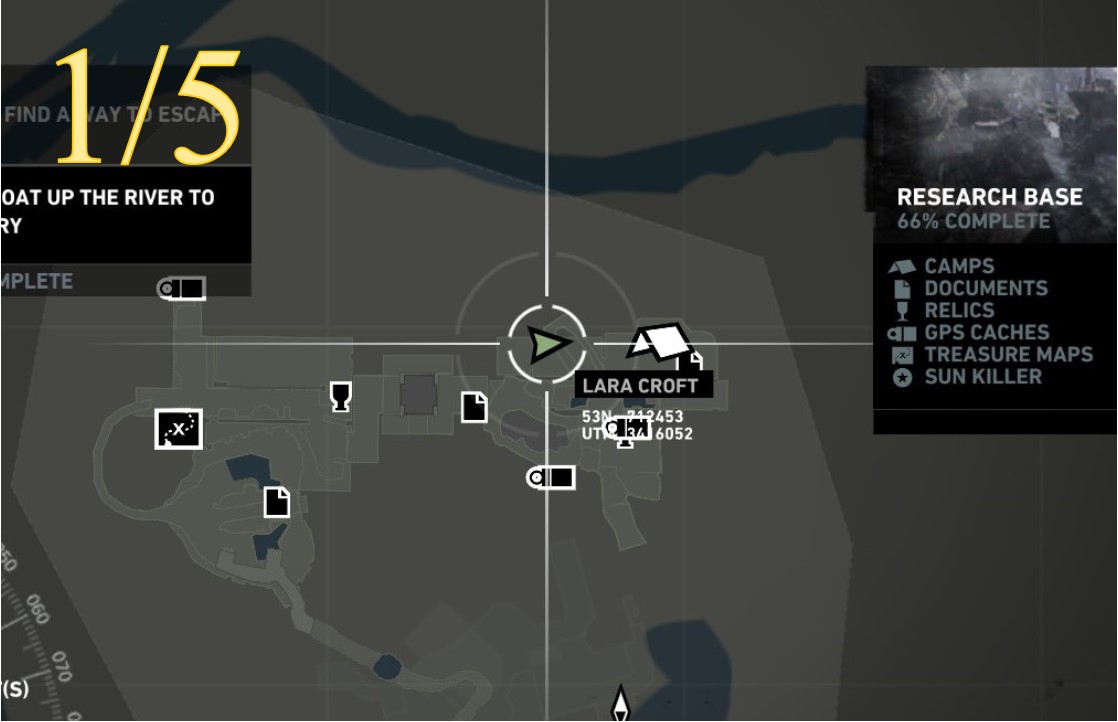
Area: Research Base
Closest Base Camp: Research Lab
Find and destroy (shoot)
Location on the Map
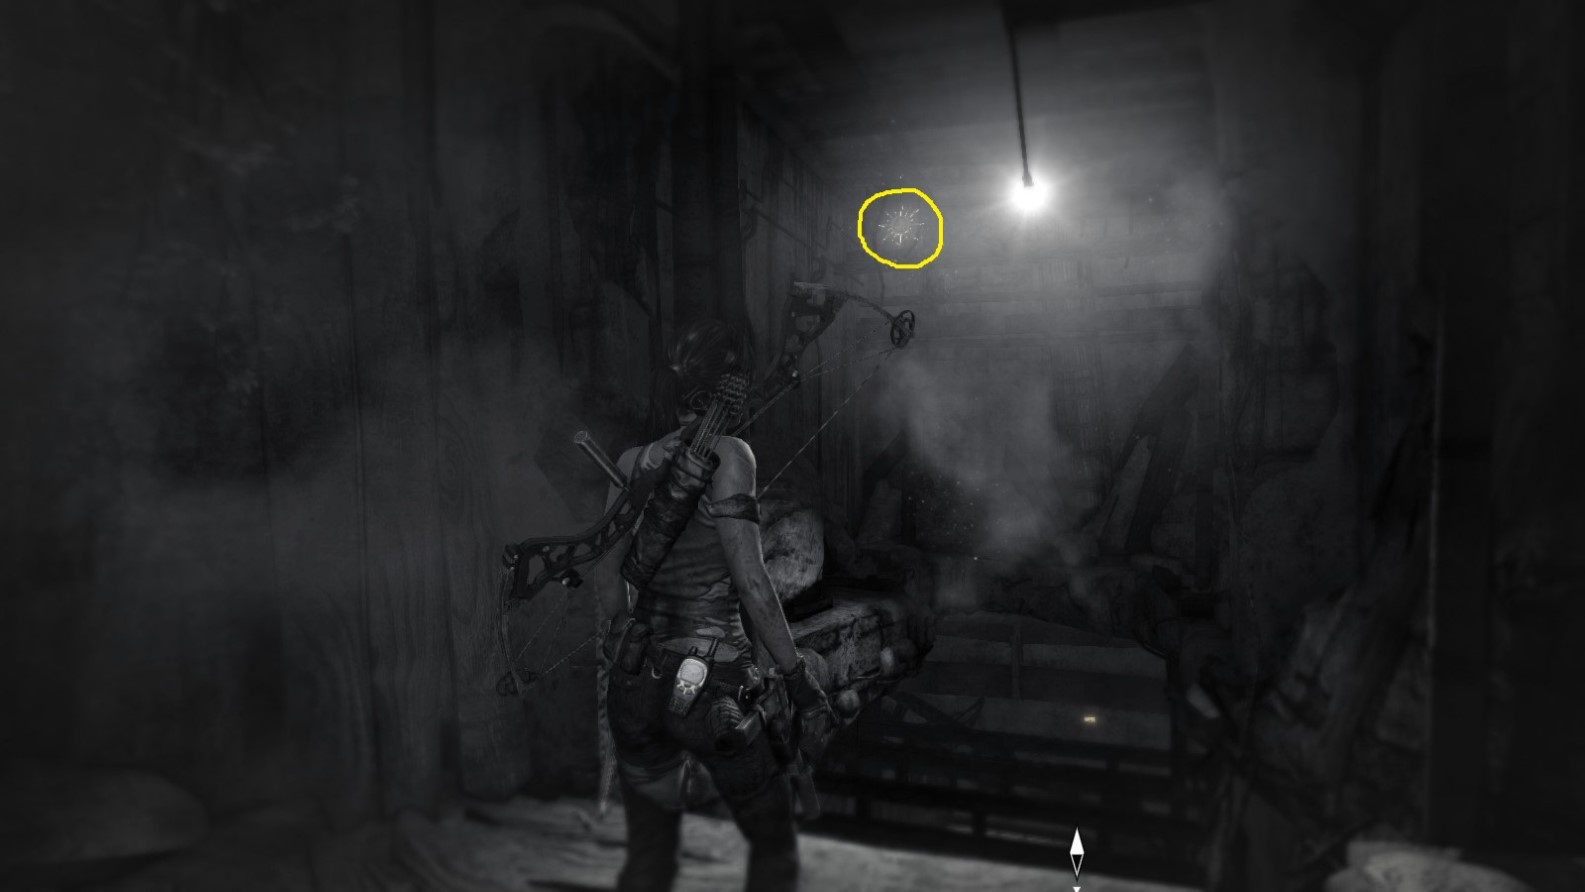
Screenshot A - Sun Killer 1/5
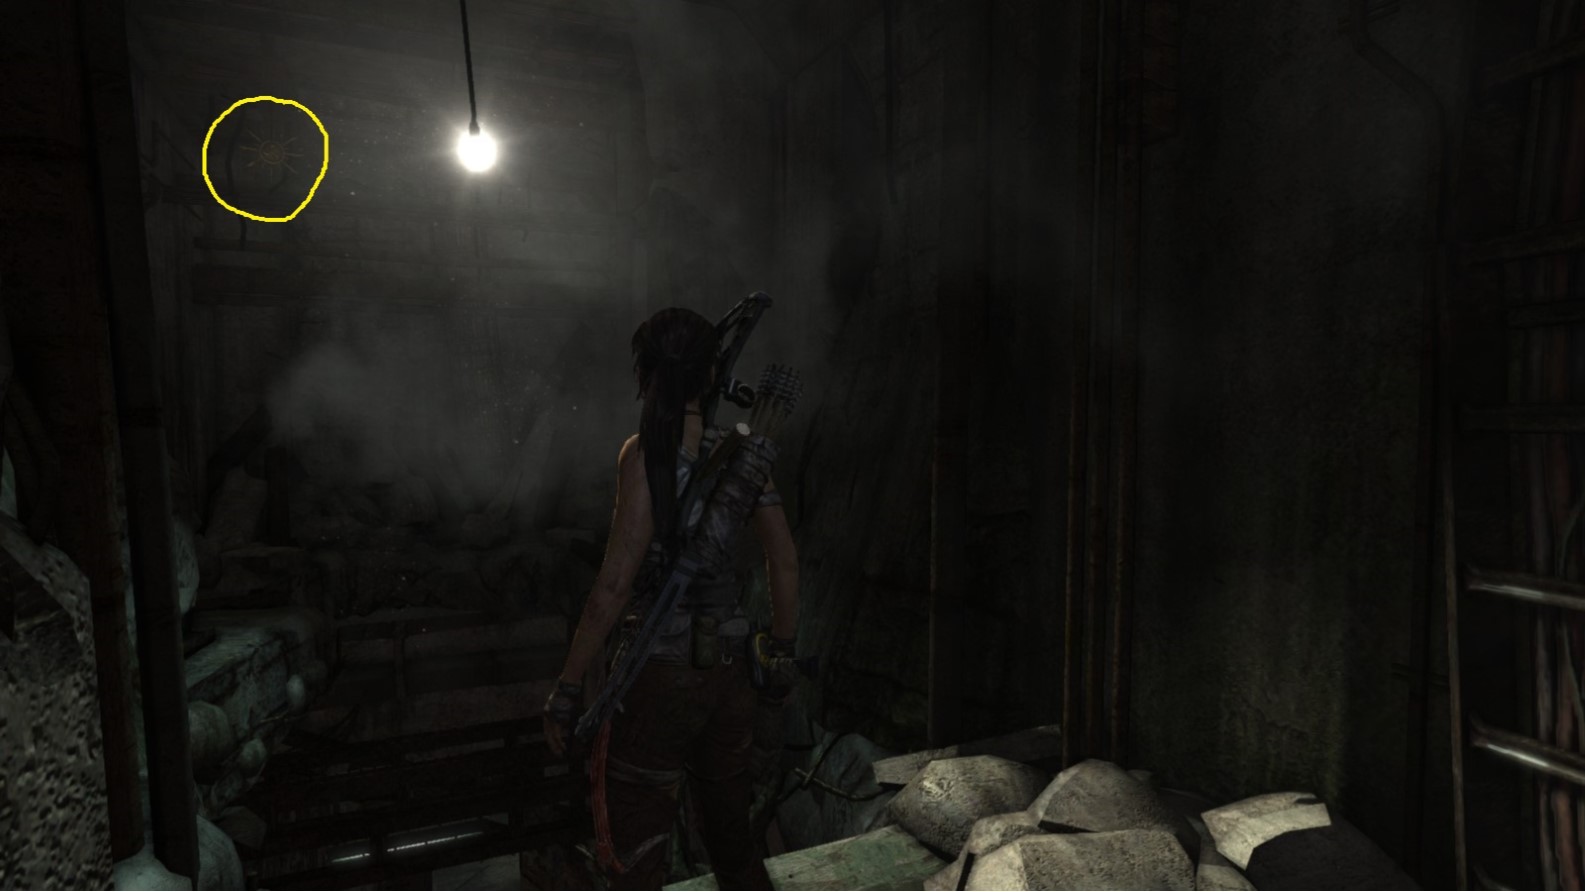
Lara has just entered this room by squeezing through a gap in a wall. Directly in front hangs a shining light bulb that obscures the dangling object behind it. Use Survival Instinct (Q) to see it more clearly and shoot to destroy.
Screenshot B - Sun Killer 1/5
Seen in Survival Instinct mode (Q). Lara is getting very close to the level’s base camp.
Sun Killer - Object 2
Area: Research Base
Closest Base Camp: Research Lab
Find and destroy (shoot)
Location on the Map
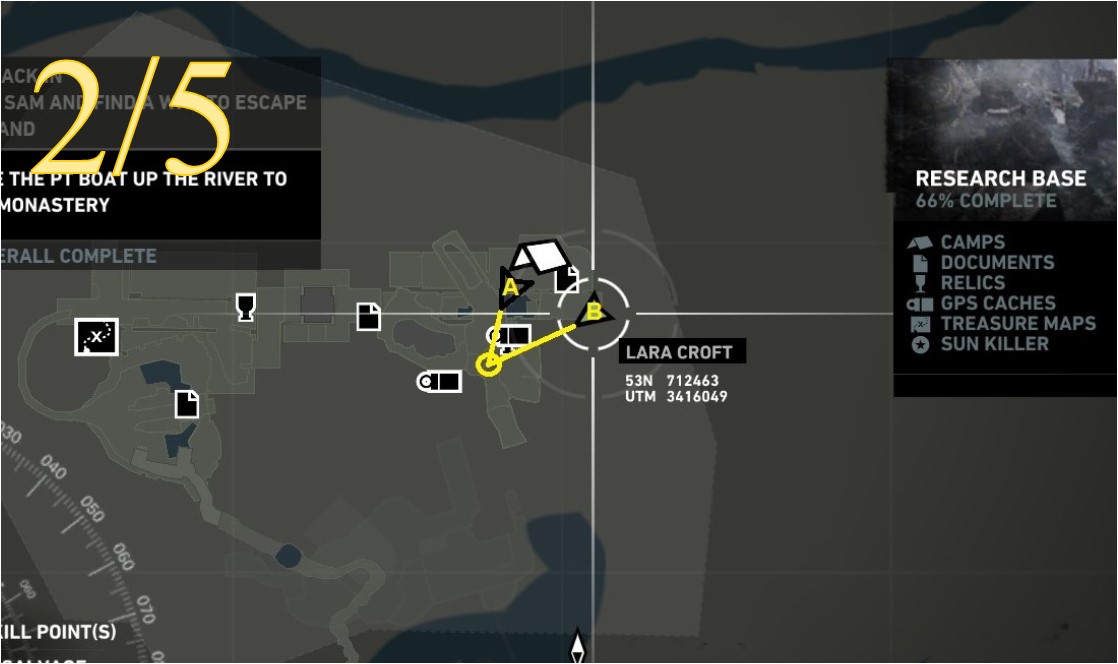
This object is very hard to find, mainly because it’s located in an unaccessible room. Lara has to find a gap in the wall with a clear view of the target in order to destroy it (as shown in screenshot A). The position of the object is represented by the yellow circle. Arrows A and B represent Lara’s position in screenshots A and B.
Screenshot A - Sun Killer 2/5
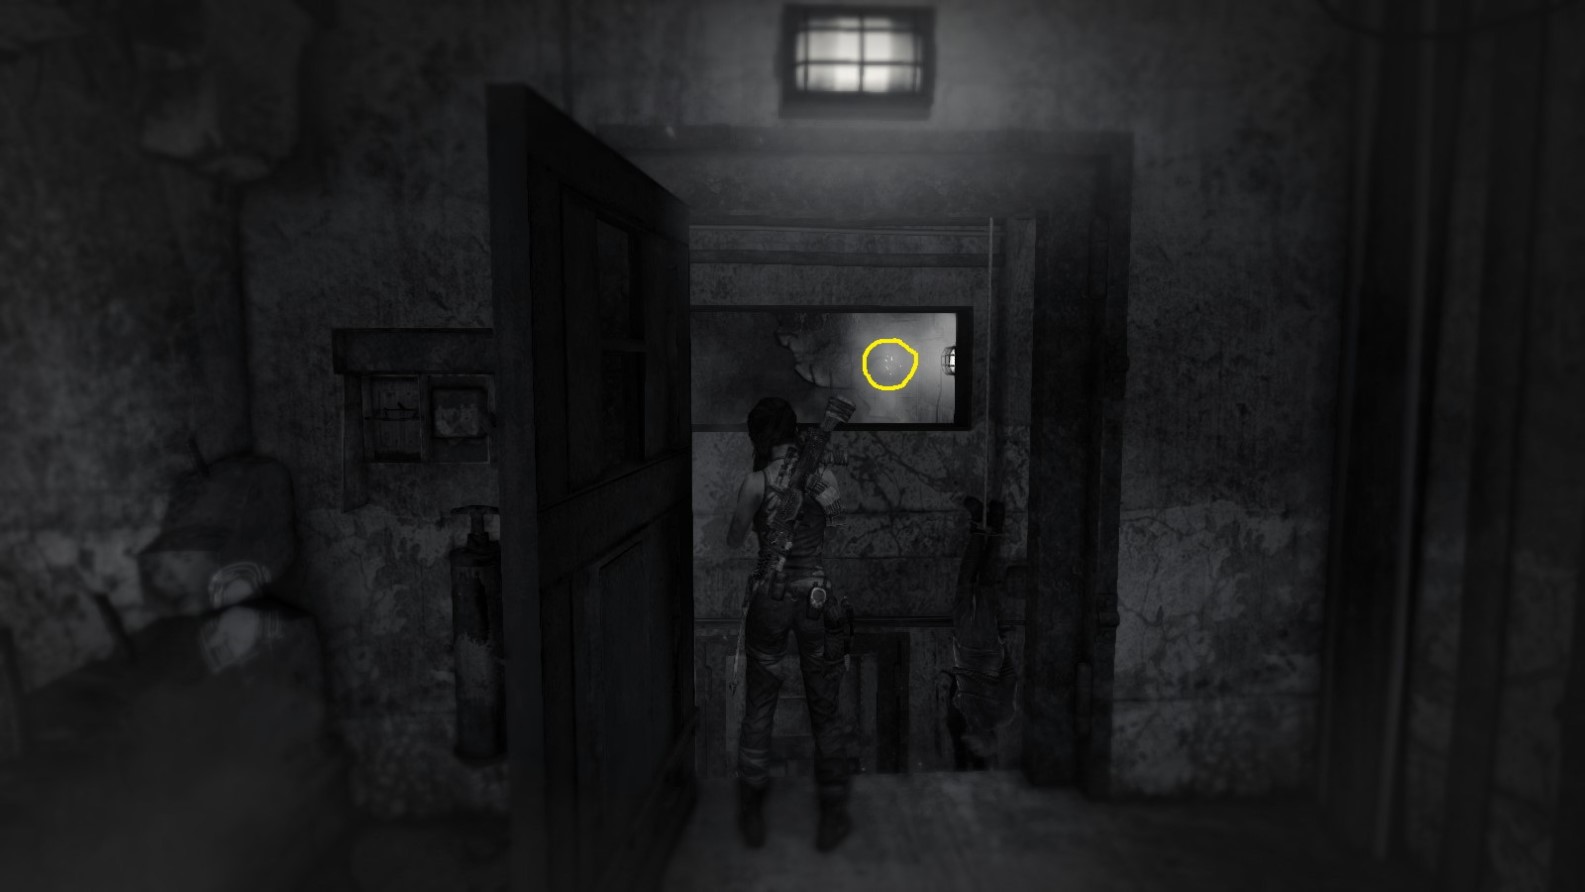
Lara has the base camp at her back. Standing in this doorway (she had to pry the door open first), and using Survival Instinct (Q), one can faintly make out the object cross the hallway. The object is located inside an unaccessible room and the only way to destroy it is to find an unobstructed view like right here through the unbarred window. Use zoom (Z) to give Lara a clearer shot.
Screenshot B - Sun Killer 2/5
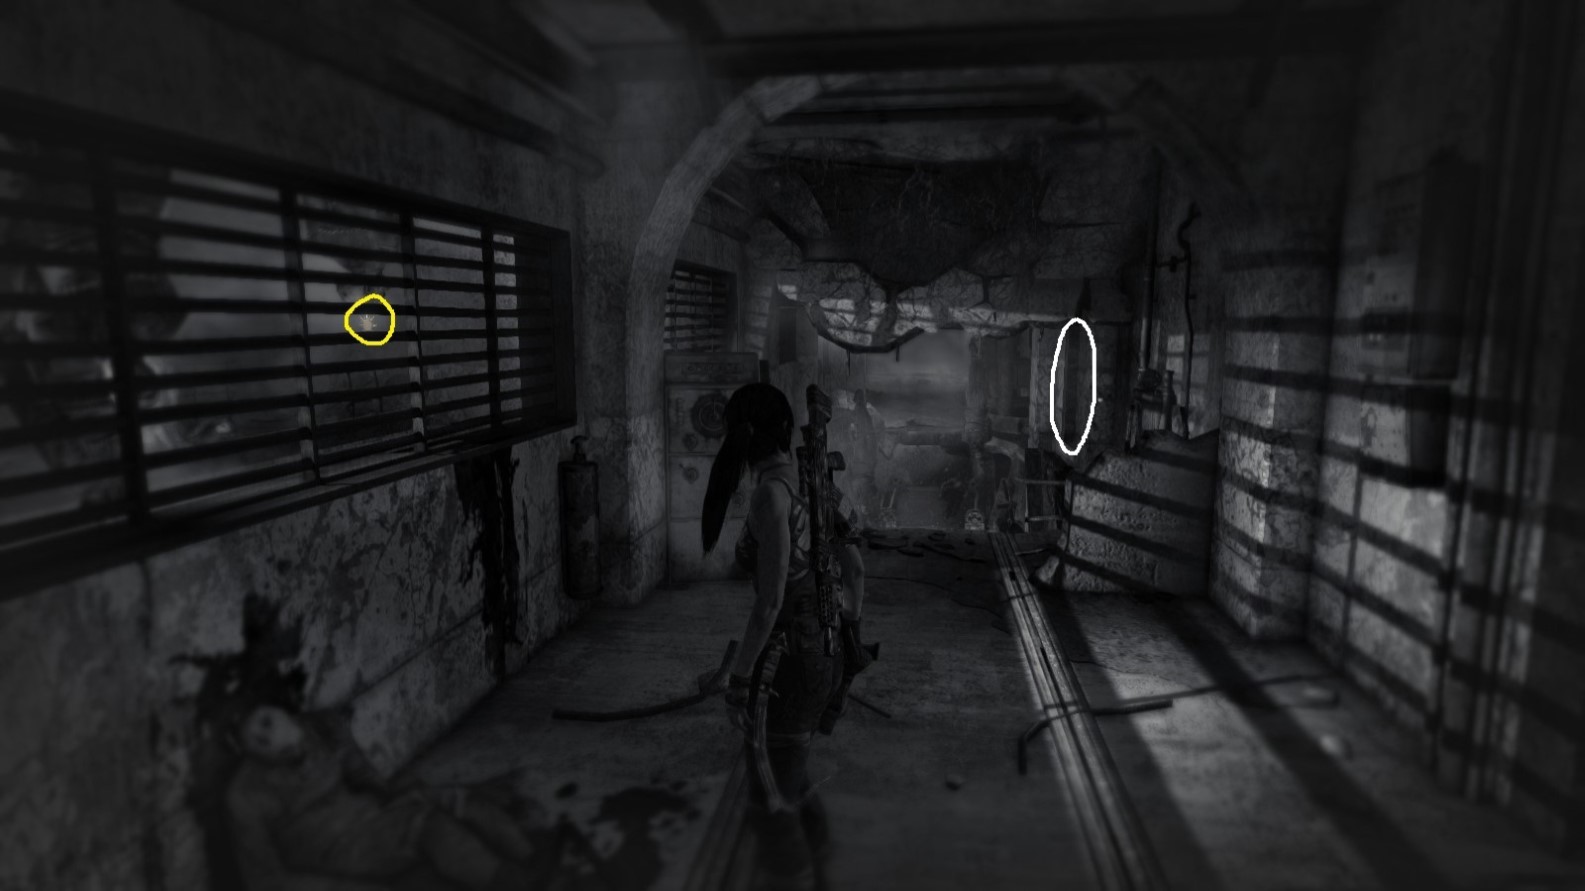
Also seen in Survival Instinct mode (Q). Lara is standing in the hallway, with the opened door (screenshot A) circled in white. Go to that doorway to get a clear shot.
Sun Killer - Object 3
Area: Research Base
Closest Base Camp: Research Lab
Find and destroy (shoot)
Location on the Map

Screenshot A - Sun Killer 3/5
The object is seen dangling from the ceiling. It is located very close to the spot where Lara stood when she fired at the second object - in this picture that doorway is in the wall right behind Lara’s head. Inlay: the totem seen from directly beneath, visually enhanced by the afterglow from Survival Instinct mode.
Screenshot B - Sun KIller 3/5
Seen through the same doorway where Lara stood aiming at the second object (room with the base camp in it).
Sun Killer - Object 4
Area: Research Base
Closest Base Camp: Research Lab
Find and destroy (shoot)
Note: Accessible after Lara makes the lift crash down
Location on the Map

Screenshot A - Sun Killer 4/5
Taken on the bottom level of the lift shaft after the lift has fallen. Lara has opened the door from the inside.
Screenshot B - Sun Killer 4/5
Easily accessible once the lift has crashed down.
Sun Killer - Object 5
Area: Research Base
Closest Base Camp: Research Lab
Find and destroy (shoot)
Note: Accessible after Lara makes the lift crash down
Location on the Map
Screenshot A - Sun Killer 5/5
Located not far from the lift shaft on the bottom level behind a wire fence. Shoot through the fence.
Screenshot B - Sun Killer 5/5
A closer view.
*** End of SUN KILLER ***
More Tomb Raider guides
- JOIN a Multiplayer★ 5 (560)44k views277 ♥1 minBulgarian
- Tomb Raider. 100% получение всех достижений★ 5 (2.3k)42k views2.6k ♥26 minRussianUpdated Jun 20, 2016
- Achievements and Multiplayer XP Boost★ 5 (1.3k)40k views1.7k ♥15 minUpdated Feb 12, 2025
- Как найти все секреты и пройти испытания.★ 5 (1.8k)36k views2.2k ♥8 minRussianUpdated Dec 22, 2013
- 100% достижений в Tomb Raider [RU]. ВНИМАНИЕ: спойлеры.★ 5 (974)33k views1.1k ♥11 minRussianUpdated Feb 29, 2020
- Collectables and challenges★ 5 (1.3k)24k views2.2k ♥1 minUpdated Oct 27, 2018


This guide was created by its original author on the Steam Community. Are you the author and want it removed? Request removal.