Tourmaline Desert Domination
Map and Reasoning
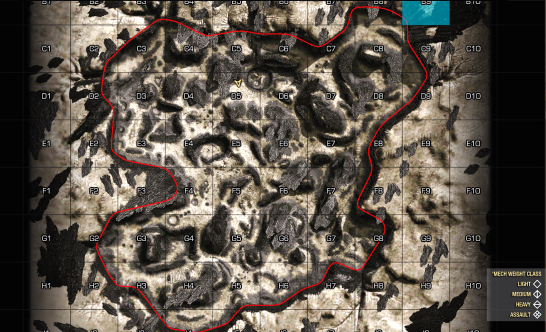
OK so here we go. Steam only gave me 2 mb per image to work with so hopefully the lines are clear enough. Again, I approximated the DZ's from memory.
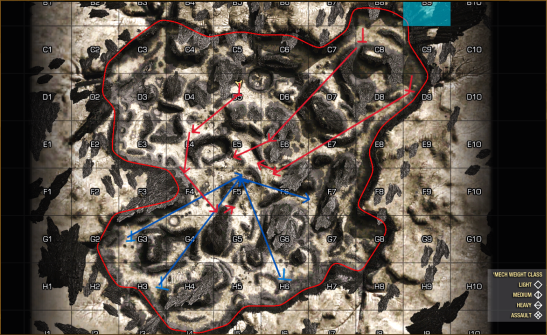
The blue lines show where my team went in the match that went wrong, as well as what 90% of teams do on this map from the southern side. They go to the middle first, where they lose trades because they get surrounded, then they panic and retreat to die in death valley. STOP IT!
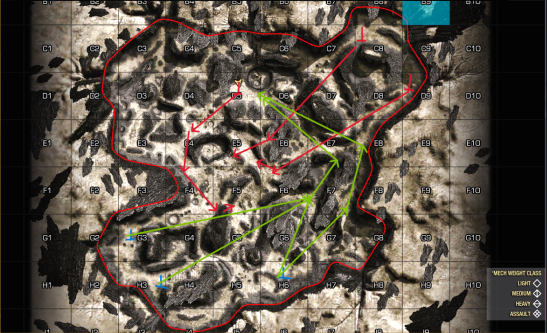
The green line image shows what you SHOULD do if you drop south side of Tourm on Domination; your survival depends on this strat because the only other direction to go besides middle would be left, which is way too exposed at extreme range to win with the typical mix of weapons you get in QP. So to be clear, don't go middle, don't go left. NASCAR like your life depends on it, because it does. It takes a bit of luck (not too many slowpokes in the west-most lance) but it is surprisingly resistant to the enemy NASCAR because if you don't stop in the middle you can often out run the poptarts and lights using cover to get to the key choke at E7. At that point, the enemy team usually has several mechs separated out hunting failing to catch your tail, and many teams don't expect such a large force in the flank that quickly so you can often jump out all at once and get some back shots and assault kills. From there, it's literally just clean up.
Again, I'm open to discussion and adjustment if someone feels like pointing out things I'm unaware of. Also, if people like this I might do more.
- A Noob's Guide to Mechwarrior Online★ 5 (309)20k views421 ♥30 minUpdated Sep 29, 2021
- Light Mech Combat Guide★ 5 (217)12k views211 ♥19 minUpdated Apr 23, 2016
- Подробное руководство по игре (с картинками!)★ 5 (439)11k views484 ♥70 minRussianUpdated Dec 15, 2024
- A First Buyers Guide: Something to Consider★ 4 (102)11k views79 ♥6 minUpdated Jan 15, 2016
- Running Cold: The Comprehensive Guide to Heat - MWO★ 5 (256)9.2k views240 ♥41 minUpdated Jul 8, 2016
- Heavier Guns: A Quick Glimpse at Free Tonnage (Clan Mechs) - MWO★ 4 (56)6.1k views50 ♥3 minUpdated Apr 14, 2022



- Upgrading to PremiumTeam Fortress 2★ 5 (20k)1441k views11k ♥6 minUpdated May 11, 2022
- No More Room in Hell Official ManualNo More Room in Hell★ 5 (2.8k)569k views2.1k ♥29 minUpdated Apr 22, 2019
- NMRiH Community Hosting GuidesNo More Room in Hell★ 5 (526)351k views653 ♥1 minUpdated Aug 10, 2022
- ULTIMATE GUIDE FOR GAME DEV TYCOONGame Dev Tycoon★ 5 (5.8k)326k views10k ♥4 minUpdated 23 Jan, 2014
- How to 'Git Gud' Soon™MORDHAU★ 5 (2k)318k views3k ♥68 minUpdated Nov 16, 2024
- Лучшие кооперативные игры SteamPAYDAY 2★ 5 (1.5k)315k views2.1k ♥56 minRussianUpdated Apr 27, 2025






This guide was created by its original author on the Steam Community. Are you the author and want it removed? Request removal.