Uploading & Using Steam Workshop for QuakeLive
Uploading your content
Prepare SteamCMD
- Download SteamCMD from https://steamcdn-a.akamaihd.net/client/installer/steamcmd.zip , unzip it to it's own folder, I'm using c:\steamCMD
- Run (using your Steam username and password): c:\steamCMD\steamcmd.exe +login myLoginName myPassword
- SteamCMD will set up and you will probably have to authorise it through SteamGuard.
Prepare Content
Create a folder to hold your workshop item, I'm going to do that within another folder in case I work on multiple projects. And add workshop project folder for uploading a map pk3 (it doesn't have to be a map, it could be other things, or multiple maps).
C:\WorkShopItems\myMap\
You should place your preview image and the VDF file (described later) that will manage uploading here, eg C:\WorkShopItems\myMap\myPreview.jpg
One more folder is needed to hold the actual content, everything within this folder gets uploaded to Steam, and subsequently downloaded by anyone that subscribes to your workshop, this is why you do not put your preview image into this folder.
The root of the content folder will be considered as the QuakeLive baseq3 folder, but steam actually stores installed workshop items within C:\Steam\SteamApps\workshop\content\<ItemID>\
C:\WorkShopItems\myMap\content\
If your map or other content is in .pk3 form (just .zip renamed) your map pk3 file will go into that folder.
If you are working with .pk3 files, there should NOT be a 'baseq3' folder within the .pk3.
If your map/content is NOT in pk3 form for uploading then within your 'content' folder create 'baseq3' and put all the files you wish to upload in there.
C:\WorkShopItems\myMap\content\myMap.pk3
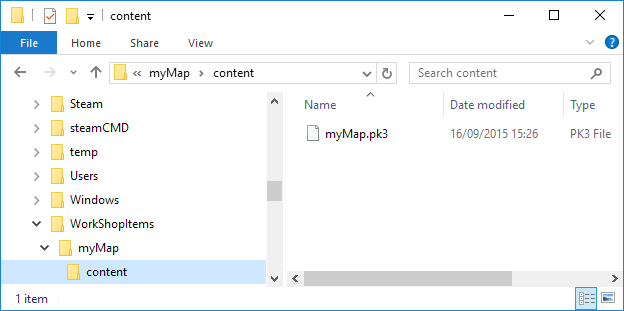
NB. if you are attempting to include 'autoexec.cfg' it appears they will not be run at all from within workshop content. You can work arround this with javascript files in a "js" folder.
eg.
nohmg.js containing -
qz_instance.SetCvar("g_startingAmmo_hmg", "0");
Prepare VDF file
eg mynewmap.vdf
- The "appid" given here is the correct one for Quake Live.
- The "publishedfileid" must be left at "0" the first time you try to upload your item, steamCMD will then fill this in for you so you can then use the same VDF file to update your workshop item later.
- Edit the "contentfolder" and "previewfile" fields to point to the correct locations for your project.
- Edit "title", "description", "changenote" as you wish.
- Visibility 0 is PUBLIC, 1 is Friends Only, 2 is HIDDEN
Preview Image Note
Run steamCMD to upload
Run the above command (this is all one line) substituting in your Steam login name and password, and that should be all you need to do.
You can then go to Community -> Workshop in Steam, and check out the workshop items you have uploaded, from there you can edit their Title, Description and Visibility (Only you, Public, Friends only).
If you ever change the contents of your item and want to update it, just run the same command again as SteamCMD will have updated the vdf with the correct publishedfileid.
Check your content
You can check your content under
<YourUserName> steam menu -> content -> then the 'Workshop Items' tab near the top,
or under - COMMUNITY steam menu -> Workshop, then on the right hand side underneath the image block there's a section labled "Your Workshop Files" with a link underneath you can click.
If your changes aren't showing up, it's probably because steamCMD has caused your steam.exe to log out but it's not realised yet, so exit Steam completely and then run it again.
Using Workshop Items For Players
To use Workshop content just subscribe to it, and follow any extra instructions in the description on the item's home page.
[Dedicated server admins instead add the workshop id to workshop.txt following the instructions earlier in this guide.]
All Steam Workshop content will download as 'Quake Live - Workshop Content', the Steam download center won't list individual subscriptions just which game the download is for. If it's not downloaded then restarting steam usually makes that happen immediately.
For example the official 'Quake Live Extras Pack' by Sponge, containing several maps:
Subscribe to the Workshop item, check your download center to see the download complete.
If there's been no download activity, restart Steam.
Run Quake Live.
To use the maps Play -> Start a mach, and select the map under 'Current Arena' then play offline or start an internet server.
For those who wish to use the console instead:Optionally, to run as a listen server at any time set:
Port 27960 (or your set net_port) would need to be forwarded on your router for people on the internet to be able to connect. By default your machine will stay offline however,
Otherwise you'll have to find an online server already running the workshop for you :o)
If a server is already running Workshop content, you should download it automatically when you connect.
- The Ultimate Quake Live Guide★ 5 (869)29k views1.2k ♥76 minUpdated 10 Feb, 2024
- How to get 40%+ accuracy with the Lightning Gun★ 5 (359)19k views563 ♥9 minUpdated 25 Sep, 2017
- Commands in Quake Live★ 5 (229)16k views363 ♥16 minCzech
- Quake Live beginner guide★ 5 (329)16k views338 ♥6 minUpdated 21 Sep, 2014
- 16 Tips for Quake Live Beginners!★ 5 (264)12k views293 ♥12 minUpdated 29 Mar, 2020
- Quake Live Configuration Basics & Custom HUDs★ 4 (110)11k views179 ♥8 minUpdated 18 Sep, 2014


- Upgrading to PremiumTeam Fortress 2★ 5 (20k)1441k views11k ♥6 minUpdated May 11, 2022
- No More Room in Hell Official ManualNo More Room in Hell★ 5 (2.8k)569k views2.1k ♥29 minUpdated Apr 22, 2019
- NMRiH Community Hosting GuidesNo More Room in Hell★ 5 (526)351k views653 ♥1 minUpdated Aug 10, 2022
- ULTIMATE GUIDE FOR GAME DEV TYCOONGame Dev Tycoon★ 5 (5.8k)326k views10k ♥4 minUpdated 23 Jan, 2014
- How to 'Git Gud' Soon™MORDHAU★ 5 (2k)318k views3k ♥68 minUpdated Nov 16, 2024
- Лучшие кооперативные игры SteamPAYDAY 2★ 5 (1.5k)315k views2.1k ♥56 minRussianUpdated Apr 27, 2025






This guide was created by its original author on the Steam Community. Are you the author and want it removed? Request removal.