Wretched Graug Bait Map: Help For Test of the Wild
Wretched Graug Bait Map
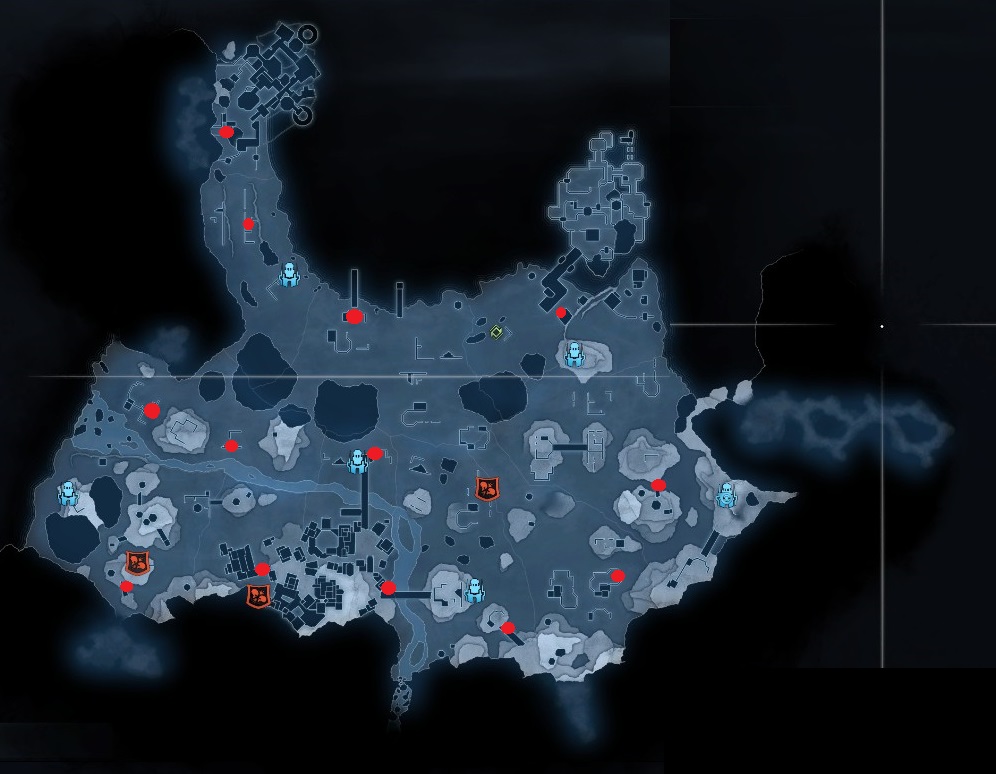
Below is a map for the Test of the Wild challenge in Trials of War.
The only purpose of this is to show where the Wrteched Graug bait is.
I've seen lots of guides, and they're fantastic, except it always relies on Graugs, and they never say where the Graug bait is. Hopefully this map will help you get some Graugs.
The bait hangs, so if you don't see it, look under whatever you're standing on (like a bridge).
I haven't found all of them I'm sure, but here's 13 different locations, in all different parts of the map, so wherever you are, there should be bait nearby.
Some Tricks I Learned
- Zugor the Beast Butcher can ruin your entire run in a split second. Try to take him out early.
- Something that saves a LOT of time is branding a warchief, and commanding him to fight another warchief. You can start the riot mission, mount a graug, and get at least three kills, and then two warchiefs. If you command the remaining warchief to fight another one, you can just keep repeating the process. This way you don't have to do the time consuming warchief missions.
- Don't use the above trick with the warchief Zugor Beast Butcher. His arrows are explosive, so it can cause fear in other warchiefs/captains, which makes it really annoying to eat them with the graug. You actually want them to stick around so you can kill them.
- For the trick in point 2, there's a very common location for riots to take place, on the west side of the map. It's far enough away from all graug baits that you CANNOT have a graug here. This prevents you from eating the captains in the riot. It's okay to do this once, maybe twice, but it really hurts your chances. Try and get a run where you don't have to have a warchief riot at the western middle location (northwest and southwest are still okay).
- If a warchief proves too difficult to brand, then brand one of his followers, and kill the warchief and his other followers. This way the new warchief is the one under your control, and you can easily command him to attack another warchief.
- Can't brand a warchief? Some of the warchiefs are kind of hard, because they're invulnerable to everything. In this case, stun them, get your multiplying up to 5, then jump over them, and use your stun ability. You can then use regular attack at the warchief's back, which actually does quite a lot of damage. Keep doing this until you get him down to a sliver of health, and he'll automatically make you decide whether to kill or dominate him. This way, you can dominate him easily.
- Go for the warchiefs early, so they have lots of captains, so your graug can have an easy lunch on multiple captains all in one sitting.
- Use the riot trick on the remaining captains too, this way you don't have to hunt them down; you just have to go to a mission site.
- To get more points, blow up fire wherever you see it, free slaves as you're running by, and spew vomit at uruks when they're all bunched up together.
- To save time, use your shadow abilities to move MUCH faster. Abuse this as much as possible. Then just combat drain uruks to get your arrows back.
More Middle-earth™: Shadow of Mordor™ guides
- 100% Achievement Guide★ 5 (2.6k)65k views3.6k ♥23 minUpdated 7 Aug, 2015
- Руководство по всем достижениям!★ 5 (3.2k)42k views3.6k ♥19 minRussianUpdated 13 Oct, 2021
- 7 Beginner’s Tips For Shadow Of Mordor★ 5 (592)42k views418 ♥4 minUpdated 3 Jul, 2017
- 100% Achievement Guide: Shadow of Mordor★ 5 (1.3k)38k views2.7k ♥112 minUpdated 15 May
- How to skip Shadow of Mordor's intro videos★ 5 (617)31k views275 ♥1 minUpdated 11 Oct, 2014
- A Guide, Tips, Tricks, Harder Difficulties, Runes, and more.★ 5 (221)24k views307 ♥16 minUpdated 4 Oct, 2014



🔥 Popular guides
- Upgrading to PremiumTeam Fortress 2★ 5 (20k)1441k views11k ♥6 minUpdated May 11, 2022
- No More Room in Hell Official ManualNo More Room in Hell★ 5 (2.8k)569k views2.1k ♥29 minUpdated Apr 22, 2019
- NMRiH Community Hosting GuidesNo More Room in Hell★ 5 (526)351k views653 ♥1 minUpdated Aug 10, 2022
- ULTIMATE GUIDE FOR GAME DEV TYCOONGame Dev Tycoon★ 5 (5.8k)326k views10k ♥4 minUpdated 23 Jan, 2014
- How to 'Git Gud' Soon™MORDHAU★ 5 (2k)318k views3k ♥68 minUpdated Nov 16, 2024
- Лучшие кооперативные игры SteamPAYDAY 2★ 5 (1.5k)315k views2.1k ♥56 minRussianUpdated Apr 27, 2025






This guide was created by its original author on the Steam Community. Are you the author and want it removed? Request removal.