AnimUV2 Full User Guide
Intro to AnimUV2
AnimUV2 is a Cities: Skylines mod that acts as a standalone redesign of the vanilla AnimUV shader / Rotor shaders, controlled through an in-game GUI. The included shaders are built to match the relevant vanilla shader behavior as closely as possible, while adding a cleaner sprite-sheet workflow, frame ranges, and support for prop, building, and submesh animation.
- Built-in GUI eliminates repetitive ModTools console scripting
- Frame clamping and start/end ranges support mixed static and animated content on complex sprite sheets
- 30 FPS animated textures can support 8-10 seconds of animation or more, depending on sheet size and frame resolution
- Large per-frame resolutions are supported, including 400x400 px and beyond depending on animation length
- Two shader variants are available: classic cutout alpha or transparent alpha blending
- Animated emissive textures support signs, holograms, screens, and other glowing elements
- Up to four independent animation channels can be used on props and building meshes with a single sprite sheet
- Building submeshes can use separate sprite sheets and animation settings
- AnimUV2 works alongside existing shaders instead of replacing them
In the Asset Editor, users open AnimUV2 by selecting the AnimUV2 icon on the far-left toolbar.
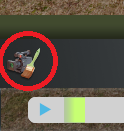
The AnimUV2 window has three tabs:
- Props
- Buildings
- Submeshes
Users must select the tab that matches the asset type being edited. Settings only apply to the selected asset type. The Submeshes tab uses a submesh ID instead of an animation slot ID. Submesh IDs start at 0, not 1. Users can check the attached submesh list in the Asset Editor to identify the correct ID.
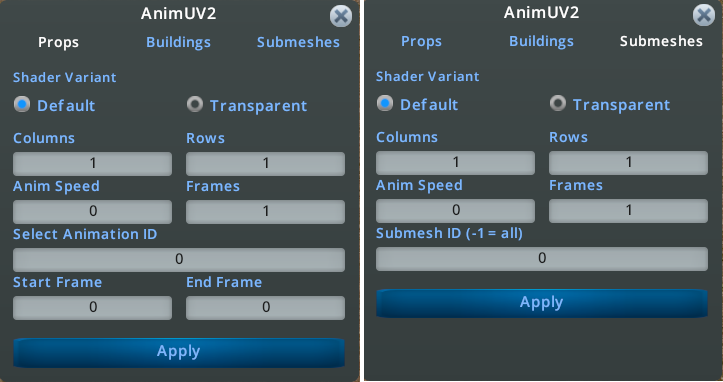
- Shader Variant: Selects the alpha mode: Default or Transparent
- Columns: Number of columns in the sprite sheet
- Rows: Number of rows in the sprite sheet
- Anim Speed: Animation playback speed
- Frames: Total number of frames to animate
- Select Animation ID: Selects animation slot 0-3; use -1 to apply to all slots
- Start Frame: First frame used by the selected animation slot
- End Frame: Last frame used by the selected animation slot
Making Sprite Sheets
Sprite sheets are the core of this mod and work similarly to traditional 2D animation. Users generate an image sequence from a video or animation, then place each frame into a grid from left to right and top to bottom. The shader iterates through those frames to create motion. The example sprite sheet screenshot can be used as a visual aid for understanding how sprite sheets work with this mod.
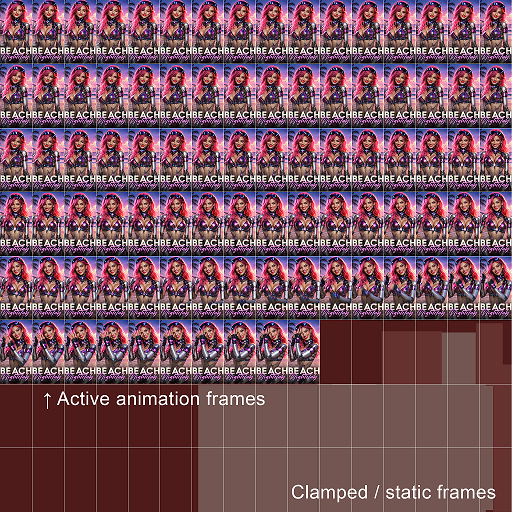
Dimensions should be powers of 8, but do not need to be square. Examples:
- 4096x4096
- 2048x1024
- 256x256
Avoid exceeding 4096 px on any side. Larger sheets allow larger frames, longer animations, or both.
Columns and rows determine the final per-frame resolution. Odd-numbered grids such as 13x7 are supported, which allows flexibility when balancing frame size and animation length.
Example:
- A 4096x4096 sheet with a 12x12 grid gives 144 cells
- At 30 FPS, that is almost 5 seconds of animation
- Each frame is roughly 341x341 px
Sprite sheets contain one frame per cell in the grid, so the total available frames should be calculated before export:
Using this number, users should crop the source video or animation clip to the intended frame size and length. The result should then be exported as an image sequence, which is supported by most modern graphics programs.
Users should place animation frames sequentially from left to right, then top to bottom. This can be done manually, through an automated script, or through an online sprite-sheet tool.
Blank cells are allowed. AnimUV2 uses frame clamping, so users can tell the shader exactly how many frames to read while unused cells are ignored.
If frames do not align perfectly, such as a small gap remaining on one side even when frames are placed edge to edge, users should scale the full frame group together in the direction of the gap until the spacing closes. This ensures the sheet forms a clean, continuous grid that the shader can interpret correctly.
Animated Normal Map Creation
Animated normal maps can be difficult to produce from video footage without an existing normal-map workflow. A simple workaround is to generate a normal map from the sprite sheet itself.
Users can generate normal maps with https://normalmaponline.com/.
Users should use a grayscale heightmap input. In practice, almost any grayscale version of the sheet can work well enough for in-game use. After adjusting the settings, users should export the generated normal map and add blur if the result is too noisy. Only the generated normal map is needed; displacement, ambient, and specular outputs can be disabled.
UVMapping Guidelines
When preparing a 3D mesh, animated faces and static faces must be handled differently, especially when both use the same sprite sheet. The model can be UV-mapped normally, but any face that will be animated must have its UVs scaled to cover the full texture sheet.
- Animated faces should not be mapped to a single frame or cell
- Stretched animated UVs may overlap static UVs
AnimUV2 automatically detects animated faces and shrinks their UVs to the correct frame size at runtime. If the UVs are not scaled to the full sheet, animation may play incorrectly or not at all.
When frame clamping is used to mix animated and static content on the same sheet:
- Only animated faces need to be stretched to the full texture
- Static faces can remain UV-mapped normally
How to Use Vertex Painting
AnimUV2 uses vertex color to decide which parts of the mesh animate and which animation slot they use. Most modern 3D software supports vertex painting. The following conventions are used by AnimUV2.
For assets that only require one animation on a sprite sheet, the simple black/white method can be used:
- Black = animated
- White = static
For sprite sheets with multiple animations on one sheet, the red channel controls whether a face is animated.
- Red near 0 = animated
- Red near 1 = static
The green channel selects the animation slot when more than one animation is used on the same mesh. AnimUV2 supports four slots with the following vertex painting colors:
- Slot 0: R = 0, G = 0.00
- Slot 1: R = 0, G = 0.33
- Slot 2: R = 0, G = 0.66
- Slot 3: R = 0, G = 1.00
This method is intended for cases where several animated areas share one sprite sheet but need different frame ranges. Each animation's frame range is assigned through the in-game modal by selecting the animation ID from 0-3 and setting the start/end frame range. The same settings can be applied to all animations by setting Select Animation ID to -1.
Making Animated Prop Assets
Animated props using AnimUV2 work well for full-texture animations, decals, animated signs, holograms, screens, and hybrid static/animated props that share one texture map. Props can also use up to four animation slots on a single sprite sheet.
Key points:
- The asset should be a single mesh, or multiple meshes merged into one
- Vertex painting determines which faces animate and which remain static
- Assets should be saved as .fbx so vertex paint data is preserved
- All animation slots share the same sheet grid, frame count, and animation speed
- Reapplying settings overwrites previous values on the prop
For hybrid props, the Default shader variant is usually recommended. The transparent variant uses a different render pipeline and may cause lighting inconsistencies on opaque surfaces.
Making Animated Building & Submesh Assets
Building assets are the best option for complex multi-part animated setups. In addition to multi-animation support for the main building mesh, each submesh can have its own texture and animation settings. This makes buildings useful for elaborate VFX, fountains, large signage, and setups that benefit from separate animated material groups.
Key points:
- Vertex painting determines which faces animate and which remain static
- The main building mesh supports single sprite sheet multi-animation setups
- Each submesh can have its own columns, rows, frame count, and animation speed
- Submesh IDs start at 0, not 1
- If multiple submeshes share identical animation settings, -1 in the submesh field applies the settings to all submeshes
- Reapplying settings overwrites previous values on the targeted building mesh or submesh
- Each submesh can use a different shader variant in mixed usage scenarios
Current Limitations
- Single sprite sheet multi-animation support is capped at four animation slots per sheet in the current implementation
- All four animation slots share the same sheet grid, frame count, and animation speed
- Networks, trees, vehicles, and citizens are not supported
- Going far above 30 FPS or 4K textures may cause instability
- Texture compression will reduce fidelity, especially on large animated sheets
- Balancing frame size against frame count is one of the main content-authoring tradeoffs
- Default and transparent variants use different render pipelines, so lighting may not match perfectly between them
- Transparent props may still show shadow or sorting artifacts in difficult cases because of Cities: Skylines 1 engine and render-pipeline limitations
- Saving large animated assets may make the game appear temporarily frozen while serialization completes
Example Steam Workshop Assets
- AnimUV2 Demo Waterfall - A single prop asset with two 3-second, 30 FPS animations for a total of 180 frames. It uses the red/green vertex painting method and a 14x14 grid.
- AnimUV2 Demo Fountain - A building asset with five submeshes. Each submesh has a 4-second, 30 FPS animation, except sidespray.fbx, which uses a 3-second animation. It uses the black/white vertex painting method and a 12x12 grid.
Users can open and inspect these assets in-game with ModTools. After opening the assets inside the Asset Editor, users can change their animation parameters through the AnimUV2 modal to see how each control affects the mesh.
- The Beginner's Guide to Traffic★ 5 (5.9k)167k views13k ♥27 minUpdated Sep 26, 2015
- HOW TO TRAFFIC★ 5 (3.5k)95k views5.2k ♥33 minUpdated Mar 26, 2017
- 都市天际线模组推荐指南V5.1★ 5 (1.9k)67k views6.5k ♥29 minSimplified ChineseUpdated Dec 26, 2023
- Cities Skylines: An In-Depth Beginner's Guide & Walkthrough★ 5 (926)66k views2.8k ♥37 minUpdated Apr 9, 2015
- Traffic Planning Guide for Realistic Cities★ 5 (1.4k)59k views3.1k ♥30 minUpdated Jul 20, 2017
- Cities Skylines | A Beginner's Guide To Using Mods & Custom Content★ 5 (898)47k views2k ♥28 minUpdated May 21, 2023


- Upgrading to PremiumTeam Fortress 2★ 5 (20k)1441k views11k ♥6 minUpdated May 11, 2022
- No More Room in Hell Official ManualNo More Room in Hell★ 5 (2.8k)569k views2.1k ♥29 minUpdated Apr 22, 2019
- NMRiH Community Hosting GuidesNo More Room in Hell★ 5 (526)351k views653 ♥1 minUpdated Aug 10, 2022
- ULTIMATE GUIDE FOR GAME DEV TYCOONGame Dev Tycoon★ 5 (5.8k)326k views10k ♥4 minUpdated 23 Jan, 2014
- How to 'Git Gud' Soon™MORDHAU★ 5 (2k)318k views3k ♥68 minUpdated Nov 16, 2024
- Лучшие кооперативные игры SteamPAYDAY 2★ 5 (1.5k)315k views2.1k ♥56 minRussianUpdated Apr 27, 2025






This guide was created by its original author on the Steam Community. Are you the author and want it removed? Request removal.