High Level Medic Build
Introduction
EDIT: 7/3/15 Most of this info is fairly old. If you have any sense you'll disregard it completely.
So I've been playing medic as my main and wanted some feedback on my current build and play style as well as some answers to questions. Also - for those looking to try the medic, there may be some handy tips and bad habits in here you can try.
I don't consider myself by any means 'good' at this game (I'm still yet to open the science sector) so constructive criticism and flaming is welcome.
EDIT: Finally ran a successful mission and opened the Science Sector with this build (using the SMG). I've also ran this build on a few veteran games this morning and it seemed to work pretty well.
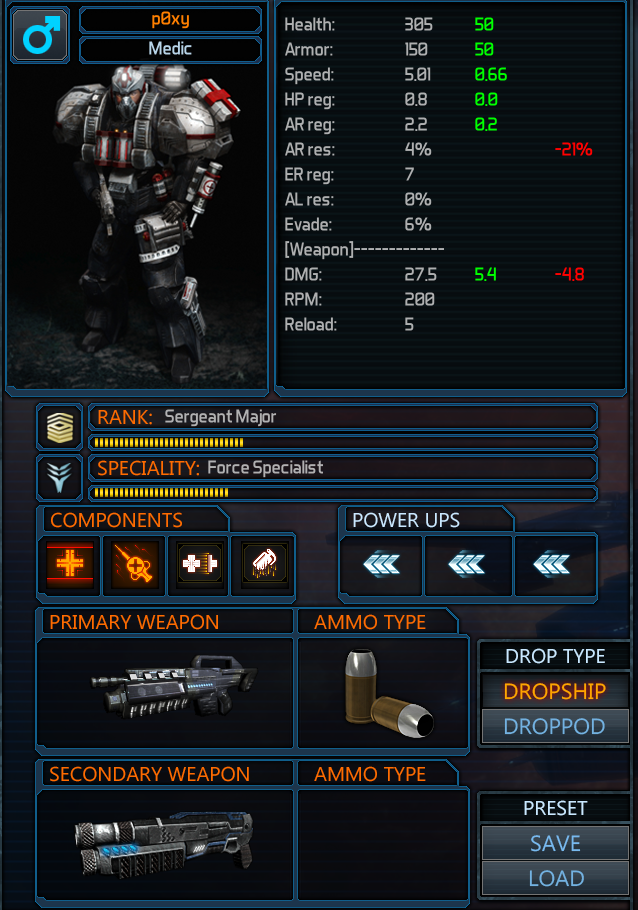
Components/Skills:
- First Aid-Module (FAM) - Pretty self-explanatory. Early game I'll move points in/out of this as required. The most serious ailment (fracture) only requires 3 points which only takes a second to move across. Move them back out once the skill is used and on CD (unless you're in late-game and have plenty of points). Once you have enough points to spread them around, always keep 2 points in this to enable Blood-Gen-S - a great heal-over-time skill with a long CD.
- Healing-Device (HD) - Just one point is needed in this skill to make it super-effective in emergencies. The one point in this skill will heal more than a maxed out heal gun. End-game it's going to be required as health tends to plummet from 100% to near-death very quickly and Blood-Gen + Heal Gun just don't have the healing power required to keep most people alive. It does have a long CD though so if you can use heal gun or Blood-Gen-S then use that option first.
- Heal Gun - effective at topping up health from a (safe) distance. Especially once fully leveled. Keeps you out of danger. Has a nice fast cooldown so use liberally.
- Chemical Bomb - destroy dead bodies to stop new mobs spawning. This is a severely underrated skill IMO as it is a great ammo saver / team DPS / movement speed booster. Those piles of dead bodies can spew out a lot of revived mobs. By removing them from the map, your turrets can focus on the bigger mobs, and your team doesn't have to spend as much ammo, and can move faster (in the earlier waves). This is actually pretty useful early game too - even at the drop zone as many of those kills will start respawning. Late game, this is the only way in the game to prevent the white dogs from reviving. Never move points from healing into chem bomb when bunkered. You only need one here but by end-game you'll probably find you'll have 2or3. It has a quick CD anyway so too many points are just wasted.
Skilling/Deskilling:
The above build allows me to skill/deskill as necessary as no points are locked. Generally I'll start with healing device and heal gun. If someone gets an ailment, I'll move points into First Aid module, use it, move the point back and heal them. If you're not moving points around as a medic in the early waves then you're handicapping yourself.
Power-Ups: Movement x 3
Gots to be able to run fast. You want to be able to cover distances quick - race over to your hellfire tanking mobs, heal, remove ailments, and get out quick. Moving slow leaves you vulnerable when saving people especially while your skills are on CD and you're the last 2 people in the group kiting a line of monsters. If you can get your hands on some stims they're great too as they will provide an additional passive move speed boost.
The risk here is early game your armor is weak weak weak. You'll need all the power station powerups to get your armor res back up to something respectable. Until then, keep your distance from the mobs. If your armor hits 0, you will get shredded very quickly, so don't be afraid to whip out the shotgun on auto-aim.
With three points here you should be getting close to a speed of 5 depending on your level.
This also comes into play with the weapon choices I make....
Weapons
- Primary: GAR-GL. (or SMG)
- Secondary: FAS-18
- Ammo: Hollow point
For those that aren't familiar with it, the GAR-GL is basically the GAR with a grenade launcher attachment. To switch in and out of GL mode, press C. To fire a grenade hold shift and you will see the area the grenade will do damage to. Never shoot immediately after pressing shift - always wait to see if you're in grenade mode or bullet mode. Never shoot placed explosives, in fact when bunkered, don't event think about turning this mode on unless you're retreating and there's no explosives around.
Also, don't TK your teammates. It WILL happen once, learn from it, don't do it again. EDIT: It may actually happen 3 times at which point you'll feel bad about killing people instead of healing people and opt to go with the SMG instead. =P
I've found this to be the handiest weapon for the medic as most games I've played, no other classes seem to want those grenades - they're always left lying around. Grenades do a lot of damage and don't take up room in your inventory so you can easily get 20 grenades per game. It's great for when you're on the move and being chased by dogs and trash - especially if you have high movement speed. Because you will have plenty of ammo and high movement speed there's no reason you can't take out 4 dogs + mobs pretty easily - especially with other weapons to switch to. Allows the medic to take out all kinds of monsters solo in an emergency. Also give you the confidence to move solo for large distances on the map if you need to.
I prefer the FAS-18 to the other shotgun as two rounds is usually sufficient to remove any threat where the shotgun is required. With the other shotgun I find my self wasting a lot of ammo, plus you don't get as much bang for the buck. You have limited shotty rounds, make sure they're doing as much damage as possible. For both the grenades and the shotgun, save the ammo for when you're in trouble/on the run. Don't be wasting ammo on big fatties - let other people take care of them.
The hollow point ammo is because I'll only ever shoot the smaller monsters with the GAR. Anything bigger will be taken care of by either the shotgun or the GL.
On *average* I use about 450 ammo per game (through wave 15). I will loot rubble, etc, but will be sure to just mule the ammo until I can drop magazines for others.
Role of my medic
Priority one is to stay alive.
Prior to bunkering up, I try to keep everyone ailment free and top up their health. Don't wander alone too much and try to stay relatively central to as many players as possible. If I'm hosting I'll waypoint, setup turrets, turn on power stations, dismantle and carry turrets, enable radars, all the stuff that is kind of just standing there doing nothing. If there's someone on the opposite side of the map slowly dying, I'll typically let them die unless they've indicated to me that we'll meet halfway. Trying to launch a heroic rescue mission with an uncooperative (or unaware) team mate often ends in both people dying and just isn't worth it.
I don't really shoot monsters once bunkered up. I'll kill the small mobs that manage to get close to teammates but generally there aren't many of these. This allows other players and turrets to focus dealing DPS on larger monsters. It also means you're not chewing through ammo that other classes can use more effectively. It might look like you're just standing there, but you'll be staying busy looking for bodies to chem bomb, keeping an eye on your CDs, teammates health and armor, dropping heals, manually shooting little nuisances, placing barricades, wasting flares, getting jumped by snatchers, whatever...
Tips
Watching players armor is as-important as watching their health. When you see it run out, that's when you need to have your heals ready as health will drop FAST.
Always keep an eye on your CDs and know which heal will be the next available. If it's not heal gun you better be standing close to your target by the time it comes off CD.
If it gets hectic - always try to heal first then cure ailments - especially if they're low on health. Healing will buy you time to move points into FAM to cure the ailments if you need to.
I prefer to leave medical supplies on the ground when bunkered. That way my teammates still have a DIY option, and if my skill is on CD, I can always pick it up and use it on them myself.
If there is a second medic, be sure that one of you takes life drone and the other chem bomb. An alternate build, is just to run with life-drone instead of chem-bomb (now that the drone has been updated). Personally I find chem bomb more fun to play. Life-drone has a tendancy to die from aggro if you're bunkered up late game and need it.
Questions
First of all can anyone see any inefficiencies or issues with it for running campaign mode on soldier difficulty (I almost always play this mode)?
FAM - Levels 4+5 say they increase first-aid efficiency by 15% / 30%. Is this saying that if my heal gun at max level normally does 80health, it will be increased to 92 / 104 health? If so, then maxing first-aid module AND heal gun would let me heal 104 health every 15 seconds?
Q. Should a medic carry stims? They probably get the most use out of the speed boost, but the least use out of the damage increase when activated?
A. Yes. Use it for the speed boost, not for the dmg increase.
Q. I read a tip on another medic guide that you can click on the players name (press L to show players health in detail, activate skill, left click on player name) and it will never miss. I'm not sure that this is actually the case as I'm pretty sure it will miss if it took you some time to get to the target, and the target has moved from their original location. It will just shoot the ground and the players health does not seem to increase. Can anyone confirm?
A. Yes. This definitely happens. Confirmed by me from seeing it happen many times.
Q. Should I swap out a skill for healing station? Often I find I'm the only medic, and if I do die it makes it much harder for the survivors where a healing station could alleviate some of that...
A. No, healing station is only really useful when you're not on the move, and the only time this happens is when you're bunkered. This should be the easiest part of the game so it's kind of a wasted skill.
- The Everything Guide(V. 1.013)★ 5 (306)9.4k views418 ♥84 minUpdated Dec 25, 2021
- [RUS] База знаний по игре + гайды★ 5 (317)6.1k views275 ♥60 minRussianUpdated Aug 24, 2015
- Information you need to know, you noob. Updated 10-Jul-15★ 4 (133)4.2k views65 ♥26 minUpdated Jul 10, 2015
- SinglePlayer Upgrade item locations (Finished)★ 4 (119)3k views170 ♥4 minUpdated Sep 11, 2015
- Basic Informations very detailed [Out of Date]★ 4 (31)1.6k views25 ♥18 minUpdated Oct 4, 2016
- Advanced Gameplay Guide★ 4 (33)1.3k views30 ♥20 minUpdated Dec 2, 2014


- Upgrading to PremiumTeam Fortress 2★ 5 (20k)1441k views11k ♥6 minUpdated May 11, 2022
- No More Room in Hell Official ManualNo More Room in Hell★ 5 (2.8k)569k views2.1k ♥29 minUpdated Apr 22, 2019
- NMRiH Community Hosting GuidesNo More Room in Hell★ 5 (526)351k views653 ♥1 minUpdated Aug 10, 2022
- ULTIMATE GUIDE FOR GAME DEV TYCOONGame Dev Tycoon★ 5 (5.8k)326k views10k ♥4 minUpdated 23 Jan, 2014
- How to 'Git Gud' Soon™MORDHAU★ 5 (2k)318k views3k ♥68 minUpdated Nov 16, 2024
- Лучшие кооперативные игры SteamPAYDAY 2★ 5 (1.5k)315k views2.1k ♥56 minRussianUpdated Apr 27, 2025






This guide was created by its original author on the Steam Community. Are you the author and want it removed? Request removal.