How to: 100% accurate death reports... with binary numbers?!
Intro and reasons
Who this guide is for: completionists and perfectionists. People who want to get 100% accuracy on death reports. It is for you if you don't mind stepping outside the game for a bit and copypasting some things into and from a spreadsheet. However, if you don't want to lose the immersion, don't mind losing a couple percentage points in case you get something wrong – you might not find it worthwhile.
Why not just use the gold standard Punchomatic Cheat Sheet from margotbean instead? Well, you may! It's a magnificent guide and it has a little more in-depth info on fields other than the death reports (and if you want even more in-depth, the Highest Percentage Completion by 🅳🅸🄞🅽 is the one), and it lists the incident particulars as well. I haven't found a way to extract the data on those from the savefile, unfortunately.
However, I personally find it a little difficult at times to match up the PIDs I find to the descriptions in that guide. It's especially the case when there's a couple right next to one another or if I accidentally move them, say, by stepping on them or an explosion. The method described in my guide bypasses that – you could just collect the PIDs in any order, scan them in any order and just check the savefile. I still recommend looking at the names you see when picking up PIDs, and to at least take a general look at the surroundings. Although if you use a spreadsheet, I don't think you could make a calculation error, it's mostly helpful if you want to try doing it by hand (Appendix B if you're curious).
Also, this method works on ANY map, made by RuneStorm or users. Want to get 100% accuracy on a Workshop map? Then you might find this guide helpful.
In the end, it's your choice! I just think it's neat and wanted to share.
The basis
Once upon a time, I was checking my save file for whatever info I was checking it for (it was the number of incinerated items, of course, among others). And I noticed curious numbers in the death reports. Some were quite low, like 65, while others were pretty big, like 2663552. What gives? I had a hunch, checked what numbers show up when you check only one box in the causes of death, and a magnificent discovery was made.
Turns out, the checkboxes have corresponding values, that are consecutive powers of two. "Shot" equals one, "bitten" equals two, "eaten" equals four, and so on, up to "other" being, in decimal, 8388608. In binary, those four I've just mentioned would be, respectively: 1, 10, 100, and 100000000000000000000000. Now, if you know anything about binary system or positional notation in general, you'll realise that this allows us to add them up to any number between zero and 16777215. If you don't and are confused what the hell I'm talking about, more on that in Appendix A. For now, just trust me on this.
And what is this useful for? Well, those curious numbers I saw were the "DeathBitField". That's where the actual causes of death are revealed. It's part of the entry that appears in your savefile when you scan a PID. There is also "PEDeathBitField", which is the total sum of what we've checked while filling a report. That means that you can check some boxes, go to the savefile, find the relevant entry, and compare whether these two numbers are the same. If they are, it means that you got the death causes 100% correct, and if they're not, well, figure it out. And thanks to the knowledge that the checkboxes are simply bits in a binary number, we can do all that with complete certainty and consistent accuracy! Again, if you're hesitant, just trust me bro. Or jump to the appendix.
But really, all you need to know is that if you check the box, you turn it on and that means that its value counts. So if I just check "shot", the PEDeathBitField will say 1. If I check "shot" and "bitten", the final value will say 3, because they add up. If I also check "eaten", it will add up to 7. If I at this point uncheck "shot", the value will become 6. Following?
For convenience and information, here's a list of the possible causes of death, along with their values, in the same order as in the Punchomatic. Notice how the binary numbers are just the next bits turned on (and all the previous turned off), but don't worry too much about it – there won't be any converting actually necessary. If you prefer, you might convert the DeathBitField number into binary and use that instead (more on that in Appendix B), but I've made a spreadsheet that makes this redundant. This is just to show how it works under the hood. The decimal values might be more convenient, though they start looking unfamiliar at, I'd say, "stricken" for me.
The examples I gave earlier are absolutely real, straight from the game. 65 corresponds to shot and murdered, 1 + 64. 2663552 means eviscerated, decapitated, dismembered, sliced, slain, and halved. If you need confirmation – check the table above, do the math, and you'll see what's going on.
Now, you may be thinking, well, why not just copy the number, paste it within the save file, save and presto! Well. I tried that and it doesn't work – if you change anything in the save file, the progress you've made resets, and I'm not sure about what happens with the Punchomatic, whether it even shows up correctly. Even if it does, the progress reset means the PIDs appear anew, and the implications of that are unclear to me. I bet it would tank the total score, whatever you do with them. Anyway, no, you can't just paste anything in the save file. But it's not a problem! It means there's just a little bit more copypasting to do.
MODUS OPERANDI
Here's the process: we take some data from the save file. We use it to establish what causes of death are linked to each entered PID, and then use that info to check the right checkboxes in the Punchomatic.
So FIRST: collect all PIDs and scan them at the Punchomatic. You can do this right at the very beginning – before you even start cleaning, or after you're done, or at any point. But before you start checking the data, you should ideally have all the PIDs entered. Or, if you don't, you'll be able to see how many you're missing.
Second: save the game. Open the savefile and find the necessary information – details on that in the next section. At this point you may also want to check other numbers, like bullet holes and casings, and incinerated items. You can do this after you're completely done cleaning so that the number of incinerated items doesn't change, or just check that one thing later on.
Step three: turn to the spreadsheet or any other chosen method of calculation. With that, you might want to make a list in Notepad or whatever, that you can later paste into the Personal Data Assistant in-game for quick access while filling out the report. Specifics on that in a whole special section.
Step four: if you've made a list in Notepad, copy it, and paste into PDA. Or go windowed mode or Alt+Tab, and check Notepad – I find this uncomfortable, though, it's much more convenient and quicker to use the PDA.
Fifthly, fill out the report at the Punchomatic, referring back to the sweet, sweet info from the list you'd made. Then punch out and marvel at the 100% death report accuracy!
Alright, so what's all that about the savefile?
Savefile and what we can find in it
Time for some technicalities.
To acquire the required data, we need to open the save file (well, first – save the game). If you don't know where to find it, check the following spoiler.
Remember the name of the slot you saved your game on. It's gonna be something like Save0, Save1 etc. Next, go to the folder where the saves are stored. For example, I can find them in D:\Steam\steamapps\common\Viscera\Saves. Whatever is before "Steam" might be different for you depending on where you installed Steam, but from there, it's always gonna be the same. When you reach this folder, open up the relevant save file in Notepad.
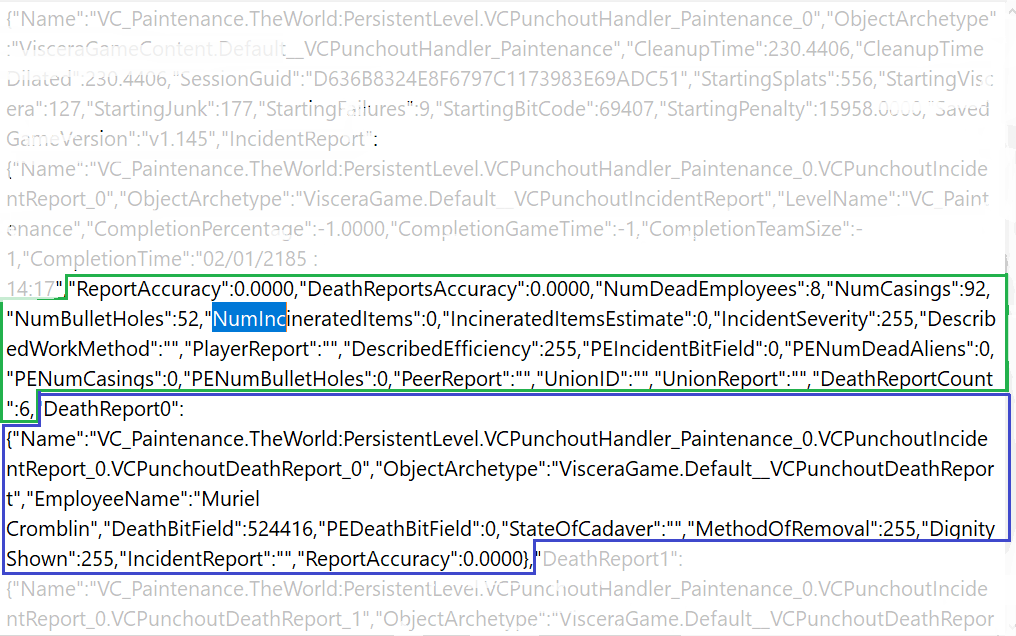 Within the green border, there's some map-specific info.
- ReportAccuracy, DeathReportsAccuracy: these will change after clocking off and you may check them in IncidentReportsData.sav. If the value is 1.0000, it means 100% accuracy.
- NumDeadEmployees: the total number of dead employees on site. Useful for checking if you haven't missed any. This number doesn't change at any point.
- NumCasings, NumBulletHoles: numbers of bullet casings and bullet holes found on site – enter these numbers into the relevant fields while filling in your report. This also does not change, it's what's present when you start the level.
- NumIncineratedItems: the actual number of items you've incinerated – enter this in the report, but be sure to be done incinerating before you check this.
- IncineratedItemsEstimate: the number of incinerated items you've entered in your report – should be the same as the previous.
- IncidentSeverity: the checkboxes, make sure you check something, anything. 255 means you haven't checked anything!
- DescribedWorkMethod, PlayerReport: the text fields which you should ideally fill completely with whatever.
- Described Efficiency: same as IncidentSeverity, those are the checkboxes. Make sure to check something to get a higher score.
- PEIncidentBitField: this number corresponds to which checkboxes of the incident particulars you've checked. This works just like the death reports, but unfortunately, I don't think the correct number is listed in the save file.
- PENumDeadAliens: the number you've entered of dead aliens found on site. Same as the above, it doesn't seem to be listed.
- PENumCasings, PENumBulletHoles: the numbers of bullet casings and holes you've entered in your report. Luckily, you can find these in the save file, just a line or two higher.
- PeerReport: text box, fill it completely with anything.
- UnionID: this field only takes numbers. Don't enter your actual ID – just mash numbers until it's full.
- UnionReport: be sure to leave this field EMPTY!
- DeathReportCount: the number of PIDs you've scanned at the Punchomatic. It should be the same as NumDeadEmployees. If it's lower, it means you haven't entered all PIDs.
The part inside the blue border is the whole one death report. What can we find there?- "DeathReport[number]" is useful for separating entries. This whole wall of text is a bit difficult to read, so when you see "DeathReport", that's where the previous one ends and the next one begins.
- Then there's some text related to the level we're on. Don't worry about it.
- "EmployeeName": pretty self explanatory. A word of caution: I've found that if there's an employee whose paper note or data log can be found in the level, their exact name isn't listed within their entry in the savefile. Instead of, say, George Seaman, the EmployeeName is <strings:MapInfo.Paintenance.Note_George_Name0>. This shouldn't be too much of a problem if you pay a little attention to what you're picking up though, which I recommend, and also the names of these more "important" employees probably don't repeat.
- "DeathBitField": what this whole guide is pretty much about! This is where the causes of death are hidden.
- "PEDeathBitField" is the sum of all the checkboxes you've checked. This should end up the same as "DeathBitField".
- "StateOfCadaver": the text field for filling up with text.
- "MethodOfRemoval", "DignityShown": the checkboxes. 255 means you haven't checked anything, and you should! It doesn't matter what – just make sure to check any box.
- "IncidentReport": fill it up with whatever you want.
- Finally, "ReportAccuracy", as previously, will only be anything else than zero once you punch out. This only relates to the death report on this one person, and these values from all entries add up for the final DeathReportsAccuracy. I mean, they get added and... divided by their number? Something like that, probably.
The spreadsheet and how to use it
The spreadsheet method! I would call it the Excel method, but since OneDrive was having server problems, I had to resort to using Google Sheets. No matter, I'm sure either works, and it's actually convenient because Google Sheets have checkboxes and Excel doesn't, at least not the online version. I have made a spreadsheet – here it is[docs.google.com]. You can make one for yourself if you'd like, or copy mine to your own Google Drive. I'm sure it's possible to create a tool that you import the save file into (or paste all its contents), and it extracts all the data for you and makes a list of all the names and checkboxes ready to copy and paste into the PDA, but I don't have the know-how to achieve that. If, however, you've seen something like this or feel inspired to make it, please, let me know, I'd love to see that!
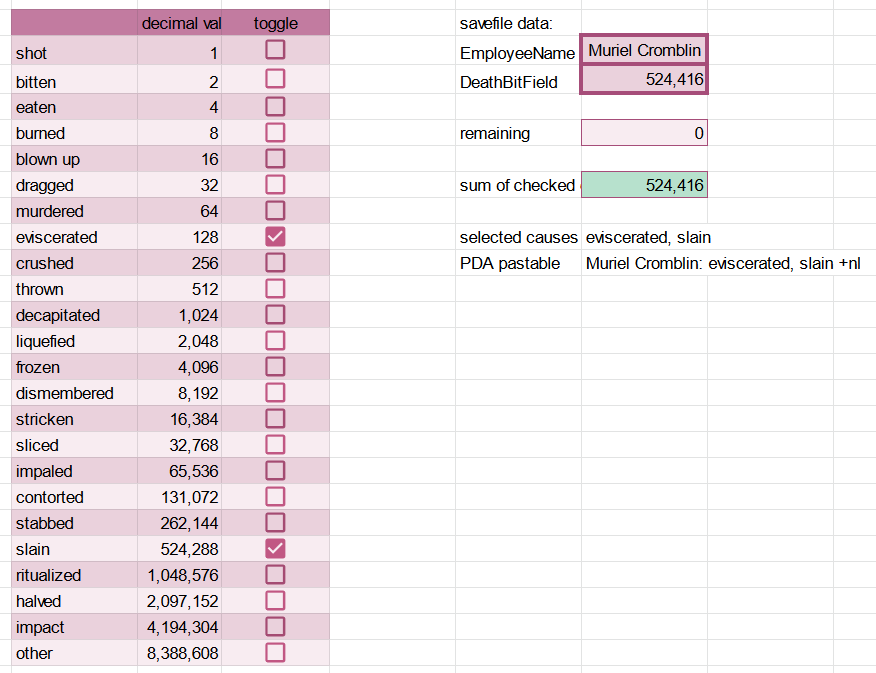 And here's where you get the info. Remember, save the game, open the savefile, and get to the DeathReport entries, preferably by searching for something convenient like numinc (or deathreport0) and looking a little bit further down.
Paste the employee name, or anything that lets you quickly recognise which death report you're working on, in the relevant cell.
Then, most importantly, paste the DeathBitField number into the next cell. I mean with shorter numbers, you can copy them by hand, but with the long ones, it's just safer – you won't make a typo.
Now, look at the "remaining" number and keep checking the highest number that is lower or equal to it. For example, since I'm starting with 524,416, first I checked 524,288 and was left with 128. Checked 128, and that's it! When the "remaining" reaches zero and the sum turns green, that means you're done.
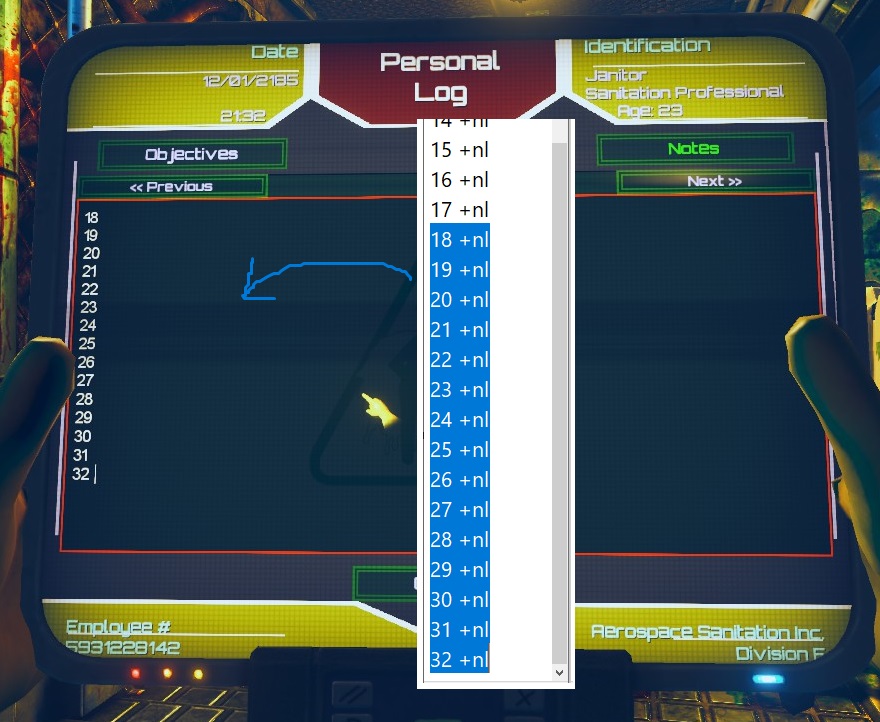
The fields you checked will be listed below, and once again with the name added and already provided "+nl" (see next paragraph), ready to be pasted into Notepad. Then you can start over with the next employee, and so on. When you're done, copy your Notepad list and paste it into the Personal Data Assistant in the game. That way you can start punching the Punchomatic and quickly pull out the PDA to check the death causes.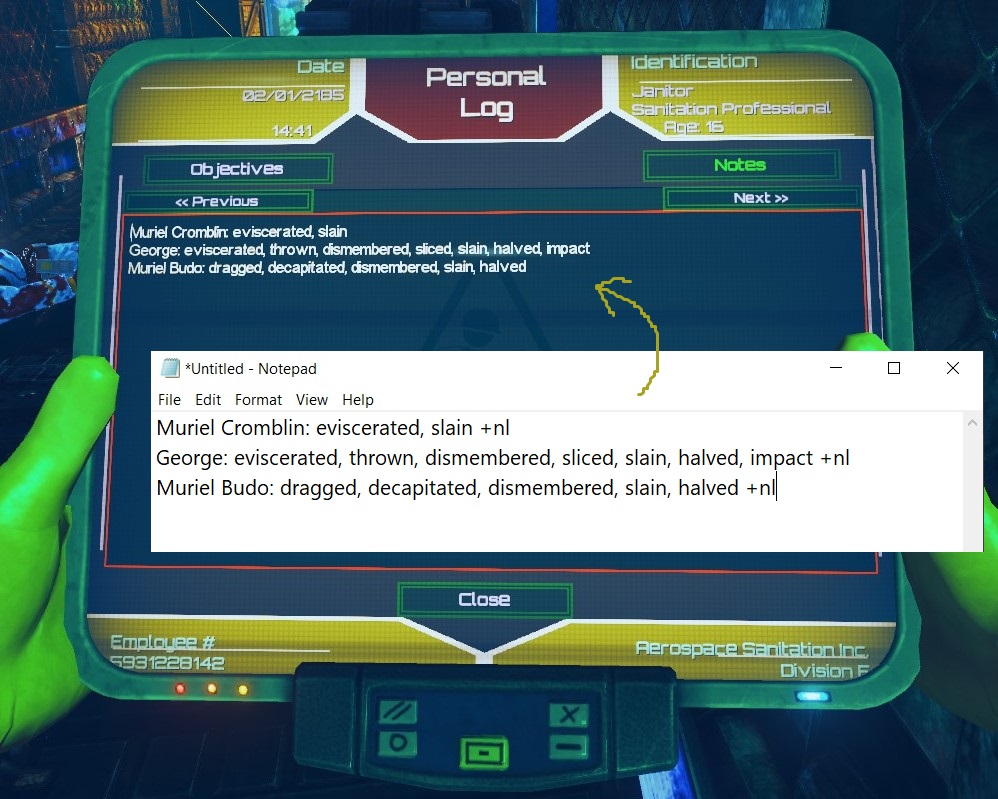 The "+nl" is there so that when you paste it into the PDA, it creates new lines. Without it, it would paste as one line, and most of it wouldn't be visible. I should also point out that the PDA has a limit to how many lines there can be on one page and that it doesn't automatically create a new one. If you notice overflow/missing content, just check which line it starts with, go to next page on the PDA, and copy from Notepad again, starting with that overflowing line, as shown: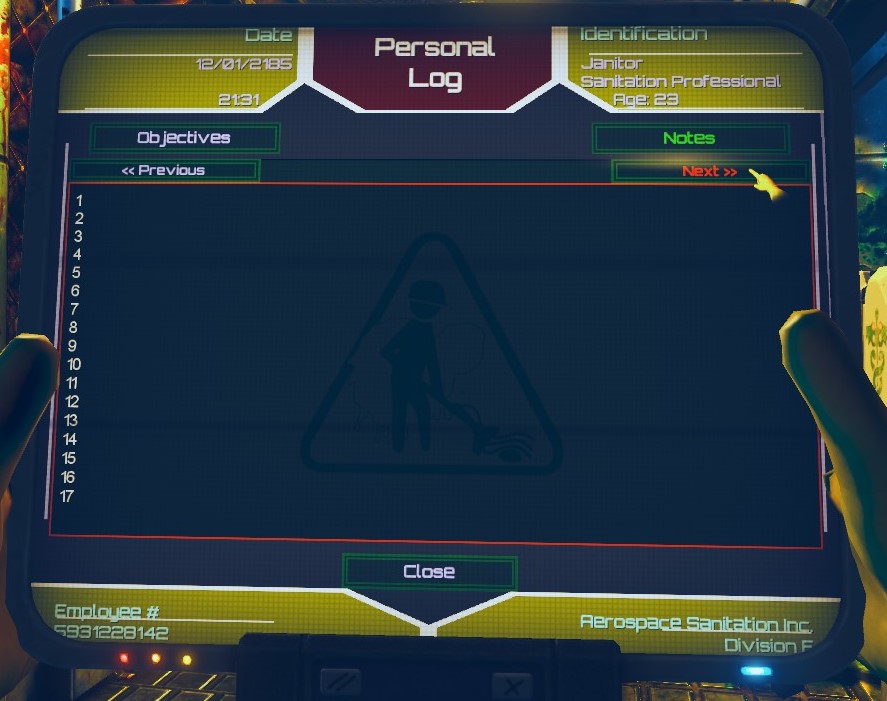
 And when you're all finished, you can save again and check the save file to see that indeed, PEDeathBitField turned into the same number as DeathBitField, which means that it's 100% correct!
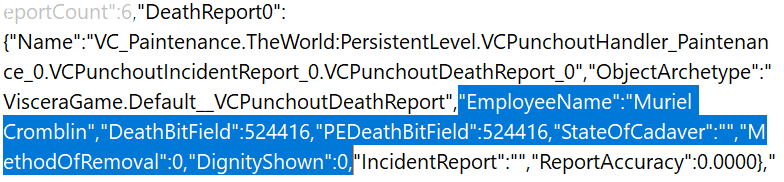 The method of removal and dignity shown also turned to 0 here, which correspond to "incinerated" and "utmost dignity", respectively.
Appendix A – binary???
Okay, so as a curiosity, I'm gonna try to explain how the binary system of notation works, and in general, the positional notation. That's because once you understand that binary works exactly the same as decimal – which you're probably so acquainted with that you don't even consider its "inner workings" – it will become super simple. It's just a way of writing down numbers, the only difference is that in the decimal system, we have ten symbols at our disposal, and in binary, we only have two. And that just makes binary less efficient in terms of the length of numbers – but it has its advantages thanks to the simplicity of only choosing between "on" and "off", or "1" and "0".
For starters, honestly, I recommend checking out this Wikipedia article[en.wikipedia.org], in particular, sections 2.1 through 2.4. It's written by people clearly more knowledgeable than me. I'm gonna try to put it in my own words, hopefully shorter. My layperson approach may be beneficial, if you get confused by all those equations and stuff.
I'm gonna start with a slightly slimplified presentation of relevant terms: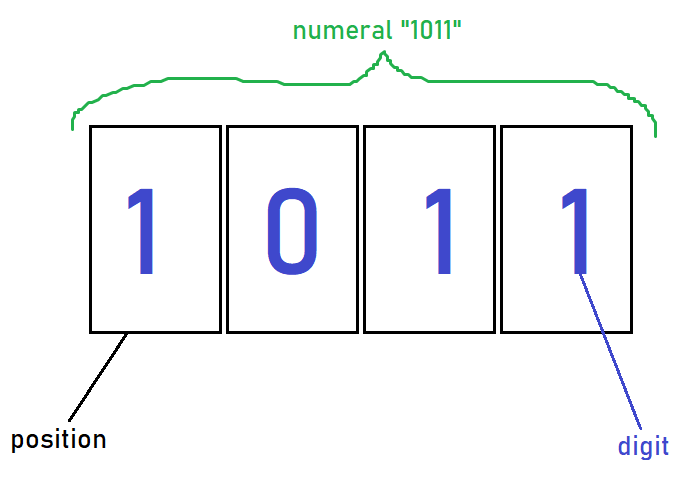
- position – this, usually invisible, rectangle, can fit one digit inside. Depending on chosen base (two in binary, ten in decimal), there's a varying amount of possible options that can go into this rectangle, but it can only ever fit ONE digit. You cannot squish any more into a given position. If you want to express a larger number, you instead have to add another position.
- digit – a symbol used to express numbers. It can be anything. We're used to using 0, 1, 2, 3, 4, 5, 6, 7, 8, and 9. Those are digits. They can be used to express single-digit numbers, of course, but forget about that for a moment and just see them as symbols. Letters can also be used as digits, which is evident in, for example, the hexadecimal system, which uses sixteen digits – apart from the aforementioned, it also utilises A, B, C, D, E, and F. Which makes it even more efficient than decimal when it comes to how many positions are used!
- numeral – the whole "word" made of digits. In my example, it's 1011. But what number is it? You can't tell, unless you know the base.
- hence, base – purposely hidden from my image to make the numeral universal. It's what the wiki calls "radix". This is how many digits are available to us in a given system. The binary system has two, hence it's base-two. Decimal uses ten, so it's base-ten. Hexadecimal is base-sixteen.
- in binary – eleven,
- in decimal – one thousand and eleven.
- in hexadecimal – I have no ♥♥♥♥♥♥♥ idea. Lemme count. It's... four thousand, one hundred and thirteen.
It works like a flip clock or scoreboard. You start from the right, you can flip through the digits until they run out. What then? You flip the next...uhh, flap(?), increasing it by just one. And then, go back to flipping the rightmost one, until you're back at zero, at which point you can increase that second one again.
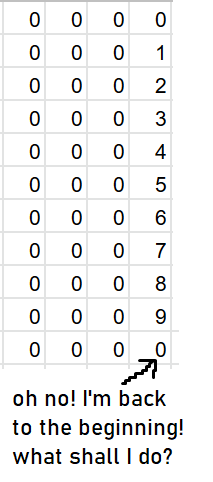
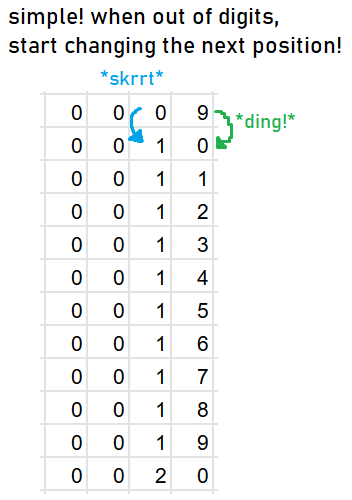
This is a matter of convention and in certain situations, it may be reversed – that is, the numbers will be entirely backwards. Although, I don't think it's particularly relevant in mathematical notation, it's important in computers. If you want to know more about that, look up what endianness is. As you can see, we can go through ten numbers when using the decimal system before we need to employ the next position. In binary though, we'll already be using four:
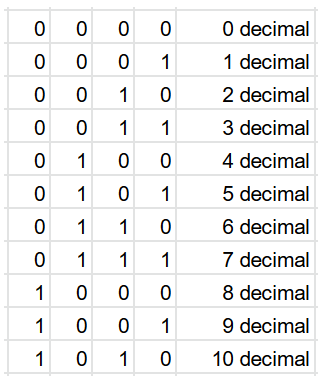
Interesting. Look how the first (by that, I mean rightmost) position flips with every consecutive number: 0, 1, 0, 1. The next one stays the same for two numbers: 0, 0, 1, 1, 0, 0, and so on. Hmmmm, and the next one for four numbers, and the next one for eight! As if... this had something to do with... the powers of two?
Base, as already explained, is the number of available digits.
And here's where the powers come into play.
When you take the base and you power it up by the index, that's the "basic" value of the position at that index, which is further multiplied by the digit that's in that position (I realise this might sound very weird – English is not my native language and I've never studied maths in English, so I have limited knowledge and "feel" in this area). In binary, this value simply is (1) or isn't (0) counted towards the final number. Again, a picture might be more clear: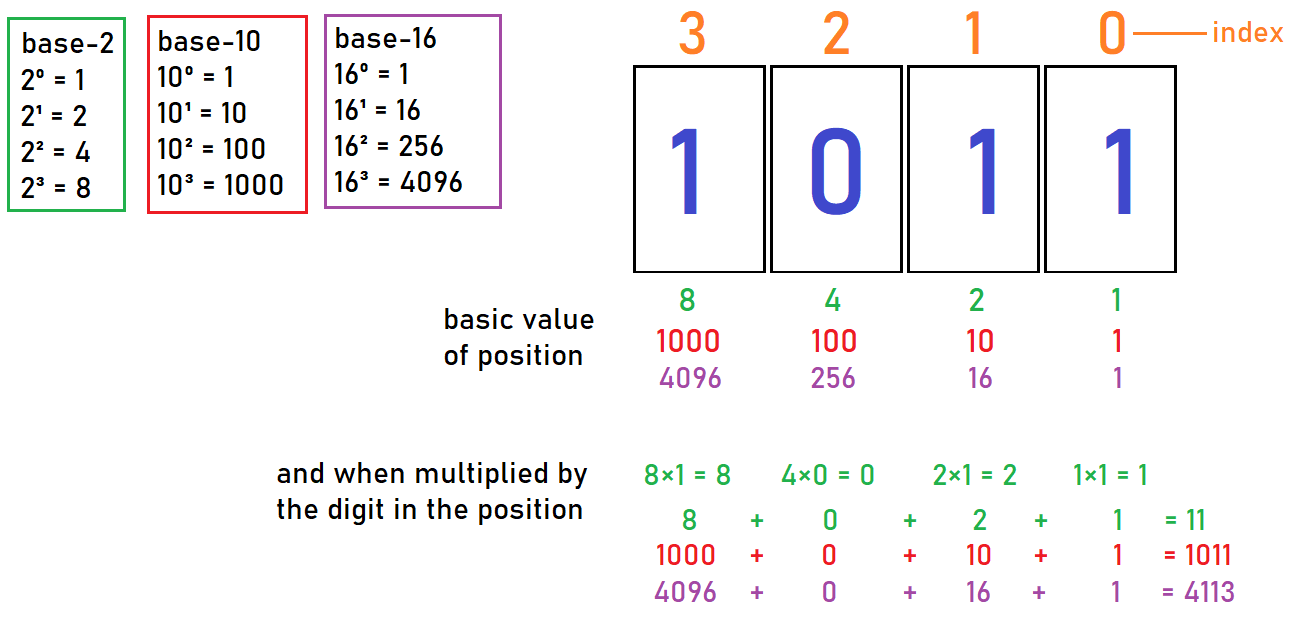
I've resorted to just using decimal for all the calculations.
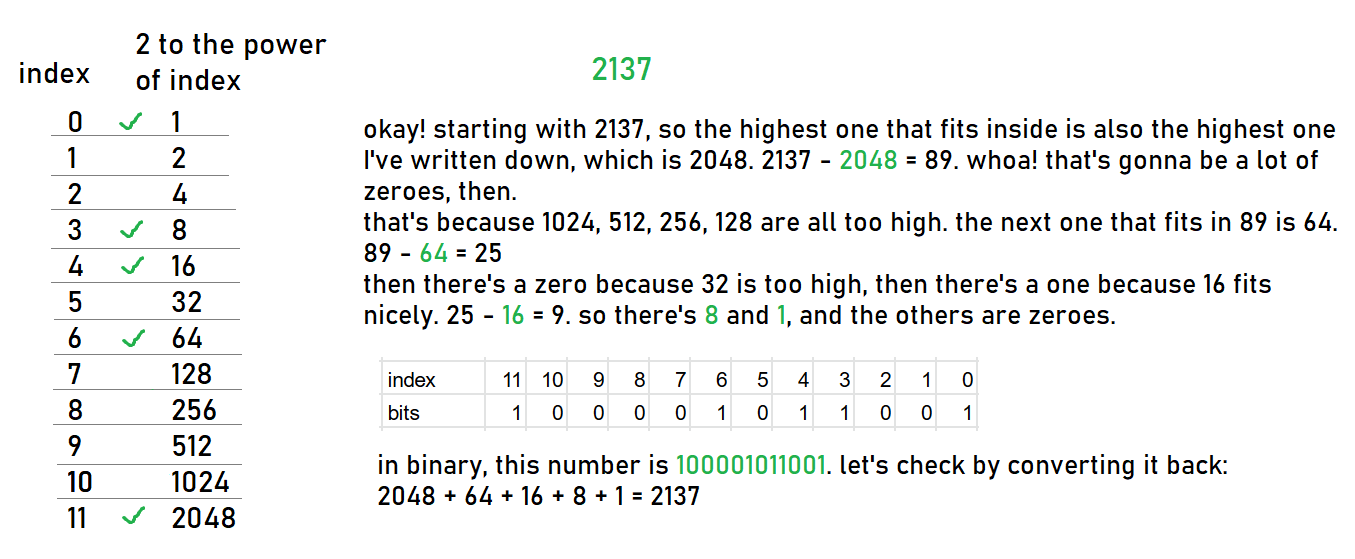
And that's it, simple like that! You should be able to calculate what value a numeral has in any base, at this point. Converting binary (and hexadecimal) to decimal is basically what I did in the picture above, so I don't think there's any more explanation needed. But how do we convert decimal to binary? Well, by doing the same thing, but in reverse – subtracting instead of adding, with the knowledge of powers of two.
Appendix B – calculation by hand, no spreadsheet
This is kind of like, "legacy" method. It's just to show that you can absolutely do this whole thing by hand, and that's how I did it at first. But then I figured, well, I gotta try to automate it a little with a spreadsheet – using it is faster, more convenient and immune to calculation errors.
There's two methods to this. DeathBitValue is given as a decimal number, but the checkboxes correspond to consecutive numbers of two, that is, positions of digits in a binary number. It's basically like the indices have names, 0 being called "shot", 1 "bitten", etc. So we will end up converting DeathBitValue to binary, one way or another. We need to make a list or table like the one in section "the basis", with all the death causes, line by line.
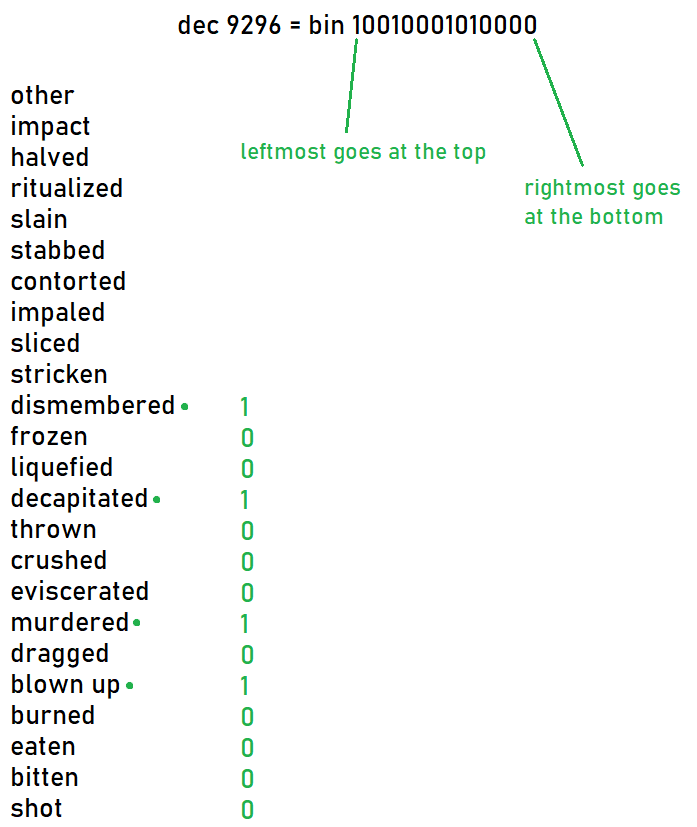
So this employee got dismembered, decapitated, murdered, and blown up. This is more comfortable when, like me, you're using Paint or something, because you only need to copy the number and alternate pressing right arrow and Enter. However, if doing this on paper, you could write down the list from "shot" topmost to "other" at the bottom, and this time, write down the number starting at the top ("shot"), but still from the right. So kind of, backwards. This time if the number were beads on a string, you'd hold it by the last 0. Let the picture illustrate it more clearly:
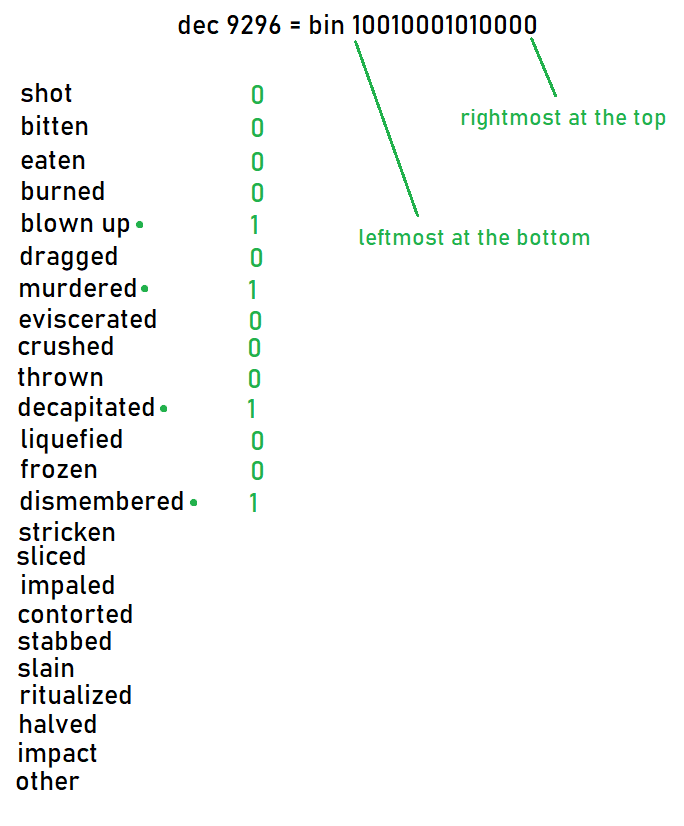
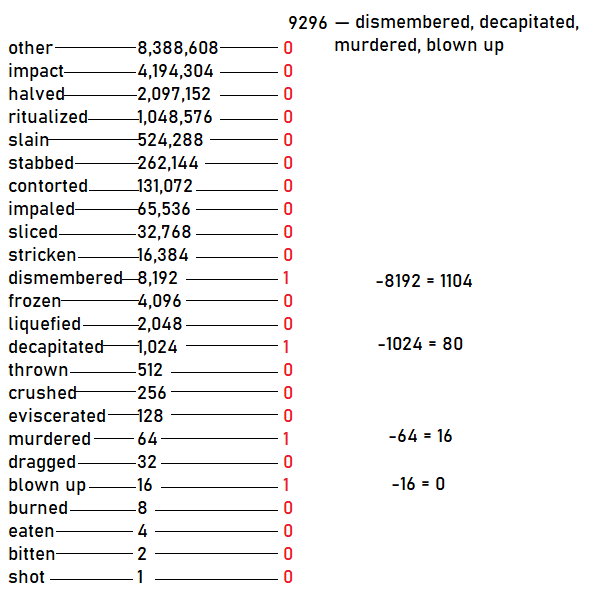
And this is basically what we do in the spreadsheet, but the subtracting is happening automatically and you only have to compare which number is higher.
Conclusion
And don't forget to SMASH THAT SUBSCRIBE BUTTON rate this guide up if you found it helpful and/or interesting, comment, or whatever. I honestly hope someone ends up trying the spreadsheet out, at least XD
Beat Viscera Cleanup Detail's 100% run?
Flex it — let your friends know you pulled it off.
- Viscera Cleanup Detail: 100% Achievements★ 5 (2.3k)58k views4.5k ♥40 minUpdated Aug 4, 2020
- Punchomatic Cheat Sheet★ 5 (1.6k)54k views3.9k ♥38 minUpdated Sep 14, 2024
- Viscera Cleanup Detail for beginners★ 5 (761)50k views818 ♥9 minUpdated Dec 16, 2016
- Unlocking your Office!★ 5 (443)44k views515 ♥4 minUpdated Jan 28, 2022
- Buckets, Baskets, and Mops [How-to and advanced advice]★ 5 (673)32k views727 ♥11 minUpdated Jul 2, 2018
- Highest Completion Percentage For Each Level★ 5 (481)25k views1.2k ♥7 minUpdated May 14, 2019





- Upgrading to PremiumTeam Fortress 2★ 5 (20k)1441k views11k ♥6 minUpdated May 11, 2022
- No More Room in Hell Official ManualNo More Room in Hell★ 5 (2.8k)569k views2.1k ♥29 minUpdated Apr 22, 2019
- NMRiH Community Hosting GuidesNo More Room in Hell★ 5 (526)351k views653 ♥1 minUpdated Aug 10, 2022
- How to 'Git Gud' Soon™MORDHAU★ 5 (2k)318k views3k ♥68 minUpdated Nov 16, 2024
- Лучшие кооперативные игры SteamPAYDAY 2★ 5 (1.5k)315k views2.1k ♥56 minRussianUpdated Apr 27, 2025
- Desert Eagle Heat Treated | Blue GemCounter-Strike 2★ 5 (1.6k)293k views1.5k ♥2 minUpdated Jan 16





This guide was created by its original author on the Steam Community. Are you the author and want it removed? Request removal.